C++ All-in-One For Dummies (2009)
Book I
Introducing C++
Chapter 5: Dividing Between Source-Code Files
In This Chapter
Creating multiple source-code files
Creating header files
Sharing variables among source files
Making use of the mysterious header wrappers
Just as you can divide your work into functions, you can also divide your work into multiple source-code files. The main reason to do so is, simply, to help keep your project more manageable. Also, with multiple source-code files, you can have several people working on a single project, each working on a different source-code file at the same time. The goal, of course, is to make sure that your coworkers work on the harder parts that are more grueling and no fun while you get all the credit.
The key to multiple source files is knowing where to break the source code into pieces. Like anything else, if you break the source code in the wrong place, it will, well, break.
In this chapter, we show you how to divide your source code into multiple files (and in all the right places). The examples we give use CodeBlocks; however, we also provide a few Makefile tips if you’re using other tools.
Creating Multiple Source Files
In this section, we talk about how to create multiple source-code files, first for CodeBlocks and then for other compilers. This process is far simpler in CodeBlocks, and we highly recommend that approach.
When you create a second source-code file, this code becomes part of your project. And when you compile, the compiler compiles all the source-code files in your project, assuming that you have changed them since the last time you compiled. You can put your functions in separate source-code files, and they can call each other. In this way, they all work together in the single program. In the section “Sharing with Header Files,” later in this chapter, we talk about how you can have a function call another function in a different source file.
 You cannot break a single function up and put it into two source files. That would be quite painful for the little fellow, and certainly not a good programming practice either because it simply wouldn’t compile. The compiler requires that your functions stay in one piece in a single source file.
Multiple source files in CodeBlocks
If you’re using CodeBlocks, cutting your program into multiple source-code files is as easy as cutting a cake. The following steps show you how to perform this task:
1. Choose File⇒New⇒File.
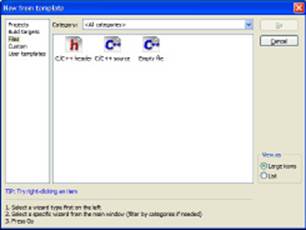
You see the New from Template dialog box shown in Figure 5-1. Notice that you can choose from a header, source code, or an empty file. Normally, you’ll choose either the C/C++ Header or C/C++ Source option. The Empty File option is for non-source files, such as a text file used as a ReadMe.
Figure 5-1: The New from Template dialog box lets you select a new file type.
2. Highlight the template you want to use and click Go.
You see a wizard associated with the particular file you’ve chosen.
3. Click Next to get past the initial Welcome page.
If you chose the Empty File template, skip to Step 5. When using the C/C++ Header or C/C++ Source templates, you see a language selection page.
4. Highlight the language you want to use — either C or C++ — and click Next.
The wizard asks what you want to call the file, where you want to store it, and which builds should use the file, as shown in Figure 5-2.
Figure 5-2:Provide the file information required by the wizard.
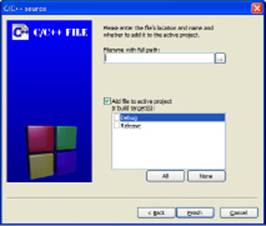
5. Type a path and filename for the file in the Filename with Full Path field.
You must provide a full path, even if you want the file in the current folder. Click the ellipses to display a Select Filename dialog box where you can choose the location of the file. The default path shown in the Select Filename dialog box is the current folder.
6. Check the individual builds that should use the file.
As an alternative, you can click All to add the file to all builds.
7. Click Finish.
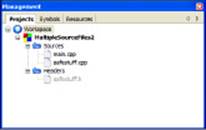
The wizard adds the new file to your project. CodeBlocks automatically opens the file so you can begin editing it. You also see the file you added in the Management window, as shown in Figure 5-3. In this case, you see both the source files and a header file. Notice that the source files appear in dark type, while the header file appears in gray type. This shows that the source files are compiled to create the project and the header file isn’t. The “Sharing with Header Files” section of the chapter discusses how the compiler works with header files in more detail.
Figure 5-3: The Management window displays the files used to compile the project.
 If you add a file to CodeBlocks that you really don’t need, right-click the file in the Management window and choose Remove File from Project from the context menu. The file will disappear from the project but still appear in the directory in which you created it. If you later decide that you really do want that file, right-click the project entry in the Management window, choose Add Files from the context menu, and select the file you want to add back into the project using the options in the Add Files to Project dialog box.
If CodeBlocks doesn’t automatically open the file you added, you can open it by double-clicking its name in the tree. When you do, an additional tab appears at the top of your source-code files. These tabs represent the different files that are open. You can click a tab to have that file’s code appear in the source-code window. When you click another tab, the window shows the source for that file, instead. And, thankfully, it remembers any changes you make if you switch to another tab. So you can bounce all around the screen and switch all you want, and the computer shouldn’t get confused.
After you have multiple files in your project, you can put some of your source in one file and some in another. But before you do, you may want to read some of the other sections in this chapter because we explain how to properly divide your source code without it ending up like cake that got smooshed while you were trying to cut it.
Multiple source files in other compilers
If you’re using CodeBlocks, you don’t really need to read this section because CodeBlocks mucks around with the Makefile for you automatically. Life is good. If you want to see how CodeBlocks performs this task, look at the .depend file for your project, such asMultipleSourceFiles.depend. The .depend file is simple XML, so you can view it with any XML-capable application (including Internet Explorer or Firefox). Otherwise, you’ll want to read this section.
To add source-code files to other compilers, you need to modify the Makefile, and you need to understand Makefile rules and the compile rocess. Yuck. (Makefiles are described in Appendix A.) Many ways to modify a Makefile are available. If you use implicit rules, you probably just need to add the name of the file to the list of source files. If you use a separate rule for each file, you need to add another rule for this new file. In that case, you may still have a list of all source-code files or a list of all object files (which are just the source-code filenames with either an .oor .obj extension), in which case you’ll have to make another entry.
For example, you may have separate rules for each source file, as in the following:
main.o: main.cpp
$(CC) -c main.cpp -o main.o $(CFLAGS)
In this case, you need to add another line similar to this one for your new file. If your new file is orangegoo.cpp, your new rule will look like this:
orangegoo.o: orangegoo.cpp
$(CC) -c orangegoo.cpp -o orangegoo.o $(CFLAGS)
Note that you must indent the second line by using a tab. If you use spaces, it may not work properly.
You probably also have a rule listing the object files. Remember that it will likely be the object files and not the source files, because the object files are the temporary things that the compiler generates — or makes. Thus, you may have a macro such as this:
OBJ = main.o orangegoo.o
This macro would be listed in the rule for the final executable file. That way, when you make the executable file, the make utility first sees whether these two .o files are up-to-date. If not, make first makes these two .o files, based on the rules you supplied earlier. Nice and simple; too bad Makefiles are so ugly.
Creating multiple files
Before two source files can work together, they must somehow find out about each other. Just because they’re both sitting on the computer doesn’t mean that they know about each other. Computers are kind of goofy about that sort of thing. So to get two source files to finally open up and get to know each other, you need to tell each of them about what’s in the other file.
When you write a function, normally the function must appear before any calls to it appear within the same source file. That’s because of the way the compiler goes through the code: If it encounters a call to a function but has not yet heard of that function, it issues an error. But the way around this is to use a function prototype. A function prototype is simply the header line from a function, ending with a semicolon, as in the following:
void BigDog(int KibblesCount);
Later in the source file is the actual function, with this header line duplicated. But instead of a semicolon, the function would have an open brace, the function code, and a closing brace, as in the following:
void BigDog(int KibblesCount)
{
cout << “I’m a lucky dog” << endl;
cout << “I have “ << KibblesCount << “ pieces of food” << endl;
}
So after the function prototype, you can call the function whether the function code itself is before or after the call.
 For the compiler to understand a function call, all it needs at the point the code makes the call is a function prototype. It’s up to the linker to determine whether that function really exists.
Because the function call only needs a function prototype, you can put the function itself in another source-code file. You could, therefore, have two separate source-code files, as in the following example. The first source-code file, main.cpp, is shown in Listing 5-1. The second source-code file, mystuff.cpp, is shown in Listing 5-2.
Listing 5-1: Calling a Function with Only a Prototype
#include <iostream>
using namespace std;
void BigDog(int KibblesCount);
int main()
{
BigDog(3);
return 0;
}
Listing 5-2: Using a Function from a Separate File
#include <iostream>
using namespace std;
void BigDog(int KibblesCount)
{
cout << “I’m a lucky dog” << endl;
cout << “I have “ << KibblesCount << “ pieces of food” << endl;
}
A quick overview of namespaces
The using namespace std; line in Listing 5-2 tells the compiler to use a specific namespace, std. A namespace is a grouping of classes and functions. The std, or standard, namespace contains a host of useful classes and functions, such as string. If you don’t include this declaration, you need to preface every use of the classes or functions found in std by typing std::<class or function>. For example, to use a string you need to type std::string. Because this is a painful way to write code, you add the using namespace std; line.
In Listings 5-1 and 5-2, we broke the function away from the prototype. When you compile these two files together as a single program (either by pressing F9 in CodeBlocks or by using the methods described in the “Multiple source files in other compilers” section, earlier in this chapter), they all fit together nicely. You can then run the program, and you see this somewhat interesting output:
I’m a lucky dog
I have 3 pieces of food
Notice also that we had to put the same #include lines at the start of the mystuff.cpp file. That’s because mystuff.cpp uses cout, and to use cout, it needs the #include <iostream> line.
Sharing with Header Files
Breaking source code apart into multiple files is easy, but soon you may run into a problem. If you have a function, say, SafeCracker, and this function is extremely useful and is likely to be called many times from within several other source-code files, you would need a prototype forSafeCracker in every file that calls it. The prototype may look like this:
string SafeCracker(int SafeID);
But instead of putting this line in every file that uses the function, we know of an easier way. (We computer people are always looking for the easier way so we can finally retire.) Simply put this line inside its own file, called a header file, and give the filename an .h or an .hppextension. (It’s your choice which extension you use, because it really doesn’t matter; we usually just go with .h.) For example, we might save the line string SafeCracker (int SafeID); in a file called safestuff.h.
Then, instead of typing the header line at the start of each file that needs the function, you type
#include “safestuff.h”
You would then have three source-code files, which we have shown in Listings 5-3, 5-4, and 5-5. The first is main.cpp, which calls the function. The second is safestuff.h, which contains the function prototype. The third is safestuff.cpp, which contains the actual code for the function whose prototype appears in the header file. Lots of files, but now the code is broken into manageable pieces. Also, make sure that you save all three of these files in the same directory.
Listing 5-3: Including the Header File in the main File
#include <iostream>
#include “safestuff.h”
using namespace std;
int main()
{
cout << “Surprise, surprise!” << endl;
cout << “The combination is (once again)” << endl;
cout << SafeCracker(12) << endl;
return 0;
}
Listing 5-4: Containing the Function Prototype in the Header File
using namespace std;
#ifndef SAFESTUFF_H_INCLUDED
#define SAFESTUFF_H_INCLUDED
string SafeCracker(int SafeID);
#endif // SAFESTUFF_H_INCLUDED
Listing 5-5: Containing the Actual Function Code
#include <iostream>
using namespace std;
string SafeCracker(int SafeID)
{
return “13-26-16”;
}
Before you compile this program, however, we need to give you a couple pointers. First, the compiler does not compile the header file into a separate .o or .obj file. With the program in Listings 5-3 through 5-5, the compiler compiles only two files: main.cpp and mystuff.cpp. Instead of compiling the header file, when it reads through the main.cpp file and gets to the #include line for the header file, it temporarily switches over and reads that file, pretending that it’s still reading the same main.cpp file. As it continues, it compiles everything as if it’s all part of the main.cpp file. And if you include this header file in other source-code files, it does the same thing again for those source files.
To get this code to compile, remember the following rules:
♦ Makefiles: If you are using a compiler where you have to handle your own Makefiles, do not add a rule for compiling the header files, which usually start with .hpp or .h. Only compile the source files, which usually start with .cpp or .cc.
♦ Visual C++: Although we’ve said very little so far about Microsoft Visual C++ (VC++), if you use VC++, do not add header files to your project. Only add source files. VC++ will keep a listing of the header files in a tree called dependencies, but you don’t add them yourself.
♦ CodeBlocks: What could be easier? You just make the files, and CodeBlocks handles all the file connectivity for you. Nothing to worry about. The header and source files all show in the project list, and CodeBlocks also handles the details of which ones need to be compiled.
After you follow these rules, you can go ahead and compile and run the code in Listings 5-3 through 5-5. When you run the program, you see the following output:
Surprise, surprise!
The combination is (once again)
13-26-16
 If you have a source file containing some functions, creating a header file that contains the associated function prototypes is generally a good practice. Then you can name the header file the same as the source file, except with a different extension. We did this in Listings 5-4 and 5-5: We named the header file safestuff.h, and the source file safestuff.cpp.
Instead of saying header file, some people prefer to say include file. We usually say header file because, to us, include is usually a verb, and it gets kind of awkward to say something like this: “We’re pretty sure that we included the include file, but if we didn’t include the correct include file, would you please include us in your meeting; and in the discussion, we will be sure to include a few questions about how to include the proper include file. Then you can include an answer to our inclusions about the inclusions of an include file.” It’s just difficult to say, you know? So we say header file.
Adding the header only once
CodeBlocks includes several lines in the header file by default. These lines create a symbol that tells the compiler whether a header file is already included in the source file so that the compiler doesn’t add it twice. Adding a header twice is an error because then you’d define the forward reference for a function twice. Here is what you see when you initially create a header file with CodeBlocks:
#ifndef SAFESTUFF_H_INCLUDED
#define SAFESTUFF_H_INCLUDED
#endif // SAFESTUFF_H_INCLUDED
When you type the header code into CodeBlocks, type it between the #define SAFESTUFF_H_INCLUDED and #endif // SAFESTUFF_H_INCLUDED lines. The “Using the Mysterious Header Wrappers” section of the chapter describes these automatic entries in detail.
Using brackets or quotes
You may have noticed something about the code in Listing 5-3. When we included the safestuff.h file, we did not put it inside brackets as we did in the other #include lines. Instead, we put it inside quotes:
#include “safestuff.h”
That’s because programmers for years have been fighting over the rules of where exactly on the hard drive to put the header files. Do you put them in the same directory or folder as your project? Or do you put them in a special directory all by themselves? Or do you just put them out in the back yard to dry out?
Regardless of where you put your header files, here is the rule for when to use quotes and when to use brackets: The compiler looks in several directories to find include files. And it can, possibly, look in the same directory as the source file. If you use angled brackets (that is, less-than and greater-than signs), as in #include <string>, the compiler does not look in the same directory as the source file. But if you use double quotes, as in #include “safestuff.h”, the compiler first looks in the same directory as the source file. And if the compiler doesn’t find the header file there, it looks in the remaining directories, as it would with angle brackets.
Some people always like to use double quotes. That way, whether the header file is in the same file as the source file or not, the compiler should find it.
Most professional programmers today always use angle brackets. This forces programmers to put their header files in a common area. With really big projects, programmers like to have a directory dedicated to source files and another directory dedicated to header files. No header file is ever in the same directory as the source file.
For small projects, some people like to lump all the source and header files into a single directory. These people typically use angle brackets around system header files (such as #include <string>) and double quotes around their own header files. In the projects in this book, we generally follow this rule. The header files that we write are in the same directory as the source files, and we use double quotes for #include lines of our own files and angle brackets for the #include lines of system headers.
If you follow the same approach that we use here, you immediately know whether the #include line refers to one of your own header files or another header file. If it refers to your own, it has double quotes.
If you start working on a large C++ project, you will probably find that project managers use the rule of always using angle brackets. For large projects, this is typically the best policy.
If you try to compile and you get a No such file or directory error on the #include line, it’s probably because you put the header file in a source file directory but used angle brackets instead of double quotes. Try switching that line to double quotes.
Sharing Variables Among Source Files
When you declare a variable inside a function, it remains local to the function. But you may want functions to share a single variable: One function may store something, and another may read its contents and write it to the console. To do this, declare the variable outside a function. That works until you try to share a variable between multiple source files. If you’re not careful, the source files end up with a separate copy of the variable. Within a single source file, the variable can be shared between functions but not between source files. That could be confusing.
There’s a trick to making this work. Declare the variable inside one and only one of the source files. Then, you declare it again inside one (and only one) header file, but you precede it with the word extern, as in extern int DoubleCheeseburgers;.
Listings 5-6, 5-7, and 5-8 demonstrate the use of a single variable that is shared between multiple source files.
Listing 5-6: Making Use of a Global Variable
#include <iostream>
#include “sharealike.h”
using namespace std;
int main()
{
DoubleCheeseburgers = 20;
EatAtJoes();
return 0;
}
Listing 5-7: Using a Header File to Declare a Global Variable
#ifndef SHAREALIKE_H_INCLUDED
#define SHAREALIKE_H_INCLUDED
extern int DoubleCheeseburgers;
void EatAtJoes();
#endif // SHAREALIKE_H_INCLUDED
Listing 5-8: Declaring the Actual Storage for the Global Variable
#include <iostream>
#include “sharealike.h”
using namespace std;
int DoubleCheeseburgers;
void EatAtJoes() {
cout << “How many cheeseburgers today?” << endl;
cout << DoubleCheeseburgers << endl;
}
Be careful when you do this; getting it exactly right is very tricky. You declare the variable once inside the header file, but you must remember the word extern. That tells the various files, “This variable is declared elsewhere, but here’s its name and type so you can use it.” Then you declare the variable in one of the source files, without the word extern; this creates the actual storage bin for the variable. Finally, you include the header file in each of your source files that use the global variable.
When you share a variable among multiple source files, it is a global variable. A variable used by a single function is called a local variable. If you share a variable between functions within a single source file but not between multiple source files, people call this a global variableor a global variable that is local to the source file.
Use the word extern in your header file when using a global variable. If you forget to do that, you give each source file its own variable that happens to have the same name.
Using the Mysterious Header Wrappers
When you include a header file, you usually only want to include it once per source file. But that can create a problem: Suppose we have a huge software project, and several header files include another of our header files, called superheader.h. If we include all these other header files, how can we be sure to pick up the superheader.h file only once?
The answer looks strange but does the trick. We start each header file with these lines:
#ifndef SHAREALIKE_H
#define SHAREALIKE_H
#endif
Depending on which C++ IDE you use, your editor may add these lines automatically, just as CodeBlocks does. In this case, you type the header file content between the #define SHAREALIKE_H and #endif lines. However, if your IDE doesn’t add the lines automatically, be sure to add them so your code looks like the code in Listing 5-7. Otherwise, the compiler may spout errors that you may not recognize immediately.
These header wrappers, as they are often called, ensure that the code in the header gets processed only once per source-code file each time you compile. The wrappers use special lines called preprocessor directives. Basically, the second line defines something that is sort of like a variable but is used only during compilation; this something is called a symbol. The symbol is called SHAREALIKE_H, and we picked it by taking the filename, making it all caps, and replacing the dot with an underscore.
The first line checks to see whether this symbol has been defined. If not, it proceeds with the lines of code that follow. The next line goes ahead and defines the symbol, so now it’s actually defined for later. Then the compiler does all the rest of the lines in the file. Finally, the last line,#endif, simply finishes the very first line.
Now consider what could happen if you include this same file twice, as in
#include “sharealike.h”
#include “sharealike.h”
(That can happen indirectly if you include two different files that each include sharealike.h.) The second time the compiler goes through sharealike.h, it sees the first line, which checks to see whether the SHAREALIKE_H symbol is defined. But this time it is! So instead of going through all the lines again, the compiler skips to the #endif line at the very end of the file. Thus, your header file gets processed only once per source-code file. Tricky, no? And confusing? Yes, a bit. So remember the following rule.
When you create a header file, be sure to put the header wrappers around it.You can use any symbol name you like, provided it uses only letters, numbers,and underscores and doesn’t start with a number, and provided it’s not already a variable name in your source or a C++ word. But most people base their choice on some variation of the filename itself, such as MYFILE_H or MYFILE_H_ or even _MYFILE_H_.
All materials on the site are licensed Creative Commons Attribution-Sharealike 3.0 Unported CC BY-SA 3.0 & GNU Free Documentation License (GFDL)
If you are the copyright holder of any material contained on our site and intend to remove it, please contact our site administrator for approval.
© 2016-2026 All site design rights belong to S.Y.A.