C++ All-in-One For Dummies (2009)
Book I
Introducing C++
Chapter 8: Using Advanced C++ Features
In This Chapter
Using comments
Working with conversions, consoles, and preprocessor directives
Manipulating constants, enums, and random numbers
Structuring your code with switch statements
Managing arrays of data
C++ has so much to offer that we thought we’d give you a mixture of advanced topics you can explore in C++. So for starters, we’re going to talk a bit about some fundamental issues in C++ that become important as you advance your programming career.
Filling Your Code with Comments
We have a task for a friend of ours. We want him to turn our refrigerator around and repair the compressor. We’re not going to give him any details about how to do this, and we don’t want him to look in a manual. Just grab the tools, go at it, and try to fix the thing. Now doesn’t that sound like fun?
Unless he happens to be an expert on refrigeration devices, it’s doubtful that he’d get very far, especially without hurting himself.
Now in computer programming, the risk of hurting yourself is pretty low, barring things like monitors falling on you or keyboards jumping up and attacking you. Nevertheless, other people occasionally have to fix your programs, so it’s a good idea for you to provide adequate explanations of what your programs do.
How do you explain your programs? You put what are called comments in your code. A comment is simply some words in the code that the compiler ignores and you put in for the benefit of the humans reading the code.
For example, you may have some code like this:
total = 10;
for (i = 0; i < 10; i++)
{
total = (total + i) * 3;
}
But this code may not be very clear to your coworkers (or to you if you put it away for six months and come back later to look at it). So instead, you can add some comments. You denote a comment in C++ by starting a line with two slashes, as follows:
// Initialize total to the number
// of items involved.
total = 10;
// Calculate total for the
// first ten sets.
for (i = 0; i < 10; i++)
{
total = (total + i) * 3;
}
Now the people working on the project can understand what the code does. Note the white space between the groups of code. Using white space helps someone looking at the code see where one thought ends and another begins. You should always include white space in your code so that other developers can read the code more easily.
Of course, you could put comments like this:
// My salary is too low
// I want a raise
total = 10;
// Someday they’ll recognize
// my superior talents!
for (i = 0; i < 10; i++)
{
total = (total + i) * 3;
}
However, comments like this don’t have much use in the code; besides, they may have the reverse effect from what you’re hoping for!
 A comment is ignored by a compiler (but not always by other humans). You can write whatever you want as comments, and the compiler pretends that it’s not even there. (Your boss, however, may notice, so use discretion.)
 A comment begins with //, and it can begin anywhere on the line. In fact, contrary to what you might think, you can even put comments at the end of a line containing C++ code, instead of on a separate line. Using comments on a code line lets you focus a comment on just that line, as follows:
int subtotal = 10; // Initialize the subtotal value to 10.
This comment gives a little more explanation of what the line does. You normally use line comments like this when you want to tell others what kind of information a variable holds or explain a complex task. Normally, you explain blocks of code as shown earlier in this section.
You can use two kinds of comments in C++. One is the double-slash (as we’ve already described). When the compiler sees two slashes, it treats the rest of that line as a comment. That is, the comment runs from the two slashes to the end of the line. The other kind of comment begins with a slash-asterisk, /*, and ends with an asterisk-slash, */. The comments go between these delimiters and can span several lines, as in the following example:
/* This program separates the parts of the
sandwich into its separate parts. This
process is often called “separation of
parts”.
(c) 1964 Sandwich Parts Separators, Inc.
*/
This is all one comment, and it spans multiple lines. You normally use this kind of comment to provide an overview of a task or describe the purpose of a function. This kind of comment also works well for the informational headings that some large company applications require. As with other comments, you can put these anywhere in your code, provided you don’t break a string or word in two by putting a comment in the middle. Nobody likes to be broken in two, and C++ words are no different.
Much of the code in the remainder of this chapter has comments in it so you can see how we use comments and so you can get a few more ideas about how the code works.
 Some beginning programmers get the mistaken idea that comments appear in the program window when the program runs. That is not the case. A comment does not write anything to the console. To write things to the console, use cout.
Converting Types
Sometimes you just don’t have the type of things you want. You might want to trade in your 1999 Ford Taurus for that brand-new Porsche. But, needless to say, unless you have plenty of money, that might be pretty hard.
But converting between different types in C++, now that’s a lot easier. For example, suppose you have a string variable called digits, and it holds the string “123”. Further, you want to somehow get the numbers inside that string into an integer variable called amount. Thus, you wantamount to hold the value 123; that is, you want to convert the string to a number.
In Listing 8-1, later in this chapter, we show you how you can convert between numbers and strings. Minibook I, Chapter 6 shows some sample code for converting a number to a string. Here we employ that same technique along with a similar technique for converting a string back to a number.
Converting strings is an interesting concept in C++ because a really great feature lets you write to and read from a string just as you would to and from a console. For example, although you can write a number 12 out to a console by using code like this:
cout << 12;
you can actually do the same thing with strings: You can write a number 12 to a string, as in
mystring << 12;
After this line runs, the string contains the value “12”. However, to do this, you need to use a special form of string called a stringstream. In the never-ending world of computer terminology, a stream is something that you can write to and read from in a flowing fashion (think about bits flowing through a wire — much as a stream flows along a waterbed). For example, you might write the word “hello” to a stringstream, then the number 87, and then the word “goodbye”. After those three operations, the string contains the value “hello87goodbye”.
And you can similarly read from a stream. In the section “Reading from the Console,” later in this chapter, we show you how you can read from a console by using the > notation. When you read from the console, although your program stops and waits for the user to enter something, the real stream technology takes place after the user types something: After the console has a series of characters, your program reads in the characters as a stream, one data type after other. You can read a string, then a series of numbers, and another string, and so on.
With stringstream, you can do something similar. You would fill the string with something, rather than having the user fill it, as in the case of a console. From there, you can begin to read from the string, placing the values into variables of different types. One of these types is integer. But because the stringstream is, at heart, just a string, that’s how you convert a string of digits to an integer: You put the digit characters in the string, and read the string as a stream into your integer. Pretty snazzy!
The only catch to using these is that you need to know in advance which kind of streaming you want to do. If you want to write to the stringstream, you create an instance of a class called ostringstream. (The o is for output.) If you want to read from a stringstream, you create an instance of a class called istringstream. (The i is for input.)
Listing 8-1 includes two handy functions that you may want to save for your own programming experience later. One is called StringToNumber, and the other is called NumberToString.
Listing 8-1: Converting Between Types Is Easy
#include <iostream>
#include <sstream> // for istringstream, ostringstream
using namespace std;
int StringToNumber(string MyString)
{
istringstream converter(MyString); // Converts from string to number.
int result; // Contains the operation results.
// Perform the conversion and return the results.
converter >> result;
return result;
}
string NumberToString(int Number)
{
ostringstream converter; // Converts from number to string.
// Perform the conversion and return the results.
converter << Number;
return converter.str();
}
int main()
{
float NumberOfKids; // Contains the theoretical number of kids.
int ActualKids; // Contains an actual number of kids.
/* You can theoretically have 2.5 kids, but in the real world,
you can’t. Convert the theoretical number of kids to a real
number by truncating NumberOfKids and display the results. */
cout << “Float to Integer” << endl;
cout << “(Truncated)” << endl;
NumberOfKids = 2.5;
ActualKids = (int)NumberOfKids;
cout << NumberOfKids << “ “ << ActualKids << endl;
// Perform the same task as before, but use a theoretical 2.1
// kids this time.
NumberOfKids = 2.1;
ActualKids = (int)NumberOfKids;
cout << NumberOfKids << “ “ << ActualKids << endl;
// This time we’ll use 2.9 kids.
NumberOfKids = 2.9;
ActualKids = (int)NumberOfKids;
cout << NumberOfKids << “ “ << ActualKids << endl;
cout << “Float to Integer” << endl;
// This process rounds the number, instead of truncating it.
// We do it using the same three numbers as before.
cout << “(Rounded)” << endl;
NumberOfKids = 2.5;
ActualKids = (int)(NumberOfKids + .5);
cout << NumberOfKids << “ “ << ActualKids << endl;
// Do it again using 2.1 kids.
NumberOfKids = 2.1;
ActualKids = (int)(NumberOfKids + .5);
cout << NumberOfKids << “ “ << ActualKids << endl;
// Do it yet again using 2.9 kids.
NumberOfKids = 2.9;
ActualKids = (int)(NumberOfKids + .5);
cout << NumberOfKids << “ “ << ActualKids << endl;
cout << endl << “Integer to Float” << endl;
// In this case, use the StringToNumber() function to perform the
// conversion.
ActualKids = 3;
NumberOfKids = ActualKids;
cout << NumberOfKids << endl << endl;
cout << “String to number” << endl;
int x = StringToNumber(“12345”) * 50;
cout << x << endl << endl;
// In this case, use the NumberToString() function to perform the
// conversion.
cout << “Number to string” << endl;
string mystring = NumberToString(80525323);
cout << mystring << endl;
return 0;
}
StringToNumber takes a string, copies it into an istringstream, and then reads it into an integer. NumberToString takes an integer, writes it to an ostringstream, and then copies it to a string.
Feel free to use the StringToNumber and NumberToString functions in your own code. Sooner or later, you are likely to need to convert between integers and strings, and these functions can help you out without having to go search for the answers yourself.
Another kind of conversion that’s useful is converting floating-point numbers (that is, numbers with a decimal point) and integers and vice versa. In C++, this conversion is easy: You just copy one to the other, and C++ takes care of the rest. The only catch is that when C++ converts from a float to an integer, it always truncates. That is, it doesn’t round up: When it converts 5.99 to an integer, it doesn’t go up to 6; it goes down to 5. But there’s an easy trick around that: Add 0.5 to the number before you convert it. If the number in the upper half (that is, from .5 to .9999 and so on), that 0.5 first takes the number above or equal to the upper whole number. Then, when the function rounds the number, the number will round down to the upper whole number.
So, for example, if you start with 4.6, just converting it gets you a 4. But if you add .5, you first get 5.1, and then when you convert that, you get 5. It works!
Going the other direction is even easier: To convert an integer to a float, you just copy it. If i is an integer, and f is a float, you just set it as follows to convert it:
f = i;
Whenever you convert from a float to an int or from an int to float, you must tell the compiler that you know what you’re doing by adding (int) or (float) in front of the variable. Adding these keywords is called coercion or type conversion. The act of coercing one type to another is called casting. For example, the following tells the compiler that you know you’re converting from a float to an int:
ActualKids = (int)NumberOfKids;
If you leave the (int) part out, the compiler displays a warning like this one:
warning: converting to ‘int’ from ‘float’
Using the proper coercion code is important because it also tells other developers that you really do mean to perform the type conversion. Otherwise, other developers will point to that area of your code and deem it the source of an error, when it might not be the true source. Using proper coding techniques saves everyone time.
When you run this program, you see the results of all these conversions. The first big batch inside main puts different floating-point values into NumberOfKids (starting with the usual 2.5 number of kids, of course) and then converts these two integers. In the first batch, we didn’t add0.5, so it just rounds it down. You can see in the output for this section that all the numbers were rounded down. The first number in each pair is the original floating-point value, and the second number is the number converted to an integer. Notice that the program always rounded down:
Float to Integer
(Truncated)
2.5 2
2.1 2
2.9 2
Tips for making numeric conversions more precise
If you are doing some sophisticated arithmetic by using a mixture of floats and integers, the suggestions in the following list will make sure that your answers come out right:
Don’t be afraid to use temporary variables: If you have an integer and need a float version of it, don’t be afraid to create a temporary variable that’s a float that holds the value. The following lines do this for you:
float MyFloat = int;
Convert everything to floating point: Make sure that you convert all your integers to floating points before you use them in the operations. For example, in the following two lines of code, MyFloat will not get 2.5, the answer of 5 divided by 2. Instead, it gets the integer (that is, rounded) value of 2. To fix this, first convert MyInt to a float before doing this operation. Then you will get 2.5 for MyFloat.
int MyInt = 5;
float MyFloat = MyInt / 2;
Try casting: If you want to use an integer in an arithmetic operation that involves floats and you don’t want to create a special float variable for it, you can just throw the word float in parentheses before the integer in the operation. This is called a cast, and the C++ compiler temporarily converts the variable to the type in parentheses. The following lines do this, and this time MyFloat gets the value 2.5, as you want.
int MyInt = 5;
float MyFloat = (float)MyInt / 2;
In the next block of code, we do the same conversions as before, except this time we add 0.5 to each float. The result is an actual round to the nearest whole number. Note that the higher decimal numbers rounded up, while the lower ones rounded down:
Float to Integer
(Rounded)
2.5 3
2.1 2
2.9 3
Next is a quick one. We just converted the integer to a float. It doesn’t print with a decimal point, but it is a float:
Integer to Float
3
Then we convert between numbers and strings. The first block of these converts a string to a number. Just to prove it really is a number, we go ahead and work some mathematical arithmetic on it — something you can’t do with a string.
String to number
617250
And finally, we convert a number to a string:
Number to string
80525323
The output of these digits, of course, would look the same whether we print them as a string or a number, but you can see in the code that what we printed is indeed a string, not a number.
Reading from the Console
Throughout this book, we have used the console to demonstrate several topics. Many of the programs write some sort of output to the console. You can also use the console to get information from the user, something we briefly mention in Minibook I, Chapter 2.
To do this, instead of using the usual << with cout to write to the console, you use the >> operator along with cin (pronounced see-in).
In the old days of the C programming language, reading data from the console and placing its variables was somewhat nightmarish because it required you to use pointers. Now, in C++, that’s no longer the case. If you want to read a set of characters into a string called MyName, you just type
cin >> MyName;
That’s it! The program pauses, and the user can type something at the console. When the user presses Enter, the string he or she typed will go into the string called MyName.
Reading from the console has some catches. First, the console uses spaces as delimiters. That means that if you put spaces in what you type, only the letters up to the space are put into the string. Anything after the space, the console saves for the next time your program calls cin. That situation can be confusing. Second, if you want to read into a number, the user can type any characters, not just numbers. The computer then goes through some bizarre process and converts any letters into a meaningless number. Not good.
But fear not. As usual, we have found ways around such problems! Listing 8-2 shows you how to read a string and then a number from the console. Next, it shows you how you can force the user to type only numbers. And finally, it shows how you can ask for a password with only asterisks appearing when the user types.
To make these last two tasks work correctly, we had to use a library called conio. This library gives you more direct access to the console, bypassing cin. But that’s okay. We also used a special function called StringToNumber that is described in “Converting Types,” earlier in this chapter.
Listing 8-2: Having the User Type Something
#include <iostream>
#include <sstream>
#include <conio.h>
using namespace std;
int StringToNumber(string MyString)
{
istringstream converter(MyString); // Holds the string.
int result; // Holds the integer result.
// Perform the conversion.
converter >> result;
return result;
}
string EnterOnlyNumbers()
{
string numAsString = “”; // Holds the numeric string.
char ch = getch(); // Obtains a single character from the user.
// Keep requesting characters until the user presses Enter.
while (ch != ‘\r’) // \r is the enter key
{
// Add characters only if they are numbers.
if (ch >= ‘0’ && ch <= ‘9’)
{
cout << ch;
numAsString += ch;
}
// Get the next character from the user.
ch = getch();
}
return numAsString;
}
string EnterPassword()
{
string numAsString = “”; // Holds the password string.
char ch = getch(); // Obtains a single character from the user.
// Keep requesting characters until the user presses Enter.
while (ch != ‘\r’) // \r is the enter key
{
// Display an asterisk instead of the input character.
cout << ‘*’;
// Add the character to the password string.
numAsString += ch;
// Get the next character from the user.
ch = getch();
}
return numAsString;
}
int main()
{
// Just a basic name-entering
string name;
cout << “What is your name? “;
cin >> name;
cout << “Hello “ << name << endl;
// Now you are asked to enter a number,
// but the computer allows you to enter anything!
int x;
cout << endl;
cout << “Enter a number, any number! “;
cin >> x;
cout << “You chose “ << x << endl;
// This time you can only enter a number.
cout << endl;
cout << “This time you’ll only be able to enter a number!” << endl;
cout << “Enter a number, any number! “;
string entered = EnterOnlyNumbers();
int num = StringToNumber(entered);
cout << endl << “You entered “ << num << endl;
// Now enter a password!
cout << endl;
cout << “Enter your password! “;
string password = EnterPassword();
cout << endl << “Shhhh, it’s “ << password << endl;
return 0;
}
The first parts of main are straightforward. You can see that we called cin >> name; to read a string from the console; then we printed it. Then we called cin >> x; to read an integer from the console, and we again printed it.
Next, we made sure that the user could enter only digits by calling the EnterOnlyNumbers function. Take a close look at that function. The first thing it does is declare a string called numAsString. When the user types things, they come in as characters, so we save them one by one in a string variable (because a string is really a character string). To find out what the user types, we call the getch function. That function returns a single character. (For example, if the user presses Shift-A to get a capital A, the getch function will return the character A.)

Avoiding getch function problems
Some compilers will complain if you use the getch function. In this case, try the _getch function instead. Both functions perform the same task. Some vendors claim that _getch is International Standards Organization (ISO) compliant, but it isn’t. The getch and _getch functions are useful low-level library functions that you can use without hesitation, but they don’t appear as part of any standard. The GNU GCC compiler provided with CodeBlocks can use either form of the function.
After retrieving a single character, we start a loop, watching for the ‘\r’ character. (Remember that the backslash in a character or string means that the character is special.) The loop continues processing characters until the user presses the Enter key. At that point, the character we get from getch is \r, so we exit the loop and return the number as a string.
Inside the loop, we test the value of the character, seeing if it’s in the range ‘0’ through ‘9’. Yes, characters are associated with a sequence, and fortunately, the digits are all grouped together. So we can determine if we have a digit character by checking to see if it’s in the range ‘0’through ‘9’ as follows:
if (ch >= ‘0’ && ch <= ‘9’)
If the user presses a number key, we wind up inside this if statement, or at least the computer does. Because the user pressed a number key, we go ahead and write that out to the console and add the digit character to the end of our string. We have to write it to the console because, when you call getch, the computer doesn’t automatically print anything. But that’s a good thing here, because after we’re out of the if statement, we go ahead and call getch again for another round. Thus, if the user pressed something other than the Enter key, the character the user pressed doesn’t even appear on the console, and it won’t get added to the string either. Nifty, huh?
The EnterPassword routine is similar to the EnterOnlyNumbers routine, except it allows the user to enter any character (including spaces). So no if statement is filtering out certain letters. And further, instead of just printing the character that the user types, it just prints an asterisk, *. That gives the feeling of a password entry, which is a good feeling. People want to feel good when they’re entering their passwords.
When you run this program, you get output like the following:
What is your name? Hank
Hello Hank
Enter a number, any number! abc123
You chose 2293728
This time you’ll only be able to enter a number!
Enter a number, any number! 5001
You entered 5001
Enter your password! *****
Shhhh, it’s hello
The first line went well; we didn’t type any spaces, and the name Hank made it into our variable. But then, when we were asked to enter a number, we got sneaky and typed something we weren’t supposed to, abc123. And boy, the computer got confused! But the next section didn’t allow us to type anything but numbers because it called our EnterOnlyNumbers routine. And finally, we entered a password, and you can see that the computer displayed asterisks when we pressed each key. Then the program kept the secret password and wrote it on the screen anyway.
Understanding Preprocessor Directives
When you compile a program, the first thing the compiler does is run your code through something called a preprocessor. The preprocessor simply looks for certain statements in your code that start with a # symbol. You have already seen one such statement in every one of your programs, #include. These preprocessor statements are known as directives because they tell the preprocessor to do something; they direct it.
Think of the preprocessor as just a machine that transforms your code into a temporary, fixed-up version that’s all ready to be compiled. For example, take a look at this preprocessor directive:
#include <iostream>
If the preprocessor sees this line, it inserts the entire text from the file called iostream (yes, that’s a filename; it has no extension) into the fixed-up version of the source code.
For example, suppose the file called iostream looks like this:
int hello = 10;
int goodbye = 20;
Just two lines are all that’s in it. (Of course, the real iostream file is much more sophisticated.) And suppose your own source file, MyProgram.cpp, has this in it:
#include <string>
int main()
{
cout << “Hello” << endl;
}
Then, after the preprocessor gets through with its preprocessing, it creates a temporary fixed-up file (which has the lines from the string file inserted into the MyProgram.cpp file where the #include line had been) to look like this:
int hello = 10;
int goodbye = 20;
int main()
{
cout << “Hello” << endl;
}
In other words, the preprocessor replaced the #include line with the contents of that file. Now, the string file itself could have #include lines, and those lines would be replaced by the contents of the files they refer to. As you may imagine, what started out as a simple program with just a few lines could actually have hundreds of lines after the preprocessor gets through with it. (In fact, that’s a conservative estimate: We ran the default CodeBlocks code through the preprocessor, and it contained 25,613 lines! Many of those are blank lines for various reasons, but nevertheless, it’s a very big file!)
Don’t worry: Your original source code file doesn’t change when the preprocessor goes at it. The preprocessor builds a temporary file, and that’s what the compiler compiles. Also, you don’t have to run the preprocessor manually; the compiler runs it for you.
Although you don’t have to run the preprocessor yourself, you can if you’re curious to see what its output looks like. The CodeBlocks compiler actually calls on gcc.exe to perform the compilation process. However, gcc is really just a small program that launches the compiler. But before it launches the compiler, it runs the preprocessor. The preprocessor command is cpp (for C preprocessor). If your paths are set up correctly and you want to try it out, just type cpp, the name of your source file, the redirection symbol (>>), and the name of an output file at the command line, such as cpp main.cpp >> main.txt. In most cases, you can set up the path correctly by typing the following at the command line and pressing Enter:
path=C:\Program Files\CodeBlocks\MinGW\bin;%path%
And prepare yourself for a lot of lines. But seeing the output and how your code looks when it’s ready to be pushed through the compiler is interesting!
The preprocessor also provides you with a lot of other directives besides #include. One of the more useful ones is the #define directive. Here’s a sample #define line:
#define MYSPECIALNUMBER 42
After the preprocessor sees this line, every time it encounters the word MYSPECIALNUMBER, it replaces it with the word 42 (that is, whatever sequence of letters, numbers, and other characters follow the definition). But #define also lets you create what are called macros. Take a look at this line:
#define oldmax(x, y) ((x)>(y)?(x):(y))
After the preprocessor learns this line, every time it sees the word oldmax followed by two things in parentheses separated by a comma, it replaces it with the form ((x)>(y)?(x):(y)), substituting the thing before the comma for x and the thing after the comma for y. For example, if you then have this line
q = oldmax(abc, 123);
the preprocessor replaces the line with
q = ((abc)>(123)?(abc):(123));
and does nothing more with the line.
Minibook I, Chapter 2, refers to these as conditional operators. The variable q is set to the value in abc if the abc value is greater than 123; otherwise, the q gets set to 123.
However, the preprocessor doesn’t have an understanding of the conditional operator, and q doesn’t get set to anything during preprocessing. All the preprocessor knows is how to replace text in your source-code file. The preprocessor replaced the earlier line of code that containedoldmax with the next line containing the conditional operator. That’s it. The preprocessor doesn’t run any code, it doesn’t make the comparison, and it doesn’t put anything in q. The preprocessor just changes the code.
Although you can still use #define statements in C++, in general you should simply create a function instead of a macro or use a constant instead of a symbol. Using symbols and macros are older and outdated styles of programming. However, they do have their place in programming in the form of conditional compilation, which we discuss next.
You may have times when you want to compile one version of your program for one situation, and compile another for a different situation. For example, you may want to have a debug version of your program that has some extra goodies in it that spit out special information for you that you can use during the development of your program. Then, after your program is ready to ship to the masses so millions of people can use it, you no longer want that extra debug information.
To accomplish this, you can use a conditional compilation. Take a look at these lines:
#ifdef DEBUG
cout << “The value of j is “ << j << endl;
#else
cout << j << endl;
#endif
The lines that begin with # are preprocessor directives. The preprocessor has its own version of if statements. In your code, you can have a line like the following with nothing after it:
#define DEBUG
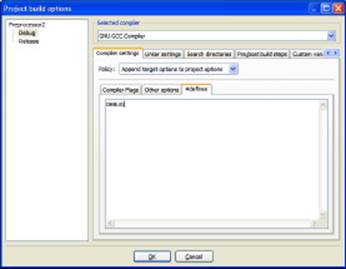
This simply defines a symbol. It works just like the symbols we described earlier, except that it’s not set to be replaced by anything. It’s just a symbol. You can also define such symbols in the command-line options to gcc or whichever compiler you use. (In CodeBlocks, you choose Project⇒Build Options. In the Project Build Options dialog box that opens, click the Compiler Settings tab, followed by the #defines subtab, as shown in Figure 8-1. You type your compiler options as shown in the figure.) To define the DEBUG symbol through a command-line option, you add
-D DEBUG
to your command, either in the gcc command or in the Project Build Options dialog box in CodeBlocks. Then, when you include this compiler option, the DEBUG symbol is defined throughout your program, just as if you had included a #define DEBUG line at the very beginning.
Now when the preprocessor starts going through your program and gets to the #ifdef DEBUG line, it checks whether the DEBUG symbol is defined. If the symbol is defined, it spits out to its fixed-up file the lines that follow, up until the #else line. Then it skips any lines that follow that, up until the #endif line.
But if the DEBUG symbol is not defined, the preprocessor skips over the lines up until the #else, and spits out the lines that follow, up until the #endif.
Figure 8-1:Provide the compiler options you want to use to change the application output.
Thus, for the example we gave earlier in this section, if DEBUG is defined, the block of code starting with #ifdef DEBUG through the line #endif is replaced by the stuff in the first half of the block:
cout << “The value of j is “ << j << endl;
But if DEBUG is not defined, it is replaced by the stuff following the #else line:
cout << j << endl;
When the preprocessor goes through your file, it is only creating a new source-code file to be used by the compiler. That means these #ifdef lines affect your program only when the compiler fires off the preprocessor. When your program is compiled and you run it, these#ifdef lines are nowhere to be found. So please don’t forget that these #ifdef lines do not affect how your program runs — only how it compiles.
Using preprocessor directives, you can have two different versions of your program. In the example we gave, we’re gearing up for two versions, a debug version and a release version. To tell the compiler which version to build, we then modify the command-line options by either removing or adding the -D DEBUG line.
The -D option works either with or without a space after the D. Thus, you can either use -DDEBUG or -D DEBUG. They both do the same thing.
Listing 8-3 demonstrates all the things that we covered in this section.
Listing 8-3: Using Many Different Preprocessor Directives
#include <iostream>
using namespace std;
#ifdef UNIVAC
const int total = 200;
const string compname = “UNIVAC”;
#elif defined(HAL2000)
const int total = 300;
const string compname = “HAL2000”;
#else
const int total = 400;
const string compname = “My Computer”;
#endif
// This is outdated, but you might
// see it on occasion. Don’t write
// code yourself that does this!
#define oldmax(x, y) ((x)>(y)?(x):(y))
#define MYSPECIALNUMBER 42
int main()
{
cout << “Welcome to “ << compname << endl;
cout << “Total is:” << endl;
cout << total << endl << endl;
// Try out the outdating things.
cout << “*** max ***” << endl;
cout << oldmax(5,10) << endl;
cout << oldmax(20,15) << endl;
cout << MYSPECIALNUMBER << endl << endl;
// Here are some standard
// predefined macros.
cout << “*** Predefined Macros ***” << endl;
cout << “This is file “ << __FILE__ << endl;
cout << “This is line “ << __LINE__ << endl;
cout << “Compiled on “ << __DATE__ << endl;
cout << “Compiled at “ << __TIME__ << endl << endl;
// Here’s how some people use #define,
// to specify a “debug” version or
// “release” version.
cout << “*** total ***” << endl;
int i;
int j = 0;
for (i = 0; i<total; i++)
{
j = j + i;
}
#ifdef DEBUG
cout << “The value of j is “ << j << endl;
#else
cout << j << endl;
#endif
return 0;
}
When we run Listing 8-3 without any symbols (we did not set DEBUG), we see this output:
Welcome to My Computer
Total is:
400
*** max ***
10
20
42
*** Predefined Macros ***
This is file C:\0246 - Source Code\BookI\Chapter08\Preprocessor2\main.cpp
This is line 37
Compiled on Apr 7 2009
Compiled at 13:54:09
*** total ***
79800
But note, at the beginning, we’re testing for the symbol UNIVAC. But that if block is a bit more complex because we also have an #elif (else if) construct. The language of the preprocessor has no elseifdef or anything like it. Instead, you have to write it like so:
#elif defined(HAL2000)
Now with this block, the preprocessor checks for the symbol UNIVAC; if the preprocessor finds UNIVAC, it spits out the lines
const int total = 200;
const string compname = “UNIVAC”;
Otherwise, the preprocessor looks for HAL2000; if the preprocessor finds it, it adds these lines to the fixed-up code:
const int total = 300;
const string compname = “HAL2000”;
And finally, if neither UNIVAC nor HAL2000 is set, the preprocessor adds these lines:
const int total = 400;
const string compname = “My Computer”;
Now remember that, in each case, these two lines are sent out to the fixed-up version in place of the entire block starting with #ifdef UNIVAC and ending with #endif.
So if we include the command-line option -D UNIVAC, we see different output:
Welcome to UNIVAC
Total is:
200
*** max ***
10
20
42
*** Predefined Macros ***
This is file C:\0246 - Source Code\BookI\Chapter08\Preprocessor2\main.cpp
This is line 37
Compiled on Apr 7 2009
Compiled at 14:05:19
*** total ***
19900
To see this different output, remember that these #define lines affect only the compilation of your program. Therefore, you need to recompile your program to see the changes. But a catch is involved: If the object file for your source-code file is newer than your source, the compiler won’t rebuild the object file, even though you changed the command-line options. You need to type makeclean first, if you are using a command-line compiler such as MinGW or Cygwin. In CodeBlocks, you choose Build⇒Clean. Then you can compile your program again and run it to see the new output.
And now, here’s a different set of options:
-D HAL2000 -D DEBUG
When we again clean, compile, and run, we see this output. Notice that the final line is a bit different now that we have DEBUG defined.
Welcome to HAL2000
Total is:
300
*** max ***
10
20
42
*** Predefined Macros ***
This is file C:\0246 - Source Code\BookI\Chapter08\Preprocessor2\main.cpp
This is line 37
Compiled on Apr 7 2009
Compiled at 14:07:14
*** total ***
The value of j is 44850
Using Constants
When you are programming, you may sometimes want a certain fixed value that you plan to use throughout the program. For example, you might want a string containing the name of your company, such as “Bobs Fixit Anywhere Anyhoo”. And you don’t want someone else working on your program to pass this string into a function as a reference and modify it by mistake, turning it into the name of your global competitor, “Jims Fixum Anyhoo Anytime”. That could be bad. Or, if you’re writing a scientific application, you might want a fixed number, such as pi = 3.1415926 or PeachPi=4.1415926.
You can create such constants in C++ by using the const keyword. When you create a constant, it works just like a variable, except you cannot change it later in the program. For example, to declare your company name, you might use
const string CompanyName = “Bobs Fixit Anywhere Anyhoo”;
Of course, you can modify this string in your code, but later in your code, you cannot do something like this:
CompanyName = CompanyName + “, Inc.”;
The compiler issues an error for that line, complaining that it’s a constant and you can’t change it.
After you declare the constant, then, you can use the string called CompanyName to refer to your company throughout your code. Listing 8-4 shows you how to do this. Note the three constants toward the top called ParkingSpaces, StoreName, and pi. In the rest of the program, we use these just like any other variables — except that we don’t try to change them.
Listing 8-4: Using Constants for Permanent Values That Do Not Change
#include <iostream>
using namespace std;
const int ParkingSpaces = 80;
const string StoreName = “Joe’s Food Haven”;
const float pi = 3.1415926;
int main()
{
cout << “Important Message” << endl;
cout << “Here at “ << StoreName << endl;
cout << “we believe you should know” << endl;
cout << “that we have “ << ParkingSpaces;
cout << “ full-sized” << endl;
cout << “parking spaces for your parking” << endl;
cout << “pleasure.” << endl;
cout << endl;
cout << “We do realize, however, that parking” << endl;
cout << “is tight at “ << StoreName << endl;
cout << “and so we are going to double our” << endl;
cout << “spaces from “ << ParkingSpaces << “ to “;
cout << ParkingSpaces * 2;
cout << “. Thank you again!” << endl << endl;
float radius = 5;
float area = radius * pi * pi;
cout << “And remember, we sell “ << radius;
cout << “ inch apple pies” << endl;
cout << “for a full “ << area << “ square” << endl;
cout << “inches of eating pleasure!” << endl;
return 0;
}
When you run this program, you see the following:
Important Message
Here at Joe’s Food Haven
we believe you should know
that we have 80 full-sized
parking spaces for your parking
pleasure.
We do realize, however, that parking
is tight at Joe’s Food Haven
and so we are going to double our
spaces from 80 to 160. Thank you again!
And remember, we sell 5 inch apple pies
for a full 49.348 square
inches of eating pleasure!
The biggest advantage to using constants is this: If you need to make a change to a string or number throughout your program, you make the change only once. For example, if you have the string “Bobs Fixit Anywhere Anyhoo” pasted a gazillion times throughout your program, and suddenly you incorporate and need to change your program so the string says, “Bobs Fixit Anywhere Anyhoo, LLC”, you would need to do some serious search-and-replace work. But if you have a single constant in the header file for use by all your source-code files, you need to change it only once. You modify the header file with the new constant definition, recompile your program, and you’re ready to go.
There’s a common saying in the programming world that goes like this (sing along now): “Don’t use any magic numbers.” The idea is that if, somewhere in your code, you need to calculate the number of cows that have crossed over the bridge to see if the bridge will hold up and you happen to know the average weight of a cow is 632 pounds, don’t just put the number 632 in your code. Somebody else reading it may wonder where that number came from. Instead, make a constant called, perhaps, AverageCowWeight and set that equal to 632. Then, in your code, use AverageCowWeight anytime you need that number. Plus, if cows evolve into a more advanced species and their weight changes, all you need to do is make one change in your code — you change the header file containing the const declaration. Here’s a sample line that declares AverageCowWeight:
const int AverageCowWeight = 632;
Before C++, the original C language did not have constants. The way to use constants was through preprocessor directives. For example, in C++, you could have a constant, such as
const int DuckCrossing = 500;
But in C, you couldn’t do this. Your choice would be to use either a non-constant variable, as in
int DuckCrossing = 500;
or a preprocessor directive, as in
#define DuckCrossing 500
Then you can use DuckCrossing as a substitute for 500 in your program. The problem here is that if you try to debug your program (see Minibook III, Chapter 1), the debugger (yes, that’s really the word) knows nothing of the word DuckCrossing. Therefore, if you see a#define used this way, you know what it means; however, we recommend that you don’t write new code that uses this. Use the const keyword instead.
Using Switch Statements
Many times in programming you may want to compare a variable to one thing, and if it doesn’t match, compare it to another and another and another. To do this with an if statement, you need to use a whole bunch of else if lines.
That works out pretty well, but you can do it in another way; you can use the switch statement.
The approach we’re showing you in this section does not work for all types of variables. In fact, it works only with the various types of integers and characters. It won’t even work with character strings. However, when you need to do multiple comparisons for integers and characters, using this approach is very useful.
First, here’s a complete switch statement that you can refer to as we describe the individual parts in the paragraphs that follow. This compares x to 1, then 2, and finally includes a catchall section called default if x is neither 1 nor 2.
int x;
cin > x;
switch (x)
{
case 1:
cout << “It’s 1!” << endl;
break;
case 2:
cout << “It’s 2!” << endl;
break;
default:
cout << “It’s something else!” << endl;
break;
}
To use the switch statement, you type the word switch and then the variable or expression you want to test in parentheses. Suppose x is type int, and you want to compare it to several different values. You would first type
switch (x) {
The preceding item in parentheses is not a comparison. It’s simply a variable. You can also put more complex expressions inside the parentheses, but they must evaluate to either an integer or a character. So, for example, if x is an integer, you can test
switch (x + 5) {
because x + 5 is still an integer.
After the header line for the switch statement, you list the items you want to compare the expression to. These have a rather strange format. They start with the word case, then have the value to compare the expression against, and then a colon, as in
case 1:
Next is the code to run in the event the expression matches this case (here, 1).
cout << “It’s 1” << endl;
Finally (here’s where it gets really strange) you have the word break. Every case in the switch statement usually has a break line, which means get out of the switch statement now! And here’s the exceedingly strange part: If you forget the break statement, when the computer runs this case, it continues running the code for the next case! Yes, C++ can seem stupid at times. And this is one of those rare and less-than-beautiful moments.
Note something peculiar at the end of the switch block: The final case is default. It applies to the situation when none of the preceding cases apply.
The default case isn’t required; you can leave it off if you don’t need it. However, if you do include it, we recommend putting it at the end of the switch block because that’s where most people expect to find it.
With the sample code we gave at the beginning of this section, you can enter in a number, which gets put in the x variable. The code then tests the value x against 1; if it matches, it performs the line after the case 1: line. But if it doesn’t match, it tests it against 2 and performs its lines if it matches. But if none of those match, it does the code after the default line.
When the computer encounters the break line, it exits the switch statement altogether. So you may be wondering: Why did those goofball authors include a break line at the very end? Our answer: Tradition. That’s all. It’s consistent with the other blocks of code. But you certainly don’t need it. However, if you leave it off, you must remember that if you decide to add any other cases, you will probably want to put it back in. But on the other hand, people typically put the default at the end. (You don’t have to, but most people expect to see it at the end and not in the middle.)
A switch statement only compares a single variable or expression against several different items. If you have more complex comparisons, you can instead use a compound if statement.
In many other programming languages, a switch statement is called a case block. That’s because in those languages, the word that starts the whole thing is case. Here, however, the whole shebang gets off with a bang on the word switch. Thus, in C and C++, we call it aswitch statement. It’s fun to be different. Sometimes.
Listing 8-5 is a complete program that demonstrates a switch statement. It also shows you how you can make a simple antiquated-looking menu program on the console. You don’t need to press Enter after you choose your menu item; you just press the key for your menu selection. That’s thanks to the use of getch rather than cin.
Listing 8-5: Making Multiple Comparisons in One Big Block
#include <iostream>
#include <conio.h>
using namespace std;
int main()
{
// Display a list of options.
cout << “Choose your favorite:” << endl;
cout << “1. Apples “ << endl;
cout << “2. Bananas “ << endl;
cout << “3. Fried worms “ << endl;
cout << “4. Poison Apples “ << endl;
cout << “5. Lobster “ << endl;
// Obtain the user’s selection.
char ch = getch();
// Continue getting user selections until the user
// enters a valid number.
while (ch < ‘1’ || ch > ‘5’)
{
ch = getch();
}
// Use a switch to display the user’s selection.
cout << “You chose “ << ch << endl;
switch (ch) {
case ‘1’:
cout << “Apples are good for you!” << endl;
break;
case ‘2’:
cout << “Bananas have plenty of potassium!” << endl;
break;
case ‘3’:
cout << “That’s disgusting!” << endl;
break;
case ‘4’:
cout << “All I wanna know is WHY?” << endl;
break;
case ‘5’:
cout << “Expensive but good taste you have!” << endl;
break;
}
return 0;
}
Supercharging enums with Classes
When you work with classes, you can use a technique called wrapping. In Minibook I, Chapter 7, we discuss the enum keyword and how you can use it to create your own types. However, when you print the enumeration, you don’t see the word, such as red or blue; you see a number. Listing 8-6 is a simple class that wraps an enum type. You can use this class with enum ColorEnum, as main demonstrates. When you run this program, you see the single word red in the console.
Listing 8-6: Creating a Class for enums
#include <iostream>
using namespace std;
class Colors
{
public:
enum ColorEnum {blue, red, green, yellow, black};
Colors(Colors::ColorEnum value);
string AsString();
protected:
ColorEnum value;
};
Colors::Colors(Colors::ColorEnum initvalue)
{
value = initvalue;
}
string Colors::AsString()
{
switch (value)
{
case blue:
return “blue”;
case red:
return “red”;
case green:
return “green”;
case yellow:
return “yellow”;
case black:
return “black”;
default:
return “Not Found”;
}
}
int main()
{
Colors InkColor = Colors::red;
cout << InkColor.AsString() << endl;
return 0;
}
In the preceding section, “Using Switch Statements,” our switch statement did not include any break statements. Instead we have a return statement. The return causes the computer to exit the function entirely, so you have no reason to worry about getting out of the switchstatement. You may wonder why the switch statement includes a default clause. After all, it will never get called. In this case, if you don’t supply a default clause, the compiler displays the following message:
warning: control reaches end of non-void function
Adding cout capabilities
It would be nice if the Colors class allowed you to just call cout, as in cout << Ink Color << endl; without having to call Ink Color.AsString() to get a string version. C++ has a capability called operator overloading. When you type something cout << followed by a variable, you are calling a function: <<. Several versions of the << functions (they are overloaded) are available; each has a different type. For example, int handles the cases when you write out an integer, as in int x = 5;, and then cout << x;. Because the << function doesn’t use parentheses, it is an operator.
To add cout capabilities to your class, just write another << function for your class. Here’s the code. This is not a class member function; it goes outside your class. Add it to Listing 8-6 anywhere after the class declaration but before main. Here goes:
ostream& operator << (ostream& out, Colors& inst)
{
out << inst.AsString();
return out;
}
Because this function is an operator, you have to throw in the word operator. The type of cout is ostream, incidentally; thus, you take an ostream as a parameter, and you return the same ostream. The other parameter is the type you are printing: in this case, it’s a Colorsinstance, and once again, it’s passed by reference. After you add this code, you can change the line cout << InkColor.As String() << endl; to simply
cout << InkColor << endl;
Whenever possible, add the code required for your application to compile without warnings. Adding the default clause simply ensures that the AsString function always returns a value, no matter what happens.
The expression Colors::red may be unfamiliar to you. That means we’re using the red value of the ColorEnum type. However, because ColorEnum is declared inside the class Color, we cannot just say red. We have to first say the class name, then two colons, and then the value. Thus we type Colors::red.
In main, we created the InkColor instance and set it not to a Color object but to an enum! We just violated An Important Rule about setting things equal to something of the same type. Why? C++ has a neat little trick: You can create a constructor that takes a certain type. In this case we have a constructor that takes a ColorEnum. Then when you create a stack variable (not a pointer) you can just set it equal to a value of that type. The computer will implicitly call the constructor, passing it that value.
Working with Random Numbers
Sometimes, you need the computer to generate random numbers for you. But computers aren’t good at doing things at random. We humans can toss dice or flip a coin, but the computer must do things in a predetermined fashion.
The computer geniuses of the last century have come up with algorithms that generate pseudorandom numbers. These are numbers that are almost random or seemingly random. They’re sufficiently random for many purposes.
The only catch with these random number generators is that you need to seed them. But a computer scientist beheld a great idea. The current time is random. If we run a program and you run a program, most likely we won’t start running them at precisely the same moment in time. Our scientist realized that would be a good starting point for a random number generator. In Listing 8-7, we obtain the current time to start the random number generator. To do that, we include time.h. We create a variable called now of a special type called time_t (which is just a number), and then we call the time function, passing the address of now. That gives us the number of seconds since January 1, 1970. Then we call srand, passing that time. That process seeds the generator.
Then we print several random numbers by calling rand, which returns a random number. But we noticed something strange when we ran this program. Each time, the first call to rand got just a little bit bigger, and it seemed to be affected by the current time. With each second that passed, the supposedly random number got just a bit bigger. The rest seemed fine, so we decided to skip the first random number. Thus, right after we seed the random number, we call rand and ignore the return value.
Then we go ahead and print five random numbers. But we wanted to limit the numbers in the range from 0 through 99, so we took the modulus 100 of the number. (That’s the remainder when we divide the number by 100.) You can choose a different number than 100 if you need a different range.
Listing 8-7: Seeding the Random Number Generator
#include <iostream>
using namespace std;
int main()
{
// Re-seed the random-number generator
time_t now;
time(&now);
srand(now);
rand();
// Print out a list of random numbers
for (int i=0; i<5; i++)
{
cout << rand() % 100 << endl;
}
return 0;
}
The first time we ran Listing 8-7, we saw the following output:
19
69
85
83
47
The second time, we saw this output. It’s very different than before:
79
67
38
72
73
Storing Data in Arrays
Most programming languages support a data structure called an array. An array is a list of variables, all stored side by side in a row. You access them through a single name. Each variable in the array must be of the same type.
When you create an array, you specify how many items the array holds. For example, you can have an array of 100 integers. Or you can have an array of 35 strings or an array of 10 pointers to the class BrokenBottle. If the code you’re working with represents a type, you can create an array out of it.
When you create an array, you give it a name. You can access the array’s elements (items) by using that name followed by an index number in brackets. The first element is always 0. Thus, if you have an array of five integers called AppendixAttacks, the first element isAppendixAttacks[0]. The second is AppendixAttacks[1], then AppendixAttacks[2], Appendix Attacks[3], and finally AppendixAttacks[4].
Because an array starts with element number 0, the final element in the array has an index that is 1 less than the size of the array. Thus, an array of 89 elements has indexes ranging from 0 to 88.
Declaring and accessing an array
Here’s how you declare an array:
int GrilledShrimp[10];
This declares an array of 10 integers called GrilledShrimp. You first put the type (which is really the type of each element in the array), then the name for the array, and then the number of elements in brackets. And because this declares 10 integers, their indexes range from 0 to 9.
To access the first element of the array, you put the number 0 in brackets after the type name, as in
GrilledShrimp[0] = 10;
Sometimes people call the act of referring to a single element in the array as subscripting. But we avoid that word. Our brains prefer simpler words.
Often people use a loop to fill in an array or access each member. People usually call this looping through the array. Listing 8-8 shows an example.
Listing 8-8: Using a Loop to Loop Through the Array
#include <iostream>
using namespace std;
int main()
{
int GrilledShrimp[5];
for (int i=0; i<5; i++)
{
GrilledShrimp[i] = i * 2;
cout << GrilledShrimp[i] << endl;
}
return 0;
}
If you use a for loop to go through all the elements in the array, start your loop at 0. You end the loop with 1 less than the size of the array. If you store the array size in the variable size and your loop index is i, the middle clause in your for loop can be either i < size ori <= size - 1. Do not use i <= size. That goes 1 more than you want.
When you use arrays, don’t go beyond the array bounds. Due to some old rules of the early C language, the compiler does not warn you if you write a loop that goes beyond the upper boundary of an array. You may not get an error when you run your program, either.
Arrays of pointers
Arrays are particularly useful for storing pointers to objects. If you have lots of objects of the same type, you can store them in an array.
Although you can store the actual objects in the array, most people don’t. Most people fill the array with pointers to the objects. To declare an array of pointers to objects, remember the asterisk in the type declaration, like this:
CrackedMusicCD *missing[10];
Listing 8-9 declares an array of pointers. In this example, after declaring the array, we fill the elements of the array with 0’s. Remember, each element is a pointer; that way, we can immediately know whether the element points to something by just comparing it to 0. If it’s 0, it’s not being used. If it has something other than 0, it has a pointer in it.
Listing 8-9: Using an Array to Store a List of Pointers to Your Objects
#include <iostream>
using namespace std;
class CrackedMusicCD
{
public:
string FormerName;
int FormerLength;
int FormerProductionYear;
};
int main()
{
CrackedMusicCD *missing[10];
for (int i=0; i<10; i++)
{
missing[i] = 0;
}
return 0;
}
If you want to create a whole group of objects and fill the array with pointers to these objects, you can do this kind of thing:
for (int i=0; i<10; i++)
{
missing[i] = new CrackedMusicCD;
}
Because each element in the array is a pointer, if you want to access the member variables or member functions of one of the objects pointed to by the array, dereference the pointer by using the shortcut -> notation:
missing[0]->FormerName = “Shadow Dancing by Andy Gibb”;
This example line accesses the FormerName member variable of the object whose address is in the first position of the array.
Though the array contains pointers to objects, because of the mental connection between a pointer and the object it points to, some people just refer to the objects in the array.
When you’re finished with the objects in the array, you can delete the objects by calling delete for each member of the array, as in this code:
for (int i=0; i<10; i++)
{
delete missing[i];
missing[i] = 0;
}
In the preceding code, we clear each array element to 0. When you are working with arrays of pointers, we recommend that you do the same. That way, the pointer is reset to 0 and no longer points to anything after its object is gone.
Passing arrays to functions
Sometimes you need to pass an entire array to a function. While passing entire objects to arrays can be unwieldy, passing an entire array can be dangerous. Arrays can be enormous, with thousands of elements. If each element is a pointer, each element can be several bytes. If you pass a really big array onto the stack, you may overflow your program’s stack.
As with passing objects, your best bet is to pass an array’s address. You pass to a function a pointer to the array. But passing an array’s address to a function is confusing to code. Listing 8-10 is a sample that passes an array, without worrying about any pointers and addresses.
Listing 8-10: Passing an Array to a Function by Declaring the Array in the Function Header
#include <iostream>
using namespace std;
const int MyArraySize = 10;
void Crunch(int myarray[], int size)
{
for (int i=0; i<size; i++)
{
cout << myarray[i] << endl;
}
}
int main()
{
int BigArray[MyArraySize];
for (int i=0; i<MyArraySize; i++)
{
BigArray[i] = i * 2;
}
Crunch(BigArray, MyArraySize);
return 0;
}
When you run this program, it prints the nine members of the array. We declared the parameter in the function header: We declared an array but did not specify a size. This means that you can pass an array of any size to the function. We included a size parameter, so the function knows the size of the array that we’re passing in. Therefore, we included the array size when we called this function from main. Also, we used a constant rather than 10 for the array size; then if we decide later to modify the program by changing the size of the array, we need to change only the one constant at the top of the program. Otherwise, we risk missing one of the 10s.
How do you pass a pointer to an array? There’s a pointer symbol in the data type for argv. argv is a pointer to a set of character pointers.
That’s exactly what we did in Listing 8-10. We did not actually pass the array itself. We passed the array’s address. When you pass an array this way, the compiler writes code to pass a pointer to the array. You don’t worry about it.
The name of an array is actually a pointer to the first element in the array.
In the main of Listing 8-10, when we call the function, we pass the array name, BigArray. The compiler treats this name as the first array element address.
Thus, BigArray is the same as &(BigArray[0]). (We put parentheses around the BigArray[0] part so the computer knows that the & refers to the combination of BigArray[0], not just BigArray.) So you could have used this in the call:
Crunch(&(BigArray[0]), MyArraySize);
But there’s no reason to do that. Just pass BigArray. It’s the same thing!
The name of the array is a pointer to the array.
Adding and subtracting pointers
You can do interesting things when you add numbers to and subtract numbers from a pointer to an array element that is stored in a pointer variable as an address. If you take the address of an element in an array and store it in a variable, such as one called cur (for current), as in
cur = &(Numbers[5]);
where Numbers is an array of integers, you can access the element at Numbers[5] by dereferencing the pointer, as in the following:
cout << *cur << endl;
Then you can add and subtract numbers from the pointer, like these lines:
cur++;
cout << *cur << endl;
The compiler knows how much memory space each array element takes. When you add 1 to cur, it advances to the next element in the array. And so the cout that follows prints the next element, in this case, Numbers[6].
Listing 8-11 shows an example of moving about an array. Note that we declare a variable called cur, which is a pointer to an integer. The array holds integers, so this pointer can point to elements in the array.
We start cur out pointing to the first element. The array name is the address of the first element, so to accomplish that we just typed
cur = Numbers;
That puts the address of the first element of the array in the variable cur.
Listing 8-11: Moving by Using Pointer Arithmetic
#include <iostream>
using namespace std;
int main()
{
int Numbers[100];
for (int i=0; i<100; i++)
{
Numbers[i] = i * 10;
}
int *cur;
cur = Numbers;
cout << *cur << endl;
cur++;
cout << *cur << endl;
cur++;
cout << *cur << endl;
cur += 3;
cout << *cur << endl;
cur--;
cout << *cur << endl;
return 0;
}
When you run the program, here is the output you see:
0
10
20
50
40
In the code, the ++ and -- operators add 1 to and subtract 1 from the pointer. We also directly added a 3 to the pointer to advance it three “notches” in the array. You can also subtract from a pointer, as in
cur -= 2;
You cannot do multiplication and division with pointers.
All materials on the site are licensed Creative Commons Attribution-Sharealike 3.0 Unported CC BY-SA 3.0 & GNU Free Documentation License (GFDL)
If you are the copyright holder of any material contained on our site and intend to remove it, please contact our site administrator for approval.
© 2016-2026 All site design rights belong to S.Y.A.