C++ All-in-One For Dummies (2009)
Book II
Understanding Objects and Classes
Contents at a Glance
Chapter 1: Planning and Building Objects
Recognizing Objects
Encapsulating Objects
Building Hierarchies
Discovering Classes
Chapter 2: Describing Your Program with UML
Moving Up to UML
Building with UML and the Unified Process
Moving Forward with UML
Chapter 3: Structuring Your Classes with UML
Drawing Classes
Building Components
Deploying the Software
Chapter 4: Demonstrating Behavior with UML
Drawing Objects
Casing Out the Use Cases
Sequence Diagrams
Collaboration Diagrams
Activity Diagrams
State Diagrams
Chapter 5: Modeling Your Programs with UML
Using UML Goodies
Free to Be UML
C++ and UML
Chapter 6: Building with Design Patterns
Introducing a Simple Pattern: the Singleton
Watching an Instance with an Observer
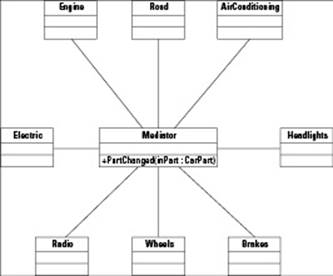
Mediating with a Pattern
Chapter 1: Planning and Building Objects
In This Chapter
Recognizing objects so you can create classes
Encapsulating classes into self-contained capsules
Building hierarchies of classes through inheritance
Discovering classes
Step outside for a moment and look down. What is the thing you are standing on? (Hint: It’s giant, it’s made of rock and sand and stone and molten lava, and it’s covered with oceans and land.) The answer? A thing! (Even a planet is a thing.) And now go back inside. What’s the thing that you opened, the thing with a doorknob? It’s a thing, too! It’s a slightly different kind of thing, but a thing nevertheless. And what are you inside? Okay, you get the idea. Everything you can imagine is a thing. Or, to use another term, an object. Remember that word: object.
Over the years, researchers in the world of computer programming (now, doesn’t that sound like an exciting job?) have figured out that the best way to program computers is to divide whatever it is you’re trying to model into a bunch of objects. These objects have capabilities and characteristics. (Eventually they have relationships, but that comes later.)
In this chapter, we show you how to make use of objects to create a software application. In the process, you get to twist some of the nuts and bolts of C++ that relate to objects and get tips on how to get the most out of them.
Recognizing Objects
Let’s get to the meat of it: Think of an object as any thing that a computer can describe. (Object = thing. How’s that for an obvious definition?) Just as physical things have characteristics, such as size, weight, or color, objects in a program can have attributes — say, a particular number of accounts, an engine, or even other objects that it contains, just as a car contains engines, doors, and other objects.
Further, just as real-world things have uses — for example, serving as containers, vehicles, or tools — an object in a program has capabilities. For example, it might be able to withdraw money or send a message or connect to the Internet.
Here’s an example of an object: Outside, in front of your house, you might see a mailbox. That mailbox is an object. (See how easy this is?) A mailbox is a useful device. You can receive mail, and depending on the style (kind) of mail, you can send mail. (The style of mail is important — you can send a letter because you know how much postage to attach, but you can’t send a package because the amount of postage is unknown.) Those are the mailbox’s capabilities. And what about its characteristics? Different mailboxes come in different shapes, sizes, and styles. So those are three characteristics. Now some mailboxes, such as the kind often found at apartment buildings, are great big metal boxes with several little boxes inside, one for each apartment. The front has doors for each individual box, and the back has a large door for the mail carrier to fill the boxes with all those wonderful ads addressed to your alternate name, Resident.
In this case, you could think of the apartment mailbox as one big mailbox with lots of little boxes, or you could think of it as a big container for smaller mailboxes. In a sense, the little boxes each have a front door that a resident uses, and the back of each has an entry that the mail carrier uses. The back opens when the big container door opens.
So think about this: The mail carrier interacts with the container, which holds mailboxes. The container has a big door, and when that door opens, it exposes the insides of the small mailboxes inside, which open, too. Meanwhile, when a resident interacts with the system, he or she interacts with only his or her own particular box.
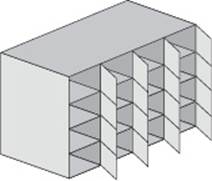
Take a look at Figures 1-1 and 1-2. Figure 1-1 shows the general look of the back of the mailbox container, where the mail carrier can open the container and put mail in all the different boxes. Figure 1-2 shows the front of the container, with one box open so a resident can take the mail out.
Figure 1-1: The outer object in this picture is a mailbox container.
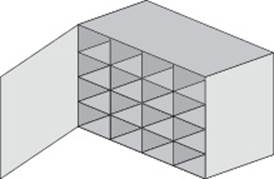
Figure 1-2: The smaller inner objects in this picture are the mailboxes.
So far, there are two objects here: the container box and the mailboxes. But wait! There are multiple mailboxes. So, really, we have one container box and multiple mailboxes. But each mailbox is pretty much the same, except for a different lock and a different apartment number, right? In Figure 1-2, each box that’s open is an example of a single mailbox. The others are also examples of the type of object called mailbox. In Figure 1-2, you can see 16 examples of the objects classified as mailbox. In other words, Figure 1-2 shows 16 instances of the class called mailbox. And all those mailboxes are inside an instance of the class that we would probably call mailboxes.
 There is no hard and fast rule about naming your classes. However, Microsoft recommends that developers use a singular name for objects and a plural name for collections. A single mailbox object would appear as part of a mailboxes collection. Using this naming convention makes it easier for other developers to understand how your code works. Of course, the most important issue is consistency — once you decide on a naming convention, use the same convention all the time.
Observing the mailboxes class
What can you say about the Mailboxes collection object?
♦ The Mailboxes collection contains 16 mailbox instances.
♦ The Mailboxes collection object is 24 inches by 24 inches in front and back, and it is 18 inches deep. (Really, it’s on legs, but we’re not going to consider those to be part of it.)
♦ When the carrier unlocks the mailboxes and pulls, its back door opens.
♦ When the mailboxes’ back door opens, it exposes the insides of each contained mailbox.
♦ When the mail carrier pushes on the door, the door shuts and relocks. (Okay, really, the mail carrier probably has to lock it, but we’re not going to worry about that part. We’d rather keep this example nice and simple.)
By using this list, you can discover some of the characteristics and capabilities of mailboxes. The following list shows its characteristics:
♦ Width: 24 inches
♦ Height: 24 inches
♦ Depth: 18 inches
♦ Mailboxes: 16 mailbox objects are inside it
And here’s a list of some of the mailboxes’ capabilities:
♦ It can open its door. (Well, some external thing — such as a human — opens the door, but we’ll get to that shortly.)
♦ It can give the mail carrier access to the mailboxes.
♦ It can close its door. (And yes, again, some external force such as a push causes the door to close, but again, we’ll get to that . . . right now!)
Think about the process of the carrier opening or closing the door. Here we seem to have a bizarre thing: The mail carrier asks mailboxes to close its door, and the door closes. That’s the way you need to look at modeling objects: Nobody does anything to an object. Rather, someone asks the object to do something, and the object does it itself.
For example, when you reach up to shove a slice of pizza into your mouth, your brain sends signals to the muscles in your arm. Your brain just sends out the signals, and your arms just move up, and so does the pizza. The point is that you make the command; then the arms carry it out, even though you feel like you’re causing your arms to do it.
Objects are the same way: They have their capabilities, and we tell them to do their job. We don’t do it for them. At least, that’s the way computer scientists view it. We know: It’s a stretch sometimes. But the more you think in this manner, the better you understand object-oriented programming.
 The mailboxes contain 16 mailboxes. In C++, that means the Mailboxes collection would have as member variables 16 different Mailbox instances. These Mailbox instances could be an array or some other collection, and most likely the array would hold pointers to Mailinstances.
Observing the mailbox class
Consider the characteristics and capabilities of the mailboxes. Each mailbox has these characteristics:
♦ Width: 6 inches
♦ Height: 6 inches
♦ Depth: 18 inches
♦ Address: A unique integer. But what number exactly? That depends on which mailbox you’re talking about.
And each mailbox has these capabilities:
♦ It can open its door.
♦ It can close its door.
Notice we wrote the capabilities from the perspective of the mailbox, not from the person opening the mailbox.
Now think about the question regarding the address printed on the mailbox. What number goes on it? There are 16 different mailboxes, and each one gets a different number. So we can say this: The mailbox class includes an address, which is an integer. Each instance of the mailbox class gets its own number. The first may get 1, the second may get 2, and so on.
And so you have two concepts here for the mailboxes:
♦ Mailbox class: This is the general description of a mailbox. It includes no specifics, such as the actual address. It simply states that each mailbox has an address.
♦ Mailbox instance: This is the actual object. The mailbox instance belongs to the class mailbox. There can be several instances of the mailbox class.
Think of the mailbox class as a cookie cutter. Or, in C++ terminology, the type. The mailbox instance is an actual example of the class. In C++, we can create a variable of class Mailbox, and set its Address integer to 1. Then we can create another variable of class Mailbox and set its Address integer to 2. Thus, we’ve created two distinct mailbox objects, each of class Mailbox.
But all these have a width of 6, a height of 6, and a depth of 18. These are the same throughout the mailbox. Thus, we would probably not set those manually; instead, we would probably set them in the constructor for the class Mailbox. Nevertheless, the values of width, height, and depth go with each instance, not with the class; and the instances could, conceivably, each have their own width, height, and depth. However, when we design the class, we would probably put some stipulation in the class that these member variables cannot be changed. (We would do that by making them private and including a single function for each of them that retrieves their values.)
Finding other objects
If you are dealing with a Mailboxes instance and an instance of Mailbox, you can probably come up with some other classes. When we start considering the parts involved, we can think of the following objects:
♦ Lock: Each Mailbox instance would have a Lock, and so would the Mailboxes instance.
♦ Key: Each lock would require a Key.
♦ Mail: Each Mailbox instance can hold several Mail instances. The carrier puts these in the Mailbox instances, and the residents take them out.
♦ LetterOpener: Some residents would use these to open the Mail.
So you now have four more types of objects (Lock, Key, Mail, and LetterOpener). But are these classes necessary? Their need depends on the application you’re building. In this case, we’re modeling the mailbox system simply as an exercise. Therefore, we can pretty much choose which classes we need. But if this were an actual program for a post office, for example, you would have to determine whether the classes are necessary for the people using the software. If the application is a training exercise for people learning to be mail carriers, the application may need more detail, such as the Key objects. If the application were a video game, it may need all the classes we mentioned and even more.
In deciding if you need certain classes, you can follow some general rules. First, some classes are so trivial or simple that it doesn’t make sense to include them. For example, a letter opener serves little purpose beyond opening mail. If you’re designing a Mail class, you would probably have a capability Open the envelope. Because some people would use a letter opener and others wouldn’t, you have little reason to pass into that function a LetterOpener instance. Therefore, you would probably not include a class as trivial as LetterOpener. But then again, if the program teaches residents how to use the mailbox (a strange idea, we know), it might include a section on How to use your letter opener. Yes, that’s kind of silly, but you get the idea: Whether you include the class depends on the situation.
Encapsulating Objects
People have come up with various definitions for what exactly object-oriented means. And the phrase various definitions in the last sentence really means that there aren’t simple discussions around a table at a coffeehouse about what the term means. Rather, there are outright arguments! Believe it or not, one of the central points of contention is whether C++ is object-oriented. And in such arguments (sorry, discussions), one of the words that usually pops up is encapsulation. People who defend C++ as being object-oriented point out that it supports encapsulation.
Instead of arguing, let’s just all agree that yes, C++ lets you program objects and classes. Now that we’ve put that argument to rest and can all live peacefully, what exactly does encapsulation mean?
First, think about the word itself. A big part of it is capsule. A capsule is a small container. In the bigger picture, it’s, well, a self-contained container that contains things. On the computer world, encapsulation refers to the process of creating a standalone object that can take care of itself and do what it must do, while holding on to information.
For example, to model a cash register, it would likely be a class. We’d encapsulate the cash register by putting everything about the register (its capabilities and characteristics) into a single class. In C++, the capabilities would be member functions and the characteristics would be member variables.
When we create the class, we would make some of the member variables and member functions public; we would make others private. (Some members can be protected, so derived classes could access them, but they still would not be public.) What exactly would private and protected member variables and member functions be?: the parts that you don’t want other functions modifying. For example, the cash register would probably have a value inside it representing the total dollar amount that the register contains. But the functions that use the class would not directly modify that value. Instead, they would call various member functions to perform transactions. One transaction might be Sale. Another transaction might be Refund; another might be Void. These would be the capabilities of the register in the form of public methods, and they would modify the cash value inside the register, making sure that it balances with the sales and returns. If a function could just modify the cash value directly, the balance would get out of whack.
The cash amount, therefore, would be a private or protected member variable. It would be hidden from the other functions and classes. As for which it would be, private or protected, that depends on whether we expect to derive new classes from the cash register class and whether we want these new classes to have access to the members. In the situation of a cash register, we would probably not want other parts of the program to access the cash register if we’re worried about security. But on the other hand, if we think that we’ll be creating derived classes that have added features involving the cash (such as automatically sending the money to a bank via an electronic transaction), we would want the members to be protected. (In general, we choose protected, rather than private, as we have been bitten too many times by using classes that have a gazillion private members. In those cases we’re unable to derive useful classes because everything is private!)
Encapsulation, then, is this: You combine the methods and member variables into a single entity, hiding some of them and making some accessible. The accessible ones together make up the interface of the object. And finally (this is important!), when you create an object, you create one that can perform on its own. In other words, the users of the class tell it what to do (such as perform a sales transaction) by calling its member functions and supplying parameters, and the object does the work. The calling function doesn’t care how the object does its thing, just that it can do it. For example, a cash register class knows how to perform a sales transaction. As the designer of the class, don’t force users to first call Sale, and then call separate functions to manually modify the amount of cash in the register and modify the running total. Rather, the Salefunction does all the hard work, and users of the class don’t have to worry about how that work takes place.
And now the really big question: Why do you need to know the word encapsulation? Because it’s a common term that computer scientists like to throw around. If they use it, however, they are likely to use it as a verb: “Look at me! I am going to encapsulate this information into an object!”
But the process matters more than the word itself. When you design objects and classes, you encapsulate your information into individual objects. If you keep the process in mind, you will be better off. Here are the things you need to do each time you design a class:
♦ Encapsulate the information. Combine the information into a single entity that becomes the class. This single entity has member variables representing its characteristics and member functions representing its capabilities.
♦ Clearly define the public interface of the class. Provide a set of functions that are public (and possibly member variables that are public, although it’s best to keep them protected or private), and make the rest of the members either protected or private.
♦ Write the class so that it knows how to do its own work. The class’s users should need only to call the functions in the public interface, and these public functions should be simple to use.
♦ Think of your class as a black box. The object has an interface that provides a means so that others can use it. The class includes details of how it does its thing; users only care that it does it. In other words, the users don’t see into the class.
Accessing read-only member variables
Suppose that you have a class that contains a member variable, and you want to allow users to retrieve the value of the variable but not change it. For example, in the Dog class, you might set the weight in the constructor, and that’s it — after that, users can get the weight but can’t change it. The way to do that is to simply not have a method that sets the value. Instead, you have a method that only retrieves the value. Thus, the Dog class would have the GetWeight method, but you would not have the SetWeight method. Then users can only read the value, not set it.
♦ Never change the class interface after you publish the class. Many application errors occur when a developer changes how methods, events, or access methods in the class work after publishing the class. If application developers rely on one behavior and the class developer introduces a new behavior, all applications that rely on the original behavior will break. You can always add to a class interface but never subtract from it or modify it. If you find that you must introduce a new behavior to Sale, add the new behavior to a new method, Sale2.
A common saying in object-oriented programming is that you should never make your member variables public. The idea is that if users of the object can easily make changes to the object’s member variables, a big mess could result. (For example, making the cash member variable public in a CashRegister class is asking for functions that just modify it directly, screwing up the balance.) By allowing users to only call member functions, you can put checking code inside to handle bad situations. For example, if you have a class called Dog that contains a member variable called Weight, you wouldn’t want a user of the class to take a Dog object and set the Weight to a negative number. But if you make the Weight member public, that’s exactly what any user can do.
So instead, you make the Weight member either private or protected, and then give the class access methods (other languages use the term properties instead of access methods — see the “Access methods versus properties” sidebar for details). For example, you might have a method called SetWeight. It would take an integer parameter and then check the parameter to make sure that it’s greater than 0. If it is, only then would it save the number in the Weight member variable. For example, the class might look like this:
class Dog
{
protected:
int Weight;
public:
void SetWeight(int NewWeight);
};
And the code for the function that sets the weight might look like this:
void Dog::SetWeight(int NewWeight)
{
if (NewWeight > 0)
{
Weight = NewWeight;
}
}
Note that the Weight member is protected, and the SetWeight is public. Thus the users of the class can’t modify the Weight member directly; they can only call SetWeight to set it, which provides built-in checking. Now this works all fine and dandy, except when the users of the class need to find Fido’s weight to make sure that he’s not rapidly shrinking. The only problem is that Weight is protected, so the user can’t read it. So you need to add a function that retrieves the value of Weight, as in the following:
int Dog::GetWeight()
{
return Weight;
}
We must modify the class to accommodate this function:
class Dog
{
protected:
int Weight;
public:
void SetWeight(int NewWeight);
int GetWeight();
};
Now when you use this class, instead of accessing the Weight variable directly, you use the access methods, as in the following sample lines:
int main()
{
Dog fido;
fido.SetWeight(10);
cout << fido.GetWeight() << endl;
fido.SetWeight(-5);
cout << fido.GetWeight() << endl;
return 0;
}
To set the weight, you call SetWeight. Note in the first call to SetWeight, we’re passing a legitimate value, 10. And when the next line runs, we see the number 10 appear on the console. But in the second call to SetWeight, we’re passing an invalid weight, -5. The SetWeightfunction rejects this value and doesn’t change the weight. So the second time we write the weight by calling GetWeight, we still see 10. The number did not change. The -5 value was rejected, and the weight remained the same.

Access methods versus properties
Many modern languages support a third aspect to classes called properties, in addition to the usual member methods and member variables. C++ doesn’t support a named entity called properties, but it does support the equivalent methodality. In your programming career you’re likely to move between lots of different languages. And so we want to take a moment to introduce you to properties, which are found in languages such as C#, VB.NET, and Object Pascal. Properties are essentially a combination of member variables and methods. Think of a public member variable in C++. Anyone using an object can freely modify a member variable. But sometimes when you’re creating a class, you want to place restrictions on what people can do with the member variables. For example, you might want to limit the access to reading the member variable but not changing it. Or you might want to restrict what values the variable can take on, such as limiting the variable to integers between 1 and 100 and not allowing it to contain any other integers.
In C++, the way to impose such limitations is to make the member variable private, and then write two member methods, one for reading the value of the variable and one for setting the value. The method that sets the value would impose the limits; if the caller tries to set the value to 101, for example, the method might automatically knock the value down to 100, if that’s the limit you’re imposing. And similarly, if you want people to be able to read the value but not change it, you might provide only a method that returns the value, and not a method for modifying the variable.
These two methods — one for setting a member variable, and one for “getting” (that is, reading) a member variable — are called accessor methods. Some languages besides C++ let you combine these member methods into what are called properties. Since C++ doesn’t support properties, we can’t really show you sample code, but the idea would be like this:
mydog.weight = 10
cout << mydog.weight << endl;
Although the first line looks like we’re just storing a 10 in the weight variable, if this were a property-based language, instead such code would cause your “property setter” method to get called. In that method you’d write code that tests the value and makes sure it’s a valid value before storing it. Similarly, the second line, which appears to just read the weight variable, would indirectly call the method that retrieves the value of weight. So the code would perform just like this code:
mydog.SetWeight(10);
cout << mydog.GetWeight() << endl;
See how we’re calling two methods, one that sets the weight and one that gets the weight? That’s the idea behind properties. They let you write code that appears to read and write member variables, but in fact the code calls “getter” and “setter” methods, respectively. (When working with other languages, you can write properties such that they let the user read values, write values, or read and write values, so the background functionality still relies on what amounts to two methods — one for setting the value and one for getting the value.) C++ doesn’t have properties, but many modern languages do. Learning about them now while studying objects will help you understand properties should you end up using other languages that support them.
When you use access functions, you can do much more than just guard against invalid values and return the current value. The Set function, for example, can process the value and make calculations or modify it. For example, the Dog class might have a maximum weight. If the user passes a larger weight to the SetWeight function, the function could change it to the maximum weight. For example, the following function limits the weight to an upper level of 100 and a lower level of 1:
void Dog::SetWeight(int NewWeight)
{
if (NewWeight < 0)
{
Weight = 0;
}
else if (NewWeight > 100)
{
Weight = 100;
}
else
{
Weight = NewWeight;
}
}
You can use a Get function to send a modified form of a member variable. For example, if you have a SalesTransaction class that contains a CreditCardNumber variable, which is a string containing the digits and the spaces, you may not want to reveal only the last four digits instead of the entire number. A Get function, then, might retrieve the CreditCardNumber, extract only the final four digits, and build a string of the form “XXXX XXXX XXXX 1234.” It would then return that string, rather than the actual CreditCardNumber value.
Building Hierarchies
One of the great powers in C++ is the capability to take a class and build new classes from it. When you use any of the available C++ libraries, such as the Standard C++ Library, you will probably encounter many classes, sometimes dozens of classes, that are all related to each other. Some classes are derived from other classes, although some classes are standalone. This gives programmers great flexibility. And it’s good to be flexible. The blood flows more easily through your system, and you will be more relaxed. And for programming, it’s good for a class library to be flexible, too, because when you are using a flexible library, you have many choices in the different classes you want to use.
Establishing a hierarchy
When you design a class, you can derive a new class from that original base class. The new class inherits the capabilities and characteristics of the base class. Normally, the members that are public in the base class will remain public in the derived class. The members that are protected in the base class will remain protected in the derived class; thus if you derive even further, those final classes will also inherit the protected members. Private members, however, live only in the base class.
Suppose you have a base class called FrozenFood, and from there you derive a class called FrozenPizza. From FrozenPizza, you then derive a class called DeepDishPizza. FrozenPizza is at the top of the hierarchy. It includes various members common to all classes.
Now suppose the FrozenFood class has the following member variables:
♦ intPrice (private): This is a private variable that represents the price of the product.
♦ intWeight (protected): This is a protected variable that represents the weight of the product.
The FrozenFood class also has these member functions:
♦ constructor: The constructor is public and takes a price and a weight as a parameter. It saves them in the Price and Weight member variables, respectively.
♦ GetPrice: This is a public access method that returns the value in the private Price member variable.
♦ GetWeight: This is a public access method that returns the value in the protected Weight member variable.
To make this a little more clear to myself, we’re going to list these items in a box, putting the name of the class (FrozenFood) at the top of the box. Then the box has a horizontal line through it, and under that we list the member variables. Under the member variables, we have another line, and then we list the member functions. We show this in Figure 1-3.
Figure 1-3: You can draw a class by using a box divided into three horizontal sections.
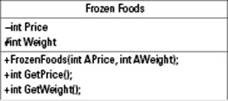
Note that, in this figure, we did one other thing: Before each member variable and function, we place either a plus sign (+), a minus sign (-), or a pound sign (#). This is shorthand notation: The + means the item is public, the - means it’s private, and the # means it’s protected.
In Figure 1-3, note that we wrote the lines for the member variables and functions in C++ form. Normally, you don’t do this; you use a special notation called UML in place of the C++, which we introduce a little of later in this chapter and then discuss for the remainder of this minibook.
Protecting members when inheriting
In C++, you have options for how you derive a class. To understand this, you need to remember that when you derive a class, the derived class inherits the members from the base class. With the different ways to derive a class, you can specify whether those inherited members will be public, protected, or private in the derived class. Here are the options:
♦ Public: When you derive a new class as public, all the members that were public in the base class will remain public in this derived class.
♦ Protected: When you derive a new class as protected, all the members that were public in the base class will now be protected in this new class. This means the members that were public in the base class will not be accessible by users of this new class.
♦ Private: When you derive a new class as private, all the members in the base class that this new class can access will be private. This means these members will not be accessible by any classes that you later derive from this new class — they are private, after all.
Think of it as an order: The highest access is public. When a member is public, users can access the member. The middle access is protected. Users cannot access protected members, but derived classes will have access to the protected members. The lowest access is private. Users cannot access private members, and derived classes can’t either.
We’re talking about inheritance here: Thus, if we have a base class called FrozenFood and a derived class called FrozenPizza, the derived class is a combination of the members in FrozenFood and additional FrozenPizza members. However, only the methods in theFrozenFood portion of FrozenPizza can access the private members of the FrozenFood portion. Nevertheless, the methods in the FrozenFood portion of FrozenPizza and the private members of FrozenFood are part of the derived class.
When you derive a class as public, the base class portion of the derived class remains unchanged: Those items that were private remain in the base class portion; therefore, the derived class does not have access to them. Those that were protected are still protected, and those that were public are still public.
But when you derive a class as protected, the base class portion is different from the original base class: Its public members are now protected members of this derived class. (But remember, the actual base class itself did not change! We’re talking only about the base class portion of the derived class.) Thus, the members that were public in the base class but are now protected in the derived class are not accessible to other functions and classes: They are now protected.
And finally, if you derive a class as private, the base class portion is again different from the original base class: All its members are now private. Because its members are private, any classes you derive from this newly derived class can’t access these members: They’re private. However, as before, the original base class itself didn’t change; we’re still talking about the base class portion of the derived class.
All these derivation approaches can be complicated. Remember that when you derive a class, you are specifying what level the inherited public and protected members will have in the derived class.
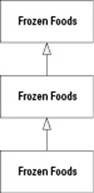
In C++, you specify the type of inheritance you want in the header line for the derived class. Take a look at Listing 1-1. Notice the three classes at the top of the listing: FrozenFood, FrozenPizza, and DeepDishPizza. Frozen Food is the base class of FrozenPizza, andFrozenPizza is the base class of DeepDishPizza. Figure 1-4 shows this by using a special notation called UML, where the arrows point toward the base class.
Listing 1-1: Specifying the Access Levels of the Inherited Members
#include <iostream>
using namespace std;
class FrozenFood
{
private:
int Price;
protected:
int Weight;
public:
FrozenFood(int APrice, int AWeight);
int GetPrice();
int GetWeight();
};
class FrozenPizza : public FrozenFood
{
protected:
int Diameter;
public:
FrozenPizza(int APrice, int AWeight, int ADiameter);
void DumpInfo();
};
class DeepDishPizza : public FrozenPizza
{
private:
int Height;
public:
DeepDishPizza(int APrice, int AWeight, int ADiameter, int AHeight);
void DumpDensity();
};
FrozenFood::FrozenFood(int APrice, int AWeight)
{
Price = APrice;
Weight = AWeight;
}
int FrozenFood::GetPrice()
{
return Price;
}
int FrozenFood::GetWeight()
{
return Weight;
}
FrozenPizza::FrozenPizza(int APrice, int AWeight, int ADiameter) :
FrozenFood(APrice, AWeight)
{
Diameter = ADiameter;
}
void FrozenPizza::DumpInfo()
{
cout << “\tFrozen pizza info:” << endl;
cout << “\t\tWeight: “ << Weight << “ ounces” << endl;
cout << “\t\tDiameter: “ << Diameter << “ inches” << endl;
}
DeepDishPizza::DeepDishPizza(int APrice, int AWeight,
int ADiameter, int AHeight) :
FrozenPizza(APrice, AWeight, ADiameter)
{
Height = AHeight;
}
void DeepDishPizza::DumpDensity()
{
// Calculate pounds per cubic foot of deep-dish pizza
cout << “\tDensity: “;
cout << Weight * 12 * 12 * 12 * 14 / (Height * Diameter * 22 * 16);
cout << “ pounds per cubic foot” << endl;
}
int main(int argc, char *argv[])
{
cout << “Thin crust pepperoni” << endl;
FrozenPizza pepperoni(450, 12, 14);
pepperoni.DumpInfo();
cout << “\tPrice: “ << pepperoni.GetPrice() << “ cents” << endl;
cout << “Deep dish extra-cheese” << endl;
DeepDishPizza extracheese(650, 21592, 14, 3);
extracheese.DumpInfo();
extracheese.DumpDensity();
cout << “\tPrice: “ << extracheese.GetPrice() << “ cents” << endl;
return 0;
}
Figure 1-4: The arrows in this UML diagram point toward the base class.
When you run Listing 1-1, you see the following output:
Thin crust pepperoni
Frozen pizza info:
Weight: 12 ounces
Diameter: 14 inches
Price: 450 cents
Deep dish extra-cheese
Frozen pizza info:
Weight: 21592 ounces
Diameter: 14 inches
Density: 35332 pounds per cubic foot
Price: 650 cents
The first five lines show information about the object of class FrozenPizza. The remaining lines show information about the object of class DeepDishPizza, including the fact that it weighs 21592 ounces (which happens to be 1349.5 pounds) and has a density of 35,332 pounds per cubic foot (35,332 pounds per cubic foot is a bit more than 17 tons per cubic foot, which is still nowhere near that of a neutron star, which measures about three trillion tons per cubic foot. Nevertheless, that’s one serious pizza).
The derivations are all public. Thus, the items that were public in FrozenFood are still public in FrozenPizza and DeepDishPizza. Note where the different information in the output comes from. The line Frozen pizza info: and the two lines that follow (Weight: andDiameter:) come from the public function DumpInfo, which is a member of FrozenPizza. DumpInfo is public in the FrozenPizza class. Since DeepDishPizza derives from FrozenPizza as public, DumpInfo is also a public member of DeepDishPizza.
Now try changing the header for DeepDishPizza from
class DeepDishPizza : public FrozenPizza
to
class DeepDishPizza : protected FrozenPizza
You’re changing the word public to protected. Make sure that you change the right line, or it will spoil the effect of this nifty thing we’re showing you.
Now try compiling the program. You will get an error. We got
In function `int main(int, char**)’:
error: `void FrozenPizza::DumpInfo()’ is inaccessible
error: within this context
error: `FrozenPizza’ is not an accessible base of `DeepDishPizza’
error: `int FrozenFood::GetPrice()’ is inaccessible
error: within this context
error: `FrozenFood’ is not an accessible base of `DeepDishPizza’
This refers to the line in main:
extracheese.DumpInfo();
Why is that an error now? Because DumpInfo is now a protected member of DeepDishPizza, thanks to the word protected in the class header. By putting the word protected in the class definition, you are saying that inherited members that are public are instead going to be protected. Because the DumpInfo member is protected, you can’t call it from main. However, DumpInfo is still public in the FrozenPizza class, so this call is fine:
pepperoni.DumpInfo();
Go ahead and change the line back to a public inheritance as it was in Listing 1-1:
class DeepDishPizza : public FrozenPizza
And now change the header of FrozenPizza, so it looks like this:
class FrozenPizza : private FrozenFood
Again, make sure you change the right lines. Now try compiling the program. When we do so in CodeBlocks, we get the following error:
In function `int main(int, char**)’:|
error: `void FrozenPizza::DumpInfo()’ is inaccessible|
error: within this context|
error: `FrozenPizza’ is not an accessible base of `DeepDishPizza’|
error: `int FrozenFood::GetPrice()’ is inaccessible|
error: within this context|
error: `FrozenFood’ is not an accessible base of `DeepDishPizza’|
This error refers to the line inside DeepDishPizza::DumpDensity where the code is trying to access the Weight member. Why doesn’t the compiler let us access the member now? Because the member, which was public in the original FrozenFood class, became private when it became a part of FrozenPizza. And because it’s private in FrozenPizza, the derived class DeepDishPizza cannot access it from within its own member functions. Remember: The rule with private members is that derived classes will not have access to them. And that was the case here.
Overriding member functions
One of the cool things about classes is that you can declare a member function in one class, and then when you derive a new class, you can give that class a different version of the same function. This is called overriding the function. For example, if you have a class FrozenFood and a derived class FrozenPizza, you may want to include a member function in FrozenFood called BakeChemistry, which modifies the food when it’s baked. Because all foods are different, the BakeChemistry function would be different for each class derived fromFrozenFood.
In C++, you can provide a different version of the function for the different derived classes by dropping the word virtual before the function name in the base class declaration, as in this line of code:
virtual void BakeChemistry();
This line is the prototype inside the class definition. Later, you would provide the code for this function.
In the class for your derived class, you would then just put the function prototype, without the word virtual:
void BakeChemistry();
And as before, you would include the code for the function later on. For example, you might have something like this. First, here are the classes:
class FrozenFood
{
private:
int Price;
protected:
int Weight;
public:
FrozenFood(int APrice, int AWeight);
int GetPrice();
int GetWeight();
virtual void BakeChemistry();
};
class FrozenPizza : public FrozenFood
{
protected:
int Diameter;
public:
FrozenPizza(int APrice, int AWeight, int ADiameter);
void DumpInfo();
void BakeChemistry();
};
You can see that we put the word virtual in the FrozenFood class, and then we put the function declaration again in the FrozenPizza class. Now here are the BakeChemistry functions:
void FrozenFood::BakeChemistry()
{
cout << “Baking, baking, baking!” << endl;
}
void FrozenPizza::BakeChemistry()
{
cout << “I’m getting crispy!” << endl;
}
Note we did not put the word virtual in front of the functions; that only goes in the class declaration. Now, when you make an instance of each class and call BakeChemistry for each instance, you call the one for the given class. Consider the following two lines of code:
FrozenPizza pepperoni(450, 12, 14);
pepperoni.BakeChemistry();
Because pepperoni is an instance of FrozenPizza, this code calls the BakeChemistry for the FrozenPizza class, not for the FrozenFood class.
You may not want any code in your base class for the BakeChemistry function. If so, you can do this:
virtual void BakeChemistry() {}
Wait! Now why would you want a function that has no code? Well, we’re not as goofy as we look. Okay, we are goofy. But regardless, you may not want any code here, but you do want code in the derived classes, and you want them to be different versions of the same code. The idea then is to provide a basic, default set of code that the classes inherit if they don’t override the function. And sometimes, that basic, default set of code is simply nothing. And so, you would just put an open brace and a closing brace, and you can do that inside the class itself:
class FrozenFood
{
private:
int Price;
protected:
int Weight;
public:
FrozenFood(int APrice, int AWeight);
int GetPrice();
int GetWeight();
virtual void BakeChemistry() {}
};
Some people prefer to put the word virtual in the overridden function’s prototype in the derived class. Technically speaking, this step is not required, although many people who have been programming in C++ for a long time do this. You can if you want, if you think that it looks cool. We do it for one reason besides looking cool: It reminds us that the function is virtual. Thus, in the FrozenPizza class definition, your function prototype would look like this, just as it did in the FrozenFood class:
virtual void BakeChemistry();
Specializing with polymorphism
Suppose you have a function called Bake, and you want it to take as a parameter a FrozenFood instance. If you derive FrozenPizza from FrozenFood and then derive DeepDishPizza from FrozenPizza, then by the “is a” rule, objects of the class FrozenPizza andDeepDishPizza are both examples of FrozenFood objects. This is true in general: If you have a class called Base and you derive from that a class called Derived, instances of class Derived are also instances of class Base. Think of it like a family name. If your last name is Swaddlebug and you have a child who grows up, marries, and takes the name Higglequack, then although the child bears the name Higglequack, at heart he or she is and always will be a Swaddlebug.
And so it is with frozen foods and C++, too. You can treat an object of any class derived from FrozenFood as if it is a FrozenFood instance. Therefore, if you have a function called Bake and you declare it as follows, you are free to pass to this function a FrozenFood instance or to pass an instance of any class derived from FrozenFood, such as FrozenPizza or DeepDishPizza:
void Bake(FrozenFood *)
{
cout << “Baking” << endl;
}
But here’s where the fun begins: Suppose that in this Bake function you’re going to set the oven temperature to a fixed amount, turn on the oven, and then cook the food. Every food behaves differently in the oven. For example, a deep-dish frozen pizza might rise and become thicker, but a regular frozen pizza will become crispier but not get any thicker.
Now you don’t really want to put all the different food types inside the Bake function, with a million if statements: If it’s this type of food, have it rise; if it’s that type of food, have it brown; and if it’s another type of food, have it scream and yell. Instead — and this is where things start to get seriously cool — you can put the actual baking chemistry in the class for the food itself! Yes! The FrozenPizza would have its own BakeChemistry member function, and the DeepDishPizza would also have its own BakeChemistry function. Then the Bakefunction would simply call BakeChemistry for whatever object it receives as a parameter! And how does C++ know how to do this? By virtue of the virtual functions! The BakeFunction itself doesn’t even know or care what type of FrozenFood it receives. It just callsBakeChemistry for whatever object it receives. And thanks to the miraculous beauty of C++, it automatically calls the correct BakeChemistry function, whether it’s the one for FrozenPizza or the one for DeepDishPizza or even a class that you add later when you modify the program! And when you modify the program, if you write a new class and derive it from Frozen Food and give it its own BakeChemistry function, then you can pass an instance of this class to Bake, without even having to modify Bake! In other words, you don’t need to tellBake about this class! Isn’t that great! Can you tell we’re excited?
In short, what this means is that the Bake function can take an object of class FrozenFood (or any class derived from FrozenFood) and call its BakeChemistry function. Each class can have its own version of BakeChemistry, and the computer will call the appropriateBakeChemistry function. This whole process is called polymorphism.
Polymorphism is one of the most powerful aspects of object-oriented programming. The idea is that you can expand and enhance your program by simply adding new classes derived from a common base class. Then you have to make very few (if any) modifications to the rest of your program. Because you used virtual functions and polymorphism, the rest of your program automatically understands the new class you created. In essence, you are able to snap in the new class, and the program will run just fine.
Getting abstract about things
When you create a base class with a virtual function and then derive other classes, you may want to override the virtual function in all the derived classes. Furthermore, you may want to make sure that nobody — and we mean nobody — ever creates an instance of the base class!
Now, why would you do that? Because the base class might contain basic things that are common to all the other classes, but the class itself doesn’t make much sense as an instance. For example, we want you to go to the store and pick up a frozen food. We hear they’re on sale at the grocery store down the street. We like the purple kind. See, it doesn’t make much sense to have an instance of a class called FrozenFood. What kind of frozen food? Well, it could be a (you guessed it!) FrozenPizza, or even better, a DeepDishPizza. But by itself, aFrozenFood item isn’t realistic.
Philosophers have a word for such things: abstract. The class FrozenFood is abstract; it doesn’t make sense to create an instance of it. In C++, you can make a class abstract, but when you do, the compiler will not allow you to make any instances of the class.
Now this is where things get a little strange: In C++, you don’t actually specify that the class itself is abstract. The word abstract does not appear in the language. Instead, you have to be, well, more abstract about it. To specify that the class is abstract, you must have at least one virtual function that has no code. But instead of just putting an empty code block, as in {}, you follow the function prototype in the class definition with = 0, as in:
class FrozenFood
{
private:
int Price;
protected:
int Weight;
public:
FrozenFood(int APrice, int AWeight);
int GetPrice();
int GetWeight();
virtual void BakeChemistry() = 0;
};
In this class definition, the function BakeChemistry has = 0 after it (but before the semicolon — don’t forget the semicolon). The = 0 magically transforms the virtual function into an abstract virtual function. And if you have an abstract virtual function inside you, then, face it, you are an abstract class. No ifs, ands, or buts. You’re abstract.
 This is the rule for creating an abstract class: You must have at least one abstract virtual function in your class. If you don’t, the class will not be abstract, and users of the class will be able to create instances of it. But if you do have at least one abstract virtual function, the compiler will issue an error message when you and other users try to create an instance of the class.
In your extensive travels throughout the virtual world of C++, you are likely to encounter a slightly different term for abstract virtual function. That term is pure virtual function. Although the name sounds all pristine and pure, it means the same thing. You can use either term.
So now that you have your abstract class and can’t make an instance of it, are you home free? Nope. Now in your derived classes, you must override the abstract virtual function. Otherwise, the derived classes will also be abstract. And when your class is abstract, you can’t create instances of it.
To override the abstract virtual function, you override as you would with any virtual function. This class includes a function that overrides the BakeChemistry function:
class FrozenPizza : public FrozenFood
{
protected:
int Diameter;
public:
FrozenPizza(int APrice, int AWeight, int ADiameter);
void DumpInfo();
void BakeChemistry();
};
Then you provide the code for the BakeChemistry function, as in
void FrozenPizza::BakeChemistry()
{
cout << “I’m getting crispy under this heat!” << endl;
}
There’s nothing magical about defining the override function, but you are required to override it if you want to create an instance of this class.
Discovering Classes
In your studies of object-oriented programming, you could spend weeks and weeks searching for the answer to this question: How do you know what classes to put in your program? Oddly, many of the books on object-oriented programming don’t even tackle this question. Too many people, even self-proclaimed experts, simply don’t know the answer to this question.
In this section, we show you how to discover the classes you need for your project, and we put the concepts in the context of the bigger picture of software engineering.
Engineering your software
Ready to write your program? Okay, sit down and start coding. And call us in six months. Oh, and in case we forgot to mention, this software that you build has to do exactly what we, your customers, need. And please, please don’t let it mess up, okay?
Well now isn’t that nice? How are you supposed to know what we need, and much less, how are you supposed to get it perfect the first time? Yet, believe it or not, many young programmers build their software this way. The shoot-from-the-hip approach goes something like this:
1. “Hey! I have a really great idea!”
2. Open up the compiler.
3. Write the code.
4. Sell it.
And people wonder why so many programs crash and screw up. Have you ever seen a program mess up? Who hasn’t? But fortunately, your software doesn’t have to be in this group! You have, in your hands, an instruction guide for building software.
When you have a great idea, the first thing you need to ask yourself is this: Who will be using your software? You? Your friends? Business people? Children? People at home? Teachers? Non-profit agencies? Airline pilots? Doctors in the middle of surgery? Hackers? The dog?
Ask yourself this question and be honest. The truth is this: No software package will be used by everyone. Yes, certain programs are used by a lot of people. Examples of this are the software that runs the telephone system or the software in your cable TV box. But even then, we could probably find a couple dozen people on some island somewhere who will never use your software. So when you answer this question, be realistic. And be as detailed as possible. For example, one answer might be the following: This software will be used by VPs and CEOs at Fortune 500 companies who need to divide time between surfing the Web and playing solitaire.
Once upon a time, people believed that, to create software, you should create a complete model that duplicates the real world. But people designing software quickly realized a slight, shall we say, difficulty in this approach: What if the real-world process you’re modeling is, frankly, screwed up and a total joke? Want to find out for sure? Ask the workers who actually use the process you’re trying to computerize. And this spawned an interesting profession that a lot of computer programmers took up: Business process reengineering. Sounds pretty cool. “What do you do?” “I’m a business process reengineer.” “Cool. We bet you have a big house.”
Business process reengineering simply means helping a company fix its internal processes so that they actually function correctly. And we’re talking about the actual processes, not just the computer software they use. One of the creators of the software modeling language we advocate in this book (UML), a guy named Ivar Jacobson, even wrote one of the early great books on business process reengineering. (And we suppose he probably does have a big house, although we’ve never seen it.)
It boils down to this: When you model a process, you may find inefficiencies in the process. So you probably won’t want to model the process exactly. Besides, if the process were exactly the same, why bother? The computer should make the process better. So think of ways that the people who use your software will find that it not only automates what they do but makes their life easier, too. Here are the steps, then, to engineering your software.
 The following are the general steps in building good software. Each step is called a workflow. As you gain experience, you will get better at actually doing these steps. Like anything else in the real world, building software that works and is good requires practice and patience.
1. Determine who will be using the software and gather the requirements. In other words, find out what the people who will be using it need the software to do. This is called the requirements workflow. In doing so, build a glossary of terms. That’s important! The glossary contains all the words involved in the process you are modeling. For instance, if you are writing the software that will automate a beach, you will probably encounter terms such as surfboard, sand castle, high tide, undertow, shark, broken glass, foot, swimsuit, umbrella, volleyball, net, andvolleyball court. These are all nouns. But your glossary can also have verbs (possibly with a noun tacked on to the end — that’s called a direct object, by the way), as in dive, swim, ward off shark, avoid broken glass, rent umbrella, and throw volleyball.
2. Next, begin the analysis workflow. To do this, determine your analysis classes. For more information on this, see “Finding those pesky classes,” later in this chapter. Note that while doing this, you may realize some things were missing or not quite right in Step 1. That’s okay — you can go back to Step 1 and fix things. Then, after you fix things in Step 1, you can return to Step 2. And remember that in this workflow, you are not worrying about the details of how you’re going to be writing the code. In fact, you won’t be writing any code here, nor will you be worrying about things like how you will be storing your files, how you’re going to sort a list of numbers, and so on. Save all that for the implementation workflow described in Step 4. Here, you’re just designing some classes. After you have your analysis classes, have the people who will be using the software (or at least some of them if there are millions) review your classes and see if these are the general parts of the software they imagined.
During this second step, you can do one thing related to programming: Design some screens. Although many of the textbooks on object-oriented analysis and design do not put that step here, doing so has many benefits. First, it allows you to show the potential users of the program what the program might look like when it’s finished. And this allows them to begin analyzing whether or not what you’re building will be useful. (And if they don’t find it useful, don’t quit and don’t yell at them. They are, after all, using this thing and paying you mondo-big bucks, so do what they want and laugh all the way to the bank.) And second, doing this lets you show them that, yes, you really are building software and not just surfing the Web.
3. Now comes the design workflow. This is where you take the analysis classes and begin building the classes you will use in your program. For this stage, you use UML notation and describe the classes in your program, how they all interact, and the steps that various processes in your program take. You can start thinking about the code now, but you still won’t actually write any code! And by the way, it’s very possible (or even likely) that you’ll discover that something you did in Step 2 or 3 is wrong, or at least not quite right. If so . . . that’s right — go ahead and return to those steps and fix the things. But if you go back to Step 2, please revisit Step 3 before coming back to Step 4. You may end up having to change some things there, too.
4. And finally the implementation workflow has arrived! That’s just a fancy term for coding time. Now that you’ve made it this far, you will realize that much of your work is already completed. The first several steps took care of much of the hard work, and now you can do the fun part of focusing on the coding part. And once again, you may have to backtrack a few steps if you find some things that aren’t quite right.
5. But you’re not finished yet. Nope. Can anyone guess what comes next? That’s right: the testing workflow. During this workflow, you try to use your program in all the possible ways you intended it to be used. And you can also choose a few other people who you trust to use it. We say trust because this is a vital stage of your software. You want to make sure that the people who test it really know what they’re doing and are going to seriously put the program through the wringer. And further, you want these people to give you honest, objective comments, not things like, “You messed up! You’re fired!” Rather, you want them to report actual problems and difficulties they found in the software so that you, the programmer, can fix them. But remember: Having others help you test your program is to your benefit. Just like editing your own papers; you are likely to miss certain things, and having at least one more set of eyes and fingers trying it out is a good thing.
Our experience in the testing world tells us that most of the bugs you and the other testers find result in you going back to Step 4 and working on the coding to fix problems. However, occasionally you find you have to backtrack to Step 3, or even once in a while to Step 2. But that’s okay: Your goal is to build the software and build it correctly.
Finding those pesky classes
When you set out to determine the classes to use in your program as part of the analysis workflow, the first thing you end up with is a set of analysis classes. These are not classes in a final form that you would type into an editor and compile as a C++ program. Rather, they are more of a descriptive style that depict what you are modeling. Then, after you have these classes, you move to the design workflow of your development: That’s when you refine the class descriptions you can easily transform into C++ code.
People use three general ways to determine the classes. None of these approaches are perfect; if they were, a computer could program itself automatically. (Assuming that somebody programmed the computer to program, but that’s a separate philosophy altogether, something we won’t get into here.) Here are the three general ways people discover classes:
♦ Look at the glossary you developed during the requirements workflow, searching out the nouns and the verbs.
♦ Use CRC cards, which stands for Class, Responsibilities, and Collaborators (as described in “Using CRC cards,” later in this chapter).
♦ Look for hidden or missing classes.
We recommend doing all three; or do either of the first two along with the final one. The final item on the list is important in case you missed anything.
Searching for nouns and verbs
As much as it sounds like a drag, searching for nouns and verbs is actually a fun process. Not all computer programmers are known for their love for the English language. (There are exceptions, and we tend to write books!), but you don’t have to be a grammar whiz to make it through this stage.
First, go through the glossary and any other documents you accumulated during the requirements workflow, and begin making two lists: all the important nouns and all the important verbs.
After you have compiled your list, think about which of the nouns are particularly important; for instance, some nouns may be major aspects of the program. If you’re writing a program that models a grocery store, for example, cash register is probably a pretty important noun. If you’re writing a program to control an intergalactic space ship, everybody knows that the antigravity booster is vital. These, then, are good candidates for classes. You will make most of the remaining nouns characteristics in your classes. (Remember that, ultimately, characteristics and capabilities will be member variables and functions, but you’re not thinking about programming at this point.) If, however, you find a characteristic that just doesn’t seem to work with any class, you probably want to make it a class as well. Finally, the verbs will become the capabilities of the classes. You should not have any capabilities that are without a class: Either you don’t need the capability, or you are probably missing a class. Go ahead and add it.
Using CRC cards
People love CRC (Class, Responsibilities, and Collaborators) cards because they find that creating them is fun. Big corporations like to do this type of thing during team-building exercises to help employees get along. In addition to climbing ropes and such, they design software with CRC cards.
People often use sticky notes for CRC cards, although we usually just draw them on a whiteboard. (But we’re not supposed to admit that because our fellow object-oriented people will be angry with us.)
A CRC card consists of three parts. The top part is the name of the class. The left side shows the responsibilities (what we call capabilities) of the class. The right side features the collaborations, which means you just list other classes that this class works together with. For example, an antigravity booster class certainly works together with a high-energy proton accelerator class, as everybody knows. You list the names of these classes on the right side of the card because they are collaborations.
 Some people prefer to put their CRC cards as sticky notes right on a whiteboard; then instead of writing the names of the related classes on the right side of the card, they just draw a line between the cards. You can either list the classes or draw lines, whichever you like best.
By coming up with collaborations, you will spot missing classes. For example, because you know that the antigravity booster works with a high-energy proton accelerator, when you fill in the collaborators for the antigravity booster class, you will know whether you forgot about the high-energy proton accelerator class.
Look for hidden or missing classes
It’s possible that when you do a class analysis, you will have left out some classes. Some of these missing classes may not be obvious, and to find them, you will probably have to get back with the people who helped suggest requirements. This is a good time to have them review the classes. Remember, the classes that you are building right now are not final classes ready for C++. Instead, these are less technical classes that are understandable by people who don’t program. Therefore, the people who offered the requirements and the people who will be using the program can probably look over the classes and help you determine if you are missing anything. After you determine that you have missing classes, go ahead and add them by making another CRC card.
Completing the analysis with the design workflow
After you have your classes, you can move to the design workflow and write the classes in UML form. This is a simple form in that you will have a box with the class name at the top followed by the characteristics of the class and finally followed by the capabilities of the class. (Refer to Figure 1-3 for an example of a class in this form.) These are the classes you will use in the coding phase (implementation workflow), where you actually transform them into real, breathing C++ classes. The remaining chapters in this minibook show you how to do all this!
All materials on the site are licensed Creative Commons Attribution-Sharealike 3.0 Unported CC BY-SA 3.0 & GNU Free Documentation License (GFDL)
If you are the copyright holder of any material contained on our site and intend to remove it, please contact our site administrator for approval.
© 2016-2025 All site design rights belong to S.Y.A.