Introduction to Game Design, Prototyping, and Development (2015)
Part IV: Appendices
Appendix B. Useful Concepts
This appendix is full of concepts that will help you be a better and more effective prototyper and programmer. Some of these are code concepts, others are methodologies. These are collected here in an appendix to make them easier for you to reference later when you look back at this book in the coming years.
Topics Covered
This appendix covers several different topics, categorized into four distinct groups and sorted alphabetically (rather than attempting to sort them conceptually). Many of these include Unity code examples, and others point you to specific parts of the book where the concept is used.
![]() C# and Unity coding concepts
C# and Unity coding concepts
![]() Bitwise Boolean operators and layer masks
Bitwise Boolean operators and layer masks
![]() Coroutines
Coroutines
![]() Enum
Enum
![]() Function delegates
Function delegates
![]() Interfaces
Interfaces
![]() Naming conventions
Naming conventions
![]() Operator precedence and order of operations
Operator precedence and order of operations
![]() Race conditions
Race conditions
![]() Recursive functions
Recursive functions
![]() Software design patterns: singleton, factory, and strategy
Software design patterns: singleton, factory, and strategy
![]() Variable Scope
Variable Scope
![]() XML
XML
![]() Math concepts
Math concepts
![]() Sine and cosine
Sine and cosine
![]() Dice probability
Dice probability
![]() Dot product
Dot product
![]() Interpolation
Interpolation
![]() Linear interpolation
Linear interpolation
![]() Time-based linear interpolations
Time-based linear interpolations
![]() Linear interpolations using Zeno’s Paradox
Linear interpolations using Zeno’s Paradox
![]() Interpolating more than just position
Interpolating more than just position
![]() Linear extrapolation
Linear extrapolation
![]() Easing for linear interpolations
Easing for linear interpolations
![]() Bézier curves
Bézier curves
![]() A recursive Bézier curve function
A recursive Bézier curve function
![]() Roleplaying games
Roleplaying games
![]() Tips for running a good roleplaying campaign
Tips for running a good roleplaying campaign
![]() User interface concepts
User interface concepts
![]() Axis and button mapping for Microsoft controllers
Axis and button mapping for Microsoft controllers
![]() Right-click on OS X
Right-click on OS X
C# and Unity Coding Concepts
This section covers elements of C# coding that you may want to look back at for a refresher after you’ve finished the book. There are also some here that, though important, didn’t fit well into one of the regular chapters. For convenience, these have all been collected into this appendix.
Bitwise Boolean Operators and Layer Masks
As you learned in Chapter 20, “Boolean Operations and Conditionals,” a single pipe ( | ) can be used as a non-shorting conditional OR operator, and a single ampersand ( & ) can be used as a nonshorting conditional AND operator. However, when dealing with ints, they have another important feature. | and & can be used to perform bitwise operations on integers, and are therefore sometimes referred to as bitwise OR and bitwise AND.
In a bitwise operation, the individual bits of an integer are compared using one of the 6 bitwise operators included in C#. The following list of them includes the effect that they would have on an 8-bit byte (a simple integral type of data that can hold numbers from 0 to 255). The operations work the same way on a 32-bit int (but 32-bits wouldn’t have fit on this page).

In Unity, bitwise operations are most often used to manage LayerMasks. Unity allows developers to define up to 32 different layers, and a LayerMask is a 32-bit integer representation of which layers to consider in any physics engine or raycast operation. In Unity, the variable type LayerMask is used for LayerMasks, but it is just a wrapper for a 32-bit int with a little additional functionality. When using a LayerMask, any bit that is a 1 represents a layer that is seen, and any bit that is a 0 represents a layer that is ignored (that is, masked). This can be very useful if you want to check collision against only a specific layer of objects or if you wish to specify a layer to ignore. (For example, the built-in layer 2, named Ignore Raycast, is automatically masked out for all raycast tests.)
Unity has eight reserved “built-in” layers, and all GameObjects are initially placed in the zeroth (0th) layer, which is named Default. The remaining layers, numbered 8 through 31, are referred to as User Layers, and giving one of these a name will place it in any pop-up menu of layers (for example, the Layer pop-up menu at the top of each GameObject Inspector).
Because the layer numbers start at zero, the bitwise LayerMask representation of not masking the zeroth layer is a 1 in the farthest-right position of the LayerMask. (See the variable lmZero in the following code listing.) This can be a bit confusing (because the integer value of this representation is 1, not 0), so many Unity developers use the bitwise shift left operator (<<) to assign LayerMask values. (For example, 1<<0 generates the value 1, which is the zeroth layer, and 1<<4 generates a 1 in the proper place to mask all but the fourth physics layer.) The following code listing includes more examples:
1 LayerMask lmNone = 0; // 00000000000000000000000000000000 bitwise // 1
2 LayerMask lmAll = ~0; // 11111111111111111111111111111111 bitwise // 2
3 LayerMask lmZero = 1; // 00000000000000000000000000000001 bitwise
4 LayerMask lmOne = 2; // 00000000000000000000000000000010 bitwise // 3
5 LayerMask lmTwo = 1<<2; // 00000000000000000000000000000100 bitwise // 4
6 LayerMask lmThree = 1<<3; // 00000000000000000000000000001000 bitwise
7
8 LayerMask lmOneOrThree = lmZero | lmTwo; // 5
9 // This creates 00000000000000000000000000000101 bitwise
10
11 LayerMask lmZeroThroughThree = lmZero | lmOne | lmTwo | lmThree;
12 // This creates 00000000000000000000000000001111 bitwise
13
14 lmZero = 1 << LayerMask.NameToLayer("Default"); // 6
15 // This creates 00000000000000000000000000000001 bitwise
1. When all bits are set to 0, the LayerMask will ignore all layers.
2. When all bits are set to 1, the LayerMask will interact with all layers.
3. The integer value of a 1 in the second place of a LayerMask is 2, which demonstrates how it can get confusing to assign LayerMask values by integer value.
4. Using the shift left operator makes more sense in this case because the 1 is shifted two places to the left for the second physics layer.
5. A bitwise OR is used to collide with either layer 0 or layer 2.
6. The static method LayerMask.NameToLayer() will return a layer number when it is passed a layer name. This is used as shown on line 14.
Coroutines
A coroutine is a feature of C# that allows a method to pause in the middle of execution, allow other methods to execute, and then return to execution. This is used in the “Dice Probability” section of this appendix because the function to calculate all the possible outcomes of rolling many dice could take so long to execute that it would appear to the user that the computer was frozen. Coroutines can also be used as timers for tasks that you want to happen on a certain schedule (as an alternative to using an InvokeRepeating call).
Unity Example
In this example, we want to print the time every second. If we used the Update() method to print the time, it would print dozens of times per second, which is far too many.
Create a new Unity project. Then create a C# script named Clock, attach it to Main Camera, and enter this code:
using UnityEngine;
using System.Collections;
public class Clock : MonoBehaviour {
// Use this for initialization
void Start () {
StartCoroutine(Tick());
}
// All coroutines have a return type of IEnumerator
IEnumerator Tick() {
// This infinite while loop will keep the print happening until the
// coroutine is halted or the program is stopped
while (true) {
print(System.DateTime.Now.ToString());
// This yield statement tells the coroutine to wait about 1 second
// before continuing. Coroutine timing is not perfectly exact.
yield return new WaitForSeconds(1);
}
}
}
There are a few different kinds of yield statements:
yield return null; // Will continue as soon as possible
yield return new WaitForSeconds(10); // Will wait 10 seconds
yield return new WaitForEndOfFrame(); // Will wait until the next frame
yield return new WaitForFixedUpdate(); // Will wait until the next fixed update
Coroutines are used in the prototypes for Chapters 33-35.
Enum
Enum is a simple way to declare a type of variable that only has a few specific options, and it is used throughout the book. Enums are declared outside of class definitions.
public enum PetType {
none,
dog,
cat,
bird,
fish,
other
}
public enum Gender {
unspecified
female,
male
}
Later, a variable within a class can be declared using the enum’s type (for example, public PetType in the following code listing). The various options for an enum are referred to by the enum type, a dot, and the enum option (for example, PetType.dog):
public class Pet {
public string name = "Flash";
public PetType pType = PetType.dog;
public Gender gender = Gender.male;
}
Enums are actually integers masquerading as other values, so they can be cast to int (as shown on lines 7 and 8 in the following code listing). This also means that an enum will default to the 0th option if not explicitly set. For example, using the preceding definition of the enum Gender, declaring a new variable Gender gen; would automatically assign gen the default value of Gender.unspecified.
1 public class Pet {
2 public string name = "Flash";
3 public PetType pType = PetType.dog;
4 public Gender gender = Gender.male;
5
6 void Awake() {
7 int i = (int) PetType.cat; // i would equal 2 // 1
8 PetType pt = (PetType) 4; // pt would equal PetType.fish // 2
9 }
10 }
1. The code (int) shown on line 7 is an explicit typecast that forces PetType.cat to be interpreted as an int. This is similar to the as GameObject keyword and type that is used as part of Instantiate() statements in Unity, but the explicit typecast is more low-level and can be used on simple data types like ints. (The as keyword can only be used on instances of classes.)
2. Here, the int literal 4 is explicitly typecast to a PetType by the code(PetType).
Enums are often used in switch statements (as you’ve seen throughout this book).
Function Delegates
A function delegate is most simply thought of as a container for similar functions (or methods) that can all be called at once. Delegates can be used to implement a strategy pattern, which is a software design pattern frequently used by game developers to define different AI strategies to be used by the same artificial intelligence (AI) agent when it encounters disparate circumstances. Strategy pattern is described in the “Software Design Patterns” section of this appendix.
The first step of using a function delegate is to define the type of the delegate. The type sets the parameters and return values for both the delegate and the functions it will contain.
public delegate float FloatOperationDelegate( float f0, float f1 );
The preceding line creates a FloatOperationDelegate delegate definition that takes two floats as input and returns a single float. Once the definition is set, you can define target methods that fit this delegate definition:
using UnityEngine;
using System.Collections;
public class DelegateExample : MonoBehaviour {
// Create a delegate definition named FloatOperationDelegate
// This defines the parameter and return types for target functions
public delegate float FloatOperationDelegate( float f0, float f1 );
// FloatAdd must have the same parameter and return types as
// FloatOperationDelegate
public float FloatAdd( float f0, float f1 ) {
float result = f0+f1;
print("The sum of "+f0+" & "+f1+" is "+result+".");
return( result );
}
// FloatMultiply must have the same parameter and return types as well
public float FloatMultiply( float f0, float f1 ) {
float result = f0 * f1;
print("The product of "+f0+" & "+f1+" is "+result+".");
return( result );
}
}
Now, a variable of the type FloatOperationDelegate can be created, and either of the target functions can be assigned to it. Then, this delegate variable can be called just like a function (see the delegate field fod in the following syntax).
public class DelegateExample : MonoBehaviour {
public delegate float FloatOperationDelegate( float f0, float f1 );
public float FloatAdd( float f0, float f1 ) { ... }
public float FloatMultiply( float f0, float f1 ) { ... }
// Declare a field "fod" of the type FloatOperationDelegate
public FloatOperationDelegate fod; // A delegate field
void Awake() {
// Assign the method FloatAdd() to fod
fod = FloatAdd;
// Call fod as if it were a method; fod then calls FloatAdd()
fod( 2, 3 ); // Prints: The sum of 2 & 3 is 5.
// Assign the method FloatMultiply() to fod, replacing FloatAdd()
fod = FloatMultiply;
// Call fod(2,3); it calls FloatMultiply(2,3), returning 6
fod( 2, 3 ); // Prints: The product of 2 & 3 is 6
}
}
Delegates can also be multicast, which means that more than one target method can be assigned to the delegate. This is the ability we count on to fire our weapons in the Chapter 30, “Prototype 3: Space SHMUP,” prototype where a single call to the fireDelegate() delegate in turn calls all of the Fire() methods of the weapons on the player’s ship. If the multicast delegate has a return type that is not void (as in our example), the final target method called will be the one to return a value. However, if a delegate is called without having any functions attached, it will throw an error. Prevent this by first checking to see whether it is null.
void Awake() {
// Assign the method FloatAdd() to fod
fod = FloatAdd;
// Add the method FloatMultiply(), now BOTH are called by fod
fod += FloatMultiply;
// Check to see whether fod is null before calling
if (fod != null) {
// Call fod(3,4); it calls FloatAdd(3,4) & then FloatMultiply(3,4)
float result = fod( 3, 4 );
// Prints: The sum of 3 & 4 is 7.
// then Prints: The product of 3 & 4 is 12.
print( result );
// Prints: 12
// Thie result is 12 because the last target method to be called
// is the one that returns a value via the delegate.
}
}
Interfaces
An interface declares methods and properties that will then be implemented by a class. Any class that implements the interface can be referred to in code as that interface type rather than as its actual class type. This differs from subclassing in several ways, one of the most interesting of which is that a class may implement several different interfaces simultaneously, where a class can only extend a single superclass.
Unity Example
Create a new project in Unity. In that project, create a C# Script named Menagerie and enter the code that follows:
using UnityEngine;
using System.Collections;
using System.Collections.Generic;
// Two enums to set specific options for fields in classes
public enum PetType {
none,
dog,
cat,
bird,
fish,
other
}
public enum Gender {
female,
male
}
// The Animal interface declares two public properties and two public methods
// that all Animals must have
public interface Animal {
// Public Properties
PetType pType { get; set; }
Gender gender { get; set; }
// Public Methods
void Move();
string Speak();
}
// Fish implements the interface Animal
public class Fish : Animal {
private PetType _pType = PetType.fish;
private Gender _gender;
public PetType pType {
get { return( _pType ); }
set { _pType = value; }
}
public Gender gender {
get { return( _gender ); }
set { _gender = value; }
}
public void Move() {
Debug.Log("The fish swims around.");
}
public string Speak() {
return("...!");
}
}
// Mammal is a superclass that will be extended by Dog and Cat
public class Mammal {
protected Gender _gender;
public Gender gender {
get { return( _gender ); }
set { _gender = value; }
}
}
// Dog is a subclass of Mammal AND implements Animal
// Because Dog is a subclass of Mammal, it inherits the protected field _gender
// and the public property gender. If _gender had been private, Dog would not
// have been able to inherit it.
public class Dog : Mammal, Animal {
private PetType _pType = PetType.dog;
public PetType pType {
get { return( _pType ); }
set { _pType = value; }
}
public void Move() {
Debug.Log("The dog walks around.");
}
public string Speak() {
return("Bark!");
}
}
// Cat is a subclass of Mammal AND implements Animal
public class Cat : Mammal, Animal {
private PetType _pType = PetType.cat;
public PetType pType {
get { return( _pType ); }
set { _pType = value; }
}
public void Move() {
Debug.Log("The cat stalks around.");
}
public string Speak() {
return("Meow!");
}
}
// Menagerie is a subclass of MonoBehaviour
public class Menagerie : MonoBehaviour {
// This list can take instances of ANY class that implements Animal
public List<Animal> animals;
void Awake () {
animals = new List<Animal>();
Dog d = new Dog();
d.gender = Gender.male;
// When d is added to Animal, it is added as an Animal, not a Dog
animals.Add( d );
animals.Add( new Cat() );
animals.Add( new Fish() );
// In this loop, all Animals are treated the same way, even though they
// work differently
for (int i=0; i<animals.Count; i++) {
animals[i].Move();
print("Animal #"+i+" says: "+animals[i].Speak());
switch (animals[i].gender) {
case Gender.female:
print("Animal #"+i+" is female.");
break;
case Gender.male:
print("Animal #"+i+" is male.");
break;
}
}
}
}
As you can see in the code, having the Animal interface allows the Cat, Dog, and Fish classes to all be treated in the same way and stored in the same List<Animal> even though two are subclasses of Mammal and one is a class that doesn’t extend anything. For an example of how this is used in a project, take a look at Chapter 35, “Prototype 8: Omega Mage.”
Naming Conventions
Naming conventions were initially covered in Chapter 19, “Variables and Components,” but they’re important enough to repeat here. The code in this book follows a number of rules governing the naming of variables, functions, classes, and so on. Although none of these rules are mandatory, following them will make your code more readable not only to others who try to decipher it but also to yourself if you ever need to return to it months later and hope to understand what you wrote. Every coder follows slightly different rules—my personal rules have even changed over the years—but the rules I present here have worked well for both me and my students, and they are consistent with most C# code that I’ve encountered in Unity:
1. Use camelCase for pretty much everything. In a variable name that is composed of multiple words, camelCase capitalizes the initial letter of each word (except for the first word, in the case of variable names).
2. Variable names should start with a lowercase letter (e.g., someVariableName).
3. Function names should start with an uppercase letter (e.g., Start(), FunctionName()).
4. Class names should start with an uppercase letter (e.g., GameObject, ScopeExample).
5. Private variable names can start with an underscore (e.g., _hiddenVariable).
6. Static variable names can be all caps with snake_case (e.g., NUM_INSTANCES). As you can see, snake_case combines multiple words with an underscore in between them.
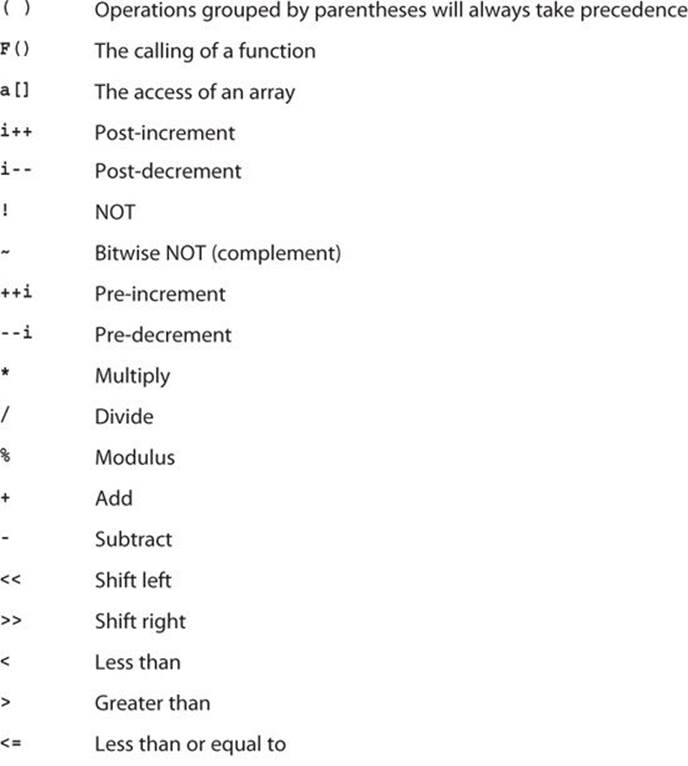
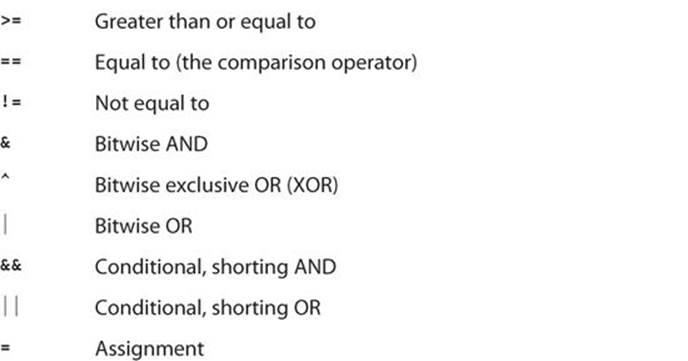
Operator Precedence and Order of Operations
Just as in algebra, some operators in C# take precedence over others. One example that you are probably familiar with is the precedence of * over + (for example, 1 + 2 * 3 is 7 because the 2 and 3 are multiplied before the 1 is added to them). Here is a list of common operators and their precedence. An operator that is higher in this list will happen before one that is lower.
Race Conditions
Unlike many of the other topics in this section, a race condition is something that you definitely don’t want in your code. A race condition occurs when it is necessary in your code for one thing to happen before another, but it’s possible that the two things could happen out of order and cause unexpected behavior or even a crash. Race conditions are a serious consideration when designing any code that is meant to be run on multiprocessor computers, multithreaded operating systems, or networked applications (where different computers around the world could possibly end up in a race condition with each other), but they can also be an issue in the simple Unity games that we write.
Let’s create an example.
Unity Example
Follow these steps:
1. Create a new Unity project named Unity-RaceCondition. Create a C# script named SetValues and enter this code:
1 using UnityEngine;
2 using System.Collections;
3
4 public class SetValues : MonoBehaviour {
5 static public int[] VALUES;
6
7 void Start() {
8 VALUES = new int[] { 0, 1, 2, 3, 4, 5 };
9 }
10
11 }
2. Create a second script named ReadValues and enter this code into it:
1 using UnityEngine;
2 using System.Collections;
3
4 public class ReadValues : MonoBehaviour {
5
6 void Start() {
7 print( SetValues.VALUES[2] );
8 }
9
10 }
3. Create two cubes in the scene and name them Cube0 and Cube1. Attach the SetValues script to Cube0 and the ReadValues script to Cube1.
Now, when you try to play the scene as we’ve created it, you will most likely encounter an error message in the Console pane. I say “most likely” because one of the things that makes race conditions difficult is the unpredictability of them occurring one way or another. If you don’t get the error, try moving SetValues to Cube1 and ReadValue to Cube0. Even if you’re not seeing the error, please continue reading.
NullReferenceException: Object reference not set to an instance of an object ReadValues.Start () (at Assets/ReadValues.cs:7)
If you double-click the error message, it should take you to line 7 of ReadValues.cs. (Your line number may differ slightly.)
print( SetValues.VALUES[2] );
4. Let’s use the debugger to learn more about what’s causing the error. Add a breakpoint next to the print line of ReadValues.cs and attach the debugger to Unity. If you need a refresher on the debugger, read Chapter 24, “Debugging.”
5. When you run the project (in Unity) with the debugger attached, it will freeze on your breakpoint immediately before executing that line. We know that something’s wrong with this line, and as a NullReferenceException, we know that we’re trying to access some variable that isn’t yet defined. Let’s look at each variable and see what’s happening. Open the Watch pane in MonoDevelop (View > Debug Windows > Watch from the menu bar; there should be already a check mark next to it, and selecting it again will bring the Watch pane to the front). The only variable used in this line is SetValues.VALUES, so type SetValues.VALUES into a line of the Watch window, and you’ll be able to see its value. As we expected, VALUES isn’t defined; that is, it’s currently null. But we know that VALUES is supposed to be defined in SetValues.Start(). You can see the code that does so just a few lines above. The only way that VALUES could not be defined is if SetValues.Start() hasn’t run yet, and that’s exactly what has happened.
This is a race condition. SetValues.Start() defines SetValues.VALUES, but ReadValues.Start() is possibly trying to use that field before it has been set. We know that Start() is called on each GameObject before the first Update() the GameObject receives, but it is unclear in what order various objects are called. I believe that it might happen in the order that the objects are added to the Hierarchy, but I’m not certain of that. In fact, I’m not even sure if you’re encountering the same error that I am because it’s possible that your Start() methods may be called in a different order from mine.
This is the major problem with race conditions. The two Start() functions are racing against each other. If one is called first, your code works fine, but when the other is called first, everything breaks. Regardless of whether your code happens to be working, this is an issue that you need to resolve.
This is one reason that there is a difference between the Awake() and Start() methods in a MonoBehaviour. Awake() is called immediately when a GameObject is instantiated, whereas Start() is called immediately before the first Update() that the GameObject receives. This can be a difference of several milliseconds, which for a computer program is a very long time. Even if you have a number of objects in your Hierarchy, you can be guaranteed that Awake() will be called on all of them before Start() is called on any of them. Awake() will always happen before Start() as long as both objects are added to your scene in the same frame (or are there from the beginning as Cube0 and Cube1 are).
Knowing this, take a look back at the original error. The error is happening because of the race between the two Start() functions. To fix this, move the one that needs to happen first into an Awake() method instead. Replace line 7 of the SetValues script as shown in the following code listing. You will need to click the Stop button in the MonoDevelop debugger (or select Run > Stop from the MonoDevelop menu bar) as well as stop playback in Unity before changing the SetValues code:
1 using UnityEngine;
2 using System.Collections;
3
4 public class SetValues : MonoBehaviour {
5 static public int[] VALUES;
6
7 void Awake() {
8 VALUES = new int[] { 0, 1, 2, 3, 4, 5 };
9 }
10
11 }
Now, the SetValues.Awake() method will definitely be called before the ReadValues.Start() method, and the race condition is resolved.
Recursive Functions
A function that is designed to call itself repeatedly is known as a recursive function. One simple example of this is calculating the factorial of a number.
In math, 5! (5 factorial) is the multiplication of that number and every other natural number below it:
5! = 5 * 4 * 3 * 2 * 1 = 120
It is a special case that 0!=1, and the factorial of a negative number will be 0 for our purposes:
0! = 1
We can write a recursive function to calculate the factorial of any integer:
1 void Awake() {
2 print( fac (-1) ); // Prints 0
3 print( fac (0) ); // Prints 1
4 print( fac (5) ); // Prints 120
5 }
6
7 int fac( int n ) {
8 if (n < 0) { // This keeps it from breaking if n<0
9 return( 0 );
10 }
11 if (n == 0) { // This is the "terminal case"
12 return( 1 );
13 }
14 int result = n * fac( n-1 );
15 return( result );
16 }
When fac(5) is called in the preceding code, and the code reaches the 14th line, fac() is called again on n-1, which is now 4. This process continues with fac() called four more times until it reaches the terminal case at fac(0) and then begins to return values. The chain of recursion resolves something like this:
fac(5)
5 * fac(4)
5 * 4 * fac(3)
5 * 4 * 3 * fac(2)
5 * 4 * 3 * 2 * fac(1)
5 * 4 * 3 * 2 * 1 * fac(0)
5 * 4 * 3 * 2 * 1 * 1
5 * 4 * 3 * 2 * 1
5 * 4 * 3 * 2
5 * 4 * 6
5 * 24
120
The best way to really understand what’s happening in this recursive function is to place a breakpoint at line 14, connect the MonoDevelop debugger to the Unity Process, and use Step In to watch the recursion happen step by step. (If you need a refresher on the debugger, read Chapter 24.)
A Recursive Function for Bézier Curves
Another fantastic example of a recursive function is the Bézier curve interpolation static method (named Bezier) that is included in the ProtoTools Utils class as part of the unitypackage imported at the beginning of Chapters 31 through 35. This function can interpolate the position of a point along a Bézier curve composed of any number of points. The code for the Bezier function is listed at the end of the “Interpolation” section of this appendix.
Software Design Patterns
In 1994, the “Gang of Four” (Erich Gamma, Richard Helm, Ralph Johnson, and John Vissides) released the book Design Patterns: Elements of Reusable Object-Oriented Software,1 which described various patterns that could be used in software development to create effective, reusable code. This book uses two of those patterns and refers to a third.
1 Erich Gamma, Richard Helm, Ralph Johnson, and John Vissides, Design Patterns: Elements of Reusable Object-Oriented Software (Reading, MA: Addison-Wesley, 1994). The Factory Pattern is one of many described in the book. Others include the Singleton Pattern, which is used in many of the tutorials in this book.
Singleton Pattern
The Singleton Pattern is the most commonly used in this book and can be found in Chapters 26, 27, and 29-35. If you know that there will only ever be a single instance of a given class in the game, you can create a singleton for that class, which is a static variable of that class type that can be used to reference it from anywhere in code. The following code listing shows an example:
1 public class Hero : MonoBehaviour {
2 static public Hero S; // 1
3
4 void Awake() {
5 S = this; // 2
6 }
7 }
1 public class Enemy {
2
3 void Update() {
4 public Vector3 heroLoc = Hero.S.transform.position; // 3
5 }
6
7 }
1. The static public field S is the singleton for hero. I personally name all of my singletons S.
2. Because there will only ever be one instance of the Hero class, it is assigned to S on Awake(), when the instance is created.
3. Because S is both public and static, it can be referenced anywhere in code via the class name as Hero.S.
Factory Pattern
Factory Pattern is used and described in Chapter 35. In short, Factory Pattern uses an interface to define a group of similar classes, and then a factory function is created that can return one of those objects based on the arguments passed into it. In Omega Mage, this is used to choose from amongst different possible enemy types that can be placed in a level. The enemies are very different classes, but they both implement the same Enemy interface, so the factory can return any of them. To learn more about interfaces, see the “Interfaces” section in this appendix. To see how Factory Pattern is used in a project, look at Chapter 35.
Strategy Pattern
As mentioned in the “Function Delegates” section of this appendix, the Strategy Pattern is often used in AI and other areas where you may want to change behavior based on conditions yet still only call a single function delegate. In the Strategy Pattern, a function delegate is created for a type of action that the class can perform (for example, taking an action in combat), and an instance of that delegate is given values and called based on the situation. This avoids complicated switch statements in the code, because the delegate can be called in a single line:
1 using UnityEngine;
2 using System.Collections;
3
4 public class Strategy : MonoBehaviour {
5 public delegate void ActionDelegate(); // 1
6
7 public ActionDelegate act; // 2
8
9 public void Attack() {} // 3
10 // Attack code would go here
11 }
12
13 public void Wait() { ... }
14 public void Flee() { ... }
15
16 void Awake() {
17 act = Wait; // 4
18 }
19
20 void Update() {
21 Vector3 hPos = Hero.S.transform.position;
22 if ( (hPos - transform.position).magnitude < 100 ) {
23 act = Attack; // 5
24 }
25
26 if (act != null) act(); // 6
27 }
28 }
1. The ActionDelegate delegate type is defined. It has no parameters and a return type of void.
2. act is created as an instance of ActionDelegate.
3. The Action(), Wait(), and Flee() functions here are placeholders that are meant to show that various actions would be defined that matched the parameters and return type of the ActionDelegate delegate type.
4. The initial strategy for this agent is to Wait.
5. If the hero singleton comes within 100 meters of this agent, it will switch its strategy to Attack by replacing the target method of the act function delegate.
6. Regardless of which strategy is selected, act() is called to execute it. It is useful to check that act != null before calling it because calling a null function delegate (that is, one that has not yet had a target function assigned to it) will cause a runtime error.
Variable Scope
The scope of variables is an important concept in any programming language. A variable’s scope refers to how much of the code is aware of the variable’s existence. Global scope would mean that any code anywhere could see and reference the variable, whereas local scope means that the variable’s scope is limited in some way, and it can’t be seen by everything else in the code. If a variable is local to a class, then only other things within the class can see it. If a variable is local to a function, then it only exists within that function and is destroyed once the function has completed.
The following code demonstrates several different levels of scope for different variables within a single class. Numbered comments after the code explain what is happening on important lines.
using UnityEngine;
using System.Collections;
public class ScopeExample : MonoBehaviour {
// public fields (public class variables)
public bool trueOrFalse = false; // 1
public int graduationAge = 18;
public float goldenRatio = 1.618f;
// private fields (private class variables)
private bool _hiddenVariable = false; // 2
private float _anotherHiddenVariable = 0.5f;
// protected fields (protected class variables)
protected int partiallyHiddenInt = 1; // 3
protected float anotherProtectedVariable = 1.0f;
// static public fields (static public class variables)
static public int NUM_INSTANCES = 0; // 4
static private int NUM_TOO = 0; // 5
void Awake() {
trueOrFalse = true; // Works: assigns "true" to trueOrFalse // 6
print( trueOrFalse ); // Works: prints "true"
int ageAtTenthReunion = graduationAge + 10; // Works // 7
print( _anotherHiddenVariable ); // Works // 8
NUM_INSTANCES += 1; // Works // 9
NUM_TOO++; // Works //10
}
void Update() {
print( ageAtTenthReunion ); // ERROR //11
float ratioed = 1f; // Works
for (int i=0; i<10; i++) { // Works //12
ratioed *= goldenRatio; // Works
}
print( ratioed ); // Works
print( i ); // ERROR //13
}
}
public class SubScopeExample : ScopeExample { //14
void Start() {
print( trueOrFalse ); // Works: prints "true" //15
print( partiallyHiddenInt ); // Works: prints "1" //16
print( _hiddenVariable ); // ERROR //17
print( NUM_INSTANCES ); // Works //18
print( NUM_TOO ); // ERROR //19
}
}
1. Public fields: The three variables here are all public fields. All fields are class variables, meaning that they are declared as part of the class and are visible to all functions within that class. Because these fields are public, the subclass SubScopeExample also has a public variabletrueOrFalse. Public variables can also be seen by anything else in code that has a reference to an instance of ScopeExample. This would allow a function with the variable ScopeExample se to see the field se.trueOrFalse.
2. Private fields: These two variables are private fields. Private fields can only be seen by this instance of ScopeExample. The subclass SubScopeExample does not have a private field _hiddenVariable. A function with the variable ScopeExample se would not be able to see or access the field se.hiddenVariable.
3. Protected fields: A field marked protected is between public and private. The SubScopeExample subclass does have a protected field partiallyHiddenInt. However, a function with the variable ScopeExample se would not be able to see or access the fieldse.partiallyHiddenVariable.
4. Static fields: A static field is a field of the class itself, not the instances of the class. This means that NUM_INSTANCES is accessed as ScopeExample.NUM_INSTANCES. This is the closest thing to global scope that I use in C#. Any script in my code can accessScopeExample.NUM_INSTANCES, and NUM_INSTANCES is the same for all instances of ScopeExample. A function with the variable ScopeExample se could not access se.NUM_INSTANCES, but it could access ScopeExample.NUM_INSTANCES. The SubScopeExample subclass of ScopeExample can also access NUM_INSTANCES.
5. NUM_TOO is a private static class variable, which means that all instances of ScopeExample share the same value of NUM_TOO, but no other class can see it or access it. The SubScopeExample subclass cannot access NUM_TOO.
6. The // Works comment means that this line executes without any errors. trueOrFalse is a public field of ScopeExample, so this method of ScopeExample can access it.
7. This line declares and defines a variable named ageAtTenthReunion that is locally scoped to the method Start(). This means that once the Start() function has finished executing, the variable ageAtTenthReunion will cease to exist. Also, nothing outside of this function can see or access ageAtTenthReunion.
8. As a private field _anotherHiddenVariable can only be seen by methods within instances of this class.
9. Within a class, static public fields can be referred to by their name, meaning that the Start() method can reference NUM_INSTANCES without needing the class name before it.
10. NUM_TOO can be accessed anywhere within the ScopeExample class.
11. This line throws an error because ageAtTenthReunion was a local variable of the method Start() so it has no meaning in Update().
12. The variable i declared and defined in this for loop is locally scoped to the for loop. This means that i ceases to have meaning when the for loop has completed.
13. This line throws an error because i has no meaning outside of the preceding for loop.
14. This line declares and defines SubScopeExample as a subclass of ScopeExample. As a subclass, SubScopeExample has access to the public and protected fields of ScopeExample but not to the private fields. Because SubScopeExample does not have its own Awake() or Update()functions defined, it will run the versions defined in its base class, ScopeExample.
15. trueOrFalse is public, so SubStaticField has inherited a trueOrFalse field. Additionally, because the base class (ScopeExample) version of Awake() has run by the time Start() is called on SubScopeExample, trueOrFalse has been set to "true" by the Awake()method.
16. SubScopeExample also has a protected partiallyHiddenInt field that it inherited from ScopeExample.
17. _hiddenVariable was not inherited from ScopeExample because it is private.
18. NUM_INSTANCES is accessible by SubScopeExample because as a public variable, it is inherited from the base class ScopeExample. Additionally, the two classes share the same value for NUM_INSTANCES, so if one instance of each class were instantiated, NUM_INSTANCESwould be 2 regardless of whether it were accessed from ScopeExample or SubScopeExample.
19. As a private static variable, NUM_TOO is not inherited by SubScopeExample. However, it’s worth noting that even though NUM_TOO is not inherited, when SubScopeExample is instantiated and runs the base class version of Awake(), the Awake() method can access NUM_TOOwithout errors then because the base class version is running within the scope of the ScopeExample class even though it’s actually running on an instance of SubScopeExample.
These 19 notes have include both very simple and very complex examples of variable scope. If some if it didn’t make sense to you, that’s okay. You can come back and read it later once you’ve used C# some more and have more specific scope questions.
XML
XML (Extensible Markup Language) is a file format that is designed to be both flexible and human-readable. Here is an example of some XML from Chapter 31, “Prototype 4: Prospector Solitaire.” Additional spaces have been added to make it a little more readable, but that is okay because XML will generally treat any number of spaces or line breaks as a single space.
<xml>
<!-- decorators are the suit and rank in the corners of each card. -->
<decorator type="letter" x="-1.05" y="1.42" z="0" flip="0" scale="1.25"/>
<decorator type="suit" x="-1.05" y="1.03" z="0" flip="0" scale="0.4" />
<decorator type="suit" x="1.05" y="-1.03" z="0" flip="1" scale="0.4" />
<decorator type="letter" x="1.05" y="-1.42" z="0" flip="1" scale="1.25"/>
<!-- A list of all cards that defines where pips are placed. -->
<card rank="1">
<pip x="0" y="0" z="0" flip="0" scale="2"/>
</card>
<card rank="2">
<pip x="0" y="1.1" z="0" flip="0"/>
<pip x="0" y="-1.1" z="0" flip="1"/>
</card>
</xml>
Even without knowing much at all about XML, you should be able to read this somewhat. XML is based on tags (also known as the markup of the document), which are the words between the two angle brackets (for example, <xml>, <card rank="2">). Most XML elements have anopening tag (e.g., <xml>) and a closing tag that contains a forward slash immediately after the opening angle bracket (e.g., </xml>). Anything between the opening and closing tags of an element is said to be the content of that element.
There are also empty-element tags, which are tags that serve as both the opening and closing tag with no content between them. For example, <card rank="1" /> is a single empty-element tag. In general, XML files should start with <xml> and end with </xml>, so everything in the XML document is content of the <xml> element.
XML tags can have attributes, which are like fields in C#. The empty-element <pip x="0" y="1.1" z="0" flip="0"/> that is seen in the XML listing includes x, y, z, and flip attributes.
In an XML file, anything between <!-- and --> is a comment and is therefore ignored by any program that is reading the XML file. In the preceding XML listing, you can see that I use them the same way that I use comments in C# code.
There is a robust XML reader included in C# .NET, but I have found it to be very large (it adds about 1 MB to the size of your compiled application, which is a lot if you’re making something for mobile) and unwieldy (using it is not simple). So, I’ve included a much smaller (though not at all as robust) XML interpreter called PT_XMLReader in the ProtoTools scripts that are part of the unitypackage imported at the beginning of Chapters 31 through 35. For an example of its use, take a look at Chapter 31.
Math Concepts
A lot of people cringe when they hear the word math, but that really doesn’t need to be the case. As you’ll see throughout this book, there are some really cool things that can be done with math. Here in this appendix, I cover just a few great math concepts that can help you in game development.
Sine and Cosine (Sin and Cos)
Sine and cosine are functions that convert an angle value Θ (theta) into a point along a wave shape that ranges from -1 to 1. They are shown in Figure B.1.
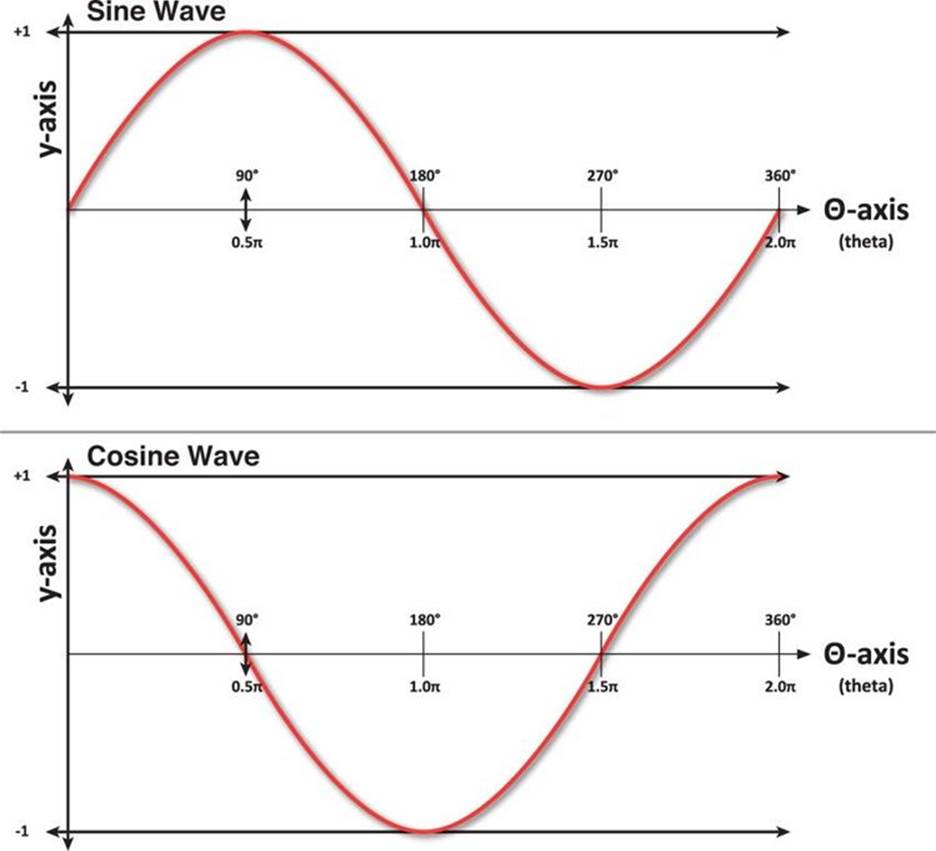
Figure B.1 The traditional representations of sine and cosine
But sine and cosine are much more than just waves; they’re descriptions of the relationship of x and y when going around a circle. I’ll demonstrate what I mean with some code.
Unity Example
Follow these steps:
1. Open Unity and create a new scene. Create a new sphere in the scene (GameObject > Create Other > Sphere). Set Sphere’s transform to P:[0,0,0], R:[0,0,0], S:[0.1, 0.1, 0.1]. Add a TrailRenderer to Sphere. (Select Sphere in the Hierarchy and choose Component > Effects > Trail Renderer from the menu bar.)
2. Open the disclosure triangle next to Materials in the Sphere:TrailRenderer Inspector and click the circle to the right of Element 0 to select Default-Particle as the texture for the TrailRenderer. Set Time = 1, StartWidth = 0.1, and EndWidth = 0.1 as well.
3. Create a new C# script named Cyclic. Attach it to Sphere in the Hierarchy. Then open the Cyclic script in MonoDevelop, and enter this code:
using UnityEngine;
using System.Collections;
public class Cyclic : MonoBehaviour {
public float theta = 0;
public bool showCosX = false;
public bool showSinY = false;
public bool ________________;
public Vector3 pos;
public Color[] colors;
void Awake() {
// Define some Colors to use
colors = new Color[] {
new Color(1f, 0f, 0.0f),
new Color(1f, 0.5f, 0.0f),
new Color(1f, 1f, 0.0f),
new Color(0.5f, 1f, 0.0f),
new Color(0f, 1f, 0.0f),
new Color(0f, 1f, 0.5f),
new Color(0f, 1f, 1.0f),
new Color(0f, 0.5f, 1.0f),
new Color(0f, 0f, 1.0f),
new Color(0.5f, 0f, 1.0f),
new Color(1f, 0f, 1.0f),
new Color(1f, 0f, 0.5f),
new Color(1f, 0f, 0.0f) };
}
void Update () {
// Calculate radians based on time
float radians = Time.time * Mathf.PI;
// Convert radians to degrees to show in the Inspector
// The "% 360" limits the value to the range from 0-359.9999
theta = Mathf.Round( radians * Mathf.Rad2Deg ) % 360;
// Reset pos
pos = Vector3.zero;
// Calculate x & y based on cos and sin respectively
pos.x = Mathf.Cos(radians);
pos.y = Mathf.Sin(radians);
// Use sin and cos if they are checked in the Inspector
Vector3 tPos = Vector3.zero;
if (showCosX) tPos.x = pos.x;
if (showSinY) tPos.y = pos.y;
// Position this.gameObject (the Sphere)
transform.position = tPos;
}
void OnDrawGizmos() {
if (!Application.isPlaying) return;
// Choose the color based on where we are in the circle
float cIndexFloat = (theta/180f)%1f * (colors.Length-1);
int cIndex = Mathf.FloorToInt(cIndexFloat);
float cU = cIndexFloat % 1.0f; // Get just the decimal bit
Gizmos.color = Color.Lerp( colors[cIndex], colors[cIndex+1], cU );
// Show individual Sin and Cos aspects using Gizmos
Vector3 cosPos = new Vector3( pos.x, -1f-(theta/360f), 0 );
Gizmos.DrawSphere(cosPos, 0.05f);
if (showCosX) Gizmos.DrawLine(cosPos, transform.position);
Vector3 sinPos = new Vector3( 1f+(theta/360f), pos.y, 0 );
Gizmos.DrawSphere(sinPos, 0.05f);
if (showSinY) Gizmos.DrawLine(sinPos, transform.position);
}
}
4. Before pressing Play, set the Scene pane to 2D by clicking the 2D button at the top of the Scene pane. Press Play, and you will see that the sphere doesn’t initially move, but there are colored circles moving below and to the right of the sphere. (You may need to zoom out to see them.) The circle on the right follows the wave defined by Mathf.Sin(theta), and the circle below follows the Mathf.Cos(theta) wave.
If you check showCosX in the Sphere:Cyclic (Script) Inspector, Sphere will start moving in the X direction following a cosine wave. You can see how the X motion of Sphere is connected directly to the cosine motion of the bottom wave. Uncheck showCosX and check showSinY. Now, you can see how the Y motion of Sphere is connected to the sine wave. If you check both showCosX and showSinY, Sphere will move in the circle defined by combining x = cos(theta) and y = sin(theta). A full circle is 360°, or 2p radians (that is, 2 * Mathf.PI).
This connection is also shown in Figure B.2, which uses the same colors as those in the Unity example.
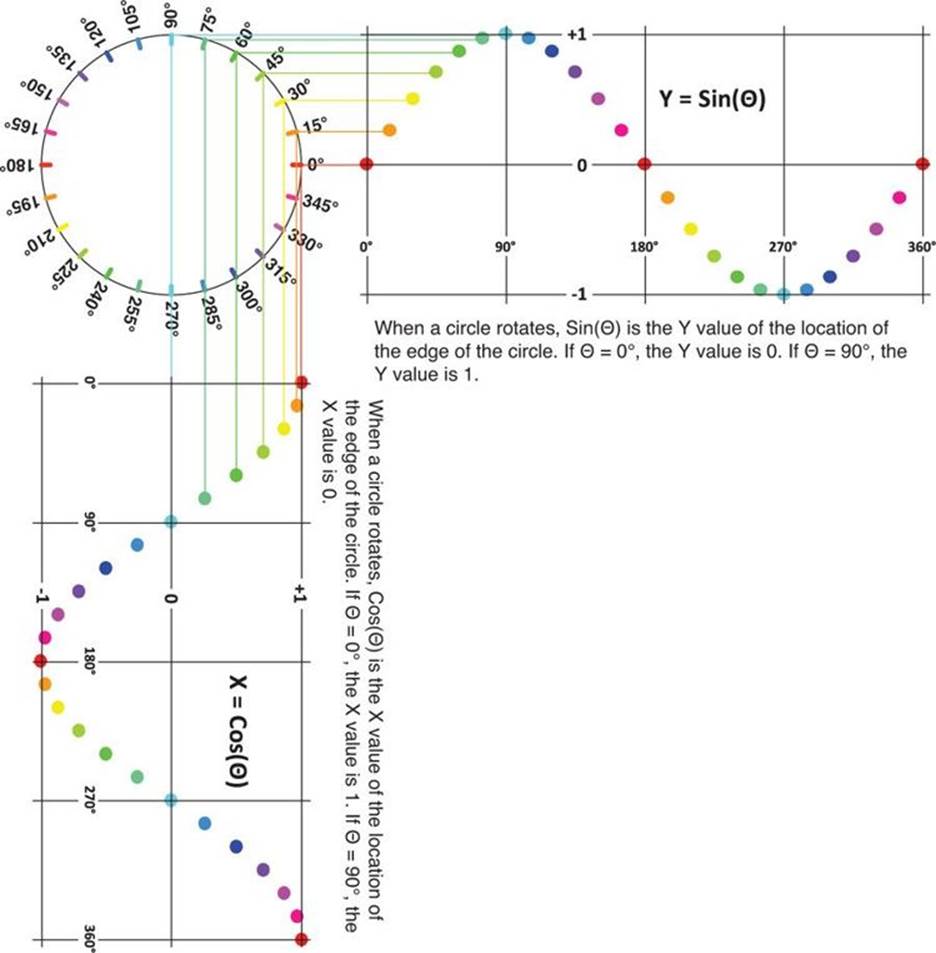
Figure B.2 The relationship of sine and cosine to a circle
This means that you can use sine and cosine for all sorts of circular or cyclic behavior!
These properties of sine and cosine are used in the Chapter 35, Omega Mage, game prototype to orbit the element around the Mage’s head and in the Chapter 30 Space SHMUP, prototype to define wavy movement for the Enemy_1 enemy type and to adjust the linear interpolation easing of the Enemy_2 type (see the “Interpolation” section in this appendix for information about linear interpolation and easing).
Dice Probability
Chapter 11, “Math and Game Balance,” covered Jesse Schell’s Rule #4 of probability: Enumeration can solve difficult mathematical problems. Here is a quick Unity program that will enumerate all the possibilities for any number of dice with any number of sides. However, beware that each die you add drastically increases the number of calculations that must be done (for example, 5d6 [five six-sided dice] take six times longer to calculate than 4d6 and 36 times longer to calculate than 3d6).
Unity Example
Follow these steps to create an example:
1. Start a new Unity project. Create a new C# script named DiceProbability and drag it onto the Main Camera in the Scene pane. Open DiceProbability and enter this code:
using UnityEngine;
using System.Collections;
public class DiceProbability : MonoBehaviour {
public int numDice = 2;
public int numSides = 6;
public bool checkToCalculate = false;
// ^ When you set checkToCalculate to true, this will start calculating
public int maxIterations = 10000;
// ^ The maximum number of iterations to perform in a single cycle of the
// CalculateRolls() coroutine
public float width = 16;
public float height = 9;
public bool ________________;
public int[] dice; // An array of the values of each die
public int[] rolls; // An array storing how many times a roll has come up
// ^ For 2d6 this would be [ 0, 0, 1, 2, 3, 4, 5, 6, 5, 4, 3, 2, 1 ],
// meaning that a 2 was rolled once while a 7 was rolled 6 times.
void Awake() {
// Set up the main camera to properly display the graph
Camera cam = Camera.main;
cam.backgroundColor = Color.black;
cam.isOrthoGraphic = true;
cam.orthographicSize = 5;
cam.transform.position = new Vector3(8, 4.5f, -10);
}
void Update() {
if (checkToCalculate) {
StartCoroutine( CalculateRolls() );
checkToCalculate = false;
}
}
void OnDrawGizmos() {
float minVal = numDice;
float maxVal = numDice*numSides;
// If the rolls array is not ready, return
if (rolls == null || rolls.Length == 0 || rolls.Length != maxVal+1) {
return;
}
// Draw the rolls array
float maxRolls = Mathf.Max(rolls);
float heightMult = 1f/maxRolls;
float widthMult = 1f/(maxVal-minVal);
Gizmos.color = Color.white;
Vector3 v0, v1 = Vector3.zero;
for (int i=numDice; i<=maxVal; i++) {
v0 = v1;
v1.x = ( (float) i - numDice ) * width * widthMult;
v1.y = ( (float) rolls[i] ) * height * heightMult;
if (i != numDice) {
Gizmos.DrawLine(v0,v1);
}
}
}
public IEnumerator CalculateRolls() {
// Calculate max value (the maximum possible value that could be rolled
// on the dice (for example, for 2d6 maxValue = 12)
int maxValue = numDice*numSides;
// Make the array large enough to hold all possible values
rolls = new int[maxValue+1];
// Make an array with an element for each die. All are preset to a value
// of 1 except for the first die which is set to 0 (to make the
// method RecursivelyAddOne() work properly)
dice = new int[numDice];
for (int i=0; i<numDice; i++) {
dice[i] = (i==0) ? 0 : 1;
}
// Iterate on the dice.
int iterations = 0;
int sum = 0;
// Usually, I avoid while loops because they can lead to infinite loops,
// but because this is a coroutine with a yield in the while loop, it's
// not as big of a problem.
while (sum != maxValue) {
// ^ the sum will == maxValue when all dice are at their maximum value
// Increment the 0th die in the dice Array
RecursivelyAddOne(0);
// Sum all the dice together
sum = SumDice();
// and add 1 to that position in the rolls array
rolls[sum]++;
// add to iterations and yield
iterations++;
if (iterations % maxIterations == 0) {
yield return null;
}
}
print("Calculation Done");
string s = "";
for (int i=numDice; i<=maxValue; i++) {
s += i.ToString()+"\t"+rolls[i]+"\n";
}
int totalRolls = 0;
foreach (int i in rolls) {
totalRolls += i;
}
s += "\nTotal Rolls: "+totalRolls+"\n";
print(s);
}
// This is a recursive method, meaning that it calls itself. You can read
// about recursive methods more later in this appendix.
public void RecursivelyAddOne(int ndx) {
if (ndx == dice.Length) return; // We've exceeded the length of dice
// Array, so just return
// Increment the die at position ndx
dice[ndx]++;
// If this exceeds the capacity of the die...
if (dice[ndx] > numSides) {
dice[ndx] = 1; // then set this die to 1...
RecursivelyAddOne(ndx+1); // and increment the next die
}
return;
}
public int SumDice() {
// Sum the values of all the dice in the dice array
int sum = 0;
for (int i=0; i<dice.Length; i++) {
sum += dice[i];
}
return(sum);
}
}
2. To use the DiceProbability enumerator, press Play and then select Main Camera in the Hierarchy pane. In the Main Camera:Dice Probability (Script) Inspector, you can set numDice (the number of dice) and numSides (the number of sides for each die) and then clickcheckToCalculate to calculate the probability of any specific number coming up on those dice. Unity will enumerate all the possible results and then output the results to the Console pane. Try it first with 2 dice of 6 sides each (2d6) and you’ll get these results in the console (you will have to select the console message to see more than the first two lines):
2 1
3 2
4 3
5 4
6 5
7 6
8 5
9 4
10 3
11 2
12 1
Total Rolls: 36
UnityEngine.MonoBehaviour:print(Object)
<CalculateRolls>c__Iterator0:MoveNext() (at Assets/DiceProbability.cs:110)
UnityEngine.MonoBehaviour:StartCoroutine(IEnumerator)
DiceProbability:Update() (at Assets/DiceProbability.cs:34)
3. Next, try 8d6. You’ll see that this takes a lot longer to calculate and that the results (and the curve graph) progressively update each time the coroutine yields (see the “Coroutines” section in this appendix).
Now, any time you want to know the probability of something like rolling a 13 on 8d6, you can figure it out through enumeration. (It’s 792/1,679,616 = 11/23,328 ≈ 0.00047 ≈ 0.05%.) In addition, this code could be tweaked to choose random rolls every time and give you a practical probability instead of the theoretical probability that is currently produced.
Dot Product
Another extremely useful math concept is the dot product. A dot product of two vectors is the result of multiplying the respective x, y, and z components of each vector together and adding the results as shown in the following pseudocode listing:
1 Vector3 a = new Vector3( 1, 2, 3 );
2 Vector3 b = new Vector3( 4, 5, 6 );
3 float dotProduct = a.x*b.x + a.y*b.y + a.z*b.z; // 1
4 // dotProduct = 1*4 + 2*5 + 3*6
5 // dotProduct = 4 + 10 + 18
6 // dotProduct = 32
7 dotProduct = Vector3.Dot(a,b); // This is the real way to do it in C# // 2
1. Line 3 shows a manual calculation of the dot product of Vector3s a and b.
2. Line 7 shows the same calculation performed using the built-in static method Vector3.Dot().
At first, this may not seem very important, but it has another extremely useful property: The float that the dot product returns is also equivalent to a.magnitude * b.magnitude * Cos(Θ) where Θ is the angle between the two vectors, as shown in Figure B.3.
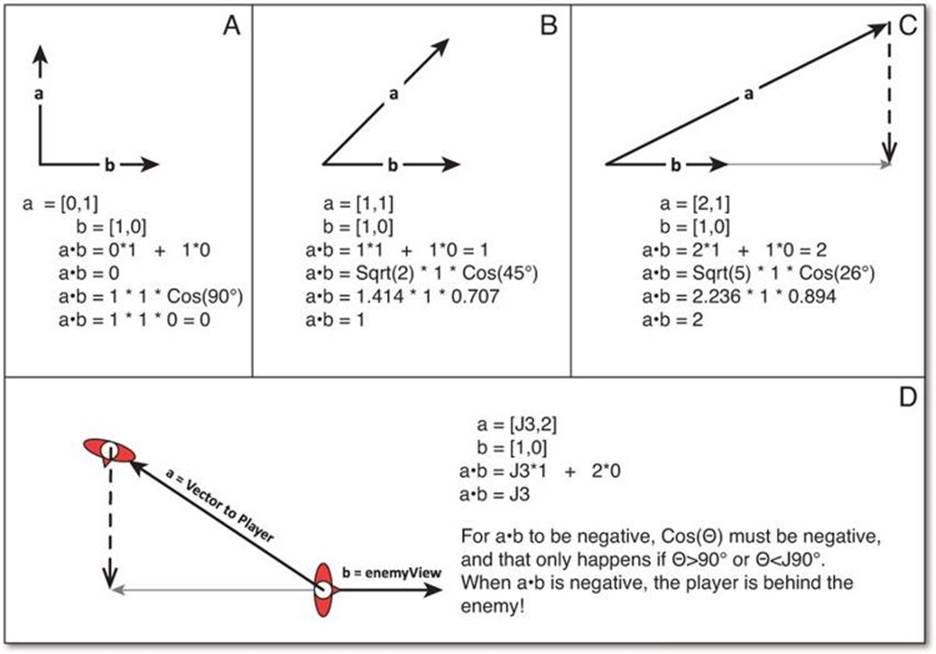
Figure B.3 Dot product examples (decimal numbers are approximate values). In the figure, the bullet • denotes the dot product operation.
As you see in Figure B.3.D, this can be used to tell whether an enemy is facing the player character (which can be useful in stealth games). There are several other places that this can be used, and it’s very common in computer graphics programming. In Omega Mage, this is used inEnemySpiker.OnTriggerEnter() to tell whether the EnemySpiker is moving toward or away from the trigger that it hit.
Interpolation
An interpolation refers to any mathematical blending between two values. When I was working as a contract programmer after college, I feel that one of the major reasons I got a lot of job offers was because the motion of elements in my graphics code looked smooth and juicy (to use Kyle Gabler’s term). This was accomplished through the use of various forms of interpolation, easing, and Bézier curves, all of which are presented in this section of the appendix.
Linear Interpolation
A linear interpolation is a way of mathematically defining a new value or position by stating that it is in between two existing values. All linear interpolations follow the same formula:
p01 = (1-u) * p0 + u * p1
In code, this would look something like this:
1 Vector3 p0 = new Vector3(0,0,0);
2 Vector3 p1 = new Vector3(1,1,0);
3 float u = 0.5f;
4 Vector3 p01 = (1-u) * p0 + u * p1;
5 print(p01); // prints: ( 0.5, 0.5, 0 ) the point half-way between p0 & p1
In the preceding code listing, a new point p01 is created by interpolating between the points p0 and p1. The value u ranges in value between 0 and 1. This can happen with any number of dimensions, though we will usually be interpolating Vector3s in Unity.
Time-Based Linear Interpolations
In a time-based linear interpolation, you are guaranteed that the interpolation will complete in a specific amount of time because the u value is based on the amount of time that as passed divided by the total desired duration of the interpolation.
Unity Example
To create a Unity example, do the following:
1. Start a new Unity project named Interpolation Project. Create a cube in the Hierarchy (GameObject > Create Other > Cube). Select Cube in the Hierarchy pane and attach a TrailRenderer to it (Components > Effects > Trail Renderer). Open the Materials array of the TrailRenderer and set Element 0 to the built-in material Default-Particle. (Click the circle to the right of Element 0, and you will see Default-Particle in the list of available materials.)
2. Create a new C# script in the Project pane named Interpolator. Attach it to Cube and then open it in MonoDevelop to enter this code:
using UnityEngine;
using System.Collections;
public class Interpolator : MonoBehaviour {
public Vector3 p0 = new Vector3(0,0,0);
public Vector3 p1 = new Vector3(3,4,5);
public float timeDuration = 1;
// Set checkToCalculate to true to start moving
public bool checkToCalculate = false;
public bool ________________;
public Vector3 p01;
public bool moving = false;
public float timeStart;
// Update is called once per frame
void Update () {
if (checkToCalculate) {
checkToCalculate = false;
moving = true;
timeStart = Time.time;
}
if (moving) {
float u = (Time.time-timeStart)/timeDuration;
if (u>=1) {
u=1;
moving = false;
}
// This is the standard linear interpolation function
p01 = (1-u)*p0 + u*p1;
transform.position = p01;
}
}
}
3. Switch back to Unity and press Play. In the Cube:Interpolator (Script) component, check the box next to checkToCalculate, and Cube will move from p0 to p1 in 1 second. If you adjust timeDuration to another value and then check checkToCalculate again, you will see that Cube will always move from p0 to p1 in timeDuration seconds. You can also change the location of p0 or p1 while Cube is moving, and it will update accordingly.
Linear Interpolations Using Zeno’s Paradox
Zeno of Elea (ca. 490-430 BCE) was a Greek philosopher who proposed a set of paradoxes all having to do with the philosophical impossibility of everyday, commonsense motion.
In Zeno’s Dichotomy Paradox, the question is posed of whether a moving object can ever reach a stationary point. Imagine that a frog is hopping toward a wall. Every hop, he covers half of the remaining distance to the wall. No matter how many times the frog hops, it will still have covered only half of the distance remaining to the wall after its last hop, so it will never reach the wall.
Ignoring the philosophical implications of this, we can actually use a similar concept along with linear interpolation to create a smooth motion that eases toward a certain point. This is used throughout this book to make cameras that smoothly follow various points of interest.
Unity Example
Continuing the same Interpolation Project from before, now add a sphere to the scene (GameObject > Create Other > Sphere) and move it somewhere away from Cube. Create a new C# script in the Project pane named ZenosFollower and attach it to Sphere. Open ZenosFollower in MonoDevelop and enter this code:
using UnityEngine;
using System.Collections;
public class ZenosFollower : MonoBehaviour {
public GameObject poi; // Point Of Interest
public float u = 0.1f;
public Vector3 p0, p1, p01;
// Update is called once per frame
void Update () {
// Get the position of this and the poi
p0 = this.transform.position;
p1 = poi.transform.position;
// Interpolate between the two
p01 = (1-u)*p0 + u*p1;
// Move this to the new position
this.transform.position = p01;
}
}
Save the code and return to Unity. There, set the poi of Sphere:ZenosFollower to be Cube (by dragging Cube from the Hierarchy pane into the poi slot of the Sphere:ZenosFollower (Script) Inspector). Save your scene!
Now, when you press Play, the sphere will move toward the cube. If you select the cube and check the checkToCalculate box, the sphere will continue to follow the cube. You can also move the cube around in the Scene window manually and watch the sphere follow.
Try changing the value of u in the Sphere:ZenosFollower Inspector. Lower values will make it follow more slowly while higher values will make it follow more rapidly. A value of 0.5 would make the sphere cover half of the distance to the cube every frame, which would exactly mimic Zeno’s Dichotomy Paradox (but in practice, this follows far too closely). It is true that with this specific code, the sphere will never get to exactly the same location as the cube, and it’s also true that because this code is not time based, the sphere will follow more closely on fast computers and follow more slowly on slow ones, but this is just meant to be a very quick, simple following script.
Interpolating More Than Just Position
It’s possible to interpolate almost any kind of numeric value. In Unity, this means that we can very easily interpolate values like scale, rotation, and color among others.
Unity Example
This can either be done in the same project as the previous interpolation examples or in a new project:
1. Create two new cubes in the hierarchy named c0 and c1. Make a new material for each (Assets > Create > Material) and name the materials Mat_c0 and Mat_c1. Apply each material to its respective cube by dragging it on top of it. Select c0 and set its position, rotation, and scale to anything you want (as long as it’s visible on screen). Under the c0:Mat_c0 section of the Inspector, you can also set the color to whatever you want. Do the same for c1 and the color of Mat_c1, making sure that c1 and c0 have different positions, rotations, scales, and colors from each other.
2. Add a third cube to the scene, leave it in the default position, and name it Cube01.
3. Create a new C# script named Interpolator2 and attach it to Cube01. Enter this code into Interpolator2:
using UnityEngine;
using System.Collections;
public class Interpolator2 : MonoBehaviour {
public Transform c0, c1;
public float timeDuration = 1;
// Set checkToCalculate to true to start moving
public bool checkToCalculate = false;
public bool ________________;
public Vector3 p01;
public Color c01;
public Quaternion r01;
public Vector3 s01;
public bool moving = false;
public float timeStart;
// Update is called once per frame
void Update () {
if (checkToCalculate) {
checkToCalculate = false;
moving = true;
timeStart = Time.time;
}
if (moving) {
float u = (Time.time-timeStart)/timeDuration;
if (u>=1) {
u=1;
moving = false;
}
// This is the standard linear interpolation function
p01 = (1-u)*c0.position + u*c1.position;
c01 = (1-u)*c0.renderer.material.color +
u*c1.renderer.material.color;
s01 = (1-u)*c0.localScale + u*c1.localScale;
// Rotations are treated differently because Quaternions are tricky
r01 = Quaternion.Slerp(c0.rotation, c1.rotation, u);
// Apply these to this Cube01
transform.position = p01;
renderer.material.color = c01;
transform.localScale = s01;
transform.rotation = r01;
}
}
}
4. Back in Unity, drag c0 from the Hierarchy pane into the c0 field of the Cube01:Interpolator2 (Script) Inspector. Do the same for c1 and the c1 field. Press Play and then click the checkToCalculate check box in the Cube01:Interpolator2 Inspector. You’ll see that Cube01 now interpolates much more than just position.
Linear Extrapolation
All the interpolations we’ve done so far have had u values that ranged from 0 to 1. If you allow the u value to go beyond this range, you get extrapolation (so named because instead of interpolating between two values, it is now extrapolating data outside of the original two points).
Given the initial two points 10 and 20, an extrapolation of u=2 would work as shown in Figure B.4.

Figure B.4 An example of extrapolation
Unity Example
To see this in code, make the following modifications to Interpolator2:
using UnityEngine;
using System.Collections;
public class Interpolator2 : MonoBehaviour {
public Transform c0, c1;
public float uMin = 0;
public float uMax = 1;
public float timeDuration = 1;
// Set checkToCalculate to true to start moving
public bool checkToCalculate = false;
public bool ________________;
public Vector3 p01;
public Color c01;
public Quaternion r01;
public Vector3 s01;
public bool moving = false;
public float timeStart;
// Update is called once per frame
void Update () {
if (checkToCalculate) {
checkToCalculate = false;
moving = true;
timeStart = Time.time;
}
if (moving) {
float u = (Time.time-timeStart)/timeDuration;
if (u>=1) {
u=1;
moving = false;
}
// Adjust u to the range from uMin to uMax
u = (1-u)*uMin + u*uMax;
// ^ Look familiar? We're using a linear interpolation to do so!
// This is the standard linear interpolation function
p01 = (1-u)*c0.position + u*c1.position;
c01 = (1-u)*c0.renderer.material.color +
u*c1.renderer.material.color;
s01 = (1-u)*c0.localScale + u*c1.localScale;
// Rotations are treated differently because Quaternions are tricky
r01 = Quaternion.Slerp(c0.rotation, c1.rotation, u);
// Apply these to this Cube01
transform.position = p01;
renderer.material.color = c01;
transform.localScale = s01;
transform.rotation = r01;
}
}
}
Now, if you just press Play and click the checkToCalculate box on Cube01, you’ll get the same behavior as before. But, try changing uMin to -1 and uMax to 2 in the Cube01:Interpolator2 (Script) Inspector. Now, click checkToCalculate, and you’ll see that the color, position, and scale all extrapolate and go beyond the original range that you set. However, rotation will not extrapolate beyond the rotation of c0 or c1 due to a limitation of the Quaternion.Slerp() method (which does a spherical linear interpolation for rotations). If Slerp() is passed any number below 0 as its u value, it still treats it as 0 (and any number above 1 is treated as 1). If you look at the documentation for Vector3, it also has a Lerp() method that can interpolate between Vector3s, but I never use that function because it also clamps the values of u to the range from 0 to 1 and doesn’t allow extrapolation.
Easing for Linear Interpolations
The interpolations we’ve been doing so far are pretty nice, but they also have a very mechanical feel to them because they start abruptly, move at a constant rate, and then stop abruptly. Happily, there are several different easing functions that can be used to make this movement more interesting. This is most easily explained with a Unity example.
Unity Example
Open Interpolator2 in MonoDevelop and make the following modification:
using UnityEngine;
using System.Collections;
public enum EasingType {
linear,
easeIn,
easeOut,
easeInOut,
sin,
sinIn,
sinOut
}
public class Interpolator2 : MonoBehaviour {
public Transform c0, c1;
public float uMin = 0;
public float uMax = 1;
public float timeDuration = 1;
public EasingType easingType = EasingType.linear;
public float easingMod = 2;
public bool loopMove = true; // Causes the move to repeat
// Set checkToCalculate to true to start moving
public bool checkToCalculate = false;
...
void Update () {
...
if (moving) {
float u = (Time.time-timeStart)/timeDuration;
if (u>=1) {
u=1;
if (loopMove) {
timeStart = Time.time;
} else {
moving = false;
}
}
// Adjust u to the range from uMin to uMax
u = (1-u)*uMin + u*uMax;
// ^ Look familiar? We're using a linear interpolation to do so!
// Easing functions
u = EaseU(u, easingType, easingMod);
// This is the standard linear interpolation function
p01 = (1-u)*c0.position + u*c1.position;
...
}
}
public float EaseU(float u, EasingType eType, float eMod) {
float u2 = u;
switch (eType) {
case EasingType.linear:
u2 = u;
break;
case EasingType.easeIn:
u2 = Mathf.Pow(u, eMod);
break;
case EasingType.easeOut:
u2 = 1 - Mathf.Pow( 1-u, eMod );
break;
case EasingType.easeInOut:
if ( u <= 0.5f ) {
u2 = 0.5f * Mathf.Pow( u*2, eMod );
} else {
u2 = 0.5f + 0.5f * ( 1 - Mathf.Pow( 1-(2*(u-0.5f)), eMod ) );
}
break;
case EasingType.sin:
// Try eMod values of 0.16f and -0.2f for EasingType.sin
u2 = u + eMod * Mathf.Sin( 2*Mathf.PI*u );
break;
case EasingType.sinIn:
// eMod is ignored for SinIn
u2 = 1 - Mathf.Cos( u * Mathf.PI * 0.5f );
break;
case EasingType.sinOut:
// eMod is ignored for SinOut
u2 = Mathf.Sin( u * Mathf.PI * 0.5f );
break;
}
return( u2 );
}
}
Save Interpolator2 and switch back to Unity. In the Cube01:Interpolator2 (Script) Inspector, set uMin back to 0 and uMax back to 1. Press Play and click checkToCalculate. Now, because loopMove is checked as well, Cube01 will continuously interpolate between c0 and c1.
Try playing around with the different settings for easingType. easingMod will affect the easeIn, easeOut, easeInOut, and sin easing types. For the sin type, try an easingMod of 0.16 as well as one of -0.2 to see the flexibility of the Sin-based easing type.
In Figure B.5 you can see a graphical representation of the various easing curves. In this figure, the horizontal dimension represents the initial u value, while the vertical dimension represents the eased u value (u2). You can see that in every example when u=1, u2 also equals 1. Because of this, if the linear interpolation is time based, the value will always move completely from p0 to p1 in the same time regardless of the easing settings.
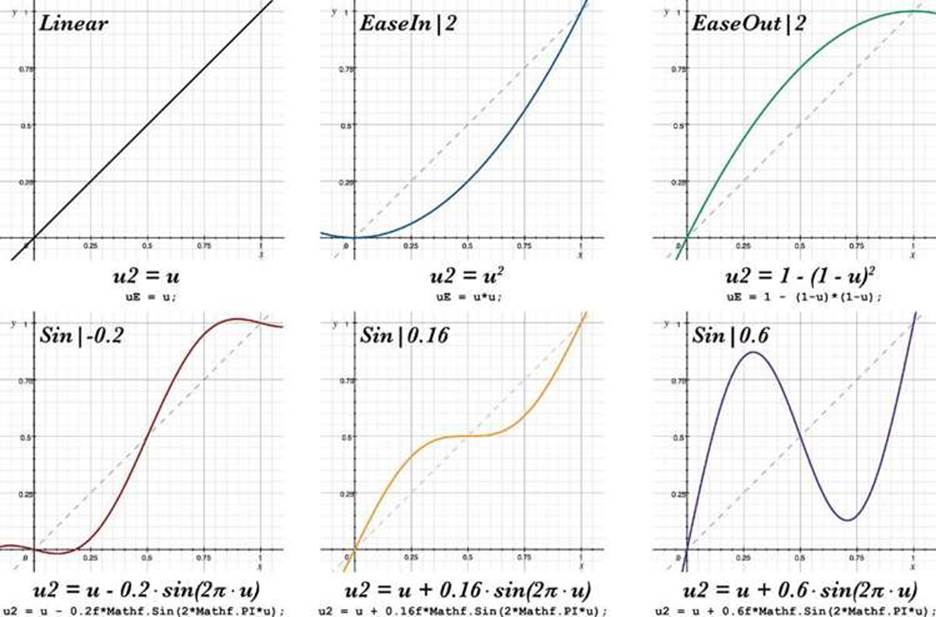
Figure B.5 Various easing curves and their formulae. In each case, the number after the pipe (|) represents the easingMod value.
The Linear curve shows no easing (u2 = u). In each of the other curves shown, the u2=u line remains as a dashed diagonal line to show normal, linear behavior. If the vertical component of a curve is ever below the dashed diagonal, the movement is happening more slowly than a linear curve. Conversely, if the vertical component of the curve is ever above the dashed diagonal, the eased curve is ahead of where the linear movement would have been.
The EaseIn curve will start slowly and then move faster toward the end (u2 = u*u). This is known as easing in because the first part of the motion is “easy” and slow before it then speeds up.
The EaseOut curve is the opposite of the EaseIn curve. With this curve, the movement starts quickly and then slows at the end.
The three Sin curves on the bottom of the diagram all follow the same formula (u2 = u + n * sin(u*2p), where n is a floating-point number (the variable easingMod in our code). The multiplication of u * 2π inside of the sin() ensures that as u moves from 0 to 1, it passes through a full sine wave (moving center, up, center, down, and back to center). If n=0, the sine curve has no effect on the curve (that is, the curve remains linear), as n moves further from zero in either direction, it has more of an effect.
The curve Sin|-0.2 is an ease-in-out with a bounce. The n value of -0.2 adds a negative sine wave to the linear progression, causing a moving object to back up a bit from p0, move quickly toward p1, overshoot a bit, and then settle at p1. An n value closer to zero of Sin|-0.1 would cause the object to ease-in to full speed at the center point and then slow as it approached p1 without the extrapolation bounce at either end.
In the curve Sin|0.16, a slight sine curve is added to the linear u progression, causing the curve to get ahead of linear, slow in the middle, and then catch up. If moving an object, this will bring it to the center point, slow it in the middle to “feature” it for a while, and then move it out.
The curve Sin|0.6 is the easing curve that is used by Enemy_2 in Chapter 30. In this case, enough positive sine wave has been added to cause the object to shoot past the center point to a point about 80% of the way to p1, then move back to a point 20% of the way to p1, and then finally move to p1.
Bézier Curves
A Bézier curve is a linear interpolation between more than two points. Just as with a normal linear interpolation, the base formula is p01 = (1-u) * p0 + u * p1. The Bézier curve just adds more points and more calculations.
Given three points: p0, p1, and p2
p01 = (1-u) * p0 + u * p1
p12 = (1-u) * p1 + u * p2
p012 = (1-u) * p01 + u * p12
As is demonstrated in the preceding equations, for the three points p0, p1, and p2, the location of the point of the Bézier curve is calculated by first performing a linear interpolation between p0 and p1 (called p01), then performing a linear interpolation between p1 and p2 (called p12), and finally performing a linear interpolation between p01 and p12 to obtain the final point, p012. A graphical representation of this is shown in Figure B.6.
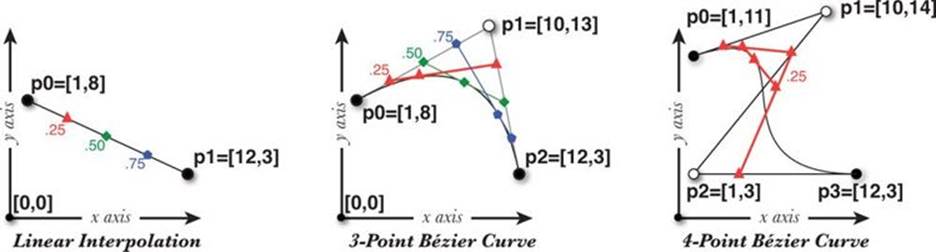
Figure B.6 A linear interpolation and 3-point and 4-point Bézier curves
A four-point curve requires more calculations to accommodate all four points:
p01 = (1-u) * p0 + u * p1
p12 = (1-u) * p1 + u * p2
p23 = (1-u) * p2 + u * p3
p012 = (1-u) * p01 + u * p12
p123 = (1-u) * p12 + u * p23
p0123 = (1-u) * p012 + u * p123
Four-point Bézier curves are used in many drawing programs as a way of defining very controllable curves, including: Adobe Flash, Adobe Illustrator, Adobe Photoshop, The Omni Groups’ OmniGraffle, and many others. In fact, the curve editors used in Unity for animation and audio processing uses a form of four-point Bézier curves.
Unity Example
Follow these steps to create a Bézier curve example in Unity. When writing code, I don’t use the accented é in Bézier because code tends to be written without any accented characters.
1. Create a new scene in your Unity project named _BezierScene. Add four cubes named c0, c1, c2, and c3. Set the transform.scale of all cubes to S:[0.5, 0.5, 0.5]. Position the cubes in various positions around the scene and adjust your Scene view so that you can see all of them. Next, add a sphere to the scene, attach a TrailRenderer to it, and set the material of the TrailRenderer to Default-Particle (as described in step one of the Unity Example for the “Time-Based Linear Interpolation” section earlier in this appendix).
2. Create a new C# script named Bezier and attach it to Sphere. Open Bezier in MonoDevelop and enter the following code:
using UnityEngine;
using System.Collections;
public class Bezier : MonoBehaviour {
public Transform c0, c1, c2, c3;
public float timeDuration = 1;
// Set checkToCalculate to true to start moving
public bool checkToCalculate = false;
public bool ________________;
public float u;
public Vector3 p0123;
public bool moving = false;
public float timeStart;
void Update () {
if (checkToCalculate) {
checkToCalculate = false;
moving = true;
timeStart = Time.time;
}
if (moving) {
u = (Time.time-timeStart)/timeDuration;
if (u>=1) {
u=1;
moving = false;
}
// 4-point Bezier curve calculation
Vector3 p01, p12, p23, p012, p123;
p01 = (1-u)*c0.position + u*c1.position;
p12 = (1-u)*c1.position + u*c2.position;
p23 = (1-u)*c2.position + u*c3.position;
p012 = (1-u)*p01 + u*p12;
p123 = (1-u)*p12 + u*p23;
p0123 = (1-u)*p012 + u*p123;
transform.position = p0123;
}
}
}
3. Back in Unity, assign each of the four cubes to their respective fields in the Sphere:Bezier (Script) Inspector. Then press Play and click the checkToCalculate check box in the Inspector. Sphere will trace a Bézier curve between the four cubes. It’s important to note here that Sphere only ever touches c0 and c3. It is influenced by but does not touch c1 and c2. This is true of all Bézier curves. The ends of the curve will always touch the first and last points, but no points in-between are ever touched. If you’re interested in looking into a kind of curve where the midpoints are touched, look up “Hermite spline” online (as well as other kinds of splines).
A Recursive Bézier Curve Function
As you saw in the previous section, the additional calculations for adding more control points to a Bézier curve are pretty straightforward conceptually, but it takes a while to type all the additional lines of code. The following code listing includes an elegant recursive function to calculate a Bézier curve of any number of points. This is included in the ProtoTools Utils class that is part of the initial unitypackage for Chapters 31 through 35:
// Remember that these three "using" lines will be needed by your code
using UnityEngine;
using System.Collections;
using System.Collections.Generic; // Needed for the List<>s in these functions
public class Utils {
// There are many lines in Utils prior to the Bezier methods
...
// The standard Vector Lerp functions in Unity don't allow for extrapolation
// (i.e., u is clamped to 0 <= u <= 1), so we write our own Lerp function
static public Vector3 Lerp (Vector3 vFrom, Vector3 vTo, float u) {
Vector3 res = (1-u)*vFrom + u*vTo;
return( res );
}
// While most Bezier curves are 3 or 4 points, it is possible to have
// any number of points using this recursive function
// This uses the Lerp function above because the Vector3.Lerp function
// doesn't allow extrapolation
static public Vector3 Bezier( float u, List<Vector3> vList ) {
// If there is only one element in vList, return it
if (vList.Count == 1) {
return( vList[0] );
}
// Create vListR, which is all but the 0th element of vList
// e.g., if vList = [0,1,2,3,4] then vListR = [1,2,3,4]
List<Vector3> vListR = vList.GetRange(1, vList.Count-1);
// And create vListL, which is all but the last element of vList
// e.g., if vList = [0,1,2,3,4] then vListL = [0,1,2,3]
List<Vector3> vListL = vList.GetRange(0, vList.Count-1);
// The result is the Lerp of the Bezier of these two shorter Lists
Vector3 res = Lerp( Bezier(u, vListL), Bezier(u, vListR), u );
// ^ The Bezier function recursively calls itself here to split the
// lists down until there is only one value in each
return( res ); // Return the result
}
// This version allows an array or a series of Vector3s as input which is
// then converted into a List<Vector3>
static public Vector3 Bezier( float u, params Vector3[] vecs ) {
return( Bezier( u, new List<Vector3>(vecs) ) );
}
...
}
Roleplaying Games
There are many good roleplaying games (RPGs) out there. The most popular is still probably Dungeons & Dragons by Wizards of the Coast (D&D), which is now in its fifth edition. Since the third edition, D&D has been based on the d20 system, which uses a single twenty-sided die in place of the many complex die rolls that were common in prior systems. I like D&D for a lot of things, but I have found that my students will often get bogged down in combat when attempting to run D&D as their first system; it has a lot of very specific combat rules, especially in the fourth edition.
My personal recommendation for a first RPG system is FATE by Evil Hat Productions. FATE is a simple system that allows players to contribute directly to the narrative much more than other systems allow. (Other systems give all power over events to the person running the game.) You can learn about FATE at the website http://faterpg.com, and you can read the free FATE system reference document (SRD) at http://fate-srd.com.
Tips for Running a Good Roleplaying Campaign
Running a roleplaying campaign can do wonders for your abilities as both a game designer and storyteller. If you try running a campaign yourself, here are some tips that I’ve found to be very useful when my students start running campaigns:
1. Start simple: There are a lot of different roleplaying systems out there, and they vary greatly in the complexity of their rules. I recommend starting with a simple system like Dungeons & Dragons. Initially released in 1974, D&D was the first roleplaying system and has continued to be the most popular system over the last 40 years. While the complete rules of D&D are anything but simple, the basic rule set that covers most situations is really pretty straightforward, and you can then add more rulebooks as you get deeper into the system.
As described in the preceding section, another fantastic possibility for new role-players is the FATE system, which has much simpler rules for combat and contests of will than D&D. In addition, FATE has specific game mechanics that allow players to make storytelling suggestions to the game master, which makes the storytelling of FATE games more collaborative than other systems.
2. Start short: Rather than starting with the first episode of a campaign that you expect to take a full year of play to complete, try starting with a simple mission that can be wrapped up in a single night of play. This will give your play group a chance to try out their characters and the system and see if they like both. If not, it’s easy to change to something else, and it’s much more important that the players enjoy their first experience roleplaying than that you kick off an epic campaign.
3. Help the players get started: Unless the other players in your campaign have prior experience roleplaying, it would be a very good idea for you to create their characters for them. This gives you the chance to make sure that the characters have complementary abilities and stats to make up a good team. A standard roleplaying party is composed of the following characters:
![]() A warrior to absorb enemy damage and fight up close
A warrior to absorb enemy damage and fight up close
![]() A wizard to do long-range damage and detect magic
A wizard to do long-range damage and detect magic
![]() A thief to disarm traps and make sneak attacks
A thief to disarm traps and make sneak attacks
![]() A cleric to detect evil and heal the other party members
A cleric to detect evil and heal the other party members
However, if you’re going to create characters for your players, you should get early buy-in from them by asking them to tell you about the kind of play experience they would like and the kind of abilities that they want their character to have. Early buy-in and interest is one of the keys to getting your players past the rough patches that can happen at the beginning of a game.
4. Plan for improvisation: Your players will frequently do things that you don’t expect. The only way to plan for this is to prepare yourself for flexibility and improvisation. Be ready with things like maps of generic spaces, a list of names that could be used for NPCs (nonplayer characters) that the party may or may not encounter, and a few generic monsters of various difficulties that you can conjure at will. The more you have ready beforehand, the less time you’ll have to spend looking through your rulebooks in the middle of the game.
5. Be willing to make rulings: If you can’t find the answer to a question in the rules after 10 minutes of looking, just make a ruling using your best judgment and agree with the players that you’ll look it up after the game session is over. This will keep the game from bogging down due to esoteric rules.
6. It’s the players’ story too: Remember to allow the players to go off the beaten path. If you’ve prepared too narrow a scenario, you might be tempted to not let them do so, but that would run the risk of killing their enjoyment of the game.
7. Remember that constant optimal challenge isn’t fun: In the discussion of flow in games in the first part of the book, you read that if players are always optimally challenged, they get exhausted quickly. This is also true in RPGs. Boss fights should always optimally challenge your players, but you should also have fights where the players win easily (this helps demonstrate to them that their characters are actually getting stronger as they level up) and sometimes even fights that the players need to flee from to survive (this is usually not expected by players, and can be really dramatic for them).
If you keep these tips in mind, it should help your roleplaying campaigns be a lot more fun for you and your players.
User Interface Concepts
Axis and Button Mapping for Microsoft Controllers
While most of the games included in this book use a mouse or keyboard interface, I’m guessing you might want to eventually hook up a gamepad controller to your games. Generally, the easiest controller to get working on a PC, OS X, or Linux is the Microsoft Xbox 360 Controller for Windows. You can get it in either a wired or wireless version, and the wireless version comes with a receiver that allows up to four Xbox controllers to be connected to one machine at a time.
However, it is unfortunately true that each platform (PC, OS X, and Linux) interprets the controllers differently, so you’ll need to set up an Input Manager that adapts to how the controller works on each platform.
Alternatively, you could save yourself a lot of trouble and choose an input manager from the Unity Asset Store. Several of my students have used InControl by Gallant Games, which maps input from not only Microsoft controllers but also Sony, Logitech, Ouya, and many others to the same input code in Unity.
http://www.gallantgames.com/pages/incontrol-introduction
If you do wish to configure the Unity InputManager yourself, Figure B.7 contains information from the Unify community’s page about the Xbox 360 controller.2 The numbers in the figure indicate the joystick button number that can be accessed by the InputManager Axes window. The axes are designated with the letter a before them (for example, aX, a5). If working with multiple joysticks on the same machine, you can designate a specific joystick in the InputManager Axes by using joystick # button # (for example, “joystick 1 button 3”). The same Unify page also includes a downloadable InputManager setup for four simultaneous Microsoft controllers.
2 The Unify community’s page for this is: http://wiki.unity3d.com/index.php?title=Xbox360Controller
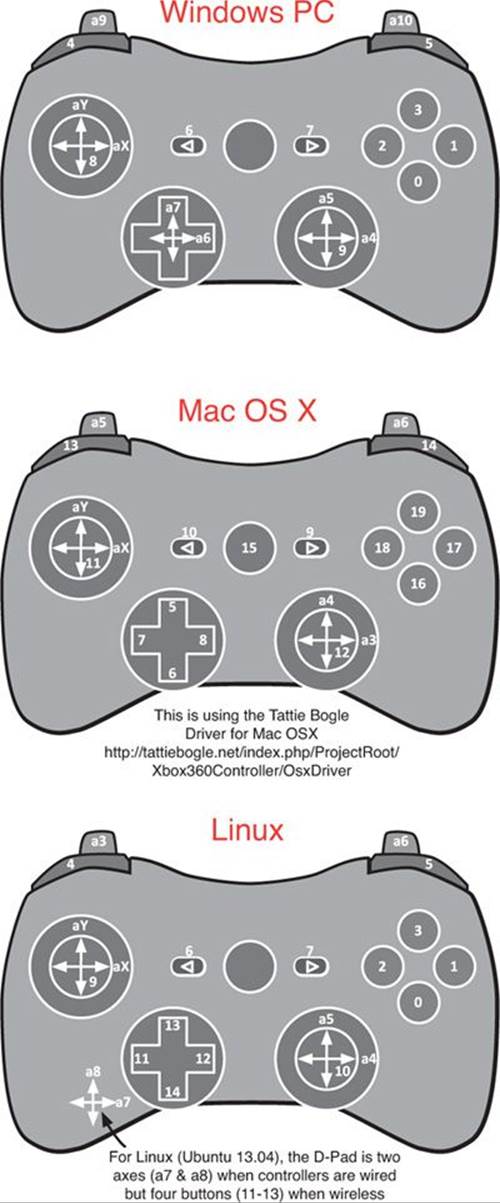
Figure B.7 Xbox controller mapping for PC, OS X, and Linux
On PC, the driver for the controller should install automatically. On Linux (Ubuntu 13.04 and later), it should be included as well. For OS X, you need to download the driver from TattieBogle at http://tattiebogle.net/index.php/ProjectRoot/Xbox360Controller/OsxDriver.
Right-Click on OS X
Throughout this book, there are many times when I ask you to right-click on something. However, many people don’t know how to right-click on a Macintosh because it’s not the default setting for OS X trackpads and mice. There are actually several ways to right-click, and the one you use depends on how new your Mac is and how you prefer to interact with your machine.
Control-Click = Right-Click
Near the bottom-left corner of all modern OS X keyboards is a Control key. If you hold down the Control key and then left-click (your normal click) on anything, OS X treats it as a right-click.
Use Any PC Mouse
You can use almost any PC mouse that has two or three buttons on OS X. I personally use a Razer Orochi.
Set Your OS X Mouse to Right-Click
If you have an OS X mouse made in 2005 or later (the Apple Mighty Mouse or Apple Magic Mouse), you can enable right-clicking by going into System Preferences > Mouse. Select the Point & Click tab at the top of the screen. Check the box next to Secondary click and then choose Click on right side from the pop-up menu directly below Secondary Click. This will make a click on the left side of the mouse left-click and a click on the right side right-click.
Set Your OS X Trackpad to Right-Click
Similar to the Apple Mouse, any modern Apple laptop trackpad (or the Bluetooth Magic Trackpad) can be configured to right-click. Open System Preferences > Trackpad and choose the Point & Click tab at the top of the window. Check the box next to Secondary Click. If you choose Click or tap with two fingers from the pop-up menu directly below Secondary Click, it will make tapping with one finger the standard left-click and tapping with two fingers the right-click. There are also other right-click trackpad options if you prefer.