Introduction to Game Design, Prototyping, and Development (2015)
Part IV: Appendices
Appendix A. Standard Project Setup Procedure
Many times throughout the book, you are asked to create a new project and then given code to try. This is the standard procedure that you should follow each time to create a new project, set up a scene, create a new C# script, and attach that script to the Main Camera of the scene. Instead of repeating these instructions throughout this book, they are collected here.
Setting Up a New Project
Follow these steps to set up a new project. The screenshots show the procedure on both OS X and Windows:
1. From the menu bar, choose File > New Project (see Figure A.1).
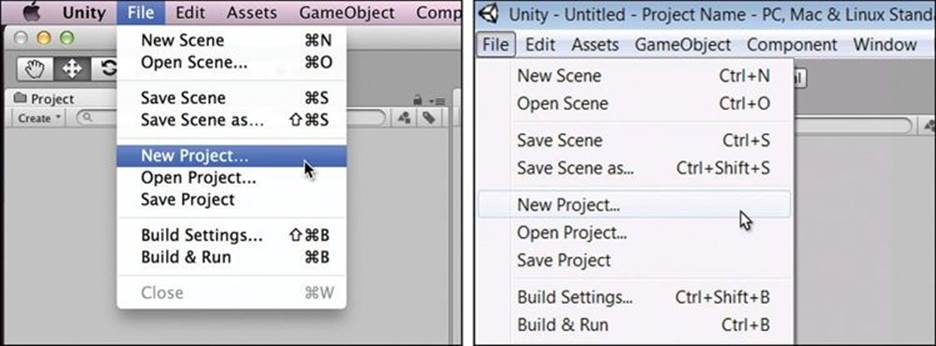
Figure A.1 Choosing New Project from the File menu on OS X and Windows
2. This opens the Unity Project Wizard (as shown in Figure A.2). In the wizard, click Set (Browse on Windows) to choose the location for your new project. This brings up a standard file dialog box enabling you to set the location of your project folder (see Figure A.3).
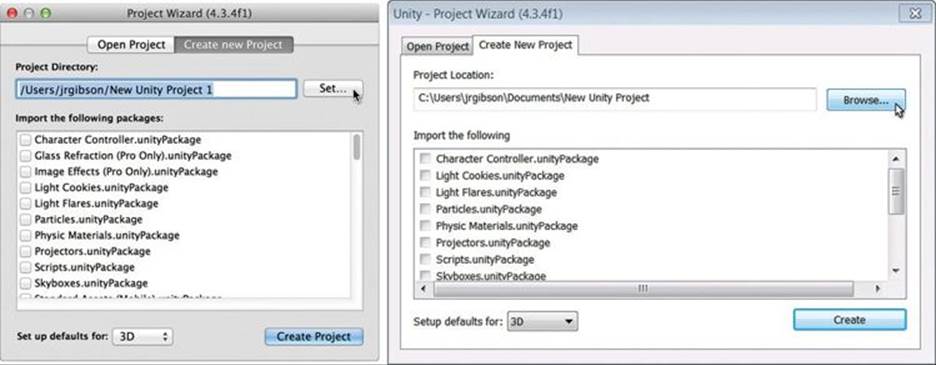
Figure A.2 The Project Wizard
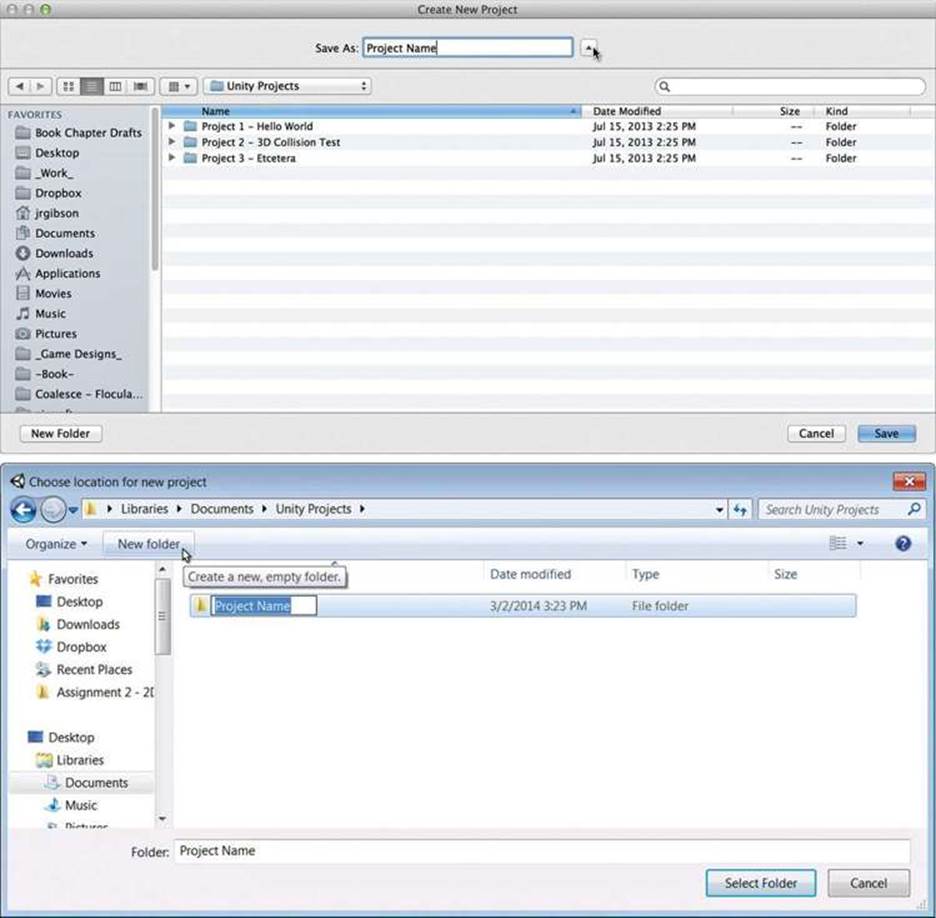
Figure A.3 The Create New Project (OS X) and Choose location for new project (Windows) dialog boxes
3. In this step, the instructions for OS X and Windows differ, although both involve creating a new folder for the Unity project (see Figure A.3). In Figure A.3, the project is named Project Name, but you’ll obviously want to choose a more appropriate name. I tend to store all of my Unity projects inside a folder named Unity Projects, as shown.
![]() OS X: On OS X, you do not need to create a new folder to hold your project; Unity will automatically create one:
OS X: On OS X, you do not need to create a new folder to hold your project; Unity will automatically create one:
a. If you do not see the full-size version of the standard file navigation dialog box that is shown in Figure A.3, click the disclosure triangle (shown under the black mouse cursor to expand the dialog box.
b. Navigate to the location where you would like to place the new project folder (which is the Unity Projects folder in the example).
c. Type the name of the project (shown as Project Name in the top image of Figure A.3) into the Save As field at the top of the window.
d. Click the Save button in the bottom right of the dialog box.
![]() Windows: On Windows, you must create a new folder to hold your new project:
Windows: On Windows, you must create a new folder to hold your new project:
a. Navigate to the folder in which you want to place you project folder (which is the Unity Projects folder in the example).
b. Click the New Folder button (shown under the white cursor in Figure A.3).
c. Type the name of your project (shown as Project Name in Figure A.3) into the new folder name field (highlighted in blue in Figure A.3) and press Enter on the keyboard. This should both set the name of the folder and enter the new folder name into the Folder field at the bottom of the dialog box.
d. Click the Select Folder button in the bottom right of the dialog box.
4. After completing step 3, you will be returned to the Project Wizard, and the path in the Project Directory field will be replaced by the path to the new project folder.
Note
Project Wizard Options Unity gives you the option to import a number of packages as part of the Project Wizard. I generally avoid this for three reasons:
![]() Project bloat: If you import every possible package, the size of the project will bloat to 1,000 times its original size (from ≈300Kb to ≈300MB)!
Project bloat: If you import every possible package, the size of the project will bloat to 1,000 times its original size (from ≈300Kb to ≈300MB)!
![]() Project pane clutter: Importing all the packages will also add a huge number of items and folders to your Assets folder and Project pane.
Project pane clutter: Importing all the packages will also add a huge number of items and folders to your Assets folder and Project pane.
![]() You can always import them later: At any time in the future, you can choose Assets > Import Package from the menu bar to import any of the packages listed in the Project Wizard.
You can always import them later: At any time in the future, you can choose Assets > Import Package from the menu bar to import any of the packages listed in the Project Wizard.
In addition, starting with Unity 4.3, you are also given the option to “set up defaults” for 3D or 2D. This option has very little effect on the project, so I usually leave 3D selected.
5. In the Project Wizard, click the Create Project button shown in Figure A.2 (labeled Create on Windows). Unity will appear to close and relaunch, presenting you with the blank canvas of your new project. This relaunch may take a few seconds, so be patient.
Getting the Scene Ready for Coding
The new project you just created comes with a default scene. To get ready for coding, follow these instructions (though they are not required for all projects):
1. Save the scene.
The first thing you do in a project should always be to save the scene. Choose File > Save Scene As from the menu bar and choose a name. (Unity will automatically navigate to the correct folder in which to save the scene). I tend to choose something like _Scene_0, which is easily enumerable as I create more scenes in the future. The underscore at the beginning of the name will sort the scene to the top of the Project pane.
2. Create a new C# script (optional).
Some chapters ask you to create one or more C# scripts before beginning the project. To do so, click the Create button in the Project pane and choose Create > C# Script. A new script will be added to the Project pane, and its name will be highlighted for you to change. Name this script whatever you like as long as there are no spaces or special characters in the name, and then press the Return or Enter key to save the name. In Figure A.4, the script is named HelloWorld.
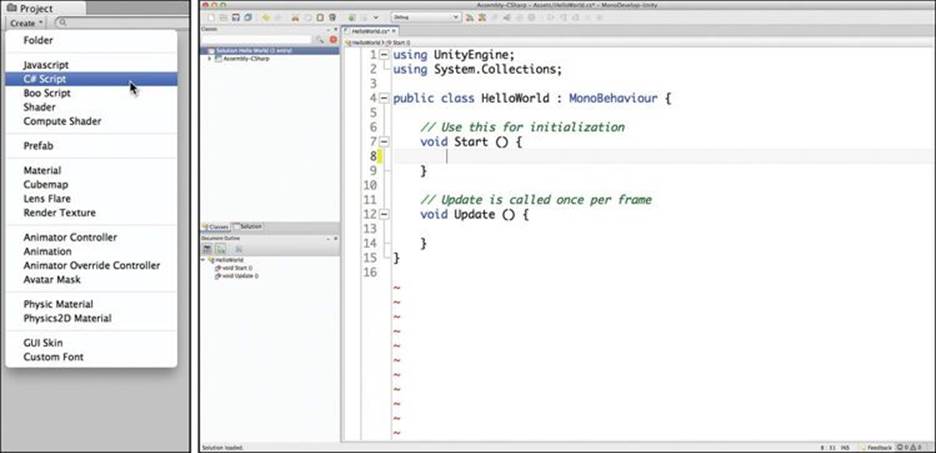
Figure A.4 Creating a new C# script and viewing that script in MonoDevelop
Warning
Changing a script name after it has been created can cause problems When you set the name of a script as part of the creation process, Unity will automatically change the name in the class declaration as well (on line 4 in Figure A.4). However, if you choose to change the name of your C# script after that initial process, you need to change its name not only in the Project pane but also in the class declaration line of the script itself. In Figure A.4, this class declaration is on line 4, where HelloWorld would need to be changed to the new script name.
3. Attach the C# script to the scene’s Main Camera (optional).
Some chapters request that you attach one or more of the new scripts to the Main Camera. Attaching a script to a GameObject like Main Camera will make that script a component of the GameObject. All scenes will start with a Main Camera already included, so that’s a fantastic place to attach any basic script that you want to run. Generally, if a C# script is not attached to a GameObject in the scene, it will not run.
This next part’s a bit tricky, but you’ll soon be used to it because it is so frequently done in Unity. Click the name of the new script, drag it onto the name of the Main Camera in the Hierarchy pane, and release the mouse button. It should look like what is shown in Figure A.5.
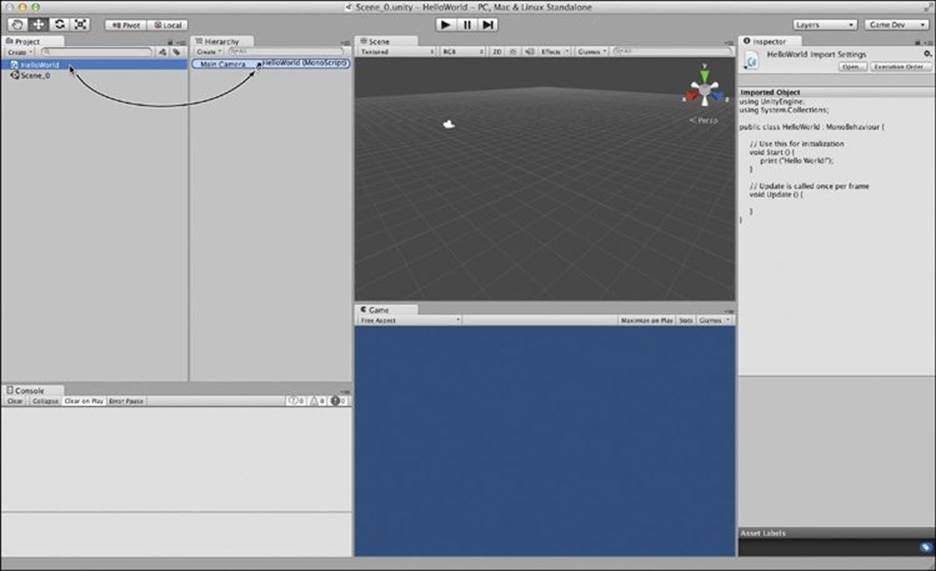
Figure A.5 Dragging the C# script onto the Main Camera in the Hierarchy pane
The C# script is now attached to the Main Camera and will appear in the Inspector if the Main Camera is selected. To begin editing the code of the C# script in MonoDevelop, simply double-click the script’s name in the Project pane.