C# 6.0 and the .NET 4.6 Framework (2015)
PART VI
Introducing the .NET Base Class Libraries
CHAPTER 23
ADO.NET Part III: Entity Framework
The previous two chapters examined the fundamental ADO.NET programming models—the connected and disconnected layers, specifically. These approaches have enabled .NET programmers to work with relational data (in a relatively straightforward manner) since the initial release of the platform. However, Microsoft introduced a new component of the ADO.NET API called the Entity Framework (or simply, EF) in .NET 3.5 Service Pack 1.
![]() Note While this first version was widely criticized, the EF team at Microsoft has been hard at work releasing new versions. Visual Studio 2015 currently (at the time of this writing) ships with version 6.1.3, which is packed full of features and performance enhancements over earlier versions. Entity Framework 7 is still in the early beta stages (again, at the time of this writing). I made the decision to focus on EF 6.x for this book since there are too many issues with EF 7.
Note While this first version was widely criticized, the EF team at Microsoft has been hard at work releasing new versions. Visual Studio 2015 currently (at the time of this writing) ships with version 6.1.3, which is packed full of features and performance enhancements over earlier versions. Entity Framework 7 is still in the early beta stages (again, at the time of this writing). I made the decision to focus on EF 6.x for this book since there are too many issues with EF 7.
The overarching goal of EF is to allow you to interact with data from relational databases using an object model that maps directly to the business objects (or domain objects) in your application. For example, rather than treating a batch of data as a collection of rows and columns, you can operate on a collection of strongly typed objects termed entities. These entities are also natively LINQ aware, and you can query against them using the same LINQ grammar you learned about in Chapter 12. The EF runtime engine translates your LINQ queries into proper SQL queries on your behalf.
This chapter will introduce you to data access using the Entity Framework. You will learn about creating a domain model, mapping model classes to the database, and the role of the DbContext class. You will also learn about navigation properties, transactions, and concurrency checking.
By the time you complete this chapter, you will have the final version of AutoLotDAL.dll. You will use this version of AutoLotDAL.dll later in this book when you learn about Windows Presentation Foundation (WPF), ASP.NET WebForms, and ASP.NET MVC.
![]() Note All the versions of the Entity Framework (up to and including EF 6.x) support using an entity designer to create an entity data model XML (EDMX) file. Starting with version 4.1, EF added support for plain old CLR objects (POCO) using a technique referred to as Code First. EF 7 will support only the Code First paradigm, dropping all designer support. For this reason, this chapter will focus on Code First.
Note All the versions of the Entity Framework (up to and including EF 6.x) support using an entity designer to create an entity data model XML (EDMX) file. Starting with version 4.1, EF added support for plain old CLR objects (POCO) using a technique referred to as Code First. EF 7 will support only the Code First paradigm, dropping all designer support. For this reason, this chapter will focus on Code First.
Understanding the Role of the Entity Framework
The connected and disconnected layers of ADO.NET discussed in Chapters 21 and 22 provide you with a fabric that lets you select, insert, update, and delete data with connections, commands, data readers, data adapters, and DataSet objects. While this is all well and good, these aspects of ADO.NET force you to treat the fetched data in a manner that is tightly coupled to the physical database schema. Recall, for example, that when you use the connected layer, you typically iterate over each record by specifying column names to a data reader. On the other hand, if you opt to use the disconnected layer, you find yourself traversing the rows and columns collections of a DataTable object within a DataSet container.
If you use the disconnected layer in conjunction with strongly typed DataSets/data adapters, you end up with a programming abstraction that provides some helpful benefits. First, the strongly typed DataSet class exposes a table data using class properties. Second, the strongly typed table adapter supports methods that encapsulate the construction of the underlying SQL statements. Recall the following AddRecords() method from Chapter 22:
public static void AddRecords(AutoLotDataSet.InventoryDataTable table,
InventoryTableAdapter adapter)
{
// Get a new strongly typed row from the table.
AutoLotDataSet.InventoryRow newRow = table.NewInventoryRow();
// Fill row with some sample data.
newRow.Color = "Purple";
newRow.Make = "BMW";
newRow.PetName = "Saku";
// Insert the new row.
table.AddInventoryRow(newRow);
// Add one more row, using overloaded Add method.
table .AddInventoryRow("Yugo", "Green", "Zippy");
// Update database.
adapter.Update(table);
}
Things got even better when you combined the disconnected layer with LINQ to DataSet. In the example, you applied LINQ queries to your in-memory data to obtain a new result set. You could then optionally map to a stand-alone object such as a new DataTable, a List<T>, aDictionary<K,V>, or an array of data, as follows:
static void BuildDataTableFromQuery(DataTable data)
{
var cars = from car in data.AsEnumerable()
where car.Field<int>("CarID") > 5 select car;
// Use this result set to build a new DataTable.
DataTable newTable = cars.CopyToDataTable();
// Work with DataTable...
}
While LINQ to DataSet is useful, you need to remember that the target of your LINQ query is the data returned from the database, not the database engine itself. This means you are pulling all the data from the database into the client and then using LINQ to get a subset or transform the data. Ideally, you could build a LINQ query that you send directly to the database engine for processing and get some strongly typed data in return (which is exactly what the ADO.NET Entity Framework lets you accomplish).
When you use either the connected or disconnected layer of ADO.NET, you must always be mindful of the physical structure of the back-end database. You must know the schema of each data table, author potentially complex SQL queries to interact with said data table, and so forth. This can force you to author some fairly verbose C# code because C# itself does not speak the language of database schema directly.
To make matters worse, the way in which a physical database is constructed (by your friendly DBA) is squarely focused on database constructs such as foreign keys, views, and stored procedures. The databases constructed by your friendly DBA can grow quite complex as the DBA endeavors to account for security and scalability. This also complicates the sort of C# code you must author to interact with the data store.
The ADO.NET Entity Framework (EF) is a programming model that attempts to lessen the gap between database constructs and object-oriented programming constructs. Using EF, you can interact with a relational database without ever seeing a line of SQL code (if you so choose). Rather, when you apply LINQ queries to your strongly typed classes, the EF runtime generates proper SQL statements on your behalf.
![]() Note LINQ to Entities is the term that describes the act of applying LINQ queries to ADO.NET EF entity objects.
Note LINQ to Entities is the term that describes the act of applying LINQ queries to ADO.NET EF entity objects.
Another possible approach (rather than updating database data by finding a row, updating the row, and sending the row back for processing with a batch of SQL queries), you can simply change properties on an object and save its state. Again, the EF runtime updates the database automatically.
As far as Microsoft is concerned, the ADO.NET Entity Framework is simply another approach to the data-access APIs and is not intended to completely replace using ADO.NET directly from C# code. However, once you spend some time working with EF, you might quickly find yourself preferring this rich object model over the more primitive world of SQL queries and row/column collections.
Nevertheless, chances are you will find uses for all three approaches in your .NET projects; in some cases, the EF model might complicate your code base. For example, if you want to build an in-house application that needs to communicate with only a single database table, you might prefer to use the connected layer to call a batch of related stored procedures. Larger applications can particularly benefit from EF, especially if the development team is comfortable working with LINQ. As with any new technology, you will need to determine how (and when) ADO.NET EF is appropriate for the task at hand.
![]() Note You might recall a database programming API introduced with .NET 3.5 called LINQ to SQL. This API is close in concept (and fairly close in terms of programming constructs) to ADO.NET EF. LINQ to SQL is in maintenance mode, meaning it will receive only critical bug fixes. If you have an application using LINQ to SQL, know that Microsoft’s official policy is to support all software for at least ten years after its “end of life.” So while it won’t be removed from your machine by the software guardians, the official word from those kind folks in Redmond is that you should put your efforts into EF, not LINQ to SQL. They certainly are.
Note You might recall a database programming API introduced with .NET 3.5 called LINQ to SQL. This API is close in concept (and fairly close in terms of programming constructs) to ADO.NET EF. LINQ to SQL is in maintenance mode, meaning it will receive only critical bug fixes. If you have an application using LINQ to SQL, know that Microsoft’s official policy is to support all software for at least ten years after its “end of life.” So while it won’t be removed from your machine by the software guardians, the official word from those kind folks in Redmond is that you should put your efforts into EF, not LINQ to SQL. They certainly are.
The Role of Entities
The strongly typed classes mentioned previously are called entities. Entities are a conceptual model of a physical database that maps to your business domain. Formally speaking, this model is termed an entity data model (EDM). The EDM is a client-side set of classes that are mapped to a physical database by Entity Framework convention and configuration. You should understand that the entities need not map directly to the database schema insofar as naming conventions go. You are free to restructure your entity classes to fit your needs, and the EF runtime will map your unique names to the correct database schema.
![]() Note In the Code First world, most people refer to the POCO classes as models and the collection of these classes as the model. When the model classes are instantiated with data from the data store, they are then referred to as entities. In reality, the terms are pretty much used interchangeably.
Note In the Code First world, most people refer to the POCO classes as models and the collection of these classes as the model. When the model classes are instantiated with data from the data store, they are then referred to as entities. In reality, the terms are pretty much used interchangeably.
For example, you might recall that you created the simple Inventory table in the AutoLot database using the database schema shown in Figure 23-1.
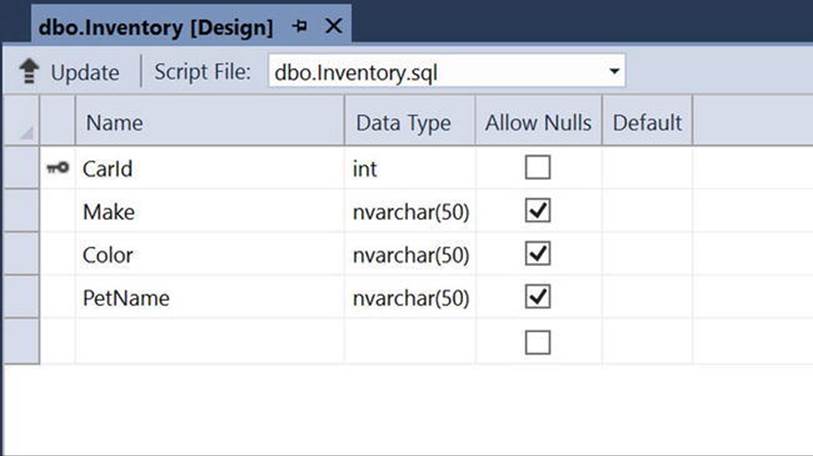
Figure 23-1. Structure of the Inventory table of the AutoLot database
If you were to create the model for the Inventory table of the AutoLot database (you’ll see how to do so momentarily), the class would be called Inventory by default. However, you could rename this class to Car and define uniquely named properties of your choosing, which will be mapped to the columns of the Inventory table. This loose coupling means you can shape the entities so they closely model your business domain. Figure 23-2 shows such an entity class.
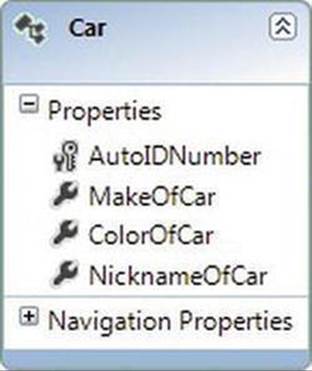
Figure 23-2. The Car model is a client-side reshaping of the Inventory schema
![]() Note In many cases, the model classes will be identically named to the related database tables. However, remember that you can always reshape the model to match your business situation.
Note In many cases, the model classes will be identically named to the related database tables. However, remember that you can always reshape the model to match your business situation.
You will build a full example with EF in just a bit. However, for the time being, consider the following Program class, which uses the Car model class (and a related context class named AutoLotEntities) to add a new row to the Inventory table of AutoLot. TheAutoLotEntities context class derives from DbContext. The job of this class is to communicate with the physical database on your behalf (you will learn more details soon).
class Program
{
static void Main(string[] args)
{
// Connection string automatically read from config file.
using (AutoLotEntities context = new AutoLotEntities())
{
// Add a new record to Inventory table, using our model.
context.Cars.Add(new Car() { ColorOfCar = "Black",
MakeOfCar = "Pinto",
NicknameOfCar = "Pete" });
context.SaveChanges();
}
}
}
It is up to the EF runtime to take the client-side representation of the Inventory table (here, a class named Car) and map it back to the correct columns of the Inventory table. Notice that you see no trace of any sort of SQL INSERT statement. You simply add a new Car object to the collection maintained by the aptly named Cars property of the context object and save your changes. Sure enough, if you view the table data using the Server Explorer of Visual Studio, you will see a new record (see Figure 23-3).
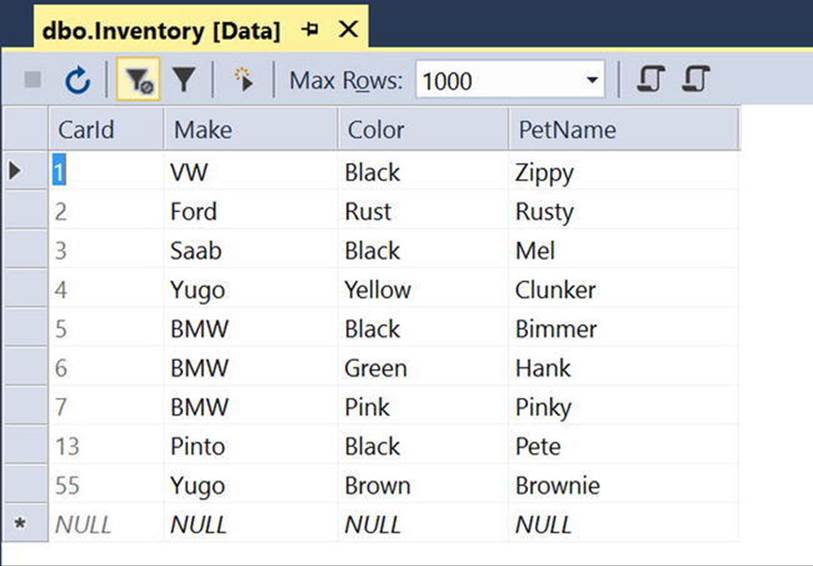
Figure 23-3. The result of saving the context
There is no magic in the preceding example. Under the covers, a connection to the database is made, a proper SQL statement is generated, and so forth. The benefit of EF is that these details are handled on your behalf. Now let’s look at the core services of EF that make this possible.
The Building Blocks of the Entity Framework
The EF API sits on top of the existing ADO.NET infrastructure you have already examined in the previous two chapters. Like any ADO.NET interaction, the Entity Framework uses an ADO.NET data provider to communicate with the data store. However, the data provider must be updated so it supports a new set of services before it can interact with the EF API. As you might expect, the Microsoft SQL Server data provider has been updated with the necessary infrastructure, which is accounted for when using the System.Data.Entity.dll assembly.
![]() Note Many third-party databases (e.g., Oracle and MySQL) provide EF-aware data providers. Consult your database vendor for details or log on to https://msdn.microsoft.com/en-us/library/dd363565.aspx for a list of known ADO.NET data providers. EF builds on top of the ADO.NET data provider model and will work with any datasource where a data provider is available.
Note Many third-party databases (e.g., Oracle and MySQL) provide EF-aware data providers. Consult your database vendor for details or log on to https://msdn.microsoft.com/en-us/library/dd363565.aspx for a list of known ADO.NET data providers. EF builds on top of the ADO.NET data provider model and will work with any datasource where a data provider is available.
In addition to adding the necessary bits to the Microsoft SQL Server data provider, the System.Data.Entity.dll assembly contains various namespaces that account for the EF services themselves. The two key pieces of the EF API to concentrate on (for the time being) are theDbContext class and the derived model-specific context.
The Role of the DbContext Class
The DbContext class represents a combination of the Unit of Work and Repository patterns that can be used to query from a database and group together changes that will be written back as a single unit of work. DbContext provides a number of core services to child classes, including the ability to save all changes (which results in a database update), tweak the connection string, delete objects, call stored procedures, and handle other fundamental details. Table 23-1 shows some of the more commonly used members of the DbContext.
Table 23-1. Common Members of DbContext
|
Member of DbContext |
Meaning in Life |
|
DbContext |
Constructor used by default in the derived context class. The string parameter is either the database name or the connection string stored in the *.config file. |
|
Entry Entry<TEntity> |
Retrieves the System.Data.Entity.Infrastructure.DbEntityEntry object providing access to information and the ability to perform actions on the entity. |
|
GetValidationErrors |
Validates tracked entries and returns a collection of System.Data.Entity.Validation.DbEntityValidationResults. |
|
SaveChanges SaveChangesAsync |
Saves all changes made in this context to the database. Returns the number of affected entities. |
|
Configuration |
Provides access to the configuration properties of the context. |
|
Database |
Provides a mechanism for creation/deletion/existence checks for the underlying database, executes stored procedures and raw SQL statements against the underlying data store, and exposes transaction functionality. |
DbContext also implements IObjectContextAdapter, so any of the functionality available in the ObjectContext class is also available. While DbContext takes care of most of your needs, there are two events that can be extremely helpful, as you will see later in the chapter. Table 23-2 lists the events.
Table 23-2. Events in DbContext
|
Events of DbContext |
Meaning in Life |
|
ObjectMaterialized |
Fires when a new entity object is created from the data store as part of a query or load operation |
|
SavingChanges |
Occurs when changes are being saved to the data store but prior to the data being persisted |
The Role of the Derived Context Class
As mentioned, the DbContext class provides the core functionality when working with EF Code First. In your projects, you will create a class that derives from DbContext for your specific domain. In the constructor, you need to pass the name of the connection string for this context class to the base class, as shown here:
public class AutoLotEntities : DbContext
{
public AutoLotEntities() base("name=AutoLotConnection")
{
}
protected override void Dispose(bool disposing)
{
}
}
The Role of DbSet<T>
To add tables into your context, you add a DbSet<T> for each table in your object model. To enable lazy loading, the properties in the context need to be virtual, like this:
public virtual DbSet<CreditRisk> CreditRisks { get; set; }
public virtual DbSet<Customer> Customers { get; set; }
public virtual DbSet<Inventory> Inventory { get; set; }
public virtual DbSet<Order> Orders { get; set; }
Each DbSet<T> provides a number of core services to each collection, such as creating, deleting, and finding records in the represented table. Table 23-3 describes some of the core members of the DbSet<T> class.
Table 23-3. Common Members of DbSet<T>
|
Member of DbSet<T> |
Meaning in Life |
|
Add AddRange |
Allows you to insert a new object (or range of objects) into the collection. They will be marked with the Added state and will be inserted into the database when SaveChanges (or SaveChangesAsync) is called on the DbContext. |
|
Attach |
Associates an object with the DbContext. This is commonly used in disconnected applications like ASP.NET/MVC. |
|
Create Create<T> |
Creates a new instance of the specified entity type. |
|
Find FindAsync |
Finds a data row by the primary key and returns an object representing that row. |
|
Remove RemoveRange |
Marks an object (or range of objects) for deletion. |
|
SqlQuery |
Creates a raw SQL query that will return entities in this set. |
Once you drill into the correct property of the object context, you can call any member of DbSet<T>. Consider again the sample code shown in the first few pages of this chapter:
using (AutoLotEntities context = new AutoLotEntities())
{
// Add a new record to Inventory table, using our entity.
context.Cars.Add(new Car() { ColorOfCar = "Black",
MakeOfCar = "Pinto",
NicknameOfCar = "Pete" });
context.SaveChanges();
}
Here, AutoLotEntities is-a derived Context. The Cars property gives you access to the DbSet<Car> variable. You use this reference to insert a new Car entity object and tell the DbContext to save all changes to the database.
DbSet<T> is typically the target of LINQ to Entity queries; as such, DbSet<T> supports the same extension methods you learned about in Chapter 12, such as ForEach(), Select(), and All(). Moreover, DbSet<T> gains a good deal of functionality from its direct parent class,DbQuery<T>, which is a class that represents a strongly typed LINQ (or Entity SQL) query.
Empty Code First Model or Code First from Database
Before you build your first Entity Framework example, there’s one more point to discuss. You can build an Entity Framework data model from scratch or reverse engineer it from an existing database (just as you can using the Entity Framework Designer). You will examine both of these methods in the following sections.
Transaction Support
All versions of EF wrap each call to SaveChanges/SaveChangesAsync in a transaction. The isolation level of these automatic transactions is the same as the default isolation level for the database (which is READ COMMITTED for SQL Server). You can add more control to the transactional support in EF if you need it. For more information, see https://msdn.microsoft.com/en-us/data/dn456843.aspx.
![]() Note Although not covered in this book, executing SQL statements using ExecuteSqlCommand() from the DbContext database object is now wrapped in an implicit transaction. This is new in EF version 6.
Note Although not covered in this book, executing SQL statements using ExecuteSqlCommand() from the DbContext database object is now wrapped in an implicit transaction. This is new in EF version 6.
Entity State
The DbContext automatically tracks the state for any object within its context. In the previous examples, while inside the using statement, any changes to the data will be tracked and saved when SaveChanges is called on the AutoLotEntities class. Table 23-4 lists the possible values for the state of an object.
Table 23-4. Entity State Enumeration Values
|
Value |
Meaning in Life |
|
Detached |
The object exists but is not being tracked. An entity is in this state immediately after it has been created and before it is added to the object context. |
|
Unchanged |
The object has not been modified since it was attached to the context or since the last time that the SaveChanges() method was called. |
|
Added |
The object is new and has been added to the object context, and the SaveChanges() method has not been called. |
|
Deleted |
The object has been deleted from the object context but not yet removed from the data store. |
|
Modified |
One of the scalar properties on the object was modified, and the SaveChanges() method has not been called. |
If you need to check the state of an object, use the following code:
EntityState state = context.Entry(entity).State;
You usually don’t need to worry about the state of your objects. However, in the case of deleting an object, you can set the state of an object to EntityState.Deleted and save a round-trip to the database. You will do this later in the chapter.
Code First from an Existing Database
Now that you have a better understanding of what the ADO.NET Entity Framework is and how it works from a high level, it’s time to look at your first full example. You will build a simple console app that uses Code First from an existing database to create the model classes representing the existing AutoLot database you built in Chapters 21 and 22. You will write code in the console app that performs typical create, read, update, and delete (CRUD) operations, and then you will look at everything that was built for you.
Generating the Model
Begin by creating a new Console Application project named AutoLotConsoleApp. Add a folder to the project through the Project ![]() New Folder menu option and name it EF. Select the new EF folder and then select Project
New Folder menu option and name it EF. Select the new EF folder and then select Project ![]() Add New Item (be sure to highlight the Data node) to insert a new ADO.NET Entity Data Model item named AutoLotEntities (as in Figure 23-4).
Add New Item (be sure to highlight the Data node) to insert a new ADO.NET Entity Data Model item named AutoLotEntities (as in Figure 23-4).
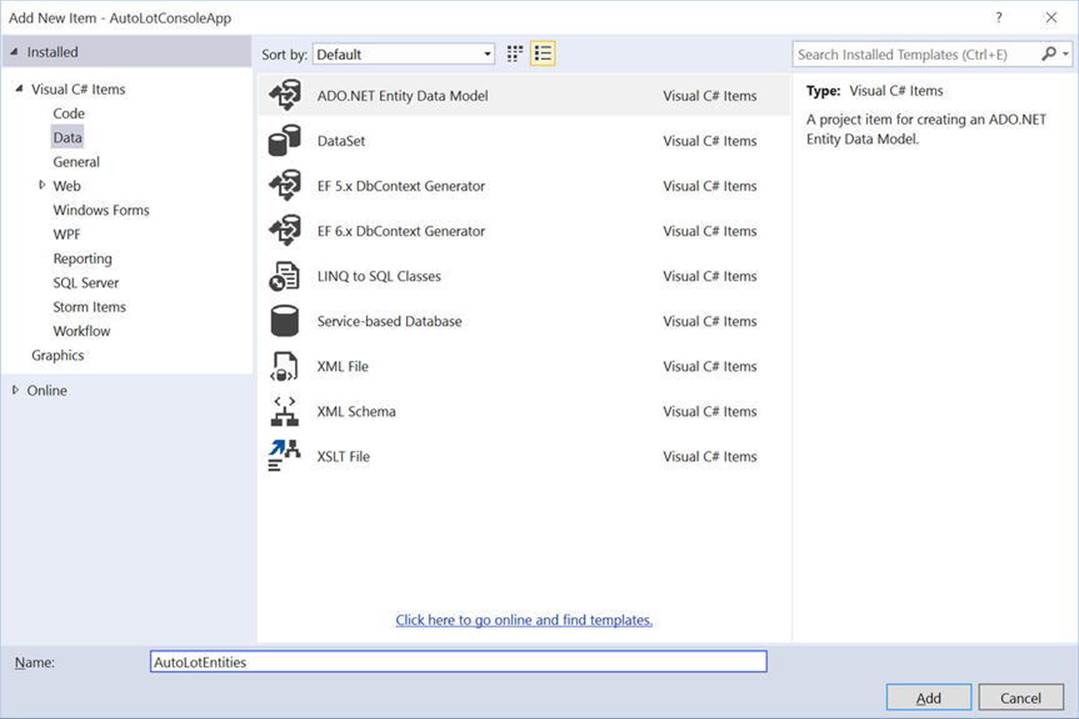
Figure 23-4. Inserting a new ADO.NET EDM project item
Clicking the Add button launches the Entity Model Data Wizard. The wizard’s first step allows you to select the option to generate an EDM using the Entity Framework Designer (from an existing database or by creating an empty designer) or using Code First (from an existing database or by creating an empty DbContext). Select the “Code First from database” option and click the Next button (see Figure 23-5).
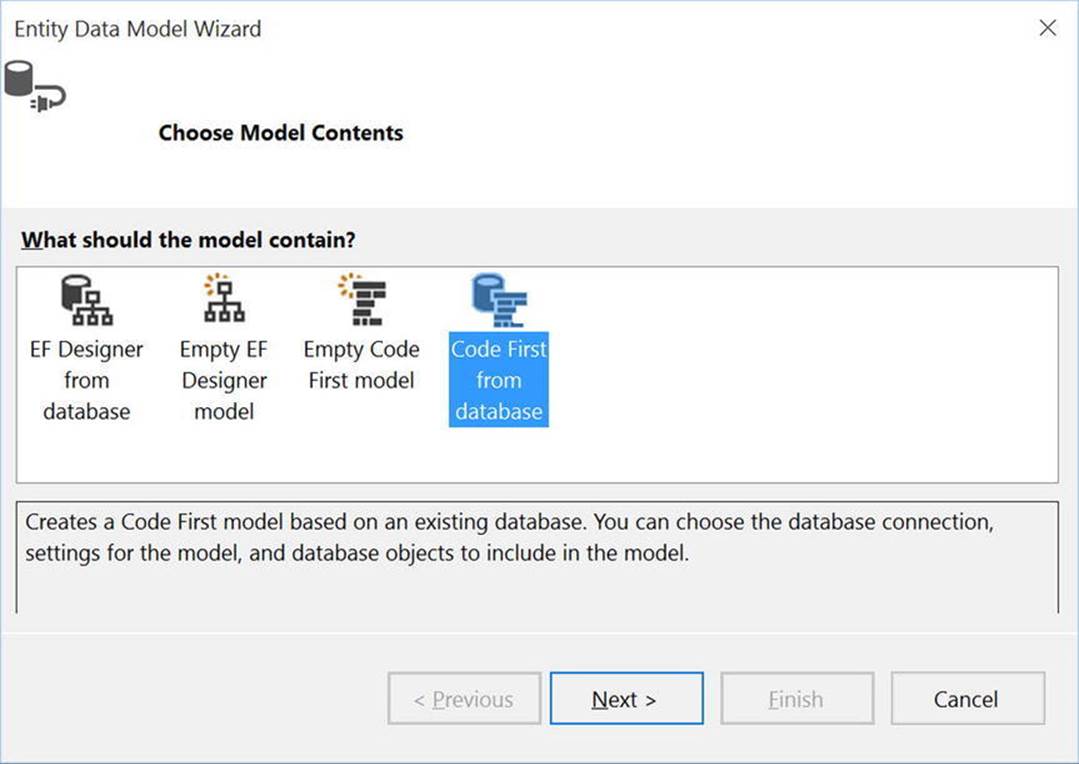
Figure 23-5. Generating an EDM from an existing database
You can select your database in the wizard’s second step. If you already have a connection to a database within the Visual Studio Server Explorer, you will see it listed in the drop-down combo box. If this is not the case, you can click the New Connection button. Either way, pick yourAutoLot database and then make certain you save the connection string data in the (autogenerated) App.config file (see Figure 23-6), changing the name to AutoLotConnection.
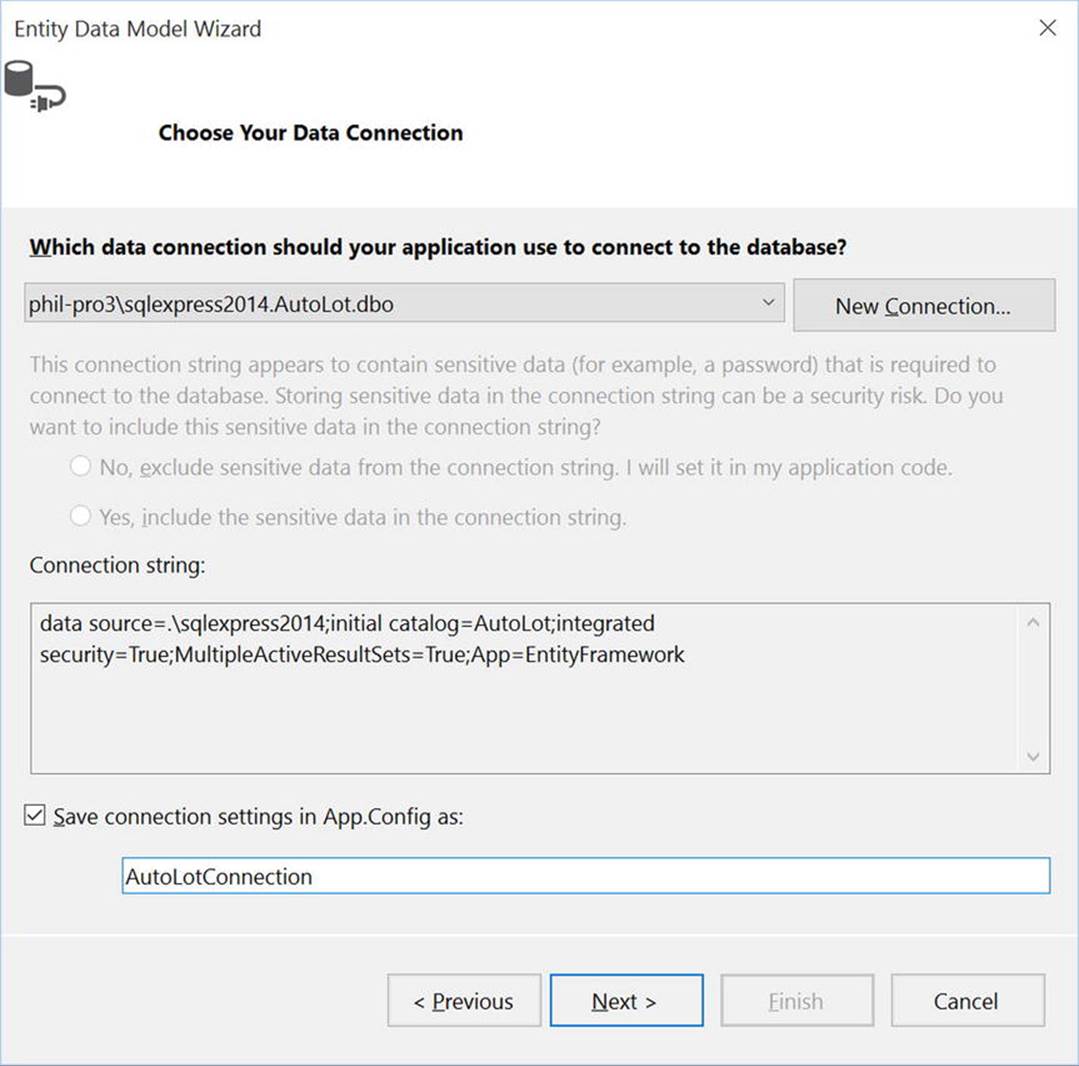
Figure 23-6. Selecting the database used to generate the model
Before you click the Next button, take a moment to examine the format of your connection string.
Data source= .\SQLEXPRESS2014;Initial Catalog=AutoLot;Integrated Security=True;MultipleActiveResultSets=true;App=EntityFramework
This is extremely similar to what you used in Chapters 21 and 22, with the addition of the App=EntityFramework name-value pair. App is short for application name, which can be used when troubleshooting SQL Server issues.
In the wizard’s final step, you can select the items from the database you want to use to generate the EDM. Select all the application tables, making sure you don’t select sysdiagrams (if it exists in your database). The dialog will look something like Figure 23-7.

Figure 23-7. Selecting the database items
Now, click the Finish button to generate your EDM data.
What Did That Do?
After you complete the wizard, you will see several new classes in your project: one for each table that you selected in the wizard and another one named AutoLotEntities (the same name that you entered in the first step of the wizard). By default, the names of your entities will be based on the original database object names; however, recall that the names of entities in your conceptual model can be anything you choose. You can change the entity name, as well as property names of the entity, by using special .NET attributes referred to as data annotations. You will use data annotations to make some modifications to your model.
![]() Note The Fluent API is another way to configure your model classes and properties to map them to the database. Everything you can do with data annotations, you can also do with code through the Fluent API. Because of space and time constraints, I focus on covering data annotations in this chapter with only a brief mention of the Fluent API.
Note The Fluent API is another way to configure your model classes and properties to map them to the database. Everything you can do with data annotations, you can also do with code through the Fluent API. Because of space and time constraints, I focus on covering data annotations in this chapter with only a brief mention of the Fluent API.
Open the Inventory class. The first thing you will notice is a series of attributes decorating the class and properties in the class. These are called data annotations, and they instruct EF how to build your tables and properties when generating the database. They also instruct EF how to map the data from the database to your model classes. At the class level, the Table attribute specifies what table the class maps to. At the property level, there are two attributes in use. The first you see is the Key attribute. This specifies the primary key for the table. The other attribute in use is StringLength, which specifies the string length when generating the DDL for the field. This attribute is also used in validations, as you will see in later chapters.
![]() Note There are also two SuppressMessage attributes. This instructs static analyzers such as FXCop and the new Roslyn code analyzers to turn off the specific rules listed in the constructor.
Note There are also two SuppressMessage attributes. This instructs static analyzers such as FXCop and the new Roslyn code analyzers to turn off the specific rules listed in the constructor.
[Table("Inventory")]
public partial class Inventory
{
[System.Diagnostics.CodeAnalysis.SuppressMessage("Microsoft.Usage", "CA2214:DoNotCallOverridableMethodsInConstructors")]
public Inventory()
{
Orders = new HashSet<Order>();
}
[Key]
public int CarId { get; set; }
[StringLength(50)]
public string Make { get; set; }
[StringLength(50)]
public string Color { get; set; }
[StringLength(50)]
public string PetName { get; set; }
[System.Diagnostics.CodeAnalysis.SuppressMessage("Microsoft.Usage", "CA2227:CollectionPropertiesShouldBeReadOnly")]
public virtual ICollection<Order> Orders { get; set; }
}
You can also see that the Inventory class has a collection of Order objects. This specifies a one-to-many relationship between Inventory and Order. At the other end of the relationship, the Order class specifies a CarId property and a Car property.
public partial class Order
{
public int OrderId { get; set; }
public int CustId { get; set; }
public int CarId { get; set; }
public virtual Customer Customer { get; set; }
public virtual Inventory Inventory { get; set; }
}
Next, open the AutoLotEntities class. This class derives from DbContext and contains a DbSet<TEntity> property for each table that you specified in the wizard. It also overrides OnModelCreating() to use the FluentAPI to define the relationships betweenCustomer and Orders and between Orders and Inventory.
public partial class AutoLotEntities : DbContext
{
public AutoLotEntities()
: base("name=AutoLotConnection")
{
}
public virtual DbSet<CreditRisk> CreditRisks { get; set; }
public virtual DbSet<Customer> Customers { get; set; }
public virtual DbSet<Inventory> Inventories { get; set; }
public virtual DbSet<Order> Orders { get; set; }
protected override void OnModelCreating(DbModelBuilder modelBuilder)
{
modelBuilder.Entity<Customer>()
.HasMany(e => e.Orders)
.WithRequired(e => e.Customer)
.WillCascadeOnDelete(false);
modelBuilder.Entity<Inventory>()
.HasMany(e => e.Orders)
.WithRequired(e => e.Inventory)
.WillCascadeOnDelete(false);
}
}
Finally, open the App.config file. You will see a new configSection (named entityFramework), as well as the connection string generated by the wizard. Most of this you can ignore, but if you change the database, know that the only thing you might need to modify is the connection string values for the AutoLotConnection connection string (the same name you specified in the wizard).
<configuration>
<configSections>
<!-- For more information on Entity Framework configuration, visit http://go.microsoft.com/fwlink/?LinkID=237468 -->
<section name="entityFramework" type="System.Data.Entity.Internal.ConfigFile.EntityFrameworkSection, EntityFramework, Version=6.0.0.0, Culture=neutral, PublicKeyToken=b77a5c561934e089" requirePermission="false" />
</configSections>
<startup>
<supportedRuntime version="v4.0" sku=".NETFramework,Version=v4.6" />
</startup>
<entityFramework>
<defaultConnectionFactory type="System.Data.Entity.Infrastructure.SqlConnectionFactory, EntityFramework" />
<providers>
<provider invariantName="System.Data.SqlClient" type="System.Data.Entity.SqlServer.SqlProviderServices, EntityFramework.SqlServer" />
</providers>
</entityFramework>
<connectionStrings>
<add name="AutoLotConnection" connectionString="data source=.\SQLEXPRESS2014;initial catalog=AutoLot;integrated security=True;MultipleActiveResultSets=True;App=EntityFramework" providerName="System.Data.SqlClient" />
</connectionStrings>
</configuration>
Changing the Default Mappings
As discussed in the previous section, the [Table("Inventory")] attribute specifies that the class maps to the Inventory table. With this attribute in place, you can change the name of your class to anything you want. Change the class name (and the constructor) to Car. In addition to the Table attribute, EF also uses the Column attribute. By adding the [Column("PetName")] attribute to the PetName property, you can change the name of the property to CarNickName. The relevant code should look like this:
[Table("Inventory")]
public partial class Car
{
public Car()
{
Orders = new HashSet<Order>();
}
[StringLength(50), Column("PetName")]
public string CarNickName { get; set; }
//remainder of the class not shown for brevity
}
If you changed the name and didn’t use the Visual Studio refactoring capabilities, your application won’t compile. If it doesn’t compile, open the Order class and change the type and name of the Inventory property to Car. The relevant code is shown here:
public partial class Order
{
public virtual Car Car { get; set; }
//remainder of the class not shown for brevity
}
The last change to make is to the AutoLotEntities class (unless you used the automatic refactorings available to you in Visual Studio 2015). Open the file and change the two occurrences of Inventory to Car and the DbSet<Car> to Cars. The updated code is shown here:
public partial class AutoLotEntities : DbContext
{
public AutoLotEntities()
: base("name=AutoLotConnection")
{
}
// Additional code removed for brevity
public virtual DbSet<Car> Cars { get; set; }
protected override void OnModelCreating(DbModelBuilder modelBuilder)
{
modelBuilder.Entity<Car>()
.HasMany(e => e.Orders)
.WithRequired(e => e.Car
.WillCascadeOnDelete(false);
// Additional code removed for brevity
}
}
![]() Note The EF team has released a set of power tools (appropriately named Entity Framework Power Tools) for Visual Studio. These tools allow various ways to diagram your EDM and additional functionality. At the time of this writing, unfortunately they are not available for Visual Studio 2015. Keep an eye on https://visualstudiogallery.msdn.microsoft.com/72a60b14-1581-4b9b-89f2-846072eff19d/ for an update.
Note The EF team has released a set of power tools (appropriately named Entity Framework Power Tools) for Visual Studio. These tools allow various ways to diagram your EDM and additional functionality. At the time of this writing, unfortunately they are not available for Visual Studio 2015. Keep an eye on https://visualstudiogallery.msdn.microsoft.com/72a60b14-1581-4b9b-89f2-846072eff19d/ for an update.
Adding to the Generated Model Classes
All the designer-generated classes have been declared with the partial keyword, which, if you recall, allows you to implement a class across multiple C# code files. This is especially useful when working with the EF programming model because it means you can add additional methods to your entity classes that help you model your business domain better.
For example, you can override the ToString() method of the Car entity class to return the state of the entity with a well-formatted string. If you add this to the generated class, you risk losing that custom code each time you regenerate your model classes. Instead, define the following partial class declaration in a new file named CarPartial.cs. The new class is listed here:
public partial class Car
{
public override string ToString()
{
// Since the PetName column could be empty, supply
// the default name of **No Name**.
return $"{this.CarNickName ?? "**No Name**"} is a {this.Color} {this.Make} with ID {this.CarId}.";
}
}
Using the Model Classes in Code
Now that you have your model classes, you can author some code that interacts with them and therefore the database. Begin by adding using statements for AutoLotConsoleApp.EF and static System.Console to your Program class.
Inserting a Record
Add a helper method from Main() (named AddNewRecord()), which will insert a new record to the Inventory table.
private static int AddNewRecord()
{
// Add record to the Inventory table of the AutoLot
// database.
using (var context = new AutoLotEntities())
{
try
{
// Hard-code data for a new record, for testing.
var car = new Car() { Make = "Yugo", Color = "Brown", CarNickName="Brownie"};
context.Cars.Add(car);
context.SaveChanges();
// On a successful save, EF populates the database generated identity field.
return car.CarId;
}
catch(Exception ex)
{
WriteLine(ex.InnerException.Message);
return 0;
}
}
}
This code uses the Add() method on the DbSet<Car> class. The Add() method takes an object of type Car and adds it to the Cars collection on the AutoLotEntities context class. By inserting a new Car object with the Add() method of DbSet<Car> and then callingSaveChanges() on the context, you have performed a SQL INSERT. When SaveChanges is called, all pending changes (in this case, only the one additional record) are saved to the database. If no errors occur, then the record is added, and the Car object gets updated with any database-generated values, in this case, the CarId.
To see this in action, update the Main() method like this:
static void Main(string[] args)
{
WriteLine("***** Fun with ADO.NET EF *****\n");
int carId = AddNewRecord();
WriteLine(carId);
ReadLine();
}
The output to the console is indeed the CarId of the new record. It’s important to note that while you didn’t have to do anything special to get the database generated IDs, EF executed a SELECT statement on your behalf to get the CarId value. This is not a big deal in most applications, but it’s important to understand in case performance or scaling issues arise and you need to start trimming calls.
Selecting Records
There are several ways to get records out of the database using EF. The simplest is to iterate over the DbSet<Car> collection. To see this in action, add a new method named PrintAllInventory() . Add a foreach loop for the Cars property of the DbContext (which returns aDbSet<Car>) and print each car, as follows:
private static void PrintAllInventory()
{
// Select all items from the Inventory table of AutoLot,
// and print out the data using our custom ToString()
// of the Car entity class.
using (var context = new AutoLotEntities())
{
foreach (Car c in context.Cars)
{
WriteLine(c);
}
}
}
To see this in action, update your Main() method as follows:
class Program
{
static void Main(string[] args)
{
WriteLine("***** Fun with ADO.NET EF *****\n");
//int carId = AddNewRecord();
//WriteLIne(carId);
PrintAllInventory();
ReadLine();
}
Enumerating each item exposed by the Cars property submits a SQL SELECT statement implicitly to the underlying ADO.NET data provider. It is important to note that underneath EF is creating a DataReader to load the records from the database and then transforms the records from the DataReader into Car types.
Querying with SQL
EF also supports filling DbSets with SQL (either inline or stored procedures). To test this, update the PrintInventory() method to the following:
private static void PrintAllInventory()
{
// Select all items from the Inventory table of AutoLot,
// and print out the data using our custom ToString()
// of the Car entity class.
using (var context = new AutoLotEntities())
{
//foreach (Car c in context.Cars)
//{
// WriteLine(c);
//}
foreach (Car c in context.Cars.SqlQuery("Select CarId,Make,Color,PetName as CarNickName from Inventory where Make=@p0", "BMW"))
{
WriteLine(c);
}
}
}
The good news is that this fills the list with tracked entities, which means that any changes or deletions will get propagated to the database when SaveChanges is called. The bad news (as you can see from the SQL text) is that SqlQuery doesn’t understand the mapping changes that you made earlier. Not only do you have to use the database table and field names, but any field name changes (such as the change to PetName) must be aliased from the database field name to the model property name.
Querying with LINQ
EF becomes much more powerful when you incorporate LINQ queries. Consider this update to the PrintInventory() method that uses LINQ to get the records from the database:
private static void PrintAllInventory()
{
// Select all items from the Inventory table of AutoLot,
// and print out the data using our custom ToString()
// of the Car entity class.
using (var context = new AutoLotEntities())
{
//foreach (Car c in context.Cars)
//{
// WriteLine(c);
//}
//foreach (Car c in context.Cars.SqlQuery("Select CarId,Make,Color,PetName as CarNickName from Inventory where Make=@p0", "BMW"))
//{
// WriteLine(c);
//}
foreach (Car c in context.Cars.Where(c => c.Make == "BMW"))
{
WriteLine(c);
}
}
The LINQ statement is translated into a SQL query, which creates a DataReader, and then returns a collection of attached Cars. The generated query looks something like this (it might differ slightly on your machine):
SELECT
[Extent1].[CarId] AS [CarId],
[Extent1].[Make] AS [Make],
[Extent1].[Color] AS [Color],
[Extent1].[PetName] AS [PetName]
FROM [dbo].[Inventory] AS [Extent1]
WHERE N’BMW’ = [Extent1].[Make]
Given that you have already worked with many LINQ expressions in Chapter 13, a few more examples will suffice for the time being.
private static void FunWithLinqQueries()
{
using (var context = new AutoLotEntities())
{
// Get a projection of new data.
var colorsMakes = from item in context.Cars select new { item.Color, item.Make };
foreach (var item in colorsMakes)
{
WriteLine(item);
}
// Get only items where Color == "Black"
var blackCars = from item in context.Cars where item.Color == "Black" select item;
foreach (var item in blackCars)
{
WriteLine(item);
}
}
}
While the syntax of these queries is simple enough, remember that you are hitting a database each time you apply a LINQ query to the object context! Recall that when you want to obtain an independent copy of data, which can be the target of new LINQ queries, you want to use immediate execution with the ToList<T>(), ToArray<T>(), or ToDictionary<K,V>() extension methods (among others). Here is an update of the previous method, which performs the equivalent of a SELECT *, caches the entities as an array, and manipulates the array data using LINQ to Objects:
using (var context = new AutoLotEntities())
{
// Get all data from the Inventory table.
// Could also write:
// var allData = (from item in context.Cars select item).ToArray();
var allData = context.Cars.ToArray();
// Get a projection of new data.
var colorsMakes = from item in allData select new { item.Color, item.Make };
foreach (var item in colorsMakes)
{
WriteLine(item);
}
// Get only items where Color == “Black”.
var blackCars = from item in allData where item.Color== "Black" select item;
foreach (var item in blackCars)
{
WriteLine(item);
}
}
To run this, update the Main() method to this:
static void Main(string[] args)
{
WriteLine("***** Fun with ADO.NET EF *****\n");
//int carId = AddNewRecord();
//WriteLine(carId);
//PrintAllInventory();
FunWithLinqQueries();
ReadLine();
}
The Role of Navigation Properties
As the name suggests, navigation properties allow you to capture JOIN operations in the Entity Framework programming model (without the need to author complex SQL statements). To account for these foreign key relationships, each class in your model contains virtual properties that connect your classes together. For example, in the Inventory.cs class, the Orders property is defined as virtual ICollection<Order>.
public virtual ICollection<Order> Orders { get; set; }
This tells EF that each Inventory database record (renamed to the Car class for the C# code) can have zero-to-many Order records.
The Order model has zero-to-one Inventory (Car) records associated with it. The Order model navigates back to the Inventory model through another virtual property of type Inventory.
public virtual Car Car { get; set; }
Lazy, Eager, and Explicit Loading
There are three ways that EF loads data into models. Lazy and Eager fetching are based on settings on the context, and the third, Explicit, is developer controlled.
Lazy Loading
The virtual modified allows EF to lazy load the data. This means that EF loads the bare minimum for each object and then retrieves additional details when properties are asked for in code. For example, if you had the following code, EF would call one query to get all the Cars and then for each Car execute another query to get all the Orders:
using (var context = new AutoLotEntities())
{
foreach (Car c in context.Cars)
{
foreach (Order o in c.Orders)
{
WriteLine(o.OrderId);
}
}
}
Lazy loading prevents the entire database (or at least much more than was intended) to be loaded into memory. Since Orders are tied to Cars and Customers are tied to Orders, if the records were eagerly loaded, then getting all Cars would also get all Orders and Customers(except for those customers who didn’t have any orders).
Eager Loading
Sometimes you want to load all related records. For example, if you absolutely knew you needed all Orders and all Cars, you could change the previous code to this:
using (var context = new AutoLotEntities())
{
foreach (Car c in context.Cars.Include(c=>c.Orders))
{
foreach (Order o in c.Orders)
{
WriteLine(o.OrderId);
}
}
}
Then the initial query would get all Cars and all Orders. The Include LINQ expression instructs EF to write one query to get them all, like this:
SELECT
[Project1].[CarId] AS [CarId],
[Project1].[Make] AS [Make],
[Project1].[Color] AS [Color],
[Project1].[PetName] AS [PetName],
[Project1].[C1] AS [C1],
[Project1].[OrderId] AS [OrderId],
[Project1].[CustId] AS [CustId],
[Project1].[CarId1] AS [CarId1]
FROM ( SELECT
[Extent1].[CarId] AS [CarId],
[Extent1].[Make] AS [Make],
[Extent1].[Color] AS [Color],
[Extent1].[PetName] AS [PetName],
[Extent2].[OrderId] AS [OrderId],
[Extent2].[CustId] AS [CustId],
[Extent2].[CarId] AS [CarId1],
CASE WHEN ([Extent2].[OrderId] IS NULL) THEN CAST(NULL AS int) ELSE 1 END AS [C1]
FROM [dbo].[Inventory] AS [Extent1]
LEFT OUTER JOIN [dbo].[Orders] AS [Extent2] ON [Extent1].[CarId] = [Extent2].[CarId]
) AS [Project1]
ORDER BY [Project1].[CarId] ASC, [Project1].[C1] ASC
The exact syntax of the query doesn’t really matter; I’ve shown it to demonstrate that all Cars and Orders are getting retrieved in one call to the database.
Explicit Loading
Explicit loading loads a collection or class that is referenced by a navigation property. If lazy loading is disabled, then you need to either eager load related objects or explicitly load them. You can turn off lazy loading by setting the LazyLoadingEnabled property on the DbContextconfiguration, like this:
context.Configuration.LazyLoadingEnabled = false;
Then, to get the related object(s), you have to use the Collection (for collections) or Property (for single objects) methods of the context and Load. The following code shows using Collection.Load():
foreach (Car c in context.Cars)
{
context.Entry(c).Collection(x => x.Orders).Load();
foreach (Order o in c.Orders)
{
WriteLine(o.OrderId);
}
}
Deleting a Record
When you want to remove a record from the database, one way is to locate the correct item in the DbSet<T> and then call Remove, passing in that instance. You can find the correct record by calling the Find() method on the DbSet<T> and passing in the primary key of the car you want to delete. Add the following method to your class:
private static void RemoveRecord(int carId)
{
// Find a car to delete by primary key.
using (var context = new AutoLotEntities())
{
// See if we have it.
Car carToDelete = context.Cars.Find(carId);
if (carToDelete != null)
{
context.Cars.Remove(carToDelete);
context.SaveChanges();
}
}
}
To run this, update the Main() method to this (remember to uncomment the AddNewRecord() line if you commented it out for the previous examples):
static void Main(string[] args)
{
WriteLine("***** Fun with ADO.NET EF *****\n");
int carId = AddNewRecord();
RemoveRecord(carId);
//WriteLine(carId);
//PrintAllInventory();
//FunWithLinqQueries();
ReadLine();
}
![]() Note Calling Find() before deleting a record requires an extra round-trip to the database. As you will see next, setting EntityState is a much more efficient way to delete records.
Note Calling Find() before deleting a record requires an extra round-trip to the database. As you will see next, setting EntityState is a much more efficient way to delete records.
Deleting a Record Using EntityState
As mentioned earlier, you can delete a record using EntityState, which doesn’t require a round-trip to the database. Add a new method named RemoveRecordUsingEntityState(), as follows:
private static void RemoveRecordUsingEntityState(int carId)
{
using (var context = new AutoLotEntities())
{
Car carToDelete = new Car() { CarId = carId };
context.Entry(carToDelete).State = EntityState.Deleted;
try
{
context.SaveChanges();
}
catch (DbUpdateConcurrencyException ex)
{
WriteLine(ex);
}
}
}
Create a new Car object, set the primary key to the value you want to delete, set EntityState to EntityState.Deleted, and then call SaveChanges(). You gain performance (since you are not making an extra call to the database), but you lose the validation that the object exists in the database (if that matters to your scenario). If the CarId does not exist in the database, EF will throw a DbUpdateConcurrencyException in the System.Data.Entity.Infrastructure namespace. The exact entities in error are accessible from the Entriesproperty of the exception, so you can determine which ones were in error.
![]() Note The fact that nothing is updated does not trigger the DbUpdateConcurrencyException exception. It is thrown when the total number objects that should be updated or deleted (based on the entity state) is greater than the total number of objects that actually were updated. The objects in error are exposed through the Entries property of the exception. On each entry, you can access the current values, the original values, and the current database values (by executing another query) of the properties.
Note The fact that nothing is updated does not trigger the DbUpdateConcurrencyException exception. It is thrown when the total number objects that should be updated or deleted (based on the entity state) is greater than the total number of objects that actually were updated. The objects in error are exposed through the Entries property of the exception. On each entry, you can access the current values, the original values, and the current database values (by executing another query) of the properties.
Updating a Record
Updating a record is also straightforward. Locate the object you want to change, set new property values on the returned entity, and save the changes, like so:
private static void UpdateRecord(int carId)
{
// Find a car to delete by primary key.
using (var context = new AutoLotEntities())
{
// Grab the car, change it, save!
Car carToUpdate = context.Cars.Find(carId);
if (carToUpdate != null)
{
WriteLine(context.Entry(carToUpdate).State);
carToUpdate.Color = "Blue";
WriteLine(context.Entry(carToUpdate).State);
context.SaveChanges();
}
}
}
Handling Database Changes
In this section, you created an EF solution that started with an existing database. This works great, for example, when your organization has dedicated DBAs and you are provided with a database that you don’t control. As your database changes over time, all you need to do is run the wizard again and re-create your AutoLotEntities class; the model classes will be rebuilt for you as well. Of course, you will most likely need to refactor any code that uses your model. But hey, it wouldn’t be any fun if everything was magically done for you!
This initial example should go a long way toward helping you understand the nuts and bolts of working with the Entity Framework.
![]() Source Code You can find the AutoLotConsoleApp example in the Chapter 23 subdirectory.
Source Code You can find the AutoLotConsoleApp example in the Chapter 23 subdirectory.
AutoLotDAL Version 4
In the previous section, you created the EF code from an existing database. EF can also create your database for you based on your model classes and derived DbContext class. In addition to creating the initial database, EF enables you to create migrations to update your database to match model changes.
![]() Note This is the version of AutoLotDAL.dll that will carry forward for the rest of the book.
Note This is the version of AutoLotDAL.dll that will carry forward for the rest of the book.
To get started, create a new Class Library project named AutoLotDAL. Delete the default class that was created and add two folders, named EF and Models. Add the Entity Framework to the project using NuGet. Right-click the project name and click Manage NuGet Packages (seeFigure 23-8). (You didn’t need to explicitly add EF to the previous example because the wizard took care of that for you. I like to add the packages in manually so I know what version is getting installed.)
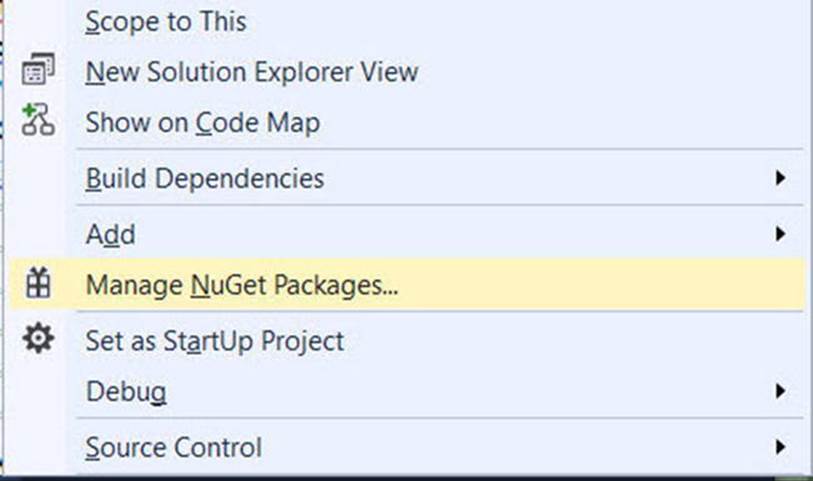
Figure 23-8. Selecting Manage NuGet Packages
Once the NuGet Package Manager loads, select Entity Framework (shown in Figure 23-9).
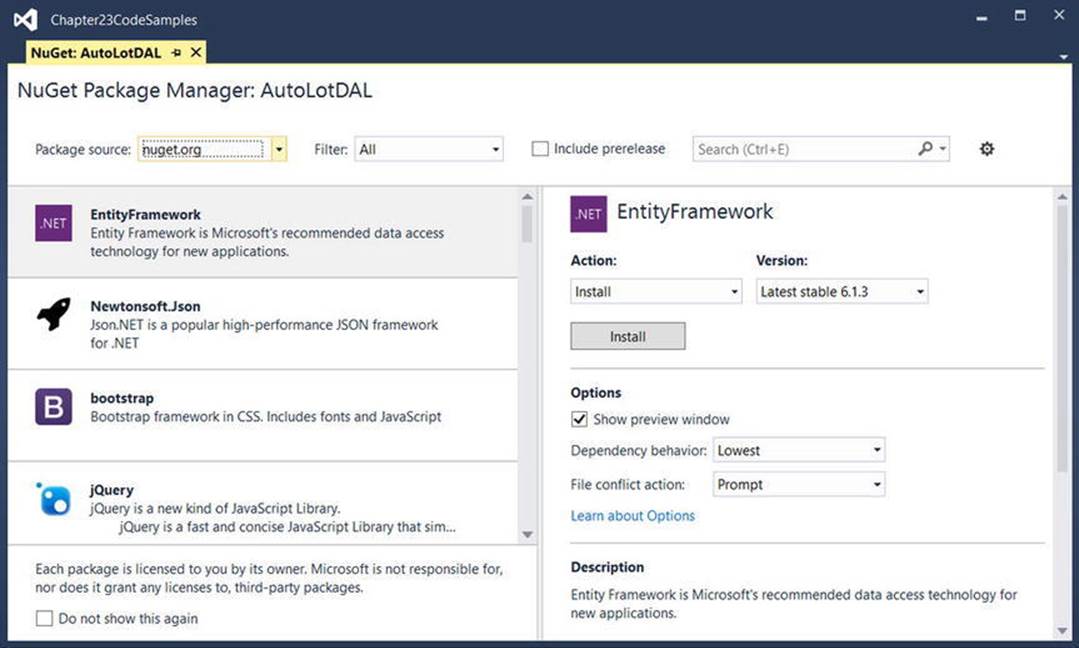
Figure 23-9. NuGet Package Manager
Accept the changes and the license agreement, and the Entity Framework (version 6.1.3 at the time of this writing) will be installed into your project.
Entity Framework Data Annotations
I briefly discussed data annotations earlier, and you saw Table, Column, Key, and StringLength in use. There are many more annotations that you can use to refine your model and add validations, and you will use many of them through the remainder of this chapter and book.
![]() Note There are many more data annotations available in the .NET Framework than shown in Table 23-5. Consult the System.ComponentModel.DataAnnotations and System.ComponentModel.DataAnnotations.Schema namespaces in the .NET 4.6 Framework documentation for more information.
Note There are many more data annotations available in the .NET Framework than shown in Table 23-5. Consult the System.ComponentModel.DataAnnotations and System.ComponentModel.DataAnnotations.Schema namespaces in the .NET 4.6 Framework documentation for more information.
Table 23-5. Data Annotations Supported by Entity Framework
|
Data Annotation |
Meaning in Life |
|
Key |
Defines the primary key for the model. This is not necessary if the key property is named Id or combines the class name with Id, such as OrderId. If the key is a composite, you must add the Column attribute with an Order, such as Column[Order=1] and Column[Order=2]. Key fields are implicitly also [Required]. |
|
Required |
Declares the property as not nullable. |
|
ForeignKey |
Declares a property that is used as the foreign key for a navigation property. |
|
StringLength |
Specifies the min and max lengths for a string property. |
|
NotMapped |
Declares a property that is not mapped to a database field. |
|
ConcurrencyCheck |
Flags a field to be used in concurrency checking when the database server does updates, inserts, or deletes. |
|
TimeStamp |
Declares a type as a row version or timestamp (depending on the database provider). |
|
Table Column |
Allows you to name your model classes and fields differently than how they are declared in the database. The Table attribute allows specification of the schema as well (as long as the data store supports schemas). |
|
DatabaseGenerated |
Specifies if the field is database generated. This takes one of Computed, Identity, or None. |
|
NotMapped |
Specifies that EF needs to ignore this property in regard to database fields. |
|
Index |
Specifies that a column should have an index created for it. You can specify clustered, unique, name, and order. |
![]() Note In addition to data annotations, EF supports a Fluent API to define your table structure and relationships. Although you saw a small example in the earlier section, the Fluent API is beyond the scope of this chapter. You can find more information on defining tables and columns using the Fluent API here: https://msdn.microsoft.com/en-us/data/jj591617. You can find more information on defining relationships here: https://msdn.microsoft.com/en-us/data/jj591620.
Note In addition to data annotations, EF supports a Fluent API to define your table structure and relationships. Although you saw a small example in the earlier section, the Fluent API is beyond the scope of this chapter. You can find more information on defining tables and columns using the Fluent API here: https://msdn.microsoft.com/en-us/data/jj591617. You can find more information on defining relationships here: https://msdn.microsoft.com/en-us/data/jj591620.
Adding or Updating the Model Classes
In this section, you can either start from the model classes created in the previous example or start from scratch and create new classes as you work through the chapter exercises. I will start from scratch so you can follow the whole process from start to finish.
Start by adding a new folder named Models to your project and add four classes, named CreditRisk.cs, Customer.cs, Inventory.cs, and Order.cs.
Creating the Inventory Model Class
Open Inventory.cs, change the class to public and partial, and add the following properties as well as usings for System.ComponentModel.DataAnnotations and System.ComponentModel.DataAnnotations.Schema to the top of the class:
public partial class Inventory
{
public int CarId { get; set; }
public string Make { get; set; }
public string Color { get; set; }
public string PetName { get; set; }
}
Configuring the Model with Data Annotations
Start by using the Table attribute to specify the table name of Inventory. By default, EF uses the convention that table names are pluralized, so the default table name is Inventories. Add the Key attribute to the CarId property and add StringLength(50) for each of the string properties. The Key attribute indicates that the field is the primary key for the table. StringLength(50) sets the max length for the string property. You can also set the min length as well, although the min value is used only for validation and does not affect the creation of the database field like max does. The updated code is listed here:
using System.Collections.Generic;
using System.ComponentModel.DataAnnotations;
using System.ComponentModel.DataAnnotations.Schema;
namespace AutoLotDAL.Models
{
[Table("Inventory")]
public partial class Inventory
{
[Key]
public int CarId { get; set; }
[StringLength(50)]
public string Make { get; set; }
[StringLength(50)]
public string Color { get; set; }
[StringLength(50)]
public string PetName { get; set; }
}
}
Adding the Navigation Property to Inventory
As mentioned in the section on navigation properties, the Orders related to an Inventory record are accessed through an ICollection<Order>, as follows:
public virtual ICollection<Order> Orders { get; set; } = new HashSet<Order>();
The complete class is listed here:
using System.Collections.Generic;
using System.ComponentModel.DataAnnotations;
using System.ComponentModel.DataAnnotations.Schema;
namespace AutoLotDAL.Models
{
[Table("Inventory")]
public partial class Inventory
{
[Key]
public int CarId { get; set; }
[StringLength(50)]
public string Make { get; set; }
[StringLength(50)]
public string Color { get; set; }
[StringLength(50)]
public string PetName { get; set; }
public virtual ICollection<Order> Orders { get; set; } = new HashSet<Order>();
}
}
Adding the InventoryPartial Class
You are now going to add a partial class to override the ToString() method of the Inventory class. Create a new directory under the Models directory named Partials. Add a new class named InventoryPartial.cs. Open the InventoryPartial.cs class, rename the class to Inventory, and make sure the namespace is set to AutoLotDAL.Models (not AutoLotDAL.Models.Partials, which is the default). Add the following code:
public partial class Inventory
{
public override string ToString()
{
// Since the PetName column could be empty, supply
// the default name of **No Name**.
return $"{this.PetName ?? "**No Name**"} is a {this.Color} {this.Make} with ID {this.CarId}.";
}
}
Next, add a calculated field that combines the Make and Color of the car. This is a field that is not to be stored in the database and doesn’t get populated when an object is materialized with data from the database, so you need to add the [NotMapped] attribute to the property.
[NotMapped]
public string MakeColor => $"{Make} + ({Color})";
Creating the Customer Model Class
Open the Customer.cs class and add usings for System.ComponentModel.DataAnnotations and System.ComponentModel.DataAnnotations.Schema to the top of the class. The process is the same as you entered for the Inventory class, so I will just list the code here. The one item to note is the FullName property, which is calculated and therefore has the NotMapped attribute applied. Here is the class in its entirety:
using System.Collections.Generic;
using System.ComponentModel.DataAnnotations;
using System.ComponentModel.DataAnnotations.Schema;
namespace AutoLotDAL.Models
{
public partial class Customer
{
[Key]
public int CustId { get; set; }
[StringLength(50)]
public string FirstName { get; set; }
[StringLength(50)]
public string LastName { get; set; }
[NotMapped]
public string FullName => FirstName + " " + LastName;
public virtual ICollection<Order> Orders { get; set; } = new HashSet<Order>();
}
}
Creating the Order Model Class
Open the Order.cs class and add usings for System.ComponentModel.DataAnnotations and System.ComponentModel.DataAnnotations.Schema to the top of the class. Add the OrderId primary key field and then the Customer and Car navigation properties. In addition to the navigation properties, add the foreign key fields CustId and CarId. The class is shown here:
using System.ComponentModel.DataAnnotations;
using System.ComponentModel.DataAnnotations.Schema;
namespace AutoLotDAL.Models
{
public partial class Order
{
public int OrderId { get; set; }
public int CustId { get; set; }
public int CarId { get; set; }
public virtual Customer Customer { get; set; }
public virtual Inventory Car { get; set; }
}
}
Now you will apply the data annotation attributes to the Order.cs class. The primary key, OrderId, is also the primary key of the table (and therefore required) and is set up as an Identity column. You want to add three attributes to the OrderId property.
· [Key]: Denotes the primary key
· [Required]: Denotes that the field is non-nullable
· [DatabaseGenerated(DatabaseGeneratedOption.Identity)]: Denotes that the field is an Identity column
As you recall from earlier in the book, you can list all three attributes separately or together as a comma-separated list. Place them all together, and your OrderId property should look like this:
[Key, Required, DatabaseGenerated(DatabaseGeneratedOption.Identity)]
public int OrderId { get; set;}
Both of the values that back the navigation properties are, by default, required since the types are not nullable. However, for readability, you will mark them as required explicitly.
[Required]
public int CustId { get; set; }
[Required]
public int CarId { get; set; }
Finally, you use annotations to indicate which properties serve as the backing fields for the two navigation properties.
[ForeignKey("CustId")]
public virtual Customer Customer { get; set; }
[ForeignKey("CarId")]
public virtual Inventory Car { get; set; }
The entire class is listed here:
public partial class Order
{
[Key, Required, DatabaseGenerated(DatabaseGeneratedOption.Identity)]
public int OrderId { get; set; }
[Required]
public int CustId { get; set; }
[Required]
public int CarId { get; set; }
[ForeignKey("CustId")]
public virtual Customer Customer { get; set; }
[ForeignKey("CarId")]
public virtual Inventory Car { get; set; }
}
Creating the CreditRisk Class
Open the CreditRisk.cs class and add usings for System.ComponentModel.DataAnnotations and System.ComponentModel.DataAnnotations.Schema to the top of the class. The only changes you need to make to the CreditRisk.cs model class is moving to the new namespace. The initial class is shown here:
using System.ComponentModel.DataAnnotations;
using System.ComponentModel.DataAnnotations.Schema;
namespace AutoLotDAL.Models
{
public partial class CreditRisk
{
public int CustId { get; set; }
public string FirstName { get; set; }
public string LastName { get; set; }
}
}
Add in the Key attribute for CustId and StringLength attributes for FirstName and LastName. The full Order.cs class is shown here:
namespace AutoLotDAL.Models
{
public partial class CreditRisk
{
[Key]
public int CustId { get; set; }
[StringLength(50)]
public string FirstName { get; set; }
[StringLength(50)]
public string LastName { get; set; }
}
}
Adding the DbContext
One important piece of the puzzle is still missing: the context class that derives from DbContext! Fortunately, this is easy to add. Select the EF folder in the AutoLotDAL project and select the Project ![]() Add New Item menu option. Select Data in the left sidebar, select ADO.NET Entity Data Model in the main section, and enter AutoLotEntities for the name (as shown in Figure 23-10).
Add New Item menu option. Select Data in the left sidebar, select ADO.NET Entity Data Model in the main section, and enter AutoLotEntities for the name (as shown in Figure 23-10).
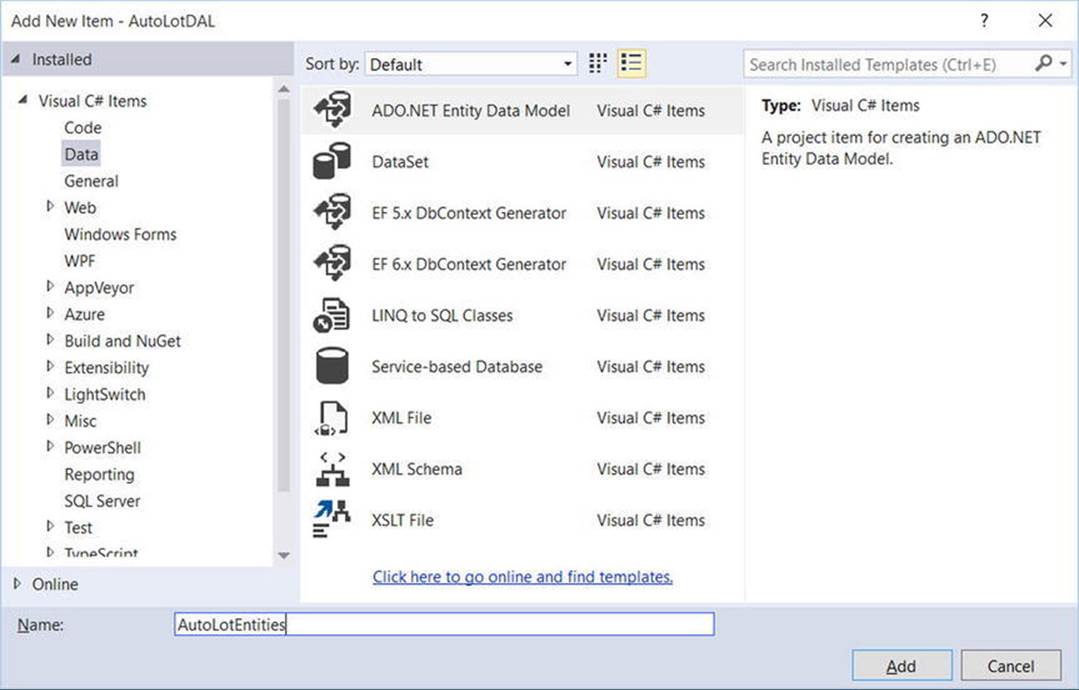
Figure 23-10. Adding a context to your project
In the Entity Data Model Wizard, select Empty Code First Model (shown in Figure 23-11).
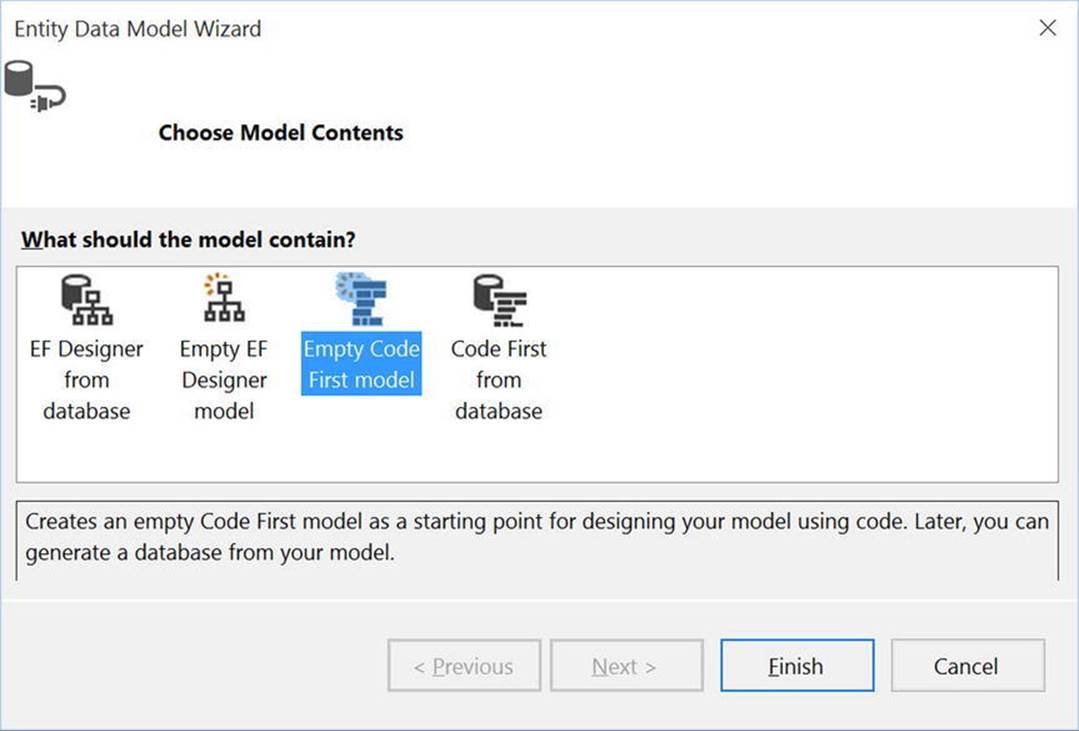
Figure 23-11. Selecting the Empty Code First model
One difference might have become apparent: the wizard never asked you for a connection string! The Code First From an Empty Database wizard presumes that there isn’t a database (go figure), so it builds a new connection string for you, which you’ll examine in the next section.
Updates to the *.config File and the EF Connection String
Open the App.config file and look at the changes that were made by EF. Most of them should look familiar to you. Two glaring differences are the data source and initial catalog properties in the connection string.
<connectionStrings>
<add name="AutoLotEntities" connectionString="data source=(LocalDb)\MSSQLLocalDB;initial catalog=AutoLotDAL.EF.AutoLotEntities;integrated security=True;MultipleActiveResultSets=True;App=EntityFramework" providerName="System.Data.SqlClient" />
</connectionStrings>
LocalDb is a flavor of SQL Server Express targeted to application developers. It uses the minimal set of files and doesn’t require any configuration on the part of the developer. Instead of a server name, such as (local)\SQLEXPRESS2014, you can use (LocalDb) with a unique name.
The catalog (database name) was derived from the namespace plus the name assigned in the wizard. In this case, it’s AutoLotDAL.EF.AutoLotEntities.
Later in the chapter you will move the database to SQL Server Express (for the benefit of later chapters), but for now just change the name of the catalog to AutoLot and the connection string to AutoLotConnection.
<add name="AutoLotConnection" connectionString="data source=(LocalDb)\MSSQLLocalDb;initial catalog=AutoLot;integrated security=True;MultipleActiveResultSets=True;App=EntityFramework" providerName="System.Data.SqlClient" />
Update the Context
The constructor for your derived DbContext class passes the name of the connection string to the base DbContext class. Open AutoLotEntities.cs and change the connection string in the constructor to AutoLotConnection. The updated code is shown here:
public class AutoLotEntities : DbContext
{
public AutoLotEntities()
: base("name=AutoLotConnection")
{
}
}
Add the using statement for the models (AutoLotDAL.Models) and then add a DbSet for each of the model classes. The relevant code is shown here:
public virtual DbSet<CreditRisk> CreditRisks { get; set; }
public virtual DbSet<Customer> Customers { get; set; }
public virtual DbSet<Inventory> Inventory { get; set; }
public virtual DbSet<Order> Orders { get; set; }
Adding the Repositories
A common data access design pattern is the Repository pattern. As described by Martin Fowler, the core of this pattern is to mediate between the domain and data mapping layers. While the full explanation of the repository pattern is beyond the scope of this book, the pattern is helpful in eliminating duplicate code.
![]() Note You can find more information on the repository pattern on Martin Fowler’s web site at www.martinfowler.com/eaaCatalog/repository.html.
Note You can find more information on the repository pattern on Martin Fowler’s web site at www.martinfowler.com/eaaCatalog/repository.html.
Adding the IRepo Interface
One of the advantages of EF is that all the models and collections are strongly typed. You want to continue that trend with your repository classes. Start by adding a new folder in the AutoLotDAL project named Repos. Add a new interface into the Repos folder named IRepo.
The interface will expose the essential CRUD methods for your models. You will expose both the synchronous and asynchronous versions (for more information on the asynchronous versions, see Chapter 19). The full interface is listed here:
interface IRepo<T>
{
int Add(T entity);
Task<int> AddAsync(T entity);
int AddRange(IList<T> entities);
Task<int> AddRangeAsync(IList<T> entities);
int Save(T entity);
Task<int> SaveAsync(T entity);
int Delete(int id);
Task<int> DeleteAsync(int id);
int Delete(T entity);
Task<int> DeleteAsync(T entity);
T GetOne(int? id);
Task<T> GetOneAsync(int? id);
List<T> GetAll();
Task<List<T>> GetAllAsync();
List<T> ExecuteQuery(string sql);
Task<List<T>> ExecuteQueryAsync(string sql);
List<T> ExecuteQuery(string sql,object[] sqlParametersObjects );
Task<List<T>> ExecuteQueryAsync(string sql, object[] sqlParametersObjects);
}
The last four members allow for passing in a string SQL query (with overloads that accept parameters for the SQL string). Executing these methods will load (and track) the entities into the DbSet<T> of the context. These methods are not typically used, as you can build powerful queries with LINQ that hide the SQL details from the developer, but they are included here to show how to call SQL directly within the context.
![]() Note There has been a lot of discussion on the merits and potential problems of executing data access code asynchronously from a high-volume system (such as a web application or service). I am presenting the synchronous and asynchronous mechanisms with EF in this book and leaving it up to you to test your particular application.
Note There has been a lot of discussion on the merits and potential problems of executing data access code asynchronously from a high-volume system (such as a web application or service). I am presenting the synchronous and asynchronous mechanisms with EF in this book and leaving it up to you to test your particular application.
Adding the BaseRepo
Next, add another class to the Repos directory named BaseRepo. This class will implement the common functionality for all your repository classes, which they will all subclass. The class will be a generic class so the derived repositories can strongly type the methods. Start by adding a protected property for the AutoLotEntities context and instantiating it. The initial class definition is shown here:
using AutoLotDAL.EF;
public abstract class BaseRepo<T> where T:class,new()
{
public AutoLotEntities Context { get; } = new AutoLotEntities();
}
All the actions start with the DbSet<T> property of the context, so add a protected property of the DbSet<T> named table, like this:
using AutoLotDAL.EF;
public abstract class BaseRepo<T>:where T:class,new()
{
public AutoLotEntities Context { get; } = new AutoLotEntities();
protected DbSet<T> Table;
}
Implementing the SaveChanges() Helper Methods
Next, add two methods for saving changes, one synchronous and the other asynchronous. These methods are merely wrappers for the SaveChanges() and SaveChangesAsync() methods of the DbContext and are placed here in the base class so all derived repositories can share the implementation. There is typically a significant amount of code and error handling code associated with calling these methods, and it is best to write that code only once. The exception handlers for the SaveChanges() method on the DbContext are stubbed out. In a production application, you would need to handle any exceptions accordingly.
internal int SaveChanges()
{
try
{
return Context.SaveChanges();
}
catch (DbUpdateConcurrencyException ex)
{
//Thrown when there is a concurrency error
//for now, just rethrow the exception
throw;
}
catch (DbUpdateException ex)
{
//Thrown when database update fails
//Examine the inner exception(s) for additional
//details and affected objects
//for now, just rethrow the exception
throw;
}
catch (CommitFailedException ex)
{
//handle transaction failures here
//for now, just rethrow the exception
throw;
}
catch (Exception ex)
{
//some other exception happened and should be handled
throw;
}
}
internal async Task<int> SaveChangesAsync()
{
try
{
return await Context.SaveChangesAsync();
}
catch (DbUpdateConcurrencyException ex)
{
//Thrown when there is a concurrency error
//for now, just rethrow the exception
throw;
}
catch (DbUpdateException ex)
{
//Thrown when database update fails
//Examine the inner exception(s) for additional
//details and affected objects
//for now, just rethrow the exception
throw;
}
catch (CommitFailedException ex)
{
//handle transaction failures here
//for now, just rethrow the exception
throw;
}
catch (Exception ex)
{
//some other exception happened and should be handled
throw;
}
}
![]() Note Creating a new instance of the DbContext can be an expensive process from a performance perspective. When a new instance of your context class is created, the base DbContext communicates several times with the database. The amount of this communication varies based on several factors, including the complexity of the model and the number of migrations, to name a few. If you will be using this class on a client like WPF or WinForms, then in reality there won’t be that many instances of this class created. If this is for a web app (like ASP.NET WebForms or ASP.NET MVC), it might be prudent to make BaseRepo a singleton. There isn’t one absolute way because every situation is different and must be customized to your particular application.
Note Creating a new instance of the DbContext can be an expensive process from a performance perspective. When a new instance of your context class is created, the base DbContext communicates several times with the database. The amount of this communication varies based on several factors, including the complexity of the model and the number of migrations, to name a few. If you will be using this class on a client like WPF or WinForms, then in reality there won’t be that many instances of this class created. If this is for a web app (like ASP.NET WebForms or ASP.NET MVC), it might be prudent to make BaseRepo a singleton. There isn’t one absolute way because every situation is different and must be customized to your particular application.
Retrieving Records
The GetOne()/GetOneAsync() methods wrap the Find()/FindAsync() methods of the DbSet<T>. Similarly, the GetAll()/GetAllAsync() methods wrap the ToList()/ToListAsync() methods. The code is listed here:
public T GetOne(int? id) => Table.Find(id);
public Task<T> GetOneAsync(int? id) => Table.FindAsync(id);
public List<T> GetAll() => Table.ToList();
public Task<List<T>> GetAllAsync() => Table.ToListAsync();
Retrieving Records with SQL
The last four methods of the interface to implement are the SQL string methods. They pass through the string and parameters to the DbSet<T> and are shown here:
public List<T> ExecuteQuery(string sql) => Table.SqlQuery(sql).ToList();
public Task<List<T>> ExecuteQueryAsync(string sql)
=> Table.SqlQuery(sql).ToListAsync();
public List<T> ExecuteQuery(string sql, object[] sqlParametersObjects)
=> Table.SqlQuery(sql, sqlParametersObjects).ToList();
public Task<List<T>> ExecuteQueryAsync(string sql, object[] sqlParametersObjects)
=> Table.SqlQuery(sql).ToListAsync();
![]() Note You should be extremely careful running raw SQL strings against a data store, especially if the string accepts input from a user. Doing so makes your application ripe for SQL injection attacks. This book doesn’t cover security, but I do want to point out the dangers of running raw SQL statements.
Note You should be extremely careful running raw SQL strings against a data store, especially if the string accepts input from a user. Doing so makes your application ripe for SQL injection attacks. This book doesn’t cover security, but I do want to point out the dangers of running raw SQL statements.
Adding Records
Many of the methods can be handled in the BaseRepo with generics. Start with the Add() and AddRange() methods (remember that you are implementing both asynchronous and synchronous versions in your examples; you might need only one or the other). Each of theAdd()/AddRange() methods adds a T/IList<T> to the DbSet<T> (referenced by the property Table). Then you need to call SaveChanges()/SaveChangesAsync(). The code is shown here:
public int Add(T entity)
{
Table.Add(entity);
return SaveChanges();
}
public Task<int> AddAsync(T entity)
{
Table.Add(entity);
return SaveChangesAsync();
}
public int AddRange(IList<T> entities)
{
Table.AddRange(entities);
return SaveChanges();
}
public Task<int> AddRangeAsync(IList<T> entities)
{
Table.AddRange(entities);
return SaveChangesAsync();
}
You finish the core of the BaseRepo by implementing the IDisposable interface, which helps to ensure any resources are released in a timely manner. Start by adding the IDisposable interface to the class and then add the following code (notice calling Context.Dispose()in the Dispose() method):
public abstract class BaseRepo: IDisposable
{
protected AutoLotEntities Context { get; } = new AutoLotEntities();
//SaveChanges and SaveChangesAsync omitted for brevity
bool disposed = false;
public void Dispose()
{
Dispose(true);
GC.SuppressFinalize(this);
}
protected virtual void Dispose(bool disposing)
{
if (disposed)
return;
if (disposing)
{
Context.Dispose();
// Free any managed objects here.
//
}
// Free any unmanaged objects here.
//
disposed = true;
}
}
![]() Note You can find more information on implementing IDisposable at https://msdn.microsoft.com/en-us/library/system.idisposable(v=vs.110).aspx.
Note You can find more information on implementing IDisposable at https://msdn.microsoft.com/en-us/library/system.idisposable(v=vs.110).aspx.
Updating Records
For the Save()/SaveAsync() methods, first set the EntityState of the entity to EntityState.Modified and then call SaveChanges()/SaveChangesAsync(). Setting the state ensures that the context will propagate the changes to the server. The code is listed here:
public int Save(T entity)
{
Context.Entry(entity).State = EntityState.Modified;
return SaveChanges();
}
public Task<int> SaveAsync(T entity)
{
Context.Entry(entity).State = EntityState.Modified;
return SaveChangesAsync();
}
Deleting Records
You will add similar code for the Delete()/DeleteAsync() methods. If the calling code passes in an object, the generic methods in the BaseRepo set the state to EntityState.Deleted and then call SaveChanges()/SaveChangesAsync(). The code is listed here:
public int Delete(T entity)
{
Context.Entry(entity).State = EntityState.Deleted;
return SaveChanges();
}
public Task<int> DeleteAsync(T entity)
{
Context.Entry(entity).State = EntityState.Deleted;
return SaveChangesAsync();
}
Adding the Inventory Repository
Add a new class to the Repos directory and name it InventoryRepo.cs. Inherit BaseRepo<Inventory>, implement IRepo<Inventory>, and assign the Table variable to the DbSet<Inventory>. The initial code should look like this:
public class InventoryRepo : BaseRepo<Inventory>, IRepo<Inventory>
{
public InventoryRepo()
{
Table = Context.Inventory;
}
}
Next, you need to implement all the members of the interface.
Deleting Records by Id
When you need to delete an Inventory record by the primary key, you need to create a new instance of the Inventory class, assign the CarId to the id parameter, and then set the state to EntityState.Deleted. After setting the state, callSaveChanges/SaveChangesAsync. The code is listed here:
public int Delete(int id)
{
Context.Entry(new Inventory() {CarId=id}).State = EntityState.Deleted;
return SaveChanges();
}
public Task<int> DeleteAsync(int id)
{
Context.Entry(new Inventory() { CarId = id }).State = EntityState.Deleted;
return SaveChangesAsync();
}
Adding the Remaining Repositories
The CustomerRepo, OrderRepo, and CreditRiskRepo classes follow the same pattern as the InventoryRepo class. Copy the InventoryRepo.cs class to CreditRiskRepo.cs, CustomerRepo.cs, and OrderRepo.cs, and update the Delete() methods, generic types, and constructors accordingly. They are shown here for completeness:
public class OrderRepo:BaseRepo<Order>,IRepo<Order>
{
public OrderRepo()
{
Table = Context.Orders;
}
public int Delete(int id)
{
Context.Entry(new Order()
{
OrderId = id
}).State = EntityState.Deleted;
return SaveChanges();
}
public Task<int> DeleteAsync(int id)
{
Context.Entry(new Order()
{
OrderId = id
}).State = EntityState.Deleted;
return SaveChangesAsync();
}
}
public class CustomerRepo:BaseRepo<Customer>,IRepo<Customer>
{
public CustomerRepo()
{
Table = Context.Customers;
}
public int Delete(int id)
{
Context.Entry(new Customer()
{
CustId = id
}).State = EntityState.Deleted;
return SaveChanges();
}
public Task<int> DeleteAsync(int id)
{
Context.Entry(new Customer()
{
CustId = id
}).State = EntityState.Deleted;
return SaveChangesAsync();
}
}
public class CreditRiskRepo:BaseRepo<CreditRisk>,IRepo<CreditRisk>
{
public CreditRiskRepo()
{
Table = Context.CreditRisks;
}
public int Delete(int id)
{
Context.Entry(new CreditRisk()
{
CustId = id
}).State = EntityState.Deleted;
return SaveChanges();
}
public Task<int> DeleteAsync(int id)
{
Context.Entry(new CreditRisk()
{
CustId = id
}).State = EntityState.Deleted;
return SaveChangesAsync();
}
}
Initializing the Database
A powerful feature of EF is the ability to initialize the database with data. This is especially handy during development since the process can restore the database to a known state before each run of your code. The process is to create a class that inherits fromDropCreateDatabaseIfModelChanges<TContext> or DropCreateDatabaseAlways<TContext>
Start by creating a new class in the EF directory, and name the class DataInitializer. Inherit DropCreateDatabaseAlways<AutoLotEntities> and override the Seed() method, like this:
using System.Collections.Generic;
using System.Data.Entity;
using AutoLotDAL.Models;
public class DataInitializer : DropCreateDatabaseAlways<AutoLotEntities>
{
protected override void Seed(AutoLotEntities context)
{
}
}
The DropCreateDatabaseAlways class is strongly typed to the AutoLotEntities context class and, as the name states, will drop and re-create the database every time the program is executed. Likewise, the DropCreateDatabaseIfModelChanges<TContext> classwill drop and re-create the database only when there are changes in the model. The Seed() method brings an instance of your derived context that you can use to populate the tables. The process is simple: call Add on the correct DbSet, and when you are finished adding records, callSaveChanges. Here is an example of how to seed the database with the same records you used in the previous chapter:
protected override void Seed(AutoLotEntities context)
{
var customers = new List<Customer>
{
new Customer {FirstName = "Dave", LastName = "Brenner"},
new Customer {FirstName = "Matt", LastName = "Walton"},
new Customer {FirstName = "Steve", LastName = "Hagen"},
new Customer {FirstName = "Pat", LastName = "Walton"},
new Customer {FirstName = "Bad", LastName = "Customer"},
};
customers.ForEach(x => context.Customers.Add(x));
var cars = new List<Inventory>
{
new Inventory {Make = "VW", Color = "Black", PetName = "Zippy"},
new Inventory {Make = "Ford", Color = "Rust", PetName = "Rusty"},
new Inventory {Make = "Saab", Color = "Black", PetName = "Mel"},
new Inventory {Make = "Yugo", Color = "Yellow", PetName = "Clunker"},
new Inventory {Make = "BMW", Color = "Black", PetName = "Bimmer"},
new Inventory {Make = "BMW", Color = "Green", PetName = "Hank"},
new Inventory {Make = "BMW", Color = "Pink", PetName = "Pinky"},
new Inventory {Make = "Pinto", Color = "Black", PetName = "Pete"},
new Inventory {Make = "Yugo", Color = "Brown", PetName = "Brownie"},
};
cars.ForEach(x => context.Inventory.Add(x));
var orders = new List<Order>
{
new Order {Car = cars[0], Customer = customers[0]},
new Order {Car = cars[1], Customer = customers[1]},
new Order {Car = cars[2], Customer = customers[2]},
new Order {Car = cars[3], Customer = customers[3]},
};
orders.ForEach(x => context.Orders.Add(x));
context.CreditRisks.Add(
new CreditRisk
{
CustId = customers[4].CustId,
FirstName = customers[4].FirstName,
LastName = customers[4].LastName,
});
context.SaveChanges();
}
The last step is to set the initializer, with the following code (which you will add in the next section):
Database.SetInitializer(new DataInitializer());
Test-Driving AutoLotDAL
The test-drive code is similar to what you did in the prior version of AutoLotDal.dll, but instead of programming directly against the context, you will be using the Repository classes. Start by adding a new Console Application project named AutoLotTestDrive to the solution and set this project as the Startup project. Add EF to the project through NuGet, and update the connectionStrings in App.config to the following:
<connectionStrings>
<add name="AutoLotConnection" connectionString="data source=(LocalDb)\MSSQLLocalDb;initial catalog=AutoLot;integrated security=True;MultipleActiveResultSets=True;App=EntityFramework" providerName="System.Data.SqlClient" />
</connectionStrings>
Add a reference to the AutoLotDAL project. Open Program.cs and add the following code to the Main() method:
static void Main(string[] args)
{
Database.SetInitializer(new DataInitializer());
WriteLine("***** Fun with ADO.NET EF Code First *****\n");
ReadLine();
}
Printing All Inventory Records
To print all records, call the GetAll() method on the Inventory repo and then iterate through the returned list. There isn’t much difference between this and coding directly against the context, but the Repository pattern provides a consistent way to access and operate on data across all classes.
private static void PrintAllInventory()
{
using (var repo = new InventoryRepo())
{
foreach (Inventory c in repo.GetAll())
{
WriteLine(c);
}
}
}
Adding Inventory Records
Adding new records shows the simplicity of calling EF using a repository. In a production system you would want to add error handling, of course, but the work of adding a record is as simple as calling Add() or AddRange() on the repository. The code is shown here:
private static void AddNewRecord(Inventory car)
{
// Add record to the Inventory table of the AutoLot
// database.
using (var repo = new InventoryRepo())
{
repo.Add(car);
}
}
private static void AddNewRecords(IList<Inventory> cars)
{
// Add record to the Inventory table of the AutoLot
// database.
using (var repo = new InventoryRepo())
{
repo.AddRange(cars);
}
}
To test this code, add the following to the Main() method:
static void Main(string[] args)
{
Database.SetInitializer(new MyDataInitializer());
WriteLine("***** Fun with ADO.NET EF Code First *****\n");
var car1 = new Inventory() { Make = "Yugo", Color = "Brown", PetName = "Brownie" };
var car2 = new Inventory() { Make = "SmartCar", Color = "Brown", PetName = "Shorty" };
AddNewRecord(car1);
AddNewRecord(car2);
AddNewRecords(new List<Inventory> { car1, car2 });
PrintAllInventory();
ReadLine();
}
Editing Records
Saving changes to records is just as simple. Get an Inventory object, make some changes, and call Save() on the InventoryRepo class. The code is shown here (with some extra code to output the EntityState of the object along the way):
private static void UpdateRecord(int carId)
{
using (var repo = new InventoryRepo())
{
// Grab the car, change it, save!
var carToUpdate = repo.GetOne(carId);
if (carToUpdate != null)
{
WriteLine("Before change: " + repo.Context.Entry(carToUpdate).State);
carToUpdate.Color = "Blue";
WriteLine("After change: " + repo.Context.Entry(carToUpdate).State);
repo.Save(carToUpdate);
WriteLine("After save: " + repo.Context.Entry(carToUpdate).State);
}
}
}
To test this code, add the following to the Main() method:
static void Main(string[] args)
{
Database.SetInitializer(new MyDataInitializer());
WriteLine("***** Fun with ADO.NET EF Code First *****\n");
var car1 = new Inventory() { Make = "Yugo", Color = "Brown", PetName = "Brownie" };
var car2 = new Inventory() { Make = "SmartCar", Color = "Brown", PetName = "Shorty" };
AddNewRecord(car1);
AddNewRecord(car2);
AddNewRecords(new List<Inventory> { car1, car2 });
UpdateRecord(car1.CarId);
PrintAllInventory();
ReadLine();
}
Using Navigation Properties
Add a method named ShowAllOrders() . In the method, add a using statement around the OrdersRepo class. For each record returned from the GetAll() method, print the itm.Customer.FullName and itm.Car.PetName properties. The code is shown here:
private static void ShowAllOrders()
{
using (var repo = new OrderRepo())
{
WriteLine("*********** Pending Orders ***********");
foreach (var itm in repo.GetAll())
{
WriteLine($"->{itm.Customer.FullName} is waiting on {itm.Car.PetName}");
}
}
}
Add a call to the method in the Main() method. When you run the program, you will get output similar to this (your mileage will vary based on the data currently in your database):
***** Fun with ADO.NET EF Code First *****
*********** Pending Orders ***********
-> Dave Brenner is waiting on Bimmer
-> Matt Walton is waiting on Zippy
-> Steve Hagen is waiting on Clunker
-> Pat Walton is waiting on Pinky
If you look at the Output window when you run the app, you will see that there are many individual database calls made to the database: one to get all of the orders and then additional calls to get each individual Customer name and Car PetName. This is because of lazy loading, as discussed earlier in this chapter. Next, you will use eager loading with the InventoryRepo.
To call this from Main(), add the following line:
ShowAllOrders();
Eager Loading
Begin by adding a using statement for System.Data.Entity. Next, create a method named ShowAllOrdersEagerlyFetched(). You need to code directly against AutoLotEntities since you don’t have a Repo method to eagerly fetch the data. (If this is something that you will use often, you can add it into the OrderRepo class.) The new method is shown here:
private static void ShowAllOrdersEagerlyFetched()
{
using (var context = new AutoLotEntities())
{
WriteLine("*********** Pending Orders ***********");
var orders = context.Orders
.Include(x => x.Customer)
.Include(y => y.Car)
.ToList();
foreach (var itm in orders)
{
WriteLine($"->{itm.Customer.FullName} is waiting on {itm.Car.PetName}");
}
}
}
To call this from Main(), add the following line:
ShowAllOrdersEagerlyFetched();
Multitable Actions/Implicit Transactions
As you recall, EF automatically enlists all changes that are propagated with a SaveChanges call into an implicit transaction. Replicating the transaction example in Chapter 22 of moving a record from the Customer table to the CreditRisk table is extremely simple. The repositories that you have coded so far work on only one table at a time, so you need to code directly against the context.
Start by creating a method named MakeCustomerARisk() . This method will remove a customer from the Customers table into the CreditRisk table. Since there isn’t a Move() method, you have to code it as a two-stage operation. Add to CreditRisk and then Deletefrom Customers. When an entity is brought into existence with one context, you have to detach it and then connect it to the new context. That is the reason for setting EntityState to EntityState.Detached in Main() and then calling Attach() on the new context. The code is shown here:
private static CreditRisk MakeCustomerARisk(Customer customer)
{
using (var context = new AutoLotEntities())
{
context.Customers.Attach(customer);
context.Customers.Remove(customer);
var creditRisk = new CreditRisk()
{
FirstName = customer.FirstName,
LastName = customer.LastName
};
context.CreditRisks.Add(creditRisk);
try
{
context.SaveChanges();
}
catch (DbUpdateException ex)
{
WriteLine(ex);
}
catch (Exception ex)
{
WriteLine(ex);
}
return creditRisk;
}
}
To show the results of this, create a method called PrintAllCustomersAndCreditRisks() . Use the existing repository classes to iterate through the Customer and CreditRisk records.
private static void PrintAllCustomersAndCreditRisks()
{
WriteLine("*********** Customers ***********");
using (var repo = new CustomerRepo())
{
foreach (var cust in repo.GetAll())
{
WriteLine($"->{cust.FirstName} {cust.LastName} is a Customer.");
}
}
WriteLine("*********** Credit Risks ***********");
using (var repo = new CreditRiskRepo())
{
foreach (var risk in repo.GetAll())
{
WriteLine($"->{risk.FirstName} {risk.LastName} is a Credit Risk!");
}
}
}
Call these methods from the Main() method, passing in a new Customer object, similar to this:
WriteLine("***** Fun with ADO.NET EF Code First *****\n");
PrintAllCustomersAndCreditRisks();
var customerRepo = new CustomerRepo();
var customer = customerRepo.GetOne(4);
customerRepo.Context.Entry(customer).State = EntityState.Detached;
var risk = MakeCustomerARisk(customer);
PrintAllCustomersAndCreditRisks();
If one of the operations (deleting from Customer or adding to CreditRisk) fail, both operations will fail.
![]() Source Code You can find the AutoLotTestDrive example in the Chapter 23 subdirectory.
Source Code You can find the AutoLotTestDrive example in the Chapter 23 subdirectory.
Entity Framework Migrations
You created this version of AutoLotDAL.dll from code and then created the database. Each time the application is run, the database is dropped and re-created through the initialization process. This works great in development, but once you deploy your app to production, you can’t keep dropping the database every time your users run the app. If your model changes, you need to keep your database in sync. This is where EF migrations come into play. Before creating your first migration, you are going to make some changes to illustrate the problem. Start by openingProgram.cs and comment out the following line:
Database.SetInitializer(new MyDataInitializer());
![]() Note As discussed earlier, the data initializer drops and re-creates the database, either each time the app runs or when the model changes. If you don’t comment out the SetInitializer line, this next section won’t work for you.
Note As discussed earlier, the data initializer drops and re-creates the database, either each time the app runs or when the model changes. If you don’t comment out the SetInitializer line, this next section won’t work for you.
Updating the Model
Suppose the business has requested a few changes to the application, including concurrency checking. To do this, you will add a Timestamp property to all your tables (you will learn about concurrency checking with EF in the next section). Recall from the list of data annotations that theTimestamp attribute is used for this. In SQL Server, the Timestamp annotations maps to the RowVersion data type, which in C# is represented by the byte[] data type. This is the only change that you will make this time for the Inventory, Customer, and Order classes. You will also add the Timestamp property to the CreditRisk, but you are going to make some additional changes to that class in the next section. The updated Inventory, Customer, and Order classes are listed next.
Inventory Class
Here is the Inventory class:
[Table("Inventory")]
public partial class Inventory
{
[Key]
public int CarId { get; set; }
[StringLength(50)]
public string Make { get; set; }
[StringLength(50)]
public string Color { get; set; }
[StringLength(50)]
public string PetName { get; set; }
[Timestamp]
public byte[] Timestamp { get; set; }
public virtual ICollection<Order> Orders { get; set; } = new HashSet<Order>();
}
Customer Class
Here is the Customer class:
public partial class Customer
{
[Key]
public int CustId { get; set; }
[StringLength(50)]
public string FirstName { get; set; }
[StringLength(50)]
public string LastName { get; set; }
[Timestamp]
public byte[] Timestamp { get; set; }
[NotMapped]
public string FullName => FirstName + " " + LastName;
public virtual ICollection<Order> Orders { get; set; } = new HashSet<Order>();
}
Order Class
Here is the Order class:
public partial class Order
{
[Key, Required, DatabaseGenerated(DatabaseGeneratedOption.Identity)]
public int OrderId { get; set; }
[Required]
public int CustId { get; set; }
[Required]
public int CarId { get; set; }
[Timestamp]
public byte[] Timestamp { get; set; }
[ForeignKey("CustId")]
public virtual Customer Customer { get; set; }
[ForeignKey("CarId")]
public virtual Inventory Car { get; set; }
}
Credit Risk Class
In addition to the Timestamp property, you are going to create a unique index on the FirstName and LastName properties using data annotations. Since this is a complex key, you also need to specify a name for the index and the order for each column in the index. In this example, the index name is IDX_CreditRisk_Name, and the column order for the index is LastName and then FirstName and is created as a unique index. The updated code is shown here:
public partial class CreditRisk
{
[Key]
public int CustId { get; set; }
[StringLength(50)]
[Index("IDX_CreditRisk_Name",IsUnique = true,Order=2)]
public string FirstName { get; set; }
[StringLength(50)]
[Index("IDX_CreditRisk_Name", IsUnique = true, Order = 1)]
public string LastName { get; set; }
[Timestamp]
public byte[] Timestamp { get; set; }
}
Testing the App
Comment everything out of the Main() method in Program.cs except for the call to PrintAllInventory() (like the following code snippet) and run the app.
static void Main(string[] args)
{
WriteLine("***** Fun with ADO.NET EF Code First *****\n");
PrintAllInventory();
ReadLine();
}
You will get a System.InvalidOperationException with the following error message:
The model backing the ’AutoLotEntities’ context has changed since the database was created. Consider using Code First Migrations to update the database (http://go.microsoft.com/fwlink/?LinkId=238269).
Entering EF Migrations
How did EF know that the database and the model were out of sync? Before EF makes its first call to the database, it looks for a table named __MigrationHistory and compares a hash of the current EF model to the most recent hash stored in the table. If you open the AutoLotdatabase in Server Explorer, you will see one record. This was created automatically by EF when it created the database. Now that you have changed your model, you need to create a new migration entry.
![]() Note When you create your model from an existing database, the __MigrationHistory table does not get created (at least at the time of this writing). Why does it matter? When your DbContext class is instantiated and before the first call to the database from your custom code, EF checks the migration history. Since this table doesn’t exist, there are a series of exceptions generated. As you well know, exceptions can be expensive operations, and this can potentially cause a performance issue. Even if you don’t ever plan on using migrations, you should enable migrations as covered in the next section.
Note When you create your model from an existing database, the __MigrationHistory table does not get created (at least at the time of this writing). Why does it matter? When your DbContext class is instantiated and before the first call to the database from your custom code, EF checks the migration history. Since this table doesn’t exist, there are a series of exceptions generated. As you well know, exceptions can be expensive operations, and this can potentially cause a performance issue. Even if you don’t ever plan on using migrations, you should enable migrations as covered in the next section.
Creating the Baseline Migration
Start by enabling migrations for your project. To do this, open the Package Manager Console (the command-line tool for managing NuGet packages) by selecting View ![]() Other Windows
Other Windows ![]() Package Manager Console. Make sure Default Project is set to AutoLotDAL and enter enable-migrations, as shown in Figure 23-12.
Package Manager Console. Make sure Default Project is set to AutoLotDAL and enter enable-migrations, as shown in Figure 23-12.
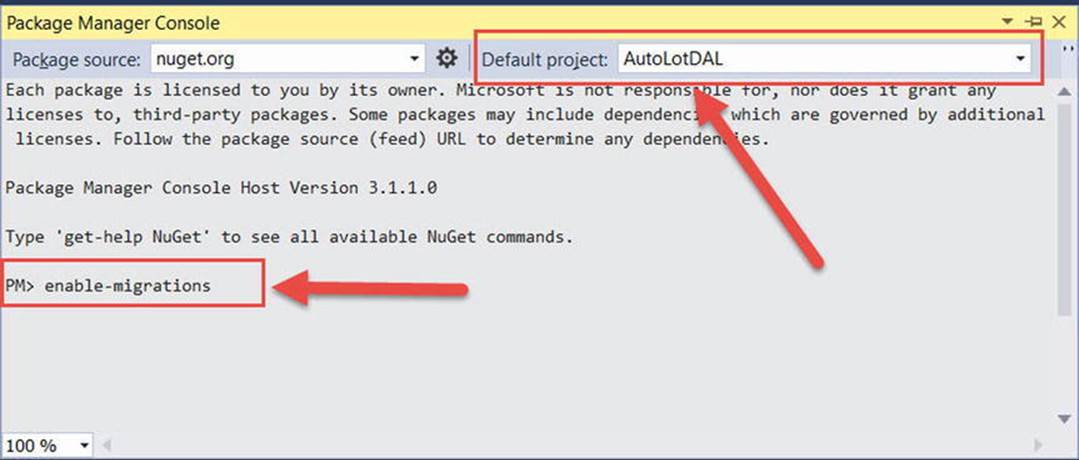
Figure 23-12. Enabling migrations on AutoLotDAL
This creates a Migrations folder with two classes: Configuration.cs and 201510060510505_InitialCreate.cs Note: The name of the second file is based on the date and CPU time followed by the name of the migration. This format for the name enables EF to run migrations in the correct chronological order (if more than one exists). Since you did not specify a name when you enabled migrations, the migration name defaulted to InitialCreate.
Open the InitialCreate.cs class. This class has two methods named Up() and Down(). The Up() method is for applying the changes to the database, and the Down() method is to roll back the changes. EF built the database based on your model prior to the changes you made in the previous section and populated the __MigrationHistory table with the hash of these tables and fields. If you examine the InitialCreate class, you will see that the Timestamp fields and the additional index in the CreditRisk table aren’t listed. The file should look like this:
public partial class InitialCreate : DbMigration
{
public override void Up()
{
CreateTable(
"dbo.CreditRisks",
c => new
{
CustId = c.Int(nullable: false, identity: true),
FirstName = c.String(maxLength: 50),
LastName = c.String(maxLength: 50),
})
.PrimaryKey(t => t.CustId);
CreateTable(
"dbo.Customers",
c => new
{
CustId = c.Int(nullable: false, identity: true),
FirstName = c.String(maxLength: 50),
LastName = c.String(maxLength: 50),
})
.PrimaryKey(t => t.CustId);
CreateTable(
"dbo.Orders",
c => new
{
OrderId = c.Int(nullable: false, identity: true),
CustId = c.Int(nullable: false),
CarId = c.Int(nullable: false),
})
.PrimaryKey(t => t.OrderId)
.ForeignKey("dbo.Inventory", t => t.CarId, cascadeDelete: true)
.ForeignKey("dbo.Customers", t => t.CustId, cascadeDelete: true)
.Index(t => t.CustId)
.Index(t => t.CarId);
CreateTable(
"dbo.Inventory",
c => new
{
CarId = c.Int(nullable: false, identity: true),
Make = c.String(maxLength: 50),
Color = c.String(maxLength: 50),
PetName = c.String(maxLength: 50),
})
.PrimaryKey(t => t.CarId);
}
public override void Down()
{
DropForeignKey("dbo.Orders", "CustId", "dbo.Customers");
DropForeignKey("dbo.Orders", "CarId", "dbo.Inventory");
DropIndex("dbo.Orders", new[] { "CarId" });
DropIndex("dbo.Orders", new[] { "CustId" });
DropTable("dbo.Inventory");
DropTable("dbo.Orders");
DropTable("dbo.Customers");
DropTable("dbo.CreditRisks");
}
}
The Configuration.cs class also has one method and some constructor code. The code in the constructor instructs EF to disable automatic migrations (which is the setting you will use most of the time, since you want to have control over how migrations work) and sets theContextKey (in the base class) to the fully qualified name of your derived DbContext class. The Seed() method enables you to add data to the database, which you will use shortly.
internal sealed class Configuration : DbMigrationsConfiguration<AutoLotDAL.EF.AutoLotEntities>
{
public Configuration()
{
AutomaticMigrationsEnabled = false;
ContextKey = "AutoLotDAL.EF.AutoLotEntities";
}
protected override void Seed(AutoLotDAL.EF.AutoLotEntities context)
{
}
}
To create a migration, type add-migration TimeStamps in the Package Manager Console. add-migration instructs EF to take a hash of the current model and compare it to the most recent hash in the __MigrationHistory table. The second parameter is the name for the migration, which can be anything but should be meaningful to you. Executing this command (Figure 23-13) creates a new file under the Migrations folder with the name <timestamp>_TimeStamps.cs.
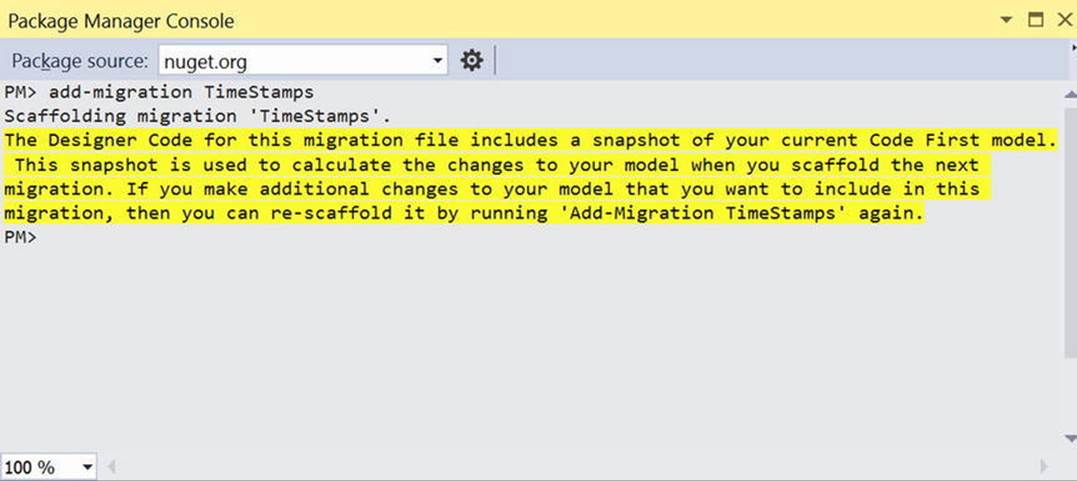
Figure 23-13. Creating the initial migration
Open the new file (mine is named 201510062307304_TimeStamps.cs) and examine the contents. Again, it has an Up() method that applies the changes and a Down() method that rolls back the changes. The file is listed here:
public partial class TimeStamps : DbMigration
{
public override void Up()
{
AddColumn("dbo.CreditRisks", "Timestamp",
c => c.Binary(nullable: false, fixedLength: true, timestamp: true, storeType: "rowversion"));
AddColumn("dbo.Customers", "Timestamp",
c => c.Binary(nullable: false, fixedLength: true, timestamp: true, storeType: "rowversion"));
AddColumn("dbo.Orders", "Timestamp",
c => c.Binary(nullable: false, fixedLength: true, timestamp: true, storeType: "rowversion"));
AddColumn("dbo.Inventory", "Timestamp",
c => c.Binary(nullable: false, fixedLength: true, timestamp: true, storeType: "rowversion"));
CreateIndex("dbo.CreditRisks", new[] { "LastName", "FirstName" },
unique: true, name: "IDX_CreditRisk_Name");
}
public override void Down()
{
DropIndex("dbo.CreditRisks", "IDX_CreditRisk_Name");
DropColumn("dbo.Inventory", "Timestamp");
DropColumn("dbo.Orders", "Timestamp");
DropColumn("dbo.Customers", "Timestamp");
DropColumn("dbo.CreditRisks", "Timestamp");
}
}
The final task is to update the database. Type update-database in the Package Manager Console, and you will get a message that the migration has been applied. Open Server Explorer, and refresh the Tables node. You will see the __MigrationHistory table. If you select Show Table Data on the table, you will see something similar to Figure 23-14.

Figure 23-14. The contents of the __MigrationHistory table
Seeding the Database
The Seed() method in Configure.cs leverages the AddOrUpdate() method on the DbSet class. The AddOrUpdate() method takes two parameters; the first is a lambda representing the unique field(s) to identify for updating, and the second is the record to add (or update) in the database. The base syntax is this:
context.Customers.AddOrUpdate(c=> c.CustId,
new Customer {CustId = 1, FirstName="Foo",LastName="Bar"});
In this example, you aren’t checking by the primary key since it’s an identity. You want to check to make sure the FirstName and LastName combination is unique. To use a complex identifier, you create an anonymous object to identify the fields, instead of a single property, like this:
context.Customers.AddOrUpdate(c=> new {c.FirstName,c.LastName},
new Customer { FirstName="Foo",LastName="Bar"});
Copy the code from the DataInitialize class into the Seed() method. Change the Add() calls to AddOrUpdate(), as shown here:
protected override void Seed(AutoLotDAL.EF.AutoLotEntities context)
{
var customers = new List<Customer>
{
new Customer {FirstName = "Dave", LastName = "Brenner"},
new Customer {FirstName = "Matt", LastName = "Walton"},
new Customer {FirstName = "Steve", LastName = "Hagen"},
new Customer {FirstName = "Pat", LastName = "Walton"},
new Customer {FirstName = "Bad", LastName = "Customer"},
};
customers.ForEach(x =>
context.Customers.AddOrUpdate(c=> new { c.FirstName,c.LastName},x));
var cars = new List<Inventory>
{
new Inventory {Make = "VW", Color = "Black", PetName = "Zippy"},
new Inventory {Make = "Ford", Color = "Rust", PetName = "Rusty"},
new Inventory {Make = "Saab", Color = "Black", PetName = "Mel"},
new Inventory {Make = "Yugo", Color = "Yellow", PetName = "Clunker"},
new Inventory {Make = "BMW", Color = "Black", PetName = "Bimmer"},
new Inventory {Make = "BMW", Color = "Green", PetName = "Hank"},
new Inventory {Make = "BMW", Color = "Pink", PetName = "Pinky"},
new Inventory {Make = "Pinto", Color = "Black", PetName = "Pete"},
new Inventory {Make = "Yugo", Color = "Brown", PetName = "Brownie"},
};
cars.ForEach(x =>
context.Inventory.AddOrUpdate(i => new { i.Make, i.Color, i.PetName }, x));
var orders = new List<Order>
{
new Order {Car = cars[0], Customer = customers[0]},
new Order {Car = cars[1], Customer = customers[1]},
new Order {Car = cars[2], Customer = customers[2]},
new Order {Car = cars[3], Customer = customers[3]},
};
orders.ForEach(x =>
context.Orders.AddOrUpdate(o => new { o.CarId, o.CustId }, x));
context.CreditRisks.AddOrUpdate(c => new { c.FirstName, c.LastName },
new CreditRisk
{
CustId = customers[4].CustId,
FirstName = customers[4].FirstName,
LastName = customers[4].LastName,
});
}
The Seed() methods runs each time you run update-database from the Package Manager Console. To seed the database, open the Package Manager Console, type update-database, and hit Enter.
Revisiting the Transaction Test
Now that you have a unique index for the CreditRisk table based on the customer first and last names, update the MakeACustomerRisk() method to add the new record twice. Because of the implicit transaction created when SaveChanges() is called, not only will the customer not be added to the CreditRisk table (either time), but the customer will not be removed from the Customer table. Add a try-catch block around the call to SaveChanges() catching the DbUpdateException. In the catch block, write the exception to the console. When you run the application, you see that indeed the changes to the database are not made, and the exception detail is written to the console window. The updated code is shown here:
private static CreditRisk MakeCustomerARisk(Customer customer)
{
using (var context = new AutoLotEntities())
{
context.Customers.Attach(customer);
context.Customers.Remove(customer);
var creditRisk = new CreditRisk()
{
FirstName = customer.FirstName,
LastName = customer.LastName
};
context.CreditRisks.Add(creditRisk);
var creditRiskDupe = new CreditRisk()
{
FirstName = customer.FirstName,
LastName = customer.LastName
};
context.CreditRisks.Add(creditRiskDupe);
try
{
context.SaveChanges();
}
catch (DbUpdateException ex)
{
WriteLine(ex);
}
return creditRisk;
}
}
Concurrency
A common problem in multiuser applications is concurrency issues. If your application does not check for concurrency issues, when two users update the same record, the last one in wins. This might be perfectly fine for your application, but if not, EF and SQL Server provide a convenient mechanism for checking for concurrency clashes.
When you added the timestamp properties to your model classes in the previous section, it changed how EF builds and runs queries that update or delete data from the database. A call to delete no longer just looks for the primary key (CarId) but also looks for the Timestamp. For example, the generated SQL looks like this:
Execute NonQuery "DELETE [dbo].[Inventory] WHERE (([CarId] = @0) AND ([Timestamp] = @1))"
EF automatically added the timestamp as part of the WHERE clause on the delete. This prevents one user (or process) from stepping on another user’s (or process’s) changes. If the delete call isn’t working with the most recent version of record, nothing will be updated, and aDbUpdateConcurrencyException will be raised.
Correcting the Repositories
The Delete(int id) and DeleteAsync(int id) methods in the repos will now fail every time they are called because the Timestamp is not being passed in. Correct the method definitions in the IRepo<T> interface first to accept a timestamp value. The updated code is shown here:
int Delete(int id, byte[] timeStamp);
Task<int> DeleteAsync(int id, byte[] timeStamp);
Now update all the repositories to leverage the new method signatures. The relevant code from the InventoryRepo class is shown here (the rest of the repositories follow the same pattern, and the updated code can be found in the sample download):
public int Delete(int id, byte[] timeStamp)
{
Context.Entry(new Inventory()
{
CarId=id,
Timestamp = timeStamp
}).State = EntityState.Deleted;
return SaveChanges();
}
public Task<int> DeleteAsync(int id, byte[] timeStamp)
{
Context.Entry(new Inventory()
{
CarId = id,
Timestamp = timeStamp
}).State = EntityState.Deleted;
return SaveChangesAsync();
}
Testing Concurrency
The following code demonstrates concurrency checking on an Inventory record. It replicates two different users updating the same record. When the users get the records from the database, the timestamps are the same. When one user updates their record, the timestamp is updated by SQL Server, but the second user hasn’t refreshed their object, so the timestamp value is still the original value. When that user attempts to save the record, the timestamps don’t match, the SaveChanges call doesn’t update any records, and the exception is thrown. The updated code is shown here:
private static void UpdateRecordWithConcurrency)
{
var car = new Inventory()
{ Make = "Yugo", Color = "Brown", PetName = "Brownie" };
AddNewRecord(car);
var repo1 = new InventoryRepo();
var car1 = repo1.GetOne(car.CarId);
car1.PetName = "Updated";
var repo2 = new InventoryRepo();
var car2 = repo2.GetOne(car.CarId);
car2.Make = "Nissan";
repo1.Save(car1);
try
{
repo2.Save(car2);
}
catch (DbUpdateConcurrencyException ex)
{
WriteLine(ex);
}
RemoveRecordById(car1.CarId, car1.Timestamp);
}
All this code does is expose the problem. You still need to decide what to do when a concurrency error occurs. That will depend on your specific business requirements.
Interception
The final topic in this chapter regarding EF covers interception. As you have seen in the previous examples, a lot of “magic” happens behind the scenes for the data to move from the data store into your object model, and vice versa. Interception is the process of running code at different phases of the process.
The IDbCommandInterceptor Interface
It all starts with the IDbCommandInterceptor interface, listed here:
public interface IDbCommandInterceptor : IDbInterceptor
{
void NonQueryExecuted(DbCommand command,
DbCommandInterceptionContext<int> interceptionContext);
void NonQueryExecuting(DbCommand command,
DbCommandInterceptionContext<int> interceptionContext);
void ReaderExecuted(DbCommand command,
DbCommandInterceptionContext<DbDataReader> interceptionContext);
void ReaderExecuting(DbCommand command,
DbCommandInterceptionContext<DbDataReader> interceptionContext);
void ScalarExecuted(DbCommand command,
DbCommandInterceptionContext<object> interceptionContext);
void ScalarExecuting(DbCommand command,
DbCommandInterceptionContext<object> interceptionContext);
}
As you can probably infer from the names, this interface contains methods that are called by EF just prior and just after certain events. For example, the ReaderExecuting() method is called just before a reader is executed, and ReaderExecuted() is called just after a reader is executed. For this example, you will simple write to the console in each of these methods. In a production system, the logic will be more appropriate to your requirements.
Adding Interception to AutoLotDAL
Add a new folder named Interception to the AutoLotDAL project and a new class to the folder name ConsoleWriterInterceptor. Make the class public, add System.Data.Entity.Infrastructure.Interception as a using, and inherit fromIDbCommandInterceptor. After you implement the missing members, you code should look like this:
public class ConsoleWriterInterceptor : IDbCommandInterceptor
{
public void NonQueryExecuting(DbCommand command,
DbCommandInterceptionContext<int> interceptionContext)
{
}
public void NonQueryExecuted(DbCommand command,
DbCommandInterceptionContext<int> interceptionContext)
{
}
public void ReaderExecuting(DbCommand command,
DbCommandInterceptionContext<DbDataReader> interceptionContext)
{
}
public void ReaderExecuted(DbCommand command,
DbCommandInterceptionContext<DbDataReader> interceptionContext)
{
}
public void ScalarExecuting(DbCommand command,
DbCommandInterceptionContext<object> interceptionContext)
{
}
public void ScalarExecuted(DbCommand command,
DbCommandInterceptionContext<object> interceptionContext)
{
}
}
To keep the example simple, you are just going to write to the console whether the call is asynchronous and the text of the command. Add a using for static System.Console and add a private method named WriteInfo() that takes a bool and a string. The code is listed here:
private void WriteInfo(bool isAsync, string commandText)
{
WriteLine($"IsAsync: {isAsync}, Command Text: {commandText}");
}
In each of the methods from the interface, add a call to the WriteInfo() method like this:
WriteInfo(interceptionContext.IsAsync,command.CommandText);
Registering the Interceptor
Interceptors can be registered through code or in the application configuration file. Registering them in code isolates them from changes to the configuration file and therefore ensures that they are always registered. If you need more flexibility, the configuration file might be the better choice. For this example, you are going to register the interceptor in code.
Open the AutoLotEntities.cs class and add the following usings:
using System.Data.Entity.Infrastructure;
using System.Data.Entity.Infrastructure.Interception;
Next, in the constructor, add the following line of code:
DbInterception.Add(new ConsoleWriterInterceptor());
Execute one of the test methods from earlier in this chapter, and you will see the additional output from the logger written to the console. This is a simple example but illustrates the capabilities of the interceptor class.
![]() Note The DbCommandInterceptionContext<T> contains much more than you have explored here. Please consult the .NET Framework 4.6 SDK documentation for more information.
Note The DbCommandInterceptionContext<T> contains much more than you have explored here. Please consult the .NET Framework 4.6 SDK documentation for more information.
Adding the DatabaseLogger Interceptor
EF now ships with a built-in logging interceptor if all you want to do is simple logging. To add this capability, start by opening the AutoLotEntities.cs class and comment out your console logger. Add a static read-only member of type DatabaseLogger (in theSystem.Data.Entity.Infrastructure.Interception namespace). The constructor takes two parameters; the first is the file name for the log file, and the second is optional and indicates whether the log should be appended to (the default is false). In the constructor, callStartLogging() on the interceptor and add the instance to the list of interceptors. The updated code is shown here:
static readonly DatabaseLogger DatabaseLogger =
new DatabaseLogger("sqllog.txt", true);
public AutoLotEntities() : base("name=AutoLotConnection")
{
//DbInterception.Add(new ConsoleWriterInterceptor());
DatabaseLogger.StartLogging();
DbInterception.Add(DatabaseLogger);
}
The last change is to leverage the DbContext implementation of the IDisposable pattern to stop logging and remove the interceptor. The code is shown here:
protected override void Dispose(bool disposing)
{
DbInterception.Remove(DatabaseLogger);
DatabaseLogger.StopLogging();
base.Dispose(disposing);
}
ObjectMaterialized and SavingChanges Events
The ObjectContext class contains two events, ObjectMaterialized and SavingChanges. These events can save you from creating an interceptor—as long as they meet your needs, that is! The ObjectMaterialized event fires when an object is reconstituted from the data store, and the SavingChanges event occurs when the object’s data is about to be propagated to the data store, just after the SaveChanges() method is called on the context.
Accessing the Object Context
As you recall, the context is derived from the DbContext class. Fortunately, it also extends the IObjectContextAdapter interface. To get to the ObjectContext, you need to cast AutoLotEntities to IObjectContextAdapter. You do this in the constructor like this:
public AutoLotEntities(): base("name=AutoLotConnection")
{
//Interceptor code
var context = (this as IObjectContextAdapter).ObjectContext;
context.ObjectMaterialized += OnObjectMaterialized;
context.SavingChanges += OnSavingChanges;
}
private void OnSavingChanges(object sender, EventArgs eventArgs)
{
}
private void OnObjectMaterialized(object sender,
System.Data.Entity.Core.Objects.ObjectMaterializedEventArgs e)
{
}
ObjectMaterialized
The ObjectMaterialized event’s arguments provide access to the entity being reconstituted. While you won’t use this event in this chapter, you will need it for Chapter 30. For now, suffice it to say that this event fires immediately after a model class’s properties are populated by EF and before the context serves it up to the calling code.
SavingChanges
As mentioned, the SavingChanges event fires just after the SaveChanges() method is called (on the DbContext) but before the database is updated. By accessing the ObjectContext passed into the event handler, all the entities in the transaction are accessible through theObjectStateEntry property on the DbContext. Table 23-6 shows some of the key properties.
Table 23-6. Key Members of ObjectStateEntry
|
Member of DbContext |
Meaning in Life |
|
CurrentValues |
The current values of the entity’s properties |
|
OriginalValues |
The original values of the entity’s properties |
|
Entity |
The entity represented by the ObjectStateEntry object |
|
State |
The current state of the entity (e.g., Modified, Added, Deleted) |
The ObjectStateEntry also exposes a set of methods that can be used on the entity. Some of these are listed in Table 23-7.
Table 23-7. Key Methods of ObjectStateEntry
|
Member of DbContext |
Meaning in Life |
|
AcceptChanges |
Accepts the current values as the original values |
|
ApplyCurrentValues |
Sets the current values to match those of a supplied object |
|
ApplyOriginalValues |
Sets the original values to match those of a supplied object |
|
ChangeState |
Updates the state of the entity |
|
GetModifiedProperties |
Returns the names of all changed properties |
|
IsPropertyChanges |
Checks a specific property for changes |
|
RejectPropertyChanges |
The current state of the entity (e.g. Modified, Added, Deleted) |
This permits you to write code that rejects any changes to a vehicle’s color if the color is red, like this:
private void OnSavingChanges(object sender, EventArgs eventArgs)
{
//Sender is of type ObjectContext. Can get current and original values, and
//cancel/modify the save operation as desired.
var context = sender as ObjectContext;
if (context == null) return;
foreach (ObjectStateEntry item in
context.ObjectStateManager.GetObjectStateEntries(
EntityState.Modified | EntityState.Added))
{
//Do something important here
if ((item.Entity as Inventory)!=null)
{
var entity = (Inventory) item.Entity;
if (entity.Color == "Red")
{
item.RejectPropertyChanges(nameof(entity.Color));
}
}
}
}
![]() Source Code You can find the updated AutoLotDAL example in the Chapter 23 subdirectory.
Source Code You can find the updated AutoLotDAL example in the Chapter 23 subdirectory.
Deploying to SQL Server
As the final step, you will deploy your database to SQL Server Express. This is as simple as changing the connection string and executing update-database! Open the App.config file in AutoLotDAL and update the connection string to point to SQL Server Express. Note: I also changed the name of the default catalog since I already have an AutoLot database in SQL Express. The exact string will depend on how you installed SQL Server, but it should look something like this:
<connectionStrings>
<add name="AutoLotConnection" connectionString="data source=.\SQLEXPRESS2014;initial catalog=AutoLot2;integrated security=True;MultipleActiveResultSets=True;App=EntityFramework" providerName="System.Data.SqlClient" />
</connectionStrings>
When you run update database, you will see the updates getting applied (as in Figure 23-15).
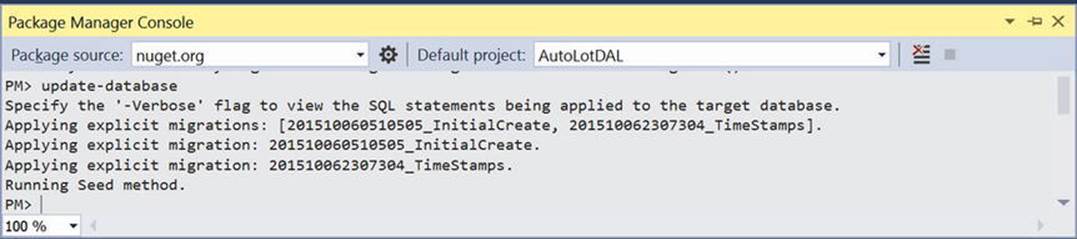
Figure 23-15. Deploying to SQL Server Express
![]() Source Code If you have an issue with the migrations not executing, the Package Manager Console might be using the console app as the target. You can specify the following to rectify the situation: Update-Database -ProjectName AutoLotDAL -StartUpProjectName AutoLotDAL
Source Code If you have an issue with the migrations not executing, the Package Manager Console might be using the console app as the target. You can specify the following to rectify the situation: Update-Database -ProjectName AutoLotDAL -StartUpProjectName AutoLotDAL
Summary
Over the past three chapters, you went on a tour of three approaches to data manipulation using ADO.NET, specifically the connection layer, the disconnected layer, and the Entity Framework. Each approach has merit, and many of your applications will likely use various aspects of each of them. Now to be sure, you have only scratched the surface of all the topics found within the ADO.NET technology set. To dive deeper into any of the topics presented in this book (as well to examine a number of related items), I recommend consulting the .NET Framework 4.6 SDK documentation.
This chapter wrapped up your formal investigation of database programming using ADO.NET by examining the role of the Entity Framework. EF allows you to program against a conceptual model that closely maps to your business domain. While you can reshape your entities in any way you choose, the EF runtime ensures that the changed data is mapped to the correct physical table data.
Along the way you learned about data annotations, which is one way to describe the mapping between your domain model and the database model. You learned about how EF handles transactions; creating, saving, and deleting data; and how entity state fits in.
You then used database migrations to keep the changes to your model in sync with the database, checked for concurrency errors, and added logging and interception. Finally, you walked through a lot of different examples while test-driving AutoLotDAL.dll.
All materials on the site are licensed Creative Commons Attribution-Sharealike 3.0 Unported CC BY-SA 3.0 & GNU Free Documentation License (GFDL)
If you are the copyright holder of any material contained on our site and intend to remove it, please contact our site administrator for approval.
© 2016-2026 All site design rights belong to S.Y.A.