C# 6.0 and the .NET 4.6 Framework (2015)
PART VI
Introducing the .NET Base Class Libraries
CHAPTER 25
Introducing Windows Communication Foundation
Windows Communication Foundation (WCF) is the name of the API designed specifically for the process of building distributed systems. Unlike other specific distributed APIs you might have used in the past (e.g., DCOM, .NET remoting, XML web services, message queuing), WCF provides a single, unified, and extendable programming object model that you can use to interact with a number of previously diverse distributed technologies.
This chapter begins by framing the need for WCF and examining the problems it intends to solve by way of a quick review of previous distributed computing APIs. After you look at the services provided by WCF, you’ll turn your attention to examining the key .NET assemblies, namespaces, and types that represent this programming model. Over the remainder of this chapter, you’ll build several WCF services, hosts, and clients using various WCF development tools.
![]() Note In this chapter, you will author code that will require that you launch Visual Studio with administrative privileges (furthermore, you must have administrative privileges). To launch Visual Studio with the correct admin rights, right-click the Visual Studio icon and select Run As Administrator.
Note In this chapter, you will author code that will require that you launch Visual Studio with administrative privileges (furthermore, you must have administrative privileges). To launch Visual Studio with the correct admin rights, right-click the Visual Studio icon and select Run As Administrator.
A Potpourri of Distributed Computing APIs
The Windows operating system has historically provided many APIs for building distributed systems. While it is true that most people consider a distributed system to involve at least two networked computers, this term in the broader sense can refer to two executables that need to exchange data, even if they happen to be running on the same physical machine. Using this definition, selecting a distributed API for your current programming task typically involves asking the following pivotal question:
Will this system be used exclusively in house, or will external users require access to the application’s functionality?
If you build a distributed system for in-house use, you have a far greater chance of ensuring that each connected computer is running the same operating system and using the same programming framework (e.g., .NET, COM, or the Java platform). Running in-house systems also means that you can leverage your existing security system for purposes of authentication, authorization, and so forth. In this situation, you might be willing to select a particular distributed API that will tie you to a specific operating system/programming framework for the purposes of performance.
In contrast, if you build a system that others must reach from outside of your walls, you have a whole other set of issues to contend with. First, you will most likely not be able to dictate to external users which operating system(s) they can use, which programming framework(s) they can use, or how they configure their security settings.
Second, if you happen to work for a larger company or in a university setting that uses numerous operating systems and programming technologies, an in-house application suddenly faces the same challenges as an outward-facing application. In either of these cases, you need to limit yourself to a more flexible distributed API to ensure the furthest reach of your application.
Based on your answer to this key distributed computing question, the next task is to pinpoint exactly which API (or set of APIs) to use. The following sections provide a quick recap of some of the major distributed APIs historically used by Windows software developers. After you finish this brief history lesson, you will be able to see the usefulness of Windows Communication Foundation quite easily.
![]() Note To ensure we are on the same page here, I feel compelled to point out that WCF (and the technologies it encompasses) has nothing to do with building an HTML-based web site. While it is true that web applications can be considered distributed because two machines are typically involved in the exchange, WCF is about establishing connections between machines to share the functionality of remote components—not for displaying HTML in a web browser. Chapter 32 will begin your examination of building web sites with the .NET platform.
Note To ensure we are on the same page here, I feel compelled to point out that WCF (and the technologies it encompasses) has nothing to do with building an HTML-based web site. While it is true that web applications can be considered distributed because two machines are typically involved in the exchange, WCF is about establishing connections between machines to share the functionality of remote components—not for displaying HTML in a web browser. Chapter 32 will begin your examination of building web sites with the .NET platform.
The Role of DCOM
Prior to the release of the .NET platform, the Distributed Component Object Model (DCOM) was the remoting API of choice for Microsoft-centric development endeavors. Using DCOM, it was possible to build distributed systems using COM objects, the system registry, and a good amount of elbow grease. One benefit of DCOM was that it allowed for location transparency of components. Simply put, this allowed you to program client software in such a way that the physical locations of the remote objects were not hard-coded in the application. Regardless of whether the remote object was on the same machine or a secondary networked machine, the code base could remain neutral because the actual location was recorded externally in the system registry.
While DCOM did enjoy some degree of success, for all practical purposes it was a Windows-centric API. DCOM alone did not provide a fabric to build comprehensive solutions involving multiple operating systems (e.g., Windows, Unix, and Mac) or promote sharing of data between diverse architectures (e.g., COM, Java, or CORBA).
![]() Note There were some attempts to port DCOM to various flavors of Unix/Linux, but the end results were lackluster and eventually became technology footnotes.
Note There were some attempts to port DCOM to various flavors of Unix/Linux, but the end results were lackluster and eventually became technology footnotes.
By and large, DCOM was best suited for in-house application development because exposing COM objects outside company walls entailed a set of additional complications (firewalls and so forth). With the release of the .NET platform, DCOM quickly became a legacy programming model; and unless you maintain legacy DCOM systems, you can consider it a deprecated technology.
The Role of COM+/Enterprise Services
DCOM alone did little more than define a way to establish a communication channel between two pieces of COM-based software. To fill in the missing pieces required for building a feature-rich distributed computing solution, Microsoft eventually released Microsoft Transaction Server (MTS), which was later renamed to COM+.
Despite its name, COM+ is not used only by COM programmers—it is completely accessible to .NET professionals, as well. Since the first release of the .NET platform, the base class libraries provided a namespace named System.EnterpriseServices. Here, .NET programmers could build managed libraries that could be installed into the COM+ runtime to access the same set of services as a traditional COM+- aware COM server. In either case, once a COM+-aware library was installed into the COM+ runtime, it was termed a serviced component.
COM+ provides a number of features that serviced components can leverage, including transaction management, object lifetime management, pooling services, a role-based security system, a loosely coupled event model, and so on. This was a major benefit at the time, given that most distributed systems require the same set of services. Rather than forcing developers to code them by hand, COM+ provided an out-of-the-box solution.
One of the compelling aspects of COM+ was that all these settings could be configured in a declarative manner using administrative tools. Thus, if you wanted to ensure an object was monitored under a transactional context or belonged to a particular security role, you simply selected the correct check boxes.
While COM+/Enterprise Services is still in use today, this technology is a Windows-only solution that is best suited for in-house application development or as a back-end service indirectly manipulated by more agonistic front ends (e.g., a public web site that makes calls on serviced components [a.k.a. COM+ objects] in the background).
![]() Note WCF does not provide a way to build serviced components. However, it does provide a manner for WCF services to communicate with existing COM+ objects. If you need to build serviced components using C#, you will need to make direct use of theSystem.EnterpriseServices namespace. Consult the .NET Framework 4.6 SDK documentation for details.
Note WCF does not provide a way to build serviced components. However, it does provide a manner for WCF services to communicate with existing COM+ objects. If you need to build serviced components using C#, you will need to make direct use of theSystem.EnterpriseServices namespace. Consult the .NET Framework 4.6 SDK documentation for details.
The Role of MSMQ
The Microsoft Message Queuing (MSMQ) API allows developers to build distributed systems that need to ensure reliable delivery of message data on the network. As developers know all too well, in any distributed system there is the risk that a network server is down, a database is offline, or connections are inexplicably lost. Furthermore, you must construct many applications in such a way that they hold message data for delivery at a later time (this process is known as queuing data).
Microsoft initially packaged MSMQ as a set of low-level C-based APIs and COM objects. With the release of the .NET platform, C# programmers could use the System.Messaging namespace to hook into MSMQ and build software that communicated with intermittently connected applications in a dependable fashion.
On a related note, the COM+ layer incorporated MSMQ functionality into the runtime (in a simplified format) using a technology termed Queued Components (QC). This manner of communicating with MSMQ was packaged up into the System.EnterpriseServices namespace mentioned in the previous section.
Regardless of which programming model you used to interact with the MSMQ runtime, the end result ensured that applications could deliver messages in a reliable and timely fashion. Like COM+, MSMQ is still part of the fabric of building distributed software on the Windows operating system.
The Role of .NET Remoting
As mentioned previously, DCOM quickly became a legacy distributed API after the release of the .NET platform. In its place, the .NET base class libraries shipped with the .NET remoting layer, represented by the System.Runtime.Remoting namespace. This (now legacy) API allows multiple computers to distribute objects, provided they all run the applications on the .NET platform.
The .NET remoting APIs provided a number of useful features. Most important was the use of XML- based configuration files to define declaratively the underlying plumbing used by the client and the server software. Using *.config files, it was easy to alter the functionality of your distributed system radically simply by changing the content of the configuration files and restarting the application.
Also, given that only .NET applications can use this API, you can gain various performance benefits because data can be encoded in a compact binary format, and you can use the Common Type System (CTS) when defining parameters and return values. While it is possible to use .NET remoting to build distributed systems that span multiple operating systems (using Mono, which was briefly mentioned in Chapter 1), interoperability between other programming architectures (e.g., Java) was still not directly possible.
The Role of XML Web Services
Each of the previous distributed APIs provided little (if any) support to allow external callers to access the supplied functionality in an agnostic manner. When you need to expose the services of remote objects to any operating system and any programming model, XML web services provide a straightforward way of doing so.
Unlike a traditional browser-based web application, a web service provides a way to expose the functionality of remote components using standard web protocols. Since the initial release of .NET, programmers have been provided with superior support for building and consuming XML web services with the System.Web.Services namespace. In many cases, building a feature-complete web service is no more complicated than applying the [WebMethod] attribute to each public method you want to provide access to. Furthermore, Visual Studio allows you to connect to a remote web service with the click of a button (or two).
Web services allow developers to build .NET assemblies containing types that can be accessed using simple HTTP. Furthermore, a web service encodes its data as simple XML. Given that web services are based on open industry standards (e.g., HTTP, XML, and SOAP) rather than proprietary type systems and proprietary wire formats (as is the case with DCOM or .NET remoting), they allow for a high degree of interoperability and data exchange. Figure 25-1 illustrates the agnostic nature of XML web services.
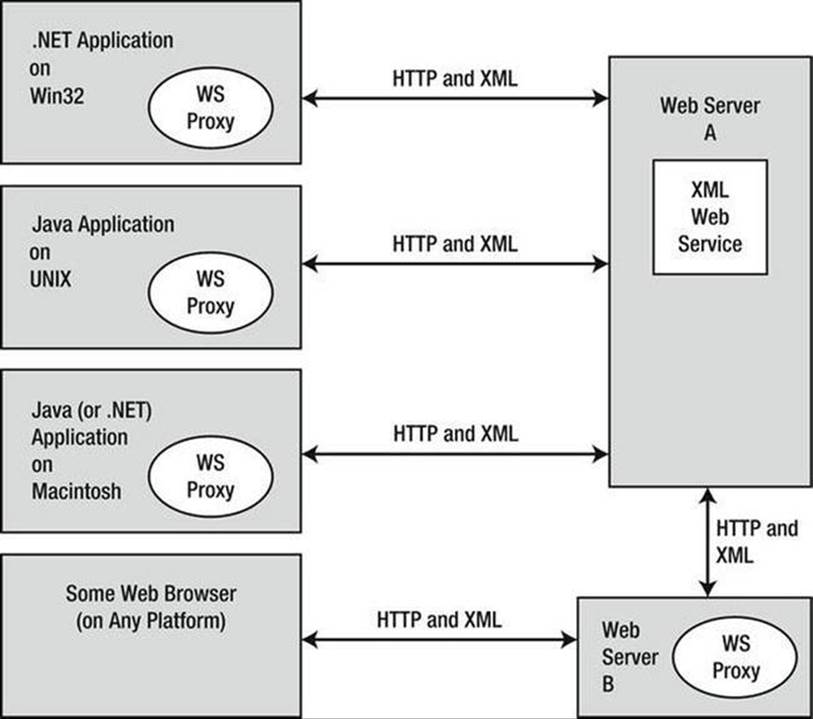
Figure 25-1. XML web services allow for a high degree of interoperability
Of course, no distributed API is perfect. One potential drawback of web services is that they can suffer from some performance issues (given the use of HTTP and XML data representation). Another drawback is that they might not be an ideal solution for in-house applications where you could use a TCP-based protocol and binary formatting of data without incurring a penalty.
Web Service Standards
Another problem that web services faced early on was that all the big industry players (e.g., Microsoft, IBM, and Sun Microsystems) created web service implementations that were not 100 percent compatible with other web service implementations. Obviously, this was an issue because the whole point of web services is to achieve a high degree of interoperability across platforms and operating systems!
To ensure the interoperability of web services, groups such as the World Wide Web Consortium (W3C: www.w3.org) and the Web Services Interoperability Organization (WS-I: www.ws-i.org) began to author several specifications that laid out how a software vendor (e.g., IBM, Microsoft, or Sun Microsystems) should build web service–centric software libraries to ensure compatibility.
Collectively, all these specifications are given the blanket name WS-*, and they cover such issues as security, attachments, the description of web services (using the Web Service Description Language, or WSDL), policies, SOAP formats, and a slew of other important details. As you will see, WCF supports many of these WS-* specifications. Typically, your WCF services will opt into various WS-* specifications based on your choice of bindings.
![]() Note In addition to the distributed APIs briefly examined, developers could also use various interprocess communication protocols such as named pipes and sockets.
Note In addition to the distributed APIs briefly examined, developers could also use various interprocess communication protocols such as named pipes and sockets.
The Role of WCF
The wide array of distributed technologies makes it difficult to pick the right tool for the job. This is further complicated by the fact that several of these technologies overlap in the services they provide (most notably in the areas of transactions and security).
Even when a .NET developer has selected what appear to be the correct technologies for the task at hand, building, maintaining, and configuring such an application is complex, at best. Each API has its own programming model, its own unique set of configuration tools, and so forth. Prior to WCF, this meant that it was difficult to plug and play distributed APIs without authoring a considerable amount of custom infrastructure. For example, if you build your system using the .NET remoting APIs and you later decide that XML web services are a more appropriate solution, you need to reengineer your code base.
WCF is a distributed computing toolkit that integrates these previously independent distributed technologies into a streamlined API represented primarily by the System.ServiceModel namespace. Using WCF, you can expose services to callers using a wide variety of techniques. For example, if you build an in-house application where all connected machines are Windows-based, you can use various TCP protocols to ensure the fastest possible performance. You can also expose this same service with HTTP and SOAP to allow external callers to leverage its functionality, regardless of the programming language or operating system.
Given that WCF allows you to pick the correct protocol for the job (using a common programming model), you will find that it becomes quite easy to plug and play the underlying plumbing of your distributed application. In most cases, you can do so without having to recompile or redeploy the client/service software because the grungy details are often relegated to application configuration files.
An Overview of WCF Features
Interoperability and integration of diverse APIs are only two (important) aspects of WCF. WCF also provides a rich software fabric that complements the remoting technologies it exposes. Consider the following list of major WCF features:
· Support for strongly typed as well as untyped messages. This approach allows .NET applications to share custom types efficiently, while software created using other platforms (such as Java) can consume streams of loosely typed XML.
· Support for several bindings (e.g., raw HTTP, TCP, MSMQ, WebSockets, named pipes, and so on) allows you to choose the most appropriate plumbing to transport message data.
· Support for the latest-and-greatest web service specifications (WS-*).
· A fully integrated security model encompassing both native Windows/.NET security protocols and numerous neutral-security techniques built on web service standards.
· Support for session-like state management techniques, as well as support for one- way or stateless messages.
As impressive as this list of features might be, it only scratches the surface of the functionality WCF provides. WCF also offers tracing and logging facilities, performance counters, a publish-and-subscribe event model, and transactional support, among other features.
An Overview of Service-Oriented Architecture
Yet another benefit of WCF is that it is based on the design principles established by service-oriented architecture (SOA) . To be sure, SOA is a major buzzword in the industry; and like most buzzwords, SOA can be defined in numerous ways. Simply put, SOA is a way to design a distributed system where several autonomous services work in conjunction by passing messages across boundaries (either networked machines or two processes on the same machine) using well-defined interfaces.
In the world of WCF, you typically create these well-defined interfaces using CLR interface types (see Chapter 9). In a more general sense, however, the interface of a service simply describes the set of members that might be invoked by external callers.
The team that designed WCF observed the four tenets of SOA design principles. While these tenets are typically honored automatically simply by building a WCF application, understanding these four cardinal design rules of SOA can help you understand WCF better. The sections that follow provide a brief overview of each tenet.
Tenet 1: Boundaries are Explicit
This tenet reiterates that the functionality of a WCF service is expressed using well-defined interfaces (e.g., descriptions of each member, its parameters, and its return values). The only way that an external caller can communicate with a WCF service is through the interface, and the external caller remains blissfully unaware of the underlying implementation details.
Tenet 2: Services are Autonomous
The term autonomous entities refers to the fact that a given WCF service is (as much as possible) an island unto itself. An autonomous service should be independent with regard to version, deployment, and installation issues. To help promote this tenet, you can fall back on a key aspect of interface-based programming. Once an interface is in production, it should never be changed (or you will risk breaking existing clients). When you need to extend the functionality of your WCF service, you author new interfaces that model the desired functionality.
Tenet 3: Services Communicate via Contract, Not Implementation
The third tenet is yet another by-product of interface-based programming. The implementation details of a WCF service (e.g., the language it was written in, how it accomplishes its work, etc.) are of no concern to the external caller. WCF clients interact with services solely through their exposed public interfaces.
Tenet 4: Service Compatibility is Based on Policy
Because CLR interfaces provide strongly typed contracts for all WCF clients (and can also be used to generate a related WSDL document based on your choice of binding), it is important to realize that interfaces and WSDL alone are not expressive enough to detail aspects of what the service is capable of doing. Given this, SOA allows you to define policies that further qualify the semantics of the service (e.g., the expected security requirements used to talk to the service). Using these policies, you can basically separate the low-level syntactic description of your service (the exposed interfaces) from the semantic details of how they work and how they need to be invoked.
WCF: The Bottom Line
The preceding short history lesson explains why WCF is the preferred approach for building distributed applications. WCF is the recommended API whether you want to build an in-house application using TCP protocols, move data between programs on the same machine using named pipes, or expose data to the world at large using HTTP-based protocols.
This is not to say that you cannot use the original .NET distributed-centric namespaces (e.g., System.Runtime.Remoting, System.Messaging, System.EnterpriseServices, and System.Web.Services) in new development efforts. In some cases (e.g., if you need to build COM+ objects), you must do so. In any case, if you have used these APIs in previous projects, you will find learning WCF straightforward. Like the technologies that preceded it, WCF makes considerable use of XML-based configuration files, .NET attributes, and proxy generation utilities.
With this introductory foundation behind you, you can concentrate on the topic of building WCF applications. Again, you should understand that full coverage of WCF would require an entire book because each of the supported services (e.g., MSMQ, COM+, P2P, and named pipes) could be a chapter unto itself. Here, you will learn the overall process of building WCF programs using both TCP- and HTTP-based (e.g., web service) protocols. This should put you in a good position to study these topics further, as you see fit.
Investigating the Core WCF Assemblies
As you might expect, the programming fabric of WCF is represented by a set of .NET assemblies installed into the GAC. Table 25-1 describes the overall role of the core WCF assemblies you need to use in just about any WCF application.
Table 25-1. Core WCF Assemblies
|
Assembly |
Meaning in Life |
|
System.Runtime.Serialization.dll |
This core assembly defines namespaces and types that you can use for serializing and deserializing objects in the WCF framework. |
|
System.ServiceModel.dll |
This core assembly contains the types used to build any sort of WCF application. |
The two assemblies listed in Table 25-1 define many new namespaces and types. You should consult the .NET Framework 4.6 SDK documentation for complete details; however, Table 25-2 documents the roles of some of the important namespaces.
Table 25-2. Core WCF Namespaces
|
Namespace |
Meaning in Life |
|
System.Runtime.Serialization |
This defines many types you use to control how data is serialized and deserialized within the WCF framework. |
|
System.ServiceModel |
This primary WCF namespace defines binding and hosting types, as well as basic security and transactional types. |
|
System.ServiceModel.Configuration |
This defines numerous types that provide programmatic access to WCF configuration files. |
|
System.ServiceModel.Description |
This defines types that provide an object model to the addresses, bindings, and contracts defined within WCF configuration files. |
|
System.ServiceModel.MsmqIntegration |
This contains types to integrate with the MSMQ service. |
|
System.ServiceModel.Security |
This defines numerous types to control aspects of the WCF security layers. |
The Visual Studio WCF Project Templates
As will be explained in more detail later in this chapter, a WCF application is typically represented by three interrelated assemblies, one of which is a *.dll that contains the types that external callers can communicate with (in other words, the WCF service itself). When you want to build a WCF service, it is perfectly permissible to select a standard Class Library project template (see Chapter 14) as a starting point and manually reference the WCF assemblies.
Alternatively, you can create a new WCF service by selecting the WCF Service Library project template of Visual Studio (see Figure 25-2). This project type automatically sets references to the required WCF assemblies; however, it also generates a good deal of starter code, which you will likely often delete.
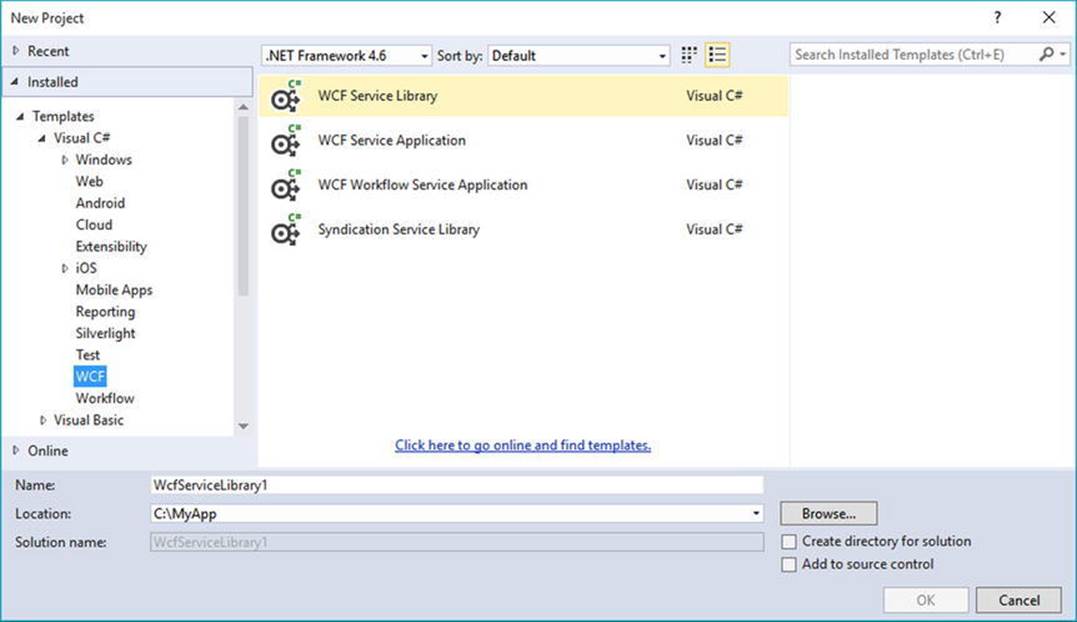
Figure 25-2. The Visual Studio WCF Service Library project template
One benefit of selecting the WCF Service Library project template is that it also supplies you with an App.config file, which might seem strange because you are building a .NET *.dll, not a .NET *.exe. However, this file is useful because when you debug or run your WCF Service Library project, the Visual Studio IDE will automatically launch the WCF Test Client application. This program (WcfTestClient.exe) will look up the settings in the App.config file, so it can host your service for testing purposes. You’ll learn more about the WCF Test Client later in this chapter.
![]() Note The App.config file of the WCF Service Library project is also useful because it shows you the bare-bones settings used to configure a WCF host application. In fact, you can copy and paste much of this code into the configuration file of your production services.
Note The App.config file of the WCF Service Library project is also useful because it shows you the bare-bones settings used to configure a WCF host application. In fact, you can copy and paste much of this code into the configuration file of your production services.
In addition to the basic WCF Service Library template, the WCF project category of the New Project dialog box defines a WCF library project that integrates Windows Workflow Foundation (WF) functionality into a WCF service, as well as a template to build an RSS library (see Figure 25-2).
The WCF Service Web Site Project Template
You can find yet another Visual Studio WCF-centric project template in the New Web Site dialog box, which you activate using the File ![]() New
New ![]() Web Site menu option (see Figure 25-3).
Web Site menu option (see Figure 25-3).
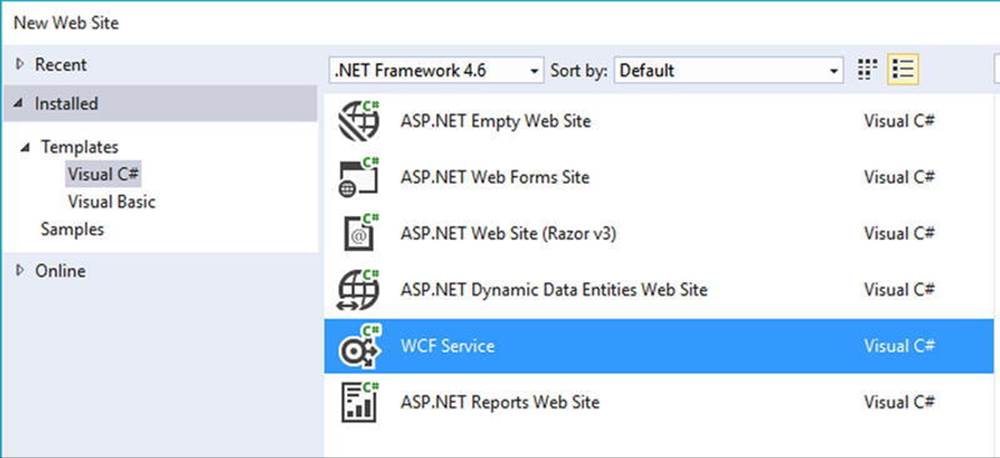
Figure 25-3. The Visual Studio web-based WCF Service project template
This WCF Service project template is useful when you know from the outset that your WCF service will use HTTP-based protocols rather than, for example, TCP or named pipes. This option can automatically create a new Internet Information Services (IIS) virtual directory to contain your WCF program files, create a proper Web.config file to expose the service through HTTP, and author the necessary *.svc file (you’ll learn more about *.svc files later in this chapter). Thus, the web-based WCF Service project is a time-saver because the IDE automatically sets up the required IIS infrastructure.
In contrast, if you build a new WCF service using the WCF Service Library option, you have the ability to host the service in a variety of ways (e.g., custom host, Windows service, or manually built IIS virtual directory). This option is more appropriate when you need to build a custom host for your WCF service that can work with any number of WCF bindings.
The Basic Composition of a WCF Application
When you build a WCF distributed system, you will typically do so by creating the following three interrelated assemblies:
· The WCF Service assembly: This *.dll contains the classes and interfaces that represent the overall functionality you want to expose to external callers.
· The WCF Service host: This software module is the entity that hosts your WCF service assembly.
· The WCF client: This is the application that accesses the service’s functionality through an intervening proxy.
As mentioned previously, the WCF Service assembly is a .NET class library that contains a number of WCF contracts and their implementations. The key difference is that the interface contracts are adorned with various attributes that control data type representation, how the WCF runtime interacts with the exposed types, and so forth.
The second assembly, the WCF Service host, can be literally any .NET executable. As you will see later in this chapter, WCF was set up so that you can expose services easily from any type of application (e.g., Windows Forms, a Windows service, and WPF applications). When you build a custom host, you use the ServiceHost type and possibly a related *.config file. The latter contains details regarding the server-side plumbing you want to use. However, if you use IIS as the host for your WCF service, you don’t need to build a custom host programmatically because IIS will use the ServiceHost type behind the scenes.
![]() Note It is also possible to host a WCF service using the Windows Activation Service (WAS); you can consult the .NET Framework 4.6 SDK documentation for details.
Note It is also possible to host a WCF service using the Windows Activation Service (WAS); you can consult the .NET Framework 4.6 SDK documentation for details.
The final assembly represents the client that makes calls into the WCF service. As you might expect, this client can be any type of .NET application. Similar to the host, client applications typically use a client-side *.config file that defines the client-side plumbing. You should also be aware that you can easily have a client application written in another framework (e.g., Java) if you build your WCF service using HTTP-based bindings.
Figure 25-4 illustrates the relationship between these three interrelated WCF assemblies (from a high level). Behind the scenes, several lower-level details are used to represent the required plumbing (e.g., factories, channels, and listeners). These low-level details are usually hidden from view; however, they can be extended or customized if required. In most cases, the default plumbing fits the bill sufficiently.
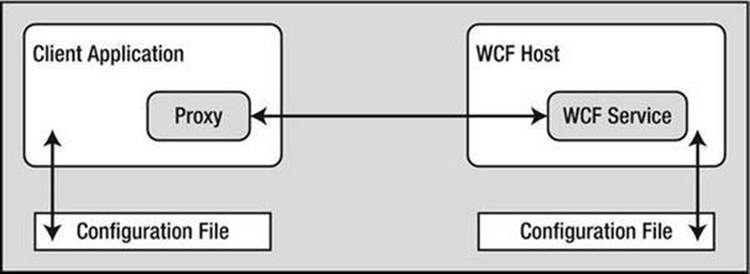
Figure 25-4. A high-level look at a typical WCF application
It is also worth pointing out that using a server-side or client-side *.config file is technically optional. If you want, you can hard-code the host (as well as the client) to specify the necessary plumbing (e.g., endpoints, binding, and addresses). The obvious problem with this approach is that if you need to change the plumbing details, you will need to recode, recompile, and redeploy a number of assemblies. Using a *.config file keeps your code base much more flexible because changing the plumbing is as simple as updating the file’s content and restarting the application. On the other hand, programmatic configuration allows an application more dynamic flexibility—it can choose how to configure the plumbing based on if-tests, for example.
The ABCs of WCF
Hosts and clients communicate with each other by agreeing on the ABCs, a friendly mnemonic for remembering the core building blocks of a WCF application address, binding, and contract, defined as follows:
· Address: Describes the location of the service. In code, you represent this with a System.Uri type; however, you typically store the value in *.config files.
· Binding: WCF ships with a many different bindings that specify network protocols, encoding mechanisms, and the transport layer.
· Contract: Provides a description of each method exposed from the WCF service.
You should realize that the ABC abbreviation does not imply that a developer must define the address first, followed by binding, and ending with the contract. In many cases, a WCF developer begins by defining a contract for the service, followed by establishing an address and bindings (any order will do, as long as each aspect is accounted for). Before you move on to building your first WCF application, let’s take a more detailed look at the ABCs.
Understanding WCF Contracts
Understanding the notion of a contract is the key to building a WCF service. While not mandatory, the vast majority of your WCF applications will begin by defining a set of .NET interface types that are used to represent the set of members a given WCF service will support. Specifically, interfaces that represent a WCF contract are called service contracts. The classes (or structures) that implement them are called service types.
WCF service contracts are adorned with various attributes, the most common of which are defined in the System.ServiceModel namespace. When the members of a service contract (the methods in the interface) contain only simple data types (e.g., numerical data, Booleans, and string data), you can build a complete WCF service using nothing more than the [ServiceContract] and [OperationContract] attributes.
However, if your members expose custom types, you will likely use various types in the System.Runtime.Serialization namespace (see Figure 25-5) of the System.Runtime.Serialization.dll assembly. Here you will find additional attributes (e.g.,[DataMember] and [DataContract]) to fine-tune the process of defining how your composite types are serialized to and from XML when they are passed to and from service operations.
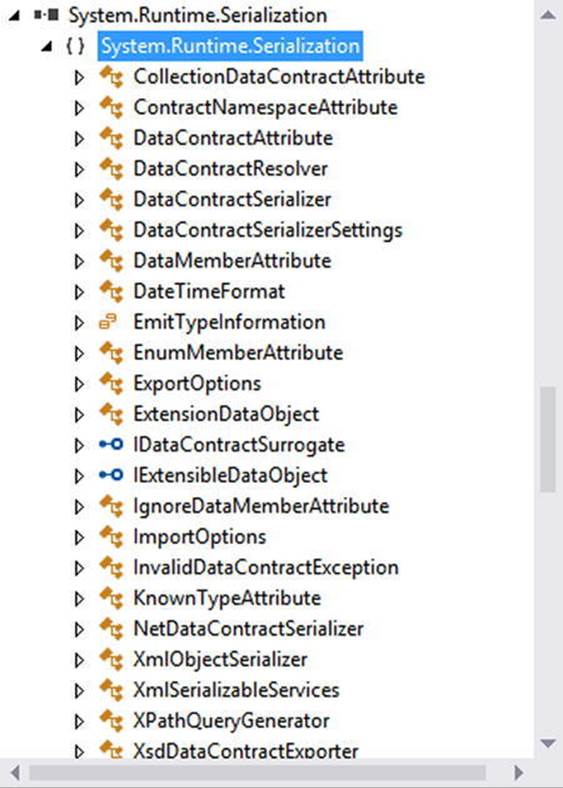
Figure 25-5. System.Runtime.Serialization defines a number of attributes used when building WCF data contracts
Strictly speaking, you are not required to use CLR interfaces to define a WCF contract. Many of these same attributes can be applied on public members of a public class (or structure). However, given the many benefits of interface-based programming (e.g., polymorphism and elegant versioning), it is safe to consider that using CLR interfaces to describe a WCF contract is a best practice.
Understanding WCF Bindings
Once you define and implement a contract (or a set of contracts) in your service library, the next logical step is to build a hosting agent for the WCF service itself. As mentioned previously, you have a variety of possible hosts to choose from, all of which must specify the bindings used by remote callers to gain access to the service type’s functionality.
WCF ships with many of binding choices, each of which is tailored to a specific need. If none of the out-of-the-box bindings fits the bill, you can create your own by extending the CustomBinding type (something you will not do in this chapter). A WCF binding can specify the following characteristics:
· The transport layer used to move data (HTTP, MSMQ, named pipes, REST, WebSockets, and TCP)
· The channels used by the transport (one-way, request-reply, and duplex)
· The encoding mechanism used to deal with the data itself (e.g., XML and binary)
· Any supported web service protocols (if permitted by the binding), such as WS- Security, WS-Transactions, WS-Reliability, and so on
Let’s take a look at your basic choices.
HTTP-Based Bindings
The BasicHttpBinding, WSHttpBinding, WSDualHttpBinding, and WSFederationHttpBinding options are geared toward exposing contract types through HTTP/SOAP protocols. If you require the furthest reach possible for your service (e.g., multiple operating systems and multiple programming architectures), you want to focus on these bindings because all of these binding types encode data based on XML representation and use HTTP on the wire.
Table 25-3 shows how you can represent a WCF binding in code (using class types within the System.ServiceModel namespace) or as XML attributes defined within *.config files.
Table 25-3. The HTTP-Centric WCF Bindings
|
Binding Class |
Binding Element |
Meaning in Life |
|
BasicHttpBinding |
<basicHttpBinding> |
You use this to build a WS-Basic Profile– conformant (WS-I Basic Profile 1.1) WCF service. This binding uses HTTP as the transport and Text/XML as the default message encoding. |
|
WSHttpBinding |
<wsHttpBinding> |
This is similar to BasicHttpBinding but provides more web service features. This binding adds support for transactions, reliable messaging, and WS-Addressing. |
|
WSDualHttpBinding |
<wsDualHttpBinding> |
This is similar to WSHttpBinding but intended for use with duplex contracts (e.g., the service and client can send messages back and forth). This binding supports only SOAP security and requires reliable messaging. |
|
WSFederationHttpBinding |
<wsFederationHttpBinding> |
This is a secure and interoperable binding that supports the WS- Federation protocol, enabling organizations that are in a federation to authenticate and authorize users efficiently. |
As its name suggests, BasicHttpBinding is the simplest of all web service–centric protocols. Specifically, this binding ensures that your WCF service conforms to a specification named WS-I Basic Profile 1.1 (defined by WS-I). The main reason to use this binding is for maintaining backward compatibility with applications that were previously built to communicate with ASP.NET web services (which have been part of the .NET libraries since version 1.0).
The WSHttpBinding protocol not only incorporates support for a subset of the WS-* specification (transactions, security, and reliable sessions) but also supports the ability to handle binary data encoding using Message Transmission Optimization Mechanism (MTOM).
The main benefit of WSDualHttpBinding is that it adds the ability to allow the caller and sender to communicate using duplex messaging, which is a fancy way of saying they can engage in a two-way conversation. When selecting WSDualHttpBinding, you can hook into the WCF publish/subscribe event model.
Finally, WSFederationHttpBinding is the web service–based protocol you might want to consider when security among a group of organizations is of the utmost importance. This binding supports the WS-Trust, WS-Security, and WS-SecureConversation specifications, which are represented by the WCF CardSpace APIs.
TCP-Based Bindings
If you build a distributed application involving machines that are configured with the .NET 4.5 libraries (in other words, all machines are running the Windows operating system), you can gain performance benefits by bypassing web service bindings and opting for a TCP binding, which ensures that all data is encoded in a compact binary format, rather than XML. Again, when you use the bindings shown in Table 25-4, the client and host must be .NET applications.
Table 25-4. The TCP-Centric WCF Bindings
|
Binding Class |
Binding Element |
Meaning in Life |
|
NetNamedPipeBinding |
<netNamedPipeBinding> |
Serves as a secure, reliable, optimized binding for on-the-same-machine communication between .NET applications |
|
NetPeerTcpBinding |
<netPeerTcpBinding> |
Provides a secure binding for P2P network applications |
|
NetTcpBinding |
<netTcpBinding> |
Serves as a secure and optimized binding suitable for cross-machine communication between .NET applications |
The NetTcpBinding class uses TCP to move binary data between the client and WCF service. As mentioned previously, this will result in higher performance than the web service protocols but limits you to an in-house Windows solution. On the plus side, NetTcpBinding supports transactions, reliable sessions, and secure communications.
Like NetTcpBinding, NetNamedPipeBinding supports transactions, reliable sessions, and secure communications; however, it has no ability to make cross-machine calls. If you want to find the fastest way to push data between WCF applications on the same machine (e.g., cross-application domain communications), NetNamedPipeBinding is the binding choice of champions. For more information on NetPeerTcpBinding, consult the .NET Framework 4.6 SDK documentation for details regarding P2P networking.
MSMQ-Based Bindings
Finally, the NetMsmqBinding and MsmqIntegrationBinding bindings are of immediate interest if you want to integrate with a Microsoft MSMQ server. This chapter will not examine the details of using MSMQ bindings, but Table 25-5 documents the basic role of each.
Table 25-5. The MSMQ-Centric WCF Bindings
|
Binding Class |
Binding Element |
Meaning in Life |
|
MsmqIntegrationBinding |
<msmqIntegrationBinding> |
You can use this binding to enable WCF applications to send and receive messages to and from existing MSMQ applications that use COM, native C++, or the types defined in the System.Messaging namespace. |
|
NetMsmqBinding |
<netMsmqBinding> |
You can use this queued binding for cross-machine communication between .NET applications. This is the preferred approach among the MSMQ-centric bindings. |
Understanding WCF Addresses
Once you establish the contracts and bindings, the final piece of the puzzle is to specify an address for the WCF service. This is important because remote callers will be unable to communicate with the remote types if they cannot locate them! Like most aspects of WCF, an address can be hard-coded in an assembly (using the System.Uri type) or offloaded to a *.config file.
In either case, the exact format of the WCF address will differ based on your choice of binding (HTTP based, named pipes, TCP based, or MSMQ based). From a high level, WCF addresses can specify the following bits of information:
· Scheme: The transport protocol (e.g., HTTP)
· MachineName: The fully qualified domain of the machine
· Port: This is optional in many cases; for example, the default for HTTP bindings is port 80.
· Path: The path to the WCF service
This information can be represented by the following generalized template (the Port value is optional because some bindings don’t use them):
scheme://<MachineName>[:Port]/Path
When you use an HTTP-based binding (e.g., basicHttpBinding, wsHttpBinding, wsDualHttpBinding, or wsFederationHttpBinding), the address breaks down like this (recall that HTTP-based protocols default to port 80 if you do not specify a port number):
http://localhost:8080/MyWCFService
If you use TCP-centric bindings (e.g., NetTcpBinding or NetPeerTcpBinding), the URI takes the following format:
net.tcp://localhost:8080/MyWCFService
The MSMQ-centric bindings (NetMsmqBinding and MsmqIntegrationBinding) are unique in their URI format because MSMQ can use public or private queues (which are available only on the local machine), and port numbers have no meaning in an MSMQ-centric URI. Consider the following URI, which describes a private queue named MyPrivateQ:
net.msmq://localhost/private$/MyPrivateQ
Last but not least, the address format used for the named-pipe binding, NetNamedPipeBinding, breaks down like this (recall that named pipes allow for interprocess communication for applications on the same physical machine):
net.pipe://localhost/MyWCFService
While a single WCF service might expose only a single address (based on a single binding), it is possible to configure a collection of unique addresses (with different bindings). You can do this in a *.config file by defining multiple <endpoint> elements. Here, you can specify any number of ABCs for the same service. This approach can be helpful when you want to allow callers to select which protocol they would like to use when communicating with the service.
Building a WCF Service
Now that you have a better understanding about the building blocks of a WCF application, it’s time to create your first sample application and see how the ABCs are accounted for in code and configuration. This first example avoids using the Visual Studio WCF project templates, so you can focus on the specific steps involved in making a WCF service.
Begin by creating a new C# Class Library project named MagicEightBallServiceLib. Next, rename your initial file from Class1.cs to MagicEightBallService.cs and then add a reference to the System.ServiceModel.dll assembly. In the initial code file, specify that you are using the System.ServiceModel namespace. At this point, your C# file should look like this (note you have a public class at this point):
// The key WCF namespace.
using System.ServiceModel;
namespace MagicEightBallServiceLib
{
public class MagicEightBallService
{
}
}
Your class type implements a single WCF service contract represented by a strongly typed CLR interface named IEightBall. As you most likely know, the Magic 8-Ball is a toy that allows you to view one of a handful of fixed answers to a question you might ask. Your interface here will define a single method that allows the caller to pose a question to the Magic 8-Ball to obtain a random answer.
WCF service interfaces are adorned with the [ServiceContract] attribute, while each interface member is decorated with the [OperationContract] attribute (you’ll learn more details regarding these two attributes in just a moment). Here is the definition of the IEightBallinterface:
[ServiceContract]
public interface IEightBall
{
// Ask a question, receive an answer!
[OperationContract]
string ObtainAnswerToQuestion(string userQuestion);
}
![]() Note It is permissible to define a service contract interface that contains methods not adorned with the [OperationContract] attribute; however, such members will not be exposed through the WCF runtime.
Note It is permissible to define a service contract interface that contains methods not adorned with the [OperationContract] attribute; however, such members will not be exposed through the WCF runtime.
As you know from your study of the interface type (see Chapter 8), interfaces are quite useless until they are implemented by a class or structure that fleshes out their functionality. Like a real Magic 8-Ball, the implementation of your service type (MagicEightBallService) will randomly return a canned answer from an array of strings. Also, your default constructor will display an information message that will be (eventually) displayed within the host’s console window (for diagnostic purposes).
public class MagicEightBallService : IEightBall
{
// Just for display purposes on the host.
public MagicEightBallService()
{
Console.WriteLine("The 8-Ball awaits your question...");
}
public string ObtainAnswerToQuestion(string userQuestion)
{
string[] answers = { "Future Uncertain", "Yes", "No",
"Hazy", "Ask again later", "Definitely" };
// Return a random response.
Random r = new Random();
return answers[r.Next(answers.Length)];
}
}
At this point, your WCF Service Library is complete. However, before you construct a host for this service, you need to examine some additional details of the [ServiceContract] and [OperationContract] attributes.
The [ServiceContract] Attribute
For a CLR interface to participate in the services provided by WCF, it must be adorned with the [ServiceContract] attribute. Like many other .NET attributes, the ServiceContractAttribute type supports many properties that further qualify its intended purpose. You can set two properties, Name and Namespace, to control the name of the service type and the name of the XML namespace that defines the service type. If you use an HTTP-specific binding, you use these values to define the <portType> elements of the related WSDL document.
Here, you do not bother to assign a Name value because the default name of the service type is directly based on the C# class name. However, the default name for the underlying XML namespace is simply http://tempuri.org (you should change this for all your WCF services).
When you build a WCF service that will send and receive custom data types (which you are not currently doing), it is important that you establish a meaningful value to the underlying XML namespace because this ensures that your custom types are unique. As you might know from your experience building XML web services, XML namespaces provide a way to wrap your custom types in a unique container to ensure that your types do not clash with types in another organization.
For this reason, you can update your interface definition with a more fitting definition, which, much like the process of defining an XML namespace in a .NET Web Service project, is typically the URI of the service’s point of origin, as in the following example:
[ServiceContract(Namespace = "http://MyCompany.com")]
public interface IEightBall
{
...
}
Beyond Namespace and Name, the [ServiceContract] attribute can be configured with the additional properties shown in Table 25-6. Be aware that some of these settings will be ignored, depending on your binding selection.
Table 25-6. Various Named Properties of the [ServiceContract] Attribute
|
Property |
Meaning in Life |
|
CallbackContract |
Establishes whether this service contract requires callback functionality for two-way message exchange (e.g., duplex bindings). |
|
ConfigurationName |
Locates the service element in an application configuration file. The default is the name of the service implementation class. |
|
ProtectionLevel |
Allows you to specify the degree to which the contract binding requires encryption, digital signatures, or both for endpoints that expose the contract. |
|
SessionMode |
Establishes whether sessions are allowed, not allowed, or required by this service contract. |
The [OperationContract] Attribute
Methods that you intend to use within the WCF framework must be attributed with the [OperationContract] attribute, which can also be configured with various named properties. You can use the properties shown in Table 25-7 to declare that a given method is intended to be one-way in nature, supports asynchronous invocation, requires encrypted message data, and so forth (again, many of these values might be ignored based on your binding selection).
Table 25-7. Various Named Properties of the [OperationContract] Attribute
|
Property |
Meaning in Life |
|
AsyncPattern |
Indicates whether the operation is implemented asynchronously using a Begin/End method pair on the service. This allows the service to offload processing to another server-side thread; this has nothing to do with the client calling the method asynchronously! |
|
IsInitiating |
Specifies whether this operation can be the initial operation in a session. |
|
IsOneWay |
Indicates whether the operation consists of only a single input message (and no associated output). |
|
IsTerminating |
Specifies whether the WCF runtime should attempt to terminate the current session after the operation completes. |
For the initial example, you don’t need to configure the ObtainAnswerToQuestion() method with additional traits; this means you can use the [OperationContract] attribute as currently defined.
Service Types As Operational Contracts
Finally, recall that the use of interfaces is not required when building WCF service types. In fact, it is possible to apply the [ServiceContract] and [OperationContract] attributes directly to the service type itself, like so:
// This is only for illustrative purposes
// and not used for the current example.
[ServiceContract(Namespace = "http://MyCompany.com")]
public class ServiceTypeAsContract
{
[OperationContract]
void SomeMethod() { }
[OperationContract]
void AnotherMethod() { }
}
You can take this approach; however, you receive many benefits if you explicitly define an interface type to represent the service contract. The most obvious benefit is that you can apply a given interface to multiple service types (authored in a variety of languages and architectures) to achieve a high degree of polymorphism. Another benefit is that you can use a service contract interface as the basis of new contracts (using interface inheritance), without having to carry any implementation baggage.
In any case, your first WCF Service Library is now complete. Compile your project to ensure you do not have any typos.
![]() Source Code You can find the MagicEightBallServiceLib project in the MagicEightBallServiceHTTP subdirectory of Chapter 25.
Source Code You can find the MagicEightBallServiceLib project in the MagicEightBallServiceHTTP subdirectory of Chapter 25.
Hosting the WCF Service
You are now ready to define a host. Although you would host a production-level service from a Windows service or an IIS virtual directory, you will make your first host a simple console named MagicEightBallServiceHost.
After you create this new Console Application project, add a reference to the System.ServiceModel.dll and MagicEightBallServiceLib.dll assemblies, and then update your initial code file by importing the System.ServiceModel andMagicEightBallServiceLib namespaces, like so:
using System;
...
using System.ServiceModel;
using MagicEightBallServiceLib;
namespace MagicEightBallServiceHost
{
class Program
{
static void Main(string[] args)
{
Console.WriteLine("***** Console Based WCF Host *****");
Console.ReadLine();
}
}
}
The first step you must take when building a host for a WCF service type is to decide whether you want to define the necessary hosting logic completely in code or to relegate several low-level details to an application configuration file. As mentioned previously, the benefit of *.configfiles is that the host can change the underlying plumbing without requiring you to recompile and redeploy the executable. However, always remember this is strictly optional because you can hard-code the hosting logic using the types within the System.ServiceModel.dll assembly.
This console-based host will use an application configuration file, so insert this new file (if your project does not currently have one) into your current project by using the Project ![]() Add New Item menu option and then choosing Application Configuration File.
Add New Item menu option and then choosing Application Configuration File.
Establishing the ABCs Within an App.config File
When you build a host for a WCF service type, you follow a predictable set of steps—some that rely on configuration and some that rely on code. These steps are as follows:
· Define the endpoint for the WCF service being hosted within the host’s configuration file.
· Programmatically use the ServiceHost type to expose the service types available from this endpoint.
· Ensure the host remains running to service incoming client requests. Obviously, this step is not required if you host your service types using a Windows service or IIS.
In the world of WCF, the term endpoint represents the address, binding, and contract rolled together in a nice, tidy package. In XML, an endpoint is expressed using the <endpoint> element and the address, binding, and contract elements. Update your *.config file to specify a single endpoint (reachable through port 8080) exposed by this host, like so:
<?xml version = "1.0" encoding = "utf-8" ?>
<configuration>
<system.serviceModel>
<services>
<service name = "MagicEightBallServiceLib.MagicEightBallService">
<endpoint address = "http://localhost:8080/MagicEightBallService"
binding = "basicHttpBinding"
contract = "MagicEightBallServiceLib.IEightBall"/>
</service>
</services>
</system.serviceModel>
</configuration>
Notice that the <system.serviceModel> element is the root for all of a host’s WCF settings. Each service exposed by the host is represented by a <service> element that is wrapped by the <services> base element. Here, your single <service> element uses the (optional)name attribute to specify the friendly name of the service type.
The nested <endpoint> element handles the task of defining the address, the binding model (basicHttpBinding, in this example), and the fully qualified name of the interface type defining the WCF service contract (IEightBall). Because you are using an HTTP-based binding, you use the http:// scheme, specifying an arbitrary port ID.
Coding Against the ServiceHost Type
With the current configuration file in place, the actual programming logic required to complete the host is simple. When your executable starts up, you will create an instance of the ServiceHost class and inform it which WCF service it is responsible for hosting. At runtime, this object will automatically read the data within the scope of the <system.serviceModel> element of the host’s *.config file to determine the correct address, binding, and contract. It will then create the necessary plumbing.
static void Main(string[] args)
{
Console.WriteLine("***** Console Based WCF Host *****");
using (ServiceHost serviceHost = new ServiceHost(typeof(MagicEightBallService)))
{
// Open the host and start listening for incoming messages.
serviceHost.Open();
// Keep the service running until the Enter key is pressed.
Console.WriteLine("The service is ready.");
Console.WriteLine("Press the Enter key to terminate service.");
Console.ReadLine();
}
}
If you run this application now, you will find that the host is alive in memory, ready to take incoming requests from remote clients.
![]() Note Recall that you must launch Visual Studio with administrative privileges to run many WCF project types!
Note Recall that you must launch Visual Studio with administrative privileges to run many WCF project types!
Specifying Base Addresses
Currently, you create your ServiceHost using a constructor that requires only the service’s type information. However, it is also possible to pass in an array of System.Uri types as a constructor argument to represent the collection of addresses this service is accessible from. Currently, you find the address using the *.config file. However, assume that you were to update the using scope like this:
using (ServiceHost serviceHost = new
ServiceHost(typeof(MagicEightBallService),
new Uri[]{new Uri("http://localhost:8080/MagicEightBallService")}))
{
...
}
If you did, you could now define your endpoint like this:
<endpoint address = ""
binding = "basicHttpBinding"
contract = "MagicEightBallServiceLib.IEightBall"/>
Of course, too much hard-coding within a host’s code base decreases flexibility. Therefore, the current host example assumes you create the service host simply by supplying the following type information, as you did before:
using (ServiceHost serviceHost = new ServiceHost(typeof(MagicEightBallService)))
{
...
}
One of the (slightly frustrating) aspects of authoring host *.config files is that you have several ways to construct the XML descriptors, based on the amount of hard-coding you have in the code base (as you have just seen in the case of the optional Uri array). Here’s a reworking that shows yet another way to author *.config files:
<?xml version = "1.0" encoding = "utf-8" ?>
<configuration>
<system.serviceModel>
<services>
<service name = "MagicEightBallServiceLib.MagicEightBallService">
<!-- Address obtained from <baseAddresses> -->
<endpoint address = ""
binding = "basicHttpBinding"
contract = "MagicEightBallServiceLib.IEightBall"/>
<!-- List all of the base addresses in a dedicated section -->
<host>
<baseAddresses>
<add baseAddress = "http://localhost:8080/MagicEightBallService"/>
</baseAddresses>
</host>
</service>
</services>
</system.serviceModel>
</configuration>
In this case, the address attribute of the <endpoint> element is still empty; regardless of the fact that you do not specify an array of Uri objects in code when creating the ServiceHost, the application runs as before because the value is pulled from the baseAddresses scope. The benefit of storing the base address in a <host>’s <baseAddresses> region is that other parts of a *.config file also need to know the address of the service’s endpoint. Thus, rather than having to copy and paste address values within a single *.config file, you can isolate the single value, as shown in the preceding snippet.
![]() Note In a later example, you’ll be introduced to a graphical configuration tool that allows you to author configuration files in a less tedious manner.
Note In a later example, you’ll be introduced to a graphical configuration tool that allows you to author configuration files in a less tedious manner.
In any case, you have a bit more work to do before you build a client application to communicate with your service. Specifically, you will dig a bit deeper into the role of the ServiceHost class type and <service.serviceModel> element, as well as the role of metadata exchange (MEX) services.
Details of the ServiceHost Type
You use the ServiceHost class type to configure and expose a WCF service from the hosting executable. However, be aware that you will use this type directly only when building a custom *.exe to host your services. If you use IIS to expose a service, the ServiceHost object is created automatically on your behalf.
As you have seen, this type requires a complete service description, which is obtained dynamically through the configuration settings of the host’s *.config file. While this happens automatically when you create a ServiceHost object, it is possible to configure the state of yourServiceHost object manually using a number of members. In addition to Open() and Close() (which communicate with your service in a synchronous manner), Table 25-8 illustrates some further members of interest.
Table 25-8. Select Members of the ServiceHost Type
|
Members |
Meaning in Life |
|
Authorization |
This property gets the authorization level for the service being hosted. |
|
AddDefaultEndpoints() |
This method is used to configure a WCF Service host programmatically so it uses any number of prebuilt endpoints supplied by the framework. |
|
AddServiceEndpoint() |
This method allows you to register an endpoint to the host programmatically. |
|
BaseAddresses |
This property obtains the list of registered base addresses for the current service. |
|
BeginOpen() BeginClose() |
These methods allow you to open and close a ServiceHost object asynchronously, using the standard asynchronous .NET delegate syntax. |
|
CloseTimeout |
This property allows you to set and get the time allowed for the service to close down. |
|
Credentials |
This property obtains the security credentials used by the current service. |
|
EndOpen() EndClose() |
These methods are the asynchronous counterparts to BeginOpen() and BeginClose(). |
|
OpenTimeout |
This property allows you to set and get the time allowed for the service to start up. |
|
State |
This property gets a value that indicates the current state of the communication object, which is represented by the CommunicationState enum (e.g., opened, closed, and created). |
You can see some additional aspects of ServiceHost in action by updating your Program class as follows, with a new static method that prints out the ABCs of each endpoint used by the host:
static void DisplayHostInfo(ServiceHost host)
{
Console.WriteLine();
Console.WriteLine("***** Host Info *****");
foreach (System.ServiceModel.Description.ServiceEndpoint se
in host.Description.Endpoints)
{
Console.WriteLine("Address: {0}", se.Address);
Console.WriteLine("Binding: {0}", se.Binding.Name);
Console.WriteLine("Contract: {0}", se.Contract.Name);
Console.WriteLine();
}
Console.WriteLine("**********************");
}
Now, assuming that you call this new method from within Main() after opening your host:
using (ServiceHost serviceHost = new ServiceHost(typeof(MagicEightBallService)))
{
// Open the host and start listening for incoming messages.
serviceHost.Open();
DisplayHostInfo(serviceHost);
...
}
the following statistics will be shown as output:
***** Console Based WCF Host *****
***** Host Info *****
Address: http://localhost:8080/MagicEightBallService
Binding: BasicHttpBinding
Contract: IEightBall
**********************
The service is ready.
Press the Enter key to terminate service.
![]() Note When running a host (or client) in this chapter, be sure to truly “run” the program from within Visual Studio (Ctrl+F5) and not debug (F5) the program to ensure your host and client processes can run independently.
Note When running a host (or client) in this chapter, be sure to truly “run” the program from within Visual Studio (Ctrl+F5) and not debug (F5) the program to ensure your host and client processes can run independently.
Details of the <system.serviceModel> Element
Like any XML element, <system.serviceModel> can define a set of subelements, each of which can be qualified using various attributes. While you should consult the .NET Framework 4.6 SDK documentation for full details regarding the set of possible attributes, here is a skeleton that lists some (but not all) useful subelements:
<system.serviceModel>
<behaviors>
</behaviors>
<client>
</client>
<commonBehaviors>
</commonBehaviors>
<diagnostics>
</diagnostics>
<comContracts>
</comContracts>
<services>
</services>
<bindings>
</bindings>
</system.serviceModel>
You’ll see more exotic configuration files as you move through the chapter; however, you can see the crux of each subelement in Table 25-9.
Table 25-9. Select Subelements of <service.serviceModel>
|
Subelement |
Meaning in Life |
|
behaviors |
WCF supports various endpoint and service behaviors. In a nutshell, a behavior allows you to qualify further the functionality of a host, service, or client. |
|
bindings |
This element allows you to fine-tune each of the WCF-supplied bindings (e.g., basicHttpBinding and netMsmqBinding), as well as to specify any custom bindings used by the host. |
|
client |
This element contains a list of endpoints a client uses to connect to a service. Obviously, this is not particularly useful in a host’s *.config file. |
|
comContracts |
This element defines COM contracts enabled for WCF and COM interoperability. |
|
commonBehaviors |
This element can be set only within a machine.config file. You can use it to define all of the behaviors used by each WCF service on a given machine. |
|
diagnostics |
This element contains settings for the diagnostic features of WCF. The user can enable/disable tracing, performance counters, and the WMI provider; the user can also add custom message filters. |
|
services |
This element contains a collection of WCF services exposed by the host. |
Enabling Metadata Exchange
Recall that WCF client applications communicate with the WCF service through an intervening proxy type. While you could author the proxy code completely by hand, doing so would be tedious and error- prone. Ideally, you could use a tool to generate the necessary grunge code (including the client-side *.config file). Thankfully, the .NET Framework 4.6 SDK provides a command-line tool (svcutil.exe) for this purpose. Also, Visual Studio provides similar functionality through its Project ![]() Add Service Reference menu option.
Add Service Reference menu option.
For these tools to generate the necessary proxy code/*.config file, however, they must be able to discover the format of the WCF service interfaces and any defined data contracts (e.g., the method names and type of parameters).
Metadata exchange (MEX) is a WCF service behavior that you can use to fine-tune how the WCF runtime handles your service. Simply put, each <behavior> element can define a set of activities a given service can subscribe to. WCF provides numerous behaviors out of the box, and it is possible to build your own.
The MEX behavior (which is disabled by default) will intercept any metadata requests sent through HTTP GET. You must enable MEX if you want to allow svcutil.exe or Visual Studio to automate the creation of the required client-side proxy *.config file.
Enabling MEX is a matter of tweaking the host’s *.config file with the proper settings (or authoring the corresponding C# code). First, you must add a new <endpoint> just for MEX. Second, you need to define a WCF behavior to allow HTTP GET access. Third, you need to associate this behavior by name to your service using the behaviorConfiguration attribute on the opening <service> element. Finally, you need to add a <host> element to define the base address of this service (MEX will look here to figure out the locations of the types to describe).
![]() Note You can bypass this final step if you pass in a System.Uri object to represent the base address as a parameter to the ServiceHost constructor.
Note You can bypass this final step if you pass in a System.Uri object to represent the base address as a parameter to the ServiceHost constructor.
Consider the following updated host *.config file, which creates a custom <behavior> element (named EightBallServiceMEXBehavior) that is associated to your service through the behaviorConfiguration attribute within the <service> definition:
<?xml version = "1.0" encoding = "utf-8" ?>
<configuration>
<system.serviceModel>
<services>
<service name = "MagicEightBallServiceLib.MagicEightBallService"
behaviorConfiguration="EightBallServiceMEXBehavior">
<endpoint address = ""
binding = "basicHttpBinding"
contract = "MagicEightBallServiceLib.IEightBall"/>
<!-- Enable the MEX endpoint -->
<endpoint address = "mex"
binding = "mexHttpBinding"
contract = "IMetadataExchange" />
<!-- Need to add this so MEX knows the address of our service -->
<host>
<baseAddresses>
<add baseAddress = "http://localhost:8080/MagicEightBallService"/>
</baseAddresses>
</host>
</service>
</services>
<!-- A behavior definition for MEX -->
<behaviors>
<serviceBehaviors>
<behavior name = "EightBallServiceMEXBehavior" >
<serviceMetadata httpGetEnabled = "true" />
</behavior>
</serviceBehaviors>
</behaviors>
</system.serviceModel>
</configuration>
You can now rerun your service host application and view its metadata description using the web browser of your choice. To do so, enter the address as the URL while the host is still running, like so:
http://localhost:8080/MagicEightBallService
Once you are at the home page for your WCF service (see Figure 25-6), you are provided with basic details regarding how to interact with this service programmatically, as well as a way to view the WSDL contract by clicking the hyperlink at the top of the page. Recall that Web Service Description Language (WSDL) is a grammar that describes the structure of web services at a given endpoint.
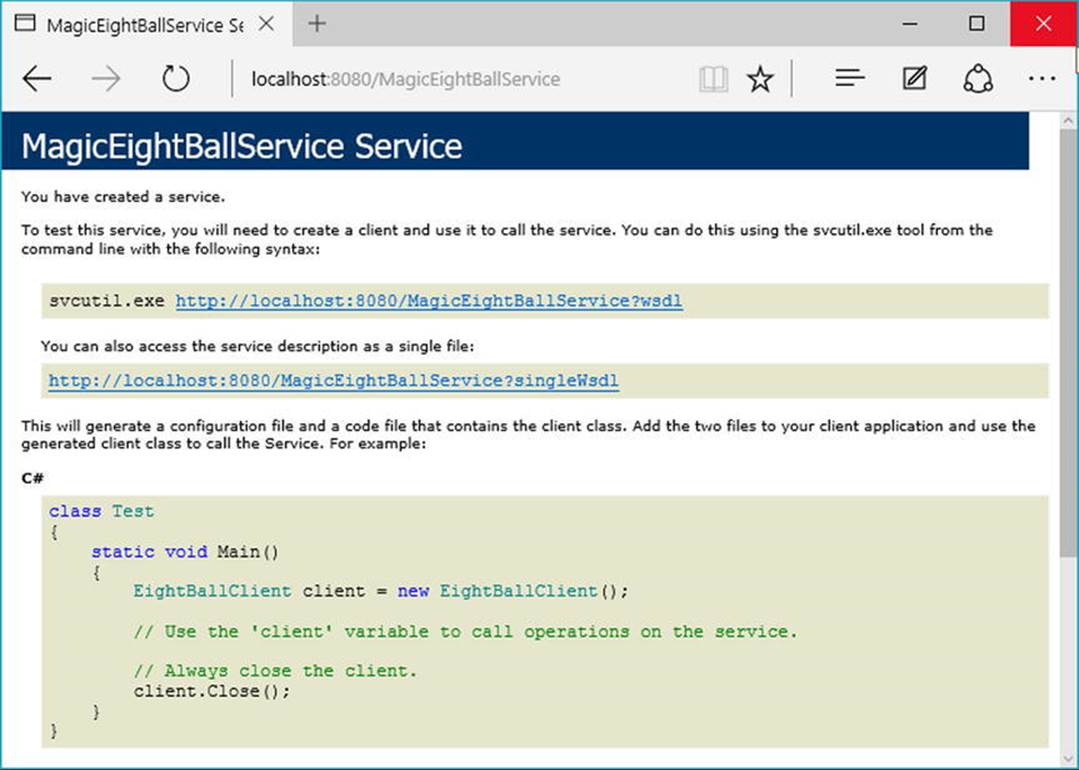
Figure 25-6. Ready-to-view metadata using MEX
Your host now exposes two different endpoints (one for the service and one for MEX), so your host’s console output will appear like this:
***** Console Based WCF Host *****
***** Host Info *****
Address: http://localhost:8080/MagicEightBallService
Binding: BasicHttpBinding
Contract: IEightBall
Address: http://localhost:8080/MagicEightBallService/mex
Binding: MetadataExchangeHttpBinding
Contract: IMetadataExchange
**********************
The service is ready.
![]() Source Code You can find the MagicEightBallServiceHost project in the MagicEightBallServiceHTTP subdirectory of Chapter 25.
Source Code You can find the MagicEightBallServiceHost project in the MagicEightBallServiceHTTP subdirectory of Chapter 25.
Building the WCF Client Application
Now that your host is in place, the final task is to build a piece of software to communicate with this WCF service type. While you could take the long road and build the necessary infrastructure by hand (a feasible but labor-intensive task), the .NET Framework 4.6 SDK provides several approaches to generate a client-side proxy quickly. Begin by creating a new Console Application project named MagicEightBallServiceClient.
Generating Proxy Code Using svcutil.exe
The first way you can build a client-side proxy is to use the svcutil.exe command-line tool. Using svcutil.exe , you can generate a new C# language file that represents the proxy code itself, as well as a client-side configuration file. You can do this by specifying the service’s endpoint as the first parameter. You use the /out: flag to define the name of the *.cs file containing the proxy, and you use the /config: option to specify the name of the generated client-side *.config file.
Assuming your service is currently running, the following command set passed into svcutil.exe will generate two new files in the working directory (which should, of course, be entered as a single line within a developer command prompt):
svcutil http://localhost:8080/MagicEightBallService
/out:myProxy.cs /config:app.config
If you open the myProxy.cs file, you will find a client-side representation of the IEightBall interface, as well as a new class named EightBallClient, which is the proxy class itself. This class derives from the generic class, System.ServiceModel.ClientBase<T>, where T is the registered service interface.
In addition to a number of custom constructors, each method of the proxy (which is based on the original interface methods) will be implemented to use the inherited Channel property to invoke the correct service method. Here is a partial snapshot of the proxy type:
[System.Diagnostics.DebuggerStepThroughAttribute()]
[System.CodeDom.Compiler.GeneratedCodeAttribute("System.ServiceModel",
"4.0.0.0")]
public partial class EightBallClient :
System.ServiceModel.ClientBase<IEightBall>, IEightBall
{
...
public string ObtainAnswerToQuestion(string userQuestion)
{
return base.Channel.ObtainAnswerToQuestion(userQuestion);
}
}
When you create an instance of the proxy type in your client application, the base class will establish a connection to the endpoint using the settings specified in the client-side application configuration file. Much like the server-side configuration file, the generated client-sideApp.config file contains an <endpoint> element and details about the basicHttpBinding used to communicate with the service.
You will also find the following <client> element, which (again) establishes the ABCs from the client’s perspective:
<client>
<endpoint
address = "http://localhost:8080/MagicEightBallService"
binding = "basicHttpBinding" bindingConfiguration = "BasicHttpBinding_IEightBall"
contract = "IEightBall" name = "BasicHttpBinding_IEightBall" />
</client>
At this point, you could include these two files into a client project (and reference the System.ServiceModel.dll assembly) and then use the proxy type to communicate with the remote WCF service. However, you’ll take a different approach here, looking at how Visual Studio can help you further automate the creation of client-side proxy files.
Generating Proxy Code Using Visual Studio
Like any good command-line tool, svcutil.exe provides a great number of options that you can use to control how the client proxy is generated. If you do not require these advanced options, you can generate the same two files using the Visual Studio IDE. For the client project, create a new Console Application project and simply select the Add Service Reference option from the Project menu.
After you activate this menu option, you will be prompted to enter the service URI. At this point, click the Go button to see the service description (see Figure 25-7).
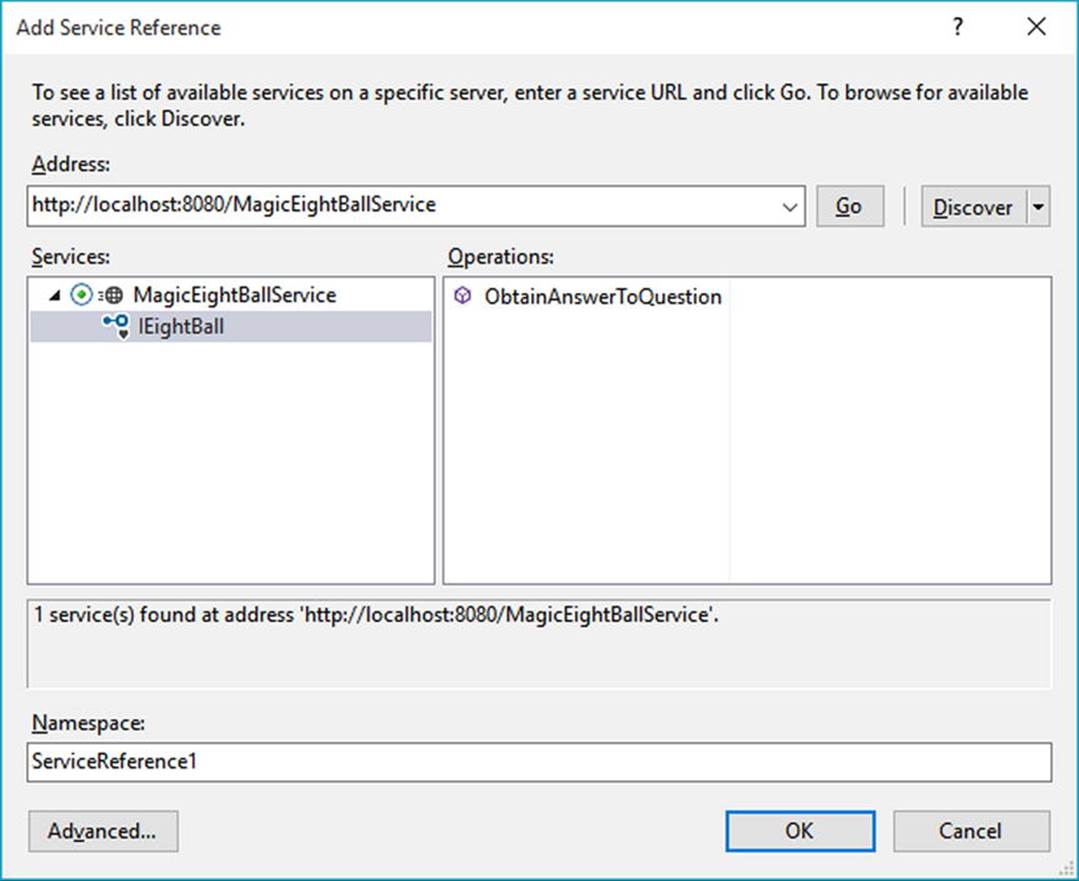
Figure 25-7. Generating the proxy files using Visual Studio
Beyond creating and inserting the proxy files into your current project, this tool is kind enough to reference the WCF assemblies automatically on your behalf. In accordance with a naming convention, the proxy class is defined within a namespace called ServiceReference1, which is nested in the client’s namespace (to avoid possible name clashes). Here is the complete client code:
// Location of the proxy.
using MagicEightBallServiceClient.ServiceReference1;
namespace MagicEightBallServiceClient
{
class Program
{
static void Main(string[] args)
{
Console.WriteLine("***** Ask the Magic 8 Ball *****\n");
using (EightBallClient ball = new EightBallClient())
{
Console.Write("Your question: ");
string question = Console.ReadLine();
string answer =
ball.ObtainAnswerToQuestion(question);
Console.WriteLine("8-Ball says: {0}", answer);
}
Console.ReadLine();
}
}
}
Now assume your WCF console host is running so you can execute the client. Here is one possible output:
***** Ask the Magic 8 Ball *****
Your question: Will I ever finish Fallout 4?
8-Ball says: No
Press any key to continue...
![]() Source Code You can find the MagicEightBallServiceClient project located in the MagicEightBallServiceHTTP subdirectory of Chapter 25.
Source Code You can find the MagicEightBallServiceClient project located in the MagicEightBallServiceHTTP subdirectory of Chapter 25.
Configuring a TCP-Based Binding
At this point, the host and client applications are both configured to use the simplest of the HTTP-based bindings, basicHttpBinding. Recall that the benefit of offloading settings to configuration files is that you can change the underlying plumbing in a declarative manner and expose multiple bindings for the same service.
To illustrate this, you can try a little experiment. Create a new folder on your C: drive (or wherever you happen to be saving your code) named EightBallTCP; in this new folder, create two subdirectories named Host and Client.
Next, use Windows Explorer to navigate to the \bin\Debug folder of the host project (from earlier in this chapter) and copy MagicEightBallServiceHost.exe, MagicEightBallServiceHost.exe.config, and MagicEightBallServiceLib.dll to theC:\EightBallTCP\Host folder. Now use a simple text editor to open the *.config file for editing and modify the existing contents as follows:
<?xml version = "1.0" encoding = "utf-8" ?>
<configuration>
<system.serviceModel>
<services>
<service name = "MagicEightBallServiceLib.MagicEightBallService">
<endpoint address = ""
binding = "netTcpBinding"
contract = "MagicEightBallServiceLib.IEightBall"/>
<host>
<baseAddresses>
<add baseAddress = "net.tcp://localhost:8090/MagicEightBallService"/>
</baseAddresses>
</host>
</service>
</services>
</system.serviceModel>
</configuration>
Essentially, this host’s *.config file strips out all the MEX settings (because you already built the proxy) and establishes that it is using the netTcpBinding binding type through a unique port. Now run the application by double-clicking the *.exe. If all is well, you should see the host output shown here:
***** Console Based WCF Host *****
***** Host Info *****
Address: net.tcp://localhost:8090/MagicEightBallService
Binding: NetTcpBinding
Contract: IEightBall
**********************
The service is ready.
Press the Enter key to terminate service.
To complete the test, copy the MagicEightBallServiceClient.exe and MagicEightBallServiceClient.exe.config files from the \bin\Debug folder of the client application (from earlier in this chapter) into the C:\EightBallTCP\Client folder. Update the client configuration file like this:
<?xml version = "1.0" encoding = "utf-8" ?>
<configuration>
<system.serviceModel>
<client>
<endpoint address = "net.tcp://localhost:8090/MagicEightBallService"
binding = "netTcpBinding"
contract = "ServiceReference1.IEightBall"
name = "netTcpBinding_IEightBall" />
</client>
</system.serviceModel>
</configuration>
This client-side configuration file is a massive simplification compared to what the Visual Studio proxy generator authored. Notice how you have completely removed the existing <bindings> element. Originally, the *.config file contained a <bindings> element with a<basicHttpBinding> subelement that supplied numerous details of the client’s binding settings (e.g., timeouts).
The truth is you never needed that detail for this example because you automatically obtain the default values of the underlying BasicHttpBinding object. If you needed to, you could of course update the existing <bindings> element to define details of the <netTcpBinding>subelement; however, doing so is not required if you are happy with the default values of the NetTcpBinding object.
In any case, you should now be able to run your client application. Assuming the host is still running in the background, you will be able to move data between your assemblies using TCP.
![]() Source Code You can find the MagicEightBallTCP config files in the Chapter 25 subdirectory.
Source Code You can find the MagicEightBallTCP config files in the Chapter 25 subdirectory.
Simplifying Configuration Settings
As you were working through the first example of the chapter, you might have noticed that the hosting configuration logic is quite verbose. For example, your host’s *.config file (for the original basic HTTP binding) needed to define an <endpoint> element for the service, a second<endpoint> element for MEX, a <baseAddresses> element (technically optional) to reduce redundant URIs, and then a <behaviors> section to define the runtime nature of metadata exchange.
To be sure, learning how to author hosting *.config files can be a major hurdle when building WCF services. To make matters more frustrating, a good number of WCF services tend to require the same basic settings in a host configuration file. For example, if you were to make a new WCF service and a new host and you wanted to expose this service using <basicHttpBinding> with MEX support, the required *.config file would look almost identical to the one you previously authored.
Thankfully, since the release of .NET 4.0, the Windows Communication Foundation API ships with a number of simplifications, including default settings (and other shortcuts) that make the process of building host configuration files much easier.
Leveraging Default Endpoints
Before support for default endpoints, if you called Open() on the ServiceHost object and you had not yet specified at least one <endpoint> element in your configuration file, the runtime would throw an exception. And you would get a similar result if you calledAddServiceEndpoint() in code to specify an endpoint. However, since the release of .NET 4.5, every WCF service is automatically provided with default endpoints that capture commonplace configuration details for each supported protocol.
If you were to open the machine.config file for .NET 4.5, you would find a new element named <protocolMapping>. This element documents which WCF bindings to use by default, if you do not specify any.
<system.serviceModel>
...
<protocolMapping>
<add scheme = "http" binding="basicHttpBinding"/>
<add scheme = "net.tcp" binding="netTcpBinding"/>
<add scheme = "net.pipe" binding="netNamedPipeBinding"/>
<add scheme = "net.msmq" binding="netMsmqBinding"/>
</protocolMapping>
...
</system.serviceModel>
To use these default bindings, all you need to do is specify base addresses in your host configuration file. To see this in action, open the HTTP-based MagicEightBallServiceHost project in Visual Studio. Now update your hosting *.config file by completely removing the<endpoint> element for your WCF service and all MEX-specific data. Your configuration file should now look like this:
<configuration>
<system.serviceModel>
<services>
<service name = "MagicEightBallServiceLib.MagicEightBallService" >
<host>
<baseAddresses>
<add baseAddress = "http://localhost:8080/MagicEightBallService"/>
</baseAddresses>
</host>
</service>
</services>
</system.serviceModel>
</configuration>
Because you specified a valid HTTP <baseAddress>, your host will automatically use basicHttpBinding. If you run your host again, you will see the same listing of ABC data.
***** Console Based WCF Host *****
***** Host Info *****
Address: http://localhost:8080/MagicEightBallService
Binding: BasicHttpBinding
Contract: IEightBall
**********************
The service is ready.
Press the Enter key to terminate service.
You have not yet enabled MEX, but you will do so in a moment using another simplification known as default behavior configurations. First, however, you will learn how to expose a single WCF service using multiple bindings.
Exposing a Single WCF Service Using Multiple Bindings
Since its first release, WCF has had the ability to allow a single host to expose a WCF service using multiple endpoints. For example, you could expose the MagicEightBallService using HTTP, TCP, and named pipe bindings simply by adding new endpoints to your configuration file. Once you restart the host, all the necessary plumbing is created automatically.
This is a huge benefit for many reasons. Before WCF, it was difficult to expose a single service using multiple bindings because each type of binding (e.g., HTTP and TCP) had its own programming model.
Nevertheless, the ability to allow a caller to pick the most appropriate binding is extremely useful. In-house callers might like to use TCP bindings that an outwardly facing client (outside of your company firewall) would need to use HTTP to access, while clients on the same machine might opt to use a named pipe.
To do this before .NET 4.5, your hosting configuration file would need to define multiple <endpoint> elements manually. It would also have to define multiple <baseAddress> elements for each protocol. However, today you can simply author the following configuration file:
<configuration>
<system.serviceModel>
<services>
<service name = "MagicEightBallServiceLib.MagicEightBallService" >
<host>
<baseAddresses>
<add baseAddress = "http://localhost:8080/MagicEightBallService"/>
<add baseAddress =
"net.tcp://localhost:8099/MagicEightBallService"/>
</baseAddresses>
</host>
</service>
</services>
</system.serviceModel>
</configuration>
If you compile your project (to refresh the deployed *.config file) and restart the host, you will now see the following endpoint data:
***** Console Based WCF Host *****
***** Host Info *****
Address: http://localhost:8080/MagicEightBallService
Binding: BasicHttpBinding
Contract: IEightBall
Address: net.tcp://localhost:8099/MagicEightBallService
Binding: NetTcpBinding
Contract: IEightBall
**********************
The service is ready.
Press the Enter key to terminate service.
Now that your WCF service can be reachable from two unique endpoints, you might wonder how the caller is able to select between them. When you generate a client-side proxy, the Add Service reference tool will give each exposed endpoint a string name in the client-side *.configfile. In code, you can pass in the correct string name to the proxy’s constructor, and sure enough, the correct binding will be used. Before you can do this, however, you need to reestablish MEX for this modified hosting configuration file and learn how to tweak the settings of a default binding.
Changing Settings for a WCF Binding
If you specify the ABCs of a service in C# code (which you will do later in this chapter), it becomes obvious how you change the default settings of a WCF binding; you simply change the property values of the object! For example, if you want to use BasicHttpBinding but also want to change the timeout settings, you could do so as follows:
void ConfigureBindingInCode()
{
BasicHttpBinding binding = new BasicHttpBinding();
binding.OpenTimeout = TimeSpan.FromSeconds(30);
...
}
It has always been possible to configure settings for a binding in a declarative manner. For example, .NET 3.5 lets you build a host configuration file that changed the OpenTimeout property of BasicHttpBinding, like so:
<configuration>
<system.serviceModel>
<bindings>
<basicHttpBinding>
<binding name = "myCustomHttpBinding"
openTimeout = "00:00:30" />
</basicHttpBinding>
</bindings>
<services>
<service name = "WcfMathService.MyCalc">
<endpoint address = "http://localhost:8080/MyCalc"
binding = "basicHttpBinding"
bindingConfiguration = "myCustomHttpBinding"
contract = "WcfMathService.IBasicMath" />
</service>
</services>
</system.serviceModel>
</configuration>
Here, you have a configuration file for a service named WcfMathService.MyCalc, which supports a single interface named IBasicMath. Note how the <bindings> section allows you to define a named <binding> element, which tweaks settings for a given binding. Within the <endpoint> of the service, you can connect your specific settings using the bindingConfiguration attribute.
This sort of hosting configuration still works as expected; however, if you leverage a default endpoint, you can’t connect the <binding> to the <endpoint>! As luck would have it, you can control the settings of a default endpoint simply by omitting the name attribute of the<binding> element. For example, this snippet changes some properties of the default BasicHttpBinding and NetTcpBinding objects used in the background:
<configuration>
<system.serviceModel>
<services>
<service name = "MagicEightBallServiceLib.MagicEightBallService" >
<host>
<baseAddresses>
<add baseAddress = "http://localhost:8080/MagicEightBallService"/>
<add baseAddress =
"net.tcp://localhost:8099/MagicEightBallService"/>
</baseAddresses>
</host>
</service>
</services>
<bindings>
<basicHttpBinding>
<binding openTimeout = "00:00:30" />
</basicHttpBinding>
<netTcpBinding>
<binding closeTimeout = "00:00:15" />
</netTcpBinding>
</bindings>
</system.serviceModel>
</configuration>
Leveraging the Default MEX Behavior Configuration
A proxy generation tool must discover the composition of a service at runtime before it can do its work. In WCF, you allow this runtime discovery to occur by enabling MEX. Again, most host configuration files need to enable MEX (at least during development); fortunately, the way you configure MEX seldom changes, so .NET 4.5 and above provides a few handy shortcuts.
The most useful shortcut is out-of-the-box MEX support. You don’t need to add a MEX endpoint, define a named MEX service behavior, and then connect the named binding to the service (as you did in the HTTP version of the MagicEightBallServiceHost); instead, you can now simply add the following:
<configuration>
<system.serviceModel>
<services>
<service name = "MagicEightBallServiceLib.MagicEightBallService" >
<host>
<baseAddresses>
<add baseAddress = "http://localhost:8080/MagicEightBallService"/>
<add baseAddress =
"net.tcp://localhost:8099/MagicEightBallService"/>
</baseAddresses>
</host>
</service>
</services>
<bindings>
<basicHttpBinding>
<binding openTimeout = "00:00:30" />
</basicHttpBinding>
<netTcpBinding>
<binding closeTimeout = "00:00:15" />
</netTcpBinding>
</bindings>
<behaviors>
<serviceBehaviors>
<behavior>
<!-- To get default MEX,
don’t name your <serviceMetadata> element -->
<serviceMetadata httpGetEnabled = "true"/>
</behavior>
</serviceBehaviors>
</behaviors>
</system.serviceModel>
</configuration>
The trick is that the <serviceMetadata> element no longer has a name attribute (also notice the <service> element no longer needs the behaviorConfiguration attribute). With this adjustment, you get free MEX support at runtime. To test this, you can run your host (after you compile to refresh the configuration file) and type in the following URL in a browser:
http://localhost:8080/MagicEightBallService
After you do this, you can click the wsdl link at the top of the web page to see the WSDL description of the service (refer to Figure 25-6 for a refresher). Note that you do not see the host’s console window print data for the MEX endpoint because you have not explicitly defined an endpoint for IMetadataExchange in your configuration file. Nevertheless, MEX is enabled, and you can start to build client proxies.
Refreshing the Client Proxy and Selecting the Binding
Assuming your updated host has been compiled and is running in the background, you will now want to open the client application and refresh the current service reference. Begin by opening the Service References folder in the Solution Explorer. Next, right-click the current ServiceReference1 and pick the Update Service Reference menu option (see Figure 25-8).
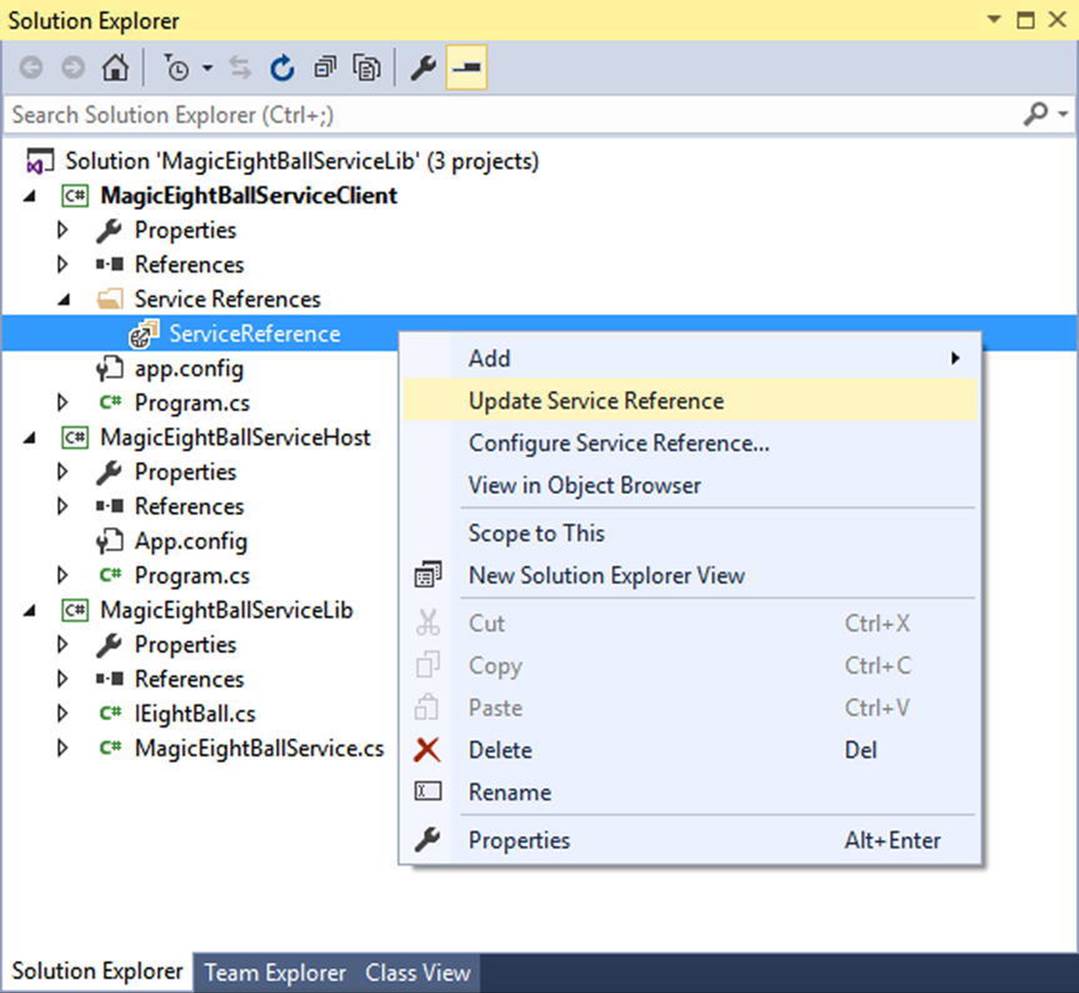
Figure 25-8. Refreshing the proxy and client-side *.config file
After you have done this, you will see that the client-side *.config file has two bindings to select from: one for HTTP and one for TCP. As you can see, you give each binding a fitting name. Here is a partial listing of the refreshed configuration file:
<configuration>
<system.serviceModel>
<bindings>
<basicHttpBinding>
<binding name = "BasicHttpBinding_IEightBall" ... />
</basicHttpBinding>
<netTcpBinding>
<binding name = "NetTcpBinding_IEightBall" ... />
</netTcpBinding>
</bindings>
...
</system.serviceModel>
</configuration>
The client can use these names when it creates the proxy object to select the binding it wants to use. Thus, if your client would like to use TCP, you could update the client side C# code as follows:
static void Main(string[] args)
{
Console.WriteLine("***** Ask the Magic 8 Ball *****\n");
using (EightBallClient ball = new EightBallClient("NetTcpBinding_IEightBall"))
{
...
}
Console.ReadLine();
}
If a client would rather use the HTTP binding, you could write the following:
using (EightBallClient ball = new
EightBallClient("BasicHttpBinding_IEightBall"))
{
...
}
That wraps up the current example, which showcased a number of useful shortcuts. These features simplify how you can author hosting configuration files. Next up, you will see how to use the WCF Service Library project template.
![]() Source Code You can find the MagicEightBallServiceHTTPDefaultBindings project located in the Chapter 25 subdirectory.
Source Code You can find the MagicEightBallServiceHTTPDefaultBindings project located in the Chapter 25 subdirectory.
Using the WCF Service Library Project Template
Before building a more exotic WCF service that communicates with the AutoLot database you created in Chapter 21, the next example will illustrate a number of important topics, including the benefits of the WCF Service Library project template, the WCF Test Client, the WCF configuration editor, hosting WCF services within a Windows service, and asynchronous client calls. To stay focused on these new concepts, this WCF service will be kept intentionally simple.
Building a Simple Math Service
To begin, create a new WCF Service Library project named MathServiceLibrary, making sure you select the correct option under the WCF node of the New Project dialog box (see Figure 25-2 if you need a nudge). Now change the name of the initial IService1.cs file toIBasicMath.cs. After you do so, delete all the example code within the MathServiceLibrary namespace and replace it with the following code:
[ServiceContract(Namespace="http://MyCompany.com")]
public interface IBasicMath
{
[OperationContract]
int Add(int x, int y);
}
Next, change the name of the Service1.cs file to MathService.cs, delete all the example code within the MathServiceLibrary namespace (again), and implement your service contract as follows:
public class MathService : IBasicMath
{
public int Add(int x, int y)
{
// To simulate a lengthy request.
System.Threading.Thread.Sleep(5000);
return x + y;
}
}
Also take a moment to notice that this *.config file has already been enabled to support MEX; by default, your service endpoint uses the basicHttpBinding protocol.
Testing the WCF Service with WcfTestClient.exe
One benefit of using the WCF Service Library project is that when you debug or run your library, it will read the settings in the *.config file and use them to load the WCF Test Client application (WcfTestClient.exe). This GUI-based application allows you to test each member of your service interface as you build the WCF service; this means you don’t have to build a host/client manually simply for testing purposes, as you did previously.
Figure 25-9 shows the testing environment for MathService. Notice that when you double-click an interface method, you can specify input parameters and invoke the member.
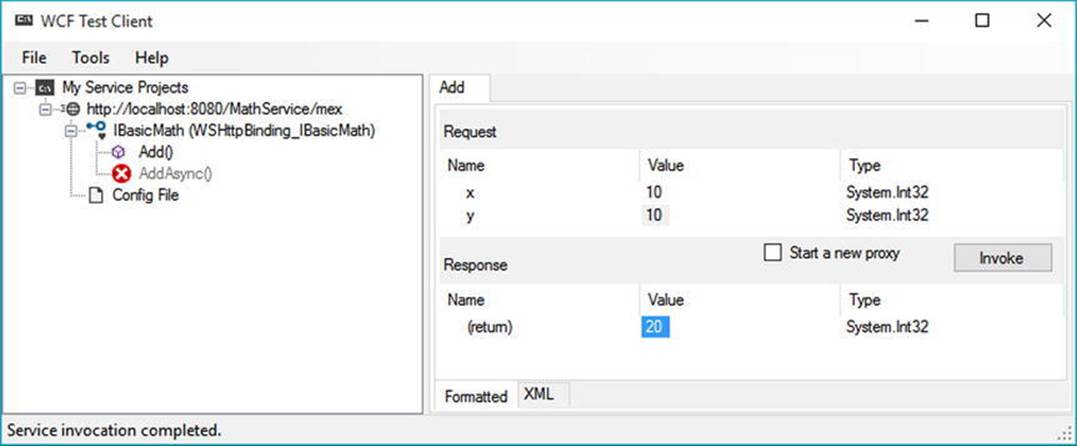
Figure 25-9. Testing the WCF service using WcfTestClient.exe
This utility works out of the box when you have created a WCF Service Library project; however, be aware that you can use this tool to test any WCF service when you start it at the command line by specifying a MEX endpoint. For example, if you were to start theMagicEightBallServiceHost.exe application, you could specify the following command at a developer command prompt:
wcftestclient http://localhost:8080/MagicEightBallService
After you do this, you can invoke ObtainAnswerToQuestion() in a similar manner.
Altering Configuration Files Using SvcConfigEditor.exe
Another benefit of using the WCF Service Library project is that you are able to right-click the App.config file within the Solution Explorer to activate the GUI-based Service Configuration Editor, SvcConfigEditor.exe (see Figure 25-10). This same technique can be used from a client application that has referenced a WCF service.
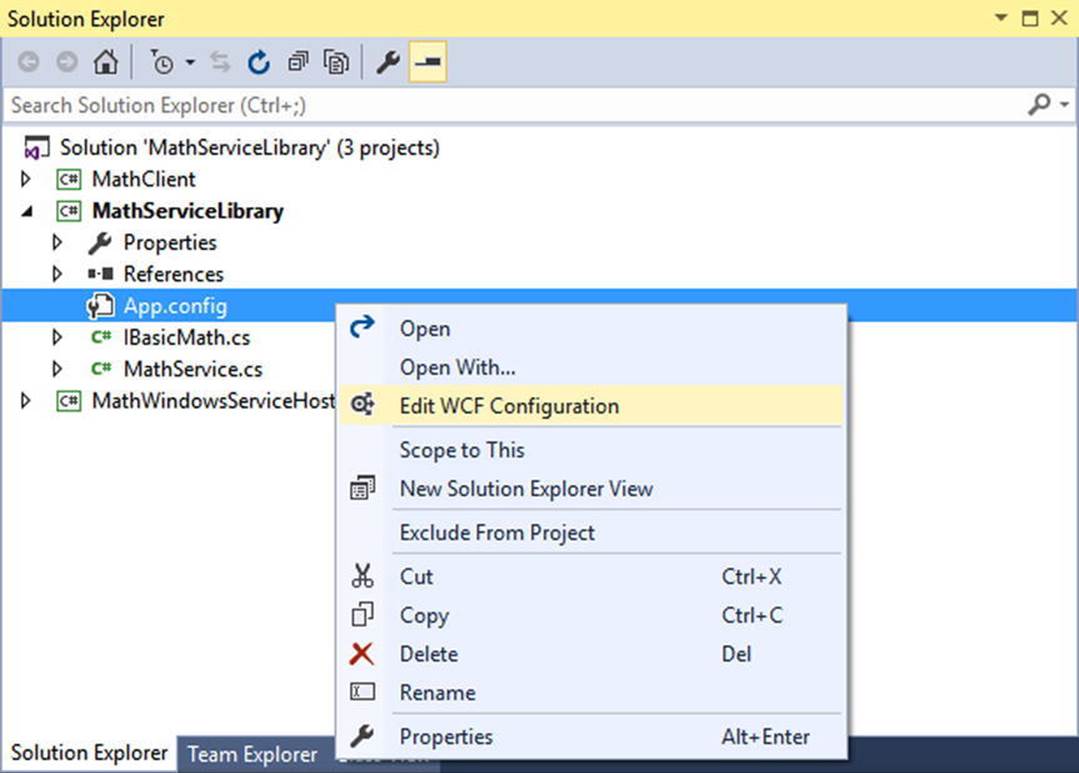
Figure 25-10. GUI-based *.config file editing starts here
After you activate this tool, you can change the XML-based data using a friendly user interface. Using a tool such as this to maintain your *.config files provides many benefits. First (and foremost), you can rest assured that the generated markup conforms to the expected format and is typo-free. Second, it is a great way to see the valid values that could be assigned to a given attribute. Finally, you no longer need to author tedious XML data manually.
Figure 25-11 shows the overall look and feel of the Service Configuration Editor. Truth be told, an entire chapter could be devoted to describing all the interesting options SvcConfigEditor.exe supports. Be sure to take time to investigate this tool; also be aware that you can access a fairly detailed help system by pressing F1.
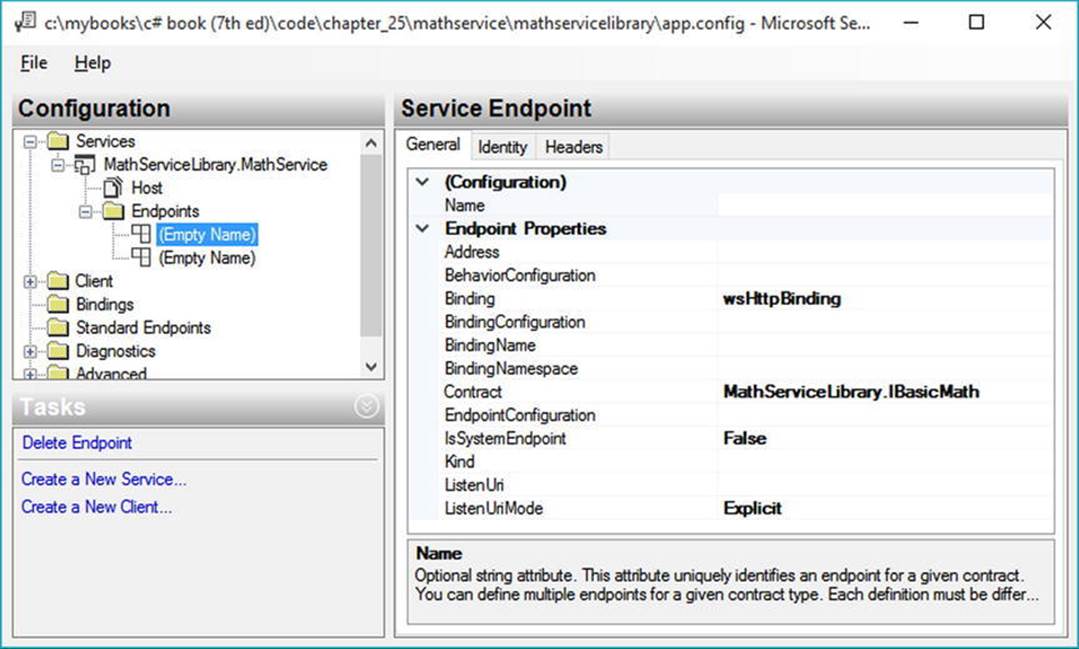
Figure 25-11. Working with the WCF Service Configuration Editor
![]() Note The SvcConfigEditor.exe utility can edit (or create) configuration files, even if you do not select an initial WCF Service Library project. Use a Developer Command window to launch the tool and then use the File Open menu option to load an existing *.config file for editing.
Note The SvcConfigEditor.exe utility can edit (or create) configuration files, even if you do not select an initial WCF Service Library project. Use a Developer Command window to launch the tool and then use the File Open menu option to load an existing *.config file for editing.
You have no need to further configure your WCF MathService; at this point, you can move on to the task of building a custom host.
Hosting the WCF Service Within a Windows Service
Hosting a WCF service from within a console application (or within a GUI desktop application, for that matter) is not an ideal choice for a production-level server, given that the host must remain running visibly in the background to service clients. Even if you were to minimize the hosting application to the Windows taskbar, it would still be far too easy to accidentally shut down the host, thereby terminating the connection with any client applications.
![]() Note While it is true that a desktop Windows application does not have to show a main window, a typical *.exe does require user interaction to load the executable. However, you can configure a Windows service (described next) to run even if no users are currently logged on to the workstation.
Note While it is true that a desktop Windows application does not have to show a main window, a typical *.exe does require user interaction to load the executable. However, you can configure a Windows service (described next) to run even if no users are currently logged on to the workstation.
If you build an in-house WCF application, another alternative you have is to host your WCF Service Library from within a dedicated Windows service. One benefit of doing so is that you can configure a Windows service to start automatically when the target machine boots up. Another benefit is that Windows services run invisibly in the background (unlike your console application) and do not require user interactivity (and you don’t need IIS installed on the host computer).
Next, you will learn how to build such a host. Begin by creating a new Windows service project named MathWindowsServiceHost (see Figure 25-12). After you do this, rename your initial Service1.cs file to MathWinService.cs using the Solution Explorer.
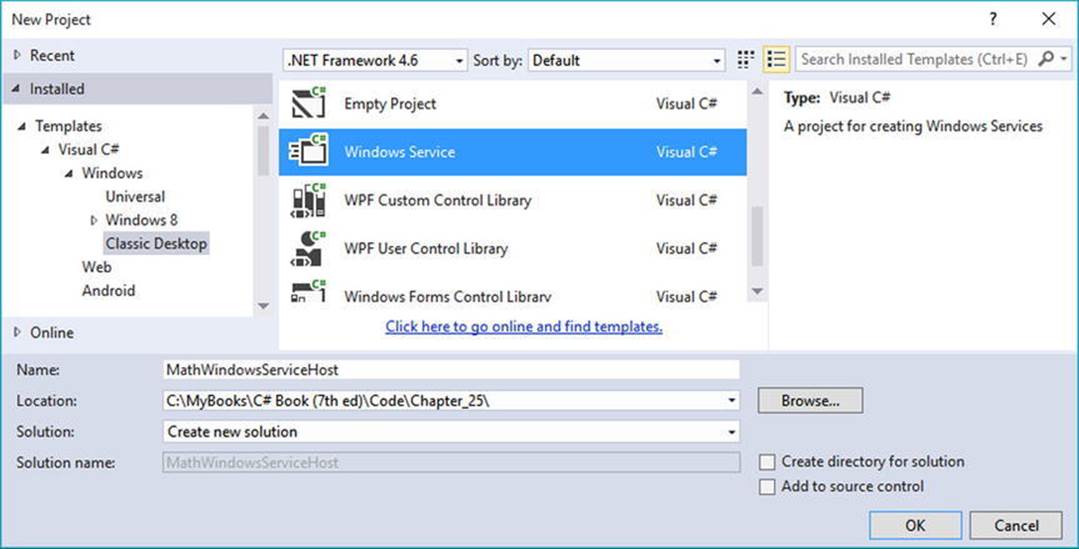
Figure 25-12. Creating a Windows service to host your WCF service
Specifying the ABCs in Code
Now assume you have set a reference to your MathServiceLibrary.dll and System.ServiceModel.dll assemblies. All you need to do is use the ServiceHost type in the OnStart() and OnStop() methods of your Windows service type. Open the code file for your service host class (by right-clicking the designer and selecting View Code) and add the following logic:
// Be sure to import these namespaces:
using MathServiceLibrary;
using System.ServiceModel;
namespace MathWindowsServiceHost
{
public partial class MathWinService: ServiceBase
{
// A member variable of type ServiceHost.
private ServiceHost myHost;
public MathWinService()
{
InitializeComponent();
}
protected override void OnStart(string[] args)
{
// Just to be really safe.
if (myHost != null)
{
myHost.Close();
myHost = null;
}
// Create the host.
myHost = new ServiceHost(typeof(MathService));
// The ABCs in code!
Uri address = new Uri("http://localhost:8080/MathServiceLibrary");
WSHttpBinding binding = new WSHttpBinding();
Type contract = typeof(IBasicMath);
// Add this endpoint.
myHost.AddServiceEndpoint(contract, binding, address);
// Open the host.
myHost.Open();
}
protected override void OnStop()
{
// Shut down the host.
if(myHost != null)
myHost.Close();
}
}
}
While nothing prevents you from using a configuration file when building a Windows service host for a WCF service, here (for a change of pace) you establish the endpoint programmatically using the Uri, WSHttpBinding, and Type classes, rather than by using a *.config file. After you create each aspect of the ABCs, you inform the host programmatically by calling AddServiceEndpoint().
If you want to inform the runtime that you want to gain access to each of the default endpoint bindings stored in the .NET 4.6 machine.config file, you can simplify your programming logic by specifying base addresses when you invoke the constructor of ServiceHost. In this case, you do not need to specify the ABCs manually in code or call AddServiceEndpoint(); instead, you call AddDefaultEndpoints(). Consider the following update:
protected override void OnStart(string[] args)
{
if (myHost != null)
{
myHost.Close();
}
// Create the host and specify a URL for an HTTP binding.
myHost = new ServiceHost(typeof(MathService),
new Uri("http://localhost:8080/MathServiceLibrary"));
// Opt in for the default endpoints!
myHost.AddDefaultEndpoints();
// Open the host.
myHost.Open();
}
Enabling MEX
While you could enable MEX programmatically as well, here you will opt for a configuration file. Modify the App.config file into your Windows service project that contains the following default MEX settings:
<?xml version = "1.0" encoding = "utf-8" ?>
<configuration>
<system.serviceModel>
<services>
<service name = "MathServiceLibrary.MathService">
</service>
</services>
<behaviors>
<serviceBehaviors>
<behavior>
<serviceMetadata httpGetEnabled = "true"/>
</behavior>
</serviceBehaviors>
</behaviors>
</system.serviceModel>
</configuration>
Creating a Windows Service Installer
To register your Windows service with the operating system, you need to add an installer to your project that contains the necessary code to allow you to register the service. To do so, right-click the Windows service designer surface and select Add Installer (see Figure 25-13).
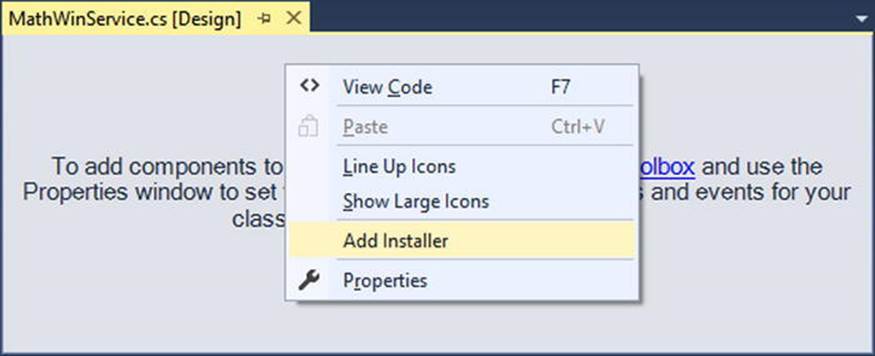
Figure 25-13. Adding an installer for the Windows service
Once you do this, you can see two components have been added to a new designer surface representing the installer. The first component (named serviceProcessInstaller1 by default) represents an item that can install a new Windows service on the target machine. Select this item on the designer and use the Properties window to set the Account property to LocalSystem (see Figure 25-14).
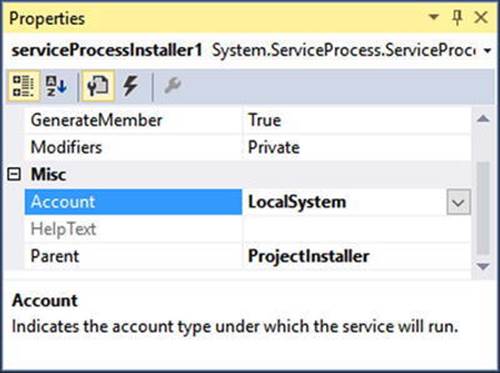
Figure 25-14. Be sure to run the Windows service as a local system account
The second component (named serviceInstaller1) represents a type that will install your particular Windows service. Again, use the Properties window to change the ServiceName property to MathService, set the StartType property to Automatic, and add a friendly description of your Windows service using the Description property (see Figure 25-15).
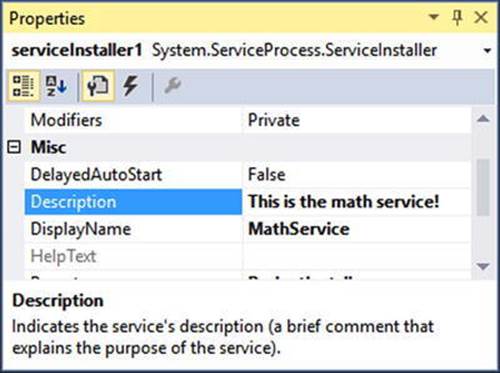
Figure 25-15. Configuring installer details
At this point, you can compile your application.
Installing the Windows Service
A Windows service can be installed on the host machine using a traditional setup program (such as an *.msi installer) or via the installutil.exe command-line tool.
![]() Note To install a Windows service using installutil.exe, you must start the developer command prompt under administrative privileges. To do so, right-click the Developer Command Prompt icon and select Run As Administrator.
Note To install a Windows service using installutil.exe, you must start the developer command prompt under administrative privileges. To do so, right-click the Developer Command Prompt icon and select Run As Administrator.
Using a command prompt, change into the \bin\Debug folder of your MathWindowsServiceHost project. Now, enter the following command (be sure you are running as administrator!):
installutil MathWindowsServiceHost.exe
Assuming the installation succeeded, you can now open the Services applet located under the Administrative Tools folder of your Control Panel. You should see the friendly name of your Windows service listed alphabetically. After you locate it, make sure you start the service on your local machine using the Start link (see Figure 25-16).
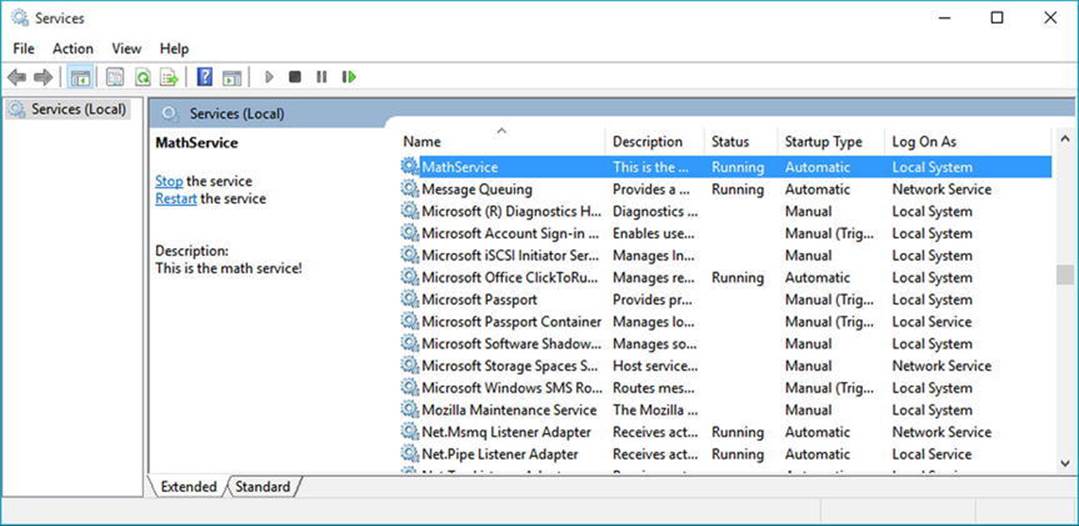
Figure 25-16. Viewing your Windows service, which hosts your WCF service
Now that the service is alive and kicking, the last step is to build a client application to consume its services.
![]() Source Code You can find the MathWindowsServiceHost project located in the Chapter 25 subdirectory.
Source Code You can find the MathWindowsServiceHost project located in the Chapter 25 subdirectory.
Invoking a Service Asynchronously from the Client
Create a new Console Application project named MathClient and set a service reference to your running WCF service (that is currently hosted by the Windows service running in the background) using the Add Service Reference option of Visual Studio (you’ll need to type the URL in the Addresses box, which should be http://localhost:8080/MathServiceLibrary). Don’t click the OK button yet, however! Notice that the Add Service Reference dialog box has an Advanced button in the lower-left corner (see Figure 25-17).

Figure 25-17. Referencing your MathService and getting ready to configure advanced settings
Click this button now to view the additional proxy configuration settings (see Figure 25-18). You can use this dialog box to generate code that allows you to call the remote methods in an asynchronous manner, provided you check the “Generate asynchronous operators” radio option. Go ahead and check this option for the time being.
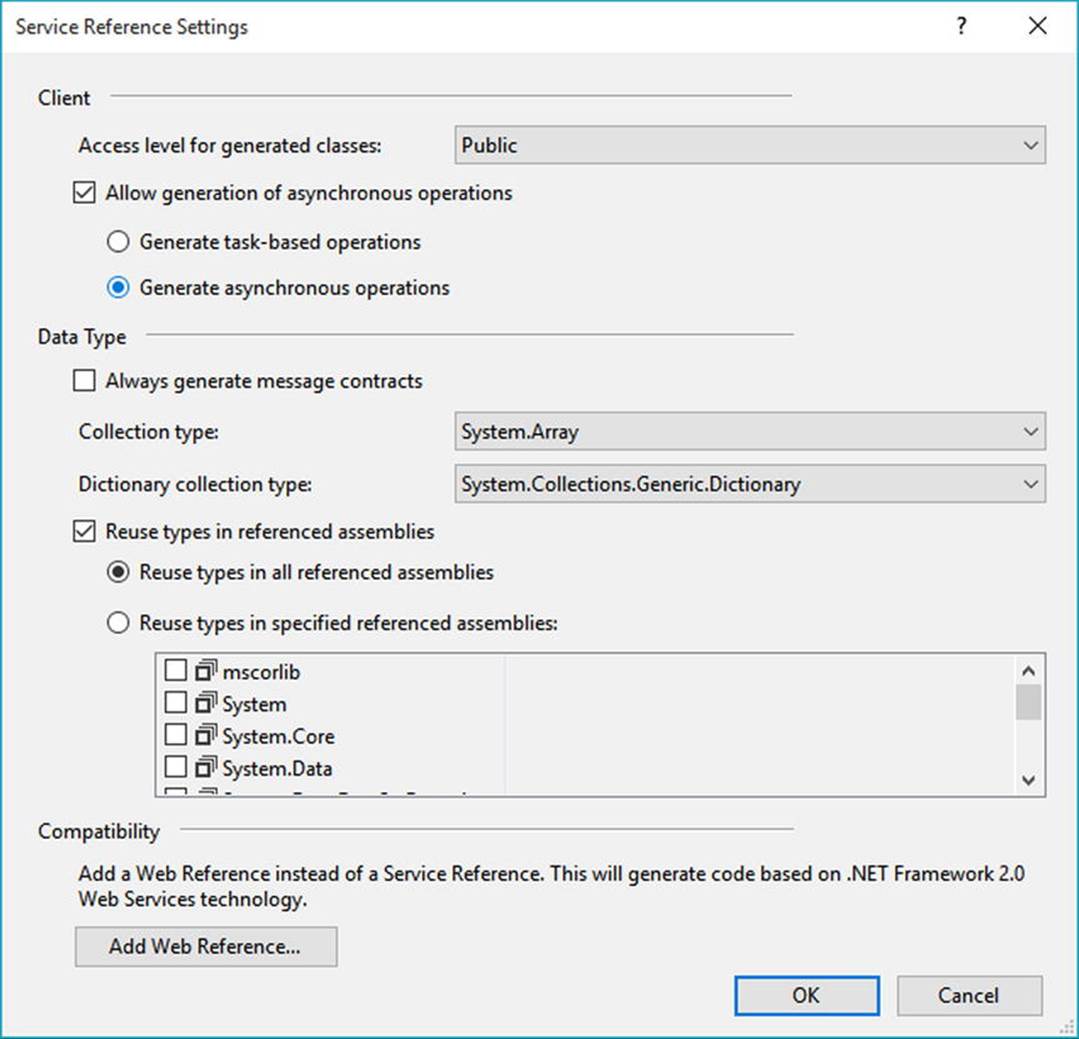
Figure 25-18. Advanced client-side proxy configuration options
At this point, the proxy code contains additional methods that allow you to invoke each member of the service contract using the expected Begin/End asynchronous invocation pattern described in Chapter 19. Here is a simple implementation that uses a lambda expression rather than a strongly typed AsyncCallback delegate:
using System;
using MathClient.ServiceReference1;
...
namespace MathClient
{
class Program
{
static void Main(string[] args)
{
Console.WriteLine("***** The Async Math Client *****\n");
using (BasicMathClient proxy = new BasicMathClient())
{
proxy.Open();
// Add numbers in an async manner, using a lambda expression.
IAsyncResult result = proxy.BeginAdd(2, 3,
ar =>
{
Console.WriteLine("2 + 3 = {0}", proxy.EndAdd(ar));
},
null);
while (!result.IsCompleted)
{
Thread.Sleep(200);
Console.WriteLine("Client working...");
}
}
Console.ReadLine();
}
}
}
![]() Source Code You can find the MathClient project located in the Chapter 25 subdirectory.
Source Code You can find the MathClient project located in the Chapter 25 subdirectory.
Designing WCF Data Contracts
This chapter’s final example shows you how to construct WCF data contracts. The previous WCF services defined simple methods that operate on primitive CLR data types. When you use of any of the HTTP binding types (e.g., basicHttpBinding and wsHttpBinding), incoming and outgoing simple data types are automatically formatted into XML elements. On a related note, if you use a TCP-based binding (such as netTcpBinding), the parameters and return values of simple data types are transmitted using a compact binary format.
![]() Note The WCF runtime will also automatically encode any type marked with the [Serializable] attribute; however, this is not the preferred way to define WCF contracts, and it is included only for backward compatibility.
Note The WCF runtime will also automatically encode any type marked with the [Serializable] attribute; however, this is not the preferred way to define WCF contracts, and it is included only for backward compatibility.
However, when you define service contracts that use custom classes as parameters or return values, it is a best practice to model such data using WCF data contracts. Simply put, a data contract is a type adorned with the [DataContract] attribute. Likewise, you must mark each field you expect to be used as part of the proposed contract with the [DataMember] attribute.
![]() Note In earlier versions of the .NET platform, it was mandatory to use [DataContract] and [DataMember] to ensure custom data types were correctly represented. Microsoft has since relaxed this requirement; technically speaking, you are not required to use these attributes on custom data types; however, it is considered a .NET best practice.
Note In earlier versions of the .NET platform, it was mandatory to use [DataContract] and [DataMember] to ensure custom data types were correctly represented. Microsoft has since relaxed this requirement; technically speaking, you are not required to use these attributes on custom data types; however, it is considered a .NET best practice.
Using the Web-centric WCF Service Project Template
The next WCF service will allow external callers to interact with the AutoLot database you created in Chapter 21. Moreover, this final WCF service will be created using the web-based WCF Service template and be hosted under IIS.
To begin, launch Visual Studio (with administrator rights) and access the File ![]() New
New ![]() Web Site menu option. Select the WCF Service project type and ensure the Web Location drop-down is set to HTTP (which will install the service under IIS). Expose the service from the following URI:
Web Site menu option. Select the WCF Service project type and ensure the Web Location drop-down is set to HTTP (which will install the service under IIS). Expose the service from the following URI:
http://localhost/AutoLotWCFService
Figure 25-19 shows the configured project.
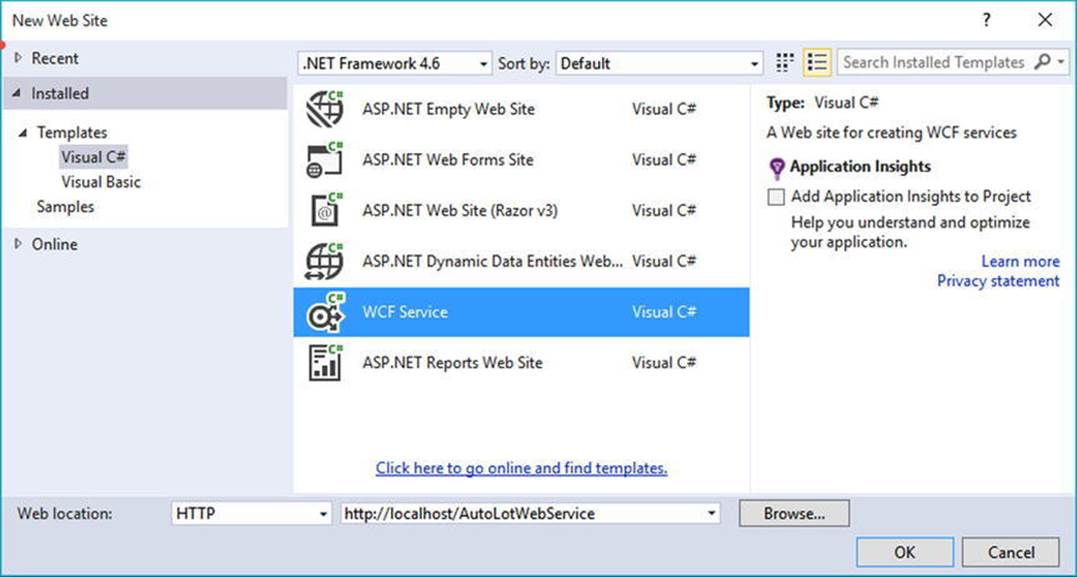
Figure 25-19. Creating a web-centric WCF service
After you have done this, set a reference to the AutoLotDAL.dll assembly you created in Chapter 21 (using the Website ![]() Add Reference menu option). You have been given some example starter code (located under the App_Code folder), which you will want to delete. Begin by renaming the initial IService.cs file to IAutoLotService.cs and then define the initial service contract within your newly named file, like so:
Add Reference menu option). You have been given some example starter code (located under the App_Code folder), which you will want to delete. Begin by renaming the initial IService.cs file to IAutoLotService.cs and then define the initial service contract within your newly named file, like so:
[ServiceContract]
public interface IAutoLotService
{
[OperationContract]
void InsertCar(int id, string make, string color, string petname);
[OperationContract]
void InsertCar(InventoryRecord car);
[OperationContract]
InventoryRecord[] GetInventory();
}
This interface defines three methods, one of which returns an array of the (yet-to-be-created) InventoryRecord type. You might recall that the GetInventory() method of InventoryDAL simply returned a DataTable object, and this might make you wonder why your service’s GetInventory() method does not do the same.
While it would work to return a DataTable from a WCF service method, recall that WCF was built to honor the use of SOA principles, one of which is to program against contracts, not implementations.
Therefore, you won’t return the .NET-specific DataTable type to an external caller; instead, you will return a custom data contract (InventoryRecord) that will be correctly expressed in the contained WSDL document in an agnostic manner.
Also note that the interface listed previously defines an overloaded method named InsertCar(). The first version takes four incoming parameters, while the second version takes an InventoryRecord type as input. You can define the InventoryRecord data contract as follows:
[DataContract]
public class InventoryRecord
{
[DataMember]
public int ID;
[DataMember]
public string Make;
[DataMember]
public string Color;
[DataMember]
public string PetName;
}
If you were to implement the IAutoLotService interface as it now stands, and then build a host and attempt to call these methods from a client, you might be surprised to see that you would get a runtime exception. The reason: one of the requirements of a WSDL description is that each method exposed from a given endpoint must be uniquely named. Thus, while method overloading works just fine as far as C# is concerned, the current web service specifications do not permit two identically named InsertCar() methods.
Fortunately, the [OperationContract] attribute supports a named property (Name) that allows you to specify how the C# method will be represented within a WSDL description. Given this, you can update the second version of InsertCar() as follows:
public interface IAutoLotService
{
...
[OperationContract(Name = "InsertCarWithDetails")]
void InsertCar(InventoryRecord car);
}
Implementing the Service Contract
Now rename Service.cs to AutoLotService.cs. The AutoLotService type implements the IAutoLotService interface as follows (be sure to import the AutoLotConnectedLayer and System.Data namespaces into this code file and update your connection string if required):
using AutoLotDAL.ConnectedLayer;
using System.Data;
public class AutoLotService : IAutoLotService
{
private const string ConnString =
@"Data Source=(local)\SQLEXPRESS;Initial Catalog=AutoLot"+
";Integrated Security=True";
public void InsertCar(int id, string make, string color, string petname)
{
InventoryDAL d = new InventoryDAL();
d.OpenConnection(ConnString);
d.InsertAuto(id, color, make, petname);
d.CloseConnection();
}
public void InsertCar(InventoryRecord car)
{
InventoryDAL d = new InventoryDAL();
d.OpenConnection(ConnString);
d.InsertAuto(car.ID, car.Color, car.Make, car.PetName);
d.CloseConnection();
}
public InventoryRecord[] GetInventory()
{
// First, get the DataTable from the database.
InventoryDAL d = new InventoryDAL();
d.OpenConnection(ConnString);
DataTable dt = d.GetAllInventoryAsDataTable();
d.CloseConnection();
// Now make a List<T> to contain the records.
List<InventoryRecord> records = new List<InventoryRecord>();
// Copy the data table into List<> of custom contracts.
DataTableReader reader = dt.CreateDataReader();
while (reader.Read())
{
InventoryRecord r = new InventoryRecord();
r.ID = (int)reader["CarID"];
r.Color = ((string)reader["Color"]);
r.Make = ((string)reader["Make"]);
r.PetName = ((string)reader["PetName"]);
records.Add(r);
}
// Transform List<T> to array of InventoryRecord types.
return (InventoryRecord[])records.ToArray();
}
}
There isn’t too much to say about the preceding code. For the sake of simplicity, you hard-code the connection string value (which you might need to adjust based on your machine settings), rather than store it in your Web.config file. Given that your data access library does all the real work of communicating with the AutoLot database, all you need to do is pass the incoming parameters to the InsertAuto() method of the InventoryDAL class type. The only other point of interest is the act of mapping the DataTable object’s values into a generic list ofInventoryRecord types (using a DataTableReader) and then transforming the List<T> into an array of InventoryRecord types.
The Role of the *.svc File
When you create a web-centric WCF service, you will find your project contains a specific file with an *.svc file extension. This particular file is required for any WCF service hosted by IIS; it describes the name and location of the service implementation within the install point. Because you have changed the names of your starter files and WCF types, you must now update the contents of the Service.svc file as follows:
<%@ ServiceHost Language="C#" Debug="true"
Service="AutoLotService" CodeBehind="~/App_Code/AutoLotService.cs" %>
Examining the Web.config File
The Web.config file of a WCF service created under HTTP will use a number of the WCF simplifications examined earlier in this chapter. As will be described in more detail during your examination of ASP.NET later in this book, the Web.config file serves a similar purpose to an executable’s *.config file; however, it also controls a number of web-specific settings. For this example, notice that MEX is enabled, and you do not have to specify a custom <endpoint> manually.
<configuration>
...
<system.serviceModel>
<behaviors>
<serviceBehaviors>
<behavior>
<!-- To avoid disclosing metadata information,
set the value below to false and remove the
metadata endpoint above before deployment -->
<serviceMetadata httpGetEnabled="true" httpsGetEnabled="true" />
<!-- To receive exception details in faults for debugging purposes,
set the value below to true.
Set to false before deployment to avoid
disclosing exception information -->
<serviceDebug includeExceptionDetailInFaults="false"/>
</behavior>
</serviceBehaviors>
</behaviors>
<serviceHostingEnvironment aspNetCompatibilityEnabled="true"
multipleSiteBindingsEnabled="true" />
</system.serviceModel>
...
</configuration>
Testing the Service
Now you are free to build any sort of client to test your service, including passing in the endpoint of the *.svc file to the WcfTestClient.exe application.
WcfTestClient http://localhost/AutoLotWCFService/Service.svc
If you want to build a custom client application, you can use the Add Service Reference dialog box, as you did for the MagicEightBallServiceClient and MathClient project examples earlier in this chapter.
![]() Source Code You can find the AutoLotService project located in the Chapter 25 subdirectory.
Source Code You can find the AutoLotService project located in the Chapter 25 subdirectory.
That wraps up your look at the Windows Communication Foundation API. Of course, there is much more to WCF than could be covered in this introductory chapter; however, if you understand the materials presented here, you are in great shape to seek out more details as you see fit. Be sure to consult the .NET Framework 4.6 SDK documentation if you want to learn more about WCF.
Summary
This chapter introduced you to Windows Communication Foundation (WCF), which represents the core distributed programming API under the .NET platform. As explained in this chapter, the major motivation behind WCF was to provide a unified object model that exposes a number of (previously unrelated) distributed computing APIs under a single umbrella. Furthermore, a WCF service is represented by specified addresses, bindings, and contracts (which you can remember easily by the friendly abbreviation ABC).
You also learned that a typical WCF application involves the use of three interrelated assemblies. The first assembly defines the service contracts and service types that represent the service’s functionality. This assembly is then hosted by a custom executable, an IIS virtual directory, or a Windows service. Finally, the client assembly uses a generated code file that defines a proxy type (and settings within the application configuration file) to communicate with the remote type.
The chapter also examined how to use a number of WCF programming tools, such as SvcConfigEditor.exe (which allows you to modify *.config files), the WcfTestClient.exe application (to test a WCF service quickly), and various Visual Studio WCF project templates. You also learned about a number of configuration simplifications, including default endpoints and behaviors.
All materials on the site are licensed Creative Commons Attribution-Sharealike 3.0 Unported CC BY-SA 3.0 & GNU Free Documentation License (GFDL)
If you are the copyright holder of any material contained on our site and intend to remove it, please contact our site administrator for approval.
© 2016-2026 All site design rights belong to S.Y.A.