C# 6.0 and the .NET 4.6 Framework (2015)
PART VIII
ASP.NET
CHAPTER 31
Introducing ASP.NET Web Forms
Until now, all of the examples in this book have focused on console-based and desktop graphical user interfaces created using the WPF platform. The remainder of the text will explore how the .NET platform facilitates the construction of Internet-based applications using a technology named ASP.NET. This and the next two chapters cover ASP.NET Web Forms, and Chapter 34 covers ASP.NET MVC and ASP.NET Web API. To begin, you’ll quickly overview a number of key web development concepts (HTTP, HTML, client-side scripting, postbacks) and examine the role of Microsoft’s commercial web server (IIS) as well as that of the IIS Express.
![]() Note This chapter and the next two cover ASP.NET Web Forms, the original web development framework in .NET. Chapter 34 covers ASP.NET MVC and ASP.NET Web API, two (fairly recent) additions to the ASP.NET family of framework.
Note This chapter and the next two cover ASP.NET Web Forms, the original web development framework in .NET. Chapter 34 covers ASP.NET MVC and ASP.NET Web API, two (fairly recent) additions to the ASP.NET family of framework.
With this brief web primer out of the way, the remainder of this chapter will concentrate on the structure of the ASP.NET web form programming model (including the single-page and code-behind model) and examine the functionality of the Page base class. Along the way, you’ll be introduced to the role of ASP.NET web controls, the directory structure of an ASP.NET web site, and how to use a Web.config file to control the runtime operation of your web sites.
The Role of HTTP
Web applications are very different animals from graphical desktop applications. The first obvious difference is that a production-level web application involves at least two networked machines: one hosting the web site and the other viewing data within a web browser. Of course, during development it is entirely possible to have a single machine play the role of both the browser-based client and the hosting web server that serves up content. Given the nature of web applications, the networked machines in question must agree upon a particular wire protocol to determine how to send and receive data. The wire protocol that connects the computers in question is the Hypertext Transfer Protocol (HTTP).
The HTTP Request/Response Cycle
When a client machine launches a web browser (such as Google Chrome, Opera, Mozilla Firefox, Apple Safari, or Microsoft Internet Explorer/Edge), an HTTP request is made to access a particular resource (typically a web page) on the remote server machine. HTTP is a text-based protocol that is built upon a standard request/response paradigm. For example, if you navigate to http://www.facebook.com, the browser software leverages a web technology termed Domain Name Service (DNS) that converts the registered URL into a numerical value termed an IP address. At this point, the browser opens a socket connection (typically via port 80 for a nonsecure connection) and sends the HTTP request for processing to the target site.
The web server receives the incoming HTTP request and may choose to parse out any client-supplied input values (such as values within a text box, check box, or list box) in order to format a proper HTTP response. Web programmers may leverage any number of server-side technologies (PHP, ASP.NET, JSP, etc.) to dynamically generate the content to be emitted into the HTTP response. At this point, the client-side browser renders the returned HTML sent from the web server. Figure 31-1 illustrates the basic HTTP request/response cycle.
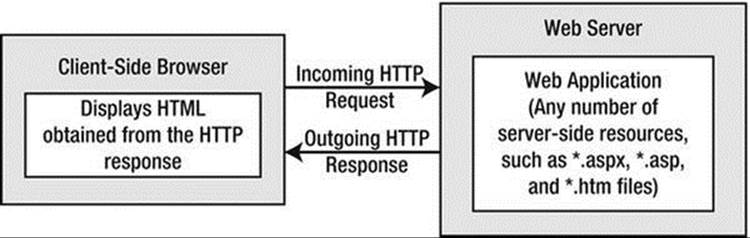
Figure 31-1. The HTTP request/response cycle
HTTP Is a Stateless Protocol
Another aspect of web development that is markedly different from traditional desktop programming is the fact that HTTP is essentially a stateless wire protocol. As soon as the web server sends a response to the client browser, everything about the previous interaction is forgotten. This is certainly not the case in a traditional desktop application, where the state of the executable is most often alive and kicking until the user shuts down the main window of the application.
Given this point, as a web developer, it is up to you take specific steps to “remember” information (such as items in a shopping cart, credit card numbers, and home addresses) about the users who are currently logged on to your site. As you will see in Chapter 33, Web Forms provide numerous ways to handle state, using techniques such as session variables, cookies, and the application cache as well as the Web Forms profile management API.
Understanding Web Applications and Web Servers
A web application can be understood as a collection of files (e.g., *.html, *.aspx, image files, XML-based file data) and related components (such as a .NET code library) stored within a particular set of directories on a web server. As shown in Chapter 33, Web Forms applications have a specific life cycle and provide numerous events (such as initial startup or final shutdown) that you can hook into in order to perform specialized processing during your web site’s operation.
A web server is a software product in charge of hosting your web applications; it typically provides a number of related services such as integrated security, File Transfer Protocol (FTP) support, mail exchange services, and so forth. Internet Information Services (IIS) is the Microsoft enterprise-level web server product, and it offers intrinsic support for Web Forms applications.
Assuming you have IIS properly installed on your workstation, you can interact with IIS from the Administrative Tools folder (located in the Control Panel folder) by double-clicking the Internet Information Services Manager applet. Figure 31-2 shows the Default Web Site node of IIS where a majority of the configuration details occur (if you are running earlier versions of IIS, your UI will look different).
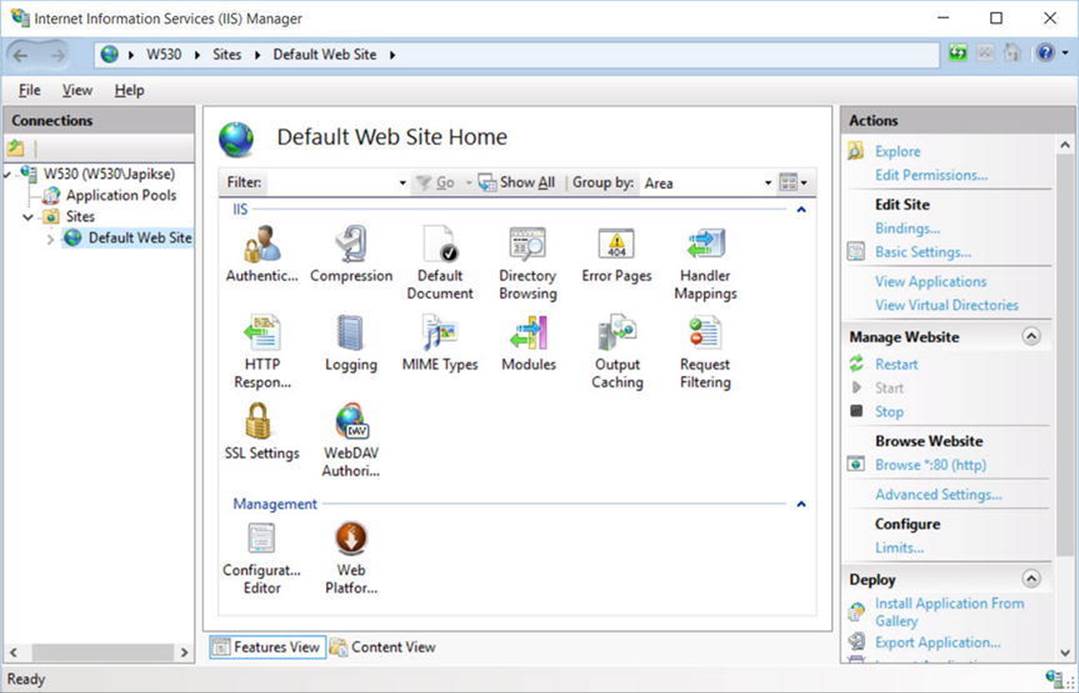
Figure 31-2. The IIS applet can be used to configure the runtime behavior of Microsoft IIS
The Role of IIS Virtual Directories
A single IIS installation is able to host numerous web applications, each of which resides in a virtual directory. Each virtual directory is mapped to a physical directory on the machine’s hard drive. For example, if you create a new virtual directory named CarsAreUs, the outside world can navigate to this site using a URL such as http://www.MyDomain.com/CarsAreUs (assuming your site’s IP address has been registered with a DNS of www.MyDomain.com). Under the hood, this virtual directory maps to a physical root directory on the web server that contains the content of the CarsAreUs web application.
As you will see later in this chapter, when you create Web Forms applications using Visual Studio, you have the option of having the IDE generate a new virtual directory for the current web site automatically. However, if required, you are certainly able to manually create a virtual directory by hand by right-clicking the Default Web Site node of IIS and selecting Add Virtual Directory from the context menu.
IIS Express
In earlier versions of the .NET platform, ASP.NET developers were required to make use of IIS virtual directories during the development and testing of their web applications. In many cases, this tight dependency on IIS made team development more complex than necessary, not to mention that many network administrators frowned upon installing IIS on every developer’s machine.
Happily, there is the option of a lightweight web server named IIS Express. This utility allows developers to host a Web Forms application outside the bounds of IIS. Using this tool, you can build and test your web pages from any folder on your machine. This is quite helpful for team development scenarios and for building Web Forms applications on versions of Windows that do not support IIS installations.
Most of the examples in this book will make use of IIS Express (via the correct Visual Studio project option) rather than hosting web content under an IIS virtual directory. While this approach can simplify the development of your web application, be aware that this web server is notintended to host production-level web applications. It is intended purely for development and testing purposes. When your web application is ready for prime time, your site will need to be copied to an IIS virtual directory.
![]() Note Visual Studio provides a built-in tool to copy a local web application to a production-level web server. Doing so is as simple as the click (or two) of a button. To start the process, you need to select your web project in the Visual Studio Solution Explorer, right-click, and select Publish. At this point you can select the intended destination of the deployment, including Microsoft Azure.
Note Visual Studio provides a built-in tool to copy a local web application to a production-level web server. Doing so is as simple as the click (or two) of a button. To start the process, you need to select your web project in the Visual Studio Solution Explorer, right-click, and select Publish. At this point you can select the intended destination of the deployment, including Microsoft Azure.
The Role of HTML
After you have configured a directory to host your web application and you have chosen a web server to serve as the host, you need to create the content itself. Recall that a web application is simply a set of files that constitute the functionality of the site. To be sure, many of these files will contain Hypertext Markup Language (HTML) statements. HTML is a standard markup language used to describe how literal text, images, external links, and various HTML controls are to be rendered within the client-side browser.
While it is true that modern IDEs (including Visual Studio) and web development platforms (such as ASP.NET) generate much of the HTML automatically, you should have a working knowledge of HTML as you work with ASP.NET.
![]() Note Recall from Chapter 2 that Microsoft has released a number of free IDEs under the Express family of products as well as Visual Studio Community Edition, which rolls all of the Express editions into one package. To work through the next chapters on WebForms, MVC, and Web API, you can download Visual Studio Express for Web or Community Edition.
Note Recall from Chapter 2 that Microsoft has released a number of free IDEs under the Express family of products as well as Visual Studio Community Edition, which rolls all of the Express editions into one package. To work through the next chapters on WebForms, MVC, and Web API, you can download Visual Studio Express for Web or Community Edition.
While this section will most certainly not cover all aspects of HTML, it will touch on some basics. This will help you better understand the markup generated on your behalf by the Web Forms programming model.
HTML Document Structure
A typical HTML file consists of a set of tags that describe the look and feel of a given web page. The basic structure of an HTML document tends to remain the same. For example, *.html files open and close with <html> and </html> tags, typically define a <body> section, and so forth.
To get started, open Visual Studio and select New ![]() Project. Under Other Project Types, select Visual Studio Solutions, and chose Blank Solution, as in Figure 31-3 (notice that you are not making a web project at this point, you are just creating a blank solution to hold your files).
Project. Under Other Project Types, select Visual Studio Solutions, and chose Blank Solution, as in Figure 31-3 (notice that you are not making a web project at this point, you are just creating a blank solution to hold your files).
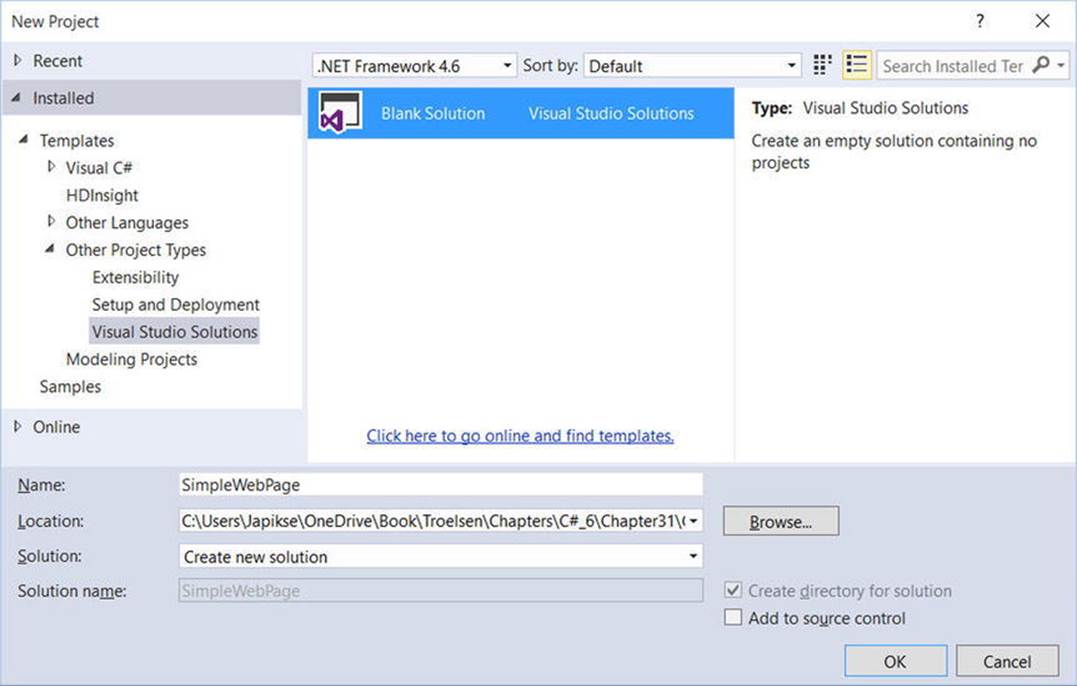
Figure 31-3. Select Blank Visual Studio Solution from the New Project dialog
Next, add an empty HTML Page file via the Project ![]() Add New Item menu selection, and select Visual C#/Web in the left rail and HTML Page in the center pane. Name the file HtmlPage1.html. You should see some initial markup such as the following (the exact HTML may differ based on how you have configured Visual Studio):
Add New Item menu selection, and select Visual C#/Web in the left rail and HTML Page in the center pane. Name the file HtmlPage1.html. You should see some initial markup such as the following (the exact HTML may differ based on how you have configured Visual Studio):
<!DOCTYPE html>
<html lang="en" xmlns="http://www.w3.org/1999/xhtml">
<head>
<title> </title>
<meta charset="utf-8" />
</head>
<body>
</body>
</html>
First, notice that this HTML file opens with a DOCTYPE processing instruction. This, in conjunction with the opening <html> tag establishes that the contained HTML tags should be validated against the HTML 5.0 standard. The HTML 5.0 standard is a W3C specification that adds many new features to vanilla-flavored markup.
![]() Note By default, Visual Studio validates all HTML documents against the HTML 5.0 validation scheme to ensure the markup is in sync with the HTML 5 standard. If you need to specify an alternative validation scheme, activate the Tools
Note By default, Visual Studio validates all HTML documents against the HTML 5.0 validation scheme to ensure the markup is in sync with the HTML 5 standard. If you need to specify an alternative validation scheme, activate the Tools ![]() Options dialog box, expand the Text Editor node, expand the HTML (Web Forms) node, and then select the Validation node. On a related note, if you would rather not see validation warnings, simply uncheck the Show Errors check box found in the same location.
Options dialog box, expand the Text Editor node, expand the HTML (Web Forms) node, and then select the Validation node. On a related note, if you would rather not see validation warnings, simply uncheck the Show Errors check box found in the same location.
To spruce things up just a bit, update the title of your page like so:
<head>
<title>This is my simple web page</title>
</head>
Not surprisingly, the <title> tags are used to specify the text string that should be placed in the title bar of the hosting web browser.
The Role of an HTML Form
An HTML form is simply a named group of related UI elements, typically used to gather user input. Do not confuse an HTML form with the entire display area shown by a given browser. In reality, an HTML form is more of a logical grouping of widgets placed in the <form> and </form>tag set, such as
<!DOCTYPE html>
<html xmlns="http://www.w3.org/1999/xhtml">
<head>
<title>This is my simple web page</title>
</head>
<body>
<form id="defaultPage">
<!-- Insert web UI content here -->
</form>
</body>
</html>
This form has been assigned the id of "defaultPage". Typically, the opening <form> tag supplies an action attribute that specifies the URL to use to submit the form data, as well as the method of transmitting that data itself (POST or GET). You will learn more about this in the next section. For the time being, let’s look at the sorts of items that can be placed in an HTML form (beyond simple literal text).
The Visual Studio HTML Designer Tools
Visual Studio provides an HTML tab on the Toolbox (accessible through the View ![]() Toolbox menu option) that allows you to select an HTML control that you may place on your HTML designer (see Figure 31-4). Similar to the process of building a WPF application, these HTML controls can be dragged onto the designer surface or directly into the markup of the page.
Toolbox menu option) that allows you to select an HTML control that you may place on your HTML designer (see Figure 31-4). Similar to the process of building a WPF application, these HTML controls can be dragged onto the designer surface or directly into the markup of the page.

Figure 31-4. The HTML tab of the Toolbox
![]() Note When you are building Web Forms pages using the web form programming model, you will typically not be using these HTML controls to create the user interface. Rather, you will use the Web Forms controls, which will render back the correct HTML on your behalf. You’ll learn about the role of web controls a bit later in this chapter.
Note When you are building Web Forms pages using the web form programming model, you will typically not be using these HTML controls to create the user interface. Rather, you will use the Web Forms controls, which will render back the correct HTML on your behalf. You’ll learn about the role of web controls a bit later in this chapter.
The HTML editor doesn’t have a designer surface. In order to use a designer (or Split Mode), you need to use the Web Forms HTML Editor. To do this, close the editor for HtmlPage1.html, and in the Solution, right-click the file, select Open With, and you will see a dialog that allows you to choose which editor (shown in Figure 31-5). If you click Set as Default, then you would not need to create a solution like we did here because the Web Forms HTML Editor will always be used.
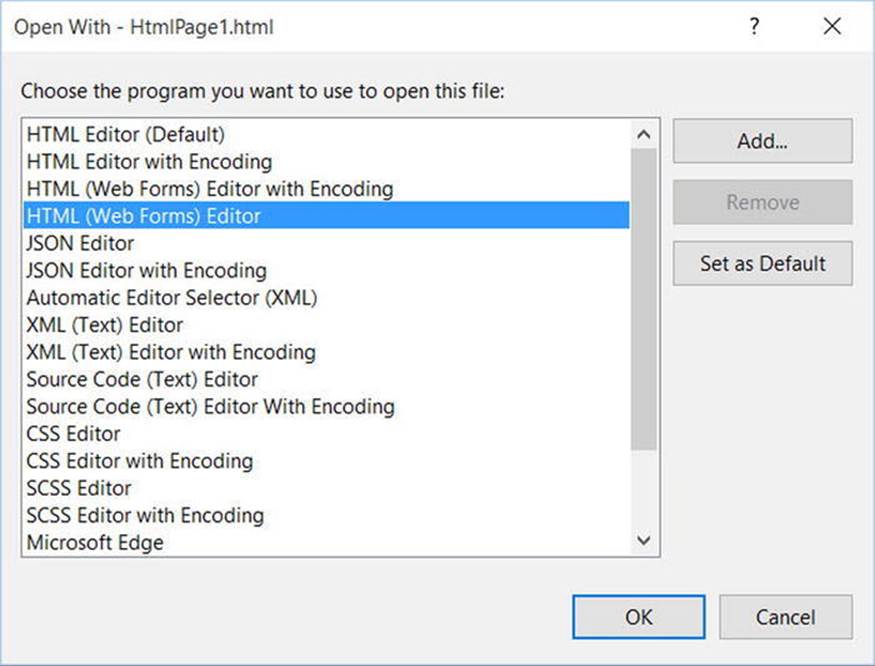
Figure 31-5. Selecting the WebForms Editor
If you click the Split button on the bottom of the HTML editor, the bottom pane of the HTML editor will display the HTML visual layout and the upper pane will show the related markup. Another benefit of this editor is that as you select markup or an HTML UI element, the corresponding representation is highlighted. Figure 31-6 shows an example of the split view in action.
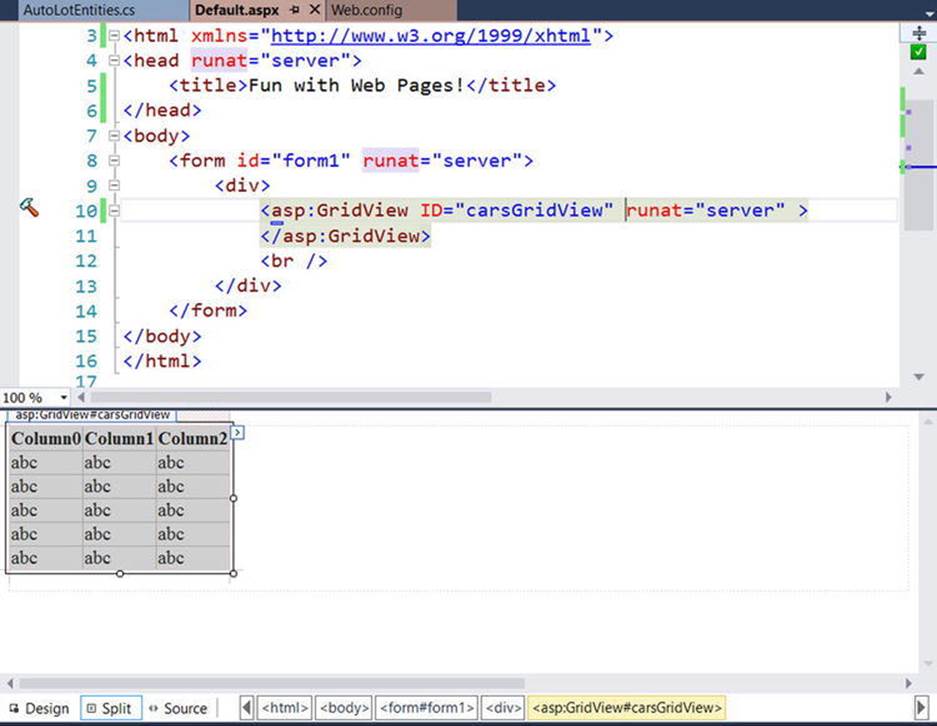
Figure 31-6. The Visual Studio Web Forms HTML designer
Visual Studio also allows you to edit the overall look and feel of the *.html file or a given HTML control in the <form> using the Properties window. For example, if you select DOCUMENT from the drop-down list of the Properties window, you can configure various aspects of the HTML page (see Figure 31-7).
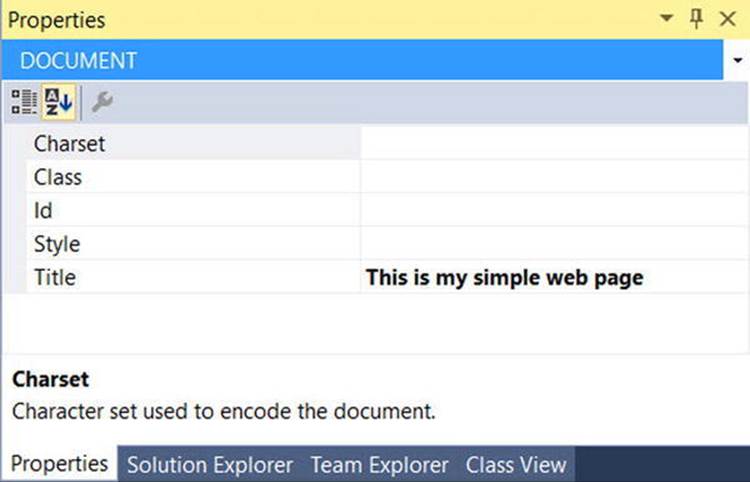
Figure 31-7. The Visual Studio Properties window can be used to configure the HTML markup
As you use the Properties window to configure an aspect of your web page, the IDE will update the HTML accordingly. Feel free to use the IDE to help edit your HTML pages as you read over the remaining chapters of the book.
Building an HTML Form
Update the <body> of the initial file to display some literal text that prompts the user to enter a message. Be aware that you can enter and format literal textual content by typing directly in the HTML designer. Here, you are using the <h1> tag to set a header weight, <p> for a paragraph block, and <i> for italic text:
<!DOCTYPE html>
<html xmlns="http://www.w3.org/1999/xhtml">
<head>
<title>This is my simple web page</title>
</head>
<body>
<!-- Prompt for user input. -->
<h1>Simple HTML Page</h1>
<p>
<br/>
<i>Please enter a message</i>.
</p>
<form id="defaultPage">
</form>
</body>
</html>
Now let’s build the form’s input area. In general, each HTML control is described using an id attribute (used to identify the item programmatically) and a type attribute (used to specify which input control you are interested in placing in the <form> declaration).
The UI you will build here will contain one text field and two button types. The first button will be used to run a client-side script and the other to reset the form input fields to the default values. Update your HTML form like so:
<!-- Build a form to get user info. -->
<form id="defaultPage">
<p>
Your Message:
<input id="txtUserMessage" type="text"/></p>
<p>
<input id="btnShow" type="button" value="Show!"/>
<input id="btnReset" type="reset" value="Reset"/>
</p>
</form>
Notice that you have assigned relevant ids to each control (txtUserMessage, btnShow, and btnReset). Also notice that each input item has an extra attribute named type that marks these input controls as UI items that automatically clear all fields to their initial values (type="reset"), receive text input (type="text"), or function as a simple client-side button that does not post back to the web server (type="button").
Save your file, then right-click on the designer, and select the View in Browser menu option. Figure 31-8 shows the current page with the new Microsoft Edge web browser.
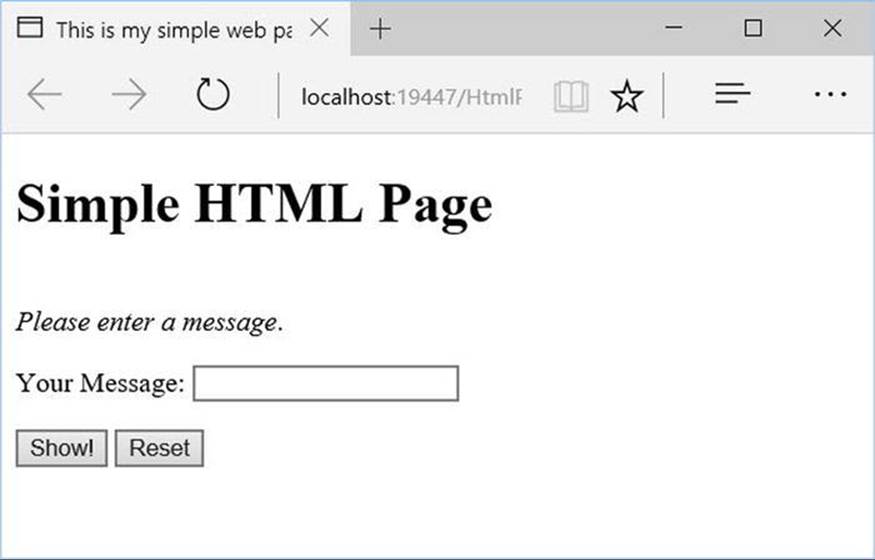
Figure 31-8. Your simple HTML page
![]() Note When you select the View in Browser option for an HTML file, Visual Studio will automatically launch the IIS Express to host your content.
Note When you select the View in Browser option for an HTML file, Visual Studio will automatically launch the IIS Express to host your content.
The Role of Client-Side Scripting
In addition to GUI elements, a given *.html file may contain blocks of script code that will be processed by the requesting browser. The following are two major reasons why client-side scripting is used:
· To validate user input in the browser before posting back to the web server
· To interact with the Document Object Model (DOM) of the browser
Regarding the first point, understand that the inherent evil of a web application is the need to make frequent round-trips (termed postbacks) to the server machine to update the HTML to be rendered into the browser. While postbacks are unavoidable, you should always be mindful of ways to minimize travel across the wire. One technique that saves postbacks is to use client-side scripting to validate user input before submitting the form data to the web server. If an error is found, such as not supplying data within a required field, you can alert the user to the error without incurring the cost of posting back to the web server. (After all, nothing is more annoying to users than posting back on a slow connection, only to receive instructions to address input errors!)
![]() Note Be aware that even when performing client-side validation (for improved response time), validation should also occur on the web server itself. This will ensure that the data has not been tampered with while it was sent across the wire. The ASP.NET validation controls automatically perform client and server-side validation (more on this in Chapter 32).
Note Be aware that even when performing client-side validation (for improved response time), validation should also occur on the web server itself. This will ensure that the data has not been tampered with while it was sent across the wire. The ASP.NET validation controls automatically perform client and server-side validation (more on this in Chapter 32).
Client-side scripts can also be used to interact with the underlying object model (the Document Object Model, or DOM) of the web browser itself. Most commercial browsers expose a set of objects that can be leveraged to control how the browser should behave.
When a browser parses an HTML page, it builds an object tree in memory, representing all the contents of the web page (forms, input controls, etc.). Browsers provide an API called DOM that exposes the object tree and allows you to modify its contents programmatically. For example, you can write JavaScript that executes in the browser to get the values from specific controls, change the color of a control, add new controls to the page dynamically, and so forth.
One major annoyance is the fact that different browsers tend to expose similar, but not identical, object models. Thus, if you emit a block of client-side script code that interacts with the DOM, it might not work identically on all browsers (thus, testing is always a must!).
ASP.NET provides the HttpRequest.Browser property, which allows you to determine at runtime the capacities of the browser and the device that sent the current request. You can use this information to stylize how to emit back the HTTP response in the most optimal manner. But you rarely need to worry about this, unless you are implementing custom controls, because all the standard web controls in ASP.NET automatically know how to render themselves appropriately based on the browser type. This remarkable capability is known as adaptive rendering, and it’s implemented out-of-the-box for all standard ASP.NET controls.
There are various scripting languages that can be used to author client-side script code, but the most popular by far is JavaScript. It’s important to note that JavaScript is in no way, shape, or form the same as the Java language. While JavaScript and Java have a somewhat similar syntax, JavaScript is less powerful than Java. The good news is that all modern-day web browsers support JavaScript, which makes it a natural candidate for client-side scripting logic.
A Client-Side Scripting Example
To illustrate the role of client-side scripting, let’s first examine how to intercept events sent from client-side GUI widgets. To capture the click event for the Show button, update the definition of the btnShow widget to support an onclick attribute, which is assigned to a JavaScript method named btnShow_onclick().
<input id="btnShow" type="button" value="Show!"
onclick="return btnShow_onclick()" />
Now, add the following JavaScript function directly after the opening <head> element, which is called when the user clicks the button. Use the alert() method to display a client-side message box containing the value in the text box via the value property.
<script type="text/javascript">
// <![CDATA[
function btnShow_onclick() {
alert(window.txtUserMessage.value);
}
// ]]>
</script>
Note that the scripting block has been wrapped within a CDATA section. The reason for this is simple: if your page ends up on a browser that does not support JavaScript, the code will be treated as a comment block and ignored. Of course, your page may be less functional, but the upside is that your page will not blow up when rendered by the browser. In any case, if you view your page in a browser once again, you should be able to type a message and see it pop up in a client-side message box (see Figure 31-9).
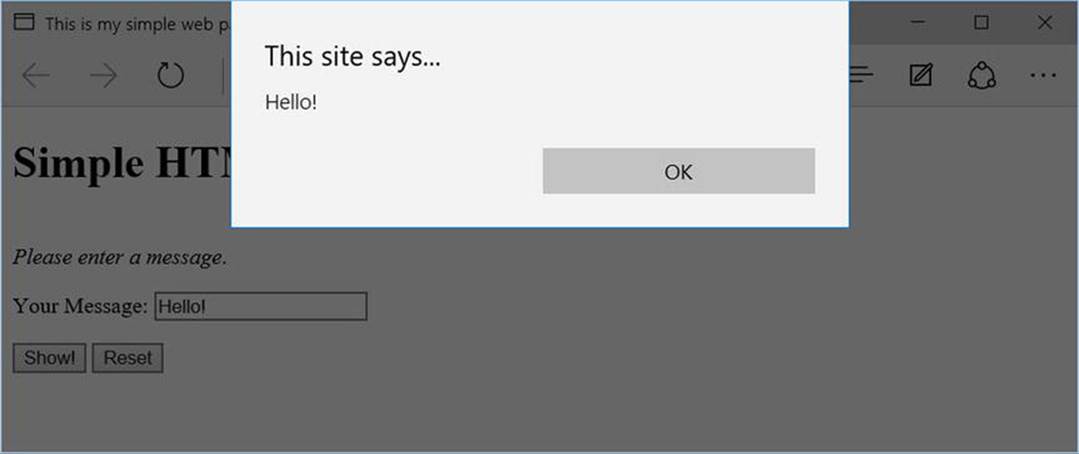
Figure 31-9. Invoking a client-side JavaScript function
As well, when you click the Reset button, you should find that the text area is cleared of data because this particular button was created by specifying type="reset".
Posting Back to the Web Server
This simple HTML page is executing all functionality within the hosting browser. A real web page needs to post back to a resource on the web server, passing all of the input data at the same time. Once the server-side resource receives this data, it can use it to build a proper, dynamically generated, HTTP response.
The action attribute on the opening <form> tag specifies the recipient of the incoming form data. Possible receivers include mail servers, other HTML files on the web server, RESTful web services, a Web Forms page, and so forth.
Beyond the action attribute, you will also likely have a submit button, which when clicked, will transmit the form data to the web application via an HTTP request. There is no need to do so for this example; however, here is an update to the file, specifying the following attribute in the opening <form> tag:
<form id="defaultPage"
action="http://localhost/Cars/MyAspNetPage.aspx" method="GET">
<input id="btnPostBack" type="submit" value="Post to Server!"/>
...
</form>
When the submit button for this form is clicked, the form data is sent to the MyAspNetPage.aspx at the specified URL. When you specify method="GET" as the mode of transmission, the form data is appended to the query string as a set of name/value pairs separated by ampersands. You might have seen this sort of data in your browser before; it looks like the following:
http://www.google.com/search?hl=en&source=hp&q=vikings&cts=1264370773666&aq=f&aql=&aqi=g1g-z1g1g-z1g1g-z1g4&oq=
The other method of transmitting form data to the web server is to specify method="POST", like so:
<form id="defaultPage"
action="http://localhost/Cars/MyAspNetPage.aspx" method = "POST">
...
</form>
In this case, the form data is not appended to the query string. Using POST, the form data is not directly visible to the outside world. More important, POST data does not have a character-length limitation; many browsers have a limit for GET queries.
Postbacks Under Web Forms
When you are building Web Forms-based web sites, the framework will take care of the posting mechanics on your behalf. One of the many benefits of building a web site using ASP.NET Web Forms is that the programming model layers on top of the standard HTTP request/response protocol of an event driven system. Thus, rather than manually setting an action attribute and defining an HTML submit button, you can simply handle events on the Web Forms controls using standard C# syntax.
Using this event-driven model, you can very easily post back to the web server using a large number of controls. If you require, you can post back to the web server if the user clicks on a radio button, an item in a list box, a day on a calendar control, and so on. In each case, you simply handle the correct event, and the ASP.NET runtime will automatically emit back the correct HTML posting data.
![]() Source Code The SimpleWebPage web site is included in the Chapter 31 subdirectory.
Source Code The SimpleWebPage web site is included in the Chapter 31 subdirectory.
An Overview of the Web Forms API
At this point, your whirlwind review of classic web application development is complete, and you are ready to dive into Web Forms. As you would expect, each edition of the .NET platform adds more functionality to the web programming APIs, and this is certainly true under .NET 4.6. Regardless of which version of .NET you happen to be targeting, the following features are commonplace for ASP.NET Web Forms-based applications:
· ASP.NET provides a model termed code-behind, which allows you to separate presentation logic (HTML) from business logic (C# code).
· ASP.NET pages are coded using .NET programming languages, rather than server-side scripting languages. The code files are compiled into valid .NET *.dll assemblies (which translates into much faster execution).
· Web Forms controls can be used to build a web UI in a model similar to that of building a desktop windows application.
· Web Forms applications can make use of any of the assemblies within the .NET base class libraries and are constructed using the object-oriented techniques examined in this book (classes, interfaces, structures, enums, and delegates).
· Web Forms applications can be easily configured via a web application configuration file (Web.config).
The first point I want to elaborate on here is the fact that the UI of a Web Forms web page can be constructed using various web controls. Unlike a typical HTML control, web controls are executed on the web server and will emit back to the HTTP response their correct HTML tags. This alone is a huge benefit of Web Forms in that the amount of HTML you must manually author by hand diminishes greatly. By way of a quick example, assume you have defined the following Web Forms web control in a Web Forms page (I’ll cover creating the details of how to do this shortly):
<asp:Button ID="btnMyButton" runat="server" Text="Button" BorderColor="Blue"
BorderStyle="Solid" BorderWidth="5px" />
You’ll learn the details of declaring Web Forms controls soon enough, but for right now, notice that many attributes of the <asp:Button> control look very similar to the properties you encountered in the WPF examples. The same is true for all Web Forms controls because when Microsoft built the web control toolkit, these widgets were purposely designed to look and feel like their desktop counterparts.
Now, if a browser makes a call to the *.aspx file containing this control, the control responds by emitting into the output stream the following HTML declaration:
<input type="submit" name="btnMyButton" value="Button" id="btnMyButton"
style="border-color:Blue;border-width:5px;border-style:Solid;" />
Notice how the web control emits back standard HTML that can be rendered in any browser. Given this, understand that using Web Forms controls in no way ties you to the Microsoft family of operating systems or to Microsoft Internet Explorer. Any operating system or browser (including those on handheld devices such as the Apple iPhone, Android, or Windows Phone devices) can view a Web Forms page.
Next, note from the previous list of features that a Web Forms application will be compiled into a .NET assembly. Thus, your web projects are no different than any .NET *.dll built during this book. The compiled web application will be composed of CIL code, an assembly manifest, and type metadata. This has a number of huge benefits, most notably performance gains, strong typing, and the ability to be micromanaged by the CLR (e.g., garbage collection, etc.).
Finally, Web Forms applications provide a programming model whereby you can partition your page’s markup from its related C# code base using code files. Using code files, the markup you type will map to a full-blown object model that is merged with your C# code file via partial class declarations.
Major Features of Web Forms 2.0 and Higher
ASP.NET 1.0 was a major step in the right direction, and ASP.NET 2.0 provided many additional bells and whistles that helped ASP.NET move from a way to build dynamic web pages to a way to build feature-rich web sites. Consider this partial list of key features:
· Introduction of the ASP.NET Development Web Server (which means developers no longer need to have the full version of IIS installed on their development computers). This is now replaced by IIS Express.
· A large number of new web controls that handle many complex situations (navigation controls, security controls, new data-binding controls, etc.).
· The introduction of master pages, which allow developers to attach a common UI frame to a set of related pages.
· Support for themes, which offer a declarative manner to change the look and feel of the entire web application on the web server.
· Support for Web Parts, which allow end users to customize the look and feel of a web page and store their settings for later use (à la portals).
· Introduction of a web-based configuration and management utility that maintains the various Web.config files.
Beyond the ASP.NET Development Web Server, one of the biggest additions brought forth with ASP.NET 2.0 was the introduction of master pages. As you are aware, most web sites have a look and feel that is common to all pages on the site. Consider a commercial web site such aswww.amazon.com. Every page has the same elements, such as a common header, common footer, common navigation menus, and so on.
Using a master page, you can model this common functionality and define placeholders that other *.aspx files can plug into. This makes it very easy to quickly reshape the overall look and feel of your site (reposition the navigation bar, change the header logo, and so on) by simply changing the master page, leaving the other *.aspx files unmodified.
![]() Note Master pages are so useful that as of Visual Studio 2010, all new Web Forms web projects include a master page by default.
Note Master pages are so useful that as of Visual Studio 2010, all new Web Forms web projects include a master page by default.
ASP.NET 2.0 also added many new web controls into the mix, including controls that automatically incorporate common security features (log in controls, password recovery controls, etc.), controls that allow you to layer a navigational structure on top of a set of related *.aspx files, and even more controls for performing complex data-binding operations, where the necessary SQL queries can be generated using a set of Web Forms controls.
Major Features of Web Forms 3.5 (and .NET 3.5 SP1) and Higher
Note that .NET 3.5 added the ability for Web Forms applications to make use of the LINQ programming model (also introduced in .NET 3.5) and the following web-centric features:
· Support for data binding against ADO.NET Entity Framework classes (see Chapter 23).
· Support for ASP.NET Dynamic Data. This is a Ruby on Rails–inspired web framework that can be used to build data-driven web applications. It exposes tables in a database by encoding them in the URI of the ASP.NET web service, and the data in the table is automatically rendered to HTML.
· Integrated support for Ajax-style development, which essentially allows for micro postbacks to refresh part of a web page as quickly as possible.
The ASP.NET Dynamic Data project templates, introduced with the .NET 3.5 Service Pack 1, provide a new model to build sites that are driven heavily by a relational database. Of course, most web sites will need to communicate with databases to some extent, but the ASP.NET Dynamic Data projects are tightly connected to the ADO.NET Entity Framework and are squarely focused on the rapid development of data-driven sites (similar to what one might build when using Ruby).
Major Features of Web Forms 4.0
.NET 4.0 added even more features to the Microsoft web development platform. Here is a hit list of some of the key web-centric features:
· The ability to compress “view state” data using the GZIP standard.
· JQuery is included with Web Forms and MVC.
· Updated browser definitions to ensure that ASP.NET pages render correctly on new browsers and devices (Google Chrome, Apple iPhone, Windows Phone, Android devices, etc.).
· The ability to customize the output of validation controls using a cascading style sheet (CSS).
· The inclusion of the ASP.NET Chart control, which allows for building ASP.NET pages that include intuitive charts for complex statistical or financial analysis.
· Support for ASP.NET Model View Controller project templates, which decrease the dependency among application layers by using the Model-View-Controller (MVC) pattern. This is a completely different approach to web site development and has little resemblance to the web form programming model examined in this edition of the text.
While this list is certainly impressive (and it’s only a subset of the new features), the work that Microsoft put into Web Forms for ASP.NET 4.5 brought many developers back to Web Forms from ASP.NET MVC (covered in Chapter 34).
Major Features of Web Forms 4.5 and 4.6
Two major focus areas of .NET 4.5 were performance improvements and porting many ASP.NET MVC features back into Web Forms. Here is just a partial list of all that was new in Web Forms 4.5 and Web Forms 4.6.
Features Added in Web Forms 4.5
· Numerous updates to support HTML 5.0.
· Integration with the new asynchronous language features of C# and VB.
· You can declare what type of data a control is going to be bound to by using a new ItemType property, allowing for strongly typed controls, IntelliSense support, and more.
· Model binding, which means you can map data from the page directly into method type parameters.
· Client-side validation is now integrated with JQuery, allowing for cleaner validation code.
· Additional validations available through Data Annotations, which are attributes on your model classes.
· Additional security from cross-site scripting attacks with the inclusion (by default) of the AntiXSS library.
· Reduced file sizes (for JavaScript and CSS) with minification (reducing files size by compressing the text of the files).
· Reduced number of browser calls by combining files into a single with bundling.
· You can defer request validation, allowing for posting of potentially unsafe content (use with caution).
· Applications can use more than one server code when compiling Web Forms applications.
Features Added in Web Forms 4.6
· Support for the new high speed HTTP2 protocol (currently only available for secure applications on IIS)
· Enabling new C# 6 features using the Roslyn Code DOM Compilers
· Ability to use async/await on model binding functions
As you might agree, the feature set of Web Forms is quite deep (and this API has many more features than I have briefly enumerated here). Truth be told, if I were to cover every possible feature of Web Forms, this book would easily double in size (triple, perhaps). Since this is not realistic, the goal for the remainder of the text is to examine the core features of Web Form that you will likely use on a day-to-day basis. Check out the .NET Framework 4.6 SDK documentation for features not covered here.
![]() Note If you require a comprehensive treatment of building web applications using ASP.NET, I suggest picking up a copy of Pro ASP.NET 4.5 in C#, Fifth Edition by Adam Freeman and Matthew MacDonald (Apress).
Note If you require a comprehensive treatment of building web applications using ASP.NET, I suggest picking up a copy of Pro ASP.NET 4.5 in C#, Fifth Edition by Adam Freeman and Matthew MacDonald (Apress).
Building a Single-File Web Forms Web App
A Web Forms page can be constructed using one of two primary approaches, the first of which is to build a single *.aspx file that contains a blend of server-side code and HTML. Using this single-file page model approach, the server-side code is placed within a <script> scope, but the code itself is not script code proper (e.g., VBScript/JavaScript). Rather, the code within a <script> block is written in your .NET language of choice (C#, Visual Basic, etc.).
If you are building a web page that contains very little code (but a good deal of static HTML), a single-file page model may be easier to work with because you can see the code and the markup in one unified *.aspx file. In addition, placing your procedural code and HTML markup into a single *.aspx file provides a few other advantages:
· Pages written using the single-file model are slightly easier to deploy or to send to another developer.
· Because there is no dependency between multiple files, a single-file page is easier to rename.
· Managing files in a source code control system is slightly easier because all the action takes place in a single file.
On the downside, the single-file page model can lead to some complex files because the UI markup and programming logic is isolated to one location. Nevertheless, you’ll begin your journey of Web Forms by examining the single-file page model.
Your goal is to build an *.aspx file that displays the Inventory table of the AutoLot database (created in Chapter 21) using Entity Framework. To begin, launch Visual Studio and create a new empty ASP.NET web application named SinglePageModel. Select File ![]() New Project, then select Visual C#/Web from the left rail, and ASP.NET Web Application in the center pane, and enter SinglePageModel for the name, as in Figure 31-10.
New Project, then select Visual C#/Web from the left rail, and ASP.NET Web Application in the center pane, and enter SinglePageModel for the name, as in Figure 31-10.
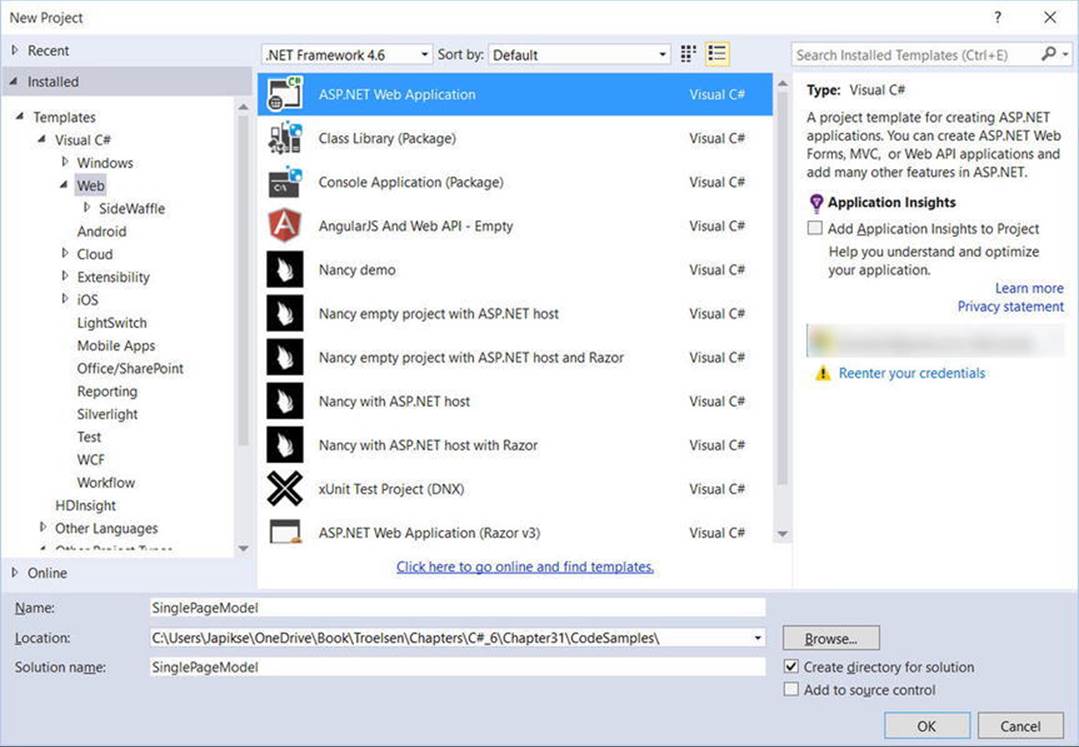
Figure 31-10. Select ASP.NET Web Application from the New Project dialog
After you click OK, you will see the updated New ASP.NET Project dialog. Make sure you select ASP.NET 4.6 templates, and the Empty project template. Leave the check boxes for Web Forms, MVC, and Web API under the “Add folders and core references for:” unchecked; leave the “Add unit tests” check box unchecked; and uncheck the Host in the cloud option (if it’s checked) under Microsoft Azure, as in Figure 31-11.
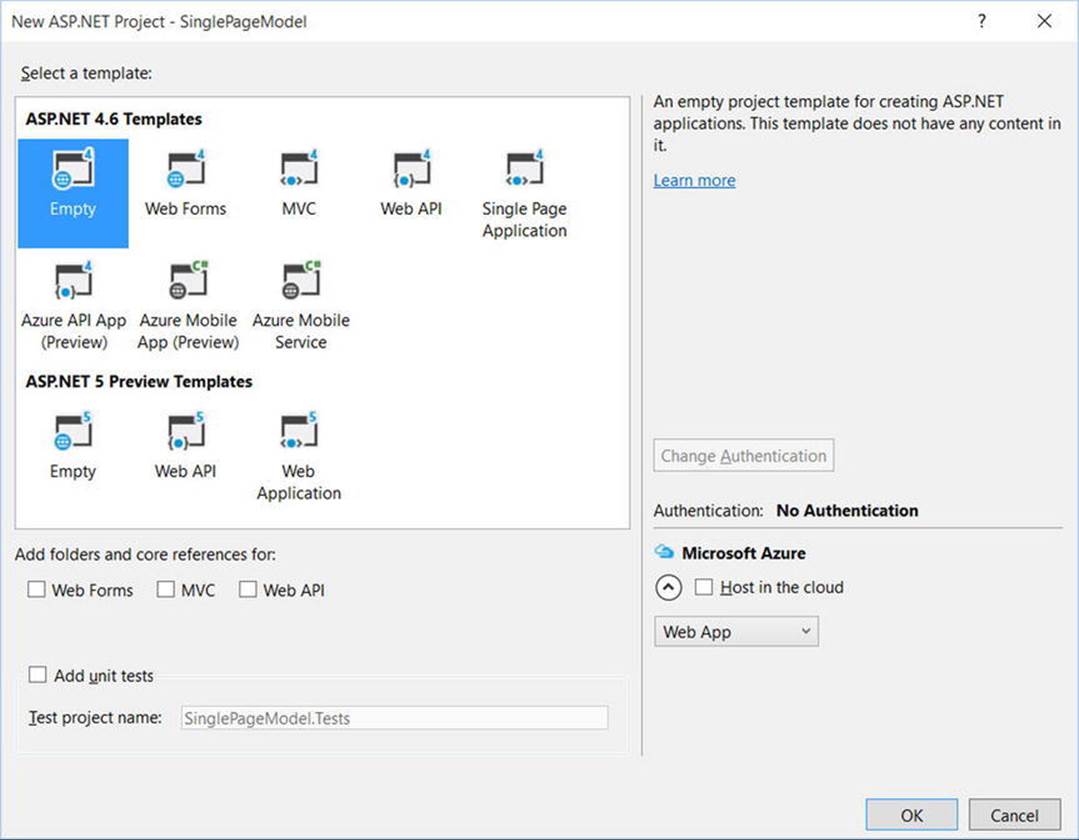
Figure 31-11. Choosing the empty project template
![]() Note The .NET 4.6 Framework (which this book covers) is the current full version of the .NET Framework. ASP.NET 5 is built on .NET core, which is a subset of .NET 4.6. Note that .NET Core is for cross-platform web sites and only supports ASP.NET MVC and the Web API from a web development standpoint.
Note The .NET 4.6 Framework (which this book covers) is the current full version of the .NET Framework. ASP.NET 5 is built on .NET core, which is a subset of .NET 4.6. Note that .NET Core is for cross-platform web sites and only supports ASP.NET MVC and the Web API from a web development standpoint.
Next, add a new Web Form to the project by selecting Project ![]() Add New Item. Be sure to select Web
Add New Item. Be sure to select Web ![]() Web Forms in the left rail. Name this file Default.aspx.
Web Forms in the left rail. Name this file Default.aspx.
Referencing AutoLotDAL.dll
Next, use Windows Explorer to copy the AutoLotDAL directory from Chapter 23 (or from the download directory for this chapter). Add the project into the solution by right-clicking the solution and selecting Add ![]() Existing Project and choosing the AutoLotDAL project. Next, add a reference to the AutoLotDAL project by right-clicking the references node in the SinglePageModel project and selecting AutoLotDAL from the Projects/Solution option.
Existing Project and choosing the AutoLotDAL project. Next, add a reference to the AutoLotDAL project by right-clicking the references node in the SinglePageModel project and selecting AutoLotDAL from the Projects/Solution option.
You will need to make a slight change to the AutoLotDAL project. First, add a reference to System.Web. The constructor for the DatabaseLogger doesn’t specify a directory, which will cause the code to fail in a web site because of a lack of permissions. This has to be updated to point to the physical directory of the web site. In the System.Web namespace is a server variable called HttPRuntime.AppDomainAppPath that contains the physical directory of the web site. In the EF folder, open AutoLotEntities.cs, add a using for System.Web, and change the DatabaseLogger initializer to this:
static readonly DatabaseLogger DatabaseLogger =
new DatabaseLogger($"{HttpRuntime.AppDomainAppPath}/sqllog.txt");
This change makes sure that the logging file is created in the same directory as the web site, resolving the permission issue.
Next, add Entity Framework to the web project by right-clicking the solution in Solution Explorer, selecting Manage NuGet Packages for Solution, and adding Entity Framework. You will also need to update the web.config file (this is analogous to the App.config files you have already been working with in previous chapters) to match the following (you might have to change your connection string based on the instance name for your SQL Server install):
<configuration>
<configSections>
<!-- For more information on Entity Framework configuration, visit http://go.microsoft.com/fwlink/?LinkID=237468 -->
<section name="entityFramework"
type="System.Data.Entity.Internal.ConfigFile.EntityFrameworkSection, EntityFramework, Version=6.0.0.0, Culture=neutral, PublicKeyToken=b77a5c561934e089"
requirePermission="false"/>
</configSections>
<system.web>
<compilation debug="true" targetFramework="4.6"/>
<httpRuntime targetFramework="4.6"/>
</system.web>
<entityFramework>
<defaultConnectionFactory type="System.Data.Entity.Infrastructure.LocalDbConnectionFactory, EntityFramework">
<parameters>
<parameter value="mssqllocaldb"/>
</parameters>
</defaultConnectionFactory>
<providers>
<provider invariantName="System.Data.SqlClient" type="System.Data.Entity.SqlServer.SqlProviderServices, EntityFramework.SqlServer"/>
</providers>
</entityFramework>
<connectionStrings>
<add name="AutoLotConnection"
connectionString="data source=.\SQLEXPRESS2014;initial catalog=AutoLot;integrated security=True;MultipleActiveResultSets=True;App=EntityFramework"
providerName="System.Data.SqlClient"/>
</connectionStrings>
</configuration>
Designing the UI
Now, open Default.aspx, click the Design tab, and using the Visual Studio Toolbox, select the Standard tab and drag and drop a GridView control (the GridView widget can be found under the Data tab of the Toolbox) onto the page designer between the opening and closing formelements. Notice that the designer fills in random data into the GridView to give you a sense of how your page will look. Feel free to make use of the Properties window to set various visual property settings as you choose. Now, locate the <form> section of your page. Notice how the web control has been defined using an <asp> tag. After this tag prefix, you will find the name of a Web Forms control (GridView). Before the closing tag of a given element, you will find a series of name/value pairs that correspond to the settings available in the Properties window, like so:
<form id="form1" runat="server">
<div>
<asp:GridView ID="carsGridView" runat="server">
</asp:GridView>
</div>
</form>
You will dig into the full details of Web Forms controls (including runat="server") later in Chapter 32. Until then, recall that web controls are objects processed on the web server that emit back their HTML representation into the outgoing HTTP response automatically. Beyond this major benefit, Web Forms controls mimic a desktop-like programming model in that the names of the properties, methods, and events typically mimic an equivalent Windows Forms/WPF counterpart.
Adding the Data Access Logic
Now, switch to the source, and add an ItemType attribute to the asp:GridView tag with the value "AutoLotDAL.Models.Inventory". This new feature, introduced in .NET 4.5, provides for strongly typed list controls in ASP.NET Web Forms, and is supported by IntelliSense to recognize the classes available in the solution.
Next, add a SelectMethod attribute with the value "GetData". The SelectMethod attribute was also introduced in .NET 4.5, and sets the method that will be executed when the control is rendered to get the data that will populate the list control. The updated markup is shown here:
<asp:GridView ID="carsGridView" runat="server"
ItemType="AutoLotDAL.Models.Inventory"
SelectMethod="GetData" >
</asp:GridView>
Create the GetData method in a <script> tag within the page. In the method, call the InventoryRepo.GetAll method. Use the <%@ Import ... %> to import AutoLotDAL.Models and AutoLotDAL.Repos. You code should be similar to this:
<!--At the top of the file, after the Page directive -->
<%@ Import Namespace="AutoLotDAL.Models" %>
<%@ Import Namespace="AutoLotDAL.Repos" %>
<!--Anywhere in the file, before the GridView control -->
<script runat="server">
public IEnumerable<Inventory> GetData()
{
return new InventoryRepo().GetAll();
}
</script>
![]() Note You only need to use the <%@ Import %> directive if you are building a page with the single-file code model. If you are using the default code file approach, use the using keyword of C# to include namespaces in your code file. The same is true for the <%@ Assembly %>directive, described next.
Note You only need to use the <%@ Import %> directive if you are building a page with the single-file code model. If you are using the default code file approach, use the using keyword of C# to include namespaces in your code file. The same is true for the <%@ Assembly %>directive, described next.
Before you dive into the details behind the format of this *.aspx file, let’s try a test run. First, save your *.aspx file. Click Run or press F5, which will launch IIS Express, which hosts your page.
When the page is served, the Select method is executed, loading the data into the GridView. Figure 31-12 shows the output.
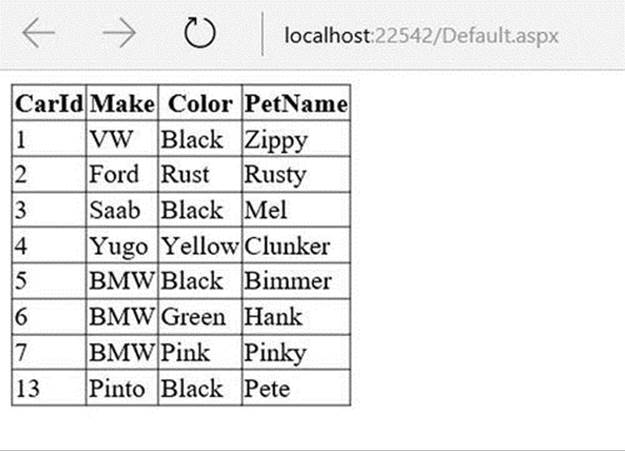
Figure 31-12. ASP.NET provides a declarative data-binding model
Given, the current UI is quite bland. To spice up the current example, select the GridView control on the Visual Studio designer, and using the context menu (that tiny arrow on the upper right of the control), select the Auto Format option (see Figure 31-13).
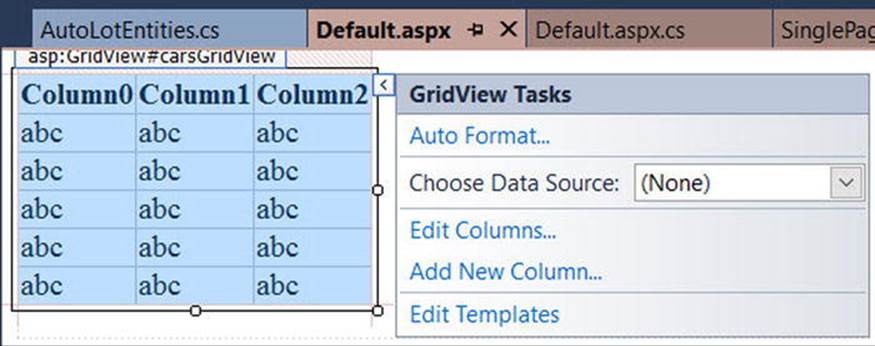
Figure 31-13. Configuring the ASP.NET GridView control
From the resulting dialog box, pick a template that suits your fancy (I picked “Slate”). After you click OK, view the generated control declaration, which is quite a bit richer than before.
<asp:GridView ID="carsGridView" runat="server"
ItemType="AutoLotDAL.Models.Inventory"
SelectMethod="GetData" BackColor="White" BorderColor="#E7E7FF"
BorderStyle="None" BorderWidth="1px" CellPadding="3" GridLines="Horizontal" >
<AlternatingRowStyle BackColor="#F7F7F7" />
<FooterStyle BackColor="#B5C7DE" ForeColor="#4A3C8C" />
<HeaderStyle BackColor="#4A3C8C" Font-Bold="True" ForeColor="#F7F7F7" />
<PagerStyle BackColor="#E7E7FF" ForeColor="#4A3C8C" HorizontalAlign="Right" />
<RowStyle BackColor="#E7E7FF" ForeColor="#4A3C8C" />
<SelectedRowStyle BackColor="#738A9C" Font-Bold="True" ForeColor="#F7F7F7" />
<SortedAscendingCellStyle BackColor="#F4F4FD" />
<SortedAscendingHeaderStyle BackColor="#5A4C9D" />
<SortedDescendingCellStyle BackColor="#D8D8F0" />
<SortedDescendingHeaderStyle BackColor="#3E3277" />
</asp:GridView>
If you view your application again and click your button, you will now see a more interesting UI (see Figure 31-14).
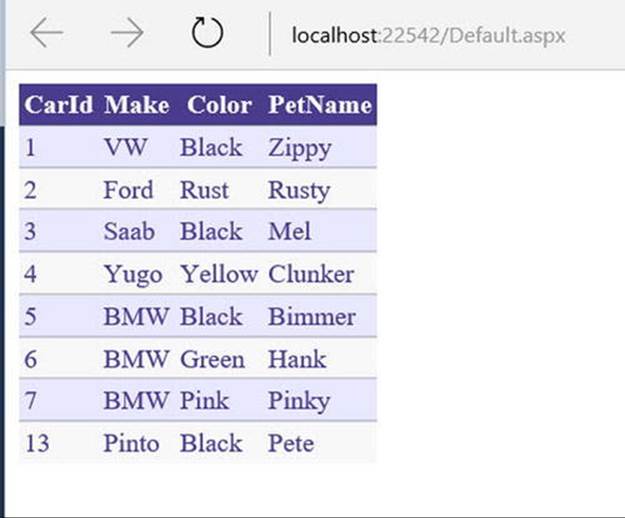
Figure 31-14. A richer display for your test page
That was fairly simple, yes? Of course, as they say, the devil is in the details, so let’s dig a bit deeper into the composition of this *.aspx file, beginning with examining the role of the <%@Page... %> directive. Do be aware that the topics you examine will apply directly to the more preferred code file model examined next.
The Role of ASP.NET Directives
A given *.aspx file will typically open with a set of directives. ASP.NET directives are always denoted with <%@ ... %> markers and may be qualified with various attributes to inform the ASP.NET runtime how to process the attribute in question.
Every *.aspx file will have at minimum a <%@Page%> directive that is used to define the managed language used within the page (via the language attribute). Also, the <%@Page%> directive may define the name of the related code-behind file (examined soon), and so on. Table 31-1 documents some of the more interesting <%@Page%>-centric attributes.
Table 31-1. Select Attributes of the <%@Page%> Directive
|
Attribute |
Meaning in Life |
|
CodePage |
Specifies the name of the related code-behind file |
|
EnableTheming |
Establishes whether the controls on the *.aspx page support ASP.NET themes |
|
EnableViewState |
Indicates whether view state is maintained across page requests (more details on this property in Chapter 33) |
|
Inherits |
Defines a class in the code-behind page the *.aspx file derives from, which can be any class derived from System.Web.UI.Page |
|
MasterPageFile |
Sets the master page used in conjunction with the current *.aspx page |
|
Trace |
Indicates whether tracing is enabled |
In addition to the <%@Page%> directive, a given *.aspx file may specify various <%@Import%> directives to explicitly state the namespaces required by the current page and <%@Assembly%> directives to specify the external code libraries used by the site (typically placed in the\bin folder of the web site).
In this example, you specified the types within the Models and Repos namespaces within the AutoLotDAL.dll assembly. If you need to make use of additional .NET namespaces, you simply specify multiple <%@Import%>/<%@Assembly%> directives.
To be sure, ASP.NET does define a number of other directives that may appear in an *.aspx file above and beyond <%@Page%>, <%@Import%>, and <%@Assembly%>; however, I’ll reserve commenting on those for the time being. You’ll see examples of other directives as you progress through the remaining chapters.
Analyzing the “Script” Block
Under the single-file page model, an *.aspx file may contain server-side scripting logic that executes on the web server. In this case, it is critical that all of your server-side code blocks are defined to execute at the server, using the runat="server" attribute. If the runat="server"attribute is not supplied, the runtime assumes you have authored a block of client-side script to be emitted into the outgoing HTTP response, and it will throw an exception. That being said, here is a proper server-side <script> block:
<script runat="server">
public IEnumerable<Inventory> GetData()
{
return new InventoryRepo().GetAll();
}
</script>
![]() Note All Web Forms controls need to have the runat="server" attribute in their opening declaration. If not, they will not render their HTML into the outbound HTTP response.
Note All Web Forms controls need to have the runat="server" attribute in their opening declaration. If not, they will not render their HTML into the outbound HTTP response.
Analyzing the ASP.NET Control Declarations
The final point of interest in this first example is the declaration of the GridView web control. Like classic ASP and raw HTML, Web Forms widgets are scoped within <form> elements. This time, however, the opening <form> element is marked with the runat="server" attribute. As well, the controls are qualified with the asp: tag prefix. Any control that takes this prefix is a member of the ASP.NET control library and has a corresponding C# class representation in a given .NET namespace of the .NET base class libraries. Here you find
<form id="form1" runat="server">
<div>
<asp:GridView ID="carsGridView" runat="server"
ItemType="AutoLotDAL.Models.Inventory"
SelectMethod="GetData" >
</asp:GridView>
</div>
</form>
The System.Web.UI.WebControls namespace of the System.Web.dll assembly contains a majority of the Web Forms controls. If you were to open the Visual Studio Object Browser, you could, for example, locate the DataGrid control (see Figure 31-15).
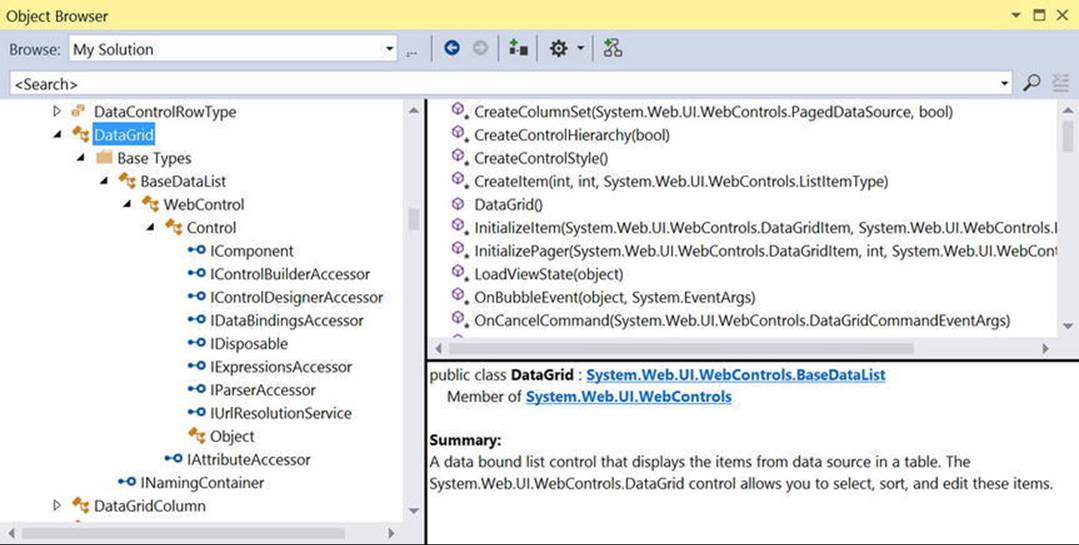
Figure 31-15. All ASP.NET control declarations map to a .NET class type
As you can see, a Web Forms control has an inheritance chain with System.Object at the very top. The WebControl parent class is a common base to all ASP.NET controls and defines all the common UI properties you would expect (BackColor, Height, etc.). The Controlclass is also very common within the framework; however, it defines more infrastructure-centric members (data binding, view state, etc.) rather than a child’s graphical look and feel. You’ll learn more about these classes in Chapter 33.
![]() Source Code The SinglePageModel web site is included in the Chapter 31 subdirectory.
Source Code The SinglePageModel web site is included in the Chapter 31 subdirectory.
Building an ASP.NET Web Page Using Code Files
While the single-file code model can be helpful at times, the default approach taken by Visual Studio (when creating a new web project) is to make use of a technique known as code-behind, which allows you to separate your server-side programming code from your HTML presentation logic using two distinct files. This model works quite well when your pages contain a significant amount of code or when multiple developers are working on the same web site. The code-behind model offers other benefits as well, such as the following:
· Because code-behind pages offer a clean separation of HTML markup and code, it is possible to have designers working on the markup while programmers author the C# code.
· Code is not exposed to page designers or others who are working only with the page markup (as you might guess, HTML folks are not always interested in viewing reams of C# code).
· Code files can be used across multiple *.aspx files.
Regardless of which approach you take, there is no difference in terms of performance. In fact, many Web Forms applications benefit from building sites that make use of both approaches. To illustrate the code-behind page model, let’s recreate the previous example once again using a blank Visual Studio web site template. Activate the File ![]() New
New ![]() Project menu option, then select ASP.NET Web Application and then the Empty ASP.NET 4.6 Template.
Project menu option, then select ASP.NET Web Application and then the Empty ASP.NET 4.6 Template.
Now, using the Project ![]() Add New Item menu option, insert a new Web Form item named Default.aspx. Once again, make use of the designer to build a UI consisting of a single GridView, and make use of the Properties window to build a UI of your liking. If you like you can copy the previous ASP.NET control declarations from the SinglePageModel example directly into your new *.aspx file. Given that this is the exact same markup, I won’t bother to relist it here (just be sure to paste the control declarations between the <form> and </form> tags).
Add New Item menu option, insert a new Web Form item named Default.aspx. Once again, make use of the designer to build a UI consisting of a single GridView, and make use of the Properties window to build a UI of your liking. If you like you can copy the previous ASP.NET control declarations from the SinglePageModel example directly into your new *.aspx file. Given that this is the exact same markup, I won’t bother to relist it here (just be sure to paste the control declarations between the <form> and </form> tags).
Now, notice that the <%@Page%> directive used within the code file model has a few attributes:
<%@ Page Language="C#" AutoEventWireup="true"
CodeBehind="Default.aspx.cs" Inherits="CodeBehindPageModel.Default" %>
The CodeFile attribute is used to specify the related external file that contains this page’s coding logic. By default, these code-behind files are named by adding the suffix .cs to the name of the *.aspx file (Default.aspx.cs, in this example). If you examine Solution Explorer, you will see this code-behind file is visible via a subnode on the Web Form icon (see Figure 31-16).
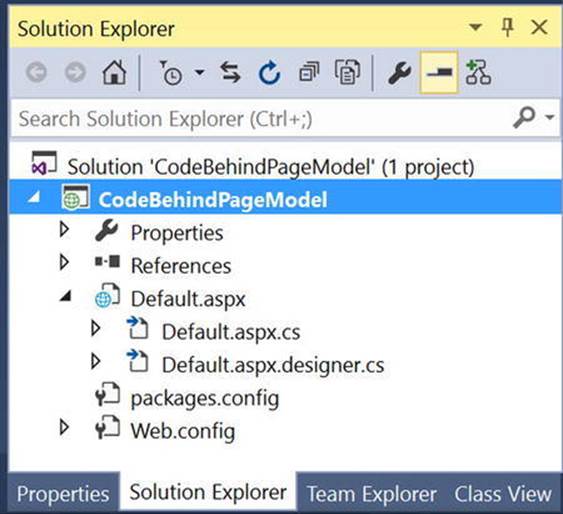
Figure 31-16. The associated code-behind file for a given *.aspx file
If you were to open your code-behind file, you would find a partial class deriving from System.Web.UI.Page with support for handling the Load event. Notice that the fully qualified name of this class (CodeBehindPageModel.Default) is identical to the Inherits attribute within the <%@Page%> directive.
public partial class Default : System.Web.UI.Page
{
protected void Page_Load(object sender, EventArgs e)
{
}
}
Reference the AutoLotDAL Project
You will need the updated AutoLotDAL project (or the compiled AutoLotDAL.dll) from the previous exercise. If you add the AutoLotDAL project to your solution, you will need to add a reference from your web project to AutoLotDAL. If you are going to reference the compiledAutoLotDAL.dll assembly, you need to add the file to the \bin folder within Solution Explorer, as shown in Figure 31-17 (you might need to toggle the Show All Files button).
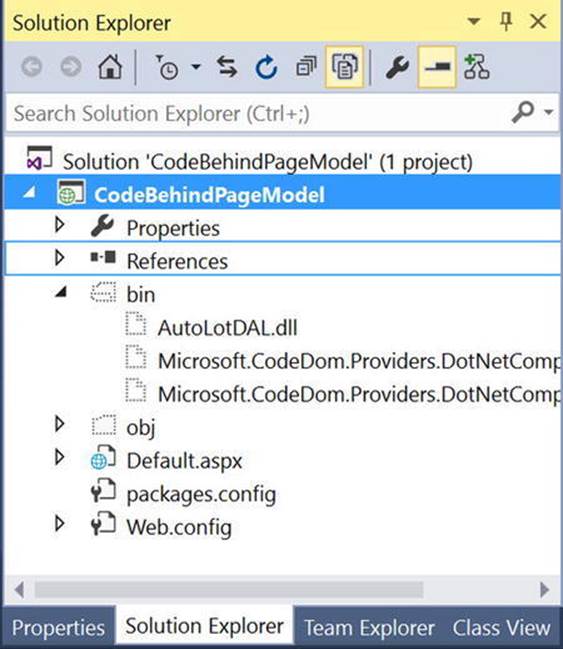
Figure 31-17. Visual Studio web projects make use of special ASP.NET folders
Just like in the previous example, add the Entity Framework to the web project by right-clicking the project, selecting Manage NuGet Packages, and installing EF. Finally, copy the <connectionStrings> node into the Web.config file.
Updating the Code File
If you examine the Default.aspx file in the previous example, you’ll see that each Web Forms page is composed of three files: the *.aspx file (for markup), the *.designer.cs file (for designer-generated C# code), and the primary C# code file (for your event handlers, custom methods, and whatnot). See Figure 31-18.
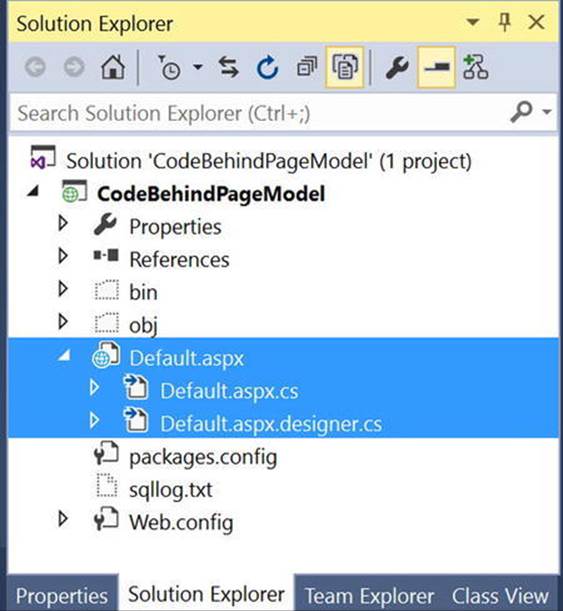
Figure 31-18. Under the Web Application model, each web page is composed of three files
If you copied the markup from the previous example, all you need to do now is create the GetData method in the Default.aspx.cs code-behind file. Start by adding using statements for AutoLotDAL.Models and AutoLotDAL.Repos. Then, add the GetData method as follows:
using AutoLotDAL.Models;
using AutoLotDAL.Repos;
namespace CodeBehindPageModel
{
public partial class Default : System.Web.UI.Page
{
protected void Page_Load(object sender, EventArgs e)
{
}
public IEnumerable<Inventory> GetData()
{
return new InventoryRepo().GetAll();
}
}
}
At this point, you can run your web application by pressing the Ctrl+F5 (or F5) key combination. Once again, IIS Express will fire up, serving your page into your hosting browser.
Debugging and Tracing ASP.NET Pages
To debug your Web Forms applications, your site must contain a properly configured Web.config file. When you start a debugging session, if the IDE asks if you would like to modify the Web.config file to enable debugging, answer yes. It means that your Web.config was missing the following markup (the most important being the debug="true" attribute):
<compilation debug="true" targetFramework="4.6"/>
On a related note, you can enable tracing support for an *.aspx file by setting the Trace attribute to true within the <%@Page%> directive (it is also possible to enable tracing for your entire site by modifying the Web.config file).
<%@ Page Language="C#" AutoEventWireup="true"
CodeBehind="Default.aspx.cs" Inherits="CodeBehindPageModel.Default"
Trace="true" %>
![]() Note Web application pages inherit from the fully qualified name of the class, in this case CodeBehindPageModel.Default. Web site pages inherit from the name of the page preceded with an underscore, such as _Default.
Note Web application pages inherit from the fully qualified name of the class, in this case CodeBehindPageModel.Default. Web site pages inherit from the name of the page preceded with an underscore, such as _Default.
Once you do so, the emitted HTML contains numerous details regarding the previous HTTP request/response (server variables, session and application variables, request/response, etc.). To insert your own trace messages into the mix, you can use the Trace property inherited fromSystem.Web.UI.Page. Anytime you would like to log a custom message (from a script block or C# source code file), simply call the static Trace.Write() method. The first argument represents the name of your custom category; the second argument specifies the trace message. To illustrate, update the GetData method with the following code statement:
public IEnumerable<Inventory> GetData()
{
Trace.Write("Default.aspx","Getting Data");
return new InventoryRepo().GetAll();
}
Run your project once again. You will find your custom category and custom message are present and accounted for. In Figure 31-19, take note of the highlighted message that displays the trace information.

Figure 31-19. Logging custom trace messages
You now know how to build a single Web Forms page using the single-file and code file approach. The rest of this chapter will take a deeper look into the composition of a Web Forms project, as well as ways to interact with the HTTP request/response and the life cycle of a Page-derived class.
![]() Source Code The CodeBehindPageModel web site is included in the Chapter 31 subdirectory.
Source Code The CodeBehindPageModel web site is included in the Chapter 31 subdirectory.
ASP.NET Web Sites vs. ASP.NET Web Applications
When you are about to build a new Web Forms project, you need to make a choice regarding which of the two project formats you will make use of, an ASP.NET web site or an ASP.NET web application. Your choice of web project will control the way in which Visual Studio organizes and processes your web application starter files, the type of initial project files that are created, and how much control you have over the resulting composition of the compiled .NET assembly.
When ASP.NET was first released with .NET 1.0, the only option was to build what is now termed a web application. Under this model, you have direct control over the name and location of the compiled output assembly.
Web applications are useful when you are migrating older .NET 1.1 web sites into .NET 2.0 and higher projects. Web applications are also helpful when you want to build a single Visual Studio Solution that can contain multiple projects (for example, the web application and any related .NET code libraries). The previous two examples used ASP.NET web applications as the starting point.
![]() Note Because the Visual Studio ASP.NET project templates can generate a great deal of starter code (master pages, content pages, script libraries, a login page, etc.), this book will opt to use the Blank web site template. However, after you have read the ASP.NET chapters of this text, make sure you create a new ASP.NET web site project and examine this starter code first hand.
Note Because the Visual Studio ASP.NET project templates can generate a great deal of starter code (master pages, content pages, script libraries, a login page, etc.), this book will opt to use the Blank web site template. However, after you have read the ASP.NET chapters of this text, make sure you create a new ASP.NET web site project and examine this starter code first hand.
In stark contrast, the Visual Studio ASP.NET web site project templates (found under the File ![]() New Web Site menu option) hide the *.designer.cs file in favor of an in-memory partial class. Moreover, ASP.NET web site projects support a number of specially named folders, such as App_Code. Within this folder, you can place any C# (or VB) code files that are not directly mapped to your web pages, and the runtime compiler will dynamically compile them as required. This is a great simplification to the normal act of building a dedicated .NET code library and referencing it in new projects.
New Web Site menu option) hide the *.designer.cs file in favor of an in-memory partial class. Moreover, ASP.NET web site projects support a number of specially named folders, such as App_Code. Within this folder, you can place any C# (or VB) code files that are not directly mapped to your web pages, and the runtime compiler will dynamically compile them as required. This is a great simplification to the normal act of building a dedicated .NET code library and referencing it in new projects.
On a related note, a web site project can be pushed as-is to a production web server without the need to precompile the site, as you would need to do with an ASP.NET web application.
In this book, we’ll make use of ASP.NET web site project types because they do offer some simplifications to the process of building web applications under the .NET platform. However, regardless of which approach you take, you will have access to the same overall programming model.
Enabling C# 6 For ASP.NET Web Sites
By default, ASP.NET web sites don’t have C# 6 enabled (Web Forms projects have C# enabled in the default project template). To enable the new C# 6 language features, you have to install the CodeDom Providers NuGet package. To install this for web sites, right-click the web site name in Solution Explorer, select Manage NuGet Packages, and search for CodeDom. This will bring up Microsoft.CodeDom.Providers.DotNetCompilerPlatform. Click Install.
The ASP.NET Web Site Directory Structure
When you create a new ASP.NET web site project, your project may contain any number of specifically named subdirectories, each of which has a special meaning to the ASP.NET runtime. Table 31-2 documents these special subdirectories.
Table 31-2. Special ASP.NET Subdirectories
|
Subfolder |
Meaning in Life |
|
App_Browsers |
Folder for browser definition files that are used to identify individual browsers and determine their capabilities. |
|
App_Code |
Folder for source code for components or classes that you want to compile as part of your application. ASP.NET compiles the code in this folder when pages are requested. Code in the App_Code folder is automatically accessible by your application. |
|
App_Data |
Folder for storing Access *.mdb files, SQL Express *.mdf files, XML files, or other data stores. |
|
App_GlobalResources |
Folder for *.resx files that are accessed programmatically from application code. |
|
App_LocalResources |
Folder for *.resx files that are bound to a specific page. |
|
App_Themes |
Folder that contains a collection of files that define the appearance of Web Forms pages and controls. |
|
App_WebReferences |
Folder for proxy classes, schemas, and other files associated with using a web service in your application. |
|
Bin |
Folder for compiled private assemblies (*.dll files). Assemblies in the Bin folder are automatically referenced by your application. |
If you are interested in adding any of these known subfolders to your current web application, you may do so explicitly using the Website ![]() Add ASP.NET Folder menu option. However, in many cases, the IDE will automatically do so as you naturally insert related files into your site. For example, inserting a new class file into your project will automatically add an App_Code folder to your directory structure if one does not currently exist.
Add ASP.NET Folder menu option. However, in many cases, the IDE will automatically do so as you naturally insert related files into your site. For example, inserting a new class file into your project will automatically add an App_Code folder to your directory structure if one does not currently exist.
Referencing Assemblies
Although the web site templates do generate an *.sln file to load your *.aspx files into the IDE, there is no longer a related *.csproj file. However, an ASP.NET web application project records all external assemblies within *.csproj. So where are the external assemblies recorded under ASP.NET?
As you have seen, when you reference a private assembly, Visual Studio will automatically create a \bin directory within your directory structure to store a local copy of the binary. When your code base makes use of types within these code libraries, they are automatically loaded on demand.
If you reference a shared assembly located in the Global Assembly Cache, Visual Studio will automatically insert a Web.config file into your current web solution (if one is not currently in place) and record the external reference within the <assemblies> element. For example, if you again activate the Website ![]() Add Reference menu option and this time select a shared assembly (such as System.Security.dll), you will find that your Web.config file has been updated as follows:
Add Reference menu option and this time select a shared assembly (such as System.Security.dll), you will find that your Web.config file has been updated as follows:
<assemblies>
<add assembly="System.Security, Version=4.0.0.0,
Culture=neutral, PublicKeyToken=B03F5F7F11D50A3A"/>
</assemblies>
As you can see, each assembly is described using the same information required for a dynamic load via the Assembly.Load() method (see Chapter 15).
The Role of the App_Code Folder
The App_Code folder is used to store source code files that are not directly tied to a specific web page (such as a code-behind file) but are to be compiled for use by your web site. Code within the App_Code folder will be automatically compiled on the fly on an as-needed basis. After this point, the assembly is accessible to any other code in the web site. To this end, the App_Code folder is much like the Bin folder, except that you can store source code in it instead of compiled code. The major benefit of this approach is that it is possible to define custom types for your web application without having to compile them independently.
A single App_Code folder can contain code files from multiple languages. At runtime, the appropriate compiler kicks in to generate the assembly in question. If you would rather partition your code, however, you can define multiple subdirectories that are used to hold any number of managed code files (*.vb, *.cs, etc.).
For example, assume you have added an App_Code folder to the root directory of a web site application that has two subfolders, MyCSharpCode and MyVbNetCode, which contain language-specific files. After you have done so, you can update your Web.config file to specify these subdirectories using a <codeSubDirectories> element nested within the <configuration> element, like so:
<compilation debug="true" strict="false" explicit="true">
<codeSubDirectories>
<add directoryName="MyCSharpCode" />
<add directoryName="MyVbNetCode" />
</codeSubDirectories>
</compilation>
![]() Note The App_Code directory will also be used to contain files that are not language files but are useful nonetheless (*.xsd files, *.wsdl files, etc.).
Note The App_Code directory will also be used to contain files that are not language files but are useful nonetheless (*.xsd files, *.wsdl files, etc.).
Beyond Bin and App_Code, the App_Data and App_Themes folders are two additional special subdirectories that you should be familiar with, both of which will be detailed in the next several chapters. As always, consult the .NET Framework 4.6 SDK documentation for full details on the remaining ASP.NET subdirectories if you require further information.
The Inheritance Chain of the Page Type
All .NET web pages eventually derive from System.Web.UI.Page. Like any base class, this type provides a polymorphic interface to all derived types. However, the Page type is not the only member in your inheritance hierarchy. If you were to locate the System.Web.UI.Pageclass (within the System.Web.dll assembly) using the Visual Studio object browser, you would find that Page is-a TemplateControl which is-a Control, which is-an Object (see Figure 31-20).
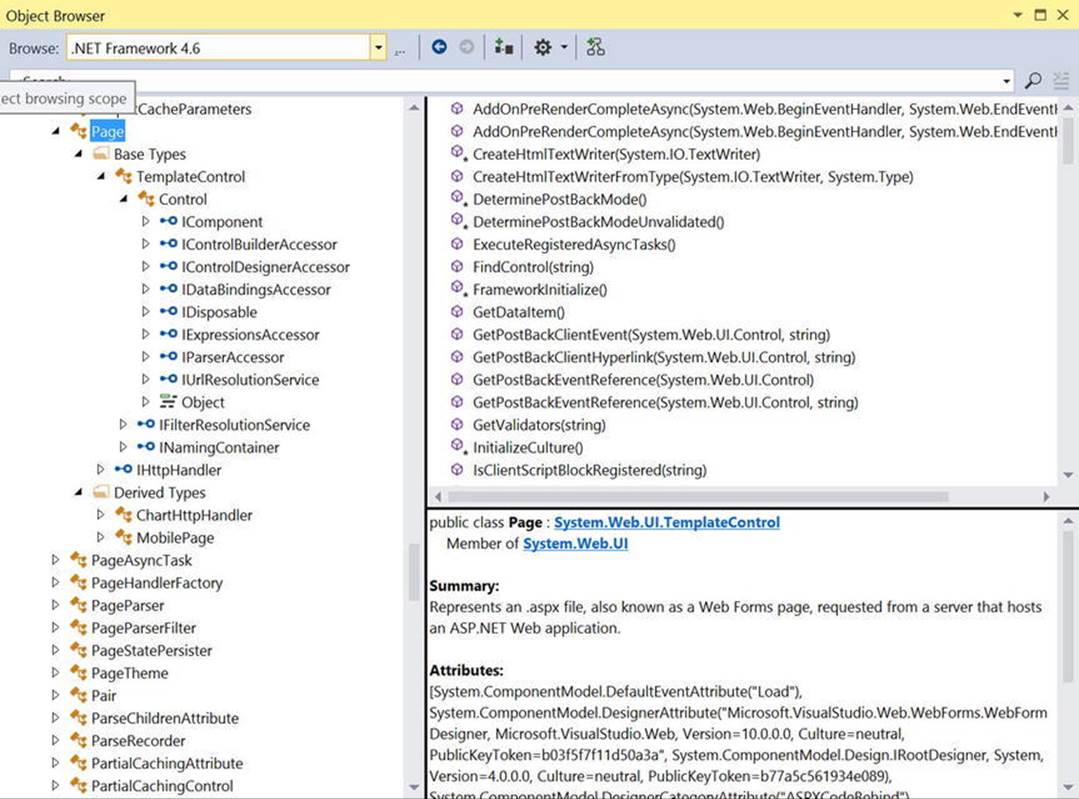
Figure 31-20. The inheritance chain of Page
Each of these base classes brings a good deal of functionality to each and every *.aspx file. For the majority of your projects, you will make use of the members defined within the Page and Control parent classes. The functionality gained from the System. Web.UI.TemplateControl class is only of interest if you are building custom Web Form controls or interacting with the rendering process.
The first parent class of interest is Page itself. Here you will find numerous properties that enable you to interact with various web primitives such as application and session variables, the HTTP request/response support, and so forth. Table 31-3 describes some (but by no means all) of the core properties.
Table 31-3. Select Properties of the Page Type
|
Property |
Meaning in Life |
|
Application |
Allows you to interact with data that can be accessed across the entire web site for all users |
|
Cache |
Allows you to interact with the cache object for the current web site |
|
ClientTarget |
Allows you to specify how this page should render itself based on the requesting browser |
|
IsPostBack |
Gets a value indicating whether the page is being loaded in response to a client postback or whether it is being loaded and accessed for the first time |
|
MasterPageFile |
Establishes the master page for the current page |
|
Request |
Provides access to the current HTTP request |
|
Response |
Allows you to interact with the outgoing HTTP response |
|
Server |
Provides access to the HttpServerUtility object, which contains various server-side helper functions |
|
Session |
Allows you to interact with the session data for the current caller |
|
Theme |
Gets or sets the name of the theme used for the current page |
|
Trace |
Provides access to a TraceContext object, which allows you to log custom messages during debugging sessions |
Interacting with the Incoming HTTP Request
As you saw earlier in this chapter, the basic flow of a web application begins with a client requesting a web page, possibly filling in user information, and clicking a “Submit button” to post back the HTML form data to a given web page for processing. In most cases, the opening tag of theform statement specifies an action attribute and a method attribute that indicates the file on the web server that will be sent the data in the various HTML widgets, as well as the method of sending this data (GET or POST).
<form name="defaultPage" id="defaultPage"
action="http://localhost/Cars/ClassicAspPage.asp" method = "GET">
...
</form>
All ASP.NET pages support the System.Web.UI.Page.Request property, which provides access to an instance of the HttpRequest class type (see Table 31-4 for some common members of this class).
Table 31-4. Members of the HttpRequest Class
|
Member |
Meaning in Life |
|
ApplicationPath |
Gets the ASP.NET application’s virtual application root path on the server |
|
Browser |
Provides information about the capabilities of the client browser |
|
Cookies |
Gets a collection of cookies sent by the client browser |
|
FilePath |
Indicates the virtual path of the current request |
|
Form |
Gets a collection of HTTP form variables |
|
Headers |
Gets a collection of HTTP headers |
|
HttpMethod |
Indicates the HTTP data transfer method used by the client (GET, POST) |
|
IsSecureConnection |
Indicates whether the HTTP connection is secure (i.e., HTTPS) |
|
QueryString |
Gets the collection of HTTP query string variables |
|
RawUrl |
Gets the current request’s raw URL |
|
RequestType |
Indicates the HTTP data transfer method used by the client (GET, POST) |
|
ServerVariables |
Gets a collection of web server variables |
|
UserHostAddress |
Gets the IP host address of the remote client |
|
UserHostName |
Gets the DNS name of the remote client |
In addition to these properties, the HttpRequest type has a number of useful methods, including the following:
· MapPath() : Maps the virtual path in the requested URL to a physical path on the server for the current request.
· SaveAs : Saves details of the current HTTP request to a file on the web server, which can prove helpful for debugging purposes.
· ValidateInput() : If the validation feature is enabled via the Validate attribute of the Page directive, this method can be called to check all user input data (including cookie data) against a predefined list of potentially dangerous input data.
Obtaining Browser Statistics
The first interesting aspect of the HttpRequest type is the Browser property, which provides access to an underlying HttpBrowserCapabilities object. HttpBrowserCapabilities, in turn, exposes numerous members that allow you to programmatically investigate statistics regarding the browser that sent the incoming HTTP request.
Create a new ASP.NET empty web site (named FunWithPageMembers) by selecting the File ![]() New Web Site menu option. You will see a screen similar to Figure 31-21.
New Web Site menu option. You will see a screen similar to Figure 31-21.
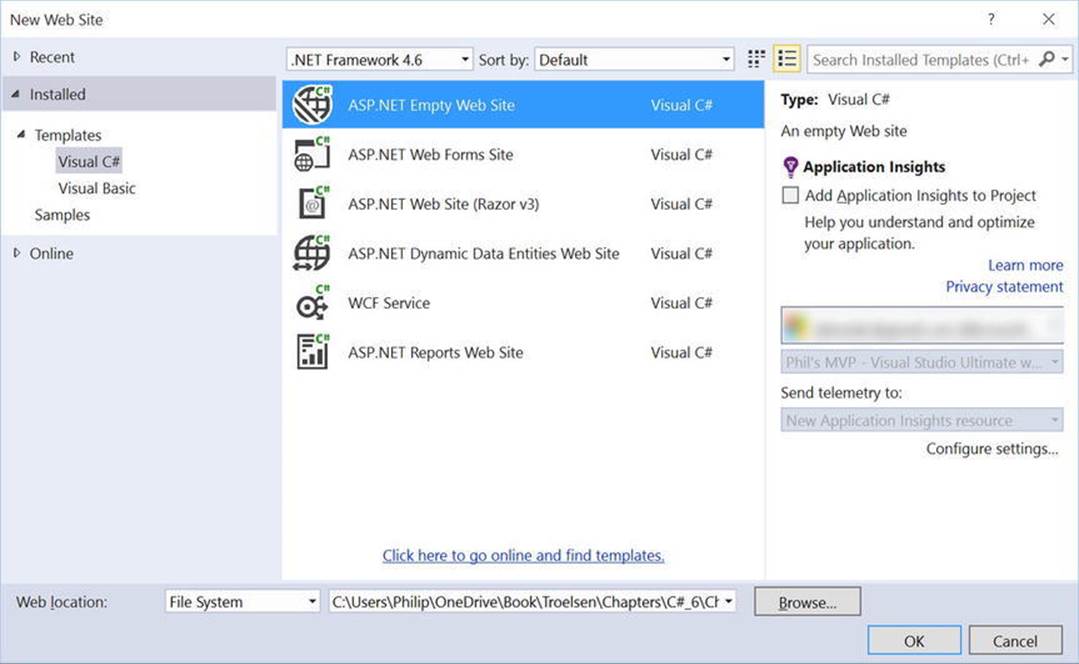
Figure 31-21. Creating a new, blank web site
Notice in Figure 31-21 that you are able to select the location of your new site. If you select File System, your content files will be placed within a local directory and pages will be served via IIS Express. If you select FTP or HTTP, your site will be hosted within a new virtual directory maintained by IIS. For this example, it makes no difference which option you select, but for simplicity I suggest selecting the File System option.
If you select a directory that already has a web site in it (or any files, for that matter), you will be prompted to enter a new name (which creates a new directory) via the dialog shown in Figure 31-22.
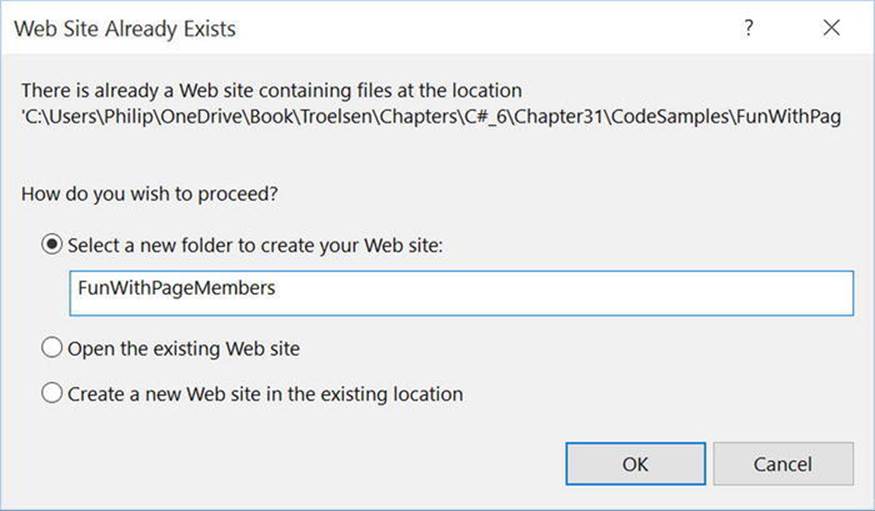
Figure 31-22. Specifying the name for the new, blank web site
Once you have your site set up, insert a new Web Forms file into your project using the Website ![]() Add New Item menu option. Select Visual C# in the left rail, and name the file Default.aspx. Your first task is to build a UI that allows users to click a Button web control (namedbtnGetBrowserStats) to view various statistics about the calling browser. These statistics will be generated dynamically and attached to a Label type (named lblOutput). Add these two controls to the web page designer anywhere to your liking. Next, handle the Click event for the button by adding the OnClick attribute in the source view, and naming the method btnGetBrowserStats. Your markup should look like this:
Add New Item menu option. Select Visual C# in the left rail, and name the file Default.aspx. Your first task is to build a UI that allows users to click a Button web control (namedbtnGetBrowserStats) to view various statistics about the calling browser. These statistics will be generated dynamically and attached to a Label type (named lblOutput). Add these two controls to the web page designer anywhere to your liking. Next, handle the Click event for the button by adding the OnClick attribute in the source view, and naming the method btnGetBrowserStats. Your markup should look like this:
<strong style="font-weight: 700">Basic Request / Response Info<br />
<br />
<asp:Button ID="btnGetBrowserStats" runat="server"
OnClick="btnGetBrowserStats_Click" Text="Get Stats" />
<br />
<br />
<asp:Label ID="lblOutput" runat="server"></asp:Label>
</strong>
In the code-behind for the Web Forms page, implement the handler as shown here (note the use of string interpolation, which you learned earlier in this book):
protected void btnGetBrowserStats_Click(object sender, EventArgs e)
{
string theInfo = "";
theInfo += $"<li>Is the client AOL? {Request.Browser.AOL}</li>";
theInfo += $"<li>Does the client support ActiveX? {Request.Browser.ActiveXControls}</li>";
theInfo += $"<li>Is the client a Beta? {Request.Browser.Beta}</li>";
theInfo += $"<li>Does the client support Java Applets? {Request.Browser.JavaApplets}</li>";
theInfo += $"<li>Does the client support Cookies? {Request.Browser.Cookies}</li>";
theInfo += $"<li>Does the client support VBScript? {Request.Browser.VBScript}</li>";
lblOutput.Text = theInfo;
}
Here you are testing for a number of browser capabilities. As you would guess, it is (very) helpful to discover a browser’s support for ActiveX controls, Java applets, and client-side VBScript code. If the calling browser does not support a given web technology, your *.aspx page will be able to take an alternative course of action.
Access to Incoming Form Data
Other aspects of the HttpRequest type are the Form and QueryString properties. These two properties allow you to examine the incoming form data using name/value pairs. While you could make use of the HttpRequest.Form and HttpRequest.QueryString properties to access client-supplied form data on the web server, ASP.NET provides a more elegant, object-oriented approach. Given that ASP.NET supplies you with server-side web controls, you are able to treat HTML UI elements as true objects. Therefore, rather than obtaining the value within a text box, as in
protected void btnGetFormData_Click(object sender, System.EventArgs e)
{
// Get value for a widget with ID txtFirstName.
string firstName = Request.Form("txtFirstName");
// Use this value in your page...
}
you can simply ask the server-side widget directly via the Text property for use in your program, like so:
protected void btnGetFormData_Click(object sender, System.EventArgs e)
{
// Get value for a widget with ID txtFirstName.
string firstName = txtFirstName.Text;
// Use this value in your page...
}
To show this, add a TextBox and Button to your form. Set the Id for the TextBox to txtFirstName and the Id for the Button to btnGetFormData. Add the OnClick attribute, and set the value to btnGetFormData_OnClick, as follows:
<br/>
<label>First Name</label>
<asp:TextBox runat="server" Id="txtFirstName"/>
<asp:Button runat="server" Id="btnGetFormData"
OnClick="btnGetFormData_Click" Text="Get First Name"/>
Implement the btnGetFormData_Click event hander as shown above. Run the app, enter your name in the TextBox, and click the Get First Name button. You will see the name you entered in the Label.
Not only does this approach lend itself to solid OO principles, but also you do not need to concern yourself with how the form data was submitted (GET or POST) before obtaining the values. Furthermore, working with the widget directly is much more type safe, given that typing errors are discovered at compile time rather than runtime. Of course, this is not to say that you will never need to make use of the Form or QueryString property in ASP.NET; rather, the need to do so has greatly diminished and is usually optional.
The IsPostBack Property
Another very important member of Page is the IsPostBack property. Recall that “postback” refers to a web page posting back to the same URL at the web server. Given this definition, understand that the IsPostBack property will return true if the current HTTP request has been sent by a user currently in session, and false if this is the user’s first interaction with the page.
Typically, the need to determine whether the current HTTP request is indeed a postback is most helpful when you need to execute a block of code only when the user first accesses a given page. For example, you might want to populate an ADO.NET DataSet when the user first accesses an *.aspx file and cache the object for later use. When the caller returns to the page, you can avoid the need to hit the database unnecessarily (of course, some pages might require that the DataSet always be updated upon each request, but that is another issue). Assuming your *.aspxfile has handled the page’s Load event (described in detail later in this chapter), you could programmatically test for postback conditions as follows:
protected void Page_Load(object sender, EventArgs e)
{
// Fill Data only the very first time
// the user comes to this page.
if (!IsPostBack)
{
// Populate Data and cache it!
}
// Use cached Data.
}
Interacting with the Outgoing HTTP Response
Now that you have a better understanding of how the Page type allows you to interact with the incoming HTTP request, the next step is to see how to interact with the outgoing HTTP response. In ASP.NET, the Response property of the Page class provides access to an instance of theHttpResponse type. This type defines a number of properties that allow you to format the HTTP response sent back to the client browser. Table 31-5 lists some core properties.
Table 31-5. Properties of the HttpResponse Type
|
Property |
Meaning in Life |
|
Cache |
Returns the caching semantics of the web page (see Chapter 34) |
|
ContentEncoding |
Gets or sets the HTTP character set of the output stream |
|
ContentType |
Gets or sets the HTTP MIME type of the output stream |
|
Cookies |
Gets the HttpCookie collection that will be returned to the browser |
|
Output |
Enables text output to the outgoing HTTP content body |
|
OutputStream |
Enables binary output to the outgoing HTTP content body |
|
StatusCode |
Gets or sets the HTTP status code of output returned to the client |
|
StatusDescription |
Gets or sets the HTTP status string of output returned to the client |
|
SuppressContent |
Gets or sets a value indicating that HTTP content will not be sent to the client |
Also, consider the partial list of methods supported by the HttpResponse type, described in Table 31-6.
Table 31-6. Methods of the HttpResponse Type
|
Method |
Meaning in Life |
|
Clear() |
Clears all headers and content output from the buffer stream |
|
End() |
Sends all currently buffered output to the client and then closes the socket connection |
|
Flush() |
Sends all currently buffered output to the client |
|
Redirect() |
Redirects a client to a new URL |
|
Write() |
Writes values to an HTTP output content stream |
|
WriteFile() |
Writes a file directly to an HTTP content output stream |
Emitting HTML Content
Perhaps the most well-known aspect of the HttpResponse type is the ability to write content directly to the HTTP output stream. The HttpResponse.Write() method allows you to pass in any HTML tags and/or text literals. The HttpResponse.WriteFile() method takes this functionality one step further, in that you can specify the name of a physical file on the web server whose contents should be rendered to the output stream (this is quite helpful to quickly emit the contents of an existing *.htm file).
To illustrate, add another Button to your current *.aspx file like this:
<br/>
<asp:Button runat="server" Id="btnHttpResponse"
OnClick="btnHttpResponse_Click" Text="Get First Name"/>
Now implement the server-side Click event handler, like so:
protected void btnHttpResponse_Click(object sender, EventArgs e)
{
Response.Write("<b>My name is:</b><br>");
Response.Write(this.ToString());
}
The role of this helper function (which you can assume is called by some server-side event handler) is quite simple. Again, while you can always take this old-school approach and render HTML tags and content using the Write() method, this approach is far less common under ASP.NET than with classic ASP. The reason is (once again) due to the advent of server-side web controls. Thus, if you want to render a block of textual data to the browser, your task is as simple as assigning a string to the Text property of a Label widget.
Redirecting Users
Another aspect of the HttpResponse type is the ability to redirect the user to a new URL, like so:
protected void btnWasteTime_Click(object sender, EventArgs e)
{
Response.Redirect("http://www.facebook.com");
}
If this event handler is invoked via a client-side postback, the user will automatically be redirected to the specified URL.
![]() Note The HttpResponse.Redirect() method will always entail a trip back to the client browser. If you simply want to transfer control to an *.aspx file in the same virtual directory, the HttpServerUtility.Transfer() method, accessed via the inherited Serverproperty, is more efficient.
Note The HttpResponse.Redirect() method will always entail a trip back to the client browser. If you simply want to transfer control to an *.aspx file in the same virtual directory, the HttpServerUtility.Transfer() method, accessed via the inherited Serverproperty, is more efficient.
So much for investigating the functionality of System.Web.UI.Page. You will examine the role of the System.Web.UI.Control base class in the next chapter. Next up, let’s examine the life and times of a Page-derived object.
![]() Source Code The FunWithPageMembers web site is included in the Chapter 31 subdirectory.
Source Code The FunWithPageMembers web site is included in the Chapter 31 subdirectory.
The Life Cycle of an ASP.NET Web Page
Every Web Forms page has a fixed life cycle. When the ASP.NET runtime receives an incoming request for a given *.aspx file, the associated System.Web.UI.Page-derived type is allocated into memory using the type’s default constructor. After this point, the framework will automatically fire a series of events. By default, the Load event is automatically accounted for, where you can add your custom code.
public partial class _Default : System.Web.UI.Page
{
protected void Page_Load(object sender, EventArgs e)
{
Response.Write("Load event fired!");
}
}
Beyond the Load event, a given Page is able to intercept any of the core events in Table 31-7, which are listed in the order in which they are encountered (consult the .NET Framework 4.6 SDK documentation for details on all possible events that may fire during a page’s lifetime).
Table 31-7. Select Events of the Page Type
|
Event |
Meaning in Life |
|
PreInit |
The framework uses this event to allocate any web controls, apply themes, establish the master page, and set user profiles. You may intercept this event to customize the process. |
|
Init |
The framework uses this event to set the properties of web controls to their previous values via postback or view state data. |
|
Load |
When this event fires, the page and its controls are fully initialized, and their previous values are restored. At this point, it is safe to interact with each web widget. |
|
“Event that triggered the postback” |
There is, of course, no event of this name. This “event” simply refers to whichever event caused the browser to perform the postback to the web server (such as a Button click). |
|
PreRender |
All control data binding and UI configuration has occurred and the controls are ready to render their data into the outbound HTTP response. |
|
Unload |
The page and its controls have finished the rendering process, and the page object is about to be destroyed. At this point, it is a runtime error to interact with the outgoing HTTP response. You may, however, capture this event to perform any page-level cleanup (close file or database connections, perform any form of logging activity, dispose of objects, etc.). |
When a C# programmer needs to handle events beyond Load, you might be surprised to find that there is no IDE support to do so! Rather, you must manually author a method in your code file, taking the name Page_NameOfEvent. For example, here is how you can handle theUnload event:
public partial class _Default : System.Web.UI.Page
{
protected void Page_Load(object sender, EventArgs e)
{
Response.Write("Load event fired!");
}
protected void Page_Unload(object sender, EventArgs e)
{
// No longer possible to emit data to the HTTP
// response, so we will write to a local file.
System.IO.File.WriteAllText(@"C:\MyLog.txt", "Page unloading!");
}
}
![]() Note Each event of the Page type works in conjunction with the System.EventHandler delegate; therefore, the subroutines that handle these events always take an Object as the first parameter and an EventArgs as the second parameter.
Note Each event of the Page type works in conjunction with the System.EventHandler delegate; therefore, the subroutines that handle these events always take an Object as the first parameter and an EventArgs as the second parameter.
The Role of the AutoEventWireup Attribute
When you want to handle events for your page, you need to update your <script> block or code-behind file with an appropriate event handler. However, if you examine the <%@Page%> directive, you will notice a specific attribute named AutoEventWireUp, which, by default, is set totrue.
<%@ Page Language="C#" AutoEventWireup="true"
CodeFile="Default.aspx.cs" Inherits="_Default" %>
With this default behavior, each page-level event handler will automatically be handled if you enter the appropriately named method. However, if you disable AutoPageWireUp by setting this attribute to false, as in
<%@ Page Language="C#" AutoEventWireup="false"
CodeFile="Default.aspx.cs" Inherits="_Default" %>
the page-level events will no longer be captured. As its name suggests, this attribute (when enabled) will generate the necessary event riggings within the autogenerated partial class described earlier in this chapter. Even if you disable AutoEventWireup, you can still process page-level events by making use of C# event-handling logic, like so:
public _Default()
{
// Explicitly hook into the Load and Unload events.
this.Load += Page_Load;
this.Unload += Page_Unload;
}
As you might suspect, you will usually leave AutoEventWireup enabled.
The Error Event
Another event that may occur during your page’s life cycle is Error. This event will be fired if a method on the Page-derived type triggered an exception that was not explicitly handled. Assume that you have handled the Click event for a given Button on your page, and within the event handler (named btnGetFile_Click), you attempt to write out the contents of a local file to the HTTP response.
Also assume you have failed to test for the presence of this file via standard structured exception handling. If you have rigged up the page’s Error event in the default constructor, you have one final chance to deal with the problem on this page before the end user finds an ugly error. Consider the following code:
public partial class _Default : System.Web.UI.Page
{
void Page_Error(object sender, EventArgs e)
{
Response.Clear();
Response.Write("I am sorry...I can’t find a required file.<br>");
Response.Write($"The error was: <b>{ Server.GetLastError().Message }</b>");
Server.ClearError();
}
protected void Page_Load(object sender, EventArgs e)
{
Response.Write("Load event fired!");
}
protected void Page_Unload(object sender, EventArgs e)
{
// No longer possible to emit data to the HTTP
// response at this point, so we will write to a local file.
System.IO.File.WriteAllText(@"C:\MyLog.txt", "Page unloading!");
}
protected void btnPostback_Click(object sender, EventArgs e)
{
// Nothing happens here. This is just to ensure a
// postback to the page.
}
protected void btnTriggerError_Click(object sender, EventArgs e)
{
System.IO.File.ReadAllText(@"C:\IDontExist.txt");
}
}
Notice that your Error event handler begins by clearing out any content currently within the HTTP response and emits a generic error message. If you want to gain access to the specific System.Exception object, you may do so using theHttpServerUtility.GetLastError() method exposed by the inherited Server property.
Exception e = Server.GetLastError();
Finally, note that before exiting this generic error handler, you are explicitly calling the HttpServerUtility.ClearError() method via the Server property. This is required because it informs the runtime that you have dealt with the issue at hand and require no further processing. If you forget to do so, the end user will be presented with the runtime’s error page.
At this point, you should feel confident with the composition of an ASP.NET Page type. Now that you have such a foundation, you can turn your attention to the role of Web Forms controls, themes, and master pages, all of which are the subject of remaining chapters. To wrap up this chapter, however, let’s examine the role of the Web.config file.
![]() Source Code The PageLifeCycle web site is included in the Chapter 31 subdirectory.
Source Code The PageLifeCycle web site is included in the Chapter 31 subdirectory.
The Role of the Web.config File
By default, all C# Web Forms applications created with Visual Studio are automatically provided with a Web.config file. However, if you ever need to manually insert a Web.config file into your site (e.g., when you are working with the single-page model and have not created a web solution), you may do so using the Website ![]() Add New Item menu option. In either case, within this scope of a Web.config file you are able to add settings that control how your web application will function at runtime.
Add New Item menu option. In either case, within this scope of a Web.config file you are able to add settings that control how your web application will function at runtime.
During your examination of .NET assemblies (in Chapter 14) you learned that client applications can leverage an XML-based configuration file to instruct the CLR how it should handle binding requests, assembly probing, and other runtime details. The same holds true for Web Forms applications, with the notable exception that web-centric configuration files are always named Web.config (unlike *.exe configuration files, which are named based on the related client executable).
The full structure of a Web.config file is rather verbose. However, Table 31-8 outlines some of the more interesting subelements that can be found within a Web.config file.
Table 31-8. Select Elements of a Web.config File
|
Element |
Meaning in Life |
|
<appSettings> |
This element is used to establish custom name/value pairs that can be programmatically read in memory for use by your pages using the ConfigurationManager type. |
|
<authentication> |
This security-related element is used to define the authentication mode for this web application. |
|
<authorization> |
This is another security-centric element used to define which users can access which resources on the web server. |
|
<connectionStrings> |
This element is used to hold external connection strings used within this web site. |
|
<customErrors> |
This element is used to tell the runtime exactly how to display errors that occur during the functioning of the web application. |
|
<globalization> |
This element is used to configure the globalization settings for this web application. |
|
<namespaces> |
This element documents all of the namespaces to include if your web application has been precompiled using the new aspnet_compiler.exe command-line tool. |
|
<sessionState> |
This element is used to control how and where session state data will be stored by the .NET runtime. |
|
<trace> |
This element is used to enable (or disable) tracing support for this web application. |
A Web.config file may contain additional subelements above and beyond the set presented in Table 31-8. The vast majority of these items are security related, while the remaining items are useful only during advanced ASP.NET scenarios, such as creating custom HTTP headers or custom HTTP modules (topics that are not covered here).
The ASP.NET Web Site Administration Utility
Although you are always free to modify the content of a Web.config file directly using Visual Studio, Web Forms projects can make use of a handy web-based editor that will allow you to graphically edit numerous elements and attributes of your project’s Web.config file. To launch this tool, activate the Website ![]() ASP.NET Configuration menu option.
ASP.NET Configuration menu option.
If you click the tabs located on the top of the page, you will quickly notice that most of this tool’s functionality is used to establish security settings for your web site. However, this tool also makes it possible to add settings to your <appSettings> element, define debugging and tracing settings, and establish a default error page.
You’ll see more of this tool in action where necessary; however, do be aware that this utility will not allow you to add all possible settings to a Web.config file. There will most certainly be times when you will need to manually update this file using your text editor of choice.
Summary
Building web applications requires a different frame of mind than that used to assemble traditional desktop applications. In this chapter, you began with a quick and painless review of some core web topics, including HTML, HTTP, the role of client-side scripting, and server-side scripts using classic ASP. The bulk of this chapter was spent examining the architecture of an ASP.NET page. As you have seen, each *.aspx file in your project has an associated System.Web.UI.Page-derived class. Using this OO approach, ASP.NET allows you to build more reusable and OO-aware systems.
After examining some of the core functionality of a page’s inheritance chain, this chapter then discussed how your pages are ultimately compiled into a valid .NET assembly. You wrapped up this chapter by exploring the role of the Web.config file and overviewed the ASP.NET Web Site Administration tool.
All materials on the site are licensed Creative Commons Attribution-Sharealike 3.0 Unported CC BY-SA 3.0 & GNU Free Documentation License (GFDL)
If you are the copyright holder of any material contained on our site and intend to remove it, please contact our site administrator for approval.
© 2016-2026 All site design rights belong to S.Y.A.