Beginning Object-Oriented Programming with C# (2012)
Part III
Writing Your Own Classes
Chapter 11
Exception Handling and Debugging
What you will learn in this chapter:
· The differences among bugs, errors, and exceptions
· Syntax, semantic, and logic bugs
· Exception handling
· Throwing exceptions
· Using the debugger
· Debugging windows
· Bug detection, isolation, and correction
wrox.com code downloads for this chapter
You can find the wrox.com code downloads for this chapter at www.wrox.com/remtitle.cgi?isbn=9781118336922 on the Download Code tab. The code in the Chapter11 folder is individually named according to the names throughout the chapter.
It would be wonderful if this chapter didn't need to be written. However, the truth is that problems do arise when programs are developed and run.
Most experienced programmers agree that approximately 20 percent of program development time consists of writing program code. The remaining 80 percent is used for testing, debugging, and maintenance of that code. Clearly, anything you can do to reduce that 80 percent figure can help keep you on time and on budget.
Overview
It's common for programmers to lump bugs, program errors, and program exceptions into a single concept. Technically, each of these types of errors is different. Now consider each in a little more detail.
Bugs
A bug is a specific type of error caused by the programmer. Bugs typically fall into one of three general categories:
· Syntax errors
· Semantic errors
· Logic errors
Syntax Errors
A syntax error occurs when a statement does not comply with the rules of the language. Just as English has specific rules, so do programming languages. A sentence in English, for example, is expected to have a noun and a verb. A programming statement is similar to a sentence, and if you don't obey the rules, syntax errors result. A program that has a syntax error cannot be compiled.
Visual Studio's IntelliSense does an excellent job of detecting syntax errors the instant you enter a program statement. The dreaded squiggly line tells you the nature of the syntax error that you've made. If you place the cursor over the squiggly line, Visual Studio presents a message informing you of the probable cause of the error. When you start writing programs, they probably have a ton of squiggly lines in them. However, as you gain experience with C#, the frequency of your syntax errors likely decreases. If you're like most programmers, however, you move to bigger, better, and more complex errors!
Semantic Errors
Semantic errors occur when you use the proper language syntax, but the context of the statement or expression is wrong. For example, you could say the following English sentence, “The dog meowed.” The syntax is correct because the sentence has a noun and a verb, but the context of the noun and verb is wrong. A program with a semantic error can often be compiled, but the results are (usually) wrong.
Consider the following statements:
int j;
int answer;
j = 10;
answer = 1 / j;
The code generates no error messages from IntelliSense and does compile. However, answer is always 0 for any value of j that is greater than 1. (The code, for example, does produce the correct result if j equals 1.) In this context, you try to create a fractional value using integer math. If you write the last statement above as
answer = 1.0 / j;
IntelliSense issues an error message asking if you need to cast the expression. IntelliSense can ferret out the proper context now because it knows that 1.0 is a floating-point value. Semantic errors are a little harder to uncover than syntax errors because IntelliSense cannot always detect them.
Logic Errors
Logic errors exist when the program compiles but produces an incorrect result. This makes them sound a lot like semantic errors, but there is a distinction. Semantic errors reflect a bending of the syntax rules of the language. Logic errors, on the other hand, are the result of design errors the programmer makes when manipulating a program's data. The distinction is subtle, but real.
As you gain programming experience, syntax and semantic errors tend to become less and less frequent. Instead, you spend most of your time tracking down and correcting logic errors in the program. Every programmer makes logic errors, and you should expect to make your fair share. The attitude to take is that fixing any kind of bug is a learning experience. It is one of the oddities of programming that the more mistakes you make, the better you become as a programmer.
Input Errors
In a strict sense, a input error is an error made by the user. Sadly, end users are smart enough to know that they don't need to read the user's manual. It's sort of like refusing to ask for directions when you're lost. Users refuse to admit that they don't know how to run a program. As a result, strange things can happen when the program runs.
How can you reduce input errors? The following programming concepts can help.
Data Validation
Perhaps the most common type of input error occurs when the user provides input into the program but not input of the correct type. For example, the program might request the user to enter the number of units to purchase, and the user might mean to type 10 but because of a fat finger types 1oinstead, pressing the “oh” key by mistake. However, a good programmer anticipates such mistakes by adding validation code to a program. If you want to validate that the user did correctly enter the quantity to be purchased, you can validate the input using the TryParse()method as you have done in the past:
bool flag;
int quantity;
flag = int.TryParse(txtQuantity.Text, out quantity);
if (flag == false) // Things didn't go well
{
MessageBox.Show("Expected digit characters only. Re-enter.",
"Input Error");
txtQuantity.Focus();
return;
}
This is a common validation routine you've seen in previous programs.
Invalid input data is probably the most common source of a program error. One reason this is true is that you cannot totally control what a user types into a textbox object. As a general rule, any time you ask for input from the user using a textbox object, you should validate the response. The general areas of validation include the following:
· Type checking: This is where you would use code such as TryParse() ensure the input characters are consistent with the wanted data type.
· Consistency checking: This type of check frequently compares two or more responses to ensure that the input data is consistent. For example, if users state their gender as male and later state they are 8 months pregnant, chances are they answered one of the input questions incorrectly.
· Range checking: This check attempts to verify that the input data is reasonable by checking the input to see if it falls within a reason range of values. For example, if you ask for someone's age and get a response of 422, it's likely that the user meant some other value. Your code should prompt the user to reenter the value.
· Length checking: Often a response requires a specific number of characters as input. Common examples are two-character state abbreviations, ZIP codes, and phone and Social Security numbers. Sometimes simply checking the length of the user's input can detect errors missed by other checks.
The rule is simple: Assume the user's input is always incorrect.
Limit User Input
You've doubtless run programs in which you've made a choice from a given list. Common input techniques are to present you with a list of options in the form of a listbox or combination box object. Although you may see this approach as a convenience provided by the programmer, the driving force was not your convenience, but rather a plan to restrict your choice to the options in the list.
Programmers know users can mess up program input. By presenting users with a limited list of options rather than letting them type something into a textbox, the programmer can limit users to input that is at least consistent with the expected data. True, users can still select the wrong option, but at least the answer is consistent with the processing that's to follow. For example, you could present a textbox with a label that reads, Enter Gender (M, F). Clearly, you expect an M or an F to be entered by users. However, you've given users at least 24 chances to mess things up (and that's assuming that they select a letter character and get the case correct.)
Writing code designed to limit input errors by users is not very difficult. In the Try It Out that follows, you use radio buttons to constrain input choices.
Try It Out: Restricting Input Choices (Chapter11ProgramRadioButtons.zip)
In this Try It Out, you are presented with a program designed to restrict users' input choices by using radio buttons.
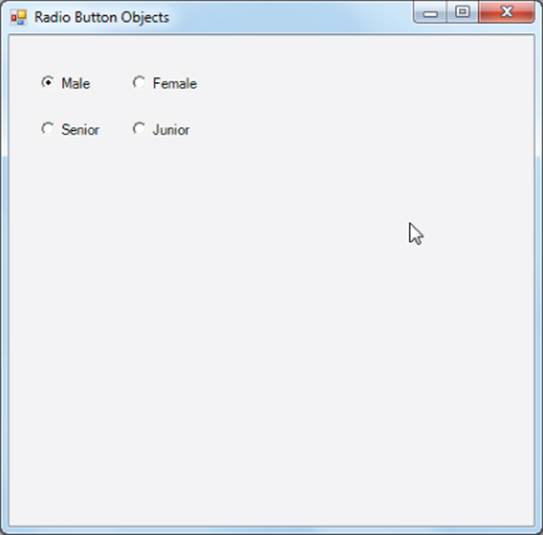
While you could use a listbox for the choices presented here, a better choice is to use radio buttons. Radio buttons let the user see all of the options without having to expand the listbox. Radio buttons are a good option when the number of options is relatively small. Figure 11.1 shows a simple program that exercises several input objects that can force users into more consistent program input.
1. Create a new project in the usual manner.
2. Add four radio buttons, as shown in Figure 11.1. If you download the code file, other objects are already placed on it (see Figure 11.3). However, you can still add a new set of radio buttons as shown here.
Figure 11.1 Using radio buttons
How it Works
The program shown suggests that the user should select either Male or Female and then select either Senior or Junior. Unfortunately, that's not the way the code works. As the form is currently laid out, if the user clicks the Male radio button, a small dot appears in that selection (refer toFigure 11.1). Having made that selection, the user then moves onto the next input and clicks Senior, which causes a small dot to appear in that selection. The bad news is that the selection of Male disappears, which is probably not what the programmer had in mind.
The problem is that radio buttons objects are associated with mutually exclusive choices. The program views all the radio buttons on the form as belonging to the same set of options. Therefore, selecting one option turns all the rest of the buttons off. This is precisely the behavior expected from radio button objects but not what the programmer expected. So how do you fix the problem?
Group Box
The solution is simple: Place each group of related radio button choices in its own GroupBox object. To add a GroupBox object to a form, select the Containers option in the Toolbox and drag a GroupBox object onto the form. Change the Text property of the object to Gender:. Now drag a second GroupBox object onto the form and make its Text property read Membership group:. Now, while holding down the Shift key, click the Male and Female radio buttons. Now press Ctrl+X to cut those two radio buttons from the form. Click in the GroupBox to which you applied the Gender text and press Ctrl+V. The two radio buttons should now be copied inside the GroupBox with the Gender:heading. Repeat for the Membership radio buttons. Your form should now look like the one in Figure 11.2.
Figure 11.2 Correctly using radio buttons
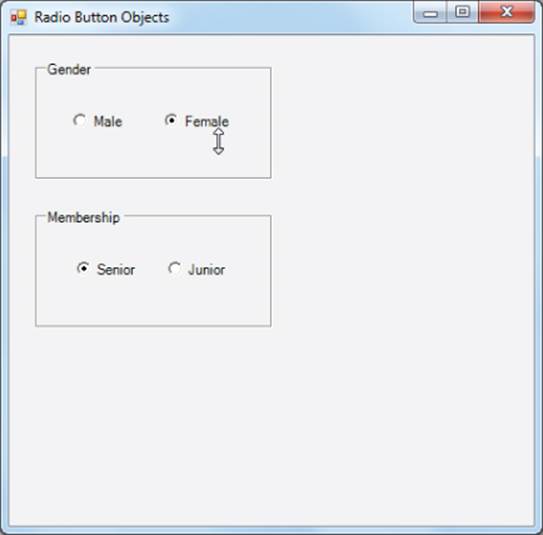
As you can see in Figure 11.2, the GroupBox arranges the radio buttons in two groups, each of which can have its appropriate choice. (You can tell this is the case because both Female and Senior are selected.)
The code for processing radio button choices is essentially as follows:
int choice;
if (rbMale.Checked == true)
{
choice = MALE;
}
else
{
choice = FEMALE;
}
(I use rb as a prefix for radio buttons, which is a break from my normal three-character prefixes for Toolbox objects. The reason for a two-character prefix is…I don't have a reason. It just seems to make sense to me. If this bothers you, try rbt or rbn.) A radio button object has a Checkedproperty that is logic true if the button is selected and logic false if it is not. (The program assumes that symbolic constants for MALE and FEMALE have been defined elsewhere in the program.) If the list of choices is greater than two, you can use nested if statements to process the selection.
Default Choices
Quite often you want to have a default choice for a series of radio buttons. It makes sense to have the default choice be the expected choice for most users. If you expect most users to be female, you can add the following code to the form's constructor:
public frmMain()
{
InitializeComponent();
rbFemale.Checked = true;
}
The InitializeComponents() method is used to build a memory image of the form. When control returns from that method call, the complete form object has been built in memory. If you want to change the default state of that form object, the constructor is the place to do it. When the form displays, it has the Female option selected. Note that placing the code inside the constructor means it falls within the Initialization step of the Five Program Steps.
Check Boxes
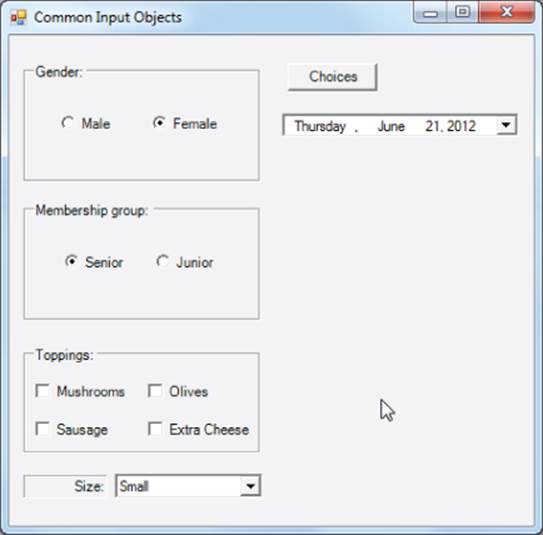
Another way to restrict the input from a user is to employ CheckBox objects, as shown in Figure 11.3.
Figure 11.3 Using checkboxes to limit input
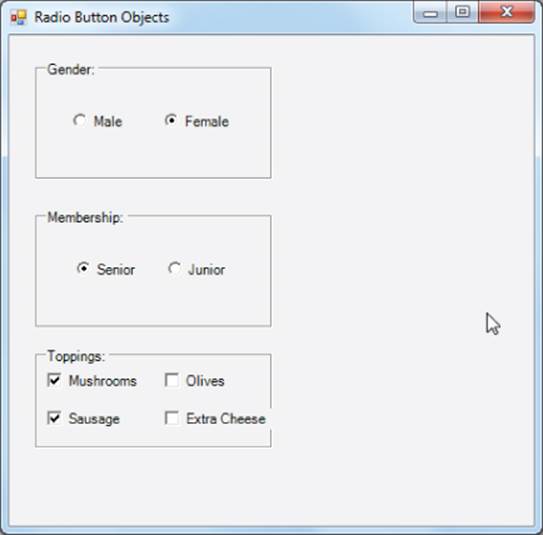
Unlike radio buttons, check box selections are not mutually exclusive. Users are free to check as many as they think are appropriate. The GroupBox object that holds the CheckBox objects in Figure 11.3 is not required. However, it is not uncommon for the range of options depicted by the check boxes to apply to some overriding choice. If that is the case, using a GroupBox helps to focus the users' attention on the choice of toppings.
Because each check box object can be selected, your code needs to examine the state of each one. One way to do this would be to use code similar to the following (I tend to use ckb as a prefix for check box objects):
Array.Clear(toppings, 0, toppings.Length);
if (ckbMushroom.Checked == true)
{
toppings[MUSHROOMS] = 1;
}
if (ckbOlives.Checked == true)
{
toppings[OLIVES] = 1;
}
if (ckbSausage.Checked == true)
{
toppings[SAUSAGE] = 1;
}
if (ckbExtraCheese.Checked == true)
{
toppings[EXTRACHEESE] = 1;
}
The code uses the Clear() method of the Array class to initialize all elements of the array to 0. Then a series of if statements records the choices made by the user. Again, symbolic constants are used to help document the choices and make subsequent processing easier for the programmer to understand. You could, of course, use a discrete variable for each topping choice. However, an array makes sense here because the choices all pertain to a single entity, and an array will likely simplify subsequent code. If you want to set a default set of choices, you can set the check boxes' Checkedproperties to true in the constructor.
Combination Boxes
Combination boxes, or combo boxes, are similar to list boxes except that users can also type in a response if they want. Normally, however, users select an option from the list presented in the combo box object. Figure 11.4 shows a typical use for a combo box. (The next “Try It Out” section also discusses the other objects shown in the figure. For now, simply consider the combo box object.)
Figure 11.4 Using combo boxes
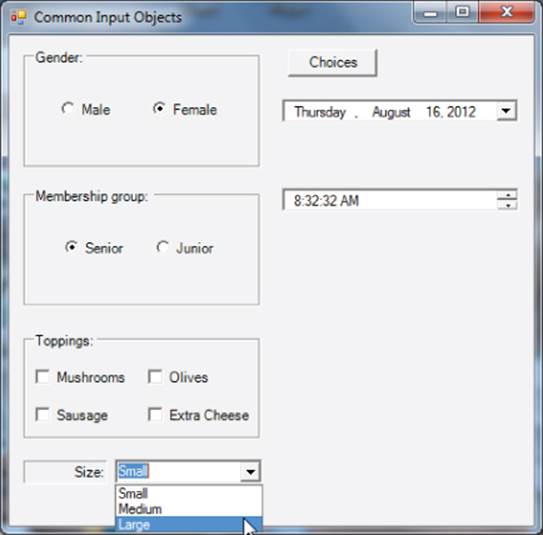
As you can see in Figure 11.4, combo boxes are similar to listboxes. Because of this, you can initialize the list in the combo box either by using the Property window in design mode or by setting the list under program control. Figure 11.5 shows how you can use the Items property from the Property window to add items to the list.
Figure 11.5 Using the String Editor of a combo box
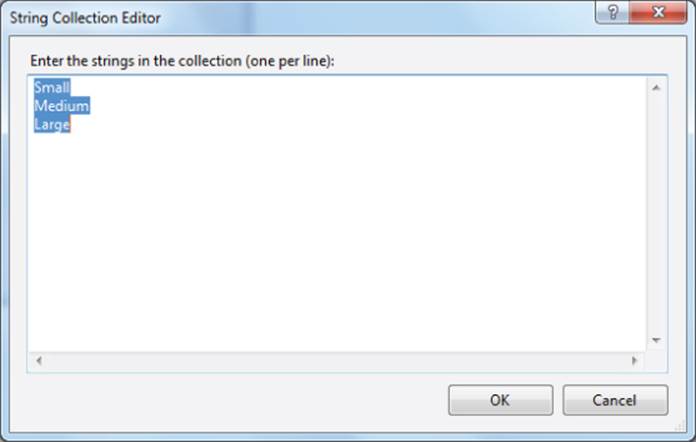
Using the Items property in the Property window presumably means that you know the list of items that you want to place in the combo box before the program runs. However, in many cases you want to populate the combo with a list determined at run time rather than at compile time. For example, you might read a list of names from a database and want to place a subset of those names in a combo box from which the user can choose a specific name. To create the list shown in Figure 11.5, you can use the following code instead of the String Collection Editor:
cmbSize.Items.Add("Small");
cmbSize.Items.Add("Medium");
cmbSize.Items.Add("Large");
If you have an array of names that you want to add to the combo box, you might use something like this:
int i;
// Assume names[] filled in here…
for (int i = 0; i < names.Length; i++)
{
cmbPeople.Items.Add(names[i]);
}
cmbPeople.SelectedIndex = 0;
This code fragment simply adds the list of names stored in the names array to the combo box. (A simpler way to accomplish the same task is to use cmbPeople.DataSource = names.) The SelectedIndex property of the combo box determines which of the items added to the combo box displays as the default choice when the program runs. Because the list of items in the combo box is a zero-based list, the preceding code displays the first item in the list. You should set SelectedIndex to be the default item from the list. If you do not set the SelectedIndex property, the combo box is empty and looks similar to an empty textbox waiting for the user to type something into it. You can also retrieve the SelectedIndex property from the combo box.
You can also have the object sort the contents of the list of items added to the combo box. Often this makes it easier for the user to locate which item she wants to select from the list. Keep in mind, however, that sometimes the order in which the items are added to the combo box has an impact on subsequent code. For example, if the names array selection will be used later to index into the database for details about the person selected, that person's position in the names array may determine how to locate him in the database. In that case you would not want to set the Sorted property to true.
If you want to retrieve the text from a combo box, use something like this:
string buff = cmbPeople.Text;
Combo Boxes With or Without User Input
You can turn off the user's ability to type a value into the combo box by setting the DropDownStyle property to DropDownList in the Property window. This style makes the combo box a read-only object. This makes it easier to validate the data since your validation code does not need to worry about the differences if the user types “small,” “Small,” or “SMALL.” If you do want to accept user input, then set the type to DropDown. This is the default style of behavior for a combo box.
Date and Time Input
Another common input is a date. Having the user enter a date is also a good way to get bogus input data because there are so many different date formats in use (military, French, and so on). The same confusion can arise for time, too, because time can be represented by a 12-hour or 24-hour clock.
You can standardize such information by using the DateTimePicker object. If you drag a DateTimePicker object onto a form and run the program, it looks similar to what is shown in Figure 11.6.
Figure 11.6 Date and time format
As you can see, the DateTimePicker object looks similar to a combo box but with a date in the Text property of the object. (The DateTimePicker is locale-aware, so it presents the proper format [e.g., US versus France].) However, if you click the down arrow on the object, the output changes to look like that shown in Figure 11.7.
Figure 11.7 The DateTimePicker object
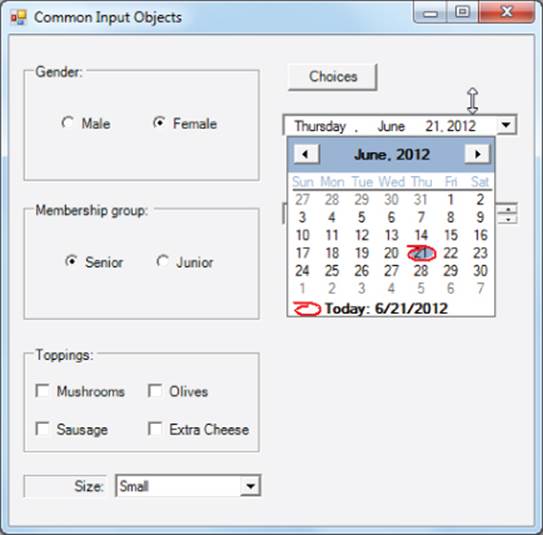
The Format and ShowUpDown Properties
The state of the object shown in Figure 11.7 assumes that the Format property of the object is set to Long and the ShowUpDown property is set to false. If you set the Format property to Short, the date would be shown as 6/21/2012.
Add a second DateTimePicker object to the form and set its ShowUpDown property to true. The form now looks like the one shown in Figure 11.8.
Figure 11.8 DateTimePicker with ShowUpDown
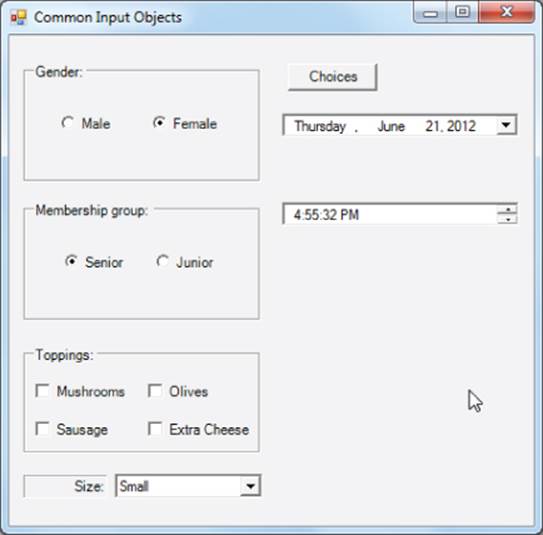
In the second DateTimePicker object, users can use the spin controls at the end of the object to change the hour displayed in the Text property. Users can also type a time into the Text property should they choose to do so.
To extract the information from a DateTimePicker object, use the following code:
string date = dtpDate.Value.ToShortDateString();
string time = dtpTime.Value.ToShortTimeString();
You can select different date and time methods to alter the format of the data extracted from the DateTimePicker object to suit your needs. The preceding statements yield 6/21/2012 for date and 4:55 PM for time. Although the various objects discussed in this section can force the user to input program data in a specific format, things can (and do) go wrong. With that in mind, examine some other techniques you can use to make your code more bulletproof.
Exception Handling
No matter how well you attempt to anticipate bad program input, the chance exists that something will be missed. When an error condition presents itself in a program, C# produces an exception. An exception is simply an unwanted program state. Note that an exception actually isn't a program bug. As pointed out earlier, a bug is a programmer mistake and you must correct that. Still, unexpected things can occur while the program runs even if there are no bugs in the program. For example, if you write a program that copies data to a DVD and the user forgot to load a blank DVD into the DVD drive, the program generates an exception. The simple program shown in Listing 11-1 illustrates an exception.
Listing 11-1: Code to Generate an Exception
using System;
using System.Windows.Forms;
public class frmMain : Form
{
private Button btnCalc;
#region Windows code
public frmMain()
{
InitializeComponent();
}
public static void Main()
{
frmMain main = new frmMain();
Application.Run(main);
}
private void btnCalc_Click(object sender, EventArgs e)
{
int exp1 = 0;
int exp2 = 5;
int result;
result = exp2 / exp1;
}
}
The program is a standard C# form with a single button object on it. In the click event for the button object, exp1 is set to 0 and exp2 to 5. Dividing a value by zero produces a divide-by-zero exception. As it stands, if you run this program outside the Visual Studio environment, the program pops up the exception notification, as shown in Figure 11.9. (If you run the program within the Visual Studio environment, you get a similar message, but the precise statement where the exception occurred is highlighted.)
Figure 11.9 Exception notification
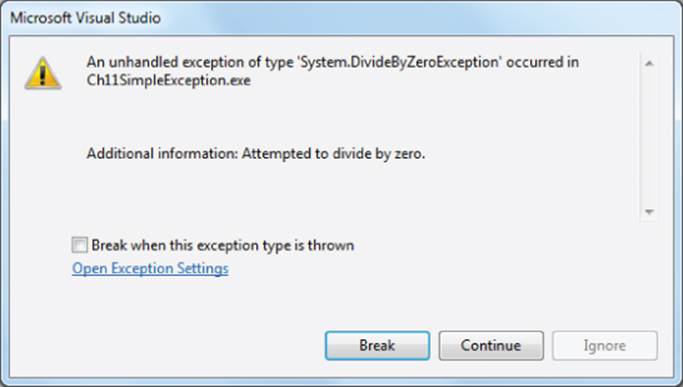
This is an ugly thing for the user to see! The message tells everyone who sees it that the programmer didn't expect the program to reach this (divide-by-zero) state, but let it happen anyway. Not good.
How can you prevent such ugliness?
try-catch Statement Blocks
You can use a try-catch statement block to “trap” program exceptions. The general syntax for a try-catch statement block is as follows:
try
{
// try statement block
}
catch [(exception)]
{
// catch statement block
}
[finally
{
// finally statement block
}]
Although this looks rather intimidating, it isn't. The try block begins with the keyword try followed by an opening curly brace. Following the curly brace are the program statements that you think might cause an exception to be generated, or thrown, by the program. (Most programmers would say, “This code might throw an exception.”) A closing curly brace for the try statement block appears after those program statements.
The catch block immediately follows the closing curly brace of the try block. The purpose of the catch block is to execute one or more statements if the exception is thrown. The brackets indicate that you can also follow the keyword catch with a specific exception if you want. (You see an example of this in a moment.) The closing curly brace marks the end of the catch statement block.
The optional finally statement block represents a block of code you want to have executed whether an exception is thrown or not. For example, you might have activated some resource in the try statement block (for example, you might have opened a file or database, or maybe a network or printer connection) that needs to be closed when you finish using it. By placing the required statements in the finally statement, you are ensured that, regardless of the exception or lack of one, those statements will be executed. Not all try-catch blocks use the (optional) finally block. However, atry block must have either a catch or a finally block.
The next section contains code that uses the try-catch block for exception handling. In the example, a specific exception is handled as well an unspecified exceptions.
Try It Out: An Exception Example
Modify the code in Listing 11-1 to include a try-catch block. All the code is presented here because it makes it easier to understand what the code does if you can see it all in one place.
1. Create a new project in the normal manner.
2. Add the code in Listing 11-2 or simply download its .zip file.
Listing 11-2: Exception Handling Program (frmMain.cs)
//#define DEBUG
#undef DEBUG
using System;
using System.Windows.Forms;
public class frmMain : Form
{
private Button btnExit;
private Button btnCalc;
#region Windows code
public frmMain()
{
InitializeComponent();
}
public static void Main()
{
frmMain main = new frmMain();
Application.Run(main);
}
private void btnCalc_Click(object sender, EventArgs e)
{
int exp1 = 0;
int exp2 = 5;
int result;
#if DEBUG
MessageBox.Show("exp1 = " + exp1.ToString());
#endif
try
{
result = exp2 / exp1;
MessageBox.Show("Never get here");
}
catch (DivideByZeroException)
{
MessageBox.Show("Divide by zero error.", "Exception Thrown");
return;
}
catch (Exception ex)
{
MessageBox.Show("Error: " + ex.Message, "Exception Thrown");
}
finally
{
MessageBox.Show("In finally");
}
}
private void btnExit_Click(object sender, EventArgs e)
{
Close();
}
}
How It Works
Now, when you run the program and the click the Calculate button, the program looks like what is shown in Figure 11.10.
Figure 11.10 A divide-by-zero exception
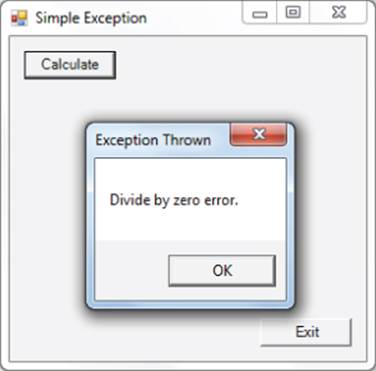
Now, when the divide-by-zero exception occurs, the catch statement block is executed to present a message to the user.
The message box that appears in the try block after the divide-by-zero exception occurs is never executed. After the program control is passed to a catch block, the code path does not automatically return to the try block code.
Although the solution is less ugly than what happened with Listing 11-1, it's still not going to win any beauty contest. You can remove a few of the remaining warts by considering what the code is trying to do.
Anticipating a Specific Exception
One of the ways you can add improvements is to consider what exceptions might occur given what the try statement block does. It's obvious that one possible exception is the divide-by-zero exception with which you have been experimenting. So how can you find out what other possible exceptions might be thrown?
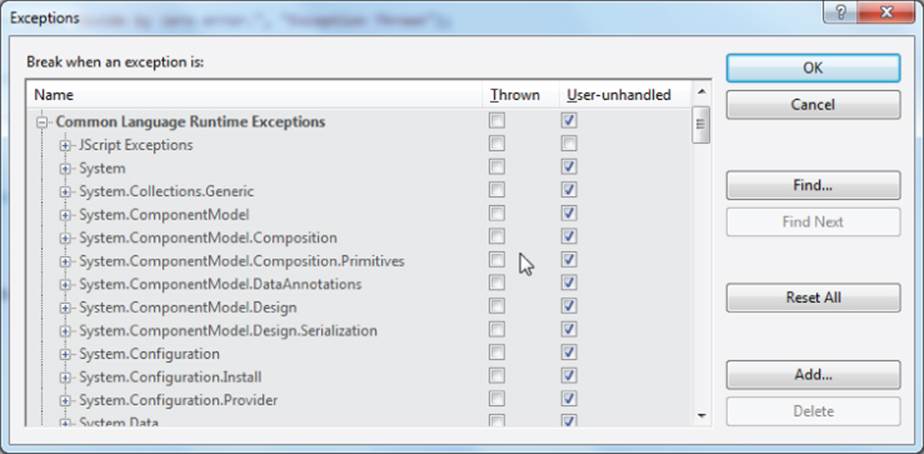
If you use the Debug → Exceptions menu sequence (or Ctrl+D, E), expand the Common Language Runtime Exceptions heading, and finally expand the System heading, you see a list similar to that shown in Figure 11.11.
Figure 11.11 Exceptions list
Realizing that a certain type of error could occur, you can modify Listing 11-2 to include the following code fragment:
try
{
result = exp2 / exp1;
MessageBox.Show("Never get here");
}
catch (DivideByZeroException)
{
MessageBox.Show("Divide by zero error.", "Exception Thrown");
}
The catch statement block is now prefaced by a parenthesized expression that uses the DivideByZeroException exception. Because you have anticipated the error with greater precision, you can give a more meaningful error message to the user.
For example, if the values for exp1 and exp2 come from other input sources, they could overflow the values allowed by an int. Or perhaps there's some kind of hardware failure that throws an exception. In those cases, you may want to provide multiple catch blocks, for example:
try
{
result = exp2 / exp1;
MessageBox.Show("Never get here");
}
catch (DivideByZeroException)
{
MessageBox.Show("Expression 1 is zero. Please reenter.",
"Exception Thrown");
txtExpression1.Focus();
return;
}
catch
{
MessageBox.Show("Something went terribly wrong.",
"Exception Thrown");
}
The code now catches the specific divide-by-zero exception but can also catch an unspecified exception should one occur. For the divide-by-zero exception, you can give a more helpful error message and even ask the user to reenter the value, as shown in the preceding code snippet. The error message for the unspecified exception, however, is not helpful to the user. You need another way to get rid of a few more warts.
Fuzzy Exception Messages
Although you might not nail the exact exception that occurs, you can provide help to the user with the following modification:
try
{
result = exp2 / exp1;
}
catch (DivideByZeroException)
{
MessageBox.Show("Expression 1 is zero. Please reenter.",
"Exception Thrown");
txtExpression1.Focus();
return;
}
catch (Exception ex)
{
MessageBox.Show("Error: " + ex.Message, "Exception Thrown");
}
In this code you define an Exception object variable named ex. In the message box you use the Message property of the Exception object to provide a more precise message about the exception that occurred. These messages are fuzzy exception messages because they are better than no message, but often not precise enough to enable you to take some specific corrective action (as you did with the divide-by-zero exception). Although this may not resolve the problem for the user, at least the fuzzy message is better than the generic message you gave before.
Given that your code now handles fuzzy exceptions, how can you test it?
Testing Fuzzy Exceptions
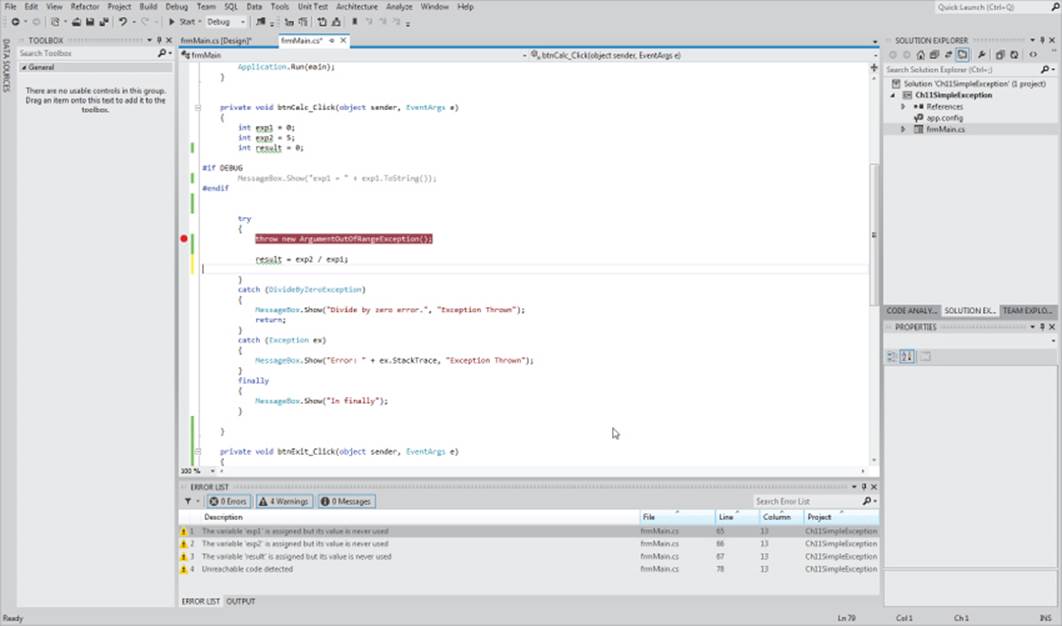
You can test an exception by throwing that exception using the throw keyword. (catch…throw…get it?) To illustrate this, modify your click event code again as follows:
try
{
throw new ArgumentOutOfRangeException(); // New statement
result = exp2 / exp1;
}
catch (DivideByZeroException)
{
MessageBox.Show("Expression 1 is zero. Please reenter.",
"Exception Thrown");
txtExpression1.Focus();
return;
}
catch (Exception ex)
{
MessageBox.Show("Error: " + ex.Message, "Exception Thrown");
}
The first statement in the try block uses a sample exception to try from the list of possibilities shown in Figure 11.11. As you probably expected, the parentheses at the end of the ArgumentOutOfRangeException() expression mean that the program is going to “construct” anArgumentOutOfRangeException and then throw that exception. (The term throw simply means that the program produces that exception at the moment the constructor executes.) Because the exception is not a DivideByZeroException, the fuzzy exception handler is called. The message actually displayed by the call to the Show() method is shown in Figure 11.12.
Figure 11.12 Throwing an exception
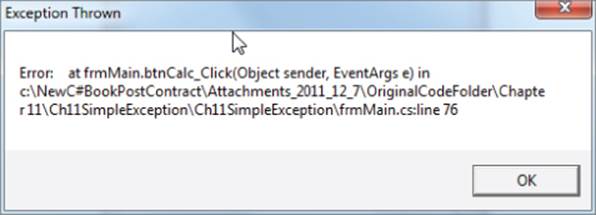
Clearly, this Exception object message is better than the generic message Something went terribly wrong. The ex.Message property is not the only useful property of the Exception object. You can also use the StackTrace property (ex.StackTrace) to show the methods that you called up to the point at which the exception occurred. (The methods display in reverse order, with the last method called at the top of the list.) Although it probably is not a good idea to display stack trace messages to the user, they can be useful for debugging complex programs.
The finally Statement Block
As I mentioned earlier, the finally statement block is used when you have a sequence of statements that you want executed regardless of the presence or absence of an exception. Again, let's modify the click event code for the button object, as follows:
try
{
result = exp2 / exp1;
}
catch (DivideByZeroException)
{
MessageBox.Show("Expression 1 is zero. Please reenter.",
"Exception Thrown");
txtExpression1.Focus();
return;
}
catch (Exception ex)
{
MessageBox.Show("Error: " + ex.Message, "Exception Thrown");
}
finally
{
MessageBox.Show("In finally");
}
The code throws a divide-by-zero exception and displays the appropriate message. The code then says to place the cursor in the txtExpression1 textbox object and return from the subroutine. If you run the program, however, after the error message displays and you click the OK button, another message box displays with the In finally message.
Even though a return statement follows the divide-by-zero exception message box, control is passed to the finally statement block rather than returning from the click event. It should be clear that the finally block executes regardless of the intent of other code in the method block. Remember that a program control never returns to the try block after an exception is thrown.
Even though there are more than 100 defined exceptions, you can write code for custom exceptions. However, I am going to postpone that topic until after I've discussed inheritance.
Program Debugging
The best way to solve program debugging is to never write a program with a bug in it. Because that's probably not going to happen anytime soon, your next best approach is to know how to use a program debugger effectively. Although you can write C# program code in other environments, you probably use Visual Studio; however, most of the debugging techniques discussed here apply to any programming environment.
The Nature of the Beast
You,ve already read about syntax and semantic errors and how they are different from one another. Logic errors are the third type of program error, or bug, and it is this type of error examined here. There are three steps in fixing a program error:
· Detection
· Isolation
· Correction
Detection
Strange as it sounds, detecting a program error isn't as easy as it might seem. If it were, no program would ever be released to the public with an error in it. As I mentioned before, my company produced a statistics package named Microstat, which sold for more than 20 years. After almost 7 years in the field with thousands of users, the Stepwise Multiple Regression component failed on one particular data set. The problem was caused when the U.S. Gross National Product (GNP) was entered in dollars and the program was calculating the sums of squares of cross products. The GNP data set was sufficiently large that the sums of squares overflowed the range of a floating-point number. (Floating-point values for the language back then had a smaller range than a C# double type does today.) After detecting the error that had lain hidden for 7 years, it took about 3 minutes to fix it. The real problem was producing a circumstance that caused the bug to manifest itself.
Most program bugs don't produce a numeric overflow exception the way the GNP data set did. More often, the program runs to completion and produces program output. Stated differently, the program manages to execute all Five Program Steps without fail. Given that the program runs to completion, how do you detect an error?
Test Data Sets
The key to bug detection is test data sets. To create these sets, take a known set of inputs (the Input step) and process that set of inputs by hand (the Process step). (Automated test sets can also be used, but that is beyond the scope of this book.) You then record the data from the Process step, the results of which become the Output step. These hand-generated test results serve as the yardstick by which you measure the output of your program.
How do you decide what data to test? In other words, how do you select the inputs by which to judge the output produced by the computer? First, select a “typical” data set that a user might be expected to use. For example, if you write a program that figures out the sales tax to apply to a purchase, you might test the method by supplying a purchase of 10 units at a price of $100 each to see if the computer produces the same sales tax figure as your hand-generated calculations. Such “typical” test data sets produce “typical” results. However, typical data rarely exercise those places where the bugs lurk.
Program bugs love to hide in what I call boundary conditions. Boundary conditions are those that lie at the extremes of the test data set. In the sales tax example, one test of a boundary condition is to determine what your method does if the sales tax rate is zero. Another boundary condition is when the quantity purchased is zero or the price is zero. Even if your sales tax method does properly handle a zero sales tax boundary condition, do subsequent methods called after this boundary condition handle the situation properly? A zero sales tax boundary is not as unusual as it sounds, especially when some purchases are exempt from sales tax. For example, some states exempt educational institutions from sales taxes, whereas other states exempt certain products (such as food).
Likewise, you should enter extremely large values that exercise the upper-boundary conditions of a test data set. A minimum test data set should target the smallest expected value (zero), some typical value(s), and the largest expected value. One upper-limit test is to have input values that run at or near the range limit for the data type being used in the test. For example, if byte data sets are used, try running an upper-limit test using an input value of 255. Likewise, if textboxes are expecting numeric data to be entered, what does the program do if the user types in her first name? Good programs handle dumb data gracefully.
Simply stated, test data sets are the only means by which you can determine if your program properly processes its data. Whenever possible, make sure you include test data sets that exercise the program's boundary conditions as well as more typical values. If your program uses arrays, exercise data sets for the lowest and highest index values allowed for the arrays.
Your test data must exercise every code path. This means that programs with if-else code paths must have data sets that exercise both paths as part of the test suite. Too often programmers never test all their code paths: that's a train wreck just waiting to happen.
Other boundary situations can exist. For example, in the advanced OOP programming course I taught, one of the first things I did at the beginning of the semester was have the students write a program in which the computer tries to determine the number the user is thinking of. The program asks for the lower and upper values for the game and then proceeds to guess the number. The computer displays its guess, and the user clicks the appropriate button (Too High, Too Low, or Correct). If the limits are 0 and 100, even a nonbinary search algorithm using RDC can guess the number in 100 tries, right? Wrong. Because the limits are inclusive, it would take 101 guesses to be sure you include all values in the search. Indeed, when the students tell me they are ready for me to test their programs, the first numbers I try are 0 and 100. A disappointingly large number of their programs fail to function properly with these boundary numbers.
Another reason for having a suite of test data sets is to increase the chance that you can make the bug repeatable. Absolutely the most difficult bug to fix is one that cannot be repeated consistently. Some programming languages (such as C and C++) suffer from stray pointer problems that can make program bugs especially difficult to track down. (This is one reason C# discourages the use of the pointer data type.)
It's not uncommon for users to enter a set of input values, click a Calculate (or similar) button, and then have the program either crash or generate incorrect answers. When you ask what values produced the error, the user can't remember what he typed in. Sometimes only a particular value or sequence of values triggers a program state that produces output errors. It's frustrating when those values cannot be recalled by the user, especially when you cannot duplicate the error. (To aid program debugging, some programs have error-logging methods called in catch blocks to write to disk specific program values.)
Whatever test data sets you use, save them. They will likely come in handy later.
Isolation
Assuming you have a repeatable bug, the next step to removing it is to isolate it. In the bad ol' days before OOP techniques were used and global scope data prevailed, erroneous output values could be caused almost anywhere in the program. There was no such thing as “private” data or scope. Every variable was visible and globally available at all points in the program. Therefore, trying to pinpoint exactly where a particular variable was incorrect was extremely difficult.
With OOP designs, it's usually simple to figure out the class in which the program bug is hiding. Still, program classes can have a lot of code in them, so you can use any help you can find to simplify the discovery process. This is where a program debugger is invaluable.
Although this section discusses the Visual Studio program debugger specifically, most debuggers have the same general set of features. Therefore, although the mechanics of running debuggers may differ, their use and purpose are universally the same.
The Visual Studio Debugger
Perhaps the greatest benefit of a debugger is as an aid to isolate a program bug. The starting point for isolating a bug is the breakpoint. (Although you've read about the Visual Studio debugger in earlier chapters, I want to make a slightly more formal examination here.) A breakpoint is a place in the program's source code at which you want to force a pause in the execution of the program. By pausing program execution, you can examine the values of various data items that are in scope at that moment.
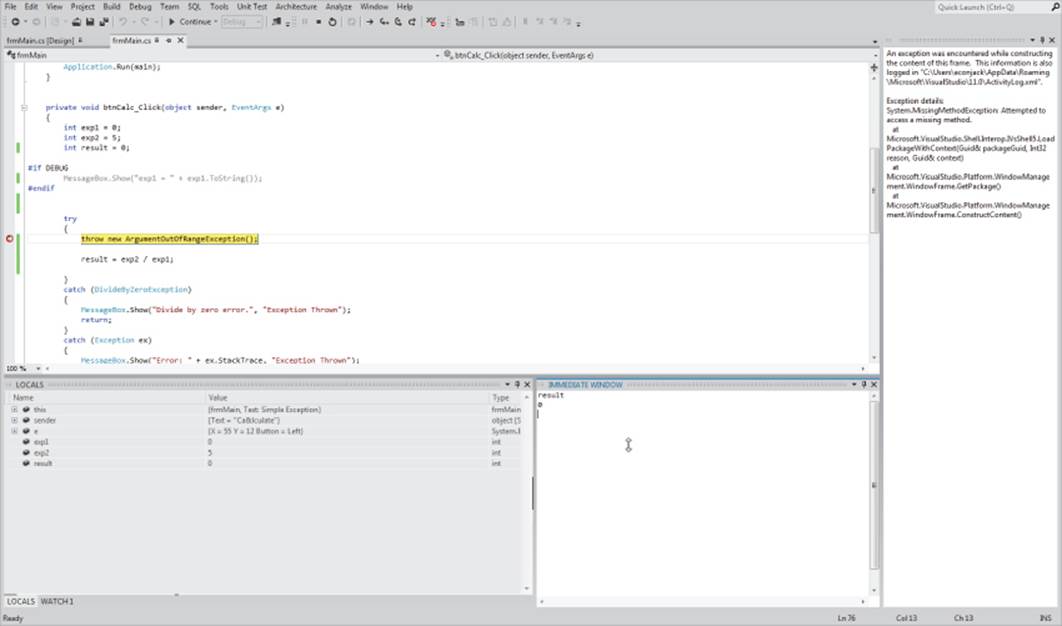
You already know that you can set a breakpoint by setting the cursor on the statement where you want the breakpoint to occur and then pressing the F9 key (or clicking the left margin of the Source window). The background color of the statement line immediately changes to red, and a red dot appears in the program margin, as shown in Figure 11.13.
Figure 11.13 Setting a breakpoint
When you run the program, it runs as usual until the breakpoint statement is reached. At that moment, the program pauses. The red background color is replaced with a yellow background color, and the program is ready to execute the breakpoint statement. Note that the breakpoint statement has not yet been processed.
At this point, you can move the cursor over different variables that are in scope and examine their values.
The Locals Window
You can see all the locally scoped variables by opening the Locals window. To do this, simply use the Debug → Windows Locals menu sequence (or Ctrl+D, L). The display changes to something similar to what is shown in Figure 11.14.
Figure 11.14 The Locals Debug window

The Locals window shows all variables that have local scope, as discussed in Chapter 9. Generally it is easier to use the Locals window than to move the cursor to each variable to inspect its value. Notice that reference data types (such as sender) can be expanded if you want to inspect the properties associated with their objects.
The Immediate Window
You can activate the Immediate window by using the Debug → Windows → Immediate menu sequence (Ctrl+D, I). The purpose of the Immediate window is to enable you to type in an expression and examine its impact on the code. For example, Figure 11.15 shows exp1 = 2, thereby changing its coded value from 0 to a new value of 2. Therefore, the Immediate window enables you to immediately change the value of a local variable and assess its impact on the behavior of the code. This is much quicker than editing the source code to change the value of exp1, recompile, and run the program.
Figure 11.15 Immediate Debug window
Single-Stepping Through the Program
You already know how to single-step through a program. However, the debugger includes additional tools available to you. First, when you reach a breakpoint, you can press the F10 or F11 keys to advance to the next statement to be executed. When you advance to the next statement, the yellow arrow in the left margin moves to the next line to show you where program execution is at any moment.
Backing Up from a Breakpoint
What may not be obvious is that you can back up program execution, too. Figure 11.16 shows the yellow arrow in the left margin and a message stating that you can drag the (yellow arrow) cursor to a previous line to execute that line again. This enables you to execute a program statement without restarting the program and running it to the current breakpoint, which can be a real time-saver. You can see the cursor dragged to the second data definition, above a breakpoint.
Figure 11.16 Drag a breakpoint
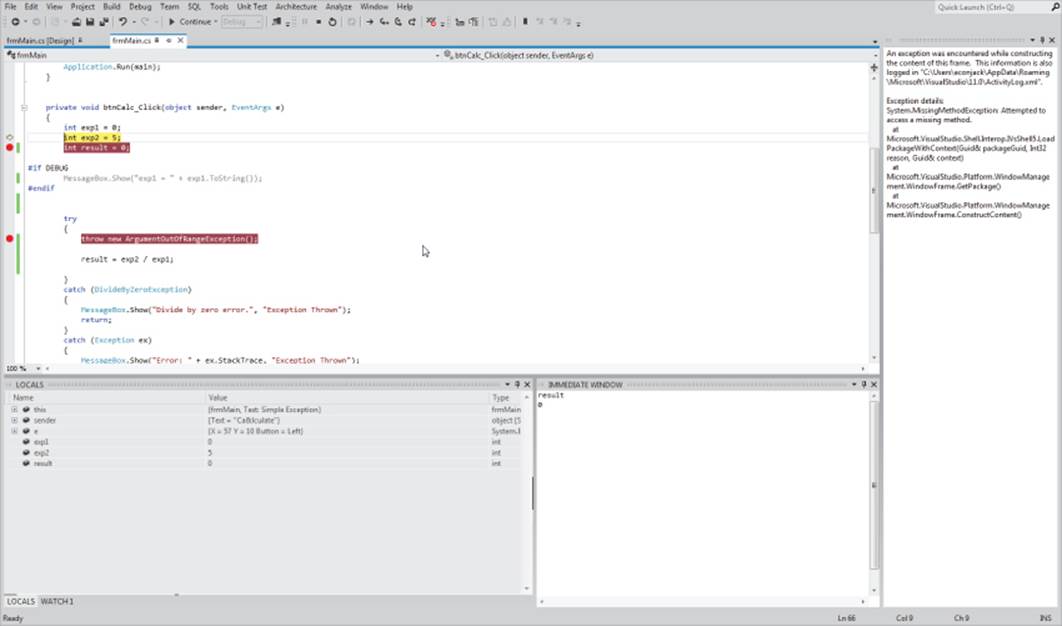
Although the message doesn't say so, you cannot advance the yellow arrow. To do so might mean bypassing needed statements to properly determine the values of the variables that are in scope. This is not a serious limitation because you can simply set a breakpoint further down in the source file and press F5 to execute “at full speed” to that breakpoint. (You can also right-click on a line and select Set Next Statement to set the breakpoint.)
The Debug Toolbar
The Debug toolbar is shown in Figure 11.17, along with callouts for the meaning of each icon on the toolbar. The Go icon simply causes the program to resume execution at normal speed from a breakpoint. The Break All icon provides a pause that enables you to enter the debug mode manually as the program executes. The Stop icon terminates the current run of the program. The Restart icon simply restarts the program. The Show Next icon shows the next statement to be executed. But perhaps the most interesting debugging features are associated with the Step icons, discussed in more detail now.
Figure 11.17 Debug toolbar
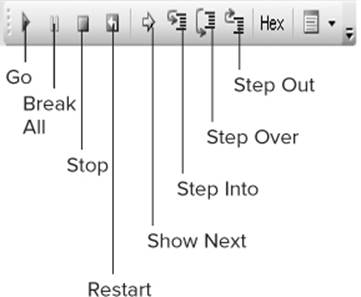
Step Into
With the Step Into icon, if the statement about to be executed is a method call for which the source code is available, program execution proceeds into that method's source code. This enables you to single-step through that method's source code.
Step Over
With the Step Over icon, if the statement about to be executed is a method call for which the source code is available, program execution skips over the method's source code and proceeds with the next statement after the current one. Stepping over a method is useful when you know the method about to be called works correctly and you don't want to waste time single-stepping through its source code.
Step Out
Finally, suppose you have single-stepped into a method's source code and you get halfway through and decide you want to return to the method's caller. By clicking the Step Out icon, you bypass the remaining source-code lines in the method and return to the point at which the method was called. This, too, can be a time-saver.
The Hex icon enables you to view the debugger information as hexadecimal values rather than their default base 10 representations. This could be useful for assembly language programmers. The final icon (Output) on the Debug toolbar presents additional information about the currently executing program. None of the information is terribly useful at this juncture.
Finding the Bug
The purpose of breakpoints and single-stepping through a program is to enable you to watch the values of the data change as the program executes. With the aid of your test data, you should see how you progress from good input values (assuming those values are correct) to bad output values. If you have sufficient granularity in your input test data (such as intermediate values for complex calculations), you should isolate exactly where the bug lies. (This is another argument for cohesive methods. If you write Swiss Army methods that try to do too many things, it makes debugging more difficult because multipurpose methods take longer to test and debug.)
Usually, fixing a bug is simple. You simply change the offending program statement(s) that generate the error. Sometimes you may need to change the way the calculation is done (that is, its algorithm).
Scaffold Code
In the days before symbolic debuggers existed, programmers were forced to print out the values of variables as the program ran. You would then look at those intermediate values and try to determine where things were going wrong. After you found the error, you had to go back and remove all the print statements that you used in the code. This was a error-prone process because it was easy to miss a print statement or two or to accidentally remove a line that should remain in the program.
Subsequent languages (such as C) enabled programmers to add preprocessor directives to the source code and enabled the compiler toggle debug statements into or out of the code. This debug code that was added or removed based on preprocessor directives was sometimes referred to as scaffold code. Letting the compiler toggle the code was much less likely to result in error.
C# enables you to use some preprocessor directives. You've already used the #region-#endregion directive in your programs. Now consider the following code:
#define MYDEBUG
// many lines of code.
// Now you're at a place where things often go amiss, so you add:
#if MYDEBUG
MessageBox.Show("Value of exp1 = " + exp1.ToString());
#endif
The #define preprocessor directive must be the first line in the source code file. In this example, the #define MYDEBUG preprocessor directive causes MYDEBUG to be added to the symbol table. (You should not use DEBUG because Visual Studio already has that symbolic constant defined.) Because it is defined outside of any method, it has class scope. This also means that MYDEBUG is known throughout all elements of the program, including other source files.
You can place as many lines of code as you want between #if and #endif. You can also use the following variation:
#if MYDEBUG
val = 3;
#else
val = 0;
#endif
This enables you to toggle test values based upon the #define directive. A nice touch is that if you look at this code fragment using Visual Studio, the statement currently not compiled display in grayed out text. In other words, if MYDEBUG is defined, the statement val = 0; is grayed out.
Toggling Scaffold Code
The easiest way to toggle scaffold code into and out of a program is with the following two lines at the top of the source file:
#define MYDEBUG
//#undef MYDEBUG
By means of these two lines, the MYDEBUG symbol is defined for the program. If you uncomment the second line, the #undef preprocessor directive has the effect to remove the MYDEBUG symbol from the symbol table. (You should leave the #define MYDEBUG directive in the source file.) In the earlier code fragment, this would cause val to equal 0.
Using the preprocessor directives in this manner enables you to leave scaffold test code in the source files permanently, yet toggle them into and out of the program as needed.
Defensive Coding
Sometimes it's difficult to determine exactly which variable is responsible for generating an erroneous result. It's common to find complex expressions like the following:
delta = a * (b −1) + (h * math.pow(1+r, x) + 2 * d) / left + right;
All you know here is that something is wrong with delta. Such complex expressions make judging intermediate values difficult, even with a Watch window. Understanding and debugging this statement would be much easier if it were broken down into several smaller statements that generated intermediate values. It might take a few more lines of (less complex) code to arrange this, but the time you save testing and debugging can amply make up for it. Defensive coding simply means writing code in a manner that makes it easier to debug and maintain a program.
Earlier chapters presented other defensive coding techniques that should help make your debugging sessions more productive. You should define all your class properties using the private access specifier. If you do this, only your getter and setter property methods should change the state of a property. Use symbolic constants in your programs to make the code easier to read. Other stylistic suggestions throughout the text should help to either prevent bugs or make them easier to detect and isolate—use default in a switch even if it's not required; always use curly braces with if and forstatements; don't rely on silent casts.
Other ideas about defensive coding techniques appear in later chapters. As you write your own programs, try to practice defensive coding techniques. Perhaps the easiest to implement is to write your code with the idea that someone else must fix it. Clever and obtuse code never wins in the long run. If you think a piece of clever code is warranted because it enhances performance enough to make it worthwhile, just make sure you comment the code so someone else can understand it—someone else may well be you 6 months from now.
Summary
In this chapter you learned about the various types of errors and bugs that can creep into your programs. By now you have probably advanced to the point that you make relatively few syntax or semantic errors. You have moved up to the big time: logic errors. Some errors throw exceptions and you now know how to safeguard yourself against those using exception handlers. You also learned how to force an exception, which can be helpful to test your exception handlers.
Your biggest ally in correcting program errors is the program debugger. You should know how to set breakpoints, single-step through your programs, and use the various debugging windows to watch key variables as the program executes.
Finally, I mentioned how defensive programming can ease the burden of testing and debugging a program. Writing clear, concise code makes it much easier for you or anyone else to debug your code. Always write your code as though someone else will be responsible for maintaining it.
Exercises
You can find the answers to the following exercises in Appendix A.
1. The following code fragment generates a compile error. What's the problem with the code?
private int TestCode()
{
int j;
int x;
j = 4;
if (j == 4)
x = 5;
return x;
}
2. The present value of a future asset is determined by the number of years into the future at which the asset will be received and the current market rate of interest. For example, if Katie promises to pay you $100 a year from now and the current interest rate is 5%, the present value of the asset is $95.23. Stated differently, placing $95.23 in the bank today at 5% interest would yield you $100 a year from now. The equation is
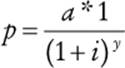
where p is the present value, a is the future amount, i is the interest rate, and y is the number of years into the future the asset is deferred. How would you code this formula and why?
3. C# enables you to use code like the following, in which several variables are defined with a single statement:
long number, val, len;
What are the pros and cons of this type of variable definition statement?
4. You've written a long and complex program that compiles and executes but produces an incorrect solution. You've tried to locate the error but so far without success. What would you do to fix the program bugs?
5. Most of my students are loath to place try-catch blocks in their code on their own. That is, unless I remind them to do so, I rarely see try-catch blocks in their assignments. If you were grading their assignments and were going to be dictatorial about it, where would you absolutely insist they use try-catch blocks or get a failing grade on the assignment?
What You Learned in This Chapter
|
TOPIC |
KEY POINTS |
|
Difference between bugs, errors, and exceptions |
A bug is a manifestation of an error, whereas exceptions are unwanted program states. |
|
Syntax error |
Not following the language rules. |
|
Semantic error |
Using a statement out of context. |
|
Logic error |
You messed up. |
|
Exceptions and exception handling |
How to cope with unexpected program states. |
|
Exception throwing |
How to force an exception. |
|
Using the debugger |
Program breakpoints and the various debug windows. |
|
Bug detection, isolation, and correction |
The proper sequence for fixing program bugs. |
All materials on the site are licensed Creative Commons Attribution-Sharealike 3.0 Unported CC BY-SA 3.0 & GNU Free Documentation License (GFDL)
If you are the copyright holder of any material contained on our site and intend to remove it, please contact our site administrator for approval.
© 2016-2026 All site design rights belong to S.Y.A.