Beginning Object-Oriented Programming with C# (2012)
Part III
Writing Your Own Classes
Chapter 10
Designing and Writing Custom Classes
What you will learn in this chapter:
· Constructor details
· Method overloading
· Cohesion
· Coupling
· Property methods
· Getters and setters
· Changing the state of an object
· Sensing an error in a class method
wrox.com code downloads for this chapter
You can find the wrox.com code downloads for this chapter at www.wrox.com/remtitle.cgi?isbn=9781118336922 on the Download Code tab. The code in the Chapter10 folder is individually named according to the names throughout the chapter.
Chapter 9 was an introduction about designing your own classes. That chapter ended by designing and writing a simple class named clsDates that added two methods: getLeapYear () and getEaster(). This chapter continues the theme of class design but discusses additional details about writing classes.
When you finish this chapter, you will have a solid foundation upon which to start writing your own classes. With a little effort, you'll find that writing your own classes is both worthwhile and kind of fun.
Constructors
You should think of constructors as methods designed to create, or instantiate, an object. The sole purpose of a constructor is to enable you to instantiate an object with a known state. The beauty of C# (and most other OOP languages) is that you get a default constructor automatically.
Default Constructors
To make the creation of a default constructor possible, a constructor always has the same name as its class. For example, if you want to create an object named myDate of the clsDates class, you would use the following statement:
clsDates myDate = new clsDate();
You've seen this syntax before, but now dig a little deeper.
First, notice that the leftmost reference to clsDates is simply the name of the class: No closing parentheses follow the class name. In effect, this reference to clsDates is simply telling you which cookie cutter to take from the thousands of them hanging on the wall.
Second, the purpose of the identifier myDate is to enable you to give a name to the reference variable that your code uses as a link to the data for the clsDates class. You learned in Chapter 5 that the rvalue of a reference variable is either null or the memory address of the location of the data for the object. For learning purposes, you can think of myDate as having the rvalue of null at this instant in time.
Third, the keyword new should always jog your memory and make you remember that there are going to be some messages exchanged between your program and the Windows Memory Manager. Specifically, new means that you are asking Windows for enough memory to store a clsDatesobject. Assuming that enough memory is found, the rvalue of myDate instantly changes from null to the memory address of where the object is stored.
Fourth, the final expression in the statement is clsDates(). Note that, unlike the first reference to the class at the beginning of the statement, this reference is followed by parentheses. This means that the code is calling a method. In this case clsDates() is a call to the constructor method. If you don't write your own constructor, C# still calls its own default class constructor. When the default constructor finishes executing, all the value type data in the class have the value 0, and all the reference variables have the value null. The default constructor places the object in a known state in which value types are 0 and references are null (unless the data is also initialized at its point of definition).
Nondefault Constructors
Okay, so when do you need to write a nondefault constructor? Under two basic circumstances: 1) when your class design is not happy with the default state of the object when it comes to life or 2) when a nondefault constructor makes life easier for the programmer who is using your class.
The first reason means that there is something about starting out with all the class data set to either 0 or null that just isn't the “right” state for the object. For example, in Chapter 9 the default constructor was changed to this:
public clsDates()
{
current = DateTime.Now; // Sets DateTime to right now
}
This constructor changes the DataTime data item named current from its uninitialized state to the present date and time. In other words, your design is such that you want to have current start out with its value set to the date and time at which the object was instantiated.
Creating a clsDates object with the present date and time already stored in current may make some aspect of the class easier to use. (Right now there's no code in the class that takes advantage of current, but that doesn't mean there won't be!)
Constructor Overloading
You've already studied method overloading in Chapter 5. Because a constructor is nothing more than a method that is always called when an object is instantiated, constructors may also be overloaded. For example, you can add the following constructor to the code shown in Listing 9-4:
public clsDates(int yr)
{
year = yr;
}
Now you have two constructors. As mentioned in Chapter 5, method overloading is never a problem as long as the method signatures are different. Because this second constructor has an integer parameter (yr) passed to it, the signatures are different. However, you can now use the following statement to instantiate the myDate object:
clsDates myDate = new clsDate(year);
Now the instance variable named year in the clsDates object named myDate is initialized the moment the object is instantiated. Kinda neat, huh?
Well, not really.
Constructor Sloppiness
There's a problem with the way I've written the two constructors. Look at them side by side:
public clsDates() // No-parameter constructor
{
current = DateTime.Now; // Sets DateTime to right now
}
public clsDates(int yr) // Constructor with parameter
{
year = yr;
}
If I create the myDate object with the statement
clsDates myDate = new clsDate();
the no-parameter version means that myDate comes to life with the instance member named current initialized to the present date and time. However, if I use the statement
clsDates myDate = new clsDate(year);
then current is not initialized to its (assumed) default state! As a general rule, a nondefault constructor (that is, a constructor that has one or more arguments) should always subsume the default state of the object. What this means is that the parameterized version of the constructor should also initialize current to the present date and time. As the code stands right now, however, the default (parameterless) constructor initializes the member named current, but the overloaded constructor does not. Not good.
Fixing the Constructor Problem
The solution to the problem seems simple enough. Just call the default constructor from within the parameterized constructor:
public clsDates(int yr) // Constructor with parameter
{
clsDates(); // This won't work!
year = yr;
}
This fix won't work because the compiler gets confused as to how clsDates is to be used in this context.
Now try the form in Listing 10-1 for the parameterized constructor.
Listing 10-1: The correct way to call a parameterized contructor
public clsDates(int yr) : this()
{
year = yr;
}
Note the (colon) operator (:) and the keyword this in the first statement. You've been using the colon operator in every program you've written but probably haven't thought much about it. For example, pick any program you've written and look at the first statement in the definition of frmMain:
public class frmMain : Form
You can verbalize the colon operator as the phrase “inherits from.” In other words, your frmMain inherits the basic properties and methods of a common Windows form but is going to extend it with whatever objects and code you add to frmMain.
Now examine the following statement:
public clsDates(int yr) : this()
The this keyword is simply shorthand notation for a reference to the instance of the current object. In other words, this is a shorthand notation for the clsDates object that the program is in the process of constructing. However, because you have followed the this keyword with parentheses, the compiler knows that it must call the default (no-parameter) constructor for this class before it does anything else. (If you're ever at a cocktail party and someone mentions constructor chaining, this is exactly what that person is talking about.)
Add the code for the second constructor (refer to Listing 10-1) to the code presented in Listing 9-4. Now set a breakpoint on the first line of this new (parameterized) constructor, and then run and single-step through the program. You will find that, upon reaching the breakpoint in the second constructor, the program immediately jumps to the default constructor, initializes current to the proper value, and then executes the statement body for the second constructor. This is exactly what you want to happen because both flavors for creating the myDate object,
clsDates myDate = new clsDate();
and
clsDates myDate = new clsDate(year);
now leave current in the same state. The parameterized version of the constructor simply initializes an additional member (year) of the class to a known value.
Always Call the Default Constructor
You might be asking yourself: “Why bother calling the default constructor? If you never use the content of current, who cares?” Well, given the way clsDates is written presently, current isn't used, so it really doesn't matter. However, that does not mean you won't add code later on that does assume a default state for current.
More important, calling the default constructor gets you into the coding habit of establishing a “base state” for the object. Not starting all objects with the same base state may cause problems later. For example, you might be writing some form of a database class in which the default constructor creates a connection to the database. If an overloaded constructor didn't also establish that database connection, perhaps other methods in the class could not perform their functions properly.
If you do write a constructor that has parameters, you can no longer call the default constructor that has no parameters. The only way you can call a parameterless constructor once you have created a contructor with parameters is to explicitly write your own parameterless constructor. That is, the “no-code” default constructor no longer exists and you must supply your own.
Just as you've seen so many times before, the Initialization Step of the Five Program Steps creates the base environment in which the program code is to perform. Calling a constructor is similar to the Initialization Step for a program but viewed in the more narrowly defined context of a method. That is, the constructor establishes the environment in which a specific object is to exist and perform. Therefore, it is always a good idea for all overloaded constructors to call the default constructor so that the base state of the object can be safely assumed.
Property Methods
So far you have designed and implemented the property members of the class, and you've also added two constructors to give the user some flexibility when he instantiates a clsDates object. Finally, you've written two General methods, getLeapYear() and getEaster(), that provide some functionality for the class. In the spirit of encapsulation, you defined all the property methods using the private access specifier. Using the private access specifier makes it difficult to inadvertently change the value of a class property. This protection for the class properties exists because theprivate access specifier limits the scope of the properties to the class in which they are defined. The class properties are invisible to the outside world!
Wait a minute....
If the properties are invisible to the outside world because of their scope, then there is no way to change them! If the class properties can't be changed, there is no way to change the state of the object. If you can't change the state of an object, you may as well have defined a boat anchor cast in concrete. It is the ability to use and change the state of an object that makes that object useful in a program. After all, how useful can an object be if its properties are always null or 0?
Property Methods and Getters and Setters
Obviously, there's a method to this seeming madness. C# provides you with a program structure known as a property method, which is used to access private properties defined within a class. A class property method is built with property getters and property setters. These are special methods designed for use with class properties. As a rule, you define a set of getters and setters for each private property member.
The syntax for a property getter and setter is as follows:
AccessSpecifier ReturnDataType PropertyName
{
get
{
return PropertyMember;
}
set
{
PropertyMember = value;
}
}
An example using the month property of the clsDates class is shown in Listing 10-2. You should add the month property method to the code you wrote for Listing 9-4 as follows.
Listing 10-2: Typical property method
public int Month
{
get
{
return month;
}
set
{
if (value > 0 && value < 13)
{
month = value;
}
}
}
Property Method Rules
There are a number of things to notice about property methods. First, all property methods use the public access specifier. As you learned in Chapter 9, if a method uses the public access specifier, that method becomes part of the user, or public, interface (or API) of the class. Because property methods are public, they become the gateway into the class and provide a means to access the private property members of the class. If the property methods weren't defined with the public access specifier, they would be useless to the code that exists outside of the class because their scope would make them invisible.
Second, the return data type for the property method must match the data type of the property. If you defined the class property to be an int (as month is), then the property method must return an int. If the property member is a string data type, the return data type must also be a string.
Third, note that a property method is different from any other type of method because the name of the property method is not followed by a set of parentheses. A common programming convention is to make the name of the property method the same as that of the property, but to capitalize the first letter of the property name. In this example, the class property named month has a class property method named Month. (This is also consistent with making the first word of all class property names lowercase.) There will be no confusion between month and Month because C# is case-sensitive.
Fourth, the keyword get is used to mark the block of code within a property method that may be used to retrieve the value of a class property member. Usually, the statement within the get statement block is simply a return keyword followed by the property name, as shown in the example. You will often hear a get statement block referred to as a getter.
Finally, the keyword set is used to mark the block of code within a property method that may be used to assign a value to a class property member. The set statement block should be the only means by which the outside world can change the private property member of a class. (You could change it through a General class method, but that's an ugly way to do it and is discouraged.)
If you look at the set statement block in the Month property method, you can see that you validate that the value assigned into month is reasonable.
Wait a minute! Where did the variable named value come from?
The value Keyword
The keyword value is an implied variable used as part of the syntax of the set statement block. You can think of value as a ghost variable that holds the data that you want to assign into the property member. The data type of value always matches the return type specifier of the property method. For example, the Month property method returns an int, so value must be an int.
There is no formal definition of value in a property method or the class. The data type for value is implied by the context in which it is used. The type always matches the type specifier for the property method.
How the get Property Methods Work
Suppose you want to read the value of month as it is presently stored in a clsDates object. The following code fragment shows how to access the property member named month:
int myMonth;
clsDates myDate = new clsDates();
// Misc lines of code . . .
myMonth = myDate.Month;
The intent of the preceding code is to retrieve the value of month as it currently exists in the myDate object and assign that value into myMonth. When the last statement executes, program control executes the get statement block of the Month property method in clsDates and returns the value of the property named month.
Now that you understand the concepts for designing a class, let's see how everything fits together. In the next section you tie the class code to the end user interface to get a fully functional program.
Try It Out: Using a Property Method (Chapter09ProgramClassDesign.zip)
In this case, you are actually reusing the code you wrote in the last chapter.
1. Load the code from the Class Design project discussed in Chapter 9.
2. Add the code from Listings 10-1 and 10-2 to the project.
3. Add the following code to frmMain.cs, after the Application.Run(main); statement:
int myMonth;
clsDates myDate = new clsDates();
myMonth = myDate.Month;
and set a breakpoint on the last statement in the code fragment, Now run the program and use the F11 key to single-step in the Month property method to see how program control works for such statements.
As the property method code in Listing 10-2 presently works, the value returned is 0 because no value has been assigned to the month property. You could modify Listing 10-2 to what is shown in Listing 10-3.
Listing 10-3: Property method for the month property
public int Month
{
get
{
if (month == 0) // New code
{
return current.Month;
} else
{
return month;
}
}
set
{
if (value > 0 && value < 13)
{
month = value;
}
}
}
How It Works
With the property method code added to the class, you have a means by which to change the state of the month property. The code you just added to frmMain gives you a way to test how the month property's state can be changed. You also have the ability to validate any new value assigned into month by the use of the if statement block. Any attempt to change the state of month outside the class must pass the if statement block check before a new value for month can be accepted.
The modification in Listing 10-3 says that if the class member named month is unassigned (that is, if it has its default value of 0), return the Month value of the DateTime object named current. This returns a nonzero value because the constructor initializes current to the date and time at which the object is created. If you had defined the class member named current with the public access specifier, you could not do this kind of checking on current before it was used.
How the set Property Methods Work
Suppose you want to change the month property to 12. You can accomplish that with the following statements in frmMain:
int myMonth = 12;
clsDates myDate = new clsDates();
// Misc lines of code . . .
myDate.Month = myMonth;
If you set a breakpoint on the last statement of the preceding code and then use the F11 key to single-step into the Month property method, you can see that the set statement block is executed. The code in Listing 10-3 can check the ghost variable named value to see that an appropriate value is recorded for month in clsDates. If you use the debugger as suggested, you can see that the variable named value has the value of myMonth back in frmMain.
How Does Visual Studio Know Whether to Use the get or set Statement Block?
Visual Studio can determine what your intent is by the context in which you use the Month property method. For example, in the assignment statement,
myMonth = myDate.Month; // A get operation
it's obvious that your intent is to fetch the current value of the month property of the myDate object and assign it into myMonth. The statement, therefore, must perform a get operation. (Because the Month property method as defined in the class does not use parentheses in its definition, you do not use parentheses when you call a property method.)
Conversely, in the assignment statement,
myDate.Month = myMonth; // A set operation
your intent is to use the value stored in myMonth and assign it into the month property of the myDate object. Because you want to change the state of the month property of myDate, Visual Studio must perform a set operation. You can generalize these context behaviors into the following two rules for using class property methods:
· If the property method name appears on the right side of an assignment operator, a get statement is performed.
· If the property method name appears on the left side of an assignment operator, a set statement is performed.
Always keep in mind that a set operation has the potential to change the state of an object. Also, the set statement block is a good place to write any validation code you deem necessary to ensure that the property doesn't accept bogus or unwanted values.
If you see a property method used in an expression that does not involve the assignment or binary (i.e., ++ or --) operators, such as
for (j = 0; j < myDate.Days; j++)
the expression is performing a get operation. (Again, the property method appears on the right side of the relational operator (<), so it must be a get operation.)
What to Do if an Error Occurs in a Property Method
There will be times when a bogus value reaches a property method. However, the set statement block is used to change the state of the object and not to return a value to the caller. So how do you communicate to the user that your class code read a bad data value in a property method?
Your first approach might to be to use a MessageBox object to display a message to the user that a bad value for a property was read. The problem with this approach is that the data manipulation is going on in the class, not in frmMain where the end user is interacting. When you write code for a class, you should always keep in mind that your user is a programmer, not the end user running the program. Because of this, you need to let the person using your class know that something's amiss. (A general style convention is that property methods never use MessageBox objects.)
The main purpose of a set statement block is to change the value of the property associated with the method. Because a change in the value of a class property also means a change in the state of the object, the safest thing to do when an error is detected is to leave the state of the object unchanged. For example, if a bogus value for a month reaches the set statement block in Listing 10-3, the new value for month is ignored and the state of the object remains unchanged. It would be the responsibility of the programmer using your class to detect that the set operation failed, as shown by the unchanged state of the object.
Another possibility is to have a state flag as a property member of the class. You could have code similar to this:
private int errorStatus = 0; // Assume no errors for object's state
// more code for other class members . . .
public int getErrorStatus // Property method for errorStatus member
{
get
{
Return errorStatus;
}
}
Notice that there is no set statement block for the getErrorStatus property method; it is a read-only property method. Because the property method is read-only, the user cannot change the state of errorStatus; only you can change it in your class code. Given that fact, you could modify Listing 10-3 to what is shown in Listing 10-4.
Listing 10-4: A Property Method with Error Handling
public int Month
{
get
{
if (month == 0) // New code
{
return current.Month;
} else
{
return month;
}
}
set
{
if (value > 0 && value < 13)
{
month = value;
} else
{
errorStatus = 1; // Flag as error
}
}
}
Now any time the user of your class wants to see if a set operation worked properly, she could add code similar to this back in frmMain:
myDate.Month = myMonth;
if (myDate.getErrorStatus == 1)
{
MessageBox.Show("The world is ending. Run for your lives!");
return;
}
This would detect the occurrence of an error in the class. Other possibilities exist, but those shown here are the most direct.
Method Coupling and Cohesion
As you've learned in this chapter, property methods are used to read and write the values associated with the properties in a class. Because they are public, property methods form an important part of the user interface for the class. However, the purpose of a property method (either getting or setting) is correctly constrained to the property.
Helper and General methods, on the other hand, are designed to use or act upon the properties of the class. Because Helper methods always use the private access specifier, they do not form part of the user interface (API) for the class. Instead, they reduce the coding burden on you, the programmer of the class. Helper methods are often used for validation purposes. Checking and validating data, like the format of phone and Social Security numbers, is a task often given to Helper methods.
General methods, however, are often used to derive new data from the property data. For example, an inventory class might have a property that records the quantity of an item sold. There might be a General method that takes the quantity sold and multiplies it by a price per item to produce a total purchase amount. A General method for the class might be called getTotalCost(). Another General method named getShippingCost() might use the weight per unit and the quantity sold to calculate the shipping charges. Yet another method named getSalesTaxDue() might calculate the sales tax for the order, and so on.
Cohesion
The important thing to notice about each of these General methods is that each one is geared to a specific and narrowly defined task. These narrowly defined tasks illustrate the concept of cohesion. This term refers to the ability to describe what a method does in one or two sentences. If it takes more than a couple of sentences to define its purpose, chances are it is not a cohesive method. A cohesive method does a single task, and you should be able to describe its purpose crisply and concisely. If you can't, it's back to the drawing board to rethink the method's design.
Beginning programmers often try to create Swiss Army knives by designing a method that performs multiple tasks. This is usually a bad idea for two reasons. First, methods that attempt to multitask complicate the code. Several simple methods that perform one task each are simpler to write, test, debug, and maintain than one method that tries to multitask. Second, single-task methods have a higher chance of being reused than a complex method that attempts to solve multiple problems at once. The more tasks you try to pack into a single method, the less likely it is that the precise sequence of tasks can be reused in some other program.
Think about cohesion when you design your general methods. That is, keep your methods crisp, clean, short, and geared to a single task.
Coupling
Coupling refers to the degree of dependency between data elements in a program. Method decoupling refers to the ability to make code changes in one method without forcing changes in another. Methods that are coupled means that the behavior of one method is somehow dependent upon the behavior of another method. The goal is to have zero coupling between methods. That is, changing the code in one method should not force you to change code in another method. Obviously, the smaller the degree of method coupling, the greater the likelihood that you can reuse that method in another program because its functionality is less dependent on other methods.
Sometimes coupling introduces sequencing issues, too. For example, if you want to open a disk file for writing data, you must first make sure the file exists or create a new file if it doesn't. Clearly, you need to open the file, write the data to the file, and then close the file. The sequencing might seem to suggest that one method should be used to open, write, and close a disk file. Such a design is bad on two levels. First, the design is not cohesive because it is multitasking. Second, this is coupling to the highest degree because what should be three separate steps are instead rolled into a single method. A major reason for unrolling such a method is because errors can occur at each step along the way, it makes more sense to decouple these tasks and write three methods to attack all three. The code will be simpler and easier to maintain, plus you can pass back more meaningful error states to the user of the class if one of the methods fails to perform its specific task.
The goal is simple: Write simple methods geared to one task, and write them so they stand alone and operate independently.
Class Design for Deck-of-Cards Program
Try your hand at a new program to incorporate some of the design elements discussed in the last two chapters. Suppose you want to write a program that models shuffling a deck of cards. In the following Try It Out, you will write a class that performs some basic card game tasks. If you design things correctly, the class should be usable in other games that involve a deck of cards.
Try It Out: Shuffle Cards (Chapter10ProgramShuffleDeckClass.zip)
The program should simply display the shuffled deck of cards in a listbox object. Figure 10.1 shows a starting point of how you might construct the user interface for the program.
Figure 10.1 Program Shuffle
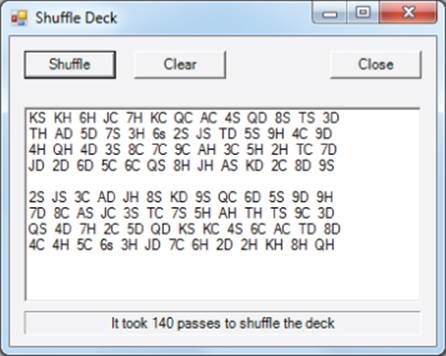
The figure shows what the output might look like after two clicks of the Shuffle button. Also note that a label object appears below the listbox to inform the user how many passes it took through the “shuffle loop” to produce a shuffled deck. (More on the shuffle loop in a minute.) Given that Figure 10.1 describes the way you want the user interface to look, how would you design and write the code? Equally important, where do you start the design process?
1. Create a new project in the usual manner. You may want to call it ShuffleDeck, but you can use whatever name you want.
2. Add the objects shown in Figure 10.1. Again, postpone the complete construction of the program until a little later. For now, just consider how you want it to work and be constructed.
How It Works
As is almost always the case, you could write the code and stuff it all into frmMain and be done with it. However, is there a chance that at some time in the future you might write a game program that needs a deck of cards? A related question to ask is, “How difficult would writing the program be if you wrote a class to simulate a deck of cards instead of jamming all the code into frmMain?” The answer is that there is virtually no appreciable cost to separating the administration of the program from the simulation of the deck of cards.
The program is sufficiently simple so that you can keep all but the Process step (of the Five Program Steps) in frmMain. The Process step, however, should be the domain of a class that simulates the behavior of a deck of cards.
UML Class Diagram for Shuffle Deck Program
Figure 10.2 shows the first attempt in designing your card deck class. The UML notation discussed in Chapter 9 is used to construct the UML class diagram, as shown in Figure 10.2. You can examine the symbolic constants and properties of the class first.
Figure 10.2 UML Diagram for Shuffle Deck Program
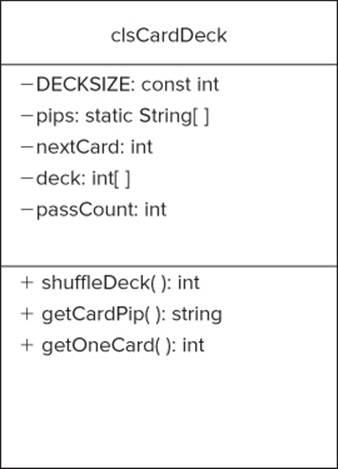
The first thing to note is that all the properties are prefixed by a minus sign, which means they use the private access specifier. Because the properties are not directly visible outside the class, they are not part of its user interface. The second thing to note is that all the methods use the publicaccess specifier. (They are prefixed with the + sign.) Therefore, you know at a glance that all three methods are part of the user interface for the class.
As you can see in Figure 10.2, the property methods are not shown as part of the UML Light class depiction. Those methods are omitted for two reasons. First, property methods always use the public access specifier. This also means that property methods always form a part of the public user interface for the class. Second, because the property methods align one-to-one with the properties, it seems redundant to make them part of the UML class diagram.
Good class design almost always makes the properties of the class private but enables the outside world to have access to them through their associated property methods. Using this design approach gives you control over what values can be properly assigned into any given property.
Class Constants and Properties
In the UML class diagram shown in Figure 10.2, the symbolic constant DECKSIZE represents the number of cards in the deck. Although most games use 52 cards in a deck, there are games that don't (such as Euchre and Canasta). The pips variable is a string array that holds a nongraphic representation of each card. As you can see in Figure 10.1, the first entry, KS, represents the king of spades. The second shuffle begins with 2S, or the two of spades, as so on.
You should know why the pips array is defined with the static storage class. The reason is that the contents of the array can be shared regardless of how many objects of clsCardDeck are instantiated.
The nextCard variable serves as an index into the card deck. If DECKSIZE is 52, when nextCard reaches the value 52, the interpretation is that all cards have been dealt from the deck. This allows the class to track where it is in the deck. Also, if nextCard has the value DECKSIZE, it's time to reshuffle the deck.
The variable deck is an integer array and represents the deck of cards. One of the design considerations discussed earlier is that you should design a class in a way that reflects how a user thinks about the properties and methods of the class. Again, most people do not think of a zero-based deck of cards. To a user, the first card in the deck is card number one, not card number zero. Therefore, you should set the dimension of the deck to DECKSIZE + 1. This allows the largest index for the deck array to match the user's ones-based perception of the deck of cards. That is, if the deck size is 52, making the dimension 53 lets you present the valid indexes for deck as the set 1 through 52. (It's that pesky N - 1 Rule again.)
You can make a valid argument that the user of this class is a programmer and they should be used to thinking of zero-based arrays. Very true, and if indexing from a non-zero base bothers you, you can easily modify the code to suit your needs.
Finally, passCount is an integer variable that stores the number of passes made through the loop that is used to shuffle the deck. Although this variable is probably not needed for any card game you might write, it does give you some information about the shuffling algorithm used to shuffle the deck and may be useful for debugging purposes.
Class Methods
Figure 10.2 shows that there are only three General methods in the class. (You know they are General methods because they are all defined with the public (+) access specifier. If they were Helper methods, they would must be defined with the private (-) access specifier. Although Propertymethods are also public, they are concerned only with getting or setting a property.) Because the methods are General methods, they become part of the user interface, or API, for the class.
As suggested in Chapter 9, method names should be action- or verb-based. If you have selected the method names well, they should reflect the tasks the methods are designed to accomplish. The methods shuffleDeck() and getOneCard() should be self-explanatory. The method getCardPip() is a little unusual and needs some explanation.
getCardPip( )
As mentioned earlier, the design uses two-letter abbreviations for the cards in the deck (3H, KS, and so on). These abbreviations are defined in the static array named pip. The definition of this array is:
private static string[] pips = {"",
"AS","2S","3S","4S","5S","6s","7S","8S","9S","TS","JS","QS","KS",
"AH","2H","3H","4H","5H","6H","7H","8H","9H","TH","JH","QH","KH",
"AD","2D","3D","4D","5D","6D","7D","8D","9D","TD","JD","QD","KD",
"AC","2C","3C","4C","5C","6C","7C","8C","9C","TC","JC","QC","KC"
};
Again, note that the first element in the initializer list is an empty string array element (""). This produces a valid (that is, non-null) array element, but one that contains no useful information. The element is nothing more than a placeholder to get away from the zero-based array configuration.
If you look at the organization of the array, you can see pips[1] is AS, pips[14] is AH; pips[27] is AD, and pips[40] is AC. What may be less obvious is that if you take the index into the pips array divided by the number of cards in each suit (13), the remainder is that suit's card. That is, 1 % 13 = 1, 14 % 13 = 1, 27 % 13 = 1, and 40 % 13 = 1. Therefore, anytime the index modulus 13 is 1, you know you are looking at the ace of some suit. You can determine which suit by looking at the quotient when the index is divided by 4 (the number of suits). For example, 2C has an index of 41. Dividing that index by 13 yields a quotient of 3, which you can interpret as the club's suit. It doesn't take too much thought to realize that values 2 through 10 represent those cards for each suit, and values 11 through 13 are the face cards. (The king of each suit has a modulus of 0 and forms a special case that needs to be checked.) Okay…so what?
Recall from the design discussion that you don't want to select a class method name that tells the user anything about the implementation details used in the method. However, suppose you want to use the clsCardDeck class to write a card game. Chances are, you're going to need to know the structure that produces the relationship between each card and its suit to make the card game work. Providing the getCardPip() method allows the user to “dump” the card deck and examine its structure. For example, the following loop helps to reveal to the user the organization of the data used to implement the deck:
clsCardDeck myDeck = new clsCardDeck();
for (int j = 0; j <= myDeck.DeckSize; j++)
{
lstCard.Items.Add(myDeck.getCardPip(j));
}
In a real sense, therefore, the method named getCardPip( ) is a Helper method, but written for the user rather than yourself. Simply stated, this method is a debugging aid for the user of clsCardDeck.
Making the method part of the user interface allows the user to have access to data structure specifics that makes her coding tasks easier. This method is provided because the user may need this information to implement her card game. Also, with this structure and knowing that she needs the information it provides, you can ease her programming burden by doing away with a trial-and-error approach to figuring out the deck's organization.
Now that the design is finished, implement the code to see how all the pieces fit together. First, examine how the end-user interface is written.
The frmMain Code
Listing 10-5 presents the code that exercises clsCardDeck.
Listing 10-5: Program Code to Exercise clsCardDeck. (frmMain.cs)
using System;
using System.Windows.Forms;
public class frmMain : Form
{
const int CARDSPERLINE = 13;
private Button btnShuffle;
private Button btnClose;
private Label lblPassCounter;
private Button btnClear;
private ListBox lstDeck;
#region Windows code
public frmMain()
{
InitializeComponent();
}
public static void Main()
{
frmMain main = new frmMain();
Application.Run(main);
}
private void btnShuffle_Click(object sender, EventArgs e)
{
int j;
int cardIndex;
int deckSize;
int passes;
string buff;
string temp;
clsCardDeck myDeck = new clsCardDeck();
passes = myDeck.ShuffleDeck();
lblPassCounter.Text = "It took " + passes.ToString() +
" passes to shuffle the deck";
deckSize = myDeck.DeckSize;
for (cardIndex = 1; cardIndex < deckSize + 1; )
{
buff = "";
for (j = 0; j < CARDSPERLINE ; j++) // Show 13 cards per line
{
temp = myDeck.getOneCard(cardIndex);
if (temp.Length == 0)
{
MessageBox.Show("Error reading deck.", "Processing Error");
return;
}
buff += temp + " ";
cardIndex++;
}
lstDeck.Items.Add(buff);
}
lstDeck.Items.Add(" "); // Add an empty line
}
private void btnClose_Click(object sender, EventArgs e)
{
Close();
}
private void btnClear_Click(object sender, EventArgs e)
{
lstDeck.Items.Clear();
}
}
As usual, all the action takes place in the btnShuffle_Click() method. The code defines a clsCardDeck object named myDeck and then calls the ShuffleDeck() method to shuffle the deck. The variable passCount is assigned the number of passes the code had to make to complete the shuffle. This information displays in the lblPassCounter object.
The statement
deckSize = myDeck.DeckSize;
uses the DeckSize property method to determine how many cards are in the deck. The return value from the property method is used to control the for loop that is responsible for displaying the deck.
A nested for loop actually displays the cards:
for (cardIndex = 1; cardIndex < deckSize + 1; )
{
buff = "";
for (j = 0; j < 13; j++) // Show 13 cards per line
{
temp = myDeck.getOneCard(cardIndex);
if (temp.Length == 0)
{
MessageBox.Show("Error reading deck.", "Processing Error");
return;
}
buff += temp + " ";
cardIndex++;
}
lstDeck.Items.Add(buff);
}
The outer for loop is controlled by the variable named cardIndex. Note how it is initialized to 1 in the first expression of the for loop. The second expression in the outer for loop simply suggests that all the cards in the deck are shown. The third expression in the outer for loop…doesn't exist! What?
Although you could have done away with the inner for loop, you elected to display the cards in a format that has 13 cards per row in the listbox object. Therefore, the code simply calls the getOneCard() method 13 times in the inner j loop, concatenating each card's pip representation to the string variable named buff. Note, however, that the code needs to increment cardIndex on each pass through the inner j loop to fetch the next card. Because the increment of cardIndex must be done within the inner j loop, the increment operation normally found in the third expression of the outerfor loop is omitted.
After the inner j loop reads 13 cards from the deck, buff contains a string representation of those 13 cards. The last statement in the outer loop adds the row of cards to the listbox object using the Add() method. With a standard deck of cards, four rows display and the program run is complete.
The clsCardDeck Code
The code for clsCardDeck is shown in Listing 10-6.
Listing 10-6: Source Code for clsCardDeck (clsCardDeck.cs)
using System;
class clsCardDeck
{
// =============== symbolic constants ==================
private const int DECKSIZE = 52; // The number of cards in the deck
// =============== static members ======================
private static string[] pips = {"",
"AS","2S","3S","4S","5S","6s","7S","8S","9S","TS","JS","QS","KS",
"AH","2H","3H","4H","5H","6H","7H","8H","9H","TH","JH","QH","KH",
"AD","2D","3D","4D","5D","6D","7D","8D","9D","TD","JD","QD","KD",
"AC","2C","3C","4C","5C","6C","7C","8C","9C","TC","JC","QC","KC"
};
// =============== instance members =====================
private int nextCard; // The next card to be dealt from deck
private int[] deck = new int[DECKSIZE + 1]; // The deck of cards.
private int passCount; // To count loop passes to shuffle deck
// =============== constructor(s) ======================
public clsCardDeck()
{
nextCard = 1;
}
// =============== property methods =====================
public int DeckSize
{
get
{
return DECKSIZE; // How many cards in the deck
}
// No setter method since this is a read-only property
}
public int NextCard
{
get
{
return nextCard;
}
set
{
if (value > 0 && value <= deck.Length)
{
nextCard = value;
}
}
}
public int PassCount
{
get
{
return passCount;
}
}
// =============== helper methods =======================
// =============== general methods ======================
/**
* Purpose: Shuffle the deck
*
* Parameter list:
* N/A
* Return value:
* int number of passes to shuffle the deck
*/
public int ShuffleDeck()
{
int index;
int val;
Random rnd = new Random();
passCount = 0; // Count how many times through the while loop
index = 1;
Array.Clear(deck, 0, deck.Length); // Initialize array to 0's
while (index < deck.Length)
{ // Add 1 to offset 0-based arrays
val = rnd.Next(DECKSIZE) + 1; // Generate values 1 thru 52
if (deck[val] == 0)
{ // Is this card place in the deck "unused"?
deck[val] = index; // Yep, so assign it a card place
index++; // Get ready for next card
}
passCount++;
}
nextCard = 1; // Prepare to deal the first card
return passCount;
}
/**
* Purpose: Show a given card in the deck.
*
* Parameter list:
* int the index of the position where the card is found
* Return value:
* string the pip for the card, or empty on error
*/
public string getOneCard(int index)
{
if (index > 0 && index <= deck.Length && nextCard <= deck.Length)
{
nextCard++;
return pips[deck[index]];
}
else
{
return ""; // Error
}
}
/**
* Purpose: Show the abbreviation used for a given card in the deck.
*
* Parameter list:
* index an integer for the index position in the deck
*
* Return value:
* string the pip for the card, or empty on error
*/
public string getCardPip(int index)
{
if (index > 0 && index <= DECKSIZE)
{
return pips[index];
}
else
{
return ""; // Error
}
}
}
Now examine each section of the class code. First, notice that when you created clsCardDeck, Visual Studio automatically enclosed the class within the project's namespace. The namespace is removed from the class, as in Chapter 9 and for the same reasons.
Class Properties, Constructor, and Property Methods
The properties are defined exactly as they were in Figure 10.2. The constructor doesn't do anything other than set the value of nextCard to 1. Do this because the first card in the deck is treated as deck[1] rather than deck[0]. Because the constructor initializes class properties to 0 or null, as dictated by the property's type, initialize nextCard explicitly to 1. Neither the DECKSIZE nor the passCount property method has a set statement block. In essence, this makes these read-only properties, which means that nothing outside of clsCardDeck can change the size of the deck of cards or the variable that counts the number of passes made to shuffle the deck. As you design other classes, you will find that read-only properties make sense in some situations. For example, if you create a clsCar to simulate an automobile, you might want to make the odometer a read-only property. (In some states, if you had a setter for the odometer property, you might find yourself a guest of the state in one of their jails!)
Class General Methods
As you gain more programming experience, you'll often find that a class design evolves as you get further into a project. Gone are the old days of BDUF (Big Design Up Front) program design whereby months were spent creating a design that went up in smoke about an hour after the project began. Agile modeling, whereby the program evolves through as a series of small design steps, seems to better capture the way software is developed today.
In clsCardDeck, your design provides for only three General methods. The codes for getOneCard() and getCardPip() are straightforward, and you should have no difficulty explaining what they do and how they do it. The way ShuffleDeck() works, however, would benefit from some explanation.
The ShuffleDeck( ) General Method
There are likely dozens of different ways in which you can simulate the process to shuffle a deck of cards. The method implemented here is based on the following algorithm:
1. Initialize a card counter variable to 0.
2. Generate a random integer number that falls within the range of 1 to DECKSIZE, inclusively.
3. Use that random number as an index into the card deck array, and examine that element of the array.
4. If the indexed element of the deck array has the value 0, it is unassigned, so it is safe to assign the index number into that element of the array and increment the card counter by one.
5. If the indexed element of the deck array is not 0, that element of the array has already been used.
6. If the card counter is less than DECKSIZE, repeat step 2.
The implementation of the algorithm begins with the definition of a number of working variables. The statement
Random rnd = new Random();
uses Visual Studio's Random class to define an object named rnd. The Next() method of the Random class is used inside the while loop with the following syntax:
val = rnd.Next(DECKSIZE) + 1; // Generate values 1 thru 52
The method Next() is design to generate a series of pseudo-random numbers that fall within the range of 0 to DECKSIZE. Assuming that DECKSIZE is 52, this means that Next() produces random numbers that fall within the range of 0 to 52. The set of values generated by Next() spans the domain from 0 to—but not including—52. However, because of the way that you have defined the pips array, you need the domain to be from 1 to 53, inclusively. You can generate that domain of values if you add 1 to each random number produced by the Next() method. In the preceding statement, valhas the potential to store the values 1 through 53…exactly what you need.
In Chapter 8 you learned that the statement
Array.Clear(deck, 0, deck.Length); // Initialize array to 0's
uses the Clear() method of the Array class to initialize all elements in the deck array to 0. Now see how your algorithm works.
The Implementation of the Shuffle Algorithm
The code for the program loop shown in Listing 10-6 is repeated here:
while (index < deck.Length) // Add 1 to offset 0-based arrays
{
val = rnd.Next(DECKSIZE) + 1; // Generate values 1 52
if (deck[val] == 0)
{ // Is this card place in the deck is "unused"?
deck[val] = index; // Yep, so assign it a place
index++; // Get ready for next card
}
passCount++;
}
At the start of the while loop, the deck array looks like Figure 10.3. The figure shows that none of the elements has been assigned a value. That is, each empty element shown in Figure 10.3 has the value 0 in it.
Figure 10.3 The state of the deck array before shuffling starts

To understand what is happening, assume that program control has entered the while loop and the first random number assigned into val is 5. The if statement checks to see if element deck[5] is 0. Because this is the first pass through the loop, deck[5] is “empty” (that is, its value is 0), so assign the value of index into the fifth element of the array. Because the variable index has been initialized to 1, the deck array now looks like Figure 10.4.
Figure 10.4 State after adding the first card

If you look at the pips array discussed earlier, you should figure out that the fifth card in the deck is now the ace of spades. (Think about it.) After the assignment of index into the deck[val] element of the array, index is incremented. Because index, with a value now equal to 2, is less than the size of the element count of the array (in this case 53), another pass is made through the loop.
On this second pass through the loop, assume the next random number is 51. Because element 51 is 0 (that is, “empty”), the if statement assigns the value 2 into deck[51]. You now know that the two of spades is the second-to-last card in the deck. The state of the card deck at this point is shown in Figure 10.5.
Figure 10.5 Adding the second card to the deck

On each pass through the loop, the code attempts to assign the current value of index into an empty element of the deck array using val as its index. If you think about it, as the arrays fill up, it gets harder and harder to find an empty array element. This is why it may take several hundred passes through the loop to fill up the array with the random card values. The variable passCount maintains a count of how many times the loop is executed before the deck array is filled. Usually the deck array is filled in less than 300 passes through the loop Although there are more efficient card shuffling algorithms out there, the simplicity of the code and its reasonable speed make this version acceptable for your purposes.
When the loop finishes filling the deck array, nextCard is assigned the value of 1, and the value of passCount is passed back to the caller in Listing 10-6.
If you set a breakpoint on the following statement
temp = myDeck.getOneCard(cardIndex);
in the nested for loops back in frmMain (Listing 10-5) and step into the getOneCard() method using the F11 key, you can see how the cards are added to the listbox object. Again, single-stepping through a program is a great way to understand how it actually works.
Designing a Card Game Using clsCardDeck
Now that you have a class capable of shuffling a deck of cards and dealing them out one at a time, design a simple card game. The card game is a simplification of one called In Between.
The variation of this game begins with the dealer (the computer) giving you $100 to wager with a default wager of $10. The dealer then deals two cards face up. You may wager nothing on a game, or you may wager up to all the credit you have. If you don't want to bet, simply click the Deal button again to deal another set of cards. If you make a wager, the dealer deals the next card. If that card falls within the range formed by the other two cards, you win an amount equal to your wager. Your winnings are automatically added to your balance. If the third card falls outside the range of the first two cards, the dealer wins and your balance is reduced by the amount of your wager. If the third card equals either of the two first cards, the dealer wins. Aces are considered to have the lowest value (1) in the deck and the king the highest (13).
A sample run is shown in Figure 10.6.
Figure 10.6 In Between user interface
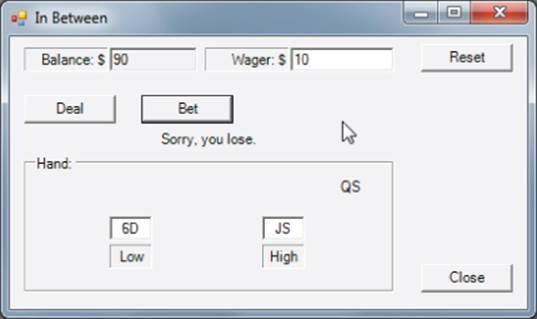
For example, if the first two cards are 6D and JS and the third card is QS, the player loses because the third card (a queen, or a 12 index) falls outside the range of 6 (a six) to 11 (a Jack) index. If the third card is an 11 or a Jack of any suit, the dealer wins because those cards form a tie, and the dealer wins ties. If the third card is 9H, the player wins because the 9 falls inside the range of 6 to 11.
Now that the rules have been stated, how would you design and implement the game? Aw, come on. Don't just continue reading. Take the time to draw up whatever class diagrams you think you need to make the game work. It's the only way you can learn this stuff. Come back and start reading again after you've given the program design some thought.
Again, you can defer the actual code and how it works until after you've read a few things about the game you may want to consider.
Design Considerations
If you think about it, games are actions governed by rules. Indeed, it is within the framework of rules that most games are played. Some require third parties to enforce the rules (such as a referee in football) whereas others may operate with self-enforcement (such as golf). The card game has rules, and it is your program that must enforce those rules. Given that viewpoint, where does your clsCardDeck come into the picture, and how do you enforce the rules of the game?
What Kind of Architecture?
If you step back and look at the forest rather than just the trees, your game is similar to a client-server architecture found in many database applications. The client is the player and the server is clsCardDeck, which “serves” cards to play the game. Simple client-server architectures are often calledtwo-tiered architectures because the design contains two active elements: the client and the server. However, because there are rules to the game, you need to introduce an intermediary into the program to ensure that the rules of the game are enforced. You can draw this design for the game, as shown in Figure 10.7.
Figure 10.7 In Between architecture
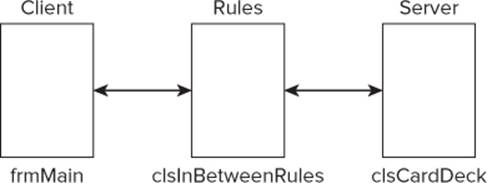
In Figure 10.7, a class named clsInBetweenRules is inserted between the client (frmMain) and the server (clsCardDeck). Because you have introduced another tier over the standard two-tier architecture, the design in Figure 10.7 is a three-tier architecture. (Sometimes programmers simply call anything above a two-tier architecture an N-tier architecture. Stick with the term three-tier because it is more descriptive.)
Sideways Refinement
Using UML class diagrams to serve as a starting point in the program's design was previously discussed. An alternative and less formal design approach is what I call Sideways Refinement. With Sideways Refinement you list the Five Program Steps on the left side of a piece of paper. Then you write to the right of each Program Step those tasks that each element of the program must address. For example, Table 10.1 shows the various steps, the tasks to be performed, and where in the architecture they might be addressed:
Table 10.1 Sideways Refinement for In-Between Program
|
STEP |
ACTION |
RESPONSIBILITY |
|
1. Initialization |
Build and display the form (frmMain). |
Set up form and all background data. |
|
2. Input |
Ask for new cards (frmMain). |
|
|
Get amount of wager (frmMain). |
||
|
Ask for bet (frmMain). |
||
|
3. Process |
Deal a hand (rules). |
Enough cards left in deck (clsCardDeck). |
|
Shuffle (clsCardDeck). |
||
|
Get three cards (clsCardDeck). |
||
|
Determine winner (clsCardDeck). |
||
|
Adjust player balance (rules). |
||
|
4. Display |
Show two cards (frmMain). |
|
|
Show third card (frmMain). |
||
|
5. Terminate |
Close. |
A Sideways Refinement is much less formal than a UML class diagram, but it serves as a good starting point for a program design. (You can always follow a Sideways Refinement with the more formal UML class diagrams.) As pointed out earlier, all but the Process step is normally performed as part of the program with which the user interacts. For the programs you've written thus far, frmMain is the class that presents the user interface for the program.
The class that sets the rules for the game assumes the processing responsibilities. That is, the game assumes that there are enough cards to deal a hand. If there aren't, the deck needs to be shuffled. The rules then ask for three cards. Although you could design the mechanics of the administration of the rules differently if you want, the author decided to determine the winner (or loser) when the first two cards are requested. That is, when the game displays the two cards and asks the player if she wants to bet, the third card is already waiting for display, and the rules class knows if the player is a winner or not before the third card is displayed. As soon as the user clicks the Bet button, the third card displays, and the player's game balance is adjusted accordingly.
Sideways Refinement does not necessarily show the sequencing of the program. Rather, it is meant to show the responsibilities each class has in the program relative to the Five Program Steps.
Now that you know how to design this game, in the following Try It Out you create the version available in the code provided for this chapter on wrox.com.
Try It Out: In Between Card Game (Chapter10ProgramInBetween.zip)
Now that you understand the design behind the game, you are ready to create it.
1. Create a new project in the normal manner.
2. Download Chapter10ProgramInBetween and copy it into the current project.
How It Works
The code for the frmMain class is shown in Listing 10-7. The nature of the code should be familiar to you now. The variable named position needs some explanation, however. The form shown in Figure 10.6 has five labels set across the top of the GroupBox object that I've labeled Hand. Because those labels have no border or text in them, they are not visible. However, when the rules class determines the winner of the hand, it also determines where the third card is to be displayed in the GroupBox object. In Figure 10.6, because the Queen of Hearts (QH) is greater than the high card that was dealt (9C), QH is assigned to the Text property of fifth label object. Therefore, the position variable is simply used to give a display of the third card relative to the range of the first two cards.
Listing 10-7: In Between Card Program. (frmMain.cs)
using System;
using System.Windows.Forms;
public class frmMain : Form
{
const int TIE = 0;
const int PLAYERWINS = 1;
const int DEALERWINS = 2;
int betResult;
int wager;
int balance;
int position;
clsInBetweenRules myRules = new clsInBetweenRules();
string[] cards = new string[3];
private Button btnDeal;
private Button btnClose;
private Label label1;
private TextBox txtWager;
private TextBox txtBalance;
private Label label2;
private GroupBox groupBox1;
private Label lblLow;
private Label label4;
private Label label3;
private TextBox txtHi;
private TextBox txtLow;
private Label lblMore;
private Label lblLess;
private Label lblHi;
private Label lblMiddle;
private Button btnBet;
private Label lblOutcome;
private Button btnReset;
#region Windows code
public frmMain()
{
bool flag;
InitializeComponent();
txtBalance.Text = myRules.Balance.ToString(); // Grub stake
txtWager.Text = myRules.Wager.ToString(); // Default bet $10
flag = int.TryParse(txtBalance.Text, out balance);
flag = int.TryParse(txtWager.Text, out wager);
myRules.Shuffle(); // Shuffle deck
}
public static void Main()
{
frmMain main = new frmMain();
Application.Run(main);
}
private void btnDeal_Click(object sender, EventArgs e)
{
int retval;
ClearRanges(); // Clear old data
lblOutcome.Text = "";
retval = myRules.Balance; // Money left to bet??
if (retval == 0)
{
MessageBox.Show("You're broke. Game over.");
return;
}
retval = myRules.getCardsLeft(); // Enough cards left??
if (retval < 3)
{
lblOutcome.Text = "Deck was shuffled . . . ";
myRules.Shuffle();
}
myRules.DealHand(cards, ref betResult, ref position);
ShowHiLow();
}
private void btnBet_Click(object sender, EventArgs e)
{
bool flag = int.TryParse(txtWager.Text, out wager);
if (flag == false)
{
MessageBox.Show("Dollar bets only. Re-enter.", "Input Error");
txtWager.Focus();
return;
}
switch (betResult)
{
case TIE: // This is a tie
lblOutcome.Text = "Tie. Dealer wins.";
myRules.Balance = wager;
break;
case PLAYERWINS:
lblOutcome.Text = "You win!";
myRules.Balance += wager;
break;
case DEALERWINS:
lblOutcome.Text = "Sorry, you lose.";
myRules.Balance = wager;
break;
}
txtBalance.Text = myRules.Balance.ToString();
switch (position)
{
case 1:
lblLess.Text = cards[2];
break;
case 2:
lblLow.Text = cards[2];
break;
case 3:
lblMiddle.Text = cards[2];
break;
case 4:
lblHi.Text = cards[2];
break;
case 5:
lblMore.Text = cards[2];
break;
default:
MessageBox.Show("Results error.", "Processing Error");
break;
}
}
private void ShowHiLow()
{
txtLow.Text = cards[0];
txtHi.Text = cards[1];
}
private void ClearRanges()
{
lblLess.Text ="";
lblLow.Text = "";
lblMiddle.Text = "";
lblHi.Text = "";
lblMore.Text = "";
}
private void btnReset_Click(object sender, EventArgs e)
{
myRules.Balance = 100;
txtBalance.Text = "100";
txtWager.Text = "10";
ClearRanges();
}
private void btnClose_Click(object sender, EventArgs e)
{
Close();
}
}
The code in the constructor simply initializes the textbox objects for play. When the user clicks the Deal button object, several method calls to the clsInBetweenRules class are made. The first checks to see if the player has any credit left with which to play the game. If the player is broke, the game cannot continue. The user can click the Reset button to reset her beginning balance. If the player has a balance, the program checks to see if there are enough cards left to play a hand. If not, the player sees a message stating that the deck was shuffled and the game continues. Finally, the hand is dealt and the two cards are shown to the dealer. If you look at the way the code works, the outcome of the bet is already known at this point. The outcome of the hand is simply a matter of whether the player clicks the Bet button.
Using the ref Keyword
If the player does decide to play, the btnBet_Click() code determines how things display to the user. When the hand was “dealt” by the call to
myRules.DealHand(cards, ref betResult, ref position);
the variable betResult determines who won the bet, and the variable position determines where among the five labels the third card displays, as explained earlier. The variable cards is an array filled in with the three cards for the hand being played.
Because C# methods can return only a single value, you cannot use a simple return statement within the method to return all the information you need from the call. Instead, you pass the cards array to the method along with the betResult and position variables. However, because the keyword ref appears before the two variables in the call, C# knows not to send each variable's rvalue to the method but sends the lvalue instead. Any time the ref keyword prefixes a variable name in a method call, the lvalue of the variable is passed to the method. Recall that arguments sent to methods pass a copy of the variable's rvalue to a method by default. However, when the ref keyword is used, the lvalue of the variable is sent to the method. Because an lvalue tells the method where the variable “lives” in memory, the method can permanently change the value of the variable. The code uses this mechanism to permanently change the values of betResult and position. The two switch statements in the btnBet_Click() method use these two variables to inform the player of the outcome of her bet.
Listing 10-8 shows the code for the clsInBetweenRules class.
Listing 10-8: Source Code for Game Rules (clsInBetweenRules.cs)
using System;
class clsInBetweenRules
{
// =============== symbolic constants ===================
const int TIE = 0;
const int PLAYERWINS = 1;
const int DEALERWINS = 2;
// =============== static members =======================
// =============== instance members =====================
private int balance; // The player's money balance
private int wager; // Amount of current bet
private int lowCard; // The low card value 1 13
private int lowCardIndex; // The position of this card in pips
private int hiCard; // The high card value 1 13
private int hiCardIndex; // The position of this card in pips
private int dealtCard; // The dealt card value 1 13
private int dealtCardIndex; // The position of this card in pips
private clsCardDeck myDeck; // A card deck object
// =============== constructor(s) ======================
public clsInBetweenRules()
{
balance = 100;
wager = 10;
myDeck = new clsCardDeck();
}
// =============== property methods =====================
public int Balance
{
get
{
return balance;
}
set
{
if (value >= 0)
{
balance = value;
}
}
}
public int Wager
{
get
{
return wager;
}
set
{
if (value > 0)
{
wager = value;
}
}
}
// =============== helper methods =======================
/*****
* Purpose: Deals out the next three cards and fills in the hand[]
* array that was passed in from frmMain. It always arranges
* cards so lower of first two cards is displayed on the
* left of frmMain.
*
* Parameter list:
* string[] hand the three cards for a hand
*
* Return value:
* void
*
* *****/
private void SetCards(string[] hand)
{
int temp;
hand[0] = myDeck.getCardPip(lowCardIndex);
hand[1] = myDeck.getCardPip(hiCardIndex);
hand[2] = myDeck.getCardPip(dealtCardIndex);
if (lowCard == hiCard || lowCard < hiCard) // A tie
{
hand[0] = myDeck.getCardPip(lowCardIndex);
hand[1] = myDeck.getCardPip(hiCardIndex);
}
else
{
temp = hiCard; // Swap hi and lo cards
hiCard = lowCard;
lowCard = temp;
temp = hiCardIndex; // Swap hi and lo indexes
hiCardIndex = lowCardIndex;
lowCardIndex = temp;
hand[0] = myDeck.getCardPip(lowCardIndex);
hand[1] = myDeck.getCardPip(hiCardIndex);
}
}
/*****
* Purpose: Sets the outcome of the bet and tells where to display the
* down card.
*
* Parameter list:
* ref int outCome who won the game
* ref int position where to display the down card
*
* Return value:
* void
*
* CAUTION: the two ints are passed in by reference, which means this
* method can permanently change their values.
* *****/
private void SetWinnerAndPosition(ref int outCome, ref int position)
{
if (dealtCard == lowCard) // Dealt and low card equal
{
outCome = DEALERWINS;
position = 2;
return;
}
if (dealtCard < lowCard) // Dealt card less than low card
{
outCome = DEALERWINS;
position = 1;
return;
}
if (dealtCard > lowCard && dealtCard < hiCard) // Card in range
{
outCome = PLAYERWINS;
position = 3;
return;
}
if (dealtCard == hiCard) // Dealt card equals hi card
{
outCome = DEALERWINS;
position = 4;
return;
}
if (dealtCard > hiCard) // Dealt card equals hi card
{
outCome = DEALERWINS;
position = 5;
return;
}
}
// =============== general methods ======================
/*****
* Purpose: Gets the first card and treats it as first displayed card
*
* Parameter list:
* n/a
*
* Return value:
* void
*
* CAUTION: King is a special case since its modulus = 0
* *****/
public void getFirstCard()
{
lowCardIndex = myDeck.getOneCard();
lowCard = lowCardIndex % 13;
if (lowCard == 0) // A King
lowCard = 13;
}
/*****
* Purpose: Gets second card and treats it as second displayed card
*
* Parameter list:
* n/a
*
* Return value:
* void
*
* CAUTION: King is a special case since its modulus = 0
* *****/
public void getSecondCard()
{
hiCardIndex = myDeck.getOneCard();
hiCard = hiCardIndex % 13;
if (hiCard == 0) // A King
hiCard = 13;
}
/*****
* Purpose: Gets the last card and treats it as down card
*
* Parameter list:
* n/a
*
* Return value:
* void
*
* CAUTION: King is a special case since its modulus = 0
* *****/
public void getDealtCard()
{
dealtCardIndex = myDeck.getOneCard();
dealtCard = dealtCardIndex % 13;
if (dealtCard == 0) // A King
dealtCard = 13;
}
/*****
* Purpose: Shuffle the deck
*
* Parameter list:
* n/a
*
* Return value:
* void
*
* *****/
public void Shuffle()
{
myDeck.ShuffleDeck();
}
/*****
* Purpose: Gets the number of cards left in the deck.
*
* Parameter list:
* n/a
*
* Return value:
* int the number of cards left
*
* CAUTION: King is a special case since its modulus = 0
* *****/
public int getCardsLeft()
{
return myDeck.getCardsLeftInDeck();
}
/*****
* Purpose: Deals out a hand. Note that all three cards are dealt at
* once, but the dealt card is not displayed until after the
* bet. The results are known before the bet, but not revealed
* now.
*
* Parameter list:
* string[] hand the three cards for a hand
* ref int outCome who won the game
* ref int position where to display the down card
*
* Return value:
* void
*
* CAUTION: the two ints are passed in by reference, which means this
* method can permanently change their values.
* *****/
public void DealHand(string[] hand, ref int outCome, ref int position)
{
getFirstCard(); // Get first two display cards
getSecondCard();
getDealtCard(); // Get down card
SetCards(hand); // Rearrange if necessary
// Who wins and where to display down card
SetWinnerAndPosition(ref outCome, ref position);
}
}
One thing to notice in the code presented in Listings 10-7 and 10-8 is that frmMain knows nothing about clsCardDeck. (That is, there is no coupling between the two classes.) All interaction with the deck of cards is managed by the clsInBetweenRules class. This is as it should be. If the game were not played with this enforced isolation between the card deck and the player, it would be like allowing gamblers in Vegas to deal their own hands of blackjack…not going to happen!
To accommodate the requirements of the game, you can add two new methods to the clsCardDeck class. These two methods are shown in Listing 10-9.
Listing 10-9: Source Code for getOneCard() (clsCardDeck.cs)
/**
* Purpose: Get the index of a dealt card. This overloads the method
* that returns the string representation of the card.
*
* Parameter list:
* void
*
* Return value:
* int the index into the pips array or 0 if no more cards
* left in deck.
*/
public int getOneCard()
{
nextCard++;
if (nextCard <= DECKSIZE)
{
return deck[nextCard];
}
else
{
return 0;
}
}
/**
* Purpose: Returns the number of cards left in the deck.
*
* Parameter list:
* void
*
* Return value:
* int A count of card remaining in the deck.
*/
public int getCardsLeftInDeck()
{
return DECKSIZE nextCard;
}
The getOneCard() method is designed to return the index of a card rather than its string representation. The getCardsLeftInDeck() method simply returns the number of cards left in the deck. Note how easy it was to make this change for the game at hand. If you think about it, most card games will likely need these methods, too.
Although this program involves more code than others you've studied, you should follow what each method does. However, to make sure you do understand what's going on in the code, study it and describe in your own mind what happens as the game is played. When you feel you understand the program flow, rerun the program with breakpoints and single-step through the code to see if your expectations match what actually happens. If they don't, you need to figure out why. This kind of exercise can help you develop your debugging skills…the subject of the next chapter.
Summary
In this chapter you learned the details of property methods and how they are part of the user interface for a class. It is the set statement blocks of the property methods that serve as your last line of defense against having a class object put into an unwanted state. You should also have a more complete appreciation of how the private access specifier for the class properties helps to safeguard the integrity of the data.
Someone once said, “Practice makes perfect.” Well, not really. Perfect practice makes perfect. However, although perfection in writing classes may be your goal, a more reasonable objective right now is to get experience designing and writing classes for objects of your own creation. You are now familiar with the benefits of both UML class and Sideways Refinement design methods. Both are worthwhile tools to hang on your tool belt.
You should spend enough time to answer the exercises at the end of this chapter before moving on to Chapter 11. After completing the exercises, try to think up a few programming problems of your own design. Thinking about programming problems, designing a solution, and then implementing that solution is the only way to learn programming.
Exercises
You can find the answers to the following exercises in Appendix A.
1. Another game similar to the In Between game discussed in this chapter is called Acey-Deucey. This variant of the game is played exactly the same way, but the high card in the deck is an ace, and a two becomes the lowest card. What would you do to implement this variation of the game instead of In Between?
2. If you made the changes suggested in Exercise 1, can you see any improvements that might make the code easier to understand?
3. The game of Euchre uses a subset of a standard deck of cards. Specifically, only the nines, tens, jacks, queens, kings, and aces are used. If you want to write a program that plays Euchre, what problems does clsCardDeck pose?
4. Given the problem stated in Exercise 3, how would you resolve the problem?
5. Modify the program shown in Figure 10.1 to display only those cards that apply to the game of Euchre.
What You Learned in This Chapter
|
TOPIC |
KEY POINTS |
|
Class constructors |
How to write overloaded constructors. |
|
Cohesion |
Ability to state the purpose of a method in one or two sentences. |
|
Coupling |
Class methods should not be dependent on other class methods. |
|
Property methods |
Used to get or set the values of class properties. They form the class interface. |
|
Getters |
A property method used to fetch a property value. |
|
Setters |
A property method used to change the state of a property. |
|
Class design |
Design considerations that make a good, reusable class. |
|
3-tier architecture |
How classes can be used to augment N-tiered architectures. |