Beginning Object-Oriented Programming with C# (2012)
Part IV
Storing Data
Chapter 13: Using Disk Data Files
Chapter 14: Using Databases
Chapter 15: Using LINQ
Chapter 13
Using Disk Data Files
What you will learn in this chapter:
· Two basic file types: text and binary
· The advantages and disadvantages of each file type
· Computer streams
· Sequential files
· Random access files
· Serialization and deserialization
· Multiple document interface (MDI) programs
· Writing program menus
wrox.com code downloads for this chapter
You can find the wrox.com code downloads for this chapter at www.wrox.com/remtitle.cgi?isbn=9781118336922 on the Download Code tab. The code in the Chapter13 folder is individually named according to the names throughout the chapter.
This chapter shows you how to use disk data files. If you think about it, computers would lose much of their functionality if there weren't a way to permanently store, or persist, the data generated by a computer. Things that you take for granted today, such as making an airline reservation, must have been a nightmare before computers were in widespread use.
Up to this point you have written programs whose usefulness ended when the program ended. After you master the contents of this chapter, you can write programs that can store data, enabling you to recall that data at some later time. Programs take on a whole new light when you know how to persist data.
Let's get started.
Directories
Anytime I want to explore a new area in C#, the first thing I do is find out which namespaces are involved with that area. Because you're going to learn about file input and output (I/O), I simply typed in using System. at the top of the program and started looking for namespaces that may apply.
Sure enough, up popped System.IO. Just highlight IO and press the F1 key, and you'll get information about the IO namespace. All kinds of interesting things come up, but concentrate first on those classes that deal with directory and drive information.
The DriveInfo Class
Just as Ed McMahon used to say on the Johnny Carson show, “Everything you could ever possibly want to know….,” about a disk drive is in the DriveInfo class. A few of the more useful methods and properties are presented in Table 13.1.
Table 13.1 The DriveInfo Class
|
Method or Property |
Description |
|
GetDrives() |
Returns an array with all the logical drives of the computer |
|
AvailableFreeSpace |
Gives the amount of free disk space (in bytes) on a drive |
|
DriveFormat |
Returns the format for the drive (such as NTFS or FAT32) |
|
DriveType |
Returns the type of drive (such as fixed, removable, RAM, and so on) |
|
Name |
Gives the name of the drive |
|
TotalFreeSpace |
Gives the amount of unused space on the drive |
|
TotalSize |
Gives the capacity of the drive |
If you look in the IO namespace, you can also discover that there are classes named Directory and DirectoryInfo. These two classes present related, albeit different, information.
Directory Class
Table 13.2 presents a partial listing for methods found in the Directory class. (You can always get more complete information using the online help for the class.)
Table 13.2 The Directory Class
|
Methods |
Description |
|
CreateDirectory() |
Creates a directory for a given pathname |
|
Delete() |
Deletes a specified directory |
|
Exists() |
Determines if a specified directory exists |
|
GetCreationTime() |
Returns a DateTime type with the time a directory was created |
|
GetCurrentDirectory() |
Gets the current working directory of an application |
|
GetFiles() |
Returns the filenames in a given directory |
|
GetLastAccessTime() |
Returns the date and time the directory was last accessed |
|
GetLastWriteTime() |
Returns the data and time the directory was last written to |
|
GetParent() |
Returns the parent directory for a given path name |
|
Move() |
Moves a file or directory to a new location |
|
SetCreationTime() |
Sets the time for the creation of a file or directory |
|
SetLastWriteTime() |
Sets the date and time the file or directory was last written to |
DirectoryInfo Class
Finally, Table 13.3 presents the methods and properties for the DirectoryInfo class. The DirectoryInfo class implements the FileSystemInfo interface. This means that you should also check the FileSystemInfo interface to see what properties and methods that interface requires.
Table 13.3 The DirectoryInfoClass
|
Methods or Property |
Description |
|
Create() |
Creates a directory. |
|
CreateSubdirectory() |
Creates a subdirectory. |
|
Delete() |
Deletes a given directory. |
|
Equals() |
Compares directory objects. |
|
GetDirectories() |
Returns the subdirectories for the current directory. |
|
GetFiles() |
Returns the files in the current directory. This is overloaded so that you can do searches easily. |
|
GetFileSystemInfos() |
Returns strongly typed FileSystemInfo for files and subdirectories. |
|
MoveTo() |
Moves a DirectoryInfo object's contents to a specified path. |
|
Exists |
Returns a value to indicate if a directory exists. |
|
Extension |
Returns a string that represents the extension component of a filename. |
|
FullName |
Returns the full path of a directory or path. |
With the properties and methods presented in the three preceding tables, you can obtain just about all the information you need to manipulate directories.
In the next Try It Out you write a program that exercises some of the methods presented in Tables 13.1, 13.2, and 13.3. You might try to work in a few other methods in the example just to see how they work.
Try It Out: Using Directories (Chapter13ProgramDirectories.zip)
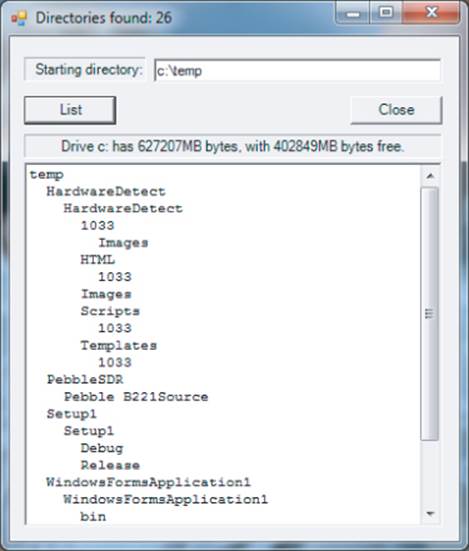
The program shown in Figure 13.1 uses some of the directory methods and properties presented in the previous tables. The user types in a drive and directory (that is, a pathname) he is interested in and clicks the List button to show the directories in that directory. The program then presents a list of the directories and subdirectories. By the way, you may not want to type in just the drive name, like C:\. My C drive had 158,831 directories and subdirectories, and it took over one-half hour for the program to run to completion.
Figure 13.1 Sample run of directory program
To create the program:
1. Start a new project in the usual manner.
2. Add the form objects using Figure 13.1 as a guideline.
3. Add the code shown in Listing 13-1 to the project. The code may be downloaded from the Chapter13ProgramDirectories.zip file.
Listing 13-1: Program to Present a Directory List (frmMain.cs)
using System;
using System.IO;
using System.Collections;
using System.Windows.Forms;
public class frmMain : Form
{
private ListBox lstDirectories;
private Label label1;
private TextBox txtStartingPath;
private Button btnClose;
private Label lblDriveInfo;
private Button btnList;
#region Windows code
public frmMain()
{
InitializeComponent();
}
public static void Main()
{
frmMain main = new frmMain();
Application.Run(main);
}
private void btnList_Click(object sender, EventArgs e)
{
string startingPath;
int count;
int i;
ArrayList dirs = new ArrayList();
// Where to start the listing
startingPath = @txtStartingPath.Text;
try
{
DirectoryInfo myDirInfo = new DirectoryInfo(startingPath);
if (myDirInfo.Exists == false)
{
MessageBox.Show("Cannot find directory. Re-enter.", "Directory Not
Found");
txtStartingPath.Focus();
return;
}
clsDirectory myDirs = new clsDirectory();
ShowDriveInfo();
lstDirectories.Items.Clear();
count = myDirs.ShowDirectory(myDirInfo, 0, dirs);
for (i = 0; i < dirs.Count; i++)
{
lstDirectories.Items.Add(dirs[i]);
}
this.Text = "Directories found: " + count.ToString();
}
catch (Exception ex) // Something went wrong?
{
MessageBox.Show("Error: " + ex.Message, "IO Error");
return;
}
}
/*****
* Purpose: This shows some size info about the drive selected.
*
* Parameter list:
* n/a
*
* Return type:
* void
******/
private void ShowDriveInfo()
{
int pos;
long driveBytes;
string buff;
try
{
pos = txtStartingPath.Text.IndexOf('\\');// Get drive name
buff = txtStartingPath.Text.Substring(0, pos);
DriveInfo myDrive = new DriveInfo(@buff); // Get its info
driveBytes = myDrive.TotalSize / 1000000;
lblDriveInfo.Text = "Drive " + buff + " has " +
driveBytes.ToString() + "MB bytes, with "
+ myDrive.TotalFreeSpace/1000000
+ "MB bytes free.";
}
catch
{
txtStartingPath.Text = "";
}
}
private void btnClose_Click(object sender, EventArgs e)
{
Close();
}
}
How It Works
The program begins by including the Collections and IO namespaces. The real action, however, takes place in the btnList_Click() event code. The starting pathname entered by the user is assigned into the variable startingPath. The program instantiates a DirectoryInfo object namedmyDirInfo, passing the user's path information to the constructor.
If you want to get a list of all the drives currently available, you could use the following code:
DriveInfo[] listDrives = DriveInfo.GetDrives();
This statement creates a string array of all the drives on the system. You could use this information to check that the user typed in a valid drive name.
The code then calls the ShowDriveInfo() method. The ShowDriveInfo() method is simply a helper method that collects some statistics about the disk drive that the user entered. The code creates a DriveInfo object named myDrive, passing the drive name to its constructor. The code then gathers some statistics about the drive and displays them in a label object. The storage statistics are divided by one million simply to express the stats in terms of megabytes. (Remember that a megabyte is actually a thousand kilobytes, or 1,048,576 bytes = 1024 bytes ∞ 1024 bytes.) You could also use
driveBytes = myDrive.AvailableFreeSpace;
to display the free space on the drive. This is the hard way just to show how to use those methods.
The program then creates a clsDirectory object named myDirs and calls the ShowDirectory() method. The code for the clsDirectory class is shown in Listing 13-2.
Listing 13-2: Source Code for clsDirectory (clsDirectory.cs)
using System;
using System.Collections;
using System.IO;
class clsDirectory
{
const string TAB = " ";
static private int visits; // How many times here
//=============== Instance variables ===================
private int dirCounter; // How many directories
//================ Constructor ==========================
public clsDirectory()
{
dirCounter = 1; // The directory passed in
}
//================= Property methods =====================
public int DirectoryCount // Make it read-only
{
get
{
return dirCounter;
}
}
/*****
* Purpose: This method creates a directory list at a given path
*
* Parameter list:
* DirectoryInfo curDir the current directory info
* int inLevel how deep in list
* ArrayList dirs array of directory strings
*
* Return value:
* int directory count or 1 on error
*
*****/
public int ShowDirectory(DirectoryInfo curDir, int inLevel,
ArrayList dirs)
{
int i;
string indent = "";
try
{
for (i = 0; i < visits; i++) // Indent subdirectories
{
indent += TAB;
}
dirs.Add(indent + curDir.Name); // Add it to list
visits++;
foreach (DirectoryInfo subDir in curDir.GetDirectories())
{
dirCounter++;
ShowDirectory(subDir, visits, dirs); // Recurse
// FileInfo[] files = subDir.GetFiles();
}
visits--; // Go back to previous directory level
if (indent.Length > 0) // Adjust the indent level accordingly
indent.Substring(0, indent.Length - TAB.Length);
}
catch (Exception ex)
{
return 1; // Could do something with ex.Message
}
return dirCounter;
}
}
Most of the code in Listing 13-2 should look familiar by now. The ShowDirectory() method is passed three arguments: 1) A DirectoryInfo object. 2) An integer that keeps track of where you are in the directory structure. 3) An ArrayList variable to store the directory names. Note thatShowDirectory() is called recursively each time a directory is read. That way you can get a list of subdirectories and traverse those, too. The variable named visits keeps track of how far down the directory tree you are at any given moment. The visits variable is also used to indent the directory names for display in the listbox object. The recursive calls are performed by the loop:
foreach (DirectoryInfo subDir in curDir.GetDirectories())
{
dirCounter++;
ShowDirectory(subDir, visits, dirs); // Recurse
// FileInfo[] files = subDir.GetFiles();
}
You also keep a count of the directories read with the variable dirCounter. After all the directories have been read, this number displays in the title bar of the form. If you want to get a list of the files in a given subdirectory, uncomment the line in the foreach loop. You can then look at the files variable to see the files in each directory.
You should single-step through this program using the debugger to inspect each of the variables as the program is run. This gives you a better feel for how the DirectoryInfo class works.
File Class
The File class presents you with a number of useful methods that you will want to use in your programs. A partial list of the methods in the File class is presented in Table 13.4.
Table 13.4 The File Class
|
Method |
Description |
|
AppendAllText() |
Appends a string of text to a specified file. The method is overloaded so that different encoding schemes may be used. |
|
AppendText() |
Uses a StreamWriter object to append UTF-8-encoded text to a specified file. UTF-8 is an 8-bit Unicode Transformation Format that is backward compatible with the ASCII character set. |
|
Copy() |
Copies a specified file. |
|
Create() |
Creates a specified file. |
|
CreateText() |
Creates or opens a file for UTF-8 encoded text. |
|
Delete() |
Deletes a specified file. |
|
Exists() |
Checks to see if a specified file exists. |
|
GetCreationTime() |
Returns the date and time a file was created. |
|
Move() |
Moves a specified file to a specified location. |
|
Open() |
Uses a FileStream object to open a specified file. |
|
OpenRead() |
Opens an existing file for reading. |
|
OpenText() |
Opens a UTF-8 file for reading. |
|
OpenWrite() |
Opens an existing file for writing. |
|
ReadAllBytes() |
Opens a binary file and copies the contents into a byte array. (Each ReadAll*() method has a corresponding WriteAll*() method.) |
|
ReadAllLines() |
Opens a text file, reads all lines in the file into a string array, and closes it. |
|
ReadAllText() |
Opens a text file, reads the contents into a string, and closes it. |
|
Replace() |
Replaces the content of one file with that of another file, deleting the original file and making a backup of the replaced file. |
|
SetAttributes() |
Sets the attributes of a file. |
|
WriteAllBytes() |
Creates, writes, and then closes the file after an array of bytes has been written. |
|
WriteAllLines() |
Creates, writes, and then closes a file after writing an array of strings to the file. |
The entries in Table 13.4 are just a partial listing of the methods available to you. If you want a specific File method, check the online help before writing the method.
FileInfo Class
Listing 13-2 commented out a statement that uses the FileInfo class. This class provides a lot of details about the files you find on the system. Some of the more important properties and methods are presented in Table 13.5.
Table 13.5 The FileInfo Class
|
Method or Property |
Description |
|
AppendText() |
Appends text for the current FileInfo object using a StreamWriter |
|
CopyTo() |
Copies an existing file to a new file |
|
Create() |
Creates a new file |
|
CreateText() |
Creates a StreamWriter object that writes a new text file |
|
Delete() |
Deletes a file |
|
Equals() |
Determines if two FileInfo objects are equal |
|
MoveTo() |
Moves a file to a new location with the option to rename it |
|
Open() |
Opens a file with various read/write privileges |
|
Replace() |
Replaces a specified file with contents of current FileInfo file |
|
Attributes |
Gets the file attributes of a specified file |
|
CreationTime |
Gets or sets the creation time for a file |
|
Directory |
Gets an instance of the parent directory |
|
DirectoryName |
Returns the full pathname as a string |
|
Exists |
Determines if a file exists |
|
Extension |
Returns a string representation of a file's extension |
|
FullName |
Returns the complete path of a file or directory |
|
LastAccessTime |
Returns the last time the file was accessed |
|
Length |
Returns the number of bytes in a file |
|
Name |
Returns the name of the current file |
The tables and their associated methods and properties should give you enough information about directories and files for you to manipulate them in your programs. You draw on several of these properties and methods later in this chapter. Before you do that, however, you need to understand the basic types of files that C# supports.
Types of Files
From a programming language point of view, there are two basic types of files: those that contain textual data and those that contain binary data. Often you can determine if a given file is a text or binary file by its name. Filenames are stored on disk using a primary and secondary filename. For example, a file named JaneAtParty.jpg has a primary name of JaneAtParty and a secondary filename of jpg. (Many people refer the primary filename as the filename and the secondary filename as the file's extension.) The secondary filename often gives a clue as to its type. For example, a file extension of txt is normally a textual data file, whereas those ending in jpg are binary image files. Although there is nothing that requires you to use common file extensions, it's usually a good idea to employ them in your programs.
Textual Versus Binary Data Files
Files that contain textual data are usually built from strings appended to the file. When a user types text into a textbox, that data is stored in memory as plain text in a string format. If you want to save that information permanently on disk, it means moving the strings from memory to a disk data file. If the user types a number into a textbox and that number is used numerically (for example, if the square root of that number is taken), the number is stored in memory in a binary format. For that number to be saved in a text file, it must be converted to a string and then written to disk. (You've done this conversion many times before when you used the ToString()method associated with a value type.) In other words, text files contain nothing but string data.
One of the nice things about text files is that it is easy to read the content of a text file. You can use a simple program like Notepad (which comes free with Windows) to read a text file. Because text files are so easy to read, programs that read and write text files are usually easier to debug. Figure 13.2 shows the output of a text file using Notepad to read it.
Figure 13.2 Sample text file

Binary files are a little different from text files. If a number is written to a binary file, no conversion of that number to a string occurs. If an int variable has the value 50, that value is written to the binary file as 4 bytes of data, even though it would only take 2 bytes if it were written as a string. (If Unicode is used, the string takes 4 bytes.) Because int value types are stored in memory as hexadecimal (base-16) values, the number 50 would be stored as 32 00 00 00 in a binary file. If that same value were a decimal data type, it would require 16 bytes to store that value in a binary file.
If some numbers (such as 50) take more bytes to store in memory than their string equivalents, why use binary files? First, if the value were 1 billion instead of 50, a string would require 10 bytes to store it as text but still would take only 4 bytes to store it as a binary value. Second, and more important, values stored as binary can be moved into memory and used without their values needing to be converted from the string format stored on disk to the hexadecimal format used in the program. Avoiding this conversion process makes binary files a little faster when reading numeric data from a disk file into a program.
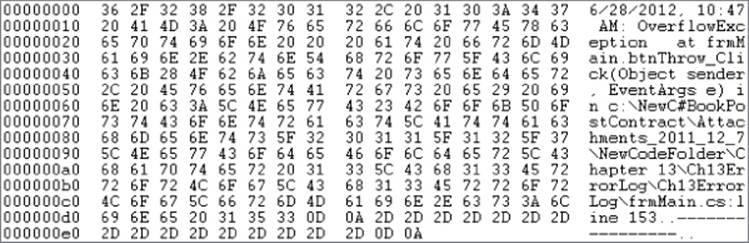
If you take the same file shown in Figure 13.2 and read it using a program that displays that file in a binary format, the output looks like that shown in Figure 13.3.
Figure 13.3 Viewing a text file in binary×
Note
You can read a text file in binary from within Visual Studio. To read a text file in binary, use the menu sequence File → Open → File to navigate to the file you want to view. However, after you select the file and are ready to click the Open button to actually open and read the file, click the down arrow on the right side of the Open button; then select Open With.. and select Binary Editor. You then see the file presented in binary, as shown in Figure 13.3.
This first column in Figure 13.3 begins with the value 00000000. This is the starting count of the number of bytes displayed in hexadecimal (often abbreviated to hex) format for the file. After that, you see the number 36. Because that number is expressed as a hex number, you need to convert it to the base-10 numbering system you are familiar with. Therefore, 2 × 16 + 4 = 32 + 4 = 36. If you look up the ASCII value for 36 (in hex), you find it represents the digit character 6. You can see this translated value in the first position of the last column. The next value in the row is 2F, so 2 × 16 + F = 47. If you look that ASCII value up, it is the slash character (/). (The hex numbering system counts the values 0 through 9 as standard numbers, but 10 through 15 are the letters A through F. Because 0 through F can represent 16 values, it is called a base-16, or hex, numbering system. Therefore, Fhas a numeric value of 15 in a hex numbering system.) Again, at the extreme right of the first row, you can see the hex values displayed as their ASCII character equivalents.
If you look closely at Figure 13.3, you can see the hex values 0D 0A are the last two characters in the file. These two characters form a carriage return-linefeed (CRLF) pair of characters. Think of a carriage return (CR) as moving the cursor to the extreme left of the screen. The linefeed (LF) moves the cursor down one line. Taken together, the CRLF combine to form the newline character, which is represented as \n in a string format. Simply stated, the CRLF sequence causes the subsequent text to appear on a new output line.
In the next Try It Out you create a program that displays the contents of a text file. Often, error log files are text files and may be used for phone-in software support.
Try It Out: Writing a Text File (Chapter13ErrorLog.zip)
In Chapter 11 you read about how using error log messages as part of exception handling can be a useful debugging technique. This section develops a program that you can easily modify to work as an error log class in your programs. A sample run of the program is shown in Figure 13.4.
Figure 13.4 Error log program
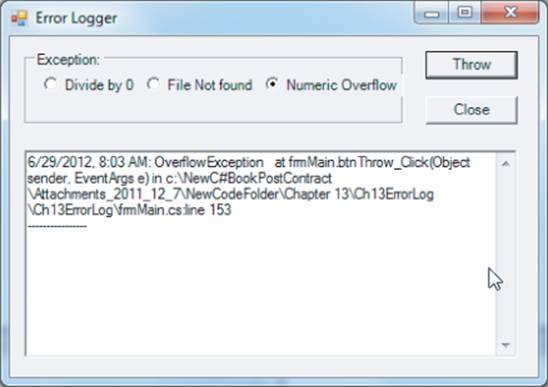
The program lets the user select the type of error she wants to throw to test the error-logging feature. After the selection is made, the user clicks the Throw button, which throws the appropriate exception. That exception is then written to an error log file. The content of the error log file then displays in a listbox object, as shown in Figure 13.4. Because the error log file is a text file, you can use other programs, such as Notepad, to display its contents.
To create this program
1. Create a new project in the normal manner.
2. Add toolbox objects to a Windows form. You can use the code shown in Listings 13-3 and 13-4, or you can download the code file Chapter13ProgramErrorLog.zip.
How It Works
As usual, there are two parts to the program. frmMain provides the shell for testing the class that actually processes the error log file (clsErrorLog). The code for frmMain is presented in Listing 13-3.
Listing 13-3: Program to Throw and Record an Exception (frmMain.cs)
using System;
using System.Windows.Forms;
using System.IO;
public class frmMain : Form
{
string err;
private RadioButton rbNumericOverflow;
private RadioButton rbFileNotFound;
private RadioButton rbDivideBy0;
private Button btnThrow;
private Button btnClose;
private TextBox txtErrorMsgs;
private GroupBox groupBox1;
#region Windows code
public frmMain()
{
InitializeComponent();
rbDivideBy0.Checked = true;
}
public static void Main()
{
frmMain main = new frmMain();
Application.Run(main);
}
private void btnThrow_Click(object sender, EventArgs e)
{
try
{
// To use a general catch, uncomment the next line
// throw new System.OutOfMemoryException();
if (rbDivideBy0.Checked == true)
{
throw new System.DivideByZeroException();
}
else
{
if (rbFileNotFound.Checked == true)
{
throw new System.IO.FileNotFoundException();
}
else
{
throw new System.OverflowException();
}
}
}
catch (DivideByZeroException ex)
{
MessageBox.Show("DivideByZeroException thrown.",
"Exception Error");
err = "DivideByZeroException: " + ex.StackTrace;
}
catch (FileNotFoundException ex)
{
MessageBox.Show("FileNotFoundException thrown.",
"Exception Error");
err = "FileNotFoundException" + ex.StackTrace;
}
catch (OverflowException ex)
{
MessageBox.Show("OverflowException thrown.",
"Exception Error");
err = "OverflowException" + ex.StackTrace;
}
catch (Exception ex)
{
MessageBox.Show(ex.StackTrace, "Exception Error");
err = ex.Message + " " + ex.StackTrace;
}
finally
{
clsErrorLog myErrLog = new clsErrorLog(err);
myErrLog.PathName = Application.StartupPath;
myErrLog.WriteErrorLog();
txtErrorMsgs.Text = myErrLog.ReadErrorLog();
}
}
private void btnClose_Click(object sender, EventArgs e)
{
Close();
}
}
Most of the work is done in the btnThrow_Click() event code. Based upon the type of exception selected by the user, a series of nested if statements causes the appropriate exception to be thrown. The exception then triggers its associated catch block to be processed. For example, if the user selects the divide-by-zero exception, that exception is thrown, and the catch block is executed:
catch (DivideByZeroException ex)
{
MessageBox.Show("DivideByZeroException thrown.",
"Exception Error");
err = "DivideByZeroException: " + ex.StackTrace;
}
A message is shown to the user, and then the string variable err records the type of exception plus the StackTrace information from the Exception object ex.
The finally block instantiates an error log object named myErrorLog, passing in the error string (err) to the constructor. Finally, the WriteErrorLog() method appends the error string to the error log file. The ReadErrorLog() method simply displays the contents of the error log file in a multiline textbox object.
Managing the error log file is done through the clsErrorLog class. To see the code for the error log class, refer to Listing 13-4).
Listing 13-4: Source Code for clsErrorLog (clsErrorLog.cs)
using System;
using System.Collections.Generic;
using System.IO;
class clsErrorLog
{
//=================== Instance members ====================
private string fileName;
private string pathName;
private string errorMessage;
private int errorFlag;
StreamWriter sw = null;
StreamReader sr = null;
//=================== Constructor =========================
public clsErrorLog(string msg)
{
errorMessage = msg;
errorFlag = 0;
fileName = "ErrorLog.txt";
}
//=================== Property Methods ====================
public string FileName
{
get
{
return fileName;
}
set
{
if (value.Length > 0)
fileName = value;
}
}
public string Message
{
get
{
return errorMessage;
}
set
{
if (value.Length > 0)
errorMessage = value;
}
}
public string PathName // Set the path name thingie
{
get
{
return pathName;
}
set
{
if (value.Length > 0)
pathName = value;
}
}
//=================== Helper Methods ======================
//=================== General Methods =====================
/*****
* Purpose: This reads the error log file.
*
* Parameter list:
* n/a
*
* Return value
* string the contents of the error log message file
*****/
public string ReadErrorLog()
{
string buff;
try
{
string pfn = Path.Combine(pathName, fileName);
if (File.Exists(pfn) == true)
{
sr = new StreamReader(pfn);
buff = sr.ReadToEnd();
sr.Close();
return buff;
}
}
catch
{
return "";
}
return "";
}
/*****
* Purpose: This writes an error log message to the error log file.
* The message has the date and time, the type of
* error, and the stack trace for the error.
*
* Parameter list:
* n/a
*
* Return value
* int 0 = no errors, 1 otherwise
*****/
public int WriteErrorLog()
{
errorFlag = 0;
DateTime currentDT = DateTime.Now;
try
{
// Do we have all the stings need?
if (errorMessage.Length != 0 && pathName.Length != 0 &&
fileName.Length != 0)
{
sw = new StreamWriter(Path.Combine(pathName,
fileName), true);
sw.WriteLine(currentDT.ToShortDateString() + ", " +
currentDT.ToShortTimeString() + ": " + errorMessage);
sw.WriteLine("----------------");
sw.Close();
}
else
{
errorFlag = 1; // Something bad happened
}
}
catch (Exception ex)
{
errorMessage = ex.Message;
errorFlag = 1; // Something bad happened
}
return errorFlag;
}
/*****
* Purpose: This writes an error log message to the error log file.
*
* Parameter list:
* string msg the error message to write
*
* Return value
* int 0 = no errors, 1 otherwise
*****/
public int WriteErrorLog(string msg)
{
errorMessage = msg; // Copy the message
errorFlag = WriteErrorLog(); // Now call original one
return errorFlag;
}
}
The StreamWriter Object
The code makes use of a StreamWriter object to write the error message and related information to a disk file named ErrorLog.txt. (Refer to the constructor code in Listing 13-4.) The statement
sw = new StreamWriter(Path.Combine(pathName, fileName), true);
calls the StreamWriter constructor to instantiate the sw StreamWriter object. The constructor is overloaded, and the version you use here has two arguments.
The first argument, Path.Combine(pathName, filename), combines the pathname and the filename to form a single argument. By default, if you do not supply a pathname for the file, C# assumes you want to place the file in the same directory as the executable file for the program. If you stored this program in a folder named TestCode on the C drive and named the project ErrorLogger, the default pathname supplied to the constructor would be
"C:\TestCode\ErrorLogger\bin\Debug\ErrorLog.txt"
The second argument is a boolean with the value true. If the second argument is true, all new text data is appended to the end of the file. If the file does not exist, the file is created. If the second argument is false and the file exists, any current data in the file is overwritten. If the file does not exist and the second argument is false, the file is created, and the new string data is written to the file.
You have overloaded the WriteErrorLog()method for the class. The signatures for the two methods are as follows:
public int WriteErrorLog()
public int WriteErrorLog(string msg)
In frmMain, you passed in the error message to the constructor. That error message is then assigned into a class member named errorMessage. However, if an object of clsErrorLog has already been instantiated and the user then wants to write another error message to the file, he can use the second WriteErrorLog() method that accepts a string as its argument. The code for this version shows that the error message passed in is assigned into errorMessage and then the no-parameter version of WriteErrorLog() is called. The appropriate return value is maintained in either call.
public int WriteErrorLog(string msg)
{
errorMessage = msg; // Copy the message
errorFlag = WriteErrorLog(); // Now call original one
return errorFlag;
}
The code for the WriteErrorLog() that does the real work is embodied within a try-catch block. This code block is always a good idea because electromechanical devices are the Achilles' heel of most computer systems. The WriteLine() method of the StreamWriter object is used to write the error message to the file. The WriteLine() method differs from the Write() method in that WriteLine() appends a newline character at the end of the string currently being saved to disk. The statements follow:
sw.WriteLine(currentDT.ToShortDateString() + ", " +
currentDT.ToShortTimeString() + ": " + errorMessage);
sw.WriteLine("----------------");
sw.Close();
The first call to WriteLine() writes the current date and time to the file, followed by the error message that has been passed to the class. The second call to WriteLine() simply writes out a series of dashes to make the end of each error message entry easier to differentiate. The final statement closes the file by a call to the Close() method of the StreamWriter object.
Reading the Data
After the data has been written to the disk, control eventually returns to the statement:
txtErrorMsgs.Text = myErrLog.ReadErrorLog();
This statement uses the ReadErrorLog() method to read the contents of the error log file. (You could, of course, use Notepad or some equivalent program to read the file.) The code for reading the file is
public string ReadErrorLog()
{
string buff;
try
{
string pfn = Path.Combine(pathName, fileName);
if (File.Exists(pfn) == true)
{
sr = new StreamReader(pfn);
buff = sr.ReadToEnd();
sr.Close();
return buff;
}
}
catch (Exception ex)
{
return ex.Message;
}
return "";
}
Again, the code is surrounded by a try-catch block to prevent an ungraceful death by the program. The program builds the path and filename and assigns them into the variable pfn. The code then uses a File object to determine if that file exists. (You can use File.Exists(pfn) directly without explicit instantiation because it is a static method.) Assuming the file does exist, you instantiate a StreamReader object named sr. The ReadToEnd() method of the StreamReader class reads all the string data in the file and assigns it into buff, which is returned to the caller. In the code, you simply copy the string to the listbox object.
Using clsErrorLog
Unlike most of your previous programs, the clsErrorLog class is actually useful in its own right. If you use try-catch blocks in your code or use if statements to sense error conditions other than exceptions, you can use this class to record what happened. Because you are free to pass in any string you want, its contents can vary according to your information needs when a given error occurs. If it is in a commercial product and someone calls for product support, you can have the caller read the ErrorLog.txt file with Notepad and at least have some idea of what went wrong.
True, the program's simple, but you can always add functionality if you need it. That's one of the nice things about OOP—you can always extend the class to suit your specific needs.
Sequential Versus Random Access Files
The error log program presented in Listings 13-3 and 13-4 writes textual data to a disk file named ErrorLog.txt. If the log file doesn't exist, it is created and the new data is written to the file. If the file exists and already has information stored in it, new data is appended to the end of the existing file. Over the years, this file could grow fairly large if errors continue to be added. Typically, when reading a text file, the reading program starts at the beginning of the file and reads the data in the file to the end.
Sequential Files
The process of continually adding new data to the end of an existing file creates a sequential file. With sequential files, new data is added on to the end of the file. There are no gaps in the data. Indeed, one of the advantages of sequential files is that they are dense. That is, every byte of storage space in a sequential file is filled with a piece of information.
Sequential files are like the old cassette music tapes. If you liked song number nine on the tape, you had to fast-forward the tape to that particular song to play it. If you were good at it, you could press the fast-forward button on the cassette player, count the required number of seconds in your head, and then press the play button. With practice, you could get close to your wanted song. The DVD players of today make this “timed search” seem archaic. You simply skip over the tracks you don't want to hear and immediately begin listening to the song of choice.
If you can visualize a disk file like a music tape, it would look something like Figure 13.5.
Figure 13.5 A sequential data file
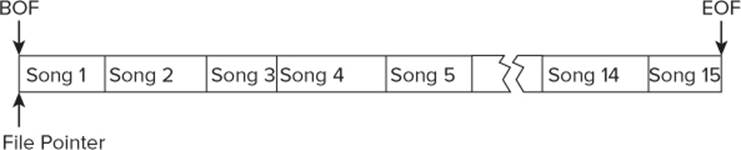
The first thing to notice in the figure is that each song is free to be longer or shorter than any other song. The BOF in Figure 13.5 stands for Beginning Of File, whereas EOF stands for End Of File. You can think of the File Pointer as the ceramic read/write head of disk hardware. Sequential files are read sequentially from BOF to EOF. Therefore, to read the sequential file, the File Pointer is placed at the BOF when the file is opened, and it moves toward the EOF as the file is read. To get to song five, you must read through the first four songs. (Although the fast-forward button sped things up, you still had to read the intervening songs.) Sequential files have an EOF marker written at the end of the file, so the end of the file can be sensed by the program code. When the File Pointer has read through the file and reads the EOF marker, you know that the entire contents of the file have been read.
Advantages and Disadvantages of Sequential Files
For sequential files, the good news is that the files are dense: They waste no disk space. The bad news is that you are forced to read through unwanted data to get to the data you actually want to use. Also, editing the information in a sequential file is awkward at best. In most cases, editing some part of a sequential file means reading the old file into memory, rewriting the old file information up to the point of the edit to a new file, writing the new information to the new file, and then appending the remaining part of the old file onto the new file. Yep…it's as clumsy as described.
Sequential files are often used for information that rarely requires editing or updating. E-mail messages, error logs, documents, letters, and similar types of data are good candidates for sequential files because they store information that isn't often updated. However, the bulk of business transactions often employ information that needs to be updated frequently, so sequential files just aren't suited to the task. That's where random access files come in.
Random Access Files
Random access files are based upon the concept of a fixed record size. For example, when you open a credit account with a store, it records your name and home and work addresses, plus some credit information. Because people do move, change jobs, improve (or ruin) their credit history, get married, and do dozens of other things, such information needs to be updated fairly often. Because information of this nature does require frequent updating, software engineers make sure each record is the same size. This is shown in Figure 13.6.
Figure 13.6 A random access data file

Whereas Figure 13.5 shows records of differing lengths, the byte length of each record in Figure 13.6 is identical. You can visualize a random access record as a line of bricks laid end to end, in which each brick represents the information about one customer. Because each brick has the same size, it's easy to pick up brick number five (perhaps the information about Ms. Smith) from the line, change the information written on the brick, and replace the brick at position number five in the line of bricks.
Fixed Record Sizes
So…big deal. What's the advantage of random access files? You can see the advantage by looking at a simple example. Suppose the information about each customer takes 300 bytes. This means the length of each “information brick” in Figure 13.6 is 300 bytes. Each information brick forms arecord for one customer. The advantage of random access files is that you can pick up the File Pointer and skip over the four bricks (that is, records) you don't want to read and drop the File Pointer down at the exact beginning of brick five. By your not having to read the information contained in the first four bricks, physically getting to brick five is significantly faster.
C# provides you with a file method named Seek() that enables you to scoot the File Pointer to any point in the file you want. The Seek() method can move the File Pointer virtually instantaneously and significantly faster than you can move the File Pointer by reading the records between its current position and the record you want to read. The general syntax for the Seek() method is as follows:
Seek((desiredRecord - 1) * RECORDSIZE, SeekOrigin.Begin);
As with almost everything in computer programming, the first record in a random access file is actually record 0. Therefore, if each RECORDSIZE is 300 bytes and you want to read record number five, you need to position the File Pointer at a spot that is 1,200 bytes into the file, as measured from BOF. Because the wanted record is record number five, the actual position in the file must be calculated as follows:
Seek((desiredRecord - 1) * RECORDSIZE, SeekOrigin.Begin);
Seek((5-1) * 300, SeekOrigin.Begin);
Seek(4 * 300, BOF);
Seek(1200, BOF);
You can read this last statement as: “Use the Seek() Method to Position the File Pointer with a Byte Offset of 1,200 Bytes Relative to the Beginning of File.” This position can be viewed, as shown in Figure 13.7.
Figure 13.7 Using Seek( )
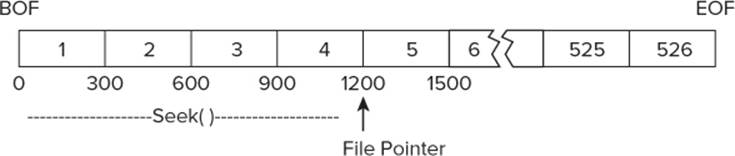
The first argument in the Seek() method is the byte offset that the File Pointer is to be moved expressed as a long data type. The second argument for Seek() is the relative position from which the File Pointer is to move. The second argument of the Seek() method provides three relative points for moving the File Pointer.
The first, SeekOrigin.Begin, positions the File Pointer with the byte offset relative to BOF. This is what is shown in Figure 13.7: The File Pointer is offset 1,200 bytes relative to BOF.
Second, SeekOrigin.Current moves the File Pointer relative to the current location of the File Pointer. For example, if you have read record number five, the File Pointer's current position would be at the start of record number six (byte offset 1,500 relative to BOF). If you want to now read record number four, you could use
Seek(−600, SeekOrigin.Current);
Because the byte offset is negative, the File Pointer is moved 600 bytes back from its current position, which would be at the start of record number four. (Byte offset = 900 in Figure 13.7.) A negative offset, therefore, means that you want to move the File Pointer toward the BOF.
The third relative point for the File Pointer is the end. The statement
Seek(0, SeekOrigin.End);
would place the File Pointer at the end of file (EOF). Where does Seek(-300, SeekOrigin.End) place the File Pointer? In terms of Figure 13.7, your code would be ready to read record number 526. If you think about it, it is an error to have a positive byte offset when SeekOrigin.End is used and you are reading the file. A positive byte offset would mean you are trying to read past the end of the file. Likewise, it is an error to have a negative byte offset when using SeekOrigin.Begin. This would imply placing the File Pointer at a location that is “in front of” the beginning of the file.
Advantages and Disadvantages of Random Access Files
The biggest advantage of random access files is that you can get to a particular record much faster than you can with sequential files. It's common to tie a customer's record location in the file to some unique piece of information associated with the customer. For example, imagine a customer's last name is Smith. The ASCII code for the letter S is 83. Therefore, you could write this customer at record position 83 in the file. If each record is 300 bytes, this person's information would be stored at byte offset 24,900 bytes relative to the BOF. The process to use one piece of information (an S) to derive a second piece of information (record 83) is called hashing. Using a hash code algorithm for record positions within a random access file makes locating an individual record fast. Obviously, if a second Smith is added to the file, this creates a hash collision, and the hash algorithm must accommodate such things. (If you're interested, C# provides a HashAlgorithm class that you can use in your own programs. Use the online help for further details.)
Not only are random access files better at finding a specific piece of information, random access files can update that information faster, too. Because each record in a random access file is exactly the same size, you can easily update a particular record and rewrite that record without needing to copy the entire file. Record updating is much faster with random access files because you must rewrite only the record that has been changed.
The bad news about random access files is that you must design the record size in terms of a worst-case scenario. Even though you know that most peoples' first names do not exceed 10 characters, you might need to design the number of bytes devoted to the customer's first name to be 15 bytes because of that one oddball whose parents thought it would be cute to name their son Guyfromtazmania. The same is true for all the information in the record. Street addresses, city names, e-mail addresses, and so on all must be designed for the largest possible size. Obviously, the trick to designing the byte size for each piece of string data is a balancing act between wasting bytes and recording the requisite information.
Because of this worst-case design philosophy, random access files are not dense like sequential files. If a customer has a short name and lives at an address like 1 Elm St., and has no e-mail address, that customer might use 100 bytes of the 300 bytes you've allowed for him in his record in the file. This means there are information “gaps” in the file where no data are stored. Such a random access file might look like that shown in Figure 13.8.
Figure 13.8 Random Access files are not dense

The shaded portion of each record in Figure 13.8 contains the actual data for a customer, whereas the unshaded portion is a gap where no useful information is present. However, if the person moves from 1 Elm St. to 657 White Oak Rd, you have enough room in the gap to update the customer's information with the longer street address.
Most programmers agree that the wasted bytes in the information “gaps” are a small price to pay for the increased performance and ease of updating that random access files bring to the table. Back in the early 1980s, I bought an IBM PC 5MB hard disk drive for $1,500. At that time, a megabyte of disk storage cost about $300. The price today is approaching 2 cents per megabyte! Although you still need to think about storage requirements, the cost constraints today are much less severe than in the past. As a result, random access rules for file may require frequent updating.
The next Try It Out presents the code for writing a random access file. As you examine the code, pay close attention to those points in the code where record sizes play a role. Notice how the code avoids magic numbers, too.
Try It Out: Random Access Files (Chapter13ProgramRandomAccess.zip)
Now write an electronic phone book to maintain a record of your friends (or customers, or…whomever). The user interface for the program is shown in Figure 13.9.
Figure 13.9 Phone book program
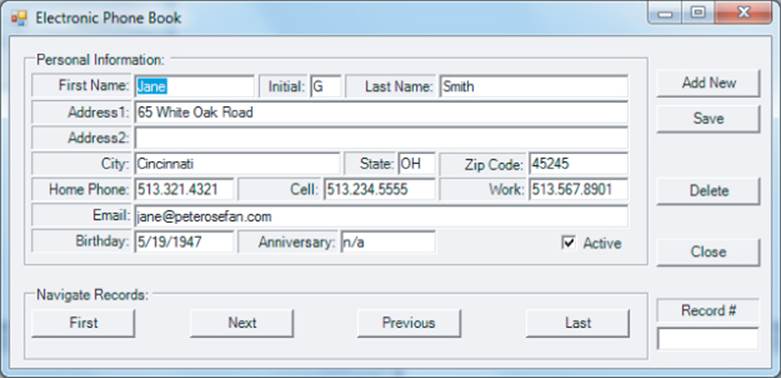
Two groupbox objects are present in the user interface. The first group is used to collect the personal information about the person via a collection of textbox objects. The second groupbox object contains several button objects that may be used to navigate through the records stored in the file.
To implement this program:
1. Create a new project in the usual manner.
2. Arrange the groupbox, label, textbox, and button objects on the form in a manner similar to that shown in Figure 13.9. Because there are a lot of form objects and code for this project, it makes a lot for sense to download the code from Chatper13ProgramRandomAccess.zip.
How It Works
Because this program is a more complex than earlier programs, the #region-#endregion preprocessor directives hide sections of code after they have been written, tested, and debugged. A picture of the source code window when finished is shown in Figure 13.10.
Figure 13.10 Hiding code with #region
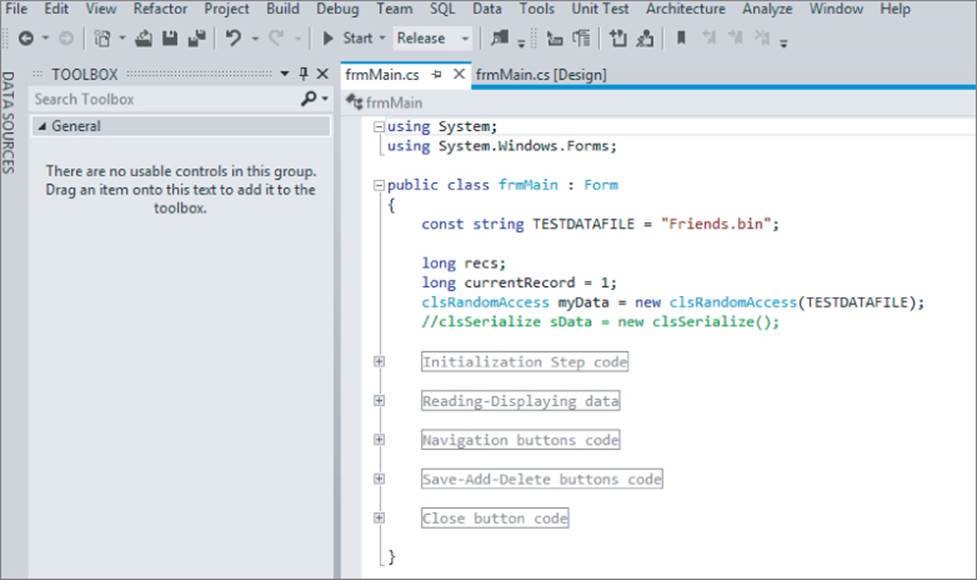
By clicking the plus sign for any given #region, you can expand the code associated with that section. Using #regions can save you a lot of scrolling time for programs that have a lot of source code.
frmMain
The complete listing for frmMain is presented in Listing 13-5.
Listing 13-5: Source Code for Writing Random Access Files (frmMain.cs)
using System;
using System.Windows.Forms;
public class frmMain : Form
{
const string TESTDATAFILE = "Friends.bin";
long recs;
long currentRecord = 1;
clsRandomAccess myData = new clsRandomAccess(TESTDATAFILE);
#region Initialization Step code
private GroupBox groupBox1;
private Label label2;
private TextBox txtMI;
private Label label1;
private Label label6;
private TextBox txtZip;
private Label label7;
private TextBox txtState;
private Label label8;
private TextBox txtCity;
private Label label5;
private TextBox txtAddr2;
private Label label4;
private TextBox txtAddr1;
private Label label3;
private TextBox txtLastName;
private TextBox txtWork;
private Label label11;
private TextBox txtCell;
private Label label10;
private TextBox txtHome;
private Label label9;
private Label label13;
private Label label12;
private TextBox txtEmail;
private CheckBox chkStatus;
private TextBox txtAnniversary;
private Label label14;
private TextBox txtBirthday;
private Button btnAdd;
private Button btnSave;
private Button btnDelete;
private Button btnClose;
private GroupBox groupBox2;
private Button btnFirst;
private Button btnLast;
private Button btnPrevious;
private Button btnNext;
private Label label15;
private TextBox txtRecord;
private TextBox txtFirstName;
#region Windows code
public frmMain()
{
InitializeComponent();
}
public static void Main()
{
frmMain main = new frmMain();
Application.Run(main);
}
#endregion
#region Reading-Displaying data
/*****
* Purpose: Read a record and display the results
*
* Parameter list:
* n/a
*
* Return value:
* void
******/
private int ReadAndShowRecord()
{
int flag = 1;
try
{
myData.Open(myData.FileName);
flag = myData.ReadOneRecord(currentRecord 1);
if (flag == 1)
{
ShowOneRecord();
txtRecord.Text = currentRecord.ToString();
}
else
{
MessageBox.Show("Record not available.", "Error Read");
flag = 0;
}
}
catch
{
flag = 0;
}
myData.Close();
return flag;
}
/*****
* Purpose: Move the record data into the textboxes
*
* Parameter list:
* n/a
*
* Return value:
* void
******/
private void ShowOneRecord()
{
txtFirstName.Text = myData.FirstName;
txtLastName.Text = myData.LastName;
txtAddr1.Text = myData.Address1;
txtAddr2.Text = myData.Address2;
txtCity.Text = myData.City;
txtState.Text = myData.State;
txtZip.Text = myData.Zip;
txtHome.Text = myData.HomePhone;
txtCell.Text = myData.CellPhone;
txtWork.Text = myData.WorkPhone;
txtEmail.Text = myData.Email;
txtBirthday.Text = myData.Birthday;
txtAnniversary.Text = myData.Anniversary;
if (myData.Status == 1)
chkStatus.Checked = true;
else
chkStatus.Checked = false;
}
/*****
* Purpose: Copies data from textboxes to class members.
*
* Parameter list:
* n/a
*
* Return value:
* void
******/
private void CopyData()
{
myData.FirstName = txtFirstName.Text;
myData.MiddleInitial = txtMI.Text;
myData.LastName = txtLastName.Text;
myData.Address1 = txtAddr1.Text;
myData.Address2 = txtAddr2.Text;
myData.City = txtCity.Text;
myData.State = txtState.Text;
myData.Zip = txtZip.Text;
myData.HomePhone = txtHome.Text;
myData.CellPhone = txtCell.Text;
myData.WorkPhone = txtWork.Text;
myData.Email = txtEmail.Text;
myData.Birthday = txtBirthday.Text;
myData.Anniversary = txtAnniversary.Text;
if (chkStatus.Checked == true)
myData.Status = 1;
else
myData.Status = 0;
}
#endregion
#region Navigation buttons code
private void btnFirst_Click(object sender, EventArgs e)
{
int flag;
currentRecord = 1;
flag = ReadAndShowRecord();
}
private void btnNext_Click(object sender, EventArgs e)
{
int flag;
currentRecord++;
flag = ReadAndShowRecord();
if (flag == 0)
{
currentRecord--;
}
}
private void btnPrevious_Click(object sender, EventArgs e)
{
int flag;
currentRecord--;
flag = ReadAndShowRecord();
if (flag == 0)
{
currentRecord++;
}
}
private void btnLast_Click(object sender, EventArgs e)
{
int flag;
myData.Open(myData.FileName);
currentRecord = myData.getRecordCount();
if (currentRecord > 1)
{
flag = ReadAndShowRecord();
}
}
#endregion
#region Save-Add-Delete buttons code
/*****
* Purpose: Save textbox info as a record.
*
* Parameter list:
* object sender control that caused the event
* EventArgs e details about the sender
*
* Return value:
* void
******/
private void btnSave_Click(object sender, EventArgs e)
{
CopyData();
if (myData.Open(TESTDATAFILE) == 1)
{
recs = myData.getRecordCount();
myData.Open(TESTDATAFILE);
myData.WriteOneRecord(recs);
myData.Close();
MessageBox.Show("Data written successfully.");
}
else
{
MessageBox.Show("Could not open file " + TESTDATAFILE,
"File Error");
return;
}
}
/*****
* Purpose: Clears out the textboxes and gets ready to accept new
* record
*
* Parameter list:
* object sender control that caused the event
* EventArgs e details about the sender
*
* Return value:
* void
******/
private void btnAdd_Click(object sender, EventArgs e)
{
ClearTextboxes();
if (myData.Status == 1)
chkStatus.Checked = true;
else
chkStatus.Checked = false;
txtFirstName.Focus();
}
/*****
* Purpose: Clear textboxes.
*
* Parameter list:
* n/a
*
* Return value:
* void
******/
private void ClearTextboxes()
{
txtFirstName.Text = "";
txtMI.Text = "";
txtLastName.Text = "";
txtAddr1.Text = "";
txtAddr2.Text = "";
txtCity.Text = "";
txtState.Text = "";
txtZip.Text = "";
txtHome.Text = "";
txtCell.Text = "";
txtWork.Text = "";
txtEmail.Text = "";
txtBirthday.Text = "";
txtAnniversary.Text = "";
}
/*****
* Purpose: Deletes a record by changing the status member
*
* Parameter list:
* object sender control that caused the event
* EventArgs e details about the sender
*
* Return value:
* void
******/
private void btnDelete_Click(object sender, EventArgs e)
{
DialogResult ask;
ask = MessageBox.Show("Are you sure you want to delete
this record?", "Delete Record", MessageBoxButtons.YesNo);
if (ask == DialogResult.Yes)
{
myData.Status = 0;
myData.Open(myData.FileName);
myData.WriteOneRecord(currentRecord 1);
MessageBox.Show("Record deleted", "Delete Record");
}
}
#endregion
#region Close button code
private void btnClose_Click(object sender, EventArgs e)
{
Close();
}
#endregion
}
The program begins by defining a number of working variables and constants:
const string TESTDATAFILE = "Friends.bin";
long recs;
long currentRecord = 1;
clsRandomAccess myData = new clsRandomAccess(TESTDATAFILE);
These variables have class scope, so they are available to all methods within frmMain. As the TESTDATAFILE filename might suggest, a binary file is used to store the information about each friend. Although you know that file records begin with record 0, you initialize the currentRecordvariable to 1 (the N - 1 Rule again) so the user can think of the first record as record number one. You administer the actual record number.
Testing Tip
If you type in the code for this program, change the Text property of each textbox to give that variable a sample test value. This saves you from typing in data for each textbox each time you test the program. To add a new person, you can view the last person, add 01 to her last name, and then press the Save button. (Don't press the Add New button because it clears all the textbox objects.) On each run, just increment the value by one to differentiate it from the others.
You can use such test values anytime there is a lot of input information that you must enter to test the program.
Enter the requested information into the appropriate textbox objects, and then click the Save button. The btnSave_Click() event code calls the CopyData() method to copy the contents of the textboxes into the appropriate members of the clsRandomAccess object named myData:
private void btnSave_Click(object sender, EventArgs e)
{
CopyData();
if (myData.Open(TESTDATAFILE) == 1)
{
recs = myData.getRecordCount();
myData.WriteOneRecord(recs);
myData.Close();
}
else
{
MessageBox.Show("Could not open file " + TESTDATAFILE,
"File Error");
return;
}
}
The program then opens the data file and, if there is no error opening the file, calls the getRecordCount() method of the clsRandomAccess class. This method simply determines where the new record should be placed in the file. The call to WriteOneRecord() writes the new data to the file, and the file is closed. (Instead of displaying the MessageBox.Show() message, you could use the error log program discussed earlier in this chapter to record the information about the error.)
Navigating the Records
The navigation buttons enable the user to roam around the records stored in the file. The code to provide this feature is simple. For example, if the user clicks the First button, the code sets the currentRecord variable to 1 and calls ReadAndShowRecord() to read and display the information in the appropriate textbox objects:
private void btnFirst_Click(object sender, EventArgs e)
{
int flag;
currentRecord = 1;
flag = ReadAndShowRecord();
}
private void btnNext_Click(object sender, EventArgs e)
{
int flag;
currentRecord++;
flag = ReadAndShowRecord();
if (flag == 0)
{
currentRecord--;
}
}
The Next button is similar, but it increments currentRecord before calling ReadAndShowRecord(). If the user tries to use the Next button on the last record in the file, an appropriate error message displays. Similar checks are made for the Previous button, too.
Delete a Record
To refer to “deleting” a record is misleading because the record isn't actually deleted. Instead, change the status member of the clsRandomAccess member to 0, thus marking it as an inactive record. Why not actually delete the record from the file?
There are several reasons for not deleting a record. First, ask yourself why you want to delete the record. Is this person no longer a friend? Was there a fight where all will be forgiven a few days later and you're just doing it now in a fit of pique? In other words, what is the reason for deleting the record? Most people would say it's to free up disk space. Aw, come on! At $.02/MB, are you really worried about 300 bytes? With a cost of $.0000006 per member, chances are you can afford to store a few inactive members.
Second, deleting any information is just not a good idea…period. For example, you might reuse the clsRandomAccess code as part of a membership program. Perhaps you have a second file that records membership dues payments, which uses a member club record number to tie the payments to the member. If you delete him from the membership file, you now have an orphan record in the membership dues file that can no longer be linked back to a member—active or not.
Also, you can bet that just as soon as you delete such a record, your luck might be such that the IRS comes in the next day and wants to audit your membership dues records. Now what do you do? If you use a status variable rather than physically deleting the record, such requests are easily fulfilled. Transactions-based programs rarely delete such information because without it, constructing a complete audit trail is difficult at best.
Finally, to completely delete the record would require rewriting the entire file after the deletion, bringing us back to a sequential file disadvantage. It's simply easier to mark the record as being deleted.
I would suggest you always use an int variable to record the status of a client. Don't make the status variable a bool. Often customer records appear to have either an active or inactive state, but other states are more common than you might think. For example, a golf club I've done some programming for has membership status states of 1) inactive, 2) active, 3) financial leave of absence, and 4) medical leave of absence. Had I elected to use a two-state bool, I would not have been able to record all data states for member status. As a general rule, a bool should not be used to record data; only a binary state (true, false).
If you delete a record in the program, you can still see the record displayed as you scroll through the file using the navigation buttons. However, the status flag check box object changes its state according to the status flag of the friend being reviewed. If you wanted to prevent the display of inactive friends, a minor change to the ReadAndShowRecord() method would do the trick. (See the exercises at the end of this chapter.)
clsRandomAccess
Now take a peek at the code for the clsRandomAccess class. The code is presented in Listing 13-6.
Listing 13-6: Source Code for clsRandomAccess (clsRandomAccess.cs)
using System;
using System.IO;
class clsRandomAccess
{
// ---------------- Constants ------------------
const int NAMESIZES = 20;
const int ADDRESSSIZES = 30;
const int PHONESIZES = 12;
const int EMAILSIZE = 100;
const int DATESIZES = 10;
const int STRINGSINFILE = 14;
const int RECORDSIZE = NAMESIZES // First name
+ 1 // Middle Initial
+ NAMESIZES // Last name
+ ADDRESSSIZES * 2 // Both addresses
+ NAMESIZES // City
2 // Stateabbreviation
+ 5 // Zip
+ PHONESIZES * 3 // Phone numbers
+ EMAILSIZE // Email address
DATESIZES * 2 // Birthday &
anniversary
+ sizeof(int) // Status
STRINGSINFILE; // String's length
byte
// --------------------- Instance variables ----------------
private string firstName; // Demographics
private string middleInitial;
private string lastName;
private string address1;
private string address2;
private string city;
private string state;
private string zip;
private string homePhone;
private string cellPhone;
private string workPhone;
private string email;
private string birthday;
private string anniversary;
private int status; // Active = 1, inactive = 0
private string errorMessage;
private string fileName;
private FileStream myFile;
private BinaryReader br;
private BinaryWriter bw;
// --------------------- Constructor ------------------
public clsRandomAccess()
{
// initialise instance variables
myFile = null;
errorMessage = "";
fileName = "Friends.bin"; // Default file name
status = 1;
}
public clsRandomAccess(string fn):this() // Call no-arg
constructor first
{
fileName = fn;
}
#region Property Methods
// ------------ Property Methods ------------------
public string FirstName
{
get
{
return firstName;
}
set
{
if (value.Length > 0) // Do we have a string?
{
firstName = value;
if (firstName.Length > NAMESIZES) // Too long
{ // Trim it.
firstName = firstName.Substring(0, NAMESIZES);
}
}
}
}
public string MiddleInitial
{
get
{
return middleInitial;
}
set
{
if (value.Length > 0) // Do we have a string?
{
middleInitial = value;
if (middleInitial.Length != 1) // Too long?
{
middleInitial = "n/a";
}
}
}
}
public string LastName
{
get
{
return lastName;
}
set
{
if (value.Length > 0) // Do we have a string?
{
lastName = value;
if (lastName.Length > NAMESIZES) // Too long?
{
lastName = lastName.Substring(0, NAMESIZES);
}
}
}
}
public string Address1
{
get
{
return address1;
}
set
{
if (value.Length > 0) // Do we have a string?
{
address1 = value;
if (address1.Length > ADDRESSSIZES) // Too long?
{
address1 = address1.Substring(0, ADDRESSSIZES);
}
}
else
{
address1 = "n/a";
}
}
}
public string Address2
{
get
{
return address2;
}
set
{
if (value.Length > 0) // Do we have a string?
{
address2 = value;
if (address2.Length > ADDRESSSIZES) // Too long?
{
address2 = address2.Substring(0, ADDRESSSIZES);
}
}
if (address2 == null) // None given?
{
address2 = "n/a";
}
}
}
public string City
{
get
{
return city;
}
set
{
if (value.Length > 0) // Do we have a string?
{
city = value;
if (city.Length > NAMESIZES) // Too long?
{
city = city.Substring(0, NAMESIZES);
}
}
}
}
public string State
{
get
{
return state;
}
set
{
if (value.Length > 0) // Do we have a string?
{
state = value;
if (state.Length != 2) // Must be 2
{
state = ""; // Error
}
}
}
}
public string Zip
{
get
{
return zip;
}
set
{
if (value.Length > 0) // Do we have a string?
{
zip = value;
if (zip.Length != 5) // Must be 5
{
zip = ""; // Error
}
}
}
}
public string HomePhone
{
get
{
return homePhone;
}
set
{
if (value.Length > 0) // Do we have a string?
{
homePhone = value;
if (homePhone.Length > PHONESIZES)
{
homePhone = homePhone.Substring(0, PHONESIZES);
}
}
if (homePhone == null)
{
homePhone = "n/a";
}
}
}
public string CellPhone
{
get
{
return cellPhone;
}
set
{
if (value.Length > 0) // Do we have a string?
{
cellPhone = value;
if (cellPhone.Length > PHONESIZES)
{
cellPhone = cellPhone.Substring(0, PHONESIZES);
}
}
if (cellPhone == null)
{
cellPhone = "n/a";
}
}
}
public string WorkPhone
{
get
{
return workPhone;
}
set
{
if (value.Length > 0) // Do we have a string?
{
workPhone = value;
if (workPhone.Length > PHONESIZES)
{
workPhone = workPhone.Substring(0, PHONESIZES);
}
}
if (workPhone == null)
{
workPhone = "n/a";
}
}
}
public string Email
{
get
{
return email;
}
set
{
if (value.Length > 0) // Do we have a string?
{
email = value;
if (email.Length > EMAILSIZE)
{
email = email.Substring(0, EMAILSIZE);
}
}
if (email == null)
{
email = "n/a";
}
}
}
public string Birthday
{
get
{
return birthday;
}
set
{
if (value.Length > 0) // Do we have a string?
{
birthday = value;
if (birthday.Length > DATESIZES)
{
birthday = birthday.Substring(0, DATESIZES);
}
}
if (birthday == null)
{
birthday = "n/a";
}
}
}
public string Anniversary
{
get
{
return anniversary;
}
set
{
if (value.Length > 0) // Do we have a string?
{
anniversary = value;
if (anniversary.Length > DATESIZES)
{
anniversary = anniversary.Substring(0,
DATESIZES);
}
}
if (anniversary == null)
{
anniversary = "n/a";
}
}
}
public int Status
{
get
{
return status;
}
set
{
if (value == 1) // Active
{
status = value;
}
else
{
status = 0; // Inactive
}
}
}
public string FileName
{
get
{
return fileName;
}
set
{
if (value.Length > 0)
fileName = value;
}
}
public FileStream MyFile
{
get
{
return myFile;
}
set
{
myFile = value;
}
}
public BinaryReader BinReader
{
get
{
return br;
}
set
{
br = value;
}
}
public BinaryWriter BinWriter
{
get
{
return bw;
}
set
{
bw = value;
}
}
public String ErrorText
{
get
{
return errorMessage;
}
}
#endregion
// ------------ General Methods ------------------
/****
* This creates a random access file.
*
* Parameter list:
* fn a string that holds the file name to use
*
* Return value:
* int 0 if error, 1 otherwise
****/
public int Create(String fn)
{
try
{
myFile = new FileStream(fn, FileMode.OpenOrCreate);
bw = new BinaryWriter(myFile);
fileName = fn;
}
catch
{
return 0;
}
return 1;
}
/****
* This opens a file for reading
*
* Parameter list:
* fn the file name
*
* Return value:
* int 0 if error, 1 otherwise
****/
public int Open(string fn)
{
if (bw == null)
{
return Create(fn);
}
else
{
myFile = new FileStream(fn, FileMode.OpenOrCreate);
}
return 1;
}
/****
* This closes the currently-open file.
*
* Parameter list:
* n/a
*
* Return value:
* void
****/
public void Close()
{
if (myFile != null)
myFile.Close();
if (bw != null)
bw.Close();
if (br != null)
br.Close();
}
/**
* This writes one record to the currently-open file
*
* Parameter list:
* num an integer that holds the record number
*
* Return value:
* int 0 if error, 1 otherwise
*
* CAUTION: this method assumes that the properties contain the
* record to be written.
*/
public int WriteOneRecord(long num)
{
int errorFlag = 1;
try
{
if (myFile != null && bw != null)
{ // Position the file pointer
myFile.Seek(num * RECORDSIZE, SeekOrigin.Begin);
bw = new BinaryWriter(myFile);
bw.Write(firstName); // Write the data
bw.Write(middleInitial);
bw.Write(lastName);
bw.Write(address1);
bw.Write(address2);
bw.Write(city);
bw.Write(state);
bw.Write(zip);
bw.Write(homePhone);
bw.Write(cellPhone);
bw.Write(workPhone);
bw.Write(email);
bw.Write(birthday);
bw.Write(anniversary);
bw.Write(status);
bw.Close();
}
}
catch (IOException ex)
{
errorMessage = ex.Message; // In case they want to
view it.
errorFlag = 0;
}
return errorFlag;
}
/**
* This reads one record and returns it as a string
*
* Parameter list:
* num an integer that holds the record number
*
* Return value
* int 0 if error, 1 otherwise
*/
public int ReadOneRecord(long num)
{
try
{
if (myFile != null)
myFile.Close();
myFile = new FileStream(fileName, FileMode.Open);
br = new BinaryReader(myFile);
if (myFile != null && br != null)
{
// Position the file pointer
myFile.Seek(num * RECORDSIZE, SeekOrigin.Begin);
firstName = br.ReadString();
middleInitial = br.ReadString();
lastName = br.ReadString();
address1 = br.ReadString();
address2 = br.ReadString();
city = br.ReadString();
state = br.ReadString();
zip = br.ReadString();
homePhone = br.ReadString();
cellPhone = br.ReadString();
workPhone = br.ReadString();
email = br.ReadString();
birthday = br.ReadString();
anniversary = br.ReadString();
status = br.ReadInt32();
br.Close();
}
}
catch (IOException ex)
{
errorMessage = ex.Message;
return 0;
}
return 1;
}
/**
* Purpose: This determines the number of records currently in
* the file
*
* Parameter list:
* void
*
* Return value
* long the number of bytes in the file
*/
public long getRecordCount()
{
long records = 0;
long remainder;
try
{
if (myFile != null)
{
// Position the file pointer
records = myFile.Seek(0, SeekOrigin.End);
Close();
}
}
catch (IOException ex)
{
//MessageBox.Show("Error: " + ex.Message);
return 1;
}
remainder = records % RECORDSIZE; // partial record?
records = records / RECORDSIZE; // Calc records
if (remainder > 0) // Partial record…
records++; // …account for it.
return records;
}
}
The code listing seems quite long because…well…it is! However, a good part of its length is due to the Property methods' code, which is fairly repetitious.
Determining a Record Size
The first order of business is to determine the record size necessary to store your data. Near the top of Listing 13-6 you find this:
// ---------------- Constants ------------------
const int NAMESIZES = 20;
const int ADDRESSSIZES = 30;
const int PHONESIZES = 12;
const int EMAILSIZE = 100;
const int DATESIZES = 10;
const int STRINGSINFILE = 14;
const int RECORDSIZE = NAMESIZES // First name
+ 1 // Middle Initial
+ NAMESIZES // Last name
+ ADDRESSSIZES * 2 // Both addresses
+ NAMESIZES // City
+ 2 // State abbrev
+ 5 // Zip
+ PHONESIZES * 3 // Phone numbers
+ EMAILSIZE // Email address
DATESIZES * 2 // Birthday &
anniversary
+ sizeof(int) // Status
STRINGSINFILE; // String's length
byte
The constants are used to set the maximum (worst-case) number of characters for various strings used to store the data. The property methods use these constants to truncate any string that exceeds the prescribed length. You can, of course, adjust these if you want, and the appropriate code reflects the changes after the program recompiles. The reason for using the constants is in case you need to change the size of a field in the data record, the new record size is automatically updated for you, as is all the code that needs to use that new record size. The constants also make it easier to read the code.
A couple of expressions need some explanation. The expression
sizeof(int)
uses the sizeof() operator to determine the number of bytes necessary to store an int value type. You can use the sizeof() operator with any value type. Simply place the value type within the enclosing parentheses.
Using the sizeof() operator makes your code more portable to other compilers and op systems. For example, I'm working on a programming book for microcontrollers where an int is only 2 bytes long instead of 4. Using the sizeof() operator takes care of this difference in data size automatically.
The Length of a String in a Binary File
What's with the expression STRINGSINFILE near the end of the list of constants? The simple explanation is that there are 14 string variables stored in each record. To understand why this is necessary needs a little more detailed explanation.
The purpose to add all the constants together is to determine the number of bytes each record uses. This total is then stored in RECORDSIZE and is used at several places in the class when the File Pointer is moved around in the file. Figure 13.11 can help explain why the value 14 forSTRINGSINFILE is necessary.
Figure 13.11 String Length Byte
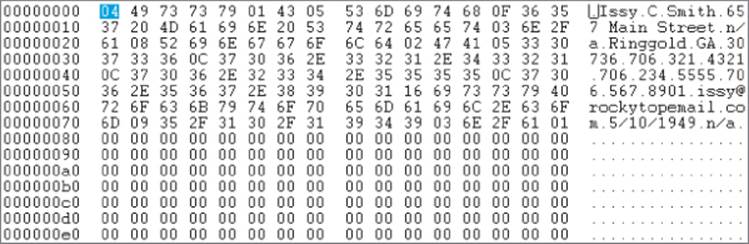
The first line in the figure has the following values:
000000 04 49 73 73 79 01 43 05 53 6D 69 74 68 0F 36 35
If you decode these hex values into their appropriate ASCII values, you get
000000 04 49 73 73 79 01 43 05 53 6D 69 74 68 0F 36 35 (Hex)
I s s y C S m i t h 6 5 (ASCII)
4 1 5 15 (Decimal)
Notice the binary values that precede each string. The number 4 precedes Issy, 1 precedes C, 5 precedes Smith, and 15 precedes 657 Main Street. Why…could it be? Does the number in front of each string tell how many bytes are necessary to store the string? Yep, it does.
When you store strings in a binary data file, the low-level file I/O code needs to know how many bytes are associated with each piece of string data. In some programming languages, the information necessary to store a string in a binary file is a little more complex and is called a string descriptor block. In C#, the string descriptor block is simply called the length byte. Because each string has one length byte and you have 14 strings in the file, you need to account for those length bytes in your total record size calculation—hence, the STRINGSINFILE (because of the 14 strings) at the end of the record size calculation.
If you add up all the byte requirements for all the data in a friend record, you find that RECORDSIZE equals 302 bytes. Therefore, after a few records are written to the file, the file is going to look similar to that shown in Figure 13.7.
Writing a Record
When the user wants to save a record, she clicks the Save button in frmMain. This causes the following methods to be called:
recs = myData.getRecordCount();
myData.Open(TESTDATAFILE);
myData.WriteOneRecord(recs);
The code in getRecordCount() uses the Seek() method to position the File Pointer at the end of the file (EOF). When the File Pointer has reached that position, it returns the number of bytes (as a long) that are in the file from its current position. If you divide the number of bytes in the file by its record size, you get the number of records that have already been written to the file. However, you need to refine the calculation to account for the fact that there could be an “information gap” in the last record. (Refer to Figure 13.8.) If that is the case, the record counter must be incremented by one.
Next, the data file is opened and the code calls WriteOneRecord(), passing in the record position (recs) that is used for the new file. The code for WriteOneRecord() is straightforward:
public int WriteOneRecord(long num)
{
int errorFlag = 1;
try
{
if (myFile != null && bw != null)
{ // Position the file pointer
myFile.Seek(num * RECORDSIZE, SeekOrigin.Begin);
bw = new BinaryWriter(myFile);
bw.Write(firstName); // Write the data
bw.Write(middleInitial);
bw.Write(lastName);
bw.Write(address1);
bw.Write(address2);
bw.Write(city);
bw.Write(state);
bw.Write(zip);
bw.Write(homePhone);
bw.Write(cellPhone);
bw.Write(workPhone);
bw.Write(email);
bw.Write(birthday);
bw.Write(anniversary);
bw.Write(status);
bw.Close();
}
}
catch (IOException ex)
{
errorMessage = ex.Message; // view it.
errorFlag = 0;
}
return errorFlag;
}
The code checks to make sure you have a valid FileStream object (myFile) and then positions the File Pointer at the spot in the file where the new record is to be written (that is, num * RECORDSIZE bytes into the file). The code then creates a BinaryWriter object (bw) and proceeds to write the data to the file. The file is then closed and you're done. (It's a good idea to close a file when you're done with it. In a networking environment, some files cannot be accessed if someone else is using them.) The code is encapsulated within a try-catch block just in case something goes wrong. You could work in the error-logging functionality in the catch block to make a more robust application.
Each string that is written by the BinaryWriter object bw automatically writes the length byte for each string. What about status? It's an int, not a string, so it has no length byte. How does bw know how many bytes to write? The Common Language Runtime knows how many bytes are associated with each value type, so bw writes four bytes for status.
Reading a Record
Reading a record is almost a mirror image of writing the record. The code for the ReadOneRecord() is shown here:
public int ReadOneRecord(long num)
{
try
{
if (myFile != null)
myFile.Close();
myFile = new FileStream(fileName, FileMode.Open);
br = new BinaryReader(myFile);
if (myFile != null && br != null)
{
// Position the file pointer
myFile.Seek(num * RECORDSIZE, SeekOrigin.Begin);
firstName = br.ReadString();
middleInitial = br.ReadString();
lastName = br.ReadString();
address1 = br.ReadString();
address2 = br.ReadString();
city = br.ReadString();
state = br.ReadString();
zip = br.ReadString();
homePhone = br.ReadString();
cellPhone = br.ReadString();
workPhone = br.ReadString();
email = br.ReadString();
birthday = br.ReadString();
anniversary = br.ReadString();
status = br.ReadInt32();
br.Close();
}
}
catch (IOException ex)
{
errorMessage = ex.Message;
return 0;
}
return 1;
}
Once again, a FileStream object named myFile is used to scoot the File Pointer to the location in the file from which you want to read the data. The code then creates a BinaryReader object (br) for use when reading the data. The BinaryReader class provides methods for reading each of the value types offered by C#. The last two statements show how a string is read followed by reading an int data type:
anniversary = br.ReadString();
status = br.ReadInt32();
Each read statement assigns its data into the appropriate member of the class. The order of the read statements must match the order used in the write statements. If you mess up the sequence of variables and their data types, don't be surprised that the data appears messed up as well. After the data is read, the file is immediately closed.
The best way for you to understand this program is to type it in and single-step through the writing and reading of the data. Make sure you use the Step Into (F11) feature of the debugger so you can see how each method works.
Serialization and Deserialization
In OOP programs, reading and writing an object's data (like myData in the previous section) is so common that C# provides a simple mechanism for those tasks. In the previous program, each time you wrote a new friend's information to disk, you were actually saving the state of theclsRandomAccess object named myData to disk. Simply stated, serialization is the act to save, or persist, an object's state to disk. Deserialization is the act to reconstruct an object's state by reading the information stored on disk back into an object of that class. This process can reduce the burden of passing object data around in an application.
Because the primitive data types (byte, char, int, long, double, string, and so on) are not serializable by default, you must explicitly state that the object can be serialized using the [Serializable] attribute at the top of the class source file of the object to be serialized. This marks the object's data as serializable.
Time-Saving Tip
If you fail to mark a class as serializable using the [Serializable] attribute after you have already compiled the program, the program will fail. The error message tells you that one (or more) of the class members does not have the [Serializable] attribute set. If you see this error message, going back and adding [Serializable] to the class file does no good. Moral of the story: Don't forget to add the [Serializable] attribute to the class file before you compile it.
The next Try It Out shows how to serialize the data for an object and then read the data back into the object (deserialization).
Try It Out: Serialization-Deserialization (Chapter13ProgramSerialization.zip)
Figure 13.12 shows a sample run of a program that uses serialization.
Figure 13.12 Serialize program
The program gathers the class information (such as name, e-mail address, and status) and serializes the data to a disk file named Test.bin when the user clicks the Serialize button. Clicking the Display button deserializes the data from the disk file and displays it in a listbox object.
To implement this program:
1. Create a new project in the usual manner.
2. Create the user interface by adding the form objects (refer to Figure 13.12), or download the code file Chapter13ProgramSerialization.zip.
How It Works
The source code for frmMain is presented in Listing 13-7.
Listing 13-7: Program Source Code to Serialize Data (frmMain.cs)
using System;
using System.Windows.Forms;
public class frmMain : Form
{
clsSerial myFriend = new clsSerial(); // Object to serialize
private Label label1;
private TextBox txtName;
private TextBox txtEmail;
private TextBox txtStatus;
private Label label3;
private Button btnSerial;
private Button btnDisplay;
private Button btnClose;
private ListBox lstOutput;
private Label label2;
#region Windows code
public frmMain()
{
InitializeComponent();
}
public static void Main()
{
frmMain main = new frmMain();
Application.Run(main);
}
private void btnSerial_Click(object sender, EventArgs e)
{
int flag;
MoveTextToClass(myFriend); // Move from textboxes to data
flag = myFriend.SerializeFriend(myFriend);
if (flag == 1)
{
MessageBox.Show("Data Serialized successfully", "Data Write");
}
else
{
MessageBox.Show("Serialization failure", "Data Error");
}
}
private void btnDisplay_Click(object sender, EventArgs e)
{
clsSerial newFriend = new clsSerial();
newFriend = newFriend.DeserializeFriend();
lstOutput.Items.Clear();
lstOutput.Items.Add(newFriend.Name);
lstOutput.Items.Add(newFriend.Email);
lstOutput.Items.Add(newFriend.Status.ToString());
}
private void MoveTextToClass(clsSerial obj)
{
bool flag;
int val;
obj.Name = txtName.Text;
obj.Email = txtEmail.Text;
flag = int.TryParse(txtStatus.Text, out val);
if (flag == false)
{
MessageBox.Show("Must be 1 or 0", "Input Error");
txtStatus.Focus();
return;
}
obj.Status = val;
}
private void btnClose_Click(object sender, EventArgs e)
{
Close();
}
}
The user types in the data via the three textbox objects. (To keep the program short, no validation is done on the inputs, except for the variable status.) The method MoveTextToClass() simply copies the three properties to their associated members of the myFriend object. TheSerializeFriend() method serializes the information to disk. (Listing 13-8 shows the clsSerial code.)
The Display button calls the DeserializeFriend() method to deserialize the data from the disk file. The members of the class are then displayed in the listbox object.
Listing 13-8 shows the source code for the clsSerial class.
Listing 13-8: Source Code for clsSerial (clsSerial.cs)
using System;
using System.IO;
using System.Runtime.Serialization;
using System.Runtime.Serialization.Formatters.Binary;
[Serializable] // DON'T FORGET THIS
class clsSerial
{
//------------------- Instance members ---------------
private string name;
private string email;
private int status;
//------------------- Property methods ---------------
public string Name
{
get
{
return name;
}
set
{
name = value;
}
}
public string Email
{
get
{
return email;
}
set
{
email = value;
}
}
public int Status
{
get
{
return status;
}
set
{
status = value;
}
}
//------------------- Helper methods ----------------
//------------------- General methods ---------------
/*****
* Purpose: To serialize the contents of this class
*
* Parameter list:
* clsSerial myFriend Serialize an instance
*
* Return value:
* int 0 on error, 1 otherwise
*****/
public int SerializeFriend(clsSerial myFriend)
{
try
{
BinaryFormatter format = new BinaryFormatter();
FileStream myStream = new FileStream("Test.bin",
FileMode.Create);
format.Serialize(myStream, myFriend);
myStream.Close();
}
catch (Exception ex)
{
string buff = ex.Message;
return 0;
}
return 1;
}
/*****
* Purpose: To deserialize an instance of this class from a file
*
* Parameter list:
* n/a
*
* Return value:
* clsSerial an instance of the class with the data
*****/
public clsSerial DeserializeFriend()
{
clsSerial temp = new clsSerial();
try
{
BinaryFormatter format = new BinaryFormatter();
FileStream myStream = new FileStream("Test.bin",
FileMode.Open);
temp = (clsSerial)format.Deserialize(myStream);
myStream.Close();
}
catch (Exception ex)
{
string buff = ex.Message;
return null;
}
return temp;
}
}
Note the various elements include files that must be added to the top of the file. These make the various elements of the Serialization namespace available for use in the class. Again, you must add [Serializable] immediately before the class signature. Failure to do this is frustrating because you must start over if you compile the file without it.
Most of the code in the file should look familiar to you by now, so concentrate on the two methods that do most of the serialization work. In the following code fragment from Listing 13-8, it is the responsibility of the BinaryFormatter object format to convert the data held in the myFriendobject into its required binary form:
public int SerializeFriend(clsSerial myFriend)
{
try
{
BinaryFormatter format = new BinaryFormatter();
FileStream myStream = new FileStream("Test.bin",
FileMode.Create);
format.Serialize(myStream, myFriend);
myStream.Close();
}
catch (Exception ex)
{
string buff = ex.Message;
return 0;
}
return 1;
}
A Filestream object (myStream) opens the test file named Test.bin. If the file does not exist, it is created automatically. (If you change FileMode.Create to FileMode.Append, you can append more than one object's state to the file.) The program then uses the Serialize() method of theBinaryFormatter class to store myFriend's state to disk. Because exceptions can occur, you should enclose the code in a try-catch block.
Deserialization is little more than serialization in reverse:
public clsSerial DeserializeFriend()
{
clsSerial temp = new clsSerial();
try
{
BinaryFormatter format = new BinaryFormatter();
FileStream myStream = new FileStream("Test.bin",
FileMode.Open);
temp = (clsSerial)format.Deserialize(myStream);
myStream.Close();
}
catch (Exception ex)
{
string buff = ex.Message;
return null;
}
return temp;
}
A BinaryFormatter object is instantiated and a FileStream object is also instantiated, but using the Open file mode. The Deserialize() method of the BinaryFormatter class reads the data from the disk file and formats into the clsSerial object. The explicit cast (clsSerial) is required because Deserialize() returns a plain object type. The FileStream is then closed and control returns to the caller. Back in frmMain, the returned object's data displays in the listbox.
To Serialize or Not to Serialize
Given how simple it is to serialize and deserialize an object, why wouldn't you use this kind of program rather than the random access program discussed earlier? After all, the random access program is also saving the state of an object to disk, but it requires quite a bit more code to do so.
First, the random access program is not specifically designed to simply serialize an object. Rather, it's intended to serve as a transactions-based structure where the object is permanently stored. Serialization of an object is more often used to temporarily store the state of an object so that it can be restored later. That object's state might be passed along to some other user of the object (such as a session state in a web app) or used to reestablish the state of an application when the application is reloaded.
Second, you may not want to have all the information in a class serialized. There could be sensitive information in the class that you don't want others to see. Even though the serialized file is in binary form, you can still read a good part of it with Notepad.
If you want to exclude a specific member of a class from being serialized as part of the object's state, you can use the following statement in the class definition:
[NonSerialized] string cellPhone;
This syntax marks the cell phone number as being excluded from the properties to be serialized to disk.
A third issue is that if your class includes other (nonprimitive) data types, like custom classes you've defined, those classes must also be compiled with the [Serializable] attribute set. This may not be a problem if you have access to the source code for these classes. However, if you use a class from a commercial product for which you don't have the source, you may not be able to mark that object as serializable.
MDI, Menus, and File Dialogs
This section shows you how to use the Multiple Document Interface, the C# menu object, and the file dialog objects.
The next Try It Out expands on the basic single-form programs you've written thus far. In this program, you learn how to call a form within a form like most complex applications do.
Try It Out: MDI Interface (Chapter13ProgramMDI.zip)
Start by creating the project as you have all the others. With the frmMain form showing in the Design window, set the form's IsMdiContainer property to true. When you do this, the style of the form changes, and the client area of the form changes to a dark shade of gray. Scroll to the bottom of the form's property list, and set the WindowState property to Maximized.
How It Works
Adding a Menu
Now go to the Toolbox window, open up the Menu & Toolbars section, and double-click on the MenuStrip object. Your Design window should look like the one in Figure 13.13. Notice that the MenuStrip object (named menuStrip1 by default) appears in the System Tray area at the bottom of the screen. (It is not viewable in Figure 13.13.) The object also causes a blank menu strip to appear just under the title bar of frmMain, as can be seen in Figure 13.13.
Figure 13.13 Adding an MDI menu
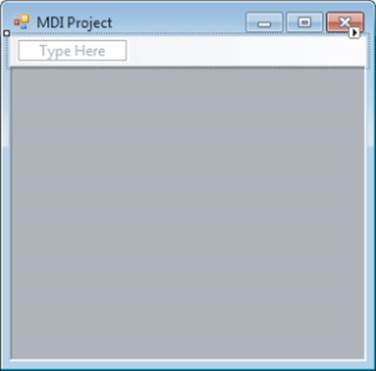
Place the cursor in the textbox on the menu strip where it says Type Here, type in &File, and press the Enter key. Your screen should look like Figure 13.14.
Figure 13.14 MDI menu change
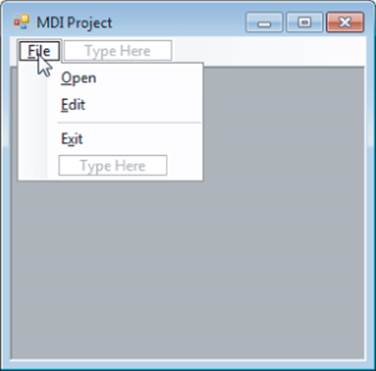
In Figure 13.14 there are two Type Here boxes. Although it may not be obvious, the lower textbox is tied to the File menu option you just entered. The second Type Here box is intended for additional menu options that you want to appear to the right of the File menu option. If you want the menu bar to look similar to that for Visual Studio, you would type Edit in that textbox. However, instead concentrate on submenus for the File menu option. In the textbox that is below File, type in &Open and press the Enter key. Move the cursor back into the &Open textbox, and change the Name property in the Properties window to mnuOpen.
Immediately below the Open menu option, type in &Edit and change its Name property to mnuEdit. Immediately below the Edit option, type in a dash. This serves as a menu separator. Finally, in the empty textbox below the menu separator line, type in E&xit and press the Enter key. Change its name to mnuExit. Your screen should look similar to what is shown in Figure 13.14.
Adding a File Open Dialog
Now examine the code for the program as it exists at this point. The code is shown in Listing 13-9.
Listing 13-9: A Simple MDI Program (frmMain.cs)
using System;
using System.Windows.Forms;
public class frmMain : Form
{
string selectFile;
private ToolStripMenuItem mnuFile;
private ToolStripMenuItem mnuOpen;
private ToolStripMenuItem editToolStripMenuItem;
private ToolStripSeparator toolStripMenuItem1;
private ToolStripMenuItem mnuExit;
private OpenFileDialog openFileDialog1;
private MenuStrip menuStrip1;
#region Windows code
public frmMain()
{
InitializeComponent();
}
[STAThread] // Something new
public static void Main()
{
frmMain main = new frmMain();
Application.Run(main);
}
private void mnuOpen_Click(object sender, EventArgs e)
{
OpenFileDialog fileOpen = new OpenFileDialog();
fileOpen.Title = "Select file to open:";
fileOpen.Filter = "(*.bin)|*.bin|(*.txt)|*.txt|All files
(*.*)|*.*";
if (fileOpen.ShowDialog() == DialogResult.OK)
{
selectFile = fileOpen.FileName;
}
}
}
Notice the statement just before the Main() method:
[STAThread] // Something new
This statement is needed when the program is run with the debugger. It tells the compiler to generate the code using a Single Thread Apartment. Without going into details, C# enables you to have multiple threads, or processes, running simultaneously. Using this statement ensures that a single thread is used for communication with the FileOpenDialog object. If you want to use the debugger while working on this program, you need this attribute statement in the program. You can leave it out, but you need to run the program outside the debugger (that is, with Ctrl+F5 rather than F5). For now, leave it in.
In the mnuOpen_Click() event code, the first statement creates an instance of an OpenFileDialog object named fileOpen. The Title property for the object simply sets the text that appears in the title bar of the file dialog box. The Filter property sets the file types that you want to see when the dialog is run. The filter shown here establishes the default file type to *.bin files because that is the first file type that appears in the filter list. The user can opt to change this to a view-only text file (*.txt) or any file type, if she wants. These different file types appear in the familiar drop-down listbox object common to many Windows programs. A sample run of the code to this point is shown in Figure 13.15.
Figure 13.15 MDI program
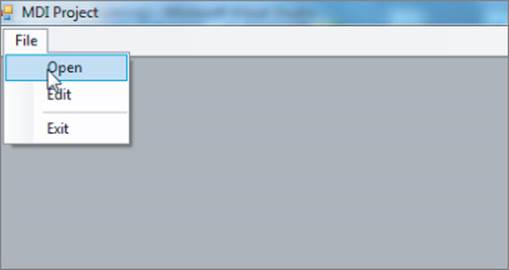
When you run the program, click File → Open. The result is the dialog you see in Figure 13.16. (When you run the program, notice that frmMain fills the entire display screen. This is because you set the WindowState property for frmMain to Maximize.)
Figure 13.16 File Open dialog
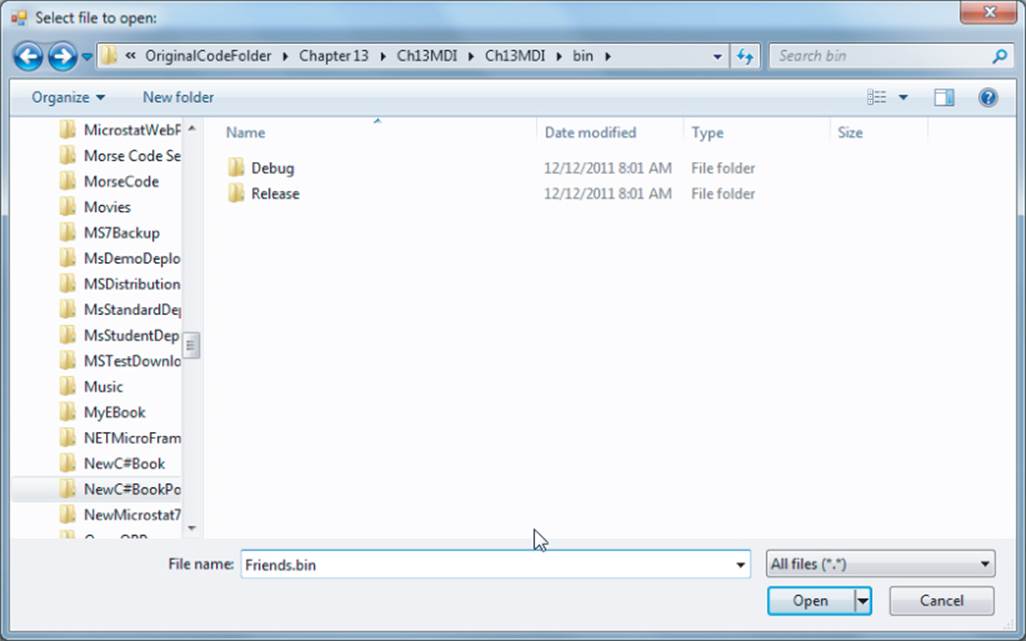
Assuming the user clicks the Open button in Figure 13.16, the selectFile variable holds the name of the file, including its full pathname. That is, the string might be something like this:
"C:\C#Code\DataFiles\Friends.bin"
Obviously, this string can be used to open and read the file using the data held in selectFile. You can use the debugger to examine the filename returned by the OpenFileDialog object. You can test the return value (DialogResult.OK) to verify that the file operation was successful.
Calling Another Form
Now add another form to the project and name it frmEditFriend. Use Project → Add New Item to add the new form. After the form is created and the stub code is visible in the Source window, delete all the stub code that appears in frmEditFriend. Now go to where you stored the random access program code shown in Listing 13-5. Using Notepad, open the frmMain.cs file and highlight and copy all the code in Listing 13-5 (Ctrl+A followed by Ctrl+C is the fastest way). Now paste that code (Ctrl+V) into the frmEditFriend source file in the Source window. Change the name of the class from frmMain to frmEditFriend and delete the following code:
public static void Main()
{
frmMain main = new frmMain();
Application.Run(main);
}
A program can have only one Main() method, and you already have one named frmMain in this project. Now make the clsRandomAccess code available to the project. You can do this either by using Project → Add Exiting Item and selecting clsRandomAccess from the old project, or using Project → Add Class and copying the code into the new file.
Add the following code to Listing 13-9:
private void mnuEdit_Click(object sender, EventArgs e)
{
frmEditFriend frm = new frmEditFriend();
frm.ShowDialog();
}
This code creates a frmEditFriend object named frm and then uses the ShowDialog() method to display that object on the screen, as shown in Figure 13.17.
Figure 13.17 Child form
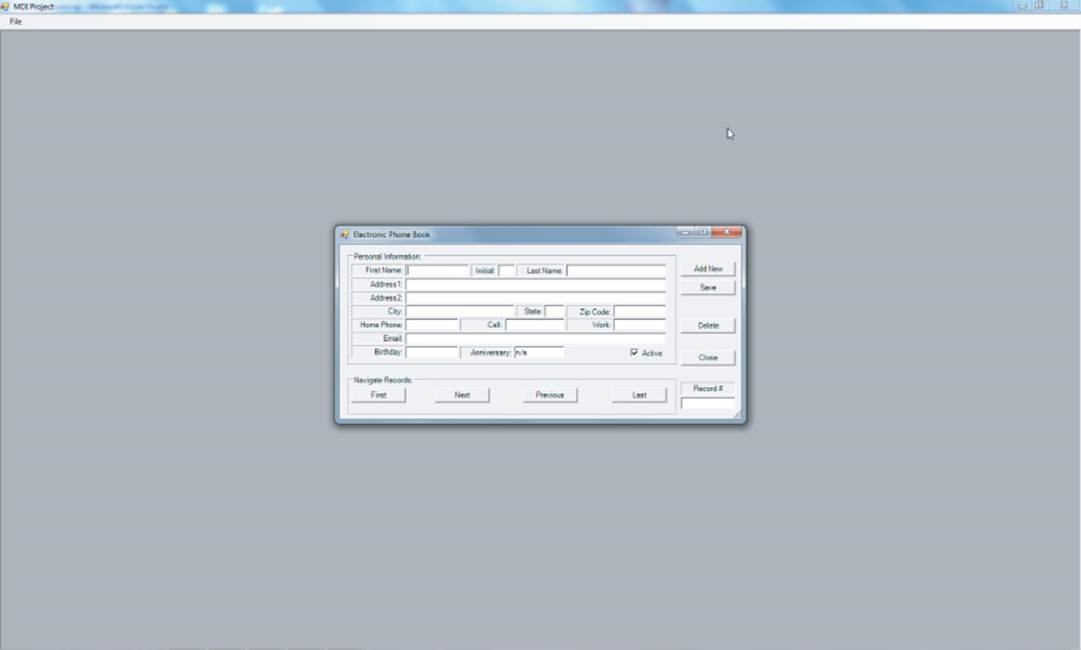
Look familiar? It should because this was the main input form used in the random access file project.
Notice how simple it was to write this application. You “borrowed” (stole?) most of the work from an earlier project by simply copying the code. The result is a Multiple Document Interface program that could be used as the starting point to build a more robust electronic phone book application. Many Windows programs use the MDI interface to give a familiar look and feel to a suite of programs. Microsoft Office is but one example.
Try adding some additional menu options to the program, such as a form that displays the contents of a friend's data file.
Summary
We covered a lot of ground in this chapter. You should feel comfortable using both text and binary files in either a sequential or random access format. You also know how to serialize and deserialize an object to disk. You learned how to create an MDI program and a system of menus. Finally, you saw how easy it is to reuse a Windows form object in a different program. Indeed, you reused the clsRandomAccess class without modification! But then, that's what OOP is all about.
Exercises
1. How might you change the code in Listing 13-5 so that it would not show inactive records?
2. Looking at the information in Table 13.5, could you use any of the FileInfo class properties or methods in the getRecordCount() method shown in Listing 13-6?
3. If you design a program that must persist a specific set of information, how would you decide whether to use sequential or random access files?
4. Which approach would you use to persist the state of an object to disk: serialization or standard read/write methods of your own design?
5. Many program use an About box to convey information about the software (version number, company name, and so on) How would you add an About box to your programs?
What You Learned in This Chapter
|
Topic |
Key Points |
|
Text and binary file types |
The two basic types of files used to store string and value type data. |
|
Advantages and disadvantages of each file type |
Text produces a dense file that is hard to update, whereas binary may use less space but is harder to read. |
|
File streams |
How C# organizes disk data files. |
|
Sequential files |
Data is written serially to the disk. |
|
Random access files |
Data is stored in easily updateable blocks. |
|
Serialization |
How objects can be persisted to disk. |
|
MDI interface |
Using the Multiple Document Interface. |
|
Program menus |
Using menus in an MDI program. |