Beginning Object-Oriented Programming with C# (2012)
Part IV
Storing Data
Chapter 14
Using Databases
What you will learn in this chapter:
· What a relational database is
· What tables, fields, records, and keys are
· What normalization is
· How to use the database Structured Query Language
· Implementing an MDI interface to a database
wrox.com code downloads for this chapter
You can find the wrox.com code downloads for this chapter at www.wrox.com/remtitle.cgi?isbn=9781118336922 on the Download Code tab. The code in the Chapter14 folder is individually named according to the names throughout the chapter.
In Chapter 13 you learned how to persist data using several different types of data files. This chapter expands on that topic but persists the data using database techniques.
It's been said that of all the programs under development, more than 80 percent of them use a database in one form or another. Clearly, this is one tool that must hang from your tool belt.
What Is a Database?
A database is simply a grouping of data. If you wanted to, you could use the topics covered in Chapter 13 to construct your own database. However, if you value your time at more than 2 cents an hour, it's silly to reinvent the wheel. It is far wiser to use a commercially available database system than to attempt to write one yourself.
A relational database is a collection of information in which the data within the database is associated with one another in some way. Managing the interrelationships in a relational database can get rather complex. For that reason, most people prefer to use a commercially available database management system (DBMS) to manage a database. A DBMS is a suite of programs that simplifies the tasks associated with building and using a relational database. Many major software companies (such as Oracle, IBM, Microsoft, and others) market DBMS software for use with their databases.
Earlier versions of C# used the Microsoft Jet Engine and DBMS, which was designed to work directly with Microsoft Access database (*.mdb) files. However, Jet has been removed from Visual Studio and it doesn't appear that a 64-bit version is planned. For this chapter, you use Microsoft's SQL Server for your database work. SQL Server is an industrial-strength database system with numerous advantages over the Access Jet Engine. Indeed, the two database systems aren't even comparable in terms of performance and security issues. You only scratch the surface of SQL Server in this chapter. If you want to learn more about SQL Server, Professional SQL Server 2008 Internals and Troubleshooting by Christian Bolton, et al. (Wrox, 2010) and the Microsoft SQL Server 2008 Bible by Paul Nielsen, et al. (Wiley 2009)—a modest tome of 1,600+ pages—are both filled with useful information.
Starting with Visual Studio 2008 support is available for a new C# language feature named LINQ that provides some interesting features for manipulating data. The C# Express version directly supports the use of LINQ only with Microsoft's SQL Server databases. (The next chapter discusses LINQ in detail.) The Professional version of C# also supports other commercially available DBMS.
The Structure of a Database
A relational database is normally a collection of two or more database tables.
Database Tables, Fields, and Records
A database table is constructed of data arranged in rows and columns. Each row in a database table is called a record. Each column in a database table is called a field. A database table may have zero or more rows. If the table has zero rows, the database table is said to be empty and contains no useful information. Database tables almost always have at least two or more fields in them.
You can think of a database field as being similar to a property for a class. Each field is used to store values for a particular data item. For example, in Chapter 13 your electronic phone book program had properties for your friend's first name, middle initial, last name, addresses, city, state, ZIP code, and so on. Each of these properties could be used to construct a field in a database table. It follows, then, that each row in the database table would become a record for one of your friends in the phone book database. It should also be clear that each row in a table must have at least one field that is different than other rows in the table. If that were not the case, you would have two rows of identical information, which is redundant. Figure 14.1 summarizes these relationships.
Figure 14.1 How a database is constructed
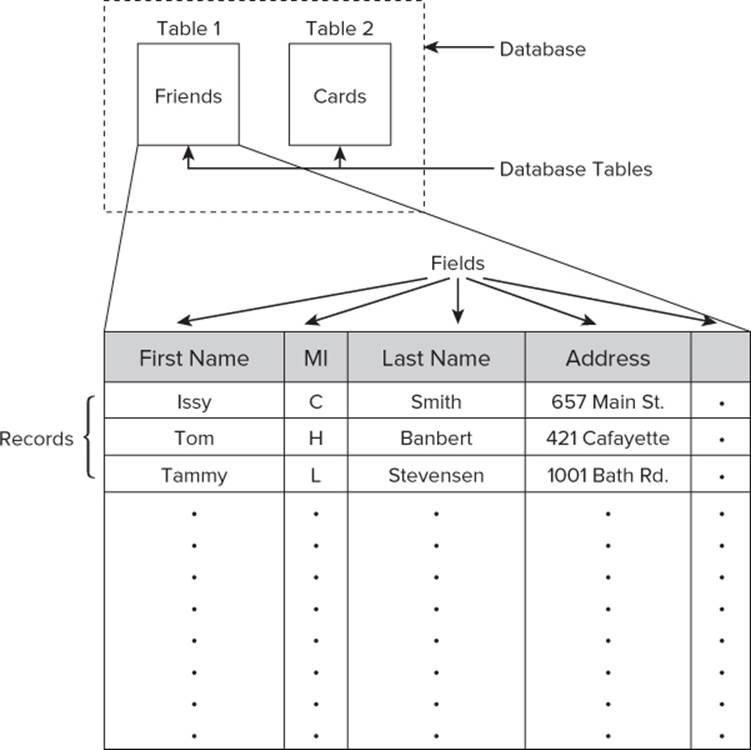
In Figure 14.1, the database that you've named Cards is shown to hold two database tables named Friends and CardsExchanged. If the database is an SQL server DMBS database, it might be named Cards.mdf. If you created the same database with Microsoft's Access, it would be named Cards .mdb. (The secondary filename often suggests which DMBS was used to create the database.) You have assumed that the Friends table is constructed to hold the information similar to the clsRandomAccess class from Chapter 13 (Listing 13-6). As you might expect, each field in the Friends table can be thought of as a property in the clsRandomAccess class. (You have omitted some properties for the database example to keep the discussion a bit simpler.) You probably want the Friends data table to keep track of which friends sent you a card and when. You might also want to track their address in case you want to send them a card.
Designing Fields for a Database Table
The CardsExchanged table might be a database table you add to the database to keep track of which friends you sent a birthday card to and which friends sent you a birthday card. You think about the information that you need to store in the table and you come up with the following fields for the table:
· firstName: The first name of the friend
· lastName: The friend's last name
· dateSent: The date you sent the friend a birthday card
· dateReceived: The date you received a card from the friend
You sit back, admire your work for a moment, and then it hits you: This is an RDC approach to the problem. You now have two tables (Friends and CardsExchanged) that store the same information. That is, both tables store the first and last name of the friend under consideration. Not good.
Data Normalization
Data normalization is a process designed to remove duplicate or redundant data from a database. Because the current design has the friend's name stored in both tables, the database design is not normalized. There are rules that define the order in which a database is normalized. The current design doesn't even follow the first rule (that is, removing redundant data), so the current database design isn't even first normal form. Although there isn't space here for a complete discussion of the rules for database normalization, most programmers are happy if they fulfill “third normal form” for a database design. The higher the degree of normalization, the more time you must spend designing the database. (If you ever find yourself in jail with a lot of time on your hands, shoot for a seventh normal form in your design. It will help pass the time!)
Primary Key
You need to redesign your database to get rid of the duplicate data. You can do that if you can find a way to relate the information in the CardsExchanged table to the Friends table in a manner that forms a unique relationship. The easiest way to do this is to create a new field in the Friends table that ties it to a unique friend in the table.
Fields in a table that hold a unique value are called primary key fields. If a record has a unique value in one of its fields, you can say that each record in the table is unique because of the primary key field. You can use this primary key field value in a different table (such as the CardsExchanged table) to refer back to the information in another table (such as the Friends table). A Social Security number would do the trick, but your friends might be reluctant to give that to you. (They're not that good of friends.) Then…shazam! Lightning strikes and you have an epiphany. Why not just use the table row numbers as ID numbers? You add a new field to the Friends table named ID, which stores a number that corresponds to the friend's row number in the Friends table. This ID field would be simple to administer because its value is simply the previous record ID plus one.
With these changes in mind, you redesign the fields in the Friends and CardsExchanged table to be an identification number (ID) associated with each friend, and the last date that you exchanged a card with your friend. Table 14.1 shows your final design.
Table 14.1 Field Descriptions for the Friends and CardsExchanged Tables
|
Field Name |
Data Type |
Null Permitted |
|
ID |
int |
No |
|
FirstName |
nvarchar(15) |
No |
|
LastName |
nvarchar(15) |
No |
|
Addr1 |
nvarchar(25) |
No |
|
Addr2 |
nvarchar(25) |
Yes |
|
City |
nvarchar(15) |
No |
|
State |
nvarchar(15) |
No |
|
ZIP |
nvarchar(15) |
Yes |
|
LastContact |
nvarchar(15) |
Yes |
|
------------------------ |
--------------------------- |
----------------------- |
|
ID |
int |
No |
|
TypeOfCard |
int |
No |
|
Sent |
nvarchar(10) |
Yes |
|
Received |
nvarchar(10) |
Yes |
In the next section, you actually create the data tables. What you need to do here is provide a short discussion of what each of the columns mean in Table 14.1.
The field name is the name that you use to access any data associated with that particular field. Think of the field name as the variable name for the data associated with the field. In the first column, the field name ID can serve as a unique identifier tied to a particular friend. The ID is unique because each friend has a unique row number in the table that becomes the ID value. Because the ID value for each friend is unique, it ensures that all records in the table are also unique.
The second column in the Table 14.1 tells the type of data used to record the information for the field. Use the int type for the ID field. The value is simply an integer that equals the number of rows currently in the table, assuming that the first row is row 1. (That way, you don't need to think of the first entry in the table as being “friend zero”.)
The last column determines whether it's okay for a field not to be filled in with data. In other words, is it okay for that field to have a value of null. Note that field Addr2 says Yes, which means it's okay to store this friend in the database table without a secondary address supplied.
The nvarchar() entries are the most common data type for the fields. The number in parentheses tells the maximum number of characters that can be stored in the field. SQL Server also enables you to use the varchar() data type. So what's the difference and which should you use? Well, obviously nvarchar() is the way to go because nvarchar() stores all character data in Unicode format, which can accommodate all character sets regardless of language. A varchar() data type can use only the ASCII character set, so it is a bit more restrictive. The cost of this flexibility is that withnvarchar(), each character takes 2 bytes for storage, whereas varchar() takes only 1 byte. Given that a megamunch of disk space costs about a penny, you can go big in this case.
Now assume that you received a card from Jane on April 30 and you sent her the same type of card on May 5. Assume that Jane's unique identifier in the Friends table is 1. (That is, she's the first person in the table.) If you record this information in the CardsExchanged table, the records might look similar to that shown in Table 14.2.
Table 14.2 Example of the CardsExchanged Data
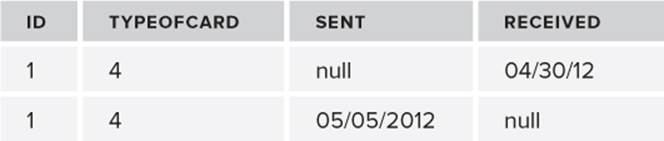
The first record details the card you received from Jane while the second record shows the type of card you sent to Jane and when you sent it. The ID field value in the CardsExchanged table tells you which friend in the Friends table exchanged cards with you. (Jane's data must reside in row 1 of the Friends table.) That is, the information in the CardsExchanged table now relates to the friends stored in the Friends table, but you are no longer duplicating that information in both tables. This is why such databases are called relational databases: Relationships usually exist between tables for the data stored in the database.
Over the years, you and Jane could exchange birthday cards many, many times. This forms a one-to-many database relationship between the Friends and CardsExchanged tables. That is, one friend (Jane in the Friends table) has sent many cards (as recorded in the CardsExchanged table) to you. There are a number of such potential database relationships possible (one-to-one, one-to-many, many-to-many, and so on).
Enhancing Functionality
Although the table design (refer to Table 14.1) fulfills your goal, what is the second field, TypeOfCard, in the CardsExchanged table all about? Think about it. What kind of cards do you get in the mail; just birthday cards? I don't think so. Because friends could exchange a variety of card types, why just limit this database to the exchange of birthday cards? If you add a third table to the database that stores information about the type of card that was received, you can significantly increase the usefulness of the database. The third table, CardTypes, needs just two fields: 1) the card type field stored as an int (null not allowed), and 2) an nvarchar(20) field that holds a description of this card type (null not allowed). Table 14.3 shows what the CardTypes table might look like after it's populated.
Table 14.3 The CardTypes Data
|
CardType |
Description |
|
1 |
“Father's Day” |
|
2 |
“Anniversary” |
|
3 |
“Sympathy” |
|
4 |
“Birthday” |
|
5 |
“Mother's Day” |
|
6 |
“Christmas” |
|
7 |
“Arbor Day” |
|
8 |
“Guy Fawkes' Day” |
|
9 |
“Jack Purdum's birthday” |
In Table 14.2, the TypeOfCard field shows that these two records exchanged a type 4 card to the friend associated with record 1 in the Friends table. If Jane is record 1 in the Friends table, you received a type 4 card from her on April 30 and then sent her a type 4 card on May 5. Looking in the CardTypes table, you can see that the type 4 card shown in Table 14.2 relates to a birthday card in the Table 14.3.
What do you gain by complicating your database design and adding the third (CardTypes) table? First, in your original design, you assumed you wanted to track only birthday cards. By adding the TypeOfCard field to the CardsExchanged table and relating it to the CardTypes table, you have enhanced the functionality of the database. Second, the current design enables you to extend the card types as you see fit, by simply adding another record to the CardTypes table (refer to Table 14.3). For example, you might add a record for graduations, another for job promotions, or April Fools' Day. The CardTypes table gives you the flexibility to tailor the database to your own specific needs. Finally, by adding the two date fields to the CardsExchanged table, you can track whether you followed up on returning the card sent to you and vice versa.
A reasonable question to ask is why use an nvarchar() data type for the dates when SQL Server does provide a date type? The reason is because the chances are that the data stored in that field is simply going to be either displayed on the screen or a printer, which would require changing it to a string anyway. If you want to use the date data type, by all means do so.
The primary key field in the CardTypes table would be the value in field CardType and would form a relationship to the CardsExchanged table that is a many-to-one relationship. (That is, the CardsExchanged table can have many different types of cards, but it must relate to one of the cards specified in the CardTypes table.)
Foreign Keys
In Figure 14.2, the field named ID serves as the primary key in the Friends table, but it also is used in the second table (CardsExchanged) to relate the information in the CardsExchanged table back to the friend in the Friends table. Therefore, the field named ID in the CardsExchanged table serves as a foreign key that tells you whom this card relates to in the Friends table. It follows that a field that serves as a foreign key in one table must have some established relationship with another table. The relationship between the Friends and CardsExchanged tables is one-to-many. This is simply a geeky way to say that a friend can send multiple cards.
Figure 14.2 Relationships for the cards database
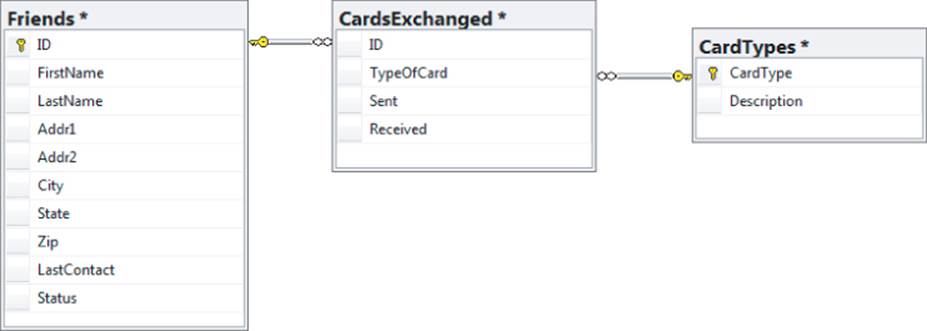
Finally, there is a relationship between the CardsExchanged and CardTypes tables. Each row in the CardsExchanged table must have one card type defined in its row, but it can be any of the card types. Therefore, this relationship is shown in Figure 14.2 as a many-to-one relationship.
Creating Your Own Databases
Many different types of commercial databases are available. Some of the more popular include Microsoft's SQL Server, IBM's DB2, MySQL (which is open source), Oracle, and probably dozens of others. You can use C# to communicate with any of them. In this section, however, you use Microsoft's SQL Server database to illustrate how to use C# with commercial databases. There are several reasons for this choice. First (and foremost), you don't need to buy additional software to use the programs that follow in this chapter. If you followed the instructions in Chapter 1, you should have Microsoft's SQL Server installed. (This version is not the full version of the DBMS for SQL Server, but the Express version can serve all but the most demanding database needs.) Second, you can always upgrade to the full version of SQL Server if you need to, and the software written for the Express version can still work.
Although you can use C# with SQL to create and manage a database, it makes more sense to not reinvent the wheel and use SQL Server Management Studio instead. This tool makes it a snap to create new databases and tables within those databases.
Using SQL Server Management Studio
Start Microsoft's SQL Server Management Studio (SSMS). The exact location of your files depends upon where you installed SQL Server. However, it will likely look similar to the path:
C:\Program Files (x86)\Microsoft SQL Server\110\Tools\Binn\
ManagementStudio\Ssms.exe
When SSMS first loads, you are asked which server you want to use. After answering that question, you see a screen similar to Figure 14.3.
Figure 14.3 SQL Server's Management Studio
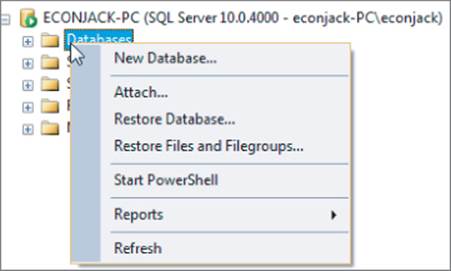
To get to the screen shown in Figure 14.3, you will be asked to select the server name that you used when you installed SQL Server. Of course, that depends on your particular information for your computer. If you right-click the Database entry (refer to Figure 14.3), you are presented with the options, as shown in Figure 14.4.
Figure 14.4 Right-click databases
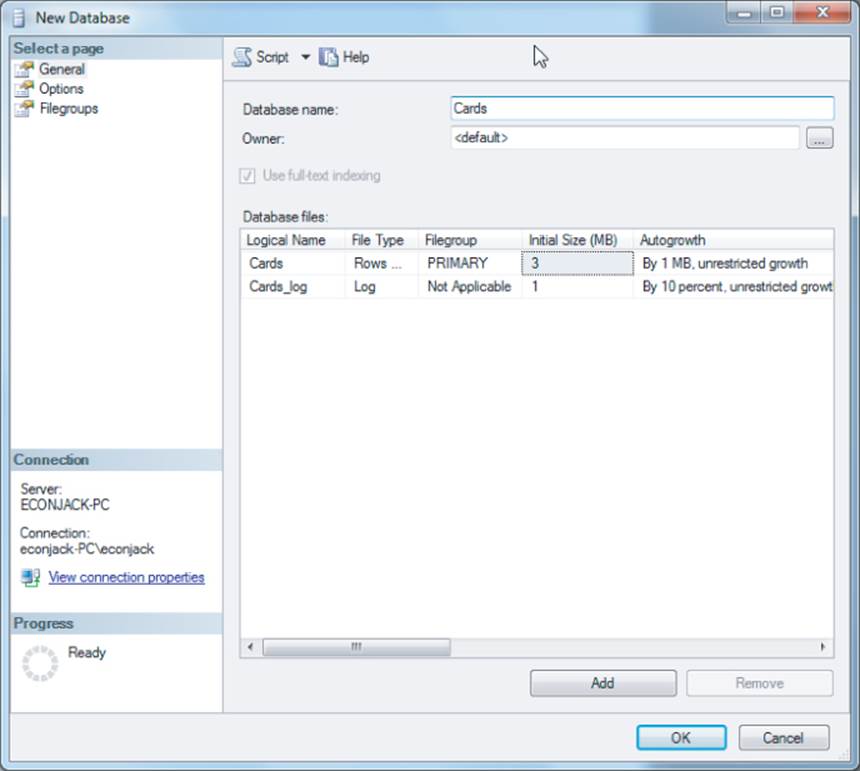
Click the New Database option, which presents you with the screen shown in Figure 14.5. As you can see, you can fill in the Database name textbox with the name of your new database, Cards. The default values can be left as they are. Click OK and the Cards.mdf database is created. At this point, all you created is an empty database shell that is ready to have database tables added to it. Your screen reverts to that shown in Figure 14.3.
Figure 14.5 Creating a new database
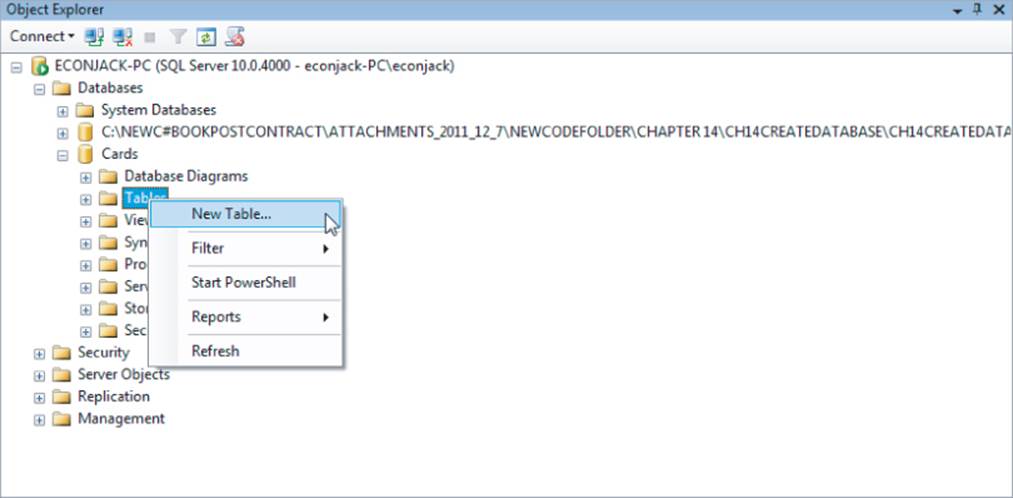
To add a table to the new database, right-click the Database option. You are then presented with a list of all the databases currently available on your server. Click the Cards database, and the display expands to show you the possible objects that can be associated with the Cards database. Now, right-click the Tables option to see the options shown in Figure 14.6. Click the New Table option.
Figure 14.6 Adding a new table to database
When you click the New Table option, as shown in Figure 14.6, a new screen opens near the middle of the display and looks similar to Figure 14.7.
Figure 14.7 Adding column names
![]()
To the immediate right of the window (refer to Figure 14.7) is the Properties Window for the new table. The default name for the table shown in the Properties Window is Table-1. You should change the name to the table you are creating, Friends in this case.
The program should be waiting for you to fill in the Column Name textbox (refer to Figure 14.7). The column names are the names you want to apply to each of the fields in the table. The first field you want to add to the table is the ID field. Type in that field name and press the Tab key to advance to the Data Type combo box. SQL Server has a number of data types that you can assign to any given field. Clicking the drop-down arrow presents you with a list of the available data types, as shown in Figure 14.8.
Figure 14.8 Setting the data type
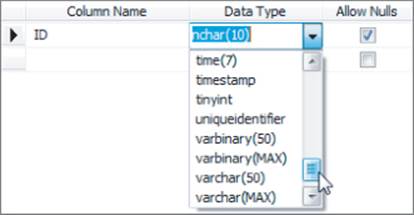
Because you are simply using the row number for your ID value, select int from the combo options as the data type. Uncheck the Allow Nulls field because each record needs to have an ID associated with it. When you press the Enter key after unchecking the null option, the program presents you with another row to enter the next field in the table.
After entering the appropriate data, you screen looks something like Figure 14.9.
Figure 14.9 A completed table definition

You can change the nvarchar() lengths to whatever you want, but the values shown in the table are the defaults. For example, you may want to increase the address fields to hold more than 15 characters. Right-click the header for the field entry window, and you are given the option to save the table. Save the table. When you do, the Tables field on the left side of the display (refer to Figure 14.5) now show the newly added Friends table.
You should repeat this process for the other two tables, following the design guidelines for those tables as discussed earlier. When you finish adding the tables, click the File → Save menu option to save the database. You now have a database named Cards.mdf, which contains the three tables you need to store your information. The next step is to start adding data to the tables.
Before writing the code to manipulate the database you just created, it would be helpful to understand the language that databases use to create, retrieve, update, and delete (CRUD) information. That language is a standardized language called Structured Query Language, or SQL for short.
Using SQL
The Structured Query Language (SQL) was developed in the early 1970s by Donald Chamberlin and Ray Boyce of IBM. It was designed to be a universal database language that could create, manage, and maintain relational databases. Entire books have been written on various SQL topics, so full coverage isn't given here. Rather, concentrate on a useful subset of SQL that you can use in your programs. When you are comfortable with the basics, there are plenty of sources that you can use to expand your SQL prowess. Microsoft's SQL Server extends the normal SQL language into Transact SQL. However, because T-SQL extends the normal SQL language, SQL Server can process any standard SQL command.
The SELECT Statement
Perhaps the most used part of SQL is the query features that enable you to retrieve specific subsets of data from a database. Most queries are initiated with the SELECT statement. Its syntax is
SELECT fieldList FROM tableName
In this case, fieldList is a comma-separated list of the fields that you want to retrieve from the database. The SQL keywords SELECT and FROM do not need to be in uppercase letters, but convention typically writes SQL keywords in uppercase letters. Some feel it makes it easier to read the query statement.
Suppose you want to retrieve the first and last names from the phone book database using fields similar to those used in Chapter 13. Suppose the table that holds the relevant information is the Friends table. The SQL command would be written like this:
SELECT firstName,lastName FROM Friends
The sample SELECT statement generates a data set that contains the first and last names of everyone in the database.
You can also use the wildcard character in lieu of a fieldList:
SELECT * FROM Friends
This SQL query returns a data set that contains all the field data for every row in the Friends table…and that's the problem: The data set contains everyone in the database. Most of the time you want some subset of the database. Perhaps it's all the people with a specific last name. Or maybe everyone who lives in a certain ZIP code. Often what you want, therefore, is a way to filter the data set that comes back from a SELECT query.
The WHERE Predicate
You can use the WHERE predicate to filter the data set returned from a database. For example, the query
SELECT firstName,lastName FROM Friends WHERE Zip = 45245
returns a data set that contains all the first and last names for people who live in the 45245 ZIP code. You can also apply basic conditional operators to a WHERE predicate, for example:
SELECT firstName,lastName FROM Friends WHERE Zip > 46214 AND Zip < 46254
This enables somewhat less restrictive data sets to be formed. In this query, all people in the database who live in the 46215 to 46253 ZIP codes are shown.
The ORDER BY Clause
The ORDER BY clause enables you to reorganize the data sets into ascending or descending order. For example, the query
SELECT * FROM Friends WHERE Zip = 80120 ORDER BY lastName
returns the data set sorted in ascending order by the lastName field. If you want the same list, but in descending order, you would use
SELECT * FROM Friends WHERE Zip = 80120 ORDER BY lastName DESC
Note the SQL keyword DESC at the end of the SELECT statement. It should be clear that the default ordering using the ORDER BY clause is in ascending order. If you do not use the ORDER BY clause, the data set returns the data in the order in which it is read from the database.
Finally, as mentioned most programmers capitalize the SQL keywords in a query. Another popular style that's often used when formatting SQL queries is this:
SELECT *
FROM Friends
WHERE Zip = 80120
ORDER BY lastName
DESC
This format places all SQL operators on their own lines with the actual database arguments to the right of the appropriate SQL operators. Use whatever form makes sense to you…the choice is yours.
Aggregates
Some database operations are so common that SQL provides methods, called aggregates, to perform specific calculations on a database. Most databases, at a minimum, support the aggregates found in Table 14.4.
Table 14.4 Aggregate SQL Types
|
Aggregate Name |
Description |
|
AVG |
Returns the numeric average of a selected field: |
|
COUNT |
Returns the number of items found in a selected field: |
|
MIN |
Finds the smallest value in a field: |
|
MAX |
Finds the largest value in a field: |
|
SUM |
Returns the sum of the values in a field: |
The aggregate methods don't give you anything you couldn't construct yourself from other (multiple) SQL queries. They do, however, make such information is easier to access.
There are SQL commands that you can use to create a new database, add new tables to the database, and the fields that populate those tables. In other words, you can use SQL to accomplish what you just did with SQL Server Management Studio. However, why reinvent the wheel if you don't have to. Again, there are dozens of online sites that can help you with all the SQL commands, if you want.
That's all you need for now! You will be surprised how much work you can do with databases building queries from these simple commands. In the following sections, you create a simple MDI program that allow you to manipulate the database and generate some simple reports about the content of the database.
A DBMS System
In this section you use some of the SQL commands you learned to write a program that can manage the small database you just created. The program uses the MDI that you learned in the previous chapter to collect all the database activities into one program. As explained in the previous section, the general purpose of the program is to track various types of cards (for example, birthday, anniversary, Christmas, and so on) that you exchange with your friends. However, you could easily redesign the program to meet some need more to your liking. It would be a suitable starting point in any situation in which a list of people (for example, a membership list or a book club members) performs some task (that is, paying monthly dues or make the month's book selection). If you do decide on another program, read the rest of this chapter first, then design the objects you need for the program, and finally create the database and related tables that you need.
This program is the largest you've worked with in this book, so it will be a lot easier if you go to the Wrox website and download the code. Indeed, there is too much code to present all of it here. The narrative that follows highlights only those sections of code germane to the current discussion. The rest of the code is straightforward and you should have no trouble understanding it.
In the following Try It Out you develop a program that can create and maintain your own database. While you are free to design your own user interface, because of the complexity, you might want to get the code up and running and then make your modifications.
Try It Out: A Mini Database Management System (MDMS) (Chapter14ProgramCreateDatabase.zip)
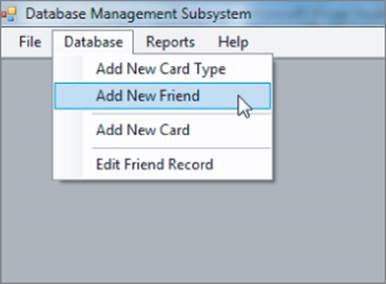
Your MDMS program can use the Multiple Document Interface style with subforms invoked from the MDI menu system. The user interface can be modeled after that shown in Figure 14.10, but you can modify it if you want.
1. Start a new project directory.
2. Download the source code file, Chapter14ProgramCreateDatabase.zip, and add it to the project.
Figure 14.10 User interface for MDMS
At this point, you should do nothing but read through all the code to get a feel for what everything does. Just because the Solution Explorer window shows a lot of source code files doesn't mean you should panic. As mentioned, this is your biggest project yet, but you have all the tools to make things work perfectly. You eat an elephant just like anything else: One bite at a time. The same is true for this program. After you take the time to study what each part does, you'll have a good understanding of how things work together.
How It Works
The first screen displayed to the user is an MDI menu of choices. As with most such applications, the first step is to select the database. That's a little more difficult here because the database could be on a remote server or at some other point on the network.
Gaining Access to the Database
When the program first starts, you need to identify the server where the database resides. This is actually a two-step process because there can be more than one server running, and that server can contain more than one database.
The MDI form is titled, as usual, frmMain and looks like that shown in Figure 14.10. As you progress through the program, you see what the menus and options look like.
The first task the user must do is select the server that holds the database. (Refer to Figure 14.10 to see this option.) Listing 14-1 shows the code associated with the Select Server menu option.
Listing 14-1: Selecting the Server for the Database (frmMain.cs)
private void mnuSelectServer_Click(object sender, EventArgs e)
{
// Debug code set here:
/*
whichServer = "ECONJACK-PC";
dbName = "Cards";
connectionString = "server=" + whichServer + ";integrated
security=SSPI;database=" + dbName;'
*/
frmServerSelect myServer = new frmServerSelect(this);
myServer.ShowDialog();
this.Text = "Database Management Subsystem: Server: " +
whichServer + " Database: " + dbName;
connectionString = "server=" + whichServer +
";integrated security=SSPI;database=" + dbName;
}
Some debug code that hardcodes the server and database names are in the listing. From those string literals, you can build a connection string used to tie into the database. When developing this database's software, I commented out the “real” code and used the debug literals instead. Why?
The reason to use the debug code is because each time you run the program to test something, Windows must do a lot of work to find out where the servers are located. On my system, this could take up to 10 seconds. Although that may not seem like a lot of time, when you run the program hundreds of times during development, the delay seems to take forever. By hard-coding the server and database names directly into the program, you can bypass this menu option and work directly on other program options. Clearly, the debug code should be commented out (refer to Listing 14-1) when you have the program stabilized.
The actual code in Listing 14-1 should look familiar. Note, however, that when you create an instance of the frmServerSelect form, you call the constructor using this as a parameter. As you can recall, this is a variable that holds the lvalue of where the data of the currently active form is stored. By passing that reference to the frmServerSelect form, that form has access to all the data associated with frmMain. Listing 14-2 presents the code for frmServerSelect. Also note that, upon return from the mnuSelectServer_Click() method, the title for frmMain changes to include the server and database names.
Listing 14-2: Code for Selecting the Server for the Database (frmServerSelect.cs)
using System;
using System.Data;
using System.Drawing;
using System.Windows.Forms;
using System.Data.Sql;
using System.Collections;
using System.Data.SqlClient;
public class frmServerSelect : Form
{
private const int SYSTEMDBTYPES = 4;
#region Windows stuff
private frmMain mdiParent;
string serverToUse;
//============================ Constructor ===========================
public frmServerSelect(frmMain me)
{
InitializeComponent();
this.mdiParent = me; // frmMain's lvalue
string serverName;
try
{
clsSqlServerList SqlSL = new clsSqlServerList();
SqlDataSourceEnumerator instance = SqlDataSourceEnumerator.Instance;
DataTable mySources = instance.GetDataSources();
foreach (DataRow row in mySources.Rows)
{
SqlSL = new clsSqlServerList();
serverName = row[0].ToString();
cmbServer.Items.Add(serverName);
}
cmbServer.SelectedIndex = 0;
} catch (Exception ex)
{
MessageBox.Show("Error: " + ex.Message);
}
}
/*****
* Purpose: List the available DB's
*
* Parameter list:
* object sender control that caused the event
* EventArgs e details about the sender
*
* Return value:
* void
******/
private void btnServer_Click(object sender, EventArgs e)
{
short i;
cmbServer.SelectedIndex = 0; // Server they selected to list databases
serverToUse = cmbServer.SelectedItem.ToString();
string conn = "Data Source=" + serverToUse +
"; Integrated Security=True;";
cmbDatabase.Visible = true;
lblDb.Visible = true;
try
{
using (SqlConnection sqlConn = new SqlConnection(conn))
{
sqlConn.Open();
DataTable tblDbs = sqlConn.GetSchema("Databases");
sqlConn.Close();
foreach (DataRow row in tblDbs.Rows)
{
i = (short)row.ItemArray[1];
if (i > SYSTEMDBTYPES)
cmbDatabase.Items.Add(row["database_name"].ToString());
}
}
cmbDatabase.SelectedIndex = 0;
} catch (SqlException ex)
{
MessageBox.Show("Error occurred while reading database data: "
+ ex.Message);
}
}
private void btnClose_Click(object sender, EventArgs e)
{
// Now send the selections back to the parent.
this.mdiParent.getServerName = cmbServer.SelectedItem.ToString();
this.mdiParent.getDatabaseName = cmbDatabase.SelectedItem.ToString();
Close();
}
}
If you look at the code in the constructor section of Listing 14-2, you can see the reference to frmMain is assigned into a variable named mdiParent using the statement:
this.mdiParent = me;
What this means is that mdiParent gives you a way to communicate with frmMain's data, even though you currently execute the code in frmSelectServer. This is a useful technique that you can use often. You see how this comes into play shortly.
The constructor code then tries to construct a list of the servers for the current machine. It is the clsSqlServerList code that causes the noticeable delay in the program and why you use the debug code during development. The delay is sufficiently annoying that you can add some additional code to the constructor after discussing threading in Chapter 18. (The code for the clsSqlServerList class is fairly simple but uses delegates; a topic we cover in Chapter 15.)
The SqlDataSourceEnumerator is a library class that enables you to iterate through a list of servers on the machine. The foreach loop adds the servers found to a combo box for display on the form. The frmServerSelect is shown in Figure 14.11.
Figure 14.11 Selecting the database to use
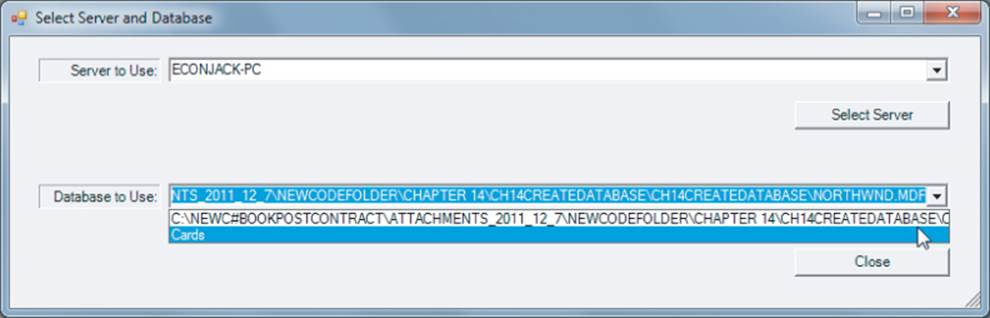
If you follow the code in Listing 14-2, you can see that only the combo box that lists the servers is visible when the form first presents itself to the user. The reason is because you cannot list the databases available until after the user has told you the server they want to use. Presenting the database combo box would be confusing because there cannot be anything shown in the combo box until after the user selects the server. After the server is selected, you can set the Visibilty property of cmbDatabase to true after populating it with the databases found on that server. (Of course, this also means that cmbDatabase.Visibilty when the form first loads.)
The code that populates the database combo box has a syntax feature you have not used until now. Consider the following code snippet:
using (SqlConnection sqlConn = new SqlConnection(conn))
{
sqlConn.Open();
DataTable tblDbs = sqlConn.GetSchema("Databases");
sqlConn.Close();
foreach (DataRow row in tblDbs.Rows)
{
i = (short)row.ItemArray[1];
if (i > SYSTEMDBTYPES)
cmbDatabase.Items.Add(row["database_name"].ToString());
}
}
cmbDatabase.SelectedIndex = 0;
Note the using statement at the start of the snippet. Up until this point, you have always used the using keyword to introduce a reference into the program. When using is implemented as shown in this snippet, it impacts the way the variables that are part of the using statement are treated by the operating system.
Recall that when a variable goes out of scope, the memory used by that variable can be reclaimed by Windows and reused for some other program data. This process, called garbage collection, is managed by Windows and you normally have no control over when Windows decides to take out the garbage. However, creating data (for example, sqlConn) with a using statement means that Windows can immediately free up the resources associated with the data as soon as the scope level containing that data is exited. Because the SQL resources are fairly heavy, it makes sense to use the using statement in this context. When the statement block terminates, the cmbDatabase combo box contains a list of all the databases registered on the selected server. This is why you didn't wrap the connection's Close() call in a finally statement block; the resources will be released even if there is an exception thrown. (The using statement can be used only this way when the IDisposable interface is present.
Adding Records to a Table (INSERT INTO)
You made life a little easier for adding data to the table by “borrowing” and slightly modifying the form shown in Figure 13.9 in Chapter 13. The modified form is shown in Figure 14.12. Most of the text boxes are self-explanatory. The Active check box simply indicates that this friend is still active (that is, not dead or mad at you). The Last Contact field is used to record the last time you exchanged some type of card with the friend.
Figure 14.12 Friend input form
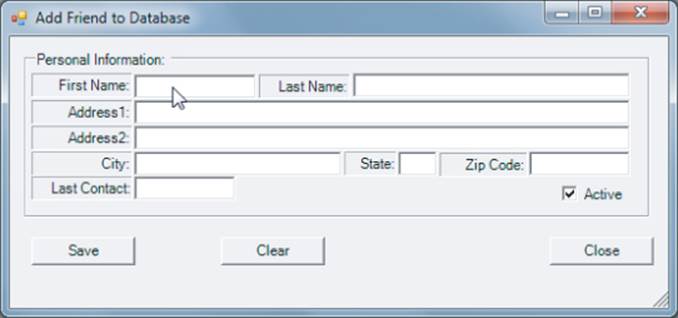
The user supplies the necessary information for the textboxes and, when finished, clicks the Save button. The code for the Save button appears in Listing 14-3.
Listing 14-3: Saving a Record to the Database (frmAddFriend.cs)
/*****
Purpose: Save text
box info as a record.
*
* Parameter list:
* object sender control that caused the event
* EventArgs e details about the sender
*
* Return value:
* void
******/
private void btnSave_Click(object sender, EventArgs e)
{
int status;
string sqlCommand;
if (chkStatus.Checked == true) // Status value
status = 1;
else
status = 0;
try
{
myDB = new clsDB(connectStr);
records = myDB.ReadRecordCount(connectStr); // How many already in DB?
records++; // Going to add new record
}
catch (Exception ex)
{
MessageBox.Show("Database error: " + ex.Message);
return;
}
// Build INSERT command
sqlCommand = "INSERT INTO Friends" +
"(ID,FirstName,LastName,Addr1,Addr2,City,State," +
"Zip,LastContact,Status) VALUES (";
// Now add the values
sqlCommand += records + ",'" +
txtFirstName.Text + "','" +
txtLastName.Text + "','" +
txtAddr1.Text + "','" +
txtAddr2.Text + "','" +
txtCity.Text + "','" +
txtState.Text.ToUpper() + "','" +
txtZip.Text + "','" +
txtLastContact.Text + "'," +
status + ")";
try
{
using (SqlConnection myConnection = new SqlConnection(connectStr))
{
myConnection.Open();
using (SqlCommand myCommand = new SqlCommand(sqlCommand,
myConnection))
{
myCommand.ExecuteNonQuery();
}
myConnection.Close();
MessageBox.Show("Add new friend successful");
}
}
catch (Exception ex)
{
MessageBox.Show("Database error: " + ex.Message);
return;
}
}
The code in Listing 14-3 sets up everything necessary to store the new friend in the database. To determine the ID value for the new friend, a call to ReadRecordCount() in clsDB is made. The method is simple and uses the COUNT aggregate to determine the record count:
SqlCommand cmd = new SqlCommand("SELECT COUNT(LastName) FROM Friends", conn);
The record count is returned and assigned into records, which is then incremented to reflect the addition of a new record to the Friends table.
Next, the sqlCommand string is built to move the textbox data for the new friends. Within the next try block, two using statements instantiate a connection object (myConnection) and command object (myCommand), which are then used to write the data to the Friends table. If all goes well, the user is given a message stating the friend was added to the database. Otherwise, the resources are cleaned up via the using statements and no success message appears.
The other database options (refer to Figure 14.10) enables the user to add a new type of greeting card and to add cards that have been exchanged between friends. The code for both options uses the SQL INSERT command much the same way that the code in Listing 14-3 does. Rather than killing a few more trees by repeating the code here, simply review the code at your leisure.
Data Binding to a Database Table
After you add a few friends and a few card types, and exchange a card or two, you want to see if the data actually was written to the database tables. The Reports option (refer to Figure 14.10) presents two different types of reports. The first option enables you dump the contents of a specified table. The second report type enables you to examine the CardsExchanged table in a variety of ways. Another reason, however, for presenting these two options is to show you two different ways to present the data to the user. The first option uses data binding to tie the table data to a dataGridView object. The second option simply uses a listbox without the overhead of data binding. Both techniques work, so both should be added to your programming toolbox. Now look at data binding first.
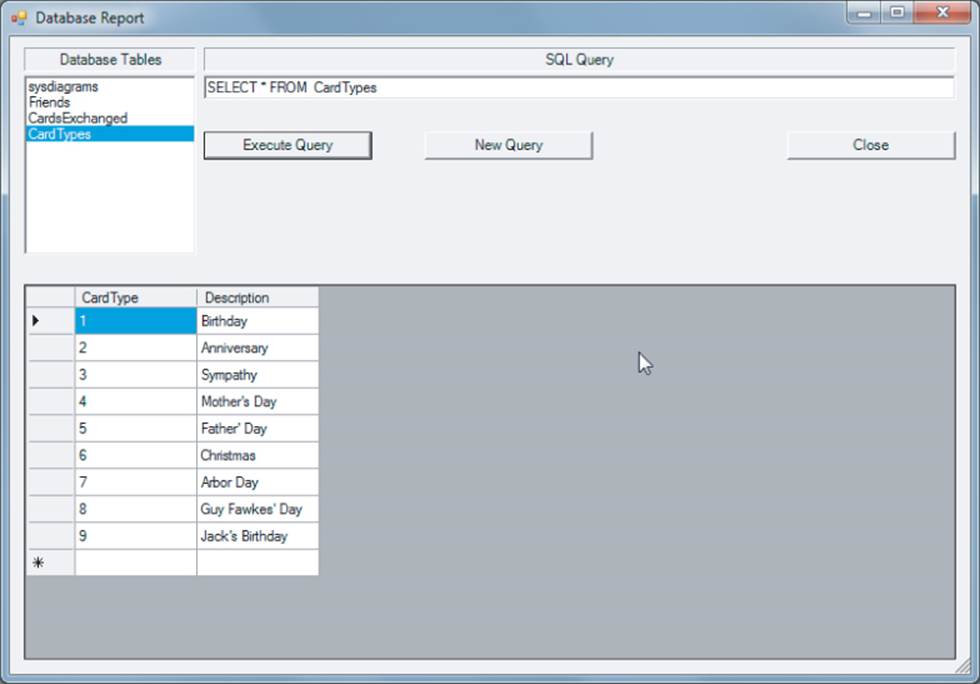
Figure 14.13 shows what the database report looks like at startup. A list of the tables in the database appears on the left, and a textbox pre-initialized with SELECT * FROM appears in the textbox. The user double-clicks the table they want to see, which copies that table name to the end of the textbox string to form a complete SQL query (that is, SELECT * FROM Friends). When the user clicks the Execute Query, the dgvFriends control is filled in with the data from the table.
Figure 14.13 Database report
The code to do all this is amazingly simple, mainly because the dataGridView control is smart. The entire code for the report form appears in Listing 14-4.
Listing 14-4: Report Display Code (frmReport.cs)
using System;
using System.Configuration;
using System.Data;
using System.Data.Common;
using System.Data.SqlClient;
using System.Windows.Forms;
public class frmReport : Form
{
private Label label1;
private ListBox lstTables;
private Label label2;
private TextBox txtQuery;
private Button btnExecute;
private Button btnClose;
private DataGridView dgvFriends;
private frmMain mdiParent;
private string connectString;
private string serverName;
private string databaseName;
private Button btnNew;
private string sql;
public frmReport(frmMain me)
{
InitializeComponent();
this.mdiParent = me;
serverName = me.getServerName;
databaseName = me.getDatabaseName;
connectString = me.getConnectString;
sql = "SELECT * FROM " + databaseName + ".sys.tables";
try
{
using (SqlConnection conn = new SqlConnection(connectString))
{
conn.Open();
SqlDataReader myReader = null;
SqlCommand myCommand = new SqlCommand(sql, conn);
myReader = myCommand.ExecuteReader();
while (myReader.Read())
{
lstTables.Items.Add(myReader[0]);
}
myReader.Close();
conn.Close();
}
}
catch (Exception ex)
{
MessageBox.Show("Error: " + ex.Message);
}
}
#region Windows code
/*****
* Purpose: Fills the data grid with the results of the query
*
* Parameter list:
* object sender control that caused the event
* EventArgs e details about the sender
*
* Return value:
* void
*
* CAUTION: This code has the ability to execute most queries, including DELETEs.
******/
private void btnExecute_Click(object sender, EventArgs e)
{
try
{
using (SqlConnection conn = new SqlConnection(connectString))
{
DataSet myDataSet = new DataSet();
SqlDataAdapter myAdapter = new SqlDataAdapter(txtQuery.Text, conn);
myAdapter.Fill(myDataSet);
dgvFriends.AutoGenerateColumns = true;
dgvFriends.DataSource = myDataSet.Tables[0];
conn.Close();
}
}
catch (Exception ex)
{
MessageBox.Show("Error: " + ex.Message);
}
}
private void lstTables_DoubleClick(object sender, EventArgs e)
{
txtQuery.Text += " " + lstTables.SelectedItem; // Space is for query string
}
private void btnClose_Click(object sender, EventArgs e)
{
Close();
}
private void btnNew_Click(object sender, EventArgs e)
{
txtQuery.Text = "SELECT * FROM ";
dgvFriends.DataSource = null;
}
}
The constructor again accepts a parameter that references the parent form frmMain. The try block fills in the list box with the names of the data tables from the Cards database. An SqlDataReader object is used to read the database tables via the while loop. When the user sees the form, therefore, the listbox is filled in with the tables from the database.
When the user double-clicks a table name in the listbox, that selection is appended to the query string in the textbox. When the user clicks the Execute Query button, the click event codes execute.
In the click event code, an SqlConnection object is instantiated using the connection string passed in from the parent form. A DataSet object, myDataSet, is then instantiated. The myDataSet object is the real work horse and manages the data that ultimately appears in the dgvFriends object.
The SqlDataAdapter object, myAdapter, is used to fetch the data from the data source. (Each potential data source provides a data adapter, such as OleDataAdapter if you use an OLE data source.) The data adapter fills the myDataSet object with the data resulting from the query via the Fill()method. When the dataGridView's AutoGenerateColumns property is set to true, the grid control takes care of the column organization for you. Finally, the code sets the data source, and the data displays in the grid control, as shown in Figure 14.13.
The dataGridView control is a complex control and has many properties that you can set. Indeed, an entire chapter or a small book could cover the details of the properties that can be set on the control; However, only are cover here.
AutoSizeColumnMode
By default, the column widths for the grid are fixed for all columns, regardless of data content. If you change this property to AllCells from the AutoSizeColumnMode drop-down combination box, the column widths automatically resize themselves to a width that accommodates the longest item in the data set for that field. Figure 14.14 shows what the Friends table might look like with AutoSizeColumnMode property set to AllCells. The shading you see in the table is explained in the next section.
Figure 14.14 Sample report run

Although this does make some columns wider than you might prefer them, other columns (such as ZIP codes, state abbreviations, and so on) use much less display real estate than they would otherwise. Often this means seeing more data without needing to scroll the display horizontally.
AlternatingRowsDefaultCellStyle
If you select the AlternatingRowsDefaultCellStyle property for the grid object, you are presented with a dialog similar to that shown in Figure 14.15.
Figure 14.15 Cell shading
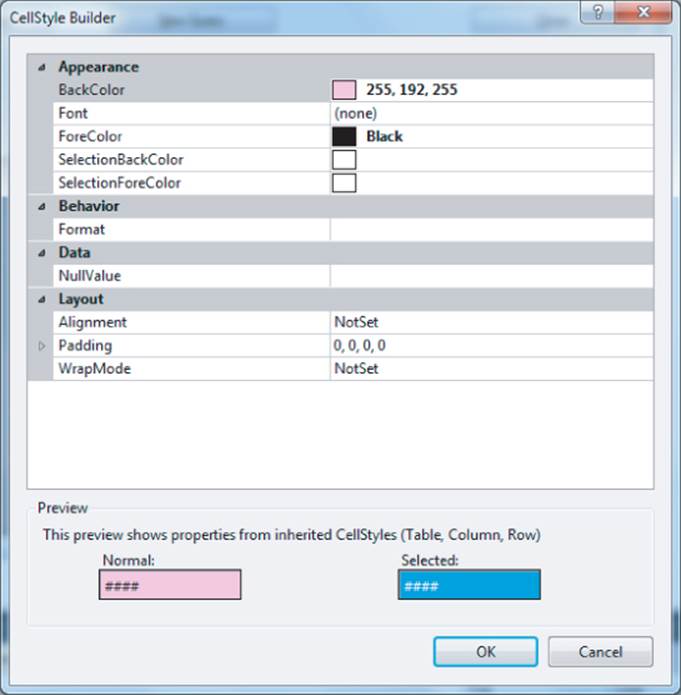
As you can see, there are a number of cell style attributes that you can set. At the top the background color is set to lavender (which is my favorite color). If you would like the display to look like the old IBM-style printout paper, click the BackColor box, click the down arrow, click the tab named Web, and select PaleGreen.
The Behavior attribute enables you to format the content of a cell in a manner that is consistent with the column type. For example, if you select Numeric, you can fix the number of decimal places that display. Commas are automatically inserted where appropriate. If you select Currency, a dollar sign appears before the numbers and negative amounts display using the accounting convention of surrounding the value with parentheses. Both of these attributes also allow you to sort the columns.
The Data attribute enables you to specify how null values display in the cell. If your data source enables null values, you might set this to n/a or some other value that makes sense for your application.
The Layout attribute has several properties that you can change. If you display currency values, you can right-justify the values
Of course, users can resize the columns widths by default if they want. (You can turn this ability off by changing AllowUserToResizeColumns to false.)
Of course, the dataGridView object subsumes many functions that you find with other Microsoft products. For example, double-clicking a column header sorts the grid data according to the values in the column selected. Experiment to see if your favorite “functionality” is implemented in the grid's default settings. If not, examine the properties for the grid object to see if that process can be adjusted.
Warning
There's a lot of stuff going on behind the scenes to end up displaying the data. Fortunately, prewritten Visual Studio classes do most of the heavy lifting for you. You should know, however, that the code used here is capable to execute almost any query you can think of, including SQL DELETE commands. If you think this might be a problem, you might want to parse the query to check for certain SQL commands before passing it off for execution.
Displaying Database Data Without Data Binding
There are a number of Visual Studio controls that can be bound to a data source, including combo boxes and list boxes. In the previous section, you let the dataGridView control do most of the work for you. Yet, there may be times where you need greater control over the presentation than a bound source enables you to have. This section shows an example of how to read the database data and presents it without data binding.
The Windows form is shown in Figure 14.16.
Figure 14.16 Cards Exchanged report
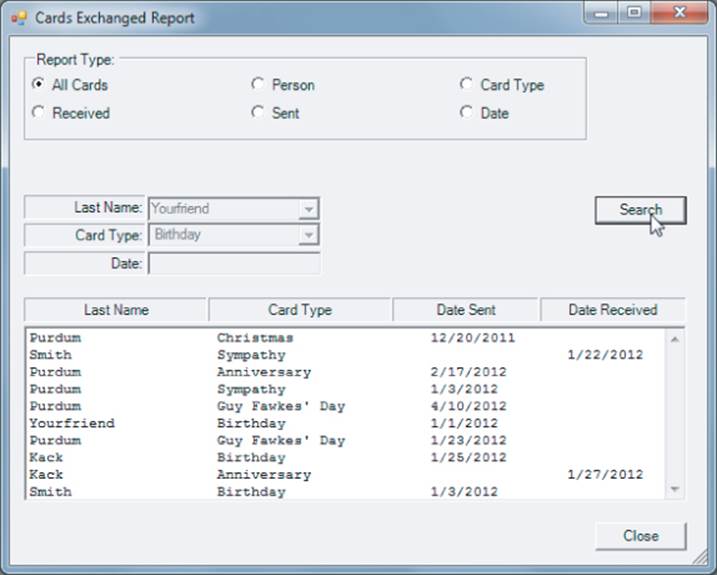
The radio button choices are probably self-explanatory. The Received and Sent buttons ask the user to supply a date, and the query then fetches the data for that receiving or sending date. The Date radio button searches both dates.
The use of the radio buttons complicates the code a little more than it may seem on the surface. The reason is because you can disable any controls that did not pertain the radio button selection. For example, if you select the Person radio button, the Card Type and Date input boxes should be disabled and the Last Name input enabled. However, if you select any of the date fields, the other two inputs should be turned off. As a result, most of the radio buttons react to a Change event, as suggested in the following code snippet:
private void rbType_CheckedChanged(object sender, System.EventArgs e)
{
if (rbType.Checked == true)
{
cmbLastName.Enabled = false;
txtDate.Enabled = false;
cmbList.Enabled = true;
}
}
In this snippet, if the card type radio button is checked, only the list of card types (that is, cmbList) is available for input. This approach also means that, after one query is run, you can perform another run on the same type of query by simply selecting a different card type for the combo box.
Performing the Query
The code presented in Listing 14-5 details how each of the selected queries is processed. The query is passed to the method via the sql string argument.
Listing 14-5: Code to Read the Content of the Database (frmCardReport.cs)
/*****
* Purpose: A data dump of the exchanged cards table
*
* Parameter list:
* string sql
*
* Return value:
* void
******/
private void ReadAll(string sql)
{
int nameIndex;
int cardIndex;
int count = 0;
string result;
string lastName;
string whichCard;
try
{
using (SqlConnection conn = new SqlConnection(connectStr))
{
conn.Open();
SqlDataReader myReader = null;
SqlCommand myCommand = new SqlCommand(sql, conn);
myReader = myCommand.ExecuteReader();
while (myReader.Read())
{
nameIndex = (int) myReader[0];
// Need to subtract one because it's zero-based
lastName = myFriends[nameIndex - 1].ToString();
cardIndex = (int) myReader[1];
whichCard = myCardList[cardIndex].ToString();
result = string.Format("{0, -20} {1, -25} {2, -15} {3,
-15}", lastName,
whichCard, myReader[2],myReader[3]);
lstResult.Items.Add(result);
count++;
}
myReader.Close();
conn.Close();
}
}
catch (Exception ex)
{
MessageBox.Show("Error: " + ex.Message);
}
if (count == 0)
{
MessageBox.Show("No data found");
}
The using statement establishes a connection to the database and that connection is opened. A data reader object, myReader, is defined followed by the definition of a command object, myCommand. After those two objects have been defined, the code executes the query and fills the data reader object via the call to Read(). Because the data reader reads the database one record at a time, the Read() call is placed in a while loop to walk through the records returned from the query. The reader object is indexed as though it were an array, as in myReader[0]. The index refers to the column position of the record returned. Because you are reading the CardsExchanged table, myReader[0] returns the ID of the friend who sent (or received) the card. Because you stored the last names of the friends in the myFriends array list, you can use the index returned by the query to retrieve the last name of the friend.
MyReader[1] in the CardsExchanged table is an index into the CardTypes table. Because myCardList holds the card types, you can use the index to display the string for the type of card that was sent (or received). The statement
result = string.Format("{0, -20} {1, -25} {2, -15} {3, -15}", lastName,
whichCard, myReader[2],myReader[3]);
simply uses the string class Format() method to format the data before placing it into the listbox. Because you want the columns to align properly, you can change the font of lstResult to use a fixed font (Courier New) rather than a True Type font.
Edit a Record (UPDATE)
At some point in time, you will likely want to change an entry in the database. People move and change addresses and they get married and change names. When such events happen, you may need to change the data in one of the data tables. The UPDATE SQL command is used when you want to edit information already stored in the database. Figure 14.17 shows the form used to edit a friend in the Friends table.
Figure 14.17 Edit a database record
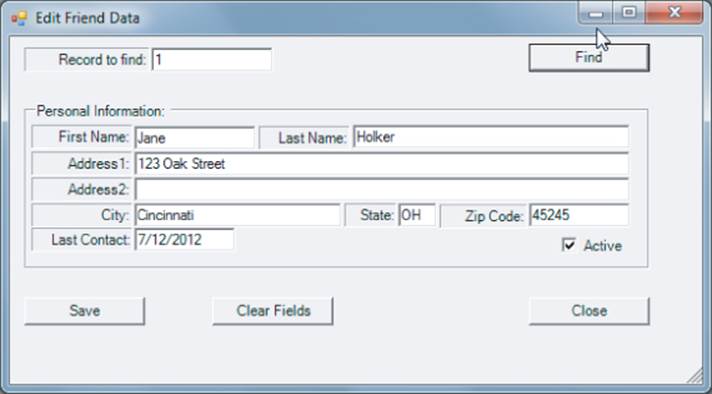
When the form first displays, all fields are empty. If you know the record number of the friend you want to edit, you can enter that record number in the topmost textbox. (You can use the Report menu option to find the appropriate record number.) If you don't know the record number, the code also accepts the person's last name as the search criteria. If no data were present and you type in Yourfriend into the Last Name textbox and click the Find button, the rest of the data would display (refer to Figure 14.17). Although it may not be obvious, the Last Contact field is disabled, which means you cannot edit that field. That's as it should be because that data is determined by the exchange of cards.
Listing 14-6 shows the code associated with the Save button's click event.
Listing 14-6: Editing a Database Record (frmEditFriend.cs)
/*****
* Purpose: Save textbox info as a record in Friends table.
*
* Parameter list:
* object sender control that caused the event
* EventArgs e details about the sender
*
* Return value:
* void
******/
private void btnSave_Click(object sender, EventArgs e)
{
int status;
int flag;
string sqlCommand;
if (chkStatus.Checked == true)
status = 1;
else
status = 0;
myData = new clsFriend(connectStr);
// Build UPDATE command
sqlCommand = "UPDATE Friends SET " +
"FirstName = '" + txtFirstName.Text + "'," +
"LastName = '" + txtLastName.Text + "'," +
"Addr1 = '" + txtAddr1.Text + "'," +
"Addr2 = '" + txtAddr2.Text + "'," +
"City = '" + txtCity.Text + "'," +
"State = '" + txtState.Text.ToUpper() + "'," +
"Zip = '" + txtZip.Text + "'," +
"LastContact = '" + txtLastContact.Text + "'," +
"Status = " + status.ToString() +
" WHERE ID = " + txtFindRecordNumber.Text;
try
{
flag = myData.ProcessCommand(sqlCommand);
if (flag > 0)
{
MessageBox.Show("Record updated successfully.");
}
else
{
MessageBox.Show("Failed to update data.", "Process Error");
}
}
catch (Exception ex)
{
MessageBox.Show("Error: " + ex.Message);
}
}
Variable myData connects to the database, and the sqlCommand is built up from the content of the textboxes. The UPDATE command simply specifies the table to change followed by the SET keyword and then a list of the field names and the associated data. After the command is constructed, it is passed to the ProcessCommand() method of the clsFriend class. Listing 14-7 shows the code for the ProcessCommand() method.
Listing 14-7: Process an SQL Query (clsFriend.cs)
/*****
* Purpose: To process an SQL command on a database
*
* Parameter list:
* string sqlCommand a command string that holds the CREATE TABLE
* directives
*
* Return value:
* int 1 on success, 0 otherwise
*
* CAUTION: The method assumes the connect string is already set
*****/
public int ProcessCommand(string sqlCommand)
{
int flag = 1;
try
{
using (SqlConnection conn = new SqlConnection(connectString))
{
conn.Open();
SqlCommand command = new SqlCommand(sqlCommand, conn);
flag = command.ExecuteNonQuery(); // Add new record
conn.Close();
}
}
catch
{
flag = 0;
}
return flag;
}
The code to process the command should look familiar to you by now. The command string, sqlCommand, opens a connection and an ExecuteNonQuery() is called to process the UPDATE. Because the query string is passed into the ProcessCommand(), the method can process any SQL command on any table. Therefore, although the program discussed here does not provide for editing the type of cards or the exchange of cards, it would be fairly simple to do so, which is left as an exercise for you.
Summary
You covered quite a bit of ground in this chapter. You should have a good idea of what a database is, how to create and expand one, and how otherwise to manipulate the data within the database. Now that you have discussed the major elements of the Cards database, you should spend some time single stepping through the code. Also experiment with the dataGridView control and changing some of its properties to see the impact it has on its behavior. It will be worth the effort.
Exercises
You can find the answers to the following exercises in Appendix A.
1. Suppose you define a Friends table using the data structure suggested in Chapter 13. Give two SQL commands that would return the number of active members of the Friends table.
2. Again using the Friends data structure from Chapter 13, construct an SQL statement that returns all the active members who live in Indiana (or whatever state you might use) and whose second address is not empty.
3. The code in frmAddFriend is a bit of a hack because it is tightly coupled with the user interface:
// Build INSERT command
sqlCommand = "INSERT INTO Friends" +
"(ID,FirstName,LastName,Addr1,Addr2,City,State," +
"Zip,LastContact,Status) VALUES (";
// Now add the values
sqlCommand += records + ",'" +
txtFirstName.Text + "','" +
txtLastName.Text + "','" +
txtAddr1.Text + "','" +
txtAddr2.Text + "','" +
txtCity.Text + "','" +
txtState.Text.ToUpper() + "','" +
txtZip.Text + "','" +
txtLastContact.Text + "'," +
status + ")";
The reason it is tightly coupled is that the inputs are tied to the textbox objects used to gather the information from the user. Because you don't want end-user interface objects like textboxes in a non-UI class, the current code shouldn't be moved into class clsDB. However, it would be nice to move the database INSERT command out of the user-interface code in frmAddFriend and move it into the clsDB class where it belongs. How might you do that?
4. I'm not a big fan of nested if statements. In the frmCardReport's search button's click event code, you see a six-level nested if statement. To me, this is SDC code (that is, Sorta Dumb Code). The reason is because in some cases you have to fall through five if tests to get to the proper statement block. If you had used a switch statement instead, the switch selection variable test results in a jump instruction that sends control immediately to the proper code block, thus avoiding the unnecessary if tests. Rewrite the code to use a switch statement.
What You Have Learned in This Chapter
|
Topic |
Key Points |
|
Database |
A file that contains data organized in a row-column fashion. If the file has two or more tables related to one another, it is a relational database. |
|
The elements of a database |
Databases hold tables that hold fields and records. |
|
Database keys |
Primary and foreign keys are used to relate information between tables. |
|
Normalization |
How redundant data can be removed from a database. |
|
SQL |
Structure Query Language used to extract useful information from a database. |
|
MDI for a database |
How the MDI system can be used with a database. |