Beginning Object-Oriented Programming with C# (2012)
Part I
Chapter 2
Understanding Objects
What you will learn in this chapter:
· What an object is
· What the term state means to objects
· What a class is
· What it means to instantiate an object
· What properties are
· What methods are
· How to use objects provided by Visual Studio .NET
wrox.com code downloads for this chapter
You can find the wrox.com code downloads for this chapter at www.wrox.com/remtitle.cgi?isbn=9781118336922 on the Download Code tab. The code in the Chapter02 folder is individually named as shown in this chapter.
The concepts introduced in this chapter lay the ground work for understanding object-oriented programming (OOP). Before you move on to Chapter 3 you should feel comfortable with the concepts introduced here. You should end this chapter feeling that you understand what objects, properties, and methods are and how they are used in an OOP program. If any of these concepts seem fuzzy after your first reading of this material, read the chapter again.
If any topic presented in this book still seems unclear after two or more passes through the chapter, you should log on to the Wrox website for this book and ask a question about the subject that is giving you trouble. If it's unclear to you, chances are it may be unclear to others. Wrox expends a lot of effort to make that web resource available to you, so use it whenever you feel unclear on some issue or topic.
Understanding Objects
As you learned in Chapter 1, programming with objects has been around for more than four decades. However, it's only in the last 20 years that object-oriented programming has become the norm rather than the exception. This chapter presents a simple example of how you can use objects in an everyday situation. You then expand on the concepts presented in that example to an actual program you build using Visual Studio .NET and the objects it provides.
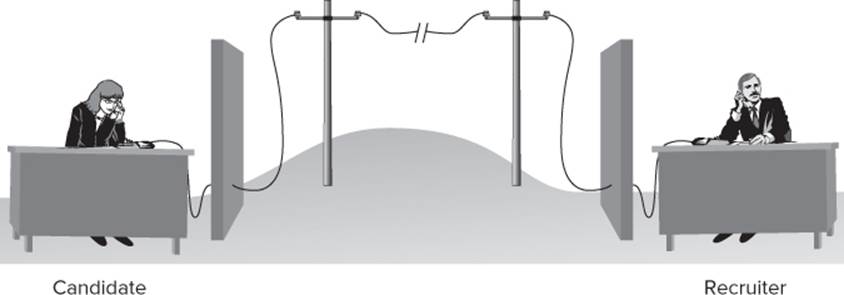
Suppose you are the personnel manager for a company and you need to hire someone to fill an important position. After sifting through dozens of résumés, you select one candidate to call to arrange for a face-to-face interview at your company offices. You call her (let's say her name is Jane) on the phone and chat for a few minutes to confirm that she appears to be the right person for the job. You (pretend your name is Jack) make arrangements for Jane to fly to your location, stating that you will meet her at the airport, as shown in Figure 2.1.
Figure 2.1: Arranging a job interview
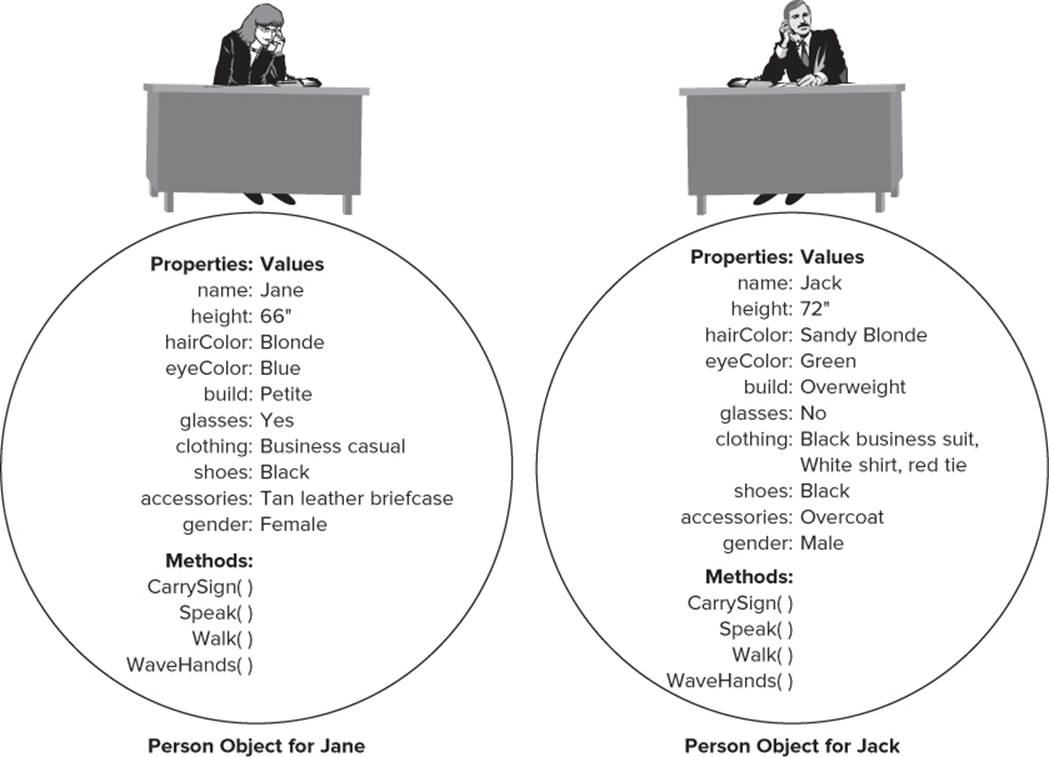
However, because the two of you have never met before, you start asking a few questions so that you can recognize each other at the airport. Jane says she's medium height with blonde hair and that she will be wearing a black business suit and carrying a tan leather briefcase. You then describe yourself as 6 feet tall with sandy hair and say that you'll be wearing a gray suit. You then set a date and time for the flight, and everything's ready for the interview.
Everyday Use of Objects
Perhaps without realizing it, both of you used objects in the course of your conversation. First, without thinking about it, you implicitly created a person class during the phone call. A class is a template used to describe an object. As such, a class is an abstraction, or simplification, of some object you observe in the real world. You can break a class down into two basic components:
· Properties that describe the object
· Methods, or actions, that you want to associate with the object
Class Properties
The class properties are the data that you want to associate and record with an object. If you want to create a class person object (referred to as clsPerson), a list of properties might include those shown in Table 2.1.
Table 2.1 clsPerson Properties
|
Properties |
|
name |
|
height |
|
hairColor |
|
eyeColor |
|
build |
|
glasses |
|
clothing |
|
shoes |
|
accessories |
|
gender |
Although not a rule, many programmers use variable names for properties that start with a lowercase letter but use uppercase letters at the start of any words contained within the property name. Because you may want to follow this convention, too, the property names in Table 2.1 follow this convention.
Prior to the phone conversation, the list of properties for the clsPerson named Jane is virtually empty. All you could fill in from her résumé were her name and gender. However, after the phone conversation you filled in almost all the properties for the clsPerson object named Jane. (You might scare her away if you tried to fill in the Build and eyeColor properties over the phone or face a lawsuit.)
While you were filling in a clsPerson object named Jane, she was doing the same thing for a clsPerson object named Jack. Prior to the phone call, the clsPerson object Jane created to be associated with the name Jack may have been totally empty because Jane had no idea who might be calling her about a job interview. However, the dialog on the phone enabled each party to fill in at least some of the property values for the other person. From Jane's point of view, her clsPerson object went from a totally nondescript object to (at least) a partially identifiable object after the phone call was completed.
By changing the values of the class properties, you can change the state of the object. The state of an object is determined by the values of the properties used to describe the object. In the example, the properties used to describe the state of a clsPerson object are those shown in Table 2.1. Prior to the phone call, there are no meaningful values for the properties shown in Table 2.1.
Although people don't change their names often, it happens occasionally. Likewise, people do gain and lose weight, dye their hair, wear tinted contacts, change clothes, and alter their accessories. If any of these property values change, the state of the object also changes. Just keep in mind thatanytime the value of a property changes, the state of the object—by definition—also changes.
It should also be obvious that it is the value of the properties that enable someone to distinguish a Jane clsPerson object from a Jack clsPerson object. That is, different objects usually have different values for their properties. It also follows, therefore, that different objects have different states.
Class Methods
Just as there are property values that define the state of an object, there are usually class methods that act on the properties. For a clsPerson object, you would want that object to talk, wave her arms, walk, change clothes, and so forth. In short, the class methods determine the behaviors or actions the object can perform. Methods are used to describe whatever actions you want to associate with the object. Class methods often are used to manipulate the data contained within the object.
You can depict the phone conversation between Jane and Jack as objects of the person class, as shown in Figure 2.2.
Figure 2.2: Filling in property values during the phone conversation
Often, class methods are used to take one or more property values, process the data those properties contain, and create a new piece of data as a by-product of the method's process. For example, you might develop a business application and need to create an invoice object that has priceEach andquantityOrdered (among others) as properties of an clsInvoice class. You might then create a method named salesTaxDue() as a class method that computes the sales tax due for the invoice. You might have another clsInvoice property named salesTax that is filled in automatically as part of the code contained in the method named salesTaxDue().
If you think about it, a class property may be viewed as a noun: a person, place, or thing used to describe an object. Class methods, on the other hand, often behave like verbs, denoting some kind of action to be taken on the class properties (that is, the data in the class) or an action the object can perform.
How Many Properties, How Many Methods?
One question that you must grapple with as a programmer is how many properties and methods you should have in a class. For example, in the clsPerson object, you could also include a photograph of the person, fingerprints, a retinal scan, blood type, a DNA sample, dental records, shoe size, plus hundreds of other things that may be part and parcel of a person object. Likewise, you can create methods to simulate talking, running, writing, walking, digestion, elimination, sleeping, dreaming, and a bunch of other actions humans can do. So where do you stop? What is the proper number of properties and methods?
Classes Are Simplifications of Objects
Keep in mind that for every property and method you add to a class, you must write program code to implement that property or method. As a general rule, the less code a program has, the fewer things there are to go wrong. From a programmer's perspective, writing less code is a good thing, provided the code accomplishes the task at hand. In other words, when you design a class, you need to strike a balance between minimizing the code you write and fulfilling the design goals for the class.
Note
The proper number of properties and methods in a class is the minimal number of properties and methods that gets the job done.
The number of properties and methods in a person class the FBI needs to find criminals is going to be vastly different from the number of properties and methods in a person class you might create to write an address book to keep track of your friends.
You'll also find that if you omit unnecessary details in a class, there's a greater likelihood that you can reuse that same class code in some other project. The concept of code reuse is one of the main advantages of object-oriented programming. The more generic the class is, the easier it is to reuse the class. In a sense, therefore, you might want to define your classes as the minimal abstraction necessary to describe an object in a way that fulfills your needs.
Always keep in mind that if there is a simple way and a complex way to accomplish the same goal, simple is almost always the best choice. Some programmers get a kick out of writing clever code that no one else can understand. That's probably okay, as long as no one else has to work with their code. In a commercial setting, however, clever, obfuscated code is rarely a good thing. Given alternatives, stick with the code that is easily understood.
What Do I Do After I've Defined a Class?
As mentioned earlier, a class is a template for an object. In that sense, a class is like a cookie cutter that enables you to shape specific cookie objects. By this release of Visual Studio, Microsoft has buried within the .NET Framework approximately 4,000 available classes. This means you have approximately 4,000 cookie cutters already hanging on the wall ready for you to use. (You'll use some of these cookie cutters later in this chapter.) Part of your job as a fledgling programmer is to learn about those classes that already exist. After all, there's no reason for you to reinvent the wheel.
There will be times when you will use one of these 4,000 objects but will say to yourself: “If only this object had such-and-such property or had a method that could do such-and-such.” OOP provides a mechanism called inheritance to do just that. However, that topic is deferred to Chapter 16. For the moment, you should concentrate on using those objects built into Visual Studio.
Visual Studio as an IDE
As pointed out in Chapter 1, Visual Studio is an IDE that incorporates numerous programming tools. Prior to the advent of IDEs, programmers had separate programs for writing the course code (an editor), compiling the program (a compiler), assembling the program (an assembler), and combining the program into an executable program (a linker). With an IDE, all these disparate functions are combined into a single package.
A huge part of the functionality of Visual Studio comes from the .NET Framework, including all those cookie cutters. As you write your code, components within the IDE combine your code with elements from the .NET Framework and produce Microsoft Intermediate Language (MSIL) code. It is this MSIL code, passed through the Common Language Runtime (CLR) component of Visual Studio that actually gets your program to run.
Rather than make the distinction between each of the “pieces” that comprise Visual Studio when some specific function is performed, you simply say something like: “Visual Studio takes your code and does whatever is necessary to produce an executable program.” If a situation arises in which the distinction is important, we will use the proper nomenclature. For now, just remember that, as an IDE, Visual Studio is composed of a lot of different components acting in concert to make your life easier.
Most of the time you must write some of your own classes in addition to those provided for you by Visual Studio. This means that, after you finish writing your class, you now have 4,001 cookie cutters hanging on the wall, each one of which can create an object of that class's type. But note: Just because you have defined a class (or a cookie cutter) does not necessarily mean you have an object (or a cookie). Just because the cookie cutter your Mom gave you is sitting in the kitchen drawer, in and of itself, doesn't put any cookies on the table.
As stated before, a class is just a template for the object. Just as a cookie cutter works to cut specific shapes out of cookie dough, a class is used to carve out chunks of memory used to hold objects of that class. Until you've used the class template to actually carve out an object, that object does not yet exist.
Figure 2.3 shows the relationship between a class and the objects you can instantiate from that class. The class is shown as a diamond-shaped cookie cutter. The class is named clsDiamond. You can think of the properties of clsDiamond as holding the values that determine the exact shape of the cookie cutter. In other words, the state of the properties makes the class look like a diamond rather than some other shape (for example, a heart). To get an object of the class, you must press the cookie cutter (class template) into the cookie dough (computer memory) to get an actual cookie (object).
Figure 2.3: Class template versus an object of the class
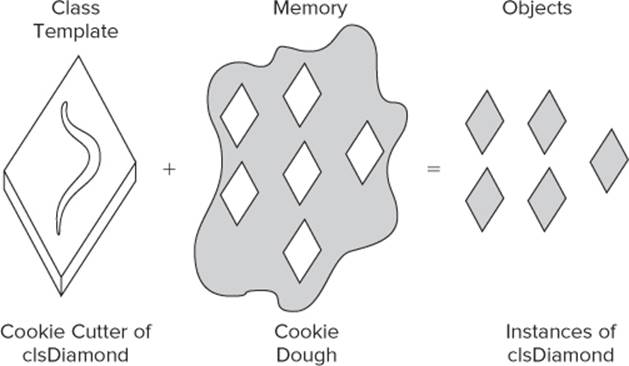
An object is also called an instance of a class. The act to use a class to define an object is called instantiation.
An object, therefore, is something that you can actually use in a program. Just as you can't eat a cookie cutter, you can't directly use a class. You must use the class to instantiate an object of the class in memory before you can use it in your program.
Naming Objects
Throughout this text, I have adopted a convention under which you prefix the name of certain objects with a specific combination of letters. For example, I use cls before class names, txt before the names of text box objects, btn before button objects, and so on. You can discover other examples as you read this text. This convention is a modified form of what is called Hungarian notation but not its “pure” form. At the extreme, Hungarian notation prefixed every data item with its data type, such as iHatSize for an integer variable, cLetter for a character variable, fWage for a floating-point variable, objMyData for a data object, plus many other similar variations. At the extreme, some programmers also include a scope identifier, as in igHatSize, which means: “an integer variable with global scope named HatSize.” This notation has lost followers simply because what it brought to the table in terms of code clarity wasn't worth the effort. So why do I continue to use a modified version of Hungarian notation?
One reason is that I feel our version is definitely worth the effort. The major reason is that the prefixes reinforce the object type used in the program. That is, at a glance you can see that txtName is a textbox object and that it's different from lblName, which is a label object.
A second reason is the way Visual Studio looks at your program data as you type in program code. For example, if you have three textboxes in your program, all prefixed with txt, Visual Studio knows about these objects and can open up a small “look-ahead” window the instant it sees you type in the prefix txt. You can then select the appropriate textbox object in the window, press the Tab key, and Visual Studio fills in the rest of the object's name for you. If you didn't prefix the textbox names with txt and you couldn't recall anything about the object (even its name) other than it's a textbox object, the names would be scattered throughout the look-ahead window, thus making the look-ahead feature less useful.
Because this look-ahead feature is a real time-saver, prefixes are used for objects in the program examples. If you don't feel it's worth the effort, you can use your own style.
Instantiating an Object of a Class
Consider the following statement:
clsPerson myFriend;
To help explain what is taking place with this statement, consider the simplified memory map of your computer system, as shown in Figure 2.4.
Figure 2.4: Simplified Windows memory map
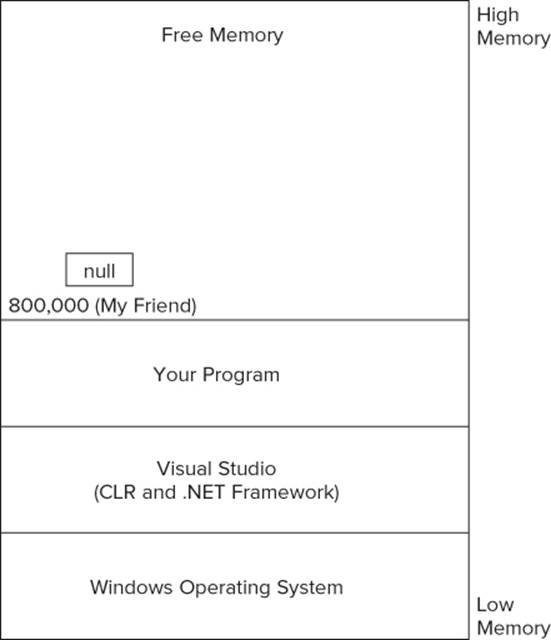
Simply stated, the program statement statement says: “Go to the cookie cutter wall and look for a cookie cutter named clsPerson. When you find it, take it down from the wall, carve out a chunk of memory for it and label that chunk myFriend.” The end result is that .NET asks the Windows operating system for 4 bytes of memory where it can store a reference, or memory address, for the variable named myFriend.
Assume that the Windows Memory Manager finds 4 bytes of free storage at memory address 800,000. For the moment, you haven't done anything with the memory at this address, so its current value is null. (The word null means the variable has nothing useful currently stored in it.)
What you have at this point is a cookie cutter named myFriend just waiting around at memory address 800,000 for something useful to happen. Things start to happen with the next program statement:
myFriend = new clsPerson();
Words that have special meaning in a programming language are called keywords. The new keyword in C# means that you want to set aside enough memory to hold a new clsPerson object. Further assume that it takes 2,000 bytes of memory to hold all the data associated with a clsPersonobject. (.NET figures out how many bytes it needs for an object by examining the program code of the class.) If you verbalize what is happening on the right side of this programming statement, you might say, “Hey, Windows! It's me…Visual Studio. My programmer wants to create a newclsPerson object. Do you have 2,000 bytes of free memory available for such an object?” The Windows Memory Manager then looks through its table of available memory and probably finds 2,000 bytes of free memory somewhere in the system. Assume the 2,000-byte memory block starts at address 900,000. The Windows Memory Manager then sends a message back to Visual Studio and says, “Hey, VS! It's me…the Windows Memory Manager. I found 2,000 bytes of free memory starting at address 900,000.” Visual Studio says, “Thanks,” and proceeds to set up things to use theclsPerson object named myFriend, which now exists at memory location 900,000.
When Visual studio finishes with the statement, the memory map now looks like the one shown in Figure 2.5.
Figure 2.5: Memory map after object instantiation
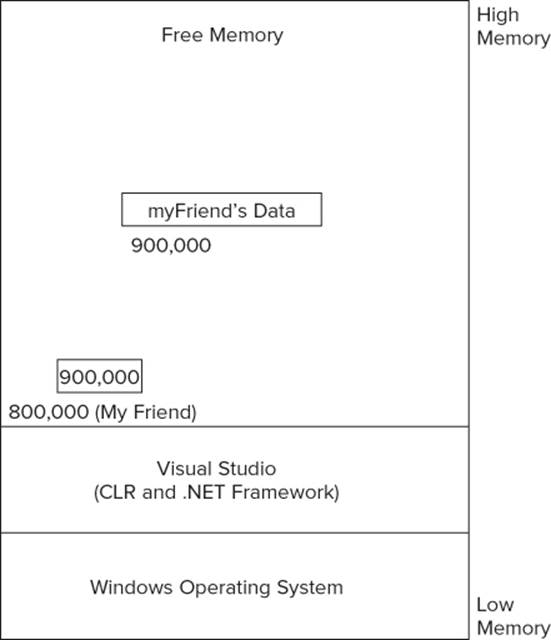
Notice what happened. The value associated with the variable myFriend at memory address 800,000 has changed from null to the memory address where the data associated with the newly created myFriend object is stored. You have now carved out a clsPerson object that you can access via the variable named myFriend. The purpose of the myFriend variable is to tell you where to find the data associated with the myFriend object.
Again, the correct programming term is that you have instantiated a clsPerson object referenced by the variable myFriend. An instantiated object is an object that you can use in your program. It should also be clear that myFriend is a reference that enables you to “find” the object's data (that is, the values of its properties).
Repeating the two programming statements (Chapter 4 explains the purpose of the slashes in the following statements):
clsPerson myFriend; // Grab a specific cookie cutter from the wall
// and name it myFriend
myFriend = new clsPerson();// Use the cookie cutter to make a clsPerson
// cookie and refer to it as myFriend
The first statement means that you intend to create an object of clsPerson and refer to that object using the variable named myFriend. The second statement says you carried through with your intent and instantiated a new object of a clsPerson type and associated it with the object variable namedmyFriend. You reference the object's data for the remainder of the program using the variable named myFriend. Using the cookie cutter analogy, the cookie cutter (that is, the reference) is found at memory address 800,000, but the cookie itself (that is, the object's data) is found at memory address 900,000.
You can combine the two statements into a single statement if you want:
clsPerson myFriend = new clsPerson();
The interpretation is exactly as before. You have simply collapsed the two statements into one. Because programmers prefer less code to more code, you will see the abbreviated form used more often.
You must understand the difference between a class and an object of the class. When you write the code for a class, you are actually acting like an architect designing a house. The plans you craft might be used to build one house or hundreds of houses. The point is that the class code is the design to be used at some later date. Later, carpenters, plumbers, and other craftsmen actually construct the house. The craftsmen grab the blueprints (that is, the class) from the wall, read them, and then instantiate the house. The “usefulness” of a class (that is, a house) actually comes into being after an object of the class is instantiated (that is, the house is actually built). Although Santa indirectly appreciates what a cookie cutter does, he'd much rather see a pile of (instantiated) cookies on a plate than a stack of rusting cookie cutters.
I Have an Object…Now What?
You now have instantiated an object of the clsPerson type. The obvious question is, “So what?” At the present time, the object named myFriend is fairly nondescript. Indeed, every property in the object is instantiated with the value of zero, false, or null by default, depending upon the data type of the property. None of the information previously presented in Table 2.1 has been filled in for the myFriend object. You need to change the faceless myFriend object into one that has some meaningful information in it.
You can change the object by changing the information contained in the properties defined within it. From Table 2.1, you might do the following:
myFriend.name = “Jane”;
myFriend.gender = “F”;
myFriend.height = 66;
myFriend.build = “Petite”;
myFriend.hairColor = “Blonde”;
myFriend.eyeColor = “Blue”;
myFriend.clothing = “Business casual”;
myFriend.accessories = “Tan leather briefcase”;
Notice what these statements do. They change the faceless myFriend object into one that gives you some impression of what this particular clsPerson object looks like. In these statements, the equals sign (=) is called the assignment operator. The assignment operator takes the information in the expression on the right side of the assignment operator and copies that information into the expression on the left side of the assignment operator. This means that somewhere near memory address 900,000, the name property has been changed from null to Jane. Similar changes have occurred for the other myFriend properties. In programming terms, the assignment statements change the state of the object from a faceless, nondescript person to an attractive female named Jane.
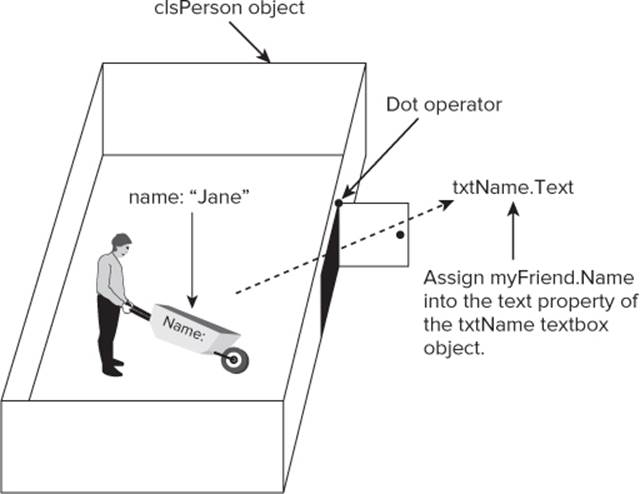
Object Syntax
It is important to note the syntax associated with changing the state of an object. The syntax of a programming language refers to the rules governing the use of the language. The general syntax for using the property of an object is as follows:
objectName.Property
Note the period, or dot, between objectName and Property. The period that appears between the object name and the property (or method) name is called the dot operator in C#. If you think of an object as a steel box surrounding the properties and methods of the object, the dot operator is the key that unlocks the object's door and lets you inside the object to gain access to the object's properties and methods.
In the statement
myFriend.Name = “Jane”;
the computer processes the statement from right to left. You might verbalize the process implied by the statement as the following sequence of steps:
1. Place the word Jane in a wheelbarrow.
2. Go to the object named myFriend.
3. Insert your key (the dot operator) into the door of the box.
4. Open the door of the box.
5. Guide your wheelbarrow over to the name property.
6. Dump the letters Jane into the name property.
You can visualize these steps, as shown in Figure 2.6.
Figure 2.6: Changing the value of the Name property

Now that you've followed these steps, the object associated with the myFriend variable has a name assigned to it. This also means that the state of the myFriend object has changed from an object with no name to one with the name Jane.
The object may be used “in the opposite direction,” too. For example, suppose you have assigned Jane's name to the myFriend object. Later in the program you want to display her name in a textbox object on a form. If the textbox object is named txtName, you could write
txtName.Text = myFriend.Name;
Again, because an assignment statement is processed from right to left, the code causes the program to do the following:
1. Go to the myFriend object.
2. Insert the key (the dot operator) into the steel box's lock.
3. Open the door of the myFriend object.
4. Push an empty wheelbarrow over to the name property of myFriend.
5. Make a copy of the bytes stored in the name property (that is, Jane).
6. Place the copy into the wheelbarrow.
7. Come out of the object's box. (The door closes automatically!)
8. Push the wheelbarrow over to the textbox object named txtName.
9. Insert the key (the dot operator) into the lock for the txtName's box.
10. Open txtName's door in its box.
11. Push the wheelbarrow over to the Text property of the txtName object.
12. Dump Jane into the Text property.
You can visualize these steps, as shown in Figure 2.7.
Figure 2.7: Copying a property value into another variable
This sequence of steps illustrates two important concepts to remember:
· You did not change the state of the object associated with myFriend in this last sequence. You simply went inside the object, copied its contents, and left. Because the code didn't alter the contents of any of the properties (data) of myFriend, its state remains unchanged.
· You did change the state of the txtName object. This is true because you went into the txtName object and assigned the copy of Jane's name to the Text property of the txtName object. Because the Text property's data changed, the state of the txtName object was changed.
You can make two important generalizations from these observations:
· If an object's property appears on the right side of the assignment operator (equals sign, =), you are simply reading the property of the object, not changing its state.
· If an object's property appears on the left side of the assignment operator, you are changing the data of one of its properties and, therefore, changing that object's state.
Although there are a few exceptions, these generalizations can serve you well most of the time.
Why Hide the Data Inside an Object?
In an oversimplified way, the discussion in this section describes how objects work and how properties, or the object's data, should be hidden inside an object. Why hide the properties inside an object? You hide them for the same reason that kings used to hide their daughters in the castle tower…to keep other people from messing around with them.
By encasing the properties (data) of the object inside a steel box, you can restrict access to those properties by forcing everyone to have a proper key (the object's dot operator) to gain access to the properties. Stated differently, you bury the data inside an object in an attempt to protect the data from accidental changes by other parts of the program. The process to hide data within an object is called encapsulation. Encapsulation is one of the cornerstones of OOP. You learn more about encapsulation and the other elements of OOP in later chapters. For the moment, however, just keep in mind that you want to encapsulate (hide) your objects' data as much as possible, yet still make that data available to those parts of your program that need it.
Getting Started with Objects
In the following Try It Out you write a simple program that uses a few of the many objects that Visual Studio provides for you. Follow the same general directions you used to create the program to test your installation of Visual Studio in Chapter 1.
Note
Virtually every program in this book starts with the C# template described here, using the same sequence of steps described next. Therefore, you should make note of this page number (perhaps writing the page number on the back cover) and refer to it whenever you are asked to start a new project. After a while, you will know the sequence by heart.
If the following sequence does not apply to a particular project, you will be told so and a different set of instructions will be presented. With the exception of the project name, the steps are the same for all future projects.
Try It Out: Create New Project
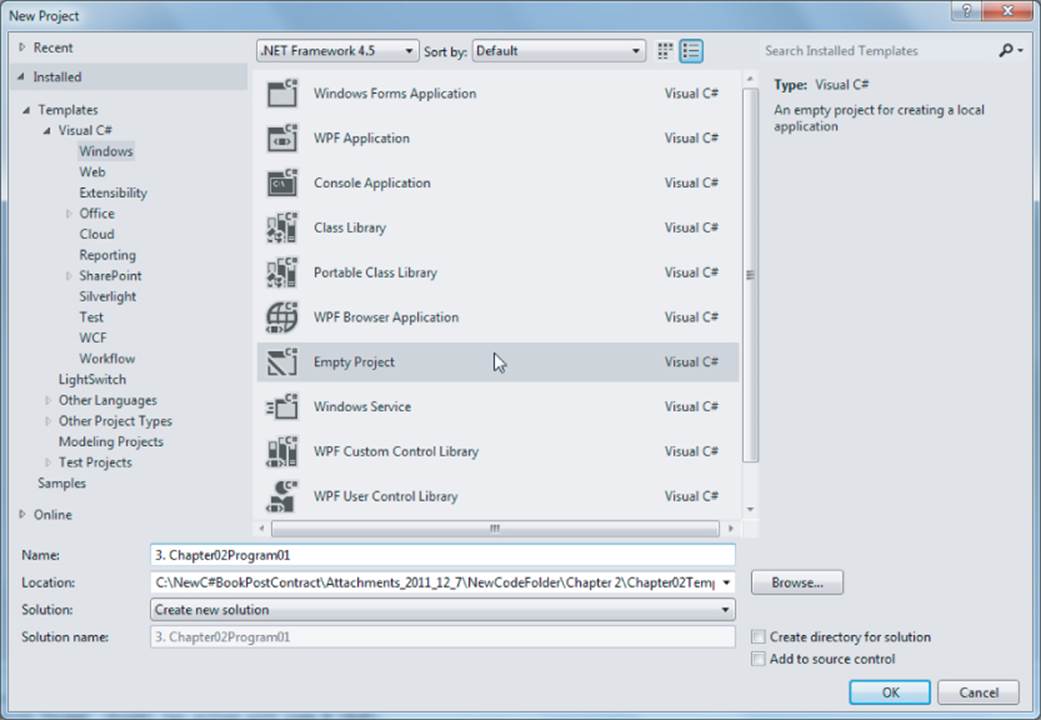
Create a new program project using the following steps:
1. From the File menu, select New → Project.
2. Select C# Windows Empty Project.
3. Name the program Chapter02Program01.
4. Uncheck the Create Directory for Solution if you don't want to add a separate folder. (I usually uncheck it but you don't have to. See Figure 2.8.)
Figure 2.8: Creating a new project
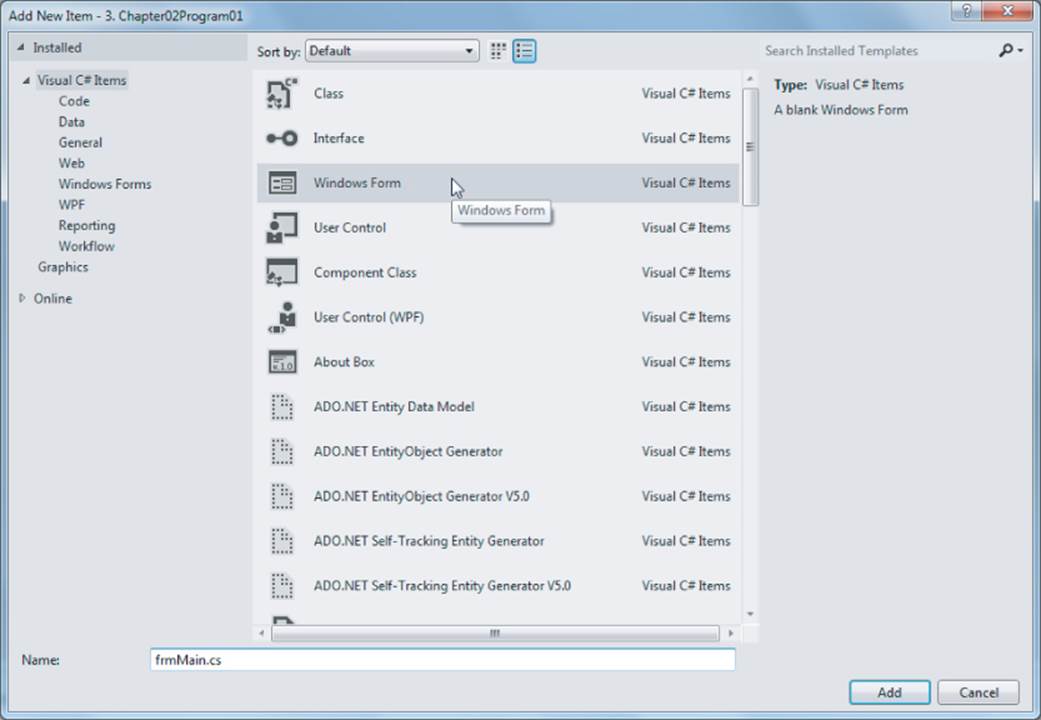
5. Add a form to the project using the Project → Add Windows Form → Windows Form; give it the name frmMain.cs and click Add.
Type your program name into the Name textbox (near the bottom of the dialog box in Figure 2.8) for the project name, and click the OK button. Visual Studio creates the project for you, using the default file location for the project (such as C:\Documents and Settings\yourUserName\Local Settings\Application Data\Temporary Projects\ProgramName).
You should now see the project listed in the Solution Explorer window. If you don't see the Solution Explorer window, use the View → Solution Explorer menu sequence. (You can also use the keyboard shortcut to display the Solution Explorer window by pressing the Control (Ctrl) and W keys at the same time and then pressing the S key.)
6. Now use the Project → Add Windows Form menu sequence to invoke the dialog, as shown in Figure 2.9. The starting point for all C# programs is with a method named Main(). For consistency, therefore, this text always names the starting form as frmMain.cs. Although this is not a C# requirement, this convention is used throughout the text. When you click the Add button, an empty form appears where the Source Code window was. This new window is called the Form Designer Window.
Figure 2.9: Adding a form to a project
7. In the Form Designer window, double-click the empty form, and then delete all the code currently on the form. (The fastest way to delete the code is to press Ctrl and then the A key (Ctrl-A) at the same time. Or, you can place the cursor at the top of the code, left-click and hold the button down, and drag the cursor down to highlight all the code. Then press the Delete button.)
8. Type the code from Listing 2-1 into the Source Code window for frmMain. You should save a copy of this code as virtually every program in this book begins with this code. In subsequent programs, the source code files are available from the Wrox website. However, in this case, you need to type the code in yourself. Use the File → Save As menu option, and save the file to the Desktop as C#Template.cs. Later in this chapter you learn how to use the template in a new program. When you saved the frmMain.cs file, Visual Studio also saved files frmMain.Designer.csand frmMain.resx. You should delete these from the Desktop by right-clicking each file and pressing the Delete menu option.
Listing 2-1: The C# frmMain Template Code
using System;
using System.Windows.Forms;
public class frmMain:Form
{
#region Windows Code
private void InitializeComponent()
{
}
#endregion
public frmMain()
{
InitializeComponent();
}
[STAThread]
public static void Main()
{
frmMain main = new frmMain();
Application.Run(main);
}
}
9. Delete the frmMain.Designer.cs file from the project. You can see this file by clicking the small triangle immediately in front of frmMain.cs in the Solutions Explorer window near the top right of your display.
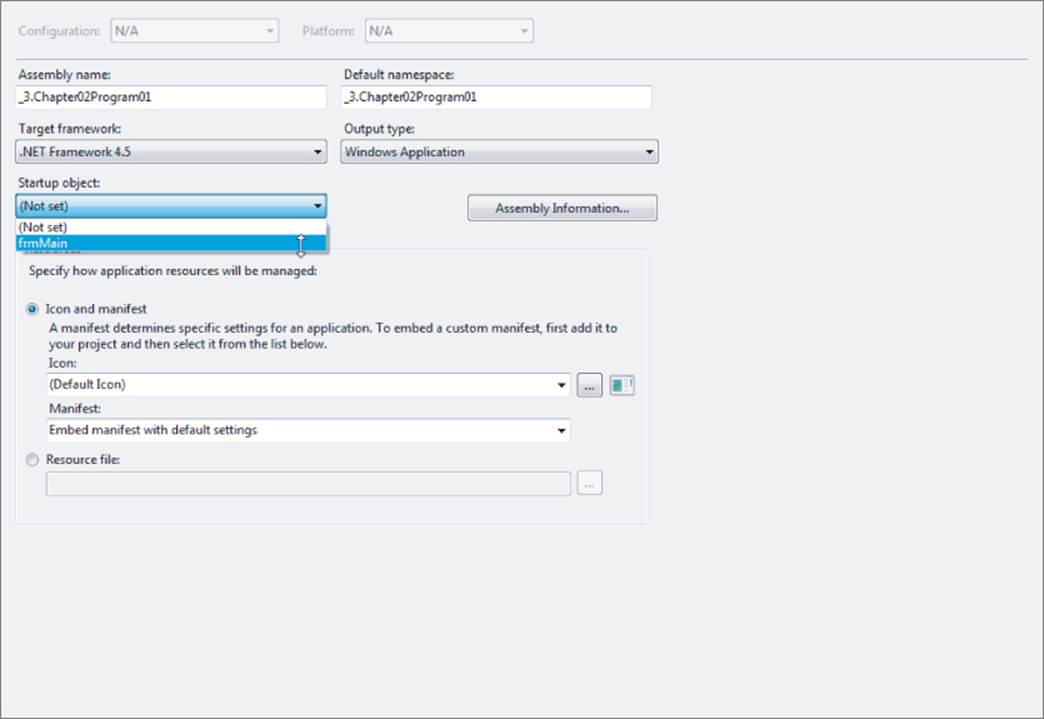
10. Select the Project → Chapter02Program01 Properties menu option, and set the Startup Object to frmMain and the Output Type to Windows Application. (The option appears at the bottom of the menu and always uses the program's name in the menu option.) Your dialog should look similar to Figure 2.10.
Figure 2.10: Setting project properties
At this point, you can actually run this program, but all it does is show an empty form. Still, you have a functioning Windows application that runs with relatively little coding on your part. Now, add some more objects to the form.
Double click the frmMain.cs object in the Solution Explorer window. This causes the empty form to reappear in the Source Code window. Now click the empty frmMain form to make the Toolbox window appear on the left side of the screen. Double-click the Label object in the Toolbox window. Visual Studio places a label object on your form in the upper-left corner of the form. If you want, you can move the cursor over the label, which causes an “arrow cross” to appear. If you press the left mouse button and hold it down, you can drag the label to wherever you want on the form.
How It Works
If you look carefully at Figure 2.8, you can see that you should not select the Windows Forms Application template (that is, the first option in the list) as you did in Chapter 1. Instead, you should click the Visual C# → Windows sequence and then select the Empty Project template. You do this because using the Empty Project template causes Visual Studio to generate less code “behind your back” than does the Windows Application template. That's the good news. The bad news is that using the Empty Project template does require you to do a little more work up front than you might otherwise have to do.
Although it may seem stupid to ask you to write code that Visual Studio can write for you, using the Empty Project template serves your purpose better. The goal in this (and subsequent) chapters is to teach you how to write object-oriented programs. Visual Studio already knows how to do that and I assume you don't! In other words, using the Empty Project template enables me to better teach you how to write your own programs. My philosophy is that you learn more if you have to do it yourself. (Also, if you're using this book to learn OOP but with a different language, such as Java, this approach can make using that language a little easier.)
If you double-click an empty space on the form, Visual Studio shifts you from the Design View to the Code View. If you look closely, you can expand the #region Windows section by clicking on the plus sign (+) and see code like:
this.label1 = new System.Windows.Forms.Label();
This line of code is responsible for creating a new label object named label1 using syntax similar to what you saw before:
clsPerson myFriend = new clsPerson();
The only difference is that the keyword this is a form of shorthand for the fully qualified name for the label object of System.Windows.Forms.Label. In other words, the statement line simply creates a label object on your form. Some of the other lines you can see determine where you placed the label and some other overhead information associated with label objects.
Now click the frmMain.cs [Design] tab of the Source Code window to make the form reappear. Click the label object and note that the Properties Window appears on the lower-right side of the display. Go to the Text property in the Properties Window, double-click label1, and change it toName:. If you now click the frmMain.cs tab, you see that one of the lines of code has changed to:
this.label1.Text = “Name:”;
What does this mean? Because you changed the Text property of the label object, you changed the state of the label object. Because you placed the label on a form object, you also changed the form object as well. Therefore, dropping objects on a form changes the state of the form object. Likewise, changing any of the properties of those objects also changes the state of both the object itself as well as the form that holds those objects.
Now go to the textbox object and drag the textbox so that it aligns with the label object. Now double-click the button object. Visual Studio automatically switches you to the Source Code window, and you can see this code:
private void button1_Click(object sender, EventArgs e)
{
}
This is stub code for the button object. Now add the following line of code between the two parentheses of the stub code:
frmMain.ActiveForm.Text = textBox1.Text;
What does this line do? Because the assignment operator (=) takes the data on the right side of the operator and assigns it to the object on the left side of the operator, this statement simply moves whatever you typed into the textbox object and makes it the title of the form object, frmMain. The dot operator gets you into the object so that you can access the property in which you are interested.
Why more than one dot operator?
Why are there two dot operators in the expression frmMain.ActiveForm.Text? Well, the first operator (moving from left to right) gets you “inside” the frmMain object. However, inside the frmMain object is another “black box object” that represents the ActiveForm object. To get inside that object, you need another key (that is, another dot operator) to open its door. When inside the ActiveForm object, you can see the Text property that you can then access as you need.
It may seem confusing at first, but you can have objects-within-objects-within-objects as deep as is necessary. A long time ago, I had to use a (poorly designed) database library that required me to use 12 dot operators to get to the property I actually needed. That's an extreme case, but you should expect to see two-level deep dot operators fairly often.
Run the program using the F5 key or click the “triangle” near the top of the Source Code window, type something into the textbox, and then click the button and observe the change to the form's title.
This simple program is actually doing quite a bit of work “behind the scenes.” If you look at the InitializeComponent() method in the Source Code window, you can see that Visual Studio has written quite a bit of code behind your back while you weren't looking. Take some time to study that code to get a feel for what is going on when you add objects to a form. You might even try changing some of the numbers you see there, switch back to the Design window, and see the impact the change had on the form. Clearly, making such changes does change the state of the object, including the frmMain object.
Experimenting like this is a great way to see how changes to the various properties affect the program. If you're like most beginning programmers, you might be a little afraid that you'll “break” something. Not to worry. You might get an ugly looking form or something else weird may happen, but it's nothing you can't fix by simply resetting the property to its original value. For that reason, it's best if you make changes to a property “one at a time” so that you are sure of that change's impact, plus being able to return the property to its original state if you want to do so. Please…experiment and have fun with this simple program.
Although you did just write a complete Windows program, it's a simple program that was kind of thrown together off the top of my head. In real life, programming tasks are rarely this simple.
Developing a Program Plan
Now put what you've learned thus far to use designing a program. Of necessity, you can leave out some code that would make your little program more bulletproof simply because you haven't learned how to do that yet. (You will learn how to make programs more bulletproof soon enough.) The goal here is to show you how to start writing a program to solve a specific task.
Where to Start? The Five Program Steps
Without a doubt, one of the hardest things for beginning programmers to figure out is where to begin writing a program. As a general rule, when I assign an in-class programming assignment, most students start solving the program problem by dragging and dropping controls from the toolbox onto a form as their first step in writing a program.
Wrong!
Don't confuse movement with problem solving. If you start dragging and dropping objects all over the place without a coherent plan, you're in for some unexpected disappointments. Inevitably, you'll end up backtracking and developing a plan of attack for the task at hand, so you may as well start out with a plan in the first place.
Indeed, to write good programs you must have a plan. Central to a programming plan is an algorithm. An algorithm is simply a step-by-step recipe, or plan, for how you want to solve the programming task at hand. A good place to start a program plan is with the Five Program Steps.
The Five Program Steps
As a broad generalization, you can describe all programming problems in terms of five steps.
Step 1: Initialization
The Initialization step involves those things that are done before the user sees anything displayed on the screen. For example, some programs “remember” the last four or five files that you worked on with the program and tack those file names on to the end of the File menu. Microsoft Word, Excel, PowerPoint, Visual Studio, and other programs do this in one way or another. Clearly, those programs must read that information from somewhere before the program can display the File menu on the screen.
Likewise, a program might establish a network connection, initialize a printer, connect to a database, read a sensor, or do all kinds of other activities before the user sees anything on the screen. All these activities are lumped under the Initialization step.
Simply stated:
The Initialization step is responsible for establishing the environment in which the program is to be run.
The activities of the Initialization step take place before the user sees anything appear on the screen.
Step 2: Input
If you think about it, all programs take some kind of input into the program, process it in some way, and then display some variation of the data that was derived from the original inputs. The Input step, therefore, is concerned with getting those inputs into the program.
Most of the time you tend to think of program input as coming from the keyboard or mouse. However, input can come from many other input sources, too. Some examples are an engine sensor, bar-code reader, retinal scanner, network connection, fire or smoke alarm sensor, information from a database, or a host of other input devices. The important aspect of the Input step, however, is that data in some form is collected by the program.
It's always a good practice to validate the input data. Users do make mistakes when entering data, network connections sometimes do weird things, data sources can be locked, and other unexpected occurrences can corrupt the data. You will learn more about data validation in later chapters. For now, I have assumed a really bright user who never makes a typing mistake and all the hardware is working perfectly! (This assumption enables you to concentrate on the essence of the objects being used in the program.)
Step 3: Process
This is the step in which you take the program inputs and process them in some way. You might perform some kind of mathematical operation on them, or perhaps the inputs are the name and account number of a customer, and this step reads a database to calculate a bill to be sent to the customer. In a jet aircraft, the inputs might be the current airspeed and GPS coordinates to calculate when the plane will touch down at a specific airport. In all cases, the Process step involves taking the inputs, acting upon them, and producing some form of result or answer.
What is meant by “taking the inputs and acting upon them”? That sentence fragment should make something itch in the back of your mind. What do you call those thingies that take an object's data and act upon them? Right…methods! Quite often, therefore, the Process step uses class methods to transform the data provided by the Input step. Hmmm? Could it be that the data used in the Process step might be provided by the properties of the class?
You must remember that often a variety of methods can be used to take the same inputs, process them, and produce the same answer. Just as you can find a variety of ways to fly from New York to Los Angeles (such as nonstop, or through Chicago, or Denver, or Houston), the result's the same: You end up in L.A. Likewise, you can use different algorithms to take the same inputs into a program, process them differently, but generate the same results. For example, there are dozens of different algorithms available to sort data using a computer. However, as you shall see in subsequent chapters, some algorithms are more efficient than others. Always keep your mind open to new ways to accomplish old tasks.
Step 4: Display
The Display step is responsible for displaying the results produced in the Process step. Usually, this means showing the results on the display screen, but other options exist. Perhaps it means skipping the display screen and simply printing a bill and mailing it to a customer. Or perhaps the program is responsible for updating a customer record in a database. There are many programs that run themselves (called batch programs) and don't display anything on the screen or ask for any inputs from the user as they run. Instead, batch programs often start automatically at a predetermined time (perhaps at 1 a.m. when no one else is using the system), read the input information from some input source (like a database), and generate reports based on the input information.
The Display step doesn't always result in your “seeing” a result displayed on a screen. Sometimes the result of the program is passed on to another process, or a database, a website, or even automatically sending an email. The key is that you have used the inputs to produce something new and you want to “see,” “use,” or “save” that new result. However, for most of the programs you write while using this book, the Display step does show some information to the user via the display device.
Step 5: Termination
The Termination step doesn't necessarily mean that you simply end the program. It also means “cleaning up” after the program has finished. For example, if the Initialization step reads the four latest files used in the program and appends them to the File menu, then this step needs to update those filenames to reflect what the user has done during the current session of the program. If the Initialization step sets up a printer or database connection, this step should close that connection.
Quite often, whatever is done in the Initialization step is “undone” in the Termination step. Finally, the Termination step should provide a graceful exit from the program, even if an error occurred while the program was running. (You learn more about how to plan for error conditions in Chapter 11.)
Creating a Simple Application Using Objects
Now use the Five Program Steps you just learned to design and write a simple program. The goal of the program is to gather address information about the user and then simply redisplay that information as if it were a mailing label. For now you won't actually do anything with the information, but after you get a little more C# programming under your belt, you could use this program as an input process for some larger programming task, such as creating a customer account or writing your own personal mailing list. The primary objective here, however, is to get you additional experience using a few of the objects provided to you as part of Visual Studio and .NET.
Using the Program Steps to Create a Program Plan
Your first task is to develop a plan to solving the task at hand. A good place to start the plan is with the Five Program Steps presented earlier.
1: Initialization
This is a simple program, and you don't actually have any fancy initialization to do. Any necessary initialization tasks are done automatically for you by Visual Studio. You take a look at Visual Studio's background handiwork a little later.
2: Input
This is the step where you must ask yourself, “What information do I need to solve the programming task at hand?” Because you want to arrange user information the way a mailing label does, you need to know the user's:
· Name
· Street address
· City
· State
· ZIP (or postal) code
You could write the program and hard-code values in for each piece of data into the program. When you hard-code a value into a program, it means that you make that value a permanent part of the program itself. If you hard-code the data for this program, you write program code that embeds the user's name and address as data directly into the program. However, hard-coding values directly into a program makes the program less flexible than it might otherwise be. For example, each time you wanted a mailing label for a new user, you'd need to write new data values into the program's code before you could display the information. Not good.
A more flexible approach is to ask the user to enter the necessary information while the program runs and to display the information as a mailing label when they finish. After they enter the information, you can arrange the data for display on the screen. The easiest way to code this approach to the solution is to use label and textbox objects for each piece of information, or input, you want to collect. When the user is satisfied that he has entered the requested information, he can click a button to display the information as a mailing label.
Designing a Program's User Interface for the Input Step
In this program, you decide to use labels and textboxes to collect the information from the user. The labels help to inform the user about the data you are requesting, and the textboxes provide a means for him to type in his responses. These labels and textboxes become part of the user interface of your program. A program's user interface simply refers to how the program interacts with the user running the program. In this program the user interface consists of labels, textboxes, and buttons arranged on a form.
Entire books have been written about how to design a good user interface. Although this chapter can't possibly do justice to the subject of user interface design, consider the following guidelines:
· Follow the KISS (Keep It Simple Stupid) principle. What this means is that you should make the user interface as simple as possible yet still acquire the information you need with minimal chance for input error. Resist the urge to add objects to a form if they don't contribute to the functionality of the program.
· Use familiar interfaces. For example, in this program you ask the user for address information. Chances are good that the user has filled in a tear-out magazine subscription form or filled in a driver's license form that asks for address information. Try to model your interface in a way that the user might already be familiar with, or do your best to make an unfamiliar user interface easy to understand.
· The user interface should have a natural flow to it. In a Windows program, the Tab key is used to advance from one input field to the next. It wouldn't make much sense to have the user type in his name and, after he presses the Tab key, to jump to the ZIP Code field, have him enter its value, and then jump back to the Address field. The flow would make more sense to the user if the program went from the Name field to the Address field to the City field to the State field, and so forth. Likewise, English-speaking users read from top left to bottom right, whereas Chinese readers progress from top right to bottom left. Therefore, even language and cultural factors can influence the flow of the user interface. Simply stated, the flow of a user interface should be intuitive and make sense to the user.
· Don't use any GWF in the program. The Gee-Whiz Factor refers to any user interface change you might make that doesn't serve any purpose other than to get the user to say, “Gee whiz!” Beginning programmers often change the background color for labels and textboxes, change the font color from black to purple, and make other changes that add nothing useful to the user interface other than to show that they know how to make such changes. The fact remains, however, that Microsoft has probably spent more money on research that tests the colors, shapes, and other default property values for objects than you will make in a lifetime. As a result, there are not many good reasons not to accept the results of that research.
Always keep in mind that the goal of a user interface is to make it easy for the user to run your program. Try to make the user interface intuitive and simple from the user's point of view.
3: Process
This is the step where you devise the algorithm that produces the wanted result of the program. The wanted result of this program simply is to display the user information in a mailing-label format. The Input step provides you with the information you need via the user interface you designed. Therefore, to actually begin the Process step, you need to have a button (such as a Display button) so that the program knows when all the input data has been entered and it can begin to address the task at hand.
Event-driven Programs
Microsoft Windows programs are event-driven. An event-driven program means that some agent (such as the user) must generate an event of some type for the program to perform the next program task. For example, in this program, if the user does not interact with the program in some way, the program will obediently sit there and wait until she does. In your program, the user must click the Display button to trigger the event associated with the Process step.
Human action is not the only way to trigger a Windows event. For example, the time of day might be constantly monitored by a program, and when a certain time is reached, the program triggers an event that causes that program to perform some type of action. A fire sensor might sit there for years monitoring the fire sensors and never trigger an event. But when the fire sensor does trigger an event, alarms go off, sprinklers turn on, and automated phone calls are sent out. For most of the programs you will write in this book, however, the user provides the activity (for example, a mouse click or a keystroke) that fires a Windows event.
The Process step for this program is simply to arrange the information entered by the user in the form of an address label. A button-click event triggers the Process step and is used to inform the program that all the necessary data has been entered and is ready for use. (Assume the user does not trigger the event before all the data is entered. This is a bright user, remember?)
4: Display
In this program, you simply display the user's name and address information as a mailing label.
5: Termination
Because you didn't write any code to do anything tricky in the Initialization step, you don't need to do anything in the Termination step to clean up and gracefully end the program. Instead, you can simply have a button object (such as an Exit button) that the user can click to end the program.
Now you have a plan based upon the Five Program Steps. Planning does not require you to do any programming. However, skipping this planning process is a common mistake all programmers make, including seasoned programmers.
Still, many of you will be like most of my students: You'll plunge ahead without formulating any kind of plan…and that's okay. However, eventually, you have to formulate a program plan, and it's always quicker to do it at the outset.
Now, all you need to do is implement your plan.
Using C# to Implement Your Program Plan
Now that you have a plan, you need to write the program code to solve the task at hand. You're going to do this by using the objects provided by Visual Studio and .NET in concert with your own program logic using C#. It won't be difficult for you to do this because…you have a plan! Because you started with a plan rather than by just dragging and dropping objects onto a form puts you light years ahead of most beginning programmers.
True, you too will be dragging and dropping objects onto a form soon enough, but your approach to the problem is different. There's a method to your dragging and dropping…it is guided by “the plan.” Too often beginning programmers start dragging labels and textboxes onto a form without a plan. However, movement without a plan generates more heat than light. Therefore, the lesson to learn is:
Never start coding a program without a plan.
Although you performed in Chapter 1 some of the steps presented in the next few sections, you didn't learn why you were doing those steps. Also, you do things a little differently now that you have some understanding of OOP. In the following Try It Out you begin.
Note
Earlier in this chapter you learned that .NET has approximately 4,000 classes available that you can use in your programs. Although all these classes are available to you, you don't actually need to use all 4,000 in a single project. For that reason, Visual Studio enables you to specify the categories of reference classes that you do want to use in your program. In this section you see how to select those groups of classes that you want to include in your current project.
Try It Out: Creating a New C# Project (Chapter02Program01.zip)
Your first task is to create a new C# project for the mailing label program.
1. Use the same File → New Project → Visual C# → Windows menu sequence discussed earlier in this chapter (refer to Figure 2.8).
2. Add program references to your project. Use the Project → Add Reference menu sequence to show the Add Reference dialog box. Now click on the Assemblies → Framework options to get a list of the assemblies that are available to you. Figure 2.11 shows you what the Add Reference dialog box looks like. In that figure, the System assembly is selected, which is the base for all Windows system references, which brings into your program all the classes that deal with Windows Forms objects. Click the Add button to add the assembly to your program.
Figure 2.11: Selecting program references
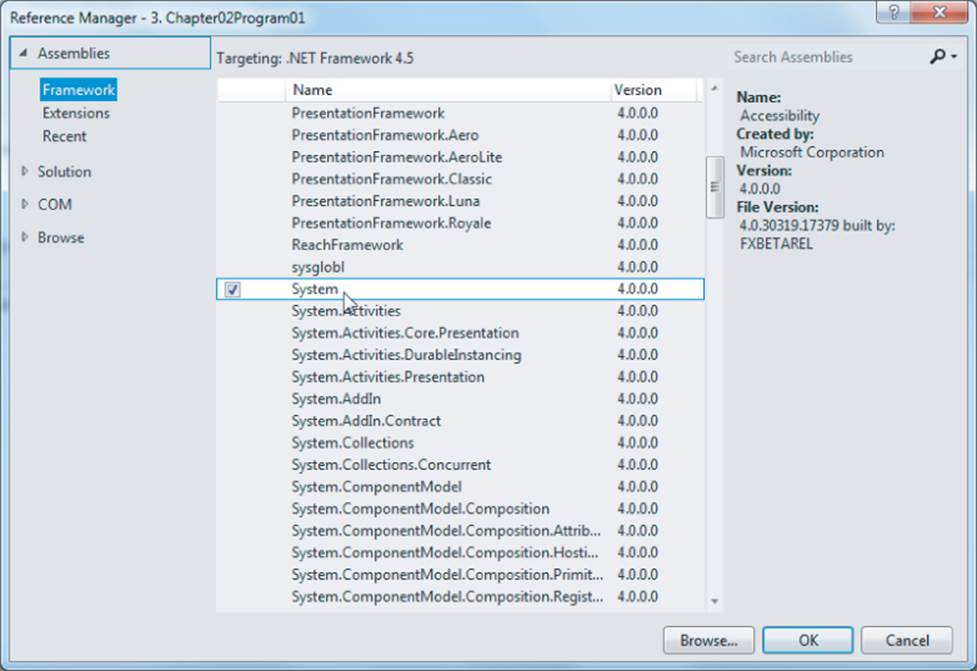
You can select additional references from the list by simply clicking the check box for each reference you want to include in the project. The references you need are:
· System
· System.Drawing
· System.Windows.Forms
Almost every program you write add these three references.
After you select these three references, click the OK button. You should see the references you selected under the References heading in the Solution Explorer window. If you don't see all three references, go back to the Add Reference dialog box and select the missing reference(s).
3. Add a new item to the project. Now you need to create a form object that is going to hold the (label, textbox, and other) objects that you want to use in your program. Use Project → Add New Item to display the Add New Item dialog box. (You need to scroll the dialog list to get to the Code File option.) Figure 2.12 shows this dialog box.
Figure 2.12: Adding a code file to the project
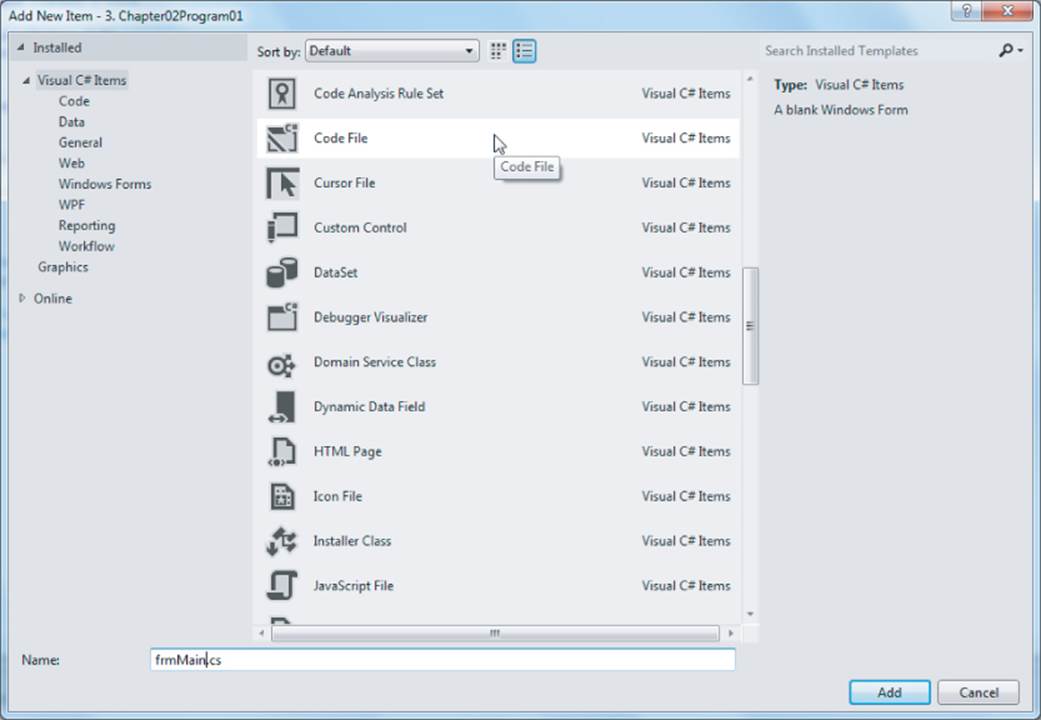
Scroll down the list of template objects until you see Code File from the list of available templates, and enter frmMain.cs in the Name textbox at the bottom of the dialog box, as shown in Figure 2.12. Click the Add button. (The “cs” secondary filename identifies the file to Visual Studio as a C# source code file.) You should now see frmMain shown in the Solution Explorer. Also the Source Window now has a new tab labeled frmMain.cs [Design]at the top of the Source Windows. The Source Window displays an empty form at this point.
If you double-click the empty form, a new tab named frmMain.cs is created, and you can see some code that Visual Studio created for you. Highlight all the code you see, and press the Delete key to remove the code from the form. (The fastest way to highlight the code is Ctrl-A, as mentioned earlier.)
4. Add program code to the frmMain object. Virtually every program you create while reading this book begins with exactly the same program statements. These program statements are exactly the same as shown earlier in the chapter in Listing 2-1. If you saved those statements in a C# template file as suggested, just cut-and-paste those lines of code into the Source window for frmMain.cs.
5. Set the project properties. You should now set the properties that govern the environment in which the program will execute. Select the Project → Chapter02Program01 menu sequence. The dialog is the same one you saw in Figure 2.10.
Because you want your program to run as a Windows application, select Windows Application from the Output Type choices. Next, set the Startup Object to be the object that contains the Main() method for the application. As mentioned in Chapter 1, every C# program must have a Main() method because it is the Main() method that tells Visual Studio where to begin executing the program. As you can see in Figure 2.11, it is the frmMain object that contains the Main() method. Select frmMain from the list of startup objects.
6. Delete the design code. Because you control the program code rather than relying on Visual Studio, you can delete the frmMain.Designer.cs source code file. You can find this file by moving the cursor to the Solution Explorer window and clicking the small triangle you see in front of the frmMain.cs file. Right-click the frmMain.Designer.cs filename, and select the Delete option. You will be prompted if you want to delete the file from the project. Click OK.
In the Solution Explorer window, right-click the frmMain.cs file, and you are presented with a list of options, as shown in Figure 2.13. Click the View Designer option. This causes a blank form to reappear in the Source Window, as shown in Figure 2.14.
Figure 2.13: Selecting the View Designer from the Solutions window
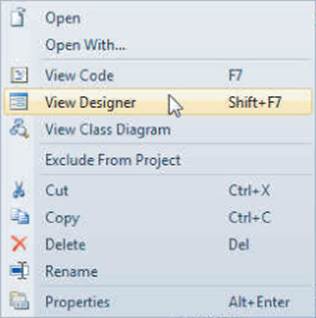
Figure 2.14: The Designer view
You are now ready to start adding objects to the form.
7. Add objects to the frmMain object. If you have followed the directions correctly, your screen should look similar to Figure 2.14. You can now add the various program objects to the form.
Table 2.2 presents the object and property values for each of the objects you should place on the form. (You need to scroll the Properties Window to find some of the properties.)
Table 2.2 Objects and Their Property Values
|
Object Name |
Property Name |
Property Value |
|
frmMain |
Text |
Mailing Label Program |
|
StartPosition |
CenterScreen |
|
|
label1 |
Text |
Name: |
|
AutoSize |
False |
|
|
BorderStyle |
Fixed3D |
|
|
Size |
75, 20 |
|
|
label2 |
Text |
Address: |
|
AutoSize |
False |
|
|
BorderStyle |
Fixed3D |
|
|
Size |
75, 20 |
|
|
label3 |
Text |
City |
|
AutoSize |
False |
|
|
BorderStyle |
Fixed3D |
|
|
Size |
75, 20 |
|
|
label4 |
Text |
State |
|
AutoSize |
False |
|
|
BorderStyle |
Fixed3D |
|
|
Size |
40, 20 |
|
|
label5 |
Text |
ZIP |
|
AutoSize |
False |
|
|
BorderStyle |
Fixed3D |
|
|
Size |
40, 20 |
|
|
txtName |
Default values for all properties |
|
|
txtAddress |
Default values for all properties |
|
|
txtCity |
Default values for all properties |
|
|
txtState |
Default values for all properties |
|
|
txtZip |
Default values for all properties |
|
|
txtDisplayOutput |
MultiLine |
True |
|
ReadOnly |
True |
|
|
btnDisplayOutput |
Text |
&Display |
|
btnExit |
Text |
E&xit |
Because the program does not manipulate the property values of the label object in the program, you can leave their names unchanged from the default names supplied for labels by Visual Studio. However, because you do want to manipulate and use the information contained in the textboxes, you should give them meaningful names, as suggested in Table 2.2.
Thus far, you have not specified the size of the objects (for example, buttons, textboxes, and labels) used on the form. However, when you finish adding the objects to the form and setting their property values, your form should look similar to the form object shown in Figure 2.15. You can adjust the sizes of the objects by using their sizing boxes. (The sizing boxes appear when you click an object and that object is capable of being resized.)
Figure 2.15: The program's user interface
8. Add program code for the Process step. When the user runs your program, she is expected to fill in the various textboxes and click the Display button. A button-click generates an event message that causes the code tied to the btnDisplayOutput click event to be executed. With the form visible in the Source Window, double-click the Display button. Recall that a double-click on the button object causes Visual Studio to generate the stub code for the button's click event. In this case, the stub code looks like:
private void btnDisplayOutput_Click(object sender, EventArgs e)
{
}
Your task is to fill in the necessary code between the opening and closing parentheses that causes the program to accomplish its task. Now add the following program code to the btnDisplayOutput click event stub so that it looks like:
private void btnDisplayOutput_Click(object sender, EventArgs e)
{
String buffer;
buffer = “Mailing Label:” + Environment.NewLine +
Environment.NewLine;
buffer = buffer + “ Name: “ + txtName.Text +
Environment.NewLine;
buffer = buffer + “Address: “ + txtAddress.Text +
Environment.NewLine;
buffer = buffer + “ City: “ + txtCity.Text +
“ State: “ + txtState.Text +” Zip: “ + txtZip.Text;
txtDisplayOutput.Text = buffer;
}
In the code some of the string elements are “padded” with blanks spaces before them (that is, ” Name:”). This is an attempt to make things line up nicely when they display. Now run the program and fill in the textboxes with the appropriate information. Figure 2.16 shows a sample run of the program.
Figure 2.16: Sample run of the program
How It Works
The program begins by building the form in memory, placing the various objects on the form where you told them to be placed when you constructed the user interface described in Table 2.2. Anytime you move an object on the form, Visual Studio automatically adjusts the code to reflect the new position. If you change a property of an object using the Property Window, Visual Studio makes the appropriate changes to the code for you. Recall that changing a property is, after all, changing the state of the object.
You can examine the code Visual Studio wrote for the user interface by looking at the statements in the InitializeComponent() method. Because the code is fairly lengthy and repetitive, only the first few statement lines are shown here.
private void InitializeComponent()
{
this.label1 = new System.Windows.Forms.Label();
this.txtName = new System.Windows.Forms.TextBox();
this.txtAddress = new System.Windows.Forms.TextBox();
this.label2 = new System.Windows.Forms.Label();
this.txtCity = new System.Windows.Forms.TextBox();
this.label3 = new System.Windows.Forms.Label();
this.label4 = new System.Windows.Forms.Label();
this.txtZip = new System.Windows.Forms.TextBox();
this.label5 = new System.Windows.Forms.Label();
this.btnDisplayOutput = new System.Windows.Forms.Button();
this.btnExit = new System.Windows.Forms.Button();
this.txtDisplayOutput = new System.Windows.Forms.TextBox();
this.txtState = new System.Windows.Forms.TextBox();
this.SuspendLayout();
//
// label1
//
this.label1.BorderStyle = System.Windows.Forms.BorderStyle.Fixed3D;
this.label1.Location = new System.Drawing.Point(12, 18);
this.label1.Name = “label1”;
this.label1.Size = new System.Drawing.Size(75, 20);
this.label1.TabIndex = 0;
this.label1.Text = “Name:”;
this.label1.TextAlign = System.Drawing.ContentAlignment.MiddleRight;
//
// txtName
//
this.txtName.Location = new System.Drawing.Point(93, 18);
this.txtName.Name = “txtName”;
this.txtName.Size = new System.Drawing.Size(297, 20);
this.txtName.TabIndex = 1;
// More statements follow
} // End of the InitializeComponent() method
Consider the first program line:
this.label1 = new System.Windows.Forms.Label();
Previously this chapter discussed what this statement does. Keeping in mind that the keyword this refers to the current object, or frmMain in this case, a label object is one of the cookie cutters you can use to instantiate an object. In this case you can create a cookie named label1, and a few lines later Visual Studio wrote the following code:
this.label1.BorderStyle = System.Windows.Forms.BorderStyle.Fixed3D;
this.label1.Location = new System.Drawing.Point(12, 18);
this.label1.Name = “label1”;
this.label1.Size = new System.Drawing.Size(75, 20);
this.label1.TabIndex = 0;
this.label1.Text = “Name:”;
this.label1.TextAlign = System.Drawing.ContentAlignment.MiddleRight;
This code changes a number of properties (like BorderStyle, Location, Name, Size, TabIndex, Text, and TextAlign) for the label1 object. Because the object's properties appear on the left side of the assignment operator, the code changes the values for each of the properties shown. This also means that the state of the label1 object has been changed.
Code similar to that shown here is generated for the other objects you placed on the form. In each case, the state of the object is changed according to the properties you changed while constructing the user interface.
If you look closely at Figure 2.15, you can see the 3-D border effect created using the Fixed3D BorderStyle property with the label objects. You should also change their TextAlign property so they are right justified. Strictly speaking, Windows programs do not use borders on label objects. Given that borders are nonstandard, why are they used in this example? There are two reasons.
First, the use of borders reinforces the purpose of an object's properties. Changing an object's property values changes the state of the object. In this case, changing the state of the BorderStyle property changes the way the label looks on the screen. The second reason to use borders on the labels is that they look kind of cool. If you want to follow the strict Windows style or don't like the way label borders look, don't use them. After all…it's your program.
Now examine program code found in the btnDisplayOutput click event method. The first statement in the method is:
String buffer;
This line simply creates a program variable named buffer. As you will learn in the next chapter, a variable is nothing more than a name for an area of computer memory used to hold a piece of program data. The keyword String denotes a specific type of variable that is capable of storing textual data. (You will learn more about variables and data types in Chapter 3.) As you are using it here, buffer is used to hold some textual characters you've hard-coded into the program (such as Mailing Label) plus some textual characters that the user has supplied via the textbox objects.
The next program line takes the characters Mailing Label: and adds two newline characters (as stored in the Environment.NewLine property of the Environment object) to the end of the sequence of characters:
buffer = “Mailing Label:” + Environment.NewLine +
Environment.NewLine;
A newline character causes subsequent characters to print on the next line. Because you have used two newline characters, this has the effect to display a blank line in the output. Refer to Figure 2.16 to see the blank line.
The next line of program code takes the current value of buffer and adds the characters Name: to it:
buffer = buffer + “ Name: “ + txtName.Text +
Environment.NewLine;
The statement then accesses the txtName object and uses the dot operator to access the data stored in the Text property of the txtName object. Using the data shown in Figure 2.16, the Text property of the txtName object currently holds the name Jane Holcar in it. This data is then added on to the end of buffer to produce the following:
Mailing Label:
Jane Holcar
This is the sequence of characters currently stored in buffer. This sequence of actions on the txtName object is similar to what is depicted in Figure 2.7. Lastly, a newline character is added to buffer so that any additional characters added to buffer appear on a new line in the display.
You can summarize the statement as a series of steps, with the step number appearing in parentheses below its associated action:
buffer = buffer + “ Name: “ + txtName.Text + Environment.NewLine;
(5) (1) (2) (3) (4)
This may be read as the following sequence of steps. (Recall that statements on the right side of the assignment operator (=) are processed first.)
1. Take the original content of buffer (that is, Mailing label:) that existed prior to the execution of this statement.
2. Add the characters Name: after the characters Mailing label: and the two newline characters.
3. Use the dot operator to fetch the characters stored in the Text property of the txtName object.
4. Add a newline character at the end of the characters.
5. Assign this new sequence of characters back into buffer so buffer contains the old plus the new characters.
After the statement has been processed, buffer now contains the first three lines displayed in Figure 2.16.
The remaining program code statements add the address, city, state, and ZIP code entered by the user, and work the same way the first two program lines did. The end result of the program statements that assign data into buffer is what you see displayed in the textbox at the bottom of the form.
The following program statement simply moves the characters stored in buffer into the Text property of the txtDisplayOutput object:
txtDisplayOutput.Text = buffer;
Because this changes the value of the Text property of txtDisplayOutput, the state of the txtDisplayOutput object is changed, which causes the display to change and look like what is shown in Figure 2.16.
The btnExit click event code does nothing more than call the Close() method, which causes the program to terminate. The btnExit text property has an ampersand (&) imbedded in it after the E. This enables the user to use the Alt+X keystroke sequence in lieu of using the mouse to click the Exit button. In this example, the letter X is the “hot key” (or accelerator) alternative to clicking the Exit button. Hot keys enable the user to run the program using just the keyboard in the absence of a mouse device. The same interpretation applies to the letter D in the btnDisplayOutputbutton. That is, the user can press Alt+D instead of clicking the Display button.
As mentioned earlier, a programming style convention is to start object names with specific prefixes. For example, textbox names begin with txt and button names start with btn. Such a prefix is followed by a name that describes the object, such as txtName for the user's name, txtAddressfor the address, and so on. The object name used after the prefix is capitalized. The practice to use an uppercase letter for the subnames within object and variable names is called Camel Notation. You can see the use of camel notation in the object names shown in Table 2.2 (such asbtnDisplayOutput). Camel notation makes it easier to read and understand object and variable names. You learn more about object and variable names in Chapter 3.
Critique of the btnDisplayOutput Click Event Code
The program code found in the btnDisplayOutput click event is an example of what I call RDC…Really Dumb Code. This is true for a number of reasons. First, there is no validation of the contents that have been typed into the various textboxes by the user. To make the program code smarter, you should add code to verify that something was typed into the textbox and that the data is appropriate for the information wanted. For example, if you want to validate the content of the Text property for the ZIP code textbox object, perhaps you should check to see if only digit characters are entered. Or if there is a mixture of alpha and digit characters, perhaps you should check to make sure exactly six characters were entered. This way you could allow Canadian postal codes, too, because those codes use both alpha and digit characters.
A second improvement would make the output a little easier to read. If you look closely at the output in Figure 2.16, you can notice that the fields don't line up properly. This is true even though you made an effort to align the Name, Address, and City fields in the program statements by using an appropriate number of spaces before each field. Why didn't this work?
The reason is that label objects have their default Font property set to the Microsoft Sans Serif font. This is what is called a TrueType font. A TrueType font is a variable-spaced font. What that means is that each character in a TrueType variable font takes up only as much screen space as it needs to be seen on the display device. The letter I, for example, takes up less space on the screen than does the letter W. Therefore, because different letters take up different amounts of space, it is difficult to get letters on different lines to align with each other.
You can solve this alignment problem by changing the font to a fixed font. With a fixed font, each letter takes up exactly the same amount of space. If you change the Font property of the txtDisplayOutput object to the Courier New font, which is a fixed font, the letters align perfectly. You can see the result of the font change by comparing the display output in Figure 2.16 with that in Figure 2.17.
Figure 2.17: Sample run after changing the font
Summary
You covered quite a bit of ground in this chapter. The remainder of this book builds upon the basic concepts presented in this chapter. You should spend enough time with the material presented here to be comfortable with all the terms introduced in this chapter (such as class, object, property, method, dot operator, instantiate, and so on). A little time spent now learning these concepts can generate huge rewards in later chapters. Take your time, experiment, and have fun.
Exercises
You can find the answers to the following exercises in Appendix A.
1. What is a class? What is an object? How are the two related? How are they different?
2. In one sentence each, describe the Five Program Steps.
3. Explain what each of the following two statements do:
clsThingie myThingie;
myThingie = new clsThingie();
4. Design a class for a kitchen oven object.
5. What constitutes a “good” user interface?
6. Why are you making the effort to learn OOP?
7. Using the mailing label program, pick six or seven properties for the label and textbox objects and change their values. What is the impact on the program? (You might use the list of properties shown in Table 2.2 as a starting place.)
What You Learned in This Chapter
|
TOPIC |
KEY POINTS |
|
Class |
A simplification of something |
|
Property |
A piece of data that is used to describe an object and its state |
|
Method |
An action, or ability, you want the object capable of doing |
|
Object |
A piece of memory that implements the design of the class. If a class is the architectural drawings of a house, object is the house. |
|
Dot operator (.) |
Used to gain access to an object's properties or methods |
|
User interface |
How the end user interacts with a program |
|
Five Program Steps |
A methodology for designing a program |