Beginning Object-Oriented Programming with C# (2012)
Part II
Understanding C# Syntax
Chapter 7
Statement Repetition Using Loops
What you will learn in this chapter:
· What a loop is and when it should be used
· What constitutes a well-behaved program loop
· What happens when loops are ill-behaved
· What a for loop is
· What a while loop is
· What a do-while loop is
· When to use the break and continue statements
wrox.com code downloads for this chapter
You can find the wrox.com code downloads for this chapter at www.wrox.com/remtitle.cgi?isbn=9781118336922 on the Download Code tab. The code in the Chapter07 folder is individually named according to the names throughout the chapter.
Computer programs are good doing repetitive tasks…much better than humans because computers don't get bored. In this chapter, you learn about program loops. These are simply a means by which a program can repeat the execution of a given set of program statements.
Most nontrivial programs use some form of program loop. Loops are so useful that C# makes several different types available. Now see what loops can do for you.
Program Loops
If you're sitting in a public building right now, look at the ceiling; chances are you can see sprinklers embedded there. In most modern office buildings, each room has one or more sprinklers in it. Modern sprinklers are monitored by software that tests each one to see if it senses a fire. If a building has 500 sprinklers, the program samples the current state of sprinkler number 1 and, assuming everything's okay, goes on to test sprinkler number 2. This process continues until sprinkler 500 is tested. Assuming all 500 passed the test and no fire is sensed, the program goes back to the start and tests sprinkler 1 again. The program then moves on to sprinkler 2 and the entire process repeats itself. It's fairly quick, probably taking less than a few seconds to test all 500 sprinklers.
The process of repeated testing is performed by a program loop within the fire system software. If one of the sprinkler system tests failed, the software would likely branch out of the loop and process code that would sound the alarm, make sure there is water pressure to feed the sprinkler system, turn on the sprinkler system, and place a call to the fire department. Loops are everywhere around us, in everything from fire alarms to elevators to circuits in your car's engine and safety equipment. Indeed, people who find their lives boring are perhaps caught in endless loops wherein they do the same things over and over again!
Good Loops, Bad Loops
Not all loops are created equal. As you see in a moment, there are good loops and bad loops. To understand the difference, consider the conditions of a well-behaved loop.
The Three Conditions of a Well-Behaved Loop
In general, well-behaved loops:
· Always initialize the starting state of the loop.
· Provide a test expression to decide whether another iteration of the loop is needed.
· Alter the current state of a variable that controls the loop.
The first condition means that your code should always start executing a program loop in a known state. Usually this means that you assign the variable that controls the loop some initial value. Failure to initialize a loop variable almost always means that the loop executes an unexpected number of times—not good!
The second condition means that you must have some form of test that decides whether another pass through the loop is needed. Usually this means testing the variable that you initialized as part of the first condition against some termination criteria. This condition often means that a relational operator is part of the condition.
The third condition means that some variable must change its value during the execution of the loop. If the state of the loop does not change during execution, there is no condition that can terminate the loop. This produces an infinite loop, which is one that continues to execute forever. Most of the time, an infinite loop is the result of an error in the logic of the program.
Infinite Loops
Infinite loops are often unintentional and can “hang” the program. Therefore, any time you write code that involves program loops, it's a good idea to save your code before running it. By default, Visual Studio saves your code when you run the program (F5). You can save the project's code explicitly by using either the File → Save All menu sequence or the Ctrl+Shift+S key combination. By saving your code before a trial run, you can pick up where you left off if the code enters an infinite loop. Usually you can regain control by clicking the small blue square icon or pressing Shift+F5. Sometimes these don't work, and you may need to use the dreaded Ctrl+Alt+Delete to regain control of the system when an infinite loop is executed.
To illustrate the three conditions of a well-behaved loop, consider the C# for loop.
The for Loop
The syntax for a for loop is as follows:
for (expression1; expression2; expression3)
{
// for loop statement block
}
expression1 is normally used to initialize the starting value of a variable that controls the loop. expression2 is usually a relational test that determines if another iteration of the loop is needed. Finally, expression3 is often a statement that increments or decrements the variable controlling the loop. A concrete example should help identify these expressions. Suppose you want to generate a table of squares for values from 0 through 100. The for loop controlling the processing might look like this:
for (i = 0; i <= 100; i++)
{
// statements to calculate the values
}
expression1 is the statement that immediately follows the opening parenthesis of the for loop:
i = 0;
This expression sets, or initializes, the initial state of the variable that controls the loop. In this case you start the table-of-squares calculations with the value 0. Because the variable i appears in all three expressions, it is the variable that controls the for loop. If you want to initialize the state of the loop with the value 1, you would change expression1 to be
i = 1;
The second expression,
i <= 100;
checks the current value of variable i against the wanted ending value of 100. If this expression resolves to logic True, another pass through the loop code is made. That is, the for loop's statement block is executed again.
The third expression,
i++;
is responsible for changing the state of the loop during each pass. In this case the code simply increments the value of variable i. Note that you can place any expression statement here, including a decrement if you want.
Increment and Decrement Operators
expression3 uses the expression i++. This is an example of a post-increment operator. The interpretation of the post-increment operator (i++) is:
i = i + 1;
That is, the post-increment operator takes the current value of variable i and adds 1 to it.
You can also use a post-decrement operator, which has the syntax form of i--. The interpretation of the post-decrement operator is:
i = i - 1;
The post-decrement operator, therefore, takes the current value of variable i and subtracts 1 from it.
When a increment or decrement operator “stands by itself” as it does in the for loop, only the single variable is affected. Now consider the following statement:
k = i++;
If the value of i just before this statement is 5, what's the value of k? Is k equal to 5 or 6? In other words, at what point does the increment take place? In this example, because you use the post-increment operator, the value of k is 5, but the value of i when the statement finishes executing is 6. This is why it is called a post-increment operator. You use the value first (using the assignment operator in this example) and then you perform the increment operation.
As you probably suspected, there is also a pre-increment operator. A pre-increment operation places the two plus signs before the variable name. With pre-increment operations, the increment is performed before the value is used. Therefore, if i is 5 before the following statement:
k = ++i;
the value of k is 6, as is the value of i.
C# also enables you to use pre- and post-decrement operations. If the value of i is 5 before the following statement:
k = i--;
the value of k is 5, but the value of i is 4. Again, the reasoning is the same: The decrement operation is done after the assignment is performed. If a pre-decrement operator were used,
k = −-i;
the value of both k and i are 4 because the decrement is performed before the assignment takes place.
You should convince yourself that a standalone increment or decrement expression behaves exactly the same from the program's point of view. It's only when the increment or decrement operation is used as part of some other expression (like an assignment operation) that it matters whether the pre- or post-operator is used. In the for loop, expression3 is not used with any other subexpression, so you can use either a pre- or post-increment operator.
Sequencing in a for Loop
There is a well-defined sequence for the order of statement execution in a for loop. This sequencing is illustrated in Figure 7.1.
Figure 7.1 Execution sequence of a for loop
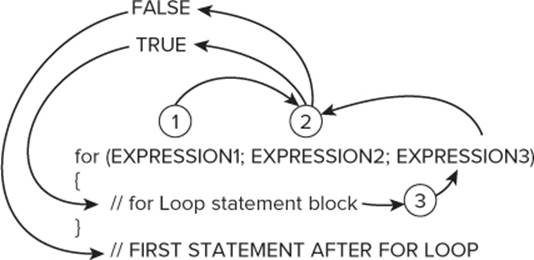
In the figure, step 1 is usually the initialization of the variable that controls the loop. After step 1 is accomplished, program control is transferred to step 2. Note that expression1 in step 1 is never revisited. The sole purpose of expression1 is to initialize the loop; after that is done, that expression is not executed again.
Step 2 is the relational expression. Often this means the code compares two variables to decide what to do next. As shown in Figure 7.1, if the outcome of the relational test in expression2 is logic true, program control is sent to the statements in the for loop statement block. If expression2evaluates to logic false, program control is sent to the first statement following the closing curly brace of the for loop statement block, and the loop body is skipped.
Assuming step 2 is logic True, the code between the opening and closing curly braces is executed. When the last statement of the for loop statement block is executed, step 3 sends program control to expression3. Normally, expression3 is responsible to change the state of the for loop. Perhaps the most common statement for expression3 is an increment operation of the variable that was initialized in step 1.
After expression3 is executed, program control is immediately sent back to expression2. Again, the code in expression2 is tested to see if another pass through the loop statement block is needed. If the test is logic True, another pass through the for loop statement block is made. This repeated sequence continues until expression2 evaluates to logic False, at which time the for loop terminates.
Just like the if statement block you studied in the last chapter, when the for loop controls only a single program statement, the curly braces can be left out and the C# compiler won't complain. However, just like you should always use braces with the if statement, you should always use curly braces with for loops for the same reasons: The braces make loops easier to read, and quite often you need to add more statements later.
Now that you understand what each of the three expressions in a for loop does, compare their tasks with the three conditions required of a well-behaved loop. See any relationship? The three expressions needed to use a for loop are the three required conditions of a well-behaved loop!
In the following Try It Out you write a program that uses a for loop to generate a table of squares for a sequence of numbers. Note how all of the conditions for a well-behaved loop are stated on a single line of the program.
Try It Out: Table of Squares (Chapter07ProgramTableOfSquares.zip)
In this example you write a program that produces a table of squares for a series of numbers. Figure 7.2 shows what the user interface looks like for your program.
1. Create a new project, and add in the C# template using the procedure explained in Chapter 2.
2. Add four label objects, two textbox objects, and three button objects following the general layout shown in Figure 7.2. Obviously, you can use a different user interface if you want.
Figure 7.2 Table of squares program using a for loop
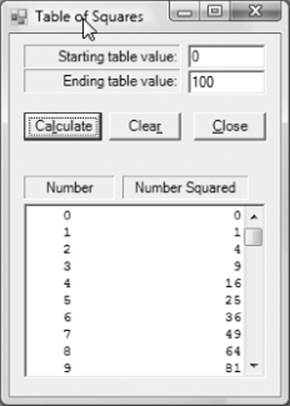
3. Add a listbox object, set the ScrollAlwaysVisible property to True, and name the listbox lstOutput.
The code behind the interface is shown in Listing 7-1. In this example, all the code is shown, including the template C# code from Listing 2-1 in Chapter 2. (See Chapter07ProgramTableOfSquares.zip)
Listing 7-1: Table of squares program (frmMain.cs)
using System;
using System.Windows.Forms;
public class frmMain : Form
{
private Label label2;
private TextBox txtStart;
private TextBox txtEnd;
private Button btnCalculate;
private Button btnClear;
private Button btnClose;
private ListBox lstOutput;
private Label label3;
private Label label4;
private Label label1;
#region Windows code // This code is hidden…
public frmMain()
{
InitializeComponent();
}
public static void Main()
{
frmMain main = new frmMain();
Application.Run(main);
}
private void btnCalculate_Click(object sender, EventArgs e)
{
bool flag;
int i;
int start;
int end;
string buff;
//================ Gather inputs ======================
// Convert start from text to int
flag = int.TryParse(txtStart.Text, out start);
if (flag == false)
{
MessageBox.Show("Numeric data only", "Input Error");
txtStart.Focus();
return;
}
// Convert end from text to int
flag = int.TryParse(txtEnd.Text, out end);
if (flag == false)
{
MessageBox.Show("Numeric data only", "Input Error");
txtEnd.Focus();
return;
}
if (start >= end) // Reasonable values?
{
MessageBox.Show("Start greater than end.", "Input Error");
txtStart.Focus();
return;
}
//================= Process and Display ==============
for (i = start; i <= end; i++)
{
buff = string.Format("{0, 5}{1, 20}", i, i * i);
lstOutput.Items.Add(buff);
}
}
private void btnClose_Click(object sender, EventArgs e)
{
Close();
}
private void btnClear_Click(object sender, EventArgs e)
{
txtStart.Clear();
txtEnd.Clear();
lstOutput.Items.Clear();
}
}
If you label the button and textbox objects with names other than those shown in Listing 7-1, you will need to adjust the code accordingly.
How It Works
All of the real work is done, as usual, in the click event code for the Calculate button. Several working variables are defined, and then the code works on securing the input data from the user interface objects. In this example, the user has typed the starting and ending values into thetxtStart and txtEnd textbox objects, respectively. (The TryParse() method was discussed in detail in Chapter 6, so there is no need to repeat that discussion here.) If both TryParse() methods perform without error, the user typed in valid digit characters that can be converted into the variables start and end. This also means that you have completed the Input step of the Five Program Steps discussed in Chapter 2.
Now review the code in the for loop:
for (i = start; i <= end; i++)
{
buff = string.Format("{0, 5}{1, 20}", i, i * i);
lstOutput.Items.Add(buff);
}
The first condition of a well-behaved loop is that you must set the initial state of the loop. In this example, expression1 of the for loop (i = start) sets the starting state of the variable controlling the loop (i) to its initial value (start). (This corresponds to step 1 in Figure 7.1.) Having done that, the program then moves to expression2 of the for loop, i <= end. Suppose the user typed in 0 for the starting value and 100 for the ending value. Because i has been initialized to 0, the expression
i <= end;
may be viewed as
0 <= 100;
Because 0 is less than 100, the expression evaluates to logic True, which means that the statements in the loop body are executed next.
Formatting String Data
The statement
buff = string.Format("{0, 5}{1, 20}", i, i * i);
is a special formatting method provided for you by the string class. The arguments to the method are the key to its usefulness. The first argument of the Format() method is always a quoted string literal. Within that string is a list of options about how you want the data formatted. The first option shown is {0, 5}. This option says to take the first argument (that is, argument 0) and right-justify it in a field of five characters. (Programmers reference almost everything from zero, so the first argument is actually argument zero.) The second option is {1, 20}, which says to format the second argument (that is, argument number 1) as right-justified in a field of 20 characters. This is why the output lines up in nice columns in Figure 7.2.
Okay, so you know how to format the arguments, but — where are the arguments? After the closing double quote in the quoted format string ("{0, 5}{1, 20}") is a comma followed by a list of the arguments. The option string indicates there are two arguments. Following the option string are two arguments: i and i * i. Therefore, the first argument is the value of variable i, and the second argument is the value of i * i, or the square of i. These two pieces of data are then formatted by the Format() method and placed in the string variable buff.
Some additional Format() method options are shown in Table 7.1. You can use Visual Studio's online help to see other formatting options. The vertical lines in the third column of Table 7.1 show the width of the field being requested in the options string. It is permissible to not specify a field width. Note how the use of a minus sign left-justifies the data. The absence of a minus sign produces the default right-justification of the data.
Table 7.1 Format Strings
|
FORMAT OPTION STRING |
ARGUMENT |
OUTPUT |
|
{0} |
"Katie" |
|Katie| |
|
{0, 15} |
"John" |
| John| |
|
{0, -15} |
"Tammy" |
|Tammy | |
|
{0,15:C} |
5.10 |
| $5.10| |
|
{0,-15:C} |
5.10 |
|$5.10 | |
|
{0, mm} |
9:15 |
|15| |
|
{0, 5:hh} |
12:15 |
| 12| |
|
{0, 15:hh mm} |
12:15 |
| 12:15| |
|
{0, dddd MMMM} |
1/1/2008 |
|Tuesday January| |
If you want to format columns in a listbox, even when using the Format() method of the string class, there are still problems to overcome. If you try the code in Listing 7-1 as it is, the column output in your listbox looks good, but not perfect. Why isn't your output perfectly aligned as inFigure 7.2?
Fonts and Column Alignment
The reason the columns in your program aren't straight is that the default font for a listbox is Microsoft Sans Serif. This is a TrueType font. This means that each character gets only as many screen pixels as are necessary to display the character. Therefore, the digit character 1 may take only 3 pixels to display, whereas the digit 8 might take 7 pixels to display. The result is that the digit characters won't line up right because each digit character in the listbox uses a different amount of pixel real estate.
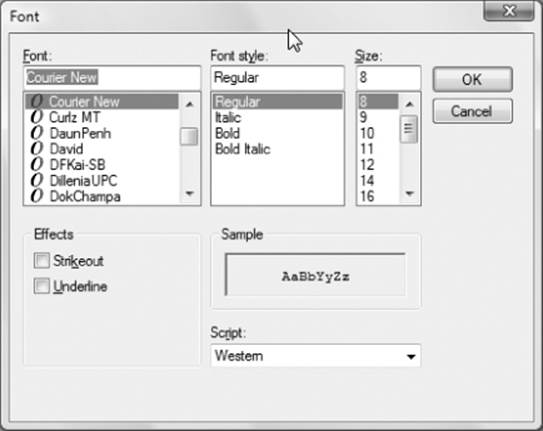
If you switch from a TrueType font to a fixed font, such as Courier New, the columns line up perfectly. This is because each character in the Courier New font character set takes exactly the same number of pixels regardless of how wide (or skinny) the character is. Therefore, all you need to do to fix this alignment problem is go to the listbox's font property and change it to Courier New. (Are you changing the state of the listbox?) You can do this by clicking the listbox in the Design window, selecting the Font property, and clicking the ellipsis operator (…). Then scroll through the list of fonts in the listbox shown in the font dialog until you come to the Courier New font. You can see the Font window in Figure 7.3. You can alter the style (for example, bold, italics) and the size of the font, too. The Sample (read-only) textbox shows you what your style selections will look like.
Figure 7.3 Font Property option
After the value of i and i * i have been formatted into buff by means of the Format() method, the code places the string into the listbox object. The statement to add a string to a listbox is simply:
lstOutput.Items.Add(buff);
You should figure out why there are two dot operators in this statement. The listbox object lstOutput has a property named Items that is an object. (Technically, Items is a collection object; you learn about these in Chapter 8. For now, you can just think of Items as a group of object thingies that can store string data.) The code calls the Add() method of the Items object, which results in one line of output being added to the listbox.
After the string data in buff has been added to lstOutput, program control jumps to the third expression of the for loop, a post-increment operation, i++, (refer to Figure 7.1). This increment expression is the third step in a well-behaved loop: It changes the state of the loop. If you didn't change the state of the loop counter variable, i, you would have an infinite loop because the second expression in the for loop would always be true. In this case, an infinite loop would not be a good thing.
After i has been incremented by means of the ++ increment operator, program control is transferred to expression2. For your for loop, this expression is
i <= end;
The second expression, therefore, compares the newly incremented value of i to the variable end to decide whether another pass through the for loop's statement body is warranted. As long as the current value of i is less than or equal to the value of the variable end, another pass through the loop is made. Eventually, after 101 passes through the loop, expression2 becomes logic False and the for loop statement block is skipped. Program execution then resumes with whatever statement follows the closing curly brace of the for loop statement block. You can see in Listing 7-1 that the next statement is actually the closing brace for the btnCalc click event. Therefore, your table of squares is now complete.
When to Use a for Loop
The most common use of for loops is to count something or perform a sequence of instructions a specific number of times. That is, the terminating condition as stated in expression2 of the for loop is usually known when the loop is entered. In the preceding program, for example, you knew that the variable end determines how many passes should be made through the for loop statement block.
You will discover hundreds of situations in which the for loop offers the perfect way to solve a given problem. Of the various looping structures C# makes available to you, it is probably the one used most often. A bonus feature of the for loop is that all three requirements for a well-behaved loop are specified in the three expressions used in a for statement. Having all three requirements for a well-behaved loop in one place makes it difficult to forget any of them.
Nested for Loops
Sometimes you need to solve problems that require a loop within a loop. When one loop appears inside another loop, it is called a nested loop. Now modify your table-of-squares program by putting a new twist on it. Many years ago the author discovered, quite by accident, that you can square a number in a different way from simple multiplication. The algorithm is:
The square of a number N is equal to the sum of N positive odd integers, starting with 1.
Reread the algorithm again and think about it. For example, suppose you want to find the square of the number 3. You already know the answer is 9, but use the new algorithm to calculate the answer:
N2 = 1 + 3 + 5
N2 = 9
Note how you simply added up three positive odd integers, starting with 1, to arrive at the square of 3, which is 9. Suppose you want to find the square of 5:
N2 = 1 + 3 + 5 + 7 + 9
N2 = 25
Although this is an RDC way to square a number, it is an interesting test to see if you can figure out how to implement the algorithm in code.
Next let's take the table of squares program discussed earlier in this chapter and improve it slightly with a few modifications. The result should look a little better when viewed on the display.
Try It Out: Table of Squares, Version 2 (Chapter07ProgramTableOfSquaresVersion2.zip)
For this example, you could reuse the code from Listing 7-1 as a starting point. (After all, one of the key advantages of object-oriented programming is code reuse! Or you could make things easy for yourself and download the program code.) You still want to generate a table of squares, so the user interface doesn't need to change. However, instead of the simple i * i means of squaring the number, you want to implement the new squaring algorithm.
1. Load the original table of squares program (that is, your program that used Listing 7-1).
2. Replace the for loop code following the Process and Display comment with the following code:
for (i = start; i <= end; i++)
{
nextOddInteger = 1; // Set first odd integer
square = 0; // Always start with square = 0
for (j = 0; j < i; j++) // Nested j loop
{
square += nextOddInteger; // Sum the odd integer
nextOddInteger += 2; // Set the next odd integer
}
buff = string.Format("{0, 5}{1, 20}", i, square);
lstOutput.Items.Add(buff);
}
You should take a piece of paper and hand write the code that implements the new algorithm. It's far too easy to read on to see how to write the code. You learn more by trying to write the code yourself.
You need to add a few new variables to the original version of the program. The new variables that you need to add to the btnCalculate click event code are the following:
int j;
int square;
int nextOddInteger;
These new variables should be added to the btnCalculate click event code.
How It Works
Of the newly-defined variables, j is used to control a new for loop, square is used to hold the squared value, and nextOddInteger is used to create the series of odd integers in the loop. In the revised for loop code:
for (i = start; i <= end; i++)
{
nextOddInteger = 1; // Set first odd integer
square = 0; // Always start with square = 0
for (j = 0; j < i; j++) // Nested j loop
{
square += nextOddInteger; // Sum the odd integer
nextOddInteger += 2; // Set the next odd integer
}
buff = string.Format("{0, 5}{1, 20}", i, square);
lstOutput.Items.Add(buff);
}
The for loop controlled by variable i is called the outer loop. The for loop controlled by variable j is called the inner loop.
Together, these loops are the nested loops mentioned earlier. The outer loop still cycles through all the values you want to display in the table of squares. Both loops are constructed using your three requirements for a well-behaved loop. Now examine the code in the inner loop.
Suppose variable i from the outer loop has a value of 3. This means you want to calculate the square of 3. The code sets nextOddInteger to 1 and clears variable square to 0. Replacing variable i with its current value in expression2 of the loop, the j for loop looks as though it is written like this:
for (j = 0; j < 3; j++) // Nested j loop
{
square += nextOddInteger; // Sum the odd integer
nextOddInteger += 2; // Set the next odd integer
}
Because expression2 is j < 3, the code makes three passes through the loop (0, 1, and 2 because expression2 becomes logic False when j = 3). If you need to refresh your memory bank, Table 5.3 in Chapter 5 explains what the += operator does. On the first pass, the loop looks like this:
for (j = 0; j < 3; j++) // Nested j loop
{
square = 1; // Sum the odd integer
nextOddInteger = 3; // Set the next odd integer
}
Therefore, after the first pass, square equals 1 and nextOddInteger is increased to 3. The partial result therefore is
square = 1
nextOddInteger = 1 + 2 = 3
On the second pass through the loop, you find:
for (j = 0; j < 3; j++) // Nested j loop
{
square = 4; // Sum the odd integer
nextOddInteger = 5; // Set the next odd integer
}
from the processing of the following code:
square = 1 + 3 = 4
nextOddInteger = 3 + 2 = 5
On the third and final pass through the loop, you find:
square = 1 + 3 + 5 = 9
nextOddInteger = 5 + 2 = 7
No additional passes through the inner loop are needed because expression2 (j < 3) is now logic False. Therefore, the next two statements display the output in the listbox as before:
buff = string.Format("{0, 5}{1, 20}", i, square);
lstOutput.Items.Add(buff);
The only difference is that you replaced i * i with the variable square. To the user running the program, the output in the listbox looks exactly the same as before. The only difference is that you used a weird algorithm and a nested for loop to generate the squares of the numbers.
Use the Debugger as a Learning Tool
The best way for you to see how loops work is to single-step through the program. For example, place the cursor on the following for statement:
for (i = start; i <= end; i++)
Press the F9 key to set a breakpoint at that statement. (The text background changes to red for that statement line.) Now press the F5 key to run the program. Eventually, you'll get to the breakpoint statement. (You may have to click in the Source window to see the breakpoint, which now has the statement displayed with a yellow text background.)
Now start pressing the F10 key to single-step through the program code. Make sure you have the Locals debugger window visible (Debug Windows → Locals or Ctrl+D, L) so that you can see the values of the variables change as you go. Using the debugger is a great way to understand how the flow of the program changes based upon the values of the variables.
While Loops
Another type of program loop is the while loop. The general syntax for a while loop is as follows:
while (expression2)
{
// while loop statement block
}
For a while loop to be well behaved, it must follow the same three rules you applied to a for loop. However, unlike the for loop, the while loop does not make all three conditions part of the syntax of the loop structure. Only the second condition (expression2) is part of a while loop's syntax.
The first expression (expression1) of a well-behaved while loop that initializes the loop control variable is set before you enter the loop structure. The third expression (expression3) is set within the while loop statement block.
You can modify the earlier table of squares program to use a while loop, too. That's the topic of the next Try It Out.
Try It Out: Table of Squares, while Loop Version (Chapter07ProgramWhileLoopVersion.zip)
Because while loop structures are different from for loops, use the table of squares program again so you can see how the two loop structures differ.
1. Load the original table of squares program (using Listing 7-1).
2. Replace the btnCalculate() code with the code shown in Listing 7-2.
Listing 7-2: Table of Squares, while loop variation. (frmMain.cs)
private void btnCalculate_Click(object sender, EventArgs e)
{
bool flag;
int i;
int start;
int end;
string buff;
//============ Gather inputs ======================
// Convert start from text to int
flag = int.TryParse(txtStart.Text, out start);
if (flag == false)
{
MessageBox.Show("Numeric data only", "Input Error");
txtStart.Focus();
return;
}
// Convert end from text to int
flag = int.TryParse(txtEnd.Text, out end);
if (flag == false)
{
MessageBox.Show("Numeric data only", "Input Error");
txtEnd.Focus();
return;
}
if (start >= end) // Reasonable values?
{
MessageBox.Show("Start less than end.", "Input Error");
txtStart.Focus();
return;
}
//============= Process and Display ==============
i = start; // Initialize loop counter: condition 1
while (i <= end) // Another iteration: condition 2
{
buff = string.Format("{0, 5}{1, 20}", i, i * i);
lstOutput.Items.Add(buff);
i++; // Change state of loop: condition 3
}
}
How It Works
You can see in Listing 7-2 that the first condition for a well-behaved loop is set prior to the while loop's being entered. That is, variable i is initialized to the value of variable start just before the while statement. The exact position of the initializing statement (that is, expression1) does not need to be the statement before the while loop block begins. Indeed, you could stick the statement anywhere before the while statement block. However, solid coding practices strongly suggest it's a good idea to place the code that initializes the loop control variable near the start of thewhile statement block. That placement makes it easier to see the initial condition should debugging be necessary. (What? You're not writing perfect code for every program yet?)
The interpretation of the conditional expression controlling the while loop is exactly the same as expression2 in the for loop (i <= end) in Listing 7-1. This is the second condition of a well-behaved loop.
The while loop body extends from the opening curly brace following expression2 to the closing curly brace. The loop body is exactly the same as the for loop body in Listing 7-1, except that you must place the third expression within the while loop body (i++). Note that all three conditions for a well-behaved loop are still present, but the while loop scatters them around a bit, whereas the for loop had them all in one place. The output from the program is exactly the same as before. This invites the question, “Why use a while loop?”
Why Have More Than One Type of Loop?
Any code that uses a for loop structure can be rewritten as a while loop, so why does C# bother with two kinds? Simply stated, C# gives you a choice of loop types because the nuances of different programming tasks may suit one loop type better than another. For example, there will be many times where you look for a specific piece of data in a list, such as a specific customer name in a list of customers, and you don't know exactly where it appears. Most programmers would code such a task as a while loop because they can't be sure of exactly how many iterations it's going to take to find the name. On the other hand, if you need to read 14 sensors on a machine and react to those sensors, you would likely use a for loop because the number of required passes through the loop is known. (Would it be a good idea to code the second expression of the loop using a symbolic constant? Hint: Yes. That would make it easier to read and change the code if the need arises.)
The ability to choose different loop structures simply makes certain programming tasks easier. Although you might contort all your code to fit into a single loop structure, having choices means you don't need to. Multiple loop structures means you have multiple tools at your disposal to attack different programming problems. After all, if the only tool you have is a hammer, it's not surprising that all your problems start to look like a nail. Multiple tools make for more elegant solutions to different programming problems.
do-while Program Loops
C# provides a third loop variation that you can add to your loop toolkit called a do-while loop. The syntax for a do-while loop is as follows:
do
{
// do-while statement block
} while (expression2);
The do-while loop variant is similar to the while loop with one major exception: A do-while loop always makes at least one pass through the loop statement block. If you look at the other two loop variations, the test of expression2 takes place before the loop statement block is ever executed. With the for and while loop statements, it is quite possible for expression2 to evaluate to logic False at the start of the loop. If expression2 is false for either the for or while loop, no pass is made through the statements in the loop body.
This is not true for a do-while loop. A do-while loop always makes at least one pass through its statement block. This is because the expression that evaluates whether another pass should be made through the loop is made at the bottom of the loop and is arrived at after the statements in the loop body have been executed at least once. In other words, program control must pass through the do-while statement block at least one time.
While you could use the table of squares program again to use the do-while statement, in the following Try It Out you shake things up a bit and generate a series of random numbers instead. Note that the conditions for a well-behaved loop still exist, the conditions simply are not in one place in the code.
Try It Out: Generate Random Numbers (Chapter07ProgramDoWhileRandomNumbers.zip)
C# provides a class capable of generating a series of random numbers. Now write a program that tests whether that class generates a series of random numbers wherein two identical random numbers are produced back-to-back.
1. Create a new project using the procedures and C# template presented in Chapter 2.
2. Add two label and button objects to the form plus one textbox object.
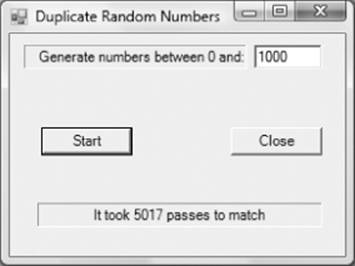
3. Arrange the objects as you see fit, although Figure 7.4 presents a sample run of the program and may be used as a model for the user interface.
Figure 7.4 Identical random numbers program
Listing 7-3 shows the code for the program.
Listing 7-3: Random numbers program. (frmMain.cs)
using System;
using System.Windows.Forms;
public class frmMain : Form
{
const int MAXITERATIONS = 200000; // Limit loop passes
private Button btnClose;
private Label lblAnswer;
private Label label1;
private TextBox txtMax;
private Button btnStart;
#region Windows code
public frmMain()
{
//========== Program Initialize Step ==============
InitializeComponent();
}
public static void Main()
{
frmMain main = new frmMain();
Application.Run(main);
}
private void btnStart_Click(object sender, EventArgs e)
{
bool flag;
int counter; // Pass counter
int max; // Max value for random number
int last;
int current;
Random randomNumber = new Random();
//========= Program Input Step ================
flag = int.TryParse(txtMax.Text, out max);
if (flag == false)
{
MessageBox.Show("Digit characters only.", "Input Error",
MessageBoxButtons.OK, MessageBoxIcon.Stop);
txtMax.Focus();
return;
}
//======== Program Process Step ==============
counter = 0;
last = (int) randomNumber.Next(max);
do
{
current = randomNumber.Next(max);
if (last == current)
{
break;
}
last = current;
counter++;
} while (counter < MAXITERATIONS);
//========= Program Output Step ==============
if (counter < MAXITERATIONS)
{
lblAnswer.Text = "It took " + counter.ToString() + " passes to match";
} else {
lblAnswer.Text = "No back-to-back match";
}
}
//============ Program Termination Step ========
private void btnClose_Click(object sender, EventArgs e)
{
Close();
}
}
How It Works
A sample run of the program is shown in Figure 7.4.
The value of 1000 in the textbox object says the program should generate random numbers between 0 and 1000, exclusively. (That is, the random values vary between 0 and 999.) Figure 7.4 shows that it took 5017 passes through the loop before the random number generator produced the same value back to back. Now take a closer look at the code.
The program begins by using the C# template discussed in Chapter 2. Near the top of Listing 7-3 is this statement:
const int MAXITERATIONS = 200000; // Limit on loop passes
This statement is used to constrain the maximum iterations of the do-while loop. This is done because it might be possible to make several billion passes through the loop without having two identical values generated in sequence. Using the symbolic constant MAXITERATIONS, you can easily change the limits on the loop without having to change code in the loop. True, you could hard-code the value 200000 in the while loop, but then you'd have a “magic number” in the code that doesn't tell you what its purpose is. Using the symbolic constant MAXITERATIONS helps document what the number does. Also, if you decide to change MAXITERATIONS to some other value, simply change it at the top of the program, and the new value is used automatically in the rest of the program.
The statement,
Random randomNumber = new Random();
is used to create a Random object named randomNumber. The program then uses the TryParse() method to construct the range within which the user wants the random numbers to fall. The Random class method Next() is called to produce a random value between 0 and max minus 1. The following code fragment does most of the work in the program:
counter = 0;
last = randomNumber.Next(max);
do
{
current = randomNumber.Next(max);
if (last == current)
{
break;
}
last = current;
counter++;
} while (counter < MAXITERATIONS);
The variable named counter is initialized to 0 prior to entering the loop. (This statement serves the purpose of expression1 in a for loop.) This is the variable used to control the loop. The program then uses the Next() method of the Random class to generate a random number and assign it into the variable last. However, because the goal of the program is to compare two random values, you know you must generate another random value before you can test to see if the two are the same. This is why you use the do-while loop: You need to execute the loop body at least once to produce the two random values for the comparison. The second random value is assigned into the variable named current. You now have two random numbers to compare.
The break Keyword in Loops
The if statement compares the values of last and current to see if they are the same. If they are, the if statement is logic True and the break statement is executed. Anytime a break statement is executed within a loop statement block, the break sends program control to the first statement following the closing curly brace of the loop statement block. In this program, control is sent to the
if (counter < MAXITERATIONS)
statement shown in Listing 7-3.
If the values for the variables current and last are not the same, the break statement is not executed, and the program evaluates the expression2 element of the do-while block:
while (counter < MAXITERATIONS);
The evaluation of this statement determines whether another pass through the loop should be made. At the moment, the symbolic constant MAXITERATIONS is set to 200000, but you could alter the constant if you want. (Notice how this symbolic constant is used again in subsequent lines to determine the message displayed to the user.) Assuming that counter does not exceed MAXITERATIONS, the while test results in another pass through the loop statement block.
The number of passes made through the loop is limited using the test against MAXITERATIONS for two reasons. First, an integer variable can hold values in excess of 2 billion, and the user may not want to sit there waiting for the loop to plow through 2 billion passes. Second, and more important, it might take more than 2 billion passes through the loop to produce matching values for last and current. This means that the program might produce a value for counter that is too large for an integer variable to store. This could produce what is called a numeric overflow exception and your program would die an ungraceful death! (You learn how to prevent such ugliness in Chapter 11.)
Eventually, either a match for the two variables occurs or counter equals MAXITERATIONS and the do-while loop is terminated. At that point, the final if statement is evaluated, and the appropriate message displays in the lblAnswer label object.
As you might expect, the number of passes required to produce a match increases as the value of max is increased by the user. Indeed, if the user enters a large value (such as 200000), the program frequently produces a no-match condition.
The Continue Statement
Sometimes situations arise in which you need to do something special within a loop before you continue processing it. For example, you might have a loop polling the fire sprinkler sensors mentioned at the beginning of this chapter. However, instead of breaking out of the loop when a sensor is tripped, perhaps you want to continue reading the rest of the sensors to see how fast the fire is spreading. The code might look like this:
while (true)
{
id++;
state = readSensor(id);
if (state == true)
{
soundAlarm();
callFireDepartment();
continue;
}
if (id == MAXSENSORS)
{
id = 0; // 0 so increment operator sets it to 1
}
}
In this code fragment, you establish an infinite while loop by design by stating that the test expression (expression2) is always logic True, as shown in the first program statement. The code increments a sensor identification number (id) and then reads the appropriate sensor. If the sensor does not return true, the program makes another pass through the loop. If there is a fire and the sensor returns true, the alarm is sounded, the fire department is called, and then the code continues execution at expression2 of the while loop because of the continue statement. Because expression2 is always logic True, the loop continues to execute the code.
When a while or do-while loop is used, the continue statement always sends control to the expression that determines whether another pass through the loop is necessary (that is, expression2).
The same type of code using a for loop would be the following:
for (id = 0; true; id++)
{
state = readSensor(id);
if (state == true)
{
soundAlarm();
callFireDepartment();
continue;
}
if (id == MAXSENSORS)
{
id = 0; // 0 so increment operator sets it to 1
}
}
In this situation, if there is a fire, variable state is true, and the alarm and fire department methods are executed; then continue is executed. (Look at expression2 of the for loop.) The continue statement sends program control to expression3 (id++) of the for statement, which increments the sensor id. Program control is then sent to expression2 to determine if another pass through the loop is needed. Because expression2 is always logic True, the code makes another pass through the loop. You should convince yourself that this is an infinite loop.
Unlike the break statement that transfers program control out of the loop, a continue statement keeps program control in the loop to decide if another pass is warranted. As an experiment, you might write dummy methods for the soundAlarm() and callFireDepartment() methods and then use the debugger to single-step through the code. Again, using the debugger is a great way to gain a more complete understanding of what the code is doing.
For the sake of completeness, you should know that C# supports the goto keyword, which can be used with a label to create a loop structure. However, because goto's are such an ugly coding structure (that is, a coding hack), you aren't shown how to write such a loop. If you actually want to know, you can probably find an example online. (Warning: Rumor is that you can get warts by just looking at goto statements.)
Summary
Loop structures are one of the fundamental elements in most programs. You should study the concepts presented in this chapter until you are confident how and when to use each loop type. You should also make sure you do these exercises and perhaps make up a few examples of your own.
Exercises
You can find the answers to the following exercises in Appendix A.
1. Write the loop code necessary to calculate the factorial of a number. For example, 5 factorial is written like this:
5! = 5 * 4 * 3 * 2 * 1
5! = 120
You may assume that a variable named num is defined to hold the number used for the factorial and that a variable named i is used to control the loop.
2. Even though the solution shown in Appendix A for Exercise 1 produces correct answers, it has two hiccups in it. Can you determine what they are?
3. Given that 1 ounce equals 28.3495231 grams, write a loop that produces a table in a listbox that shows the conversion into grams for weights from 1 ounce through 4 pounds.
4. Look at the solution code for Exercise 3. Can you find a minor change that improves the code?
5. Assuming that a monetary asset grows by x percent each year, calculate how much the asset is worth at the end of n years (using simple interest).
What You've Learned in This Chapter
|
TOPIC |
KEY POINTS |
|
Well-behaved loops |
The necessary and sufficient conditions for writing a well-behavedprogram loop. |
|
for, while, do-while loops |
The three types of program loops used in C#. |
|
Which loop to use |
How to decide which loops structure provides the best way to iterate over a set of program statements. |
|
break, continue |
How to use these keywords in program loops. |