Beginning Object-Oriented Programming with C# (2012)
Part II
Understanding C# Syntax
Chapter 8
Understanding Arrays and Collections
What you will learn in this chapter:
· Arrays
· Array indexes and elements
· How to set the size of an array
· Some of the array class methods commonly used
· Multidimensional arrays
· Array lists
· Collections
· Jagged arrays
wrox.com code downloads for this chapter
You can find the wrox.com code downloads for this chapter at www.wrox.com/remtitle.cgi?isbn=9781118336922 on the Download Code tab. The code in the Chapter08 folder is individually named according to the names throughout the chapter.
In this chapter you learn about arrays, array lists, and collections. These data structures are useful to solve many types of programming problems. When you finish this chapter, you'll have an appreciation of how arrays can make certain programming problems much easier to solve.
What Is an Array?
An array is a group of identical data types that share a common name. The syntax to define an array is as follows:
typeSpecifier[] arrayName = new typeSpecifier[numberOfElements];
where:
· typeSpecifier is the data type you want to use.
· arrayName is the name you want to use for the array.
· numberOfElements is the number of array elements you want.
Each of these parts is explained in a moment using the following example.
Suppose you have an address book with 100 names in it. Because you want to manipulate those names in some way in your program, each unique name must be stored in a unique variable. Because names are textual data, you could use something like this:
string name00;
string name01;
string name02;
string name03;
//…Many more variables…
string name98;
string name99;
Although this would work, it suffers two serious drawbacks. First, you would get tired of typing in all those variable names. Even worse, think what would happen if the address book had a million names in it! Second, how would you perform the common task to search the names in the list for a specific person? You'd be forced to plow through 100 if statements looking for a particular name:
if (name00.Equals(targetName))
{
index = 0;
}
else
{
if (name01.Equals(targetName))
{
index = 1;
}
else //…and so on…
Remember that when you compare objects like strings, you don't compare rvalue-to-rvalue. Instead, you want to compare what is stored at the memory address contained in the object's rvalue. Therefore, when comparing strings, you should use the Equals () method, which is available for all string objects. Such a programming solution is not practical, which is precisely why arrays were created.
Instead of using 100 different variables, one for each name, you would define a single string array to hold the names using the syntax you saw earlier:
string[] names = new string[100];
The program now has a string array variable named names that can store 100 names. You can use what you learned about loops in the previous chapter to simplify the code:
for (i = 0; i < names.Length; i++)
{
if (names[i].Equals(targetName))
{
index = i;
break;
}
}
If you read the code carefully, you can see that on the first pass through the loop, the if test compares the first name in the list (names[0]) to the name stored in targetName, the name you want to find. If the test fails, the loop counter variable i is incremented by the third expression of the for loop (i++) and the code makes the next comparison test (if names[1].Equals(targetName)). The loop continues until a match is found. At that time, the index is assigned the value of i (so you can reference that person later) and the break statement sends program control to the first statement following the for loop. If no match is found, index is unchanged and the search fails. (Setting index to -1 before entering the loop is a good way to tell if the search failed because -1 cannot be used as an index into an array.)
As you can see, there is a symbiotic relationship between arrays and loops, and they are used together often to solve a myriad of programming problems. Also note that names.Length is used for the expression2 in the for loop above since it returns the number of elements in the array. This is much preferred to hard coding a value for the number of elements in the array.
Some Array Details
To justify the use of arrays, a number of important details about them were ignored. You cover those details in the next few paragraphs.
Array Element Versus Array Index
An array element is a single unit of an array. Consider the following array definition:
int[] myData = new int[10];
The statement says that you want 10 integers arranged back to back in memory and that you want to refer to them as myData. You can see how this might look in memory in Figure 8.1.
Figure 8.1 Memory image of an array
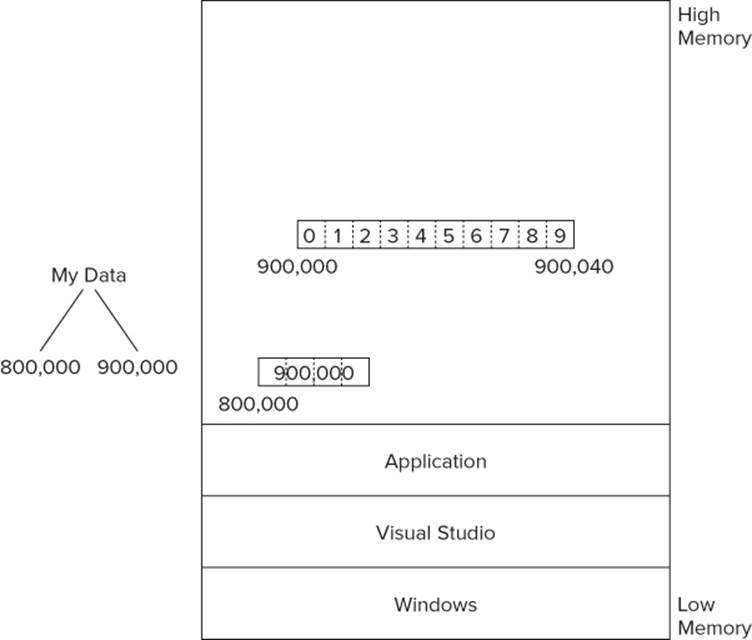
Each of those 10 integers is referred to as one element in the array. When you define the size of the array, you always specify the number of elements you want. That number appears between the last set of brackets at the end of the definition statement ([10] in this example).
An array index refers to the position of a specific element in the array. In the example you requested 10 elements, but the position of the first element is index 0. Like almost everything else, C# counts array indexes starting with 0. Therefore, in
val = myData[0];
val would equal the content of the first element of the myData array. This also means that an index of 0 accesses the first element of the array. (In Figure 8.1, val is assigned the value stored at the 4 bytes beginning at memory location 900,000.)
N - 1 Rule
Your definition of the myData array requested 10 elements for the array size. This means that the valid indexes for the array run from 0 through 9. This gives you the N - 1 Rule:
The highest index permitted for an array is one less than the number of array elements.
This is a frequent stumbling block for beginning programmers. Because you asked for 10 elements, it would seem reasonable to use an index of 10 to access the last array element. Not so. Visual Studio issues an out-of-bounds error if you attempt to reference an element using something like this:
val = myData[10];
The reason for the error message is that the statement tried to access an element that doesn't exist within the boundaries of the array. Only elements 0 through 9 are valid array index values. If you get an out-of-bounds error, remember the N - 1 Rule to see if you're trying to index outside the limits of the array.
If you are uncertain about how large the array is, you can always use the following code:
size = myData.Length;
The Length property of the array object returns the number of elements in the array. (It does not return the number of bytes in memory occupied by the array.) In this example, size would equal 10 after the statement is executed. (Note the Length property used in the sample for loop at the beginning of this chapter.)
In the following Try It Out, you write a simple program that counts the number of occurrences of letters in a section of text. You will use arrays to keep track of things as the code executes.
Try It Out: Letter Count (Chapter08ProgramLetterCount.zip)
Now write a short program that has the user enter a couple of sentences in a multiline textbox and then count how many times each letter occurs in that text. You are not interested in punctuation, spaces, digit characters, or the distinction between upper- and lowercase letters—just alpha characters.
Given the program design stated in this section, how would you attack the problem? Again, start thinking about solving a programming problem using the Five Program Steps you learned about in Chapter 2. The Initialization step is done for you by Visual Studio. The Input step is simply the text entered by the user. The Process step involves examining each letter typed into the textbox object and counting how many times each alpha character occurs. The Output step simply involves copying the letter counts to a listbox for display. The Termination step is simple in this program. You simply end the program with the Close() method. Clearly, the actual work is done in the Process step.
To create this program, use the following steps:
1. Create a new project in the usual manner and add the C# code as shown in Listing 8-1.
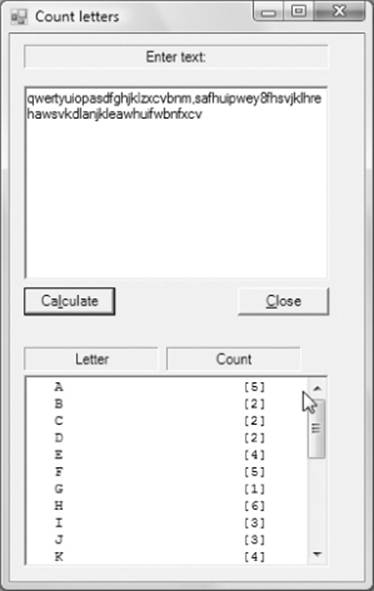
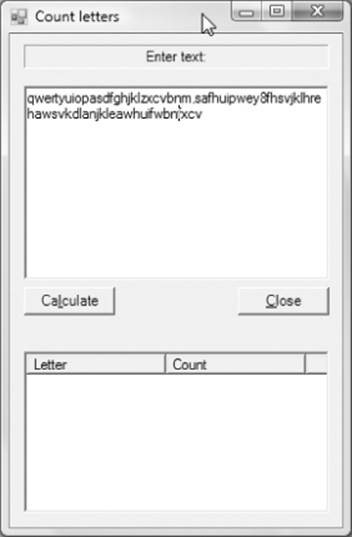
2. Add three label objects, a multiline textbox for the input letters, a listbox to show the letter counts, and two button objects. You can arrange these objects as you want, but Figure 8.2 shows a sample run using one possible user interface.
Figure 8.2 Program to count letters in text
As you can see in Listing 8-1, the actual work is done in the Process step, as shown in the button click event code.
Listing 8-1: Letter count program (frmMain.cs)
using System;
using System.Windows.Forms;
public class frmMain : Form
{
private const int MAXLETTERS = 26; // Symbolic constants
private const int MAXCHARS = MAXLETTERS 1;
private const int LETTERA = 65;
private TextBox txtInput;
private Button btnCalc;
private Button btnClose;
private ListBox lstOutput;
private Label label2;
private Label label3;
private Label label1;
#region Windows code
public frmMain()
{
InitializeComponent();
}
public static void Main()
{
frmMain main = new frmMain();
Application.Run(main);
}
private void btnCalc_Click(object sender, EventArgs e)
{
char oneLetter;
int index;
int i;
int length;
int[] count = new int[MAXLETTERS];
string input;
string buff;
length = txtInput.Text.Length;
if (length == 0) // Anything to count??
{
MessageBox.Show("You need to enter some text.", "Missing Input");
txtInput.Focus();
return;
}
input = txtInput.Text;
input = input.ToUpper();
for (i = 0; i < input.Length; i++) // Examine all letters.
{
oneLetter = input[i]; // Get a character
index = oneLetter - LETTERA; // Make into an index
if (index < 0 || index > MAXCHARS) // A letter??
continue; // Nope.
count[index]++; // Yep.
}
for (i = 0; i < MAXLETTERS; i++)
{
buff = string.Format("{0, 4} {1,20}[{2}]", (char)(i + LETTERA),
" ",count[i]);
lstOutput.Items.Add(buff);
}
}
private void btnClose_Click(object sender, EventArgs e)
{
Close();
}
}
How It Works
The solution for the programming task is shown in Listing 8-1. The program begins by defining a series of symbolic constants.
private const int MAXLETTERS = 26; // Symbolic constants
private const int MAXCHARS = MAXLETTERS - 1;
private const int LETTERA = 65;
You already know why using symbolic constants in a program is a good thing. If nothing else, it prevents you from using magic numbers in the program.
The LETTERA constant needs some explanation. When you press a letter on your keyboard, it completes an electrical circuit in the keyboard matrix, which is decoded and sent to the computer as a single-byte numeric value. (Some keyboards can send 2-byte Unicode characters, but assume that's not the case here.) The code sent to the computer uses the ASCII character set as explained in Chapter 5. The ASCII value for the letter A is 65. The ASCII value for Z is 90, which means the codes are in alphabetical order. That is, B is 66, C is 67, and so on. Therefore, if you convert the text the user typed into the textbox object to uppercase letters, it's a simple matter to create the proper index into the array that holds the letter counts. The array that holds the counts is defined as follows:
int[] count = new int[MAXLETTERS];
Because the symbolic constant MAXLETTERS is 26, you define an array with 26 elements in it, which means the indexes can have values from 0 through 25. (The N - 1 Rule, remember?) Plan to use count[0] to store the count for the A's, count[1] for the B's, count[2] for the C's, and so on.
Now suppose the user typed in the word Abe. Because lower- and uppercase letters do have different ASCII values, the first thing you need to do is convert everything to uppercase letters. (Your program design said you don't care about the case of the letters.) The following statements fromListing 8-1 take the input typed in by the user and assign it into the string variable named input:
input = txtInput.Text;
input = input.ToUpper();
The code then uses the ToUpper() method to convert all the letters to uppercase. The text is now ABE. Having made the case conversion, you are now ready to count the letters.
The statement
oneLetter = input[i]; // Get a character
makes use of the fact that you can treat a character string as though it is an array. Therefore, in the for loop, when i is 0, input[i] is the A in ABE. Here's the next statement:
index = oneLetter - LETTERA; // Make into an index
resolves to this:
index = 'A' - 65; // Make into an index
However, A is actually 65 when it is viewed as an ASCII character. So the expression becomes this:
index = 65-65; // Make into an index
index = 0;
The next three lines first check to make sure the index that was just calculated falls between 0 and 25. If it doesn't, the character is not an alpha letter, and you don't want to count it:
if (index < 0 || index > MAXCHARS) // A letter??
continue; // Nope.
count[index]++; // Yep.
Because your index is 0, you execute the following statement:
count[0]++;
This increments the contents of the first integer in the array. (All value-type array elements are initialized to 0 at the moment they are defined in C#. Arrays of objects are initialized to null. (You read more about these details in the section “Initializer Lists for String Objects” and in Table 8.1, for example.) If you think about it, count[0] corresponds to the letter A—which is exactly the element you want! count[0] now equals 1 because the code counted the letter A in ABE.
Table 8.1 Partial List of Array Class Properties and Methods
|
EXAMPLE |
DESCRIPTION |
|
System.Array.BinarySearch(count, target) |
Performs a binary search on a sorted, one-dimensional array named count looking for target. |
|
System.Array.Clear(count, start, count.Length) |
Clears value type arrays from element start through element Length to 0. Reference arrays are cleared to null. |
|
System.Array.Copy(Source, Dest, Length); |
Copies Length elements from the Source array to the Dest array. |
|
System.Array.IndexOf(count, val) |
Returns the index in the count array where the first occurrence of val is found. |
|
System.Array.LastIndexOf(count, val) |
Returns the index in the count array where the last occurrence of val is found. |
|
System.Array.Sort(count) |
Sorts a one-dimensional array named count into ascending order. |
|
System.Array.Reverse(count) |
Reverses the current values of a one-dimensional array named count. Note: If you call Sort() and then Reverse(), it puts the array into descending order. |
|
count.Rank |
Returns the number of dimensions for the array named count. |
|
count.GetUpperBound(val) |
Returns the highest index number for dimension val for the count array. For example, if the definition for an array named test is as follows: |
|
count.Initialize() |
Calls the default constructor to set each element. For value data types the value is 0; for reference data types the value is null. |
The processing for the next letters is as follows:
index = 'B' - 65;
index = 66-65;
index = 1;
This means the code increments count[1] to 1 because you counted the B in ABE. Finally:
index = 'E' 65;
index = 69-65;
index = 4;
Here count[4] is incremented to 1, which counts the letter E. This process continues as long as there are characters in the string left to process. (Note expression2 in the for loop: i < input.Length, which limits the number of passes through the loop.)
You should convince yourself that the final for loop,
for (i = 0; i < MAXLETTERS; i++)
{
buff = string.Format("{0, 4} {1,10}[{2}]", (char)(i + LETTERA),
" ",count[i]);
lstOutput.Items.Add(buff);
}
increments through the count [] array and displays the characters in the ListBox object (refer to Figure 8.2).
Casts
Notice how the format string uses an empty string for the second argument and has brackets surrounding the third argument. The expression
(char)(i + LETTERA)
uses a form of C# syntax called a cast. The syntax for a cast is
(dataTypeDesired) dataTypeYouHave
The cast uses parentheses to surround the wanted data type. Simply stated, you should use a cast anytime you want to assign one data type into a different data type. Most often you see a cast used in a code sequence like
char c;
int val;
// some code…
c = (char) val; // You are casting an int into a char
Technically, casts are necessary only when moving from a data type with a larger byte count for storage than the target data type. However, it's good coding practice to always use a cast when different data types are used because it helps document what your intentions are.
In the program example, it is necessary to use a cast in the Format() method because you take the sum of the numeric values i and LETTERA, which are int data types of 4 bytes each, but want to display them as a char data type of 2 bytes each. Because you want to pour 4 bytes of data into a 2-byte bucket, you must cast the sum of i and LETTERA to a char data type before you can display it as an alphabetic character. Again, use the formatting capabilities of string.Format() to make the columns line up in the listbox (using a fixed font).
When the program finishes executing, the output looks similar to that shown in Figure 8.2. (Just to get a good distribution of letters, simply drag your finger over all three rows of letters on the keyboard and add a few more letters after doing that.) The two labels above the listbox identify what displays in the listbox.
The ListView Object
Formatting columns of data in a listbox is such a common practice that Visual Studio provides a special control dedicated to that specific purpose. It's called the ListView object.
In the next Try It Out you use a ListView object instead of an ordinary listbox to display the results of the program. You will find that the ListView object offers several nice features not found in the ListBox object.
Try It Out: Using a ListView Object (Chapter08ProgramLettersVersion02.zip)
The easiest way to code this exercise is to simply use the code available for download for this chapter. You could also use the code presented in Listing 8-1 and simply change the ListBox object to a ListView object following these instructions:
1. Select the ListView object from the Toolbox and drag (or double-click) it onto the form as you would any other control. Indeed, at this juncture, it looks the same as a ListBox object. Now the neat stuff begins.
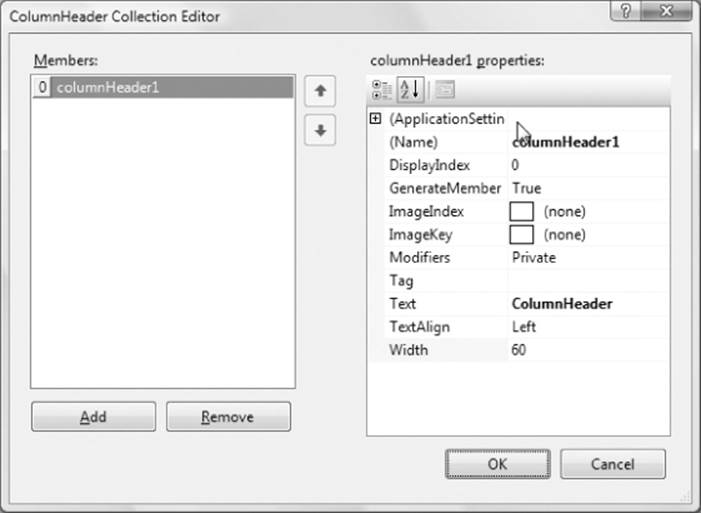
2. With the focus set to the ListView object in the Source window, scroll to the View property in the Properties window, and set it to Details from the list of choices. This enables you to see the impact of property changes for the object as you make them. Now scroll to the Columnsproperty in the Properties window. (If the Properties window is hidden, press the F4 key.) Click the ellipsis button of the Columns property. You should see a dialog box similar to that shown in Figure 8.3.Now click the Add button, and the display changes to that shown in Figure 8.4.
Figure 8.3 The ListView properties
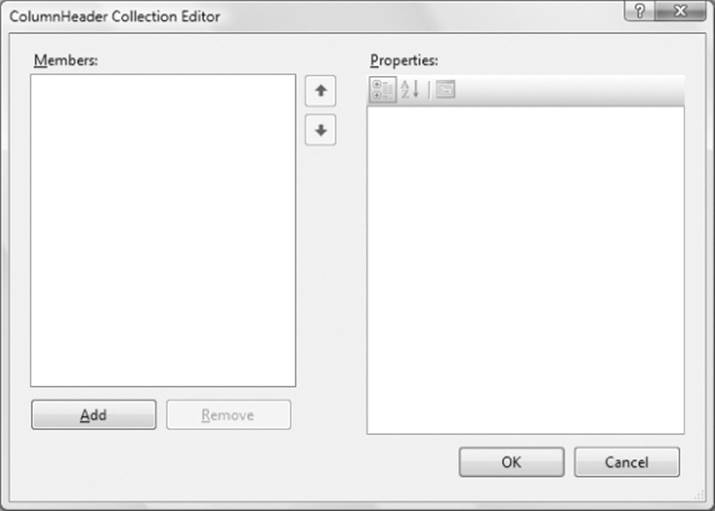
Figure 8.4 ListView after clicking the Add button
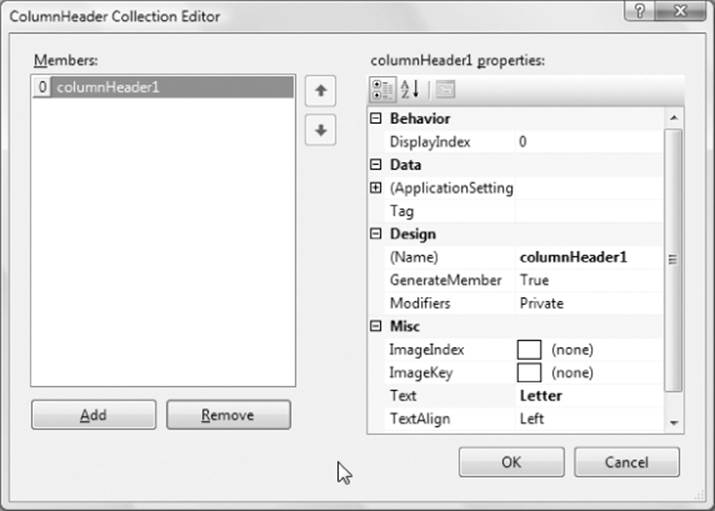
3. On the left side of the dialog box is a box area labeled Members. This area contains the columns you want to define for the ListView object. (Because you haven't added any members yet, the box has filled in the default name of columnHeader1.) On the right side of the dialog form is a box that presents the properties you can use for each column, arranged by function (in this example Behavior, Data, Design, and Misc). Personally, I don't like this arrangement of ordering by function.) At the top of the box is an icon showing the letters A and Z with a downward-pointing arrow next to them. If you click this icon, the list in the box changes to show the properties arranged in alphabetical order. The dialog box now looks like that shown in Figure 8.5.The contents of the properties box appears less cluttered than before because the functional area titles have been removed. If you prefer it the other way (as shown in Figure 8.4), simply click the categorized icon next to the alphabetical icon you just clicked. The rest of the discussion assumes that you, too, prefer the “decluttered” version of the properties list.
Figure 8.5 Listing properties alphabetically for a ListView object
4. Change the Text property for columnHeader1 in the right box to Letter and its Width property to 110,, as shown in Figure 8.6.
Figure 8.6 Setting the width property
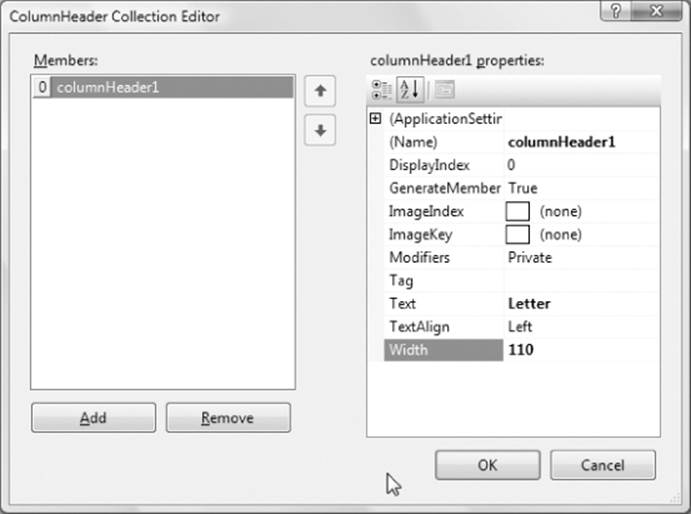
Now click the Add button. (Do not click the OK button because that dismisses the Columns dialog box and you're not through with it yet.) If you drag the Columns dialog box out of the way, you should see the changes you just made reflected in the ListView object in the Source window. The dialog box now shows a second column header in the Members box. Set its Text property to Count and its Width property to 115. Now click OK. Your ListView object should look similar to Figure 8.7.
Figure 8.7 The ListView object after setting the properties
The Width property is stated in pixels, and you may want to experiment with its value until the ListView object looks “good” to you. In Figure 8.7 you can see a small gap to the right of the ListView column headers. This is for the scroll bar control that appears automatically when there is more data than can be shown in the ListView object.
Guesstimating Column Widths
So how can you determine that each column should be 115 pixels wide? Well, after setting the View property to Details, you can see that the ListView object had its Size property set to 251, 133. This means that the width of the ListView object is 251 pixels. Because a scroll bar object takes approximately 20 pixels of display real estate, simply divide the remaining 231 pixels in half to get approximately 115 pixels for each column. Although this approach isn't exact, especially with an odd number of columns, it's close enough for government work.
With the ListView object's properties set, you need to modify the code that places the data in the ListView object. To do this, remove the following lines from Listing 8-1:
for (i = 0; i < MAXLETTERS; i++)
{
buff = string.Format("{0, 4} {1,10}[{2}]", (char)(i + LETTERA),
" ",count[i]);
lstOutput.Items.Add(buff);
}
Replace them with this:
ListViewItem which;
for (i = 0; i < MAXLETTERS; i++)
{
oneLetter = (char)(i + LETTERA);
which = new ListViewItem(oneLetter.ToString());
which.SubItems.Add(count[i].ToString());
lsvOutput.Items.Add(which);
}
The first statement creates a ListViewItem reference object variable named which. You can think of a ListViewItem object as a group of data that defines one row of the ListView object. The for loop remains unchanged from the previous version. The third statement simply constructs the cast you used in the first version and assigns the character that's constructed from the sum of variable i and LETTERA into the variable oneLetter. When i is 0, the sum is 65, which is then cast to a char, which becomes the character A in the Unicode character set and is assigned intooneLetter.
A ListViewItem, however, prefers to work with string data rather than char data. Therefore, you use the ToString() method for char objects to convert oneLetter to a string when the code creates the ListViewItem object in statement four using its constructor method. This statement has the effect of creating a ListViewItem named which with its first column initialized to the current letter (in this example A).
The fifth statement takes the count for the current letter as stored in the count[] array and adds it to the ListViewItem named which. Notice that which contains an object named SubItems and uses its Add() method to add this column data to the first column's data. The last statement is virtually the same as the ListBox object's Add() method, except that you pass it the ListViewItem object named which instead of a formatted string.
How It Works
After you have the objects on the form and the properties set for the ListView object, you can run the program. The result of these code changes is shown in Figure 8.8.
Figure 8.8 Sample program output with ListView object
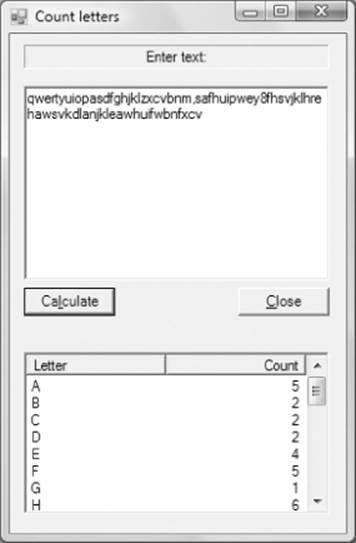
Although you did have to add a few new lines of code and tinker around with the Columns property of the ListView object, the results do look a little better than the output in Figure 8.2. The biggest visual improvement is that the column headers are more closely tied to the data. (Try modifying the code in the second version to surround the counts with brackets, as the first version does.)
The actual behavior of the ListView object is similar to that of the ListBox object, However, although it is a more complex to set up a ListView object, the end results are usually worth it.
Arrays Are Objects
Unlike in some other programming languages, arrays in C# are objects. This means each array object has a set of properties and methods that you can use with it. The code in Listing 8-1 makes use of the Length array property to control the number of iterations made through the loop. What is less obvious is that all array objects are derived from the System.Array class. Table 8.1 presents a partial list of some of the properties and methods available through the System.Array class.
Many of the methods presented in Table 8.1 are overloaded. You can use IntelliSense to see the overloaded parameter lists for the various array methods.
After you define an array, you can use the properties and methods presented in Table 8.1. For example, if an array named val has 100 random values in it and you want them sorted into ascending order, the statement
System.Array.Sort(val);
reorganizes the values into sorted order. If you then call
System.Array.Reverse(val);
the values in the val array are now in descending order. As you can see, manipulating array data is greatly simplified by the properties and methods in Table 8.1 compared to you writing the code.
Multidimensional Arrays
So far you have read only about one-dimensional arrays, which are great for describing lists of data. However, data is often organized in tables of rows and columns. For example, you might want to see the distribution of grades in a class where the columns represent the student's class and the rows represent the grades, as shown in Table 8.2.
Table 8.2 Grade Distribution by Class

If you want to define an array to store the data shown in Table 8.2, you might use the following code:
int[,] grades = new int[5, 4];
This definition states that you want to define a table, or matrix, with five rows and four columns. Note the comma within the brackets at the beginning of the definition statement. The first comma in the brackets on the left side of the assignment expression simply tells C# that you are about to define a two-dimensional array. The second set of brackets on the right side of the assignment expression specifies exactly how many elements there are in the table. Because there are two dimensions, you say the grades array has a rank of two. That is, the term rank refers to the number of dimensions associated with the array.
You can use more than two dimensions if you need them. For example, 3-D graphics are drawn using X, Y, and Z coordinates. To define an array with three dimensions, you might use this code:
int[,,] images = new int[20, 20, 20];
This defines a data cube rather than a table or list. If you want N dimensions (such as three), there are always N - 1 commas (in this case two commas) within the brackets.
You may even need more than three dimensions. If you write game software, for example, you might need three dimensions for the placement of the 3-D images in the game and a fourth dimension to keep track of the time at which each image should appear. (I tried to think of an example using five dimensions and all I got was a headache.) C# appears to support more ranks than you can ever reasonably be assumed to need.
In the next Try It Out you apply some of the array concepts we've been discussing, but applies them to a two-dimensional array. Although the processing is similar, there are small differences that you need to handle.
Try It Out: Using a Two-Dimensional Array (Chaper08ProgramTwoDimensionalArray.zip)
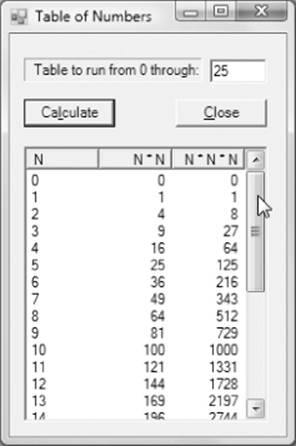
Now assume you want to write a program that lets the user enter the number of rows she wants in a table that shows the number, the square of the number, and the cube of the number. The program requires a two-dimensional array with a user-supplied number of rows and three columns. For this project, you can download the code in the Chaper08ProgramTwoDimensionalArray.zip file or use the following steps:
1. Create a new project, and insert the C# template as usual.
2. Add a label object, two button objects, a textbox object, and a ListView object.
3. Arrange the objects as you see fit, but a sample arrangement and run is shown in Figure 8.9. (Don't forget to set the ListView's View property to Details before you start working with the ListView object. This makes it easier to see the impact of changing the properties as you go.)
Figure 8.9 User interface for multidimensional array program
4. Add the code presented in Listing 8-2.
Listing 8-2: A two-dimensional array program (frmMain.cs)
using System;
using System.Windows.Forms;
public class frmMain : Form
{
private TextBox txtMax;
private Button btnCalc;
private Button btnClose;
private ListView lsvTable;
private ColumnHeader columnHeader1;
private ColumnHeader columnHeader2;
private ColumnHeader columnHeader3;
private Label label1;
#region Windows code
public frmMain()
{
InitializeComponent();
}
public static void Main()
{
frmMain main = new frmMain();
Application.Run(main);
}
private void btnCalc_Click(object sender, EventArgs e)
{
bool flag;
int number;
int i;
ListViewItem which;
flag = int.TryParse(txtMax.Text, out number); // check input
if (flag == false)
{
MessageBox.Show("Numeric data only.", "Input Error");
txtMax.Focus();
return;
}
if (number < 0) // Make sure it's positive
{
number = number * 1;
}
number++; // Do this because of N - 1 Rule
int[,] myData = new int[number, 3]; // Define array
for (i = 0; i < number; i++)
{
myData[i, 0] = i; // first column of table
myData[i, 1] = i * i; // second column of table
myData[i, 2] = i * i * i; // third column of table
}
for (i = 0; i < number; i++) // Now show it
{
which = new ListViewItem(myData[i, 0].ToString());
which.SubItems.Add(myData[i, 1].ToString());
which.SubItems.Add(myData[i, 2].ToString());
lsvTable.Items.Add(which);
}
}
private void btnClose_Click(object sender, EventArgs e)
{
Close();
}
}
How It Works
The code for the program is presented in Listing 8-2. As usual, things get interesting in the btnCalc_Click() event code. First, several working variables are defined, including a ListViewItem object named which. The code draws upon the TryParse() method to validate that the user entered numeric data. If she entered a negative number, you force it to be positive. When these checks are complete, the variable number holds the number of rows you want to display in the ListView object. That value is incremented because you want to display the data through the number the user entered, inclusively. That is, if the user types in 100, you actually want to display 101 values, 0 through 100—it's that pesky N - 1 Rule again.
The statement
int[,] myData = new int[number, 3]; // Define array
defines the array that holds the data. The loop simply assigns the values needed for each column of the array:
for (i = 0; i < number; i++)
{
myData[i, 0] = i; // first column of table
myData[i, 1] = i * i; // second column of table
myData[i, 2] = i * i * i; // third column of table
}
As you can see, variable i controls the loop but also dictates the number of rows in the table. Therefore, variable i is used to set the first dimension of the array in the loop, or its row value. The second dimension (values 0, 1, 2) determines the values for the three columns in the table.
The next for loop formats the data into the ListView object named lsvTable:
for (i = 0; i < number; i++) // Now show it
{
which = new ListViewItem(myData[i, 0].ToString());
which.SubItems.Add(myData[i, 1].ToString());
which.SubItems.Add(myData[i, 2].ToString());
lsvTable.Items.Add(which);
}
This code is similar to the code you saw earlier in the discussion of the ListView object. The only contextual difference is that there are now three columns instead of the two shown in Figure 8.8.
If you've looked at the code closely you're probably saying, “Hey, doofus! The three expressions controlling the two for loops are identical, so why not collapse them into a single for loop?” This piece of RDC was done purposely to minimize the “busyness” of the code. You can easily move the four statements from the second for loop and place them after the three statements in the first for loop. You can then do away with the second for loop altogether. (Of course, if you do that, you can do away with the array completely and the whole purpose of the program disappears!)
Initializing Arrays
Often you know that certain arrays have specific values and you want to initialize the array elements to those values. For example, you might have an array named days that holds a count of the number of days in each month. You could use the following code:
days[0] = 31; // January
days[1] = 28; // February
days[2] = 31; // March
and so on. As you can see, this is a repetitive task that requires 12 statements that are almost identical. C# provides you with an easier, more direct way to set the values of an array. The syntax is shown here:
typeSpecifier [] arrayID = new typeSpecifier [elementCount] { val1, val2, val3,. . .};
Using the example of the days in each month, you might use this:
int[] days = new int[12] {31,28,31,30,31,30,31,31,30,31,31};
This statement sets all 12 monthly values in a single statement. Setting the values of an array as part of the definition of the array is called initializing the array. The list of values that appears between the curly braces is often referred to as the initializer list.
Variations for Initializing an Array
What's interesting is that C# provides two additional syntax variations for initializing an array. These variations for the same array shown in the previous section are
int[] days = new int[] {31,28,31,30,31,30,31,31,30,31,31};
or
int[] days = {31,28,31,30,31,30,31,31,30,31,31};
The first variation does not fill in the element count for the array. The compiler does that automatically by counting the number of values in the initializer list. The second variation does away with the new keyword and the type specifier with brackets.
Which Array Definition/Initialization Syntax Is Best?
Given that you have three ways to accomplish the same task, which should you use? As always, whenever you have options for the way to code a specific task, the important thing is that you are consistent in the option you use. You (or your programming team) should pick one and always use that variation. It makes no difference to C# which one you use.
That said, I would opt for the following definition:
int[] days = new int[] {0, 31,28,31,30,31,30,31,31,30,31,31};
There are several reasons to choose this variation. First, the use of the new keyword in the definition reinforces that arrays are objects. Second, there is no good reason for you to fill in the element count for the initializer list. The compiler is good at counting, so you should let it do its thing. Finally, if you need to add or delete elements from the initializer list, the compiler automatically adjusts for the new size when you don't specify the element count. (If you do supply the element count and it doesn't match the initializer list, Visual Studio gets cranky and issues an error message complaining about the rank of the array. This message is a little misleading because the problem is that the number of elements supplied doesn't match the elements specified.)
Code Like a User
Did you notice that the preferred definition for the days array has 13 elements in it? An extra element is added because of the way users think about this type of data. After all, if you ask someone, “What is the first month of the year?” most won't answer, “February!” Yet, element 1 in the array,days[1], has the value 28. True, you as the programmer can always make the mental adjustment when using zero-based arrays; however, programs work with familiar data sizes (such as days in the month, days of the week, number of holes in a round of golf, and so on) often have fewer bugs when the first value in the array is initialized to 0 to make the data align with a ones-based counting system.
If you do use a ones-based data set, it doesn't hurt to call attention to that fact with a comment:
// CAUTION: Human thinking ones-based array follows:
int[] days = new int[] {0, 31,28,31,30,31,30,31,31,30,31,31};
Again, whatever choice you make about initializing arrays, make that choice and stick with it consistently in your code. Consistency helps to make the code easier to read and understand, which in turn makes debugging easier.
Initializing Multidimensional Arrays
You may also use initializer lists with multidimensional arrays. For example, suppose you want to initialize a two-by-three array (an array with two rows and three columns). You could use this code:
int [,] myData = new int[ , ] { {1,2,3}, {4,5,6} };
The syntax rule for initializing multidimensional arrays is that the values for each row are enclosed in their own set of curly braces. If you want to supply the element counts, as in
int [,] myData = new int[2 ,3 ] { {1,2,3}, {4,5,6} };
you may do so. However, again, the compiler is good at doing this for you. Because you already have enough on your plate, why not let the compiler perform those tasks for which it has a comparative advantage?
Some programmers find it useful to use a different style to present multidimensional array initializer lists:
int [] myData = new int[,] {
{1,2,3},
{4,5,6}
};
Although this style does reinforce the idea that the data definition establishes a matrix of data values, it also takes up three extra rows of display real estate that you may be reluctant to give up. Still, if you think it makes it easier to understand the data, select this style and apply it consistently in your code.
Initializer Lists for String Objects
You can use initializer lists for string objects, too. For example:
string[] weekDays = new string[] { "Monday", "Tuesday",
"Wednesday", "Thursday", "Friday",
"Saturday", "Sunday" };
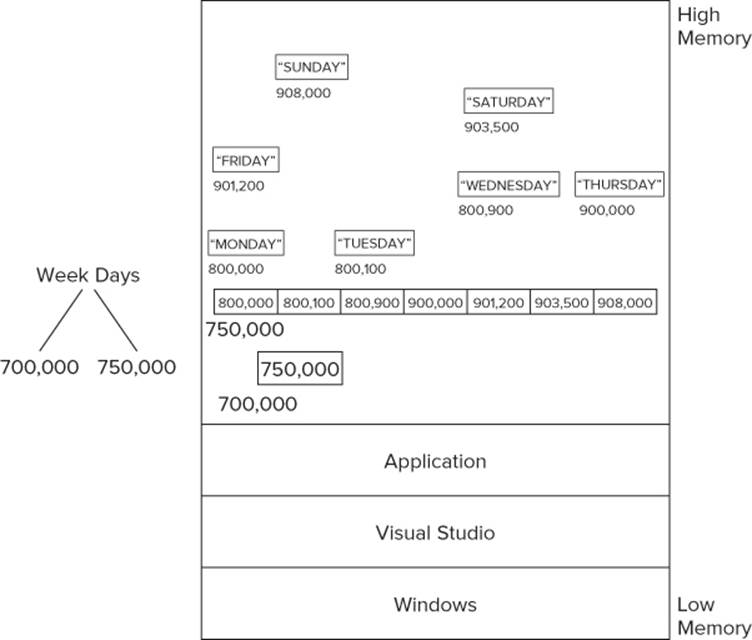
The syntax is the same as for value-type data. However, the way in which arrays of objects (that is, an array of reference-type data) work is not exactly the same as it is for value-type data. Figure 8.1 showed how the memory map for an array of integer value types appears in memory. Although the author has taken a few liberties with the details, you should visualize the memory map for the weekDays array as something like that shown in Figure 8.10.
Figure 8.10 Memory map for string objects
The memory map in Figure 8.1 for integer data shows that the actual integer data values are in a contiguous set of bytes starting at memory address 900,000. (The rvalue of myData in that figure is 900,000.) Now compare Figure 8.1 with Figure 8.10.
In Figure 8.10, you can see that the lvalue for weekDays is 700,000 and its rvalue is 750,000. This means that there is an array of memory addresses that begins at memory address 750,000. Because the initializer list contains seven strings, there is enough memory allocated for the weekDays array to hold seven contiguous memory addresses, not the strings themselves, starting at address 750,000. Each element of the array contains a memory address that points to the memory location where its string data is stored. For example, the first string object in the array is stored at memory location 800,000. Go to that address, and you find Monday stored starting at that memory location. Look at the other values in the array, and you can find they are stored in the same manner.
What would the weekDays array look like if you didn't have the initializer list? In Figure 8.10, instead of finding seven memory addresses starting at memory location 750,000, you would find that each element in the array contains the value null. When each element of the weekDays array is assigned a piece of string data to store, the Windows operating system hands Visual Studio a memory address, based upon where the Windows Memory Manager found enough memory for the string data item, to replace the null value for that element in the array.
Why doesn't C# just store the data back to back as it does the integer data shown in Figure 8.1? The reason is that the memory requirements (based on its length) for each object in the string array can vary. Although each integer always takes 4 bytes, each object in an array of string objects can require differing amounts of memory. That is, the memory needed to store Friday is different from the amount of memory needed to store Wednesday. Because you cannot assume the memory requirements for elements of an object array are symmetrical, C# must store an array of memory addresses (which are symmetrical), each element of which points to the memory location of the actual data for that element in the array.
Ragged Arrays
It is this lack of symmetry in object arrays that gives rise to the term ragged array (or jagged array). That is, if you were to stack an array of integer elements one on top of the other, they would form a smooth vertical column with a width of 4 bytes per element. If you take the days-of-the-week array and stack the elements on top of each other, the column would probably be ragged, because each element may have a differing width.
Arrays of value data types are guaranteed always to be symmetrical. That is, you can always think of arrays of value types as being stored in the manner presented in Figure 8.1. Arrays of objects, however, cannot make that guarantee and use the storage mechanism depicted in Figure 8.10.
Defining Ragged Arrays at Runtime
You can illustrate how to define a ragged array at run time with another example. Suppose you have three people who agree to provide blood samples. The first person hates needles but agrees to give 3 samples. The second person isn't bothered by needles and agrees to give 10 samples. The third person simply agrees to give 5 samples. Suppose these sample counts are inputted by the user and maintained in variables count1, count2, and count3, respectively. If you keep in mind that a two-dimensional array is an array of arrays, understanding the following code snippet should be easy.
int[][] samples = new int[3][]; // Note last spec empty
// Some code that sets the element counts for each person
samples[0] = new int[count1]; // Person 1
samples[1] = new int[count2]; // Person 2
samples[2] = new int[count3]; // Person 3
for (i = 0; i < 3; i++) // Set 1st three values to equal i
{
samples[0][i] = i;
samples[1][i] = i;
samples[2][i] = i;
}
This code snippet also shows another syntax style for declaring multidimensional arrays. Note how the first statement starts with [][] after the type specifier and ends with the second dimension unspecified in the second set of brackets ([3][]). If you want to leave the second dimension unspecified, you must use the syntax presented here. (Using a comma to separate dimensions does not work.)
The next three definition statements fill in the missing dimensions according to the subjects' desire to provide samples. (The keyword new in the three statements is a tipoff that Visual Studio is having conversations with the Windows Memory Manager.) Finally, the for loop demonstrates how you can assign values into the new array elements. Therefore, the syntax presented here enables you to define ragged arrays at run time. Always keep in mind, however, that only the last dimension of a multidimensional array can be unspecified.
Collections
A collection is a set of objects that shares the same characteristics. You can have a collection of strings, as you do with the weekDays array, or you can have collections of complex objects, such as a ListView or similar control object.
In the next Try It Out you use collections to create a table of squares and cubes. While you could easily write the program without using collections, it can be used to illustrate how collections can be used.
Try It Out: Squares and Cubes (Chapter08ProgramCollections.zip)
Suppose you want to iterate through the days and weekDays arrays. Because arrays are objects, you can treat them as a collection. Create a new project using the following steps:
1. Create a new project in the usual manner, and add the code shown in Listing 8-3.
2. Add two button objects and a ListBox object.
Figure 8.11 shows a sample user interface and program run.
Figure 8.11 A program to demonstrate collections
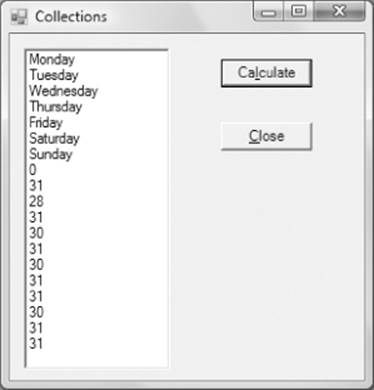
Notice how you can place either collection in the ListBox object.
Listing 8-3: Sample collections program (frmMain.cs)
using System;
using System.Windows.Forms;
public class frmMain : Form
{
private Button btnCalc;
private Button btnClose;
private ListBox lstTest;
#region Windows code
public frmMain()
{
InitializeComponent();
}
public static void Main()
{
frmMain main = new frmMain();
Application.Run(main);
}
private void btnClose_Click(object sender, EventArgs e)
{
Close();
}
private void btnCalc_Click(object sender, EventArgs e)
{
int[] days = new int[] { 0, 31, 28, 31, 30, 31, 30, 31, 31, 30,
31, 31 };
string[] weekDays = new string[] { "Monday", "Tuesday",
"Wednesday", "Thursday", "Friday", "Saturday",
"Sunday"};
foreach (string str in weekDays)
{
lstTest.Items.Add(str);
}
foreach (int val in days)
{
lstTest.Items.Add(val.ToString());
}
}
}
How It Works
The code for the program is shown in Listing 8-3.
The two arrays are defined in the button-click event method. Notice the use of the keyword foreach in the loops that iterate through the collections:
foreach (string str in weekDays)
{
lstTest.Items.Add(str);
}
foreach (int val in days)
{
lstTest.Items.Add(val.ToString());
}
A foreach loop is designed specifically to iterate through a collection of objects. It is similar to a standard for loop, except that the first expression (expression1 in a standard for loop) is always set to the first object in the collection, and the loop iterates through all elements of the array one by one (expression3 in a standard for loop). The data type used in the loop must match the data type in the collection. This is why str is a string in the first loop, and val is an int in the second loop.
You should think of the foreach loop as a read-only loop. That is, you should not use a foreach loop to change the value of any of the objects in the collection. Collections provide a convenient way to view objects by iterating through them, but you should not try to change those objects within a foreach loop.
ArrayList Objects
The arrays discussed thus far are called static arrays. This is because when you set their element sizes, they cannot be changed. Indeed, you cannot use a static array until its dimension or dimensions have been determined. However, life isn't always that simple. Quite often you have a situation in which you know you need to store the data in an array but don't have a clue how many elements you might need. For example, you might write a program that records the names and addresses of friends in an object called Friends. When you run the program, you might need 50 array elements, but another person might need only 20 elements. The issue is, “How do you decide how many elements to allocate for the array?”
With static arrays, the usual solution is to settle for a worst-case design. A worst-case design is one in which you try to guess the largest reasonable value you will ever need for the size of the array and then set the dimension for the array to that size. This can be inefficient because you will likely overestimate the required size for the array most of the time. The ArrayList object overcomes this limitation of static arrays. ArrayList objects have the effect to create dynamic arrays for which you don't have to specify a size. Now see how this works.
ArrayList objects offer some features that are not available with simple array. This is especially true for those arrays where you don't know the size of the array at compile time. The following Try It Out shows you how you can use ArrayLists in your programs.
Try It Out: ArrayList Example (Chapter08ProgramArrayList.zip)
Write a simple program that enables you to add a person's name to a list. Because you have no idea how many names will be added by the user, you decide to use an ArrayList object.
1. Create a new project in the usual manner.
2. Add a textbox object, three button objects, a label object, and a ListBox object. A sample interface is shown in Figure 8.12.
Figure 8.12 Sample program using an ArrayList object

3. Add the code shown in Listing 8-4.
The program has the user type in a name after which he clicks the Add button. This process can continue as long at the user wants. When he finishes, he can click the Show button to review the list of names he has entered.
Listing 8-4: Using ArrayLists (frmMain.cs)
using System;
using System.Windows.Forms;
using System.Collections;
public class frmMain : Form
{
ArrayList names = new ArrayList();
private TextBox txtName;
private Button btnAdd;
private Button btnShow;
private Button btnClose;
private ListBox lstNames;
private Label label1;
#region Windows code
public frmMain()
{
InitializeComponent();
}
public static void Main()
{
frmMain main = new frmMain();
Application.Run(main);
}
private void btnAdd_Click(object sender, EventArgs e)
{
if (txtName.Text.Length != 0)
{
names.Add(txtName.Text); // Add new name
txtName.Clear(); // Clear it out
txtName.Focus(); // Get ready for another name
}
else
{
MessageBox.Show("Please enter a name.", "Input Error");
return;
}
}
private void btnShow_Click(object sender, EventArgs e)
{
foreach (string str in names)
{
lstNames.Items.Add(str);
}
}
private void btnClose_Click(object sender, EventArgs e)
{
Close();
}
}
How It Works
The first thing to notice in Listing 8-4 is that you must add a new using statement:
using System.Collections;
This new using statement is required because it is part of the Collections class and is not included in a program by default.
Inside the frmMain class, you find the statement
ArrayList names = new ArrayList();
This statement defines the ArrayList object used to hold the names entered by the user. I defined names outside any method so it has class scope. This means that names is visible at all points in the frmMain class. Even though the ArrayList is used like an array, no dimension size is associated with its definition.
All the work is done in the click event for the Add button:
private void btnAdd_Click(object sender, EventArgs e)
{
if (txtName.Text.Length != 0)
{
names.Add(txtName.Text); // Add new name
txtName.Clear(); // Clear it out
txtName.Focus(); // Get ready for another name
}
else
{
MessageBox.Show("Please enter a name.", "Input Error");
return;
}
}
The code simply checks to make sure the user typed in a name and then uses the Add() method of the ArrayList object to add the new name to the array list. The program then clears out the name that was just entered from the txtName textbox object and sets the focus back into the textbox object in preparation for another name. The user may continue this process until all names have been entered.
When the user finishes entering the names, he can click the Show button to view the list of names he just entered. The code in the Show() click event uses a foreach loop to iterate through the ArrayList object and add each name to the ListBox object. ArrayList objects make it easy to use dynamic arrays in a program.
Also note that ArrayList objects have most of the methods and properties shown in Table 8.1 available for you to use. For example, if you want to present the names in sorted order before displaying them in the listbox, just add the statement
names.Sort();
before the foreach loop, and the names display in ascending order.
If ArrayList objects enable you to create dynamic arrays, why would you ever use a static array? It's just like the old saying: “There's no such thing as a free lunch.” The same holds true in programming. The dynamic behavior of ArrayList objects adds a fair amount of overhead to them, so they tend to consume more memory than static arrays for the same objects. This additional overhead also means there is a slight performance hit during processing for ArrayList objects compared to static arrays. Still, the ability to use an “undimensioned” array in a program adds sufficient flexibility that the ArrayList is a valuable tool to add to your toolkit.
Summary
Arrays are a fundamental data structure in any programming language, and you should be comfortable with the concepts presented in this chapter before moving to Chapter 9.
Exercises
You can find the answers to the following exercises in Appendix A.
1. A recent research study suggests that a person's ideal weight is related to his height in inches. It said that a person's ideal weight can be calculated from the following equations:
Female = 3.5 * height (in inches) - 108
Male = 4.0 * height (in inches) - 128
Write a program that has the user enter a starting and ending height, calculates a table of ideal weights for males and females, and stores the results in an array. The program should then display the table in either a listbox or ListView object.
2. In what way are arrays of objects different from arrays of value types?
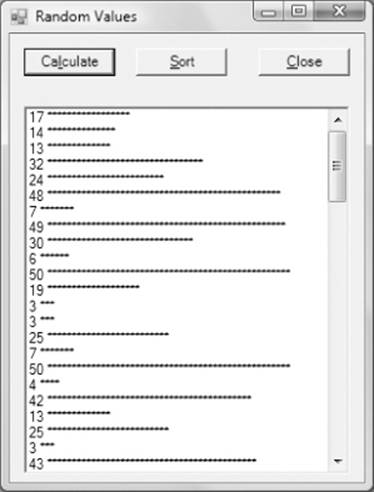
3. Write a program that stores 100 random values in an int array and then displays those values in a listbox. Have a Sort button that, when clicked, sorts the values and redisplays them in the listbox.
4. Modify the program you wrote for Exercise 3 so that it displays a bar graph for the data, as shown in Figure 8.13.
Figure 8.13 Textual bar graph
5. Given the following statements
string [] str1 = new string[100];
string[] temp;
str1[0] = "Hailey";
// Some more code
temp = str1;
What does the rvalue of temp equal?
What You Learned in This Chapter
|
TOPIC |
KEY POINTS |
|
Array |
What an array is and how they are different for value type versus reference types. |
|
Array index versus array element |
Why these two items are different and why that difference is important. |
|
Array rank |
How many dimensions an array has. |
|
Jagged arrays |
Not all arrays are symmetrical. |
|
Array initialization |
The different ways that arrays can be initialized. |
|
Array class |
What properties and methods are available. |
|
Collections |
How collections behave like arrays of objects. |