Professional C++ (2014)
Part IIICoding the Professional Way
Chapter 8Mastering Classes and Objects
WHAT’S IN THIS CHAPTER?
· How to use dynamic memory allocation in objects
· The different kinds of data members you can have (static, const, reference)
· The different kinds of methods you can implement (static, const, inline)
· The details of method overloading
· How to work with default parameters
· How to use nested classes
· How to make classes friends of other classes
· What operator overloading is
· How to write separate interface and implementation classes.
WROX.COM DOWNLOADS FOR THIS CHAPTER
Please note that all the code examples for this chapter are available as a part of this chapter’s code download on the book’s website at www.wrox.com/go/proc++3e on the Download Code tab.
Chapter 7 started the discussion on classes and objects. Now it’s time to master their subtleties so you can use them to their full potential. By reading this chapter, you will learn how to manipulate and exploit some of the most powerful aspects of the C++ language in order to write safe, effective, and useful classes.
Many of the concepts in this chapter arise in advanced C++ programming, especially in the standard template library.
DYNAMIC MEMORY ALLOCATION IN OBJECTS
Sometimes you don’t know how much memory you will need before your program actually runs. As you know, the solution is to dynamically allocate as much space as you need during program execution. Classes are no exception. Sometimes you don’t know how much memory an object will need when you write the class. In that case, the object should dynamically allocate memory. Dynamically allocated memory in objects provides several challenges, including freeing the memory, handling object copying, and handling object assignment.
The Spreadsheet Class
Chapter 7 introduced the SpreadsheetCell class. This chapter moves on to write the Spreadsheet class. As with the SpreadsheetCell class, the Spreadsheet class will evolve throughout this chapter. Thus, the various attempts do not always illustrate the best way to do every aspect of class writing. To start, a Spreadsheet is simply a two-dimensional array of SpreadsheetCells, with methods to set and retrieve cells at specific locations in the Spreadsheet. Although most spreadsheet applications use letters in one direction and numbers in the other to refer to cells, this Spreadsheet uses numbers in both directions. Here is a first attempt at a class definition for a simple Spreadsheet class:
#include "SpreadsheetCell.h"
class Spreadsheet
{
public:
Spreadsheet(int inWidth, int inHeight);
void setCellAt(int x, int y, const SpreadsheetCell& cell);
SpreadsheetCell& getCellAt(int x, int y);
private:
bool inRange(int val, int upper);
int mWidth, mHeight;
SpreadsheetCell** mCells;
};
NOTE The Spreadsheet class uses normal pointers for the mCells array. This is done throughout this chapter to show the consequences and to explain how you should handle dynamic memory in classes. In production code, you should use one of the standard C++ containers, like std::vector which greatly simplifies the implementation of Spreadsheet, but then you won’t learn how to correctly handle dynamic memory using naked pointers. In modern C++ you should never use naked pointers, but you might come across it in existing code in which case you need to know how it works.
Note that the Spreadsheet class does not contain a standard two-dimensional array of SpreadsheetCells. Instead, it contains a SpreadsheetCell**. The reason is that each Spreadsheet object might have different dimensions, so the constructor of the class must dynamically allocate the two-dimensional array based on the client-specified height and width. In order to allocate dynamically a two-dimensional array you need to write the following code. Note that in C++, unlike in Java, it’s not possible to simply write newSpreadsheetCell[mWidth][mHeight].
#include "Spreadsheet.h"
Spreadsheet::Spreadsheet(int inWidth, int inHeight) :
mWidth(inWidth), mHeight(inHeight)
{
mCells = new SpreadsheetCell* [mWidth];
for (int i = 0; i < mWidth; i++) {
mCells[i] = new SpreadsheetCell[mHeight];
}
}
The resultant memory for a Spreadsheet called s1 on the stack with width four and height three is shown in Figure 8-1.
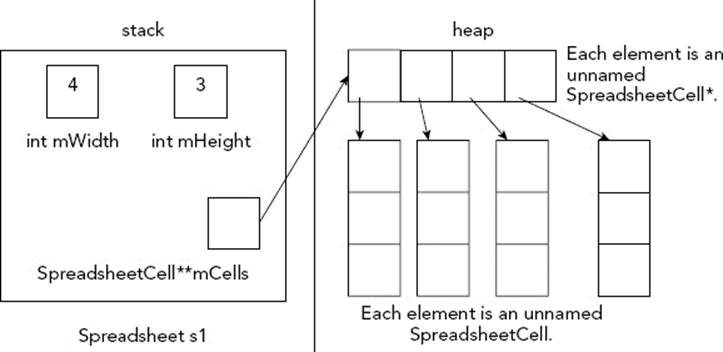
FIGURE 8-1
The implementations of the set and retrieval methods are straightforward:
void Spreadsheet::setCellAt(int x, int y, const SpreadsheetCell& cell)
{
if (!inRange(x, mWidth) || !inRange(y, mHeight)) {
throw std::out_of_range("");
}
mCells[x][y] = cell;
}
SpreadsheetCell& Spreadsheet::getCellAt(int x, int y)
{
if (!inRange(x, mWidth) || !inRange(y, mHeight)) {
throw std::out_of_range("");
}
return mCells[x][y];
}
Note that these two methods use a helper method inRange() to check that x and y represent valid coordinates in the spreadsheet. Attempting to access an array element at an out-of-range index will cause the program to malfunction. This example uses exceptions which are mentioned in Chapter 1 and described in detail in Chapter 13.
Freeing Memory with Destructors
Whenever you are finished with dynamically allocated memory, you should free it. If you dynamically allocate memory in an object, the place to free that memory is in the destructor. The compiler guarantees that the destructor will be called when the object is destroyed. Here is the Spreadsheet class definition from earlier with a destructor:
class Spreadsheet
{
public:
Spreadsheet(int inWidth, int inHeight);
~Spreadsheet();
// Code omitted for brevity
};
The destructor has the same name as the name of the class (and of the constructors), preceded by a tilde (~). The destructor takes no arguments, and there can only be one of them.
Here is the implementation of the Spreadsheet class destructor:
Spreadsheet::~Spreadsheet()
{
for (int i = 0; i < mWidth; i++) {
delete [] mCells[i];
}
delete [] mCells;
mCells = nullptr;
}
This destructor frees the memory that was allocated in the constructor. However, no rule requires you to free memory in the destructor. You can write whatever code you want in the destructor, but it is a good idea to use it only for freeing memory or disposing of other resources.
Handling Copying and Assignment
Recall from Chapter 7 that, if you don’t write a copy constructor and an assignment operator yourself, C++ writes them for you. These compiler-generated methods recursively call the copy constructor or assignment operator on object data members. However, for primitives, such as int, double, and pointers, they provide shallow or bitwise copying or assignment: they just copy or assign the data members from the source object directly to the destination object. That presents problems when you dynamically allocate memory in your object. For example, the following code copies the spreadsheet s1 to initialize s when s1 is passed to the printSpreadsheet() function.
#include "Spreadsheet.h"
void printSpreadsheet(Spreadsheet s)
{
// Code omitted for brevity.
}
int main()
{
Spreadsheet s1(4, 3);
printSpreadsheet(s1);
return 0;
}
The Spreadsheet contains one pointer variable: mCells. A shallow copy of a spreadsheet gives the destination object a copy of the mCells pointer, but not a copy of the underlying data. Thus, you end up with a situation where both s and s1 have a pointer to the same data, as shown in Figure 8-2.
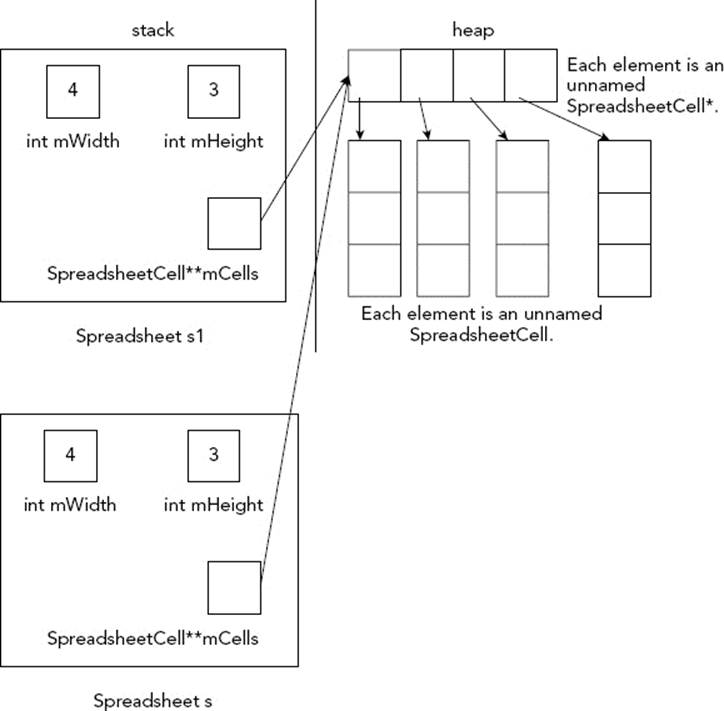
FIGURE 8-2
If s were to change something to which mCells points, that change would show up in s1 too. Even worse, when the printSpreadsheet() function exits, s’s destructor is called, which frees the memory pointed to by mCells. That leaves the situation shown in Figure 8-3.
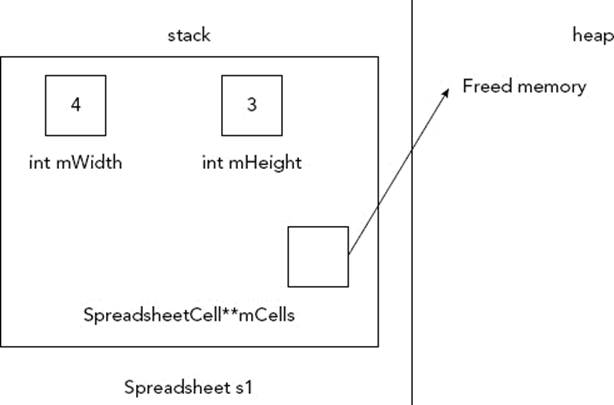
FIGURE 8-3
Now s1 has a pointer which no longer points to valid memory. This is called a dangling pointer.
Unbelievably, the problem is even worse with assignment. Suppose that you had the following code:
Spreadsheet s1(2, 2), s2(4, 3);
s1 = s2;
After both objects are constructed, you would have the memory layout shown in Figure 8-4.
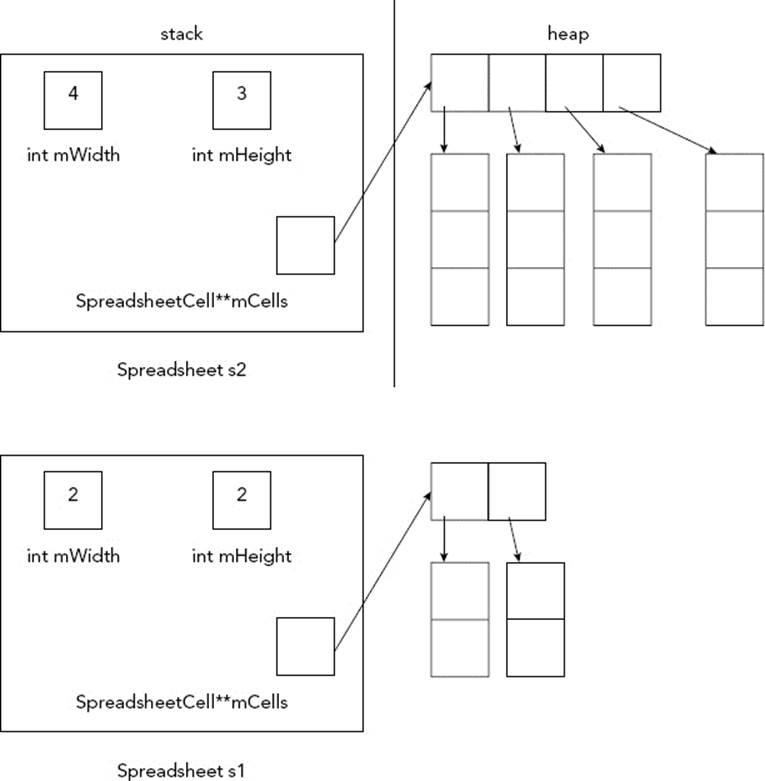
FIGURE 8-4
After the assignment statement, you would have the layout shown in Figure 8-5.
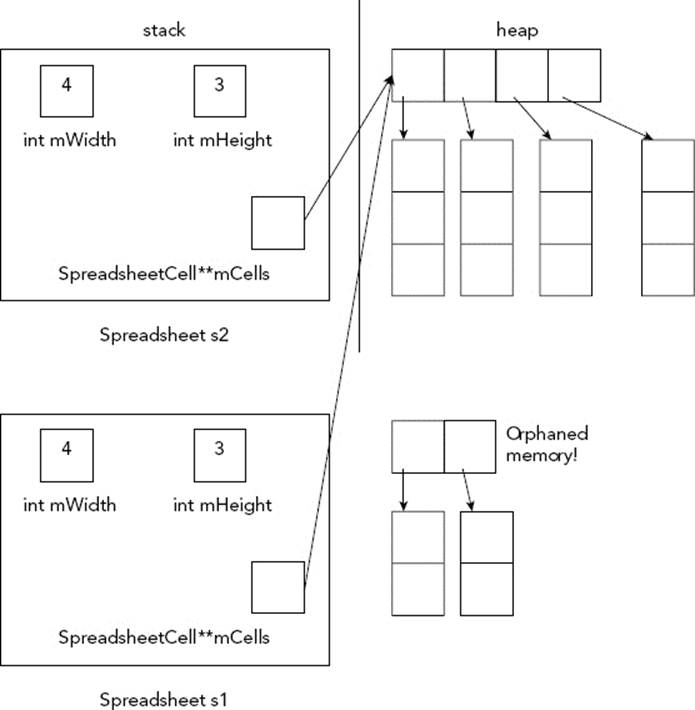
FIGURE 8-5
Now, not only do the mCells pointers in s1 and s2 point to the same memory, but also you have orphaned the memory to which mCells in s1 previously pointed. This is called a memory leak. That is why in assignment operators you must first free the memory referenced by the left-hand side, and then do a deep copy.
As you can see, relying on C++’s default copy constructor or assignment operator is not always a good idea.
WARNING Whenever you have dynamically allocated memory in a class, you should write your own copy constructor and assignment operator to provide a deep copy of the memory.
The Spreadsheet Copy Constructor
Here is a declaration for a copy constructor in the Spreadsheet class:
class Spreadsheet
{
public:
Spreadsheet(int inWidth, int inHeight);
Spreadsheet(const Spreadsheet& src);
// Code omitted for brevity
};
Here is a first definition of the copy constructor:
Spreadsheet::Spreadsheet(const Spreadsheet& src)
{
mWidth = src.mWidth;
mHeight = src.mHeight;
mCells = new SpreadsheetCell* [mWidth];
for (int i = 0; i < mWidth; i++) {
mCells[i] = new SpreadsheetCell[mHeight];
}
for (int i = 0; i < mWidth; i++) {
for (int j = 0; j < mHeight; j++) {
mCells[i][j] = src.mCells[i][j];
}
}
}
Note that the copy constructor copies all data members, including mWidth and mHeight, not just the pointer data members. The rest of the code in the copy constructor provides a deep copy of the mCells dynamically allocated two-dimensional array. There is no need to delete the existing mCells because this is a copy constructor and therefore there is no existing mCells yet in this object.
The Spreadsheet Assignment Operator
Here is the definition for the Spreadsheet class with an assignment operator:
class Spreadsheet
{
public:
// Code omitted for brevity
Spreadsheet& operator=(const Spreadsheet& rhs);
// Code omitted for brevity
};
Here is the implementation of the assignment operator for the Spreadsheet class, with explanations interspersed. Note that when an object is assigned to, it already has been initialized. Thus, you must free any dynamically allocated memory before allocating new memory. You can think of an assignment operator as a combination of a destructor and a copy constructor. You are essentially “reincarnating” the object with new life (or data) when you assign to it.
The first line of code in any assignment operator checks for self-assignment.
Spreadsheet& Spreadsheet::operator=(const Spreadsheet& rhs)
{
// Check for self-assignment.
if (this == &rhs) {
return *this;
}
This self-assignment check is required, not only for efficiency, but also for correctness. If the preceding self-assignment test was removed, the code will not work correctly. The assignment operator would first delete mCells and allocate a new mCells for the left-hand side object. However, both the left-hand side object and the right-hand side object are the same, so by deleting and re-allocating mCells for the left-hand side, you are doing the same for the right-hand side. The cells that you wanted to copy will be lost.
Because this is an assignment operator, the object being assigned to already has mCells initialized. You need to free these cells up.
// Free the old memory.
for (int i = 0; i < mWidth; i++) {
delete [] mCells[i];
}
delete [] mCells;
mCells = nullptr;
You must free all the memory before reallocating it, or you will create a memory leak. This chunk of code is identical to the destructor, so you should make a separate method to cleanup the memory and call it both from the destructor and from the assignment operator. The next step is to copy the memory.
// Copy the new memory.
mWidth = rhs.mWidth;
mHeight = rhs.mHeight;
mCells = new SpreadsheetCell* [mWidth];
for (int i = 0; i < mWidth; i++) {
mCells[i] = new SpreadsheetCell[mHeight];
}
for (int i = 0; i < mWidth; i++) {
for (int j = 0; j < mHeight; j++) {
mCells[i][j] = rhs.mCells[i][j];
}
}
return *this;
}
Note that this code looks remarkably like the code in the copy constructor. The following section explains how you can avoid this code duplication.
The assignment operator completes the “big 3” routines for managing dynamically allocated memory in an object: the destructor, the copy constructor, and the assignment operator. Whenever you find yourself writing one of those methods you should write all of them.
WARNING Whenever a class dynamically allocates memory, write a destructor, copy constructor, and assignment operator.
NOTE Next to copying, C++ also supports move semantics, which requires a move constructor and move assignment operator. These can be used to increase performance in certain situations and are discussed in detail in Chapter 10.
Common Helper Routines for Copy Constructor and Assignment Operator
The copy constructor and the assignment operator are quite similar. Thus, it’s usually convenient to factor the common tasks into a helper method. For example, you could add a copyFrom() method to the Spreadsheet class, and rewrite the copy constructor and assignment operator to use it like this:
void Spreadsheet::copyFrom(const Spreadsheet& src)
{
mWidth = src.mWidth;
mHeight = src.mHeight;
mCells = new SpreadsheetCell* [mWidth];
for (int i = 0; i < mWidth; i++) {
mCells[i] = new SpreadsheetCell[mHeight];
}
for (int i = 0; i < mWidth; i++) {
for (int j = 0; j < mHeight; j++) {
mCells[i][j] = src.mCells[i][j];
}
}
}
Spreadsheet::Spreadsheet(const Spreadsheet& src)
{
copyFrom(src);
}
Spreadsheet& Spreadsheet::operator=(const Spreadsheet& rhs)
{
// Check for self-assignment.
if (this == &rhs) {
return *this;
}
// Free the old memory.
for (int i = 0; i < mWidth; i++) {
delete [] mCells[i];
}
delete [] mCells;
mCells = nullptr;
// Copy the new memory.
copyFrom(rhs);
return *this;
}
Disallowing Assignment and Pass-By-Value
Sometimes when you dynamically allocate memory in your class, it’s easiest just to prevent anyone from copying or assigning to your objects. You can do this by explicitly deleting your operator= and copy constructor. That way, if anyone tries to pass the object by value, return it from a function or method, or assign to it, the compiler will complain. Here is a Spreadsheet class definition that prevents assignment and pass-by-value:
class Spreadsheet
{
public:
Spreadsheet(int inWidth, int inHeight);
Spreadsheet(const Spreadsheet& src) = delete;
~Spreadsheet();
Spreadsheet& operator=(const Spreadsheet& rhs) = delete;
// Code omitted for brevity
};
You don’t provide implementations for deleted copy constructors and assignment operators. The linker will never look for them because the compiler won’t allow code to call them. When you write code to copy or assign to a Spreadsheet object, the compiler will complain with a message like:
'Spreadsheet &Spreadsheet::operator =(const Spreadsheet &)' : attempting to reference a deleted function
NOTE If your compiler doesn’t support explicitly deleting member functions, then you can disallow copying and assigning by making your copy constructor and assignment operator private without any implementation.
DIFFERENT KINDS OF DATA MEMBERS
C++ gives you many choices for data members. In addition to declaring simple data members in your classes, you can create static data members that all objects of the class share, const members, reference members, const reference members, and more. This section explains the intricacies of these different kinds of data members.
static Data Members
Sometimes giving each object of a class a copy of a variable is overkill or won’t work. The data member might be specific to the class, but not appropriate for each object to have its own copy. For example, you might want to give each spreadsheet a unique numerical identifier. You would need a counter that starts at 0 from which each new object could obtain its ID. This spreadsheet counter really belongs to the Spreadsheet class, but it doesn’t make sense for each Spreadsheet object to have a copy of it because you would have to keep all the counters synchronized somehow. C++ provides a solution with static data members. A static data member is a data member associated with a class instead of an object. You can think of static data members as global variables specific to a class. Here is the Spreadsheet class definition, including the new static counter data member:
class Spreadsheet
{
// Omitted for brevity
private:
static int sCounter;
};
In addition to listing static class members in the class definition, you will have to allocate space for them in a source file, usually the source file in which you place your class method definitions. You can initialize them at the same time, but note that unlike normal variables and data members, they are initialized to 0 by default. static pointers are initialized to nullptr. Here is the code to allocate space for and initialize the sCounter member:
int Spreadsheet::sCounter;
This code appears outside of any function or method bodies. It’s almost like declaring a global variable, except that the Spreadsheet:: scope resolution specifies that it’s part of the Spreadsheet class.
Accessing static Data Members within Class Methods
You can use static data members as if they were regular data members from within class methods. For example, you might want to create an mId member of the Spreadsheet class and initialize it from the sCounter member in the Spreadsheet constructor. Here is theSpreadsheet class definition with an mId member:
class Spreadsheet
{
public:
// Omitted for brevity
int getId() const;
private:
// Omitted for brevity
static int sCounter;
int mId;
};
Here is an implementation of the Spreadsheet constructor that assigns the initial ID:
Spreadsheet::Spreadsheet(int inWidth, int inHeight) :
mWidth(inWidth), mHeight(inHeight)
{
mId = sCounter++;
mCells = new SpreadsheetCell* [mWidth];
for (int i = 0; i < mWidth; i++) {
mCells[i] = new SpreadsheetCell[mHeight];
}
}
As you can see, the constructor can access sCounter as if it were a normal member. Remember to assign an ID in the copy constructor as well:
Spreadsheet::Spreadsheet(const Spreadsheet& src)
{
mId = sCounter++;
copyFrom(src);
}
You should not copy the ID in the assignment operator. Once an ID is assigned to an object it should never change. Thus it’s recommended to make mId a const data member. Const data members are discussed in the next section.
Accessing static Data Members Outside Methods
Access control specifiers apply to static data members: sCounter is private, so it cannot be accessed from outside class methods. If sCounter was public, you could access it from outside class methods by specifying that the variable is part of the Spreadsheet class with the :: scope resolution operator:
int c = Spreadsheet::sCounter;
However, it’s not recommended to have public data members. You should grant access through public get/set methods. If you want to grant access to a static data member, you need to implement static get/set methods, which are explained later in this chapter.
const Data Members
Data members in your class can be declared const, meaning they can’t be changed after they are created and initialized. You should use static const data members in place of global constants when the constants apply only to the class. For example, you might want to specify a maximum height and width for spreadsheets. If the user tries to construct a spreadsheet with a greater height or width than the maximum, the maximum is used instead. You can make the max height and width static const members of the Spreadsheet class:
class Spreadsheet
{
public:
// Omitted for brevity
static const int kMaxHeight = 100;
static const int kMaxWidth = 100;
};
You can use these new constants in your constructor as shown in the following section of code (note the use of the ternary operator):
Spreadsheet::Spreadsheet(int inWidth, int inHeight) :
mWidth(inWidth < kMaxWidth ? inWidth : kMaxWidth),
mHeight(inHeight < kMaxHeight ? inHeight : kMaxHeight)
{
mId = sCounter++;
mCells = new SpreadsheetCell* [mWidth];
for (int i = 0; i < mWidth; i++) {
mCells[i] = new SpreadsheetCell[mHeight];
}
}
NOTE Instead of automatically clamping the width and height to their maximum, you could also decide to throw an exception when the width or height exceed their maximum. However, the destructor will not be called when you throw an exception from a constructor. So, you need to be careful with this. Details are explained in Chapter 13.
NOTE Non-static data members can also be declared const. For example, the mId data member could be declared as const. Since you cannot assign to a const data member, you need to initialize them in your ctor-initializers.
kMaxHeight and kMaxWidth are public, so you can access them from anywhere in your program as if they were global variables, but with slightly different syntax: you must specify that the variable is part of the Spreadsheet class with the :: scope resolution operator:
cout << "Maximum height is: " << Spreadsheet::kMaxHeight << endl;
Reference Data Members
Spreadsheets and SpreadsheetCells are great, but they don’t make a very useful application by themselves. You need code to control the whole spreadsheet program, which you could package into a SpreadsheetApplication class.
The implementation of this class is unimportant at the moment. For now, consider this architecture problem: how can spreadsheets communicate with the application? The application stores a list of spreadsheets, so it can communicate with the spreadsheets. Similarly, each spreadsheet could store a reference to the application object. The Spreadsheet class must then know about the SpreadsheetApplication class and the SpreadsheetApplication class must know about the Spreadsheet class. This is a circular reference and cannot be solved with normal #includes. The solution is to use a forward declaration in one of the header files. Here is the new Spreadsheet class definition that uses a forward declaration to tell the compiler about the SpreadsheetApplication class:
class SpreadsheetApplication; // forward declaration
class Spreadsheet
{
public:
Spreadsheet(int inWidth, int inHeight,
SpreadsheetApplication& theApp);
// Code omitted for brevity.
private:
// Code omitted for brevity.
SpreadsheetApplication& mTheApp;
};
This definition adds a SpreadsheetApplication reference as a data member. It’s recommended to use a reference in this case instead of a pointer because a Spreadsheet should always refer to a SpreadsheetApplication. This would not be guaranteed with a pointer.
Note that storing a reference to the application is only done to demonstrate the use of references as data members. It’s not recommended to couple the Spreadsheet and SpreadsheetApplication classes together in this way, but instead to use the MVC (Model-View-Controller) paradigm.
The application reference is given to each Spreadsheet in its constructor. A reference cannot exist without referring to something, so mTheApp must be given a value in the ctor-initializer of the constructor:
Spreadsheet::Spreadsheet(int inWidth, int inHeight,
SpreadsheetApplication& theApp)
: mWidth(inWidth < kMaxWidth ? inWidth : kMaxWidth),
mHeight(inHeight < kMaxHeight ? inHeight : kMaxHeight), mTheApp(theApp)
{
// Code omitted for brevity.
}
You must also initialize the reference member in the copy constructor:
Spreadsheet::Spreadsheet(const Spreadsheet& src) :
mTheApp(src.mTheApp)
{
mId = sCounter++;
copyFrom(src);
}
Remember that after you have initialized a reference you cannot change the object to which it refers. It’s not possible to assign to references in the assignment operator.
const Reference Data Members
Your reference members can refer to const objects just as normal references can refer to const objects. For example, you might decide that Spreadsheets should only have a const reference to the application object. You can simply change the class definition to declaremTheApp as a const reference:
class Spreadsheet
{
public:
Spreadsheet(int inWidth, int inHeight,
const SpreadsheetApplication& theApp);
// Code omitted for brevity.
private:
// Code omitted for brevity.
const SpreadsheetApplication& mTheApp;
};
There is an important difference between using a const reference versus a non-const reference. The const reference SpreadsheetApplication data member can only be used to call const methods on the SpreadsheetApplication object. If you try to call a non-const method through a const reference, you will get a compiler error.
It’s also possible to have a static reference member or a static const reference member, but you will rarely find the need for something like that.
MORE ABOUT METHODS
C++ also provides myriad choices for methods. This section explains all the tricky details.
static Methods
Methods, like data members, sometimes apply to the class as a whole, not to each object. You can write static methods as well as data members. As an example, consider the SpreadsheetCell class from Chapter 7. It has two helper methods: stringToDouble() anddoubleToString(). These methods don’t access information about specific objects, so they could be static. Here is the class definition with these methods static:
class SpreadsheetCell
{
// Omitted for brevity
private:
static std::string doubleToString(double val);
static double stringToDouble(const std::string& str);
// Omitted for brevity
};
The implementations of these two methods are identical to the previous implementations. You don’t repeat the static keyword in front of the method definitions. However, note that static methods are not called on a specific object, so they have no this pointer, and are not executing for a specific object with access to its non-static members. In fact, a static method is just like a regular function. The only difference is that it can access private and protected static data members of the class. It can also access private and protectednon-static data members on objects of the same type, if those objects are made visible to the static method, for example by passing in a reference or pointer to such an object.
You call a static method just like a regular function from within any method of the class. Thus, the implementation of all methods in SpreadsheetCell can stay the same. Outside of the class, you need to qualify the method name with the class name using the scope resolution operator (as for static members). Access control applies as usual.
You might want to make stringToDouble() and doubleToString() public so that other code outside the class could make use of them. If so, you could call them from anywhere like this:
string str = SpreadsheetCell::doubleToString(5.0);
const Methods
A const object is an object whose value cannot be changed. If you have a const, reference to const or pointer to const object, the compiler will not let you call any methods on that object unless those methods guarantee that they won’t change any data members. The way you guarantee that a method won’t change data members is to mark the method itself with the const keyword. Here is the SpreadsheetCell class with the methods that don’t change any data member marked const:
class SpreadsheetCell
{
public:
// Omitted for brevity
double getValue() const;
const std::string& getString() const;
// Omitted for brevity
};
The const specification is part of the method prototype and must accompany its definition as well:
double SpreadsheetCell::getValue() const
{
return mValue;
}
const std::string& SpreadsheetCell::getString() const
{
return mString;
}
Marking a method as const signs a contract with client code guaranteeing that you will not try to change the internal values of the object within the method. If you try to declare a method const that actually modifies a data member, the compiler will complain. You also cannot declare a static method, such as the doubleToString() and stringToDouble() methods from the previous section const because it is redundant. Static methods do not have an instance of the class so it would be impossible for them to change internal values.const works by making it appear inside the method that you have a const reference to each data member. Thus, if you try to change the data member the compiler will flag an error.
A non-const object can call const and non-const methods. However, a const object can only call const methods. Here are some examples:
SpreadsheetCell myCell(5);
cout << myCell.getValue() << endl; // OK
myCell.setString("6"); // OK
const SpreadsheetCell& anotherCell = myCell;
cout << anotherCell.getValue() << endl; // OK
anotherCell.setString("6"); // Compilation Error!
You should get into the habit of declaring const all methods that don’t modify the object so that you can use references to const objects in your program.
Note that const objects can still be destroyed, and their destructor can be called. Nevertheless, destructors are not allowed to be declared const.
mutable Data Members
Sometimes you write a method that is “logically” const but happens to change a data member of the object. This modification has no effect on any user-visible data, but is technically a change, so the compiler won’t let you declare the method const. For example, suppose that you want to profile your spreadsheet application to obtain info about how often data is being read. A crude way to do this would be to add a counter to the SpreadsheetCell class that counts each call to getValue() or getString(). Unfortunately, that makes those methods non-const in the compiler’s eyes, which is not what you intended. The solution is to make your new counter variable mutable, which tells the compiler that it’s okay to change it in a const method. Here is the new SpreadsheetCell class definition:
class SpreadsheetCell
{
// Omitted for brevity
private:
double mValue;
std::string mString;
mutable int mNumAccesses = 0;
};
Here are the definitions for getValue() and getString():
double SpreadsheetCell::getValue() const
{
mNumAccesses++;
return mValue;
}
const std::string& SpreadsheetCell::getString() const
{
mNumAccesses++;
return mString;
}
Method Overloading
You’ve already noticed that you can write multiple constructors in a class, all of which have the same name. These constructors differ only in the number or types of their parameters. You can do the same thing for any method or function in C++. Specifically, you can overload the function or method name by using it for multiple functions, as long as the number or types of the parameters differ. For example, in the SpreadsheetCell class you could rename both setString() and setValue() to set(). The class definition now looks like this:
class SpreadsheetCell
{
public:
// Omitted for brevity
void set(double inValue);
void set(const std::string& inString);
// Omitted for brevity
};
The implementations of the set() methods stay the same. Note that the double constructor that previously called setValue() must now call set(). When you write code to call set(), the compiler determines which instance to call based on the parameter you pass: if you pass a string the compiler calls the string instance; if you pass a double the compiler calls the double instance. This is called overload resolution.
You might be tempted to do the same thing for getValue() and getString(): rename each of them to get(). However, that does not compile. C++ does not allow you to overload a method name based only on the return type of the method because in many cases it would be impossible for the compiler to determine which instance of the method to call. For example, if the return value of the method is not captured anywhere, the compiler has no way to tell which instance of the method you wanted.
Note also that you can overload a method based on const. That is, you can write two methods with the same name and same parameters, one of which is declared const and one of which is not. The compiler will call the const method if you have a const object and the non-const method if you have a non-const object.
Overloaded methods can be explicitly deleted, which can be used to disallow calling a member function with particular arguments. For example, suppose you have the following class:
class MyClass
{
public:
void foo(int i);
};
The foo() method can be called as follows:
MyClass c;
c.foo(123);
c.foo(1.23);
For the third line, the compiler will convert the double value (1.23) to an integer value (1) and then call foo(int i). The compiler might give you a warning, but it will perform this implicit conversion. You can prevent the compiler from performing this conversion by explicitly deleting a double instance of foo():
class MyClass
{
public:
void foo(int i);
void foo(double d) = delete;
};
With this change, an attempt to call foo() with a double will be flagged as an error by the compiler, instead of performing a conversion to an integer.
Default Parameters
A feature similar to method overloading in C++ is default parameters. You can specify defaults for function and method parameters in the prototype. If the user specifies those arguments, the defaults are ignored. If the user omits those arguments, the default values are used. There is a limitation, though: you can only provide defaults for a continuous list of parameters starting from the rightmost parameter. Otherwise, the compiler would not be able to match missing arguments to default parameters. Default parameters can be used in functions, methods, and constructors. For example, you can assign default values to the width and height in your Spreadsheet constructor:
class Spreadsheet
{
public:
Spreadsheet(const SpreadsheetApplication& theApp,
int inWidth = kMaxWidth, int inHeight = kMaxHeight);
// Omitted for brevity
};
The implementation of the Spreadsheet constructor stays the same. Note that you specify the default parameters only in the method declaration, but not in the definition.
Now you can call the Spreadsheet constructor with one, two, or three arguments even though there is only one non-copy constructor:
SpreadsheetApplication theApp;
Spreadsheet s1(theApp);
Spreadsheet s2(theApp, 5);
Spreadsheet s3(theApp, 5, 6);
A constructor with defaults for all its parameters can function as a default constructor. That is, you can construct an object of that class without specifying any arguments. If you try to declare both a default constructor and a multi-argument constructor with defaults for all its parameters, the compiler will complain because it won’t know which constructor to call if you don’t specify any arguments.
Note that anything you can do with default parameters you can do with method overloading. You could write three different constructors, each of which takes a different number of parameters. However, default parameters allow you to write only one constructor to take three different numbers of arguments. You should use the mechanism with which you are most comfortable.
Inline Methods
C++ gives you the ability to recommend that a call to a method or function should not actually be implemented in the generated code as a call to a separate block of code. Instead, the compiler should insert the method or function body directly into the code where the method or function call is made. This process is called inlining, and methods or functions that want this behavior are called inline methods or functions. Inlining is safer than using #define macros.
You can specify an inline method or function by placing the inline keyword in front of its name in the function or method definition. For example, you might want to make the accessor methods of the SpreadsheetCell class inline, in which case you would define them like this:
inline double SpreadsheetCell::getValue() const
{
mNumAccesses++;
return mValue;
}
inline const std::string& SpreadsheetCell::getString() const
{
mNumAccesses++;
return mString;
}
This gives a hint to the compiler to replace calls to getValue() and getString() with the actual method body instead of generating code to make a function call. Note that the inline keyword is just a hint for the compiler. The compiler can ignore it if it thinks it would hurt performance.
There is one caveat: definitions of inline methods and functions must be available in every source file in which they are called. That makes sense if you think about it: how can the compiler substitute the function body if it can’t see the function definition? Thus, if you write inline functions or methods you should place the definitions in a header file along with their prototypes. For methods, this means placing the definitions in the .h file that includes the class definition.
NOTE Advanced C++ compilers do not require you to put definitions of inline methods in a header file. For example, Microsoft Visual C++ supports Link-Time Code Generation (LTCG) which will automatically inline small function bodies, even if they are not declared as inline and even if they are not defined in a header file. When you use such a compiler, make use of it, and don’t put the definitions in the header file. This way, your interface files stay clean without any implementation details visible in it.
C++ provides an alternate syntax for declaring inline methods that doesn’t use the inline keyword at all. Instead, you place the method definition directly in the class definition. Here is a SpreadsheetCell class definition with this syntax:
class SpreadsheetCell
{
public:
// Omitted for brevity
double getValue() const { mNumAccesses++; return mValue; }
const std::string& getString() const { mNumAccesses++; return mString; }
// Omitted for brevity
};
NOTE If you single-step with a debugger on a function call that is inlined, some advanced C++ debuggers will jump to the actual source code of the inline function, giving you the illusion of a function call, but in reality, the code is inlined.
Many C++ programmers discover the inline method syntax and employ it without understanding the ramifications of marking a method inline. Marking a method or function as inline only gives a hint to the compiler to inline it. Compilers will only inline the simplest methods and functions. If you define an inline method that the compiler doesn’t want to inline, it will silently ignore the directive.
Modern compilers will take metrics like code bloat into account before deciding to inline a method or function, and they will not inline anything that is not cost-effective.
NESTED CLASSES
Class definitions can contain more than just member functions and data members. You can also write nested classes and structs, declare typedefs, or create enumerated types. Anything declared inside a class is in the scope of that class. If it is public, you can access it outside the class by scoping it with the ClassName:: scope resolution syntax.
You can provide a class definition inside another class definition. For example, you might decide that the SpreadsheetCell class is really part of the Spreadsheet class. You could define both of them like this:
class Spreadsheet
{
public:
class SpreadsheetCell
{
public:
SpreadsheetCell();
SpreadsheetCell(double initialValue);
// Omitted for brevity
private:
double mValue;
std::string mString;
mutable int mNumAccesses = 0;
};
Spreadsheet(const SpreadsheetApplication& theApp,
int inWidth = kMaxWidth, int inHeight = kMaxHeight);
Spreadsheet(const Spreadsheet& src);
~Spreadsheet();
// Remainder of Spreadsheet declarations omitted for brevity
};
Now, the SpreadsheetCell class is defined inside the Spreadsheet class, so anywhere you refer to a SpreadsheetCell outside of the Spreadsheet class you must qualify the name with the Spreadsheet:: scope. This applies even to the method definitions. For example, the default constructor now looks like this:
Spreadsheet::SpreadsheetCell::SpreadsheetCell() : mValue(0)
{
}
This syntax can quickly become clumsy. For example, the definition of the SpreadsheetCell assignment operator now looks like this:
Spreadsheet::SpreadsheetCell& Spreadsheet::SpreadsheetCell::operator=(
const SpreadsheetCell& rhs)
{
if (this == &rhs) {
return *this;
}
mValue = rhs.mValue;
mString = rhs.mString;
mNumAccesses = rhs.mNumAccesses;
return *this;
}
In fact, you must even use the syntax for return types (but not parameters) of methods in the Spreadsheet class itself:
Spreadsheet::SpreadsheetCell& Spreadsheet::getCellAt(int x, int y)
{
if (!inRange(x, mWidth) || !inRange(y, mHeight)) {
throw std::out_of_range("");
}
return mCells[x][y];
}
You can avoid the clumsy syntax by using a type alias to rename Spreadsheet::SpreadsheetCell to something more manageable like SCell:
using SCell = Spreadsheet::SpreadsheetCell;
This type alias should go outside the Spreadsheet class definition, or else you will have to qualify the type alias name itself with Spreadsheet:: to get Spreadsheet::SCell. That wouldn’t do you much good!
Now you can write the default constructor like this:
SCell::SpreadsheetCell() : mValue(0)
{
}
Normal access control applies to nested class definitions. If you declare a private or protected nested class, you can only use it inside the outer class.
You should generally use nested class definitions only for trivial classes. It is really too clumsy for something like the SpreadsheetCell class.
ENUMERATED TYPES INSIDE CLASSES
If you want to define a number of constants inside a class, you should use an enumerated type instead of a collection of #defines. For example, you can add support for cell coloring to the SpreadsheetCell class as follows:
class SpreadsheetCell
{
public:
// Omitted for brevity
enum class Colors { Red = 1, Green, Blue, Yellow };
void setColor(Colors color);
private:
// Omitted for brevity
Colors mColor = Colors::Red;
};
The implementation of the setColor() method is straightforward:
void SpreadsheetCell::setColor(Colors color)
{
mColor = color;
}
The new method can be used as follows:
SpreadsheetCell myCell(5);
myCell.setColor(SpreadsheetCell::Colors::Blue);
Using an enumerated type is the preferred solution instead of using #defines as follows:
#define SPREADSHEETCELL_RED 1
#define SPREADSHEETCELL_GREEN 2
#define SPREADSHEETCELL_BLUE 3
#define SPREADSHEETCELL_YELLOW 4
class SpreadsheetCell
{
public:
// Omitted for brevity
void setColor(int color);
private:
// Omitted for brevity
int mColor;
};
When you use #defines, you have to use an integer parameter for the setColor() function instead of a clear type like the Colors enumerated type.
FRIENDS
C++ allows classes to declare that other classes, or member functions of other classes, or nonmember functions are friends, and can access protected and private data members and methods. For example, the SpreadsheetCell class could specify that the Spreadsheetclass is its “friend” like this:
class SpreadsheetCell
{
public:
friend class Spreadsheet;
// Remainder of the class omitted for brevity
};
Now all the methods of the Spreadsheet class can access the private and protected data members and methods of the SpreadsheetCell class.
If you only want to make a specific member function of the Spreadsheet class a friend, you can do that as follows:
class SpreadsheetCell
{
public:
friend void Spreadsheet::setCellAt(int x, int y,
const SpreadsheetCell& cell);
// Remainder of the class omitted for brevity
};
Note that a class needs to know which other classes, methods, or functions wish to be its friends; a class, method or function cannot declare itself to be a friend of some other class and access the non-public names of that class.
You might, for example, want to write a function to verify that the string of a SpreadsheetCell object is not empty. You might want this verification routine to be outside the SpreadsheetCell class to model an external audit, but the function should be able to access the internal data members of the object in order to check it properly. Here is the SpreadsheetCell class definition with a friend checkSpreadsheetCell() function:
class SpreadsheetCell
{
public:
friend bool checkSpreadsheetCell(const SpreadsheetCell& cell);
// Omitted for brevity
};
The friend declaration in the class serves as the function’s prototype. There’s no need to write the prototype elsewhere (although it’s harmless to do so).
Here is the function definition:
bool checkSpreadsheetCell(const SpreadsheetCell& cell)
{
return !(cell.mString.empty());
}
You write this function just like any other function, except that you can directly access private and protected data members of the SpreadsheetCell class. You don’t repeat the friend keyword on the function definition.
friend classes and methods are easy to abuse; they allow you to violate the principle of encapsulation by exposing internals of your class to other classes or functions. Thus, you should use them only in limited circumstances such as operator overloading because in that case you need access to protected and private members, as discussed in the next section.
OPERATOR OVERLOADING
You often want to perform operations on objects, such as adding them, comparing them, or streaming them to or from files. For example, spreadsheets are really only useful when you can perform arithmetic actions on them, such as summing an entire row of cells.
Example: Implementing Addition for SpreadsheetCells
In true object-oriented fashion, SpreadsheetCell objects should be able to add themselves to other SpreadsheetCell objects. Adding a cell to another cell produces a third cell with the result. It doesn’t change either of the original cells. The meaning of addition forSpreadsheetCells is the addition of the values of the cells. The string representations are ignored.
First Attempt: The add Method
You can declare and define an add() method for your SpreadsheetCell class like this:
class SpreadsheetCell
{
public:
// Omitted for brevity
SpreadsheetCell add(const SpreadsheetCell& cell) const;
// Omitted for brevity
};
This method adds two cells together, returning a new third cell whose value is the sum of the first two. It is declared const and takes a reference to a const SpreadsheetCell because add() does not change either of the source cells. Here is the implementation:
SpreadsheetCell SpreadsheetCell::add(const SpreadsheetCell& cell) const
{
SpreadsheetCell newCell;
newCell.set(mValue + cell.mValue); // update mValue and mString
return newCell;
}
Note that the implementation creates a new SpreadsheetCell called newCell and returns a copy of that cell. You might be tempted to return a reference to the cell instead. However, that will not work because as soon as the add() method ends and newCell goes out of scope it will be destroyed. The reference that you returned will then be a dangling reference.
You can use the add() method like this:
SpreadsheetCell myCell(4), anotherCell(5);
SpreadsheetCell aThirdCell = myCell.add(anotherCell);
That works, but it’s a bit clumsy. You can do better.
Second Attempt: Overloaded operator+ as a Method
It would be convenient to be able to add two cells with the plus sign the way that you add two ints or two doubles. Something like this:
SpreadsheetCell myCell(4), anotherCell(5);
SpreadsheetCell aThirdCell = myCell + anotherCell;
C++ allows you to write your own version of the plus sign, called the addition operator, to work correctly with your classes. To do that you write a method with the name operator+ that looks like this:
class SpreadsheetCell
{
public:
// Omitted for brevity
SpreadsheetCell operator+(const SpreadsheetCell& cell) const;
// Omitted for brevity
};
NOTE You are allowed to write spaces between operator and the plus sign. For example, instead of writing operator+, you can write operator +. This is true for all operators. This book adopts the style without spaces.
The definition of the method is identical to the implementation of the add() method:
SpreadsheetCell
SpreadsheetCell::operator+(const SpreadsheetCell& cell) const
{
SpreadsheetCell newCell;
newCell.set(mValue + cell.mValue); // update mValue and mString.
return newCell;
}
Now you can add two cells together using the plus sign as shown previously.
This syntax takes a bit of getting used to. Try not to worry too much about the strange method name operator+ — it’s just a name like foo or add. In order to understand the rest of the syntax, it helps to understand what’s really going on. When your C++ compiler parses a program and encounters an operator, such as +, -, =, or <<, it tries to find a function or method with the name operator+, operator-, operator=, or operator<<, respectively, that takes the appropriate parameters. For example, when the compiler sees the following line, it tries to find either a method in the SpreadsheetCell class named operator+ that takes another SpreadsheetCell object or a global function named operator+ that takes two SpreadsheetCell objects:
SpreadsheetCell aThirdCell = myCell + anotherCell;
If the SpreadsheetCell class contains an operator+ method, then the previous line will be translated to:
SpreadsheetCell aThirdCell = myCell.operator+(anotherCell);
Note that there’s no requirement that operator+ takes as a parameter an object of the same type as the class for which it’s written. You could write an operator+ for SpreadsheetCells that takes a Spreadsheet to add to the SpreadsheetCell. That wouldn’t make sense to the programmer, but the compiler would allow it.
Note also that you can give operator+ any return value you want. Operator overloading is a form of function overloading, and recall that function overloading does not look at the return type of the function.
Implicit Conversions
Surprisingly, once you’ve written the operator+ shown earlier, not only can you add two cells together, you can also add a cell to a string, a double, or an int!
SpreadsheetCell myCell(4), aThirdCell;
string str = "hello";
aThirdCell = myCell + str;
aThirdCell = myCell + 5.6;
aThirdCell = myCell + 4;
The reason this code works is that the compiler does more to try to find an appropriate operator+ than just look for one with the exact types specified. The compiler also tries to find an appropriate conversion for the types so that an operator+ can be found. Constructors that take the type in question are appropriate converters. In the preceding example, when the compiler sees a SpreadsheetCell trying to add itself to double, it finds the SpreadsheetCell constructor that takes a double and constructs a temporarySpreadsheetCell object to pass to operator+. Similarly, when the compiler sees the line trying to add a SpreadsheetCell to a string, it calls the string SpreadsheetCell constructor to create a temporary SpreadsheetCell to pass to operator+.
This implicit conversion behavior is usually convenient. However, in the preceding example, it doesn’t really make sense to add a SpreadsheetCell to a string. You can prevent the implicit construction of a SpreadsheetCell from a string by marking that constructor with the explicit keyword:
class SpreadsheetCell
{
public:
SpreadsheetCell();
SpreadsheetCell(double initialValue);
explicit SpreadsheetCell(const std::string& initialValue);
SpreadsheetCell(const SpreadsheetCell& src);
SpreadsheetCell& operator=(const SpreadsheetCell& rhs);
// Remainder omitted for brevity
};
The explicit keyword goes only in the class definition, and only makes sense when applied to constructors that can be called with one argument, such as one-parameter constructors or multi-parameter constructors with default values for parameters.
The selection of an implicit constructor might be inefficient, because temporary objects must be created. To avoid implicit construction for adding a double, you could write a second operator+ as follows:
SpreadsheetCell SpreadsheetCell::operator+(double rhs) const
{
return SpreadsheetCell(mValue + rhs);
}
Note also that this demonstrates that you don’t need to create a variable to return a value.
Third Attempt: Global operator+
Implicit conversions allow you to use an operator+ method to add your SpreadsheetCell objects to ints and doubles. However, the operator is not commutative, as shown in the following code:
aThirdCell = myCell + 4; // Works fine.
aThirdCell = myCell + 5.6; // Works fine.
aThirdCell = 4 + myCell; // FAILS TO COMPILE!
aThirdCell = 5.6 + myCell; // FAILS TO COMPILE!
The implicit conversion works fine when the SpreadsheetCell object is on the left of the operator, but doesn’t work when it’s on the right. Addition is supposed to be commutative, so something is wrong here. The problem is that the operator+ method must be called on a SpreadsheetCell object, and that object must be on the left-hand side of the operator+. That’s just the way the C++ language is defined. So, there’s no way you can get the above code to work with an operator+ method.
However, you can get it to work if you replace the in-class operator+ with a global operator+ function that is not tied to any particular object. The function looks like this:
SpreadsheetCell operator+(const SpreadsheetCell& lhs,
const SpreadsheetCell& rhs)
{
SpreadsheetCell newCell;
newCell.set(lhs.mValue + rhs.mValue); // update mValue and mString.
return newCell;
}
Now all four of the addition lines work as you expect:
aThirdCell = myCell + 4; // Works fine.
aThirdCell = myCell + 5.6; // Works fine.
aThirdCell = 4 + myCell; // Works fine.
aThirdCell = 5.6 + myCell; // Works fine.
Note that the implementation of the global operator+ accesses private data members of SpreadsheetCell objects. Therefore, it must be a friend function of the SpreadsheetCell class:
class SpreadsheetCell
{
public:
// Omitted for brevity
friend SpreadsheetCell operator+(const SpreadsheetCell& lhs,
const SpreadsheetCell& rhs);
//Omitted for brevity
};
You might be wondering what happens if you write the following code:
aThirdCell = 4.5 + 5.5;
It compiles and runs, but it’s not calling the operator+ you wrote. It does normal double addition of 4.5 and 5.5, which results in the following intermediate statement:
aThirdCell = 10;
To make this assignment work, there should be a SpreadsheetCell object on the right-hand side. The compiler will discover a user-defined constructor that takes a double, will use this constructor to implicitly convert the double value into a temporary SpreadsheetCellobject, and will then call the assignment operator.
Overloading Arithmetic Operators
Now that you understand how to write operator+, the rest of the basic arithmetic operators are straightforward. Here are declarations of -, *, and / (you can also overload %, but it doesn’t make sense for the double values stored in SpreadsheetCells):
class SpreadsheetCell
{
public:
// Omitted for brevity
friend SpreadsheetCell operator+(const SpreadsheetCell& lhs,
const SpreadsheetCell& rhs);
friend SpreadsheetCell operator-(const SpreadsheetCell& lhs,
const SpreadsheetCell& rhs);
friend SpreadsheetCell operator*(const SpreadsheetCell& lhs,
const SpreadsheetCell& rhs);
friend SpreadsheetCell operator/(const SpreadsheetCell& lhs,
const SpreadsheetCell& rhs);
// Omitted for brevity
};
Here are the implementations. The only tricky aspect is remembering to check for division by zero. This implementation throws an exception if division by zero is detected:
SpreadsheetCell operator-(const SpreadsheetCell& lhs,
const SpreadsheetCell& rhs)
{
SpreadsheetCell newCell;
newCell.set(lhs.mValue - rhs.mValue); // update mValue and mString.
return newCell;
}
SpreadsheetCell operator*(const SpreadsheetCell& lhs,
const SpreadsheetCell& rhs)
{
SpreadsheetCell newCell;
newCell.set(lhs.mValue * rhs.mValue); // update mValue and mString.
return newCell;
}
SpreadsheetCell operator/(const SpreadsheetCell& lhs,
const SpreadsheetCell& rhs)
{
if (rhs.mValue == 0)
throw invalid_argument("Divide by zero.");
SpreadsheetCell newCell;
newCell.set(lhs.mValue / rhs.mValue); // update mValue and mString
return newCell;
}
C++ does not require you to actually implement multiplication in operator*, division in operator/, and so on. You could implement multiplication in operator/, division in operator+, and so forth. However, that would be extremely confusing, and there is no good reason to do so except as a practical joke. Whenever possible, stick to the commonly used operator meanings in your implementations.
NOTE In C++, you cannot change the precedence of operators. For example, * and / are always evaluated before + and -. The only thing user-defined operators can do is specify the implementation once the precedence of operations has been determined. C++ also does not allow you to invent new operator symbols.
Overloading the Arithmetic Shorthand Operators
In addition to the basic arithmetic operators, C++ provides shorthand operators such as += and -=. You might assume that writing operator+ for your class provides operator+= also. No such luck. You have to overload the shorthand arithmetic operators explicitly. These operators differ from the basic arithmetic operators in that they change the object on the left-hand side of the operator instead of creating a new object. A second, subtler, difference is that, like the assignment operator, they generate a result that is a reference to the modified object.
The arithmetic shorthand operators always require an object on the left-hand side, so you should write them as methods, not as global functions. Here are the declarations for the SpreadsheetCell class:
class SpreadsheetCell
{
public:
// Omitted for brevity
SpreadsheetCell& operator+=(const SpreadsheetCell& rhs);
SpreadsheetCell& operator-=(const SpreadsheetCell& rhs);
SpreadsheetCell& operator*=(const SpreadsheetCell& rhs);
SpreadsheetCell& operator/=(const SpreadsheetCell& rhs);
// Omitted for brevity
};
Here are the implementations:
SpreadsheetCell& SpreadsheetCell::operator+=(const SpreadsheetCell& rhs)
{
set(mValue + rhs.mValue); // Call set to update mValue and mString.
return *this;
}
SpreadsheetCell& SpreadsheetCell::operator-=(const SpreadsheetCell& rhs)
{
set(mValue - rhs.mValue); // Call set to update mValue and mString.
return *this;
}
SpreadsheetCell& SpreadsheetCell::operator*=(const SpreadsheetCell& rhs)
{
set(mValue * rhs.mValue); // Call set to update mValue and mString.
return *this;
}
SpreadsheetCell& SpreadsheetCell::operator/=(const SpreadsheetCell& rhs)
{
if (rhs.mValue == 0)
throw invalid_argument("Divide by zero.");
set(mValue / rhs.mValue); // Call set to update mValue and mString.
return *this;
}
The shorthand arithmetic operators are combinations of the basic arithmetic and the assignment operators. With the above definitions, you can now write code like this:
SpreadsheetCell myCell(4), aThirdCell(2);
aThirdCell -= myCell;
aThirdCell += 5.4;
You cannot, however, write code like this (which is a good thing!):
5.4 += aThirdCell;
Overloading Comparison Operators
The comparison operators, such as >, <, and ==, are another useful set of operators to define for your classes. Like the basic arithmetic operators, they should be global friend functions so that you can use implicit conversion on both the left-hand side and right-hand side of the operator. The comparison operators all return a bool. Of course, you can change the return type, but that’s not recommended. Here are the declarations and definitions:
class SpreadsheetCell
{
public:
// Omitted for brevity
friend bool operator==(const SpreadsheetCell& lhs,
const SpreadsheetCell& rhs);
friend bool operator<(const SpreadsheetCell& lhs,
const SpreadsheetCell& rhs);
friend bool operator>(const SpreadsheetCell& lhs,
const SpreadsheetCell& rhs);
friend bool operator!=(const SpreadsheetCell& lhs,
const SpreadsheetCell& rhs);
friend bool operator<=(const SpreadsheetCell& lhs,
const SpreadsheetCell& rhs);
friend bool operator>=(const SpreadsheetCell& lhs,
const SpreadsheetCell& rhs);
// Omitted for brevity
};
bool operator==(const SpreadsheetCell& lhs, const SpreadsheetCell& rhs)
{
return (lhs.mValue == rhs.mValue);
}
bool operator<(const SpreadsheetCell& lhs, const SpreadsheetCell& rhs)
{
return (lhs.mValue < rhs.mValue);
}
bool operator>(const SpreadsheetCell& lhs, const SpreadsheetCell& rhs)
{
return (lhs.mValue > rhs.mValue);
}
bool operator!=(const SpreadsheetCell& lhs, const SpreadsheetCell& rhs)
{
return (lhs.mValue != rhs.mValue);
}
bool operator<=(const SpreadsheetCell& lhs, const SpreadsheetCell& rhs)
{
return (lhs.mValue <= rhs.mValue);
}
bool operator>=(const SpreadsheetCell& lhs, const SpreadsheetCell& rhs)
{
return (lhs.mValue >= rhs.mValue);
}
NOTE The preceding overloaded operators are working with mValue, which is a double. Most of the time, performing equality or inequality tests on floating point values is not a good idea. You should use an epsilon test, but this falls outside the scope of this book.
In classes with more data members, it might be painful to compare each data member. However, once you’ve implemented == and <, you can write the rest of the comparison operators in terms of those two. For example, here is a definition of operator>= that usesoperator<:
bool operator>=(const SpreadsheetCell& lhs, const SpreadsheetCell& rhs)
{
return !(lhs < rhs);
}
The section on relational operators in Chapter 14 discusses a mechanism that automatically generates the operators !=, >, <=, and >= based on operator == and <.
You can use these operators to compare SpreadsheetCells to other SpreadsheetCells, and to doubles and ints:
if (myCell > aThirdCell || myCell < 10) {
cout << myCell.getValue() << endl;
}
Building Types with Operator Overloading
Many people find the syntax of operator overloading tricky and confusing, at least at first. The irony is that it’s supposed to make things simpler. As you’ve discovered, that doesn’t mean simpler for the person writing the class, but simpler for the person using the class. The point is to make your new classes as similar as possible to built-in types such as int and double: it’s easier to add objects using + than to remember whether the method name you should call is add() or sum().
NOTE Provide operator overloading as a service to clients of your class.
At this point, you might be wondering exactly which operators you can overload. The answer is “almost all of them — even some you’ve never heard of.” You have actually just scratched the surface: you’ve seen the assignment operator in the section on object life cycles, the basic arithmetic operators, the shorthand arithmetic operators, and the comparison operators. Overloading the stream insertion and extraction operators is also useful. In addition, there are some tricky, but interesting, things you can do with operator overloading that you might not anticipate at first. The STL uses operator overloading extensively. Chapter 14 explains how and when to overload the rest of the operators. Chapter 15 and later chapters cover the STL.
BUILDING STABLE INTERFACES
Now that you understand all the gory syntax of writing classes in C++, it helps to revisit the design principles from Chapters 5 and 6. Classes are the main unit of abstraction in C++. You should apply the principles of abstraction to your classes to separate the interface from the implementation as much as possible. Specifically, you should make all data members private and provide getter and setter methods for them. This is how the SpreadsheetCell class is implemented. mValue and mString are private; set(), getValue(), and getString() set and retrieve those values. That way you can keep mValue and mString in synch internally without worrying about clients delving in and changing those values.
Using Interface and Implementation Classes
Even with the preceding measures and the best design principles, the C++ language is fundamentally unfriendly to the principle of abstraction. The syntax requires you to combine your public interfaces and private (or protected) data members and methods together in one class definition, thereby exposing some of the internal implementation details of the class to its clients. The downside of this is that if you have to add new non-public methods or data members to your class, all the clients of the class have to be recompiled. This can become a burden in bigger projects.
The good news is that you can make your interfaces a lot cleaner and hide all implementation details, resulting in stable interfaces. The bad news is that it takes a bit of hacking. The basic principle is to define two classes for every class you want to write: the interface class and the implementation class. The implementation class is identical to the class you would have written if you were not taking this approach. The interface class presents public methods identical to those of the implementation class, but it only has one data member: a pointer to an implementation class object. This is called the pimpl idiom, or private implementation idiom. The interface class method implementations simply call the equivalent methods on the implementation class object. The result of this is that no matter how the implementation changes, it has no impact on the public interface class. This reduces the need for recompilation. None of the clients that use the interface class need to be recompiled if the implementation (and only the implementation) changes. Note that this idiom only works if the single data member is a pointer to the implementation class. If it would be a by-value data member, the clients would have to be recompiled when the definition of the implementation class changes.
To use this approach with the Spreadsheet class, simply rename the old Spreadsheet class to SpreadsheetImpl. Here is the new SpreadsheetImpl class (which is identical to the old Spreadsheet class, but with a different name):
#include "SpreadsheetCell.h"
class SpreadsheetApplication; // Forward declaration
class SpreadsheetImpl
{
public:
SpreadsheetImpl(const SpreadsheetApplication& theApp,
int inWidth = kMaxWidth, int inHeight = kMaxHeight);
SpreadsheetImpl(const SpreadsheetImpl& src);
~SpreadsheetImpl();
SpreadsheetImpl &operator=(const SpreadsheetImpl& rhs);
void setCellAt(int x, int y, const SpreadsheetCell& inCell);
SpreadsheetCell& getCellAt(int x, int y);
int getId() const;
static const int kMaxHeight = 100;
static const int kMaxWidth = 100;
private:
bool inRange(int val, int upper);
void copyFrom(const SpreadsheetImpl& src);
int mWidth, mHeight;
int mId;
SpreadsheetCell** mCells;
const SpreadsheetApplication& mTheApp;
static int sCounter;
};
Then define a new Spreadsheet class that looks like this:
#include "SpreadsheetCell.h"
#include <memory>
// Forward declarations
class SpreadsheetImpl;
class SpreadsheetApplication;
class Spreadsheet
{
public:
Spreadsheet(const SpreadsheetApplication& theApp, int inWidth,
int inHeight);
Spreadsheet(const SpreadsheetApplication& theApp);
Spreadsheet(const Spreadsheet& src);
~Spreadsheet();
Spreadsheet& operator=(const Spreadsheet& rhs);
void setCellAt(int x, int y, const SpreadsheetCell& inCell);
SpreadsheetCell& getCellAt(int x, int y);
int getId() const;
private:
std::unique_ptr<SpreadsheetImpl> mImpl;
};
This class now contains only one data member: a pointer to a SpreadsheetImpl. The public methods are identical to the old Spreadsheet with one exception: the Spreadsheet constructor with default arguments has been split into two constructors because the values for the default arguments were const members that are no longer in the Spreadsheet class. Instead, the SpreadsheetImpl class will provide the defaults.
The implementations of the Spreadsheet methods, such as setCellAt() and getCellAt(), just pass the request on to the underlying SpreadsheetImpl object:
void Spreadsheet::setCellAt(int x, int y, const SpreadsheetCell& inCell)
{
mImpl->setCellAt(x, y, inCell);
}
SpreadsheetCell& Spreadsheet::getCellAt(int x, int y)
{
return mImpl->getCellAt(x, y);
}
int Spreadsheet::getId() const
{
return mImpl->getId();
}
The constructors for the Spreadsheet must construct a new SpreadsheetImpl to do its work. Note that the SpreadsheetImpl class has only one constructor with default arguments. Both normal constructors in the Spreadsheet class call that constructor on the SpreadsheetImplclass:
Spreadsheet::Spreadsheet(const SpreadsheetApplication& theApp, int inWidth,
int inHeight)
{
mImpl = std::make_unique<SpreadsheetImpl>(theApp, inWidth, inHeight);
}
Spreadsheet::Spreadsheet(const SpreadsheetApplication& theApp)
{
mImpl = std::make_unique<SpreadsheetImpl>(theApp);
}
Spreadsheet::Spreadsheet(const Spreadsheet& src)
{
mImpl = std::make_unique<SpreadsheetImpl>(*src.mImpl);
}
Spreadsheet::~Spreadsheet()
{
}
The copy constructor looks a bit strange because it needs to copy the underlying SpreadsheetImpl from the source spreadsheet. Because the copy constructor takes a reference to a SpreadsheetImpl, not a pointer, you must dereference the mImpl pointer to get to the object itself so the constructor call can take its reference.
The Spreadsheet assignment operator must similarly pass on the assignment to the underlying SpreadsheetImpl:
Spreadsheet& Spreadsheet::operator=(const Spreadsheet& rhs)
{
*mImpl = *rhs.mImpl;
return *this;
}
The first line in the assignment operator looks a little strange. You might be tempted to write this line instead:
mImpl = rhs.mImpl; // Incorrect assignment!
That code will not compile. The type of the mImpl data member in this implementation is std::unique_ptr which doesn’t allow assignment. The Spreadsheet assignment operator needs to forward the call to the SpreadsheetImpl assignment operator, which only runs when you copy direct objects. By dereferencing the mImpl pointers, you force direct object assignment, which causes the assignment operator of SpreadsheetImpl to be called.
This technique to truly separate interface from implementation is powerful. Although a bit clumsy at first, once you get used to it you will find it natural to work with. However, it’s not common practice in most workplace environments, so you might find some resistance to trying it from your coworkers. The most compelling argument in favor of it is not the aesthetic one of splitting out the interface but the cost of a full rebuild if the implementation of the class changes. A full rebuild on a huge project might take hours. With stable interface classes, rebuild time is reduced.
SUMMARY
This chapter, along with Chapter 7, provided all the tools you need to write solid, well-designed classes, and to use objects effectively.
You discovered that dynamic memory allocation in objects presents new challenges: you must free the memory in the destructor, copy the memory in the copy constructor, and both free and copy the memory in the assignment operator. You learned how to prevent assignment and pass-by-value by explicitly deleting the copy constructor and assignment operator.
You learned more about different kinds of data members, including static, const, const reference, and mutable members. You also learned about static, inline, and const methods, method overloading and default parameters. The chapter also described nested class definitions, and friend classes, functions and methods.
You encountered operator overloading, and learned how to overload the arithmetic and comparison operators, both as global friend functions and as class methods.
Finally, you learned how to take abstraction to an extreme by providing separate interface and implementation classes.
Now that you’re fluent in the language of object-oriented programming, it’s time to tackle inheritance, which is covered in Chapter 9.