Professional C++ (2014)
Part IIICoding the Professional Way
Chapter 9Discovering Inheritance Techniques
WHAT’S IN THIS CHAPTER?
· How to extend a class through inheritance
· How to employ inheritance to reuse code
· How to build interactions between base classes and derived classes
· How to use inheritance to achieve polymorphism
· How to work with multiple inheritance
· How to deal with unusual problems in inheritance
WROX.COM DOWNLOADS FOR THIS CHAPTER
Please note that all the code examples for this chapter are available as a part of this chapter’s code download on the book’s website at www.wrox.com/go/proc++3e on the Download Code tab.
Without inheritance, classes would simply be data structures with associated behaviors. That alone would be a powerful improvement over procedural languages, but inheritance adds an entirely new dimension. Through inheritance, you can build new classes based on existing ones. In this way, your classes become reusable and extensible components. This chapter will teach you the different ways to leverage the power of inheritance. You will learn about the specific syntax of inheritance as well as sophisticated techniques for making the most of inheritance.
The portion of this chapter relating to polymorphism draws heavily on the spreadsheet example discussed in Chapters 7 and 8. This chapter also refers to the object-oriented methodologies described in Chapter 5. If you have not read that chapter and are unfamiliar with the theories behind inheritance, you should review Chapter 5 before continuing.
BUILDING CLASSES WITH INHERITANCE
In Chapter 5, you learned that an “is-a” relationship recognizes the pattern that real-world objects tend to exist in hierarchies. In programming, that pattern becomes relevant when you need to write a class that builds on, or slightly changes, another class. One way to accomplish this aim is to copy code from one class and paste it into the other. By changing the relevant parts or amending the code, you can achieve the goal of creating a new class that is slightly different from the original. This approach, however, leaves an OOP programmer feeling sullen and slightly annoyed for the following reasons:
· A bug fix to the original class will not be reflected in the new class because the two classes contain completely separate code.
· The compiler does not know about any relationship between the two classes, so they are not polymorphic — they are not just different variations on the same thing.
· This approach does not build a true is-a relationship. The new class is very similar to the original because it shares code, not because it really is the same type of object.
· The original code might not be obtainable. It may exist only in a precompiled binary format, so copying and pasting the code might be impossible.
Not surprisingly, C++ provides built-in support for defining a true is-a relationship. The characteristics of C++ is-a relationships are described in the following section.
Extending Classes
When you write a class definition in C++, you can tell the compiler that your class is inheriting from, or extending, an existing class. By doing so, your class will automatically contain the data members and methods of the original class, which is called the parent class or base class or superclass. Extending an existing class gives your class (which is now called a derived class or a subclass) the ability to describe only the ways in which it is different from the parent class.
To extend a class in C++, you specify the class you are extending when you write the class definition. To show the syntax for inheritance, I use two classes called Super and Sub. Don’t worry — more interesting examples are coming later. To begin, consider the following definition for the Super class:
class Super
{
public:
Super();
void someMethod();
protected:
int mProtectedInt;
private:
int mPrivateInt;
};
If you wanted to build a new class, called Sub, which inherits from Super, you would tell the compiler that Sub derives from Super with the following syntax:
class Sub : public Super
{
public:
Sub();
void someOtherMethod();
};
Sub itself is a full-fledged class that just happens to share the characteristics of the Super class. Don’t worry about the word public for now — its meaning is explained later in this chapter. Figure 9-1 shows the simple relationship between Sub and Super. You can declare objects of type Sub just like any other object. You could even define a third class that inherits from Sub, forming a chain of classes, as shown in Figure 9-2.
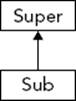
FIGURE 9-1
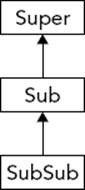
FIGURE 9-2
Sub doesn’t have to be the only derived class of Super. Additional classes can also derive from Super, effectively becoming siblings to Sub, as shown in Figure 9-3.
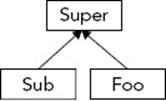
FIGURE 9-3
A Client’s View of Inheritance
To a client, or another part of your code, an object of type Sub is also an object of type Super because Sub inherits from Super. This means that all the public methods and data members of Super and all the public methods and data members of Sub are available.
Code that uses the derived class does not need to know which class in your inheritance chain has defined a method in order to call it. For example, the following code calls two methods of a Sub object even though one of the methods was defined by the Super class:
Sub mySub;
mySub.someMethod();
mySub.someOtherMethod();
It is important to understand that inheritance works in only one direction. The Sub class has a very clearly defined relationship to the Super class, but the Super class, as written, doesn’t know anything about the Sub class. That means that objects of type Super do not support public methods and data members of Sub because Super is not a Sub.
The following code will not compile because the Super class does not contain a public method called someOtherMethod():
Super mySuper;
mySuper.someOtherMethod(); // Error! Super doesn't have a someOtherMethod().
NOTE From the perspective of other code, an object belongs to its defined class as well as to any base classes.
A pointer or reference to an object can refer to an object of the declared class or any of its derived classes. This tricky subject is explained in detail later in this chapter. The concept to understand at this point is that a pointer to a Super can actually be pointing to a Subobject. The same is true for a reference. The client can still access only the methods and data members that exist in Super, but through this mechanism, any code that operates on a Super can also operate on a Sub.
For example, the following code compiles and works just fine even though it initially appears that there is a type mismatch:
Super* superPointer = new Sub(); // Create sub, store it in super pointer.
However, you cannot call methods from the Sub class through the Super pointer. The following will not work:
superPointer->someOtherMethod();
This will be flagged as an error by the compiler, because, although the object is of type Sub and therefore does have someOtherMethod() defined, the compiler can only think of it as type Super which does not have someOtherMethod() defined.
A Derived Class’s View of Inheritance
To the derived class itself, nothing much has changed in terms of how it is written or how it behaves. You can still define methods and data members on a derived class just as you would on a regular class. The previous definition of Sub declares a method calledsomeOtherMethod(). Thus, the Sub class augments the Super class by adding an additional method.
A derived class can access public and protected methods and data members declared in its base class as though they were its own, because technically, they are. For example, the implementation of someOtherMethod() on Sub could make use of the data membermProtectedInt, which was declared as part of Super. The following code shows this implementation. Accessing a base class data member or method is no different than if the data member or method were declared as part of the derived class.
void Sub::someOtherMethod()
{
cout << "I can access base class data member mProtectedInt." << endl;
cout << "Its value is " << mProtectedInt << endl;
}
When access specifiers (public, private, and protected) were introduced in Chapter 7, the difference between private and protected may have been confusing. Now that you understand derived classes, the difference should be clear. If a class declares methods or data members as protected, derived classes have access to them. If they are declared as private, derived classes do not have access.
The following implementation of someOtherMethod() will not compile because the derived class attempts to access a private data member from the base class.
void Sub::someOtherMethod()
{
cout << "I can access base class data member mProtectedInt." << endl;
cout << "Its value is " << mProtectedInt << endl;
cout << "The value of mPrivateInt is " << mPrivateInt << endl; // Error!
}
The private access specifier gives you control over how a potential derived class could interact with your class. I recommend that you make all your data members private by default. You can provide public getters and setters if you want to allow anyone to access those data members, and you can provide protected getters and setters if you only want derived classes to access them. The reason to make data members private by default is that this provides the highest level of encapsulation. This means that you can change how you represent your data while keeping the public and protected interface unchanged. Without giving direct access to data members, you can also easily add checks on the input data in your public and protected setters. Methods should also be private by default. Only make those methods public that are designed to be public, and make methods protected if you only want derived classes to have access to them.
NOTE From the perspective of a derived class, all public and protected data members and methods from the base class are available for use.
Preventing Inheritance
C++ allows you to mark a class as final, which means trying to inherit from it will result in a compiler error. A class can be marked as final with the final keyword right behind the name of the class. For example, the following Super class is marked as final:
class Super final
{
// Omitted for brevity
};
The following Sub class tries to inherit from the Super class, but this will result in a compiler error because Super is marked as final.
class Sub : public Super
{
// Omitted for brevity
};
Overriding Methods
The main reasons to inherit from a class are to add or replace functionality. The definition of Sub adds functionality to its parent class by providing an additional method, someOtherMethod(). The other method, someMethod(), is inherited from Super and behaves in the derived class exactly as it does in the base class. In many cases, you will want to modify the behavior of a class by replacing, or overriding, a method.
How I Learned to Stop Worrying and Make Everything virtual
There is one small twist to overriding methods in C++ and it has to do with the keyword virtual. Only methods that are declared as virtual in the base class can be overridden properly by derived classes. The keyword goes at the beginning of a method declaration as shown in the modified version of Super that follows:
class Super
{
public:
Super();
virtual void someMethod();
protected:
int mProtectedInt;
private:
int mPrivateInt;
};
The virtual keyword has a few subtleties and is often cited as a poorly designed part of the language. A good rule of thumb is to just make all of your methods virtual. That way, you won’t have to worry about whether or not overriding the method will work. The only drawback is a very tiny performance hit. The subtleties of the virtual keyword are covered toward the end of this chapter, and performance is discussed further in Chapter 25.
Even though it is unlikely that the Sub class will be extended, it is a good idea to make its methods virtual as well, just in case.
class Sub : public Super
{
public:
Sub();
virtual void someOtherMethod();
};
NOTE As a rule of thumb, make all your methods virtual (including the destructor, but not constructors) to avoid problems associated with omission of the virtual keyword.
Syntax for Overriding a Method
To override a method, you redeclare it in the derived class definition exactly as it was declared in the base class. In the derived class’s implementation file, you provide the new definition.
For example, the Super class contains a method called someMethod(). The definition of someMethod() is provided in Super.cpp and shown here:
void Super::someMethod()
{
cout << "This is Super's version of someMethod()." << endl;
}
Note that you do not repeat the virtual keyword in front of the method definition.
If you wish to provide a new definition for someMethod() in the Sub class, you must first add it to the class definition for Sub, as follows:
class Sub : public Super
{
public:
Sub();
virtual void someMethod() override; // Overrides Super's someMethod()
virtual void someOtherMethod();
};
It is recommended to add the override keyword to the end of overriding method declarations. A more detailed discussion of the override keyword comes later in this chapter. The new definition of someMethod() is specified along with the rest of Sub’s methods in Sub.cpp.
void Sub::someMethod()
{
cout << "This is Sub's version of someMethod()." << endl;
}
Once a method or destructor is marked as virtual, it will be virtual for all derived classes even if the virtual keyword is removed from derived classes. For example, in the following Sub class, someMethod() is still virtual and can still be overridden by derived classes ofSub, because it was marked as virtual in the Super class.
class Sub : public Super
{
public:
Sub();
void someMethod() override; // Overrides Super's someMethod()
};
A Client’s View of Overridden Methods
With the preceding changes, other code would still call someMethod() the same way it did before. Just as before, the method could be called on an object of class Super or an object of class Sub. Now, however, the behavior of someMethod() will vary based on the class of the object.
For example, the following code works just as it did before, calling Super’s version of someMethod():
Super mySuper;
mySuper.someMethod(); // Calls Super's version of someMethod().
The output of this code is:
This is Super's version of someMethod().
If the code declares an object of class Sub, the other version will automatically be called:
Sub mySub;
mySub.someMethod(); // Calls Sub's version of someMethod()
The output this time is:
This is Sub's version of someMethod().
Everything else about objects of class Sub remains the same. Other methods that might have been inherited from Super will still have the definition provided by Super unless they are explicitly overridden in Sub.
As you learned earlier, a pointer or reference can refer to an object of a class or any of its derived classes. The object itself “knows” the class of which it is actually a member, so the appropriate method is called as long as it was declared virtual. For example, if you have a Super reference that refers to an object that is really a Sub, calling someMethod() will actually call the derived class’s version, as shown next. This aspect of overriding will not work properly if you omit the virtual keyword in the base class.
Sub mySub;
Super& ref = mySub;
ref.someMethod(); // Calls Sub's version of someMethod()
Remember that even though a base class reference or pointer knows that it is actually a derived class, you cannot access derived class methods or members that are not defined in the base class. The following code will not compile because a Super reference does not have a method called someOtherMethod():
Sub mySub;
Super& ref = mySub;
mySub.someOtherMethod(); // This is fine.
ref.someOtherMethod(); // Error
The derived class knowledge characteristic is not true for nonpointer nonreference objects. You can cast or assign a Sub to a Super because a Sub is a Super. However, the object will lose any knowledge of the derived class at this point:
Sub mySub;
Super assignedObject = mySub; // Assigns a Sub to a Super.
assignedObject.someMethod(); // Calls Super's version of someMethod()
One way to remember this seemingly strange behavior is to imagine what the objects look like in memory. Picture a Super object as a box taking up a certain amount of memory. A Sub object is a box that is a little bit bigger because it has everything a Super has plus a bit more. When you have a reference or pointer to a Sub, the box doesn’t change — you just have a new way of accessing it. However, when you cast a Sub into a Super, you are throwing out all the “uniqueness” of the Sub class to fit it into a smaller box.
NOTE Derived classes retain their overridden methods when referred to by base class pointers or references. They lose their uniqueness when cast to a base class object. The loss of overridden methods and derived class data is called slicing.
Preventing Overriding
C++ allows you to mark a method as final which means that the method cannot be overridden in a derived class. Trying to override a final method will result in a compiler error. Take the following Super class:
class Super
{
public:
Super();
virtual void someMethod() final;
};
Trying to override someMethod(), as in the following Sub class, will result in a compiler error because someMethod() is marked as final in the Super class.
class Sub : public Super
{
public:
Sub();
virtual void someMethod() override; // Error
virtual void someOtherMethod();
};
INHERITANCE FOR REUSE
Now that you are familiar with the basic syntax for inheritance, it’s time to explore one of the main reasons that inheritance is an important feature of the C++ language. Inheritance is a vehicle that allows you to leverage existing code. This section presents an example of inheritance for the purpose of code reuse.
The WeatherPrediction Class
Imagine that you are given the task of writing a program to issue simple weather predictions, working with both Fahrenheit and Celsius. Weather predictions may be a little out of your area of expertise as a programmer, so you obtain a third-party class library that was written to make weather predictions based on the current temperature and the present distance between Jupiter and Mars (hey, it’s plausible). This third-party package is distributed as a compiled library to protect the intellectual property of the prediction algorithms, but you do get to see the class definition. The class definition for WeatherPrediction is as follows:
// Predicts the weather using proven new-age techniques given the current
// temperature and the distance from Jupiter to Mars. If these values are
// not provided, a guess is still given but it's only 99% accurate.
class WeatherPrediction
{
public:
// Virtual destructor
virtual ~WeatherPrediction();
// Sets the current temperature in fahrenheit
virtual void setCurrentTempFahrenheit(int inTemp);
// Sets the current distance between Jupiter and Mars
virtual void setPositionOfJupiter(int inDistanceFromMars);
// Gets the prediction for tomorrow's temperature
virtual int getTomorrowTempFahrenheit() const;
// Gets the probability of rain tomorrow. 1 means
// definite rain. 0 means no chance of rain.
virtual double getChanceOfRain() const;
// Displays the result to the user in this format:
// Result: x.xx chance. Temp. xx
virtual void showResult() const;
// Returns string representation of the temperature
virtual std::string getTemperature() const;
private:
int mCurrentTempFahrenheit;
int mDistanceFromMars;
};
Note that this class marks all methods as virtual, because the class presumes that its methods might be overridden in a derived class.
This class solves most of the problems for your program. However, as is usually the case, it’s not exactly right for your needs. First, all the temperatures are given in Fahrenheit. Your program needs to operate in Celsius as well. Also, the showResult() method might not display the result in a way you require.
Adding Functionality in a Derived Class
When you learned about inheritance in Chapter 5, adding functionality was the first technique described. Fundamentally, your program needs something just like the WeatherPrediction class but with a few extra bells and whistles. Sounds like a good case for inheritance to reuse code. To begin, define a new class, MyWeatherPrediction, that inherits from WeatherPrediction.
#include "WeatherPrediction.h"
class MyWeatherPrediction : public WeatherPrediction
{
};
The preceding class definition will compile just fine. The MyWeatherPrediction class can already be used in place of WeatherPrediction. It will provide the same functionality, but nothing new yet. For the first modification, you might want to add knowledge of the Celsius scale to the class. There is a bit of a quandary here because you don’t know what the class is doing internally. If all of the internal calculations are made by using Fahrenheit, how do you add support for Celsius? One way is to use the derived class to act as a go-between, interfacing between the user, who can use either scale, and the base class, which only understands Fahrenheit.
The first step in supporting Celsius is to add new methods that allow clients to set the current temperature in Celsius instead of Fahrenheit and to get tomorrow’s prediction in Celsius instead of Fahrenheit. You will also need private helper methods that convert between Celsius and Fahrenheit. These methods can be static because they are the same for all instances of the class.
#include "WeatherPrediction.h"
class MyWeatherPrediction : public WeatherPrediction
{
public:
virtual void setCurrentTempCelsius(int inTemp);
virtual int getTomorrowTempCelsius() const;
private:
static int convertCelsiusToFahrenheit(int inCelsius);
static int convertFahrenheitToCelsius(int inFahrenheit);
};
The new methods follow the same naming convention as the parent class. Remember that from the point of view of other code, a MyWeatherPrediction object will have all of the functionality defined in both MyWeatherPrediction and WeatherPrediction. Adopting the parent class’s naming convention presents a consistent interface.
The implementation of the Celsius/Fahrenheit conversion methods is left as an exercise for the reader — and a fun one at that! The other two methods are more interesting. To set the current temperature in Celsius, you need to convert the temperature first and then present it to the parent class in units that it understands.
void MyWeatherPrediction::setCurrentTempCelsius(int inTemp)
{
int fahrenheitTemp = convertCelsiusToFahrenheit(inTemp);
setCurrentTempFahrenheit(fahrenheitTemp);
}
As you can see, once the temperature is converted, the method calls the existing functionality from the base class. Similarly, the implementation of getTomorrowTempCelsius() uses the parent’s existing functionality to get the temperature in Fahrenheit, but converts the result before returning it.
int MyWeatherPrediction::getTomorrowTempCelsius() const
{
int fahrenheitTemp = getTomorrowTempFahrenheit();
return convertFahrenheitToCelsius(fahrenheitTemp);
}
The two new methods effectively reuse the parent class because they “wrap” the existing functionality in a way that provides a new interface for using it.
You can also add new functionality completely unrelated to existing functionality of the parent class. For example, you could add a method that will retrieve alternative forecasts from the Internet or a method that will suggest an activity based on the predicted weather.
Replacing Functionality in a Derived Class
The other major technique for inheritance is replacing existing functionality. The showResult() method in the WeatherPrediction class is in dire need of a facelift. MyWeatherPrediction can override this method to replace the behavior with its own implementation.
The new class definition for MyWeatherPrediction is as follows:
#include "WeatherPrediction.h"
class MyWeatherPrediction : public WeatherPrediction
{
public:
virtual void setCurrentTempCelsius(int inTemp);
virtual int getTomorrowTempCelsius() const;
virtual void showResult() const override;
private:
static int convertCelsiusToFahrenheit(int inCelsius);
static int convertFahrenheitToCelsius(int inFahrenheit);
};
A possible new user-friendly implementation follows:
void MyWeatherPrediction::showResult() const
{
cout << "Tomorrow's temperature will be " <<
getTomorrowTempCelsius() << " degrees Celsius (" <<
getTomorrowTempFahrenheit() << " degrees Fahrenheit)" << endl;
cout << "Chance of rain is " << (getChanceOfRain() * 100) << " percent"
<< endl;
if (getChanceOfRain() > 0.5) {
cout << "Bring an umbrella!" << endl;
}
}
To clients using this class, it’s as if the old version of showResult() never existed. As long as the object is a MyWeatherPrediction object, the new version will be called.
As a result of these changes, MyWeatherPrediction has emerged as a new class with new functionality tailored to a more specific purpose. Yet, it did not require much code because it leveraged its base class’s existing functionality.
RESPECT YOUR PARENTS
When you write a derived class, you need to be aware of the interaction between parent classes and child classes. Issues such as order of creation, constructor chaining, and casting are all potential sources of bugs.
Parent Constructors
Objects don’t spring to life all at once; they must be constructed along with their parents and any objects that are contained within them. C++ defines the creation order as follows:
1. If the class has a base class, the default constructor of the base class is executed, unless there is a call to a base class constructor in the ctor-initializer in which case that constructor is called instead of the default constructor.
2. Non-static data members of the class are constructed in the order in which they are declared.
3. The body of the class’s constructor is executed.
These rules can apply recursively. If the class has a grandparent, the grandparent is initialized before the parent, and so on. The following code shows this creation order. As a reminder, I generally advise against implementing methods directly in a class definition, as I’ve done in the code that follows. In the interest of readable and concise examples, I have broken my own rule. The proper execution will output the result 123.
class Something
{
public:
Something() { cout << "2"; }
};
class Parent
{
public:
Parent() { cout << "1"; }
};
class Child : public Parent
{
public:
Child() { cout << "3"; }
private:
Something mDataMember;
};
int main()
{
Child myChild;
return 0;
}
When the myChild object is created, the constructor for Parent is called first, outputting the string "1". Next, mDataMember is initialized, calling the Something constructor, which outputs the string "2". Finally, the Child constructor is called, which outputs "3".
Note that the Parent constructor was called automatically. C++ will automatically call the default constructor for the parent class if one exists. If no default constructor exists in the parent class, or if one does exist but you wish to use an alternate constructor, you can chain the constructor just as when initializing data members in the constructor initializer.
The following code shows a version of Super that lacks a default constructor. The associated version of Sub must explicitly tell the compiler how to call the Super constructor or the code will not compile.
class Super
{
public:
Super(int i);
};
class Sub : public Super
{
public:
Sub();
};
Sub::Sub() : Super(7)
{
// Do Sub's other initialization here.
}
In the preceding code, the Sub constructor passes a fixed value (7) to the Super constructor. Sub could also pass a variable if its constructor required an argument:
Sub::Sub(int i) : Super(i) {}
Passing constructor arguments from the derived class to the base class is perfectly fine and quite normal. Passing data members, however, will not work. The code will compile, but remember that data members are not initialized until after the base class is constructed. If you pass a data member as an argument to the parent constructor, it will be uninitialized.
WARNING Virtual methods behave differently in constructors. If your derived class has overridden a virtual method from the base class, calling that method from a base class constructor will call the base class implementation of that virtual method and not your overridden version in the derived class.
Parent Destructors
Because destructors cannot take arguments, the language can always automatically call the destructor for parent classes. The order of destruction is conveniently the reverse of the order of construction:
1. The body of the class’s destructor is called.
2. Any data members of the class are destroyed in the reverse order of their construction.
3. The parent class, if any, is destructed.
Again, these rules apply recursively. The lowest member of the chain is always destructed first. The following code adds destructors to the previous example. The destructors are all declared virtual, which is very important and will be discussed right after this example. If executed, this code will output "123321".
class Something
{
public:
Something() { cout << "2"; }
virtual ~Something() { cout << "2"; }
};
class Parent
{
public:
Parent() { cout << "1"; }
virtual ~Parent() { cout << "1"; }
};
class Child : public Parent
{
public:
Child() { cout << "3"; }
virtual ~Child() { cout << "3"; }
private:
Something mDataMember;
};
int main()
{
Child myChild;
return 0;
}
Notice that the destructors are all virtual. As a rule of thumb, all destructors should be declared virtual. If the preceding destructors were not declared virtual, the code would continue to work fine. However, if code ever called delete on a base class pointer that was really pointing to a derived class, the destruction chain would begin in the wrong place. For example, the following code is similar to the previous example but the destructors are not virtual. This becomes a problem when a Child object is accessed as a pointer to aParent and deleted.
class Something
{
public:
Something() { cout << "2"; }
~Something() { cout << "2"; } // Should be virtual, but will work
};
class Parent
{
public:
Parent() { cout << "1"; }
~Parent() { cout << "1"; } // BUG! Make this virtual!
};
class Child : public Parent
{
public:
Child() { cout << "3"; }
~Child() { cout << "3"; } // Should be virtual, but will work
private:
Something mDataMember;
};
int main()
{
Parent* ptr = new Child();
delete ptr;
return 0;
}
The output of this code is a shockingly terse "1231". When the ptr variable is deleted, only the Parent destructor is called because the destructor was not declared virtual. As a result, the Child destructor is not called and the destructors for its data members are not called.
Technically, you could fix the preceding problem by making the Parent destructor virtual. The “virtualness” would automatically be used by any children. However, I advocate explicitly making all destructors virtual so that you never have to worry about it.
WARNING Always make your destructors virtual! The compiler generated default destructor is not virtual, so you should define your own virtual destructor, at least for your parent classes.
WARNING Just as with constructors, virtual methods behave differently when called from a destructor. If your derived class has overridden a virtual method from the base class, calling that method from the base class destructor will call the base class implementation of that virtual method and not your overridden version in the derived class.
Referring to Parent Names
When you override a method in a derived class, you are effectively replacing the original as far as other code is concerned. However, that parent version of the method still exists and you may want to make use of it. For example, an overridden method would like to keep doing what the base class implementation does, plus something else. Take a look at the getTemperature() method in the WeatherPrediction class that returns a string representation of the current temperature.
class WeatherPrediction
{
public:
virtual std::string getTemperature() const;
// Omitted for brevity
};
You can override this method in the MyWeatherPrediction class as follows:
class MyWeatherPrediction : public WeatherPrediction
{
public:
virtual std::string getTemperature() const override;
// Omitted for brevity
};
Suppose the derived class wants to add °F to the string by first calling the base class getTemperature() method and then adding °F to the string. You might want to try to write this as follows:
string MyWeatherPrediction::getTemperature() const
{
// Note: \u00B0 is the ISO/IEC 10646 representation of the degree symbol.
return getTemperature() + "\u00B0F"; // BUG
}
However, this will not work because, under the rules of name resolution for C++, it first resolves against the local scope, then the class scope, and as a consequence will end up calling MyWeatherPrediction::getTemperature(). This will result in an infinite recursion until you run out of stack space (some compilers detect this error and report it at compile time).
To make this work, you need to use the scope resolution operator as follows:
string MyWeatherPrediction::getTemperature() const
{
// Note: \u00B0 is the ISO/IEC 10646 representation of the degree symbol.
return WeatherPrediction::getTemperature() + "\u00B0F";
}
NOTE Microsoft Visual C++ supports the __super keyword (with two underscores). This allows you to write the following:
return __super::getTemperature() + "\u00B0F";
Calling the parent version of the current method is a commonly used pattern in C++. If you have a chain of derived classes, each might want to perform the operation already defined by the base class but add their own additional functionality as well.
As another example, imagine a class hierarchy of types of books. A diagram showing such a hierarchy is shown in Figure 9-4.
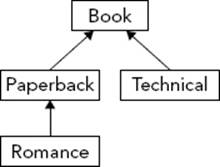
FIGURE 9-4
Since each lower class in the hierarchy further specifies the type of book, a method that gets the description of a book really needs to take all levels of the hierarchy into consideration. This can be accomplished by chaining to the parent method. The following code illustrates this pattern. The code also defines a virtual getHeight() method, discussed further after the example.
class Book
{
public:
virtual ~Book() {}
virtual string getDescription() const { return "Book"; }
virtual int getHeight() const { return 120; }
};
class Paperback : public Book
{
public:
virtual string getDescription() const override {
return "Paperback " + Book::getDescription();
}
};
class Romance : public Paperback
{
public:
virtual string getDescription() const override {
return "Romance " + Paperback::getDescription();
}
virtual int getHeight() const override {
return Paperback::getHeight() / 2; }
};
class Technical : public Book
{
public:
virtual string getDescription() const override {
return "Technical " + Book::getDescription();
}
};
int main()
{
Romance novel;
Book book;
cout << novel.getDescription() << endl; // Outputs "Romance Paperback Book"
cout << book.getDescription() << endl; // Outputs "Book"
cout << novel.getHeight() << endl; // Outputs "60"
cout << book.getHeight() << endl; // Outputs "120"
return 0;
}
The Book class defines a virtual getHeight() method, returning 120. Only the Romance class overrides this by calling getHeight() on its parent class (Paperback) and dividing the result by two as follows:
virtual int getHeight() const override { return Paperback::getHeight() / 2; }
However, Paperback does not override getHeight(), so C++ will walk up the class hierarchy to find a class that implements getHeight(). In the preceding example, Paperback::getHeight() will resolve to Book::getHeight().
Casting Up and Down
As you have already seen, an object can be cast or assigned to its parent class. If the cast or assignment is performed on a plain old object, this results in slicing:
Super mySuper = mySub; // SLICE!
Slicing occurs in situations like this because the end result is a Super object, and Super objects lack the additional functionality defined in the Sub class. However, slicing does not occur if a derived class is assigned to a pointer or reference to its base class:
Super& mySuper = mySub; // No slice!
This is generally the correct way to refer to a derived class in terms of its base class, also called upcasting. This is why it’s always a good idea to make your methods and functions take references to classes instead of directly using objects of those classes. By using references, derived classes can be passed in without slicing.
WARNING When upcasting, use a pointer or reference to the base class to avoid slicing.
Casting from a base class to one of its derived classes, also called downcasting, is often frowned upon by professional C++ programmers because there is no guarantee that the object really belongs to that derived class, and because downcasting is a sign of bad design. For example, consider the following code:
void presumptuous(Super* inSuper)
{
Sub* mySub = static_cast<Sub*>(inSuper);
// Proceed to access Sub methods on mySub.
}
If the author of presumptuous() also wrote code that called presumptuous(), everything would probably be okay because the author knows that the function expects the argument to be of type Sub*. However, if other programmers were to call presumptuous(), they might pass in a Super*. There are no compile-time checks that can be done to enforce the type of the argument, and the function blindly assumes that inSuper is actually a pointer to a Sub.
Downcasting is sometimes necessary, and you can use it effectively in controlled circumstances. If you’re going to downcast, however, you should use a dynamic_cast, which uses the object’s built-in knowledge of its type to refuse a cast that doesn’t make sense. If adynamic_cast fails on a pointer, the pointer’s value will be nullptr instead of pointing to nonsensical data. If a dynamic_cast fails on an object reference, a std::bad_cast exception will be thrown. Chapter 10 discusses casting in more detail.
The previous example should have been written as follows:
void lessPresumptuous(Super* inSuper)
{
Sub* mySub = dynamic_cast<Sub*>(inSuper);
if (mySub != nullptr) {
// Proceed to access Sub methods on mySub.
}
}
WARNING Use downcasting only when necessary and be sure to use a dynamic_cast.
INHERITANCE FOR POLYMORPHISM
Now that you understand the relationship between a derived class and its parent, you can use inheritance in its most powerful scenario — polymorphism. Chapter 5 discusses how polymorphism allows you to use objects with a common parent class interchangeably, and to use objects in place of their parents.
Return of the Spreadsheet
Chapters 7 and 8 use a spreadsheet program as an example of an application that lends itself to an object-oriented design. A SpreadsheetCell represents a single element of data. That element could be either a double or a string. A simplified class definition forSpreadsheetCell follows. Note that a cell can be set either as a double or a string. The current value of the cell, however, is always returned as a string for this example.
class SpreadsheetCell
{
public:
SpreadsheetCell();
virtual void set(double inDouble);
virtual void set(const std::string& inString);
virtual std::string getString() const;
private:
static std::string doubleToString(double inValue);
static double stringToDouble(const std::string& inString);
double mValue;
std::string mString;
};
The preceding SpreadsheetCell class seems to be having an identity crisis — sometimes a cell represents a double, sometimes a string. Sometimes it has to convert between these formats. To achieve this duality, the class needs to store both values even though a given cell should be able to contain only a single value. Worse still, what if additional types of cells are needed, such as a formula cell or a date cell? The SpreadsheetCell class would grow dramatically to support all of these data types and the conversions between them.
Designing the Polymorphic Spreadsheet Cell
The SpreadsheetCell class is screaming out for a hierarchical makeover. A reasonable approach would be to narrow the scope of the SpreadsheetCell to cover only strings, perhaps renaming it StringSpreadsheetCell in the process. To handle doubles, a second class,DoubleSpreadsheetCell, would inherit from the StringSpreadsheetCell and provide functionality specific to its own format. Figure 9-5 illustrates such a design. This approach models inheritance for reuse since the DoubleSpreadsheetCell would only be deriving fromStringSpreadsheetCell to make use of some of its built-in functionality.
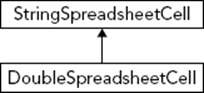
FIGURE 9-5
If you were to implement the design shown in Figure 9-5, you might discover that the derived class would override most, if not all, of the functionality of the base class. Since doubles are treated differently from strings in almost all cases, the relationship may not be quite as it was originally understood. Yet, there clearly is a relationship between a cell containing strings and a cell containing doubles. Rather than using the model in Figure 9-5, which implies that somehow a DoubleSpreadsheetCell “is-a” StringSpreadsheetCell, a better design would make these classes peers with a common parent, SpreadsheetCell. Such a design is shown in Figure 9-6.
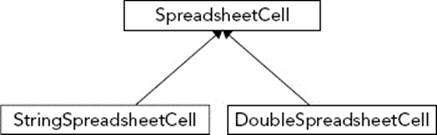
FIGURE 9-6
The design in Figure 9-6 shows a polymorphic approach to the SpreadsheetCell hierarchy. Since DoubleSpreadsheetCell and StringSpreadsheetCell both inherit from a common parent, SpreadsheetCell, they are interchangeable in the view of other code. In practical terms, that means:
· Both derived classes support the same interface (set of methods) defined by the base class.
· Code that makes use of SpreadsheetCell objects can call any method in the interface without even knowing whether the cell is a DoubleSpreadsheetCell or a StringSpreadsheetCell.
· Through the magic of virtual methods, the appropriate instance of every method in the interface will be called depending on the class of the object.
· Other data structures, such as the Spreadsheet class described in Chapter 8, can contain a collection of multityped cells by referring to the parent type.
The Spreadsheet Cell Base Class
Since all spreadsheet cells are deriving from the SpreadsheetCell base class, it is probably a good idea to write that class first. When designing a base class, you need to consider how the derived classes relate to each other. From this information, you can derive the commonality that will go inside the parent class. For example, string cells and double cells are similar in that they both contain a single piece of data. Since the data is coming from the user and will be displayed back to the user, the value is set as a string and retrieved as a string. These behaviors are the shared functionality that will make up the base class.
A First Attempt
The SpreadsheetCell base class is responsible for defining the behaviors that all SpreadsheetCell derived classes will support. In this example, all cells need to be able to set their value as a string. All cells also need to be able to return their current value as a string. The base class definition declares these methods, but note that it has no data members. The reason will be explained afterwards.
class SpreadsheetCell
{
public:
SpreadsheetCell();
virtual ~SpreadsheetCell();
virtual void set(const std::string& inString);
virtual std::string getString() const;
};
When you start writing the .cpp file for this class, you very quickly run into a problem. Since the base class of spreadsheet cell contains neither a double nor a string, how can you implement it? More generally, how do you write a parent class that declares the behaviors that are supported by derived classes without actually defining the implementation of those behaviors?
One possible approach is to implement “do nothing” functionality for those behaviors. For example, calling the set() method on the SpreadsheetCell base class will have no effect because the base class has nothing to set. This approach still doesn’t feel right, however. Ideally, there should never be an object that is an instance of the base class. Calling set() should always have an effect because it should always be called on either a DoubleSpreadsheetCell or a StringSpreadsheetCell. A good solution will enforce this constraint.
The preceding code declares a virtual destructor for the SpreadsheetCell class. If you don’t do this, the compiler will generate a default destructor for you but a non-virtual one. That means if you don’t declare the virtual destructor yourself, you might encounter problems with destruction of derived classes through pointers or references as explained earlier in this chapter.
Pure Virtual Methods and Abstract Base Classes
Pure virtual methods are methods that are explicitly undefined in the class definition. By making a method pure virtual, you are telling the compiler that no definition for the method exists in the current class. Thus, the class is said to be abstract because no other code will be able to instantiate it. The compiler enforces the fact that if a class contains one or more pure virtual methods, it can never be used to construct an object of that type.
There is a special syntax for designating a pure virtual method. The method declaration is followed by =0. No implementation needs to be written.
class SpreadsheetCell
{
public:
SpreadsheetCell();
virtual ~SpreadsheetCell();
virtual void set(const std::string& inString) = 0;
virtual std::string getString() const = 0;
};
Now that the base class is an abstract class, it is impossible to create a SpreadsheetCell object. The following code will not compile, and will give an error such as Cannot declare object of type 'SpreadsheetCell' because one or more virtual functions are abstract:
SpreadsheetCell cell; // Error! Attempts creating abstract class instance
However, the following code will compile:
SpreadsheetCell* ptr = nullptr;
This works because it will require instantiating a derived class of the abstract base class, for example:
ptr = new StringSpreadsheetCell();
NOTE An abstract class provides a way to prevent other code from instantiating an object directly, as opposed to one of its derived classes.
Base Class Source Code
There is not much code required for SpreadsheetCell.cpp. As the class was defined, most of the methods are pure virtual — there is no definition to give. All that is left is the constructor and destructor. For this example, the constructor is implemented just as a placeholder in case initialization needs to happen in the future. However, the virtual destructor is required because this is a base class.
SpreadsheetCell::SpreadsheetCell() { }
SpreadsheetCell::~SpreadsheetCell() { }
The Individual Derived Classes
Writing the StringSpreadsheetCell and DoubleSpreadsheetCell classes is just a matter of implementing the functionality that is defined in the parent. Because you want clients to be able to instantiate and work with string cells and double cells, the cells can’t be abstract — they must implement all of the pure virtual methods inherited from their parent. If a derived class does not implement all pure virtual methods from the base class, then the derived class will be abstract as well, and clients will not be able to instantiate objects of the derived class.
String Spreadsheet Cell Class Definition
The first step in writing the class definition of StringSpreadsheetCell is to inherit from SpreadsheetCell:
class StringSpreadsheetCell : public SpreadsheetCell
{
You want to initialize the data value of the StringSpreadsheetCell to “#NOVALUE” to indicate that the value has not been set. The compiler generated default constructor will call the default string constructor for mValue which will set the initial value to the empty string, “”. So, you need to provide an explicit default constructor and initialize the value yourself.
public:
StringSpreadsheetCell();
Next, the inherited pure virtual methods are overridden, this time without being set to zero:
virtual void set(const std::string& inString) override;
virtual std::string getString() const override;
Finally, the string cell adds a private data member, mValue, which stores the actual cell data:
private:
std::string mValue;
};
String Spreadsheet Cell Implementation
The .cpp file for StringSpreadsheetCell is a bit more interesting than the base class. In the constructor, mValue is initialized to a string that indicates that no value has been set.
StringSpreadsheetCell::StringSpreadsheetCell() : mValue("#NOVALUE") { }
The set method is straightforward since the internal representation is already a string. Similarly, the getString() method returns the stored value.
void StringSpreadsheetCell::set(const string& inString)
{
mValue = inString;
}
string StringSpreadsheetCell::getString() const
{
return mValue;
}
Double Spreadsheet Cell Class Definition and Implementation
The double version follows a similar pattern, but with different logic. In addition to the set() method that takes a string, it also provides a new set() method that allows a client to set the value with a double. Two new private methods are used to convert between astring and a double and vice versa. As in StringSpreadsheetCell, it has a data member called mValue, this time a double.
class DoubleSpreadsheetCell : public SpreadsheetCell
{
public:
DoubleSpreadsheetCell();
virtual void set(double inDouble);
virtual void set(const std::string& inString) override;
virtual std::string getString() const override;
private:
static std::string doubleToString(double inValue);
static double stringToDouble(const std::string& inValue);
double mValue;
};
The implementation of the DoubleSpreadsheetCell constructor is as follows.
DoubleSpreadsheetCell::DoubleSpreadsheetCell()
: mValue(std::numeric_limits<double>::quiet_NaN())
{
}
NOTE This implementation initializes mValue to std::numeric_limits<double>::quiet_NaN() where NaN stands for “Not a Number.” You need to include <limits> to use std::numeric_limits<>.
The set() method that takes a double is straightforward. The string version uses the private static method stringToDouble(). The getString() method converts the stored double value into a string:
void DoubleSpreadsheetCell::set(double inDouble)
{
mValue = inDouble;
}
void DoubleSpreadsheetCell::set(const string& inString)
{
mValue = stringToDouble(inString);
}
string DoubleSpreadsheetCell::getString() const
{
return doubleToString(mValue);
}
You may already see one major advantage of implementing spreadsheet cells in a hierarchy — the code is much simpler. You don’t need to worry about using two fields to represent the two types of data. Each object can be self-centered and only deal with its own functionality.
Note that the implementations of doubleToString() and stringToDouble() are omitted because they are the same as in Chapter 7.
Leveraging Polymorphism
Now that the SpreadsheetCell hierarchy is polymorphic, client code can take advantage of the many benefits that polymorphism has to offer. The following test program explores many of these features:
int main()
{
To demonstrate polymorphism, this test program declares a vector of three SpreadsheetCell pointers. Remember that since SpreadsheetCell is an abstract class, you can’t create objects of that type. However, you can still have a pointer or reference to a SpreadsheetCellbecause it would actually be pointing to one of the derived classes. This vector, because it is an vector of the parent type SpreadsheetCell, allows you to store a heterogeneous mixture of the two derived classes. This means that elements of the vector could be either aStringSpreadsheetCell or a DoubleSpreadsheetCell.
vector<unique_ptr<SpreadsheetCell>> cellArray;
The first element of the vector is set to point to a new StringSpreadsheetCell; the second is also set to a new StringSpreadsheetCell, and the third is a new DoubleSpreadsheetCell.
cellArray.push_back(make_unique<StringSpreadsheetCell>());
cellArray.push_back(make_unique<StringSpreadsheetCell>());
cellArray.push_back(make_unique<DoubleSpreadsheetCell>());
Now that the vector contains multityped data, any of the methods declared by the base class can be applied to the objects in the vector. The code just uses SpreadsheetCell pointers — the compiler has no idea at compile time what types the objects actually are. However, because they are inheriting from SpreadsheetCell, they must support the methods of SpreadsheetCell.
cellArray[0]->set("hello");
cellArray[1]->set("10");
cellArray[2]->set("18");
When the getString() method is called, each object properly returns a string representation of their value. The important, and somewhat amazing, thing to realize is that the different objects do this in different ways. A StringSpreadsheetCell will return its stored value. A DoubleSpreadsheetCell will first perform a conversion. As the programmer, you don’t need to know how the object does it — you just need to know that because the object is a SpreadsheetCell, it can perform this behavior.
cout << "Vector values are [" << cellArray[0]->getString() << "," <<
cellArray[1]->getString() << "," <<
cellArray[2]->getString() << "]" <<
endl;
return 0;
}
Future Considerations
The new implementation of the SpreadsheetCell hierarchy is certainly an improvement from an object-oriented design point of view. Yet, it would probably not suffice as an actual class hierarchy for a real-world spreadsheet program for several reasons.
First, despite the improved design, one feature of the original is still missing: the ability to convert from one cell type to another. By dividing them into two classes, the cell objects become more loosely integrated. To provide the ability to convert from aDoubleSpreadsheetCell to a StringSpreadsheetCell, you could add a typed constructor. It would have a similar appearance to a copy constructor but instead of a reference to an object of the same class, it would take a reference to an object of a sibling class.
class StringSpreadsheetCell : public SpreadsheetCell
{
public:
StringSpreadsheetCell();
StringSpreadsheetCell(const DoubleSpreadsheetCell& inDoubleCell);
// Omitted for brevity
};
With a typed constructor, you can easily create a StringSpreadsheetCell given a DoubleSpreadsheetCell. Don’t confuse this with casting, however. Casting from one sibling to another will not work, unless you overload the cast operator as described in Chapter 14.
WARNING You can always cast up the hierarchy, and you can sometimes cast down the hierarchy. Casting across the hierarchy is possible by changing the behavior of the cast operator, or by using reinterpret_cast<>, which is not recommended.
The question of how to implement overloaded operators for cells is an interesting one, and there are several possible solutions. One approach is to implement a version of each operator for every combination of cells. With only two derived classes, this is manageable. There would be an operator+ function to add two double cells, to add two string cells, and to add a double cell to a string cell. Another approach is to decide on a common representation. The preceding implementation already standardizes on a string as a common representation of sorts. A single operator+ function could cover all the cases by taking advantage of this common representation. One possible implementation, which assumes that the result of adding two cells is always a string cell, is as follows:
StringSpreadsheetCell operator+(const StringSpreadsheetCell& lhs,
const StringSpreadsheetCell& rhs)
{
StringSpreadsheetCell newCell;
newCell.set(lhs.getString() + rhs.getString());
return newCell;
}
As long as the compiler has a way to turn a particular cell into a StringSpreadsheetCell, the operator will work. Given the previous example of having a StringSpreadsheetCell constructor that takes a DoubleSpreadsheetCell as an argument, the compiler will automatically perform the conversion if it is the only way to get the operator+ to work. That means the following code will work, even though operator+ was explicitly written to work on StringSpreadsheetCells:
DoubleSpreadsheetCell myDbl;
myDbl.set(8.4);
StringSpreadsheetCell result = myDbl + myDbl;
Of course, the result of this addition won’t really add the numbers together. It will convert the double cells into string cells and add the strings, resulting in a StringSpreadsheetCell with a value of 8.48.4.
If you are still feeling a little unsure about polymorphism, start with the code for this example and try things out. The main() function in the preceding example is a great starting point for experimental code that simply exercises various aspects of the class.
MULTIPLE INHERITANCE
As you read in Chapter 5, multiple inheritance is often perceived as a complicated and unnecessary part of object-oriented programming. I’ll leave the decision of whether or not it is useful up to you and your coworkers. This section explains the mechanics of multiple inheritance in C++.
Inheriting from Multiple Classes
Defining a class to have multiple parent classes is very simple from a syntactic point of view. All you need to do is list the base classes individually when declaring the class name.
class Baz : public Foo, public Bar
{
// Etc.
};
By listing multiple parents, the Baz object will have the following characteristics:
· A Baz object will support the public methods and contain the data members of both Foo and Bar.
· The methods of the Baz class will have access to protected data and methods in both Foo and Bar.
· A Baz object can be upcast to either a Foo or a Bar.
· Creating a new Baz object will automatically call the Foo and Bar default constructors, in the order that the classes are listed in the class definition.
· Deleting a Baz object will automatically call the destructors for the Foo and Bar classes, in the reverse order that the classes are listed in the class definition.
The following example shows a class, DogBird, that has two parent classes — a Dog class and a Bird class. The fact that a dog-bird is a ridiculous example should not be viewed as a statement that multiple inheritance itself is ridiculous. Honestly, I leave that judgment up to you.
class Dog
{
public:
virtual void bark() { cout << "Woof!" << endl; }
};
class Bird
{
public:
virtual void chirp() { cout << "Chirp!" << endl; }
};
class DogBird : public Dog, public Bird
{
};
The class hierarchy for DogBird is shown in Figure 9-7.
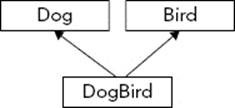
FIGURE 9-7
Using objects of classes with multiple parents is no different from using objects without multiple parents. In fact, the client code doesn’t even have to know that the class has two parents. All that really matters are the properties and behaviors supported by the class. In this case, a DogBird object supports all of the public methods of Dog and Bird.
DogBird myConfusedAnimal;
myConfusedAnimal.bark();
myConfusedAnimal.chirp();
The output of this program is as follows:
Woof!
Chirp!
Naming Collisions and Ambiguous Base Classes
It’s not difficult to construct a scenario where multiple inheritance would seem to break down. The following examples show some of the edge cases that must be considered:
Name Ambiguity
What if the Dog class and the Bird class both had a method called eat()? Since Dog and Bird are not related in any way, one version of the method does not override the other — they both continue to exist in the DogBird derived class.
As long as client code never attempts to call the eat() method, that is not a problem. The DogBird class will compile correctly despite having two versions of eat(). However, if client code attempts to call the eat() method on a DogBird, the compiler will give an error indicating that the call to eat() is ambiguous. The compiler will not know which version to call. The following code provokes this ambiguity error:
class Dog
{
public:
virtual void bark() { cout << "Woof!" << endl; }
virtual void eat() { cout << "The dog has eaten." << endl; }
};
class Bird
{
public:
virtual void chirp() { cout << "Chirp!" << endl; }
virtual void eat() { cout << "The bird has eaten." << endl; }
};
class DogBird : public Dog, public Bird
{
};
int main()
{
DogBird myConfusedAnimal;
myConfusedAnimal.eat(); // Error! Ambiguous call to method eat()
return 0;
}
The solution to the ambiguity is to either explicitly upcast the object, essentially hiding the undesired version of the method from the compiler, or to use a disambiguation syntax. For example, the following code shows two ways to invoke the Dog version of eat():
dynamic_cast<Dog&>(myConfusedAnimal).eat(); // Calls Dog::eat()
myConfusedAnimal.Dog::eat(); // Calls Dog::eat()
Methods of the derived class itself can also explicitly disambiguate between different methods of the same name by using the same syntax used to access parent methods, the :: operator. For example, the DogBird class could prevent ambiguity errors in other code by defining its own eat() method. Inside this method, it would determine which parent version to call.
void DogBird::eat()
{
Dog::eat(); // Explicitly call Dog's version of eat()
}
Yet another way to prevent the ambiguity error is to use a using statement to explicitly state which version of eat() should be inherited in DogBird. This is done in the following DogBird definition:
class DogBird : public Dog, public Bird
{
public:
using Dog::eat; // Explicitly inherit Dog's version of eat()
};
Another way to provoke ambiguity is to inherit from the same class twice. For example, if the Bird class inherited from Dog for some reason, the code for DogBird would not compile because Dog becomes an ambiguous base class.
class Dog {};
class Bird : public Dog {};
class DogBird : public Bird, public Dog {}; // Error! Dog is an ambiguous base class.
Most occurrences of ambiguous base classes are either contrived “what-if” examples, as in the preceding, or arise from untidy class hierarchies. Figure 9-8 shows a class diagram for the preceding example, indicating the ambiguity.
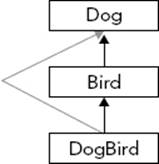
FIGURE 9-8
Ambiguity can also occur with data members. If Dog and Bird both had a data member with the same name, an ambiguity error would occur when client code attempted to access that member.
Ambiguous Base Classes
A more likely scenario is that multiple parents themselves have common parents. For example, perhaps both Bird and Dog are inheriting from an Animal class, as shown in Figure 9-9.
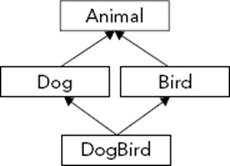
FIGURE 9-9
This type of class hierarchy is permitted in C++, though name ambiguity can still occur. For example, if the Animal class has a public method called sleep(), that method could not be called on a DogBird object because the compiler would not know whether to call the version inherited by Dog or by Bird.
The best way to use these “diamond-shaped” class hierarchies is to make the topmost class an abstract base class with all methods declared as pure virtual. Since the class only declares methods without providing definitions, there are no methods in the base class to call and thus there are no ambiguities at that level.
The following example implements a diamond-shaped class hierarchy with a pure virtual eat() method that must be defined by each derived class. The DogBird class still needs to be explicit about which parent’s eat() method it uses, but any ambiguity would be caused by Dog and Bird having the same method, not because they inherit from the same class.
class Animal
{
public:
virtual void eat() = 0;
};
class Dog : public Animal
{
public:
virtual void bark() { cout << "Woof!" << endl; }
virtual void eat() override { cout << "The dog has eaten." << endl; }
};
class Bird : public Animal
{
public:
virtual void chirp() { cout << "Chirp!" << endl; }
virtual void eat() override { cout << "The bird has eaten." << endl; }
};
class DogBird : public Dog, public Bird
{
public:
using Dog::eat;
};
A more refined mechanism for dealing with the top class in a diamond-shaped hierarchy, virtual base classes, is explained at the end of this chapter.
Uses for Multiple Inheritance
At this point, you’re probably wondering why programmers would want to tackle multiple inheritance in their code. The most straightforward use case for multiple inheritance is to define a class of objects that is-a something and also is-a something else. As was said in Chapter 5, any real-world objects you find that follow this pattern are unlikely to translate well into code.
One of the most compelling and simple uses of multiple inheritance is for the implementation of mixin classes. Mixin classes are explained in Chapter 5.
Another reason that people sometimes use multiple inheritance is to model a component-based class. Chapter 5 gave the example of an airplane simulator. The Airplane class has an engine, a fuselage, controls, and other components. While the typical implementation of an Airplane class would make each of these components a separate data member, you could use multiple inheritance. The airplane class would inherit from engine, fuselage, and controls, in effect getting the behaviors and properties of all of its components. I recommend you stay away from this type of code because it confuses a clear has-a relationship with inheritance, which should be used for is-a relationships. The recommended solution is to have an Airplane class which contains data members of typeEngine, Fuselage, and Controls.
INTERESTING AND OBSCURE INHERITANCE ISSUES
Extending a class opens up a variety of issues. What characteristics of the class can and cannot be changed? What does the mysterious virtual keyword really do? These questions, and many more, are answered in the following sections.
Changing the Overridden Method’s Characteristics
For the most part, the reason you override a method is to change its implementation. Sometimes, however, you may want to change other characteristics of the method.
Changing the Method Return Type
A good rule of thumb is to override a method with the exact method declaration, or method prototype, that the base class uses. The implementation can change, but the prototype stays the same.
That does not have to be the case, however. In C++, an overriding method can change the return type as long as the original return type is a pointer or reference to a class, and the new return type is a pointer or reference to a descendent class. Such types are called covariant return types. This feature sometimes comes in handy when the base class and derived class work with objects in a parallel hierarchy. That is, another group of classes that is tangential, but related, to the first class hierarchy.
For example, consider a hypothetical cherry orchard simulator. You might have two hierarchies of classes that model different real-world objects but are obviously related. The first is the Cherry chain. The base class, Cherry, has a derived class called BingCherry. Similarly, there is another chain of classes with a base class called CherryTree and a derived class called BingCherryTree. Figure 9-10 shows the two class chains.
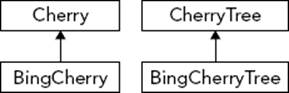
FIGURE 9-10
Now assume that the CherryTree class has a virtual method called pick() that will retrieve a single cherry from the tree:
Cherry* CherryTree::pick()
{
return new Cherry();
}
In the BingCherryTree derived class, you may want to override this method. Perhaps Bing Cherries need to be polished when they are picked (bear with me on this one). Because a BingCherry is a Cherry, you could leave the method prototype as is and override the method as in the following example. The BingCherry pointer is automatically cast to a Cherry pointer. Note that this implementation uses a unique_ptr to make sure no memory is leaked when polish() throws an exception.
Cherry* BingCherryTree::pick()
{
auto theCherry = std::make_unique<BingCherry>();
theCherry->polish();
return theCherry.release();
}
The implementation above is perfectly fine and is probably the way that I would write it. However, because you know that the BingCherryTree will always return BingCherry objects, you could indicate this fact to potential users of this class by changing the return type, as shown here:
BingCherry* BingCherryTree::pick()
{
auto theCherry = std::make_unique<BingCherry>();
theCherry->polish();
return theCherry.release();
}
A good way to figure out whether you can change the return type of an overridden method is to consider whether existing code would still work, the Liskov substitution principle (LSP). In the preceding example, changing the return type was fine because any code that assumed that the pick() method would always return a Cherry* would still compile and work correctly. Because a BingCherry is a Cherry, any methods that were called on the result of CherryTree’s version of pick() could still be called on the result of BingCherryTree’s version of pick().
You could not, for example, change the return type to something completely unrelated, such as void*. The following code will not compile:
void* BingCherryTree::pick() // Error!
{
auto theCherry = std::make_unique<BingCherry>();
theCherry->polish();
return theCherry.release();
}
This will generate a compiler error, something like 'BingCherryTree::pick': overriding virtual function return type differs and is not covariant from 'CherryTree::pick'.
Changing the Method Parameters
If you use the name of a virtual method from the parent class in the definition of a derived class, but it uses different parameters than the method with that name uses in the parent class, it is not overriding the method of the parent class — it is creating a new method. Returning to the Super and Sub example from earlier in this chapter, you could attempt to override someMethod() in Sub with a new argument list as follows:
class Super
{
public:
Super();
virtual void someMethod();
};
class Sub : public Super
{
public:
Sub();
virtual void someMethod(int i); // Compiles, but doesn't override
virtual void someOtherMethod();
};
The implementation of this method could be as follows:
void Sub::someMethod(int i)
{
cout << "This is Sub's version of someMethod with argument " << i
<< "." << endl;
}
The preceding class definition will compile, but you have not overridden someMethod(). Because the arguments are different, you have created a new method that exists only in Sub. If you want a method called someMethod() that takes an int, and you want it to work only on objects of class Sub, the preceding code is correct.
In fact, the C++ standard says that the original method is now hidden as far as Sub is concerned. The following sample code will not compile because there is no longer a no-argument version of someMethod().
Sub mySub;
mySub.someMethod(); // Error! Won't compile because original method is hidden.
If instead you really did intend to override someMethod() from the base class, then you should have marked the someMethod(int) declaration of Sub with the override specifier. By doing so, the compiler will give an error stating that someMethod(int) is not overriding a method from the base class.
There is a somewhat obscure technique you can use to have your cake and eat it too. That is, you can use this technique to effectively “override” a method in the derived class with a new prototype but continue to inherit the base class version. This technique uses theusing keyword to explicitly include the base class definition of the method within the derived class as follows:
class Super
{
public:
Super();
virtual void someMethod();
};
class Sub : public Super
{
public:
Sub();
using Super::someMethod; // Explicitly "inherits" the Super version
virtual void someMethod(int i); // Adds a new version of someMethod
virtual void someOtherMethod();
};
NOTE It is rare to find a method in a derived class with the same name as a method in the base class but using a different parameter list.
The override Keyword
Sometimes, it is possible to accidentally create a new virtual method instead of overriding a method from the base class. Take the following Super and Sub classes where Sub is properly overriding someMethod():
class Super
{
public:
Super();
virtual void someMethod(double d);
};
class Sub : public Super
{
public:
Sub();
virtual void someMethod(double d);
};
You can call someMethod() through a reference as follows:
Sub mySub;
Super& ref = mySub;
ref.someMethod(1.1); // Calls Sub's version of someMethod()
This will correctly call the overridden someMethod() from the Sub class. Now, suppose you used an integer parameter instead of a double while overriding someMethod() as follows:
class Sub : public Super
{
public:
Sub();
virtual void someMethod(int i);
};
As seen in the previous section, this code will not override someMethod(), but will instead create a new virtual method. If you try to call someMethod() through a reference as in the following code, someMethod() of Super will be called instead of the one from Sub.
Sub mySub;
Super& ref = mySub;
ref.someMethod(1.1); // Calls Super's version of someMethod()
This type of problem can happen when you start to modify the Super class but forget to update all derived classes. For example, maybe your first version of the Super class had a method called someMethod() accepting an integer. You then wrote the Sub derived class overriding this someMethod() accepting an integer. Later you decide that someMethod() in the Super class needs a double instead of an integer, so you update someMethod() in the Super class. It might happen that at that time, you forget to update the someMethod() methods in derived classes to also accept a double instead of an integer. By forgetting this, you are now actually creating a new virtual method instead of properly overriding the method.
You can prevent this situation by using the override keyword as follows:
class Sub : public Super
{
public:
Sub();
virtual void someMethod(int i) override;
};
This definition of Sub will generate a compiler error, because with the override keyword you are saying that someMethod() is supposed to be overriding a method from the Super class, but in the Super class there is no someMethod() accepting an integer, only one accepting adouble.
The problem of accidentally creating a new method instead of properly overriding one can also happen when you rename a method in the base class, and forget to rename the overriding methods in derived classes.
The override keyword has already been used throughout the examples in this chapter and it is recommended that you use it whenever you want to override a base class method.
Inherited Constructors
In an earlier section you saw the use of the using keyword to explicitly include the base class definition of a method within a derived class. This works perfectly for normal class methods, but it also works for constructors allowing you to inherit constructors from your base classes. Take a look at the following definition for the Super and Sub classes:
class Super
{
public:
Super(const std::string& str);
};
class Sub : public Super
{
public:
Sub(int i);
};
You can construct a Super object only with the provided Super constructor, which requires a string as argument. On the other hand, constructing a Sub object can happen only with the provided Sub constructor, which requires a single integer as argument. You cannot construct Sub objects by using the constructor accepting a string defined in the Super class. For example:
Super super("Hello"); // OK, calls string based Super ctor
Sub sub1(1); // OK, calls integer based Sub ctor
Sub sub2("Hello"); // Error, Sub does not inherit string Super ctor
If you would like the ability to construct Sub objects using the string based Super constructor, you can explicitly inherit the Super constructors in the Sub class as follows:
class Sub : public Super
{
public:
using Super::Super;
Sub(int i);
};
Now you can construct Sub objects in the following two ways:
Sub sub1(1); // OK, calls integer based Sub ctor
Sub sub2("Hello"); // OK, calls inherited string based Super ctor
The Sub class can define a constructor with the same parameter list as one of the inherited constructors in the Super class. In this case, as with any override, the constructor of the Sub class takes precedence over the inherited constructor. In the following example, theSub class inherits all constructors from the Super class with the using keyword. However, since the Sub class defines its own constructor with a single argument of type float, the inherited constructor from the Super class with a single argument of type float is overridden.
class Super
{
public:
Super(const std::string& str);
Super(float f);
};
class Sub : public Super
{
public:
using Super::Super;
Sub(float f); // Overrides inherited float based Super ctor
};
With this definition, objects of Sub can be created as follows:
Sub sub1("Hello"); // OK, calls inherited string based Super ctor
Sub sub2(1.23f); // OK, calls float based Sub ctor
A few restrictions apply to inheriting constructors from a base class with the using clause. When you inherit a constructor from a base class, you inherit all of them. It is not possible to inherit only a subset of the constructors of a base class. A second restriction is related to multiple inheritance. It’s not possible to inherit constructors from one of the base classes if another base class has a constructor with the same parameter list, because this will lead to ambiguity. To resolve this, the Sub class needs to explicitly define the conflicting constructors. For example, the following Sub class tries to inherit all constructors from both the Super1 and Super2 base classes, which results in a compiler error due to ambiguity of the float based constructors.
class Super1
{
public:
Super1(float f);
};
class Super2
{
public:
Super2(const std::string& str);
Super2(float f);
};
class Sub : public Super1, public Super2
{
public:
using Super1::Super1;
using Super2::Super2;
Sub(char c);
};
The first using clause in Sub inherits the constructors from Super1. This means that Sub will get the following constructor:
Sub(float f); // Inherited from Super1
With the second using clause in Sub you are trying to inherit all constructors from Super2. However, this will generate a compiler error because this would mean that Sub gets a second Sub(float f) constructor. The problem is solved by explicitly declaring conflicting constructors in the Sub class as follows:
class Sub : public Super1, public Super2
{
public:
using Super1::Super1;
using Super2::Super2;
Sub(char c);
Sub(float f);
};
The Sub class now explicitly declares a constructor with a single argument of type float, solving the ambiguity. If you want, this explicitly declared constructor in the Sub class accepting a float argument can still forward the call to the Super1 and Super2 constructors in its ctor-initializer as follows:
Sub::Sub(float f) : Super1(f), Super2(f) {}
When using inherited constructors, make sure that all member variables are properly initialized. For example, take the following new definitions for the Super and Sub classes. This example does not properly initialize the mInt data member in all cases which is a serious error.
class Super
{
public:
Super(const std::string& str) : mStr(str) {}
private:
std::string mStr;
};
class Sub : public Super
{
public:
using Super::Super;
Sub(int i) : Super(""), mInt(i) {}
private:
int mInt;
};
You can create a Sub object as follows:
Sub s1(2);
This will call the Sub(int i) constructor, which will initialize the mInt data member of the Sub class and call the Super constructor with an empty string to initialize the mStr data member.
Because the Super constructor is inherited in the Sub class, you can also construct a Sub object as follows:
Sub s2("Hello World");
This will call the inherited Super constructor in the Sub class. However, this inherited Super constructor only initializes the mStr member variable of the Super class and does not initialize the mInt member variable of the Sub class, leaving it in an uninitialized state. This is usually not recommended.
The solution is to use in-class member initializers, which are discussed in Chapter 7. The following code uses an in-class member initializer to initialize mInt to 0. The Sub(int i) constructor can still change this initialization and initialize mInt to the constructor parameter i.
class Sub : public Super
{
public:
using Super::Super;
Sub(int i) : Super(""), mInt(i) {}
private:
int mInt = 0;
};
Special Cases in Overriding Methods
Several special cases require attention when overriding a method. This section outlines the cases that you are likely to encounter.
The Base Class Method is static
In C++, you cannot override a static method. For the most part, that’s all you need to know. There are, however, a few corollaries that you need to understand.
First of all, a method cannot be both static and virtual. This is the first clue that attempting to override a static method will not do what you intend for it to do. If you have a static method in your derived class with the same name as a static method in your base class, you actually have two separate methods.
The following code shows two classes that both happen to have static methods called beStatic(). These two methods are in no way related.
class SuperStatic
{
public:
static void beStatic() {
cout << "SuperStatic being static." << endl; }
};
class SubStatic : public SuperStatic
{
public:
static void beStatic() {
cout << "SubStatic keepin' it static." << endl; }
};
Because a static method belongs to its class, calling the identically named methods on the two different classes will call their respective methods:
SuperStatic::beStatic();
SubStatic::beStatic();
This will output:
SuperStatic being static.
SubStatic keepin' it static.
Everything makes perfect sense as long as the methods are accessed by class. The behavior is less clear when objects are involved. In C++, you can call a static method using an object, but since the method is static, it has no this pointer and no access to the object itself, so it is equivalent to calling it by classname::method(). Referring to the previous example classes, you can write code as follows, but the results may be surprising.
SubStatic mySubStatic;
SuperStatic& ref = mySubStatic;
mySubStatic.beStatic();
ref.beStatic();
The first call to beStatic() will obviously call the SubStatic version because it is explicitly called on an object declared as a SubStatic. The second call might not work as you expect. The object is a SuperStatic reference, but it refers to a SubStatic object. In this case,SuperStatic’s version of beStatic() will be called. The reason is that C++ doesn’t care what the object actually is when calling a static method. It only cares about the compile-time type. In this case, the type is a reference to a SuperStatic.
The output of the previous example is as follows:
SubStatic keepin' it static.
SuperStatic being static.
NOTE static methods are scoped by the name of the class in which they are defined, but are not methods that apply to a specific object. A method in a class that calls a static method calls the version determined by normal name resolution. When called syntactically by using an object, the object is not actually involved in the call, except to determine the type at compile time.
The Base Class Method is Overloaded
When you override a method by specifying a name and a set of parameters, the compiler implicitly hides all other instances of the name in the base class. The idea is that if you have overridden one method of a given name, you might have intended to override all the methods of that name, but simply forgot, and therefore this should be treated as an error. It makes sense if you think about it — why would you want to change some versions of a method and not others? Consider the following sub class, which overrides a method without overriding its associated overloaded siblings:
class Super
{
public:
virtual void overload() { cout << "Super's overload()" << endl; }
virtual void overload(int i) {
cout << "Super's overload(int i)" << endl; }
};
class Sub : public Super
{
public:
virtual void overload() override { cout << "Sub's overload()" << endl; }
};
If you attempt to call the version of overload() that takes an int parameter on a Sub object, your code will not compile because it was not explicitly overridden.
mySub.overload(2); // Error! No matching method for overload(int).
It is possible, however, to access this version of the method from a Sub object. All you need is a pointer or a reference to a Super object.
Sub mySub;
Super* ptr = &mySub;
ptr->overload(7);
The hiding of unimplemented overloaded methods is only skin deep in C++. Objects that are explicitly declared as instances of the subtype will not make the method available, but a simple cast to the base class will bring it right back.
The using keyword can be employed to save you the trouble of overloading all the versions when you really only want to change one. In the following code, the Sub class definition uses one version of overload() from Super and explicitly overloads the other:
class Super
{
public:
virtual void overload() { cout << "Super's overload()" << endl; }
virtual void overload(int i) {
cout << "Super's overload(int i)" << endl; }
};
class Sub : public Super
{
public:
using Super::overload;
virtual void overload() override { cout << "Sub's overload()" << endl; }
};
The using clause has certain risks. Suppose a third overload() method is added to Super, which should have been overridden in Sub. This will now not be detected as an error because due to the using clause, the designer of the Sub class has explicitly said “I am willing to accept all other overloads of this method from the parent class.”
WARNING To avoid obscure bugs, you should override all versions of an overloaded method, either explicitly or with the using keyword, but keep the risks of the using clause in mind.
The Base Class Method Is private or protected
There’s absolutely nothing wrong with overriding a private or protected method. Remember that the access specifier for a method determines who is able to call the method. Just because a derived class can’t call its parent’s private methods doesn’t mean it can’t override them. In fact, overriding a private or protected method is a common pattern in C++. It allows derived classes to define their own “uniqueness” that is referenced in the base class. Note that for example Java and C# only allow overriding public and protectedmethods, not private methods.
For example, the following class is part of a car simulator that estimates the number of miles the car can travel based on its gas mileage and amount of fuel left:
class MilesEstimator
{
public:
virtual int getMilesLeft() const {
return getMilesPerGallon() * getGallonsLeft();
}
virtual void setGallonsLeft(int inValue) { mGallonsLeft = inValue; }
virtual int getGallonsLeft() const { return mGallonsLeft; }
private:
int mGallonsLeft;
virtual int getMilesPerGallon() const { return 20; }
};
The getMilesLeft() method performs a calculation based on the results of two of its own methods. The following code uses the MilesEstimator to calculate how many miles can be traveled with 2 gallons of gas:
MilesEstimator myMilesEstimator;
myMilesEstimator.setGallonsLeft(2);
cout << "I can go " << myMilesEstimator.getMilesLeft() << " more miles." << endl;
The output of this code is as follows:
I can go 40 more miles.
To make the simulator more interesting, you may want to introduce different types of vehicles, perhaps a more efficient car. The existing MilesEstimator assumes that all cars get 20 miles per gallon, but this value is returned from a separate method specifically so that a derived class could override it. Such a derived class is shown here:
class EfficientCarMilesEstimator : public MilesEstimator
{
private:
virtual int getMilesPerGallon() const override { return 35; }
};
By overriding this one private method, the new class completely changes the behavior of existing, unmodified, public methods. The getMilesLeft() method in the base class will automatically call the overridden version of the private getMilesPerGallon() method. An example using the new class is as follows:
EfficientCarMilesEstimator myEstimator;
myEstimator.setGallonsLeft(2);
cout << "I can go " << myEstimator.getMilesLeft() << " more miles." << endl;
This time, the output reflects the overridden functionality:
I can go 70 more miles.
NOTE Overriding private and protected methods is a good way to change certain features of a class without a major overhaul.
The Base Class Method Has Default Arguments
Derived classes and base classes can each have different default arguments, but the argument that is used depends on the declared type of the variable, not the underlying object. Following is a simple example of a derived class that provides a different default argument in an overridden method:
class Super
{
public:
virtual void go(int i = 2) {
cout << "Super's go with i=" << i << endl; }
};
class Sub : public Super
{
public:
virtual void go(int i = 7) override {
cout << "Sub's go with i=" << i << endl; }
};
If go() is called on a Sub object, Sub’s version of go() will be executed with the default argument of 7. If go() is called on a Super object, Super’s version of go() will be executed with the default argument of 2. However (this is the weird part), if go() is called on a Superpointer or Super reference that really points to a Sub object, Sub’s version of go() will be called but it will use the default Super argument of 2. This behavior is shown in the following example:
Super mySuper;
Sub mySub;
Super& mySuperReferenceToSub = mySub;
mySuper.go();
mySub.go();
mySuperReferenceToSub.go();
The output of this code is as follows:
Super's go with i=2
Sub's go with i=7
Sub's go with i=2
The reason for this behavior is that C++ binds default arguments at compile time, thus to the type of the expression describing the object being involved, not by the actual object type. Default arguments are not “inherited” in C++. If the Sub class above failed to provide a default argument as its parent did, it would be overloading the go() method with a new non zero-argument version.
NOTE When overriding a method that has a default argument, you should provide a default argument as well, and it should probably be the same value. It is recommended to use a symbolic constant for default values so that the same symbolic constant can be used in derived classes.
The Base Class Method Has a Different Access Level
There are two ways you may wish to change the access level of a method — you could try to make it more restrictive or less restrictive. Neither case makes much sense in C++, but there are a few legitimate reasons for attempting to do so.
To enforce tighter restriction on a method (or on a data member for that matter), there are two approaches you can take. One way is to change the access specifier for the entire base class. This approach is described later in this chapter. The other approach is simply to redefine the access in the derived class, as illustrated in the Shy class that follows:
class Gregarious
{
public:
virtual void talk() override {
cout << "Gregarious says hi!" << endl; }
};
class Shy : public Gregarious
{
protected:
virtual void talk() override {
cout << "Shy reluctantly says hello." << endl; }
};
The protected version of talk() in the Shy class properly overrides the method. Any client code that attempts to call talk() on a Shy object will get a compile error:
myShy.talk(); // Error! Attempt to access protected method.
However, the method is not fully protected. One only has to obtain a Gregarious reference or pointer to access the method that you thought was protected:
Shy myShy;
Gregarious& ref = myShy;
ref.talk();
The output of the preceding code is: Shy reluctantly says hello.
This proves that making the method protected in the derived class did actually override the method (because the derived class version was correctly called), but it also proves that the protected access can’t be fully enforced if the base class makes it public.
NOTE There is no reasonable way (or good reason) to restrict access to a public parent method.
NOTE The previous example redefined the method in the derived class because it wants to display a different message. If you don’t want to change the implementation, but instead only want to change the access level of a method, the preferred way is to simply add a using statement in the derived class definition with the desired access level.
It’s much easier (and makes a lot more sense) to lessen access restrictions in derived classes. The simplest way is simply to provide a public method that calls a protected method from the base class, as shown here:
class Secret
{
protected:
virtual void dontTell() { cout << "I'll never tell." << endl; }
};
class Blabber : public Secret
{
public:
virtual void tell() { dontTell(); }
};
A client calling the public tell() method of a Blabber object would effectively access the protected method of the Secret class. Of course, this doesn’t really change the access level of dontTell(), it just provides a public way of accessing it.
You could also override dontTell() explicitly in Blabber and give it new behavior with public access. This makes a lot more sense than reducing the level of access because it is entirely clear what happens with a reference or pointer to the base class. For example, suppose that Blabber actually made the dontTell() method public:
class Secret
{
protected:
virtual void dontTell() { cout << "I'll never tell." << endl; }
};
class Blabber : public Secret
{
public:
virtual void dontTell() override { cout << "I'll tell all!" << endl; }
};
If the dontTell() method is called on a Blabber object, it will output I'll tell all!
myBlabber.dontTell(); // Outputs "I'll tell all!"
In this case, however, the protected method in the base class stays protected because any attempts to call Secret’s dontTell() method through a pointer or reference will not compile.
Blabber myBlabber;
Secret& ref = myBlabber;
Secret* ptr = &myBlabber;
ref.dontTell(); // Error! Attempt to access protected method.
ptr->dontTell(); // Error! Attempt to access protected method.
NOTE The only truly useful way to change a method’s access level is by providing a less restrictive accessor to a protected method.
Copy Constructors and Assignment Operator in Derived Classes
Chapter 8 says that providing a copy constructor and assignment operator is considered a good programming practice when you have dynamically allocated memory in the class. When defining a derived class, you need to be careful about copy constructors andoperator=.
If your derived class does not have any special data (pointers, usually) that require a nondefault copy constructor or operator=, you don’t need to have one, regardless of whether or not the base class has one. If your derived class omits the copy constructor oroperator=, a default copy constructor or operator= will be provided for the data members specified in the derived class and the base class copy constructor or operator= will be used for the data members specified in the base class.
On the other hand, if you do specify a copy constructor in the derived class, you need to explicitly chain to the parent copy constructor, as shown in the following code. If you do not do this, the default constructor (not the copy constructor!) will be used for the parent portion of the object.
class Super
{
public:
Super();
Super(const Super& inSuper);
};
class Sub : public Super
{
public:
Sub();
Sub(const Sub& inSub);
};
Sub::Sub(const Sub& inSub) : Super(inSub)
{
}
Similarly, if the derived class overrides operator=, it is almost always necessary to call the parent’s version of operator= as well. The only case where you wouldn’t do this is if there is some bizarre reason why you only want part of the object assigned when an assignment takes place. The following code shows how to call the parent’s assignment operator from the derived class:
Sub& Sub::operator=(const Sub& inSub)
{
if (&inSub == this) {
return *this;
}
Super::operator=(inSub); // Calls parent's operator=.
// Do necessary assignments for derived class.
return *this;
}
WARNING If your derived class does not specify its own copy constructor or operator=, the parent functionality continues to work. If the derived class does provide its own copy constructor or operator=, it needs to explicitly reference the parent versions.
The Truth about virtual
When you first encountered method overriding earlier in this chapter, I told you that only virtual methods can be properly overridden. The reason I had to add the qualifier properly is that if a method is not virtual, you can still attempt to override it but it will be wrong in subtle ways.
Hiding Instead of Overriding
The following code shows a base class and a derived class, each with a single method. The derived class is attempting to override the method in the base class, but it is not declared to be virtual in the base class.
class Super
{
public:
void go() { cout << "go() called on Super" << endl; }
};
class Sub : public Super
{
public:
void go() { cout << "go() called on Sub" << endl; }
};
Attempting to call the go() method on a Sub object will initially appear to work.
Sub mySub;
mySub.go();
The output of this call is, as expected, go() called on Sub. However, since the method was not virtual, it was not actually overridden. Rather, the Sub class created a new method, also called go() that is completely unrelated to the Super class’s method called go(). To prove this, simply call the method in the context of a Super pointer or reference.
Sub mySub;
Super& ref = mySub;
ref.go();
You would expect the output to be, go() called on Sub, but in fact, the output will be, go() called on Super. This is because the ref variable is a Super reference and because the virtual keyword was omitted. When the go() method is called, it simply executes Super’s go()method. Because it is not virtual, there is no need to consider whether a derived class has overridden it.
WARNING Attempting to override a non-virtual method will hide the base class definition and will only be used in the context of the derived class.
How virtual is Implemented
To understand how method hiding is avoided, you need to know a bit more about what the virtual keyword actually does. When a class is compiled in C++, a binary object is created that contains all methods for the class. In the non-virtual case, the code to transfer control to the appropriate method is hard-coded directly where the method is called based on the compile-time type.
If the method is declared virtual, the correct implementation is called through the use of a special area of memory called the vtable, for “virtual table.” For each class that has one or more virtual methods there is a vtable, and every object of such a class contains a pointer to said vtable. This vtable contains pointers to the implementations of the virtual methods. In this way, when a method is called on an object, the pointer is followed into the vtable and the appropriate version of the method is executed based on the actual type of the object.
To better understand how vtables make overriding of methods possible, take the following Super and Sub classes as an example.
class Super
{
public:
virtual void func1() {}
virtual void func2() {}
void nonVirtualFunc() {}
};
class Sub : public Super
{
public:
virtual void func2() override {}
void nonVirtualFunc() {}
};
For this example, assume that you have the following two instances:
Super mySuper;
Sub mySub;
Figure 9-11 shows a high-level view of how the vtables for both instances look. The mySuper object contains a pointer to its vtable. This vtable has two entries, one for func1() and one for func2(). Those entries point to the implementations of Super::func1() andSuper::func2().
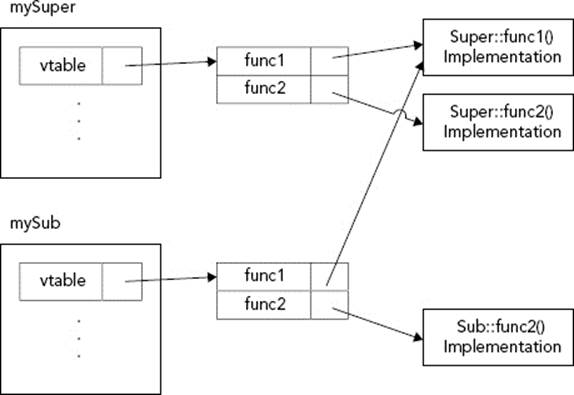
FIGURE 9-11
mySub also contains a pointer to its vtable which also has two entries, one for func1() and one for func2(). The func1() entry of the mySub vtable points to Super::func1() because Sub does not override func1(). On the other hand, the func2() entry of the mySub vtable points to Sub::func2().
Note that both vtables do not contain any entry for the nonVirtualFunc() method because that method is not virtual.
The Justification for virtual
Given the fact that you are advised to make all methods virtual, you might be wondering why the virtual keyword even exists. Can’t the compiler automatically make all methods virtual? The answer is yes, it could. Many people think that the language should just make everything virtual. The Java language effectively does this.
The argument against making everything virtual, and the reason that the keyword was created in the first place, has to do with the overhead of the vtable. To call a virtual method, the program needs to perform an extra operation by dereferencing the pointer to the appropriate code to execute. This is a miniscule performance hit for most cases, but the designers of C++ thought that it was better, at least at the time, to let the programmer decide if the performance hit was necessary. If the method was never going to be overridden, there was no need to make it virtual and take the performance hit. However, with today’s CPUs, the performance hit is measured in fractions of a nanosecond and this will keep getting smaller with future CPUs. In most applications, you will not have a measurable performance difference between using virtual methods and avoiding them, so you should still follow the advice of making all methods, especially destructors, virtual.
There is also a tiny hit to memory usage for each object. In addition to the implementation of the method, each object would also need a pointer, which takes up a tiny amount of space.
The Need for virtual Destructors
Even programmers who don’t adopt the guideline of making all methods virtual still adhere to the rule when it comes to destructors. The reason is that making your destructors non-virtual can easily result in situations in which memory is not freed by object destruction. In only one case it is allowed for a destructor to be non-virtual, that is for a class that is marked as final.
For example, if a derived class uses memory that is dynamically allocated in the constructor and deleted in the destructor, it will never be freed if the destructor is never called. As the following code shows, it is easy to “trick” the compiler into skipping the call to the destructor if it is non-virtual:
class Super
{
public:
Super() {}
~Super() {}
};
class Sub : public Super
{
public:
Sub() { mString = new char[30]; }
~Sub() { delete [] mString; }
private:
char* mString;
};
int main()
{
Super* ptr = new Sub(); // mString is allocated here.
delete ptr; // ~Super is called, but not ~Sub because the destructor
// is not virtual!
return 0;
}
WARNING Unless you have a specific reason not to, or the class is marked as final, I recommend making all methods, including destructors but not constructors, virtual. Constructors cannot and need not be virtual because you always specify the exact class being constructed when creating an object.
Run-time Type Facilities
Relative to other object-oriented languages, C++ is very compile-time oriented. Overriding methods, as you learned above, works because of a level of indirection between a method and its implementation, not because the object has built-in knowledge of its own class.
There are, however, features in C++ that provide a run-time view of an object. These features are commonly grouped together under a feature set called Run-Time Type Information, or RTTI. RTTI provides a number of useful features for working with information about an object’s class membership. One such feature is dynamic_cast to safely convert between types within an OO hierarchy and is discussed earlier in this chapter.
A second RTTI feature is the typeid operator, which lets you query an object at run time to find out its type. For the most part, you shouldn’t ever need to use typeid because any code that is conditionally run based on the type of the object would be better handled with virtual methods.
The following code uses typeid to print a message based on the type of the object:
#include <typeinfo>
void speak(const Animal& inAnimal)
{
if (typeid(inAnimal) == typeid(Dog&)) {
cout << "Woof!" << endl;
} else if (typeid(inAnimal) == typeid(Bird&)) {
cout << "Chirp!" << endl;
}
}
Anytime you see code like this, you should immediately consider reimplementing the functionality as a virtual method. In this case, a better implementation would be to declare a virtual method called speak() in the Animal class. Dog would override the method to print "Woof!" and Bird would override the method to print "Chirp!". This approach better fits object-oriented programming, where functionality related to objects is given to those objects.
WARNING The typeid operator only works correctly if the class has at least one virtual method. Using dynamic_cast on a class without any virtual method will cause a compiler error.
One of the primary values of the typeid operator is for logging and debugging purposes. The following code makes use of typeid for logging. The logObject() function takes a “loggable” object as a parameter. The design is such that any object that can be logged inherits from the Loggable class and supports a method called getLogMessage(). In this way, Loggable is a mixin class.
#include <typeinfo>
void logObject(const Loggable& inLoggableObject)
{
logfile << typeid(inLoggableObject).name() << " ";
logfile << inLoggableObject.getLogMessage() << endl;
}
The logObject() function first writes the name of the object’s class to the file, followed by its log message. This way, when you read the log later, you can see which object was responsible for every line of the file.
NOTE If you are using typeid other than for logging and debugging purposes, consider reimplementing it using virtual methods.
Non-Public Inheritance
In all previous examples, parent classes were always listed using the public keyword. You may be wondering if a parent can be private or protected. In fact it can, though neither is as common as public.
Declaring the relationship with the parent to be protected means that all public methods and data members from the base class become protected in the context of the derived class. Similarly, specifying private access means that all public and protected, methods and data members of the base class become private in the derived class.
There are a handful of reasons why you might want to uniformly degrade the access level of the parent in this way, but most reasons imply flaws in the design of the hierarchy. Some programmers abuse this language feature, often in combination with multiple inheritance, to implement “components” of a class. Instead of making an Airplane class that contains an engine data member and a fuselage data member, they make an Airplane class that is a protected engine and a protected fuselage. In this way, the Airplane doesn’t look like an engine or a fuselage to client code (because everything is protected), but it is able to use all of that functionality internally.
NOTE Non-public inheritance is rare and I recommend using it cautiously, if for no other reason than because most programmers are not familiar with it.
Virtual Base Classes
Earlier in this chapter, you learned about ambiguous base classes, a situation that arises when multiple parents each have a parent in common, as shown again in Figure 9-12. The solution that I recommended was to make sure that the shared parent doesn’t have any functionality of its own. That way, its methods can never be called and there is no ambiguity problem.
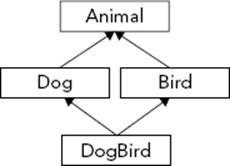
FIGURE 9-12
C++ has another mechanism for addressing this problem in the event that you do want the shared parent to have its own functionality. If the shared parent is a virtual base class, there will not be any ambiguity. The following code adds a sleep() method to the Animalbase class and modifies the Dog and Bird classes to inherit from Animal as a virtual base class. Without the virtual keyword, a call to sleep() on a DogBird object would be ambiguous and would generate a compiler error because DogBird would have two subobjects of class Animal, one coming from Dog and one coming from Bird. However, when Animal is inherited virtually, DogBird has only one subobject of class Animal, so there will be no ambiguity with calling sleep().
class Animal
{
public:
virtual void eat() = 0;
virtual void sleep() { cout << "zzzzz...." << endl; }
};
class Dog : public virtual Animal
{
public:
virtual void bark() { cout << "Woof!" << endl; }
virtual void eat() override { cout << "The dog has eaten." << endl; }
};
class Bird : public virtual Animal
{
public:
virtual void chirp() { cout << "Chirp!" << endl; }
virtual void eat() override { cout << "The bird has eaten." << endl; }
};
class DogBird : public Dog, public Bird
{
public:
virtual void eat() override { Dog::eat(); }
};
int main()
{
DogBird myConfusedAnimal;
myConfusedAnimal.sleep(); // Not ambiguous because Animal is virtual
return 0;
}
NOTE Virtual base classes are a great way to avoid ambiguity in class hierarchies. The only drawback is that many C++ programmers are unfamiliar with the concept.
SUMMARY
This chapter has covered numerous details about inheritance. You have learned about its many applications, including code reuse and polymorphism. You have also learned about its many abuses, including poorly-designed multiple inheritance schemes. Along the way, you’ve uncovered some cases that require special attention.
Inheritance is a powerful language feature that takes some time to get used to. After you have worked with the examples of this chapter and experimented on your own, I hope that inheritance will become your tool of choice for object-oriented design.
All materials on the site are licensed Creative Commons Attribution-Sharealike 3.0 Unported CC BY-SA 3.0 & GNU Free Documentation License (GFDL)
If you are the copyright holder of any material contained on our site and intend to remove it, please contact our site administrator for approval.
© 2016-2026 All site design rights belong to S.Y.A.