C++ Recipes: A Problem-Solution Approach (2015)
CHAPTER 10
Memory
Memory is a fundamentally important resource in modern computers. All the data that your program operates on will at some point or other be stored into RAM to be retrieved by the processor at a later time when required to complete part of your algorithms.
Because of this, it’s vitally important for a C++ programmer to understand how and when your program uses different types of memory. This chapter introduces three different memory spaces, how they can be utilized, and the potential performance impacts that each may cause on your programs.
10-1. Using Static Memory
Problem
You have an object that you would like to be able to access anywhere in your code.
Solution
Static memory can be thought of as global variables. These variables and their values can be accessed by any part of your program at any time.
How It Works
The compiler you use automatically adds memory in static memory space for any globals you create. The address of static variables can usually be found in the address space of your executable and as such can be accessed by any part of your program at any time. Listing 10-1 shows an example of an unsigned integer global variable.
Listing 10-1. An Unsigned Integer Global Variable
#include <iostream>
using namespace std;
unsigned int counter{ 0 };
void IncreaseCounter()
{
counter += 10;
cout << "counter is " << counter << endl;
}
int main(int argc, char* argv[])
{
counter += 5;
cout << "counter is " << counter << endl;
IncreaseCounter();
return 0;
}
The variable counter in Listing 10-1 is declared with global scope. The result is that the variable can be accessed globally in your program. You can see this in effect in the main function and in the IncreaseCounter function. Both of these functions increase the value of the same global counter variable. The result shown in Figure 10-1 confirms that this is the case.

Figure 10-1. Output showing the result of changing a global variable
Global variables may be useful under certain circumstances but can cause many problems in other situations. Recipe 9-4 showed the use of a static class member variable to create a Singleton object. A static member is also a type of global variable and as such is accessible from anywhere in your program. A general problem with static variables is their order of creation. The C++ standard doesn’t guarantee that static variables will be initialized in a given order. This can cause programs that use many dependent globals to run into problems and crashes as a result of an unexpected initialization order. Global variables also cause many problems in multithreaded programming because multiple threads can access the static address space at the same time with unexpected results. It’s generally recommended that you keep the usage of global variables to a minimum.
10-2. Using Stack Memory
Problem
You require memory for temporary variables for doing work within functions.
Solution
A C++ program can use a growing and shrinking stack to provide temporary space for local variables.
How It Works
Because all variables in a C++ program are required to be backed by memory, temporary space is created on the fly for variables defined within functions. This is achieved using a stack. When a function is called, the compiler adds machine code that allocates enough stack space to store all the variables needed by a function.
The stack is manipulated using two registers (on x86-based CPUs) called esp and ebp. esp is the stack pointer, and ebp is the base pointer. The base pointer is used to store the address of the previous stack frame. This allows the current function to return to the correct stack when its execution is over. The esp register is used to store the current top of the stack; this allows the ebp to be updated if the current function calls another function.
The process of creating enough space on the program stack for local variables is shown in Listing 10-2.
Listing 10-2. x86 Assembly Showing the Creation of a 20-Byte Stack Frame
push ebp
mov ebp, esp
sub esp 20
The three lines of x86 Assembly language in Listing 10-2 show the basics of stack-frame creation in x86. First the push instruction is used to move the current base pointer onto the stack. The push instruction moves esp down far enough the store the value of ebp and then moves that value onto the stack. The current value of esp is then moved into ebp, moving the base pointer up to the beginning of the current stack frame. The last instruction subtracts the size of the stack frame from esp. It should be clear from this that a stack in an x86-based computer grows down toward 0.
A program then accesses each of the variables in the stack using an offset from the base pointer. You can see these three lines in the disassembly from Visual Studio shown in Figure 10-2.
Figure 10-2. Disassembly from an x86 program, showing the creation of a stack frame
Listing 10-3 shows the code from which the disassembly in Figure 10-2 is taken.
Listing 10-3. Simple Program Used to View the Disassembly
#include <iostream>
using namespace std;
void Function()
{
int a{ 0 };
cout << a;
}
int main(int argc, char* argv[])
{
Function();
return 0;
}
All the local variables that you create are allocated on the stack. Class variables’ constructors are called at the point they’re created, and their destructors are called when the stack is being destroyed. Listing 10-4 shows a simple program that consists of a class with a constructor and a destructor.
Listing 10-4. Class Variables on the Stack
#include <iostream>
using namespace std;
class MyClass
{
public:
MyClass()
{
cout << "Constructor called!" << endl;
}
~MyClass()
{
cout << "Destructor called!" << endl;
}
};
int main(int argc, char* argv[])
{
MyClass myClass;
cout << "Function body!" << endl;
return 0;
}
The constructor of the variable myClass in Listing 10-4 is called at the point of initialization. The rest of the function body is executed, and the class destructor is called when the variable goes out of scope. The myClass variable goes out of scope after the return statement. This happens because the local variables in the function may be needed to calculate the value returned from the function. You can see the output from Listing 10-4 in Figure 10-3.
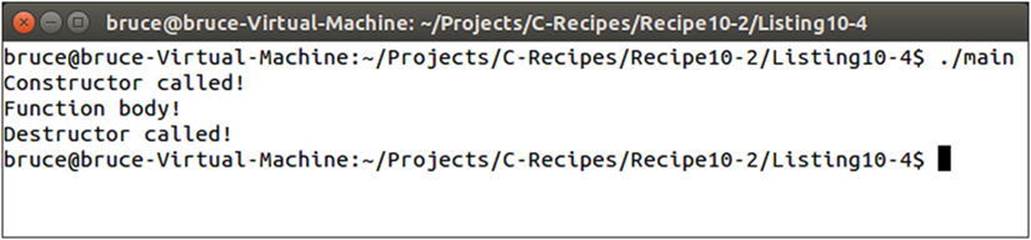
Figure 10-3. The output from running the code in Listing 10-4
The code in Listing 10-4 shows the creation and destruction of class variables in a function. It’s also possible to control the creation of stack frames in C++. You do so by using curly braces to create a new scope within an existing scope. Listing 10-5 creates several different scopes, each with their own local variables.
Listing 10-5. Creating Multiple Scopes
#include <iostream>
using namespace std;
class MyClass
{
private:
static int m_Count;
int m_Instance{ -1 };
public:
MyClass()
: m_Instance{m_Count++}
{
cout << "Constructor called on " << m_Instance << endl;
}
~MyClass()
{
cout << "Destructor called on " << m_Instance << endl;
}
};
int MyClass::m_Count{ 0 };
int main(int argc, char* argv[])
{
MyClass myClass1;
{
MyClass myClass2;
{
MyClass myClass3;
}
}
return 0;
}
The code in Listing 10-5 shows the use of curly braces to create multiple stack frames within a single function. The class MyClass contains a static variable m_Count that is used to track the different instances. This variable is post-incremented every time a new instance is created, and the pre-incremented value is stored in m_Instance. The destructor is called on local variables each time a scope is closed. The results are shown in Figure 10-4.
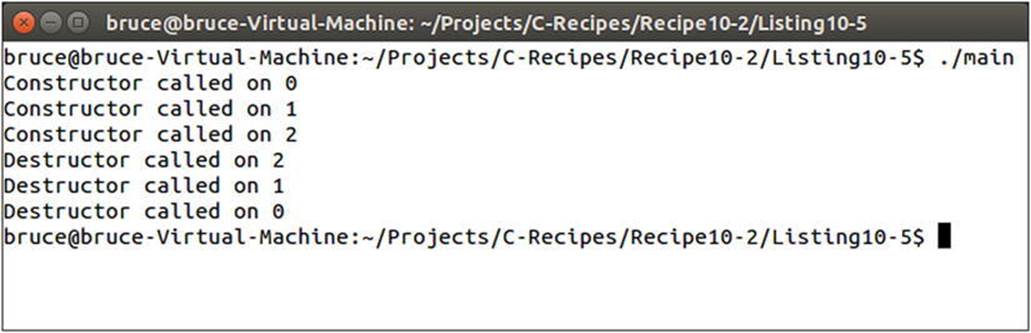
Figure 10-4. Output showing the destruction order of objects with multiple scopes
10-3. Using Heap Memory
Problem
You need to create a large pool of memory that outlives a single local scope.
Solution
C++ provides the new and delete operators that allow you to manage large pools of dynamically allocated memory.
How It Works
Dynamically allocated memory is important to many long-running programs. It’s essential for programs that allow users to generate their own content or load resources from files. It’s usually very difficult if not impossible to provide enough memory for programs such as web browsers that are used to stream videos or social media content without the use of dynamically allocated memory, because you’re unable to determine your memory requirements at the time of creating your program.
You can allocate dynamic memory in an address space commonly called the heap using the C++ new and delete operators. The new operator returns a pointer to dynamically allocated memory that is large enough to store the type of variable being created. Listing 10-6 shows how thenew and delete operators are used.
Listing 10-6. Using new and delete
#include <iostream>
using namespace std;
int main(int argc, char* argv[])
{
int* pInt{ new int };
*pInt = 100;
cout << hex << "The address at pInt is " << pInt << endl;
cout << dec << "The value at pInt is " << *pInt << endl;
delete pInt;
pInt = nullptr;
return 0;
}
This code uses the new operator to allocate enough memory to store a single int variable. A pointer is returned from new and stored in the variable pInt. The memory returned is uninitialized, and it’s generally a good idea to initialize this memory at the point of creation. You can see this in main, where the pointer dereference operator is used to initialize the memory pointed to by pInt to 100.
Once you have allocated memory from the heap, it’s your responsibility to ensure that it’s returned correctly to the operating system. Failing to do so results in a memory leak. Memory leaks can cause problems for users and often result in poor computer performance, memory fragmentation, and, in severe cases, computer crashes due to insufficient memory.
You return heap memory to the operating system using the delete operator. This operator tells the system that you no longer need all the memory that was returned from the initial call to new. Your program should no longer attempt to use the memory returned by new after the call todelete has been made. Doing so causes undefined behavior that more often than not results in a program crash. Crashes caused by access to freed memory are usually very difficult to find, because they manifest themselves in places that you can’t link to the offending code in any way. You can ensure that your program doesn’t access deleted memory by setting any pointers to the memory to nullptr.
The output from Listing 10-6 is shown in Figure 10-5.
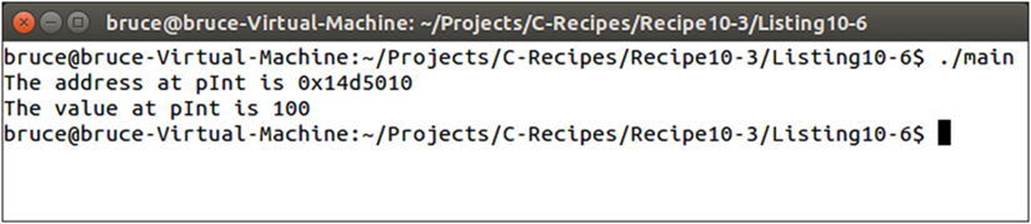
Figure 10-5. The output showing the address of and value stored in dynamically allocated memory from Listing 10-6
The new and delete operators in Listing 10-6 are used to allocate single objects. There are also new and delete array operators for allocating multiples of the same object. Listing 10-7 shows the array new and delete operators in action.
Listing 10-7. The Array new and delete Operators
#include <iostream>
using namespace std;
class MyClass
{
private:
int m_Number{ 0 };
public:
MyClass() = default;
~MyClass()
{
cout << "Destroying " << m_Number << endl;
}
void operator=(const int value)
{
m_Number = value;
}
};
int main(int argc, char* argv[])
{
const unsigned int NUM_ELEMENTS{ 5 };
MyClass* pObjects{ new MyClass[NUM_ELEMENTS] };
pObjects[0] = 100;
pObjects[1] = 45;
pObjects[2] = 31;
pObjects[3] = 90;
pObjects[4] = 58;
delete[] pObjects;
pObjects = nullptr;
return 0;
}
The code in Listing 10-7 creates an array of objects. The MyClass class consists of an overloaded assignment operator to initialize the created objects and a destructor that shows the destruction order of the elements in the array. Using the standard delete operator on an array of objects can cause various problems for your program, because the standard delete operator only calls the class destructor on the first element of the array. If your class had allocated its own memory, then each of the subsequent objects in the array would leak their memory. Using the delete array operator ensures that each of the destructors in your array is called. You can see that each of the destructors for the elements in the array is called in Figure 10-6.
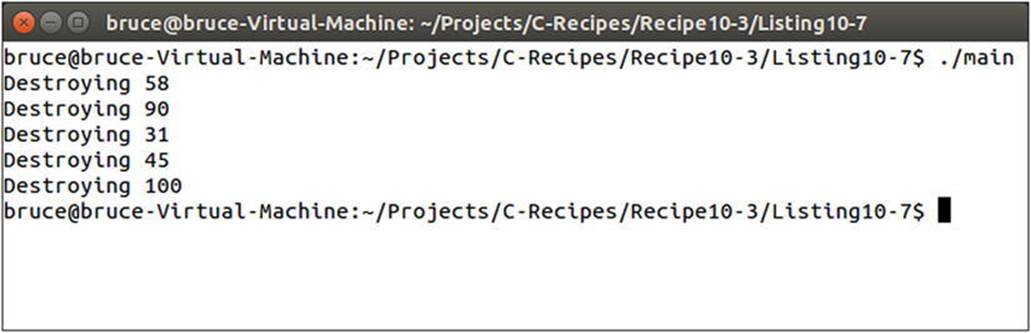
Figure 10-6. The output showing that each of the destructors has been called when using the array delete operator
10-4. Using Automated Shared Memory
Problem
You have an object that can be shared by multiple systems with different lifespans.
Solution
C++ provides the shared_ptr template that can automatically delete memory when it’s no longer needed.
How It Works
Dynamically allocated memory in C++ must be deleted by a programmer. This means you’re responsible for ensuring that your program behaves as a user expects at all times. C++ provides the shared_ptr template, which tracks how many places in your program are sharing access to the same memory and can delete that memory when it’s no longer needed. Listing 10-8 shows how you can create a shared pointer.
Listing 10-8. Creating a Shared Pointer
#include <iostream>
#include <memory>
using namespace std;
class MyClass
{
private:
int m_Number{ 0 };
public:
MyClass(int value)
: m_Number{ value }
{
}
~MyClass()
{
cout << "Destroying " << m_Number << endl;
}
void operator=(const int value)
{
m_Number = value;
}
int GetNumber() const
{
return m_Number;
}
};
using SharedMyClass = shared_ptr< MyClass >;
int main(int argc, char* argv[])
{
SharedMyClass sharedMyClass{ new MyClass(10) };
return 0;
}
This code contains a class, MyClass, that has a private integer member variable. There is also a type alias used to represent a shared_ptr to a MyClass object. This type alias is used to make writing your code easier and more maintainable in the long term. The shared_ptrtemplate itself takes a parameter to the type of object that you would like to share around your program. In this case, you want to share dynamic objects of type MyClass.
An instance of SharedMyClass is created on the first line of the main function. This instance is initialized with a dynamically allocated MyClass object. The MyClass object itself is initialized with the value 10. The only other code in the body of main is the return statement. Despite this, Figure 10-7 shows that the destructor of MyClass has been called on the object stored in sharedMyClass.

Figure 10-7. Output showing that the MyClass destructor has been called in Listing 10-8
The shared_ptr template automatically calls delete on the memory it wraps once the last instance of that shared_ptr goes out of scope. In this case, there is only a single shared_ptr in the main function; therefore the MyClass object is deleted, and its destructor is called after the function return statement is executed.
Listing 10-9 shows how you can use a shared_ptr to transfer ownership of shared memory from one function to another and still maintain this automated cleanup code.
Listing 10-9. Transferring Dynamic Memory between Functions
#include <iostream>
#include <memory>
using namespace std;
class MyClass
{
private:
int m_Number{ 0 };
public:
MyClass(int value)
: m_Number{ value }
{
}
~MyClass()
{
cout << "Destroying " << m_Number << endl;
}
void operator=(const int value)
{
m_Number = value;
}
int GetNumber() const
{
return m_Number;
}
};
using SharedMyClass = shared_ptr< MyClass >;
void ChangeSharedValue(SharedMyClass sharedMyClass)
{
if (sharedMyClass != nullptr)
{
*sharedMyClass = 100;
}
}
int main(int argc, char* argv[])
{
SharedMyClass sharedMyClass{ new MyClass(10) };
ChangeSharedValue(sharedMyClass);
return 0;
}
Listing 10-9 creates a SharedMyClass instance pointing to a MyClass object initialized with the value 10. The sharedMyClass instance is then passed by value into the ChangeSharedValue function. Passing a shared_ptr by value makes a copy of the pointer. You now have two instances of the SharedMyClass template, both pointing to the same MyClass instance. The destructor for MyClass isn’t called until both of the shared_ptr instances of gone out of scope. Figure 10-8 shows that the initial value of the MyClass instance was changed and that the destructor was only called a single time.
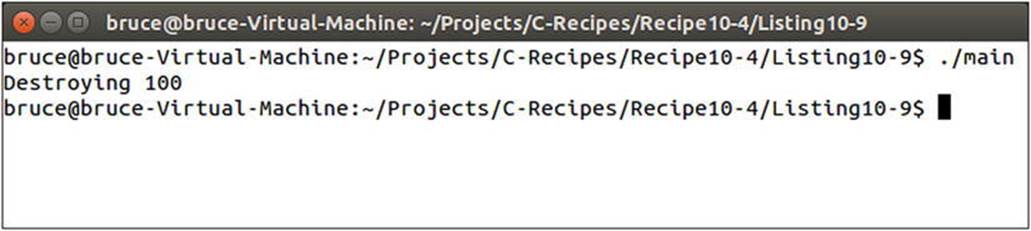
Figure 10-8. Output showing that the shared object’s stored value was changed and destroyed a single time
10-5. Creating Single-Instance Dynamic Objects
Problem
You have an object that you would like to pass around, but you only wish to have a single instance of that object.
Solution
C++ provides the unique_ptr template, which allows a pointer instance to be transferred but not shared.
How It Works
unique_ptr is a template that can be used to store a pointer to dynamically allocated memory. It differs from shared_ptr in that there can only be a single reference to the dynamic memory at a time. Listing 10-10 shows how to create a unique_ptr.
Listing 10-10. Creating a unique_ptr
#include <iostream>
#include <memory>
using namespace std;
class MyClass
{
private:
int m_Number{ 0 };
public:
MyClass(int value)
: m_Number{ value }
{
}
~MyClass()
{
cout << "Destroying " << m_Number << endl;
}
void operator=(const int value)
{
m_Number = value;
}
int GetNumber() const
{
return m_Number;
}
};
using UniqueMyClass = unique_ptr< MyClass >;
void CreateUniqueObject()
{
UniqueMyClass uniqueMyClass{ make_unique<MyClass>(10) };
}
int main(int argc, char* argv[])
{
cout << "Begin Main!" << endl;
CreateUniqueObject();
cout << "Back in Main!" << endl;
return 0;
}
The unique_ptr in Listing 10-10 is created inside a function to demonstrate that the instance of the dynamically created object is destroyed when the unique_ptr goes out of scope. You can see this reflected in the output in Figure 10-9.
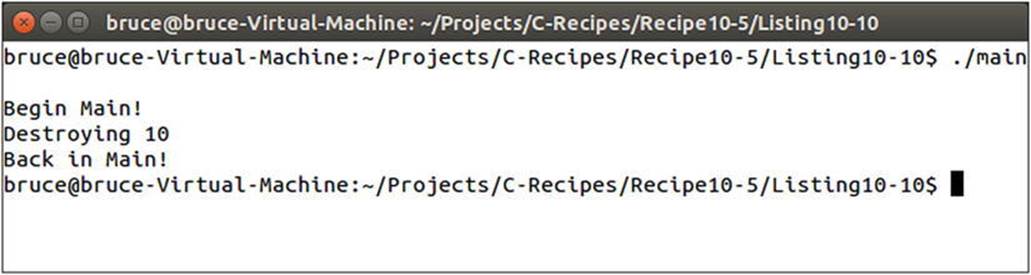
Figure 10-9. Output showing the destruction of a dynamically allocated object stored in a unique_ptr
Listing 10-10 showed that a unique_ptr can be used to automatically delete dynamically allocated memory when it’s no longer needed. It didn’t show that a unique_ptr can be used to transfer ownership of a single object between different scopes. This is shown in Listing 10-11.
Listing 10-11. Transferring Dynamically Allocated Memory Between unique_ptr instances
#include <iostream>
#include <memory>
using namespace std;
class MyClass
{
private:
int m_Number{ 0 };
public:
MyClass(int value)
: m_Number{ value }
{
}
~MyClass()
{
cout << "Destroying " << m_Number << endl;
}
void operator=(const int value)
{
m_Number = value;
}
int GetNumber() const
{
return m_Number;
}
};
using UniqueMyClass = unique_ptr< MyClass >;
void CreateUniqueObject(UniqueMyClass& referenceToUniquePtr)
{
UniqueMyClass uniqueMyClass{ make_unique<MyClass>(10) };
cout << hex << showbase;
cout << "Address in uniqueMyClass " << uniqueMyClass.get() << endl;
referenceToUniquePtr.swap(uniqueMyClass);
cout << "Address in uniqueMyClass " << uniqueMyClass.get() << endl;
}
int main(int argc, char* argv[])
{
cout << "Begin Main!" << endl;
UniqueMyClass uniqueMyClass;
CreateUniqueObject(uniqueMyClass);
cout << "Address in main's uniqueMyClass " << uniqueMyClass.get() << endl;
cout << dec << noshowbase << "Back in Main!" << endl;
return 0;
}
The code in Listing 10-11 creates an instance of MyClass in the CreateUniqueObject function. That function also takes a reference to another unqiue_ptr<MyClass> that is used to transfer the dynamically allocated object out of the function. The transfer is achieved using theswap function supplied by the unique_ptr template. The MyClass destructor is called at the end of the main function when all the UniqueMyClass instances have gone out of scope. You can see the transfer of memory and the destruction order of the MyClass instance in Figure 10-10.
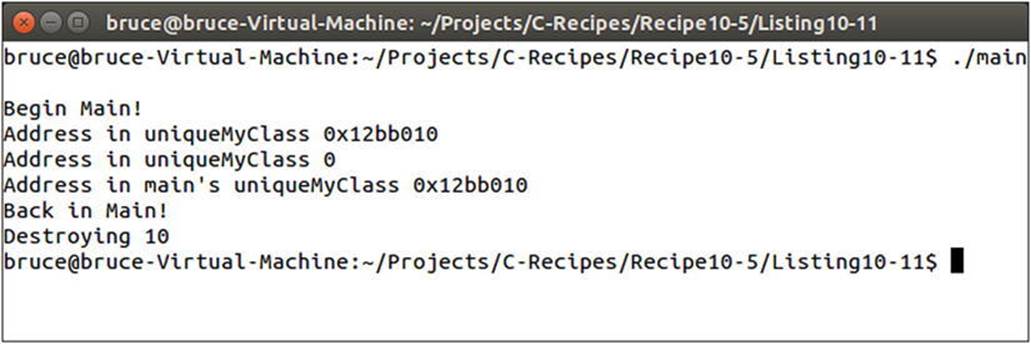
Figure 10-10. The output showing the transfer of a unique_ptr and the destruction of its dynamically allocated memory
10-6. Creating Smart Pointers
Problem
You would like to use automated pointer management on systems that don’t support shared_ptr and unique_ptr.
Solution
You can use member variables in a class to track how many references to the data are currently in use.
How It Works
The unique_ptr and shared_ptr templates were added to the STL in C++11. Some programs are written without access to C++11 or without access to the STL. In this situation, you can write your own smart pointer implementation. To begin, you need to create an object that can be used to reference-count. Reference counting works by increasing an integer every time you make a copy of the object you would like to count. Listing 10-12 shows the code for a reference-counting class.
Listing 10-12. The Code for a Reference-Counting Class
class ReferenceCount
{
private:
int m_Count{ 0 };
public:
void Increment()
{
++m_Count;
}
int Decrement()
{
return --m_Count;
}
int GetCount() const
{
return m_Count;
}
};
The ReferenceCount class is pretty basic. It simply consists of a member variable to keep track of a count and methods to increase and decrease that count. The GetCount method is there to provide access to the count, to allow for printing during debugging.
The ReferenceCount class is then used in a template class called SmartPointer. This class provides a template parameter you can use to specialize the template with the type of object you want to be automatically tracked. The class has a member variable that is a pointer to the object being tracked and another pointer to a ReferenceCount object. The ReferenceCount object is accessed through a pointer so that it can be shared among multiple SmartPointer objects that are all accessing the same dynamically allocated object. You can see the code forSmartPointer in Listing 10-13.
Listing 10-13. The SmartPointer Class
template <typename T>
class SmartPointer
{
private:
T* m_Object{ nullptr };
ReferenceCount* m_ReferenceCount{ nullptr };
public:
SmartPointer()
{
}
SmartPointer(T* object)
: m_Object{ object }
, m_ReferenceCount{ new ReferenceCount }
{
m_ReferenceCount->Increment();
cout << "Created smart pointer! Reference count is "
<< m_ReferenceCount->GetCount() << endl;
}
virtual ~SmartPointer()
{
if (m_ReferenceCount)
{
int decrementedCount = m_ReferenceCount->Decrement();
cout << "Destroyed smart pointer! Reference count is "
<< decrementedCount << endl;
if (decrementedCount == 0)
{
delete m_ReferenceCount;
delete m_Object;
}
m_ReferenceCount = nullptr;
m_Object = nullptr;
}
}
SmartPointer(const SmartPointer<T>& other)
: m_Object{ other.m_Object }
, m_ReferenceCount{ other.m_ReferenceCount }
{
m_ReferenceCount->Increment();
cout << "Copied smart pointer! Reference count is "
<< m_ReferenceCount->GetCount() << endl;
}
SmartPointer<T>& operator=(const SmartPointer<T>& other)
{
if (this != &other)
{
if (m_ReferenceCount && m_ReferenceCount->Decrement() == 0)
{
delete m_ReferenceCount;
delete m_Object;
}
m_Object = other.m_Object;
m_ReferenceCount = other.m_ReferenceCount;
m_ReferenceCount->Increment();
}
cout << "Assigning smart pointer! Reference count is "
<< m_ReferenceCount->GetCount() << endl;
return *this;
}
SmartPointer(SmartPointer<T>&& other)
: m_Object{ other.m_Object }
, m_ReferenceCount{ other.m_ReferenceCount }
{
other.m_Object = nullptr;
other.m_ReferenceCount = nullptr;
}
SmartPointer<T>& operator=(SmartPointer<T>&& other)
{
if (this != &other)
{
m_Object = other.m_Object;
m_ReferenceCount = other.m_ReferenceCount;
other.m_Object = nullptr;
other.m_ReferenceCount = nullptr;
}
}
T& operator*()
{
return *m_Object;
}
};
You can see the member variables that are used to store the dynamically allocated object and the ReferenceCount object in the SmartPointer class in Listing 10-13. The m_Object pointer is a pointer to an abstract templatized type; this allows the use of any type to be tracked by the SmartPointer template.
The first public methods in SmartPointer are the constructors. A new SmartPointer can be created either as a null pointer or pointing to an already-existing object. A null SmartPointer has both m_Object and m_ReferenceCount set to nullptr. The other constructor takes a pointer to T that causes a SmartPointer to be initialized. In this case, a new ReferenceCount object is created to track the use of the object being passed to the constructor. The side effect of this is that a new SmartPointer can only be created when initialized with an object pointer; a null SmartPointer can only be assigned to from another SmartPointer object.
The SmartPointer destructor checks whether a ReferenceCount object is being held by the class (remember that it could be nullptr in a null SmartPointer). If a pointer to a ReferenceCount object is held, its count is decremented. If the count has reached 0, then you know this SmartPointer is the last to be referencing this dynamically allocated object. In this case, you’re free to delete both the ReferenceCount object and the object being held by the SmartPointer.
The next method in the SmartPointer is the copy constructor. This method simply copies the m_Object and m_ReferenceCount pointers from the parameter passed to the method into the object being copy-constructed. It then makes sure the reference count is incremented. The call to Increment is essential because you now have two SmartPointer objects that are referencing the same dynamically allocated object. Missing the call to Increment here would cause delete to be called in the destructor of the first of these SmartPointers to go out of scope.
The assignment operator has a slightly different job than the copy constructor. In the copy constructor, you’re free to assume that the existing object is new and therefore not already pointing to an existing object or ReferenceCount instance. This isn’t true in the assignment operator; therefore it’s necessary to account for this occurrence. You can see that the assignment operator first checks to ensure that the operator isn’t assigning an object to itself; in this case, there would be no work to be done. If a new object is being assigned, then there is a check to see whether theReferenceCount pointer is valid. If it is, then Decrement is called; and in the case where this returns 0, the existing m_ReferenceCount and m_Object pointers are deleted. The m_Object and m_ReferenceCount pointers are always copied from the parameter to the assignment operator method into the variables of this, and Increment is called on the new ReferenceCount object.
Next in the class are a move constructor and move assignment operator. These are present to conform with the C++ rule of five. This is a programming guideline that suggests that in any case where you overload the copy constructor or assignment operator, you should overload all five of the destructor, copy constructor, assignment operator, move constructor, and move assignment operator. Move operations are destructive in nature, so no calls to Increment or Decrement are made. These are unnecessary because the m_Object and m_ReferenceCount pointers are set to nullptr on the parameter in both cases, meaning delete will never be called in their destructors. Supporting the move constructor and move assignment operator provides a more efficient method to pass SmartPointer objects into and out of functions.
The final method provides access to the data stored by the SmartPointer object. This could result in crashes if this method is called on null SmartPointer objects. You should take care to only try to dereference valid SmartPointer instances.
![]() Note Listing 10-14 contains debug code to allow the printing of object state for the purposes of illustration. This code can be removed from a working solution.
Note Listing 10-14 contains debug code to allow the printing of object state for the purposes of illustration. This code can be removed from a working solution.
Listing 10-14 shows a complete working example of the SmartPointer class in use.
Listing 10-14. Using SmartPointer
#include <iostream>
using namespace std;
class ReferenceCount
{
private:
int m_Count{ 0 };
public:
void Increment()
{
++m_Count;
}
int Decrement()
{
return --m_Count;
}
int GetCount() const
{
return m_Count;
}
};
template <typename T>
class SmartPointer
{
private:
T* m_Object{ nullptr };
ReferenceCount* m_ReferenceCount{ nullptr };
public:
SmartPointer()
{
}
SmartPointer(T* object)
: m_Object{ object }
, m_ReferenceCount{ new ReferenceCount }
{
m_ReferenceCount->Increment();
cout << "Created smart pointer! Reference count is " << m_ReferenceCount->GetCount() << endl;
}
virtual ~SmartPointer()
{
if (m_ReferenceCount)
{
int decrementedCount = m_ReferenceCount->Decrement();
cout << "Destroyed smart pointer! Reference count is " << decrementedCount << endl;
if (decrementedCount <= 0)
{
delete m_ReferenceCount;
delete m_Object;
}
m_ReferenceCount = nullptr;
m_Object = nullptr;
}
}
SmartPointer(const SmartPointer<T>& other)
: m_Object{ other.m_Object }
, m_ReferenceCount{ other.m_ReferenceCount }
{
m_ReferenceCount->Increment();
cout << "Copied smart pointer! Reference count is " << m_ReferenceCount->GetCount() << endl;
}
SmartPointer<T>& operator=(const SmartPointer<T>& other)
{
if (this != &other)
{
if (m_ReferenceCount && m_ReferenceCount->Decrement() == 0)
{
delete m_ReferenceCount;
delete m_Object;
}
m_Object = other.m_Object;
m_ReferenceCount = other.m_ReferenceCount;
m_ReferenceCount->Increment();
}
cout << "Assigning smart pointer! Reference count is " << m_ReferenceCount->GetCount() << endl;
return *this;
}
SmartPointer(SmartPointer<T>&& other)
: m_Object{ other.m_Object }
, m_ReferenceCount{ other.m_ReferenceCount }
{
other.m_Object = nullptr;
other.m_ReferenceCount = nullptr;
}
SmartPointer<T>& operator=(SmartPointer<T>&& other)
{
if (this != &other)
{
m_Object = other.m_Object;
m_ReferenceCount = other.m_ReferenceCount;
other.m_Object = nullptr;
other.m_ReferenceCount = nullptr;
}
}
T& operator*()
{
return *m_Object;
}
};
struct MyStruct
{
public:
int m_Value{ 0 };
~MyStruct()
{
cout << "Destroying MyStruct object!" << endl;
}
};
using SmartMyStructPointer = SmartPointer< MyStruct >;
SmartMyStructPointer PassValue(SmartMyStructPointer smartPointer)
{
SmartMyStructPointer returnValue;
returnValue = smartPointer;
return returnValue;
}
int main(int argc, char* argv[])
{
SmartMyStructPointer smartPointer{ new MyStruct };
(*smartPointer).m_Value = 10;
SmartMyStructPointer secondSmartPointer = PassValue(smartPointer);
return 0;
}
Listing 10-14 shows a MyStruct instance being passed between the main and PassValue functions using the SmartPointer template. A type alias is created to ensure that the type of the SmartPointer for MyStruct is valid and easily maintainable throughout. The code uses the constructor, copy constructor, and assignment operators from the SmartPointer template. The MyStruct object is automatically deleted only when the last of the SmartPointer instances has gone out of scope at the end of the main function.
Figure 10-11 shows the output generated when running the code in Listing 10-14.
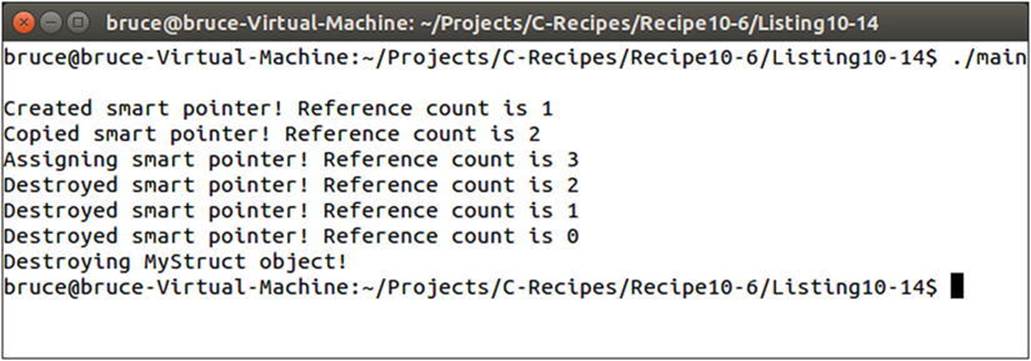
Figure 10-11. A working example of SmartPointer in action
10-7. Debugging Memory Problems by Overloading new and delete
Problem
You have some memory issues in your program and would like to add diagnostic code to the allocations and deallocations in the program.
Solution
C++ allows the replacement of the new and delete operators with custom written versions.
How It Works
The C++ new and delete operators boil down to being function calls. The signature for the global new function is
void* operator new(size_t size);
The signature for the global delete function is
void delete(void* ptr);
The new function takes the number of bytes to be allocated as a parameter, and the delete function takes a pointer to a memory address that has been returned from new. These functions can be replaced to provide added debugging information to your program. Listing 10-15 shows an example of adding a header to your memory allocations to help with program debugging.
Listing 10-15. Adding a Header to Memory Allocations
#include <cstdlib>
#include <iostream>
using namespace std;
struct MemoryHeader
{
const char* m_Filename{ nullptr };
int m_Line{ -1 };
};
void* operator new(size_t size, const char* filename, int line) noexcept
{
void* pMemory{ malloc(size + sizeof(MemoryHeader)) };
MemoryHeader* pMemoryHeader{ reinterpret_cast<MemoryHeader*>(pMemory) };
pMemoryHeader->m_Filename = filename;
pMemoryHeader->m_Line = line;
return static_cast<void*>(static_cast<char*>(pMemory)+sizeof(MemoryHeader));
}
void operator delete(void* pMemory) noexcept
{
char* pMemoryHeaderStart{ reinterpret_cast<char*>(pMemory)-sizeof(MemoryHeader) };
MemoryHeader* pMemoryHeader{ reinterpret_cast<MemoryHeader*>(pMemoryHeaderStart) };
cout << "Deleting memory allocated from: "
<< pMemoryHeader->m_Filename << ":" << pMemoryHeader->m_Line << endl;
free(pMemoryHeader);
}
#define new new(__FILE__, __LINE__)
class MyClass
{
private:
int m_Value{ 1 };
};
int main(int argc, char* argv[])
{
int* pInt{ new int };
*pInt = 1;
delete pInt;
MyClass* pClass{ new MyClass };
delete pClass;
return 0;
}
This code replaces the new and delete function with custom versions. The custom version of new doesn’t conform to the standard signature, so a macro was used to replace the standard version. This was done to allow the compiler to tell the custom new function the file name and line number where new is called. This allows you to track down individual allocations to their exact place in the program source code. This can be a very useful debugging tool when you’re dealing with memory problems.
The custom new function adds the size of the MemoryHeader structure to the number of bytes being requested by the program. It then sets the m_Filename pointer in the MemoryHeader struct to the filename parameter supplied to new. The m_Line member is similarly set to the line parameter passed in. The address returned from new is the address of the beginning of the user area of memory, not including the MemoryHeader structure; this allows your debugging information to be added and addressed at the memory subsystem level and be completely transparent to the rest of your program.
The delete function shows a basic use for this debugging information. It simply prints out the line where the memory chunk being freed was allocated. It gets the address of the memory header by subtracting the size of the header from the address the function was passed.
The new macro is used to give a simple method for passing the __FILE__ and __LINE__ macros to the overloaded new function. These macros are known as built-in macros and are supplied by most modern C++ compilers. These macros are replaced by a pointer to the filename and the line number where they’re used. Adding them to the new macro results in the filename and line number for every call to new in your program being passed to the custom new allocator.
The malloc and free functions used in the new and delete functions are the C-style memory-allocation functions. These are used to prevent conflicts with the many different types of C++ allocation functions. The functions shown in Listing 10-15 are suitable for allocating single objects. It’s also possible to replace the C++ array new and delete functions. It’s essential to replace these functions when you’re trying to track down problems such as memory leaks. Listing 10-16 shows these functions in action.
Listing 10-16. Replacing the Array new and delete Operators
#include <cstdlib>
#include <iostream>
using namespace std;
struct MemoryHeader
{
const char* m_Filename{ nullptr };
int m_Line{ -1 };
};
void* operator new(size_t size, const char* filename, int line) noexcept
{
void* pMemory{ malloc(size + sizeof(MemoryHeader)) };
MemoryHeader* pMemoryHeader{ reinterpret_cast<MemoryHeader*>(pMemory) };
pMemoryHeader->m_Filename = filename;
pMemoryHeader->m_Line = line;
return static_cast<void*>(static_cast<char*>(pMemory)+sizeof(MemoryHeader));
}
void* operator new[](size_t size, const char* filename, int line) noexcept
{
void* pMemory{ malloc(size + sizeof(MemoryHeader)) };
MemoryHeader* pMemoryHeader{ reinterpret_cast<MemoryHeader*>(pMemory) };
pMemoryHeader->m_Filename = filename;
pMemoryHeader->m_Line = line;
return static_cast<void*>(static_cast<char*>(pMemory)+sizeof(MemoryHeader));
}
void operator delete(void* pMemory) noexcept
{
char* pMemoryHeaderStart{ reinterpret_cast<char*>(pMemory)-sizeof(MemoryHeader) };
MemoryHeader* pMemoryHeader{ reinterpret_cast<MemoryHeader*>(pMemoryHeaderStart) };
cout << "Deleting memory allocated from: "
<< pMemoryHeader->m_Filename << ":" << pMemoryHeader->m_Line << endl;
free(pMemoryHeader);
}
void operator delete[](void* pMemory) noexcept{
char* pMemoryHeaderStart{ reinterpret_cast<char*>(pMemory)-sizeof(MemoryHeader) };
MemoryHeader* pMemoryHeader{ reinterpret_cast<MemoryHeader*>(pMemoryHeaderStart) };
cout << "Deleting memory allocated from: "
<< pMemoryHeader->m_Filename << ":" << pMemoryHeader->m_Line << endl;
free(pMemoryHeader);}
#define new new(__FILE__, __LINE__)
class MyClass
{
private:
int m_Value{ 1 };
};
int main(int argc, char* argv[])
{
int* pInt{ new int };
*pInt = 1;
delete pInt;
MyClass* pClass{ new MyClass };
delete pClass;
const unsigned int NUM_ELEMENTS{ 5 };
int* pArray{ new int[NUM_ELEMENTS] };
delete[] pArray;
return 0;
}
The array new and delete operators’ signatures differ from the standard new and delete operators only by having the [] operator present in their signature, as you can see in Listing 10-16. Figure 10-12 shows the output generated by this code.
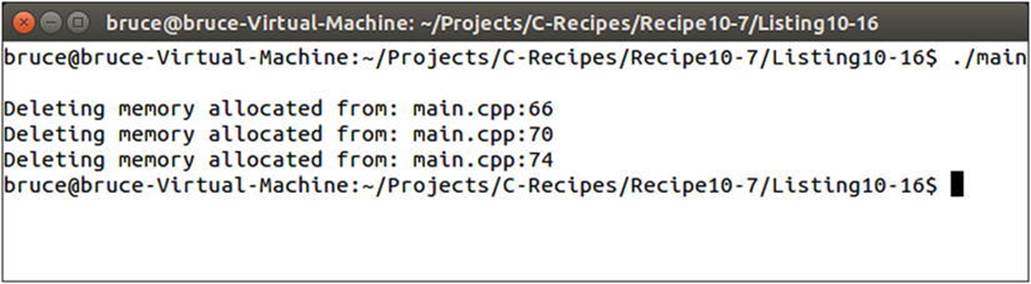
Figure 10-12. Output showing the use of the replaced new and delete operators
The new and delete functions you have seen so far in this recipe have been global replacements for the new and delete operators. It’s also possible to replace new and delete for specific classes. You can add these functions directly to a class definition, and those functions will be used when creating and destroying dynamic instances of that type of object. Listing 10-17 shows code that replaces the global new, new[], delete, and delete[] operators and also adds new and delete operators to the MyClass class definition.
Listing 10-17. Adding new and delete Operators to MyClass
#include <cstdlib>
#include <iostream>
using namespace std;
struct MemoryHeader
{
const char* m_Filename{ nullptr };
int m_Line{ -1 };
};
void* operator new(size_t size, const char* filename, int line) noexcept
{
void* pMemory{ malloc(size + sizeof(MemoryHeader)) };
MemoryHeader* pMemoryHeader{ reinterpret_cast<MemoryHeader*>(pMemory) };
pMemoryHeader->m_Filename = filename;
pMemoryHeader->m_Line = line;
return static_cast<void*>(static_cast<char*>(pMemory)+sizeof(MemoryHeader));
}
void* operator new[](size_t size, const char* filename, int line) noexcept
{
void* pMemory{ malloc(size + sizeof(MemoryHeader)) };
MemoryHeader* pMemoryHeader{ reinterpret_cast<MemoryHeader*>(pMemory) };
pMemoryHeader->m_Filename = filename;
pMemoryHeader->m_Line = line;
return static_cast<void*>(static_cast<char*>(pMemory)+sizeof(MemoryHeader));
}
void operator delete(void* pMemory) noexcept
{
char* pMemoryHeaderStart{ reinterpret_cast<char*>(pMemory)-sizeof(MemoryHeader) };
MemoryHeader* pMemoryHeader{ reinterpret_cast<MemoryHeader*>(pMemoryHeaderStart) };
cout << "Deleting memory allocated from: "
<< pMemoryHeader->m_Filename << ":" << pMemoryHeader->m_Line << endl;
free(pMemoryHeader);
}
void operator delete[](void* pMemory) noexcept
{
char* pMemoryHeaderStart{ reinterpret_cast<char*>(pMemory)-sizeof(MemoryHeader) };
MemoryHeader* pMemoryHeader{ reinterpret_cast<MemoryHeader*>(pMemoryHeaderStart) };
cout << "Deleting memory allocated from: "
<< pMemoryHeader->m_Filename << ":" << pMemoryHeader->m_Line << endl;
free(pMemoryHeader);
}
class MyClass
{
private:
int m_Value{ 1 };
public:
void* operator new(size_t size, const char* filename, int line) noexcept
{
cout << "Allocating memory for MyClass!" << endl;
return malloc(size);
}
void operator delete(void* pMemory) noexcept
{
cout << "Freeing memory for MyClass!" << endl;
free(pMemory);
}
};
#define new new(__FILE__, __LINE__)
int main(int argc, char* argv[])
{
int* pInt{ new int };
*pInt = 1;
delete pInt;
MyClass* pClass{ new MyClass };
delete pClass;
const unsigned int NUM_ELEMENTS{ 5 };
MyClass* pArray{ new MyClass[NUM_ELEMENTS] };
delete[] pArray;
return 0;
}
The new and delete operators in the MyClass definition are called in the main function when creating a single instance of MyClass. You can see that this is the case in the output shown in Figure 10-13.
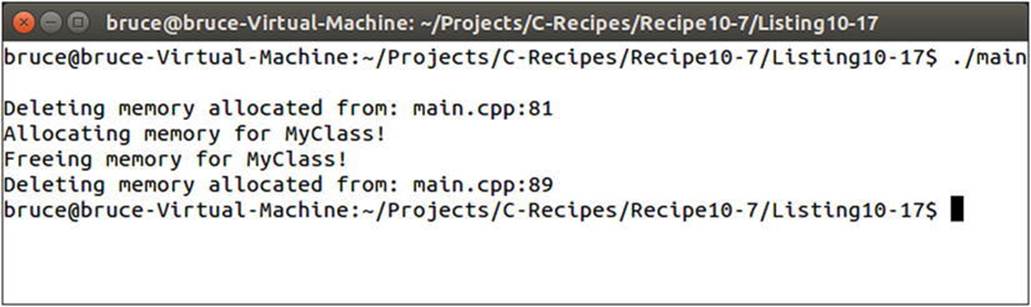
Figure 10-13. Output showing the use of member new and delete operators in MyClass
10-8. Calculating Performance Impacts of Code Changes
Problem
You would like to determine whether changes you’re making to code are faster or slower than the existing code.
Solution
C++ provides access to a computer system’s high-performance timers to carry out high-precision timing.
How It Works
The C++ programming language provides access to a high-resolution timer that allows you to make timing measurements around different parts of your code. This lets you record the time taken for your functions or algorithms and compare these across different versions to work out which are the most efficient and performant.
Listing 10-18 shows code that is used to time three different numbers of iterations around a loop.
Listing 10-18. Using chrono::high_resolution_timer
#include <chrono>
#include <iostream>
using namespace std;
void RunTest(unsigned int numberIterations)
{
auto start = chrono::high_resolution_clock::now();
for (unsigned int i{ 0 }; i < numberIterations; ++i)
{
unsigned int squared{ i*i*I };
}
auto end = chrono::high_resolution_clock::now();
auto difference = end - start;
cout << "Time taken: "
<< chrono::duration_cast<chrono::microseconds>(difference).count()
<< " microseconds!" << endl;
}
int main(int argc, char* argv[])
{
RunTest(10000000);
RunTest(100000000);
RunTest(1000000000);
return 0;
}
This listing shows that the chrono namespace in the STL provides a struct named high_resolution_clock with a static function called now. This function returns an object that is of type time_point from the chrono::system_clock struct. Listing 10-18 uses theauto keyword to deduce this type for the start and end variables in the RunTest function. Both start and end are initialized using the high_resolution_timer::now function, start before the for loop, and end after the for loop. The value of start is subtracted from the value of end to give the duration of time elapsed while the function was executing the loop. The chrono::duration_cast template is then used to convert the time_point difference variable into a representation that can be expressed in a human-readable form, in this case microseconds.
The RunTest function is called three different times from the main function. Each call has a different number of loop iterations to be run, to show that the timing code can be used to tell which of the runs is the least time-efficient. Figure 10-14 shows the output generated when running the program on an Intel Core i7-3770.
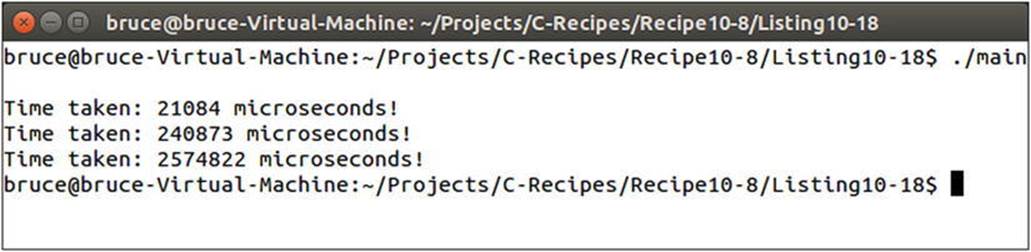
Figure 10-14. Output showing that each subsequent call to RunTest in Listing 10-18 takes longer to execute
duration_cast can be used to convert system times into nanoseconds, milliseconds, seconds, minutes, and hours, as well as microseconds. Microsecond precision is what you’re looking for when optimizing many computer-programming algorithms. The timing techniques used in this recipe will prove useful when comparing the impacts of memory storage types on program efficiency.
10-9. Understanding the Performance Impacts of Memory Choices
Problem
You have a program that is performing poorly, but you aren’t sure why.
Solution
There is no silver bullet to solve performance problems in modern computer programs. However, a lack of understanding of how memory works on a modern computer can lead to poorly performing programs. Understanding the impacts of cache misses on program performance will help you write better-performing programs.
How It Works
The speed of modern processors has accelerated at a much faster rate than memory-access latencies. This had led to a situation where processing performance can be severely hampered by poor memory-access patterns in your programs. Understanding how to structure your C++ programs to take effective use of processor cache memory is essential to writing the most performant programs possible.
Reading and writing data from main memory can take several hundred cycles on modern computer systems. Processors implement caches to help alleviate this problem. A modern CPU cache works by reading large chunks of data simultaneously from main memory into much faster cache memory. These chunks are known as cache lines. An L1 cache line on an Intel Core i7-3770 processor is 32KB in size. The processor reads an entire 32KB chunk into the L1 cache in a single go. If the data you’re reading or writing isn’t present in the cache, the result is a cache miss, and the processor must retrieve the data from L2 cache, L3 cache, or system RAM. Cache misses can be very expensive, and seemingly innocuous mistakes or choices in your code can have massive performance implications. Listing 10-19 contains one loop to initialize some arrays and three different loops that have different memory-access patterns.
Listing 10-19. Exploring the Performance Impacts of Memory Access Patterns
#include <chrono>
#include <iostream>
using namespace std;
const int NUM_ROWS{ 10000 };
const int NUM_COLUMNS{ 1000 };
int elements[NUM_ROWS][NUM_COLUMNS];
int* pElements[NUM_ROWS][NUM_COLUMNS];
int main(int argc, char* argv[])
{
for (int i{ 0 }; i < NUM_ROWS; ++i)
{
for (int j{ 0 }; j < NUM_COLUMNS; ++j)
{
elements[i][j] = i*j;
pElements[i][j] = new int{ elements[i][j] };
}
}
auto start = chrono::high_resolution_clock::now();
for (int i{ 0 }; i < NUM_ROWS; ++i)
{
for (int j{ 0 }; j < NUM_COLUMNS; ++j)
{
const int result{ elements[j][i] };
}
}
auto end = chrono::high_resolution_clock::now();
auto difference = end - start;
cout << "Time taken for j then i: "
<< chrono::duration_cast<chrono::microseconds>(difference).count()
<< " microseconds!" << endl;
start = chrono::high_resolution_clock::now();
for (int i{ 0 }; i < NUM_ROWS; ++i)
{
for (int j{ 0 }; j < NUM_COLUMNS; ++j)
{
const int result{ elements[i][j] };
}
}
end = chrono::high_resolution_clock::now();
difference = end - start;
cout << "Time taken for i then j: "
<< chrono::duration_cast<chrono::microseconds>(difference).count()
<< " microseconds!" << endl;
start = chrono::high_resolution_clock::now();
for (int i{ 0 }; i < NUM_ROWS; ++i)
{
for (int j{ 0 }; j < NUM_COLUMNS; ++j)
{
const int result{ *(pElements[i][j]) };
}
}
end = chrono::high_resolution_clock::now();
difference = end - start;
cout << "Time taken for pointers with i then j: "
<< chrono::duration_cast<chrono::microseconds>(difference).count()
<< " microseconds!" << endl;
return 0;
}
The first loop in Listing 10-19 is used to set up two arrays. The first array stores integer values directly, and the second array stores pointers to integers. Each of the arrays contains 10,000 × 1,000 unique elements.
It’s important to understand how multidimensional arrays are laid out in memory, to understand why this test creates the results it does with respect to cache-miss performance problems. A 3 × 2 array can be thought of as laid out as shown in Table 10-1.
Table 10-1. The Layout of a 3 × 2 Array
But computer memory isn’t two-dimensional in this manner. The elements of the array are laid out linearly in memory in the order of the numbers shown in Table 10-1. Given a 4-byte integer size, that means the value in Row 2 Column 1 can be found 12 bytes after the value in Row 1 Column 1. Extend the row size to 10,000, and you can see that there is no possibility for the element at the beginning of a following row residing in the same cache line as the previous row.
This fact allows the performance implications of cache misses to be tested with a simple loop. You can see this in the second loop in Listing 10-18, where the incremented j value is used to walk along the columns rather than the rows. The third loop walks along the array in the correct order. That is, it walks along the rows in linear order in memory. The fourth loop walks along the pElement array in linear order but has to dereference a pointer to reach the values stored in the array. The results show you the impacts of cache-unaware programming in the first loop, the ideal situation in the second, and the result of unnecessary memory indirection in the third. Figure 10-15 shows these results.
Figure 10-15. The results from the loops in Listing 10-19
You can see that the processor in my computer has a ten-times increase in the length of time taken to complete a simple loop when walking an array out of order. Such problems can cause stutters and delays in programs that can leave users and customers feeling a sense of frustration with your software. The case with pointer dereferences is also around twice as slow as the case where the integers can be accessed directly. You should consider the implications of this before using dynamic memory liberally.
10-10. Reducing Memory Fragmentation
Problem
You have a program that requires you to create a lot of small memory allocations over a long period of time, which introduces memory-fragmentation problems.
Solution
You can create a small block allocator that can be used to pack small allocations into larger pages.
How It Works
The first step in bundling small allocations together is to create a class that contains a larger page of memory. This recipe shows you a straightforward way to wrap a 32KB memory page in a class and manage allocations from this pool. The memory is tracked using an array of Boolean values that knows whether a given memory block is free or is in use. New pages of memory are added when all current pages are full.
The downside to this approach is that all allocations have a minimum size of 32 bytes. Any request for memory that is smaller than 32 bytes is allocated an entire block from a currently active memory page. Pages are also freed when they’re completely empty, to ensure that the program doesn’t grow to a high water mark and never release unneeded memory. Listing 10-20 shows the class definition for Page.
Listing 10-20. The Page Class Definition
class Page
{
private:
char m_Memory[1024 * 32];
bool m_Free[1024];
Page* m_pNextPage;
public:
Page();
~Page();
void* Alloc();
bool Free(void* pMem);
bool IsEmpty() const;
};
The Page class definition contains two arrays. There is a char array that serves memory-allocation requests. This pool is an array of bytes and in this case is 32KB in size. There are 1,024 individual blocks in the pool, each 32 bytes in size. The 1,024 blocks are mirrored in the Boolean array m_Free. This array is used to track whether a given block is already allocated or is free for allocation. The m_pNextPage pointer stores the address of the next page. The next page is used to allocate a block if the current page is entirely in use.
The class consists of five methods: a constructor, a destructor, an Alloc method, a Free method, and the IsEmpty method to determine if the page is no longer in use. Listing 10-21 shows the function bodies for the Page class’s constructor and destructor.
Listing 10-21. The Page Constructor and Destructor
Page()
: m_pNextPage{ nullptr }
{
memset(m_Free, 1, 1024);
}
~Page()
{
if (m_pNextPage)
{
delete m_pNextPage;
m_pNextPage = nullptr;
}
}
The Page constructor is responsible for initializing the m_pNextPage pointer to nullptr and for setting all the elements in the m_Free array to true. The destructor for Page is responsible for deleting the object pointer to m_pNextPage if it has been allocated.
Listing 10-22 shows the code for the Page::Alloc method.
Listing 10-22. The Page::Alloc Method
void* Alloc()
{
void* pMem{ nullptr };
for (unsigned int i = 0; i < 1024; ++i)
{
if (m_Free[i] == true)
{
m_Free[i] = false;
pMem = &m_Memory[i * 32];
break;
}
}
if (pMem == nullptr)
{
if (m_pNextPage == nullptr)
{
m_pNextPage = new Page();
}
pMem = m_pNextPage->Alloc();
}
return pMem;
}
The Alloc method is responsible for finding the first unused memory block in the page-linked list. The first step is to loop over the m_Free array and check each block to see whether it’s currently in use. If a free block is found, the pMem return value is set to the address of the free block. The Boolean for that block is set to false to indicate that the block is now in use. If a free block is found, the loop is broken.
In the event that a free block isn’t found, the memory must be allocated from another memory page. If another page has already been created, the pointer m_pNextPage already holds its address. If not, a new page is created. The Alloc method is then called on m_pNextPage. At this point, the Alloc method is recursive. It’s called repeatedly until a memory page is found that contains a free memory block to return up the stack to the calling code. The memory returned from a page must also be returned to that page when it’s no longer needed. The Free method inListing 10-23 is responsible for carrying out this task.
Listing 10-23. The Page::Free Method
bool Free(void* pMem)
{
bool freed{ false };
bool inPage{ pMem >= m_Memory && pMem <= &m_Memory[(NUM_PAGES * BLOCK_SIZE) - 1] };
if (inPage)
{
unsigned int index{
(reinterpret_cast<unsigned int>(pMem)-reinterpret_cast<unsigned int>(m_Memory))
/ BLOCK_SIZE };
m_Free[index] = true;
freed = true;
}
else if (m_pNextPage)
{
freed = m_pNextPage->Free(pMem);
if (freed && m_pNextPage->IsEmpty())
{
Page* old = m_pNextPage;
m_pNextPage = old->m_pNextPage;
old->m_pNextPage = nullptr;
delete m_pNextPage;
}
}
return freed;
}
The Page::Free method begins by checking whether the memory address being released is contained within the current page. It does so by comparing the address against the address of the beginning of the memory page and the address of the last block in the page. If the memory being freed is greater than or equal to the page address and less than or equal to the last block in the page, then the memory was allocated from this page. In this case, the m_Free Boolean for this block can be set back to true. The memory itself doesn’t need to be cleared, because new gives no guarantees of the values contained in the memory it returns—that is responsibility of the caller.
If the memory was not found in the current Page, then the Free method checks whether the Page has a pointer to another Page object. If it does, then the Free method is called on that Page. The Free method is recursive in nature in the same way as the Alloc method. If the call toFree on m_pNextPage returned a true value, the Page is checked to see if it’s now empty. If it is, then the Page can be released. Because Page is using a simple linked list to track pages, you must make sure you don’t orphan the tails of the list. You need to ensure that them_pNextPage pointer of the current page is set to point to the m_pNextPage pointer of the Page being released. The IsEmpty method is called in the Free method; the body of this method is shown in Listing 10-24.
Listing 10-24. The Page::IsEmpty Method
bool IsEmpty() const
{
bool isEmpty{ true };
for (unsigned int i = 0; i < NUM_PAGES; ++i)
{
if (m_Free[i] == false)
{
isEmpty = false;
break;
}
}
return isEmpty;
}
The IsEmpty method checks the free list to determine whether the page is currently in use. If any of the blocks in the Page aren’t free, than the Page isn’t empty. The linked list of pages is accessed through another class called SmallBlockAllocator. This simplifies the management of the pages for the calling code. Listing 10-25 shows the SmallBlockAllocator class.
Listing 10-25. The SmallBlockAllocator Class
class SmallBlockAllocator
{
public:
static const unsigned int BLOCK_SIZE{ 32 };
private:
static const unsigned int NUM_ BLOCKS { 1024 };
static const unsigned int PAGE_SIZE{ NUM_ BLOCKS * BLOCK_SIZE };
class Page
{
private:
char m_Memory[PAGE_SIZE];
bool m_Free[NUM_ BLOCKS];
Page* m_pNextPage;
public:
Page()
: m_pNextPage{ nullptr }
{
memset(m_Free, 1, NUM_ BLOCKS);
}
~Page()
{
if (m_pNextPage)
{
delete m_pNextPage;
m_pNextPage = nullptr;
}
}
void* Alloc()
{
void* pMem{ nullptr };
for (unsigned int i = 0; i < NUM_ BLOCKS; ++i)
{
if (m_Free[i] == true)
{
m_Free[i] = false;
pMem = &m_Memory[i * BLOCK_SIZE];
break;
}
}
if (pMem == nullptr)
{
if (m_pNextPage == nullptr)
{
m_pNextPage = new Page();
}
pMem = m_pNextPage->Alloc();
}
return pMem;
}
bool Free(void* pMem)
{
bool freed{ false };
bool inPage{ pMem >= m_Memory &&
pMem <= &m_Memory[(NUM_ BLOCKS * BLOCK_SIZE) - 1] };
if (inPage)
{
unsigned int index{
(reinterpret_cast<unsigned int>(pMem)-
reinterpret_cast<unsigned int>(m_Memory)) / BLOCK_SIZE };
m_Free[index] = true;
freed = true;
}
else if (m_pNextPage)
{
freed = m_pNextPage->Free(pMem);
if (freed && m_pNextPage->IsEmpty())
{
Page* old = m_pNextPage;
m_pNextPage = old->m_pNextPage;
old->m_pNextPage = nullptr;
delete m_pNextPage;
}
}
return freed;
}
bool IsEmpty() const
{
bool isEmpty{ true };
for (unsigned int i = 0; i < NUM_BLOCKS; ++i)
{
if (m_Free[i] == false)
{
isEmpty = false;
break;
}
}
return isEmpty;
}
};
Page m_FirstPage;
public:
SmallBlockAllocator() = default;
void* Alloc()
{
return m_FirstPage.Alloc();
}
bool Free(void* pMem)
{
return m_FirstPage.Free(pMem);
}
};
The Page class can be seen as an internal class to SmallBlockAllocator in Listing 10-25. This helps ensure that only the SmallBlockAllocator itself can be used as an interface to the Page objects. SmallBlockAllocator begins by creating static constants to control the size of the blocks and number of blocks each Page contains. The only public methods exposed from SmallBlockAllocator are an Alloc method and a Free method. These simply wrap calls to Page::Alloc and Page::Free and are called on the member m_FirstPage. This means the SmallBlockAllocator class always has at least one page of memory allocated for small allocations, and this page will be resident in your program for as long as SmallBlockAllocator is active.
Listing 10-26 shows the overloaded new and delete operators that are needed to route small allocations to SmallBlockAllocator.
Listing 10-26. Routing Small Allocations to SmallBlockAllocator
static SmallBlockAllocator sba;
void* operator new(unsigned int numBytes)
{
void* pMem{ nullptr };
if (numBytes <= SmallBlockAllocator::BLOCK_SIZE)
{
pMem = sba.Alloc();
}
else
{
pMem = malloc(numBytes);
}
return pMem;
}
void* operator new[](unsigned int numBytes)
{
void* pMem{ nullptr };
if (numBytes <= SmallBlockAllocator::BLOCK_SIZE)
{
pMem = sba.Alloc();
}
else
{
pMem = malloc(numBytes);
}
return pMem;
}
void operator delete(void* pMemory)
{
if (!sba.Free(pMemory))
{
free(pMemory);
}
}
void operator delete[](void* pMemory)
{
if (!sba.Free(pMemory))
{
free(pMemory);
}
}
The new and new[] operators in Listing 10-26 check the number of bytes being allocated against the supported block size of the SmallBlockAllocator class. If the size of memory being requested is smaller or equal to the block size of the SBA, the Alloc method is called on thestatic sba object. If it was larger, then malloc is used. The two delete functions both call Free on sba. If Free returns false, then the memory being released wasn’t present in any of the small block pages and is released using the free function.
That covers all the code needed to implement a simple small-block allocator. Listing 10-27 shows the entire listing for a working example program that uses this class.
Listing 10-27. A Working Small-Block Allocator Example
#include <cstdlib>
#include <iostream>
using namespace std;
class SmallBlockAllocator
{
public:
static const unsigned int BLOCK_SIZE{ 32 };
private:
static const unsigned int NUM_BLOCKS{ 1024 };
static const unsigned int PAGE_SIZE{ NUM_BLOCKS * BLOCK_SIZE };
class Page
{
private:
char m_Memory[PAGE_SIZE];
bool m_Free[NUM_BLOCKS];
Page* m_pNextPage;
public:
Page()
: m_pNextPage{ nullptr }
{
memset(m_Free, 1, NUM_BLOCKS);
}
~Page()
{
if (m_pNextPage)
{
delete m_pNextPage;
m_pNextPage = nullptr;
}
}
void* Alloc()
{
void* pMem{ nullptr };
for (unsigned int i{ 0 }; i < NUM_BLOCKS; ++i)
{
if (m_Free[i] == true)
{
m_Free[i] = false;
pMem = &m_Memory[i * BLOCK_SIZE];
break;
}
}
if (pMem == nullptr)
{
if (m_pNextPage == nullptr)
{
m_pNextPage = new Page();
}
pMem = m_pNextPage->Alloc();
}
return pMem;
}
bool Free(void* pMem)
{
bool freed{ false };
bool inPage{ pMem >= m_Memory &&
pMem <= &m_Memory[(NUM_BLOCKS * BLOCK_SIZE) - 1] };
if (inPage)
{
unsigned int index{
(reinterpret_cast<unsigned int>(pMem)-
reinterpret_cast<unsigned int>(m_Memory)) / BLOCK_SIZE };
m_Free[index] = true;
freed = true;
}
else if (m_pNextPage)
{
freed = m_pNextPage->Free(pMem);
if (freed && m_pNextPage->IsEmpty())
{
Page* old = m_pNextPage;
m_pNextPage = old->m_pNextPage;
old->m_pNextPage = nullptr;
delete m_pNextPage;
}
}
return freed;
}
bool IsEmpty() const
{
bool isEmpty{ true };
for (unsigned int i{ 0 }; i < NUM_BLOCKS; ++i)
{
if (m_Free[i] == false)
{
isEmpty = false;
break;
}
}
return isEmpty;
}
};
Page m_FirstPage;
public:
SmallBlockAllocator() = default;
void* Alloc()
{
return m_FirstPage.Alloc();
}
bool Free(void* pMem)
{
return m_FirstPage.Free(pMem);
}
};
static SmallBlockAllocator sba;
void* operator new(size_t numBytes, const std::nothrow_t& tag) noexcept
{
void* pMem{ nullptr };
if (numBytes <= SmallBlockAllocator::BLOCK_SIZE)
{
pMem = sba.Alloc();
}
else
{
pMem = malloc(numBytes);
}
return pMem;
}
void* operator new[](size_t numBytes, const std::nothrow_t& tag) noexcept
{
void* pMem{ nullptr };
if (numBytes <= SmallBlockAllocator::BLOCK_SIZE)
{
pMem = sba.Alloc();
}
else
{
pMem = malloc(numBytes);
}
return pMem;
}
void operator delete(void* pMemory)
{
if (!sba.Free(pMemory))
{
free(pMemory);
}
}
void operator delete[](void* pMemory)
{
if (!sba.Free(pMemory))
{
free(pMemory);
}
}
int main(int argc, char* argv[])
{
const unsigned int NUM_ALLOCS{ 2148 };
int* pInts[NUM_ALLOCS];
for (unsigned int i{ 0 }; i < NUM_ALLOCS; ++i)
{
pInts[i] = new int;
*pInts[i] = i;
}
for (unsigned int i{ 0 }; i < NUM_ALLOCS; ++i)
{
delete pInts[i];
pInts[i] = nullptr;
}
return 0;
}