C++ Recipes: A Problem-Solution Approach (2015)
CHAPTER 9
Templates
The STL is written using a language feature provided by C++ called templates. Templates provide a method you can use to write generic code that can be specialized at compile time to create concrete functions and classes of varying type. The only requirement for template code is that output can be generated for all of the types used to specialize a template in your program. This may be a little difficult to understand at this point, but it should be clearer by the time you finish this chapter.
9-1. Creating a Template Function
Problem
You would like to create a function that can be passed different types of parameters and return different types of values.
Solution
It’s possible to use method overloading to supply different versions of a function for each type you wish to support, but this still limits you to functions with the types supplied. A better approach is to create a template function that that be specialized to work with any type.
How It Works
C++ includes a template compiler that can be used to turn generic function definitions into concrete functions at compile time.
Creating a Template Function
Templates allow you to write code without specifying concrete types. Code usually contains the types you wish to work with; Listing 9-1 shows a function written under these normal circumstances.
Listing 9-1. A Non-Template Function
#include <iostream>
using namespace std;
int Add(int a, int b)
{
return a + b;
}
int main(int argc, char* argv[])
{
const int number1{ 1 };
const int number2{ 2 };
const int result{ Add(number1, number2) };
cout << "The result of adding" << endl;
cout << number1 << endl;
cout << "to" << endl;
cout << number2 << endl;
cout << "is" << endl;
cout << result;
return 0;
}
The Add function in Listing 9-1 is a standard C++ function. It takes two int parameters and returns an int value. You could supply a float version of this function by copying the function and altering every reference to int so that it used a float instead. You could then do the same for string and any other types you wished the function to support. The problem with this approach is that you must duplicate the function for every type, even though the body of the function remains the same. An alternative solution is to use a template function. You can see a template version of Add in Listing 9-2.
Listing 9-2. A Template Version of Add
template <typename T>
T Add(const T& a, const T& b)
{
return a + b;
}
As you can see, the template version of Add no longer uses the concrete type int. Instead, the function is defined inside a template block. The template keyword is used to tell the compiler that the next block of code should be treated as a template. This is followed by an angled bracket section (< >) that defines any types the template uses. This example defines a single template type, represented by the character T. T is then used to specify the return type and the types of both parameters being passed to the function.
![]() Note It’s a good idea to pass parameters to template functions as const references. The initial implementation of Add passed int types by value, but there’s no guarantee that a template won’t be used by a type that would create a performance penalty when passed by value, such as a copied object.
Note It’s a good idea to pass parameters to template functions as const references. The initial implementation of Add passed int types by value, but there’s no guarantee that a template won’t be used by a type that would create a performance penalty when passed by value, such as a copied object.
Now that you have templatized the Add function, you can see in Listing 9-3 that the calling code in the main function is no different than that shown in Listing 9-1.
Listing 9-3. Calling the Template Add Function
#include <iostream>
using namespace std;
template <typename T>
T Add(const T& a, const T& b)
{
return a + b;
}
int main(int argc, char* argv[])
{
const int number1{ 1 };
const int number2{ 2 };
const int result{ Add(number1, number2) };
cout << "The result of adding" << endl;
cout << number1 << endl;
cout << "to" << endl;
cout << number2 << endl;
cout << "is" << endl;
cout << result;
return 0;
}
Listing 9-3 contains a call to the Add function in exactly the same place as the code in Listing 9-1. This is possible because compilers can implicitly work out the correct type to use with a template.
Explicit vs. Implicit Template Specialization
Sometimes you want to be explicit about the types your template can use. Listing 9-4 shows an example of explicit template specialization.
Listing 9-4. Explicit and Implicit Template Specialization
#include <iostream>
using namespace std;
template <typename T>
T Add(const T& a, const T& b)
{
return a + b;
}
template <typename T>
void Print(const T& value1, const T& value2, const T& result)
{
cout << "The result of adding" << endl;
cout << value1 << endl;
cout << "to" << endl;
cout << value2 << endl;
cout << "is" << endl;
cout << result;
cout << endl << endl;
}
int main(int argc, char* argv[])
{
const int number1{ 1 };
const int number2{ 2 };
const int intResult{ Add(number1, number2) };
Print(number1, number2, intResult);
const float floatResult{ Add(static_cast<float>(number1), static_cast<float>(number2)) };
Print<float>(number1, number2, floatResult);
return 0;
}
Listing 9-4 adds a template Print function that takes three templatized parameters. This function is called twice in the main function. The first time, the template type is deduced implicitly. This is possible because all three parameters passed to the function are of type int; therefore the compiler works out that you intended to call an int version of the template. The second call to Print is explicit. This is achieved by adding angled brackets containing the type to use (in this case, float) immediately after the function name. This is necessary due to the different types of variables being passed to the function. Here number1 and number2 are both of type int, but floatResult is of type float; as a result, the compiler can’t deduce the correct type to use with the template. Visual Studio generated the following error when I tried to compile this code using implicit specialization:
error C2782: 'void Print(const T &,const T &,const T &)' : template parameter 'T' is ambiguous
9-2. Partially Specializing a Template
Problem
You have a template function that won’t compile with a specific type.
Solution
You can create template overloads using partial template specialization.
How It Works
The body of a template function contains code that requires implicit properties from the types you use to specialize that template. Consider the code in Listing 9-5.
Listing 9-5. A Template Function
#include <iostream>
using namespace std;
template <typename T>
T Add(const T& a, const T& b)
{
return a + b;
}
template <typename T>
void Print(const T& value1, const T& value2, const T& result)
{
cout << "The result of adding" << endl;
cout << value1 << endl;
cout << "to" << endl;
cout << value2 << endl;
cout << "is" << endl;
cout << result;
cout << endl << endl;
}
int main(int argc, char* argv[])
{
const int number1{ 1 };
const int number2{ 2 };
const int intResult{ Add(number1, number2) };
Print(number1, number2, intResult);
return 0;
}
This code requires two implicit properties from the types used by the Add function and then the Print function. The Add function requires that the type used can also be used with the + operator. The Print function requires that the type used can be passed to the << operator. Themain function uses these functions with int variables, so both of these conditions are met. If you were to use Add or Print with a class you created, then chances are that the compiler wouldn’t be able to use that class with the + or << operator.
![]() Note The “proper” solution in this case is to add overloaded + and << operators so that the original code works as expected. This example shows how you can use partial specialization to achieve the same result.
Note The “proper” solution in this case is to add overloaded + and << operators so that the original code works as expected. This example shows how you can use partial specialization to achieve the same result.
You can easily update Listing 9-5 to use a simple class, as shown in Listing 9-6.
Listing 9-6. Using Templates with Classes
#include <iostream>
using namespace std;
class MyClass
{
private:
int m_Value{ 0 };
public:
MyClass() = default;
MyClass(int value)
: m_Value{ value }
{
}
MyClass(int number1, int number2)
: m_Value{ number1 + number2 }
{
}
int GetValue() const
{
return m_Value;
}
};
template <typename T>
T Add(const T& a, const T& b)
{
return a + b;
}
template <typename T>
void Print(const T& value1, const T& value2, const T& result)
{
cout << "The result of adding" << endl;
cout << value1 << endl;
cout << "to" << endl;
cout << value2 << endl;
cout << "is" << endl;
cout << result;
cout << endl << endl;
}
int main(int argc, char* argv[])
{
const MyClass number1{ 1 };
const MyClass number2{ 2 };
const MyClass intResult{ Add(number1, number2) };
Print(number1, number2, intResult);
return 0;
}
The code in Listing 9-6 won’t compile. Your compiler won’t be able to find suitable operators that can be used with the MyClass type for + and <<. You can fix this problem by using partial template specialization, as shown in Listing 9-7.
Listing 9-7. Using Partial Template Specialization
#include <iostream>
using namespace std;
class MyClass
{
private:
int m_Value{ 0 };
public:
MyClass() = default;
MyClass(int value)
: m_Value{ value }
{
}
MyClass(int number1, int number2)
: m_Value{ number1 + number2 }
{
}
int GetValue() const
{
return m_Value;
}
};
template <typename T>
T Add(const T& a, const T& b)
{
return a + b;
}
template <>MyClass Add(const MyClass& myClass1, const MyClass& myClass2){
return MyClass(myClass1.GetValue(), myClass2.GetValue());}
template <typename T>
void Print(const T& value1, const T& value2, const T& result)
{
cout << "The result of adding" << endl;
cout << value1 << endl;
cout << "to" << endl;
cout << value2 << endl;
cout << "is" << endl;
cout << result;
cout << endl << endl;
}
template <>void Print(const MyClass& value1, const MyClass& value2, const MyClass& result){
cout << "The result of adding" << endl;
cout << value1.GetValue() << endl;
cout << "to" << endl;
cout << value2.GetValue() << endl;
cout << "is" << endl;
cout << result.GetValue();
cout << endl << endl;}
int main(int argc, char* argv[])
{
const MyClass number1{ 1 };
const MyClass number2{ 2 };
const MyClass intResult{ Add(number1, number2) };
Print(number1, number2, intResult);
return 0;
}
The code in Listing 9-7 adds specialized versions of Add and Print. It does so by using an empty template-type specifier and the concrete MyClass types in the function signatures. You can see this in the Add function, where the parameters being passed are of type MyClass and the return value is of type MyClass. The partially specialized Print function also passes const references to MyClass variables. The template functions can still be used with variables such as ints and floats but now also explicitly support the MyClass type.
For the sake of completeness, Listing 9-8 shows a preferred implementation that adds support for the + and << operators and MyClass.
Listing 9-8. Adding + and << Operator Support to MyClass
#include <iostream>
using namespace std;
class MyClass
{
friend ostream& operator <<(ostream& os, const MyClass& myClass);
private:
int m_Value{ 0 };
public:
MyClass() = default;
MyClass(int value)
: m_Value{ value }
{
}
MyClass(int number1, int number2)
: m_Value{ number1 + number2 }
{
}
MyClass operator +(const MyClass& other) const
{
return m_Value + other.m_Value;
}
};
ostream& operator <<(ostream& os, const MyClass& myClass){
os << myClass.m_Value;
return os;}
template <typename T>
T Add(const T& a, const T& b)
{
return a + b;
}
template <typename T>
void Print(const T& value1, const T& value2, const T& result)
{
cout << "The result of adding" << endl;
cout << value1 << endl;
cout << "to" << endl;
cout << value2 << endl;
cout << "is" << endl;
cout << result;
cout << endl << endl;
}
int main(int argc, char* argv[])
{
const MyClass number1{ 1 };
const MyClass number2{ 2 };
const MyClass intResult{ Add(number1, number2) };
Print(number1, number2, intResult);
return 0;
}
This code adds support for the + operator to MyClass directly. A function is also specified for the << operator that works along with the ostream type. This works because cout is compatible with ostream (which stands for output stream). This function signature is added as afriend of MyClass so that the function can access internal data from MyClass. You could also leave the GetValue accessor and not add the operator as a friend function.
9-3. Creating Class Templates
Problem
You would like to create a class that can store variables of different types without duplicating all the code.
Solution
C++ allows for the creation of template classes that support abstract types.
How It Works
You can define a class as a template using the template specifier. The template specifier takes types and values as parameters that the compiler uses to build a specialization of the template code. Listing 9-9 shows an example that uses an abstract type and value to construct a template class.
Listing 9-9. Creating a Template Class
#include <iostream>
using namespace std;
template <typename T, int numberOfElements>
class MyArray
{
private:
T m_Array[numberOfElements];
public:
MyArray()
: m_Array{}
{
}
T& operator[](const unsigned int index)
{
return m_Array[index];
}
};
int main(int argc, char* argv[])
{
const unsigned int ARRAY_SIZE{ 5 };
MyArray<int, ARRAY_SIZE> myIntArray;
for (unsigned int i{ 0 }; i < ARRAY_SIZE; ++i)
{
myIntArray[i] = i;
}
for (unsigned int i{ 0 }; i < ARRAY_SIZE; ++i)
{
cout << myIntArray[i] << endl;
}
cout << endl;
MyArray<float, ARRAY_SIZE> myFloatArray;
for (unsigned int i{ 0 }; i < ARRAY_SIZE; ++i)
{
myFloatArray[i] = static_cast<float>(i)+0.5f;
}
for (unsigned int i{ 0 }; i < ARRAY_SIZE; ++i)
{
cout << myFloatArray[i] << endl;
}
return 0;
}
The class MyArray creates a C-style array of type T and a number of elements. Both of these are abstract at the time you write the class and are specified at the time you use them in your code. You can now use the MyArray class to create an array of any size and containing any number of elements that can be represented by an int. You can see this in practice in the main function, where the MyArray class template is specialized to create an array of ints and an array of floats. Figure 9-1 shows the output generated when running this code: the two arrays contain different types of variables.
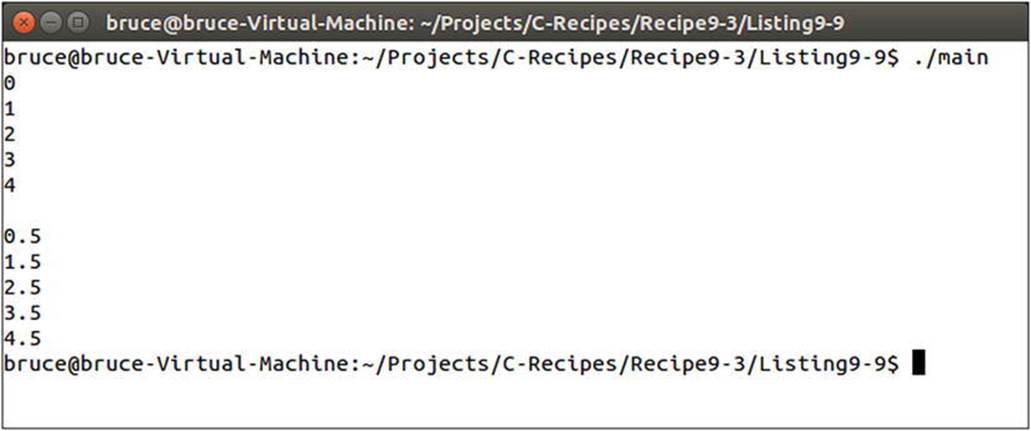
Figure 9-1. The output generated by running the code in Listing 9-9
![]() Note The creation of an array template wrapper is a simple example that shows the foundation of the std::array template supplied by the STL. The STL version supports STL iterators and algorithms and is a better choice than writing your own implementation.
Note The creation of an array template wrapper is a simple example that shows the foundation of the std::array template supplied by the STL. The STL version supports STL iterators and algorithms and is a better choice than writing your own implementation.
9-4. Creating Singletons
Problem
You have a system, and you would like to create a single instance of it that you can access from many places in your application.
Solution
You can use a template to create a Singleton base class.
How It Works
The basis of the singleton is a class template. The Singleton class template contains a static pointer to an abstract type that can be used to represent any type of class you like. A byproduct of using a static pointer is that the instance of the class can be accessed from anywhere in your program. You should be careful not to abuse this, although it can be a useful property. Listing 9-10 shows show to create and use a Singleton template.
Listing 9-10. The Singleton Template
#include <cassert>
#include <iostream>
using namespace std;
template <typename T>
class Singleton
{
private:
static T* m_Instance;
public:
Singleton()
{
assert(m_Instance == nullptr);
m_Instance = static_cast<T*>(this);
}
virtual ~Singleton()
{
m_Instance = nullptr;
}
static T& GetSingleton()
{
return *m_Instance;
}
static T* GetSingletonPtr()
{
return m_Instance;
}
};
template <typename T>
T* Singleton<T>::m_Instance = nullptr;
class Manager
: public Singleton < Manager >
{
public:
void Print() const
{
cout << "Singleton Manager Successfully Printing!";
}
};
int main(int argc, char* argv[])
{
new Manager();
Manager& manager{ Manager::GetSingleton() };
manager.Print();
delete Manager::GetSingletonPtr();
return 0;
}
The Singleton class in Listing 9-10 is a template class that contains a private static pointer to the abstract type T. The Singleton constructor assigns a cast of this to the m_Instance variable. It’s possible to use a static_cast in this manner because you know that the type of the object will be the type supplied to the template. The class’s virtual destructor is responsible for setting m_Instance back to nullptr; there are also reference and pointer accessors to the instance.
Listing 9-10 then uses this template to create a Singleton-capable Manager class. It does so by creating a class that inherits from Singleton and passes its own type into the Singleton template parameter.
![]() Note Passing the type of a class into a template from which the class derives is known as the curiously recursive template pattern.
Note Passing the type of a class into a template from which the class derives is known as the curiously recursive template pattern.
The main function creates a Manager using the new keyword. The Manager isn’t stored as a reference or pointer to the class. Although you could do this, it’s better to simply use the accessor to the Singleton from this point. You do so by using the static function syntax with the name of the derived class. The main function creates a reference to the Manager instance by calling the Manager::GetSingleton function.
The Singleton instance is deleted by calling delete on the value returned by Manager::GetSingletonPtr. This causes ~Singleton to be called, which clears the address stored in m_Instance and releases the memory used to store the instance.
![]() Note This Singleton class is based on the implementation originally written by Scott Bilas in Game Programming Gems (Charles River Media, 2000).
Note This Singleton class is based on the implementation originally written by Scott Bilas in Game Programming Gems (Charles River Media, 2000).
9-5. Calculating Values at Compile Time
Problem
You need to calculate complex values and would like to avoid computing them at runtime.
Solution
Template metaprogramming takes advantage of the C++ template compiler to calculate values at compile time and save runtime performance for users.
How It Works
Template metaprogramming can be a complex topic to understand. This complexity comes from the scope of the C++ template compiler’s capabilities. In addition to letting you carry out generic programming by abstracting types from functions and classes, the template compiler can also compute values.
Hashing data is a common method of comparing two sets of data for equality. It works by creating a hash of the data at the time of creation and comparing the hash to the runtime version of the data. You can use this method to detect changes in executables of data files when your program is being executed. The SDBM hash is a simple-to-implement hashing function; Listing 9-11 shows a normal function implementation of the SDBM hash algorithm.
Listing 9-11. The SDBM Hash Algorithm
#include <iostream>
#include <string>
using namespace std;
unsigned int SDBMHash(const std::string& key)
{
unsigned int result{ 0 };
for (unsigned int character : key)
{
result = character + (result << 6) + (result << 16) - result;
}
return result;
}
int main(int argc, char* argv[])
{
std::string data{ "Bruce Sutherland" };
unsigned int sdbmHash{ SDBMHash(data) };
cout << "The hash of " << data << " is " << sdbmHash;
return 0;
}
The SDBMHash function in Listing 9-11 works by iterating over the supplied data and calculating a result by manipulating each byte from the data set into a result variable. This functional version of SDBMHash is useful for creating a hash of data loaded at runtime, but here the data being supplied was known at compile time. You can optimize the execution speed of your program by replacing this function with a template metaprogram. Listing 9-12 does just that.
Listing 9-12. Replacing SDBMHash with a Template Metaprogram
#include <iostream>
using namespace std;
template <int stringLength>
struct SDBMCalculator
{
constexpr static unsigned int Calculate(const char* const stringToHash, unsigned int& value)
{
unsigned int character{
SDBMCalculator<stringLength - 1>::Calculate(stringToHash, value)
};
value = character + (value << 6) + (value << 16) - value;
return stringToHash[stringLength - 1];
}
constexpr static unsigned int CalculateValue(const char* const stringToHash)
{
unsigned int value{};
unsigned int character{ SDBMCalculator<stringLength>::Calculate(stringToHash, value) };
value = character + (value << 6) + (value << 16) - value;
return value;
}
};
template<>
struct SDBMCalculator < 1 >
{
constexpr static unsigned int Calculate(const char* const stringToHash, unsigned int& value)
{
return stringToHash[0];
}
};
constexpr unsigned int sdbmHash{ SDBMCalculator<16>::CalculateValue("Bruce Sutherland") };
int main(int argc, char* argv[])
{
cout << "The hash of Bruce Sutherland is " << sdbmHash << endl;
return 0;
}
You can immediately see that the code in Listing 9-12 looks much more complicated than Listing 9-11. The syntax required to write template metaprograms isn’t the nicest to read. The main function is now a single line of code. The hash value is stored in a constant, and no call is made to any of the template functions. You can test this by placing a breakpoint in the template functions and running a release build of your program.
The template metaprogram in Listing 9-12 works by using recursion. The length of the data to be hashed is supplied to the template parameter and can be seen when the sdbmHash variable is initialized. Here, 16 is passed to the template, which is the length of the string “Bruce Sutherland”. The template compiler recognizes that it has been supplied with data that it can evaluate at compile time, and therefore it automatically calls the Calculate metaprogram function in the CalculateValue function. This recursion occurs until the terminator is hit. The terminator is the partially specialized version of Calculate that is written to be called once the length of the data to be hashed is 1. When the terminator is reached, the recursive calls begin to unwind, and the compiler eventually stores the result of the template metaprogram in thesdbmHash variable. You can see the template metaprogram in action using a debug build. The compiler won’t optimize out the template metaprogram in a debug build, which allows you to test your code and step through it to see the results. Figure 9-2 shows the output from running the code in Listing 9-12.

Figure 9-2. The output generated by the code in Listing 9-12, showing the SDBM hash of the string “Bruce Sutherland”