Real World .NET, C#, and Silverlight: Indispensible Experiences from 15 MVPs (2012)
Chapter 7
MVVM Patterns in Silverlight 4
by Kevin Grossnicklaus
As developers working with either the Silverlight or Windows Presentation Foundation (WPF) platforms, it is a safe bet that you have already heard about the Model-View-ViewModel (MVVM) pattern for developing user interfaces (UIs). Numerous books, magazine articles, and blogs enthusiastically explain the benefits of MVVM and demonstrate the advantages of leveraging this new development pattern. The unfortunate reality when working with MVVM is that, although the primary concepts of the pattern provide definite benefits to developers, there is no universally accepted implementation.
Because the core libraries for Silverlight and WPF development do not ship with any reusable MVVM-specific constructs for developers to utilize when developing an MVVM-based architecture, it is up to individual developers to “roll their own” framework components, or adopt one of the numerous third-party frameworks that have sprung up to fill this void. Much of the MVVM knowledge out there (whether in print or on the Internet) originates from bright developers who realize innovative and effective ways to utilize new technologies such as Silverlight and XAML to streamline how patterns such as MVVM are implemented.
Although this innovation is one of the great things about our industry, developers new to MVVM who look for guidance on “best practices” are often overwhelmed with all the differing MVVM solutions and architectures being promoted. Many of these recommendations and concepts contain great ideas, and most are only slightly different solutions to the same fundamental MVVM patterns. This is not necessarily a bad thing but does force new developers to have a deeper fundamental understanding of the problems these frameworks try to solve prior to deciding which framework or implementation pattern is best for them.
This chapter explains some of these fundamental choices and walks you through the development of a set of MVVM framework components for use in Silverlight line-of-business (LOB) applications. To focus solely on the MVVM components that make up this framework, this discussion generally assumes that you are proficient in Silverlight development, and that you have an understanding of XAML and data binding. Other chapters in this book focus on specific implementation concepts related to building Silverlight applications, many of which are complementary to the MVVM-based architecture you build here.
Developing Your Own Framework
Before beginning a review of the MVVM pattern itself and designing a UI architecture to support it, let's first discuss the reason you are developing your own framework.
You can choose to build upon many existing options that can give your applications an out-of-the-box MVVM architecture, and near the end of this chapter, you learn about a few of the most common options available, as well as their capabilities. For many projects and teams, selecting one of these prewritten frameworks is the best choice for a solid foundation. For other teams, a custom-developed framework for implementing MVVM concepts is definitely preferable, given the particular needs and capabilities of the teams.
Even when choosing to use a prewritten framework, properly determining which one best suits a project's needs is critical. Although they all fundamentally exist to solve similar problems, they all do so via different implementations that each come with different limitations and benefits.
You should become as familiar as possible with the full capabilities of any platform, and study as many different solutions to the same problem as possible, before deciding which solution or framework is the best fit for your environment. Thus, the purpose of this chapter is to familiarize you with the concepts of MVVM through the exercise of putting together a small framework to support this pattern. In doing so, you can not only gain an understanding of basic MVVM concepts, but you can also better evaluate all the available options, as well as recognize their strengths and weaknesses.
Getting to Know MVVM
Before diving too far into the development of a whole MVVM framework, it is worth taking a minute to review the general reasons why this pattern exists, and why it has gained such popularity within the WPF and Silverlight development spaces.
At its simplest, the MVVM pattern is a recommended practice for the separation of concerns for UI components and the data in which they are intended to display. Developers looking to implement this pattern are asked to separate their UI logic into three distinct components:
· Model — These are the data structures that represent objects within a particular application's target domain. The MVVM pattern requires that these classes be contained within a distinct tier, and, to the extent possible, that they encapsulate all their own business rules and validation logic. Beyond a few implementation details you learn about later in this chapter, the MVVM pattern doesn't care where these Model objects come from, or how they are written.
· View — The View component of an MVVM-based interface is simply the visual representation of a particular screen or a component. All code within the View tier (whether declarative via XAML or written in a .NET language such as C# or VB.NET) should be 100 percent related to UI concerns. As you quickly can realize, because of the power of XAML and Silverlight data binding, it is common for a View to be declared 100 percent in XAML, and to have no code-behind beyond the default initialization code provided by your integrated development environment (IDE).
· ViewModel — The ViewModel tier is represented by a nonvisual .NET class that encapsulates all the logic necessary to load or save any model data, and to expose it to the View for display or interaction. The ViewModel should also react to any actions taken by a user via the View (such as button-click events).
Although these brief descriptions provide the 50,000-foot overview of the parts of an MVVM UI, in practice, there is obviously more that goes into making all the moving parts work. Many of these details become apparent as you develop an actual MVVM framework.
Also, these descriptions focus solely on the “what” aspect of the primary MVVM components, and don't explain why they are important, or what benefit all this provides to the general .NET developer.
One of the primary reasons the .NET industry has begun to heavily adopt these types of patterns is generally related to testability. As the concept of a Test-Driven Development (TDD) process has become more mainstream (and as unit testing has become less shocking to most developers and more of a common, day-to-day practice), it became necessary to revisit how and where you put the majority of your code to simplify this process. Mixing critical business logic into the code-behind of your UIs made it less possible to include unit tests for these areas, hampering the whole development process.
A solution in which your logic was separated from your interfaces was necessary. Although the concept of this type of separation had existed for years, it was only recently that .NET developers married these patterns with the current capabilities of the .NET platform to develop frameworks such as ASP.NET Model-View-Controller (MVC) and Silverlight MVVM. In both ASP.NET MVC and MVVM, the goal is to create a clean separation of logic into a layer outside of the UI. The reason for two different patterns is directly related to the differences in platform capabilities between Silverlight and ASP.NET. In the request-and-response model that the web imposes on ASP.NET, the MVC framework is a perfect fit, whereas the data-binding capabilities of Silverlight make the MVVM pattern much more suitable.
Many developers who are new to MVVM and attempting to implement this pattern for the first time not only become confused with all the implementation details and possibilities, but also often come to a point in which they question the value of the pattern versus the complexity of the implementation. They often point to examples where tasks that traditionally took a few lines of code in the code-behind of a Silverlight UserControl now take much more code to cleanly adhere to the separation of logic and UI.
This is often the case when developers opt to adhere to a pattern such as MVVM for the consistency and benefits that it provides, and to do things “right,” versus the ability to quickly throw something together. Ultimately, many of the benefits of consistently adhering to a pattern such as MVVM are not immediately recognizable, but rather are earned with lower cost of maintenance and the delivery of higher-quality software.
To achieve goals such as these does, at times, require you to implement more code. That said, when correctly used, the data-binding interaction between Views and ViewModels should generally lead to much less of the traditional “spaghetti” code developers commonly write for complex UIs.
Finally, before putting all the pieces in place, you need to know that the MVVM concepts discussed in this chapter apply not only to Silverlight applications, but also to those written using WPF, or even those written for the Windows Phone 7 platform. Although there may be minor implementation tweaks because of platform differences, the core concepts remain the same, and MVVM frameworks exist for all three platforms.
Creating an MVVM Framework
Now comes the point where you can begin to put the wheels in motion, developing an MVVM architecture that you can use in your projects. The framework you develop follows many of the same patterns as those available for download on this book's companion website (www.wrox.com). Working through the development on your own framework can definitely jump-start your understanding of MVVM frameworks in general and hopefully help you better appreciate the components of other frameworks.
This will be a reusable framework, and, although there is absolutely no reason you couldn't take the resulting components and incorporate them directly into your existing or upcoming projects, you should also take the knowledge you gain through the development of this framework and use it to better evaluate all your MVVM options. If it turns out that the implementation you develop here suits your needs, then, by all means, build on top of it, and extend it as required. If it does nothing more than clarify some of the MVVM concepts that you've already been evaluating in other frameworks (thus helping you better adopt those products), then that is acceptable as well.
Remember, there is no “right way” to develop a framework such as this. Instead, you should employ generally accepted patterns and some implementation details that are found to be common among multiple frameworks. For this reason, I am always fascinated to review the implementations of others to help glean good ideas on where to go with my next projects and frameworks. I hope the framework you build here gives you some of those same ideas.
If nothing else, I hope to stir discussion to make you realize that, even if you wouldn't implement things exactly as you would here, forming your own opinions on the code of others is a great way to learn.
Framework Goals
As mentioned, the primary goal for this sample framework is to demonstrate some of the key concepts required for a usable MVVM-based application. However, prior to starting, it is also worth pointing out some of the specific items you should focus on during its development.
· Model development best practices — This discussion does not focus on any particular data-access technology but instead focuses on characteristics of a good model layer that makes these classes more usable within your framework.
· Common ViewModel infrastructure — Most MVVM frameworks have some standardization for the capabilities of a ViewModel, and the one presented here can do the same. Already built-in components and patterns exist for implementing Models and Views, but the ViewModel concept has no such standardization, and, thus, you will develop some core classes on which new ViewModels will be created.
· Registration of Views and ViewModels — Keeping track of which Views should be used to display and visualize each of the ViewModel classes is critical to easy management of your MVVM components. You will want to develop a means to easily make this association and use it throughout your infrastructure.
· Displaying Views to the user — Developers should be able to easily display a new View as the content of another control, or as a modal dialog window. The framework developed here can provide this capability and manage all the setup of the correct associations between Views and ViewModels.
· Managing visible Views — With LOB applications of any complexity, developers usually need to manage multiple open Views at once. In an MVVM framework, managing Views and providing the capability to access open Views is critical.
· Building composite UIs from multiple Views — Rarely are complex UIs the result of a single View and are instead made up of many smaller Views that make up a single UI. You learn how a framework such as the one developed here can help support this composition of Views.
The entire source code for the resulting framework is provided with the downloads for this book on the companion website (www.wrox.com). It is included with a small sample Silverlight 4 application demonstrating its capabilities by providing a UI like the one shown in Figure 7.1.
Figure 7.1 Example UI
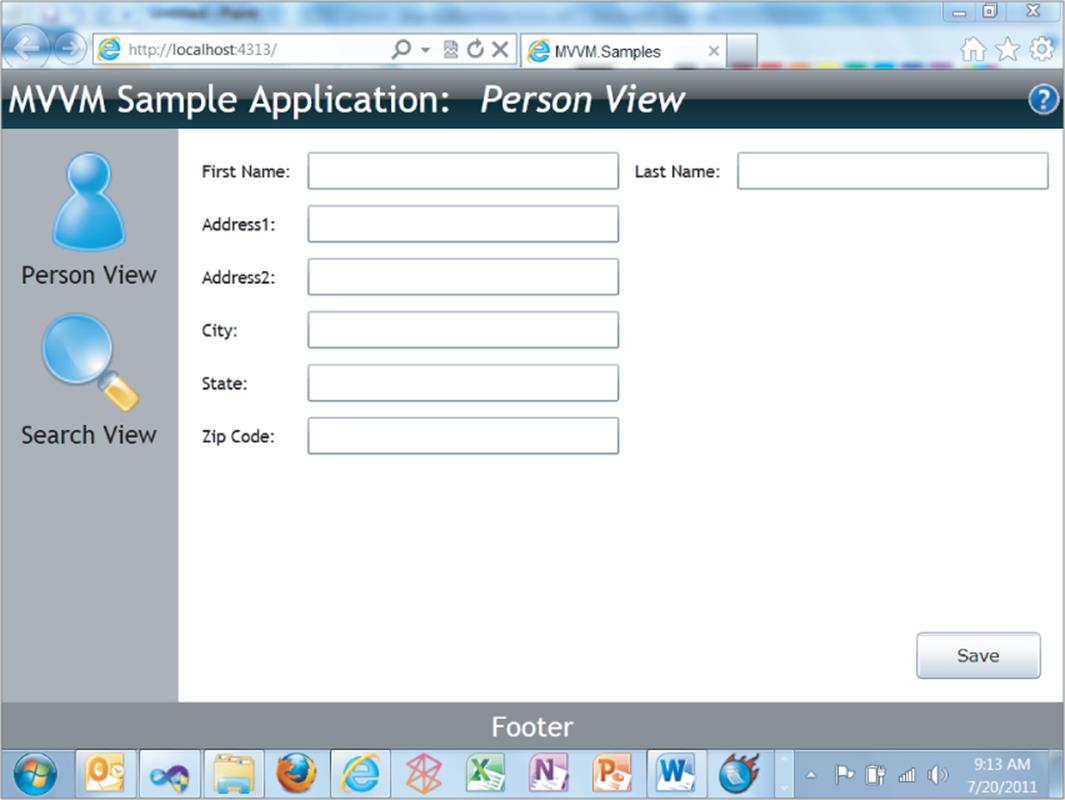
If you prefer not to enter all the code as it is found in the following sections, you can download the completed solution and just follow along.
Framework Technologies
For purposes of this chapter, you perform all framework development using the following technologies:
· Visual Studio 2010 Express (available at www.microsoft.com/express/web)
· C# 4.0 programming language
· Silverlight 4 SDK (installed via the Microsoft Web Platform Installer found at //www.microsoft.com/web/downloads/platform.aspx)
· Silverlight 4 Control Toolkit (available at http://silverlight.codeplex.com)
· Microsoft's Unity Container (available at http://unity.codeplex.com)
If you do not already have Visual Studio 2010 installed, you can download the Express version of this tool from the link shown in the previous list. The Silverlight Control Toolkit is a collection of rich Silverlight controls that Microsoft provides for download from the CodePlex website. These controls are available at no cost under an Open Source license and are updated out-of-band with the full .NET Framework. This enables Microsoft to be more responsive in its management, and to release new additions much more frequently than it would the full .NET Framework.

It is important to note that there are multiple versions of Visual Studio 2010 Express. For the Silverlight development required for this chapter, you can use Visual Web Developer 2010 Express.
For extensibility, the framework developed here uses the Unity Inversion of Control (IoC) container. Many other options for IoC containers provide great value. The choice to use Unity here is arbitrary because any IoC container you are comfortable with could be utilized as necessary.
If you are new to the concept of IoC containers, you should consult the Unity documentation at http://unity.codeplex.com or spend some time researching the concept online for one of the many online blog posts or articles describing the subject.
An additional point about the usage of an IoC container in general is that many MVVM frameworks today are also starting to take advantage of Microsoft's Managed Extensibility Framework (MEF). MEF provides a robust foundation for such frameworks, and the choice of IoC versus MEF is again an arbitrary decision made by you or the developer of the framework upon which you are building. I encourage you to spend some time researching both options and to make your own educated decision about which technology you feel more comfortable using.
In my own experience, I have used both MEF and IoC containers as the core of my architectures, and both are powerful. I do not drastically change my approach regardless of the technology, but there are times I do bend a little this way or that to better utilize what I am given from the tool.
Beyond the technologies listed here, many other technologies are complementary to an MVVM architecture and, without which, a real-world Silverlight LOB application would not be possible. The following list shows some of these technologies presented here for information purposes but are considered to be outside the scope of this chapter:
· Windows Communication Foundation (WCF)
· WCF Rich Internet Application (RIA) Services
· ADO.NET Entity Framework (EF)
Some of these technologies are covered in somewhat greater detail elsewhere in this book, and the reason they are called out here is to demonstrate that it takes a lot of technologies to provide the foundation for a robust application. Those required for the MVVM framework developed in this chapter are but a small sampling of what you will ultimately need to use.
Getting Started
The first step in the creation of a usable MVVM framework is to create the Visual Studio solutions and projects you will utilize for the rest of the framework. For purposes of this discussion, this is nothing more than a single Visual Studio solution containing the following three projects:
· MVVM.Shell — This is a standard Silverlight 4 application.
· MVVM.HostSite — This is an ASP.NET application that hosts the MVVM.Shell Silverlight application and serves as the start-up project for the solution.
· MVVM.Framework — This is a Silverlight 4 class library that contains all the reusable MVVM components and services and makes them available for use on many projects outside of just this sample.
After these three projects have been created in Visual Studio, you must create a project reference between the MVVM.Shell application and the MVVM.Framework application. You can do this via the Add Reference dialog box, which is necessary so that the primary Silverlight application can have access to the reusable MVVM components.
Whenever I start up a new project such as this, I spend a lot of time verifying my project setup. This includes my default namespace settings, my project references, the folder structure in which these projects exist on my hard disk and, ultimately, in my source control repository using tools such as Microsoft's Team Foundation Server or SubVersion (SVN).
In addition to these three projects, you must ensure that you have access to the Microsoft Unity IoC container and the Silverlight Control Toolkit controls. You can install references to these components either by manually downloading them from the previously listed links, or by using NuGet to add references to the necessary packages to your project. As with all source code from this chapter, the necessary dynamic link libraries (DLLs) can be found in a Binaries folder alongside the completed solutions to the sample MVVM framework with the source code that accompanies this book.
While many developers have their own preferences for how to add and manage references to external DLLs, there is a strong industry movement toward the use of the NuGet Visual Studio extension for managing references to Open Source libraries and tools. You can easily install NuGet from the Visual Studio 2010 Extension manager, or by downloading it directly fromhttp://nuget.org/.
When developing a solution that has external dependencies — for example, Unity and the Silverlight Control Toolkit — you need to efficiently manage the required DLLs and to treat them as part of source control for versioning purposes. This simplifies the setup for all developers collaborating on the same project.
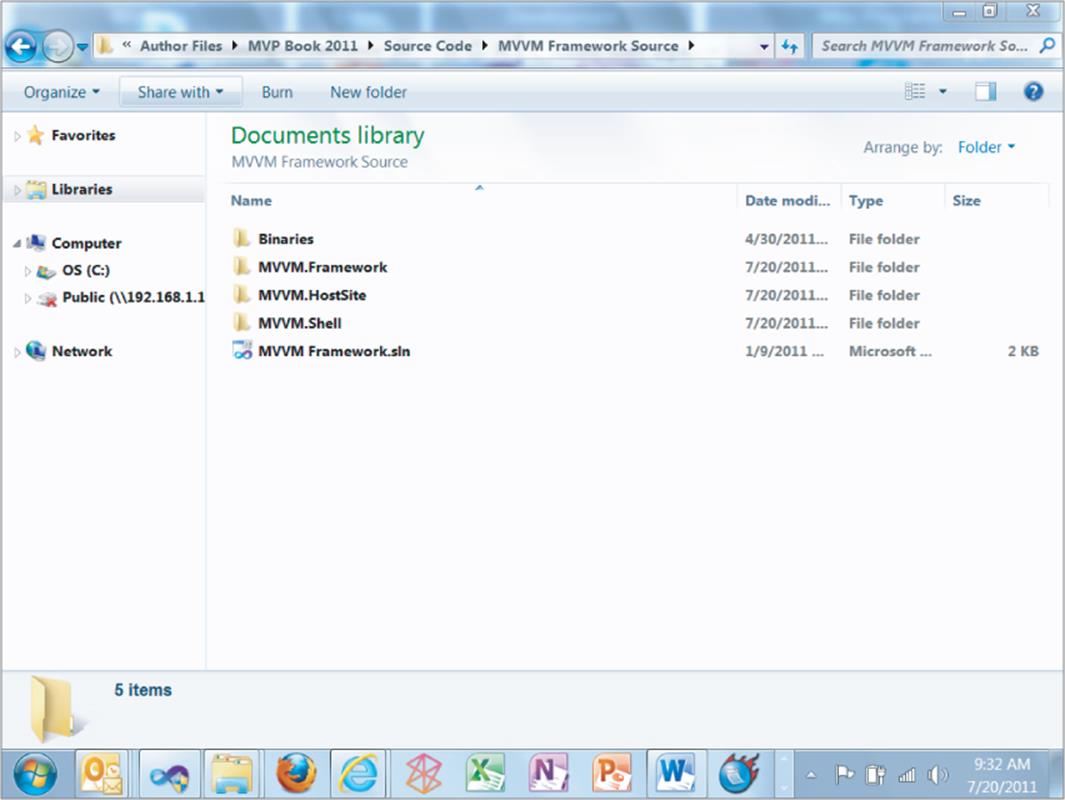
I traditionally create a Binaries folder on my hard disk alongside my Visual Studio project folders. I then copy all required dependent DLLs into this folder, and when adding binary references to my project files, I add them to the files in this folder, thus making them relative references, and available to all new developers attempting to build my source code. Figure 7.2 shows how the solution for this framework looks on disk.
Figure 7.2 Files and folders for sample framework
After all the base projects and references are configured to your liking, you can build and run your solution to see the default (and empty) Silverlight control display in a browser.
Defining ViewModels
The first of many moving parts in this framework development process will be developing a common infrastructure for defining ViewModels.
As mentioned earlier, a ViewModel is intended to be a nonvisual class that encapsulates all interaction between a Model and a View. If the Model describes the data, and the View describes the UI itself, then the ViewModel could be thought of as containing the glue that loads all the right pieces of data and exposes them in such a way that the View can easily display them.
Additionally, the ViewModel class must receive and handle notifications when a user performs specific interactions through the View, such as pressing a button or changing the value of a textbox. Obviously, this is an oversimplification of what can and should be done in a View, but, for now, the important thing you should start focusing on is defining what a ViewModel is and how it gets tied to a View.
First, an important (and yet simple) concept new MVVM developers must understand is the basic premise behind Silverlight and WPF data binding. All Silverlight controls contain a dependency property called DataContext. The DataContext property can be set to any object, and, through a XAML concept called markup extensions, properties of the control in the View can be easily “bound” to public properties of the class that has been assigned to the DataContext of that control.
Consider the following snippet of code:
var _view = new PersonView();
var _viewModel = new PersonViewModel();
_view.DataContext = _viewModel;
In this code, you instantiate a new instance of a user control called PersonView and a new instance of a class called PersonViewModel. After creating both objects, you immediately assign the PersonViewModel instance to the DataContext property of the PersonView control. When this seemly benign relationship is made, UI elements declared in XAML on the PersonView control can be bound to public properties of the PersonViewModel.
Consider the following example of a TextBox declaration in XAML:
<TextBlock Text="{Binding Title}"/>
This TextBlock declaration uses the XAML {Binding} markup extension to bind its Text property to the Title property of whatever object is currently set to its DataContext. In this scenario, although it cannot be seen, you can assume that the PersonViewModel object assigned to the View's DataContext has a public property called Title.
The astute observer might notice something strange about the these snippets of code — you assigned the ViewModel to be the DataContext of the View class itself, but this XAML snippet showing the binding to the Title property is demonstrated using a TextBlock control that is presumably sitting somewhere within the PersonView user control.
As mentioned earlier, the DataContext property exists on all Silverlight controls but is unique because if a current control's DataContext is null and someone attempts to read it, the property accessor (that is, the get{} block of the property) returns the value resulting from a call to the Parent.DataContextproperty.
In Silverlight's simple control hierarchy, this means that when you set the DataContext property of a parent control such as PersonView, it is immediately (and easily) available to all child controls who have not had their direct DataContext properties set to a different value. This is especially useful when utilizing the MVVM pattern because you can simply set the ViewModel class to the DataContext property of the View, and all child controls of that specific view can be bound to properties of the ViewModel.
Because any object can be assigned to the DataContext property of any control or View, there are technically no limitations relating to the types or structure of a ViewModel. That said, in real-world situations in which a single project or solution might contain dozens of different ViewModels, it is generally preferable to maintain consistency among all ViewModels. It is also highly desirable to develop reusable code that works on any or all ViewModels, regardless of which developer created them. For this to work, all ViewModels must implement common interfaces or inherit from common base classes that contain these standard members.
Before proceeding, be sure you understand one additional data-binding concept: change notification. When utilizing the {Binding} markup extension to synchronize the properties of the ViewModel with the control values of the View, you must consider when a change to the control updates the ViewModel property, and also when and how a programmatic change to a ViewModel property results in the control being visually updated.
When a data-bound Silverlight control is initially displayed, the data-binding infrastructure queries the value of the DataContext property to which the control is bound, and assigns the correct values to the data-bound property of the control. Then, when a user interacts with a Silverlight control via the keyboard or the mouse, the data-binding infrastructure is notified, and the appropriate change can be made to the bound property of the ViewModel. This is fairly straightforward because the act of a user making a change to a control is an easily triggered event.
For a user's action upon a control (such as entering text into a textbox or checking a check box) to be propagated back to the value of a bound property, the data binding must be configured to be in a mode of TwoWay. This is discussed later in this chapter.
On the other hand, in the example snippet presented earlier in which a TextBlock control's Text property was bound to the Title property of a ViewModel, you must ask what would happen if, in code, you updated the ViewModel's Title property at some point after the control was initially displayed. Would the TextBlock control immediately change to reflect this change?
The short answer is “No.” Unfortunately, in Silverlight data binding, the controls do not natively listen for changes to the objects to which they are bound unless certain conditions are met. The first of these conditions is that the DataContext object (the ViewModel) must notify others of changes to its state by implementing one of a specific set of interfaces. These interfaces are simple and expose a specific event that others can listen to when needing to be notified of changes.
Following are the interfaces used for change notification:
· System.ComponentModel.INotifyPropertyChanged — This is used when a single class must raise an event indicating that one of its properties has been changed.
· System.Collections.Specialized.INotifyCollectionChanged — This is used when creating a custom collection that needs to notify others that an item has been either added or removed.
When creating a large set of classes to represent a complex domain, it often gets tedious to repeatedly implement the INotifyPropertyChanged interface. For this reason, it is common to create an abstract base class for use by domain classes that need it.
Beyond binding to a class that supports one of the described interfaces, the second condition to support this advanced level of data binding is that the {Binding} markup extension must be configured to listen for changes made to the user interface controls.
By default, Silverlight data binding is initialized in a mode called OneWay, which indicates that changes are propagated from the bound property to the control, but not from the control back to the bound property. With controls that accept user input such as textboxes, check boxes, combo boxes, and others, it is usually the developer's intent to have actions made by a user upon these controls to also affect the underlying property to which these controls are bound. This is done by specifying a value of TwoWay for the data-binding Mode, as follows:
<TextBlock Text="{Binding Title, Mode=TwoWay}"/>
When working with Silverlight data binding, there are three different possible values for a specific binding's Mode:
· OneWay — One-way data binding means that changes to the underlying object are reflected in the bound controls, but that a user's changes to the control via mouse or keyboard are not reflected in the underlying object. This is the default value.
· OneTime — One-time data binding indicates that the binding is used to assign the initial value to the control property, but beyond that point, the binding goes away, and there is no automatic synchronization of the two properties.
· TwoWay — Two-way data binding means that programmatic changes to the property are reflected visually on any bound properties of the control, and that a user's changes to the control are reflected in the underlying bound property. This mode is only successful if the target object of the binding implements one of the previously mentioned change notification interfaces (that is, INotifyPropertyChanged), and if the control itself allows changes to be made by the user. For example, a TextBox would benefit from a binding mode of TwoWay because a user can modify the text, whereas a TextBlockcontrol wouldn't be able to take advantage of this mode, since a user cannot interact with its properties.
So, how do you start the example framework so that it can quickly and easily provide this change notification capability to your framework objects? For purposes of this discussion, add a new class to the root of the MVVM.Framework project called BaseObservableObject. This class can provide a common implementation of this interface, and many other classes within the framework will simply inherit this interface.
using System.ComponentModel;
namespace MVVM.Framework
{
public abstract class BaseObservableObject : INotifyPropertyChanged
{
public abstract class BaseObservableObject : INotifyPropertyChanged
{
public event PropertyChangedEventHandler PropertyChanged;
protected void OnPropertyChanged(string propertyName)
{
var handlers = PropertyChanged;
if (handlers != null)
{
handlers(this, new PropertyChangedEventArgs(propertyName));
}
}
}
}
Like any event or interface implementation, you need to realize that it takes two sides to make a successful implementation. First, your ViewModel objects must implement the interface and correctly raise the PropertyChanged event when data actually changes. On the other hand, Views and other listeners must correctly recognize that a class implements this interface, and must react accordingly when notified of changes to data.
Fortunately, the Silverlight data-binding infrastructure is inherently familiar with this interface and automatically keeps any dependency property in sync with a data-bound property of a class implementing INotifyPropertyChanged. This is especially important when a developer wants to implement two-way binding.
The “Magic-String” Issue
The BaseObservableObject is a basic means to provide common code to implement the INotifyPropertyChanged interface. As you become aware of the common need for such an INotifyPropertyChanged implementation, you can begin to recognize the wide variety of solutions available to serve the same purpose.
Although almost all frameworks achieve this goal through a commonly adopted base class, some of these classes expose methods that utilize generics, whereas others utilize lambda expressions to specify the property that is currently being changed. Still others use .NET reflection as the means to determine which property is currently being modified.
The basic difference between all such implementations comes down to how much code can be abstracted into the base class, versus how much knowledge of the change notification is required of the calling developer.
A primary concern of developers implementing such a base class is the embedding of “magic strings” for the PropertyName parameter of the event. In the example provided in the section, “Defining ViewModels,” it was left to the calling code to specify the “name” of the property that is changing when calling OnPropertyChanged. This string is critical in notifying listeners which property has changed and, as is typical with C# and .NET, the string is case-sensitive. If the NameLast property were changing, and a developer inadvertently called OnPropertyChanged and passed “Namelast” as the parameter, any UI component bound to this property would not be aware a change had occurred and would now reflect out-of-date data.
The number and variety of proposed solutions to this magic-string issue are part of the reason that there is no industry-accepted base class for providing change notifications. The base class utilized in the sample provided in this chapter simply relies on the calling developer to be aware of the case-sensitivity and specify the correct property name.
When working with collections of data, the INotifyCollectionChanged interface should be implemented to enable UI elements such as grids or list boxes to be notified when items are added or deleted from the underlying collection. Fortunately, the .NET Framework provides an enhanced version of the commonly used generic List<> that implements this interface. This collection, called System.Collections.ObjectModel.ObservableCollection<>, provides a plug-and-play replacement for the generic List<> class with the added benefit of implementing INotifyCollectionChanged.
Now that you understand some of the specifics of Silverlight data binding and change notification, move on with the creation of the ViewModel infrastructure. For this framework, you develop both a common ViewModel interface and an abstract class to simplify the implementation of new ViewModels.
Begin by adding a new interface class called IViewModel to the root of the MVVM.Framework project. The following code should be added to that class:
using System.ComponentModel;
namespace MVVM.Framework
{
public interface IViewModel : INotifyPropertyChanged
{
string Title { get; set; }
void Initialize(object parameters);
bool IsBusy { get; }
bool IsDirty { get; }
void Save();
void Refresh();
}
}
Through this interface, you specify that (for consistency and to be used elsewhere in the framework) each of the ViewModel classes contain at least the six specified members. The signatures of the remaining components of the framework enforce the usage of this interface to ensure compliance with the MVVM pattern.
In the previously specified IViewModel interface, you declare the following members:
· Title — This simple string property will be utilized when needing to display the name of a particular View.
· Initialize(object parameters) — It is within this common method that developers can place any custom loading code specific to a particular ViewModel.
· IsBusy — Because of the asynchronous nature of Silverlight development, it is frequently necessary to know if a particular screen is waiting on a long-running operation. This property enables you to track that state at a ViewModel level.
· IsDirty — On screens where a user is actively modifying data, the IsDirty property enables you to keep track of whether pending changes have been made to a particular screen.
· Save — This method contains any custom persistence code.
· Refresh — Because Silverlight is a stateful UI technology, it is common that users of LOB applications may find themselves looking at stale data. Providing them with the means to refresh the data on a particular screen can ultimately be where you incorporate the Refresh method of a particular ViewModel.
These members suit the purposes of the discussion in this chapter and are meant to cover many common MVVM scenarios. If your scenario would benefit from additional common members across all ViewModels, then the IViewModel interface would be the location where you could enforce that globally.
Unfortunately, you cannot see a demonstration of the full capability of each of these ViewModel properties and methods within this chapter. But, as you add additional functionality, you can see how the consistency of the IViewModel interface opens a number of doors to more reusable code and services within a common framework.
When developing functionality in the MVVM framework, the creation of ViewModel classes is extremely common, and, as a result, so is the implementation of the IViewModel interface. For this reason, you create an abstract base class that developers can inherit from to take advantage of a prewritten implementation of much of the common ViewModel code.
To do this, add a new class to the root of the MVVM framework project, and name this class BaseViewModel.cs:
namespace MVVM.Framework
{
public abstract class BaseViewModel : BaseObservableObject, IViewModel
{
public abstract void Initialize(object parameters);
public virtual void Save()
{
}
public virtual void Refresh()
{
}
private string title = string.Empty;
public string Title
{
get
{
return title;
}
set
{
if (title!=value)
{
title=value;
OnPropertyChanged("Title");
}
}
}
private bool isBusy = false;
public bool IsBusy
{
get
{
return isBusy;
}
protected set
{
if (isBusy!=value)
{
isBusy=value;
OnPropertyChanged("IsBusy");
}
}
}
private bool isDirty = false;
public bool IsDirty
{
get
{
return isDirty;
}
protected set
{
if (isDirty!=value)
{
isDirty=value;
OnPropertyChanged("IsDirty");
}
}
}
}
}
Some key aspects of the BaseViewModel implementation are worth pointing out:
· The class itself is flagged as abstract, which disallows direct instantiation of BaseViewModel objects, and instead requires developers to derive its functionality through inheritance.
· The class itself inherits from the previously implemented BaseObservableObject, which provides it with the INotifyPropertyChanged interface and access to the protected OnPropertyChanged method for raising change events.
· The Initialize method is flagged as abstract, forcing any class inheriting from BaseViewModel to provide its own Initialize implementation. Alternatively, the Save and Refresh methods are both flagged as virtual, which dictates that derived classes are not required to provide their own implementation but may override and do so if they want.
· Each property of declaration raises the PropertyChanged event when a value actually changes. Following this pattern is a bit more verbose and tedious than would be possible if you could use the C# 3.0 auto-generated properties, but this is a requirement for the best possible MVVM experience.
Now that you have a common ViewModel interface (IViewModel) and a base implementation of this interface (BaseViewModel), you can continue on with the example framework by putting these components to use to create and display Views.
Creating New Views and ViewModels
The next logical step in the creation of the MVVM framework is to create the first View and ViewModel pair.
Based upon the work you performed in the previous section, creating a new ViewModel is fairly straightforward and, at its simplest, constitutes nothing more than creating a new class and inheriting all the base functionality from BaseViewModel.
Do this by first creating a folder within the MVVM.Shell project called Views and, within that new folder, creating a new class called HeaderViewModel.cs. Within that new class file, add the following code:
using MVVM.Framework;
namespace MVVM.Shell.Views
{
public class HeaderViewModel : BaseViewModel
{
public override void Initialize(object parameters)
{
Title = "MVVM Sample Application";
}
}
}
The HeaderViewModel example contains possibly the most basic of ViewModels and does not perform any real work, other than assigning its own Title property. It is worth noting that — because of the inheritance from BaseViewModel — the HeaderViewModel class already implements IViewModel andINotifyPropertyChanged, which can greatly simplify your upcoming work and enable it to be easily managed via the framework.
Now that you have a ViewModel declared, the next step is to create a View for this ViewModel. This View needs to contain the visual elements that are actually visible by the end user (whereas the ViewModel contains the logic that makes the View work).
To create this View, add a new Silverlight UserControl called HeaderView.xaml to the Views folder of the MVVM.Shell project. After this View has been created and the design surface for HeaderView.xaml is visible, add a single TextBlock control to the View to get you started, as shown in the following XAML:
<UserControl x:Class="MVVM.Shell.Views.HeaderView"
xmlns="http://schemas.microsoft.com/winfx/2006/xaml/presentation"
xmlns:x="http://schemas.microsoft.com/winfx/2006/xaml"
xmlns:d="http://schemas.microsoft.com/expression/blend/2008"
xmlns:mc="http://schemas.openxmlformats.org/markup-compatibility/2006"
mc:Ignorable="d"
d:DesignHeight="300" d:DesignWidth="400">
<Grid x:Name="LayoutRoot" Background="White">
<TextBlock Text="{Binding Title}"/>
</Grid>
</UserControl>
Here, note that the TextBlock control's Text property is bound to the Title property of its DataContext. This data binding won't be apparent in the UI until you get farther in your framework and reach a point where you can associate Views and ViewModels. If you review the code provided with this chapter on this book's companion website (www.wrox.com), you can find a more aesthetically pleasing ViewModel and a more sophisticated implementation.
Before getting into the intricacies of associating your Views and ViewModels, and actually getting something to display to the user, it is worth taking a moment to discuss the naming and organizing of your Views and ViewModels.
You created a folder called Views and, in it, created two files: HeaderViewModel.cs and HeaderView.xaml (which does include a code-behind file, so you could say you created three files).
First, notice that the ViewModel class contains the word ViewModel as a suffix to its name, and the View contains the word View. This is not a requirement and is just a common naming convention utilized to help make the various components easy to find. Because both the View and ViewModel files are specific to a Header View, they contain that name. Unlike ASP.NET MVC, in this MVVM framework, the naming of these items has no direct impact on their usage in your framework and is simply a boon to maintainability.
Beyond the naming convention, you included both the View and the ViewModel in the same folder where the files sit side-by-side. This, too, is a matter of preference and differs from the ASP.NET MVC pattern to include special folders for controllers (similar to your ViewModels) and Views.
Become familiar enough with the MVVM pattern and standardize on your own naming and organizational best practices that help you best organize your projects. In an MVVM environment, you ultimately create more files than you may be used to, and, when something goes wrong, you want to easily find the necessary files to troubleshoot. This is the primary reason you should care about naming and organization at this point.
Registering Views and ViewModels
Now that you have created a simple View and ViewModel pair, you have reached a critical point in which you must decide how best to make the association between them. Earlier, you learned how this concept was critical to any MVVM framework and is one of the areas in which they differ the most.
The most basic means of associating them is to leave the responsibility of knowing which Views and ViewModels go together up to developers. This can be seen in the following code snippet:
var viewModel_= new_HeaderViewModel();
var view_= new_HeaderView();
view.DataContext_=_viewModel;
In the scenario in which developers want to display a header, they would need to be aware that the HeaderView user control was the intended view for the HeaderViewModel ViewModel and would be required to directly make the DataContext association.
Although this solution is functional, it is also highly error-prone and not as flexible as you might like. With a View such as a header (which may be displayed only once in an application), this might not be a huge issue. However, with other Views that may appear multiple times in an application, you might end up with the previous code existing multiple times throughout a project. In this scenario, if you decide to change the View you were using for the header, you would wind up searching for every single place throughout the solution in which a new HeaderView was created.
While a number of solutions to this problem exist, the framework described in this chapter solves this problem by keeping a centralized list of the available Views and ViewModels.
Before implementing the infrastructure to make this association, add a class to centrally control the data. You do this by adding a class called ViewService to the MVVM.Framework project. The ViewService class will be the central location within your framework where you implement the majority of your most reusable MVVM code. This primarily includes the means to associate Views and ViewModels, as well as the capability to show a View within a content control.
The ViewService class is the first (and primary) class within your MVVM framework that makes use of the Microsoft Unity IoC container. You need an instance of a Unity container exposed as a simple property directly off of the ViewService class. You can see this in the following code for the baseViewService implementation:
using System;
using Microsoft.Practices.Unity;
namespace MVVM.Framework
{
public class ViewService
{
public IUnityContainer Container
{
Get;
set;
}
}
}
Again, if you are unfamiliar with the concepts of IoC containers, take the time to familiarize yourself with their capabilities. For the purposes of this framework, you will simply be utilizing the Unity container to create new instances of the specified Views and ViewModels as needed. You see how this is accomplished in the next section.
For now, the first capability you add to the ViewService class is the capability to maintain a list of Views and ViewModels in a “registry.” This registry can be nothing more than a generic dictionary of types used to look up types. The following line of code needs to be added to the ViewService class to provide storage for the registry:
private Dictionary<Type, Type> viewModelRegistry = new
Dictionary<Type, Type>();
Within this dictionary, you utilize the “key” to store the type of ViewModel, and the “value” stores the type of View associated. The concept of using the dictionary can inherently enforce a one-view-per-one-ViewModel limitation with the framework.
The MVVM framework developed in this chapter keeps track of a View-ViewModel registry that is keyed on the ViewModel and not the View. The primary implication of this choice is that it makes this framework very ViewModel-centric. When developers want to display a particular View, they indicate this by providing the ViewService with the type of the corresponding ViewModel. Then the framework uses the registry to look up the appropriate type of View, and handles the creation of an instance of both, assigning the data context, and displaying the View. Many MVVM frameworks are also keyed on the View and, although they work in fundamentally the same way, developers specify the type of View they want, and the type of ViewModel is inferred through various means.
So, how do you leverage this ViewModel registry and provide access to developers to make the association between Views and ViewModels? The first means to provide this association can be to add a single method to the ViewService class called RegisterView, as shown here:
public void RegisterView(Type viewModelType, Type viewType)
{
if (!typeof(IViewModel).IsAssignableFrom(viewModelType))
{
throw new ArgumentOutOfRangeException("ViewModelType does
not implement IViewModel");
}
_viewModelRegistry[viewModelType] = viewType;
}
The RegisterView method accepts both a type of View and a type of ViewModel, and after validating that the provided View implements IViewModel, it simply adds the values to the dictionary.
What might seem unusual at first is that this registry works with types, and not with explicit instances of a View or a ViewModel. Instead of accepting objects of type IViewModel and UserControl, you accept two instances of System.Type.
The reason for this is that, when configuring this registry, you do not want to create a new ViewModel but are instead preparing for some point later in the overall process when a developer wants to actually show something. At this point, the correct View and ViewModel will be created in memory.
Also, the same type of View and ViewModel pair might be created and shown many times simultaneously. (Think Visual Studio tabs displaying multiple instances of the C# code editor in different tabs.) Your registry must enforce only one entry per ViewModel, and this is achieved through the simple use of the generic Dictionary<K, V> class as the in-memory storage.
If you deal with types and not instances, how would a developer make the association between a View and a ViewModel? The following code provides an example of how this is done using the C# typeof keyword:
viewService.RegisterView(typeof(PersonViewModel), typeof
(PersonView));
In this code snippet, you simply tell the ViewService class that, whenever a developer wants to create and utilize a ViewModel called PersonViewModel, you will use and display a new instance of the PersonView class as the visual representation for the UI.
When would a call to RegisterView be executed within your project? A call to RegisterView would need to occur only once and would generally occur during the startup or initialization phase of your application. As a developer, you must make a single call to RegisterView for every View/ViewModel pair within your application, which could be dozens or even hundreds in large applications. Unfortunately, this again could become error-prone (and cumbersome) and requires that you remember to add these lines of code to your startup every time you create a new View and ViewModel pair.
A better approach would be to implement a means to programmatically tag a view with the type of ViewModel to which it should be associated. You can achieve this through the use of .NET attributes. You can create a fairly basic .NET attribute and then decorate each View class with this attribute to specify its associated ViewModel class.
In addition, to achieve the desired effect, you must add a bit more functionality to the ViewService class to scan a provided .NET assembly for all Views tagged with this attribute and add them accordingly to the ViewModel registry. This can provide a more automated means to maintain the registry and can be less error-prone in production. This is generally the route most MVVM frameworks that are built upon MEF use. This implementation can be coded with a similar architecture but will not rely on MEF to import your associations.
For those who are unfamiliar with the concept to develop custom attributes in .NET, this is an excellent example of their use and how simple and powerful they can be both to create and to search for and utilize.
The first step in this new enhancement is to create a new class called ViewAttribute within the root of the MVVM.Framework project. After the class is created, add the following code:
using System;
namespace MVVM.Framework
{
[AttributeUsage(AttributeTargets.Class)]
public class ViewAttribute : Attribute
{
public ViewAttribute(Type viewModelType)
{
ViewModelType = viewModelType;
}
private Type viewModelType = null;
public Type ViewModelType
{
get
{
return viewModelType;
}
set
{
if (value == null || !typeof(IViewModel).IsAssignableFrom(value))
{
throw new ArgumentException("Cannot associate view with a
class which does not implement IViewModel");
}
viewModelType = value;
}
}
}
}
Take a moment to review the ViewAttribute class to see a few key things:
· It inherits from System.Attribute, which, by definition, makes it available to use as a custom attribute.
· The name of the class (ViewAttribute) ends with the word Attribute. Although this is not a requirement, this does enable you to shorten the name of the attribute when applying it to its targets. In essence, instead of specifying the full name [ViewAttribute] you can simply use [View]. You see this in action shortly.
· The custom ViewAttribute has a single parameter of type System.Type, with which you require anyone creating an instance of ViewAttribute to specify an IViewModel type with which you make your association.
So, what does all this actually mean? It means that if you open up the HeaderView.xaml.cs class (that is, the code-behind class for the previously created HeaderView.xaml user control), you can now decorate this class with the View attribute, as shown here:
[View(typeof(HeaderViewModel))]
public partial class HeaderView : UserControl
{
This addition of the ViewAttribute to the HeaderView class declaration did not require you to utilize the full ViewAttribute name. You can use the shortened version because, when using .NET attributes, the suffix Attribute is inferred.
At this point, you have a custom attribute you can utilize to decorate View classes, but other than existing in code and being attached to the HeaderView class, it is not used for anything. For the ViewAttribute to truly be useful to you, you must add another method to the ViewService class that looks for classes that have this attribute attached and then registers them accordingly.
To add this functionality, add the following method to the ViewService class in the MVVM.Framework project:
public void RegisterViews(Assembly assembly)
{
//Get all types in assembly that have the [View] attribute
var viewTypes =
assembly.GetTypes().Where(t => t.GetCustomAttributes(true).Any(x => x is
ViewAttribute));
//Register each found view/viewmodel type
foreach (var viewType in viewTypes)
{
var attribute =
(ViewAttribute)viewType.GetCustomAttributes(true).Where(x
=> x is ViewAttribute).FirstOrDefault();
RegisterView(attribute.ViewModelType, viewType);
}
}
Although relatively short, the RegisterViews method is one of the more complex methods in the entire example framework. It first accepts a single parameter of type assembly. This enables you to actually scan for View and ViewModel pairs across multiple assemblies. This proves to be especially useful in modular architectures such as Microsoft's Prism framework, where an application is broken into multiple module assemblies, each of which may or may not be loaded at runtime.
After you provide the method with an assembly, the first line of code in the RegisterViews method utilizes reflection, LINQ, and C# lambda expressions to perform a search through all classes defined in that assembly for any that have the ViewAttribute attached to them. When a list of all resulting types is found, you simply loop through the results and register them via the previously provided RegisterView method of the ViewService class.
With the addition of the RegisterView and RegisterViews methods to the ViewService, you can now utilize a single line of code like the following to automatically find all Views and their associated ViewModels within any .NET assembly:
viewService.RegisterViews(Assembly.GetExecutingAssembly());
This line of code searches for Views only in the currently executing assembly.
Having the ability to automatically detect any new Views within an assembly is much easier than being forced to add a new line of code to manually associate each View with its respective ViewModel. Also, when the need arises to remove a View from its association with a ViewModel, you can either delete the View entirely, or simply remove the [View] attribute from that View, and add it to another View. The RegisterViews method can handle the rest the next time you run the application.
Displaying Views
Now look at the pieces you have put in place thus far:
· A common ViewModel infrastructure via IViewModel and BaseViewModel
· An initial View and ViewModel called HeaderView and HeaderViewModel
· A custom attribute called ViewAttribute you can use to decorate Views to loosely associate them with ViewModels
· A location for common MVVM functionality called ViewService, including the capability to search for and maintain a registry of View/ViewModel pairs
Thus far, you have quite a bit of the “behind the scenes” infrastructure, and have yet to get to the point where you can make something visible and start to see interaction between a View and a ViewModel. Now, you will start to see where all your hard work begins to pay off.
This section discusses the addition of a single method to the ViewService class to display Views, while also configuring the MVVM.Shell project to better host the MVVM framework, and to be in a position to display Views.
Because you have already performed much of the legwork, and you now understand a number of the concepts, dive right in by adding the following method to the ViewService class:
public IViewModel ShowView(ContentControl host, Type viewModelType,
object parameters)
{
if (Container == null)
{
throw new ArgumentNullException("Container is null");
}
if (host == null)
{
throw new ArgumentNullException("Host");
}
if (viewModelType == null)
{
throw new ArgumentNullException("ViewModelType");
}
if (!typeof(IViewModel).IsAssignableFrom(viewModelType))
{
throw new ArgumentOutOfRangeException("Type specified by
ViewModelType does not implement IViewModel");
}
//verify that we have a registered view for this view model
if (!viewModelRegistry.ContainsKey(viewModelType))
{
throw new Exception("No registered view found for specified
view model");
}
//get the type of view we will create from our registry
Type viewType = viewModelRegistry[viewModelType];
if (!typeof(UserControl).IsAssignableFrom(viewType))
{
throw new ArgumentOutOfRangeException("Type specified by
ViewType does not inherit from UserControl");
}
//use the Unity container to create a new instance of our view
var view = (UserControl)Container.Resolve(viewType);
//use the Unity container to create a new instance of our view model
var viewModel = (IViewModel)Container.Resolve(viewModelType);
//call any custom initialization code for this view model
viewModel.Initialize(parameters);
//make the DataContext property of the view our association between
//the view and view model
view.DataContext = viewModel;
//display the resulting view in the host
host.Content = view;
return viewModel;
}
The ShowView method here might seem to contain the most code for anything you have written thus far, but it is surprisingly simple. It accepts three parameters: an instance of a ContentControl, a System.Type instance representing the type of ViewModel you want to use, and a parameter called Parametersthat represents some arbitrary data you want to pass to the resulting ViewModel.
The bulk of the code in the ShowView method is actually code checking the validity of the parameters and verifying they are what you expect. Although this type of defensive programming can be done a number of ways and is valuable in most (if not all) methods that you write, more of this type of code is included here to emphasize that, in an MVVM framework such as you develop here, a method such as ShowView will be one of the most utilized. ShowView will be called more than any other method throughout the entire application and, thus, will make it the most prone to errors in which the calling developer inadvertently passes in parameters specifying incorrect values.
If you take out all the parameter validation found in the ShowView method just to review what remains, you are left with the following few lines of code:
//use the Unity container to create a new instance of our view
var view = (UserControl)Container.Resolve(viewType);
//use the Unity container to create a new instance of our view model
var viewModel = (IViewModel)Container.Resolve(viewModelType);
//call any custom initialization code for this view model
viewModel.Initialize(parameters);
//make the DataContext property of the view our association between the view
//and view model
view.DataContext = viewModel;
//display the resulting view in the host
host.Content = view;
return viewModel;
The first thing you do is use your View/ViewModel registry to find the View associated with the requested ViewModel. When you have this type, you utilize the Unity IoC container to resolve (or create) a new instance of this View. The use of the IoC container here offers some nice benefits because you can have a container that has “dependencies” via constructor parameters or public properties that are resolved (or “injected”) via Unity. When you have a new instance of your View, you again use the Unity container, and this time instantiate a new instance of your ViewModel (again relying on the IoC concept to resolve all dependencies).
The next thing you do is call the Initialize method of the new ViewModel, thus giving the specific ViewModel the opportunity to begin loading its data, or to perform any other initialization work. When the Initialize method has been called, you immediately make the DataContext assignment discussed earlier so that the elements within the View can easily be data-bound to properties of the ViewModel.
You then assign the View (which is a visible UserControl) to be the Content property of the ContentControl provided as a parameter. This results in your View now displaying within the UI area assigned to the ContentControl (specified by the Host parameter).
The final step is to return the IViewModel instance back to the caller. This is useful in scenarios in which a developer making a call to ShowView wants to retain a reference to the created ViewModel to be notified of changes, or to otherwise maintain a connection to the data being displayed. It is worth noting that the ViewModel never has a reference to the View that is being used to display it.
One thing you may have noticed about the approach being followed here is that it is heavily ViewModel-centric. You created common functionality for ViewModels, and your interfaces tend to expose things as ViewModels and, more specifically, classes implementing the IViewModel interface. When using this type of framework, developers are forced to think in terms of ViewModels and let the framework determine which View is appropriate. This is by design and focuses on getting developers to adhere to the MVVM pattern by considering all interfaces by the ViewModels first. Different MVVM frameworks available today are either ViewModel-centric or View-centric in how they force developers to deal with these concepts.
The next step is to put together a shell to “host” your Views and ViewModels so that you can actually see one displayed. One of the key things to consider in any architecture is how all the moving pieces fit together at runtime. In this case, you have some setup that must occur upon application startup to help get the right components in place. This setup includes such things as the creation and tracking of your View service, as well as the registering of your Views and ViewModels via calls to RegisterViews.
With IoC components such as Unity, or with the use of an extensibility framework like MEF, there are many common patterns for registering and locating key services or functionality. To keep this chapter focused on MVVM framework, the primary concern here is the capability to track a single instance of ViewService so that you can maximize the use of a single View/ViewModel registry.
An easy way to make this possible is simply to make your ViewService class a singleton. Another possibility would be to make it a simple static class. For the purposes of this discussion, make the ViewService a singleton.
You can make the ViewService a singleton by adding the following code:
private static ViewService currentInstance = null;
private ViewService()
{
//This code exists to make the ViewService constructor private
}
public static ViewService Current
{
get
{
if (currentInstance == null)
{
currentInstance = new ViewService();
}
return currentInstance;
}
}
After it is added inside the ViewService class, this code converts your class into a singleton through two steps:
1. The constructor of the ViewService class is declared as private. This disallows developers from directly instantiating new instances of ViewService from their own code (thus creating multiple copies of this class, which is what you do not want).
2. It adds a private static field that will be used to maintain a reference to the only instance of ViewService within your application. This static field is retrieved via a read-only property called Current.
To take advantage of this singleton pattern, and to demonstrate its use, add some initialization code to the example application. A common place to put this is in the App.Xaml.cs file of the MVVM.Shell project. This is the code file for the primary Silverlight project and will have events that fire during application startup. First, add the following using statements to the top of this file:
using System.Reflection;
using Microsoft.Practices.Unity;
using MVVM.Framework;
Next, add the following few initialization lines to the Application_Startup event of the App class:
private void Application_Startup(object sender, StartupEventArgs e)
{
ViewService.Current.Container = new UnityContainer();
ViewService.Current.RegisterViews(Assembly.GetExecutingAssembly());
this.RootVisual = new MainPage();
}
The initialization code demonstrates that the ViewService class can be accessed via the static ViewService.Current method. Because you do not need to instantiate a new instance here, you can simply assign a new instance of the Unity container to the Container property and then utilize the previously implemented RegisterViews method to scan the current assembly for all Views tagged with ViewAttribute. After this code is executed, you are ready to utilize ViewService throughout the rest of the application.
The next step is hooking up your Views to organize the MainPage.xaml file into a set of containers to hold them. To do so, you configure the currently empty XAML file to host a grid that provides the general layout of the UI. Each cell of your grid contains a ContentControl that you utilize as hosts for the Views in your MVVM architecture.
Add the following XAML to the MainPage.XAML file within the MVVM.Shell project:
<Grid x:Name="LayoutRoot">
<Grid.ColumnDefinitions>
<ColumnDefinition Width="*" />
<ColumnDefinition Width="5*" />
</Grid.ColumnDefinitions>
<Grid.RowDefinitions>
<RowDefinition Height="Auto" />
<RowDefinition Height="*" />
<RowDefinition Height="Auto" />
</Grid.RowDefinitions>
<ContentControl x:Name="HeaderContent" Grid.Row="0" Grid.Column="0"
Grid.ColumnSpan="2" HorizontalContentAlignment="Stretch"
VerticalContentAlignment="Stretch"/>
<ContentControl x:Name="FooterContent" Grid.Row="2" Grid.Column="0"
Grid.ColumnSpan="2" HorizontalContentAlignment="Stretch"
VerticalContentAlignment="Stretch" />
<ContentControl x:Name="NavigationContent" Grid.Row="1" Grid.Column="0"
HorizontalContentAlignment="Stretch"
VerticalContentAlignment="Stretch"/>
<ContentControl x:Name="MainContent" Grid.Row="1" Grid.Column="1"
HorizontalContentAlignment="Stretch"
VerticalContentAlignment="Stretch"/>
</Grid>
This layout is nothing overtly fancy and instead simply provides a header, a footer, a navigation column on the left, and a main content area in the center of the screen. The HorizontalContentAlignment and VerticalContentAlignment of all ContentControls are set to Stretch. In this particular layout, this can help with some of your aesthetic issues by stretching your Views to fill the cells accordingly.
To begin to put Views into your layout, simply add the following boldfaced line of code to the constructor of the MainPage.xaml.cs file:
public MainPage()
{
InitializeComponent();
ViewService.Current.ShowView(HeaderContent, typeof
(HeaderViewModel), null);
}
With the single call to the ViewService.ShowView method, you have effectively utilized your entire MVVM framework. The first parameter passed into this method is the HeaderContent control, which is declared in the MainPage.Xaml file. The second parameter is the type of ViewModel you want to display. It is critical to understand that you are not passing an instance of the ViewModel, but rather the System.Type instance that represents a type of ViewModel. Within the ShowView method, you use the Unity container to create a new instance of this type and then utilize your previously initialized registry of Views and ViewModels to find the appropriate View. After all the build-up code has executed, you set the resulting View to be content of the specified host (in this case, HeaderControl).
You can now add additional UI components to the HeaderView and take advantage of the MVVM infrastructure you've built to bind controls back to the properties of the HeaderViewModel.
At this stage, when developers want to add a new screen anywhere within an application, they need to perform the following steps:
1. Create a new ViewModel class that implements IViewModel or inherits from BaseViewModel.
2. Create a new Silverlight UserControl class, and place the ViewAttribute on the class declaration.
3. Use the ViewService.ShowView method to display the current View into the appropriate user control.
As shown previously in Figure 7.1, you can see the primary “sections” of the screen that make up the header, footer, left navigation, and main content area. Although not all UIs do (or should) follow this pattern, it does demonstrate how even the simplest of interfaces can be broken up into various areas (or “regions”) that can be treated as distinct components. In the next section, you develop a more robust way to manage these regions that provide better communication and control for the application as a whole.
Building Composite Screens
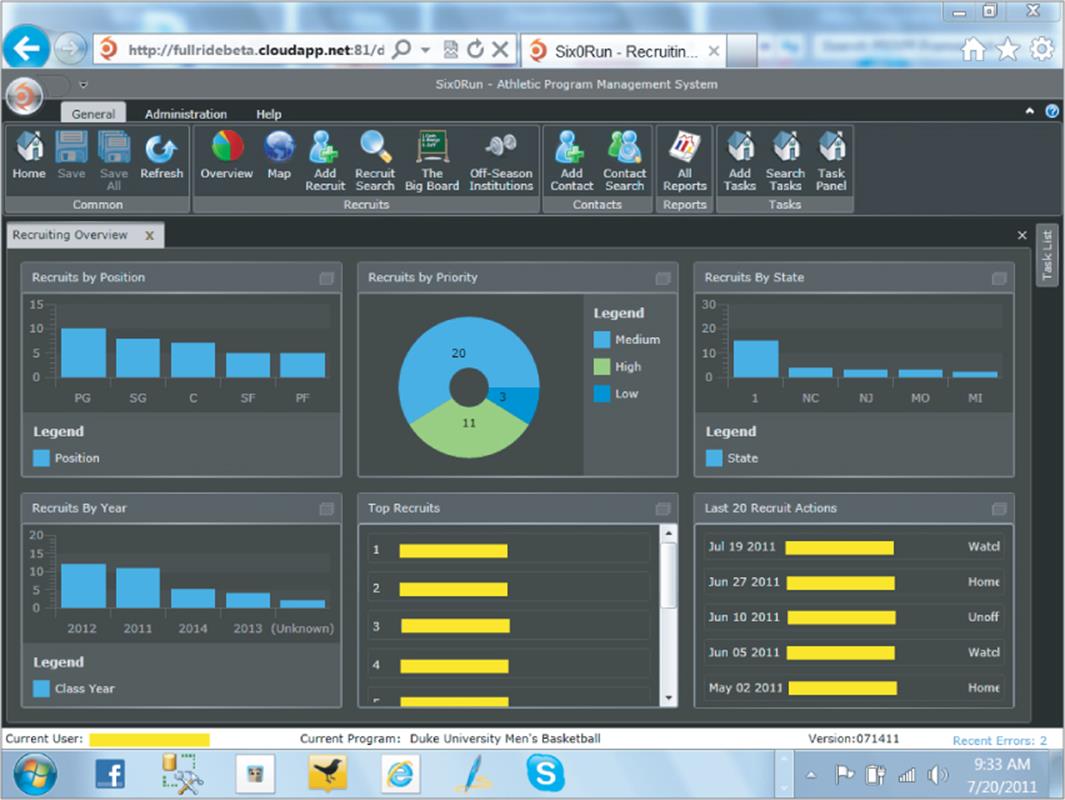
It is rare that an application consists of a single View area or that even a single screen is made up of a single View. Take a look at Figure 7.3, which shows a screen shot of a Silverlight application composed of multiple Views (and corresponding ViewModels).
Figure 7.3 Silverlight application that is composed of multiple Views
In your framework thus far, you have developed the capability to create Views and ViewModels, and display the results in a single content control. Although this capability is critical, another major hurdle you will soon face is the need to display specific Views in specific regions of the UI, or even display other Views as pop-up windows.
Keeping track of which content control is responsible for displaying the content for a particular region of the UI is key, and you must provide the capability to easily locate these “region” controls. To accomplish this, enhance ViewService to enable the tracking of a new set of classes for managing these regions.
In the example framework (and in others such as Microsoft's Prism framework for building composite Silverlight and WPF applications), the term region indicates an area of your screen that hosts different Views. For each region in a UI, you create and register a new instance of a class called aregion manager. The region manager class manages the current View or Views visible within a current region. It also enables you to show or hide Views in a region and get access to the View currently displayed or selected within a region.
To accomplish this, let's define exactly what a region manager is by creating a new interface within the MVVM.Framework project called IRegionManager. Following is the code for this interface:
using System;
using System.Collections.ObjectModel;
using System.Windows.Controls;
namespace MVVM.Framework
{
public interface IRegionManager
{
IViewModel CurrentView { get; }
ObservableCollection<IViewModel> OpenViews { get; }
Control HostControl { get; }
IViewModel ShowView(Type viewModelType, object parameters);
void CloseView(IViewModel viewModel);
}
}
This interface provides a peek at the functionality you will ultimately add to a region manager class. Again, notice that the region manager deals primarily with the IViewModel interface. Developers are again asked to utilize ViewModels when working with UIs and to let the framework determine which View is appropriate.
As you can see, the IRegionManager class exposes a CurrentView property and an OpenViews property, both of which are intended to expose information about which ViewModels are currently visible within a particular region. The HostControl property of the IRegionManager provides access directly to the actual Silverlight control that is currently hosting the region. The ShowView and CloseView methods provide developers with the means to manage the Views within the particular region.
Much like the process followed earlier by providing an abstract BaseViewModel implementation for the IViewModel interface, you again create an abstract class for the IRegionManager class. This can help in creating new region managers by providing a common implementation of specific functionality. Following is the code for the BaseRegionManager implementation:
using System;
using System.Collections.ObjectModel;
using System.Windows.Controls;
namespace MVVM.Framework
{
public abstract class BaseRegionManager : BaseObservableObject, IRegionManager
{
private readonly ObservableCollection<IViewModel> openViews = new
ObservableCollection<IViewModel>();
private IViewModel currentViewModel;
private Control hostControl;
public IViewModel CurrentView
{
get { return currentViewModel; }
protected set
{
currentViewModel = value;
OnPropertyChanged("CurrentView");
}
}
public ObservableCollection<IViewModel> OpenViews
{
get { return openViews; }
}
public Control HostControl
{
get { return hostControl; }
protected set
{
hostControl = value;
OnPropertyChanged("HostControl");
}
}
public abstract IViewModel ShowView(Type viewModelType, object parameters);
public abstract void CloseView(IViewModel viewModel);
}
}
The BaseRegionManager implementation provides a simple implementation of the IRegionManager properties but specifies both ShowView and the CloseView as being abstract methods. This forces any developers implementing the BaseRegionManager to provide their own implementation of these methods.BaseRegionManager is nothing more than an abstract “middle layer” intended to simplify the implementation of a set of region managers for specific types of regions.
The first implementation of a region manager will be one called SingleViewRegionManager. As the name implies, SingleViewRegionManager is meant to handle the interaction with a basic ContentControl region that hosts a single View/ViewModel UI at a time. The CurrentView property provides access to the single View being displayed, and the OpenViews collection always exposes only a single ViewModel (or none, if no View is currently being displayed).
You must add the SingleViewRegionManager class to the root of the MVVM.Framework project. The full implementation of a SingleViewRegionManager is as follows:
using System;
using System.Windows.Controls;
namespace MVVM.Framework
{
public class SingleViewRegionManager : BaseRegionManager
{
public SingleViewRegionManager(ContentControl contentHost)
{
if (contentHost == null)
{
throw new ArgumentNullException("ContentHost");
}
HostControl = contentHost;
}
public override IViewModel ShowView(Type viewModelType, object parameters)
{
if (CurrentView != null)
{
CloseView(CurrentView);
}
IViewModel viewModel =
ViewService.Current.ShowView((ContentControl)
HostControl, viewModelType, parameters);
CurrentView = viewModel;
OpenViews.Add(viewModel);
return viewModel;
}
public override void CloseView(IViewModel viewModel)
{
if (CurrentView.Equals(viewModel))
{
CurrentView = null;
OpenViews.Clear();
((ContentControl)HostControl).Content = null;
}
}
}
}
As you can see, this implementation is fairly simple and leans heavily on the BaseRegionManager implementation from which it inherits. There are some significant points to make about the SingleViewRegionManager.
The constructor for this class accepts a single parameter of type ContentControl and validates that this control is passed in correctly. With this constructor in place, every SingleViewRegionManager control must be directly associated with a single ContentControl. At this stage, your framework does nothing to limit multiple region managers from attempting to manage the content for the same ContentControl, but this is something that is definitely possible.
The ShowView method of the SingleViewRegionManager utilizes the previously written ViewService.ShowView method to perform the actual work of creating and associating the Views and ViewModels after correctly closing any View that is already visible.
The CloseView method clears out any visible content and cleans up the CurrentView property and OpenViews collection.
Because this particular region manager is meant for scenarios in which only a single View is visible at a time, the implementation is relatively straightforward.
So, now that you have invested some time to create a region manager interface, a base class, and a single implementation, you must begin to hook up this infrastructure to see it in action.
First, find some way to globally keep track of your region managers in a central location available to any areas of your application. Again, you utilize the ViewService class as the central location and add the following to ViewService to help keep track of your region managers:
private readonly Dictionary<string, IRegionManager> regionManagers =
new Dictionary<string, IRegionManager>();
public void RegisterRegionManager(string regionName,
IRegionManager regionManager)
{
if (regionManager == null || string.IsNullOrEmpty(regionName))
{
throw new ArgumentException("Invalid arguments");
}
regionManagers[regionName] = regionManager;
}
public IRegionManager GetRegionManager(string regionName)
{
return regionManagers[regionName];
}
In the code above, we use another generic dictionary class to keep track of your region managers. Each region manager will be assigned a string name to help you globally locate it. The RegisterRegionManager and GetRegionManager methods simply provide controlled access to this central registry.
Next, you must put the entire region manager infrastructure to use and hook it into your MainPage class (which is the location being utilized for this initialization code). To do this requires rewriting the code you had previously in the constructor of your MainPage class in the MVVM.Shell to look like the following:
public MainPage()
{
InitializeComponent();
//register our dialog region manager...
ViewService.Current.RegisterRegionManager("Dialog",
new DialogRegionManager());
var headerRegion = new SingleViewRegionManager(HeaderContent);
var navigationRegion =
new SingleViewRegionManager(NavigationContent);
var footerRegion = new SingleViewRegionManager(FooterContent);
var mainRegion = new SingleViewRegionManager(MainContent);
ViewService.Current.RegisterRegionManager("Header", headerRegion);
ViewService.Current.RegisterRegionManager("Footer", footerRegion);
ViewService.Current.RegisterRegionManager("Navigation",
navigationRegion);
ViewService.Current.RegisterRegionManager("Main", mainRegion);
headerRegion.ShowView(typeof(HeaderViewModel), null);
navigationRegion.ShowView(typeof(NavigationViewModel), null);
footerRegion.ShowView(typeof(FooterViewModel), null);
mainRegion.ShowView(typeof(PersonViewModel), null);
}
This configuration is broken into three sections for readability:
· The first section creates four SingleViewRegionManager instances related to the header, footer, navigation, and main content controls.
· Next, using the previously discussed RegisterRegionManager method of the ViewService, you register each of these View managers with a simple string name for future identification and retrieval.
· Finally, you use the ShowView method of each region manager to provide an initial display.
This sample references three ViewModels for which you have no implementation. If you download and review the sample code provided with this chapter (from this book's companion website at www.wrox.com), you can see a full implementation of the framework that includes Views and ViewModels for the footer and navigation, and an edit screen for a fictitious “Person” object. If you enter the preceding code without the navigation, footer, and person ViewModels, just do not enter the last three lines of code.
With the appropriate region managers registered during your initialization phase, you can (from anywhere within your application) show a View in the main View area with a single line such as the following:
ViewService.Current.GetRegionManager("Main").ShowView(typeof(PersonViewModel),
null);
With every View you have displayed thus far, you pass in a null value for your parameters. If necessary, you could pass any object for your parameters, and this value would be passed to the IViewModel.Initialize method.
Displaying Dialogs
To demonstrate the flexibility of the region manager infrastructure, take a look at one more region manager implementation that you can use to display Views as pop-up windows using the Silverlight Control Toolkit. To do this, you create a DialogRegionManager class in the MVVM.Framework project. Following is the code for this class:
using System;
using System.Collections.Generic;
using System.Linq;
using System.Windows;
using System.Windows.Controls;
using System.Windows.Data;
namespace MVVM.Framework
{
public class DialogRegionManager : BaseRegionManager
{
private readonly Dictionary<IViewModel, ChildWindow> openWindows =
new Dictionary<IViewModel, ChildWindow>();
public override IViewModel ShowView(Type viewModelType,
object parameters)
{
var childWindow = new ChildWindow();
IViewModel viewModel = ViewService.Current.ShowView(childWindow,
viewModelType, parameters);
AddBinding(viewModel, "Title", childWindow,
ChildWindow.TitleProperty);
AddBinding(viewModel, "Height", childWindow,
ChildWindow.HeightProperty);
AddBinding(viewModel, "Width", childWindow,
ChildWindow.WidthProperty);
openWindows[viewModel] = childWindow;
childWindow.Closed += childWindowClosed;
childWindow.Show();
return viewModel;
}
private void childWindowClosed(object sender, EventArgs e)
{
KeyValuePair<IViewModel, ChildWindow> item =
openWindows.Where(x =>
x.Value.Equals(sender)).FirstOrDefault();
item.Value.Closed -= childWindowClosed;
openWindows.Remove(item.Key);
}
public override void CloseView(IViewModel viewModel)
{
if (openWindows.ContainsKey(viewModel))
{
openWindows[viewModel].Close();
}
}
private static void AddBinding(object sourceObject, string sourcePath,
DependencyObject destinationObject,
DependencyProperty destinationProperty)
{
var sourceBinding = new Binding(sourcePath);
sourceBinding.Source = sourceObject;
sourceBinding.Mode = BindingMode.TwoWay;
BindingOperations.SetBinding(destinationObject,
destinationProperty, sourceBinding);
}
}
}
Without examining every line of the DialogRegionManager implementation, a few points are worth noting. First, this region manager requires a reference to the System.Windows.Controls.dll found in the Silverlight Control Toolkit. Within this assembly is an infrastructure to display a Silverlight ChildWindowcontrol. The dialog region manager provided here does not support displaying the dialog modally, and execution of code continues immediately upon a call to ShowView.
For DialogRegionManager to be made available throughout your application, you must register it upon startup of the application by adding the following line to the constructor of the MainPage class in the MVVM.Shell project:
ViewService.Current.RegisterRegionManager("Dialog", new
DialogRegionManager());
After this code has been added to your initialization, you can now display any ViewModel and View as a dialog window with code similar to the following:
ViewService.Current.GetRegionManager("Dialog").ShowView(typeof
(AboutViewModel), null);
Although the DialogRegionManager does not manage a particular region of a specific UI, it does demonstrate the flexibility of the architecture in that various types of region managers can be developed to manage the same View/ViewModel pairs within the context of different types of hosts, or even as dialogs. Registering these various region managers and making them available from a central location allows them to be utilized globally within an application and provides all components the capability to access the currently displayed ViewModel classes in any particular region.
A major missing piece so far is the lack of more types of region managers. At this point, you have a region manager for working with areas of an interface that can have only one View open at a time, and a region manager that displays Views as dialog windows.
In a more production-oriented framework, you would incorporate region managers for regions that allow for multiple Views (such as tabbed View managers or list View managers). These are fairly straightforward, and plugging such region managers into the flexible region manager infrastructure is left as an exercise for you to do. You now have the foundation for such implementations by including a collection of OpenViews on your IRegionManager interface. The two provided region managers do not take full advantage of this collection, but more robust region managers would do so.
Communicating Between Views
Now that you have the capability to conceptualize your entire UI as a set of distinct regions (albeit with a limited number of region managers), you are faced with the frequent need to communicate from one ViewModel to another. A good example of this would be if you would like the title of the currently visible ViewModel being displayed in the “Main” region to be displayed in the HeaderViewModel. This is a common need in applications and will be the first time you take advantage of the Title property of your ViewModels.
To get access to the current ViewModel displayed in any particular region, you can now utilize code such as the following:
var _currentMainView = ViewService.Current.GetRegionManager("Main").CurrentView;
If you evaluate the source code for the HeaderView and HeaderViewModel in the provided sample application, you can see an example of how one ViewModel (HeaderViewModel) can listen for changes to a property of another ViewModel to display the title of the main view. The implementation provided in the code for download accompanying this book keeps the title of the current main view visible within the UI of the header.
Another key means of communication between Views is the concept of a messaging infrastructure that utilizes a centralized system for raising and reacting to message. Neither the ViewService class nor the region manager classes you have implemented within this sample framework expose any type of messaging infrastructure to notify others when key actions related to Views occur. Adding such messages to triggers such as opening a new View or closing a View is left for you to do on your own, which can add significant value to this type of framework. Many of the more robust MVVM frameworks discussed later in this chapter support some type of loosely coupled messaging capability to help provide a more complete MVVM solution.
Putting the MVVM Framework to Use
You have reached a point in the development of this example framework in which you have created a number of useful classes and services you could utilize across a wide array of Silverlight applications. By isolating all framework-specific components into the MVVM.Framework class library, you can easily reuse this library on multiple projects.
To achieve the most consistency, you should also standardize on some of the initialization infrastructure and add some additional region managers for more complex scenarios. But, given the code provided, it is reasonable to assume that a new Silverlight project could be started, and the new framework incorporated with little work. The components provided are small enough and flexible enough to also be easily incorporated into an existing application.
It should be obvious that there are a number of key components missing from this example framework that would be critical to any common LOB application. These would include reusable components for such things as logging, caching, data access, security, and other core services. Other chapters in this book touch on some of these topics, whereas solutions to others are frequently discussed on blogs or articles throughout the Internet.
Existing MVVM Frameworks
The previous sections of this chapter focused on the development of a custom framework for managing the complexity of an MVVM project. This framework was developed from scratch with little dependencies on external components beyond Microsoft's Unity container and some components from the Silverlight 4 Toolkit. Although you accomplished the goal to provide core MVVM functionality, the true question is what is the goal of this framework?
As discussed at the beginning of this endeavor, you should have gained some value from working through the provided code and grown the provided framework into something that provides direct value to you and your team. Some of you may evaluate the provided implementation and use it to increase your knowledge of such frameworks to a point in which you can better evaluate and select from one of the many existing MVVM frameworks.
There is no right answer or “silver bullet” for which framework best suits the needs of a particular team. I like various aspects of many frameworks, and dislike others. I try to choose the right tool for the job and then absorb the better ideas and incorporate those into my own designs and platforms.
To help give you some initial guidance on your search for an appropriate MVVM framework, the following sections provide some guidance on various frameworks you might consider as the foundation for your own MVVM platform.
Prism
Although not directly an MVVM framework, Microsoft Prism is a great foundation on which to consider building your MVVM applications. The newest version of the Prism framework, version 4, provides a reference MVVM application that includes a large amount of documentation and sample applications.
Prism provides a complete bootstrap infrastructure to standardize your application startup, an extremely useful composite UI infrastructure to manage your screen regions, a loosely coupled event aggregator, and a nice system for modularizing your applications into separate projects that can be loaded into a common shell at runtime.
In addition, Prism provides a common framework that shares a significant amount of code between Silverlight, WPF, and Windows 7 applications. This means that the concepts and patterns you learn for developing a Prism application for one technology are immediately applicable to other technologies.
Although the Prism framework provides a significant amount of great functionality, its lack of a standard MVVM implementation is a slight drawback. The reference implementation serves as more of a demonstration than a foundation of reusable components. To make up for this, there are many great articles and blog posts on building more MVVM capabilities into the standard Prism framework.
Prism does come with a significant amount of documentation to help get developers started, and the CodePlex community is a great resource for those with questions on specific features or capabilities.
Prism is Open Source and available from Microsoft at http://compositewpf.codeplex.com, and can also be installed via NuGet.
MVVM Light
The MVVM Light framework is a framework focused more on providing a common set of MVVM components for Silverlight, WPF, and Windows 7 Phone developers. In this way, it is similar to the basic framework you put together in this chapter (although significantly more feature-rich and documented).
Some of the highlights of the MVVM Light framework are that it provides a large amount of nice services for developers to build upon or use directly out-of-the-box. MVVM Light also ships with Visual Studio project templates and code snippets that greatly simplify many common MVVM tasks and the setup of new projects built on the MVVM Light framework.
MVVM Light also has a significant amount of documentation and guidance available and has a great user community to go to for support as necessary.
The MVVM Light framework is, like Prism, provided as an Open Source solution and is also hosted on CodePlex at http://mvvmlight.codeplex.com. MVVM Light is also available via NuGet.
Caliburn.Micro
Caliburn.Micro is another popular foundation for building MVVM applications. Caliburn.Micro has a significant amount of infrastructure to support both MVVM and other UI patterns such as Model-View-Controller (MVC) and Model-View-Presenter (MVP). Caliburn provides a solid foundation for using commands and messaging and an extensible application model. Caliburn.Micro is extremely lightweight and provides some great convention-based patterns for automatically binding action controls such as buttons to ViewModel methods, but also to easily configure data binding. Caliburn.Micro also features the capability for developers to work in a View-centric or ViewModel-centric mode.
Like the two previously mentioned frameworks, Caliburn.Micro is full-featured, as well as heavily supported and documented. In some ways, Caliburn.Micro offers a significantly more full-featured framework than either Prism or MVVM Light.
Caliburn.Micro is also hosted on CodePlex and can be found at http://caliburnmicro.codeplex.com/.
Other Frameworks
Beyond the three frameworks highlighted here, a quick Internet search can point you to dozens of other Silverlight, WPF, or Windows 7 MVVM frameworks. Some of these frameworks are innovative solutions to the common problems discussed throughout this chapter, whereas others are creative ways to build upon other platforms, such as Prism or MVVM Light.
Different frameworks are going to provide different solutions to the same problems, and each uses a mixture of the same common components (such as IoC containers or MEF) to achieve its specific goals. You should review any frameworks you can before making the decision that any one is a better platform for your application.
In addition to evaluating a framework for specific features, some developers simply “get” certain frameworks more than others that they may struggle to comprehend. This understanding is key to the successful adoption of any framework, so it is worth weighing that before making your final decision.
Additional Considerations
Now that you have put a fairly substantial amount of MVVM “plumbing” in place for use in streamlining the usage of Views and ViewModels, spend a little time examining some of the addition items you must consider as a developer moving into this type of framework.
At this point, your code has been focused on managing the complexity surrounding keeping track of Views and ViewModels, associating them with each other, and displaying them within the appropriate areas of a UI. Although managing the Views and ViewModels is important, it is only one part of a much bigger picture when considering your standard LOB applications. Unfortunately, as a developer, you must have a thorough understanding of a wide array of concepts to be truly effective at building great Silverlight applications.
This section points out a few of those areas as a means to provide guidance on which areas can be useful for developers to perform additional research.
Data Binding
To be efficient in this type of environment, you must be fluent in the data binding and various patterns for keeping properties of the ViewModel in sync with the visually represented state of the user controls displayed in the View. The framework developed in this chapter (as well as any other MVVM framework you might use) can assist with the management of the components, but typically do little to provide assistance with the actual interaction between the Views and the Models.
Although this chapter has emphasized the advantages of MVVM, end users do not care about such low-level implementation details, and they simply see the application as a means for them to interact with some data or other UI elements. From this standpoint, a thorough understanding of the user experience is important, and it would benefit any Silverlight developer to become as knowledgeable as possible on the syntax and capabilities of this.
Commands
One key area of complexity many developers struggle with in working with MVVM is the capability to react to button clicks or other action events on the View and to execute code that interacts with the ViewModel. This is easily achieved through the use of the ICommand infrastructure built into Silverlight.
The ICommand interface enables developers to encapsulate the actions triggered by action controls into a set of reusable “command” classes. In Silverlight, action controls such as the button each have a property called Command that can be set or bound to any class that supports the ICommand interface. A number of efficient patterns exist for implementing your own ICommand classes and managing this interaction. Many developers have their own standards they follow in this regard.
The sample framework provided with the source code for this chapter provides an implementation of a DelegateCommand class that utilizes lambda expressions to propagate the execution of actions back to methods of the ViewModel. The use of some type of command delegate is common in many Silverlight and WPF frameworks and eliminates the need to create many small command objects that provide little value.
Data Access
This chapter has intentionally stayed away from discussions on the possible means of data access available to Silverlight developers. Any LOB application (whether written utilizing MVVM) will have the need to query some source of data, and to possibly submit changes to this data back to a persistent data store.
Because Silverlight is a client-side technology that runs in the browser, direct access to a database is not allowed, and instead communication must pass through the server. Silverlight provides a few powerful options for communicating back to the server, and they all rely solely on WCF as the means to make asynchronous calls from the Silverlight client to an appropriate endpoint to query or submit data.
When on the server, any existing .NET data access technology can be used to query the appropriate relational data (if that type of access is required). EF is a great option for many modern data-access scenarios.
Another great option for data access from Silverlight is the use of the WCF RIA Services infrastructure. Utilizing this framework for data access provides numerous capabilities that are extremely useful in an MVVM architecture. Not only are most of the complexities of WCF abstracted away from the developers, but the generated domain objects are a great fit as the model portion of your framework. These domain classes natively implement the INotifyPropertyChanged interface and support the data annotation means of validating data and incorporating business rules. RIA Services is discussed elsewhere in this book, and a review of its capabilities is highly recommended for those looking to build robust Silverlight LOB applications, whether utilizing MVVM.
Summary
This chapter focused on the concepts required to build a basic MVVM framework in Silverlight 4. You have learned about some related concepts and technologies that are worth researching prior to deciding on what direction to take with your own MVVM needs.
This chapter started off by pointing out that the MVVM space does not enjoy a single solution that is widely adopted, but is instead filled with dozens of great solutions that are as different as they are similar. When working with frameworks such as these, what works for one team might be tedious and not a good fit for another, so you should work through the framework provided in this chapter as a means of enhancing your understanding of what most of these frameworks are trying to accomplish. Then, when drawing comparisons to what has been done here to the framework options available to you, you will be in a better position to make a smart decision.
About the Author
Kevin Grossnicklaus founded ArchitectNow, LLC, in 2009, after spending ten years as the .NET Practice Lead and Chief Architect at SSE, a St. Louis-based technology firm. While at SSE, he oversaw the design, implementation, and delivery of mission-critical software applications to dozens of local and national firms. In 2000, while at SSE, Grossnicklaus was as an early adopter of the Microsoft .NET platform (then called the Next Generation of Web Services, or NGWS), and became active in the local development community, sharing his knowledge and experience with these tools and technologies with any developers willing to learn. Since then, he has worked with developers throughout the world on many projects around the newest .NET technologies. In 2004, Grossnicklaus became an instructor at Washington University's Center for the Application of Information Technology (CAIT) program, where he continues to teach all of the .NET-related topics in both C# and VB.NET. Today, through ArchitectNow (www.architectnow.net), he is sharing his knowledge of technology with teams around the world.
All materials on the site are licensed Creative Commons Attribution-Sharealike 3.0 Unported CC BY-SA 3.0 & GNU Free Documentation License (GFDL)
If you are the copyright holder of any material contained on our site and intend to remove it, please contact our site administrator for approval.
© 2016-2026 All site design rights belong to S.Y.A.