Real World .NET, C#, and Silverlight: Indispensible Experiences from 15 MVPs (2012)
Chapter 8
Windows Phone “Mango” for Silverlight Developers
by Alex Golesh
Microsoft Windows Phone 7 brought great opportunities to the mobile developers' community by introducing two familiar development frameworks to the mobile world — Silverlight and XNA. However, the first version of Windows Phone left developers with some unsupported scenarios, and the platform did not support some wanted features. The next version of the Windows Phone operating system, codenamed “Mango,” addresses the most popular requests, and even some completely new scenarios, while improving the developer experience.
This chapter familiarizes you with Windows Phone, codenamed Mango (referred to simply as Mango throughout this chapter), by examining the hardware foundation, the software foundation, the application model, and the integration service.
Hardware Foundation
As announced by Microsoft, all Windows Phone 7 devices will be supported by Mango. Also, the newer generation of Windows Phone devices will support additional hardware components, such as the gyroscope sensor and a new system on chip (SoC). To support the new hardware components and improve usage scenarios for existing components, the Mango release adds several new APIs.
Let's take a closer look at two important new APIs: the Camera API and the Sensors API.
Camera API
With the Mango release, developers can access a live camera feed, which enables some interesting scenarios (such as augmented reality applications, live image processing, and others). Mango provides two alternatives for using the on-board camera: Silverlight's 4 Webcamera APIs and the completely new PhotoCamera class. Let's take a closer look at these APIs so that you can understand the differences between them.
The Silverlight 4 Webcamera approach should be familiar to Silverlight developers. It can be shared (both in terms of XAML and code-behind) with desktop applications. It uses the CaptureSource class from System.Windows.Media namespace and supports the capturing of video, still images, and audio.CaptureSource is used as a source for VideoBrush instances to show a live camera preview.
Consider the following simple user interface (UI):
<Rectangle Width="780" Height="460" Margin="10">
<Rectangle.Fill>
<VideoBrush x:Name="previewVideo"/>
</Rectangle.Fill>
</Rectangle>
This XAML code snippet defines a rectangle that is filled with a VideoBrush named “previewVideo”.
The following code snippet initializes a CaptureSource instance and assigns it as a source to the VideoBrush:
captureSource = new CaptureSource();
captureSource.VideoCaptureDevice =
CaptureDeviceConfiguration.GetDefaultVideoCaptureDevice();
previewVideo.SetSource(captureSource);
captureSource.Start();
This simple technique enables a live camera feed onscreen. In addition, you can use CaptureSource to capture still images.
To capture the image, CaptureSource provides an asynchronous method (CaptureImageAsync) and two events that handle successful and unsuccessful capture attempts. It is up to the developer to subscribe to these events, call the method, and handle the results, as shown here:
captureSource.CaptureImageCompleted += new
EventHandler<CaptureImageCompletedEventArgs>
(captureSource_CaptureImageCompleted);
captureSource.CaptureFailed += new
EventHandler<ExceptionRoutedEventArgs>
(captureSource_CaptureFailed);
//...
captureSource.CaptureImageAsync();
//...
void captureSource_CaptureFailed(object sender, ExceptionRoutedEventArgs e)
{
//Error processing goes here...
}
//...
void captureSource_CaptureImageCompleted(object sender,
CaptureImageCompletedEventArgs e)
{
if (null == e.Error)
{
//Capture successful. Captures image is
//WriteableBitmap in e.Result
//Images processing goes here…
}
}
As you can see, capturing and previewing the image is a simple process; although, developers have no access to the phone's hardware Camera button, no access to the camera's flash, and no control over the camera's auto-focus. These issues do not exist when using the new PhotoCamera class from the Microsoft.Devices namespace.
PhotoCamera initialization takes time, so if your application page uses this device, you should start initialization at the earliest possible time after PhotoCamera class initializations are complete. Override the OnNavigatedTo function, and create a new instance of the PhotoCamera class, as shown here:
protected override void OnNavigatedTo(System.Windows.Navigation.
NavigationEventArgs e)
{
photoCamera = new PhotoCamera();
photoCamera.Initialized +=
new EventHandler<CameraOperationCompletedEventArgs>
(photoCamera_Initialized);
previewVideo.SetSource(photoCamera);
base.OnNavigatedTo(e);
}
The PhotoCamera class can be used as a source for VideoBrush instances as well. The events of the PhotoCamera class can be consumed only after the camera is initialized. Subscribe to camera events in the Initialized event handler, as shown here:
void photoCamera_Initialized(object sender,
CameraOperationCompletedEventArgs e)
{
if (photoCamera.IsFlashModeSupported(FlashMode.Auto))
photoCamera.FlashMode = FlashMode.Auto;
//Select the lowest available resolution
photoCamera.Resolution = photoCamera.AvailableResolutions.ElementAt(0);
photoCamera.AutoFocusCompleted += new
EventHandler<CameraOperationCompletedEventArgs>
(photoCamera_AutoFocusCompleted);
CameraButtons.ShutterKeyPressed += new
EventHandler(photoCamera_ButtonFullPress);
CameraButtons.ShutterKeyHalfPressed += new
EventHandler(photoCamera_ButtonHalfPress);
CameraButtons.ShutterKeyReleased += new
EventHandler(photoCamera_ButtonRelease);
photoCamera.CaptureCompleted += new
EventHandler<CameraOperationCompletedEventArgs>
(photoCamera_CaptureCompleted);
photoCamera.CaptureImageAvailable += new
EventHandler<ContentReadyEventArgs>
(photoCamera_CaptureImageAvailable);
}
The CameraButtons class is a static class that enables subscribing to the hardware's Camera button events. Because this class is static, you must release the event subscription as soon as possible to prevent getting false events, and to release camera-related variables:
protected override void OnNavigatedFrom
(System.Windows.Navigation.NavigationEventArgs e)
{
photoCamera.Initialized -= photoCamera_Initialized;
photoCamera.AutoFocusCompleted -= photoCamera_AutoFocusCompleted;
CameraButtons.ShutterKeyPressed -= photoCamera_ButtonFullPress;
CameraButtons.ShutterKeyHalfPressed -= photoCamera_ButtonHalfPress;
CameraButtons.ShutterKeyReleased -= photoCamera_ButtonRelease;
photoCamera.CaptureCompleted -= photoCamera_CaptureCompleted;
photoCamera.CaptureImageAvailable -= photoCamera_CaptureImageAvailable;
photoCamera.Dispose();
photoCamera = null;
base.OnNavigatedFrom(e);
}
After the camera is initialized and working, you can issue Focus() commands (for example, at the ShutterKeyHalfPressed event handler) and CaptureImage() commands (at the ShutterKeyPressed event handler):
void photoCamera_ButtonHalfPress(object sender, EventArgs e)
{
photoCamera.Focus();
}
void photoCamera_ButtonFullPress(object sender, EventArgs e)
{
photoCamera.CaptureImage();
}
Another feature of the PhotoCamera class available to developers is the capability to preview buffers in different formats. The GetPreviewBuffer_XXXX functions copy the current viewfinder frame into an array to enable frame processing:
int[] pixelData = new int[(int)(photoCamera.PreviewResolution.Width *
photoCamera.PreviewResolution.Height)];
photoCamera.GetPreviewBufferArgb32(pixelData);
This feature enables applying live effects on the viewfinder's image.
Camera Best Practices
Keep in mind the following when writing code for the Camera APIs:
· Use the Webcamera API for simple scenarios and compatibility with desktop solutions.
· Use the PhotoCamera API when fine control over the image capturing is needed, or image processing is needed.
· Use the lowest possible resolution when processing a live video stream.
· Release camera devices as soon as they are no longer needed.
· Use VideoBrush to present live previews on screen.
Sensors API
The initial release of Windows Phone supported the accelerometer sensor. Mango adds support for three additional sensors:
· Gyroscope
· Compass (magnetometer)
· Motion sensor
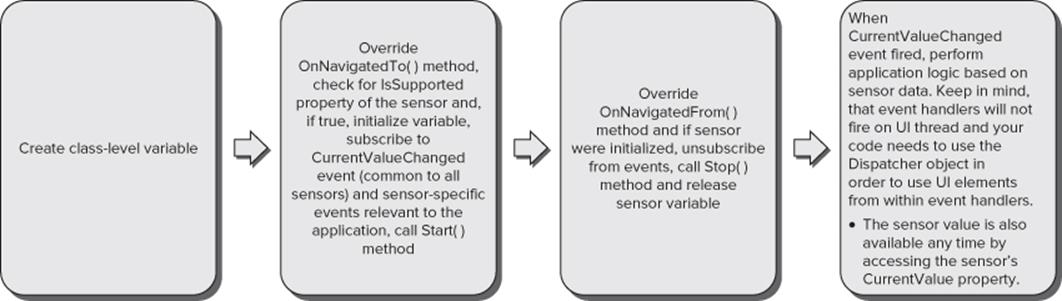
All the sensor classes are located in the Microsoft.Devices.Sensors namespace and derive from the SensorBase<T> abstract class. This means that all sensors have a common usage pattern, and differ only by additional methods and internal implementation. Figure 8.1 shows the general sensor interaction pattern.
Figure 8.1 General sensor interaction pattern
Gyroscope
A gyroscope is a device for measuring or maintaining orientation, based on the principles of conservation of angular momentum. In Mango, the Gyroscope API provides the rotational velocity around each one of three axes (X, Y, and Z) of the device in radians per second. This sensor is a new addition to the Windows Phone 7 sensors family. It is optional and exists only on a small number of new devices, and not on original Windows Phone devices.
The GyroscopeReading class (exposed via CurrentValue property) provides the gyroscope's RotationRate (which is the rotational velocities around each one of three axes of the device) and a Timestamp (which indicates when the reading was taken).

The gyroscope sensor readings are subject to significant drift.
Compass
The compass sensor (also known as the magnetometer sensor) provides the following data in its CurrentValue property:
· HeadingAccuracy — This is the accuracy of compass heading readings in degrees. You use this value for compass calibration.
· MagneticHeading — This is the compass heading relative to Earth's magnetic north (provided in degrees).
· TrueHeading — This is the compass heading relative to Earth's geographic north (provided in degrees).
· MagnetometerReading — This is the raw magnetometer reading values in microteslas (that is, values provided in XNA's Vector3 type). To use these readings, you must add a reference to the Microsoft.Xna.Framework assembly.
In addition, the compass sensor enables applications to subscribe to the Calibrate event. When this event is fired, the application must present instructions for performing sensor calibration. Sensor calibration is performed by waving the device in a figure-eight pattern. This calibration is required because the magnetometer sensor is subject to external interference. Metal obstacles, high-voltage electrical installations, and some electronic devices could interfere with Earth's magnetic field and change the local magnetic field's values. In these cases, the sensor must be calibrated, and the compass API fires the Calibrate event.
The Mango API doesn't provide any CalibrationComplete notification, and it is up to the developer to decide when data accuracy is sufficient for the application. In general, HeadingAccuracy below 10 to 15 degrees should be enough for most applications.
Following is an example:
void compass_Calibrate(object sender, CalibrationEventArgs e)
{
//Show calibration instructions
stkCalibration.Visibility = Visibility.Visible;
//Hide compass sensor related UI
imgRose.Visibility = Visibility.Collapsed;
//Set "Is Calibrating" flag to consume it later
compassCalibrating = true;
}
void compass_CurrentValueChanged(object sender,
SensorReadingEventArgs<CompassReading> e)
{
//Check if compass is calibrating
if (compassCalibrating)
{
//Check if current HeadingAccuracy below threshold value
if (e.SensorReading.HeadingAccuracy < 10)
{
//Compass calibrated, restore the compass UI
compassCalibrating = false;
//...
}
}
if (!compassCalibrating)
//Compass calibrated, use the data
//...
}
Motion
The motion sensor is a virtual sensor that combines the gyroscope, compass, and accelerometer sensors. The motion sensor performs math calculations to combine data from all sensors. The data is combined using an algorithm that compensates for the inaccuracies of each independent sensor, making the motion sensor the most accurate sensor.
The motion sensor should be used when available, and should be preferable over each independent sensor. The availability of this sensor depends on the physical sensors available on the device. Table 8.1 summarizes the availability of the motion sensor.
Table 8.1 Motion Sensor Availability
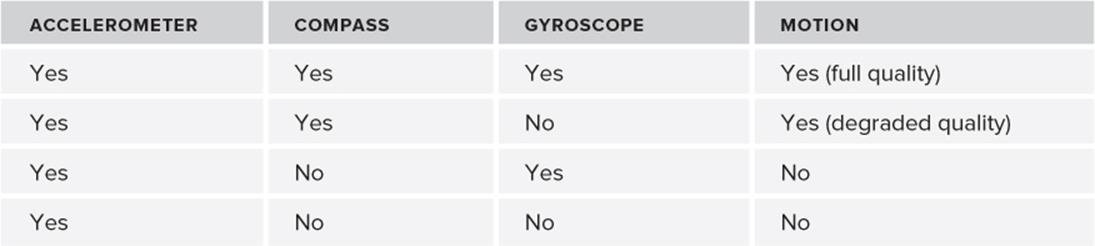
In Table 8.1, “degraded quality” means that sensor data is still available, but the values are subject to some approximations. If the IsSupported property of the motion sensor is false, applications should use the accelerometer (which is always available because it is required by basic hardware specification for all Windows Phone 7 devices) and other input and control mechanisms.

The motion sensor requires calibration over time because it uses compass sensor data. The calibration process is similar to compass calibration.
Sensors Best Practices
Keep the following in mind when working with sensors:
· Always use the Motion sensor when available.
· Always check the IsSupported property for any sensor before initializing/using it in your application.
· Initialize sensors only when needed, and release them as soon as possible (when they are no longer needed).
· Always prepare backup input and control mechanisms if certain sensors are not available on the device.
· Those changes in the hardware platform benefit most when combined with changes made in the software foundation.
Software Foundation
In this section, you will learn about what's new in Mango with regard to the runtime and tools.
Runtime Improvements
From a developer's standpoint, the biggest improvement in Mango is Silverlight 4 integration. Although the initial release of Windows Phone enabled Silverlight 3 development with some phone-specific additions, Mango brings the capability to use the full Silverlight 4 development environment with powerful features such as implicit styles, RichTextBox control, ViewBox control, touch-event support (such as tap, double-tap, and so on) and languages support (for example, for Register Transfer Languages, or RTLs).
In addition, Mango brings many performance improvements over previous versions of Windows Phone, such as a generational Garbage Collector (GC), separate input thread, and profiler support.
Tools Enhancements
Mango introduces many enhancements in Visual Studio 2010 to help developers create better applications. Mango tools provide better developer support for developing sensor-enabled applications.
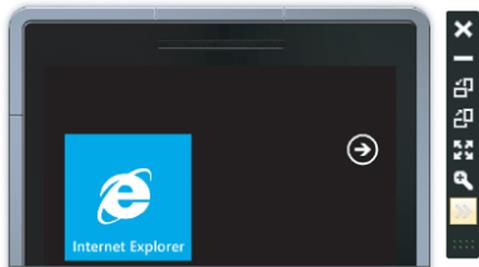
In the previous release, developing an accelerometer-enabled or a GPS-enabled (location-aware) application required a developer-unlocked phone device, or some community solution to emulate sensor input. With the Mango release, sensor emulation is supported by the Windows Phone Emulator. To emulate accelerometer or location readings, open the Additional Tools window in the Emulator, as shown in Figure 8.2.
Figure 8.2 Additional Tools window in the Emulator
The opened Additional Tools window enables accelerometer and location-change emulation. To simulate the accelerometer data, move the pink ball using the mouse, as shown in Figure 8.3.
Figure 8.3 Simulating accelerometer data
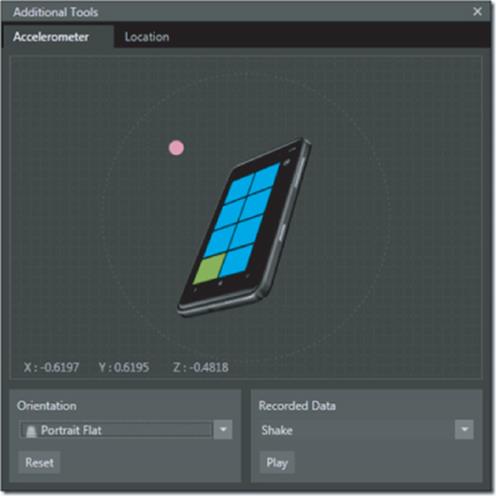
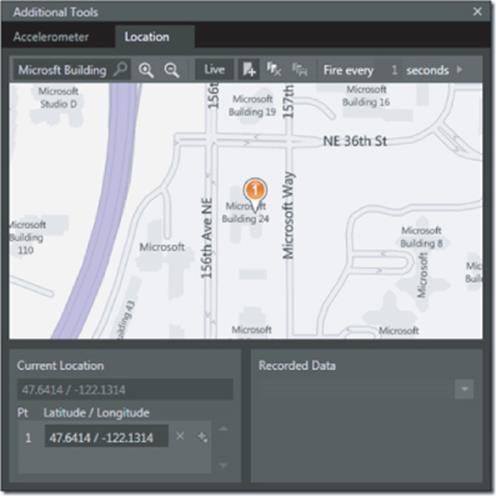
The Location tab (shown in Figure 8.4) enables you not only to send the current location to the Windows Phone Emulator, but also to record a virtual path through specified geographical points, and send them at given time intervals to emulate the device's movement.
Although the Windows Phone Emulator provides you with a way to simulate the accelerometer and GPS location data, you are advised to check your application on a real device as well because real sensor data is subject to environmental influence, network availability, magnetic fields, and so on. Always check your application on a real device to see how it behaves under real-world conditions.
Figure 8.4 Location tab
Some additional new features in Mango include a local database engine based on SQL CE, an improved network stack with TCP and UDP sockets support, an enhanced web browser based on Internet Explorer 9 (IE9) with HTML5 support, and the VideoBrush object. Mango introduces a new type of application as well: hybrid Silverlight and XNA applications.
Network Sockets
Mango introduces support for TCP and UDP sockets. UDP sockets support both unicast and multicast communication (on Wi-Fi). In addition, Mango introduces a Connection Manager component that manages connections on the phone. It is responsible for connecting the application with a data source, as well as providing information about the type of data network the phone uses (for example, Wi-Fi, 3G, EDGE, and so on).
The socket APIs are compatible with Silverlight on the desktop (where applicable). Table 8.2 compares Silverlight 4 and Mango sockets.
Table 8.2 Socket Comparison
|
Area |
Silverlight 4 (Desktop) |
Silverlight 4 (Mango) |
|
TCP sockets |
Sockets |
Socket |
|
UDP sockets |
UdpAnySourceMulticastClient |
UdpSingleSourceMulticastClient |
|
UdpAnySourceMulticastClient |
||
|
UdpSingleSourceMulticastClient |
||
|
Addressing |
SocketAddress |
SocketAddress |
|
IPAddress |
IPAddress |
|
|
IPEndPoint |
IPEndPoint |
|
|
Name Resolution |
DnsEndPoint |
DnsEndPoint |
The following code snippet demonstrates how to create a TCP socket connection:
_endPoint = new DnsEndPoint("192.168.0.2", 5000);
_socket = new Socket(AddressFamily.InterNetwork, SocketType.Stream,
ProtocolType.Tcp);
SocketAsyncEventArgs args = new SocketAsyncEventArgs();
args.UserToken = _socket;
args.RemoteEndPoint = _endPoint;
args.Completed += new
EventHandler<SocketAsyncEventArgs>(OnSocketConnectCompleted);
_socket.ConnectAsync(args);
The following code snippet demonstrates how to join UDP casting:
Client = new UdpAnySourceMulticastClient(address, port);
Client.BeginJoinGroup(
result =>
{
Client.EndJoinGroup(result);
Dispatcher.BeginInvoke(
delegate
{
OnAfterOpen();
Receive();
});
}, null);
Silverlight/XNA Hybrid Applications
Mango introduces a new model of hybrid applications. These applications enable XNA content inside Silverlight applications, which introduces a completely different level of graphics inside those applications.
XNA is a game framework used to create games for the Xbox360, PC, and Windows Phone. It provides a game engine and a lot of boilerplate code that helps developers create two-dimensional (2D) and three-dimensional (3D) games. XNA's 2D graphics are based on image sprites (textures), and its 3D graphics are based on real 3D models created in professional 3D-design tools. The framework provides APIs to display these graphics using an immediate graphics mode (the developer has full control over each single frame displayed by the application), as well as a set of comprehensive math libraries to help with game development logic.
In Mango, Silverlight/XNA integration is done at the page level, which means XNA content is part of a Silverlight page. The XNA rendering mechanism takes over the Silverlight one using the SharedGraphicsDeviceManager class, as shown here:
SharedGraphicsDeviceManager.Current.GraphicsDevice.SetSharingMode(true);
This way, the XNA graphics take over the whole page with the Silverlight rendering engine not running at all. To present in the Silverlight UI, Mango provides a new class, UIElementRenderer, from the Microsoft.Xna.Framework.Graphics namespace. This class is responsible for rendering the SilverlightUIElement (and its siblings) into textures that can be used for rendering in XNA, along with other game graphics.
The following code snippet demonstrates how to initialize the UIElementRenderer instance to render a whole Silverlight page into a texture:
uiRenderer = new UIElementRenderer(LayoutRoot, (int)LayoutRoot.ActualWidth,
(int)LayoutRoot.ActualHeight);
At XNA's Draw() time, simply render the UIElement and paint it on screen, as shown here:
// Update the Silverlight UI
uiRenderer.Render();
// Draw the sprite
spriteBatch.Begin();
spriteBatch.Draw(uiRenderer.Texture, Vector2.Zero, Color.White);
spriteBatch.End();
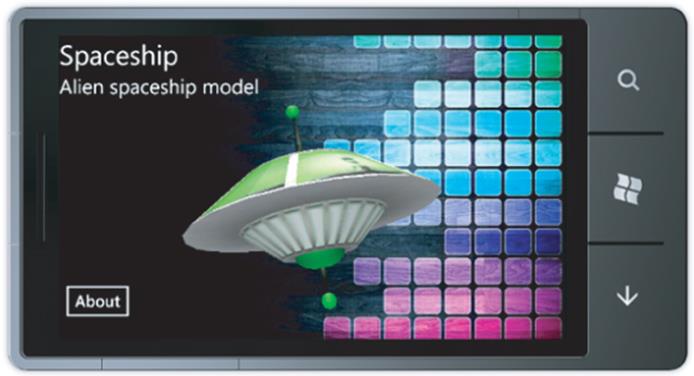
The result is an application that mixes Silverlight and XNA graphics (with real hardware-accelerated 3D graphics). These applications can look like what is shown in Figure 8.5.
Figure 8.5 Application mixing Silverlight and XNA graphics
Local Database
Mango adds a local database engine to the device. The database engine on the phone is based on the SQL CE engine. Mango applications use LINQ-to-SQL for all database operations. LINQ-to-SQL provides an object-oriented approach to working with data and is composed of an object model and a runtime. The database files are stored in isolated storage on the phone and available to the application only (which means multiple applications cannot share the same database).
Following are some suggested scenarios for local database usage in applications:
· “Shopping list”-style applications
· Complex schema databases, which usually include a few tables (five to seven), hundreds of records, along with numerous relations, constraints, and foreign keys
· “Dictionary”-style applications
· Reference data that usually has a huge amount of static reference data with few tables (two to three) and constraints, with one or two of the tables holding huge amounts of data (500,000 to 1 million records)
· “Local cache” for applications
The database serves as a local cache for data fetched from the cloud, sometimes in combination with application-specific data. Usually, such cache data contains very few tables with relatively simple data. Those tables usually hold up to hundreds of records for a defined period of time (until application logic defines the data there as expired).
LINQ-to-SQL provides Object-Relational Mapping (ORM) capabilities that enable your managed application to use Language Integrated Queries (LINQ) to communicate with a relational database. LINQ-to-SQL maps the object model (which you express with .NET-managed code) to a relational database.
When your application runs, LINQ-to-SQL translates language-integrated queries into database “language” and then sends them to the database for execution. When the database returns the results, LINQ-to-SQL translates them back to objects that you can work with in your own programming language.
LINQ-to-SQL works with the DataContext object, which defines the object model of the data. Usually, DataContext defines the data using plain old CLR objects (POCO) and attributes conventions.
The current version of Windows Phone developer tools doesn't provide any visual designer to assist in creating the DataContext and entity classes. You can create those classes manually as described here.
To create your own DataContext classes, derive them from the DataContext base class. A DataContext derived class is a managed class that defines table structure and a mapping between the object model and the database schema. The mapping is created by decorating objects with mapping attributes. These attributes specify database-specific features (such as tables, columns, primary keys, indexes, and so on).
The DataContext class (with mapped properties) is used to create a local database on the phone. The code-first approach (which uses managed code to define the schema and create the database) is the preferred approach for Windows Phone applications.
Following are some key points about local databases created by applications:
· A local database exists only for parent application.
· The database is not shared across different applications on the device and is accessible only by the parent application.
· Only the LINQ-to-SQL query mechanism is supported. T-SQL is not supported.
Application Model
In this section, you will learn about application model changes, and will see how those changes lead to more responsive applications, and enable very interesting user scenarios.
Fast Application Switching (FAS)
The initial version of the Windows Phone operating system supported only one active application. When applications were sent to the background, their state was serialized and kept in isolated storage. This process is called tombstoning, and an application that had undergone it was consideredtombstoned. When users returned to a tombstoned application, they would have to wait a while as the application deserialized its state. Developers had to take care of saving the application's state and resuming it.
With Mango, that is no longer the case. There is only one active (foreground) application. When an application is sent to the background, the operating system keeps its image (variables, execution state, and so on) alive in memory for as long as possible without impairing the performance of the currently active application.
This new state of the application is called dormant. When a user reactivates the dormant application, the experience is virtually instantaneous because restoring the application's in-memory image is a fast operation. In cases when the dormant application's memory must be released to ensure active application performance is not impaired, Mango tombstones the dormant application, and the user must wait to get back to the application (as was the case in the previous Windows Phone release). This new mechanism is called Fast Application Switching (FAS).
Mango application developers must be aware of this new behavior and respond accordingly when the application is resuming. When an application is activated, ActivatedEventArgs has a new property, IsApplicationInstancePreserved, which indicates the latest state of resumed application. IfIsApplicationInstancePreserved is true, then all application memory is intact, and virtually nothing should be done. If IsApplicationInstancePreserved is false, you must perform an “old-styled” tombstoning resume operation, as shown here:
private void Application_Activated(object sender, ActivatedEventArgs e)
{
// Ensure that application state is restored appropriately
if (!e.IsApplicationInstancePreserved)
{
WasTombstoned = true;
//Your code to resume from tombstoning ...
}
else
{
WasTombstoned = false;
}
}
The default behavior of the Mango application life-cycle manager is to preserve application images in memory as long as possible. The tombstoning process can take place automatically by the phone's operating system when it is needed.
To enable debugging of tombstoned applications, you can use the new version of the developer tools to force an application to forego FAS in favor of tombstoning. To force tombstoning, open the project's properties, and navigate to the Debug tab, as shown in Figure 8.6.
Figure 8.6 The Debug tab
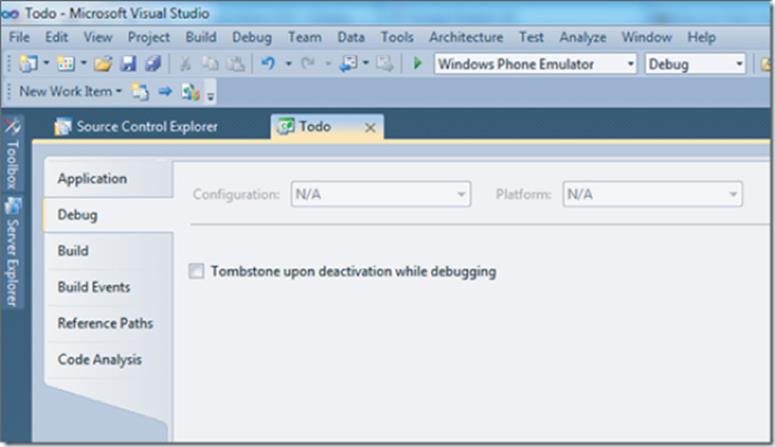
Clicking the check box that says Tombstone upon Deactivation While Debugging forces your application to consistently perform tombstoning upon deactivation while the debugger is attached. Clear the check box to have the application use FAS again.
Multitasking
One of most requested and discussed features of the Mango release is multitasking. In Mango, the multitasking term has slightly different meaning than standard (PC) multitasking. Multitasking for Mango phones means the capability to execute an application's code while the application in not active, and to play audio started by the application in the background. This is achieved by background agents.
In addition to background agents, Mango also introduces APIs to download and upload files while an application is in the background, as well as to add reminders and alarms to get the user's attention. You learn about these features later in the chapter.
Background Agents
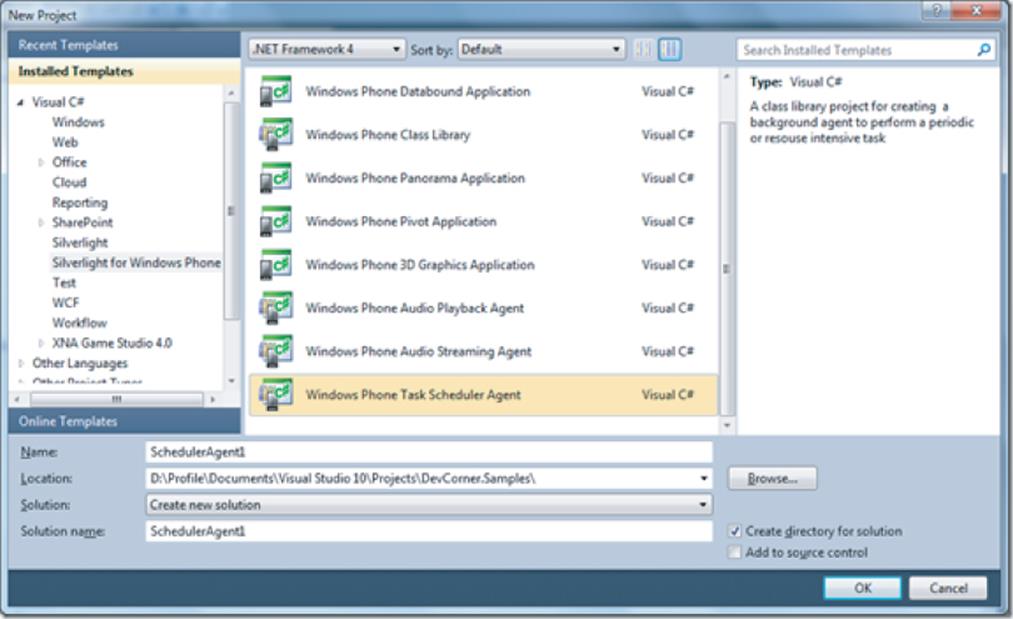
The background agents are class libraries that are “manifested” within the application. They can perform periodic tasks (or resource-intensive tasks), and play audio from a local file or audio stream. As shown in Figure 8.7, the developer tools provide a starting point for creating agents.
Figure 8.7 The Windows Phone agent templates
Audio background agents enable continued play of sounds, even if the application is closed. These sounds integrate into the universal volume control on the phone to ensure the consistency of the user experience on the device. An audio agent can start playing from a provided URL or stream and notify the application of file/buffer completion, user actions from the universal volume control (like skip to next/previous track), as well as provide the application with playback status, progress, and metadata.
Audio playback agents help to create scenarios in which an application provides the URL (or URL list) to play and provide some custom logic for skipping forward and backward, and to pause/resume/stop.
Audio streaming agents provide the raw audio buffers. These are used to enable scenarios that require custom logic to decrypt (and sometimes decompress) the stream before playback.
Task scheduler agents enable applications to run some business logic when the application is in the background, or even when it is tombstoned.
Applications can create a PeriodicTask or ResourceIntensiveTask (both from Microsoft.Phone.Scheduler namespace). These tasks must be initialized while the application is active, but can run while the application is in the background. Applications may have only one such task from each type.
· PeriodicTasks run once every 30 minutes for a duration of about 15 seconds and are constrained to consume no more than 10 percent of the CPU resources and 6MB of memory.
· ResourceIntensiveTasks run only when the system is in an idle state, connected to an external powers source, and with a noncellular network available. It can run for the duration of 10 minutes and be constrained to use no more than 6MB of memory.
Additionally, both tasks are limited to a set of APIs that can be executed. Table 8.3 helps to demonstrate that limitation.
Table 8.3 Task Limitations
|
Allowed |
Restricted |
|
Update tiles. |
Display UI. |
|
Show toast notification. |
Use XNA libraries. |
|
Use location services. |
Use microphone or camera. |
|
Most framework APIs use network. |
Use sensors. |
|
Read/write to isolated storage. |
Play audio (may only use background audio APIs). |
|
Use sockets. |
The new task (either PeriodicTask or ResourceIntensiveTask) should be registered using ScheduledActionService and removed when not needed anymore.
private void btnStartStopBgTask_Click(object sender, RoutedEventArgs e)
{
if (!isBackgroundTaskEnabled)
{
PeriodicTask periodicTask = new PeriodicTask("TheWorker");
periodicTask.Description = "The worker task";
periodicTask.ExpirationTime = DateTime.Now.AddDays(1);
ScheduledActionService.Add(periodicTask);
isBackgroundTaskEnabled = true;
}
else
{
ScheduledActionService.Remove("TheWorker");
isBackgroundTaskEnabled = false;
}
}
Keep the following in mind when working with agents:
· Agents run for up to 14 days and should then be renewed, or they will be removed by the system.
· Agents are persisted across reboots.
· The user can control agents through the system's control panel.
· The total amount of periodic agents (systemwide) is 18.
Notifications
Mango provides a new API to create time-based, on-phone notifications. These notifications can be from one of two types: alarms or reminders.
Figure 8.8 shows the alarm type, which has the following characteristics:
· Modal
· Buttons for “snooze” and “dismiss”
· Sound customization enabled
· No application deep-link invocation (that is, getting back to a specific navigation page) allowed
· No stacking
Figure 8.8 Alarm notification
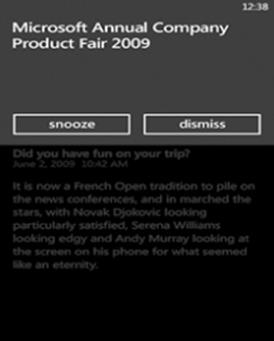
The following code snippet is used to create the alarm shown in Figure 8.8:
using Microsoft.Phone.Scheduler;
private void AddAlarm(object sender, RoutedEventArgs e)
{
Alarm alarm = new Alarm("Long Day");
alarm.BeginTime = DateTime.Now.AddSeconds(15);
alarm.Content = "Microsoft Annual Company Product Fair 2009";
ScheduledActionService.Add(alarm);
}
Figure 8.9 shows a reminder notification, which has the following characteristics:
· Rich information provided
· Other reminders can be integrated
· Buttons for “snooze” and “dismiss”
· Deep linking into the application allowed
· Global settings for the phone followed
Figure 8.9 Reminder notification

The following code snippet is used to create the reminder shown in Figure 8.9:
using Microsoft.Phone.Scheduler;
private void AddReminder(object sender, RoutedEventArgs e)
{
Reminder reminder = new Reminder("CompanyMeeting");
reminder.BeginTime = DateTime.Now.AddSeconds(15);
reminder.Content = "Soccer Fields by The Commons";
reminder.Title = "Microsoft Annual Company Product Fair 2009";
reminder.RecurrenceType = RecurrenceInterval.Yearly;
reminder.NavigationUri = new Uri("/Reminder.xaml", UriKind.Relative);
ScheduledActionService.Add(reminder);
}
The NavigationUri property enables you to deep link into the application when the user taps the reminder.
Background Transfer Service
An additional exciting feature in Mango is background file transfer, which enables the transfer of files (in both directions — upload and download) even when the application is dormant or is tombstoned. You may start a file transfer while the application is in the foreground and complete the transfer in the background. The file transfer will be preserved across device reboots. After the application is started after one or more background transfers have been completed, it receives all events from corresponding background transfers upon reactivation.
Every application can queue up to five background transfer requests. All the requests are queued into the phone's service and served in first in, first out (FIFO) order. Transferred files can be served from the /shared/Transfers folder only. This means that files for upload should be copied into this folder before scheduling the upload request, and the downloaded file will be placed into this folder upon completion. Files should be moved to their final locations by the application. By default, big files (that is, more than 20MB) will be downloaded only when the device has Wi-Fi connectivity.
Transfers (both ways) are started by creating a BackgroundTransferRequest instance and adding it to the BackgroundTransferService queue, as shown here:
void StartDownload()
{
btr = new BackgroundTransferRequest(remoteVideoUri, localDownloadUri);
btr.TransferPreferences = TransferPreferences.AllowCellularAndBattery;
BackgroundTransferService.Add(btr);
btr.TransferProgressChanged += new
EventHandler<BackgroundTransferEventArgs>
(btr_TransferProgressChanged);
btr.TransferStatusChanged += new
EventHandler<BackgroundTransferEventArgs>
(btr_TransferStatusChanged);
}
The following event enables control over the transfer flow:
void btr_TransferProgressChanged(object sender, BackgroundTransferEventArgs e)
{
double progress = e.Request.BytesReceived * 100 /
e.Request.TotalBytesToReceive;
//Your code here...
}
When the transfer finishes, it is up to application to remove it from the BackgroundTransferService queue, as shown here:
void btr_TransferStatusChanged(object sender, BackgroundTransferEventArgs e)
{
if (btr.TransferStatus == TransferStatus.Completed)
{
btr.TransferProgressChanged -= btr_TransferProgressChanged;
btr.TransferStatusChanged -= btr_TransferStatusChanged;
BackgroundTransferService.Remove(btr);
//Your code here...
}
}
As mentioned, big files use Wi-Fi by default to download, like the Marketplace application does. Also, in some cases, big files can download only when the device is connected to a power source. To override this default behavior, change the TransferPrefereneces property of BackgroundTransferRequestinstance to the following:
btr.TransferPreferences = TransferPreferences.AllowCellularAndBattery;
Integration Service
The changes in Mango enable very interesting scenarios and improvements for the end user, while still preserving the phone health. This can provide even more benefits by using improvements in integration features.
Secondary Tiles
The Mango release enables multiple main screen tiles for applications.
In the initial Windows Phone release, the user could pin an application to the main screen, and the push notification mechanism was used to update this tile.
With the Mango release, in addition to the old mechanism, developers can programmatically pin additional application tiles (secondary tiles) to the main screen. These secondary tiles can be updated using the push notification mechanism, enable deep linking (navigation to a specific application page when the user taps the tile), and provides two interchangeable surfaces. If both tile surfaces contain data (at creation), the tile flips randomly to expose both sides.
The following snippet shows how to create a two-sided tile:
StandardTileData initialData = new StandardTileData
{
BackgroundImage = new Uri("images/DEFAULT.png", UriKind.Relative),
Title = "Mood",
BackContent = "No updates yet",
BackTitle = "More info",
};
ShellTile.Create(new Uri("/MoodInfo.xaml?Name=Alex", UriKind.Relative),
initialData);
The URI provided at creation time serves as the tile's unique identifier and as a link to an application page.
Push Notifications
All Windows Phone applications are capable of subscribing to push notification events. The notifications are provided by the Microsoft Push Notification Service (MPNS), which identifies the device by a unique URI. This URI is generated when the device subscribes to the push notifications and opens a push notification channel.
Push notifications can be from three types:
· Raw notifications — These notifications will be delivered to the application and are processed while the application is running in the foreground.
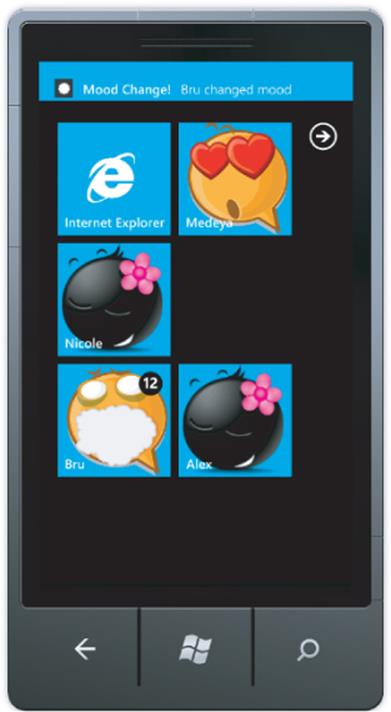
· Toast notifications — These notifications will be delivered to the application when it is in the background, and are displayed in the system notification area (that is, the upper part of the device).
· Tile notifications — These notifications will be delivered when the application is in the background and will change the application's tiles (main or secondary).
Figure 8.10 shows both types of background notifications (toast and secondary tiles).
Figure 8.10 Background notifications
Push notifications are received as an XML payload sent through MPNS to the device. The sender is usually some kind of server, which attempts to update relevant client applications with new information.
To send tile push notifications to specific clients, you must prepare and send the following XML payload:
<?xmlversion="1.0"encoding="utf-8"?>
<wp:Notification xmlns:wp="WPNotification">
<wp:Tile Id="THE URL">
<wp:BackgroundImage><background image="" path=""></wp:BackgroundImage>
<wp:Count><count></wp:Count>
<wp:Title><title></wp:Title>
<wp:BackTitle><back side="" title=""></wp:BackTitle>
<wp:BackContent><back side="" content=""></wp:BackContent>
<wp:BackBackgroundImage><back side="" background="" image=""
path=""></wp:BackBackgroundImage>
</wp:Tile>
</wp:Notification>
In this case, the Id attribute value identifies the tile. A primary tile has the value of /, and secondary tiles have a value leading to an actual application page. For example, the secondary tile from the mood application shown in Figure 8.10 has “/MoodInfo.xaml?Name=Alex” as a value.
To send toast notifications to a specific client, you must prepare and send the following XML payload:
<?xmlversion="1.0"encoding="utf-8"?>
<wp:Notification xmlns:wp="WPNotification">
<wp:Toast>
<wp:Text1><string></wp:Text1>
<wp:Text2><string></wp:Text2>
<wp:Param><THE URL=""></wp:Param>
</wp:Toast>
</wp:Notification>
The <The URL> parameter enables deep linking to a specific application page when the user taps the notification.
Contacts/Appointments Data Access
Mango provides an API to take advantage of the user's contacts and appointments. To search for appointments and contacts, use the Appointments and Contacts classes located under Microsoft.Phone.UserData namespace.
The Contacts class contains information that indicates the accounts used to provide the information. The information is provided via an Accounts property. It holds a collection of accounts with an account kind (of StorageKind type) and account name.
Contacts can be searched using the SearchAsyc method. The result is returned as a ContactSearchEventArgs class instance. It has a collection of Results, and each item in the Results collection holds an instance of Contact class from Microsoft.Phone.UserData namespace. It has all the information about the contact (such as PhoneNumbers, DisplayName, EmailAddresses, Companies) the Accounts associated with this contact, and indicates whether the contact is pinned to the start screen (IsPinnedToStart).
The following code snippet shows how to search for contacts and group the results by the first letter in their display names:
contacts = new Contacts();
contacts.SearchCompleted += contacts_SearchCompleted;
contacts.SearchAsync(String.Empty, FilterKind.None, null);
void contacts_SearchCompleted(object sender, ContactsSearchEventArgs e)
{
// Group all contacts according to the first letter in their display name
var itemsSource = e.Results.GroupBy(c => c.DisplayName.First()).
OrderBy(group => group.Key).
Select(group => new ContactsGroup(group));
// ...
}
Similarly to the Contacts class, the Windows Phone APIs provide the Appointments class under the Microsoft.Phone.UserData namespace to search through the user's appointments. The Appointments class is initialized similarly to the Contacts class, as shown here:
appointments = new Microsoft.Phone.UserData.Appointments();
appointments.SearchCompleted += new
EventHandler<AppointmentsSearchEventArgs>
(appointments_SearchCompleted);
To start the search, invoke the SearchAsyc method, which asynchronously searches for appointments that occur between the specified start date and time, and end date and time. The following code snippet searches for all appointments in all accounts in the next 5 days:
appointments.SearchAsync(DateTime.Now, DateTime.Now.AddDays(5), null);
The SearchCompleted event handler returns the Start and End date/time used to search for the current result set. Each item in the Results collection holds an instance of Appointment class from the Microsoft.Phone.UserData namespace. It has all the information about the appointment (such as Location, Organizer,Attendees list, Subject, and so on).
Summary
The Mango release of Windows Phone 7 provides developers with many new features and enables many new interesting scenarios. Combined with features from the original Windows Phone release, it exposes a powerful (yet easy) mechanism to create modern mobile applications and leverage the full power of modern devices. It introduces very interesting end-user scenarios that range from controlling the application with built-in sensors and executing background activities, to having multiple application tiles on the main screen and updating them via push notifications.
About the Author
Alex Golesh is a senior architect at Sela Group and a Silverlight division manager. He is an international expert who specializes in Silverlight, Windows Presentation Foundation (WPF), Windows Phone 7, and XNA. Golesh is currently consulting for various enterprises in Israel and worldwide, architecting and developing Rich Internet Application (RIA) and Smart Client-based solutions. He has been developing training samples and courses for various product groups at Microsoft (Redmond, WA). He conducts lectures and workshops, and leads projects worldwide in the fields of RIA, Smart Client, and Windows Phone 7. He has conducted WPF and Silverlight training in India, Sweden, and Poland as a part of the Metro Program Microsoft Early Adoption program. He has received recognition as a Microsoft Most Valuable Professional (MVP) in Silverlight.
All materials on the site are licensed Creative Commons Attribution-Sharealike 3.0 Unported CC BY-SA 3.0 & GNU Free Documentation License (GFDL)
If you are the copyright holder of any material contained on our site and intend to remove it, please contact our site administrator for approval.
© 2016-2026 All site design rights belong to S.Y.A.