Microsoft® Visual C#® 2012 Step by Step (2012)
Chapter 14. Using Garbage Collection and Resource Management
After completing this chapter, you will be able to
§ Manage system resources by using garbage collection.
§ Write code that runs when an object is finalized by using a destructor.
§ Release a resource at a known point in time in an exception-safe manner by writing a try/finally statement.
§ Release a resource at a known point in time in an exception-safe manner by writing a using statement.
§ Implement the IDisposable interface to support exception-safe disposal in a class.
You have seen in earlier chapters how to create variables and objects, and you should understand how memory is allocated when you create variables and objects. (In case you don’t remember, value types are created on the stack, and reference types are allocated memory from the heap.) Computers do not have infinite amounts of memory, so memory must be reclaimed when a variable or an object no longer needs it. Value types are destroyed and their memory reclaimed when they go out of scope. That’s the easy bit. How about reference types? You create an object by using the new keyword, but how and when is an object destroyed? That’s what this chapter is all about.
The Life and Times of an Object
First, let’s recap what happens when you create an object.
You create an object by using the new operator. The following example creates a new instance of the Square class that you met in Chapter 13:
Square mySquare = new Square(); // Square is a reference type
From your point of view, the new operation is a single operation, but underneath, object creation is really a two-phase process:
1. The new operation allocates a chunk of raw memory from the heap. You have no control over this phase of an object’s creation.
2. The new operation converts the chunk of raw memory to an object; it has to initialize the object. You can control this phase by using a constructor.
NOTE
C++ programmers should note that in C#, you cannot overload the new operation to control allocation.
After you have created an object, you can access its members by using the dot operator (.). For example, the Square class includes a method named Draw that you can call:
mySquare.Draw();
NOTE
This code is based on the version of the Square class that inherits from the DrawingShape abstract class and that does not implement the IDraw interface explicitly. For more information, please refer back to Chapter 13.
When the mySquare variable goes out of scope, the Square object is no longer being actively referenced, and the object can be destroyed and the memory that it is using can be reclaimed (this may not happen immediately, though, as you will see later). Like object creation, object destruction is a two-phase process. The two phases of destruction exactly mirror the two phases of creation:
1. The common language runtime (CLR) has to perform some tidying up. You can control this by writing a destructor.
2. The CLR has to return the memory previously belonging to the object back to the heap; the memory that the object lived in has to be deallocated. You have no control over this phase.
The process of destroying an object and returning memory back to the heap is known as garbage collection.
NOTE
C++ programmers should note that C# does not have a delete operator. The CLR controls when an object is destroyed.
Writing Destructors
You can use a destructor to perform any tidying up required when an object is garbage collected. The CLR will automatically clear up any managed resources that an object uses, and in many of these cases, writing a destructor is unnecessary. However, if a managed resource is large (such as a multidimensional array), it may make sense to make this resource available for immediate disposal by setting any references that the object has to this resource to null. Additionally, if an object references an unmanaged resource, either directly or indirectly, a destructor can prove useful.
NOTE
Indirect unmanaged resources are reasonably common. Examples include file streams, network connections, database connections, and other resources managed by the Microsoft Windows operating system. So, if you open a file in a method, you may want to add a destructor that closes the file when the object is destroyed. However, there may be a better and timelier way to close the file depending on the structure of the code in your class (see the discussion of the using statement later in this chapter).
A destructor is a special method, a little like a constructor, except that the CLR calls it after the reference to an object has disappeared. The syntax for writing a destructor is a tilde (~) followed by the name of the class. For example, here’s a simple class that opens a file for reading in its constructor and closes the file in its destructor (note that this is simply an example, and I do not recommend that you always follow this pattern for opening and closing files):
class FileProcessor
{
FileStream file = null;
public FileProcessor(string fileName)
{
this.file = File.OpenRead(fileName); // open file for reading
}
~FileProcessor()
{
this.file.Close(); // close file
}
}
There are some very important restrictions that apply to destructors:
§ Destructors apply only to reference types. You cannot declare a destructor in a value type, such as a struct.
§ struct MyStruct
§ {
§ ~ MyStruct() { ... } // compile-time error
}
§ You cannot specify an access modifier (such as public) for a destructor. You never call the destructor in your own code—part of the CLR called the garbage collector does this for you.
public ~ FileProcessor() { ... } // compile-time error
§ A destructor cannot take any parameters. Again, this is because you never call the destructor yourself.
~ FileProcessor(int parameter) { ... } // compile-time error
Internally, the C# compiler automatically translates a destructor into an override of the Object.Finalize method. The compiler converts the following destructor:
class FileProcessor
{
~ FileProcessor() { // your code goes here }
}
into this:
class FileProcessor
{
protected override void Finalize()
{
try { // your code goes here }
finally { base.Finalize(); }
}
}
The compiler-generated Finalize method contains the destructor body inside a try block, followed by a finally block that calls the Finalize method in the base class. (The try and finally keywords are described in Chapter 6) This ensures that a destructor always calls its base class destructor, even if an exception occurs during your destructor code.
It’s important to understand that only the compiler can make this translation. You can’t write your own method to override Finalize, and you can’t call Finalize yourself.
Why Use the Garbage Collector?
You can never destroy an object yourself by using C# code. There just isn’t any syntax to do it. Instead, the CLR does it for you at a time of its own choosing. In addition, bear in mind that you can also make more than one reference variable refer to the same object. In the following code example, the variables myFp and referenceToMyFp point to the same FileProcessor object:
FileProcessor myFp = new FileProcessor();
FileProcessor referenceToMyFp = myFp;
How many references can you create to an object? As many as you want! This has an impact on the lifetime of an object. The CLR has to keep track of all these references. If the variable myFp disappears (by going out of scope), other variables (such as referenceToMyFp) might still exist and the resources used by the FileProcessor object cannot be reclaimed (the file should not be closed). So, the lifetime of an object cannot be tied to a particular reference variable. An object can be destroyed and its memory made available for reuse only when all the references to it have disappeared.
You can see that managing object lifetimes is complex, which is why the designers of C# decided to prevent your code from taking on this responsibility. If it were your responsibility to destroy objects, sooner or later one of the following situations would arise:
§ You’d forget to destroy the object. This would mean that the object’s destructor (if it had one) would not be run, tidying up would not occur, and memory would not be deallocated back to the heap. You could quite easily run out of memory.
§ You’d try to destroy an active object and risk the possibility of one or more variables holding a reference to a destroyed object, known as a dangling reference. A dangling reference refers either to unused memory or possibly to a completely different object that now happens to occupy the same piece of memory. Either way, the outcome of using a dangling reference would be undefined at best or a security risk at worst. All bets would be off.
§ You’d try and destroy the same object more than once. This might or might not be disastrous, depending on the code in the destructor.
These problems are unacceptable in a language like C#, which places robustness and security high on its list of design goals. Instead, the garbage collector destroys objects for you. The garbage collector makes the following guarantees:
§ Every object will be destroyed, and its destructor will be run. When a program ends, all outstanding objects will be destroyed.
§ Every object will be destroyed exactly once.
§ Every object will be destroyed only when it becomes unreachable—that is, when there are no references to the object in the process running your application.
These guarantees are tremendously useful and free you, the programmer, from tedious housekeeping chores that are easy to get wrong. They enable you to concentrate on the logic of the program itself and be more productive.
When does garbage collection occur? This might seem like a strange question. After all, surely garbage collection occurs when an object is no longer needed. Well, it does, but not necessarily immediately. Garbage collection can be an expensive process, so the CLR collects garbage only when it needs to (when available memory is starting to run low or the size of the heap has exceeded the system-defined threshold, for example), and then it collects as much as it can. Performing a few large sweeps of memory is more efficient than performing lots of little dustings!
NOTE
You can invoke the garbage collector in a program by calling the static method Collect of the GC class located in the System namespace However, except in a few cases, this is not recommended. The GC.Collect method starts the garbage collector, but the process runs asynchronously—the GC.Collect method does not wait for garbage collection to be complete before it returns, so you still don’t know whether your objects have been destroyed. Let the CLR decide when it is best to collect garbage.
One feature of the garbage collector is that you don’t know, and should not rely upon, the order in which objects will be destroyed. The final point to understand is arguably the most important: destructors do not run until objects are garbage collected. If you write a destructor, you know it will be executed, but you just don’t know when. Consequently, you should never write code that depends on destructors running in a particular sequence or at a specific point in your application.
How Does the Garbage Collector Work?
The garbage collector runs in its own thread and can execute only at certain times—typically, when your application reaches the end of a method. While it runs, other threads running in your application will temporarily halt. This is because the garbage collector might need to move objects around and update object references; it cannot do this while objects are in use.
NOTE
A thread is a separate path of execution in an application. Windows uses threads to enable an application to perform multiple operations concurrently.
The garbage collector is a complex piece of software that is self-tuning and implements a number of optimizations to try and balance the need to keep memory available against the requirement to maintain the performance of the application. The details of the internal algorithms and structures that the garbage collector uses are beyond the scope of this book (and Microsoft continually refines the way in which the garbage collector performs its work), but at the high level, the steps that the garbage collector takes are as follows:
1. It builds a map of all reachable objects. It does this by repeatedly following reference fields inside objects. The garbage collector builds this map very carefully and ensures that circular references do not cause an infinite recursion. Any object not in this map is deemed to be unreachable.
2. It checks whether any of the unreachable objects has a destructor that needs to be run (a process called finalization). Any unreachable object that requires finalization is placed in a special queue called the freachable queue (pronounced “F-reachable”).
3. It deallocates the remaining unreachable objects (those that don’t require finalization) by moving the reachable objects down the heap, thus defragmenting the heap and freeing memory at the top of the heap. When the garbage collector moves a reachable object, it also updates any references to the object.
4. At this point, it allows other threads to resume.
5. It finalizes the unreachable objects that require finalization (now in the freachable queue) by running the Finalize methods on its own thread.
Recommendations
Writing classes that contain destructors adds complexity to your code and to the garbage collection process, and makes your program run more slowly. If your program does not contain any destructors, the garbage collector does not need to place unreachable objects in the freachable queue and finalize them. Clearly, not doing something is faster than doing it. Therefore, try to avoid using destructors except when you really need them; only use them to reclaim unmanaged resources. For example, consider a using statement instead, as described later in this chapter.
You need to be very careful when you write a destructor. In particular, be aware that, if your destructor calls other objects, those other objects might have already had their destructor called by the garbage collector. Remember that the order of finalization is not guaranteed. Therefore, ensure that destructors do not depend on one another or overlap with one another—don’t have two destructors that try to release the same resource, for example.
Resource Management
Sometimes it’s inadvisable to release a resource in a destructor; some resources are just too valuable to lie around waiting for an arbitrary length of time until the garbage collector actually releases them. Scarce resources such as memory, database connections, or file handles need to be released, and they need to be released as soon as possible. In these situations, your only option is to release the resource yourself. You can achieve this by creating a disposal method. A disposal method is a method that explicitly disposes of a resource. If a class has a disposal method, you can call it and control when the resource is released.
NOTE
The term disposal method refers to the purpose of the method rather than its name. A disposal method can be named using any valid C# identifier.
Disposal Methods
An example of a class that implements a disposal method is the TextReader class from the System.IO namespace. This class provides a mechanism to read characters from a sequential stream of input. The TextReader class contains a virtual method named Close, which closes the stream. TheStreamReader class (which reads characters from a stream, such as an open file) and the StringReader class (which reads characters from a string) both derive from TextReader, and both override the Close method. Here’s an example that reads lines of text from a file by using theStreamReader class and then displays them on the screen:
TextReader reader = new StreamReader(filename);
string line;
while ((line = reader.ReadLine()) != null)
{
Console.WriteLine(line);
}
reader.Close();
The ReadLine method reads the next line of text from the stream into a string. The ReadLine method returns null if there is nothing left in the stream. It’s important to call Close when you have finished with reader to release the file handle and associated resources. However, there is a problem with this example: it’s not exception-safe. If the call to ReadLine or WriteLine throws an exception, the call to Close will not happen; it will be bypassed. If this happens often enough, you will run out of file handles and be unable to open any more files.
Exception-Safe Disposal
One way to ensure that a disposal method (such as Close) is always called, regardless of whether there is an exception, is to call the disposal method inside a finally block. Here’s the preceding example coded using this technique:
TextReader reader = new StreamReader(filename);
try
{
string line;
while ((line = reader.ReadLine()) != null)
{
Console.WriteLine(line);
}
}
finally
{
reader.Close();
}
Using a finally block like this works, but it has several drawbacks that make it a less than ideal solution:
§ It quickly gets unwieldy if you have to dispose of more than one resource. (You end up with nested try and finally blocks.)
§ In some cases, you might have to modify the code to make it fit this idiom. (For example, you might need to reorder the declaration of the resource reference, remember to initialize the reference to null, and remember to check that the reference isn’t null in the finally block.)
§ It fails to create an abstraction of the solution. This means that the solution is hard to understand and you must repeat the code everywhere you need this functionality.
§ The reference to the resource remains in scope after the finally block. This means that you can accidentally try to use the resource after it has been released.
The using statement is designed to solve all these problems.
The using Statement and the IDisposable Interface
The using statement provides a clean mechanism for controlling the lifetimes of resources. You can create an object, and this object will be destroyed when the using statement block finishes.
IMPORTANT
Do not confuse the using statement shown in this section with the using directive that brings a namespace into scope. It is unfortunate that the same keyword has two different meanings.
The syntax for a using statement is as follows:
using ( type variable = initialization )
{
StatementBlock
}
Here is the best way to ensure that your code always calls Close on a TextReader:
using (TextReader reader = new StreamReader(filename))
{
string line;
while ((line = reader.ReadLine()) != null)
{
Console.WriteLine(line);
}
}
This using statement is equivalent to the following transformation:
{
TextReader reader = new StreamReader(filename);
try
{
string line;
while ((line = reader.ReadLine()) != null)
{
Console.WriteLine(line);
}
}
finally
{
if (reader != null)
{
((IDisposable)reader).Dispose();
}
}
}
NOTE
The using statement introduces its own block for scoping purposes. This arrangement means that the variable you declare in a using statement automatically goes out of scope at the end of the embedded statement and you cannot accidentally attempt to access a disposed resource.
The variable you declare in a using statement must be of a type that implements the IDisposable interface. The IDisposable interface lives in the System namespace and contains just one method, named Dispose:
namespace System
{
interface IDisposable
{
void Dispose();
}
}
The purpose of the Dispose method is to free any resources used by an object. It just so happens that the StreamReader class implements the IDisposable interface, and its Dispose method calls Close to close the stream. You can employ a using statement as a clean, exception-safe, and robust way to ensure that a resource is always released. This approach solves all of the problems that existed in the manual try/finally solution. You now have a solution that
§ Scales well if you need to dispose of multiple resources.
§ Doesn’t distort the logic of the program code.
§ Abstracts away the problem and avoids repetition.
§ Is robust. You can’t accidentally reference the variable declared inside the using statement (in this case, reader) after the using statement has ended because it’s not in scope anymore—you’ll get a compile-time error.
Calling the Dispose Method from a Destructor
When writing your own classes, should you write a destructor or implement the IDisposable interface to enable instances of your class to be managed by a using statement? A call to a destructor will happen, but you just don’t know when. On the other hand, you know exactly when a call to the Dispose method happens, but you just can’t be sure that it will actually happen, because it relies on the programmer using your classes remembering to write a using statement. However, it is possible to ensure that the Dispose method always runs by calling it from the destructor. This acts as a useful backup. You might forget to call the Dispose method, but at least you can be sure that it will be called, even if it’s only when the program shuts down. You will investigate this feature in detail in the exercises at the end of the chapter, but here’s an example of how you might implement the IDisposable interface:
class Example : IDisposable
{
private Resource scarce; // scarce resource to manage and dispose
private bool disposed = false; // flag to indicate whether the resource
// has already been disposed
...
~Example()
{
this.Dispose(false);
}
public virtual void Dispose()
{
this.Dispose(true);
GC.SuppressFinalize(this);
}
protected virtual void Dispose(bool disposing)
{
if (!this.disposed)
{
if (disposing)
{
// release large, managed resource here
...
}
// release unmanaged resources here
...
this.disposed = true;
}
}
public void SomeBehavior() // example method
{
checkIfDisposed();
...
}
...
private void checkIfDisposed()
{
if (this.disposed)
{
throw new ObjectDisposedException("Example: object has been disposed of");
}
}
}
Notice the following features of the Example class:
§ The class implements the IDisposable interface.
§ The public Dispose method can be called at any time by your application code.
§ The public Dispose method calls the protected and overloaded version of the Dispose method that takes a Boolean parameter, passing the value true as the argument. This method actually performs the resource disposal.
§ The destructor calls the protected and overloaded version of the Dispose method that takes a Boolean parameter, passing the value false as the argument. The destructor is called only by the garbage collector, when your object is being finalized.
§ The protected Dispose method can safely be called multiple times. The variable disposed indicates whether the method has already been run and is a safety feature to prevent the method from attempting to dispose the resources multiple times if it is called concurrently. (Your application might call Dispose, but before the method completes, your object might be garbage collected and the Dispose method run again by the CLR from destructor.) The resources are released only the first time the method runs.
§ The protected Dispose method supports disposal of managed resources (such as a large array) and unmanaged resources (such as a file handle). If the disposing parameter is true, then this method must have been called from the public Dispose method. In this case, the managed resources and unmanaged resources are all released. If the disposing parameter is false, then this method must have been called from the destructor, and the garbage collector is finalizing the object. In this case, it is not necessary (or exception-safe) to release the managed resources, as they will be, or might already have been, handled by the garbage collector, so only the unmanaged resources are released.
§ The public Dispose method calls the static GC.SuppressFinalize method. This method stops the garbage collector from calling the destructor on this object, because the object has already been finalized.
§ All the regular methods of the class (such as SomeBehavior) check to see whether the object has already been disposed of. If it has, they throw an exception.
Implementing Exception-Safe Disposal
In the following set of exercises you will examine how the using statement helps to ensure that resources used by objects in your applications can be released in a timely manner, even if an exception occurs in your application code. Initially, you will implement a simple class that implements a destructor and examine when this destructor is invoked by the garbage collector.
NOTE
The Calculator class created in these exercises is intended to show the essential principles of garbage collection for illustrative purposes only. The class does not actually consume any significant managed or unmanaged resources. You would not normally create a destructor or implement the IDisposable interface for such a simple class as this.
Create a simple class that uses a destructor
1. Start Microsoft Visual Studio 2012 if it is not already running.
2. On the FILE menu, point to New, and then click Project.
3. In the New Project dialog box, in the left pane under Templates, click Visual C#. In the middle pane, select the Console Application template. In the Name field near the bottom of the dialog box, type GarbageCollectionDemo. In the Location field, specify the folder Microsoft Press\Visual CSharp Step By Step\Chapter 14 under your Documents folder, and then click OK.
TIP
You can use the Browse button adjacent to the Location field to navigate to the Microsoft Press\Visual CSharp Step By Step\Chapter 14 folder rather than typing in the path manually.
Visual Studio creates a new console application and displays the Program.cs file in the Code and Text Editor window.
4. On the PROJECT menu, click Add Class.
5. In the Add New Item – GarbageCollectionDemo dialog box, ensure that the Class template is selected, type Calculator.cs in the Name field, and click Add.
The Calculator class is created and displayed in the Code and Text Editor window.
6. Add the public Divide method shown below in bold to the Calculator class:
7. class Calculator
8. {
9. public int Divide(int first, int second)
10. {
11. return first / second;
12. }
}
This is a very straightforward method that divides the first parameter by the second and returns the result. It is provided just to add a bit of functionality that can be called by an application.
13.Add the public constructor shown below in bold to the start of the Calculator class, above the Divide method. The purpose of this constructor is to enable you to verify that a Calculator object has been successfully created.
14.class Calculator
15.{
16. public Calculator()
17. {
18. Console.WriteLine("Calculator being created");
19. }
20. ...
}
21.Add the destructor shown below in bold to the Calculator class.
22.class Calculator
23.{
24. ...
25. ~Calculator()
26. {
27. Console.WriteLine("Calculator being finalized");
28. }
29. ...
}
This destructor simply displays a message so you can see when the garbage collector runs and finalizes instances of this class. When writing classes for real-world applications, you would not normally output text in a destructor.
30.Display the Program.cs file in the Code and Text Editor window.
31.Add the statements shown below in bold to the Main method in the Program class:
32.static void Main(string[] args)
33.{
34. Calculator calculator = new Calculator();
35. Console.WriteLine("{0} / {1} = {2}", 120, 15, calculator.Divide(120, 15));
36. Console.WriteLine("Program finishing");
}
This code creates a Calculator object, calls the Divide method of this object (and displays the result), and then outputs a message as the program finishes.
37.On the DEBUG menu, click Start Without Debugging. Verify that the program displays the following series of messages:
38.Calculator being created
39.120 / 15 = 8
40.Program finishing
Calculator being finalized
Notice that the finalizer for the Calculator object runs only when the application is about to finish, after the Main method has completed.
41.In the console window, press the Enter key and return to Visual Studio 2012.
The CLR guarantees that all objects created by your applications will be subject to garbage collection, but you cannot always be sure when this will happen. In the exercise, the program was very short-lived and the Calculator object was finalized when the CLR tidied up as the program finished. However, you might also find that this is the case in more substantial applications with classes that consume scarce resources, and unless you take the necessary steps to provide a means of disposal, the objects that your applications create might retain their resources until the application finishes. If the resource is a file, this could prevent other users from being able to access that file; if the resource is a database connection, your application could prevent other users from being able to connect to the same database. Ideally, you want to free resources as soon as you have finished using them rather than waiting for the application to terminate.
In the next exercise, you will implement the IDisposable interface in the Calculator class and enable the program to finalize Calculator objects at a time of its choosing.
Implement the IDisposable interface
1. Display the Calculator.cs file in the Code and Text Editor window.
2. Modify the definition of the Calculator class so that it implements the IDisposable interface, as shown below in bold:
3. class Calculator : IDisposable
4. {
5. ...
}
6. Add the following method named Dispose to the Calculator class. This is the method required by the IDisposable interface:
7. class Calculator : IDisposable
8. {
9. ...
10. public void Dispose()
11. {
12. Console.WriteLine("Calculator being disposed");
13. }
}
You would normally add code to the Dispose method that releases the resources held by the object. There are none in this case, and the purpose of the Console.WriteLine statement in this method is just to enable you to see when the Dispose method is run. However, you can see that in a real-world application, there would likely be some duplication of code between the destructor and the Dispose method. To remove this duplication, you would typically place this code in one place and call it from the other. Seeing as you cannot explicitly invoke a destructor from theDispose method, it makes sense instead to call the Dispose method from the destructor and place the logic that releases resources in the Dispose method.
14.Modify the destructor so that it calls the Dispose method, as shown in bold below (leave the statement displaying the message in place in the finalizer so you can see when it is being run by the garbage collector):
15.~Calculator()
16.{
17. Console.WriteLine("Calculator being finalized");
18. this.Dispose();
}
When you want to destroy a Calculator object in an application, the Dispose method does not run automatically; your code must either call it explicitly (with a statement such as calculator.Dispose()) or create the Calculator object within a using statement. In your program, you will adopt the latter approach.
19.Display the Program.cs file in the Code and Text Editor window. Modify the statements in the Main method that create the Calculator object and call the Divide method, as shown below in bold:
20.static void Main(string[] args)
21.{
22. using (Calculator calculator = new Calculator())
23. {
24. Console.WriteLine("{0} / {1} = {2}", 120, 15, calculator.Divide(120, 15));
25. }
26. Console.WriteLine("Program finishing");
}
27.On the DEBUG menu, click Start Without Debugging. Verify that the program now displays the following series of messages:
28.Calculator being created
29.120 / 15 = 8
30.Calculator being disposed
31.Program finishing
32.Calculator being finalized
Calculator being disposed
The using statement causes the Dispose method to run before the statement that displays the “Program finishing” message. However, you can see that the destructor for the Calculator object still runs when the application finishes, and it calls the Dispose method again. This is clearly a waste of processing.
33.In the console window, press the Enter key and return to Visual Studio 2012.
Disposing of the resources held by an object more than once may or may not be disastrous, but it is definitely not good practice. The recommended approach to resolving this problem is to add a private Boolean field to the class to indicate whether the Dispose method has already been invoked, and then examine this field in the Dispose method.
Prevent an object from being disposed of more than once
1. Display the Calculator.cs file in the Code and Text Editor window.
2. Add a private Boolean field called disposed to the Calculator class, and initialize the value of this field to false as shown below in bold:
3. class Calculator : IDisposable
4. {
5. private bool disposed = false;
6. ...
}
The purpose of this field is to track the state of this object and indicate whether the Dispose method has been invoked.
7. Modify the code in the Dispose method to display the message only if the disposed field is false. After displaying the message, set the disposed field to true, as shown below in bold:
8. public void Dispose()
9. {
10. if (!disposed)
11. {
12. Console.WriteLine("Calculator being disposed");
13. }
14. this.disposed = true;
}
15.On the DEBUG menu, click Start Without Debugging. Notice that the program displays the following series of messages:
16.Calculator being created
17.120 / 15 = 8
18.Calculator being disposed
19.Program finishing
Calculator being finalized
The Calculator object is now only being disposed once, but the destructor is still running. Again, this is a waste; there is little point in running a destructor for an object that has already released its resources.
20.In the console window, press the Enter key and return to Visual Studio 2012.
21.Add the statement shown below in bold to the end of the Dispose method in the Calculator class:
22.public void Dispose()
23.{
24. if (!disposed)
25. {
26. Console.WriteLine("Calculator being disposed");
27. }
28. this.disposed = true;
29. GC.SuppressFinalize(this);
}
The GC class provides access to the garbage collector, and it implements several static methods that enable you to control some of the actions it performs. The SuppressFinalize method enables you to indicate that the garage collector should not perform finalization on the specified object, and this prevents the destructor from running.
IMPORTANT
The GC class exposes a number of methods that enable you to configure the garbage collector. However, it is usually better to let the CLR manage the garbage collector itself, as you can seriously impair the performance of your application if you call these methods injudiciously. You should treat the SuppressFinalize method with extreme caution because if you fail to dispose an object, you run the risk of losing data (if you fail to close a file correctly, for example, any data buffered in memory but not yet written to disk could be lost). Call this method only in situations such as that shown in this exercise, when you know that an object has already been disposed.
30.On the DEBUG menu, click Start Without Debugging. Notice that the program displays the following series of messages:
31.Calculator being created
32.120 / 15 = 8
33.Calculator being disposed
Program finishing
You can see that the destructor is no longer running as the Calculator object has already been disposed before the program finishes.
34.In the console window, press the Enter key and return to Visual Studio 2012.
THREAD SAFETY AND THE DISPOSE METHOD
The example of using the disposed field to prevent an object from being disposed multiple times works well in most cases, but bear in mind that you have no control over when the finalizer runs. In the exercises in this chapter, it has always executed as the program finishes, but this might not always be the case—it can run any time after the last reference to an object has disappeared. So, it is possible that the finalizer might actually be invoked by the garbage collector on its own thread while the Dispose method is being run, especially if the Dispose method has to do a significant amount of work. You could reduce the possibility of resources being released multiple times by moving the statement that sets the disposed field to true closer to the start of the Dispose method, but in this case you run the risk of not freeing the resources at all if an exception occurs after you have set this variable but before you have released them.
To completely eliminate the chances of two concurrent threads disposing of the same resources in the same object simultaneously, you can write your code in a thread-safe manner, by embedding it in a C# lock statement, like this:
public void Dispose()
{
lock(this)
{
if (!disposed)
{
Console.WriteLine("Calculator being disposed");
}
this.disposed = true;
GC.SuppressFinalize(this);
}
}
The purpose of the lock statement is to prevent the same block of code from being run at the same time on different threads. The argument to the lock statement (this in the preceding example) should be a reference to an object. The code between the curly braces defines the scope of the lock statement. When execution reaches the lock statement, if the specified object is currently locked, the thread requesting the lock is blocked and the code is suspended at this point. When the thread that currently holds the lock reaches the closing curly brace of the lock statement, the lock is released, enabling the blocked thread to acquire the lock itself and continue. However, by the time this happens, the disposed field will be have been set to true, so the second thread will not attempt to perform the code in the if (!disposed) block.
Using locks in this manner is safe but can impair performance. An alternative approach is to use the strategy described earlier in this chapter, where only the repeated disposal of managed resources is suppressed (it is not exception-safe to dispose managed resources more than once; you will not compromise the security of your computer, but you may affect the logical integrity of your application if you attempt to dispose of a managed object that no longer exists). This strategy implements overloaded versions of the Dispose method; the using statement calls Dispose(), which in turn runs the statement Dispose(true), while the destructor invokes Dispose(false). Managed resources are only freed if the parameter to the overloaded version of the Dispose method is true. For more information, refer back to the example in the section Calling the Dispose Method from a Destructor.
The purpose of the using statement is to ensure that an object is always disposed, even if an exception occurs while it is being used. In the final exercise in this chapter, you will verify that this is the case by generating an exception in the middle of a using block.
Verify that an object is disposed after an exception
1. Display the Program.cs file in the Code and Text Editor window.
2. Modify the statement that calls the Divide method of the Calculator object, as shown below in bold, to the using block:
3. static void Main(string[] args)
4. {
5. using (Calculator calculator = new Calculator())
6. {
7. Console.WriteLine("{0} / {1} = {2}", 120, 0, calculator.Divide(120, 0));
8. }
9. Console.WriteLine("Program finishing");
}
The amended statement attempts to divide 120 by 0.
10.On the DEBUG menu, click Start Without Debugging.
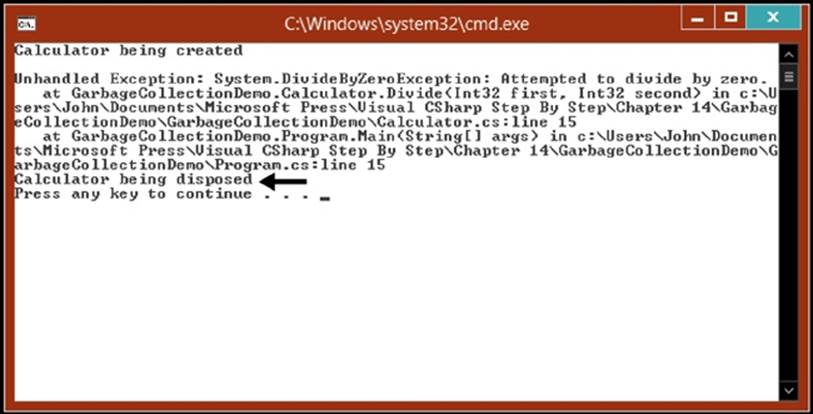
As you might have anticipated, the application throws an unhandled DivideByZeroException exception.
11.In the GarbageCollectionDemo message box, click Cancel (you need to be quick, before the Debug and Close Program buttons appear).
Verify that the message “Calculator being disposed” appears after the unhandled exception in the console window.
NOTE
If you were too slow and the Debug and Close Program buttons have already appeared, click Close Program and run the application again without debugging.
12.In the console window, press the Enter key and return to Visual Studio 2012.
Summary
In this chapter, you saw how the garbage collector works and how the .NET Framework uses it to dispose of objects and reclaim memory. You learned how to write a destructor to clean up the resources used by an object when memory is recycled by the garbage collector. You also saw how to use the using statement to implement exception-safe disposal of resources and how to implement the IDisposable interface to support this form of object disposal.
§ If you want to continue to the next chapter
Keep Visual Studio 2012 running, and turn to Chapter 15.
§ If you want to exit Visual Studio 2012 now
On the FILE menu, click Exit. If you see a Save dialog box, click Yes and save the project.
Chapter 14 Quick Reference
|
To |
Do this |
|
Write a destructor |
Write a method whose name is the same as the name of the class and is prefixed with a tilde (~). The method must not have an access modifier (such as public) and cannot have any parameters or return a value. For example: class Example { ~Example() { ... } } |
|
Call a destructor |
You can’t call a destructor. Only the garbage collector can call a destructor. |
|
Force garbage collection (not recommended) |
Call GC.Collect. |
|
Release a resource at a known point in time (but at the risk of resource leaks if an exception interrupts the execution) |
Write a disposal method (a method that disposes of a resource) and call it explicitly from the program. For example: class TextReader { ... public virtual void Close() { ... } } class Example { void Use() { TextReader reader = ...; // use reader reader.Close(); } } |
|
Support exception-safe disposal in a class |
Implement the IDisposable interface. For example: class SafeResource : IDisposable { ... public void Dispose() { // Dispose resources here } } |
|
Implement exception-safe disposal for an object that implements the IDisposable interface |
Create the object in a using statement. For example: using (SafeResource resource = new SafeResource()) { // Use SafeResource here ... } |
Part III. Defining Extensible Types with C#
The first two parts of this book introduced the core syntax of the C# language and showed you how to use C# to build new types by using structures, enumerations, and classes. You also saw how the common language runtime manages the memory used by variables and objects when a program runs, and you should now understand the life cycle of C# objects. The chapters in Part III build on this information, showing you how to use C# to create extensible components—highly functional data types that you can reuse in many different applications.
In Part III, you’ll learn about many of the more advanced features of C# such as properties, indexers, generics, and collection classes. You’ll also see how you can build highly responsive systems by using events, and how you can use delegates to invoke the application logic of one class from another without closely coupling them together; this is an extremely powerful technique that enables you to construct highly extensible systems. You will also learn about the Language-Integrated Query (LINQ) feature of C#, which enables you to perform potentially complex queries over collections of objects in a clear and natural manner.
All materials on the site are licensed Creative Commons Attribution-Sharealike 3.0 Unported CC BY-SA 3.0 & GNU Free Documentation License (GFDL)
If you are the copyright holder of any material contained on our site and intend to remove it, please contact our site administrator for approval.
© 2016-2025 All site design rights belong to S.Y.A.