Microsoft® Visual C#® 2012 Step by Step (2012)
Chapter 13. Creating Interfaces and Defining Abstract Classes
After completing this chapter, you will be able to
§ Define an interface specifying the signatures and return types of methods.
§ Implement an interface in a structure or class.
§ Reference a class through an interface.
§ Capture common implementation details in an abstract class.
§ Implement sealed classes that cannot be used to derive new classes.
Inheriting from a class is a powerful mechanism, but the real power of inheritance comes from inheriting from an interface. An interface does not contain any code or data; it just specifies the methods and properties that a class that inherits from the interface must provide. Using an interface enables you to completely separate the names and signatures of the methods of a class from the method’s implementation.
Abstract classes are similar in many ways to interfaces except that they can contain code and data. However, you can specify that certain methods of an abstract class are virtual, so that a class that inherits from the abstract class must provide its own implementation of these methods. You frequently use abstract classes with interfaces, and together they provide a key technique for enabling you to build extensible programming frameworks, as you will discover in this chapter.
Understanding Interfaces
Suppose you want to define a new class that enables you to store collections of objects, a bit like an array. However, unlike using an array, you want to provide a method named RetrieveInOrder to enable applications to retrieve objects in a sequence that depends on the type of object the collection contains (an ordinary array simply enables you to iterate through its contents, and by default you retrieve items according to their index). For example, if the collection holds alphanumeric objects such as strings, the collection should enable an application to retrieve these strings in sequence according to the collating sequence of the computer, and if the collection holds numeric objects such as integers, the collection should enable the application to retrieve objects in numerical order.
When you define the collection class, you do not want to restrict the types of objects that it can hold (the objects can even be class or structure types), and consequently you don’t know how to order these objects. The question is, how do you provide a method in the collection class that sorts objects whose types you do not know when you actually write the collection class? At first glance, this problem seems similar to the ToString problem described in Chapter 12, which could be resolved by declaring a virtual method that subclasses of your collection class can override. However, this is not the case. There is no inheritance relationship between the collection class and the objects that it holds, so a virtual method would not be of much use. If you think for a moment, the problem is that the way in which the objects in the collection should be ordered is dependent on the type of the object in the collection, and not on the collection itself. The solution, therefore, is to require that all the objects provide a method, such as the CompareTo method shown here that the RetrieveInOrder method of the collection can call, enabling the collection to compare these objects with one another:
int CompareTo(object obj)
{
// return 0 if this instance is equal to obj
// return < 0 if this instance is less than obj
// return > 0 if this instance is greater than obj
...
}
You can define an interface for collectable objects that includes the CompareTo method and specify that the collection class can contain only classes that implement this interface. In this way, an interface is similar to a contract. If a class implements an interface, the interface guarantees that the class contains all the methods specified in the interface. This mechanism ensures that you will be able to call the CompareTo method on all objects in the collection and sort them.
Interfaces enable you to truly separate the “what” from the “how.” The interface tells you only the name, return type, and parameters of the method. Exactly how the method is implemented is not a concern of the interface. The interface describes the functionality that a class should provide but not how this functionality is implemented.
Defining an Interface
Defining an interface is syntactically similar to defining a class, except that you use the interface keyword instead of the class keyword. Inside the interface, you declare methods exactly as in a class or a structure, except that you never specify an access modifier (public, private, or protected). Additionally, the methods in an interface have no implementation; they are simply declarations, and all types that implement the interface must provide their own implementations. Consequently, you replace the method body with a semicolon. Here is an example:
interface IComparable
{
int CompareTo(object obj);
}
TIP
The Microsoft .NET Framework documentation recommends that you preface the name of your interfaces with the capital letter I. This convention is the last vestige of Hungarian notation in C#. Incidentally, the System namespace already defines the IComparable interface as just shown.
An interface cannot contain any data; you cannot add fields (not even private ones) to an interface.
Implementing an Interface
To implement an interface, you declare a class or structure that inherits from the interface and that implements all the methods specified by the interface. This is not really inheritance as such, although the syntax is the same and some of the semantics that you will see later in this chapter bear many of the hallmarks of inheritance. You should note that unlike class inheritance, a struct can implement an interface.
For example, suppose you are defining the Mammal hierarchy described in Chapter 12, but you need to specify that land-bound mammals provide a method named NumberOfLegs that returns as an int the number of legs that a mammal has. (Sea-bound mammals do not implement this interface.) You could define the ILandBound interface that contains this method as follows:
interface ILandBound
{
int NumberOfLegs();
}
You could then implement this interface in the Horse class. You inherit from the interface and provide an implementation of every method defined by the interface (in this case, there is just the one method: NumberOfLegs).
class Horse : ILandBound
{
...
public int NumberOfLegs()
{
return 4;
}
}
When you implement an interface, you must ensure that each method matches its corresponding interface method exactly, according to the following rules:
§ The method names and return types match exactly.
§ Any parameters (including ref and out keyword modifiers) match exactly.
§ All methods implementing an interface must be publicly accessible. However, if you are using an explicit interface implementation, the method should not have an access qualifier.
If there is any difference between the interface definition and its declared implementation, the class will not compile.
TIP
The Microsoft Visual Studio IDE can help reduce coding errors caused by failing to implement the methods in an interface. The Implement Interface Wizard can generate stubs for each item in an interface that a class implements. You then fill in these stubs with the appropriate code. You will see how to use this wizard in the exercises later in this chapter.
A class can extend another class and implement an interface at the same time. In this case, C# does not distinguish between the base class and the interface by using specific keywords as, for example, Java does. Instead, C# uses a positional notation. The base class is always named first, followed by a comma, followed by the interface. The following example defines Horse as a class that is a Mammal but that additionally implements the ILandBound interface:
interface ILandBound
{
...
}
class Mammal
{
...
}
class Horse : Mammal , ILandBound
{
...
}
NOTE
An interface InterfaceA can inherit from another interface, InterfaceB. Technically, this is known as interface extension rather than inheritance. In this case, any class or struct that implements InterfaceA must provide implementations of all the methods in InterfaceB and InterfaceA.
Referencing a Class Through Its Interface
In the same way that you can reference an object by using a variable defined as a class that is higher up the hierarchy, you can reference an object by using a variable defined as an interface that its class implements. Taking the preceding example, you can reference a Horse object by using anILandBound variable, as follows:
Horse myHorse = new Horse(...);
ILandBound iMyHorse = myHorse; // legal
This works because all horses are land-bound mammals, although the converse is not true—you cannot assign an ILandBound object to a Horse variable without casting it first to verify that it does actually reference a Horse object and not some other class that also happens to implement theILandBound interface.
The technique of referencing an object through an interface is useful because it enables you to define methods that can take different types as parameters, as long as the types implement a specified interface. For example, the FindLandSpeed method shown here can take any argument that implements the ILandBound interface:
int FindLandSpeed(ILandBound landBoundMammal)
{
...
}
You can verify that an object is an instance of a class that implements a specific interface by using the is operator, which you first saw in Chapter 8 You use the is operator to determine whether an object has a specified type, and it works with interfaces as well as classes and structs. For example, the following block of code checks that the variable myHorse actually implements the ILandBound interface before attempting to assign it to an ILandBound variable:
if (myHorse is ILandBound)
{
ILandBound iLandBoundAnimal = myHorse;
}
Note that when referencing an object through an interface, you can invoke only methods that are visible through the interface.
Working with Multiple Interfaces
A class can have at most one base class, but it is allowed to implement an unlimited number of interfaces. A class must implement all the methods declared by these interfaces.
If a structure or class implements more than one interface, you specify the interfaces as a comma-separated list. If a class also has a base class, the interfaces are listed after the base class. For example, suppose you define another interface named IGrazable that contains the ChewGrassmethod for all grazing animals. You can define the Horse class like this:
class Horse : Mammal, ILandBound, IGrazable
{
...
}
Explicitly Implementing an Interface
The examples so far have shown classes that implicitly implement an interface. If you revisit the ILandBound interface and the Horse class (shown next), although the Horse class implements from the ILandBound interface, there is nothing in the implementation of the NumberOfLegs method in the Horse class that says it is part of the ILandBound interface:
interface ILandBound
{
int NumberOfLegs();
}
class Horse : ILandBound
{
...
public int NumberOfLegs()
{
return 4;
}
}
This might not be an issue in a simple situation, but suppose the Horse class implemented multiple interfaces. There is nothing to prevent multiple interfaces from specifying a method with the same name, although they might have different semantics. For example, suppose you wanted to implement a transportation system based on horse-drawn coaches. A lengthy journey might be broken down into several stages, or “legs.” If you wanted to keep track of how many legs each horse had pulled the coach for, you might define the following interface:
interface IJourney
{
int NumberOfLegs();
}
Now if you implement this interface in the Horse class, you have an interesting problem:
class Horse : ILandBound, IJourney
{
...
public int NumberOfLegs()
{
return 4;
}
}
This is legal code, but does the horse have four legs, or has it pulled the coach for four legs of the journey? The answer as far as C# is concerned is both of these! By default, C# does not distinguish which interface the method is implementing, so the same method actually implements both interfaces.
To solve this problem and disambiguate which method is part of which interface implementation, you can implement interfaces explicitly. To do this, you specify which interface a method belongs to when you implement it, like this:
class Horse : ILandBound, IJourney
{
...
int ILandBound.NumberOfLegs()
{
return 4;
}
int IJourney.NumberOfLegs()
{
return 3;
}
}
Now you can see that the horse has four legs and has pulled the coach for three legs of the journey.
Apart from prefixing the name of the method with the interface name, there is one other subtle difference in this syntax: the methods are not marked as public. You cannot specify the protection for methods that are part of an explicit interface implementation. This leads to another interesting phenomenon. If you create a Horse variable in code, you cannot actually invoke either of the NumberOfLegs methods because they are not visible. As far as the Horse class is concerned, they are both private. In fact, this makes sense. If the methods were visible through the Horse class, which method would the following code actually invoke—the one for the ILandBound interface or the one for the IJourney interface?
Horse horse = new Horse();
...
int legs = horse.NumberOfLegs();
So, how do you access these methods? The answer is that you reference the Horse object through the appropriate interface, like this:
Horse horse = new Horse();
...
IJourney journeyHorse = horse;
int legsInJourney = journeyHorse.NumberOfLegs();
ILandBound landBoundHorse = horse;
int legsOnHorse = landBoundHorse.NumberOfLegs();
I recommend explicitly implementing interfaces when possible.
Interface Restrictions
The essential idea to remember is that an interface never contains any implementation. The following restrictions are natural consequences of this:
§ You’re not allowed to define any fields in an interface, not even static ones. A field is an implementation detail of a class or structure.
§ You’re not allowed to define any constructors in an interface. A constructor is also considered to be an implementation detail of a class or structure.
§ You’re not allowed to define a destructor in an interface. A destructor contains the statements used to destroy an object instance. (Destructors are described in Chapter 14)
§ You cannot specify an access modifier for any method. All methods in an interface are implicitly public.
§ You cannot nest any types (such as enumerations, structures, classes, or interfaces) inside an interface.
§ An interface is not allowed to inherit from a structure or a class, although an interface can inherit from another interface. Structures and classes contain implementation; if an interface were allowed to inherit from either, it would be inheriting some implementation.
Defining and Using Interfaces
In the following exercises, you will define and implement interfaces that constitute part of a simple graphical drawing package. You will define two interfaces called IDraw and IColor, and then you will define classes that implement them. Each class will define a shape that can be drawn on a canvas on a form. (A canvas is a control that enables you to draw lines, text, and shapes on the screen.)
The IDraw interface defines the following methods:
§ SetLocation. This method enables you to specify the position as x- and y-coordinates of the shape on the canvas.
§ Draw. This method actually draws the shape on the canvas at the location specified by using the SetLocation method.
The IColor interface defines the following method:
§ SetColor. This method lets you specify the color of the shape. When the shape is drawn on the canvas, it will appear in this color.
Define the IDraw and IColor interfaces
1. Start Microsoft Visual Studio 2012 if it is not already running.
2. Open the Drawing project, located in the \Microsoft Press\Visual CSharp Step By Step\Chapter 13\Windows X\Drawing folder in your Documents folder.
The Drawing project is a graphical application. It contains a form called DrawingPad. This form contains a canvas control called drawingCanvas. You will use this form and canvas to test your code.
3. In Solution Explorer, click the Drawing project. On the PROJECT menu, click Add New Item.
The Add New Item – Drawing dialog box appears.
4. In the left pane of the Add New Item – Drawing dialog box, click Visual C# and then click Code. In the middle pane, click the Interface template. In the Name text box, type IDraw.cs, and then click Add.
Visual Studio creates the IDraw.cs file and adds it to your project. The IDraw.cs file appears in the Code and Text Editor window. It should look like this:
using System;
using System.Collections.Generic;
using System.Linq;
using System.Text;
using System.Threading.Tasks;
namespace Drawing
{
interface IDraw
{
}
}
5. In the IDraw.cs file, if you are using Window 8, add the following using directive to the list at the top of the file:
using Windows.UI.Xaml.Controls;
If you are using Windows 7, add this using directive instead:
using System.Windows.Controls;
You will reference the Canvas class in this interface. The Canvas class is located in the Windows.UI.Xaml.Controls namespace for Windows Store apps and in the System.Windows.Controls namespace for Windows Presentation Foundation (WPF) applications.
6. Add the methods shown here in bold to the IDraw interface:
7. interface IDraw
8. {
9. void SetLocation(int xCoord, int yCoord);
10. void Draw(Canvas canvas);
}
11.On the PROJECT menu, click Add New Item again.
12.In the middle pane of the Add New Item – Drawing dialog box, click the Interface template. In the Name text box, type IColor.cs, and then click Add.
Visual Studio creates the IColor.cs file and adds it to your project. The IColor.cs file appears in the Code and Text Editor window.
13.In the IColor.cs file, if you are using Window 8, add the following using directive to the list at the top of the file:
using Windows.UI;
If you are using Windows 7, add this using directive:
using System.Windows.Media;
You will reference the Color class in this interface, which is located in the Windows.UI namespace for Windows Store apps and in the System.Windows.Media namespace for WPF applications.
14.Add the following method shown in bold to the IColor interface definition:
15.interface IColor
16.{
17. void SetColor(Color color);
}
You have now defined the IDraw and IColor interfaces. The next step is to create some classes that implement them. In the following exercise, you will create two new shape classes called Square and Circle. These classes will implement both interfaces.
Create the Square and Circle classes, and implement the interfaces
1. On the PROJECT menu, click Add Class.
2. In the Add New Item – Drawing dialog box, verify that the Class template is selected in the middle pane, type Square.cs in the Name text box, and then click Add.
Visual Studio creates the Square.cs file and displays it in the Code and Text Editor window.
3. If you are using Windows 8, add the following using directives to the list at the top of the Square.cs file:
4. using Windows.UI;
5. using Windows.UI.Xaml.Media;
6. using Windows.UI.Xaml.Shapes;
using Windows.UI.Xaml.Controls;
If you are using Windows 7, add these using directives to the top of the Square.cs file:
using System.Windows.Media;
using System.Windows.Shapes;
using System.Windows.Controls;
7. Modify the definition of the Square class so that it implements the IDraw and IColor interfaces, as shown here in bold:
8. class Square : IDraw, IColor
9. {
}
10.Add the following private variables shown in bold to the Square class. These variables will hold the position and size of the Square object on the canvas. The Rectangle class is located in the Windows.UI.Xaml.Shapes namespace for Windows Store apps and in theSystem.Windows.Shapes namespace for WPF applications. You will use this class to draw the square:
11.class Square : IDraw, IColor
12.{
13. private int sideLength;
14. private int locX = 0, locY = 0;
15. private Rectangle rect = null;
}
16.Add the constructor shown in bold to the Square class. This constructor initializes the sideLength field and specifies the length of each side of the square.
17.class Square : IDraw, IColor
18.{
19. ...
20. public Square(int sideLength)
21. {
22. this.sideLength = sideLength;
23. }
}
24.In the definition of the Square class, right-click the IDraw interface. A shortcut menu appears. In the shortcut menu, point to Implement Interface, and then click Implement Interface Explicitly, as shown in the following image:
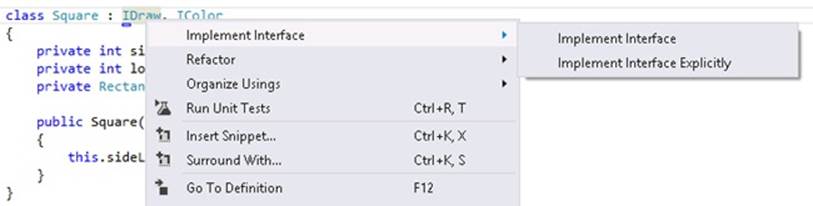
This feature causes Visual Studio to generate default implementations of the methods in the IDraw interface. You can also add the methods to the Square class manually if you prefer. The following example shows the code generated by Visual Studio:
void IDraw.SetLocation(int xCoord, int yCoord)
{
throw new NotImplementedException();
}
void IDraw.Draw(Canvas canvas)
{
throw new NotImplementedException();
}
Each of these methods currently throws a NotImplementedException exception. You are expected to replace the body of these methods with your own code.
25.In the SetLocation method, replace the existing code with the statements shown in bold. This code stores the values passed in through the parameters in the locX and locY fields in the Square object.
26.void IDraw.SetLocation(int xCoord, int yCoord)
27.{
28. this.locX = xCoord;
29. this.locY = yCoord;
}
30.Replace the code in the Draw method with the statements shown here in bold:
31.void IDraw.Draw(Canvas canvas)
32.{
33. if (this.rect != null)
34. {
35. canvas.Children.Remove(this.rect);
36. }
37. else
38. {
39. this.rect = new Rectangle();
40. }
41.
42. this.rect.Height = this.sideLength;
43. this.rect.Width = this.sideLength;
44. Canvas.SetTop(this.rect, this.locY);
45. Canvas.SetLeft(this.rect, this.locX);
46. canvas.Children.Add(this.rect);
}
This method renders the Square object by drawing a Rectangle shape on the canvas. (A square is simply a rectangle where all four sides have the same length.) If the Rectangle has been drawn previously (possibly at a different location and with a different color), it is removed from the canvas. The height and width of the Rectangle are set by using the value of the sideLength field. The position of the Rectangle on the canvas is set by using the static SetTop and SetLeft methods of the Canvas class, and then the Rectangle is added to the canvas. (This causes it to appear.)
47.Add the SetColor method from the IColor interface to the Square class, as shown here:
48.void IColor.SetColor(Color color)
49.{
50. if (this.rect != null)
51. {
52. SolidColorBrush brush = new SolidColorBrush(color);
53. this.rect.Fill = brush;
54. }
}
This method checks that the Square object has actually been displayed. (The rect field will be null if it has not yet been rendered.) The code sets the Fill property of the rect field with the specified color by using a SolidColorBrush object. (The details of the how the SolidColorBrushclass works are outside the scope of this discussion.)
55.On the PROJECT menu, click Add Class. In the Add New Item – Drawing dialog box, type Circle.cs in the Name text box, and then click Add.
Visual Studio creates the Circle.cs file and displays it in the Code and Text Editor window.
56.If you are using Windows 8, add the following using directives to the list at the top of the Circle.cs file:
57.using Windows.UI;
58.using Windows.UI.Xaml.Media;
59.using Windows.UI.Xaml.Shapes;
using Windows.UI.Xaml.Controls;
If you are using Windows 7, add these using directives to the top of the Circle.cs file:
using System.Windows.Media;
using System.Windows.Shapes;
using System.Windows.Controls;
60.Modify the definition of the Circle class so that it implements the IDraw and IColor interfaces as shown here in bold:
61.class Circle : IDraw, IColor
62.{
}
63.Add the following private variables shown in bold to the Circle class. These variables will hold the position and size of the Circle object on the canvas. The Ellipse class provides the functionality that you will use to draw the circle.
64.class Circle : IDraw, IColor
65.{
66. private int diameter;
67. private int locX = 0, locY = 0;
68. private Ellipse circle = null;
}
69.Add the constructor shown in bold to the Circle class. This constructor initializes the diameter field.
70.class Circle : IDraw, IColor
71.{
72. ...
73. public Circle(int diameter)
74. {
75. this.diameter = diameter;
76. }
}
77.Add the SetLocation method shown below to the Circle class. This method implements part of the IDraw interface, and the code is exactly the same as that in the Square class.
78.void IDraw.SetLocation(int xCoord, int yCoord)
79.{
80. this.locX = xCoord;
81. this.locY = yCoord;
}
82.Add the Draw method shown below to the Circle class. This method is also part of the IDraw interface.
83.void IDraw.Draw(Canvas canvas)
84.{
85. if (this.circle != null)
86. {
87. canvas.Children.Remove(this.circle);
88. }
89. else
90. {
91.
92. this.circle = new Ellipse();
93. }
94.
95. this.circle.Height = this.diameter;
96. this.circle.Width = this.diameter;
97. Canvas.SetTop(this.circle, this.locY);
98. Canvas.SetLeft(this.circle, this.locX);
99. canvas.Children.Add(this.circle);
}
This method is similar to the Draw method in the Square class, except that it renders the Circle object by drawing an Ellipse shape on the canvas. (A circle is an ellipse where the width and height are the same.)
100. Add the SetColor method to the Circle class. This method is part of the IColor interface. As before, this method is similar to that of the Square class.
101. void IColor.SetColor(Color color)
102. {
103. if (this.circle != null)
104. {
105. SolidColorBrush brush = new SolidColorBrush(color);
106. this.circle.Fill = brush;
107. }
}
You have completed the Square and Circle classes. You can now use the form to test them.
Test the Square and Circle classes
1. Display the DrawingPad.xaml file in the Design View window.
2. Click the shaded area in the middle of the form.
The shaded area of the form is the Canvas object, and this action sets the focus to this object.
3. In Properties window, click the Event Handlers button. (This button has an icon that looks like a bolt of lightning.)
4. If you are using Windows 8, in the list of events, locate the Tapped event and then double-click it. If you are using Windows 7, locate the MouseLeftButtonDown event and then double-click it.
Visual Studio creates a method called drawingCanvas_Tapped (Windows Store apps) or drawingCanvas_MouseLeftButtonDown (WPF) for the DrawingPad class and displays it in the Code and Text Editor window. This is an event handler that runs when the user taps the canvas with a finger (Windows Store apps) or clicks the left mouse button over the canvas (WPF). You will learn more about event handlers in Chapter 18
NOTE
If you are using a mouse with Windows 8, you can also click the left mouse button, as this raises the same event as the tap gesture.
5. If you are using Windows 8, add the following using directive to the list at the top of the DrawingPad.xaml.cs file:
using Windows.UI;
6. Add the code shown below in bold to the drawingCanvas_Tapped or drawingCanvas_MouseLeftButtonDown method:
7. private void drawingCanvas_Tapped(object sender, TappedRoutedEventArgs e)
8. // If you are using WPF, the method is declared as:
9. // private void drawingCanvas_MouseLeftButtonDown(object sender, MouseButtonEventArgs e)
10.{
11. Point mouseLocation = e.GetPosition(this.drawingCanvas);
12. Square mySquare = new Square(100);
13.
14. if (mySquare is IDraw)
15. {
16. IDraw drawSquare = mySquare;
17. drawSquare.SetLocation((int)mouseLocation.X, (int)mouseLocation.Y);
18. drawSquare.Draw(drawingCanvas);
19. }
}
The TappedRoutedEventArgs parameter (Windows Store apps) or MouseButtonEventArgs parameter (WPF) to this method provides useful information about the position of the mouse. In particular, the GetPosition method returns a Point structure that contains the x- and y-coordinates of the mouse. The code that you have added creates a new Square object. It then checks to verify that this object implements the IDraw interface (which is good practice) and creates a reference to the object by using this interface. Remember that when you explicitly implement an interface, the methods defined by the interface are available only by creating a reference to that interface. (The SetLocation and Draw methods are private to the Square class and are available only through the IDraw interface.) The code then sets the location of the Square to the position of the user’s finger or mouse. Note that the x- and y-coordinates in the Point structure are actually double values, so this code casts them to ints. The code then calls the Draw method to display the Square object.
20.Add the following code shown in bold to the end of the drawingCanvas_Tapped or drawingCanvas_MouseLeftButtonDown method:
21.private void drawingCanvas_Tapped(object sender, TappedRoutedEventArgs e)
22.// If you are using WPF, the method is declared as:
23.// private void drawingCanvas_MouseLeftButtonDown(object sender, MouseButtonEventArgs e)
24.{
25. ...
26. if (mySquare is IColor)
27. {
28. IColor colorSquare = mySquare;
29. colorSquare.SetColor(Colors.BlueViolet);
30. }
}
This code tests the Square class to verify that it implements the IColor interface; if it does, it creates a reference to the Square class through this interface and calls the SetColor method to set the color of the Square object to Colors.BlueViolet. (The Colors enumeration is provided as part of the .NET Framework.)
IMPORTANT
You must call Draw before you call SetColor. This is because the SetColor method sets the color of the Square only if it has already been rendered. If you invoke SetColor before Draw, the color will not be set and the Square object will not appear.
31.Return to the DrawingPad.xaml file in the Design View window, and click the Canvas object in the middle of the form.
32.If you are using Windows 8, in the list of events, locate the RightTapped event and then double-click it. If you are using Windows 7, locate the MouseRightButtonDown event and then double-click it.
These events occur when the user taps, holds, and then releases on the canvas using their finger (Windows Store apps) or the user clicks the right mouse button on the canvas (WPF).
NOTE
If you are using Windows 8 with a mouse, you can right-click or tap, hold, and release—both gestures raise the RightTapped event.
33.Add the code shown below in bold to the drawingCanvas_RightTapped method (Windows Store apps) or drawingCanvas_MouseRightButtonDown method (WPF). The logic in this code is similar to the method that handles the left mouse button, except that it displays a Circle object inHotPink.
34.private void drawingCanvas_RightTapped(object sender, HoldingRoutedEventArgs e)
35.// If you are using WPF, the method is declared as:
36.// private void drawingCanvas_MouseRightButtonDown(object sender, MouseButtonEventArgs e)
37.{
38. Point mouseLocation = e.GetPosition(this.drawingCanvas);
39. Circle myCircle = new Circle(100);
40.
41. if (myCircle is IDraw)
42. {
43. IDraw drawCircle = myCircle;
44. drawCircle.SetLocation((int)mouseLocation.X, (int)mouseLocation.Y);
45. drawCircle.Draw(drawingCanvas);
46. }
47.
48. if (myCircle is IColor)
49. {
50. IColor colorCircle = myCircle;
51. colorCircle.SetColor(Colors.HotPink);
52. }
}
The logic in this method is very similar to that of the drawingCanvas_Tapped and drawingCanvas_MouseRightButtonDown methods, except that they draw and fill a circle on the canvas.
53.On the DEBUG menu, click Start Debugging to build and run the application.
54.When the Drawing Pad window appears, tap or left-click anywhere on the canvas displayed in the window. A violet square should appear.
55.Tap, hold, and release, or right-click anywhere on the canvas. A pink circle should appear. You can click the left and right mouse buttons any number of times, and each click will draw a square or circle at the mouse position, as shown in the following image:

56.Return to Visual Studio and stop debugging.
Abstract Classes
You can implement the ILandBound and IGrazable interfaces discussed before the previous set of exercises in many different classes, depending on how many different types of mammals you want to model in your C# application. In situations such as this, it’s quite common for parts of the derived classes to share common implementations. For example, the duplication in the following two classes is obvious:
class Horse : Mammal, ILandBound, IGrazable
{
...
void IGrazable.ChewGrass()
{
Console.WriteLine("Chewing grass");
// code for chewing grass
};
}
class Sheep : Mammal, ILandBound, IGrazable
{
...
void IGrazable.ChewGrass()
{
Console.WriteLine("Chewing grass");
// same code as horse for chewing grass
};
}
Duplication in code is a warning sign. If possible, you should refactor the code to avoid this duplication and reduce any associated maintenance costs. One way to achieve this refactoring is to put the common implementation into a new class created specifically for this purpose. In effect, you can insert a new class into the class hierarchy, as shown by the following code example:
class GrazingMammal : Mammal, IGrazable
{
...
void IGrazable.ChewGrass()
{
// common code for chewing grass
Console.WriteLine("Chewing grass");
}
}
class Horse : GrazingMammal, ILandBound
{
...
}
class Sheep : GrazingMammal, ILandBound
{
...
}
This is a good solution, but there is one thing that is still not quite right: you can actually create instances of the GrazingMammal class (and the Mammal class, for that matter). This doesn’t really make sense. The GrazingMammal class exists to provide a common default implementation. Its sole purpose is to be inherited from. The GrazingMammal class is an abstraction of common functionality rather than an entity in its own right.
To declare that creating instances of a class is not allowed, you can declare that the class is abstract by using the abstract keyword. For example:
abstract class GrazingMammal : Mammal, IGrazable
{
...
}
If you now try to instantiate a GrazingMammal object, the code will not compile:
GrazingMammal myGrazingMammal = new GrazingMammal(...); // illegal
Abstract Methods
An abstract class can contain abstract methods. An abstract method is similar in principle to a virtual method (which you met in Chapter 12), except that it does not contain a method body. A derived class must override this method. The following example defines the DigestGrass method in the GrazingMammal class as an abstract method; grazing mammals might use the same code for chewing grass, but they must provide their own implementation of the DigestGrass method. An abstract method is useful if it does not make sense to provide a default implementation in the abstract class but you want to ensure that an inheriting class provides its own implementation of that method.
abstract class GrazingMammal : Mammal, IGrazable
{
abstract void DigestGrass();
...
}
Sealed Classes
Using inheritance is not always easy and requires forethought. If you create an interface or an abstract class, you are knowingly writing something that will be inherited from in the future. The trouble is that predicting the future is a difficult business. With practice and experience, you can develop the skills to craft a flexible, easy-to-use hierarchy of interfaces, abstract classes, and classes, but it takes effort and you also need a solid understanding of the problem you are modeling. To put it another way, unless you consciously design a class with the intention of using it as a base class, it’s extremely unlikely that it will function well as a base class. C# allows you to use the sealed keyword to prevent a class from being used as a base class if you decide that it should not be. For example:
sealed class Horse : GrazingMammal, ILandBound
{
...
}
If any class attempts to use Horse as a base class, a compile-time error will be generated. Note that a sealed class cannot declare any virtual methods and that an abstract class cannot be sealed.
Sealed Methods
You can also use the sealed keyword to declare that an individual method in an unsealed class is sealed. This means that a derived class cannot override this method. You can seal only an override method, and you declare the method as sealed override. You can think of the interface, virtual, override, and sealed keywords as follows:
§ An interface introduces the name of a method.
§ A virtual method is the first implementation of a method.
§ An override method is another implementation of a method.
§ A sealed method is the last implementation of a method.
Implementing and Using an Abstract Class
The following exercises use an abstract class to rationalize some of the code that you developed in the previous exercise. The Square and Circle classes contain a high proportion of duplicate code. It makes sense to factor this code out into an abstract class called DrawingShape because this will ease maintenance of the Square and Circle classes in the future.
Create the DrawingShape abstract class
1. Return to the Drawing project in Visual Studio.
NOTE
A finished working copy of the previous exercise is available in the Drawing project located in the \Microsoft Press\Visual CSharp Step By Step\Chapter 13\Windows X\Drawing Using Interfaces folder in your Documents folder.
2. In Solution Explorer, click the Drawing project in the Drawing solution. On the PROJECT menu, click Add Class.
The Add New Item – Drawing dialog box appears.
3. In the Name text box, type DrawingShape.cs, and then click Add.
Visual Studio creates the class and displays it in the Code and Text Editor window.
4. In the DrawingShape.cs file, if you are using Windows 8, add the following using directives to the list at the top:
5. using Windows.UI;
6. using Windows.UI.Xaml.Media;
7. using Windows.UI.Xaml.Shapes;
using Windows.UI.Xaml.Controls;
If you are using Windows 7, add these using directives:
using System.Windows.Media;
using System.Windows.Shapes;
using System.Windows.Controls;
The purpose of this class is to contain the code common to the Circle and Square classes. A program should not be able to instantiate a DrawingShape object directly.
8. Modify the definition of the DrawingShape class, and declare it as abstract, as shown here in bold:
9. abstract class DrawingShape
10.{
}
11.Add the private variables shown in bold to the DrawingShape class:
12.abstract class DrawingShape
13.{
14. protected int size;
15. protected int locX = 0, locY = 0;
16. protected Shape shape = null;
}
The Square and Circle classes both use the locX and locY fields to specify the location of the object on the canvas, so you can move these fields to the abstract class. Similarly, the Square and Circle classes both use a field to indicate the size of the object when it was rendered; although it has a different name in each class (sideLength and diameter), semantically the field performs the same task in both classes. The name size is a good abstraction of the purpose of this field.
Internally, the Square class uses a Rectangle object to render itself on the canvas, and the Circle class uses an Ellipse object. Both of these classes are part of a hierarchy based on the abstract Shape class in the .NET Framework. The DrawingShape class uses a Shape field to represent both of these types.
17.Add the following constructor to the DrawingShape class:
18.abstract class DrawingShape
19.{
20. ...
21. public DrawingShape(int size)
22. {
23. this.size = size;
24. }
}
This code initializes the size field in the DrawingShape object.
25.Add the SetLocation and SetColor methods to the DrawingShape class, as shown in bold below. These methods provide implementations that are inherited by all classes that derive from the DrawingShape class. Notice that they are not marked as virtual, and a derived class is not expected to override them. Also, the DrawingShape class is not declared as implementing the IDraw or IColor interfaces (interface implementation is a feature of the Square and Circle classes and not this abstract class), so these methods are simply declared as public.
26.abstract class DrawingShape
27.{
28. ...
29. public void SetLocation(int xCoord, int yCoord)
30. {
31. this.locX = xCoord;
32. this.locY = yCoord;
33. }
34.
35. public void SetColor(Color color)
36. {
37. if (this.shape != null)
38. {
39. SolidColorBrush brush = new SolidColorBrush(color);
40. this.shape.Fill = brush;
41. }
42. }
}
43.Add the Draw method to the DrawingShape class. Unlike the previous methods, this method is declared as virtual, and any derived classes are expected to override it to extend the functionality. The code in this method verifies that the shape field is not null and then draws it on the canvas. The classes that inherit this method must provide their own code to instantiate the shape object. (Remember that the Square class creates a Rectangle object and the Circle class creates an Ellipse object.)
44.abstract class DrawingShape
45.{
46. ...
47. public virtual void Draw(Canvas canvas)
48. {
49. if (this.shape == null)
50. {
51. throw new InvalidOperationException("Shape is null");
52. }
53.
54. this.shape.Height = this.size;
55. this.shape.Width = this.size;
56. Canvas.SetTop(this.shape, this.locY);
57. Canvas.SetLeft(this.shape, this.locX);
58. canvas.Children.Add(this.shape);
59. }
}
You have now completed the DrawingShape abstract class. The next step is to change the Square and Circle classes so that they inherit from this class, and then remove the duplicated code from the Square and Circle classes.
Modify the Square and Circle classes to inherit from the DrawingShape class
1. Display the code for the Square class in the Code and Text Editor window.
2. Modify the definition of the Square class so that it inherits from the DrawingShape class as well as implementing the IDraw and IColor interfaces.
3. class Square : DrawingShape, IDraw, IColor
4. {
5. ...
}
Notice that you must specify the class that the Square class inherits from before any interfaces.
6. In the Square class, remove the definitions of the sideLength, rect, locX, and locY fields. These fields are no longer necessary as they are now provided by the DrawingShape class.
7. Replace the existing constructor with the following code, which calls the constructor in the base class. Notice that the body of this constructor is empty because the base class constructor performs all the initialization required.
8. class Square : DrawingShape, IDraw, IColor
9. {
10. public Square(int sideLength) : base(sideLength)
11. {
12. }
13. ...
}
14.Remove the SetLocation and SetColor methods from the Square class. The DrawingShape class provides the implementation of these methods.
15.Modify the definition of the Draw method. Declare it as public override, and remove the reference to the IDraw interface. Again, the DrawingShape class already provides the base functionality for this method, but you will extend it with specific code required by the Square class.
16.public override void Draw(Canvas canvas)
17.{
18. ...
}
19.Replace the body of the Draw method with the code shown in bold. These statements instantiate the shape field inherited from the DrawingShape class as a new instance of the Rectangle class if it has not already been instantiated, and then they call the Draw method in theDrawingShape class.
20.public override void Draw(Canvas canvas)
21.{
22. if (this.shape != null)
23. {
24. canvas.Children.Remove(this.shape);
25. }
26. else
27. {
28. this.shape = new Rectangle();
29. }
30.
31. base.Draw(canvas);
}
32.Repeat steps 2 through 6 for the Circle class, except that the constructor should be called Circle with a parameter called diameter, and in the Draw method you should instantiate the shape field as a new Ellipse object. The complete code for the Circle class should look like this:
33.class Circle : DrawingShape, IDraw, IColor
34.{
35. public Circle(int diameter) : base(diameter)
36. {
37. }
38.
39. public override void Draw(Canvas canvas)
40. {
41. if (this.shape != null)
42. {
43. canvas.Children.Remove(this.shape);
44. }
45. else
46. {
47. this.shape = new Ellipse();
48. }
49.
50. base.Draw(canvas);
51. }
}
52.On the DEBUG menu, click Start Debugging. When the Drawing Pad window appears, verify that Square objects appear when you left-click in the window and Circle objects appear when you right-click in the window. The application should look and feel exactly the same as before.
53.Return to Visual Studio and stop debugging.
COMPATIBILITY WITH THE WINDOWS RUNTIME ON WINDOWS 8 REVISITED
Chapter 9, described how Windows 8 implements the Windows Runtime, or WinRT, as a layer on top of the native Windows APIs, providing a simplified programming interface for developers building unmanaged applications (an unmanaged application is an application that does not run by using the .NET Framework; you build them by using a language such as C++ rather than C#). Managed applications use the common language runtime (CLR) to run .NET Framework applications. The .NET Framework provides an extensive set of libraries and features. On Windows 7 and earlier, the CLR implements these features by using the native Windows APIs. If you are building desktop or enterprise applications and services on Windows 8, this same feature set is still available (although the .NET Framework itself has been upgraded to version 4.5), and any C# applications that work on Windows 7 should run unchanged on Windows 8.
On Windows 8, Windows Store apps always run by using WinRT. This means that if you are building Windows Store apps by using a managed language such as C#, the CLR actually invokes WinRT rather than the native Windows APIs. Microsoft has provided a mapping layer between the CLR and WinRT that can transparently translate requests made to the .NET Framework to create objects and invoke methods into the equivalent object requests and method calls in WinRT. For example, when you create a .NET Framework Int32 value (an int in C#), this code is translated to create a value using the equivalent WinRT data type. However, although the CLR and WinRT have a large amount of overlapping functionality, not all of the features of the .NET Framework 4.5 have corresponding features in WinRT. Consequently, Windows Store apps have access to only a reduced subset of the types and methods provided by the .NET Framework 4.5 (IntelliSense in Visual Studio 2012 automatically shows the restricted view of available features when you are building Windows Store apps when using C#, omitting the types and methods not available through WinRT).
On the other hand, WinRT provides a significant set of features and types that have no direct equivalent in the .NET Framework or that operate in a significantly different way to the corresponding features in the .NET Framework and so cannot easily be translated. WinRT makes these features available to the CLR through a mapping layer that makes them look like .NET Framework types and methods, and you can invoke them directly from managed code. For Windows Store apps, the primary area that this concerns is the way in which the user interface is implemented, and this is why some of the exercises in this book ask you to reference different namespaces for Windows 7 and Windows 8 applications when building graphical applications—System.Windows and its subnamespaces for Windows 7 versus Windows.UI and its subnamespaces for Windows 8. These namespaces contain types that are implemented by different assemblies; the types in the System.Windows namespace reside in the WindowsBase, PresentationCore, and PresentationFramework assemblies for the .NET Framework 4.5, while the types in the Windows.UI namespace are located in the Windows assembly for WinRT.
NOTE
Strictly speaking, WinRT does not use assemblies but has its own structure for holding libraries of executable code. However, WinRT libraries expose metadata that is held in the same format as .NET Framework assemblies, enabling them to be read by the CLR. The CLR can create objects defined in these libraries and invoke their methods through WinRT to the CLR. WinRT libraries look and behave like .NET Framework assemblies.
So, integration implemented by the CLR and WinRT enables the CLR to transparently use WinRT types, but it also supports interoperability in the reverse direction:you can define types by using managed code and make them available to unmanaged applications as long as these types conform to the expectations of WinRT. Chapter 9 highlights the requirements of structs in this respect (instance and static methods in structs are not available through WinRT, and private fields are unsupported). If you are building classes that are intended to be consumed by unmanaged applications through WinRT, your classes must follow these rules:
§ Any public fields, and the parameters and return values of any public methods must be WinRT types or .NET Framework types that can be transparently translated by WinRT into WinRT types. Examples of supported .NET Framework types include conforming value types (such as structs and enums) and those corresponding to the C# primitives (int, long, float, double, string, and so on). Private fields are supported in classes, and they can be of any type available in the .NET Framework; they do not have to conform to WinRT.
§ Classes cannot override methods of System.Object other than ToString, and they cannot declare protected constructors.
§ The namespace in which a class is defined must be the same as the name of the assembly implementing the class. Additionally, the namespace name (and therefore the assembly name) must not begin with “Windows”.
§ You cannot inherit from managed types in unmanaged applications through WinRT. Therefore, all public classes must be sealed. If you need to implement polymorphism, you can create a public interface and implement that interface on the classes that must be polymorphic.
§ You can throw any exception type that is included in the subset of the .NET Framework available to Windows Store apps; you cannot create your own custom exception classes. If your code throws an unhandled exception when called from an unmanaged application, WinRT raises an equivalent exception in the unmanaged code.
WinRT has other requirements concerning features of C# code covered later in this book. These requirements will be highlighted as each feature is described.
Summary
In this chapter, you saw how to define and implement interfaces and abstract classes. The following table summarizes the various valid (yes), invalid (no), and mandatory (required) keyword combinations when defining methods for interfaces, classes, and structs.
|
Keyword |
Interface |
Abstract class |
Class |
Sealed class |
Structure |
|
abstract |
No |
Yes |
No |
No |
No |
|
new |
Yes[a] |
Yes |
Yes |
Yes |
No[b] |
|
override |
No |
Yes |
Yes |
Yes |
No[c] |
|
private |
No |
Yes |
Yes |
Yes |
Yes |
|
protected |
No |
Yes |
Yes |
Yes |
No[d] |
|
public |
No |
Yes |
Yes |
Yes |
Yes |
|
sealed |
No |
Yes |
Yes |
Required |
No |
|
virtual |
No |
Yes |
Yes |
No |
No |
|
[a] An interface can extend another interface and introduce a new method with the same signature. [b] Structures do not support inheritance, so they cannot hide methods. [c] Structures do not support inheritance, so they cannot override methods. [d] Structures do not support inheritance; a structure is implicitly sealed and cannot be derived from. |
|||||
§ If you want to continue to the next chapter
Keep Visual Studio 2012 running, and turn to Chapter 14.
§ If you want to exit Visual Studio 2012 now
On the FILE menu, click Exit. If you see a Save dialog box, click Yes and save the project.
Chapter 13 Quick Reference
|
To |
Do this |
|
Declare an interface |
Use the interface keyword. For example: interface IDemo { string GetName(); string GetDescription(); } |
|
Implement an interface |
Declare a class using the same syntax as class inheritance, and then implement all the member functions of the interface. For example: class Test : IDemo { string IDemo.GetName() { ... } string IDemo.GetDescription() { ... } } |
|
Create an abstract class that can be used only as a base class, containing abstract methods |
Declare the class using the abstract keyword. For each abstract method, declare the method with the abstract keyword and without a method body. For example: abstract class GrazingMammal { abstract void DigestGrass(); ... } |
|
Create a sealed class that cannot be used as a base class |
Declare the class using the sealed keyword. For example: sealed class Horse { ... } |
All materials on the site are licensed Creative Commons Attribution-Sharealike 3.0 Unported CC BY-SA 3.0 & GNU Free Documentation License (GFDL)
If you are the copyright holder of any material contained on our site and intend to remove it, please contact our site administrator for approval.
© 2016-2026 All site design rights belong to S.Y.A.