Microsoft® Visual C#® 2012 Step by Step (2012)
Chapter 24. Improving Response Time by Performing Asynchronous Operations
After completing this chapter, you will be able to
§ Define and use asynchronous methods to improve the response time of applications that perform long-running operations.
§ Explain how to reduce the time taken to perform complex LINQ queries by using parallelization.
§ Use the concurrent collection classes to safely share data between parallel tasks.
In Chapter 23, you saw how to use the Task class to perform operations in parallel and improve throughput in compute-bound applications. However, while maximizing the processing power available to an application may make it run more quickly, responsiveness is also important. Remember that the Microsoft Windows user interface operates by using a single thread of execution, but users expect an application to respond when they click a button on a form, even if the application is currently performing a large and complex calculation. Additionally, some tasks might take a considerable time to run even if they are not compute-bound (a task waiting to receive information across the network from a website, for example), and blocking user interaction while waiting for an event that may take an indeterminate time to happen is clearly not good design practice. The solution to both of these problems is the same: perform the task asynchronously and leave the user interface thread-free to handle user interactions. In the past, this approach was traditionally fraught with complexity, and user interface frameworks such as the Windows Presentation Foundation (WPF) had to implement some rather messy workarounds to support this mode of working. Fortunately, Microsoft Windows 8 and the Windows Runtime (WinRT) have been designed with asynchronicity in mind, and the C# language has been extended to take advantage of the asynchronous features that Windows 8 now provides, making it much easier to define asynchronous operations. You will learn about these features and how to use them in conjunction with tasks in the first part of this chapter.
Issues with response time are not limited to user interfaces. For example, Chapter 21, showed how you can access data held in memory in a declarative manner by using Language-Integrated Query (LINQ). A typical LINQ query generates an enumerable result set, and you can iterate serially through this set to retrieve the data. If the data source used to generate the result set is large, running a LINQ query can take a long time. Many database management systems faced with the issue of optimizing queries address this issue by using algorithms that break down the process of identifying the data for a query into a series of tasks and then running these tasks in parallel, combining the results when the tasks have completed to generate the completed result set. The designers of the .NET Framework decided to provide LINQ with a similar facility, and the result is Parallel LINQ, or PLINQ. You will study PLINQ in the second part of this chapter.
However, PLINQ is not always the most appropriate technology to use for an application. If you create your own tasks manually, you need to ensure that these tasks coordinate their activities correctly. The .NET Framework class library provides methods that enable you to wait for tasks to complete, and you can use these methods to coordinate tasks at a very coarse level. But consider what happens if two tasks attempt to access and modify the same data. If both tasks run at the same time, their overlapping operations might corrupt the data. This situation can lead to bugs that are difficult to correct, primarily because of their unpredictability. Since version 1.0, the Microsoft .NET Framework has provided primitives that you can use to lock data and coordinate threads, but to use them effectively required a good understanding of the way in which threads interact. The most recent versions of the .NET Framework class library include some variations to these primitives, and they provide specialized collection classes that can synchronize access to data across tasks. These classes hide much of the complexity involved in coordinating data access. You will see how to use some of these new synchronization primitives and collection classes in the third part of this chapter.
Implementing Asynchronous Methods
An asynchronous method is a method that does not block the current thread of execution. When an application invokes an asynchronous method, there is an implied contract that the method will return control to the calling environment quite quickly. The definition of quite is not a mathematically defined quantity, but the expectation is that if an asynchronous method performs an operation that might cause a noticeable delay to the caller, it should do so by using a background thread and enable the caller to continue running on the current thread. This process sounds complicated, and indeed in earlier versions of the .NET Framework it was. However, C# now provides the async method modifier and the await operator, which delegate much of this complexity to the compiler, meaning that you no longer have to concern yourself with the intricacies of multithreading.
Defining Asynchronous Methods: The Problem
You have already seen how you can implement concurrent operations by using Task objects. To quickly recap, when you initiate a task by using the Start or Run method of the Task type, the common language runtime (CLR) will use its own scheduling algorithm to allocate the task to a thread and set this thread running at a time convenient to the operating system, when sufficient resources are available. This level of abstraction frees your code from the requirement to understand and manage the workload of your computer. If you need to perform another operation when a specific task completes, you have a couple of choices:
§ You can manually wait for the task to finish by using one of the Wait methods exposed by the Task type. You can then initiate the new operation, possibly by defining another task.
§ You can define a continuation. A continuation simply specifies an operation to be performed when a given task completes. The .NET Framework automatically executes the continuation operation as a task that it schedules when the original task finishes.
However, although the Task type provides a convenient generalization of an operation, it is still often necessary to write potentially awkward code to solve some of the common problems that developers frequently encounter when building applications that may need to execute these operations on a background thread. For example, suppose you define the following method for a Windows 8 application that involves performing a series of long-running operations that must run in a serial manner and then displays a message in a TextBox control on the screen:
private void slowMethod()
{
doFirstLongRunningOperation();
doSecondLongRunningOperation();
doThirdLongRunningOperation();
message.Text = "Processing Completed";
}
private void doFirstLongRunningOperation()
{
...
}
private void doSecondLongRunningOperation()
{
...
}
private void doThirdLongRunningOperation()
{
...
}
You can make the slowMethod method more responsive by using a Task object to run the doFirstLongRunningOperation method, and define continuations for the same Task that run the doSecondLongRunningOperation and doThirdLongRunningOperation methods in turn, like this:
private void slowMethod()
{
Task task = new Task(doFirstLongRunningOperation);
task.ContinueWith(doSecondLongRunningOperation);
task.ContinueWith(doThirdLongRunningOperation);
task.Start();
message.Text = "Processing Completed"; // When does this message appear?
}
private void doFirstLongRunningOperation()
{
...
}
private void doSecondLongRunningOperation(Task t)
{
...
}
private void doThirdLongRunningOperation(Task t)
{
...
}
Although this refactoring seems fairly simple, there are points that you should note. Specifically, the signatures of the doSecondLongRunningOperation and doThirdLongRunningOperation methods have had to change to accommodate the requirements of continuations (the Task is passed as a parameter to a continuation method). More important, you need to ask yourself when the message gets displayed in the TextBox control. The issue with this second point is that although the Start method initiates a Task, it does not wait for it to complete, so the message appears while the processing is being performed rather than when it has finished.
This is a somewhat trivial example, but the general principle is important, and there are at least two solutions. The first is to wait for the Task to complete before displaying the message, like this:
private void slowMethod()
{
Task task = new Task(doFirstLongRunningOperation);
task.ContinueWith(doSecondLongRunningOperation);
task.ContinueWith(doThirdLongRunningOperation);
task.Start();
task.Wait();
message.Text = "Processing Completed";
}
However, the call to the Wait method now blocks the thread executing the slowMethod method and obviates the purpose of using a Task in the first place. A better solution is to define a continuation that displays the message and arrange for it to be run only when thedoThirdLongRunningOperation method finishes, in which case you can remove the call to the Wait method. You may be tempted to implement this continuation as a delegate as shown below in bold (remember that a continuation is passed a Task object as an argument; that is the purpose of the t parameter to the delegate):
private void slowMethod()
{
Task task = new Task(doFirstLongRunningOperation);
task.ContinueWith(doSecondLongRunningOperation);
task.ContinueWith(doThirdLongRunningOperation);
task.ContinueWith((t) => message.Text = "Processing Complete");
task.Start();
}
Unfortunately, this approach yields another problem. If you try this code, you will find that the final continuation generates a System.Exception exception with the rather obscure message “The application called an interface that was marshaled for a different thread.” The issue is that only the user interface thread can manipulate user interface controls, and now you are attempting to write to a TextBox control from a different thread—the thread being used to run the Task. You can resolve this problem by using the Dispatcher object. The Dispatcher object is a component of the user interface infrastructure and you can send it requests to perform work on the user interface thread by calling its Invoke method. The Invoke method takes an Action delegate that specifies the code to run. The details of the Dispatcher object and the Invoke method are outside the scope of this book, but the following code example shows how you might use it to display the message required by the slowMethod method from a continuation:
private void slowMethod()
{
Task task = new Task(doFirstLongRunningOperation);
task.ContinueWith(doSecondLongRunningOperation);
task.ContinueWith(doThirdLongRunningOperation);
task.ContinueWith((t) => this.Dispatcher.Invoke(
CoreDispatcherPriority.Normal,
(sender, args) => messages.Text = "Processing Complete",
this, null));
task.Start();
}
This works, but it is messy and difficult to maintain. You now have a delegate (the continuation) specifying another delegate (the code to be run by Invoke).
NOTE
You can find more information about the Dispatcher object and the Invoke method on the Microsoft website at http://msdn.microsoft.com/en-us/library/ms615907.aspx.
Defining Asynchronous Methods: The Solution
As you may have already guessed, the purpose of the async and await keywords in C# is to enable you to define asynchronous methods without having to concern yourself with defining continuations or scheduling code to run on Dispatcher objects to ensure that data is manipulated on the correct thread. Very simply, the async modifier indicates that a method contains functionality that can be run asynchronously. The await operator specifies the points at which this asynchronous functionality should be performed. The following code example shows the slowMethod method implemented as an asynchronous method with the async modifier and await operators:
private async void slowMethod()
{
await doFirstLongRunningOperation();
await doSecondLongRunningOperation();
await doThirdLongRunningOperation();
messages.Text = "Processing Complete";
}
This method now looks remarkably similar to the original version, and that is the power of async and await. In fact, this magic is nothing more than an exercise in reworking your code by the C# compiler. When the C# compiler encounters the await operator in an async method, it effectively reformats the operand that follows this operator as a task that runs on the same thread as the async method. The remainder of the code is converted into a continuation that runs when the task completes, again running on the same thread. Now, because the thread that was running the asyncmethod was the thread running the user interface, it has direct access to the controls in the window, and so it can update them directly without routing them through the Dispatcher object.
Although this approach looks quite simple at first glance, it is important to bear in mind a few points and avoid some possible misconceptions:
§ The async modifier does not signify that a method runs asynchronously on a separate thread. All it does is specify that the code in the method can be divided into one or more continuations. When these continuations run, they execute on the same thread as the original method call.
§ The await operator specifies the point at which the C# compiler can split the code into a continuation. The await operator itself expects its operand to be an awaitable object. An awaitable object is a type that provides the GetAwaiter method, which returns an object that in turn provides methods for running code and waiting for it to complete. The C# compiler converts your code into statements that use these methods to create an appropriate continuation.
IMPORTANT
You can use the await operator only in a method marked as async. Outside of an async method, the await keyword is treated as an ordinary identifier (you can even create a variable called await, although this is not recommended).
Additionally, you cannot use the await operator in the catch or finally blocks of a try/catch/finally construct (not even in an async method) or in a query expression in a LINQ query. However, if you want to perform a LINQ query by using multiple concurrent tasks, you can use the PLINQ extensions described later in this chapter.
In the current implementation of the await operator, the awaitable object it expects you to specify as the operand is a Task. This means that you must make some modifications to the doFirstLongRunningOperation, doSecondLongRunningOperation, and doThirdLongRunningOperationmethods. Specifically, each method must now create and run a Task to perform its work and return a reference to this Task. The following example shows an amended version of the doFirstLongRunningOperation method:
private Task doFirstLongRunningOperation()
{
Task t = Task.Run(() => { /* original code for this method goes here */ });
return t;
}
It is also worth considering whether there are opportunities to break the work done by the doFirstLongRunningOperation method into a series of parallel operations. If so, you can divide the work into a set of Tasks as described in Chapter 23. However, which of these Task objects should you return as the result of the method?
private Task doFirstLongRunningOperation()
{
Task first = Task.Run(() => { /* code for first operation */ });
Task second = Task.Run(() => { /* code for second operation */ });
return ...; // Do you return first or second?
}
If the method returns first, then the await operator in slowMethod will only wait for that Task to complete and not the second. Similar logic applies if the method returns second. The solution is to define the doFirstLongRunningOperation method as async, and await each of the Tasks:
private async Task doFirstLongRunningOperation()
{
Task first = Task.Run(() => { /* code for first operation */ });
Task second = Task.Run(() => { /* code for second operation */ });
await first;
await second;
}
Remember that when the compiler encounters the await operator, it generates code that waits for the item specified by the argument to complete, together with a continuation that runs the statements that follow. You can think of the value returned by the async method as a reference to the Taskthat runs this continuation (this description is not completely accurate, but it is a good enough model for the purposes of this chapter). So, the doFirstLongRunningOperation method creates and starts the tasks first and second running in parallel, the compiler reformats the await statements into code that waits for first to complete followed by a continuation that waits for second to finish, and the async modifier causes the compiler to return a reference to this continuation. Notice that because the compiler now determines the return value of the method, you no longer specify a return value yourself (in fact, if you try and return a value, your code will not compile).
NOTE
If you don’t include an await statement in an async method, the method is simply a reference to a Task that performs the code in the body of the method. As a result, when you invoke the method, the code that it contains does not actually run asynchronously. In this case, the compiler will warn you with the message “This async method lacks await operators and will run synchronously.”
TIP
You can use the async modifier to prefix a delegate. This enables you to create delegates that incorporate asynchronous processing by using the await operator.
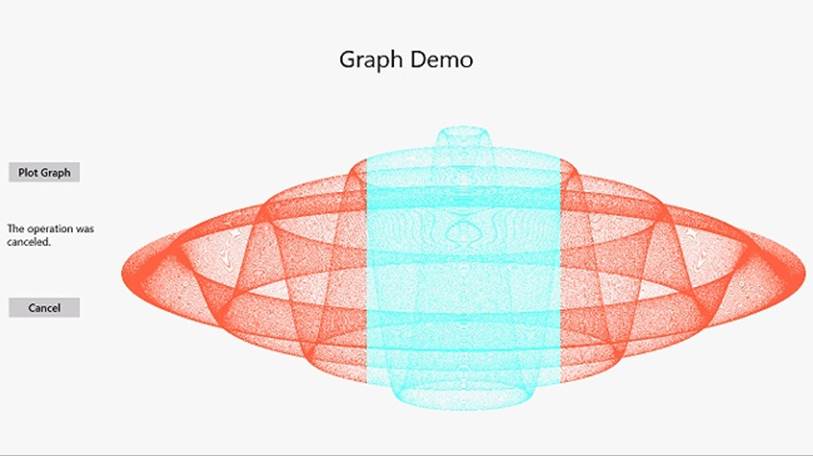
In the following exercise, you will revisit the GraphDemo application from Chapter 23 and modify it to generate the data for the graph by using an asynchronous method.
Modify the GraphDemo application to use an asynchronous method
1. Using Microsoft Visual Studio 2012, open the GraphDemo solution, located in the \Microsoft Press\Visual CSharp Step By Step\Chapter 24\GraphDemo folder in your Documents folder.
2. In Solution Explorer, expand the GraphDemo.xaml node, and open the GraphDemo.xaml.cs file in the Code and Text Editor window.
3. In the GraphWindow class, locate the plotButton_Click method. The code in this method looks like this:
4. private void plotButton_Click(object sender, RoutedEventArgs e)
5. {
6. Random rand = new Random();
7. redValue = (byte)rand.Next(0xFF);
8. greenValue = (byte)rand.Next(0xFF);
9. blueValue = (byte)rand.Next(0xFF);
10.
11. tokenSource = new CancellationTokenSource();
12. CancellationToken token = tokenSource.Token;
13.
14. Stopwatch watch = Stopwatch.StartNew();
15.
16. try
17. {
18. generateGraphData(data, 0, pixelWidth / 2, token);
19. duration.Text = string.Format("Duration (ms): {0}", watch.ElapsedMilliseconds);
20. }
21.
22. catch (OperationCanceledException oce)
23. {
24. duration.Text = oce.Message;
25. }
26.
27. Stream pixelStream = graphBitmap.PixelBuffer.AsStream();
28. pixelStream.Seek(0, SeekOrigin.Begin);
29. pixelStream.Write(data, 0, data.Length);
30. graphBitmap.Invalidate();
31. graphImage.Source = graphBitmap;
}
This is a simplified version of the application from the previous chapter. It invokes the generateGraphData method directly from the user interface thread and does not use Task objects to generate the data for the graph in parallel.
NOTE
If you reduced the size of the pixelWidth and pixelHeight fields in the exercises in Chapter 23 to save memory, do so again in this application before proceeding with the next step.
32.On the DEBUG menu, click Start Debugging.
33.In the GraphDemo window, click Plot Graph. While the data is being generated, try to click Cancel. Notice that the user interface is completely unresponsive while the graph is being generated and displayed. This is because the plotButton_Click method performs all of its work synchronously, including the generation of the data for the graph.
34.Return to Visual Studio and stop debugging.
35.In the Code and Text Editor window displaying the GraphWindow class, add a new private method called generateGraphDataAsync above the generateGraphData method. This method should take the same list of parameters as the generateGraphData method, but it should return aTask object rather than a void. The method should also be marked as async, and it should look like this:
36.private async Task generateGraphDataAsync(byte[] data,
37. int partitionStart, int partitionEnd,
38. CancellationToken token)
39.{
}
NOTE
It is recommended practice to name asynchronous methods with the Async suffix.
40.In the generateGraphDataAsync method, add the statements shown below in bold.
41.private async Task generateGraphDataAsync(byte[] data, int partitionStart, int partitionEnd, CancellationToken token)
42.{
43. Task task = Task.Run(() => generateGraphData(data, partitionStart, partitionEnd,
44.token));
45. await task;
}
This code creates a Task object that runs the generateGraphData method and uses the await operator to wait for the Task to complete. The task generated by the compiler as a result of the await operator is the value returned from the method.
46.Return to the plotButton_Click method, and change the definition of this method to include the async modifier as shown below in bold:
47.private async void plotButton_Click(object sender, RoutedEventArgs e)
48.{
49. ...
}
50.In the try block in the plotButton_Click method, modify the statement that generates the data for the graph to call the generateGraphDataAsync method asynchronously, as shown below in bold:
51.try
52.{
53. await generateGraphDataAsync(data, 0, pixelWidth / 2, token);
54. duration.Text = string.Format("Duration (ms): {0}", watch.ElapsedMilliseconds);
55.}
...
56.On the DEBUG menu, click Exceptions. In the Exceptions dialog box, expand Common Language Runtime Exceptions, expand System, clear the User-unhandled check box for the System.OperationCanceledException exception, and then click OK.
This step prevents the debugger from intercepting the System.OperationCanceledException exception while reporting any other exceptions that may occur.
57.On the DEBUG menu, click Start Debugging.
58.In the GraphDemo window, click Plot Graph and verify that the application generates the graph correctly.
59.Click Plot Graph and, while the data is being generated, click Cancel. This time, the user interface should be responsive. Only part of the graph should be generated, and the duration TextBlock should display the message “The operation was canceled.”
60.Return to Visual Studio and stop debugging.
Defining Asynchronous Methods That Return Values
So far, all the examples you have seen use a Task object to perform a piece of work that does not return a value. However, you also use tasks to run methods that calculate a result. To do this, you can use the generic Task<TResult> class, where the type parameter, TResult, specifies the type of the result.
You create and start a Task<TResult> object in a similar way to an ordinary Task. The primary difference is that the code you execute should return a value. For example, the method calculateValue shown in the following code example generates an integer result. To invoke this method by using a task, you create and run a Task<int> object. You obtain the value returned by the method by querying the Result property of the Task<int> object. If the task has not finished running the method and the result is not yet available, the Result property blocks the caller. This means that you don’t have to perform any synchronization yourself, and you know that when the Result property returns a value, the task has completed its work.
Task<int> calculateValueTask = Task.Run(() => calculateValue(...));
...
int calculatedData = calculateValueTask.Result; // Block until calculateValueTask completes
...
private int calculateValue(...)
{
int someValue;
// Perform calculation and populate someValue
...
return someValue;
}
The generic Task<TResult> type is also the basis of the mechanism for defining asynchronous methods that return values. In previous examples, you saw that you implement asynchronous void methods by returning a Task. If an asynchronous method actually generates a result, it should return a Task<TResult>, as shown in the following example, which creates an asynchronous version of the calculateValue method:
private async Task<int> calculateValueAsync(...)
{
// Invoke calculateValue using a Task
Task<int> generateResultTask = Task.Run(() => calculateValue(...));
await generateResultTask;
return generateResultTask.Result;
}
This method looks slightly confusing, inasmuch as the return type is specified as Task<int>, but the return statement actually returns an int. Remember that when you define an async method, the compiler performs some refactoring of your code, and it essentially returns a reference to Taskthat runs the continuation for the statement return generateResultTask.Result;. The type of the expression returned by this continuation is int, so the return type of the method is Task<int>.
To invoke an asynchronous method that returns a value, use the await operator, like this:
int result = await calculateValueAsync(...);
The await operator extracts the value from the Task returned by the calculateValueAsync method and in this case assigns it to the result variable.
Asynchronous Methods and the Windows Runtime APIs
The designers of Windows 8 wanted to ensure that applications were as responsive as possible, so they made the decision when they implemented WinRT that any operation that may take more than 50 milliseconds to perform should be available only through an asynchronous API. You may have noticed one or two instances of this approach already in this book. For example, to display a message to a user, you can use a MessageDialog object. However, when you display this message, you must use the ShowAsync method, like this:
using Windows.UI.Popups;
...
MessageDialog dlg = new MessageDialog("Message to user");
await dlg.ShowAsync();
The MessageDialog object displays the message and waits for the user to click the Close button that appears as part of this dialog box. Any form of user interaction may take an indeterminate length of time (the user might have gone for lunch before clicking Close), and it is often important not to block the application or prevent it from performing other operations (such as responding to events) while the dialog box is displayed. The MessageDialog class does not provide a synchronous version of the ShowAsync method, but if you need to display a dialog box synchronously, you can simply call dlg.ShowAsync() without the await operator.
Another common example of asynchronous processing concerns the FileOpenPicker class, which you used in Chapter 5 The FileOpenPicker class displays a list of files and enables the user to select from this list. As with the MessageDialog class, the user may take a considerable time browsing and selecting files, so this operation should not block the application. The following example shows how to use the FileOpenPicker class to display the files in the user’s Documents folder and wait while the user selects a single file from this list.
using Windows.Storage;
using Windows.Storage.Pickers;
...
FileOpenPicker fp = new FileOpenPicker();
fp.SuggestedStartLocation = PickerLocationId.DocumentsLibrary;
fp.ViewMode = PickerViewMode.List;
fp.FileTypeFilter.Add("*");
StorageFile file = await fp.PickSingleFileAsync();
The key statement is the line that calls the PickSingleFileAsync method. This is the method that displays the list of files and allows the user to navigate around the file system and select a file (the FileOpenPicker class also provides the PickMultipleFilesAsync method to enable a user to select more than one file). The value returned by this method is Task<StorageFile>, and the await operator extracts the StorageFile object from this result. The StorageFile class provides an abstraction of a file held on disk, and using this class, you can open a file and read from it or write to it.
NOTE
Strictly speaking, the PickSingleFileAsync method returns an IAsyncOperation <StorageFile> object. WinRT uses its own abstraction of asynchronous operations and maps .NET Framework Task objects to this abstraction; the Task class implements the IAsyncOperation interface. If you are programming in C#, your code is not affected by this transformation, and you can simply use Taskobjects without concerning yourself how they get mapped to WinRT asynchronous operations.
File I/O is another source of potentially slow operations, and the StorageFile class implements a raft of asynchronous methods to enable these operations to be performed without impacting the responsiveness of an application. For example, in Chapter 5, after the user selects a file using aFileOpenPicker object, the code then opens this file for reading, asynchronously:
StorageFile file = await fp.PickSingleFileAsync();
...
var fileStream = await file.OpenAsync(FileAccessMode.Read);
One final example that is directly applicable to the exercises you have seen in this and the previous chapter concerns writing to a stream. You may have noticed that although the time reported to generate the data for the graph is a few seconds, it can take up to twice that amount of time before the graph actually appears. This is because of the way the data is written to the bitmap. The bitmap renders data held in a buffer as part of the WriteableBitmap object, and the AsStream extension method provides a Stream interface to this buffer. The data is written to the buffer via this stream by using the Write method, like this:
...
Stream pixelStream = graphBitmap.PixelBuffer.AsStream();
pixelStream.Seek(0, SeekOrigin.Begin);
pixelStream.Write(data, 0, data.Length);
...
Unless you have reduced the value of the pixelWidth and pixelHeight fields to save memory, the volume of data written to the buffer is 366 MB (12,000 * 8,000 * 4 bytes), so this Write operation may take a few seconds. To improve response time, you can perform this operation asynchronously by using the WriteAsync method:
await pixelStream.WriteAsync(data, 0, data.Length);
In general, when you build applications for Windows 8, you should seek to exploit asynchronicity wherever possible.
THE IASYNCRESULT DESIGN PATTERN IN EARLIER VERSIONS OF THE .NET FRAMEWORK
Asynchronicity has been long recognized as a key element in building responsive applications with the .NET Framework, and the concept predates the introduction of the Task class in the .NET Framework version 4.0. Microsoft introduced the IAsyncResult design pattern based on the AsyncCallback delegate type to handle these situations. The exact details of how this pattern works are not relevant in this book, but from a programmer’s perspective the implementation of this pattern meant that many types in the .NET Framework class library exposed long-running operations in two ways: in a synchronous form consisting of a single method and in an asynchronous form using a pair of methods named BeginOperationName and EndOperationName, where OperationNamespecified the operation being performed. For example, the MemoryStream class in the System.IO namespace provides the Write method to write data synchronously to a stream in memory, but it also provides the BeginWrite and EndWrite methods to perform the same operation asynchronously. The BeginWrite method initiates the write operation that is performed on a new thread. TheBeginWrite method expects the programmer to provide a reference to a callback method that runs when the write operation completes; this reference is in the form of an AsyncCallback delegate. In this method, the programmer should implement any appropriate tidying up and call the EndWrite method to signify that the operation has completed. The following code example shows this pattern in action:
...
Byte[] buffer = ...; // populated with data to write to the MemoryStream
MemoryStream ms = new MemoryStream();
AsyncCallback callback = new AsyncCallback(handleWriteCompleted);
ms.BeginWrite(buffer, 0, buffer.Length, callback, ms);
...
private void handleWriteCompleted(IAsyncResult ar)
{
MemoryStream ms = ar.AsyncState as MemoryStream;
... // Perform any appropriate tidying up
ms.EndWrite(ar);
}
The parameter to the callback method (handlWriteCompleted) is an IAsyncResult object that contains information about the status of the asynchronous operation and any other state information. You can pass user-defined information to the callback in this parameter; the final argument supplied to the BeginOperationName method is packaged into this parameter. In this example, the callback is passed a reference to the MemoryStream.
While this sequence works, it is a messy paradigm that obscures the operation you are performing. The code for the operation is split into two methods, and it is easy to lose the mental connection between these methods if you have to maintain this code. If you are using Task objects, you can simplify this model by calling the static FromAsync method of the TaskFactory class. This method takes the BeginOperationName and EndOperationName methods and wraps them into code that is performed by using a Task. There is no need to create an AsyncCallback delegate, as this is generated behind the scenes by the FromAsync method. So, you can perform the same operation shown in the previous example like this:
...
Byte[] buffer = ...;
MemoryStream s = new MemoryStream();
Task t = Task<int>.Factory.FromAsync(s.Beginwrite, s.EndWrite, buffer, 0,
buffer.Length, null);
t.Start();
await t;
...
This technique is useful if you need to access asynchronous functionality exposed by types developed in earlier versions of the .NET Framework.
Using PLINQ to Parallelize Declarative Data Access
Data access is another area where response time is important, especially if you are building applications that have to search through lengthy data structures. In earlier chapters, you saw how powerful LINQ is for retrieving data from an enumerable data structure, but the examples shown were inherently single-threaded. LINQ provides a set of extensions called PLINQ (short for Parallel LINQ) that is based on Tasks and that can help you boost performance and parallelize some query operations.
PLINQ works by dividing a data set into partitions, and then using tasks to retrieve the data that matches the criteria specified by the query for each partition in parallel. The results retrieved for each partition are combined into a single enumerable result set when the tasks have completed. PLINQ is ideal for scenarios that involve data sets with large numbers of elements, or if the criteria specified for matching data involve complex, computationally expensive operations.
A primary aim of PLINQ is to be as nonintrusive as possible. If you have a lot of existing LINQ queries, you don’t want to have to modify your code to enable them to run with the latest build of the .NET Framework. To achieve this, the .NET Framework includes the extension methodAsParallel that you can use with an enumerable object. The AsParallel method returns a ParallelQuery object that acts in a similar manner to the original enumerable object, except that it provides parallel implementations of many of the LINQ operators, such as join and where. These implementations of the LINQ operators are based on tasks and use various algorithms to try and run parts of your LINQ query in parallel wherever possible.
As ever in the world of parallel computing, the AsParallel method is not magic. You cannot guarantee that your code will speed up; it all depends on the nature of your LINQ queries and whether the tasks they are performing lend themselves to parallelization. To understand how PLINQ works and the situations in which it is useful, it helps to see some examples. The exercises in the following sections demonstrate a pair of simple scenarios.
Using PLINQ to Improve Performance While Iterating Through a Collection
The first scenario is simple. Consider a LINQ query that iterates through a collection and retrieves elements from the collection based on a processor-intensive calculation. This form of query can benefit from parallel execution as long as the calculations are independent. The elements in the collection can be divided into a number of partitions; the exact number depends on the current load of the computer and the number of CPUs available. The elements in each partition can be processed by a separate thread. When all the partitions have been processed, the results can be merged. Any collection that supports access to elements through an index, such as an array or a collection that implements the IList<T> interface, can be managed in this way.
Parallelize a LINQ query over a simple collection
1. Using Visual Studio 2012, open the PLINQ solution, located in the \Microsoft Press\Visual CSharp Step By Step\Chapter 24\PLINQ folder in your Documents folder.
2. In Solution Explorer, double-click Program.cs in the PLINQ project to display the file in the Code and Text Editor window.
This is a console application. The skeleton structure of the application has already been created for you. The Program class contains two methods called Test1 and Test2 that illustrate a pair of common scenarios. The Main method calls each of these test methods in turn.
Both test methods have the same general structure: they create a LINQ query (you will add the code to do this later in this set of exercises), run it, and display the time taken. The code for each of these methods is almost completely separate from the statements that actually create and run the queries.
3. Examine the Test1 method. This method creates a large array of integers and populates it with a set of random numbers between 0 and 200. The random number generator is seeded, so you should get the same results every time you run the application.
4. After the first TO DO comment in this method, add the LINQ query shown below in bold:
5. // TO DO: Create a LINQ query that retrieves all numbers that are greater than 100
6. var over100 = from n in numbers
7. where TestIfTrue(n > 100)
select n;
This LINQ query retrieves all the items in the numbers array that have a value greater than 100. The test n > 100 is not computationally intensive enough by itself to show the benefits of parallelizing this query, so the code calls a method named TestIfTrue, which slows it down a little by performing a SpinWait operation. The SpinWait method causes the processor to continually execute a loop of special “no operation” instructions for a short period of time, keeping the processor busy but not actually doing any work. (This is known as spinning.) The TestIfTruemethod looks like this:
public static bool TestIfTrue(bool expr)
{
Thread.SpinWait(1000);
return expr;
}
8. After the second TO DO comment in the Test1 method, add the following code shown in bold:
9. // TO DO: Run the LINQ query, and save the results in a List<int> object
List<int> numbersOver100 = new List<int>(over100);
Remember that LINQ queries use deferred execution, so they do not run until you retrieve the results from them. This statement creates a List<int> object and populates it with the results of running the over100 query.
10.After the third TO DO comment in the Test1 method, add the following statement shown in bold:
11.// TO DO: Display the results
Console.WriteLine("There are {0} numbers over 100.", numbersOver100.Count);
12.On the DEBUG menu, click Start Without Debugging. Note the time taken to run Test 1 and the number of items in the array that are greater than 100.
13.Run the application several times, and take an average for the time. Verify that the number of items greater than 100 is the same each time. Return to Visual Studio when you have finished.
14.The logic that selects each item returned by the LINQ query is independent of the selection logic for all the other items, so this query is an ideal candidate for partitioning. Modify the statement that defines the LINQ query, and specify the AsParallel extension method to the numbersarray, as shown here in bold:
15.var over100 = from n in numbers.AsParallel()
16. where TestIfTrue(n > 100)
select n;
NOTE
If the selection logic or calculations require access to shared data, you must synchronize the tasks that run in parallel, otherwise the results may be unpredictable. However, synchronization can impose an overhead and might negate the benefits of parallelizing the query.
17.On the DEBUG menu, click Start Without Debugging. Verify that the number of items reported by Test1 is the same as before but that the time taken to perform the test has decreased significantly. Run the test several times, and take an average of the duration required for the test. If you are running on a dual-core processor (or a twin-processor computer), you should see the time reduced by 40 to 45 percent. If you have more processor cores, the decrease should be even more dramatic.
18.Close the application, and return to Visual Studio.
The preceding exercise shows the performance improvement you can get by making a small change to a LINQ query. However, bear in mind that you will see results such as this only if the calculations performed by the query take some time. I cheated a little by spinning the processor. Without this overhead, the parallel version of the query is actually slower than the serial version. In the next exercise, you will see a LINQ query that joins two arrays in memory. This time, the exercise uses more realistic data volumes, so there is no need to slow down the query artificially.
Parallelize a LINQ query that joins two collections
1. In Solution Explorer, open the Data.cs file in the Code and Text Editor window and locate the CustomersInMemory class.
This class contains a public string array called Customers. Each string in the Customers array holds the data for a single customer, with the fields separated by commas; this format is typical of data that an application might read in from a text file that uses comma-separated fields. The first field contains the customer ID, the second field contains the name of the company that the customer represents, and the remaining fields hold the address, city, country, and postal code.
2. Find the OrdersInMemory class.
This class is similar to the CustomersInMemory class except that it contains a string array called Orders. The first field in each string is the order number, the second field is the customer ID, and the third field is the date that the order was placed.
3. Find the OrderInfo class. This class contains four fields that hold the customer ID, company name, order ID, and order date for an order. You will use a LINQ query to populate a collection of OrderInfo objects from the data in the Customers and Orders arrays.
4. Display the Program.cs file in the Code and Text Editor window and locate the Test2 method in the Program class.
In this method, you will create a LINQ query that joins the Customers and Orders arrays over the customer ID to return a list of customers and all the orders that each customer has placed. The query will store each row of the result in an OrderInfo object.
5. In the try block in this method, add the code shown next in bold after the first TO DO comment:
6. // TO DO: Create a LINQ query that retrieves customers and orders from arrays
7. // Store each row returned in an OrderInfo object
8. var orderInfoQuery = from c in CustomersInMemory.Customers
9. join o in OrdersInMemory.Orders
10. on c.Split(',')[0] equals o.Split(',')[1]
11. select new OrderInfo
12. {
13. CustomerID = c.Split(',')[0],
14. CompanyName = c.Split(',')[1],
15. OrderID = Convert.ToInt32(o.Split(',')[0]),
16. OrderDate = Convert.ToDateTime(o.Split(',')[2],
17. new CultureInfo("en-US"))
};
This statement defines the LINQ query. Notice that it uses the Split method of the String class to split each string into an array of strings. The strings are split on the comma character. (The commas are stripped out.) One complication is that the dates in the array are held in U.S. English format, so the code that converts them into DateTime objects in the OrderInfo object specifies the U.S. English formatter. If you use the default formatter for your locale, the dates might not parse correctly. All in all, this query performs a significant amount of work to generate the data for each item.
18.In the Test2 method, add the following code shown in bold after the second TO DO statement:
19.// TO DO: Run the LINQ query, and save the results in a List<OrderInfo> object
List<OrderInfo> orderInfo = new List<OrderInfo>(orderInfoQuery);
This statement runs the query and populates the orderInfo collection.
20.Add the statement shown here in bold after the third TO DO statement:
21.// TO DO: Display the results
Console.WriteLine("There are {0} orders", orderInfo.Count);
22.In the Main method, comment out the statement that calls the Test1 method and uncomment the statement that calls the Test2 method, as shown below in bold:
23.static void Main(string[] args)
24.{
25. // Test1();
26. Test2();
}
27.On the DEBUG menu, click Start Without Debugging.
Verify that Test2 retrieves 830 orders, and note the duration of the test. Run the application several times to obtain an average duration and then return to Visual Studio.
28.In the Test2 method, modify the LINQ query and add the AsParallel extension method to the Customers and Orders arrays, as shown here in bold:
29.var orderInfoQuery = from c in CustomersInMemory.Customers.AsParallel()
30. join o in OrdersInMemory.Orders.AsParallel()
31. on c.Split(',')[0] equals o.Split(',')[1]
32. select new OrderInfo
33. {
34. CustomerID = c.Split(',')[0],
35. CompanyName = c.Split(',')[1],
36. OrderID = Convert.ToInt32(o.Split(',')[0]),
37. OrderDate = Convert.ToDateTime(o.Split(',')[2],
38. New CultureInfo("en-US"))
};
WARNING
When you join two data sources in this way, they must both be IEnumerable objects or ParallelQuery objects. This means that if you specify the AsParallel method for the first source, you should also specify AsParallel for the other. If you fail to do this, your code will not run—it will stop with an error.
39.Run the application several times. Notice that the time taken for Test2 should be significantly less than it was previously. PLINQ can make use of multiple threads to optimize join operations by fetching the data for each part of the join in parallel.
40.Close the application and return to Visual Studio.
These two simple exercises have shown you the power of the AsParallel extension method and PLINQ. Note that PLINQ is an evolving technology, and the internal implementation is very likely to change over time. Additionally, the volumes of data and the amount of processing you perform in a query also have a bearing on the effectiveness of using PLINQ. Therefore, you should not regard these exercises as defining fixed rules you should always follow. Rather, they illustrate the point that you should carefully measure and assess the likely performance or other benefits of using PLINQ with your own data in your own environment.
Canceling a PLINQ Query
Unlike ordinary LINQ queries, a PLINQ query can be canceled. To do this, you specify a CancellationToken object from a CancellationTokenSource and use the WithCancellation extension method of the ParallelQuery.
CancellationToken tok = ...;
...
var orderInfoQuery =
from c in CustomersInMemory.Customers.AsParallel().WithCancellation(tok)
join o in OrdersInMemory.Orders.AsParallel()
on ...
You specify WithCancellation only once in a query. Cancellation applies to all sources in the query. If the CancellationTokenSource object used to generate the CancellationToken is canceled, the query stops with an OperationCanceledException exception.
Synchronizing Concurrent Access to Data
The Task class supplies a powerful framework that enables you to design and build applications that can take advantage of multiple CPU cores to perform tasks in parallel. However, as I alluded to in the introduction to this chapter, you need to be careful when building solutions that perform concurrent operations, especially if those operations share access to the same data.
The issue is that you have little control over how parallel operations are scheduled, or even the degree of parallelism that the operating system might provide to an application constructed by using tasks. These decisions are left as run-time considerations and depend on the workload and hardware capabilities of the computer running your application. This level of abstraction was a deliberate design decision on the part of the Microsoft development team, and it removes the need for you to understand the low-level threading and scheduling details when you build applications that require concurrent tasks. But this abstraction comes at a cost. Although it all appears to work magically, you must make some effort to understand how your code runs; otherwise, you can end up with applications that exhibit unpredictable (and erroneous) behavior, as shown in the following example:
using System;
using System.Threading;
class Program
{
private const int NUMELEMENTS = 10;
static void Main(string[] args)
{
SerialTest();
}
static void SerialTest()
{
int[] data = new int[NUMELEMENTS];
int j = 0;
for (int i = 0; i < NUMELEMENTS; i++)
{
j = i;
doAdditionalProcessing();
data[i] = j;
doMoreAdditionalProcessing();
}
for (int i = 0; i < NUMELEMENTS; i++)
{
Console.WriteLine("Element {0} has value {1}", i, data[i]);
}
}
static void doAdditionalProcessing()
{
Thread.Sleep(10);
}
static void doMoreAdditionalProcessing()
{
Thread.Sleep(10);
}
}
The SerialTest method populates an integer array with a set of values (in a rather long-winded way) and then iterates through this list, printing the index of each item in the array together with the value of the corresponding item. The doAdditionalProcessing and doMoreAdditionalProcessingmethods simply simulate performing long-running operations as part of the processing that might cause the runtime to yield control of the processor. The output of the program method is shown here:
Element 0 has value 0
Element 1 has value 1
Element 2 has value 2
Element 3 has value 3
Element 4 has value 4
Element 5 has value 5
Element 6 has value 6
Element 7 has value 7
Element 8 has value 8
Element 9 has value 9
Now consider the ParallelTest method shown next. This method is the same as the SerialTest method except that it uses the Parallel.For construct to populate the data array by running concurrent tasks. The code in the lambda expression run by each task is identical to that in the initial forloop in the SerialTest method.
using System.Threading.Tasks;
...
static void ParallelTest()
{
int[] data = new int[NUMELEMENTS];
int j = 0;
Parallel.For (0, NUMELEMENTS, (i) =>
{
j = i;
doAdditionalProcessing();
data[i] = j;
doMoreAdditionalProcessing();
});
for (int i = 0; i < NUMELEMENTS; i++)
{
Console.WriteLine("Element {0} has value {1}", i, data[i]);
}
}
The intention is for the ParallelTest method to perform the same operation as the SerialTest method, except that it uses concurrent tasks and (hopefully) runs a little faster as a result. The problem is that it might not always work as expected. Some sample output generated by the ParallelTestmethod is shown here:
Element 0 has value 1
Element 1 has value 1
Element 2 has value 4
Element 3 has value 8
Element 4 has value 4
Element 5 has value 1
Element 6 has value 4
Element 7 has value 8
Element 8 has value 8
Element 9 has value 9
The values assigned to each item in the data array are not always the same as the values generated by using the SerialTest method. Additionally, further runs of the ParallelTest method can produce different sets of results.
If you examine the logic in the Paralell.For construct, you should see where the problem lies. The lambda expression contains the following statements:
j = i;
doAdditionalProcessing();
data[i] = j;
doMoreAdditionalProcessing();
The code looks innocuous enough. It copies the current value of the variable i (the index variable identifying which iteration of the loop is running) into the variable j, and later on it stores the value of j in the element of the data array indexed by i. If i contains 5, then j is assigned the value 5, and later on the value of j is stored in data[5]. The problem is that between assigning the value to j and then reading it back, the code does more work; it calls the doAdditionalProcessing method. If this method takes a long time to execute, the runtime might suspend the thread and schedule another task. A concurrent task running another iteration of the Parallel.For construct might run and assign a new value to j. Consequently, when the original task resumes, the value of j it assigns to data[5] is not the value it stored, and the result is data corruption. More troublesome is that sometimes this code might run as expected and produce the correct results, and at other times it may not; it all depends on how busy the computer is and when the various tasks are scheduled. Consequently, these types of bugs can lie dormant during testing and then suddenly manifest themselves in a production environment.
The variable j is shared by all the concurrent tasks. If a task stores a value in j and later reads it back, it has to ensure that no other task has modified j in the meantime. This requires synchronizing access to the variable across all concurrent tasks that can access it. One way in which you can achieve synchronized access is to lock data.
Locking Data
The C# language provides locking semantics through the lock keyword, which you can use to guarantee exclusive access to resources. You use the lock keyword like this:
object myLockObject = new object();
...
lock (myLockObject)
{
// Code that requires exclusive access to a shared resource
...
}
The lock statement attempts to obtain a mutual-exclusion lock over the specified object (you can actually use any reference type, not just object), and it blocks if this same object is currently locked by another thread. When the thread obtains the lock, the code in the block following the lockstatement runs. At the end of this block, the lock is released. If another thread is blocked waiting for the lock, it can then grab the lock and continue its processing.
Synchronization Primitives for Coordinating Tasks
The lock keyword is fine for many simple scenarios, but there are situations in which you might have more complex requirements. The System.Threading namespace includes a number of additional synchronization primitives you can use to address these situations. These synchronization primitives are classes designed for use with tasks; they expose locking mechanisms that restrict access to a resource while a task holds the lock. They support a variety of locking techniques you can use to implement different styles of concurrent access, ranging from simple exclusive locks (where a single task has sole access to a resource), to semaphores (where multiple tasks can access a resource simultaneously, but in a controlled manner), to reader/writer locks that enable different tasks to share read-only access to a resource while guaranteeing exclusive access to a thread that needs to modify the resource.
The following list summarizes some of these primitives. For more information and examples, consult the documentation provided with Visual Studio 2012.
NOTE
The .NET Framework has included a respectable set of synchronization primitives since its initial release. The following list describes only the more recent primitives included in the System.Threading namespace. There is some overlap between the new primitives and those provided previously. Where overlapping functionality exists, you should use the more recent alternatives because they have been designed and optimized for computers with multiple CPUs.
Detailed discussion of the theory of all the possible synchronization mechanisms available for building multithreaded applications is outside the scope of this book. For more information about the general theory of multiple threads and synchronization, see the topic “Synchronizing Data for Multithreading” on the Microsoft web site at http://msdn.microsoft.com/en-us/library/z8chs7ft.aspx.
§ ManualResetEventSlim. The ManualResetEventSlim class provides functionality that enables one or more tasks to wait for an event.
A ManualResetEventSlim object can be in one of two states: signaled (true) and unsignaled (false). A task creates a ManualResetEventSlim object and specifies its initial state. Other tasks can wait for the ManualResetEventSlim object to be signaled by calling the Wait method. If theManualResetEventSlim object is in the unsignaled state, the Wait method blocks the tasks. Another task can change the state of the ManualResetEventSlim object to signaled by calling the Set method. This action releases all tasks waiting on the ManualResetEventSlim object, which can then resume running. The Reset method changes the state of a ManualResetEventSlim object back to unsignaled.
§ SemaphoreSlim. You can use the SemaphoreSlim class to control access to a pool of resources.
A SemaphoreSlim object has an initial value (a non-negative integer) and an optional maximum value. Typically, the initial value of a SemaphoreSlim object is the number of resources in the pool. Tasks accessing the resources in the pool first call the Wait method. This method attempts to decrement the value of the SemaphoreSlim object, and if the result is nonzero, the thread is allowed to continue and can take a resource from the pool. When it has finished, the task should call the Release method on the SemaphoreSlim object. This action increments the value of theSemaphore.
If a task calls the Wait method and the result of decrementing the value of the SemaphoreSlim object would result in a negative value, the task waits until another task calls Release.
The SemaphoreSlim class also provides the CurrentCount property, which you can use to determine whether a Wait operation is likely to succeed immediately or will result in blocking.
§ CountdownEvent. You can think of the CountdownEvent class as a cross between the inverse of a semaphore and a manual reset event.
When a task creates a CountdownEvent object, it specifies an initial value (a non-negative integer). One or more tasks can call the Wait method of the CountdownEvent object, and if its value is nonzero, the tasks are blocked. Wait does not decrement the value of the CountdownEventobject; instead, other tasks can call the Signal method to reduce the value. When the value of the CountdownEvent object reaches zero, all blocked tasks are signaled and can resume running.
A task can set the value of a CountdownEvent object back to the value specified in its constructor by using the Reset method, and a task can increase this value by calling the AddCount method. You can determine whether a call to Wait is likely to block by examining the CurrentCountproperty.
§ ReaderWriterLockSlim. The ReaderWriterLockSlim class is an advanced synchronization primitive that supports a single writer and multiple readers. The idea is that modifying (writing to) a resource requires exclusive access, but reading a resource does not; multiple readers can access the same resource at the same time, but not at the same time as a writer.
A task that wants to read a resource calls the EnterReadLock method of a ReaderWriterLock Slim object. This action grabs a read lock on the object. When the task has finished with the resource, it calls the ExitReadLock method, which releases the read lock. Multiple tasks can read the same resource at the same time, and each task obtains its own read lock.
When a task modifies the resource, it can call the EnterWriteLock method of the same ReaderWriterLockSlim object to obtain a write lock. If one or more tasks currently have a read lock for this object, the EnterWriteLock method blocks until they are all released. Once a task has a write lock, it can then modify the resource and call the ExitWriteLock method to release the lock.
A ReaderWriterLockSlim object has only a single write lock. If another task attempts to obtain the write lock, it is blocked until the first task releases this write lock.
To ensure that writing tasks are not blocked indefinitely, as soon as a task requests the write lock, all subsequent calls to EnterReadLock made by other tasks are blocked until the write lock has been obtained and released.
§ Barrier. The Barrier class enables you to temporarily halt the execution of a set of tasks at a particular point in an application and continue only when all tasks have reached this point. It is useful for synchronizing tasks that need to perform a series of concurrent operations in step with each other.
When a task creates a Barrier object, it specifies the number of tasks in the set that will be synchronized. You can think of this value as a task counter maintained internally inside the Barrier class. This value can be amended later by calling the AddParticipant or RemoveParticipantmethod. When a task reaches a synchronization point, it calls the SignalAndWait method of the Barrier object, which decrements the thread counter inside the Barrier object. If this counter is greater than zero, the task is blocked. Only when the counter reaches zero are all the tasks waiting on the Barrier object released, and only then can they continue running.
The Barrier class provides the ParticipantCount property, which specifies the number of tasks that it synchronizes, and the ParticipantsRemaining property, which indicates how many tasks need to call SignalAndWait before the barrier is raised and blocked tasks can continue running.
You can also specify a delegate in the Barrier constructor. This delegate can refer to a method that runs when all the tasks have arrived at the barrier. The Barrier object is passed in as a parameter to this method. The barrier is not raised and the tasks are not released until this method completes.
Cancelling Synchronization
The ManualResetEventSlim, SemaphoreSlim, CountdownEvent, and Barrier classes all support cancellation by following the cancellation model described in Chapter 23. The wait operations for each of these classes can take an optional CancellationToken parameter, retrieved from aCancellationTokenSource object. If you call the Cancel method of the CancellationTokenSource object, each wait operation referencing a CancellationToken generated from this source is aborted with an OperationCanceledException exception (possibly wrapped in an AggregateExceptionexception, depending on the context of the wait operation).
The following code shows how to invoke the Wait method of a SemaphoreSlim object and specify a cancellation token. If the wait operation is canceled, the OperationCanceledException catch handler runs.
CancellationTokenSource cancellationTokenSource = new CancellationTokenSource();
CancellationToken cancellationToken = cancellationTokenSource.Token;
...
// Semaphore that protects a pool of 3 resources
SemaphoreSlim semaphoreSlim = new SemaphoreSlim(3);
...
// Wait on the semaphore, and catch the OperationCanceledException if
// another thread calls Cancel on cancellationTokenSource
try
{
semaphoreSlim.Wait(cancellationToken);
}
catch (OperationCanceledException e)
{
...
}
The Concurrent Collection Classes
A common requirement of many multithreaded applications is to store and retrieve data in a collection. The standard collection classes provided with the .NET Framework are not thread safe by default, although you can use the synchronization primitives described in the previous section to wrap code that adds, queries, and removes elements in a collection. However, this process is potentially error-prone and not very scalable, so the .NET Framework class library includes a small set of thread-safe collection classes and interfaces in the System.Collections.Concurrent namespace that are designed specifically for use with tasks. The following list briefly summarizes the key types in this namespace.
§ ConcurrentBag<T>. This is a general-purpose class for holding an unordered collection of items. It includes methods to insert (Add), remove (TryTake), and examine (TryPeek) items in the collection. These methods are thread safe. The collection is also enumerable, so you can iterate over its contents by using a foreach statement.
§ ConcurrentDictionary<TKey, TValue>. This class implements a thread-safe version of the generic Dictionary<TKey, TValue> collection class described in Chapter 18 It provides the methods TryAdd, ContainsKey, TryGetValue, TryRemove, and TryUpdate, which you can use to add, query, remove, and modify items in the dictionary.
§ ConcurrentQueue<T>. This class provides a thread-safe version of the generic Queue<T> class described in Chapter 18. It includes the methods Enqueue, TryDequeue, and TryPeek, which you can use to add, remove, and query items in the queue.
§ ConcurrentStack<T>. This is a thread-safe implementation of the generic Stack<T> class, also described in Chapter 18. It provides methods such as Push, TryPop, and TryPeek, which you can use to push, pop, and query items on the stack.
NOTE
Adding thread safety to the methods in a collection class imposes additional runtime overhead, so these classes are not as fast as the regular collection classes. You need to bear this fact in mind when deciding whether to parallelize a set of operations that require access to a shared collection.
Using a Concurrent Collection and a Lock to Implement Thread-Safe Data Access
In the following set of exercises, you will implement an application that calculates Pi by using a geometric approximation. Initially, you will perform the calculation in a single-threaded manner, and then you will change the code to perform the calculation by using parallel tasks. In the process, you will uncover some data synchronization issues you need to address and that you will solve by using a concurrent collection class and a lock to ensure that the tasks coordinate their activities correctly.
The algorithm you will implement calculates Pi based on some simple mathematics and statistical sampling. If you draw a circle of radius r and draw a square with sides that touch the circle, the sides of the square are 2 * r in length, as shown in the following image:
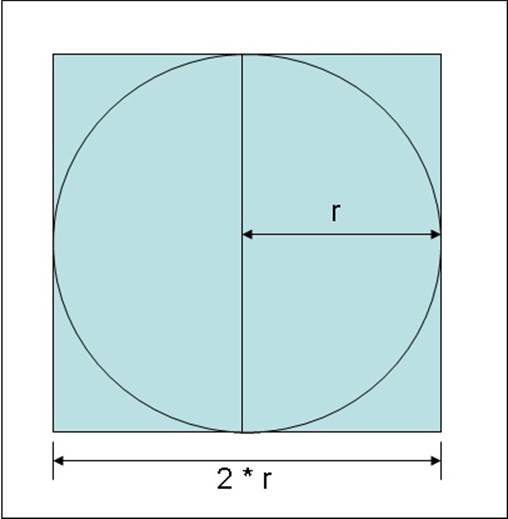
You can calculate the area of the square, S, as follows:
S = (2 * r) * (2 * r)
or
S = 4 * r * r
The area of the circle, C, is calculated as follows:
C = Pi * r * r
Rearranging these formulas, you can see that
r * r = C / Pi
and
r * r = S / 4
Therefore,
S / 4 = C / Pi
and rearranging this formula to calculate pi you get this:
Pi = 4 * C / S
The trick is to determine the value of the ratio of the area of the circle, C, with respect to the area of the square, S. This is where the statistical sampling comes in. You can generate a set of random points that lie within the square and count how many of these points also fall within the circle. If you have generated a sufficiently large and random sample, the ratio of points that lie within the circle to the points that lie within the square (and also in the circle) approximates the ratio of the areas of the two shapes, C / S. All you have to do is count them.
How do you determine whether a point lies within the circle? To help visualize the solution, draw the square on a piece of graph paper with the center of the square at the origin, point (0,0). You can then generate pairs of values, or coordinates, that lie within the range (-r, -r) to (+r, +r). You can determine whether any set of coordinates (x, y) lie within the circle by applying Pythagoras’ theorem to determine the distance d of these coordinates from the origin. You can calculate d as the square root of ((x * x) + (y * y)). If d is less than or equal to r, the radius of the circle, then the coordinates (x, y) specify a point within the circle, as shown in the following diagram:
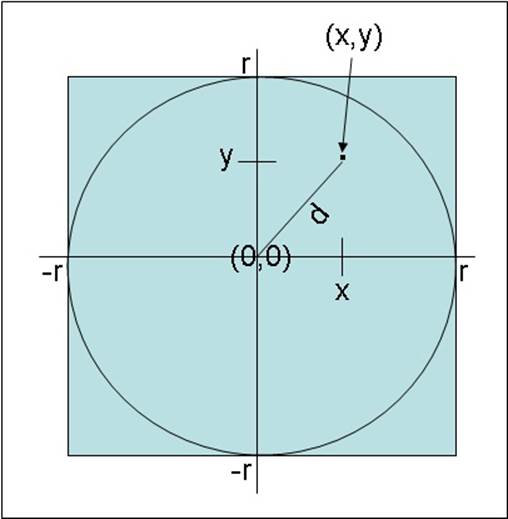
You can simplify matters further by generating only coordinates that lie in the upper-right quadrant of the graph so that you only have to generate pairs of random numbers between 0 and r. This is the approach you will take in the exercises.
NOTE
The exercises in this chapter are intended to run on a computer with a multicore processor. If you have only a single-core CPU, you will not observe the same effects. Also, you should not start any additional programs or services between exercises because these might affect the results you see.
Calculate Pi by using a single thread
1. Start Visual Studio 2012 if it is not already running.
2. Open the CalculatePI solution, located in the \Microsoft Press\Visual CSharp Step By Step\Chapter 24\CalculatePI folder in your Documents folder.
3. In Solution Explorer, in the CalculatePI project, double-click Program.cs to display the file in the Code and Text Editor window.
This is a console application. The skeleton structure of the application has already been created for you.
4. Scroll to the bottom of the file and examine the Main method. The code in this method looks like this:
5. double pi = SerialPI();
6. Console.WriteLine("Geometric approximation of PI calculated serially: {0}", pi);
7. Console.WriteLine();
8. // pi = ParallelPI();
// Console.WriteLine("Geometric approximation of PI calculated in parallel: {0}", pi);
This code calls the SerialPI method, which will calculate pi by using the geometric algorithm described before this exercise. The value is returned as a double and displayed. The code that is currently commented out calls the ParallelPI method, which will perform the same calculation but by using concurrent tasks. The result displayed should be exactly the same as that returned by the SerialPI method.
9. Examine the SerialPI method.
10.static double SerialPI()
11.{
12. List<double> pointsList = new List<double>();
13. Random random = new Random(SEED);
14. int numPointsInCircle = 0;
15. Stopwatch timer = new Stopwatch();
16. timer.Start();
17.
18. try
19. {
20. // TO DO: Implement the geometric approximation of PI
21. return 0;
22. }
23. finally
24. {
25. long milliseconds = timer.ElapsedMilliseconds;
26. Console.WriteLine("SerialPI complete: Duration: {0} ms", milliseconds);
27. Console.WriteLine(
28. "Points in pointsList: {0}. Points within circle: {1}",
29. pointsList.Count, numPointsInCircle);
30. }
}
This method generates a large set of coordinates and calculates the distances of each set of coordinates from the origin. The size of the set is specified by the constant NUMPOINTS at the top of the Program class. The bigger this value is, the greater the set of coordinates and the more accurate the value of pi calculated by this method. If you have sufficient memory, you can increase the value of NUMPOINTS. Similarly, if you find that the application throws OutOfMemoryException exceptions when you run it, you can reduce this value.
You store the distance of each point from the origin in the pointsList List<double> collection. The data for the coordinates is generated by using the random variable. This is a Random object, seeded with a constant to generate the same set of random numbers each time you run the program. (This helps you determine that it is running correctly.) You can change the SEED constant at the top of the Program class if you want to seed the random number generator with a different value.
You use the numPointsInCircle variable to count the number of points in the pointsList collection that lie within the bounds of the circle. The radius of the circle is specified by the RADIUS constant at the top of the Program class.
To help you compare performance between this method and the ParallelPI method, the code creates a Stopwatch variable called timer and starts it running. The finally block determines how long the calculation took and displays the result. For reasons that will be described later, thefinally block also displays the number of items in the pointsList collection and the number of points that it found that lay within the circle.
You will add the code that actually performs the calculation to the try block in the next few steps.
31.In the try block, delete the comment and remove the return statement. (This statement was provided only to ensure that the code compiles.) Add the for block and statements shown below in bold to the try block:
32.try
33.{
34. for (int points = 0; points < NUMPOINTS; points++)
35. {
36. int xCoord = random.Next(RADIUS);
37. int yCoord = random.Next(RADIUS);
38. double distanceFromOrigin = Math.Sqrt(xCoord * xCoord + yCoord * yCoord);
39. pointsList.Add(distanceFromOrigin);
40. doAdditionalProcessing();
41. }
}
This block of code generates a pair of coordinate values that lie in the range 0 to RADIUS, and it stores them in the xCoord and yCoord variables. The code then employs the Pythagorean theorem to calculate the distance of these coordinates from the origin and adds the result to thepointsList collection.
NOTE
Although there is a little bit of computational work performed by this block of code, in a real-world scientific application you are likely to include far more complex calculations that will keep the processor occupied for longer. To simulate this situation, this block of code calls another method, doAdditionalProcessing. All this method does is occupy a number of CPU cycles as shown in the following code sample. I opted to follow this approach to better demonstrate the data synchronization requirements of multiple tasks rather than have you write an application that performs a highly complex calculation such as a fast Fourier transform (FFT) to keep the CPU busy:
private static void doAdditionalProcessing()
{
Thread.SpinWait(SPINWAITS);
}
SPINWAITS is another constant defined at the top of the Program class.
42.In the SerialPI method, in the try block, add the foreach statement shown below in bold after the for block.
43.try
44.{
45. for (int points = 0; points < NUMPOINTS; points++)
46. {
47. ...
48. }
49.
50. foreach (double datum in pointsList)
51. {
52. if (datum <= RADIUS)
53. {
54. numPointsInCircle++;
55. }
56. }
}
This code iterates through the pointsList collection and examines each value in turn. If the value is less than or equal to the radius of the circle, it increments the numPointsInCircle variable. At the end of this loop, numPointsInCircle should contain the total number of coordinates that were found to lie within the bounds of the circle.
57.Add the following statements shown in bold to the try block, after the foreach statement:
58.try
59.{
60. for (int points = 0; points < NUMPOINTS; points++)
61. {
62. ...
63. }
64.
65. foreach (double datum in pointsList)
66. {
67. ...
68. }
69.
70. double pi = 4.0 * numPointsInCircle / NUMPOINTS;
71. return pi;
}
The first statement calculates pi based on the ratio of the number of points that lie within the circle to the total number of points, using the formula described earlier. The value is returned as the result of the method.
72.On the DEBUG menu, click Start Without Debugging.
The program runs and displays its approximation of pi, as shown in the following image. (It took just over 46 seconds on my computer, so be prepared to wait for a little while.) The time taken to calculate the result is also displayed. (You can ignore the results from the ParallelPImethod because you have not written the code for this method yet.)
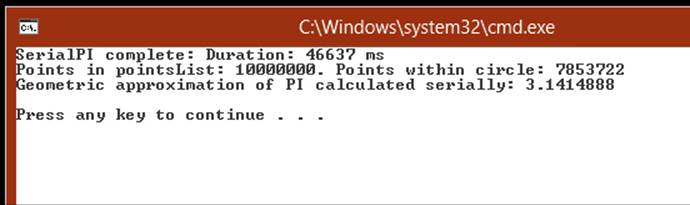
NOTE
Apart from the timing, your results should be the same unless you have changed the NUMPOINTS, RADIUS, or SEED constant.
73.Close the console window, and return to Visual Studio.
In the SerialPI method, the code in the for loop that generates the points and calculates their distance from the origin is an obvious area that can parallelized. This is what you will do in the next exercise.
Calculate Pi by using parallel tasks
1. In Solution Explorer, double-click Program.cs to display the file in the Code and Text Editor window if it is not already open.
2. Locate the ParallelPI method. It contains exactly the same code as the initial version of the SerialPI method before you added the code to the try block to calculate pi.
3. In the try block, delete the comment and remove the return statement. Add the Parallel.For statement shown below in bold to the try block:
4. try
5. {
6. Parallel.For (0, NUMPOINTS, (x) =>
7. {
8. int xCoord = random.Next(RADIUS);
9. int yCoord = random.Next(RADIUS);
10. double distanceFromOrigin = Math.Sqrt(xCoord * xCoord + yCoord * yCoord);
11. pointsList.Add(distanceFromOrigin);
12. doAdditionalProcessing();
13. });
}
This construct is the parallel analog of the code in the for loop in the SerialPI method. The body of the original for loop is wrapped in a lambda expression. Remember that each iteration of the loop is performed by using a task, and tasks can run in parallel. The degree of parallelism depends on the number of processor cores and other resources available on your computer.
14.Add the following code shown in bold to the try block after the Parallel.For statement. This code is exactly the same as the corresponding statements in the SerialPI method.
15.try
16.{
17. Parallel.For (...
18. {
19. ...
20. });
21.
22. foreach (double datum in pointsList)
23. {
24. if (datum <= RADIUS)
25. {
26. numPointsInCircle++;
27. }
28. }
29.
30. double pi = 4.0 * numPointsInCircle / NUMPOINTS;
31. return pi;
}
32.In the Main method near the end of the Program.cs file, uncomment the code that calls the ParallelPI method and the Console.WriteLine statement that displays the results.
33.On the DEBUG menu, click Start Without Debugging.
The program runs. The following image shows the typical output:
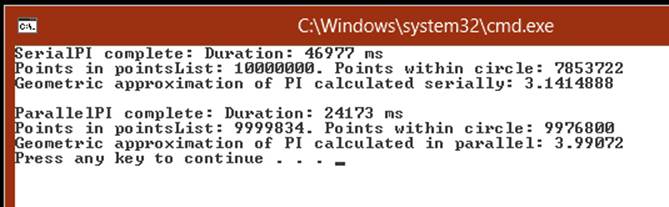
The value calculated by the SerialPI method should be exactly the same as before (the timing may be slightly different). However, although it was calculated somewhat more quickly, the result of the ParallelPI method looks a little suspect. The random number generator is seeded with the same value as that used by the SerialPI method, so it should produce the same sequence of random numbers with the same result and the same number of points within the circle. Another curious point is that the pointsList collection in the ParallelPI method seems to contain fewer points than the same collection in the SerialPI method.
NOTE
If the pointsList collection actually contains the expected number of items, run the application again. You should find that it contains fewer items than expected in most (but not necessarily all) runs.
34.Close the console window, and return to Visual Studio.
So what went wrong with the parallel calculation? A good place to start is the number of items in the pointsList collection. This collection is a generic List<double> object. However, this type is not thread safe. The code in the Parallel.For statement calls the Add method to append a value to the collection, but remember that this code is being executed by tasks running as concurrent threads. Consequently, given the number of items being added to the collection, it is highly probable that some of the calls to Add will interfere with each other and cause some corruption. A solution is to use one of the collections from the System.Collections.Concurrent namespace because these collections are thread safe. The generic ConcurrentBag<T> class in this namespace is probably the most suitable collection to use for this example.
Use a thread-safe collection
1. In Solution Explorer, double-click Program.cs to display the file in the Code and Text Editor window if it is not already open.
2. Add the following using directive to the list at the top of the file:
using System.Collections.Concurrent;
3. Locate the ParallelPI method. At the start of this method, replace the statement that instantiates the List<double> collection with code that creates a ConcurrentBag<double> collection, as shown in bold in the following code example:
4. static double ParallelPI()
5. {
6. ConcurrentBag<double> pointsList = new ConcurrentBag <double>();
7. Random random = ...;
8. ...
}
Notice that you cannot specify a default capacity for this class, so the constructor does not take a parameter.
You do not need to change any other code in this method; you add an item to a ConcurrentBag<T> collection by using the Add method, which is the same mechanism that you use to add an item to a List<T> collection.
9. On the DEBUG menu, click Start Without Debugging.
The program runs and displays its approximation of pi by using the SerialPI and ParallelPI methods. The following image shows the typical output.
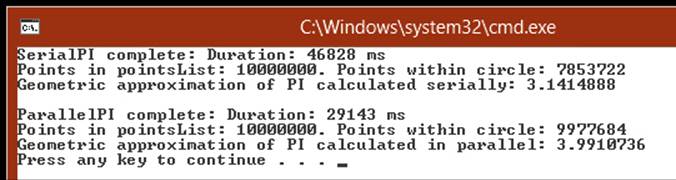
This time, the pointsList collection in the ParallelPI method contains the correct number of points, but the number of points within the circle still appears to be very high; it should be the same as that reported by the SerialPI method.
You should also note that the time taken by the ParallelPI method has increased compared to the previous exercise. This is because the methods in the ConcurrentBag<T> class have to lock and unlock data to guarantee thread safety, and this process adds to the overhead of calling these methods. Bear this in mind when considering whether it is appropriate to parallelize an operation.
10.Close the console window, and return to Visual Studio.
You now have the correct number of points in the pointsList collection, but the value recorded for each of these points is now questionable. The code in the Parallel.For construct calls the Next method of a Random object, but like the methods in the generic List<T> class, this method is not thread safe. Sadly, there is no concurrent version of the Random class, so you must resort to using an alternative technique to serialize calls to the Next method. Because each invocation is relatively brief, it makes sense to use a simple lock to guard calls to this method.
Use a lock to serialize method calls
1. In Solution Explorer, double-click Program.cs to display the file in the Code and Text Editor window if it is not already open.
2. Locate the ParallelPI method. Modify the code in the lambda expression in the Parallel.For statement to protect the calls to random.Next by using a lock statement. Specify the pointsList collection as the subject of the lock, as shown below in bold:
3. static double ParallelPI()
4. {
5. ...
6. Parallel.For(0, NUMPOINTS, (x) =>
7. {
8. int xCoord;
9. int yCoord;
10.
11. lock(pointsList)
12. {
13. xCoord = random.Next(RADIUS);
14. yCoord = random.Next(RADIUS);
15. }
16.
17. double distanceFromOrigin = Math.Sqrt(xCoord * xCoord + yCoord * yCoord);
18. pointsList.Add(distanceFromOrigin);
19. doAdditionalProcessing();
20. });
21.
22. ...
}
Notice that the xCoord and yCoord variables are declared outside of the lock statement. This is because the lock statement defines its own scope, and any variables defined within the block specifying the scope of the lock statement disappear when the construct exits.
23.On the DEBUG menu, click Start Without Debugging.
This time, the values of pi calculated by the SerialPI and ParallelPI methods are the same. The only difference is that the ParallelPI method runs more quickly.
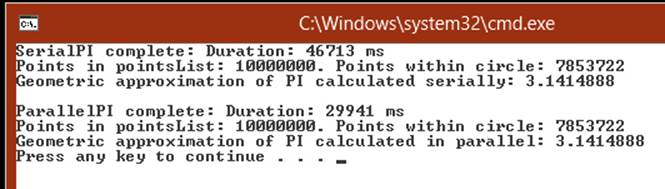
24.Close the console window, and return to Visual Studio.
Summary
In this chapter, you saw how to define asynchronous methods by using the async modifier and the await operator. Asynchronous methods are based on tasks, and the await operator specifies the points at which a task can be used perform asynchronous processing.
You also learned a little about PLINQ and how you can use the AsParallel extension method to parallelize some LINQ queries. However, PLINQ is a big subject in its own right, and this chapter has only shown you how to get started. For more information, see the topic “Parallel LINQ (PLINQ)” in the documentation provided with Visual Studio.
This chapter also showed you how to synchronize data access in concurrent tasks by using the synchronization primitives provided for use with tasks. You saw how to use the concurrent collection classes to maintain collections of data in a thread-safe manner.
§ If you want to continue to the next chapter
Keep Visual Studio 2012 running, and turn to Chapter 25.
§ If you want to exit Visual Studio 2012 now
On the FILE menu, click Exit. If you see a Save dialog box, click Yes and save the project.
Chapter 24 Quick Reference
|
To |
Do this |
|
Implement an asynchronous method |
Define the method with the async modifier and change the type of the method to return a Task (or a void). In the body of the method, use the await operator to specify points at which asynchronous processing can be performed. For example: private async Task<int> calculateValueAsync(...) { // Invoke calculateValue using a Task Task<int> generateResultTask = Task.Run(() => calculateValue(...)); await generateResultTask; return generateResultTask.Result; } |
|
Parallelize a LINQ query |
Specify the AsParallel extension method with the data source in the query. For example: var over100 = from n in numbers.AsParallel() where ... select n; |
|
Enable cancellation in a PLINQ query |
Use the WithCancellation method of the ParallelQuery class in the PLINQ query, and specify a cancellation token. For example: CancellationToken tok = ...; ... var orderInfoQuery = from c in CustomersInMemory.Customers.AsParallel(). WithCancellation(tok) join o in OrdersInMemory.Orders.AsParallel() on ... |
|
Synchronize one or more tasks to implement thread-safe exclusive access to shared data |
Use the lock statement to guarantee exclusive access to the data. For example: object myLockObject = new object(); ... lock (myLockObject) { // Code that requires exclusive access to a shared resource ... } |
|
Synchronize threads, and make them wait for an event |
Use a ManualResetEventSlim object to synchronize an indeterminate number of threads. Use a CountdownEvent object to wait for an event to be signaled a specified number of times. Use a Barrier object to coordinate a specified number of threads and synchronize them at a particular point in an operation. |
|
Synchronize access to a shared pool of resources |
Use a SemaphoreSlim object. Specify the number of items in the pool in the constructor. Call the Wait method prior to accessing a resource in the shared pool. Call the Release method when you have finished with the resource. For example: SemaphoreSlim semaphore = new SemaphoreSlim(3); ... semaphore.Wait(); // Access a resource from the pool ... semaphore.Release(); |
|
Provide exclusive write access to a resource, but shared read access |
Use a ReaderWriterLockSlim object. Prior to reading the shared resource, call the EnterReadLock method. Call the ExitReadLock method when you have finished. Before writing to the shared resource, call the EnterWriteLock method. Call the ExitWriteLock method when you have completed the write operation. For example: ReaderWriterLockSlim readerWriterLock = new ReaderWriterLockSlim(); Task readerTask = Task.Factory.StartNew(() => { readerWriterLock.EnterReadLock(); // Read shared resource readerWriterLock.ExitReadLock(); }); Task writerTask = Task.Factory.StartNew(() => { readerWriterLock.EnterWriteLock(); // Write to shared resource readerWriterLock.ExitWriteLock(); }); |
|
Cancel a blocking wait operation |
Create a cancellation token from a CancellationTokenSource object, and specify this token as a parameter to the wait operation. To cancel the wait operation, call the Cancel method of the CancellationTokenSource object. For example: CancellationTokenSource cancellationTokenSource = new CancellationTokenSource(); CancellationToken cancellationToken = cancellationTokenSource.Token; ... // Semaphore that protects a pool of 3 resources SemaphoreSlim semaphoreSlim = new SemaphoreSlim(3); ... // Wait on the semaphore, and throw an OperationCanceledException if // another thread calls Cancel on cancellationTokenSource semaphore.Wait(cancellationToken); |
All materials on the site are licensed Creative Commons Attribution-Sharealike 3.0 Unported CC BY-SA 3.0 & GNU Free Documentation License (GFDL)
If you are the copyright holder of any material contained on our site and intend to remove it, please contact our site administrator for approval.
© 2016-2025 All site design rights belong to S.Y.A.