Microsoft® Visual C#® 2012 Step by Step (2012)
Chapter 27. Accessing a Remote Database in a Windows Store App
After completing the chapter, you will be able to
§ Use the Entity Framework to create an entity model that can retrieve and modify information held in a database.
§ Create a WCF Data Service that provides remote access to a database through an entity model.
§ Fetch data from a remote database by using a data service.
§ Insert, update, and delete data in a remote database by using a data service.
In Chapter 26, you learned how to implement the Model-View-ViewModel (MVVM) pattern. You saw how to separate the business logic of an application from the user interface by using a ViewModel class that provided access to the data in the model and that implemented commands the user interface could use to invoke the business logic of the application. You also saw how to use data binding to display the data presented by the ViewModel in the user interface and enable the user interface to update this data. You now have a fully functional Windows Store app.
In this chapter, you will turn your attention to the model aspect of the MVVM pattern. In particular, you will see how to implement a model that a Microsoft Windows Store app can use to retrieve and update data in a remote database.
Retrieving Data from a Database
So far, the data you have been using has been confined to a simple collection embedded in the ViewModel of the application. In the real world, the data displayed and maintained by an application is more likely to be stored in a data source such as a relational database.
Windows Store apps cannot directly access a relational database by using technologies provided by Microsoft (although some third-party database vendors may implement their own solutions). This may sound like a severe restriction, but there are sensible reasons for this limitation. Primarily, it eliminates any dependencies that a Windows Store app might have on external resources, making it a stand-alone item that can be easily packaged and downloaded from the Windows Store without requiring users to install and configure a database management system on their computer. However, many business applications are still going to have a requirement for accessing a database. To address this scenario, you can use a data service.
A data service is a type of web service that enables an application to connect to a remote data source to retrieve and update data. This data service can be located almost anywhere, from the same computer on which the application is running to a web server hosted on a computer on a different continent. As long as you can connect to it, you can use a data service to provide access to the repository for your information. Microsoft Visual Studio provides templates and tools that enable you to build a data service very quickly and easily. The simplest strategy is to base the data service on an entity model generated by using the Entity Framework, as shown in the following diagram:
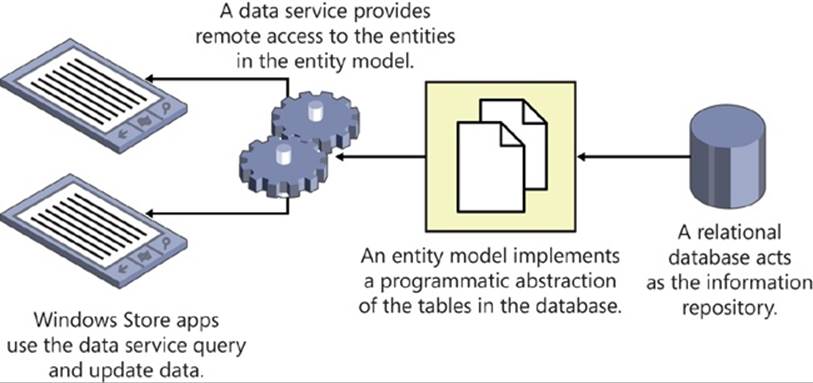
The Entity Framework is a powerful technology that enables you to connect to a relational database. It can reduce the amount of code that most developers need to write to add data access capabilities to an application. This is where you will start, but first you need to set up the AdventureWorks database; this is the database that contains the details of Adventure Works customers.
NOTE
There is not sufficient space in this book to go into great detail on how to use the Entity Framework, and the exercises in this section walk you through only the most essential steps to get started. If you want more information, look at the “Entity Framework” page on the Microsoft website at http://msdn.microsoft.com/data/aa937723.
Install the AdventureWorks database
1. Start Visual Studio 2012 if it is not already running.
2. On the FILE menu, point to Open and then click File.
3. In the Open File dialog box, browse to the folder \Microsoft Press\Visual CSharp Step By Step\Chapter 27\AdventureWorks under your Documents folder, click AttachDatabase.sql, and then click Open.
4. In the Transact-SQL Editor window displaying the CREATE DATABASE command, change the text <YourName> to your username. This text occurs twice: once on the second line of the command and once on the third.
5. On the SQL menu, point to Transact-SQL Editor, and then click Execute to run the command.
6. In the Connect to Server dialog box, enter (localdb)\v11.0 in the Server Name text box, make sure that the Authentication combo box is set to Windows Authentication, and then click Connect. Verify that the command completes without errors.
NOTE
(localdb)\V11.0 is the connection string that identifies the version of SQL Server that is installed with Visual Studio 2012. Sometimes this instance of SQL Server can take a few seconds to start up, and you may receive a timeout error after you click Connect. If this happens, click Execute to run the command again; SQL Server should now be running and the command should be successful.
7. Close the AttachDatabase.sql window. In the message box that appears asking you whether to save the changes you made to the script, click No.
Creating an Entity Model
Now that you have installed the AdventureWorks database, you can use the Entity Framework to create an entity model that an application can use to query and update information in this database. If you have worked with databases in the past, you may be familiar with technologies such as ADO.NET, which provides a library of classes that enable you to connect to a database and run SQL commands. ADO.NET is useful, but it requires that you have a decent understanding of SQL, and if you are not careful it can force you into structuring your code around the logic necessary to perform SQL commands rather than focusing on the business operations of your application. The Entity Framework provides a level of abstraction that reduces the dependencies that your applications have on SQL. Essentially, the Entity Framework implements a mapping layer between a relational database and your application; it generates an entity model that consists of collections of classes that your application can use just like any other collection. A collection typically corresponds to a table in the database, and each row in a table corresponds to an item in the collection. You perform queries by iterating through the items in a collection, typically by using LINQ. Behind the scenes, the entity model converts your queries into SQL SELECT commands that fetch the data. You can modify the data in the collection, and then you can arrange for the entity model to generate and perform the appropriate SQL INSERT, UPDATE, and DELETE commands to perform the equivalent operations in the database. In short, the Entity Framework is an excellent vehicle for connecting to a database and retrieving and managing data without requiring that you embed SQL commands in your code.
In the following exercise, you will create a very simple entity model for the Customer table in the AdventureWorks database. You will follow what is known as the database-first approach to entity modeling. In this approach, the Entity Framework generates classes based on the definitions of tables in the database. The Entity Framework also enables you to employ a code-first approach; this strategy can generate a set of tables in a database based on classes that you have implemented in your application.
NOTE
If you want more information about the code-first approach to creating an entity model, please consult the “Data Developer Center” page on the Microsoft website at http://msdn.microsoft.com/en-us/data/jj200620.
Create the AdventureWorks entity model
1. In Visual Studio, open the Customers project, located in the \Microsoft Press\Visual CSharp Step By Step\Chapter 27\Data Service folder in your Documents folder.
This project contains a modified version of the Customers application from the previous set of exercises. The ViewModel contains additional commands to skip to the first and last customers in the customers collection, and the app bar contains First and Last buttons that invoke these commands. The buttons for these commands use the SkipBackAppBarButtonStyle and SkipAheadAppBarButtonStyle styles defined in the StandardStyles.xaml file in the Common folder (the styles have been uncommented as described in the exercise in the previous section, and the text displayed by each button has also been changed to First and Last).
In addition, the app bar adapts itself to different views by handling the SizeChanged event. The method AppBarSizeChanged in MainPage.xaml.cs (shown below) uses the Visual State Manager to modify the appearance of the buttons in Snapped view; the captions are removed and the buttons are moved closer together. This functionality is built into the styles of these buttons as defined in StandardStyles.xaml. All the code does is call the static GoToState method of the VisualStateManager class with the name of the state; you wrote similar code in Chapter 25 to adapt the layout of the form in the WindowSizeChanged method.
private void AppBarSizeChanged(object sender, SizeChangedEventArgs e)
{
ApplicationViewState viewState = ApplicationView.Value;
VisualStateManager.GoToState(this.firstCustomer, viewState.ToString(), false);
VisualStateManager.GoToState(this.previousCustomer, viewState.ToString(), false);
VisualStateManager.GoToState(this.nextCustomer, viewState.ToString(), false);
VisualStateManager.GoToState(this.lastCustomer, viewState.ToString(), false);
}
Finally, this version of the project does not implement the Search contract. The reason behind this omission is that it enables you to concentrate on the core elements of this exercise without the files and other elements that make up the Search contract getting in the way.
2. In Solution Explorer, right-click the Customers solution (not the Customers project), point to Add, and then click New Project.
3. In the Add New Project dialog box, click the Web tab in the left pane. Click the ASP.NET Empty Web Application template in the middle pane, enter AdventureWorksService in the Name text box, and then click OK.
As mentioned at the start of this section, you cannot access a relational database directly from a Windows Store app, and this includes using the Entity Framework. Instead, you have created a web application (this is not a Windows Store app), and you will host the entity model that you create in this application. In the next exercise, you will add a data service to the web application. This data service will provide remote access to the entity model for the Customers Windows Store app.
4. In Solution Explorer, right-click the Customers solution again, and then click Set Startup Projects.
5. In the Solution ‘Customers’ Property Pages dialog box, click Multiple Startup Projects. Set the Action for the AdventureWorksService and Customers projects to Start, and then click OK.
This configuration ensures that the AdventureWorksService web application runs whenever you start the project from the DEBUG menu.
6. Right-click the AdventureWorksService project, and then click Properties.
7. In the properties page, click the Web tab in the left column.
8. On the Web page, click “Don’t open a page. Wait for a request from an external application.”
9. On the FILE menu, click Save All, and then close the properties page.
Normally, when you run a web application from Visual Studio, the web browser (Internet Explorer) opens and attempts to display the home page for the application. The Adventure WorksService application does not have a home page; the purpose of this application is to host the data service to which client applications can connect and retrieve data from the AdventureWorks database.
10.In Solution Explorer, right-click the AdventureWorksService project, point to Add, and then click New Item.
11.In the Add New Item – AdventureWorksService dialog box, click the Data tab in the left column. Click the ADO.NET Entity Data Model template in the middle pane, type AdventureWorksModel.edmx in the Name text box, and then click Add.
The Entity Data Model Wizard starts running. You can use this wizard to generate an entity model from an existing database.
12.On the Choose Model Contents page of the Entity Data Model Wizard, select Generate from Database and the click Next.
13.On the Choose Your Data Connection page, click New Connection.
14.In the Connection Properties dialog box, type (localdb)\v11.0 in the Server Name text box. Verify that Use Windows Authentication is selected, type AdventureWorks in the Select or Enter a Database Name box, and then click OK.
This action creates a connection to the AdventureWorks database that you configured in the previous exercise.
15.On the Choose Your Data Connection page, verify that Save Entity Connection Settings in Web.Config As is selected, and confirm that the name of the connection string is AdventureWorksEntities. Click Next.
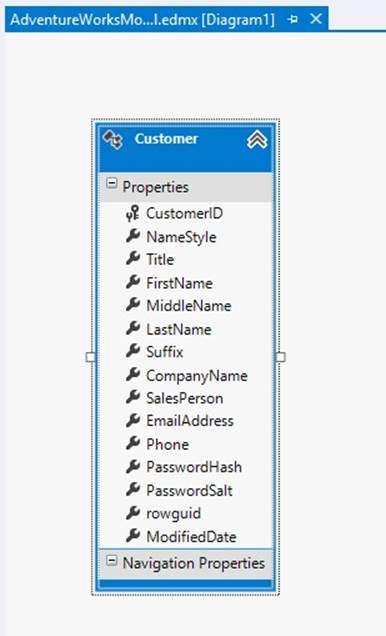
16.On the Choose Your Database Objects and Settings page, expand Tables, expand SalesLT, and then select Customer. Verify that the option Pluralize or Singularize Generated Object Names is selected (the other two options on this page will also be selected by default), observe that that Entity Framework generates the classes for the entity model in the AdventureWorksModel namespace, and then click Finish.

The Entity Data Model Wizard generates an entity model for the Customers table and displays a graphical representation in the Entity Model editor on the screen, like this:
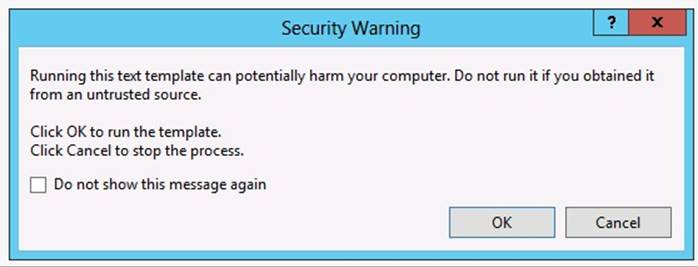
If the following Security Warning message box appears, select Do Not Show This Message Again and then click OK. This security warning appears because the Entity Framework uses a technology known as T4 templates to generate the code for your entity model, and it has downloaded these templates from the web using NuGet. The Entity Framework templates have been verified by Microsoft and are safe to use.
17.In Solution Explorer, expand AdventureWorksModel.edmx, expand AdventureWorksModel.tt, and then double-click Customer.cs.
This file contains the class that the Entity Data Model Wizard generated to represent a customer. This class contains automatic properties for each of the columns in the Customer table in the database:
public partial class Customer
{
public int CustomerID { get; set; }
public Nullable<bool> NameStyle { get; set; }
public string Title { get; set; }
public string FirstName { get; set; }
public string MiddleName { get; set; }
public string LastName { get; set; }
public string Suffix { get; set; }
public string CompanyName { get; set; }
public string SalesPerson { get; set; }
public string EmailAddress { get; set; }
public string Phone { get; set; }
public string PasswordHash { get; set; }
public string PasswordSalt { get; set; }
public System.Guid rowguid { get; set; }
public Nullable<System.DateTime> ModifiedDate { get; set; }
}
18.In Solution Explorer, under AdventureWorksModel.edmx, expand AdventureWorksModel.Context.tt, and then double-click AdventureWorksModel.Context.cs.
This file contains the definition of a class called AdventureWorksEntities (it has the same name that you used when you generated the connection to the database in the Entity Data Model Wizard):
public partial class AdventureWorksEntities : DbContext
{
public AdventureWorksEntities()
: base("name=AdventureWorksEntities")
{
}
protected override void OnModelCreating(DbModelBuilder modelBuilder)
{
throw new UnintentionalCodeFirstException();
}
public DbSet<Customer> Customers { get; set; }
}
The AdventureWorksEntities class is descended from the DbContext class, and this class provides the functionality that an application uses to connect to the database. The constructor passes a parameter to the base class constructor that specifies the name of a connection string to use to connect to the database. If you look in the Web.config file, you will find this string in the <ConnectionStrings> section. It contains the parameters (among other things) that you specified when you ran the Entity Data Model Wizard.
You can ignore the OnModelCreating method in the AdventureWorksEntities class, and the only remaining item is the Customers collection. This collection has the type DbSet<Customer>. The DbSet generic type provides methods that enable you to add, update, delete, and query objects in a database; it works in conjunction with the DbContext class to generate the appropriate SQL SELECT commands necessary to fetch customer information from the database and populate the collection, as well as create the SQL INSERT, UPDATE, and DELETE commands that run if Customer objects are added, modified, or removed from the collection. A DbSet collection is frequently referred to as an entity set.
19.On the BUILD menu, click Build Solution.
Creating and Using a Data Service
You have created an entity model that provides operations to retrieve and maintain customer information, and the next step is to create a data service so that the entity model can be accessed by a Windows Store app. A data service is, as its name implies, a service that supplies data. An application can connect to a data service and request the information that the service publishes. Additionally, most data services enable an application to make modifications to the data and send these changes back to the data service.
Visual Studio 2012 enables you to create data services based directly on an entity model generated by using the Entity Framework. The data service uses the entity model to retrieve data from a database and update the database. You create a data service by using the WCF Data Service template (WCF is an acronym for Windows Communication Foundation, a set of assemblies and tools that you can use to build services that provide remote operations and data access). The WCF Data Service template generates a data service that implements the REST model (REST is another acronym that stands for Representational State Transfer). The REST model uses a navigational scheme to represent business objects and services over a network and the HTTP protocol to transmit requests to access these objects and services. A client application that accesses a resource submits a request in the form of a URL that the data service parses and processes. For example, Adventure Works might publish customer information, exposing the details of each customer as a single resource, by using a scheme similar to this:
http://Adventure-Works.com/DataService/Customers(1)
Accessing this URL causes the data service to retrieve the data for customer 1. This data can be returned in a number of formats, but for portability the most common formats include XML and JavaScript Object Notation (JSON). A typical XML response generated by a WCF Data Service to the previous query looks like this:
<?xml version="1.0" encoding="utf-8" ?>
<entry xml:base="http://localhost:53923/AdventureWorks.svc/"
xmlns="http://www.w3.org/2005/Atom"
xmlns:d="http://schemas.microsoft.com/ado/2007/08/dataservices"
xmlns:m="http://schemas.microsoft.com/ado/2007/08/dataservices/metadata">
<id>http://localhost:53923/AdventureWorks.svc/Customers(1)</id>
<category term="AdventureWorksModel.Customer"
scheme="http://schemas.microsoft.com/ado/2007/08/dataservices/scheme" />
<link rel="edit" title="Customer" href="Customers(1)" />
<title />
<updated>2012-10-10T14:30:29Z</updated>
<author>
<name />
</author>
<content type="application/xml">
<m:properties>
<d:CustomerID m:type="Edm.Int32">1</d:CustomerID>
<d:NameStyle m:type="Edm.Boolean">false</d:NameStyle>
<d:Title>Mr</d:Title>
<d:FirstName>Orlando</d:FirstName>
<d:MiddleName>N.</d:MiddleName>
<d:LastName>Gee</d:LastName>
<d:Suffix m:null="true" />
<d:CompanyName>A Bike Store</d:CompanyName>
<d:SalesPerson>adventure-works\pamela0</d:SalesPerson>
<d:EmailAddress>orlando0@adventure-works.com</d:EmailAddress>
<d:Phone>245-555-0173</d:Phone>
<d:PasswordHash>L/Rlwxzp4w7RWmEgXX+/A7cXaePEPcp+KwQhl2fJL7w=</d:PasswordHash>
<d:PasswordSalt>1KjXYs4=</d:PasswordSalt>
<d:rowguid m:type="Edm.Guid">3f5ae95e-b87d-4aed-95b4-c3797afcb74f</d:rowguid>
<d:ModifiedDate m:type="Edm.DateTime">2001-08-01T00:00:00</d:ModifiedDate>
</m:properties>
</content>
</entry>
The REST model relies on the application that accesses the data sending the appropriate HTTP verb as part of the request used to access the data. For example, the simple request shown previously should send an HTTP GET request to the web service. HTTP supports other verbs as well, such as POST, PUT, and DELETE, which you can use to create, modify, and remove resources, respectively. Writing the code to generate the appropriate HTTP requests and parsing the responses returned by a WCF Data Service all sounds quite complicated. Fortunately, Visual Studio 2012 includes various wizards that can generate most of this code for you, leaving you free to concentrate on the business logic of your application.
NOTE
You can find more information about WCF Data Services on the “WCF Data Services” page on the Microsoft website at http://msdn.microsoft.com/library/cc668792.aspx.
In the following exercise, you will create a simple WCF Data Service for the AdventureWorks entity model. This data service will enable a client application to query and maintain customer information.
Create the AdventureWorks data service
1. In Visual Studio, right-click the AdventureWorksService project, point to Add, and then click New Item.
2. In the Add New Item – AdventureWorksService dialog box, in the left column click the Web tab. In the middle pane scroll down and click the WCF Data Service template, in the Name text box type AdventureWorks.svc, and then click Add.
The data service is added to the project, and the file AdventureWorks.svc.cs is displayed in the Code and Text Editor window.
The AdventureWorks.svc.cs file contains a class called AdventureWorks that inherits from the generic DataService class. The DataService class provides all the functionality necessary for listening for incoming HTTP REST requests over the network, parsing them, and generating the logic that retrieves, inserts, updates, or deletes information. All you have to do is indicate which entity model the data service should use, and specify the operations that client applications can perform (for example, you might want to make some entity sets in the entity model query-only, while allowing client applications to insert, update, and delete information in others).
3. In the statement that declares the AdventureWorks class, replace the comment /* TODO: put your data source class name here */ with AdventureWorksEntities, as shown below in bold:
4. public class AdventureWorks : DataService<AdventureWorksEntities>
5. {
6. ...
}
Remember that AdventureWorksEntities is the name of the DbContext class that the Entity Framework generated for your entity model. The data service uses this class to connect to the database and determine which entities are available in the entity model; the AdventureWorksEntitiesclass contains a single entity set called Customers.
7. In the InitializeService method, remove the comments, and add the statement shown below in bold:
8. public static void InitializeService(DataServiceConfiguration config)
9. {
10. config.SetEntitySetAccessRule("Customers", EntitySetRights.All);
11. config.DataServiceBehavior.MaxProtocolVersion = DataServiceProtocolVersion.V3;
}
This statement grants read and write access to the entities in the Customers entity set. These privileges enable client applications to query the data in this entity set as well as add new entities, delete entities, and update existing entities in this set.
12.In Solution Explorer, check that you have correctly configured the data service. Right-click the AdventureWorks.svc file, and then click View in Browser.
Your web browser will start and it should display the following page:
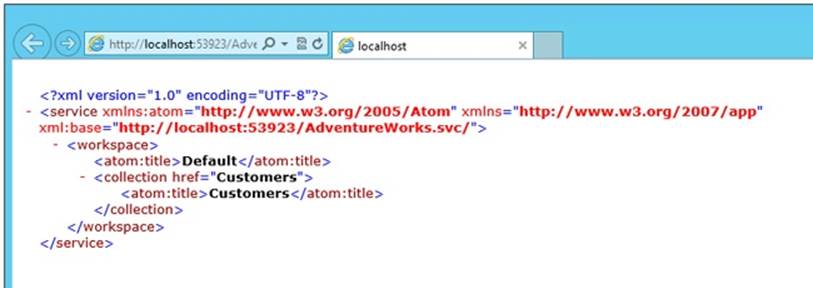
This page shows the entity sets that the data service publishes. In this case, there is only one: Customers.
13.Close the web browser and return to Visual Studio.
The next phase of this journey is to connect to the data service from the Customers Windows Store app, and then use the data service to actually fetch some data. Visual Studio provides the Add Service Reference wizard that can generate the code to connect to a data service, together with a set of classes that you can use to query and update information in the data service. These classes are similar in concept to the DbContext and DbSet collection classes in the entity model in that they abstract much of the detail of connecting to the data source and the intricacies of retrieving data away from your application code, although the underlying technology is now based on an HTTP connection to a REST data service rather than a database, so the implementation is actually quite different. Fortunately, this is not really your concern other than to note the convenience of this approach!
Consume the AdventureWorks data service
1. In Solution Explorer, right-click the Customers project (not the Customers solution), and then click Add Service Reference.
2. In the Add Service Reference dialog box, click Discover.
The wizard should automatically track down all data services in your solution and list them in the Address combo box. In this case, there is only a single data service.
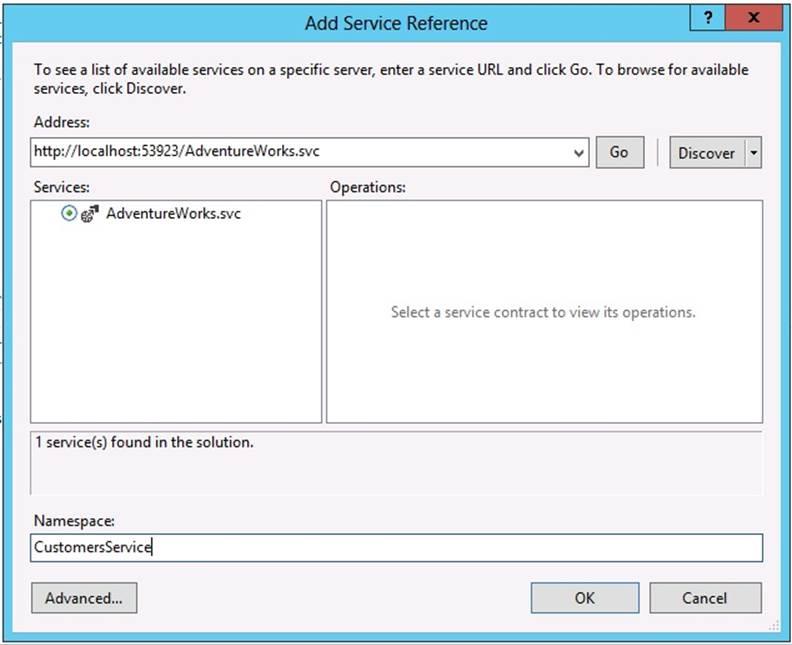
NOTE
The port used by your data service might be different from that shown in this image (53923).
3. In the Namespace text box type CustomersService, and then click OK.
At this point, you might receive the following error message: “There was an error downloading metadata from the address. Please verify that you have entered a valid address.” If this happens, click OK. The most common cause of this error (assuming that you have not accidentally changed the address in the Address combo box) is that the OData Client Tools for Windows Store Apps have not been installed. The Add Service Reference wizard uses these tools to generate the code necessary to connect to a data service. Another error message will be displayed in the dialog box, and you can click the Details link to verify that this is indeed the problem:
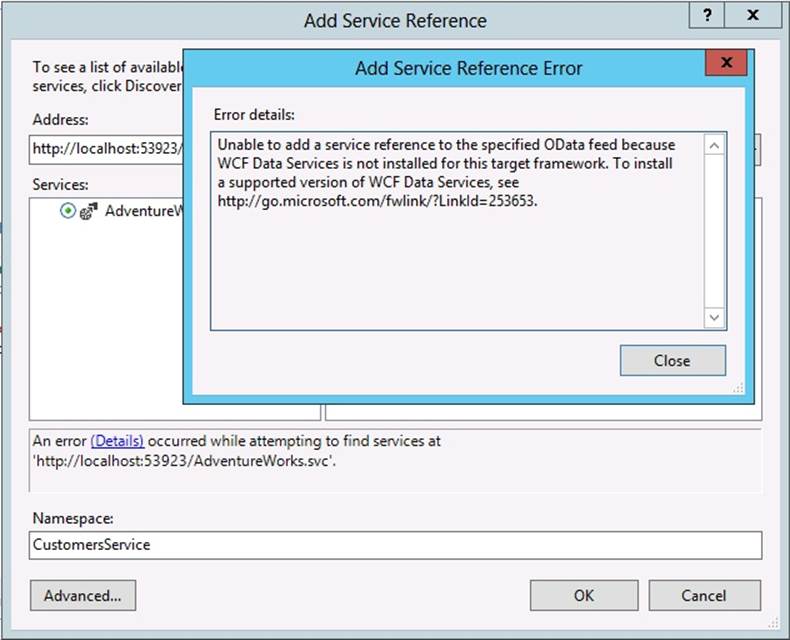
Go to the URL specified in the error message (http://go.microsoft.com/fwlink/?LinkId=253653) and download the OData Client Tools for Windows Store Apps. Visual Studio cannot be running while you install these tools, so cancel the Add Service Reference wizard, click Save All on the FILE menu, and then close Visual Studio.
After you have installed the OData Client Tools for Windows Store Apps, restart Visual Studio, open the Customers project, located in the \Microsoft Press\Visual CSharp Step By Step\Chapter 27\Data Service folder in your Documents folder, and the repeat this exercise starting from step 1.
4. In Solution Explorer, make sure that the Show All Files option is selected in the toolbar, and then in the Customers project expand Service References, expand CustomersService, expand Reference.datasvcmap, and then double-click Reference.cs.
This file contains the code generated by the Add Service Reference wizard.
You should see that this file contains two classes called AdventureWorksEntities and Customer. These classes mirror the functionality of the classes with the same names in the entity model, except that the functionality of the AdventureWorksEntities class is extended to connect to the data service over the network.
An application uses the AdventureWorksEntities class to perform queries and data updates. This class contains a property called Customers. This property is similar to the Customers property in the entity model except that it is a DataServiceQuery<Customer> collection; it is populated with Customer objects retrieved over the network from the data service when the client application performs a query.
The Customer class is a more complex version of the Customer class generated by the Entity Framework for the entity model. It implements the INotifyPropertyChanged interface, and each of the properties raises the PropertyChanged event when modified, making this class an ideal source for data binding to a user interface.
5. On the BUILD menu, click Build Solution.
NOTE
The port used by your data service might be different from that shown in this image (53923). You may get the warning “Resources found for language(s) ‘en, zh-hant, zh-hans, ru, ko, ja, it, fr, es, de’ but no resources found for default language(s): ‘en-US’.” You can ignore this warning.
The next step in this odyssey through the world of data access is to add code to the Customers application to actually retrieve and display some data. In theory, this process is quite simple: use the AdventureWorksEntities class to connect to the data service, define a query that specifies which customers to retrieve, send this query to the data service and capture the results, and then display the results. Let’s look at each part of this process in more detail:
a. Connect to the data service. The AdventureWorksEntities class provides a constructor that expects the URL of the data service as its parameter. If the data service is actually listening at the specified URL, the connection will be established.
b. Define a query that specifies which customers to retrieve. The simplest way to perform this task is to use the Customers collection of the AdventureWorksEntities object. You can use this collection as is to retrieve all customers, or you can use LINQ to refine the query. For example, the following query retrieves all customers that have a CustomerID less than 100:
c. AdventureWorksEntities connection = ...;
d. var data = from c in connection.Customers
e. where c.CustomerID < 100
select c;
f. Send this query to the data service and capture the results. Recall that the Customers collection is an instance of the DataServiceQuery generic class. The DataServiceQuery class encapsulates the functionality necessary to submit a query to a WCF Data Service and receive the results. If you are not creating a Windows Store app, you can use the Execute method to send the query to the data service. However, the Execute operation is synchronous and may take some time to run. Such operations are banned in Windows Store apps because they can impact the responsiveness of the user interface. Instead, you must use the asynchronous methods BeginExecute and EndExecute.
The BeginExecute method sends the query to the data service and allows the application to continue running. The first parameter to BeginExecute is an AsyncCallback object that contains a reference to a method to run when the results are ready. This method should call theEndExecute method to actually receive the results and return them as an enumerable list. The results themselves are made available to the EndExecute method via a parameter passed to this method.
NOTE
This processing model is a hangover from the days before the Task Parallel Library, and if you want to learn more about it, look at the “Asynchronous Programming Model” page on the Microsoft website at http://msdn.microsoft.com/library/ms228963.aspx.
The Task Parallel Library contains an adapter method that can take a pair of Begin and End methods and use them to create a Task object that performs the operation asynchronously. This adapter method is called FromAsync, and you access it through the static Factory property of the Task class. The FromAsync method is useful because it means you use the await operator to run the task, and the method that creates the task can be marked as async. The following code example shows how to use this approach to run a query that retrieves all customers from the data service:
var queryResults = await Task.Factory.FromAsync(
connection.Customers.BeginExecute(null, null),
(result) => connection.Customers.EndExecute(result));
NOTE
If you need to fetch the data defined by a LINQ query as described in step 2, you must cast the LINQ query as a DataServiceQuery object, as follows:
var queryResults = await Task.Factory.FromAsync(
(data as DataServiceQuery).BeginExecute(null, null),
(result) => (data as DataServiceQuery).EndExecute(result));
Notice that you don’t need to provide any parameters to the BeginExecute method if you use it in this way; the FromAsync method automatically creates the callback (in this case, it is a lambda expression that calls EndExecute), and the asynchronous result generated by theBeginExecute method is passed as the parameter to the EndExecute method.
g. Display the results. The EndExecute method returns an enumerable collection that contains the results of the query. To display the results, you can enumerate this collection, store the results in a local list, and configure data binding to display each item in the user interface.
In the next exercise, you will modify the ViewModel class to retrieve data from the AdventureWorks data service.
Fetch data from the AdventureWorks data service
1. In Solution Explorer, right-click the Customer.cs file in the root folder of the Customers project, and then click Delete. In the message box, click OK to permanently delete this file.
You no longer need the Customer class defined in this file because your application will use the Customer class implemented by the data service instead.
2. Right-click the DataSource.cs file in the root folder of the Customers project and the click Delete. In the message box, click OK to permanently delete this file as well.
You will retrieve customer information from the data service, so the DataSource class is now redundant.
3. Double-click the ViewModel.cs file in the Customers project to display it in the Code and Text Editor window.
4. Add the following using directives to the list at the top of the file:
5. using System.Data.Services.Client;
using Customers.CustomersService;
The System.Data.Services.Client namespace contains the types required to use a WCF Data Service in a Windows Store app. The Customers.CustomersService namespace contains the AdventureWorksEntities and Customer classes generated by the Add Service Reference wizard.
6. Add the following private fields shown in bold to the ViewModel class:
7. public class ViewModel : INotifyPropertyChanged
8. {
9. ...
10. public Command LastCustomer { get; private set; }
11. private AdventureWorksEntities connection = null;
12. private string url = "http://localhost:53923/AdventureWorks.svc";
13. ...
}
The url field specifies the address of the data service, including the port (53923) that Visual Studio selected when you created your data service, will likely be different from mine. You should replace this number with the port for your data service. You can find the URL of your data service as follows:
a. In Solution Explorer, click the AdventureWorksService project.
b. In the Properties window, look at the value of the URL property.
14.In the ViewModel constructor, delete the following line of code that creates the customers list:
this.customers = DataSource.Customers;
15.Add the public GetData method shown below to the ViewModel class, after the constructor:
16.public async Task GetData()
17.{
18. try
19. {
20. this.connection = new AdventureWorksEntities(new Uri(this.url));
21. var query = await Task.Factory.FromAsync(
22. this.connection.Customers.BeginExecute(null, null),
23. (result) => this.connection.Customers.EndExecute(result));
24.
25. this.customers = query.ToList();
26. this.currentCustomer = 0;
27. this.OnPropertyChanged("Current");
28. this.IsAtStart = true;
29. this.IsAtEnd = (this.customers.Count == 0);
30. }
31. catch (DataServiceQueryException dsqe)
32. {
33. // TODO: Handle errors
34. }
}
This method is asynchronous; it uses the technique described before the start of this exercise to connect to the data service and fetch all the customers. Ideally, to preserve resources and prevent fetching data unnecessarily over the network, you should be selective in the data that you retrieve by applying a LINQ operators to the query as described earlier. However, in this application, the AdventureWorks database contains only a few hundred customers, so they are all retrieved and cached in the customers list.
The exception handler is currently empty. You will see a useful technique for displaying error messages later in this chapter.
35.Modify the get accessor for the Current property as shown below:
36.public Customer Current
37.{
38. get
39. {
40. if (this.customers != null)
41. {
42. return this.customers[currentCustomer];
43. }
44. else
45. {
46. return null;
47. }
48. }
}
The GetData method is asynchronous, so there is the possibility that the customers collection might not be populated when the controls on the MainPage form attempt to bind to a customer. In this situation, this modification prevents the data bindings from generating a null reference exception when they access the customers collection.
49.In the ViewModel constructor, update the conditions that enable each of the commands to run as shown below in bold:
50.public ViewModel()
51.{
52. ...
53. this.NextCustomer = new Command(this.Next, () =>
54. { return this.customers != null && this.customers.Count > 0 && !this.IsAtEnd; });
55. this.PreviousCustomer = new Command(this.Previous, () =>
56. this.FirstCustomer = new Command(this.First, () =>
57. this.LastCustomer = new Command(this.Last, () =>
58. { return this.customers != null && this.customers.Count > 0 && !this.IsAtEnd; });
}
These changes ensure that the buttons in the app bar are not enabled until there is some data to display.
59.In Solution Explorer, expand MainPage.xaml and double-click MainPage.xaml.cs to open it in the Code and Text Editor window.
60.Add the statement shown below in bold to the MainPage constructor:
61.public MainPage()
62.{
63. ...
64. ViewModel viewModel = new ViewModel();
65. viewModel.GetData();
66. this.DataContext = viewModel;
}
This statement populates the ViewModel.
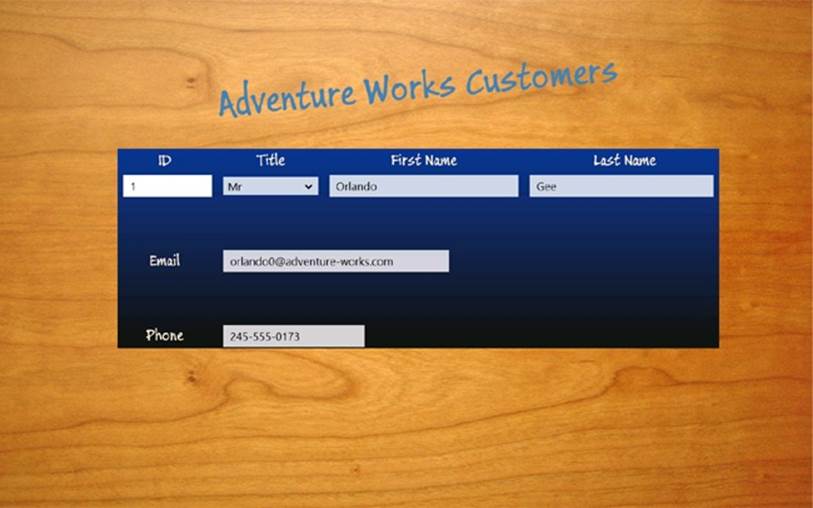
67.On the DEBUG menu, click Start Debugging to build and run the application.
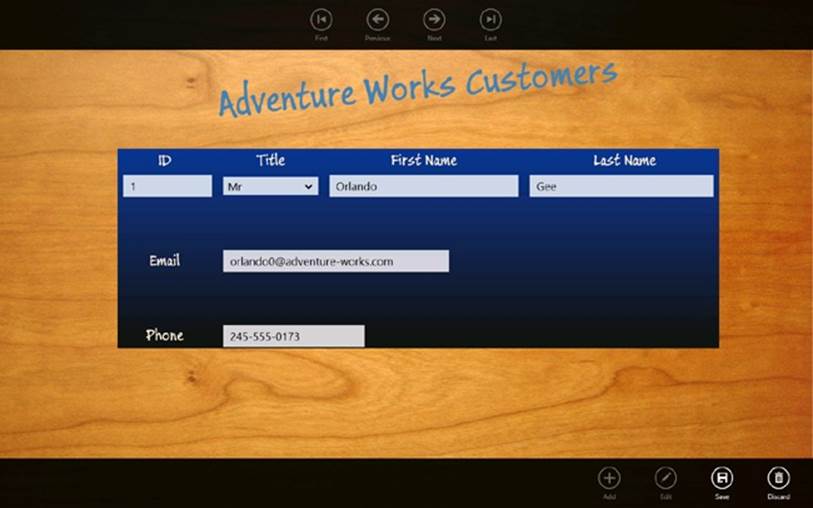
68.The form will appear empty initially while the GetData method runs, but after a few seconds the details of the first customer, Orlando Gee, should appear:
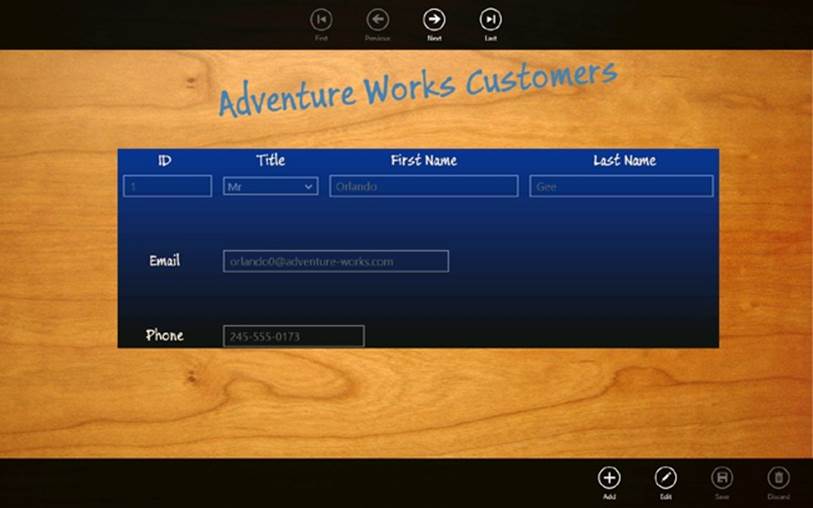
69.Right-click the form to display the app bar. Use the navigation buttons to move through the list of customers to verify that the form works as expected.
70.Return to Visual Studio and stop debugging.
As a final flourish to this section, when the form is initially displayed it would be helpful to let the user know that although the form appears to be empty, the application is actually in the process of fetching the data. In a Windows Store app, you can use a ProgressRing control to provide this feedback. This control should be displayed when the ViewModel is busy communicating with the data service, but inactive otherwise.
Add a busy indicator to the Customers form
1. Display the VievModel.cs file in the Code and Text Editor window, and add the private _isBusy field and public IsBusy property to the ViewModel class, after the GetData method:
2. private bool _isBusy;
3. public bool IsBusy
4. {
5. get { return this._isBusy; }
6. set
7. {
8. this._isBusy = value;
9. this.OnPropertyChanged("IsBusy");
10. }
}
11.In the GetData method, add the statements shown below in bold:
12.public async Task GetData()
13.{
14. try
15. {
16. this.IsBusy = true;
17. this.connection = new AdventureWorksEntities(...);
18. ...
19. }
20. catch (DataServiceQueryException dsqe)
21. {
22. // TODO: Handle errors
23. }
24. finally
25. {
26. this.IsBusy = false;
27. }
}
The GetData method sets the IsBusy property to true prior to running the query to fetch the customer information. The finally block ensures that the IsBusy property is set back to false, even if an exception occurs.
28.Open the MainPage.xaml file in the Design View window.
29.In the XAML pane, add the ProgressRing control shown below in bold as the first item in the top-level Grid control.
30.<Grid Style="{StaticResource GridStyle}">
31.<ProgressRing HorizontalAlignment="Center" VerticalAlignment="Center"
32.Foreground="AntiqueWhite" Height="100" Width="100"
33.IsActive="{Binding IsBusy}" Canvas.ZIndex="1"/>
34. <Grid x:Name="customersTabularView" Margin="40,104,0,0" ...>
...
Setting the Canvas.ZIndex property to “1” ensures that the ProgressRing appears in front of the other controls displayed by the Grid control.
35.On the DEBUG menu, click Start Debugging to build and run the application.
Notice that when the application starts, the progress ring briefly appears before the first customer is displayed. If you find that the first customer appears too quickly, you can introduce a small delay into the GetData method just to satisfy yourself that the progress ring is working. Add the following statement that pauses the method for 5 seconds:
public async Task GetData()
{
try
{
this.IsBusy = true;
await Task.Delay(5000);
this.connection = new AdventureWorksEntities(...);
...
}
...
}
Be sure to remove this statement when you have finished testing the progress ring.
36.Return to Visual Studio and stop debugging.
Inserting, Updating, and Deleting Data in a Database
Apart from enabling users to query and display data, many applications will have the requirement to enable users to insert, update, and delete information. WCF Data Services implements a model that supports these operations; it can track the state of objects that the user has retrieved and use this state information to send the appropriate insert, update, or delete requests through the entity model to the database. The entity model converts these requests into the equivalent SQL INSERT, UPDATE, and DELETE statements.
Performing Insert, Update, and Delete Operations Through a WCF Data Service
Remember that a WCF Data Service maintains a collection for each entity set in the underlying entity model. You access these collections through the connection class generated by the Add Service Reference wizard. In the AdventureWorks example, you saw that the connection class is called AdventureWorksEntities, and it contains a collection named Customers. You can modify the data in a Customer object retrieved from the Customers collection, but you need to inform WCF Data Services that the state of this object has changed if you want these modifications to be sent back to the data service. You achieve this by using the UpdateObject method of the connection class, as shown in the following code example:
AdventureWorksEntities connection = ...;
var query = await Task.Factory.FromAsync(
this.connection.Customers.BeginExecute(null, null)
...);
Customer cust = query.First();
...
cust.FirstName = "John";
connection.UpdateObject(cust);
This code changes the FirstName property of the first customer returned from the connection.
To add a new customer, you create a new Customer object and populate it with data. You then use the AddToCustomers method of the connection object to add it to the Customers collection, like this:
AdventureWorksEntities connection = ...;
Customer newCust = new Customer();
newCust.FirstName = "Diana";
newCust.LastName = "Sharp";
...
connection.AddToCustomers(newCust);
The connection class generated by the Add Service Reference wizard contains an AddToXXX method for each entity set in the underlying entity model, where XXX is the name of the entity set. Note that you can add a customer object only once. In the previous example, if you repeat theAddToCustomers method call with the same newCust object, you will receive an InvalidOperationException exception with the message “The context is already tracking the entity.”
To remove a customer, you use the DeleteObject method of the connection class:
AdventureWorksEntities connection = ...;
var query = await Task.Factory.FromAsync(
this.connection.Customers.BeginExecute(null, null)
...);
Customer cust = query.First();
...
connection.DeleteObject(cust);
You can only remove a customer that you had either retrieved from the data service or added by using the AddToCustomers method; otherwise, your code will throw an InvalidOperationException exception with the message “The context is not currently tracking the entity.”
After you have updated, added, or removed objects from the entity collection, you need to inform the data service that it should make these changes permanent in the data. To do this, you use the SaveChanges method of the connection object. As with the Execute method that you call to run a query and retrieve data, you can only use the asynchronous version of SaveChanges in a Windows Store app; you must call BeginSaveChanges to initiate the save and EndSaveChanges to capture the result of the operation. You can use the same idiom employed for querying data and use the static FromAsync method of the TaskFactory class to invoke these methods, like this:
await Task.Factory.FromAsync(
connection.BeginSaveChanges(null, null),
(result) => connection.EndSaveChanges(result));
There is one small but significant complication you should be aware of. The CustomerID column in the Customer table contains automatically generated values. The user does not provide a value for this data when creating a customer; rather, the database generates the value itself when a customer is added to the database. In this way, the database can ensure that each customer has a unique CustomerID. When you use a WCF Data Service to insert a new customer, it will retrieve the newly generated CustomerID from the database. The data service will then pass this same value back as part of the information returned by the EndExecute method, which will attempt to update the corresponding customer in the Customers collection in your application. This is useful, as it ensures that all new customers that your application adds can be displayed with their generated IDs. The problem is that each Customer object resides in the memory of a different thread from that which is running the EndExecute method, and you will receive a rather obscure COMException exception as a result, with the message “The application called an interface that was marshaled for a different thread.” This is very similar to the issue described in Chapter 24, in the section Defining Asynchronous Methods: The Problem. The solution is the same as that proposed in Chapter 24: use an async method. (Turn back to the section Defining Asynchronous Methods: The Solution in Chapter 24 if you need reminding how an async method solves this problem.) In the case of the EndSaveChanges method in the preceding example, all you need to do is specify that the lambda expression that invokes this method is async, as highlighted below in bold:
await Task.Factory.FromAsync(
connection.BeginSaveChanges(null, null),
async (result) => connection.EndSaveChanges(result));
In the next exercise, you will extend the Customers application and add features that enable users to add new customers and modify the details of existing customers. You will not provide any functionality to delete customers. This ensures that you have a record of all customers that have done business with the Adventure Works organization, which may be required for auditing purposes. Additionally, even if a customer has not been active for a long time, there is a chance that the customer may place an order at some point in the future.
Implement add and edit functionality in the ViewModel class
1. In Visual Studio, open the Customers project, located in the \Microsoft Press\Visual CSharp Step By Step\Chapter 27\Updatable ViewModel folder in your Documents folder.
The code in the ViewModel.cs file is getting rather lengthy, so it has been reorganized into regions to make it easier to manage. The ViewModel class has also been extended with the following Boolean properties that indicate the “mode” in which the ViewModel is operating: Browsing, Adding, or Editing. These properties are defined in the region named Properties for managing the edit mode:
o IsBrowsing This property indicates whether the ViewModel is in Browsing mode. When the ViewModel is in Browsing mode, the FirstCustomer, LastCustomer, PreviousCustomer, and NextCustomer commands are enabled and a view can invoke these commands to browse data.
o IsAdding This property indicates whether the ViewModel is in Adding mode. In this mode, the FirstCustomer, LastCustomer, PreviousCustomer, and NextCustomer commands are disabled. You will define an AddCustomer command, a SaveChanges command, and aDiscardChanges command that will be enabled in this mode.
o IsEditing This property indicates whether the ViewModel is in Editing mode. Like Adding mode, in this mode, the FirstCustomer, LastCustomer, PreviousCustomer, and NextCustomer commands are disabled. You will define an EditCustomer command that will be enabled in this mode. The SaveChanges command and DiscardChanges command will also be enabled, but the AddCustomer command will be disabled. The EditCustomer command will be disabled in Adding mode.
o IsAddingOrEditing This property indicates whether the ViewModel is in Adding or Editing mode. You will use this property in the methods that you define in this exercise.
o CanBrowse This property returns true if the ViewModel is in Browsing mode and there is an open connection to the data service. The code in the constructor that creates the FirstCustomer, LastCustomer, PreviousCustomer, and NextCustomer commands has been updated to use this property to determine whether these commands should be enabled or disabled, as follows:
o public ViewModel()
o {
o ...
o this.NextCustomer = new Command(this.Next, () =>
o { return this.CanBrowse && this.customers.Count > 0 && !this.IsAtEnd; });
o this.PreviousCustomer = new Command(this.Previous, () =>
o { return this.CanBrowse && this.customers.Count > 0 && !this.IsAtStart; });
o this.FirstCustomer = new Command(this.First, () =>
o { return this.CanBrowse && this.customers.Count > 0 && !this.IsAtStart; });
o this.LastCustomer = new Command(this.Last, () =>
o { return this.CanBrowse && this.customers.Count > 0 && !this.IsAtEnd; });
}
o CanSaveOrDiscardChanges This property returns true if the ViewModel is in Adding or Editing mode and it has an open connection to the data service.
The Methods for fetching and updating data region contains the following methods:
o GetData This is the same method that you created earlier in this chapter. It connects to the data service and retrieves the details of every customer.
o ValidateCustomer This method takes a Customer object and examines the FirstName and LastName properties to ensure that they are not empty. It also inspects the EmailAddress and Phone properties to verify that they contain information that is in a valid format. The method returns true if the data is valid and false otherwise. You will use this method when you create the SaveChanges command later in this exercise.
NOTE
The code that validates the EmailAddress and Phone properties performs regular expression matching by using the Regex class defined in the System.Text.RegularExpressions namespace. To use this class, you define a regular expression in a Regex object that specifies the pattern that the data should match, and then you invoke the IsMatch method of the Regex object with the data that you need to validate. For more information about regular expressions and the Regex class, visit the “Regular Expression Object Model” page on the Microsoft website at http://msdn.microsoft.com/library/30wbz966.
o CopyCustomer The purpose of this method is to create a shallow copy of a Customer object. You will use it when you create the EditCustomer command, to make a copy of the original data of a customer before it is changed. If the user decides to discard the changes, they can simply be copied back from the copy made by this method.
2. In Solution Explorer, expand the Customers project and double-click the ViewModel.cs file to open it in the Code and Text Editor window.
3. In the ViewModel.cs file, expand the Methods for fetching and updating data region. In this region, above the ValidateCustomer method, create the Add method shown below:
4. // Create a new (empty) customer
5. // and put the form into Adding mode
6. private void Add()
7. {
8. Customer newCustomer = new Customer { CustomerID = 0 };
9. this.customers.Insert(currentCustomer, newCustomer);
10. this.IsAdding = true;
11. this.OnPropertyChanged("Current");
}
This method creates a new Customer object. It is empty, apart from the CustomerID property, which is temporarily set to 0 for display purposes; the real value in this property is generated when the customer is saved to the database, as described earlier. The customer is added to the customers list (the view uses data binding to display the data in this list), the ViewModel is placed in Adding mode, and the PropertyChanged event is raised to indicate that the Current customer has changed.
12.Add the following Command variable shown in bold to the list at the start of the ViewModel class:
13.public class ViewModel : INotifyPropertyChanged
14.{
15. ...
16. public Command LastCustomer { get; private set; }
17. public Command AddCustomer { get; private set; }
18. ...
}
19.In the ViewModel constructor, instantiate the AddCustomer command as shown below in bold:
20.public ViewModel()
21.{
22. ...
23. this.LastCustomer = new Command(this.Last, ...);
24. this.AddCustomer = new Command(this.Add,
25. () => { return this.CanBrowse; });
}
This code references the Add method that you just created. The command is enabled if the ViewModel has a connection to the data service and it is in Browsing mode (the AddCustomer command will not be enabled if the ViewModel is already in Adding mode).
26.After the Add method in the Methods for fetching and updating data region, create a private Customer variable called oldCustomer and define another method called Edit:
27.// Edit the current customer
28.// - save the existing details of the customer
29.// and put the form into Editing mode
30.private Customer oldCustomer;
31.
32.private void Edit ()
33.{
34. this.oldCustomer = new Customer();
35. this.CopyCustomer(this.Current, this.oldCustomer);
36. this.IsEditing = true;
}
This method copies the details of the current customer to the oldCustomer variable and puts the ViewModel into Editing mode. In this mode, the user can change the details of the current customer. If the user subsequently decides to discard these changes, the original data can be copied back from the oldCustomer variable.
37.Add the following Command variable shown in bold to the list at the start of the ViewModel class:
38.public class ViewModel : INotifyPropertyChanged
39.{
40. ...
41. public Command AddCustomer { get; private set; }
42. public Command EditCustomer { get; private set; }
43. ...
}
44.In the ViewModel constructor, instantiate the EditCustomer command as shown below in bold:
45.public ViewModel()
46.{
47. ...
48. this.AddCustomer = new Command(this.Add, ...);
49. this.EditCustomer = new Command(this.Edit,
50. () => { return this.CanBrowse; });
}
This code is similar to the statement for the AddCustomer command, except that it references the Edit method.
51.After the Edit method in the Methods for fetching and updating data region, add the following method named Discard to the ViewModel class:
52.// Discard changes made while in Adding or Editing mode
53.// and return the form to Browsing mode
54.private void Discard ()
55.{
56. // If the user was adding a new customer, then remove it
57. if (this.IsAdding)
58. {
59. this.customers.Remove(this.Current);
60. this.OnPropertyChanged("Current");
61. }
62.
63. // If the user was editing an existing customer,
64. // then restore the saved details
65. if (this.IsEditing)
66. {
67. this.CopyCustomer(this.oldCustomer, this.Current);
68. }
69.
70. this.IsBrowsing = true;
}
The purpose of this method is to enable the user to discard any changes made when the ViewModel is in Adding or Editing mode. If the ViewModel is in Adding mode, the current customer is removed from the list (this is the new customer created by the Add method), and thePropertyChanged event is raised to indicate that the current customer in the customers list has changed. If the ViewModel is in Editing mode, the original details in the oldCustomer variable are copied back to the currently displayed customer. Finally, the ViewModel is returned to Browsing mode.
71.Add the DiscardChanges Command variable to the list at the start of the ViewModel class, and update the constructor to instantiate this command as shown below in bold:
72.public class ViewModel : INotifyPropertyChanged
73.{
74. ...
75. public Command EditCustomer { get; private set; }
76. public Command DiscardChanges { get; private set; }
77. ...
78. public ViewModel()
79. {
80. ...
81. this.EditCustomer = new Command(this.Edit, ...);
82. this.DiscardChanges = new Command(this.Discard,
83. () => { return this.CanSaveOrDiscardChanges; });
84. }
85. ...
}
Notice that the DiscardChanges command is only enabled if the CanSaveOrDiscardChanges property is true; the ViewModel has a connection to the data service and the ViewModel is in Adding or Editing mode.
86.In the Methods for fetching and updating data region, after the Discard method, add one more method, named Save, as follows. This method should be marked as async.
87.// Save the new or updated customer back to the WCF Data Service
88.// and return the form to Browsing mode
89.private async void Save()
90.{
91. // Validate the details of the Customer
92. if (this.ValidateCustomer(this.Current))
93. {
94. // Only continue if the customer details are valid
95. this.IsBusy = true;
96.
97. // Set the ModifiedDate for the customer
98. // to record the date the changes were made
99. this.Current.ModifiedDate = DateTime.Today;
100.
101. // Continued in next step
102. }
}
This method is not yet complete. The initial code that you have just entered verifies that the customer details are valid. If they are, the details can be saved, and the IsBusy property of the ViewModel is set to true to indicate that this may take some time while the information is sent over the network to the data service (remember that the IsActive property of ProgressRing control on the Customers form is bound to this property, and the progress ring will be displayed while the data is being saved).
The Customer table in the AdventureWorks database has some additional requirements; specifically, if you are adding or editing a customer, you should set the ModifiedDate property of the customer to reflect the date on which the change was made.
103. In the Save method, replace the comment // Continued in next step with the following code shown in bold:
104. private async void Save()
105. {
106. // Validate the details of the Customer
107. if (this.ValidateCustomer(this.Current))
108. {
109. ...
110. // If the user is creating a new customer,
111. // add it to the collection for the WCF Data Service
112. if (this.IsAdding)
113. {
114. this.Current.rowguid = Guid.NewGuid();
115. this.connection.AddToCustomers(this.Current);
116. }
117.
118. // If the user is editing the current customer,
119. // update it in the collection for the WCF Data Service
120. if (this.IsEditing)
121. {
122. this.connection.UpdateObject(this.Current);
123. }
124.
125. // Save the changes back to the data source
126. }
}
If the ViewModel is in Adding mode, you must populate the rowguid property of the Customer object with a new GUID before you can save it (this is a mandatory column in the Customer table; other applications inside the Adventure Works organization use this column to track information about customers). The customer is then added to the Customers collection of the data service by using the AddToCustomers method (this method was described earlier in this section, before the exercise).
NOTE
GUID stands for globally unique identifier. A GUID is a string, generated by Windows, that is almost guaranteed to be unique (there is a very small possibility that Windows might generate a nonunique GUID, but the possibility is so infinitesimally small that it can be discounted). GUIDs are frequently used by databases as key values used to identify individual rows, as in the case of the Customer table in the AdventureWorks database.
If the ViewModel is in Editing mode, the Customer object in the Customers collection of the data service is modified by using the UpdateObject method. Again, this method was described prior to this exercise.
You can now save the changes back to the database by using the data service.
127. After the comment // Save the changes back to the data source, add the following code shown in bold:
128. private async void Save()
129. {
130. // Validate the details of the Customer
131. if (this.ValidateCustomer(this.Current))
132. {
133.
134. // Save the changes back to the data source
135. try
136. {
137. await Task.Factory.FromAsync(
138. this.connection.BeginSaveChanges(null, null),
139. async (result) => this.connection.EndSaveChanges(result));
140. this.IsBrowsing = true;
141. this.OnPropertyChanged("Current");
142. }
143. catch (DataServiceRequestException dsre)
144. {
145. if (this.IsAdding)
146. {
147. this.connection.DeleteObject(this.Current);
148. }
149. }
150. finally
151. {
152. this.IsBusy = false;
153. }
154. }
}
You should recognize the idiom that this code uses to save the changes: it creates a Task object that runs the BeginSaveChanges method followed by the EndSaveChanges method as described earlier. If the data is saved successfully, the ViewModel is placed into Browsing mode and thePropertyChanged event is raised for the current customer (if the user has added a new customer, the CustomerID will have been generated by the database and used to update the Customer object).
If an exception occurs, the ViewModel remains in Adding or Editing mode, as appropriate, and the user can correct the changes and try to save them again. Additionally, if the ViewModel is in Adding mode, the new customer is removed from the Customers collection of the data service. This step is necessary because previously the Save method uses the AddToCustomers method to add the customer to this collection; if the application tries to add the same customer again (when the user saves the changes after making any corrections), and this customer is already in the Customers collection, the AddToCustomers method will throw an InvalidOperationException exception with the message “The context is already tracking the entity.”
The finally block sets the IsBusy property to false, causing the ProgressRing control on the form to disappear.
155. Add the SaveChanges Command variable to the list at the start of the ViewModel class, and update the constructor to instantiate this command:
156. public class ViewModel : INotifyPropertyChanged
157. {
158. ...
159. public Command DiscardChanges { get; private set; }
160. public Command SaveChanges { get; private set; }
161. ...
162. public ViewModel()
163. {
164. ...
165. this.DiscardChanges = new Command(this.Discard, ...);
166. this.SaveChanges = new Command(this.Save, () =>
167. { return this.CanSaveOrDiscardChanges; });
168.
169. }
170. ...
}
171. On the BUILD menu, click Build Solution and verify that your application compiles without any errors.
Reporting Errors and Updating the User Interface
You have added the commands that enable a user to add, edit, and save customer information. However, if something goes wrong and an error occurs, the user is not going to know what has happened. This is because the ViewModel class does not include any error reporting capabilities. One way to add such a feature is to capture the exception messages that occur and expose them as a property of the ViewModel class. A view can use data binding to connect to this property and display the error messages.
Add error reporting to the ViewModel class
1. In the ViewModel.cs file, expand the region named Properties for “busy” and error message handling.
2. After the IsBusy property, add the private _lastError string variable and public LastError string property shown below:
3. private string _lastError = null;
4. public string LastError
5. {
6. get { return this._lastError; }
7. private set
8. {
9. this._lastError = value;
10. this.OnPropertyChanged("LastError");
11. }
}
12.In the Methods for fetching and updating data region, find the GetData method. This method contains the following exception handler:
13.catch (DataServiceQueryException dsqe)
14.{
15. // TODO: Handle errors
}
16.Replace the // TODO: Handle errors comment with the following code shown in bold:
17.catch (DataServiceQueryException dsqe)
18.{
19. this.LastError = dsqe.Message;
}
20.At the end of the try block immediately preceding the exception handler, add the following statement:
21.try
22.{
23. ...
24. this.LastError = String.Empty;
25.}
26.catch (DataServiceQueryException dsqe)
27.{
28. ...
}
This statement removes any error messages from the LastError property.
29.Find the ValidateCustomer method, and add the following statement shown in bold immediately before the return statement:
30.private bool ValidateCustomer(Customer customer)
31.{
32. ...
33. this.LastError = validationErrors;
34. return !hasErrors;
}
The ValidateCustomer method populates the validationErrors variable with information about any properties in the Customer object that contain invalid data. The statement that you have just added copies this information to the LastError property.
35.Find the Save method, and modify the code that catches the DataServiceRequestException exception as follows in bold:
36.private async void Save()
37.{
38. ...
39. // Save the changes back to the data source
40. try
41. {
42. ...
43. }
44. catch (DataServiceRequestException dsre)
45. {
46. if (this.IsAdding)
47. {
48. this.connection.DeleteObject(this.Current);
49. }
50. this.LastError = dsre.Message;
51. }
52. ...
}
53.At the end of the try block immediately preceding the exception handler, add the following statement:
54.try
55.{
56. ...
57. this.LastError = String.Empty;
58.}
59.catch (DataServiceRequestException ex)
60.{
61. ...
}
62.Find the Discard method, and add the statement shown in bold below to the end of this method:
63.private void Discard()
64.{
65. ...
66. this.LastError = String.Empty;
}
67.On the BUILD menu, click Build Solution and verify that the application builds without any errors.
The ViewModel is now complete. The final stage is to incorporate the new commands, state information, and error reporting features into the view provided by the Customers form.
Integrate add and edit functionality into the Customers form
1. Open the MainPage.xaml file in the Design View window.
The XAML markup for the MainPage form has already been modified, and the following TextBlock controls have been added to the Grid controls that appear in Fullscreen, Filled, and Snapped views:
<Page
x:Class="Customers.MainPage"
...>
<Grid Style="{StaticResource GridStyle}">
...
<Grid x:Name="customersTabularView" ...>
...
<Grid Grid.Row="2">
...
<TextBlock Grid.Row="3" Grid.RowSpan="4"
Grid.Column="7" Style="{StaticResource ErrorMessageStyle}"/>
</Grid>
</Grid>
<Grid x:Name="customersColumnarView" Margin="20,10,20,110" ...>
...
<Grid Grid.Row="1">
...
<TextBlock Grid.Row="6" Grid.Column="0"
Grid.ColumnSpan="2" Style="{StaticResource ErrorMessageStyle}"/>
</Grid>
</Grid>
...
</Grid>
...
</Page>
The ErrorMessageStyle referenced by these TextBlock controls is defined in the AppStyles.xaml file.
2. Set the Text property of both TextBlock controls to bind to the LastError property of the ViewModel, as shown below in bold:
3. ...
4. <TextBlock Grid.Row="3" Grid.RowSpan="4" Grid.Column="7"
5. Style="{StaticResource ErrorMessageStyle}" Text="{Binding LastError}"/>
6. ...
7. <TextBlock Grid.Row="6" Grid.Column="0" Grid.ColumnSpan="2"
Style="{StaticResource ErrorMessageStyle}" Text="{Binding LastError}"/>
8. The TextBox and ComboBox controls on the form that display customer data should only allow the user to modify this data if the ViewModel is in Adding or Editing mode; otherwise, they should be disabled. Add the IsEnabled property to each of these controls, and bind it to theIsAddingOrEditing property of the ViewModel as follows:
9. ...
10.<TextBox Grid.Row="1" Grid.Column="1" x:Name="id"
11.IsEnabled="{Binding IsAddingOrEditing}" .../>
12.<ComboBox Grid.Row="1" Grid.Column="3" x:Name="title"
13.IsEnabled="{Binding IsAddingOrEditing}" ...>
14.</ComboBox>
15.<TextBox Grid.Row="1" Grid.Column="5" x:Name="firstName"
16.IsEnabled="{Binding IsAddingOrEditing}" .../>
17.<TextBox Grid.Row="1" Grid.Column="7" x:Name="lastName"
18.IsEnabled="{Binding IsAddingOrEditing}" .../>
19....
20.<TextBox Grid.Row="3" Grid.Column="3" ... x:Name="email"
21.IsEnabled="{Binding IsAddingOrEditing}" .../>
22....
23.<TextBox Grid.Row="5" Grid.Column="3" ... x:Name="phone"
24.IsEnabled="{Binding IsAddingOrEditing}" .../>
25....
26....
27.<TextBox Grid.Row="0" Grid.Column="1" x:Name="cId" />
28.IsEnabled="{Binding IsAddingOrEditing}" .../>
29.<ComboBox Grid.Row="1" Grid.Column="1" x:Name="cTitle"
30.IsEnabled="{Binding IsAddingOrEditing}" ...>
31.</ComboBox>
32.<TextBox Grid.Row="2" Grid.Column="1" x:Name="cFirstName"
33.IsEnabled="{Binding IsAddingOrEditing}" .../>
34.<TextBox Grid.Row="3" Grid.Column="1" x:Name="cLastName"
35.IsEnabled="{Binding IsAddingOrEditing}" .../>
36....
37.<TextBox Grid.Row="4" Grid.Column="1" x:Name="cEmail"
38.IsEnabled="{Binding IsAddingOrEditing}" .../>
39....
40.<TextBox Grid.Row="5" Grid.Column="1" x:Name="cPhone"
IsEnabled="{Binding IsAddingOrEditing}" .../>
41.Add an app bar to the bottom of the page, immediately after the top app bar, using the <Page.BottomAppBar> element. This app bar should contain buttons for the AddCustomer, EditCustomer, SaveChanges, and DiscardChanges commands as follows:
42.<Page ...>
43. ...
44. <Page.TopAppBar >
45. ...
46. </Page.TopAppBar>
47. <Page.BottomAppBar>
48. <AppBar IsSticky="True" SizeChanged="AppBarSizeChanged">
49. <Grid>
50. <StackPanel Orientation="Horizontal"
51.HorizontalAlignment="Right">
52. <Button x:Name="addCustomer"
53.Style="{StaticResource AddAppBarButtonStyle}"
54.Command="{Binding Path=AddCustomer}"/>
55. <Button x:Name="editCustomer"
56.Style="{StaticResource EditAppBarButtonStyle}"
57.Command="{Binding Path=EditCustomer}"/>
58. <Button x:Name="saveChanges"
59.Style="{StaticResource SaveAppBarButtonStyle}"
60.Command="{Binding Path=SaveChanges}"/>
61. <Button x:Name="discardChanges"
62.Style="{StaticResource DiscardAppBarButtonStyle}"
63.Command="{Binding Path=DiscardChanges}"/>
64. </StackPanel>
65. </Grid>
66. </AppBar>
67. </Page.BottomAppBar>
</Page>
Note that the convention for commands on the bottom app bar is to group them together, starting on the right side. Also, notice that when the user switches between views, the SizeChanged event fires and the AppBarSizeChanged method runs. You will add code to the handler for this event to change the appearance of the buttons, following the same approach used by the navigation buttons in the top app bar.
The styles referenced by the buttons are defined in the StandardStyles.xaml file in the Common folder, but you must enable them before building and running the application.
68.In Solution Explorer, expand the Common folder and then double-click StandardStyles.xaml to display this file in the Code and Text Editor window.
69.Find the XAML markup for the EditAppBarButtonStyle. This style is currently commented out. Uncomment this style and the SaveAppBarButtonStyle that immediately follows it. Also uncomment the DiscardAppBarButtonStyle and AddAppBarButtonStyle that occur a short way below the SaveAppBarButtonStyle.
TIP
To uncomment a style, add a close comment tag, -->, to the end of the line immediately above the style, and add open comment tag, <!--, to the start of the line immediately below the style.
70.In Solution Explorer, expand MainPage.xaml and double-click MainPage.xaml.cs to display the code for the MainPage form in the Code and Text Editor window.
71.Add the statements shown below in bold to the AppBarSizeChanged method:
72.private void AppBarSizeChanged(object sender, SizeChangedEventArgs e)
73.{
74. ...
75. VisualStateManager.GoToState(this.lastCustomer, viewState.ToString(), false);
76. VisualStateManager.GoToState(this.addCustomer, viewState.ToString(), false);
77. VisualStateManager.GoToState(this.editCustomer, viewState.ToString(), false);
78. VisualStateManager.GoToState(this.saveChanges, viewState.ToString(), false);
79. VisualStateManager.GoToState(this.discardChanges, viewState.ToString(), false);
}
This code uses the VisualStateManager to change the appearance of the buttons when the user changes between Fullscreen and Snapped views.
Test the Customers application
1. On the DEBUG menu, click Start Debugging to build and run the application.
When the Customers form appears, notice that the TextBox and ComboBox controls are disabled. This is because the view is in Browsing mode.
2. Right-click the form and verify that the upper and lower app bars both appear. You can use the First, Next, Previous, and Last buttons in the upper app bar as before (remember that the First and Previous buttons will not be enabled until you move away from the first customer). In the lower app bar, the Add and Edit buttons should be enabled, but the Save and Discard buttons should be disabled. This is because the AddCustomer and EditCustomer commands are enabled when the ViewModel is in Browsing mode, and the SaveChanges and DiscardChangescommands are only enabled when the ViewModel is in Adding or Editing mode.
3. In the bottom app bar, click Edit.
4. The buttons in the top app bar become disabled because the ViewModel is now in Editing mode. Additionally, the Add and Edit buttons are also disabled, but the Save and Discard buttons should be enabled. Furthermore, the data entry fields on the form should now be enabled, and the user can modify the details of the customer.
5. Modify the details of the customer: blank out the first name, type Test for the email address, type Test 2 for the phone number, and then click Save.
These changes violate the validation rules implemented by the ValidateCustomer method. The ValidateCustomer method populates the LastError property of the ViewModel with validation messages, and they are displayed on the form in the TextBlock that binds to the LastErrorproperty:

6. Click Discard, and verify that the original data is reinstated on the form, the validation messages disappear, and the ViewModel reverts to Browsing mode.
7. Click Add. The fields on the form should be emptied (apart from the ID field, which displays the value 0). Enter the details for a new customer. Be sure to provide a first name and last name, a valid email address of the form name@organization.com, and a numeric phone number (you can also include parentheses, hyphens, and spaces).
8. Click Save. If the data is valid (there are no validation errors), your data should be saved to the database. You should see the ID generated for the new customer in the ID field, and the ViewModel should switch back to Browsing mode.
9. Experiment with the application and try adding and editing more customers. Notice that you can switch to Snapped view and the form should still work.
10.When you have finished, return to Visual Studio and stop debugging.
Summary
In this chapter, you learned how to use the Entity Framework to create an entity model that you can use to connect to a SQL Server database. You saw how to create a WCF Data Service that a Windows Store app can use to query and update data in the database through the entity model, and you learned how to integrate a WCF Data Service into a ViewModel.
You have now completed all the exercises in this book. Hopefully, you are now thoroughly conversant with the C# language and understand how to use Visual Studio 2012 to build professional applications for Windows 7 and for Windows 8. However, this is not the end of the story. You have jumped the first hurdle, but the best C# programmers learn from continued experience, and you can gain this experience only by building C# applications. As you do so, you will discover new ways to use the C# language and the many features available in Visual Studio 2012 that I have not had space to cover in this book. Also, remember that C# is an evolving language. Back in 2001, when I wrote the first edition of this book, C# introduced the syntax and semantics necessary to build applications that made use of the .NET Framework 1.0. Some enhancements were added to Visual Studio and the .NET Framework 1.1 in 2003, and then in 2005, C# 2.0 emerged with support for generics and the .NET Framework 2.0. C# 3.0 added numerous features such as anonymous types, lambda expressions, and, most significantly, LINQ. C# 4.0 extended the language further with support for named arguments, optional parameters, contra- and covariant interfaces, and integration with dynamic languages. C# 5.0 has added full support for asynchronous processing through the async keyword and the await operator.
In parallel with the evolution of the C# programming language, the Windows operating system has changed considerably since the first edition of this book. Arguably, the changes instigated by Windows 8 have been the most radical in this period, and developers familiar with earlier editions of Windows now have exciting new challenges to build applications for the modern, touch-centric, mobile platform that Windows 8 provides. Visual Studio 2012 and C# will undoubtedly be instrumental in assisting you to address these challenges.
What will the next version of C# and Visual Studio bring? Watch this space!
Chapter 27 Quick Reference
|
To |
Do this |
|
Create an entity model by using the Entity Framework |
Add a new item to your project by using the ADO.NET Entity Data Model template. Use the Entity Data Model to connect to the database containing the tables that you want to model, and select the tables that your require. |
|
Create a data service that provides remote access to a database through an entity model |
Use the WCF Data Service template. Specify the name of the data context class for the entity model as the type parameter of the DataService class. In the InitializeService method of the DataService class, specify the entity access rules for each entity in the entity model that you want the data service to expose. For example: public class AdventureWorks : DataService<AdventureWorksEntities> { public static void InitializeService(DataServiceConfiguration config) { config.SetEntitySetAccessRule("Customers", EntitySetRights.All); ... } } |
|
Consume a data service in a Windows Store app |
Use the Add Service Reference wizard to generate the code to connect to the data service and generate the classes that the application can use to connect to the service and retrieve and update data. |
|
Open a connection to a data service in a Windows Store app |
Connect to the data service by creating a new instance of the connection class generated by the Add Service Reference wizard. Specify the URL of the data service as the parameter to the constructor. For example: AdventureWorksEntities connection = null; string url ="http://localhost:53923/AdventureWorks.svc"; connection = new AdventureWorksEntities(new Uri(url)); |
|
Retrieve data from a data service in a Windows Store app |
Create a DataServiceQuery object that specifies the data to retrieve, and run this query asynchronously by using the BeginExecute and EndExecute methods of the DataServiceQuery object. Use the Task.Factory.FromAsync method to run the BeginExecute and EndExecute methods by creating a Task. For example: AdventureWorksEntities connection = ...; var data = from c in connection.Customers where c.CustomerID < 100 select c; var queryResults = await Task.Factory.FromAsync( (data as DataServiceQuery).BeginExecute(null, null), (result) =>(data as DataServiceQuery).EndExecute(result)); |
|
Insert a new object into the collection returned by a data service |
Call the AddToXXX method of the connection object, where XXX is the name of the collection. Pass the new object as the parameter to this method. For example: AdventureWorksEntities connection = ...; Customer newCust = new Customer(); newCust.FirstName = "Diana"; newCust.LastName = "Sharp"; connection.AddToCustomers(newCust); |
|
Update an existing object in the collection returned by a data service |
Call the UpdateObject method of the connection object. Pass the object to update as the parameter to this method. For example: AdventureWorksEntities connection = ...; var query = await Task.Factory.FromAsync( this.connection.Customers. BeginExecute(null, null) ...); Customer cust = query.First(); cust.FirstName = "John"; connection.UpdateObject(cust); |
|
Remove an object from the collection returned by a data service |
Call the DeleteObject method of the connection object. Pass the object to remove as the parameter to this method. For example: AdventureWorksEntities connection = ...; var query = await Task.Factory.FromAsync( this.connection.Customers.BeginExecute(null, null) ...); Customer cust = query.First(); connection.DeleteObject(cust); |
|
Send the changes made to a data service collection back to the data source and make them permanent |
Save the changes asynchronously by using the BeginSaveChanges and EndSaveChanges method of the connection object that was used to retrieve the data. For example: AdventureWorksEntities connection = ...; ... await Task.Factory.FromAsync( this.connection.BeginSaveChanges(null, null), (result) => connection.EndSaveChanges(result)); |
All materials on the site are licensed Creative Commons Attribution-Sharealike 3.0 Unported CC BY-SA 3.0 & GNU Free Documentation License (GFDL)
If you are the copyright holder of any material contained on our site and intend to remove it, please contact our site administrator for approval.
© 2016-2025 All site design rights belong to S.Y.A.