Microsoft® Visual C#® 2012 Step by Step (2012)
Chapter 4. Using Decision Statements
After completing this chapter, you will be able to
§ Declare Boolean variables.
§ Use Boolean operators to create expressions whose outcome is either true or false.
§ Write if statements to make decisions based on the result of a Boolean expression.
§ Write switch statements to make more complex decisions.
In Chapter 3, you learned how to group related statements into methods. You also learned how to use parameters to pass information to a method and how to use return statements to pass information out of a method. Dividing a program into a set of discrete methods, each designed to perform a specific task or calculation, is a necessary design strategy. Many programs need to solve large and complex problems. Breaking up a program into methods helps you understand these problems and focus on how to solve them one piece at a time.
The methods that you wrote in Chapter 3 were very straightforward, with each statement executing sequentially after the previous statement completed. However, to solve many real-world problems, you also need to be able to write code that selectively performs different actions and that takes different paths through a method, depending on the circumstances. In this chapter, you’ll learn how to accomplish this task.
Declaring Boolean Variables
In the world of C# programming (unlike in the real world), everything is black or white, right or wrong, true or false. For example, if you create an integer variable called x, assign the value 99 to x, and then ask, “Does x contain the value 99?”, the answer is definitely true. If you ask, “Is x less than 10?”, the answer is definitely false. These are examples of Boolean expressions. A Boolean expression always evaluates to true or false.
NOTE
The answers to these questions are not necessarily definitive for all other programming languages. An unassigned variable has an undefined value, and you cannot, for example, say that it is definitely less than 10. Issues such as this one are a common source of errors in C and C++ programs. The Microsoft Visual C# compiler solves this problem by ensuring that you always assign a value to a variable before examining it. If you try to examine the contents of an unassigned variable, your program will not compile.
Microsoft Visual C# provides a data type called bool. A bool variable can hold one of two values: true or false. For example, the following three statements declare a bool variable called areYouReady, assign true to that variable, and then write its value to the console:
bool areYouReady;
areYouReady = true;
Console.WriteLine(areYouReady); // writes True to the console
Using Boolean Operators
A Boolean operator is an operator that performs a calculation whose result is either true or false. C# has several very useful Boolean operators, the simplest of which is the NOT operator, represented by the exclamation point, !. The ! operator negates a Boolean value, yielding the opposite of that value. In the preceding example, if the value of the variable areYouReady is true, the value of the expression !areYouReady is false.
Understanding Equality and Relational Operators
Two Boolean operators that you will frequently use are equality, ==, and inequality, != . These are binary operators that enable you to determine whether one value is the same as another value of the same type, yielding a Boolean result. The following table summarizes how these operators work, using an int variable called age as an example.
|
Operator |
Meaning |
Example |
Outcome if age is 42 |
|
== |
Equal to |
age == 100 |
false |
|
!= |
Not equal to |
age != 0 |
true |
Don’t confuse the equality operator == with the assignment operator =. The expression x==y compares x with y and has the value true if the values are the same. The expression x=y assigns the value of y to x and returns the value of y as its result.
Closely related to == and != are the relational operators. You use these operators to find out whether a value is less than or greater than another value of the same type. The following table shows how to use these operators.
|
Operator |
Meaning |
Example |
Outcome if age is 42 |
|
< |
Less than |
age < 21 |
false |
|
<= |
Less than or equal to |
age <= 18 |
false |
|
> |
Greater than |
age > 16 |
true |
|
>= |
Greater than or equal to |
age >= 30 |
true |
Understanding Conditional Logical Operators
C# also provides two other binary Boolean operators: the logical AND operator, which is represented by the && symbol, and the logical OR operator, which is represented by the || symbol. Collectively, these are known as the conditional logical operators. Their purpose is to combine two Boolean expressions or values into a single Boolean result. These operators are similar to the equality and relational operators in that the value of the expressions in which they appear is either true or false, but they differ in that the values on which they operate must be also be either true or false.
The outcome of the && operator is true if and only if both of the Boolean expressions it operates on are true. For example, the following statement assigns the value true to validPercentage if and only if the value of percent is greater than or equal to 0 and the value of percent is less than or equal to 100:
bool validPercentage;
validPercentage = (percent >= 0) && (percent <= 100);
TIP
A common beginner’s error is to try to combine the two tests by naming the percent variable only once, like this:
percent >= 0 && <= 100 // this statement will not compile
Using parentheses helps avoid this type of mistake and also clarifies the purpose of the expression. For example, compare these two expressions:
validPercentage = percent >= 0 && percent <= 100
and
validPercentage = (percent >= 0) && (percent <= 100)
Both expressions return the same value because the precedence of the && operator is less than that of >= and <=. However, the second expression conveys its purpose in a more readable manner.
The outcome of the || operator is true if either of the Boolean expressions it operates on is true. You use the || operator to determine whether any one of a combination of Boolean expressions is true. For example, the following statement assigns the value true to invalidPercentage if the value of percent is less than 0 or the value of percent is greater than 100:
bool invalidPercentage;
invalidPercentage = (percent < 0) || (percent > 100);
Short-Circuiting
The && and || operators both exhibit a feature called short-circuiting. Sometimes it is not necessary to evaluate both operands when ascertaining the result of a conditional logical expression. For example, if the left operand of the && operator evaluates to false, the result of the entire expression must be false regardless of the value of the right operand. Similarly, if the value of the left operand of the || operator evaluates to true, the result of the entire expression must be true, irrespective of the value of the right operand. In these cases, the && and || operators bypass the evaluation of the right operand. Here are some examples:
(percent >= 0) && (percent <= 100)
In this expression, if the value of percent is less than 0, the Boolean expression on the left side of && evaluates to false. This value means that the result of the entire expression must be false, and the Boolean expression to the right of the && operator is not evaluated.
(percent < 0) || (percent > 100)
In this expression, if the value of percent is less than 0, the Boolean expression on the left side of || evaluates to true. This value means that the result of the entire expression must be true and the Boolean expression to the right of the || operator is not evaluated.
If you carefully design expressions that use the conditional logical operators, you can boost the performance of your code by avoiding unnecessary work. Place simple Boolean expressions that can be evaluated easily on the left side of a conditional logical operator, and put more complex expressions on the right side. In many cases, you will find that the program does not need to evaluate the more complex expressions.
Summarizing Operator Precedence and Associativity
The following table summarizes the precedence and associativity of all the operators you have learned about so far. Operators in the same category have the same precedence. The operators in categories higher up in the table take precedence over operators in categories lower down.
|
Category |
Operators |
Description |
Associativity |
|
Primary |
() ++ -- |
Precedence override Post-increment Post-decrement |
Left |
|
Unary |
! + - ++ -- |
Logical NOT Addition Subtraction Pre-increment Pre-decrement |
Left |
|
Multiplicative |
* / % |
Multiply Divide Division remainder (modulus) |
Left |
|
Additive |
+ - |
Addition Subtraction |
Left |
|
Relational |
< <= > >= |
Less than Less than or equal to Greater than Greater than or equal to |
Left |
|
Equality |
== != |
Equal to Not equal to |
Left |
|
Conditional AND Conditional OR |
&& || |
Conditional AND Conditional OR |
Left Left |
|
Assignment |
= |
Right |
Notice that the && operator and the || operator have a different precedence: && is higher than ||.
Using if Statements to Make Decisions
In a method, when you want to choose between executing two different statements depending on the result of a Boolean expression, you can use an if statement.
Understanding if Statement Syntax
The syntax of an if statement is as follows (if and else are C# keywords):
if ( booleanExpression )
statement-1;
else
statement-2;
If booleanExpression evaluates to true, statement-1 runs; otherwise, statement-2 runs. The else keyword and the subsequent statement-2 are optional. If there is no else clause and the booleanExpression is false, execution continues with whatever code follows the if statement. Also, notice that the Boolean expression must be enclosed in parentheses; otherwise, the code will not compile.
For example, here’s an if statement that increments a variable representing the second hand of a stopwatch. (Minutes are ignored for now.) If the value of the seconds variable is 59, it is reset to 0; otherwise, it is incremented using the ++ operator:
int seconds;
...
if (seconds == 59)
seconds = 0;
else
seconds++;
BOOLEAN EXPRESSIONS ONLY, PLEASE!
The expression in an if statement must be enclosed in parentheses. Additionally, the expression must be a Boolean expression. In some other languages (notably C and C++), you can write an integer expression, and the compiler will silently convert the integer value to true (nonzero) or false (0). C# does not support this behavior, and the compiler reports an error if you write such an expression.
If you accidentally specify the assignment operator, =, instead of the equality test operator, ==, in an if statement, the C# compiler recognizes your mistake and refuses to compile your code. For example:
int seconds;
...
if (seconds = 59) // compile-time error
...
if (seconds == 59) // ok
Accidental assignments were another common source of bugs in C and C++ programs, which would silently convert the value assigned (59) to a Boolean expression (with anything nonzero considered to be true), with the result that the code following the if statement would be performed every time.
Incidentally, you can use a Boolean variable as the expression for an if statement, although it must still be enclosed in parentheses, as shown in this example:
bool inWord;
...
if (inWord == true) // ok, but not commonly used
...
if (inWord) // more common and considered better style
Using Blocks to Group Statements
Notice that the syntax of the if statement shown earlier specifies a single statement after the if (booleanExpression) and a single statement after the else keyword. Sometimes, you’ll want to perform more than one statement when a Boolean expression is true. You could group the statements inside a new method and then call the new method, but a simpler solution is to group the statements inside a block. A block is simply a sequence of statements grouped between an opening brace and a closing brace.
In the following example, two statements that reset the seconds variable to 0 and increment the minutes variable are grouped inside a block, and the whole block executes if the value of seconds is equal to 59:
int seconds = 0;
int minutes = 0;
...
if (seconds == 59)
{
seconds = 0;
minutes++;
}
else
{
seconds++;
}
IMPORTANT
If you omit the braces, the C# compiler associates only the first statement (seconds = 0;) with the if statement. The subsequent statement (minutes++;) will not be recognized by the compiler as part of the if statement when the program is compiled. Furthermore, when the compiler reaches the else keyword, it will not associate it with the previous if statement, and it will report a syntax error instead. Therefore, it is good practice to always define the statements for each branch of an if statement within a block, even if a block consists of only a single statement. It may save you some grief later if you want to add additional code.
A block also starts a new scope. You can define variables inside a block, but they will disappear at the end of the block. The following code fragment illustrates this point:
if (...)
{
int myVar = 0;
... // myVar can be used here
} // myVar disappears here
else
{
// myVar cannot be used here
...
}
// myVar cannot be used here
Cascading if Statements
You can nest if statements inside other if statements. In this way, you can chain together a sequence of Boolean expressions, which are tested one after the other until one of them evaluates to true. In the following example, if the value of day is 0, the first test evaluates to true and dayName is assigned the string “Sunday”. If the value of day is not 0, the first test fails and control passes to the else clause, which runs the second if statement and compares the value of day with 1. The second if statement is reached only if the first test is false. Similarly, the third if statement is reached only if the first and second tests are false.
if (day == 0)
{
dayName = "Sunday";
}
else if (day == 1)
{
dayName = "Monday";
}
else if (day == 2)
{
dayName = "Tuesday";
}
else if (day == 3)
{
dayName = "Wednesday";
}
else if (day == 4)
{
dayName = "Thursday";
}
else if (day == 5)
{
dayName = "Friday";
}
else if (day == 6)
{
dayName = "Saturday";
}
else
{
dayName = "unknown";
}
In the following exercise, you’ll write a method that uses a cascading if statement to compare two dates.
Write if statements
1. Start Microsoft Visual Studio 2012 if it is not already running.
2. Open the Selection project, located in the \Microsoft Press\Visual CSharp Step By Step\Chapter 4\Windows X\Selection folder in your Documents folder.
3. On the DEBUG menu, click Start Debugging.
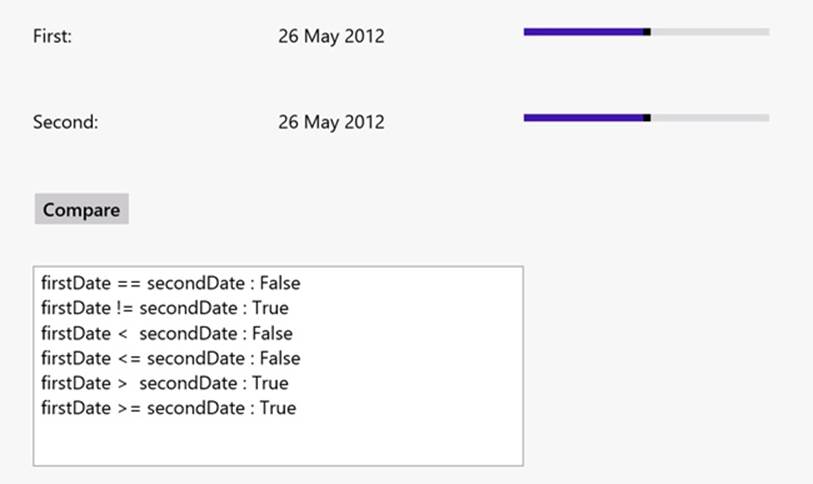
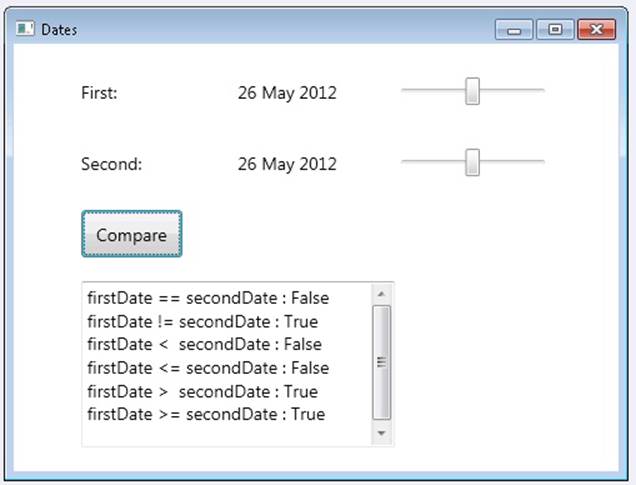
Visual Studio 2012 builds and runs the application. The form displays two TextBlock controls, both containing the current date. These controls are called firstDate and secondDate. You can adjust these dates by using the slider controls to within + or – 50 days of the current date.
4. Without changing the dates, click Compare.
The following text appears in the text box in the lower half of the window:
firstDate == secondDate : False
firstDate != secondDate : True
firstDate < secondDate : False
firstDate <= secondDate : False
firstDate > secondDate : True
firstDate >= secondDate : True
The Boolean expression firstDate == secondDate should be true because both firstDate and secondDate are set to the current date. In fact, only the less than operator and the greater than or equal to operator seem to be working correctly. The following images show the Windows 8 and Windows 7 versions of the application running.
5. Return to Visual Studio 2012, and on the DEBUG menu click Stop Debugging (or simply close the application if you are using Windows 7).
6. Display the code for the MainWindow.xaml.cs file in the Code and Text Editor window.
7. Locate the compareClick method. It looks like this:
8. private void compareClick(object sender, RoutedEventArgs e)
9. {
10. int diff = dateCompare(first, second);
11. info.Text = "";
12. show("firstDate == secondDate", diff == 0);
13. show("firstDate != secondDate", diff != 0);
14. show("firstDate < secondDate", diff < 0);
15. show("firstDate <= secondDate", diff <= 0);
16. show("firstDate > secondDate", diff > 0);
17. show("firstDate >= secondDate", diff >= 0);
}
This method runs whenever the user clicks the Compare button on the form. The variables first and second hold DateTime values; they are populated with the dates displayed in the firstDate and second controls on the form elsewhere in the application. The DateTime data type is just another data type, like int or float, except that it contains subelements that enable you to access the individual pieces of a date, such as the year, month, or day.
The compareClick method passes the two DateTime values to the dateCompare method. The purpose of this method is to compare dates and return the int value 0 if they are the same, –1 if the first date is less than the second, and +1 if the first date is greater than the second. A date is considered greater than another date if it comes after it chronologically. You will examine the dateCompare method in the next step.
The show method displays the results of the comparison in the info text box control in the lower half of the form.
18.Locate the dateCompare method. It looks like this:
19.private int dateCompare(DateTime leftHandSide, DateTime rightHandSide)
20.{
21. // TO DO
22. return 42;
}
This method currently returns the same value whenever it is called—rather than 0, –1, or +1—regardless of the values of its parameters. This explains why the application is not working as expected! You need to implement the logic in this method to compare two dates correctly.
23.Remove the // TO DO comment and the return statement from the dateCompare method.
24.Add the following statements shown in bold type to the body of the dateCompare method:
25.private int dateCompare(DateTime leftHandSide, DateTime rightHandSide)
26.{
27. int result;
28.
29. if (leftHandSide.Year < rightHandSide.Year)
30. {
31. result = -1;
32. }
33. else if (leftHandSide.Year > rightHandSide.Year)
34. {
35. result = 1;
36. }
}
If the expression leftHandSide.Year < rightHandSide.Year is true, the date in leftHandSide must be earlier than the date in rightHandSide, so the program sets the result variable to –1. Otherwise, if the expression leftHandSide.Year > rightHandSide.Year is true, the date in leftHandSidemust be later than the date in rightHandSide, and the program sets the result variable to 1.
If the expression leftHandSide.Year < rightHandSide.Year is false, and the expression leftHandSide.Year > rightHandSide.Year is also false, the Year property of both dates must be the same, so the program needs to compare the months in each date.
37.Add the following statements shown in bold type to the body of the dateCompare method, after the code you entered in the preceding step:
38.private int dateCompare(DateTime leftHandSide, DateTime rightHandSide)
39.{
40. ...
41. else if (leftHandSide.Month < rightHandSide.Month)
42. {
43. result = -1;
44. }
45. else if (leftHandSide.Month > rightHandSide.Month)
46. {
47. result = 1;
48. }
}
These statements follow a similar logic for comparing months to that used to compare years in the preceding step.
If the expression leftHandSide.Month < rightHandSide.Month is false, and the expression leftHandSide.Month > rightHandSide.Month is also false, the Month property of both dates must be the same, so the program finally needs to compare the days in each date.
49.Add the following statements to the body of the dateCompare method, after the code you entered in the preceding two steps:
50.private int dateCompare(DateTime leftHandSide, DateTime rightHandSide)
51.{
52. ...
53. else if (leftHandSide.Day < rightHandSide.Day)
54. {
55. result = -1;
56. }
57. else if (leftHandSide.Day > rightHandSide.Day)
58. {
59. result = 1;
60. }
61. else
62. {
63. result = 0;
64. }
65.
66. return result;
}
You should recognize the pattern in this logic by now.
If leftHandSide.Day < rightHandSide.Day and leftHandSide.Day > rightHandSide.Day both are false, the value in the Day properties in both variables must be the same. The Month values and the Year values must also be identical, respectively, for the program logic to have reached this far, so the two dates must be the same, and the program sets the value of result to 0.
The final statement returns the value stored in the result variable.
67.On the DEBUG menu, click Start Debugging.
The application is rebuilt and restarted. Once again, the two TextBlock controls, firstDate and secondDate, are set to the current date.
68.Click Compare.
The following text appears in the text box:
firstDate == secondDate : True
firstDate != secondDate : False
firstDate < secondDate: False
firstDate <= secondDate: True
firstDate > secondDate: False
firstDate >= secondDate: True
These are the correct results for identical dates.
69.Click the slider for the secondDate TextBlock control, and advance it forward a few days.
The control should display the new date.
70.Click Compare.
The following text appears in the text box:
firstDate == secondDate: False
firstDate != secondDate: True
firstDate < secondDate: True
firstDate <= secondDate: True
firstDate > secondDate: False
firstDate >= secondDate: False
Again, these are the correct results when the first date is earlier than the second date.
71.Test some other dates, and verify that the results are as you would expect. Return to Visual Studio 2012 and stop debugging (or close the application if you are using Windows 7) when you have finished.
COMPARING DATES IN REAL-WORLD APPLICATIONS
Now that you have seen how to use a rather long and complicated series of if and else statements, I should mention that this is not the technique you would employ to compare dates in a real-world application. If you look at the dateCompare method from the preceding exercise, you will see that the two parameters, leftHandSide and rightHandSide, are DateTime values. The logic you have written compares only the date part of these parameters, but they also contain a time element that you have not considered (or displayed). For two DateTime values to be considered equal, they should have not only the same date but also the same time. Comparing dates and times is such a common operation that the DateTime type actually has a built-in method called Compare for doing just that. The Compare method takes two DateTime arguments and compares them, returning a value indicating whether the first argument is less than the second, in which case the result will be negative; whether the first argument is greater than the second, in which case the result will be positive; or whether both arguments represent the same date and time, in which case the result will be 0.
Using switch Statements
Sometimes when you write a cascading if statement, all the if statements look similar because they all evaluate an identical expression. The only difference is that each if compares the result of the expression with a different value. For example, consider the following block of code that uses anif statement to examine the value in the day variable and work out which day of the week it is:
if (day == 0)
{
dayName = "Sunday";
}
else if (day == 1)
{
dayName = "Monday";
}
else if (day == 2)
{
dayName = "Tuesday";
}
else if (day == 3)
{
...
}
else
{
dayName = "Unknown";
}
In these situations, often you can rewrite the cascading if statement as a switch statement to make your program more efficient and more readable.
Understanding switch Statement Syntax
The syntax of a switch statement is as follows (switch, case, and default are keywords):
switch ( controllingExpression )
{
case constantExpression :
statements
break;
case constantExpression :
statements
break;
...
default :
statements
break;
}
The controllingExpression (which must be enclosed in parentheses) is evaluated once. Control then jumps to the block of code identified by the constantExpression, whose value is equal to the result of the controllingExpression. (The constantExpression identifier is also called a case label.) Execution runs as far as the break statement, at which point the switch statement finishes and the program continues at the first statement after the closing brace of the switch statement. If none of the constantExpression values is equal to the value of the controllingExpression, the statements below the optional default label run.
NOTE
Each constantExpression value must be unique, so the controllingExpression will match only one of them. If the value of the controllingExpression does not match any constantExpression value and there is no default label, program execution continues with the first statement after the closing brace of the switch statement.
So, you can rewrite the previous cascading if statement as the following switch statement:
switch (day)
{
case 0 :
dayName = "Sunday";
break;
case 1 :
dayName = "Monday";
break;
case 2 :
dayName = "Tuesday";
break;
...
default :
dayName = "Unknown";
break;
}
Following the switch Statement Rules
The switch statement is very useful, but unfortunately, you can’t always use it when you might like to. Any switch statement you write must adhere to the following rules:
§ You can use switch only on certain data types, such as int, char, or string. With any other types (including float and double), you have to use an if statement.
§ The case labels must be constant expressions, such as 42 if the switch data type is an int, ‘4’ if the switch data type is a char, or “42” if the switch data type is a string. If you need to calculate your case label values at run time, you must use an if statement.
§ The case labels must be unique expressions. In other words, two case labels cannot have the same value.
§ You can specify that you want to run the same statements for more than one value by providing a list of case labels and no intervening statements, in which case the code for the final label in the list is executed for all cases in that list. However, if a label has one or more associated statements, execution cannot fall through to subsequent labels; in this case, the compiler generates an error. The following code fragment illustrates these points:
switch (trumps)
{
case Hearts :
case Diamonds : // Fall-through allowed - no code between labels
color = "Red"; // Code executed for Hearts and Diamonds
break;
case Clubs :
color = "Black";
case Spades : // Error - code between labels
color = "Black";
break;
}
NOTE
The break statement is the most common way to stop fall-through, but you can also use a return statement to exit from the method containing the switch statement, or a throw statement to generate an exception and abort the switch statement. The throw statement is described in Chapter 6
SWITCH FALL-THROUGH RULES
Because you cannot accidentally fall through from one case label to the next if there is any intervening code, you can freely rearrange the sections of a switch statement without affecting its meaning (including the default label, which by convention is usually—but does not have to be—placed as the last label).
C and C++ programmers should note that the break statement is mandatory for every case in a switch statement (even the default case). This requirement is a good thing—it is common in C or C++ programs to forget the break statement, allowing execution to fall through to the next label and leading to bugs that are difficult to spot.
If you really want to, you can mimic C/C++ fall-through in C# by using a goto statement to go to the following case or default label. Using goto in general is not recommended, though, and this book does not show you how to do it.
In the following exercise, you will complete a program that reads the characters of a string and maps each character to its XML representation. For example, the left angle bracket character, <, has a special meaning in XML. (It’s used to form elements.) If you have data that contains this character, it must be translated into the text < so that an XML processor knows that it is data and not part of an XML instruction. Similar rules apply to the right angle bracket (>), ampersand (&), single quotation mark (’), and double quotation mark (”) characters. You will write a switchstatement that tests the value of the character and traps the special XML characters as case labels.
Write switch statements
1. Start Visual Studio 2012 if it is not already running.
2. Open the SwitchStatement project, located in the \Microsoft Press\Visual CSharp Step By Step\Chapter 4\Windows X\SwitchStatement folder in your Documents folder.
3. On the DEBUG menu, click Start Debugging.
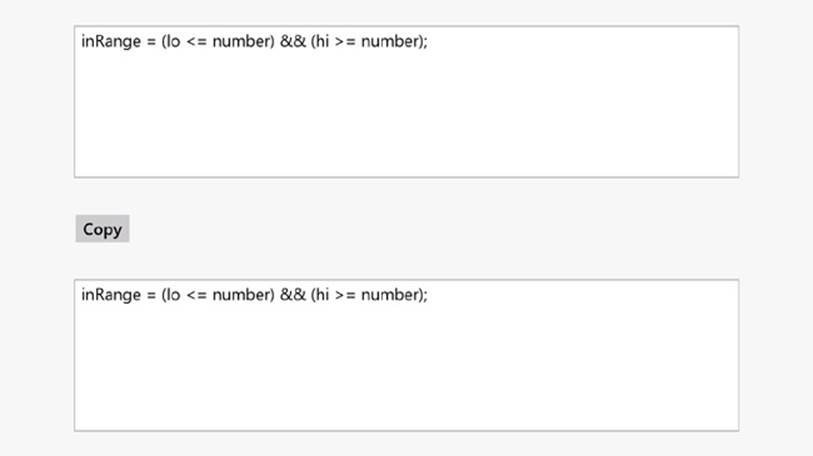
Visual Studio 2012 builds and runs the application. The application displays a form containing two text boxes separated by a Copy button.
4. Type the following sample text into the upper text box:
inRange = (lo <= number) && (hi >= number);
5. Click Copy.
The statement is copied verbatim into the lower text box, and no translation of the <, &, or > characters occurs, as shown in the following image showing the Windows 8 version of the application.
6. Return to Visual Studio 2012 and stop debugging.
7. Display the code for MainWindow.xaml.cs in the Code and Text Editor window, and locate the copyOne method.
The copyOne method copies the character specified as its input parameter to the end of the text displayed in the lower text box. At the moment, copyOne contains a switch statement with a single default action. In the following few steps, you will modify this switch statement to convert characters that are significant in XML to their XML mapping. For example, the < character will be converted to the string <.
8. Add the following statements shown in bold to the switch statement after the opening brace for the statement and directly before the default label:
9. switch (current)
10.{
11. case '<' :
12. target.Text += "<";
13. break;
14. default:
15. target.Text += current;
16. break;
}
If the current character being copied is a <, this code appends the string “>” to the text being output in its place.
17.Add the following statements to the switch statement after the break statement you have just added and above the default label:
18.case '>' :
19. target.Text += ">";
20. break;
21.case '&' :
22. target.Text += "&";
23. break;
24.case '\"' :
25. target.Text += """;
26. break;
27.case '\'' :
28. target.Text += "'";
break;
NOTE
The single quotation mark (’) and double quotation mark (“) have a special meaning in C# as well as in XML—they are used to delimit character and string constants. The backslash (\) in the final two case labels is an escape character that causes the C# compiler to treat these characters as literals rather than as delimiters.
29.On the DEBUG menu, click Start Debugging.
30.Type the following text into the upper text box:
inRange = (lo <= number) && (hi >= number);
31.Click Copy.
The statement is copied into the lower text box. This time, each character undergoes the XML mapping implemented in the switch statement. The target text box displays the following text:
inRange = (lo <= number) && (hi >= number);
32.Experiment with other strings, and verify that all special characters (<, >, &, ”, and ’) are handled correctly.
33.Return to Visual Studio and stop debugging (or simply close the application if you are using Windows 7).
Summary
In this chapter, you learned about Boolean expressions and variables. You saw how to use Boolean expressions with the if and switch statements to make decisions in your programs, and you combined Boolean expressions by using the Boolean operators.
§ If you want to continue to the next chapter
Keep Visual Studio 2012 running, and turn to Chapter 5.
§ If you want to exit Visual Studio 2012 now
On the FILE menu, click Exit. If you see a Save dialog box, click Yes and save the project.
Chapter 4 Quick Reference
|
To |
Do this |
Example |
|
Determine whether two values are equivalent |
Use the == operator or the != operator. |
answer == 42 |
|
Compare the value of two expressions |
Use the <, <=, >, or >= operator. |
age >= 21 |
|
Declare a Boolean variable |
Use the bool keyword as the type of the variable. |
bool inRange; |
|
Create a Boolean expression that is true only if two conditions are both true |
Use the && operator. |
inRange = (lo <= number) && (number <= hi); |
|
Create a Boolean expression that is true if either of two conditions is true |
Use the || operator. |
outOfRange = (number < lo) || (hi < number); |
|
Run a statement if a condition is true |
Use an if statement. |
if (inRange) process(); |
|
Run more than one statement if a condition is true |
Use an if statement and a block. |
if (seconds == 59) { seconds = 0; minutes++; } |
|
Associate different statements with different values of a controlling expression |
Use a switch statement. |
switch (current) { case 0: ... break; case 1: ... break; default : ... break; } |
All materials on the site are licensed Creative Commons Attribution-Sharealike 3.0 Unported CC BY-SA 3.0 & GNU Free Documentation License (GFDL)
If you are the copyright holder of any material contained on our site and intend to remove it, please contact our site administrator for approval.
© 2016-2025 All site design rights belong to S.Y.A.