Microsoft® Visual C#® 2012 Step by Step (2012)
Chapter 5. Using Compound Assignment and Iteration Statements
After completing this chapter, you will be able to
§ Update the value of a variable by using compound assignment operators.
§ Write while, for, and do iteration statements.
§ Step through a do statement and watch as the values of variables change.
In Chapter 4, you learned how to use the if and switch constructs to run statements selectively. In this chapter, you’ll see how to use a variety of iteration (or looping) statements to run one or more statements repeatedly.
When you write iteration statements, you usually need to control the number of iterations that you perform. You can achieve this by using a variable, updating its value as each iteration is performed, and stopping the process when the variable reaches a particular value. To help simplify this process, you’ll start by learning about the special assignment operators that you should use to update the value of a variable in these circumstances.
Using Compound Assignment Operators
You’ve already seen how to use arithmetic operators to create new values. For example, the following statement uses the plus operator (+) to display to the console a value that is 42 greater than the variable answer:
Console.WriteLine(answer + 42);
You’ve also seen how to use assignment statements to change the value of a variable. The following statement uses the assignment operator (=) to change the value of answer to 42:
answer = 42;
If you want to add 42 to the value of a variable, you can combine the assignment operator and the plus operator. For example, the following statement adds 42 to answer. After this statement runs, the value of answer is 42 more than it was before:
answer = answer + 42;
Although this statement works, you’ll probably never see an experienced programmer write code like this. Adding a value to a variable is so common that C# lets you perform this task in a shorthand manner by using the operator +=. To add 42 to answer, you can write the following statement:
answer += 42;
You can use this notation to combine any arithmetic operator with the assignment operator, as the following table shows. These operators are collectively known as the compound assignment operators.
|
Don’t write this |
Write this |
|
variable = variable * number; |
variable *= number; |
|
variable = variable / number; |
variable /= number; |
|
variable = variable % number; |
variable %= number; |
|
variable = variable + number; |
variable += number; |
|
variable = variable - number; |
variable -= number; |
TIP
The compound assignment operators share the same precedence and right associativity as the corresponding simple assignment operators.
The += operator also works on strings; it appends one string to the end of another. For example, the following code displays “Hello John” on the console:
string name = "John";
string greeting = "Hello ";
greeting += name;
Console.WriteLine(greeting);
You cannot use any of the other compound assignment operators on strings.
TIP
Use the increment (++) and decrement (--) operators instead of a compound assignment operator when incrementing or decrementing a variable by 1. For example, replace
count += 1;
with
count++;
Writing while Statements
You use a while statement to run a statement repeatedly while some condition is true. The syntax of a while statement is as follows:
while ( booleanExpression )
statement
The Boolean expression (which must be enclosed in parentheses) is evaluated, and if it is true, the statement runs and then the Boolean expression is evaluated again. If the expression is still true, the statement is repeated and then the Boolean expression is evaluated yet again. This process continues until the Boolean expression evaluates to false, when the while statement exits. Execution then continues with the first statement after the while statement. A while statement shares many syntactic similarities with an if statement (in fact, the syntax is identical except for the keyword):
§ The expression must be a Boolean expression.
§ The Boolean expression must be written inside parentheses.
§ If the Boolean expression evaluates to false when first evaluated, the statement does not run.
§ If you want to perform two or more statements under the control of a while statement, you must use braces to group those statements in a block.
Here’s a while statement that writes the values 0 through 9 to the console. Note that as soon as the variable i reaches the value 10, the while statement finishes and the code in the statement block does not run:
int i = 0;
while (i < 10)
{
Console.WriteLine(i);
i++;
}
All while statements should terminate at some point. A common beginner’s mistake is forgetting to include a statement to cause the Boolean expression eventually to evaluate to false and terminate the loop, which results in a program that runs forever. In the example, the statement i++;performs this role.
NOTE
The variable i in the while loop controls the number of iterations that the loop performs. This is a common idiom, and the variable that performs this role is sometimes called the sentinel variable. You can also create nested loops (one loop inside another), and in these cases it is common to extend this naming pattern to use the letters j, k, and even l as the names of the sentinel variables used to control the iterations in these loops.
TIP
As with if statements, it is recommended that you always use a block with a while statement, even if the block contains only a single statement. This is for much the same reason as the if statement: if you decide to add more statements to the body of the while construct later, it is clear that you should add them to the block. If you don’t do this, only the first statement that immediately follows the Boolean expression in the while construct will be executed as part of the loop, resulting in difficult-to-spot bugs such as this:
int i = 0;
while (i < 10)
Console.WriteLine(i);
i++;
This code iterates forever, displaying an infinite number of zeros, because only the Console.WriteLine statement—and not the i++; statement—is executed as part of the while construct.
In the following exercise, you will write a while loop to iterate through the contents of a text file one line at a time and write each line to a text box in a form.
Write a while statement
1. Using Microsoft Visual Studio 2012, open the WhileStatement project, located in the \Microsoft Press\Visual CSharp Step By Step\Chapter 5\Windows X\WhileStatement folder in your Documents folder.
2. On the DEBUG menu, click Start Debugging.
Visual Studio 2012 builds and runs the application. The application is a simple text file viewer that you can use to select a text file and display its contents.
3. Click Open File.
If you are using Windows 8, the Open file picker appears, as shown in the following image.

If you are using Windows 7, the Open dialog box is displayed like this:
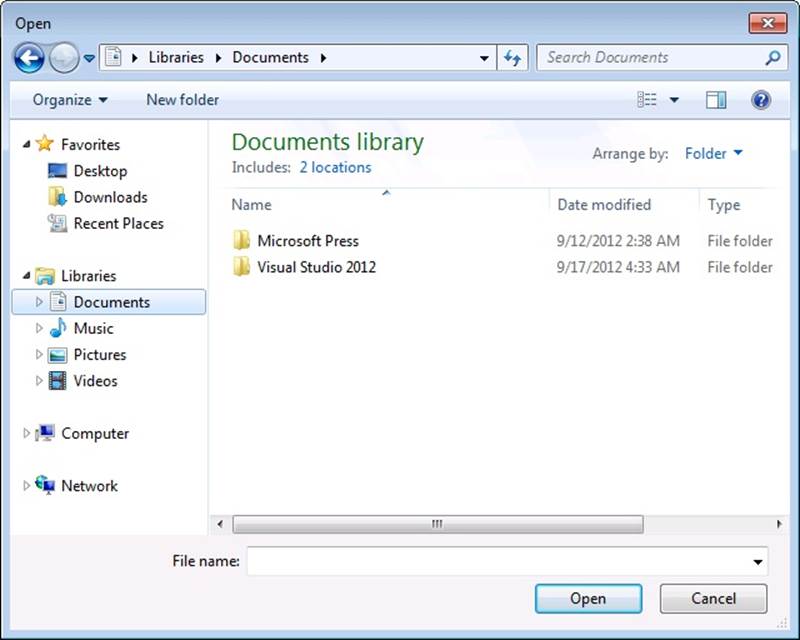
Whichever operating system you are using, you can use this feature to move to a folder and select a file to display.
4. Move to the \Microsoft Press\Visual CSharp Step By Step\Chapter 5\Windows X\WhileStatement\WhileStatement folder in your Documents folder.
5. Select the file MainWindow.xaml.cs, and then click Open.
The name of the file, MainWindow.xaml.cs, appears in the text box at the top of the form, but the contents of the file MainWindow.xaml.cs do not appear in the large text box. This is because you have not yet implemented the code that reads the contents of the file and displays it. You will add this functionality in the following steps.
6. Return to Visual Studio 2012 and stop debugging (or close the application if you are using Windows 7).
7. Display the code for the file MainWindow.xaml.cs in the Code and Text Editor window, and locate the openFileClick method.
This method runs when the user clicks the Open button to select a file in the Open dialog box. The way in which this method is implemented is different between Windows 7 and Windows 8. It is not necessary for you to understand the exact details of how this method works at this point—simply accept the fact that this method prompts the user for a file (using an FileOpenPicker or OpenFileDialog window) and opens the selected file for reading. (In the Windows 7 version, this method simply displays the OpenFileDialog window, and when the user selects a file, the openFileDialogFileOk method runs, so it is actually this method that opens the file for reading.)
The final two statements in the openFileClick method (Windows 8) or openFileDialogFileOk method (Windows 7) are important, however. In Windows 8, they look like this:
TextReader reader = new StreamReader(inputStream.AsStreamForRead());
displayData(reader);
The first statement declares a TextReader variable called reader. TextReader is a class provided by the .NET Framework that you can use for reading streams of characters from sources such as files. It is located in the System.IO namespace. This statement makes the data in the file specified by the user in the FileOpenPicker available to the TextReader object, which can then be used to read the data from the file. The final statement calls a method named displayData, passing reader as a parameter to this method. The displayData method reads the data using thereader object and displays it to the screen (or it will do so once you have written the code to accomplish this).
In Windows 7, the corresponding statements look like this:
TextReader reader = src.OpenText();
displayData(reader);
The src variable is a FileInfo object populated with information about the file the user selected using the OpenFileDialog window. The FileInfo class is another class found in the .NET Framework, and it provides the OpenText method for opening a file for reading. The first statement opens the file selected by the user so that the reader variable can retrieve the contents of this file. As in the Windows 8 version of the code, the second statement calls the displayData method, passing reader as the parameter.
8. Examine the displayData method. It looks like this in both Windows 7 and Windows 8:
9. private void displayData(TextReader reader)
10.{
11. // TODO: add while loop here
12.
}
You can see that, other than the comment, this method is currently empty. This is where you need to add the code to fetch and display the data.
13.Replace the // TODO: add while loop here comment with the following statement:
source.Text = "";
The source variable refers to the large text box on the form. Setting its Text property to the empty string (“”) clears any text that is currently displayed in this text box.
14.Add the following statement after the previous line you added to the displayData method:
string line = reader.ReadLine();
This statement declares a string variable called line and calls the reader.ReadLine method to read the first line from the file into this variable. This method returns either the next line of text from the file or a special value called null if there are no more lines to read.
15.Add the following statements to the displayData method, after the code you have just entered:
16.while (line != null)
17.{
18. source.Text += line + '\n';
19. line = reader.ReadLine();
}
This is a while loop that iterates through the file one line at a time until there are no more lines available.
The Boolean expression at the start of the while loop examines the value in the line variable. If it is not null, the body of the loop displays the current line of text by appending it to the Text property of the source text box, together with a newline character (‘\n’—the ReadLine method of the TextReader object strips out the newline characters as it reads each line, so the code needs to add it back in again). The while loop then reads in the next line of text before performing the next iteration. The while loop finishes when there is no more text in the file and the ReadLinemethod returns a null value.
20.If you are using Windows 8, add the following statement after the closing brace at the end of the while loop:
reader.Dispose();
If you are using Windows 7, add the following statement:
reader.Close();
These statements release the resources associated with the file and close it. This is good practice, as it enables other applications to use the file and also frees up any memory and other resources used to access the file.
NOTE
You will learn more about managing resources in Chapter 14
21.On the DEBUG menu, click Start Debugging.
22.When the form appears, click Open File.
23.In the Open file picker or Open dialog box, move to the \Microsoft Press\Visual CSharp Step By Step\Chapter 5\Windows X\WhileStatement\WhileStatement folder in your Documents folder. Select the file MainWindow.xaml.cs, and then click Open.
NOTE
Don’t try and open a file that does not contain text. If you attempt to open an executable program or a graphics file, for example, the application will simply display a text representation of the binary information in this file. If the file is large, it may hang the application, requiring you to forcibly terminate it.
This time, the contents of the selected file appear in the text box—you should recognize the code that you have been editing. The following image shows the Windows 8 version of the application running; the Windows 7 application functions in the same manner:
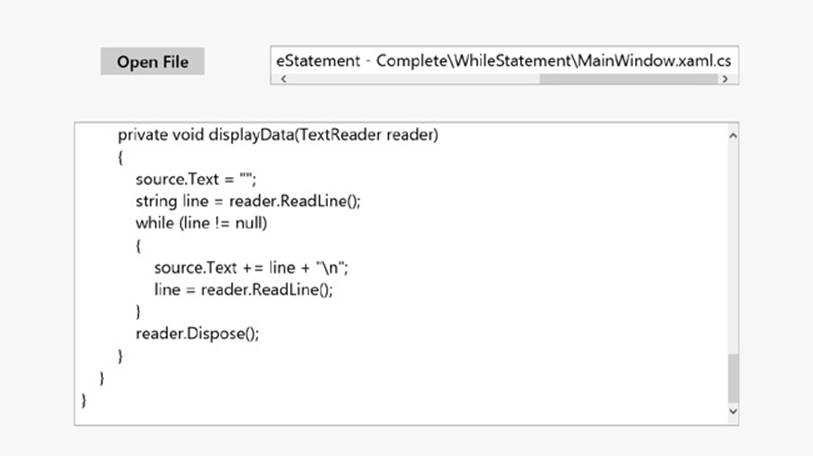
24.Scroll through the text in the text box, and find the displayData method. Verify that this method contains the code you just added.
25.Return to Visual Studio 2012 and stop debugging (or close the application if you are using Windows 7).
Writing for Statements
In C#, most while statements have the following general structure:
initialization
while (Boolean expression)
{
statement
update control variable
}
The for statement in C# provides a more formal version of this kind of construct by combining the initialization, Boolean expression, and code that updates the control variable. You’ll find the for statement useful because it is much harder to accidentally leave out the code that initializes or updates the control variable, so you are less likely to write code that loops forever. Here is the syntax of a for statement:
for (initialization; Boolean expression; update control variable)
statement
The statement that forms the body of the for construct can be a single line of code or a code block enclosed in braces.
You can rephrase the while loop shown earlier that displays the integers from 0 through 9 as the following for loop:
for (int i = 0; i < 10; i++)
{
Console.WriteLine(i);
}
The initialization occurs just once, at the very start of the loop. Then, if the Boolean expression evaluates to true, the statement runs. The control variable update occurs, and then the Boolean expression is reevaluated. If the condition is still true, the statement is executed again, the control variable is updated, the Boolean expression is evaluated again, and so on.
Notice that the initialization occurs only once, that the statement in the body of the loop always executes before the update occurs, and that the update occurs before the Boolean expression reevaluates.
TIP
As with the while construct, it is considered good practice to always use a code block even if the body of the for construct comprises just a single statement. If you add additional statements to the body of the for construct later, this approach will help to ensure that your code is always executed as part of each iteration.
You can omit any of the three parts of a for statement. If you omit the Boolean expression, it defaults to true, so the following for statement runs forever:
for (int i = 0; ;i++)
{
Console.WriteLine("somebody stop me!");
}
If you omit the initialization and update parts, you have a strangely spelled while loop:
int i = 0;
for (; i < 10; )
{
Console.WriteLine(i);
i++;
}
NOTE
The initialization, Boolean expression, and update control variable parts of a for statement must always be separated by semicolons, even when they are omitted.
You can also provide multiple initializations and multiple updates in a for loop. (You can have only one Boolean expression, though.) To achieve this, separate the various initializations and updates with commas, as shown in the following example:
for (int i = 0, j = 10; i <= j; i++, j--)
{
...
}
As a final example, here is the while loop from the preceding exercise recast as a for loop:
for (string line = reader.ReadLine(); line != null; line = reader.ReadLine())
{
source.Text += line + '\n';
}
Understanding for Statement Scope
You might have noticed that you can declare a variable in the initialization part of a for statement. That variable is scoped to the body of the for statement and disappears when the for statement finishes. This rule has two important consequences. First, you cannot use that variable after the forstatement has ended because it’s no longer in scope. Here’s an example:
for (int i = 0; i < 10; i++)
{
...
}
Console.WriteLine(i); // compile-time error
Second, you can write two or more for statements that reuse the same variable name because each variable is in a different scope, as shown in the following code:
for (int i = 0; i < 10; i++)
{
...
}
for (int i = 0; i < 20; i += 2) // okay
{
...
}
Writing do Statements
The while and for statements both test their Boolean expression at the start of the loop. This means that if the expression evaluates to false on the first test, the body of the loop does not run, not even once. The do statement is different: its Boolean expression is evaluated after each iteration, so the body always executes at least once.
The syntax of the do statement is as follows (don’t forget the final semicolon):
do
statement
while (booleanExpression);
You must use a statement block if the body of the loop comprises more than one statement (the compiler will report a syntax error if you don’t). Here’s a version of the example that writes the values 0 through 9 to the console, this time constructed using a do statement:
int i = 0;
do
{
Console.WriteLine(i);
i++;
}
while (i < 10);
THE BREAK AND CONTINUE STATEMENTS
In Chapter 4, you saw the break statement being used to jump out of a switch statement. You can also use a break statement to jump out of the body of an iteration statement. When you break out of a loop, the loop exits immediately and execution continues at the first statement after the loop. Neither the update nor the continuation condition of the loop is rerun.
In contrast, the continue statement causes the program to perform the next iteration of the loop immediately (after reevaluating the Boolean expression). Here’s another version of the example that writes the values 0 through 9 to the console, this time using break and continue statements:
int i = 0;
while (true)
{
Console.WriteLine("continue " + i);
i++;
if (i < 10)
continue;
else
break;
}
This code is absolutely ghastly. Many programming guidelines recommend using continue cautiously or not at all because it is often associated with hard-to-understand code. The behavior of continue is also quite subtle. For example, if you execute a continue statement from inside a for statement, the update part runs before performing the next iteration of the loop.
In the following exercise, you will write a do statement to convert a positive decimal whole number to its string representation in octal notation. The program is based on the following algorithm, based on a well-known mathematical procedure:
store the decimal number in the variable dec
do the following
divide dec by 8 and store the remainder
set dec to the quotient from the previous step
while dec is not equal to zero
combine the values stored for the remainder for each calculation in reverse order
For example, suppose you want to convert the decimal number 999 to octal. You perform the following steps:
1. Divide 999 by 8. The quotient is 124 and the remainder is 7.
2. Divide 124 by 8. The quotient is 15 and the remainder is 4.
3. Divide 15 by 8. The quotient is 1 and the remainder is 7.
4. Divide 1 by 8. The quotient is 0 and the remainder is 1.
5. Combine the values calculated for the remainder at each step in reverse order. The result is 1747. This is the octal representation of the decimal value 999.
Write a do statement
1. Using Visual Studio 2012, open the DoStatement project, located in the \Microsoft Press\Visual CSharp Step By Step\Chapter 5\Windows X\DoStatement folder in your Documents folder.
2. Display the MainWindow.xaml form in the Design View window.
The form contains a text box called number that the user can enter a decimal number into. When the user clicks the Show Steps button, the octal representation of the number entered is generated. The text box to the right, called steps, shows the results of each stage of the calculation.
3. Display the code for MainWindow.xaml.cs in the Code and Text Editor window. Locate the showStepsClick method. This method runs when the user clicks the Show Steps button on the form. Currently it is empty.
4. Add the following statements shown in bold to the showStepsClick method:
5. private void showStepsClick(object sender, RoutedEventArgs e)
6. {
7. int amount = int.Parse(number.Text);
8. steps.Text = "";
9. string current = "";
}
The first statement converts the string value in the Text property of the number text box into an int by using the Parse method of the int type and stores it in a local variable called amount.
The second statement clears the text displayed in the lower text box by setting its Text property to the empty string.
The third statement declares a string variable called current and initializes it to the empty string. You will use this string to store the digits generated at each iteration of the loop used to convert the decimal number to its octal representation.
10.Add the following do statement, shown in bold, to the showStepsClick method:
11.private void showStepsClick(object sender, RoutedEventArgs e)
12.{
13. int amount = int.Parse(number.Text);
14. steps.Text = "";
15. string current = "";
16.
17. do
18. {
19. int nextDigit = amount % 8;
20. amount /= 8;
21. int digitCode = '0' + nextDigit;
22. char digit = Convert.ToChar(digitCode);
23. current = digit + current;
24. steps.Text += current + "\n";
25. }
26. while (amount != 0);
}
The algorithm used repeatedly performs integer arithmetic to divide the amount variable by 8 and determine the remainder. The remainder after each successive division constitutes the next digit in the string being built. Eventually, when amount is reduced to 0, the loop finishes. Notice that the body must run at least once. This behavior is exactly what is required because even the number 0 has one octal digit.
Look more closely at the code, and you will see that the first statement inside the do loop is this:
int nextDigit = amount % 8;
This statement declares an int variable called nextDigit and initializes it to the remainder after dividing the value in amount by 8. This will be a number somewhere between 0 and 7.
The next statement inside the do loop is
amount /= 8;
This is a compound assignment statement and is equivalent to writing amount = amount / 8;. If the value of amount is 999, the value of amount after this statement runs is 124.
The next statement is this:
int digitCode = '0' + nextDigit;
This statement requires a little explanation. Characters have a unique code according to the character set used by the operating system. In the character sets frequently used by the Microsoft Windows operating system, the code for character ‘0’ has integer value 48. The code for character ‘1’ is 49, the code for character ‘2’ is 50, and so on up to the code for character ‘9’, which has integer value 57. C# allows you to treat a character as an integer and perform arithmetic on it, but when you do so, C# uses the character’s code as the value. So the expression ‘0’ + nextDigit actually results in a value somewhere between 48 and 55 (remember that nextDigit will be between 0 and 7), corresponding to the code for the equivalent octal digit.
The fourth statement inside the do loop is
char digit = Convert.ToChar(digitCode);
This statement declares a char variable called digit and initializes it to the result of the Convert.ToChar(digitCode) method call. The Convert.ToChar method takes an integer holding a character code and returns the corresponding character. So, for example, if digitCode has the value 54, Convert.ToChar(digitCode) returns the character ‘6’.
To summarize, the first four statements in the do loop have determined the character representing the least-significant (rightmost) octal digit corresponding to the number the user typed in. The next task is to prepend this digit to the string being output, like this:
current = digit + current;
The next statement inside the do loop is this:
steps.Text += current + "\n";
This statement adds to the steps text box the string containing the digits produced so far for the octal representation of the number. It also appends a newline character so that each stage of the conversion appears on a separate line in the text box.
Finally, the condition in the while clause at the end of the loop is evaluated:
while (amount != 0)
Because the value of amount is not yet 0, the loop performs another iteration.
In the final exercise, you will use the Visual Studio 2012 debugger to step through the previous do statement to help you understand how it works.
Step through the do statement
1. In the Code and Text Editor window displaying the MainWindow.xaml.cs file, move the cursor to the first statement of the showStepsClick method:
int amount = int.Parse(number.Text);
2. Right-click anywhere in the first statement, and then click Run to Cursor.
3. When the form appears, type 999 in the number text box on the left, and then click Show Steps.
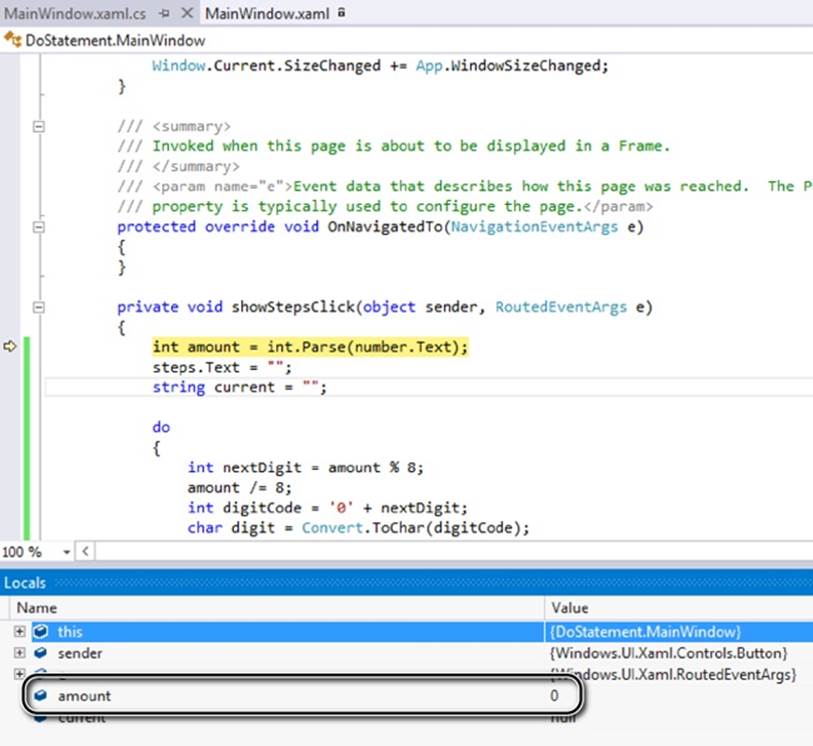
The program stops, and you are placed in Visual Studio 2012 debug mode. A yellow arrow in the left margin of the Code and Text Editor window and yellow highlighting indicates the current statement.
4. Display the Debug toolbar if it is not visible. (On the VIEW menu, point to Toolbars, and then click Debug.)
5. On the Debug toolbar, click the drop-down arrow, point to Add or Remove Buttons, and then select Windows, as shown in the following image:

This action adds the Breakpoints Window button to the toolbar.
6. On the Debug toolbar, click the Breakpoints Window button, and then click Locals.
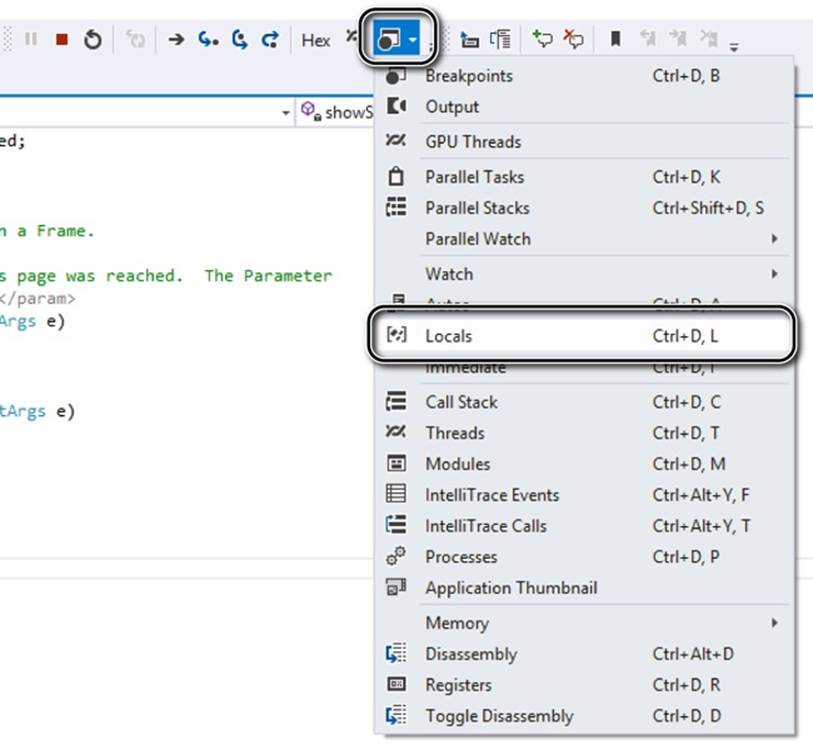
The Locals window appears (if it wasn’t already open). This window displays the name, value, and type of the local variables in the current method, including the amount local variable. Notice that the value of amount is currently 0:
7. On the Debug toolbar, click the Step Into button.
The debugger runs the statement
int amount = int.Parse(number.Text);
The value of amount in the Locals window changes to 999, and the yellow arrow moves to the next statement.
8. Click Step Into again.
The debugger runs the statement
steps.Text = "";
This statement does not affect the Locals window because steps is a control on the form and not a local variable. The yellow arrow moves to the next statement.
9. Click Step Into.
The debugger runs the statement
string current = "";
The yellow arrow moves to the opening brace at the start of the do loop. The do loop contains three local variables of its own: nextDigit, digitCode, and digit. Notice that these local variables appear in the Locals window, and the value of all three variables is initially set to 0.
10.Click Step Into.
The yellow arrow moves to the first statement inside the do loop.
11.Click Step Into.
The debugger runs the statement
int nextDigit = amount % 8;
The value of nextDigit in the Locals window changes to 7. This is the remainder after dividing 999 by 8.
12.Click Step Into.
The debugger runs the statement
amount /= 8;
The value of amount changes to 124 in the Locals window.
13.Click Step Into.
The debugger runs the statement
int digitCode = '0' + nextDigit;
The value of digitCode in the Locals window changes to 55. This is the character code of the character ‘7’ (48 + 7).
14.Click Step Into.
The debugger runs the statement
char digit = Convert.ToChar(digitCode);
The value of digit changes to ‘7’ in the Locals window. The Locals window shows char values using both the underlying numeric value (in this case, 55) and also the character representation (‘7’).
Note that in the Locals window, the value of the current variable is still ““.
15.Click Step Into.
The debugger runs the statement
current = current + digit;
The value of current changes to “7” in the Locals window.
16.Click Step Into.
The debugger runs the statement
steps.Text += current + "\n";
This statement displays the text “7” in the steps text box, followed by a newline character to cause subsequent output to be displayed on the next line in the text box. (The form is currently hidden behind Visual Studio, so you won’t be able to see it.) The cursor moves to the closing brace at the end of the do loop.
17.Click Step Into.
The yellow arrow moves to the while statement to evaluate whether the do loop has completed or whether it should continue for another iteration.
18.Click Step Into.
The debugger runs the statement
while (amount != 0);
The value of amount is 124, the expression 124 != 0 evaluates to true, and so the do loop performs another iteration. The yellow arrow jumps back to the opening brace at the start of the do loop.
19.Click Step Into.
The yellow arrow moves to the first statement inside the do loop again.
20.Repeatedly click Step Into to step through the next three iterations of the do loop, and watch how the values of the variables change in the Locals window.
21.At the end of the fourth iteration of the loop, the value of amount is 0 and the value of current is “1747”. The yellow arrow is on the while condition at the end of the do loop:
while (amount != 0);
As the value of amount is now 0, the expression amount != 0 evaluates to false, and the do loop should terminate.
22.Click Step Into.
The debugger runs the statement
while (amount != 0);
As predicted, the do loop finishes, and the yellow arrow moves to the closing brace at the end of the showStepsClick method.
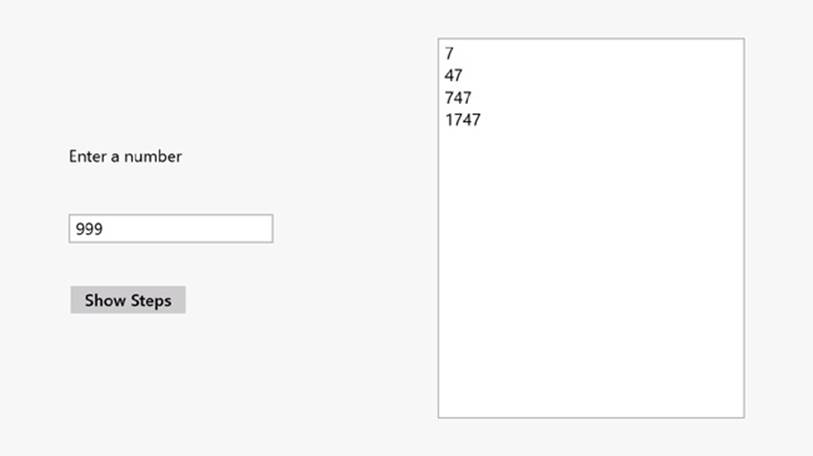
23.On the DEBUG menu, click Continue.
The form appears, displaying the four steps used to create the octal representation of 999: 7, 47, 747, and 1747.
24.Return to Visual Studio 2012, and on the DEBUG menu click Stop Debugging (or close the application if you are using Windows 7).
Summary
In this chapter, you learned how to use the compound assignment operators to update numeric variables. You saw how to use while, for, and do statements to execute code repeatedly while some Boolean condition is true.
§ If you want to continue to the next chapter
Keep Visual Studio 2012 running, and turn to Chapter 6.
§ If you want to exit Visual Studio 2012 now
On the FILE menu, click Exit. If you see a Save dialog box, click Yes and save the project.
Chapter 5 Quick Reference
|
To |
Do this |
|
Add an amount to a variable |
Use the compound addition operator. For example: variable += amount; |
|
Subtract an amount from a variable |
Use the compound subtraction operator. For example: variable -= amount; |
|
Run one or more statements zero or more times while a condition is true |
Use a while statement. For example: int i = 0; while (i < 10) { Console.WriteLine(i); i++; } Alternatively, use a for statement. For example: for (int i = 0; i < 10; i++) { Console.WriteLine(i); } |
|
Repeatedly execute statements one or more times |
Use a do statement. For example: int i = 0; do { Console.WriteLine(i); i++; } while (i < 10); |
All materials on the site are licensed Creative Commons Attribution-Sharealike 3.0 Unported CC BY-SA 3.0 & GNU Free Documentation License (GFDL)
If you are the copyright holder of any material contained on our site and intend to remove it, please contact our site administrator for approval.
© 2016-2026 All site design rights belong to S.Y.A.