Sams Teach Yourself C# 5.0 in 24 Hours (2013)
Part IV: Building an Application Using Visual Studio
Hour 20. Building a Web Application
What You’ll Learn in This Hour
• Understanding web application architecture
• Working with ASP.NET
• Creating a web application
• Understanding data validation
Up until now, you have focused on building applications that run on the desktop. These applications enable you to use the full richness of the Windows platform in your applications. They also pose potential deployment concerns because these applications typically must be installed on the end user’s computer. Although technologies such as ClickOnce ease these issues, there are times when building such an application is not the most appropriate choice.
Caution: Visual Studio Express for Web
If you use Visual Studio Express for Windows 8 or Visual Studio Express for Windows Desktop, you cannot build web applications. Instead, you need to install Visual Studio Express for Web. If you use one of the paid editions of Visual Studio, you already have everything you need to build web applications.
In this hour, you learn about an alternative to creating rich desktop applications using web applications and the ASP.NET Framework. You explore the different classes provided by the .NET Framework that enable you to create web applications and see how the architecture of a web application is different from that of traditional desktop applications.
Understanding Web Application Architecture
Web applications reside on web servers and are accessed through a web browser, such as Internet Explorer. These applications can be highly distributed, such that the application and database reside in one physical location but are accessed worldwide over the Internet or a corporate wide area network. Even today, despite the advances in computer hardware, network bandwidth is still a scarce resource that should be consumed sparingly.
Running an application distributed over any network can suffer when network performance degrades. Ultimately, you are dependent upon any number of network switches, servers, and routers sending requests from a web browser to your web application.
Communication between a web browser and a web application uses Hypertext Transfer Protocol (HTTP). Typically, a web server, such as Internet Information Services (IIS), understands how to read HTTP requests. When that request has been received and processed, the server sends an HTTP response back to the client. Most HTTP responses consist of a Hypertext Markup Language (HTML) page that the web browser knows how to translate, or render, into a visual representation.
Due to the request/response nature of HTTP communication, it is commonly referred to as a connectionless protocol. A connection is established only long enough to send a response or receive a request; other than that, there is no active connection between the browser and the server.
Working with ASP.NET
To help make building web applications easier, and in keeping with the overall theme of “making the simple things easier and the difficult things possible,” Microsoft developed the ASP.NET web application framework. This is the successor to Microsoft’s Active Server Pages (ASP) technology and is built on the common language runtime (CLR), enabling you to write ASP.NET applications using any programming language that targets the .NET Framework.
Applications built using ASP.NET can use the more traditional ASP.NET Web Forms or the Model View Controller (MVC) Framework. The ASP.NET MVC Framework is an application framework that utilizes the model-view-controller pattern. This hour provides an overview of building applications using the traditional web forms model.
An application built using Web Forms uses one or more pages that are contained in ASPX files. These ASPX files describe the user interface using HTML and other markup defining server-side web controls and user controls. The application logic, written using C#, is contained in a code-behind file. This code-behind file typically has the same name as the ASPX file with a .cs extension. This arrangement should sound familiar because it is similar to the model used by Windows Presentation Foundation (WPF).
A simple ASP.NET page is shown in Listing 20.1, which is the web application equivalent to the “Hello, world” application you wrote in Hour 1, “The .NET Framework and C#.”
Listing 20.1. HelloWorld.aspx
<%@ Page
Title="Hello, world"
CodeFile="HelloWorld.aspx.cs"
Inherits="HelloWorldWeb.HelloWorld"
%>
<html>
<body>
<form id="form1" runat="server">
</form>
</body>
</html>
As you can see, the page in Listing 20.1 is not very exciting. It contains a Page directive that specifies the following:
• Code-behind file (CodeFile)
• Class from which the page derives (Inherits)
• Page title displayed by the web browser (Title)
All ASP.NET pages must include an HTML form element that specifies runat="server" that is included within <html> and <body> tags.
The accompanying code-behind file is shown in Listing 20.2.
Listing 20.2. HelloWorld.aspx.cs
namespace HelloWorldWeb
{
public partial class HelloWorld : System.Web.UI.Page
{
protected void Page_Load(object sender, EventArgs e)
{
Response.Write("Hello, world from the Web.");
}
}
}
The output of this simple web application is shown in Figure 20.1.
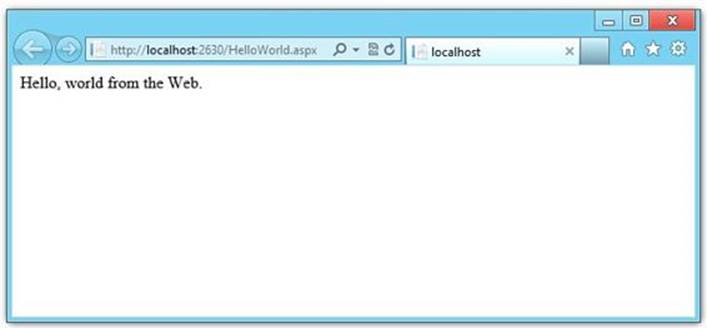
Figure 20.1. Hello, world from the Web.
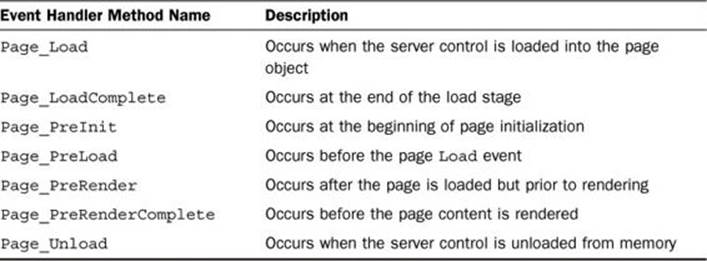
The Page class supports several events that you can handle, the most common of which are shown in Table 20.1.
Table 20.1. Common Page Event Handlers
Note: Developing Web Applications Without IIS
You do not need to have Internet Information Services (IIS) installed to develop and test web applications. All editions of Visual Studio include a built-in web server that will be used when you run the application. For hosting product web applications, you should still use IIS.
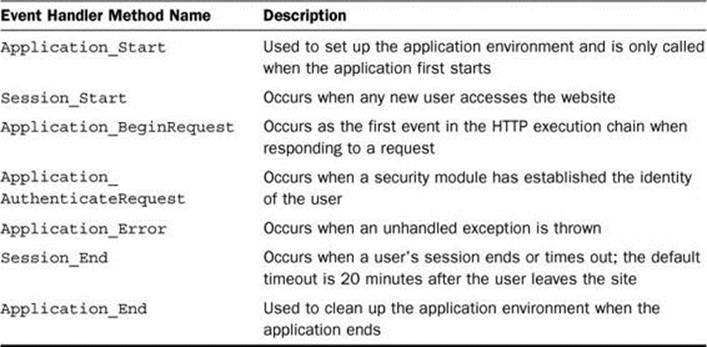
Just as WPF provides the App.xaml for application-level events and code, ASP.NET applications provide a Global.asax. Table 20.2 shows the common events handled by Global.asax.
Table 20.2. Common Global.asax Event Handlers
Creating a Web Application
In the rest of this hour, you create a web-based photo viewer application by creating a new project, laying out the form, and adding controls.
First, create a new ASP.NET Web Forms Application project using the New Project dialog box, as shown in Figure 20.2. In the Name field, enter PhotoViewerWeb.
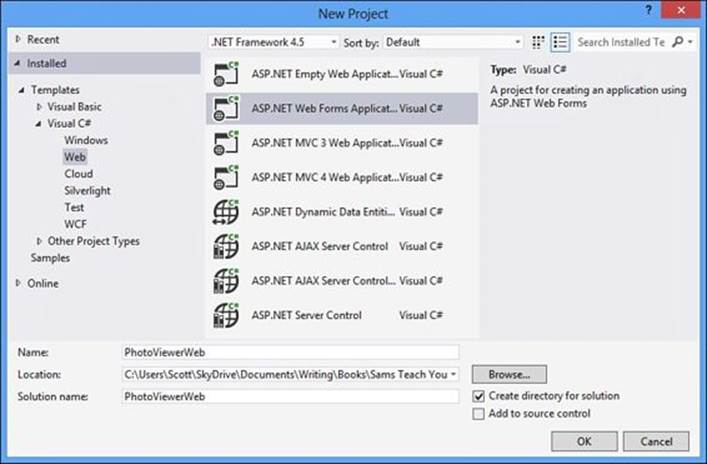
Figure 20.2. New Project dialog box.
Just as it does with desktop applications, Visual Studio creates a solution and project for you. This time, instead of displaying the generated C# class file or Extensible Application Markup Language (XAML) designer, Visual Studio displays the code editor for the application’s default.aspxpage and the Properties window. Figure 20.3 shows what Visual Studio should look like after having just created the project.
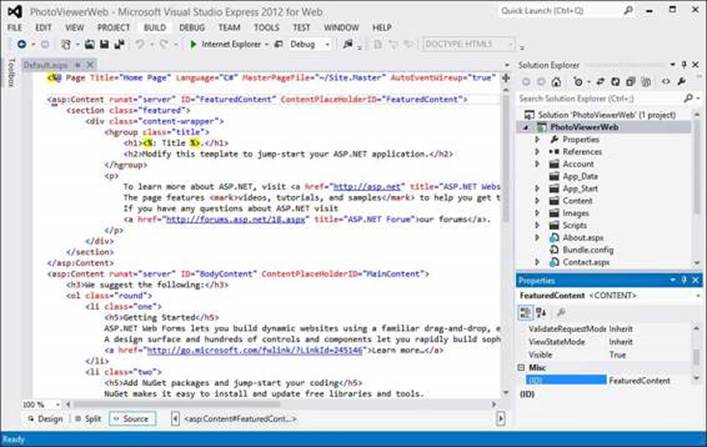
Figure 20.3. Visual Studio after creating a web application.
The editor for ASPX pages can show you the source markup, the visual representation of the layout, or a split view showing both. By default, the editor shows the source markup. You can make changes in either view, and changes made in one will be reflected in the other. Figure 20.4 shows a more detailed view of the ASPX editor.
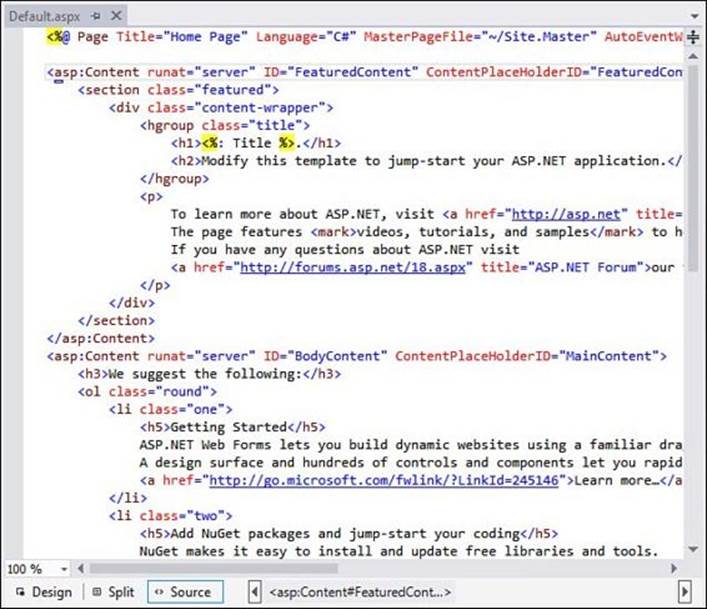
Figure 20.4. Detailed view of the ASPX editing surface.
You can easily switch between the ASPX and Design panes, including the Split view, using the tabs, as shown in Figure 20.5.
![]()
Figure 20.5. Design and Source tabs.
At the bottom of the editing window is the selected element outline, as shown in Figure 20.6. This shows you visually what element you have selected and the path of visual elements that contain the currently selected element.
![]()
Figure 20.6. Selected element outline.
If you look at the ASPX generated by Visual Studio, the Page directive specifies the code-behind file and the class that implements the web form. In this case, the code file is named Default.aspx.cs and the class is PhotoViewerWeb._Default. The page Title is also specified. Any of the attributes defined by the Page directive, HTML elements, or ASP.NET controls can be changed directly in the ASPX or using the Properties window, shown in Figure 20.7.
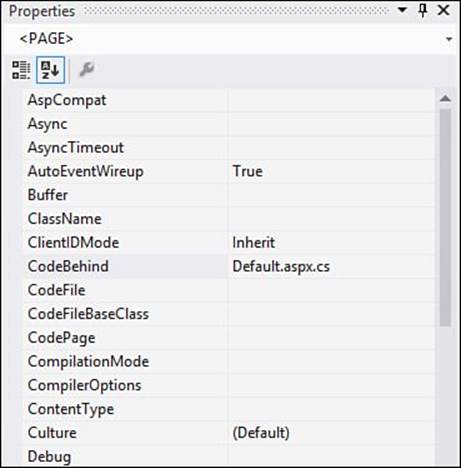
Figure 20.7. Properties window.
Change the page title to Photo Web Viewer, either through the Properties window or directly in the ASPX.
Creating the Layout
You are now ready to start creating the layout for the application. If you look at the ASPX again, you notice that the page already includes two content controls. These content controls are part of a template engine provided by ASP.NET. This template engine utilizes the idea of master pages, which define a structure and layout that can be used throughout the site. Master pages have placeholder controls, identified by an <asp:ContentPlaceHolder> element, which denote where dynamic content can be placed. A web application can make use of multiple master pages, and master pages can also be nested.
Note: Master Pages
You can think of the concept behind master pages as being similar to the mail merge capability in many word processing applications. The child page uses the ContentPlaceHolder controls mapped to the placeholders defined in the master page, which defines the rest of the page. When a request is made, ASP.NET merges the output of the child page with that of the master page and sends the merged content to the user.
Figure 20.8 shows the project structure in more detail, showing a master page named Site.Master that has been created for you.
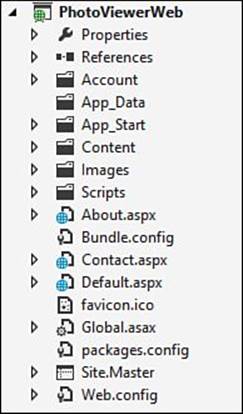
Figure 20.8. Web application project structure.
If you look again at the Page directive shown in Figure 20.4, you see that it defines the associated master page. Web forms do not need to be associated with a master page, but if they are, content can be placed only within the content controls mapped to the content placeholders of the master page. If you were to try to add text outside one of those content controls, the web application generates an error at runtime, as shown in Figure 20.9.
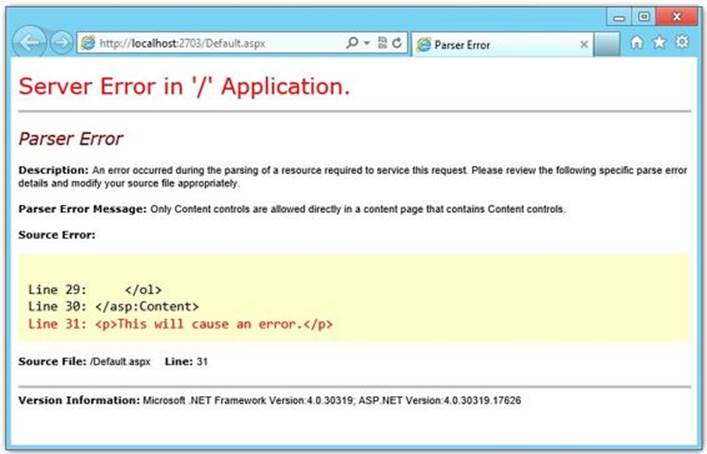
Figure 20.9. Parser error.
The default page for the application should display a list of photo albums, as shown in Figure 20.10.
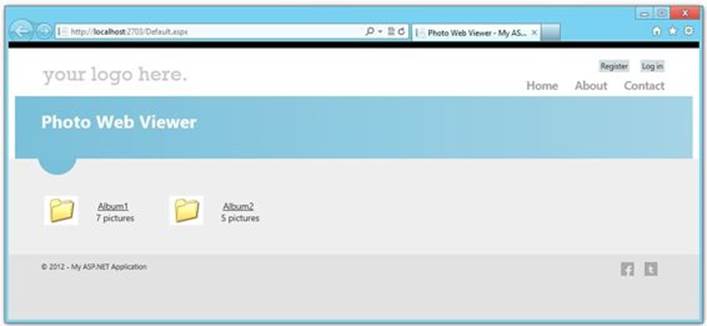
Figure 20.10. Photo Web Viewer default page.
The necessary HTML, which would be included in the MainContent placeholder, is shown in Listing 20.3.
Listing 20.3. Markup for the MainContent Layout
<asp:DataList ID="albums" runat="server" RepeatDirection="Horizontal"
RepeatColumns="3" CssClass="groupbox" Height="100%">
<ItemTemplate>
<table>
<tr>
<td>
<img src="Images/folder.png">
</td>
<td>
<asp:HyperLink runat="server" ID="albumLink" />
<br>
<asp:Label runat="server" ID="albumCount" />
</td>
</tr>
</table>
</ItemTemplate>
</asp:DataList>
Styling the Layout
Styling a layout can be accomplished using a Cascading Style Sheets (CSS) file, called a style sheet, or through inline styles declared directly on each element. Inline styles have the benefit of being declared along with the element but cannot be easily shared. CSS files enable you to define styles globally that can be shared by multiple pages.
When styling an element using inline styles, you add a style attribute to each element that contains the CSS properties and values you set. For example, to style the first table cell (the td element) of the second table row (the tr element) so that it has a border, you can use the following:
<td style="border: thick solid #E5EBD8;">
This defines an inline style that sets the border width to “thick,” the border style to “solid,” and the border color to “#E5EBD8.”
If you look at Figure 20.8 again, you will see a Content folder. By default, when you create a new web application project, the Site.Master page already includes a style sheet named site.css, found in that folder. You can modify this style sheet, replace it with one of your own, or add an additional style sheet by providing another style sheet link in the Site.Master ASPX, as shown in Listing 20.4.
Listing 20.4. Including a Style Sheet Link in a Master Page
<head runat="server">
<link href="~Content/PhotoViewer.css" rel="stylesheet" type="text/css" />
</head>
You could also include additional style sheets only for a specific child page by including it in the HeadContent ContentControl, as shown in Listing 20.5.
Listing 20.5. Including a Style Sheet Link in a Child Page
<asp:Content ID="HeaderContent" runat="server" ContentPlaceHolderID="HeadContent>
<link href="Styles/PhotoViewer.css" rel="stylesheet" type="text/css" />
</asp:Content >
CSS style sheets enable you to define styles that will be applied to any element. These styles are the broadest type of style you can define and use element selectors. You can also define classes that apply to specifically named elements using ID selectors. Applying styles to an element using element or ID selectors is automatic.
Note: Use Style Sheets Instead of Inline Styles
Even though you can use inline styles instead of defining your CSS in a separate file (and can even mix them), you should use style sheets as much as possible.
Inline styles are somewhat limited because you cannot easily build up styles, apply the same style to all instances of a certain element or to any element, or apply a style to an element with a specific name.
CSS style sheets help to make your web application markup more maintainable and enable you to easily modify styles, even swapping style sheets entirely to completely change the look of your web application.
Listing 20.6 shows a portion of the site.css style sheet. The first two declarations apply a style to the specific HTML elements listed, which occurs automatically. The next declaration, starting with a dot (.), is a CSS class definition, which is applied only to elements that specifically include the class through their class attribute. The benefit to CSS classes is that you can provide multiple classes (separated by a space) to the class attribute. If you want to apply a CSS class to an ASP.NET web control, use the CssClass attribute instead. Finally, the last declaration is an ID selector definition, which is automatically applied to any element whose ID is body.
Listing 20.6. Part of the site.css Style Sheet
html
{
background-color: #e2e2e2;
margin: 0;
padding: 0;
}
header, footer, hgroup, nav, section
{
display: block;
}
.float-left
{
float: left;
}
#body
{
background-color: #efeeef;
clear: both;
padding-bottom: 35px;
}
Understanding Data Binding
ASP.NET supports both one-way and two-way data binding in a way that is similar, although more limited, to that of WPF. The data-binding expressions are contained within <%# and %> delimiters and use either the Eval (one-way) or Bind (two-way) function. These expressions are resolved when the DataBind method of a control or Page class is called.
To make the page shown in Listing 20.3 useful, you need to provide text for the Label control and both text and a navigation URL for the HyperLink control. This can easily be accomplished through data binding. The default page represents an album viewer and needs to be bound to an album collection. In the Page_Load method of Default.aspx.cs, add the code shown in Listing 20.7.
Listing 20.7. Page_Load Method of Default.aspx.cs
albums.DataSource = new AlbumCollection(
Path.Combine(Request.PhysicalApplicationPath, "Albums"));
albums.DataBind();
The first line creates a new AlbumCollection instance. The Request.PhysicalApplicationPath property represents the physical path on the web server that contains the web application. The second line tells the ASP.NET runtime engine to actually perform the binding. Now you need to add the binding expressions to the user interface controls, as shown in Listing 20.8.
Listing 20.8. Adding Binding Expressions
<asp:HyperLink runat="server" ID="hlItem"
NavigateUrl='<%# Eval("Name", "viewalbum.aspx?id={0}") %>'
Text='<%# Eval("Name") %>' />
<br>
<asp:Label runat="server" ID="lbItem"
Text='<%# Eval("Count", "{0} pictures") %>' />
The Eval method takes the name of a data field in the current data item and, optionally, a formatting string used to display the data. This formatting string uses the same formatting syntax as the String.Format method. Notice that you don’t specify the container (or data context) of the binding. That’s because the Eval method uses the naming container, which is generally the smallest part of the data-bound control that contains a whole record. As a result, you can use only Eval for binding expressions inside templates of a data-bound control like a DataList.
Note: Embedded ASP.NET Code Blocks
The <% %> tags indicate embedded code blocks, which is server code that executes during the page’s render stage. If the Page directive includes the Language attribute, the embedded code must be written using the indicated language. The common types of embedded code block follow:
• <% %>—The simplest form of embedded code block that can contain any code
• <%@ %>—Directives
• <%# %>—Data-binding expressions
• <%= %>—Used to write text data to the page, the equivalent of <% Response.Write() %>
• <%-- %>—Server-side comments
If you need to use data binding in another control, you can still do so by using the DataBinder.Eval method directly. In fact, the binding expressions you just saw internally call DataBinder.Eval and pass Container.DataItem, which refers to the current data item of the current data container, as the first parameter.
You could rewrite the binding expression for the Label control as shown here:
<%# DataBinder.Eval(Container.DataItem, "Count", "{0} pictures") %>
Using the Bind method is similar and uses the same syntax as the Eval method. The difference is that Bind establishes a two-way binding, enabling you to also update the source control.
Understanding Data Validation
Just as desktop applications enable you to validate user input, web applications do as well. However, to perform data validation for web applications, you have a choice of where that validation occurs—either at the server or at the client. Server-side validation is best used when the validation logic is complex or can be performed only on the server, such as validating data against a database.
Performing server-side validation is similar to the way you perform validation in a desktop application. You add event handlers to the necessary events, such as the TextChanged event of a TextBox control, to perform any required validation. However, for server-side validation to execute, the page (and all its data) must be sent to the server, validated, and then a response sent back to the client.
Note: Server-Side Validation and Security
If there is a possibility of a security impact with the input data, it is important to perform server-side validation even if you are also performing client-side validation.
You should not trust the client to always pass well-formed data because a potential attacker might have written his or her own client that bypasses your client-side validation.
Client-side validation involves the use of validation controls that intelligently generate client-side JavaScript and Dynamic HTML (DHTML) code (for older browsers, the validator controls generate server-side code). ASP.NET provides the following validation controls:
• RequiredFieldValidator, which can be used to ensure the user has entered data into the control.
• CompareValidator, which compares the data entered with a constant value, the value of a property of another control, or a value retrieved from a database.
• RangeValidator, which checks the data entered to ensure that it falls either inside or outside of a given range of values.
• RegularExpressionValidator, which determines if the entered data matches a specified regular expression. If the data entered is empty, validation always succeeds.
• CustomValidator, which enables you to define your own custom validation logic.
Each validation control performs only a single, well-defined validation, but you can combine multiple validation controls to perform validations that are more complicated. When a validation control determines that a control contains invalid data, it displays the supplied error message next to the control.
You can also use a ValidationSummary control, allowing you to summarize the error messages from all validation controls on a page in a list, bulleted list, or single paragraph.
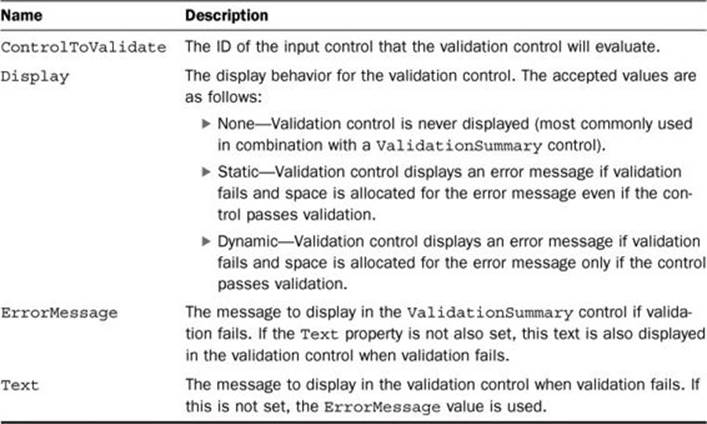
The commonly used properties of validation controls are shown in Table 20.3.
Table 20.3. Common Validation Control Properties
Listing 20.9 shows a simple ASPX page that uses some of the validation controls.
Listing 20.9. Associating Validation Rules with a Binding
<%@ Page Language="C#" AutoEventWireup="True" %>
<!DOCTYPE html PUBLIC "-//W3C//DTD XHTML 1.0 Transitional//EN"
"http://www.w3.org/TR/xhtml1/DTD/xhtml1-transitional.dtd">
<html>
<head>
<title>Validation Controls</title>
</head>
<body>
<form id="Form1" runat="server">
<h3>Validator Example</h3>
Enter a number from 1 to 30:
<asp:TextBox ID="TextBox1" runat="server" /><br />
<asp:RequiredFieldValidator
ID="RequiredFieldValidator1"
ControlToValidate="TextBox1"
Display="None" ErrorMessage="You must enter a value."
runat="server" />
<asp:RegularExpressionValidator
ID="RegularExpressionValidator1"
ControlToValidate="TextBox1"
Display="None" ValidationExpression="\d+"
ErrorMessage="You must enter a numeric value."
runat="server" />
<asp:RangeValidator
ID="Range1"
ControlToValidate="TextBox1"
Display="None"
MinimumValue="1"
MaximumValue="30"
Type="Integer"
ErrorMessage="The value must be from 1 to 30"
runat="server" />
<p />
<asp:ValidationSummary runat="server" />
<p />
<asp:Button ID="Button1" Text="Submit" runat="server" />
</form>
</body>
</html>
Figure 20.11 shows this simple validator example after having entered invalid data.
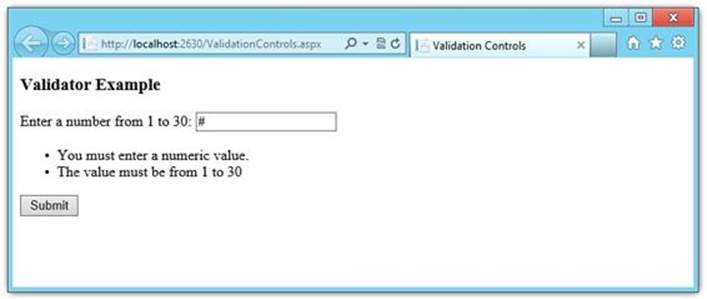
Figure 20.11. Validator example.
Summary
In this hour, you learned about building web applications, including how to apply styles, data binding, and validation. As you can see, although there are many similarities between building web applications and WPF desktop applications, there are also many differences. Although many developers are familiar with both types of applications, most tend to specialize in one or the other.
Q&A
Q. What is a web form?
A. A web form is an ASPX page that describes the user interface markup using HTML and, typically, a code-behind file.
Q. What is the Global.asax file used for?
A. The Global.asax file provides application-level events and code for web applications, much the same way the App.xaml file does for WPF applications.
Q. How are web applications styled?
A. Web applications can be styled using Cascading Style Sheets (CSS).
Workshop
Quiz
1. What is a master page?
2. Do web forms always need to be associated with a master page?
3. How do you specify data-binding expressions in a web form?
Answers
1. You can think of the concept behind master pages as being similar to the mail merge capability in many word processing applications. The child page uses the ContentPlaceHolder controls mapped to the placeholders defined in the master page, which defines the rest of the page. When a request is made, ASP.NET merges the output of the child page with that of the master page and sends the merged content to the user.
2. No, web forms can be created that are not associated with a master page.
3. Data-binding expressions are contained within <%# and %> delimiters and use either the Eval (one-way) or Bind (two-way) functions. These expressions are resolved when the DataBind method of a control or Page class is called.
Exercises
There are no exercises for this hour.
All materials on the site are licensed Creative Commons Attribution-Sharealike 3.0 Unported CC BY-SA 3.0 & GNU Free Documentation License (GFDL)
If you are the copyright holder of any material contained on our site and intend to remove it, please contact our site administrator for approval.
© 2016-2026 All site design rights belong to S.Y.A.