Administering ArcGIS for Server (2014)
Chapter 6. Clustering and Load Balancing
One of the vital features of ArcGIS for Server is load balancing. How a GIS server can take over in case others are busy or highly loaded is certainly a very important aspect of maintaining good response time. When a request is made to consume a GIS service, the Web server (whether dedicated or built in) keeps logs in the Server site. These include which GIS server is free and which one is not. The decision regarding which GIS server should get this request next is made accordingly. The server then executes the request efficiently using the optimization tools we discussed in Chapter 5, Optimizing GIS Services. The load balancing module is a closed box, which means you get to enjoy the experience of Server balancing the requests between your GIS servers but cannot peek under the hood and configure it. It would be really useful if Esri were to expose this part for us to play with; it did, however, enable us to tap into something really interesting—clustering.
In this chapter, we will discuss clustering technology, which has its benefits and limitations. By implementing clustering, you will see how easy it is to scale up a Server site and add machines. You will know how to group and categorize GIS servers based on their characteristics to ensure proper load balancing on your Server site. Despite its advantages, clustering does come with some limitations that we will discuss as well.
Clustering
For any service you publish on ArcGIS for Server, one or more instances will start on the GIS servers to represent that service. Each instance takes resources from the machine it is running on. The number of instances on each server can be configured when you publish the service. Each GIS service differs in terms of memory usage and processing consumption, and the same thing applies on the GIS servers. You might have different generations of servers with different specs and resources, so it makes sense to have some sort of distribution window by which you can specify which services will run on which servers. To manage this in an efficient way, Esri came up with a technique to group GIS servers into clusters and then permit you to configure which service goes to which cluster of machines. Clustering is an advanced technique that can prove to be of use if configured correctly. For instance, you have some unused workstations or some standard-issue PCs lying around in your inventory that you can format; make them fresh and ready, add them to your Server site, and place them into a commodity computing cluster. You can then assign those services with low priority to run on this cluster and free up your more powerful GIS servers to host services with higher affinity. Within a cluster, the GIS servers need to communicate with each other and update each other with vital information to help in the load balancing process. This communication happens using the Transmission Control Protocol (TCP) by default on a unique port. Each cluster gets assigned a dedicated port, and if there are any firewalls in place, that port on which the GIS servers communicate must be opened or an exception must be added to the firewall rules to allow the servers to exchange information freely.
Note
Commodity computing
Commodity computing is the use of a large number of available, average-power machines into a cluster to obtain high computing power at a lower cost.
Creating clusters
Before you start creating clusters, you have to determine what type of GIS services you possess. This is done by properly planning and designing GIS services, analyzing their nature, and predicting what kind of resources are required, which you have already done back in Chapter 4, Planning and Designing GIS Services. Once you identify your GIS services, you can decide what kind of clusters you want to create. You might not require any clustering at all; however, sometimes you need to group your GIS servers by some factors. GIS services can be grouped by resources and computing power, where you put the most resourceful GIS servers into one cluster and your typical ones in another cluster.
You can group your servers by security level; you can assign high-profile and sensitive GIS services running on servers with tightened cyber and physical security to a dedicated cluster. Some even create clusters by networking area, where servers within the same area network and subnet are grouped together and remote servers are put into a separate cluster. Of course, there is always the ownership factor to consider; you can group servers by owner, making them easily manageable.
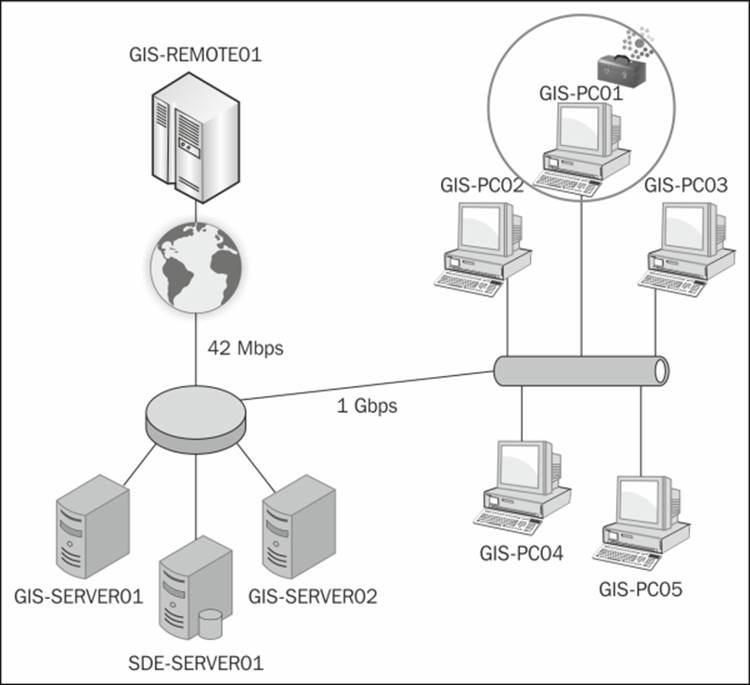
Take a look at the following network diagram: there are two high-power servers—GIS-SERVER01 and GIS-SERVER02—connected directly to the database that hosts the GIS data—SDE-SERVER01. Another five PCs—GIS-PC01 to GIS-PC05—are connected to the database via a 1 Gbps Ethernet, and finally, to one powerful, cloud VPN-leased server— GIS-REMOTE01—in China with a 42 Mbps Internet bandwidth.
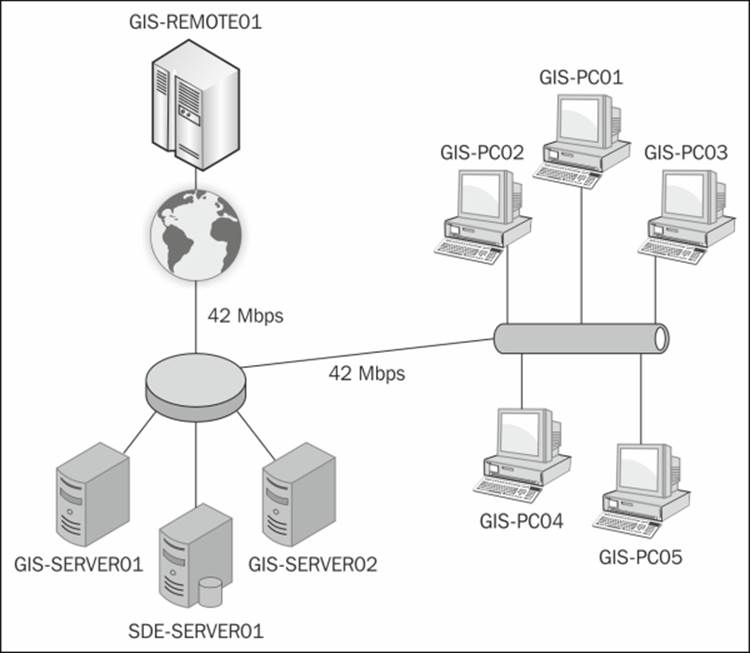
All these eight GIS servers are joined to an ArcGIS for Server site and are load balanced. You have four services running on the Server site: Building, Parcels, Electricity, and Geoprocessing. Users are frequently experiencing slow performance on the overall services despite the high-spec configuration and networking setup, and the management is not happy to hear this, especially after spending a large sum of money purchasing and leasing servers. You were asked to solve the slow performance problem by first identifying the cause of the problem. On looking, you will find that load balancing is not intelligent enough to take into consideration the resources and networking factors. For example, if you run a geoprocessing task, you might get diverted to one of the commodity PCs, which are not designed for such tasks. To prevent this, the first thing we need to do is to create clusters for our machines and put each machine in the right cluster.
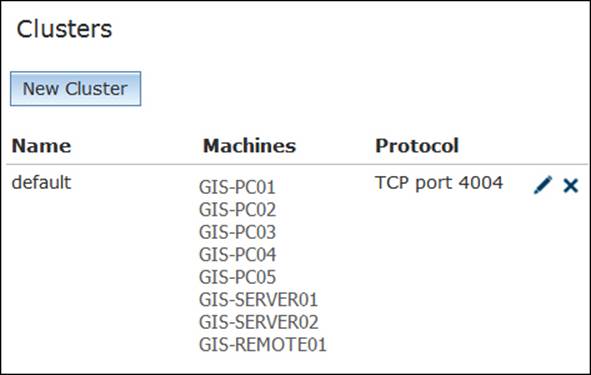
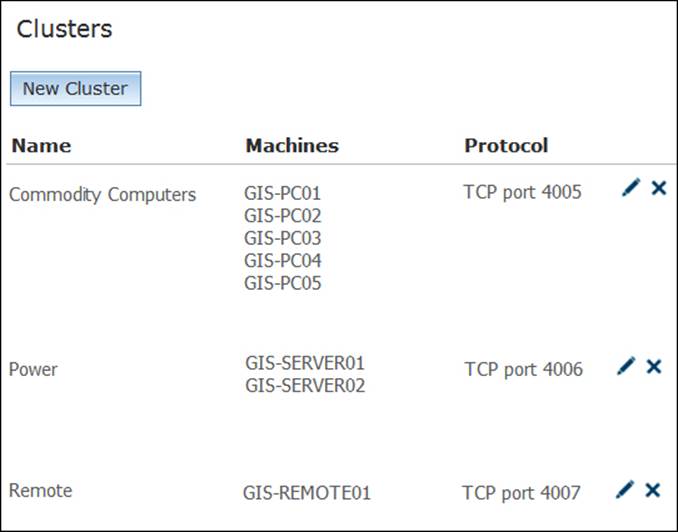
Log in to your ArcGIS Server Manager, activate the Site tab, and from the left-hand pane, click on Clusters. By default, there is always one cluster—default—which is created when you set up your Server site, and all the machines are placed into this cluster. Manager looks as follows:
Adding machines to the default cluster
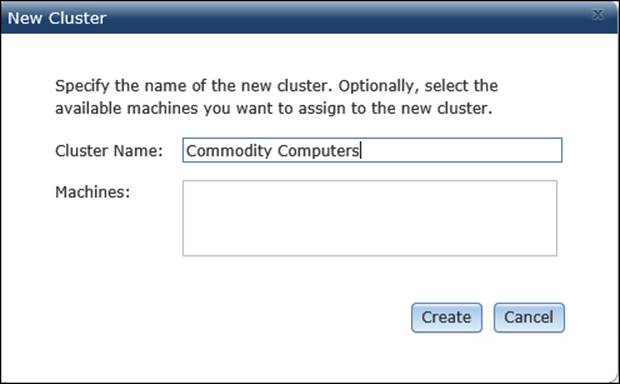
First, we need to create a new cluster for the five PCs. Click on New Cluster, and in the New Cluster form, type Commodity Computers in the Cluster Name field. You will notice that all the available machines get listed in the Machines box. In this case, you might not see any machine, and that is ok, since they are already assigned to another cluster default. Click on Create to add the new cluster. The New Cluster form now looks as follows:
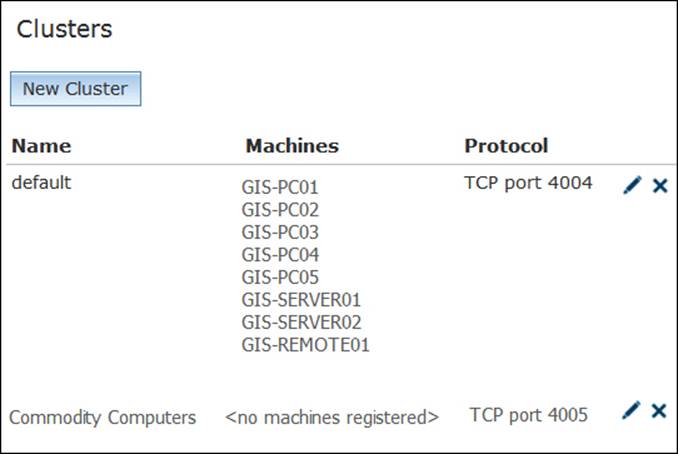
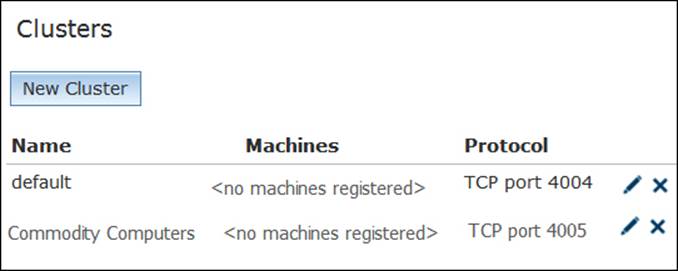
Note that there are no machines registered on your new cluster, and this is expected because you didn't add any machine to this cluster yet. That is why we need to rearrange the machines. To do that, we need to edit the default cluster; we will show how to do this in a while. Our Clusters form now looks as follows:
Grouping machines by resources
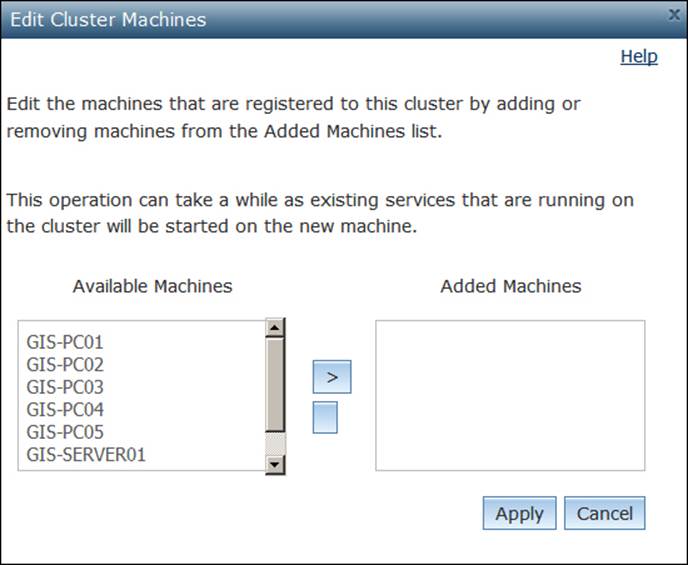
Now that all machines are added to the default cluster, we need to group them into separate cluster by their resources, as we discussed earlier. Commodity Computers represents the five PCs that are already assigned to the default cluster: we need to remove those machines from the default cluster and assign them to the Commodity Computers cluster. To start editing the cluster, click on the edit icon next to the default cluster. In fact, let us remove all GIS servers from the default clusters and turn them into available machines so that we can easily assign them later.
From the Added Machines list, remove all servers, add them into the Available Machines list, and then click on Apply. The Edit Cluster Machines page looks as shown in the following screenshot.
Tip
Best practice
It is a good idea to implement clustering if you have three or more GIS servers on your Server site.
Note that the default cluster no longer has any machines, and now that the machines are free, we can reassign them to other clusters. Now the Clusters page appears as follows:
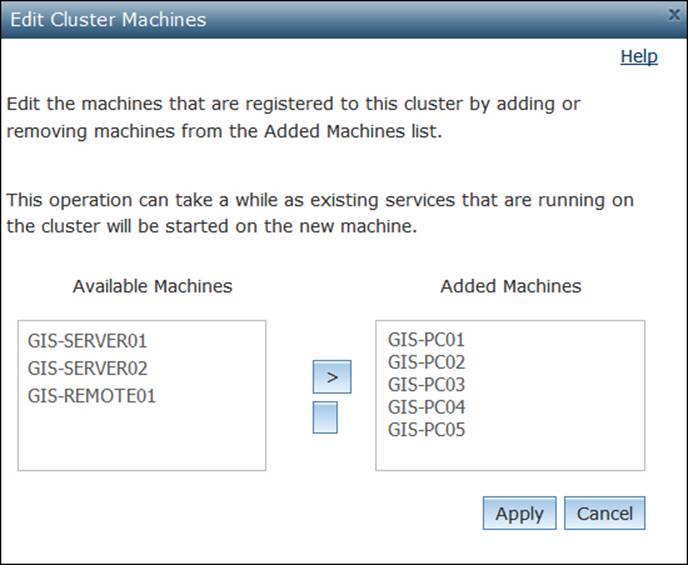
Go ahead and edit the Commodity Computers cluster, and move the five PCs from the Available Machines list to the Added Machines list by using the arrow icon. Click on Apply when you finish as shown in the following screenshot:
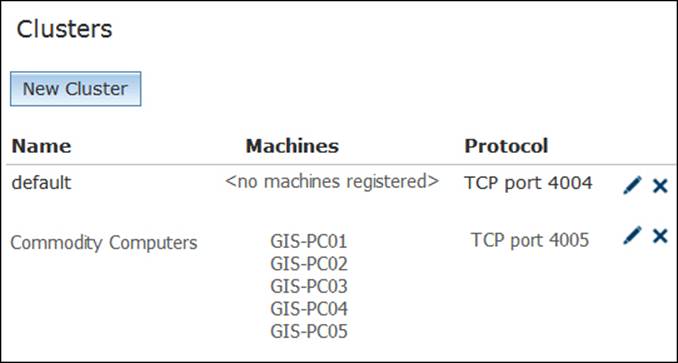
Usually the process of moving GIS servers from one cluster to another can take a long time, especially if there are existing services running on those servers, as they need to be restarted on each cluster. Various clusters can be seen as shown in the following screenshot:
We will not require the default cluster anymore, so you can delete it; however, there are other system services, such as publishing and caching, that were using that cluster, and we have to reassign them as well to your new cluster. In the next topic, you will learn how to reassign a service to a new cluster. If you do not want to change your system services, keep the default cluster and assign one powerful machine to it.
This cluster is now up and running, hosting five GIS servers standard PCs, so we must be careful to assign services that are low priority and often queried to this cluster. It could even be used for testing GIS services. If you want to publish a new service but you want to test how it performs, you can first run it on the commodity cluster, and then after you see it is fine, you can decide whether to keep it or migrate it to a more powerful cluster. We will discuss about an application in the next topic. Now we need to create two more clusters. According to our network diagram, we have three more machines left; one is remote and is hosted externally and connected to the Internet, and the other two are local with a direct connection to the database. Logically, the remote server should go to a separate cluster for obvious reasons; security is one of them, control and management another. The rest of the servers are powerful pieces of hardware and they have high bandwidth connections to the database, so they are gems to us. We can put them in a new cluster called the Power cluster. Go ahead and create the Power and Remote clusters and assign GIS-SERVER01 and GIS-SERVER02 to the Power cluster and GIS-REMOTE01 to the Remote cluster. After doing this, the Clusters form looks as follows:
Mapping GIS services to a cluster
We managed to set up three clusters of machines and took our network diagram and extracted a clustering pattern out of it. We then created the clusters and assigned the machines to those clusters based on different factors: resources, network cost, and locality. That was one side of the coin. We should now assign services to each cluster, and since you have multiple clusters, you will be asked to select which cluster you want to publish your GIS service on. To do this, we should first analyze the nature of the service, see how it behaves, and accordingly select the right environment for it. We have four services that we need to manage and map to clusters: Parcels, Buildings, Electricity, and extraction geoprocessing.
Mapping a simple map service
The Parcels service consists of only simple operations, such as pan and zoom and search, functions that seemingly do not require massive resources. It looks like it is a waste of resources to assign the Power or Remote cluster to such services; commodity computers can take care of this service easily.
Note
You may decide to cache this service; however, hosting it on the commodity cluster will be expensive as the whole cache need to be copied on all the five PCs. The next section covers the mapping of cached service.
To assign a service to a cluster, you can do it either from the Service Editor form or from the ArcGIS Server Manager. Open Manager and edit the Parcels service. From the left-hand pane, select Parameters, and then select Commodity Computers from the cluster drop-down list. Click on Save to save your changes. The changes will be as shown in the following screenshot:

Mapping a cached map service
The second service is Buildings, a service with an extensive number of features. The fact that this service is queried frequently made us decide to cache it so that we can save expensive calls to the database. You can imagine that plenty of space is required for caching, especially if you are going to implement it on many scales. Let us examine our clusters again. They are as follows:
· Remote cluster: Here I have a leased a powerful server set on a VPN connection over the Internet with a bandwidth of 42 Mbps
· Power cluster: It has two resourceful servers setting right on my 1 Gbps local area network connected directly to my database
· Commodity cluster: It has a set of five good workstations offering us their CPU cycles
Now, which one of these three clusters do you think is suitable to host our Buildings GIS service? That would definitely be the Remote cluster. The service does not require a database connection as it is cached. Since I'm renting this server, I can put the terabytes of disk space to good use by caching this service. It doesn't matter how far this remote server is because it won't require connecting to my database. Thus, all bandwidth will be used to download cached images only, which are PNG compressed files and are therefore fast to fetch.
To assign a service to a cluster, you can do it either from Service Editor or from the ArcGIS Server Manager. Open the manager and edit the Buildings Service. From the left-hand pane, select Parameters, and then select Remote from the cluster drop-down list as shown in the following screenshot. Click on Save to save your changes.

Once we map the Buildings service to the Remote cluster, all the cache will be created initially on the remote server; this process is long and will consume some time. As discussed in the previous chapter, it is recommended to run this overnight or when the database is less busy. You can also create the cache locally and upload it to the remote server. Either way, the advantage of this mapping is that you took a very busy service and managed to run it very efficiently and remotely without depleting your own resources. The folks at your finance department will be very happy to learn that you are fully utilizing the rented overseas server. The disadvantage of this is that you are overexposing your data remotely and insecurely; anyone could tap into the channel and copy these images and get access to your data. There is always a physical route by which your remote server can get infiltrated from the inside and your data get stolen.
Mapping a high-affinity map service
Let us take the third service, Electricity. This service is not requested very often, but when it is requested, it is always a complex request—a trace task that involves tapping into the geometric network and traversing downstream or upstream assets. Such requests require powerful machines; unfortunately, they cannot be cached because the data is dynamic and changing. It requires constant communication with the database. The Commodity cluster obviously wouldn't work; it is not powerful enough to handle such requests for this service. We can assign it to the Remote cluster just like Buildings, but we will have a bottleneck due to limited network bandwidth and latency. Establishing communication with the database over a VPN network makes the latency factor go very high, which consequently makes the service perform atrociously. The Power cluster seems to be the one that can handle this. We tried to use low-cost solutions to outsource CPU cycles and resources, but this service requires a resourceful server running on a local, high-bandwidth network right next to the database server. Go ahead and assign the Electricity service to the Power cluster as shown in the following screenshot:

Mapping a geoprocessing service
The last service is an extraction geoprocessing service that is developed to query the database and extract a user-defined boundary for the data. You're probably thinking that this is a very bandwidth-heavy service; this is true, and there will be a massive transfer of raw data. Plus, you require a powerful machine capable of crunching and processing this data. Therefore, the Remote cluster definitely cannot handle such a service although it is powerful. The fact that it is hosted over a 42 Mbps network excludes it as an option to serve our geoprocessing service. You can run it on the Commodity cluster since they are on the same network as the database is and this makes it a good candidate. However, if a geoprocessing job is received, it will assign the entire job to one of the commodity PCs, and that average-power PC will struggle with the job by itself. It might be able to pull it off eventually, but it will take a significant amount of time.
However, if this geoprocessing request were divided into blocks and then executed on a group of machines in parallel, just like Hadoop architecture, it would definitely make sense to assign it to the Commodity cluster.
Note
Hadoop
Hadoop is an open source framework for large storage and high processing using commodity computing clusters.
Unfortunately, Server does not work this way, which leaves us with the Power cluster as the best candidate to map this geoprocessing service to.
Good job! You have managed to fix the performance problem on this ArcGIS for Server setup by properly balancing requests across the GIS Servers. The users are experiencing a great performance boost, thanks to your newly acquired skills.
Note
If you have deleted the default cluster and you are faced with problems publishing your services, make sure that your system services in the ArcGIS Manager are running and assigned to a working cluster. Remember that system services need to be close to the database and need to run on powerful machines.
Scaling clusters
You have finished your initial ArcGIS for Server setup and determined your GIS Servers, GIS services, and clusters. Now, your users are increasing and the initial configuration does not support the increase in the volume of requests. This is when you need to decide whether you want to scale a cluster by adding more machines. The good news is that, once your clusters are created, they can scale very easily. Adding a GIS server to a cluster is simple: all you have to do is install ArcGIS for Server on the new machine that you want to add to the cluster and then join the machine to the Server site, which we have learned back in Chapter 1, Best Practices for Installing ArcGIS for Server. If you have a single cluster on your Server site, the new machine will directly be added to that default cluster. However, if your Server site has multiple clusters, you will be prompted to select one. It is important to mention that by scalability we mean adding physical machines and not virtual machines; this gives you more computing power from each machine. Adding virtual machines to a cluster will not give you any added value.
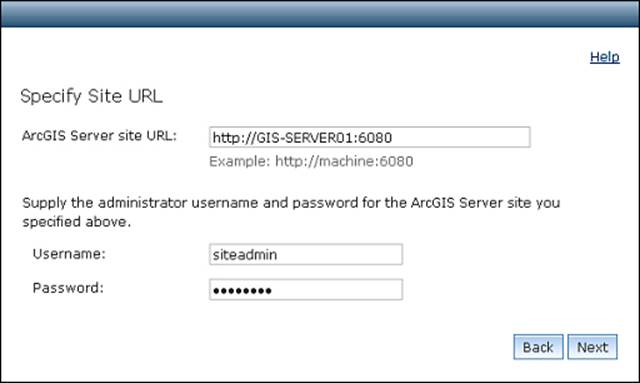
To add a machine to a cluster, install the GIS server component on your new machine and launch the ArcGIS Manager; you will be notified to either create a new Server site or join an existing one, as shown in the following screenshot. The URL for Manager ishttp://GIS-SERVER04:6080/arcgis/manager, where GIS-SERVER04 is the new machine you want to join.

Click on Join Existing Site to attach the machine to your site and type in your Server site URL; remember that any machine that is joined to the Server site will point you to the Server site. Specify the username and password for the primary administrator account and click on Next as shown in the following screenshot.
Note
If you have any problem connecting to the Server site, use the IP address instead and make sure that you can ping the server and that port 6080 is allowed to receive connections on the firewall.
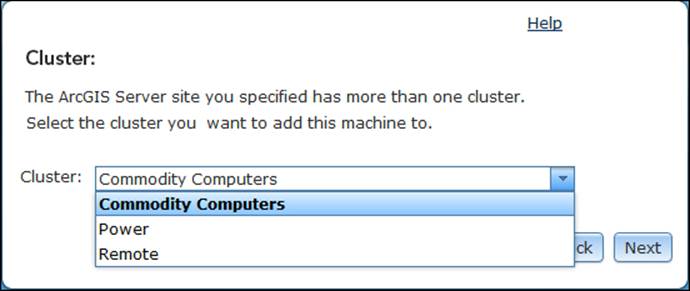
Since the Server site has more than one cluster, you will be prompted to select an existing cluster in order to join this machine. The machine will then be added to that cluster. Select the cluster and then click on Next as shown in the following screenshot.
Note
As we discussed earlier, any cluster you select communicates through a TCP port, and that port should be opened for the information to flow in and out of each machine on that cluster. If that port is closed, you will not be able to join the cluster.
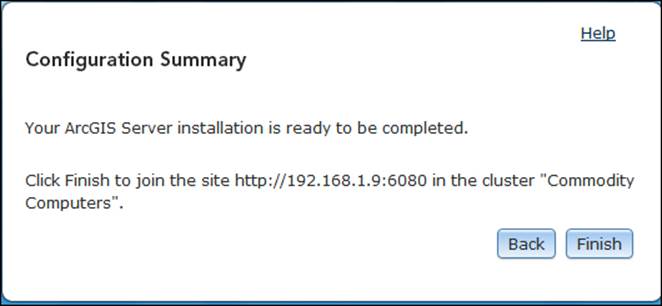
That is all. You will now get a summary of your configuration as a confirmation as shown in the following screenshot; click on Finish to join the Server site.
Tip
Best practice
Make sure to allow all cluster ports on all your GIS server firewalls before joining them; this will save you a huge amount of work. If you have a domain-level firewall, it will be easier to configure.
Limitations
Unfortunately, adding more machines to a cluster doesn't mean better performance. Yes, it can yield response time; however, the time for executing a particular request for a service will remain the same. That is because the request will be piped to a single machine (eventually), and that machine is responsible for fetching the required data from the database—be it a few records or thousands—and solely processing them. Distributed computing architectures, such as Hadoop, help utilize the power of parallel processing for all the machines by breaking up the data into parts and distributing them into cluster machines to be processed in parallel using the MapReduce concept. The power of Hadoop resides in the concept of data locality, where the database is accessed once and the result is fetched, divided into parts, and distributed to each machine for processing. Machines, in this case, do not need to query the database and this prevents networking latency. Instead, they work on the data locally on the disk, which gives a huge performance boost. I would like to see Esri implement Hadoop one day as its clustering platform; this will be a breakthrough in the GIS industry.
Note
MapReduce
MapReduce is a programming model for processing large amounts of data on a group of machines using the concept of data locality. The model consists of two functions: Map, which filters the input, removes unnecessary things, and prepares the results, andReduce, which performs the actual work and summarizes on the filtered results.
Another limitation is that having too many clusters can threaten security since you will be poking a lot of holes into your firewall to enable the communication between the machines. You will end up with a vulnerable sponge system, full of holes and very attractive prey to hackers.
Summary
In this chapter, you have learned a new technique ArcGIS for Server offers; clustering can be useful if used with caution and on the right GIS servers. You now know how to create a cluster from the Server site, where these clusters define the spectrum of your GIS servers. You have learned that clustering can be categorized by the machine power or memory or even by networking factors. You have learned how to assign a service to a cluster of machines so that its instances run only on those machines. You also know the limitations of clustering: what it can or can't do and when to use it.
In addition to the Server site optimization skills you acquired in the previous chapter, you now know how to take advantage of individual machines and organize them so that they perform more effectively. There are, of course, other factors that affect Server, but they are outside the scope of this book.
In the next chapter, we move from optimizing to securing ArcGIS for Server, where you will learn how to protect your GIS services from unauthorized access.
All materials on the site are licensed Creative Commons Attribution-Sharealike 3.0 Unported CC BY-SA 3.0 & GNU Free Documentation License (GFDL)
If you are the copyright holder of any material contained on our site and intend to remove it, please contact our site administrator for approval.
© 2016-2026 All site design rights belong to S.Y.A.