MySQL High Availability (2014)
Appendix A. Replication Tips and Tricks
This appendix is a collection of useful tips and tricks for running, diagnosing, repairing, and improving MySQL replication. They are supplemental material and, as such, may not contain all of the details needed for a full tutorial. Consult the online MySQL Reference Manual for more details about MySQL replication.
The last few sections of this appendix describe features that will be offered by MySQL soon, but are not officially available at the time of this writing.
Examining the Binary Log with Verbose
If you are using row-based logging, you can use the --verbose option to see a reconstruction of the queries in the event. The following shows what this looks like when run on a binary log with row-based logging:
$ mysqlbinlog --verbose master-bin.000001
BINLOG '
qZnvSRMBAAAAKQAAAAYCAAAAABAAAAAAAAAABHRlc3QAAnQxAAEDAAE=
qZnvSRcBAAAAJwAAAC0CAAAQABAAAAAAAAEAAf/+AwAAAP4EAAAA '/*!*/;
### INSERT INTO test.t1
### SET
### @1=3
### INSERT INTO test.t1
### SET
### @1=4
Notice that the values are given using @n-style names for the columns. This is because row-based replication is transferring the record and applying it by column position, but ignores the names of the columns.
Using Replication to Repopulate a Table
If a table on your slave becomes corrupt either through error or accident (e.g., a user deletes the data), you can use replication to recover the data. Do so by creating a temporary table on the master that is a copy of the original table, dropping the original table, and then re-creating it from the copy. This works very well as long as you do not have any column data types that this could affect (e.g., autoincrement). You are using the power of replication to reproduce the table on the slaves. There are two forms of this process, based on which form of logging you are using.
Statement-Based Logging
If you are using statement-based logging, run the following for each table:
SELECT * INTO OUTFILE 't1.txt' FROM t1;
DROP TABLE IF EXISTS t1;
CREATE TABLE t1 ...;
LOAD DATA INFILE 't1.txt' INTO TABLE t1;
Row-Based Logging
If you are using row-based logging, the temporary table is not transferred to the slave. Therefore, send only the data that is necessary to bootstrap the table using the INSERT INTO command as follows:
CREATE TEMPORARY TABLE t1_tmp LIKE t1;
INSERT INTO t1_tmp SELECT * FROM t1;
DROP TABLE IF EXISTS t1;
CREATE TABLE t1 SELECT * FROM t1_tmp;
Using MySQL Proxy to Perform Multimaster Replication
No slave can have more than one master, but a master can have many slaves. This isn’t an issue for most installations, but what if you need to combine data from two different masters and replicate the combined data to your slaves?
One way to do this is to use MySQL Proxy as an intermediate slave. Figure A-1 shows a conceptual drawing of this configuration.
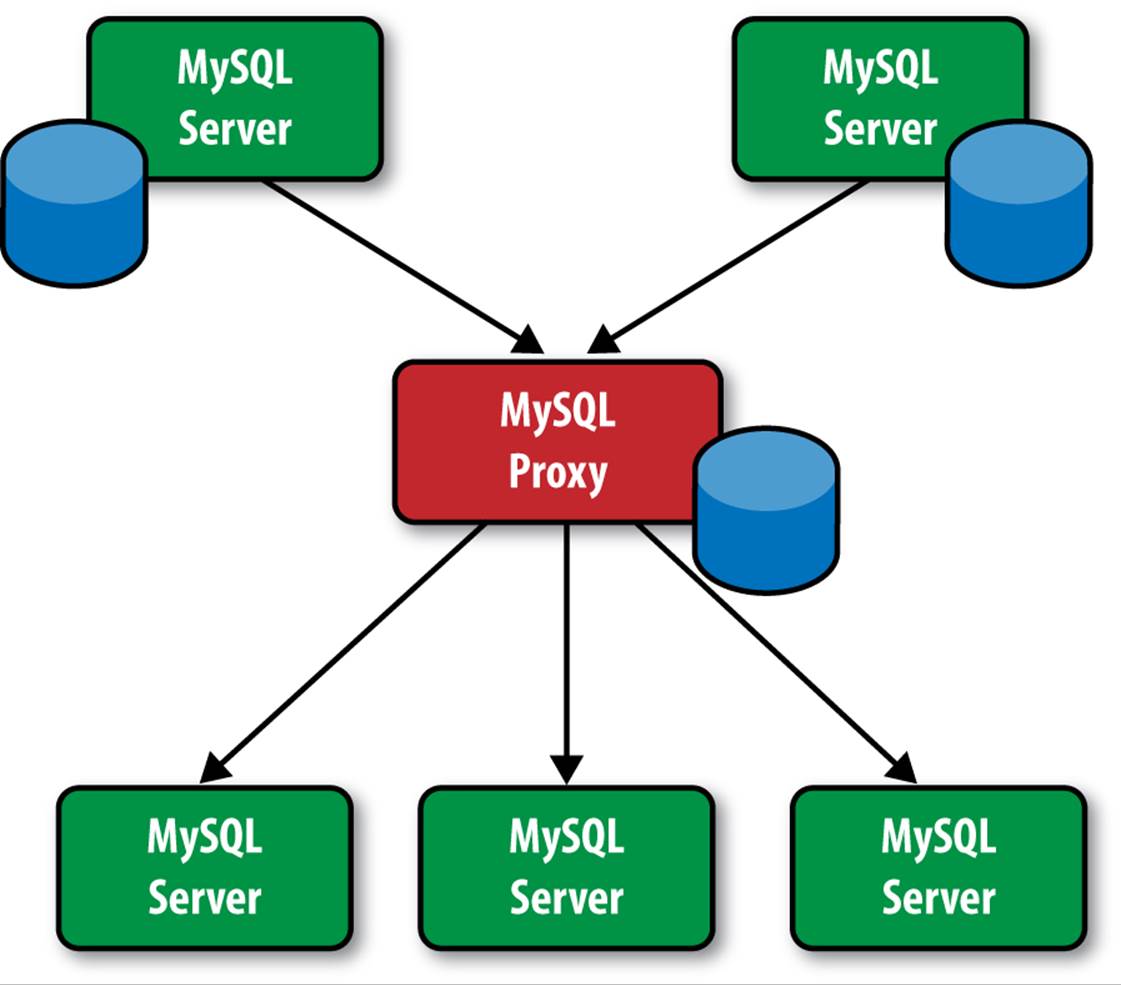
Figure A-1. Using MySQL Proxy to handle multiple masters
MySQL Proxy will receive changes (events) from both masters and write a new binary log without saving the data (writing it to a database). Your slaves use MySQL Proxy as a master. This has the effect of combining data from two masters and replicating to a set of slaves. This effectively implements multimaster replication.
For more information about MySQL Proxy, see the section on MySQL Proxy in the online MySQL Reference Manual.
Using a Default Storage Engine
If you use a default storage engine on your master by issuing the SET GLOBAL STORAGE ENGINE command, this command is not replicated. Therefore, any CREATE statement that does not specify a storage engine will get the default storage engine as it was set on the slaves. Thus, it is possible that your InnoDB tables will be replicated to MyISAM tables. If you ignore the warnings when this occurs, you can encounter a scenario in which replication stops due to some incompatibility.
One solution is to ensure the global storage engine is set on each slave by including the default-storage-engine option in the configuration file. However, the best practice is to specify the storage engine on the CREATE statement.
This does not prevent issues in which a storage engine used on the master does not exist on the slave. In this case, you may encounter problems that can be solved only by installing the missing storage engine on the slave.
MySQL Cluster Multisource Replication
You can set up multisource replication using MySQL Cluster (Figure A-2). To do so, set up the masters to replicate different data. By keeping the data on different masters, you avoid cross-contamination of keys and similar context-dependent values.
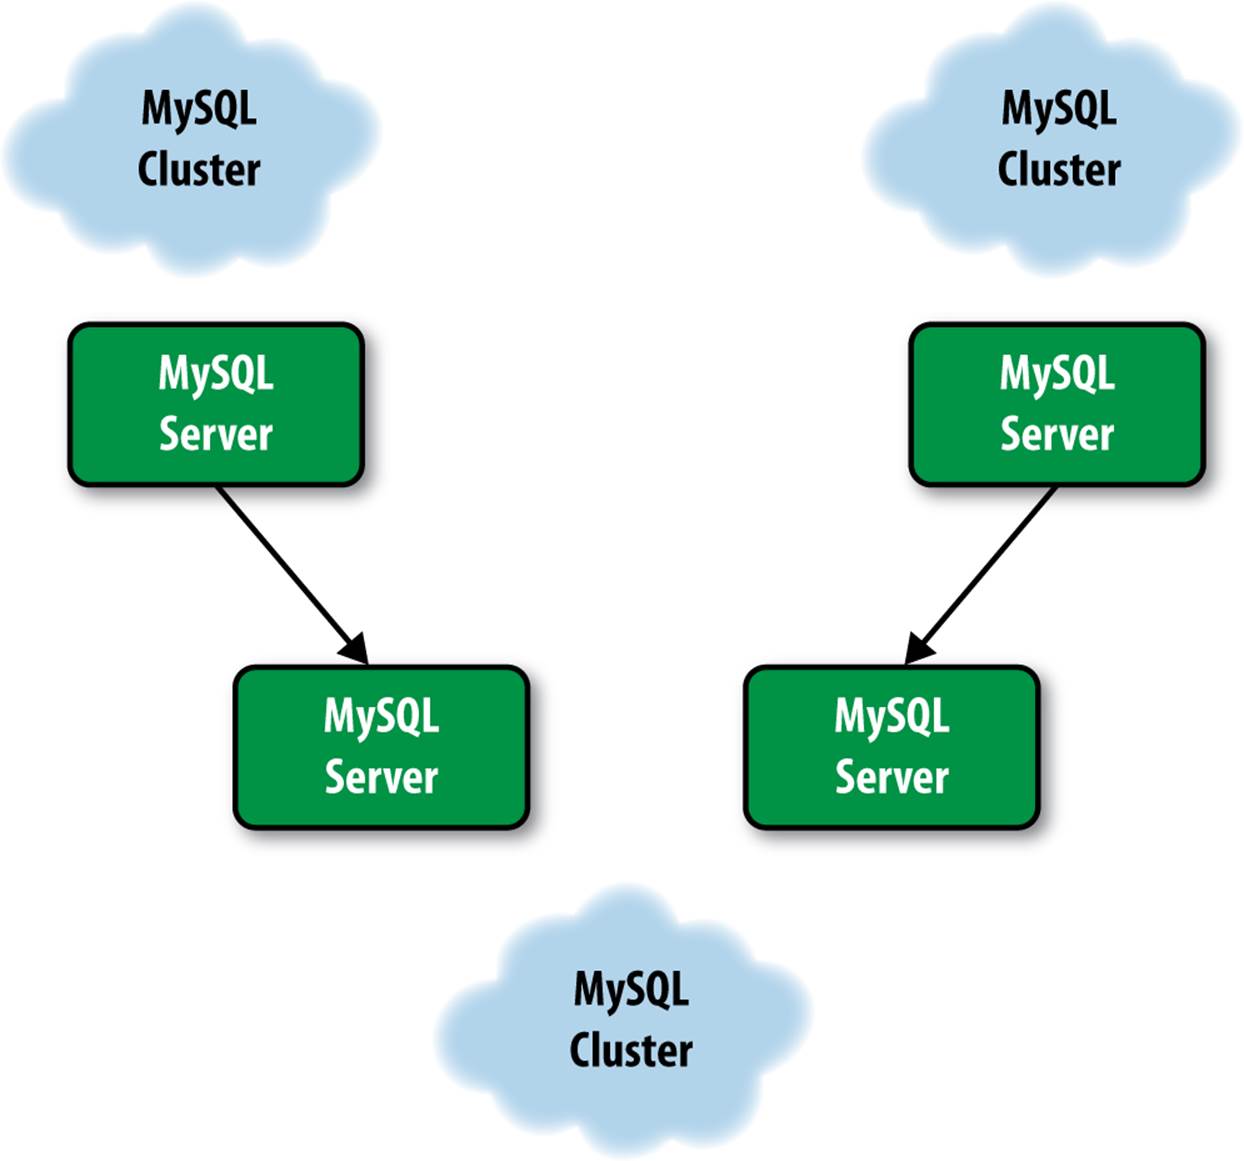
Figure A-2. Multisource replication
Multichannel Replication with Failover
For greater reliability and rapid recovery, you can use a dual replication setup (Figure A-3), in which two sets of replication topologies replicate from one cluster to another. If one stream goes down, you can fail over to the other stream quickly.
Notice that server names are of the form mysql.X and saved positions are of the form mysql.X.savepos.
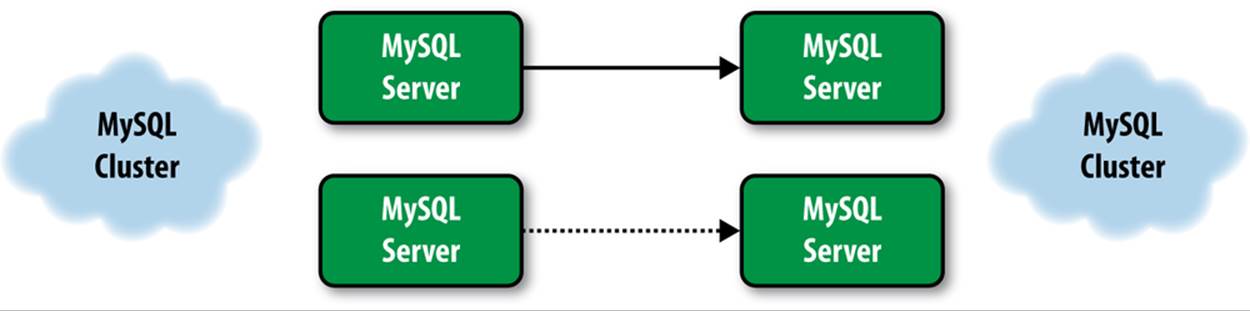
Figure A-3. Multichannel replication
Using the Current Database to Filter
The binlog filters can be quite convenient for eliminating statements for particular purposes.
For example, some statements may be meant only for the server, such as setting the engine of a table where you want the engines to be different on the master and the slave. There are many reasons to use a different engine on the slave, including the following:
§ MyISAM is more suitable for reporting, and because the binary log contains complete transactions, you can use InnoDB on the master for transactional processing and MyISAM on slaves for reporting and analytical processing.
§ To save memory, you can eliminate some tables on a slave used for analytical processing by replacing the engine with Blackhole.
You can suspend writing to the binary log by setting the SQL_LOG_BIN server variable to 0. For instance, Example A-1 turns off logging (SQL_LOG_BIN = 0) before changing a table to the MyISAM engine, so that it takes place only on the master, then turns logging back on (SQL_LOG_BIN = 1). However, setting SQL_LOG_BIN requires SUPER privileges, which you probably don’t want to grant to regular database users. Therefore, Example 6-8 shows an alternative way to change an engine on the master without logging it. (In the example, it is assumed that the table my_tableresides in a database my_db.) Create a dedicated database (in this case, we use the name no_write_db). Then, any user who wants to execute a statement that should not be replicated can USE the no_write_db database, and the statement will be filtered out. Because using a database requires access privileges, you can control who has the privileges to hide statements without providing the SUPER privilege to an untrusted user.
Example A-1. Two different ways to filter a statement from the binary log
master> SET SQL_LOG_BIN = 0;
Query OK, 0 rows affected (0.00 sec)
master> ALTER TABLE my_table ENGINE=MyISAM;
Query OK, 92 row affected (0.90 sec)
Records: 92 Duplicates: 0 Warnings: 0
master> SET SQL_LOG_BIN = 1;
Query OK, 0 rows affected (0.00 sec)
master> USE no_write_db;
Reading table information for completion of table and column names
You can turn off this feature to get a quicker startup with -A
Database changed
master> ALTER TABLE my_db.my_table ENGINE=MyISAM;
Query OK, 92 row affected (0.90 sec)
Records: 92 Duplicates: 0 Warnings: 0
More Columns on Slave Than Master
If you need to include additional columns on the slave that the master doesn’t have—for example, to record timestamps or add routing or other localized data—you can add columns to a table on a slave without having to add the columns on the master. MySQL replication supports this scenario by ignoring the additional columns. To actually insert data into the extra columns on the slave, define them to accept default values (an easy way to insert timestamps, for instance) or use a trigger defined on the slave to provide the values.
For statement-based logging, you can create the columns as follows:
1. Create the table on the master:
CREATE TABLE t1 (a INT, b INT);
2. Alter the table on the slave:
ALTER TABLE t1 ADD ts TIMESTAMP;
3. Sample insert on the master:
INSERT INTO t1(a,b) VALUES (10,20);
For row-based logging, you must make the new columns appear at the end of the row and have default values. Row-based replication will fail if you add columns in the middle or at the front of the row. As long as you add columns at the end of the table and give them default values, no special consideration needs to be taken regarding which statements to use when replicating, because row-based replication will extract the columns directly from the row being updated, inserted, or deleted.
Fewer Columns on Slave Than Master
If you need to have fewer columns on the slave than the master—for example, to protect sensitive data or to reduce the amount of data replicated—you can remove columns from a table on a slave without having to remove the columns on the master. MySQL row-based replication supports this scenario by ignoring the missing columns. However, the missing columns on the slave must be from the end of the master’s row.
For row-based replication, you can drop the columns as follows:
1. Create the table on the master:
CREATE TABLE t1 (a INT, b INT, comments TEXT);
2. Alter the table on the slave:
ALTER TABLE t1 DROP comments;
3. Sample insert on the master:
INSERT INTO t1 VALUES (1,2,"Do not store this on slave");
For row-based replication, you can replicate an arbitrary set of columns of a table without regard to whether they are at the end or not by using a trigger on the master to update the table from a base table in a separate database so that only the columns in the slave’s database are replicated.Figure A-4 shows a conceptual drawing of this solution. Here, a table with three columns is transformed using a trigger to a table in the replicated database.
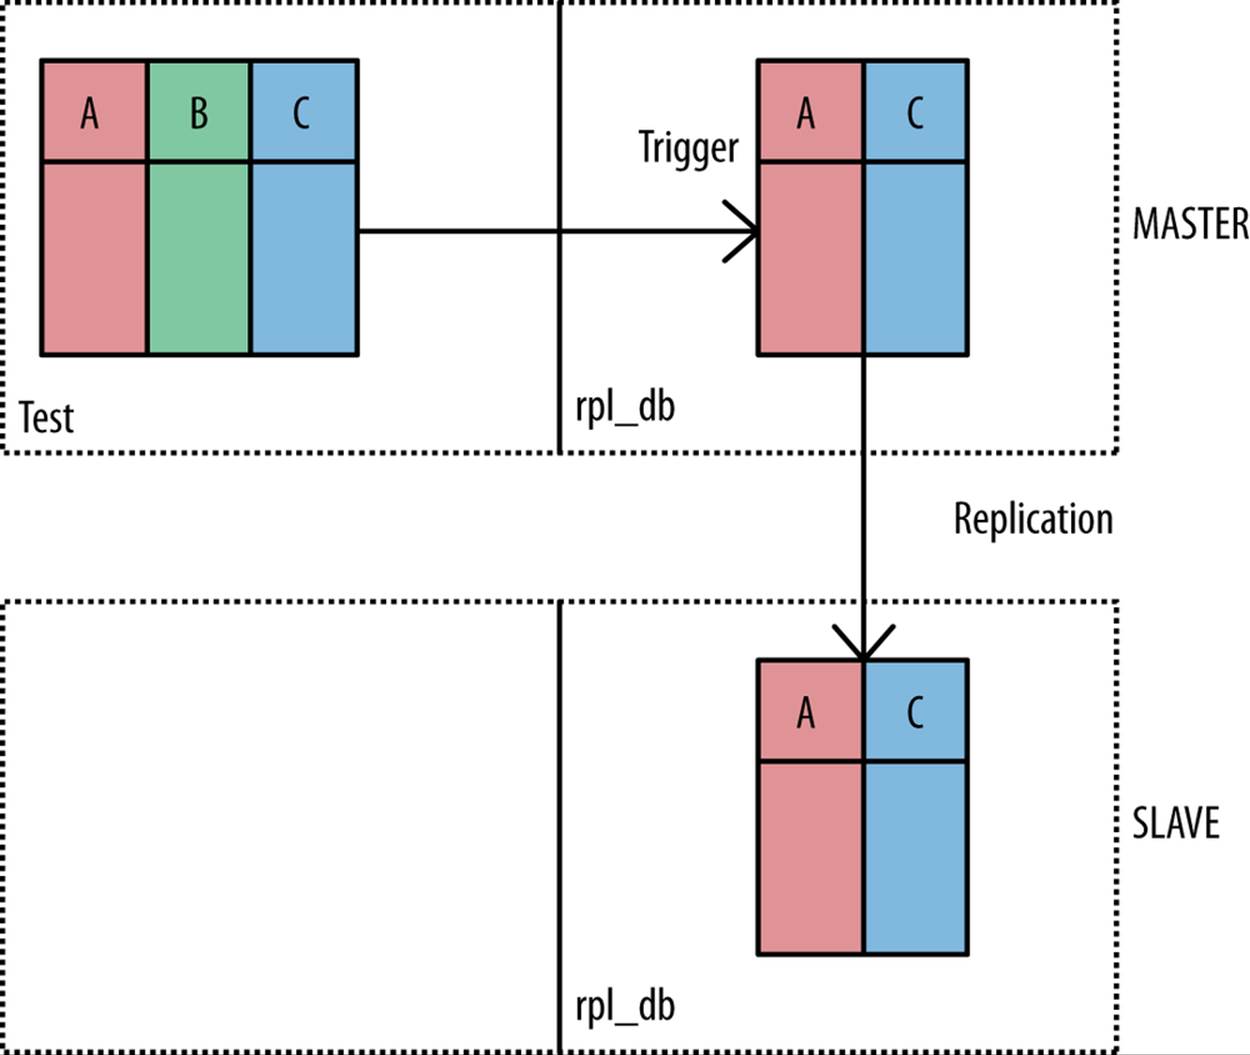
Figure A-4. Replicating a subset of columns
An example follows of how you can use a trigger to update the table in the replicated database. On the master, execute the following:
CREATE DATABASE rpl_db;
USE test;
CREATE TABLE t1 (a INT, b BLOB, c INT);
CREATE TRIGGER tr_t1 AFTER INSERT ON test.t1 FOR EACH ROW
INSERT INTO rpl_db.t1_v(a,c) VALUES(NEW.a,NEW.c);
USE rpl_db;
CREATE TABLE t1_v (a INT, c INT);
When executing a normal insert, the trigger will extract a subset of the columns and write it to the table in the rpl_db database. This database will then be replicated, but the original table will not:
USE test;
SET @blob = REPEAT('beef',100);
INSERT INTO t1 VALUES (1,@blob,3), (2,@blob,9);
Replicate Selected Rows to Slave
You can also segment replication so that only rows satisfying a certain condition are replicated. This technique uses a special database that is replicated from the master to the slave (this is accomplished by setting up a filter) and a trigger to determine which rows are to be replicated. The trigger determines which rows are to be replicated by inserting them into the replicated table (Figure A-5).

Figure A-5. Replicating a subset of rows
An example follows of how you can use a trigger to update the table in the replicated database with only rows having an odd value in column a inserted:
# Just replicate rows that have odd numbers in the first column.
USE rpl_db;
CREATE TABLE t1_h (a INT, b BLOB, c INT);
--delimiter //
CREATE TRIGGER slice_t1_horiz AFTER INSERT ON test.t1
FOR EACH ROW
BEGIN
IF NEW.a MOD 2 = 1 THEN INSERT
INTO rpl_db.t1_h VALUES (NEW.a, NEW.b, NEW.c);
END IF;
END//
--delimiter ;
Replication Heartbeat (5.4.4 or Later)
It is possible to improve the reliability of replication and improve failover using the replication heartbeat mechanism. When the heartbeat is turned on, the slave will periodically challenge the master. As long as the slave gets a response, it will continue as usual and challenge the master again at the next interval. The server maintains statistics of the number of heartbeats received, which can help to determine whether the master is offline or not responding. Figure A-6 shows a conceptual drawing of the heartbeat mechanism.
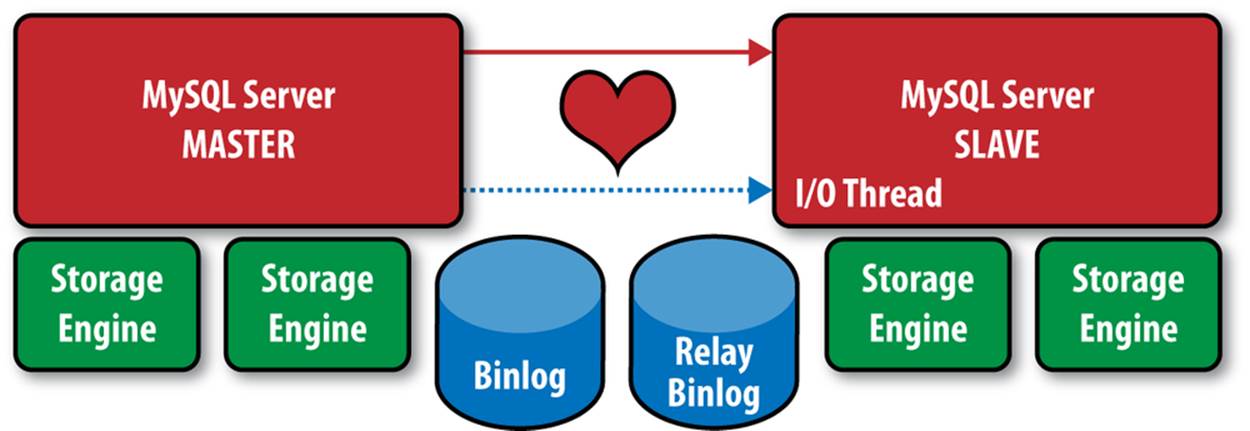
Figure A-6. Heartbeat during replication
The heartbeat mechanism allows the slave to detect when the master is still responding, and has the following advantages and capabilities:
§ Automatic checking of connection status
§ No more relay log rotates when the master is idle
§ Detection of master/slave disconnect, configurable in milliseconds
Thus, you can use the heartbeat mechanism to perform automatic failover and similar high availability operations. Use the following command to set the heartbeat interval on the slave:
CHANGE MASTER SET master_heartbeat_period= val;
The following commands allow you to check the settings and statistics of the heartbeat mechanism:
SHOW STATUS like 'slave_heartbeat period';
SHOW STATUS like 'slave_received_heartbeats';
Ignoring Servers in Circular Replication (5.5 or Later)
If you have a circular replication topology and one of the servers fails, you must change the topology to exclude the failed server. In Figure A-7, server A has failed and you must remove it from the circle. In this case, you can set server B to terminate server A’s events in the new circle.
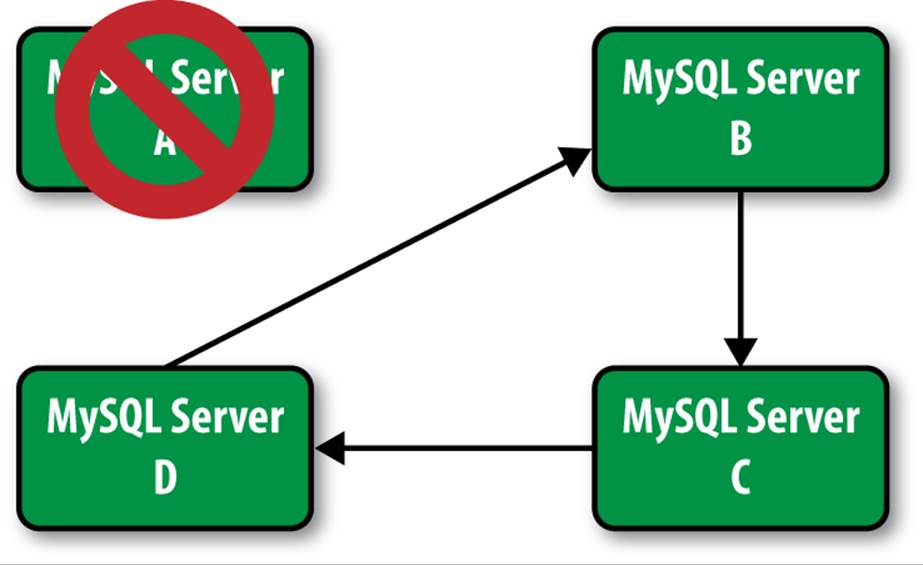
Figure A-7. Replacing a server in circular replication
You can do this by issuing the following command on server B:
CHANGE MASTER TO MASTER_HOST=C ... IGNORE_SERVER_IDS=(A)
This feature was introduced in MySQL version 5.5.
Time-Delayed Replication (5.6 or Later)
There is sometimes a need to delay replication—for example, when you want to ensure slaves are not overloaded with changes. This feature provides the ability to execute replication events on a slave so that it is n seconds behind the master at all times. You can set this parameter as shown:
CHANGE MASTER TO MASTER_DELAY= seconds
seconds is a nonnegative integer less than MAX_ULONG number of seconds for the slave to wait (attempts to set the number higher will be rejected with an error).
You can verify the delayed setup by running the SHOW SLAVE STATUS command and examining the Seconds_behind_master column of the output.
You can read more about time-delayed replication in the MySQL Reference Manual.
Shell Commands for Common Tasks
The set of shell functions in this section will add a lot of power to your shell scripts. The library is intended to be included from the script file and will parse the command-line options from the command line:
set -- `getopt 'S:u:P:h:p:' "$@"` ![]()
while [ x$1 != x-- ]
do
case $1 in
-S) opt_sock=$2 ; shift 2 ;;
-u) opt_user=$2 ; shift 2 ;;
-P) opt_port=$2 ; shift 2 ;;
-h) opt_host=$2 ; shift 2 ;;
-p) opt_pass=$2 ; shift 2 ;;
esac
done
connect_param () { ![]()
echo --user=$opt_user ${opt_pass:+--password="$opt_pass"}\
${opt_sock:+--socket="$opt_sock"}\
${opt_host:+--host="$opt_host"}${opt_port:+--port="$opt_port"}
}
mysql_exec () { ![]()
echo "$@" |
mysql `connect_param` --vertical --batch
}
stop_slave () {
mysql_exec STOP SLAVE $2
}
start_slave () {
mysql_exec START SLAVE $2
}
change_master () {
host=${1:+MASTER_HOST=\'$1\'}
port=${2:+MASTER_PORT=$2}
user=${3:+MASTER_USER=\'$3\'}
pass=${4:+MASTER_PASSWORD=\'$4\'}
file=${5:+MASTER_LOG_FILE=\'$5\'}
pos=${6:+MASTER_LOG_POS=$6}
mysql_exec CHANGE MASTER TO \
$host ${host:+,} $port ${port:+,}\
$user ${user:+,} $pass ${pass:+,}\
$file ${file:+,} $pos
}
fetch_slave_exec_pos () {
mysql_exec SHOW SLAVE STATUS | ![]()
grep '\<Relay_Master_Log_File\|\<Exec_Master_Log_Pos' |
cut -f2 -d:
}
fetch_slave_read_pos () {
mysql_exec SHOW SLAVE STATUS |
grep '\<Master_Log_File\|\<Read_Master_Log_Pos' |
cut -f2 -d:
}
fetch_master_pos () {
mysql_exec SHOW MASTER STATUS |
grep '\<File\|\<Pos' | cut -f2 -d:
}
slave_wait_for_empty_relay_log () {
stop_slave IO_THREAD
fetch_slave_read_pos | {
read file pos
mysql_exec "SELECT MASTER_POS_WAIT('$file',$pos)"
}
stop_slave SQL_THREAD
}
![]()
Options are read using the standard getopt UNIX command. The intended usage of this library is to use source to pull it in, and it will then read the options from the command line. It accepts -h for specifying the hostname, -P for specifying the port, -u for specifying the user, and -p for specifying the password.
![]()
Function that prints the connection parameters necessary to use for the mysql command. All the commands that accept the same parameters as mysql can use this function as well, so you can issue a mysqladmin connection_param shutdown to shut down the server (for example).
![]()
Helper function to simplify execution of SQL commands. The command is using the connection information set up previously and assumes that all the arguments provided makes up the command.
Because this function is intended to be used from other shell functions, the column names are skipped and the output is a simple columnar output written to standard output. To process the result further, you will have to split on columns using, for example, cut.
![]()
Here you see an example of how to handle the result set. In this case, the lines containing the file and position of the last executed transaction are filtered out, and then cut is used to extract the columns with the value.
Multisource Replication in a Shell Script
A MySQL slave cannot be set up to read changes from multiple masters, but it is possible to simulate it by using time-sharing where a client issues SQL commands to the slave in a round-robin fashion, as in Figure A-8.
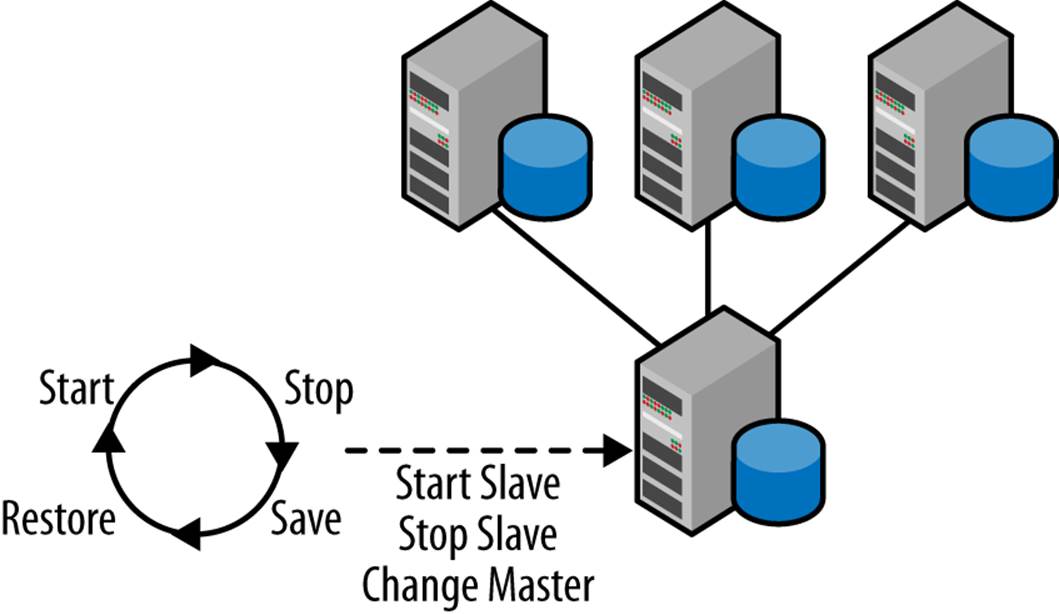
Figure A-8. Multi-master using round-robin
The procedure can be implemented in a few different ways, depending on what language you want to use and to some extent also what versions of the server you have. The general procedure is:
1. Initialize the procedure by storing the log position and the log file for all the masters. This position should be where you want to start replication.
2. Select one of the masters as the current master.
3. Repeat the following steps:
a. Set the slave to read from the current master using CHANGE MASTER.
b. Start the slave using START SLAVE.
c. Let replication run for a while to replicate from the current master.
d. Stop replication using STOP SLAVE.
e. Save away information about the current position of replication by using SHOW SLAVE STATUS.
Implementing the client using our library of shell functions from Shell Commands for Common Tasks and a few extra functions demonstrate an easy implementation using a shell script. This procedure can, of course, be implemented in a number of other languages. The code saves the position data in files, where each file is numbered sequentially and is based on the name of the slave server:
fetch_host_and_pos () { ![]()
mysql_exec $1 SHOW SLAVE STATUS |
grep '\<Master_\(Host\|Port\|Log_File\)\|\<Read_Master_Log_Pos' |
cut -f2 -d:
}
stop_and_save () { ![]()
sock="/var/run/mysqld/$1.sock"
stop_slave $socket
fetch_host_and_pos $sock >$1.savepos
}
restore_and_start () { ![]()
socket="/var/run/mysqld/$1.sock"
cat $1.savepos | {
read host
read port
read file
read pos
change_master $socket $host $port $file $pos
start_slave $socket
}
}
cnt=1
while true ![]()
do
stop_and_save mysqld.$cnt
cnt=`expr $cnt % 5 + 1`
restore_and_start mysqld.$cnt
sleep 60
done
![]()
This is a helper function to fetch the host and position so that it can be saved to the file. Because the data is retrieved in column format, it is possible to grep for the lines containing the position information, and then cut out the column names.
![]()
This function stop the slave using STOP SLAVE, fetch the position of the current master using the fetch_host_and_pos function, and save it to the file provided as argument. This should be the file used for the current master.
![]()
This file restore the position from the given file, uses CHANGE MASTER to set the slave to the correct position, and then starts the slave using START SLAVE.
![]()
Here the loop shown in Figure A-8 is executed repeatedly and switches between the masters.
Stored Procedure to Change Master
When writing stored procedures for performing various tasks, it is quite useful to be able to supply declared variables or user variables instead of constant values. Unfortunately, this is not the case for all commands in MySQL. For example, CHANGE MASTER does not accept parameters, so in order to be able to use parameters for the command, it is necessary to be a little creative.
A statement can be prepared from a string, so by constructing a string containing the statement, it is possible to execute any statement you like. This trick can be used to construct any statement you fancy:
delimiter $$ ![]()
CREATEPROCEDURE change_master(
host VARCHAR(50) NOT NULL, port INTNOT NULL,
user VARCHAR(50) NOT NULL, passwd VARCHAR(50) NOT NULL,
file VARCHAR(50), pos LONG) ![]()
BEGIN
SET @cmd = CONCAT('CHANGE MASTER TO ',
CONCAT('MASTER_HOST = "', host, '", '),
CONCAT('MASTER_PORT = ', port, ', '),
CONCAT('MASTER_USER = "', user, '", '),
CONCAT('MASTER_PASSWORD = "', passwd, '"')));
IF name ISNOT NULL AND pos ISNOT NULL THEN
SET @cmd = CONCAT(@cmd,
CONCAT(', MASTER_LOG_FILE = "', name, '"'),
CONCAT(', MASTER_LOG_POS = ', pos));
END IF;
PREPARE change_master FROM @cmd; ![]()
EXECUTE change_master;
DEALLOCATE PREPARE change_master;
END $$
delimiter ; ![]()
![]()
![]()
To be able to define the body of stored routines, it is necessary to change delimiter from a semicolon to something else. In this example, $$ is used as the delimiter. It is convenient because it does not normally occur inside the body of stored procedures, but you can of course use any delimiter you like. Just make sure that it does not appear inside the body of the stored routine.
![]()
The position given by a file and a position within the file can be NULL. In that case, no file or position will be given to the CHANGE MASTER command, so replication will start from the beginning.
![]()
The prepare statement accepts only a user variable, so it is necessary to store the string in a user variable. It would be convenient to be able to use a declare local variable but, alas, the syntax does not support it.
Implementing Multisource Replication in Pure SQL (5.6 or Later)
As you saw in the section Multisource Replication in a Shell Script, a slave can currently not replicate from multiple master (multisource replication) at the same time, but it is possible to replicate from multiple masters by using a time-sharing scheme where the current master is switched at regular intervals.
The solution in Multisource Replication in a Shell Script used a separate client—implemented there in the Bourne shell—to work as scheduler and change the master for the server regularly. Wouldn’t it be neat if there were a way to have the server change master itself? The good news is that it is possible... if you are using MySQL 5.6. By using the tables that were introduced in MySQL 5.6 to handle transactional replication (see Transactional Replication) it is possible to implement a time-share multisource entirely in SQL by creating an event (as in CREATE EVENT) to perform the master change.
To implement this, it is necessary to have a list of masters to traverse. The list need to contain all the necessary connection information, as well as the position where replication left off before switching to the next master. To keep track of the masters easily, there is also a column containing a server number (it is not the server ID, just a number used in the algorithm). In addition, it would be convenient if masters could be added and removed from the from the list without having to stop the event scheduler.
Table A-1. Definition of Table My_Masters
|
Field |
Type |
Null |
Key |
Default |
|
server_id |
int(10) unsigned |
NO |
PRI |
NULL |
|
host |
varchar(50) |
YES |
NULL |
|
|
port |
int(10) unsigned |
YES |
3306 |
|
|
user |
varchar(50) |
YES |
NULL |
|
|
passwd |
varchar(50) |
YES |
NULL |
The table described in Table A-1 suits the purpose well. In order to keep track of the current master, a Current_Master table is introduced as well, holding the index of the currently active master. To be able to support addition and removal of masters, both tables have to be transactional because we will update the information in both tables as a single transaction. In this case, it would have been convenient if a session variable could be used to keep track of the index of the current server, but each time an event is started, a new sessions is spawned, so the value of the session variable is not kept between invocations of the event; therefore we have to store the value in a table.
Here is the complete definition of the event that switches the master (followed by a step-by-step explanation):
delimiter $$
CREATE EVENT multi_source
ON SCHEDULE EVERY 10 SECOND DO
BEGIN
DECLARE l_host VARCHAR(50);
DECLARE l_port INTUNSIGNED;
DECLARE l_user TEXT;
DECLARE l_passwd TEXT;
DECLARE l_file VARCHAR(50);
DECLARE l_pos BIGINT;
DECLARE l_next_idx INTDEFAULT 1; ![]()
SET SQL_LOG_BIN = 0; ![]()
STOP SLAVE IO_THREAD; ![]()
SELECT master_log_name, master_log_pos
INTO l_file, l_pos
FROM mysql.slave_master_info;
SELECT MASTER_POS_WAIT(l_file, l_pos);
STOP SLAVE;
START TRANSACTION; ![]()
UPDATE my_masters AS m, ![]()
mysql.slave_relay_log_info AS rli
SET m.log_pos = rli.master_log_pos,
m.log_file = rli.master_log_name
WHERE idx = (SELECT idx FROM current_master);
SELECT idx INTO l_next_idx FROM my_masters ![]()
WHERE idx > (SELECT idx FROM current_master)
ORDERBY idx LIMIT 1;
SELECT idx INTO l_next_idx FROM my_masters ![]()
WHERE idx >= l_next_idx
ORDERBY idx LIMIT 1;
UPDATE current_master SET idx = l_next_idx;
COMMIT;
SELECT host, port, user, passwd, log_pos, log_file
INTO l_host, l_port, l_user, l_passwd, l_pos, l_file
FROM my_masters
WHERE idx = l_next_idx;
CALL change_master(l_host, l_port, l_user, l_passwd, l_file, l_pos); ![]()
START SLAVE;
END $$
delimiter ;
![]()
Note that this variable is declared with a default of 1. We will use that in ![]() .
.
![]()
This disables the binary log, as we don’t want to write any of the statements to the binary log. Because this is an event, the variable will automatically be reset at the end of the execution and not affect anything else.
![]()
The next part of the event stop the slave I/O thread and empty the relay log before switching the master. This is done by reading the last seen position from the Slave_Master_Info table and then use MASTER_POS_WAIT to wait until the end of the relay log is reached.
![]()
Because we want the changes to both the update of the My_Masters and Current_Master table to be performed atomically, we wrap the code to update the tables in a transaction.
![]()
The position where the old master stopped is saved away in My_Masters.
![]()
Finding the next master in turn, is necessary to do as a two-step procedure. This SELECT picks the next master according to the index. Recall that you can add and remove masters while the scheduler is running, so there can be gaps in the sequence of indexes.
![]()
Wrap-around is handled by relying on the default of 1 used in ![]() . However, if there were a wrap-around, the master with index 1 (the default for l_next_idx) might not exist. In that case, we do a scan and find the first existing index that is equal to or greater than l_next_idx.
. However, if there were a wrap-around, the master with index 1 (the default for l_next_idx) might not exist. In that case, we do a scan and find the first existing index that is equal to or greater than l_next_idx.
![]()
After fetching information about the new master, we issue a CHANGE MASTER using the stored procedure introduced in Stored Procedure to Change Master.
All materials on the site are licensed Creative Commons Attribution-Sharealike 3.0 Unported CC BY-SA 3.0 & GNU Free Documentation License (GFDL)
If you are the copyright holder of any material contained on our site and intend to remove it, please contact our site administrator for approval.
© 2016-2026 All site design rights belong to S.Y.A.