MySQL High Availability (2014)
Part II. Monitoring and Managing
Chapter 17. Managing MySQL Replication with MySQL Utilities
Joel was feeling pretty good about his job. Over the last few months he had conquered many tasks, including setting up replication and tuning MySQL. Most recently, his boss agreed to allow Joel to hire another MySQL administrator. Yes, Joel had finally made the job his own.
A familiar knock followed by an equally familiar intrusion by his boss broke Joel’s revelry.
“Joel, I’ve got a few candidates I’d like to interview. Before you do that, I’d like you to write up a training manual. Make sure you include all of the tricks and tips as well as all of your administrative trickery so that our new employee can come up to speed quickly. Start with that replication thing. That worries me.”
Not waiting for a reply, Joel’s boss disappeared on his way to the next drive-by tasking. Joel chuckled as he considered his latest challenge.
Suddenly, Joel’s boss thrust his head back into the doorway and said, “Be sure to use that DocBook format the documentation guys like so much.”
“Great!” Joel said with a mock smile as his boss once again disappeared. “I guess I’ll go visit the documentation team to see what tools they use to compile their DocBook files.”
MySQL replication is a very sound and reliable server feature. As you have seen in previous chapters, initiating and configuring replication requires a certain amount of knowledge as well as a set of procedures tailored to your needs. Knowing what to do when is the key to managing MySQL replication well.
Many of the best practices for managing MySQL replication have been presented in previous chapters. Most have been presented in the context of learning replication and applying replication features for high availability solutions. However, we felt the book would be more complete if we devoted a special chapter to summarizing the common tasks involved with replication. We also highlight two important tools you can use to achieve high availability from MySQL right out of the box, without third-party tools or complicated installation steps.
In this chapter, we will examine the core replication administration tasks, best practices, and tools for managing multiple replication servers, including tools for performing failover and switchover. We begin with a short review of the common tasks that administrators of replication will encounter.
Common MySQL Replication Tasks
Managing a replication installation is thankfully very easy. There are a few things that must be done on a regular basis, but it is seldom necessary to change or tune the replication configuration. This section summarizes the common tasks that you are likely to encounter when managing MySQL replication.
We omit the obvious task—setting up replication—and instead refer you to Chapter 3 for a complete tutorial on setting up replication. However, we will show you a tool that you can use to make setting up replication a one-command endeavor.
Checking Status
Let’s begin with the most frequent replication administration task you will likely perform: checking the status of your slaves for errors and other anomalies. This is the basic way to check the status of a replication. The key command to do this is SHOW SLAVE STATUS. This command displays a long list of information about the slave. We see an example of the output in Example 17-1.
Example 17-1. SHOW SLAVE STATUS example
mysql> SHOW SLAVE STATUS \G
*************************** 1. row ***************************
Slave_IO_State: Waiting for master to send event ![]()
Master_Host: localhost ![]()
Master_User: rpl ![]()
Master_Port: 13001 ![]()
Connect_Retry: 60
Master_Log_File: clone-bin.000001 ![]()
Read_Master_Log_Pos: 594 ![]()
Relay_Log_File: clone-relay-bin.000002
Relay_Log_Pos: 804
Relay_Master_Log_File: clone-bin.000001
Slave_IO_Running: Yes ![]()
Slave_SQL_Running: Yes ![]()
Replicate_Do_DB:
Replicate_Ignore_DB:
Replicate_Do_Table:
Replicate_Ignore_Table:
Replicate_Wild_Do_Table:
Replicate_Wild_Ignore_Table:
Last_Errno: 0 ![]()
Last_Error: ![]()
Skip_Counter: 0
Exec_Master_Log_Pos: 594 ![]()
Relay_Log_Space: 1008
Until_Condition: None
Until_Log_File:
Until_Log_Pos: 0
Master_SSL_Allowed: No
Master_SSL_CA_File:
Master_SSL_CA_Path:
Master_SSL_Cert:
Master_SSL_Cipher:
Master_SSL_Key:
Seconds_Behind_Master: 0 ![]()
Master_SSL_Verify_Server_Cert: No
Last_IO_Errno: 0 ![]()
Last_IO_Error: ![]()
Last_SQL_Errno: 0 ![]()
Last_SQL_Error: (16)
Replicate_Ignore_Server_Ids:
Master_Server_Id: 101 (17)
Master_UUID: aa73ae8c-2a9d-11e2-936b-7e5b4e755f7e (18)
Master_Info_File: /Volumes/Source/source/temp_13002/master.info
SQL_Delay: 0 (19)
SQL_Remaining_Delay: NULL (20)
Slave_SQL_Running_State: Slave has read all relay log; waiting
for the slave (21) (22)
I/O thread to update it
Master_Retry_Count: 86400
Master_Bind:
Last_IO_Error_Timestamp: (23)
Last_SQL_Error_Timestamp: (24)
Master_SSL_Crl:
Master_SSL_Crlpath:
Retrieved_Gtid_Set: AA73AE8C-2A9D-11E2-936B-7E5B4E755F7E:1-2 (25)
Executed_Gtid_Set: AA73AE8C-2A9D-11E2-936B-7E5B4E755F7E:1-2, (26)
BB8BF918-2A9D-11E2-936B-C5790DD70EC1:1
While this example contains a great many entries, there are a few critical lines you should examine when checking the status of a slave. We have highlighted these areas in the following groups:
![]()
![]()
![]()
![]()
![]() (17)
(17)
Check these entries for master connection information. You want to ensure the slave is connected to the correct master.
![]()
![]()
![]()
![]()
![]() (16) (22) (23) (24)
(16) (22) (23) (24)
Check these entries for errors. All of these entries should show 0 for error numbers, be blank for error messages, or not include any state that indicates an error.
![]()
![]()
![]() (21)
(21)
Check these entries for state information. As we have seen in previous chapters, there can be a number of different states. Usually you want to make sure there are no states indicating the slave is encountering an error or has lost connection with the master.
![]()
![]() (18) (19) (20)
(18) (19) (20)
Check for slave delay at these entries. You are looking for how far (seconds, transactions, etc.) the slave is from the master. Depending on your installation, some delay may be acceptable.
(18) (25) (26)
Check these entries for issues with GTIDs. Use the information here to diagnose missing transactions on the slave.
See the online reference manual for more details about what each of these entries contain and what their normal values should be for a healthy slave.
Aside from the slave status, you can also glean some information from the SHOW PROCESSLIST output on the master. Example 17-2 shows an excerpt of the command run on the master. This shows the typical state for a healthy slave connection as illustrated by the dump thread on the master.
Example 17-2. SHOW PROCESSLIST excerpt
mysql> SHOW PROCESSLIST \G
*************************** 1. row ***************************
Id: 4
User: rpl
Host: localhost:51234
db: NULL
Command: Binlog Dump GTID
Time: 2623
State: Master has sent all binlog to slave; waiting for binlog to be updated
Info: NULL
*************************** 2. row ***************************
Id: 7
User: rpl
Host: localhost:51374
db: NULL
Command: Binlog Dump GTID
Time: 4
State: Master has sent all binlog to slave; waiting for binlog to be updated
Info: NULL
[...]
In the example, we see one entry for the binlog dump thread for each slave attached. This master has two slaves attached and they are both healthy, because there’s no indication of an error in the state field.
These commands are very good at giving all of the details about the slave and its connection with the master and are easy to issue from a mysql client. However, what if you have dozens of slaves or even hundreds of slaves, or better still a tiered topology with intermediate masters and thousands of slaves? Running these commands on each slave can get very tedious.
Fortunately, there are tools you can use to make life easier. For installations of many slaves and complex topologies, the MySQL Enterprise Monitor solution is most likely your tool of choice for its one-stop monitoring capabilities.
However, there is an alternative. Even if you have many slaves, you may want to check a few of them or perhaps check only the slaves for a particular master. In this case, you can use the health command of the mysqlrpladmin utility to generate a health report for a master and its slaves. We will see this utility in action later in this chapter.
Stopping Replication
The next most common replication administration task is stopping and restarting replication. We recommend doing these operations any time you need to do something to the slave: for maintenance reasons, to correct errors in the data, or perhaps for application specific changes.
The commands for starting and stopping replication include commands for resetting the replication configurations on the master or slave. We have seen these commands in previous chapters but summarize them here for convenience (we also include variants as separate entries for clarity):
STOP SLAVE
Stops the replication threads (SQL, IO) on the slave. Use this command when you wish to disconnect the slave from the master and stop receiving updates.
STOP SLAVE IO_THREAD
Stops the replication IO thread only. Use this command when you wish to stop receiving updates from the master but still want to process any events in the slave’s relay log.
STOP SLAVE SQL_THREAD
Stops the replication SQL thread only. Use this command when you wish to stop processing events in the relay log but do not want to stop receiving updates from the master.
START SLAVE
Starts the slave’s replication threads.
START SLAVE UNTIL SQL_BEFORE_GTIDS gtid_set
Start the replication threads until both have reached the first GTID before the GTID in gtid_set is encountered, at which time the threads are stopped.
START SLAVE UNTIL SQL_AFTER_GTIDS gtid_set
Start the replication threads until both have reached the last GTID before the GTID in gtid_set is encountered at which time the threads are stopped.
START SLAVE UNTIL MASTER_LOG_FILE='file', MASTER_LOG_POS=position
Start the replication slaves until the master’s log file and position are reached, after which the slave threads are stopped.
START SLAVE UNTIL RELAY_LOG_FILE='file', RELAY_LOG_POS=position
Start the replication slaves until the slave’s relay log file and position are reached, after which the slave threads are stopped.
RESET SLAVE
This command causes the slave to delete the settings for connecting to the master. It is designed to be used for making a clean start of replication (e.g., when moving a slave from one master to another—also called pruning). The command also starts a new relay log ceasing any reads to existing relay logs.
RESET MASTER
This command is issued on the master. It is used to delete all of the binary log files and the binary log index creating a new binary log and index. Clearly, this command is one you will want to use very sparingly and never in the normal course of replication management. For example, it will disrupt slaves (perhaps with data loss or inconsistency) when run on a master with active slaves connected. A case where you may use it is if you have a master that has been taken offline (or has failed) and you later wish to return it to service as a slave for another master.
TIP
You can specify a thread type for the START SLAVE UNTIL command when used with SQL_BEFORE_GTIDS or SQL_AFTER_GTIDS. You can also specify only the SQL_THREAD option for the other START SLAVE UNTIL forms to act only on the SQL thread. See the online reference manual for a complete list of the options for the START SLAVE command.
If you need to stop, start, or reset a lot of slaves, connecting to each and every one may become time consuming if you haven’t the time to write a script to repeat the command on a list (or something similar). Fortunately, there is a tool you can use to issue these commands to a list of slaves. We will see the mysqlrpladmin utility in more detail later in this chapter.
Adding Slaves
Aside from checking on the health of your slaves and the routine starting and stopping replication on slaves, the next most common replication administrative task is adding slaves to a topology. The purpose of doing so may be for scale out, making the data accessible to remote areas, or the normal maintenance process of removing a slave, making system changes, then returning it to the topology.
The most important element for this operation, and indeed the one that trips up most novice administrators, is getting the slave in sync with the master. This is particularly complicated when working with a slave that has older states of the databases. While the process is essentially the same, the case where you are adding a new slave with no data is a bit easer (only one data loading option to consider).
Before you add a slave to the topology, you must consider whether the slave has an older state of the data on the master. If this is true, you have several options.
§ You can overwrite the data with a copy from the master. This would normally be applying a backup file taken from the master to the slave.
§ You can attempt to roll forward the master’s binary log from the last known master’s binary log and position. This technique, called point-in-time recovery (PITR), has been mentioned elsewhere in this book. Depending on how far behind the slave is, this may be a faster option than waiting for the slave to catch up. Note that this requires you know the master’s binary log file and position at the time the slave was taken out of the topology.
§ You can connect to the master and let the slave catch up.
TIP
You can discover the slave’s last known master binary log file and position from the master information stored in the master.info file, for slaves started with the --master-info-repo=FILE option. You can also query the mysql.slave_master_infotable for slaves started with the --master-info-repo=TABLE option.
The process of adding a slave involves deciding how to set up the data on the slave and then executing the plan using backups, file copies, or some other form of data recovery. Once the slave has data that is close to or the same as the master, you can then set up replication in the usual manner, as described in Chapter 3. The following list summarizes the steps for completeness:
1. If you’re not using GTIDs, be sure the new slave’s --server-id is set to a value that is unique among your master and its slaves.
2. Prepare the data on the slave.
3. Issue the CHANGE MASTER command on the slave. If using GTIDs, use MASTER_AUTO_POSITION=1 instead of the master log file and position
4. Issue the START SLAVE command on the slave.
5. Check the slave’s SHOW SLAVE STATUS for errors.
The preceding process is called slave provisioning. Although you can’t perform all of these steps with a single command, there are helper utilities to make each of the steps easier. We will see these utilities in action later in this chapter.
MySQL Utilities
Oracle has included a set of very useful administrative tools called MySQL Utilities, which is a subproduct of MySQL Workbench. The utilities are written purely in Python and are all command-line based.
Included in MySQL Utilities are a number of helpful utilities for managing replication. Many of the tasks discussed in the previous section can be accomplished using these utilities. In addition to replication-specific utilities, there are a number of utilities that can be used in a variety of scenarios involving replication.
The following sections will present the utilities available. Rather than present an option-by-option discussion of each feature for each utility, we present the goals of the utilities along with discussions on how best to use them with replication. If you need more specific information about the utilities—the available options, features, and limitations—consult the online documentation for MySQL Utilities. The documentation contains a number of additional example scenarios and in-depth description of all options.
Most utilities provide a verbosity option, --verbose or just -v, that can be specified multiple times to increase the amount of information printed. The highest level of verbosity is usually --verbose --verbose --verbose or -vvv, to indicate a verbosity of three.
Getting Started
MySQL Utilities are available via a direct download from the MySQL download site. To download from that site, visit the MySQL Developers’ Zone download page. You will find downloads for most popular platforms, including .tar and .zip files for those who wish to install the utilities using the traditional python ./setup.py install command.
The only installation requirements for installing and using MySQL Utilities are Python 2.7 or higher and the Connector/Python database connector. Connector/Python can also be found on the download site. The connector must be installed before running a utility but may be installed after MySQL Utilities.
Using the Utilities Without Workbench
To use MySQL Utilities outside of MySQL Workbench, you can open any terminal (console) and, if it is not already specified in your environment or profile, set the PYTHONPATH environment variable. It must include the locations of both MySQL Utilities and Connector/Python. If you installed both using a platform-specific installer or via the standard Python install command, both products were installed in your PythonXX folder.
Using the Utilities via Workbench
If you download and install Workbench version 6 and later, and you have installed MySQL Utilities, you can access MySQL Utilities from within Workbench. Versions of MySQL Workbench prior to version 6 include MySQL Utilities in the installation. MySQL Workbench version 6 and later do not.
To access MySQL Utilities from Workbench, open Workbench, then either click on the Plugins menu item and choose “Start Shell for MySQL Utilities” or click on the multi-tool icon. You may need to widen the display or click on the right arrow icon to see the Utilities plug-in icon.Figure 17-1 highlights both methods of accessing MySQL Utilities.
When the plug-in is launched, it will open a terminal (console) and print a list of the utilities available. Figure 17-2 demonstrates the results of launching the utilities plug-in.
NOTE
The development of MySQL Utilities and Workbench often result in new versions available several times a year. Be sure to check the downloads page for the latest version of MySQL Utilities and MySQL Workbench.
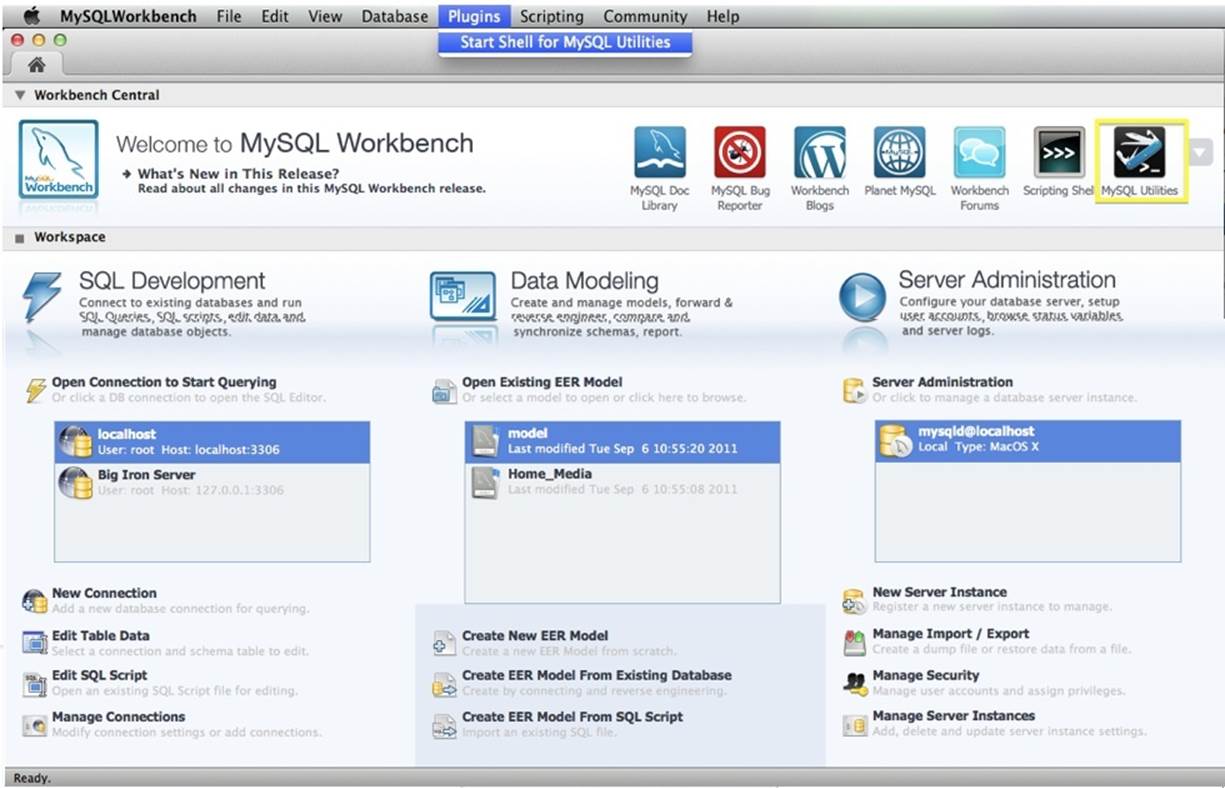
Figure 17-1. Accessing MySQL Utilities from Workbench

Figure 17-2. The MySQL Utilities Plugin Console
General Utilities
This section includes a brief overview of those utilities that are general purpose in nature. We describe each utility and present a brief example of its execution along with some ideas for how the utility can be used to help manage replication.
TIP
While some utilities provide shortcuts such as -s for certain options, all utilities have the ability to use prefixes for option names provided the prefix matches a single option. For example, suppose there is a utility with an option named --discover-slaves-login and there are no other options that have similar prefixes. You can use --discover= or --disco instead of typing the entire option name. Clearly, this can be a huge time saver when entering many options.
Comparing Databases for Consistency: mysqldbcompare
Although data inconsistency is rare in a well-managed infrastructure, it is possible data can become corrupt. But it is not just data that could be inconsistent—the object definitions themselves can be inconsistent. Fortunately, the compare database utility is designed to compare both definitions as well as data.
In replication, it is less likely to encounter object definition differences. Most of the time, this is a result of user error but can be the result of errors occurring during the replication process. What is needed is a utility that allows you to compare two tables to determine any differences in the data.
Accidental or misdirected changes can cause data on a slave to become out of sync with the master. For example, if a user (or an application) writes to a slave, it has effectively introduced inconsistencies. Depending on the type of change, the inconsistency can go undetected for some time.
Data inconsistency can also occur if there are errors during transport of the changes from the master to the slave, or as a result of an unrelated failure of the slave during execution of events. In most cases, the error is detected right away, but it may be difficult to determine what inconsistencies exist or if any exist at all. Rather than take a chance that the data remains consistent after the slave is repaired, it is always a good idea to check for inconsistencies.
Checking for inconsistency is a non-trivial endeavor. There are also many ways one can determine inconsistencies. The mysqldbcompare utility builds checksums on a row-by-row basis, grouping them into chunks that are later compared to determine which chunk contains inconsistencies. While effective in identifying the exact rows that differ, due to the overhead involved in generating the checksums, running the utility against multiple databases or multiple tables with many rows may result in extended run times.
NOTE
This utility is considered an offline utility due to the overhead required to execute it, which includes a potentially long lock on the tables. If you decide to run the utility while the database is available to users, try to do so when response time is not critical and you can hold up the database with the resource-intensive utility.
Use with replication
mysqldbcompare can be used during recovery from data corruption problems on the slave. Because the utility requires locking of the tables to be compared, it is considered an offline utility.
To minimize impacts to production applications and users, the best use case is to choose a slave among the active, viable slaves and compare the databases between the known good slave and the recovered slave. You don’t have to take the servers offline, but it is best to suspend replication before running the compare to avoid the possibility of updates being blocked by the lock taken during the compare.
There are two uses of the utility for recovery. First, you can use the utility to compare the slave with the data issues with another slave to discover what has changed. Second, you can use the utility to determine whether the data recovery attempts were successful.
Once you have identified the rows that differ, you can begin efforts to correct the differences. There are many ways to go about this, from manual changes to the rows on the slave to running a data recovery process like backup or point-in-time recovery.
One feature makes this utility especially useful for recovery of data inconsistencies. It can generate the SQL commands needed to bring the databases into synchronization. This generates statements you can use on your slave to correct data inconsistencies.
Examples of mysqldbcompare
The following examples compare a database on two servers: two slaves in a replication topology. The first example detects missing views on server2. This may be OK for a slave. Some administrators will create views for application-specific features. Notice the data differences identified. Because we are running the utility on two slaves, we would expect the slaves to be identical, but clearly the row for the supplier table with id 2 was changed differently between the slaves. The good news is you now know which row to focus your attention to determine what changes are needed to bring the slaves into consistency.
$ mysqldbcompare --server1=root@slave1 --server2=root@slave2 \
inventory:inventory --run-all-tests
# server1 on slave1: ... connected.
# server2 on slave2: ... connected.
# Checking databases inventory on server1 and inventory on server2
WARNING: Objects in server1:inventory but not in server2:inventory:
VIEW: finishing_up
VIEW: cleaning
Defn Row Data
Type Object Name Diff Count Check
---------------------------------------------------------------------------
TABLE supplier pass FAIL FAIL
Data differences found among rows:
--- inventory.supplier
+++ inventory.supplier
@@ -1,2 +1,2 @@
code,name
-2,Never Enough Inc.
+2,Wesayso Corporation
In the next example, we run the same command, only this time we generate the data transformation statements needed to synchronize the databases and correct the data inconsistency. Compare this to the previous example. Notice the statements presented at the end of the listing. These are statements that can make your job of recovering from data inconsistency on a slave.
$ mysqldbcompare --server1=root@slave1 --server2=root@slave2 \
inventory:inventory --run-all-tests --difftype=sql
# server1 on slave1: ... connected.
# server2 on slave2: ... connected.
# Checking databases inventory on server1 and inventory on server2
WARNING: Objects in server1:inventory but not in server2:inventory:
VIEW: finishing_up
VIEW: cleaning
Defn Row Data
Type Object Name Diff Count Check
---------------------------------------------------------------------------
TABLE supplier pass FAIL FAIL
Data differences found among rows:
--- inventory.supplier
+++ inventory.supplier
@@ -1,2 +1,2 @@
code,name
-2,Never Enough Inc.
+2,Wesayso Corporation
#
# Transformation for --changes-for=server1:
#
UPDATE `inventory`.`supplier` SET name = 'Wesayso Corporation' WHERE code = 2;
Copying Databases: mysqldbcopy
There are times when you need to copy data from one server to another. Depending on the sizes of the databases you need to copy and the urgency or expediency of the copy, common offline solutions—a backup, file copy, or logical volume image—may be inconvenient to set up and execute. In these times, it would be easier to simply tell a utility to copy the databases. That is what the copy database utility, mysqldbcopy, is designed to do. mysqldbcopy copies all objects and the data in each database listed.
The copy database utility allows you to specify one or more databases to be copied from one server to another. There are options for renaming the databases on the destination server. You can also copy a database on the same server by specifying a different name for the database, thereby permitting you to rename databases without taking the original database offline.
Use with replication
One of the steps needed when adding a new slave is to load the slave with the data from the master, so you can then start replication without forcing the slave to read and execute many events from the master. Although it is often more efficient and faster to restore a backup from the master (or another up-to-date slave), it is sometimes necessary or convenient to copy a small amount of data. In this case, mysqldbcopy may be easier to execute than a partial restore.
Example of mysqldbcopy
The following example copies a single database from one server to another. Notice the messages printed as the copy executes. Not only are the objects and data copied, but the database-level grants are copied as well. Depending on your backup application, this last feature may make using this utility easier and faster than copying the data and then applying the grants manually.
$ mysqldbcopy --source=root@slave1 --destination=root@slave2 \
util_test:util_test
# Source on slave1: ... connected.
# Destination on slave2: ... connected.
# Copying TABLE util_test.t1
# Copying table data.
# Copying TABLE util_test.t2
# Copying table data.
# Copying TABLE util_test.t3
# Copying table data.
# Copying TABLE util_test.t4
# Copying table data.
# Copying VIEW util_test.v1
# Copying TRIGGER util_test.trg
# Copying PROCEDURE util_test.p1
# Copying FUNCTION util_test.f1
# Copying EVENT util_test.e1
# Copying GRANTS from util_test
#...done.
Exporting Databases: mysqldbexport
Copying data using MySQL’s database copy utilities involves two operations; reading the data from one server and writing the data to another server. There are times when you want or need to have copies of your data in a file for manipulation (correcting errors to many rows manually), for safekeeping, or for ingestion into analytical tools.
To meet these use cases, the copy operation was made into two utilities: mysqldbexport for exporting the data and mysqldbimport for importing it. The export and import database utilities are designed to perform a logical copy of the data. This means the utility will read tables one row at a time rather than reading the table data in binary form like a physical copy.
The export database utility is designed to copy object definitions, data, or both using the --export option. You can also specify which object types you want to include with the --skip option. Thus it is possible to export only the events for a given list of databases, only the data for a specific table, or all of the objects and data from a server.
Although the utility generates its output at the console (standard out), you can redirect the output to a file for use in other tools or for use by the import database utility.
One of the most powerful features of this utility is the ability to produce the output in one of several forms:
SQL
Produce SQL statements for object creation (CREATE) and data (INSERT). This is the default output format.
GRID
Display output in grid or table format like that of the mysql client.
CSV
Display output in comma-separated values format.
TAB
Display output in tab-separated format.
VERTICAL
Display output in single-column format like that of the \G command option in the mysql client.
NOTE
These formats are supported by a number of utilities, enabling you to pass the formats through further filtering to make the output easier to read or easier to use with external tools.
The export database utility is designed to support replication by adding the appropriate replication commands in the output stream. This permits you to use the output of the export as an import to a slave or a master depending on the option you specify. Use the --rpl option to instruct the utilty to add STOP SLAVE , CHANGE MASTER, START SLAVE commands to the output. For example, you can instruct the utility to include the replication commands for controlling a slave during import. To do so, use the --rpl=SLAVE option to copy data off of one slave with the goal of updating another slave that has fallen behind. The --rpl=SLAVE option adds a CHANGE MASTER command to the end of the output. When you import this file on another slave, the slave will connect to the same master as the slave where the export was run.
The --rpl=MASTER option also adds a CHANGE MASTER command to the end of the output. But this time, the master is the server where the export was run. This means when you import this file on another slave, the slave will connect to the slave where the export was run.
You can even tell the utility to generate both statements with the --rpl=BOTH option, allowing you to edit the import for use in different levels in your topology (slaves of the current server and peer slaves).
When replication statements are generated, they are always generated as SQL statements (regardless of the format chosen) and are written in the order they would be used during an import operation. The following shows the order of statements generated (the statements generated by use of the --rpl option are shown in bold):
1. STOP SLAVE
2. Object definitions
3. Data
4. CHANGE MASTER ...
5. START SLAVE
The utility also permits you to specify a separate file containing the replication commands. This lets you use the replication commands separately from the export. This may be most helpful when you use the replication mode to generate both forms of the CHANGE MASTER (current server as master or current servers master).
If you recall, the CHANGE MASTER command includes the replication user and password. You can specify this using the --rpl-user option in the form of username:password. For example, the --rpl-user=rpl:secret option instructs the mysqldbexport command to use rpl as the replication user and secret as the replication user password in the CHANGE MASTER command as shown here:
CHANGE MASTER TO MASTER_HOST = 'localhost', MASTER_USER = 'rpl',
MASTER_PASSWORD = 'secret', MASTER_PORT = 13001,
MASTER_LOG_FILE = 'clone-bin.000001', MASTER_LOG_POS = 920;
If you omit the --rpl-user option, the CHANGE MASTER command will be generated with commented-out sections for the master user and password. This is because the information may not be known at the time the export is running. We show this in an upcoming example.
Another use for this utility with replication, perhaps the most useful, is during recovery of a slave from data corruption. When used together with the mysqldbcompare database consistency utility, mysqldbexport can be used to export the data from the known good slave. You then import it on the recovered slave to restore consistency.
The latest versions of both mysqldbcopy and mysqldbexport permit you to generate the correct GTID statements setting the GTID_PURGED list for use in importing the data on slaves. See the online reference manual for MySQL Utilities for more information.
Example of mysqldbexport
The following example shows an export of a database with replication statements and GTID statements. The format used is a comma separated file, but the replication commands are all SQL commands. Notice also the CHANGE MASTER command. To use this command, you need to provide the correct user and password for the replication user on the master.
Although the database in the example is trivial, the example illustrates the replication commands that enable the use of the utility in replication:
$ mysqldbexport --server=root:pass@localhost:13001 --export=both --rpl=master
--format=csv test_125
# Source on localhost: ... connected.
-- STOP SLAVE;
# Exporting metadata from test_125
# TABLES in test_125:
TABLE_SCHEMA,TABLE_NAME,ENGINE,ORDINAL_POSITION,COLUMN_NAME,COLUMN_TYPE,
IS_NULLABLE,COLUMN_DEFAULT,COLUMN_KEY,TABLE_COLLATION,CREATE_OPTIONS,
CONSTRAINT_NAME,REFERENCED_TABLE_NAME,UNIQUE_CONSTRAINT_NAME,UPDATE_RULE,
DELETE_RULE,CONSTRAINT_NAME,COL_NAME,REFERENCED_TABLE_SCHEMA,
REFERENCED_COLUMN_NAME
test_125,t1,InnoDB,1,a,int(11),YES,,,latin1_swedish_ci,,,,,,,,,,
test_125,t1,InnoDB,2,b,char(30),YES,,,latin1_swedish_ci,,,,,,,,,,
# VIEWS in test_125: (none found)
# TRIGGERS in test_125: (none found)
# PROCEDURES in test_125: (none found)
# FUNCTIONS in test_125: (none found)
# EVENTS in test_125: (none found)
# GRANTS in test_125: (none found)
#...done.
# Exporting data from test_125
# Data for table test_125.t1:
a,b
1,one
2,two
3,three
#...done.
# Connecting to the current server as master
# WARNING: No --rpl-user specified and multiple users found with
replication privileges.
-- CHANGE MASTER TO MASTER_HOST = 'localhost', # MASTER_USER = '',
# MASTER_PASSWORD = '', MASTER_PORT = 13001,
MASTER_LOG_FILE = 'clone-bin.000001', MASTER_LOG_POS = 920;
-- START SLAVE;
NOTE
Notice the -- prefix for the replication commands. These are added to permit the mysqldbimport to import the file and identify the rows with replication commands.
Importing Databases: mysqldbimport
The import database utility, mysqldbimport, is designed to read a file formatted in any of the formats generated by the export database utility. This permits you to store or use copies of your data in the form most convenient to the task at hand and import the data without having to convert it.
The import database utility simply reads the file, parsing formats other than the SQL format by converting them to SQL statements, and executes the commands on the server.
NOTE
You can use mysqldbimport to import your own files if they are formatted in one of mysqldbexport’s output formats.
One of the best features of this utility is the ability to import only the object definitions or the data. Use the --import option to tell the utility to import the object definitions, the data, or both.
Another feature is the ability to change the storage engine of the tables when importing, thereby performing two operations in one pass. This can be very handy when importing data on servers that do not support the storage engines of the originating server. For example, you can use this feature to restore MyISAM tables, changing the storage engine to InnoDB in a single step.
Lastly, you can use the --dryrun option to validate the file but not actually execute the statements generated.
Use with replication
mysqldbimport is a key companion to mysqleximport, which we discussed previously, to support the use cases for replication. The import operation is the natural follow-up to an export: you read from one server and write to another. If the file to be imported contains replication commands, they are executed as they are encountered.
Examples of mysqldbimport
The following example shows the result of importing the data from the database export example shown in Example of mysqldbexport. In this case, we tell the import database utility to include both object definitions and data:
$ mysqldbimport --server=root:pass@localhost:13001 test_125.sql --import=both
# Source on localhost: ... connected.
# Importing definitions and data from test_125.sql.
#...done.
When you use the mysqldbimport utility to import output from the mysqldbexport utility that contains replication commands (via the --rpl option), you need do nothing extra to make these commands execute. The mysqldbimport utility is designed to identify these commands even if the format of the file is not SQL and execute them.
However, you can disable these commands by using the --skip-rpl option. You may want to do this if the export was saved to a file and you are using the file to import to a server that isn’t or is not intended to be part of the topology. For example, if you want to generate a test server to test some application, you can use an export from a viable slave and skip the replication commands when importing the file on the test server.
Discovering Differences: mysqldiff
The database difference utility, mysqldiff, performs the object definition difference check required by mysqldbcompare data consistency utility and described in Comparing Databases for Consistency: mysqldbcompare. In fact, mysqldiff predates mysqldbcompare, which includes all its functionality. This shows an interesting consequence of the high degree of reuse in the MySQL Utilities supporting library.
Rather than replace the difference utility with the data consistency utility, it was decided to leave the utility for cases where users want to check object definitions only.
The output of mysqldiff is a difference report in one of several forms of your choice, including unified, context, differ, or SQL. The default is unified. The SQL mode can be valuable because it generates the transformation statements (ALTER statements) that can be used to transform the tables so that they are the same structure.
Use with replication
mysqldiff is very helpful with replication for detecting when objects have diverged. For example, one of your servers may fail to update data because one or more of the tables or dependent tables have changed in structure.
NOTE
MySQL replication permits you to have different columns on the master and slave. There are many legitimate use cases for these features. But mysqldiff does not currently recognize the valid forms of differences and instead identifies these cases as errors.
Example of mysqldiff
The following example demonstrates the use of the utility to detect differences in objects on two servers:
$ mysqldiff --server1=root:pass@localhost:13001
--server2=root:pass@localhost:13002
diff_db:diff_db
# server1 on localhost: ... connected.
# server2 on localhost: ... connected.
# Comparing diff_db to diff_db [PASS]
# Comparing diff_db.table1 to diff_db.table1 [FAIL]
# Object definitions differ. (--changes-for=server1)
#
--- diff_db.table1
+++ diff_db.table1
@@ -1,4 +1,5 @@
CREATE TABLE `table1` (
`a` int(11) DEFAULT NULL,
- `b` char(30) DEFAULT NULL
+ `b` char(30) DEFAULT NULL,
+ `c` timestamp NOT NULL DEFAULT CURRENT_TIMESTAMP
) ENGINE=InnoDB DEFAULT CHARSET=latin1
Compare failed. One or more differences found.
DETECTING MISDIRECTED WRITES
One of the ways that replication can go wrong is if updates to data are misdirected to slaves instead of the master. If your slaves are not running in read-only mode, a user could issue an update to the wrong server. When this happens, it may go undetected for some time and can cause some frustrating side effects.
This could manifest as a slave that stops unexpectedly for queries that run correctly on other slaves or different data displayed by applications on some slaves and not others.
There is a trick that you can use to help identify the rogue updates. If your tables do not have any restrictions on using timestamps, add a timestamp column to the tables on your slave. By default, this value will not be updated for any replicated event but will be updated for a data change issued on the slave directly.
The following transcript demonstrates how to set up this configuration and how to use the data to identify the rows changed (we have annotated the listing, removing extraneous output for brevity; the commands were run on a simple replication topology of a master and a single slave):
# Executed on the master:
mysql> CREATE DATABASE diff_db;
mysql> CREATE TABLE diff_db.table1 (a int, b char(30));
mysql> INSERT INTO diff_db.table1 VALUES (1, 'one'), (2, 'two'), (3, 'three');
mysql> SELECT * FROM diff_db.table1;
+------+-------+
| a | b |
+------+-------+
| 1 | one |
| 2 | two |
| 3 | three |
+------+-------+
# Executed on the slave:
mysql> SELECT * FROM diff_db.table1;
+------+-------+
| a | b |
+------+-------+
| 1 | one |
| 2 | two |
| 3 | three |
+------+-------+
# Alter the table on the slave:
mysql> ALTER TABLE diff_db.table1
add column c timestamp default NOW() after b;
### Enter the rogue update ###
mysql> INSERT INTO diff_db.table1 VALUES (4, 'four', NULL);
mysql> SELECT * FROM diff_db.table1;
+------+-------+---------------------+
| a | b | c |
+------+-------+---------------------+
| 1 | one | 0000-00-00 00:00:00 |
| 2 | two | 0000-00-00 00:00:00 |
| 3 | three | 0000-00-00 00:00:00 |
| 4 | four | 2012-11-14 15:34:08 |
+------+-------+---------------------+
# Executed on the master:
mysql> INSERT INTO diff_db.table1 VALUES (7, 'seven'), (8, 'eight');
mysql> SELECT * FROM diff_db.table1;
+------+-------+
| a | b |
+------+-------+
| 1 | one |
| 2 | two |
| 3 | three |
| 7 | seven |
| 8 | eight |
+------+-------+
# Executed on the slave:
mysql> SELECT * FROM diff_db.table1;
+------+-------+---------------------+
| a | b | c |
+------+-------+---------------------+
| 1 | one | 0000-00-00 00:00:00 |
| 2 | two | 0000-00-00 00:00:00 |
| 3 | three | 0000-00-00 00:00:00 |
| 4 | four | 2012-11-14 15:34:08 |
| 7 | seven | 0000-00-00 00:00:00 |
| 8 | eight | 0000-00-00 00:00:00 |
+------+-------+---------------------+
# Query for detecting rogue updates:
mysql> SELECT * FROM diff_db.table1 WHERE c > 0;
+------+------+---------------------+
| a | b | c |
+------+------+---------------------+
| 4 | four | 2012-11-14 15:34:08 |
+------+------+---------------------+
Notice the last two queries issued on the slave. We see that the timestamp column was not updated by any row from the master (we show new rows being added for validation), but the row update on the slave is given a timestamp value. If you have reason to not make your slaves read only, you may want to consider a similar solution.
Showing Disk Usage: mysqldiskusage
The disk usage utility, mysqldiskusage, is one of several diagnostic utilities that report information about a MySQL server. This utility is designed to display the total size of each database as well as other file related information, such as names and sizes of logs and InnoDB configuration parameters.
Database sizes are calculated in one of two ways. If the user account has read access to the data directory, the sizes displayed reflect the total size of the files in the directory. If the user does not have read access to the data directory, the sizes are calculated based on metadata information about the tables, including row size and average row length. By default, the utility shows only the total size of the database, but the --verbose option shows the database size broken out by data and miscellaneous files.
The utility can also display the existing and number of binary logs with the --binlog option, relay logs with the --relaylog option, and slow and query logs with the --logs option. You can turn on all options with the --all option.
The output can be formatted in the GRID, CSV, TAB, or VERTICAL formats described in Exporting Databases: mysqldbexport.
NOTE
The utility must be run on the server hosting MySQL. You will also need read access to the data directory in order to display all of the information about logs and InnoDB data. As a result, you may need elevated privileges to run the utility.
Use with replication
Although mysqldiskusage does not apply directly to replication, it is useful when planning upgrades to replication servers to make sure you have sufficient disk space. You can also use the utility to check on the size of the log files and InnoDB files.
Example of mysqldiskusage
The following example shows a detailed list of the sizes of all databases on a server. We also show all information with all of the options enabled. Notice the information displayed for InnoDB. This could be helpful in diagnosing InnoDB configuration issues:
$ mysqldiskusage --server=root:root@localhost --binlog --logs --innodb --all
--empty -vvv
# Source on localhost: ... connected.# Database totals:
+--------------------+--------------+--------------+-------------+--------------+
| db_name | db_dir_size | data_size | misc_files | total |
+--------------------+--------------+--------------+-------------+--------------+
| oltp2 | 472,785 | 445,728 | 27,057 | 472,785 |
| frm_test | 472,785 | 445,728 | 27,057 | 472,785 |
| compare_util_test | 472,785 | 445,728 | 27,057 | 472,785 |
| bvm | 15,129 | 6,080 | 9,049 | 15,129 |
| compare | 97,924,346 | 97,897,677 | 26,669 | 97,924,346 |
| compare_employees | 554,176,356 | 554,166,900 | 9,456 | 554,176,356 |
| db1 | 11,035 | 2,188 | 8,847 | 11,035 |
| db2 | 11,035 | 2,188 | 8,847 | 11,035 |
| emp1 | 17,517 | 81,920 | 17,517 | 99,437 |
| emp2 | 88,877 | 206,029,917 | 87,760 | 206,117,677 |
| emp3 | 27,989 | 33,885 | 26,872 | 60,757 |
| employees | 88,892 | 206,029,917 | 87,775 | 206,117,692 |
| griots | 14,415 | 5,288 | 9,127 | 14,415 |
| groits | 9,045 | 16,384 | 9,045 | 25,429 |
| mysql | 903,022 | 693,480 | 191,720 | 885,200 |
| oltp1 | 62,705 | 114,688 | 62,705 | 177,393 |
| sak1 | 411,538 | 6,887,232 | 143,442 | 7,030,674 |
| sakila | 510,111 | 6,944,576 | 184,671 | 7,129,247 |
| test | 580,636 | 74,029 | 506,607 | 580,636 |
| test123 | 17,343 | 32,768 | 17,343 | 50,111 |
| test_1 | 48,730 | 5,225 | 43,505 | 48,730 |
| test_cache | 9,868 | 1,045 | 8,823 | 9,868 |
| test_trig | 9,871 | 1,024 | 8,847 | 9,871 |
| util_test_clone2 | 36,709 | 50,269 | 35,592 | 85,861 |
| welford_kindle | 59,058 | 48,896 | 10,162 | 59,058 |
| world | 472,785 | 445,728 | 27,057 | 472,785 |
+--------------------+--------------+--------------+-------------+--------------+
Total database disk usage = 1,081,112,742 bytes or 1.00 GB
# Log information.
+------------------------+--------------+
| log_name | size |
+------------------------+--------------+
| Chucks-iMac.log | 829,601,162 |
| Chucks-iMac-slow.log | 97,783 |
| Chucks-iMac.local.err | 234,028 |
+------------------------+--------------+
Total size of logs = 829,932,973 bytes or 791.00 MB
# binary log information:
Current binary log file = my_log.000171
+----------------+----------+
| log_file | size |
+----------------+----------+
| my_log.000001 | 3527 |
| my_log.000002 | 785115 |
| my_log.000003 | 569 |
...
| my_log.000169 | 348 |
| my_log.000170 | 258 |
| my_log.000171 | 722 |
| my_log.index | 2736 |
+----------------+----------+
Total size of binary logs = 21,883,426 bytes or 20.00 MB
# Server is not an active slave - no relay log information.
# InnoDB tablespace information:
+--------------+------------+--------------------+-------------------------+
| innodb_file | size | type | specification |
+--------------+------------+--------------------+-------------------------+
| ib_logfile0 | 5242880 | log file | |
| ib_logfile1 | 5242880 | log file | |
| ibdata1 | 815792128 | shared tablespace | ibdata1:778M |
| ibdata2 | 52428800 | shared tablespace | ibdata2:50M:autoextend |
+--------------+------------+--------------------+-------------------------+
Total size of InnoDB files = 889,192,448 bytes or 848.00 MB
Tablespace ibdata2:50M:autoextend can be extended by using ibdata2:50M[...]
InnoDB freespace = 427,819,008 bytes or 408.00 MB
#...done.
Notice the list of binary logs. We have cut a long section of the results for brevity, but it is clear from the listing that the server has never had its binary logs purged. This is one area that may be a concern for servers that have been running for extended periods.
Checking Tables Indexes: mysqlindexcheck
One of the most highly scrutinized areas for improving queries is indexing. The index check utility mysqlindexcheck examines tables to determine whether there are duplicate or redundant indexes. Duplicate indexes are those that match exactly, while redundant indexes are those that are subsets of others. For example, if you have one index on the id and title columns (in that exact order) and another index on just the id column, the index on the single column is not needed. You would be surprised to see how often this occurs.
mysqlindexcheck can generate SQL statements for the DROP command for all indexes identified. You can also show the statistics of the indexes identified. This may be helpful in performance tuning specific index parameters.
Perhaps the most useful options display a list of the worst (or best) performing indexes. This can be invaluable when tuning your databases for better query performance.
Use with replication
Although this utility has no direct application to replication other than improving the performance of queries, you would do well to use the utility to help you improve the performance of your applications that run on a replication system.
Example of mysqlindexcheck
The following example shows the result of checking for duplicate and redundant indexes on the sample Sakila database (while no duplicate or redundant indexes are found, we included the --worst option to show the worst performing index for each table; we omit some of the data for brevity):
$ mysqlindexcheck --stats -d -s --server=root:pass@localhost sakila --worst=1
--format=vertical
# Source on localhost: ... connected.
#
# Showing the top 1 worst performing indexes from sakila.actor:
#
************************* 1. row *************************
database: sakila
table: actor
name: idx_actor_last_name
column: last_name
sequence: 1
num columns: 1
cardinality: 200
est. rows: 200
percent: 100.00
1 rows.
...
#
# Showing the top 1 worst performing indexes from sakila.rental:
#
************************* 1. row *************************
database: sakila
table: rental
name: idx_fk_staff_id
column: staff_id
sequence: 1
num columns: 1
cardinality: 1
est. rows: 16305
percent: 0.01
1 rows.
Searching Metadata: mysqlmetagrep
The metadata search utility, mysqlmetagrep, is another diagnostic tool that can aid in finding objects that match a given pattern. This can be helpful any time you need to locate an object that matches a name or partial name.
The utility has unique search capabilities that permit you to search using POSIX regular expressions (REGEX) or SQL patterns (e.g., LIKE). You can restrict the search to specific object types using the --object-types option, which accepts a comma-separated list of one or more of the following: database, trigger, user, routine, column, table, partition, event, and view. The default is to search all object types. Although the default is to search by name, you can also instruct the utility to search the body of procedures using the --body option.
You can also generate a SQL statement for the search that you can use inside other routines or scripts.
The output can be formatted in the GRID, CSV, TAB, or VERTICAL formats described in Exporting Databases: mysqldbexport.
Use with replication
You may need to find objects by name if you encounter errors in your application or binary log that result in partial statements or errors and warnings with partial information.
Example of mysqlmetagrep
The following example shows a metadata search for objects with that start with the letter “t” (we signify this by providing the underscore characer after the t):
$ mysqlmetagrep --server=root:pass@localhost --pattern="t_" --format=vertical
************************* 1. row *************************
Connection: root:*@localhost:3306
Object Type: TABLE
Object Name: t1
Database: example1
Field Type: TABLE
Matches: t1
************************* 2. row *************************
Connection: root:*@localhost:3306
Object Type: TABLE
Object Name: t1
Database: test
Field Type: TABLE
Matches: t1
2 rows.
Searching for Processes: mysqlprocgrep
The process search utility, mysqlprocgrep permits you to search the running processes on a server via the same search capabilities as the metadata search utility, mysqlmetagrep. In this case, you can match the user, host, database, command, info, and state fields of the SHOW PROCESSLISToutput. You can also query for processes by age, permitting you to identify long-running queries or long-term connections. Once you have identified the processes you are interested in, the utility will also permit you to kill either the query or the connection matching the search terms.
TIP
Run the utility with general search terms until you identify the exact processes you want. You can then run the utility again, specifying the --kill-query or --kill-connection option to kill either the query or the connection for processes that match.
Like the metadata grep utility, you can use the --sql option to generate SQL statements for use in procedures or scripts.
Use with replication
The process search utility can be helpful with replication by identifying the connections for each slave or for a specific slave by user or host. We will see a unique use of this utility in the example.
Example of mysqlprocgrep
The following example shows a topology map generated by one of the replication utilities we will discuss later (see Showing Topologies: mysqlrplshow). In this case, there is a slave that was started without the --report-host and --report-port options (required by all replication utilities). We first show the topology map, which depicts a master and three slaves. Notice the warning. The utility has detected more than the three slaves. Using the process search utility we can find the fourth slave.
$ mysqlrplshow --master=root:pass@localhost:13002 --disco=root:pass
# master on localhost: ... connected.# Finding slaves for master: localhost:13002
WARNING: There are slaves that have not been registered with --report-host or
--report-port.
# Replication Topology Graph
localhost:13002 (MASTER)
|
+--- slavehost1:13001 - (SLAVE)
|
+--- slavehost3:13003 - (SLAVE)
|
+--- slavehost4:13004 - (SLAVE)
$ mysqlprocgrep --server=root:pass@localhost:13002 --match-command="Bin%"
--format=vertical
************************* 1. row *************************
Connection: root:*@localhost:13002
Id: 10
User: rpl
Host: slavehost1:56901
Db: None
Command: Binlog Dump
Time: 258
State: Master has sent all binlog to slave; waiting for binlog to be up
Info: None
************************* 2. row *************************
Connection: root:*@localhost:13002
Id: 8
User: rpl
Host: slavehost3:56898
Db: None
Command: Binlog Dump
Time: 261
State: Master has sent all binlog to slave; waiting for binlog to be up
Info: None
************************* 3. row *************************
Connection: root:*@localhost:13002
Id: 6
User: rpl
Host: slavehost4:56894
Db: None
Command: Binlog Dump
Time: 264
State: Master has sent all binlog to slave; waiting for binlog to be up
Info: None
************************* 4. row *************************
Connection: root:*@localhost:13002
Id: 19
User: rpl
Host: localhost:56942
Db: None
Command: Binlog Dump
Time: 18
State: Master has sent all binlog to slave; waiting for binlog to be up
Info: None
4 rows.
Cloning Servers: mysqlserverclone
The server clone utility, mysqlserverclone, is the workhorse of the bunch. It provides the ability to create a new instance of a server, either by connecting to a running server or by launching a server from a MySQL installation (via the --basedir option).
When you use this utility, you specify a new data directory and a new port. You can also specify a server ID and a password for the root user, and pass any special options to the mysqld process that will be started. If you use the --verbose option, the utility will print the server messages on startup; otherwise these are suppressed.
The new server will be started with a new database with only defaults set. For example, you will only see the mysql database (along with the INFORMATION_SCHEMA and PERFORMANCE_SCHEMA). If you want to copy data to the new server, you can use the database copy or the database export and import utilities.
Use with replication
This utility is very handy when you need to create a new slave in a hurry. On most systems, the utility takes only a few seconds to create the new data directory and launch the server. This makes it very easy to quickly set up a new replication slave or even an entire topology on a single server.
When you are faced with difficult diagnostics of binary logs, replication errors, and data consistency issues, you can use mysqlserverclone to create and test a master and slave quickly. You can then use them to conduct a forensic investigation of problems by duplicating the server instances and re-creating the error on the instances. This in turn saves you from risking harm to your existing servers.
Example of mysqlserverclone
The following example shows how to start a new instance of a server that may be offline or unreachable. Run this command on the host where MySQL was installed. The options passed include a new data directory, the new port, the new server_id, and a root password:
$ mysqlserverclone --basedir=/usr/local/mysql-5.6 --new-data=../temp_13001 \
--new-port=13001 --new-id=101 --root=pass123 \
--mysqld="--log-bin --gtid-mode=on --log-slave-updates
--enforce-gtid-consistency"
# Cloning the MySQL server located at ../mysql-5.6.
# Creating new data directory...
# Configuring new instance...
# Locating mysql tools...
# Setting up empty database and mysql tables...
# Starting new instance of the server...
# Testing connection to new instance...
# Success!
# Setting the root password...
# Connection Information:
# -uroot -ppass123 --socket=../temp_13001/mysql.sock
#...done.
The following example shows how easy it is to launch a new instance of a running server. Notice the options passed to the server process (mysqld) using the --mysqld option. Notice as well that we used the --delete-data option to delete the data directory if it exists. The utility will not start unless the data directory is empty or this option is present:
$ mysqlserverclone --server=root:root@localhost:13001 --new-data=../temp_13002 \
--new-port=13002 --new-id=102 --root=pass123 \
--mysqld="--log-bin --gtid-mode=on --log-slave-updates
--enforce-gtid-consistency" \
--delete-data
# Cloning the MySQL server running on localhost.
# Creating new data directory...
# Configuring new instance...
# Locating mysql tools...
# Setting up empty database and mysql tables...
# Starting new instance of the server...
# Testing connection to new instance...
# Success!
# Setting the root password...
# Connection Information:
# -uroot -ppass123 --socket=/Volumes/Source/source/temp_13002/mysql.sock
#...done.
Showing Server Information: mysqlserverinfo
The show server information command, mysqlserverinfo, is another diagnostic utility. It is used to present the basic information about a server. It displays the major settings for the server, such as the base directory, data directory, configuration file, and more.
There are options for displaying the defaults read from the configuration file as well as an option to display a list of any MySQL servers running on the host where the utility is running. The command can display the information in a variety of formats, as described in Exporting Databases: mysqldbexport: GRID, CSV, TAB, and VERTICAL.
Use with replication
Like any diagnostic tool, this utility is applicable to all forms of problem investigation in replication. If used in conjunction with the server clone utility, you can quickly discover any cloned server instances.
Example of mysqlserverinfo
The following example shows this utility running on a server installed on the local host. The chosen options output the servers running on this host along with the defaults from the configuration file:
$ mysqlserverinfo --server=root:root@localhost:13001 --show-servers
--show-defaults --format=VERTICAL
#
# The following MySQL servers are active on this host:
# Process id: 236, Data path: /Users/cbell/source/temp_13001
# Process id: 331, Data path: /Users/cbell/source/temp_13002
# Process id: 426, Data path: /Users/cbell/source/temp_13003
# Process id: 431, Data path: /Users/cbell/source/temp_13004
#
# Source on localhost: ... connected.
************************* 1. row *************************
server: localhost:13001
version: 5.6.6-m9-log
datadir: /Users/cbell/source/temp_13001/
basedir: /Users/cbell/source/mysql-5.6/
plugin_dir: /Users/cbell/source/mysql-5.6/lib/plugin/
config_file: /etc/my.cnf
binary_log: clone-bin.000001
binary_log_pos: 853
relay_log: None
relay_log_pos: None
1 rows.
Defaults for server localhost:13001
--port=13001
--basedir=/usr/local/mysql
--datadir=/usr/local/mysql/data
--server_id=5
--log-bin=my_log
--general_log
--slow_query_log
--innodb_data_file_path=ibdata1:778M;ibdata2:50M:autoextend
#...done
NOTE
You must be running on the localhost (the server) to use the --show-defaults option.
Cloning Users: mysqluserclone
Database administrators working on MySQL have often commented on the inconvenience of creating multiple users with the same set of privileges. Savvy administrators often write scripts to do this, usually including the actual GRANT statements and just substituting the username and host for each user they need to create.
This can be error prone especially when the privileges change over time. If security is a top priority, the location and access to the script may require special handling.
This seems like a lot of extra work. Fortunately, there is a utility to make it easier to copy (clone) users privileges. The user clone utility, mysqluserclone, copies all of the privileges for one user to one or more users, either on the same system or on another system. You can even set the password for each user you create.
The utility has a number of interesting features, including the ability to include the actual SQL statements during the clone operation and the ability to include global privileges that match the user@host specified. You can also list all of the users and their privileges on the server with the --list option. The output can be formatted in GRID, CSV, TAB, or VERTICAL formats described in Exporting Databases: mysqldbexport.
Use with replication
One area where this utility can be helpful is during the provisioning of a slave. In this case, you may have a new slave that you need to re-create the accounts that exist on the master. The user clone utility makes this as easy as specifying the user on the master (or another active slave) you want to clone and providing the connection information for the master and the new slave. You can even use an option to clone all users. Thus, this utility is another convenience utility to make slave provisioning easier.
Example of mysqluserclone
The following example clones a user account and her grants from one server to another. The first command prints (dumps) the GRANT statements for the user. The second performs the clone operation. Notice that we specify the user twice in the second command. This is because the utility allows you to clone other users from a single user account. So in this command, the first instance is the one you want to copy and the second is the new user you wish to create with the same privileges. You may specify as many new users as you want, each one a clone of the existing one that you are copying:
$ mysqluserclone --source=root:root@localhost:13002 joe@localhost --dump
# Source on localhost: ... connected.
Dumping grants for user joe@localhost
GRANT SELECT ON *.* TO 'joe'@'localhost'
$ mysqluserclone --source=root:root@localhost:13002
--destination=root:root@localhost:13003 joe@localhost joe@localhost
# Source on localhost: ... connected.
# Destination on localhost: ... connected.
# Cloning 1 users...
# Cloning joe@localhost to user joe@localhost
# ...done.
Utilities Client: mysqluc
The MySQL Utilities client, mysqluc, is not a utility in and of itself. Rather, it is a wrapper that provides type completion for utility commands, options, and parameters. It also lets you specify user-defined variables that enable repeated reuse of a single value.
Perhaps the best feature of the utilities client is the ability to get help for any utility, including itself. This makes using any of the utilities much easier and more convenient.
Use with replication
While the client offers no administrative features related directly to replication, it can be a very handy tool for running replication utilities. This is especially true when user-defined variables are used to represent the master and slave connections. Type completion will also help you to remember the various options and is especially helpful for seldom used options.
Example of mysqluc
The following example executes several commands inside the utilities console. The commands demonstrate how to display the health of a simple replication topology. We will discuss the replication administration (mysqlrpladmin) utility in more detail in a later section:
$ mysqluc
Launching console ...
Welcome to the MySQL Utilities Client (mysqluc) version 1.1.0 -
MySQL Workbench Distribution 5.2.44
Copyright (c) 2000, 2012, Oracle and/or its affiliates. All rights reserved.
Oracle is a registered trademark of Oracle Corporation and/or its affiliates.
Other names may be trademarks of their respective owners.
Type 'help' for a list of commands or press TAB twice for list of utilities.
mysqluc> help rpladmin
Usage: mysqlrpladmin.py --slaves=root@localhost:3306 <command>
mysqluc> set $MASTER=root:root@localhost:13001
mysqluc> set $DISCOVER=root:root
mysqluc> rpladmin --master=$MASTER --disco=$DISCOVER health
# Discovering slaves for master at localhost:13001
# Checking privileges.
#
# Replication Topology Health:
+------------+--------+---------+--------+------------+---------+
| host | port | role | state | gtid_mode | health |
+------------+--------+---------+--------+------------+---------+
| localhost | 13001 | MASTER | UP | ON | OK |
| localhost | 13002 | SLAVE | UP | ON | OK |
| localhost | 13003 | SLAVE | UP | ON | OK |
| localhost | 13004 | SLAVE | UP | ON | OK |
+------------+--------+---------+--------+------------+---------+
# ...done.
mysqluc>
Notice the commands issued in the client. Another very convenient feature of the client is you don’t have to type the mysql prefix in the utility commands. Notice also the use of the user-defined variables, $MASTER and $DISCOVER, and detailed help for the replication administration utility. Clearly, this is a very handy tool.
Replication Utilities
This section includes a brief overview of the MySQL Utilities that were designed specially for replicated environments.
Setting Up Replication: mysqlreplicate
We have discussed setting up replication in detail in Chapter 3. In summary, once the replication prerequisites are met, the steps involve the following general operations:
1. Create the replication user on the master.
2. If not using GTIDs, check the master’s SHOW MASTER STATUS view and record the values.
3. Issue the CHANGE MASTER TO command on the slave.
4. Issue the START SLAVE command on the slave.
5. Check for errors on the slave with SHOW SLAVE STATUS.
While this is not a long list of operations, it does involve at least one trip to the master to issue at least two commands and at least three commands on the slave. If you consider needing to do this many times for a large scale out effort, the operations can become tedious.
This is where the replicate utility mysqlreplicate makes life much easier. Instead of issuing five commands over the master and its slave, the replicate command permits you to issue a single command where, at a minimum, you list the master and the slave. The utility takes care of the rest. There are options for setting the replication user, testing the replication setup, and most importantly, controlling how replication starts.
Replication can start from the beginning (where the slave requests all events from the master), start from the first event in a particular binary log file, or start from a specific binary log file and position. The utility provides sufficient options to cover many scenarios where you want to start replication.
Best of all, because this is a single command, you can script it for use in a large scale out operation where you simply use a variable populated by a list of values for the slave (or even the master).
Example of mysqlreplicate
The following example shows a simple replication setup using the default options:
$ mysqlreplicate --master=root:root@localhost:13001
--slave=root:root@localhost:13002
# master on localhost: ... connected.
# slave on localhost: ... connected.
# Checking for binary logging on master...
# Setting up replication...
# ...done.
The following example shows the previous command executed with the -vvv option to request a high level of verbosity. Notice that all of the commands needed for replication configuration are performed by the utility, as well as key prerequisite checks. If something goes wrong setting up replication with this utility, try rerunning it with verbosity and check the output for errors:
$ mysqlreplicate --master=root:root@localhost:13001
--slave=root:root@localhost:13002 -vvv --test-db=test_rpl
# master on localhost: ... connected.
# slave on localhost: ... connected.
# master id = 101
# slave id = 102
# master uuid = 8e1903fa-2de4-11e2-a8c9-59dc46c8181e
# slave uuid = 8a40ec3a-2ded-11e2-a903-0ca829d3a6c5
# Checking InnoDB statistics for type and version conflicts.
# Checking storage engines...
# Checking for binary logging on master...
# Setting up replication...
# Connecting slave to master...
# CHANGE MASTER TO MASTER_HOST = 'localhost', MASTER_USER = 'rpl',
MASTER_PASSWORD = 'rpl', MASTER_PORT = 13001, MASTER_AUTO_POSITION=1
# Starting slave from master's last position...
# status: Waiting for master to send event
# error: 0:
# Testing replication setup...
# Creating a test database on master named test_rpl...
# Success! Replication is running.
# ...done.
Notice that we also used the --test-db option to test replication between the master and slave. This feature creates a new database specified by the option and ensures the slave receives the update. Thus, the utility permits you to ensure replication is working once the slave is started.
This utility is the most useful replication utility for configuring your replication topology. However, for situations where you may not know the full configuration of the slave or have many masters and many more slaves, it can be tedious to check whether replication is configured correctly or whether two servers can be made master and slave. Fortunately, the next replication utility fills this need.
Checking Replication Setup: mysqlrplcheck
One of the challenges for setting up replication is knowing when a master and slave have all of the prerequisites for replication and are compatible. “Compatible,” in this case, means the slave has the correct settings so that it can either rejoin the master or connect to the master for the first time.
The replication check utility, mysqlrplcheck, examines the master and slave to determine whether each is configured properly for replication (e.g., the master has binary logging enabled), whether they are compatible, and whether the slave has been connected or is connected to this master. This last feature can be very handy if you are uncertain to which master your slave is connected—especially if you have recovered the slave from an error condition.
Because the utility accepts one master and one slave, it is well suited to diagnostic and administrative work on replication. If you run the utility with verbosity turned on at the -vvv level, you will see additional details including the actual values for the UUIDs, slave status, and more. Verbosity also gives you more information about error conditions.
Example of mysqlrplcheck
Let’s see an example where a master and slave are not connected and there are configuration conflicts. The following output shows a number of issues with replication between the chose master and slave (we use the verbosity option to see the additional details):
$ mysqlrplcheck --master=root:root@localhost:13001
--slave=root:root@localhost:13002 -vvv
# master on localhost: ... connected.
# slave on localhost: ... connected.
Test Description Status
---------------------------------------------------------------------------
Checking for binary logging on master [pass]
Are there binlog exceptions? [pass]
Replication user exists? [FAIL]
Slave is not connected to a master.
Checking server_id values [FAIL]
The slave's server_id is the same as the master.
Checking server_uuid values [pass]
master uuid = 8e1903fa-2de4-11e2-a8c9-59dc46c8181e
slave uuid = d722e59c-2de5-11e2-a8d1-3f758e665783
Is slave connected to master? [FAIL]
Slave is stopped.
Check master information file [pass]
#
# Master information file:
#
# Reading master information from a table.
Checking InnoDB compatibility [pass]
Checking storage engines compatibility [pass]
Checking lower_case_table_names settings [pass]
Master lower_case_table_names: 2
Slave lower_case_table_names: 2
Checking slave delay (seconds behind master) [FAIL]
The server specified as the slave is not configured as a replication slave.
# ...done.
Notice the problems revealed in the output. Because the slave is not connected to the master, a number of checks or tests fail, including the replication use check, whether the slave is connected, and the slave delay. But most importantly, we see that the server_ids are the same on the master and slave: a common problem that makes it impossible to set up replication.
NOTE
If the slave were connected to the master and there were errors, the verbosity option would display the output of the SHOW SLAVE STATUS view.
The following example shows a successful execution of the utility (now we know that the master and slave are configured correctly, and that replication between them is working correctly):
$ mysqlrplcheck --master=root:root@localhost:13001
--slave=root:root@localhost:13002
# master on localhost: ... connected.
# slave on localhost: ... connected.
Test Description Status
---------------------------------------------------------------------------
Checking for binary logging on master [pass]
Are there binlog exceptions? [pass]
Replication user exists? [pass]
Checking server_id values [pass]
Checking server_uuid values [pass]
Is slave connected to master? [pass]
Check master information file [pass]
Checking InnoDB compatibility [pass]
Checking storage engines compatibility [pass]
Checking lower_case_table_names settings [pass]
Checking slave delay (seconds behind master) [pass]
# ...done.
Now that we have a nice replication setup and checking utility, it would be great if we could see our topology in a graph. The next utility was designed to allow you to discover your topology. Its core functionality is essential for the HA utilities, which we will discuss in the next section.
Showing Topologies: mysqlrplshow
Another useful utility for replication is the ability to see a graph of your topology. The show replication utility, mysqlrplshow, shows the slaves attached to a given master. Slaves must be started with --report-host and --report-port so that they show in the SHOW SLAVE HOSTS view.
If you provide the --recurse option, the utility will attempt to connect to each slave and display its slaves. In this manner, the utility can discover the topology for as many servers as can be reached with the credentials provided by the --discover-slaves-login option.
NOTE
You can use the --prompt option to prompt for the username and password for each slave that fails to connect with the default credentials provided.
The utility can also identify circular replication topologies. If you use the --show-list option, the utility displays a list of the servers in a variety of formats. The formats are the familiar GRID, CSV, TAB, and VERTICAL options. The output could be imported into another script of application for further analysis or reports.
Example of mysqlrplshow
The following example demonstrates the utility running on a simple tiered replication topology. Notice that there is an intermediate master on slavehost2.
$ mysqlrplshow --master=root:pass@masterhost:13001 --recurse \
--discover-slaves-login=root:root --format=grid --show-list
# master on masterhost: ... connected.
# Finding slaves for master: localhost:13001
# master on slavehost1: ... connected.
# Finding slaves for master: localhost:13002
# master on slavehost2: ... connected.
# Finding slaves for master: localhost:13003
# master on slavehost3: ... connected.
# Finding slaves for master: localhost:13004
# Replication Topology Graph
masterhost:13001 (MASTER)
|
+--- slavehost1:13002 - (SLAVE)
|
+--- slavehost2:13003 - (SLAVE + MASTER)
|
+--- slavehost3:13004 - (SLAVE)
+-------------------+-------------------+
| Master | Slave |
+-------------------+-------------------+
| masterhost:13001 | slavehost1:13002 |
| masterhost:13001 | slavehost2:13003 |
| slavelhost:13002 | slavehost3:13004 |
+-------------------+-------------------+
High Availability Utilities
The MySQL Utilities project includes two utilities that are designed specifically for HA solutions. There is a general utility for performing routine, on-demand operations (mysqlrpladmin), and another designed to run continuously to monitor a master and its slaves (mysqlfailover).
The following sections present details of these utilities along with examples of their use and a discussion of scenarios for using the utilities.
Concepts
We begin with a discussion of the concepts used in the HA utilities. As with many specialized tools, there are often ideas or concepts that the user is expected to understand prior to using the tool. For example, the HA utilities are designed to perform two basic operations: switchover and failover. The following will help you understand the modes, commands, and output of the utilities and make your experience using them better. Some of these may be familiar but are included for review.
NOTE
We assume you have read the previous chapters on replication and high availability, including Chapters 4, 5, and 6, and have a good understanding of replication terminology.
Global Transaction Identifiers
A Global Transaction Identifier (GTID) is a special marker added to the binary log that includes a unique value to identify the origin of the event. These marks are added before each group of events (transactions) in the binary log and are composed of the Unique Universal Identifier (UUID) of the server and a sequence number. The sequence number is ordinal starting from 1.
GTIDs therefore enable a new replication protocol that permits the slave to request any GTIDs it has not executed from the master. The calculation of what GTIDs have or have not been applied is simplified and made accurate by the uniqueness of the GTID.
This new concept and the new protocol make it possible to take any slave of a downed master and make it the new master by collecting the GTIDs from the other slaves. Thus, for the first time, MySQL has a native mechanism to enable failover.
GTIDs must be enabled (the gtid_mode=ON option to mysqld) if you plan to run the mysqlfailover utility and to execute the failover command for the mysqlrpladmin utility.
Candidate slave
A candidate slave is a slave that has been chosen to replace the master when the master has gone down or is unreachable. The candidate slave can be chosen automatically from those meeting all the following criteria:
§ The slave is running and reachable.
§ GTIDs are enabled.
§ The slave is not lagging behind the master.
§ The slave’s replication filters do not conflict. More specifically, the list of databases in the filters have matches. For example, if the master has db1 and db3 listed in --binlog-do-db and a slave had db1 and db2 listed in --replicate-do-db, these filters conflict because the data replicated to the slave is different from what the slave is filtering from the master.
§ The replication user exists on the slave.
§ Binary logging is enabled on the slave.
Slave election
This is the process of selecting a candidate slave for use in replacing the master. The utilities have a feature that includes this step as a precursor to failover.
Failover
Failover is the process of replacing the role of the master when the master is down or has become unreachable.
Switchover
Switchover is the purposeful switching of the master role from a live master to another slave. It is different from failover because in this case, the master is available and the new slave can be brought up to date with all events from the master. You may perform switchover, for instance, when you have to take the master offline for maintenance.
mysqlrpladmin
The mysqlrpladmin utility permits administrators to execute operations on MySQL replication resources on-demand (i.e., it executes a command and then exits). Available commands include:
elect
Elect the best slave and report the winner.
failover
Conduct a failover from the master to the best slave.
gtid
Show the status of Global Transaction Identifier variables, and display UUIDs for all servers.
health
Display the replication health for the master and its slaves.
reset
Issue the STOP SLAVE and RESET SLAVE commands to each slave.
start
Start all slaves.
stop
Stop all slaves.
switchover
Perform slave promotion.
The next section presents examples of the more frequently used commands and practical ways they can be used.
Examples of mysqlrpladmin
Let us begin the tour of the replication administration utility with the health command. This displays a list of the slaves connected to the master and a summary of the status for slave and replication health. The following example shows a master and its slaves. Notice we used the discovery option (-disco), passing the user and password to be used to connect to each slave. If you want to see more details for the health report, use the --verbose option:
$ mysqlrpladmin --master=root:pass@localhost:13002 --disco=root:pass health
# Discovering slaves for master at localhost:13002
# Checking privileges.
#
# Replication Topology Health:
+------------+--------+---------+--------+------------+---------+
| host | port | role | state | gtid_mode | health |
+------------+--------+---------+--------+------------+---------+
| localhost | 13002 | MASTER | UP | ON | OK |
| localhost | 13003 | SLAVE | UP | ON | OK |
| localhost | 13004 | SLAVE | UP | ON | OK |
| localhost | 13005 | SLAVE | UP | ON | OK |
+------------+--------+---------+--------+------------+---------+
# ...done.
NOTE
Remember that you must start your slaves with the --report-host and --report-port options to use the discover slaves feature.
If you want to use the failover command rather than the failover utility to conduct manual failover, the elect command permits you to look ahead to see which slave will be chosen for failover. This can be helpful when building a fault-tolerant application where you need to know specifics of the new master. The following example shows how to find out which slave will be chosen:
$ mysqlrpladmin --master=root:pass@localhost:13002 --disco=root:pass elect
# Discovering slaves for master at localhost:13002
# Checking privileges.
# Electing candidate slave from known slaves.
# Best slave found is located on localhost:13003.
# ...done.
The GTID command displays a list of all of the GTIDs in the topology. This can be a very long list if your master and slaves have been running for a long period with many transactions. You can use this report to help diagnose problems with transactions. The following shows an excerpt of the output of the GTID command:
$ mysqlrpladmin --master=root:pass@localhost:13002 --disco=root:pass gtid
# Discovering slaves for master at localhost:13002
# Checking privileges.
#
# UUIDS for all servers:
+------------+--------+---------+---------------------------------------+
| host | port | role | uuid |
+------------+--------+---------+---------------------------------------+
| localhost | 13002 | MASTER | 673d40e4-32ac-11e2-87f6-419d4fb292c5 |
| localhost | 13003 | SLAVE | 7cb05e3e-32ac-11e2-87f6-336560b463d4 |
| localhost | 13004 | SLAVE | 940abcdc-32ac-11e2-87f7-9f158c80ded6 |
| localhost | 13005 | SLAVE | a680695c-32ac-11e2-87f7-797d07ab4557 |
+------------+--------+---------+---------------------------------------+
#
# Transactions executed on the server:
+------------+--------+---------+-------------------------------------------+
| host | port | role | gtid |
+------------+--------+---------+-------------------------------------------+
| localhost | 13002 | MASTER | 0035A78A-32AF-11E2-8807-6F5662E76235:1-2 |
| localhost | 13002 | MASTER | 42077312-32AC-11E2-87F5-4FD43CAEB376:1-2 |
| localhost | 13002 | MASTER | 498880AE-32B1-11E2-8815-C19FD75A3D21:1-2 |
| localhost | 13002 | MASTER | 4AA055C2-32AF-11E2-8808-366E88604744:1-2 |
| localhost | 13002 | MASTER | 59D25A04-32AF-11E2-8809-6D4E4056F0AF:1-2 |
| localhost | 13002 | MASTER | 5D3211AC-32B0-11E2-880F-F6735C743197:1-2 |
| localhost | 13002 | MASTER | 673D40E4-32AC-11E2-87F6-419D4FB292C5:1-3 |
| localhost | 13002 | MASTER | 74151132-32AE-11E2-8803-E93E7AABEB97:1-2 |
| localhost | 13002 | MASTER | 7CB05E3E-32AC-11E2-87F6-336560B463D4:1-3 |
...
| localhost | 13005 | SLAVE | 7CB05E3E-32AC-11E2-87F6-336560B463D4:1-3 |
| localhost | 13005 | SLAVE | 940ABCDC-32AC-11E2-87F7-9F158C80DED6:1-3 |
| localhost | 13005 | SLAVE | 9E6957E4-32AF-11E2-880B-C19ED44E0636:1-2 |
| localhost | 13005 | SLAVE | A680695C-32AC-11E2-87F7-797D07AB4557:1-3 |
| localhost | 13005 | SLAVE | C903D9AC-32AF-11E2-880C-6D4F415B0402:1-2 |
| localhost | 13005 | SLAVE | F37C4048-32AF-11E2-880D-CFD6C34C3629:1-2 |
+------------+--------+---------+-------------------------------------------+
# ...done.
The most popular command of the replication administration utility is the switchover command. This permits you to perform a controlled switch of the master role from the current master to a specified slave. We say “controlled” because the slave is allowed to catch up to the master before the change of role occurs.
A very handy option for this command is the --demote-master option. This tells the switchover command to make the old master a slave of the new master once the change of role is complete. This permits you to rotate the role of master among a set of slaves. The following example shows this command in action. Notice the health report at the end of the execution. You can use this to verify the change of role. Compare this to the health report from the earlier examples.
Take a moment and look through the output; all of the steps in the switchover process are documented with brief status statements.
$ mysqlrpladmin --master=root:pass@localhost:13003 --disco=root:pass failover
# Discovering slaves for master at localhost:13003
# Checking privileges.
# Performing failover.
# Candidate slave localhost:13002 will become the new master.
# Preparing candidate for failover.
# Creating replication user if it does not exist.
# Stopping slaves.
# Performing STOP on all slaves.
# Switching slaves to new master.
# Starting slaves.
# Performing START on all slaves.
# Checking slaves for errors.
# Failover complete.
#
# Replication Topology Health:
+------------+--------+---------+--------+------------+---------+
| host | port | role | state | gtid_mode | health |
+------------+--------+---------+--------+------------+---------+
| localhost | 13002 | MASTER | UP | ON | OK |
| localhost | 13004 | SLAVE | UP | ON | OK |
| localhost | 13005 | SLAVE | UP | ON | OK |
+------------+--------+---------+--------+------------+---------+
# ...done.
We save the failover command for last to show you how it can be used manually in place of the failover utility, which is designed to support automatic failover. The following shows the results of running the failover command. Notice that this command also prints a health report at the end to confirm the operation.
Take a moment and look through the output; all of the steps in the failover process are documented with brief status statements.
$ mysqlrpladmin --master=root:pass@localhost:13003 --disco=root:pass failover
# Discovering slaves for master at localhost:13003
# Checking privileges.
# Performing failover.
# Candidate slave localhost:13002 will become the new master.
# Preparing candidate for failover.
# Creating replication user if it does not exist.
# Stopping slaves.
# Performing STOP on all slaves.
# Switching slaves to new master.
# Starting slaves.
# Performing START on all slaves.
# Checking slaves for errors.
# Failover complete.
#
# Replication Topology Health:
+------------+--------+---------+--------+------------+---------+
| host | port | role | state | gtid_mode | health |
+------------+--------+---------+--------+------------+---------+
| localhost | 13002 | MASTER | UP | ON | OK |
| localhost | 13004 | SLAVE | UP | ON | OK |
| localhost | 13005 | SLAVE | UP | ON | OK |
+------------+--------+---------+--------+------------+---------+
# ...done.
mysqlfailover
The failover utility is not a run-once type of utility. Rather, it is a utility designed to run interactively. The failover utility is also called the failover console, but it is a command-line tool and purely text based.
The console can be run on any system but should be run on a system that can be monitored closely. It would not fare well for your failover strategy if the server on which the automatic failover utility runs happens to be offline should the master fail. Also, if you have multiple masters in your topology, you will need to run one (and only one) instance of the utility and connect each to one and only one master.
The console is also designed to be used with GTID-enabled servers and will not work with non-GTID enabled servers.
Because it is an interactive utility, there are a number of menu commands you can choose once the console is started. Let’s take a look at what the console looks like when connected to master with four slaves:
$ mysqlfailover --master=root:pass@localhost:13001 --disco=root:pass
--log=failover_log.txt
# Discovering slaves for master at localhost:13001
# Checking privileges.
[...]
MySQL Replication Failover Utility
Failover Mode = auto Next Interval = Mon Nov 19 20:00:49 2012
Master Information
------------------
Binary Log File Position Binlog_Do_DB Binlog_Ignore_DB
clone-bin.000001 574
GTID Executed Set
42077312-32AC-11E2-87F5-4FD43CAEB376:1-2
Replication Health Status
+------------+--------+---------+--------+------------+---------+
| host | port | role | state | gtid_mode | health |
+------------+--------+---------+--------+------------+---------+
| localhost | 13001 | MASTER | UP | ON | OK |
| localhost | 13002 | SLAVE | UP | ON | OK |
| localhost | 13003 | SLAVE | UP | ON | OK |
| localhost | 13004 | SLAVE | UP | ON | OK |
| localhost | 13005 | SLAVE | UP | ON | OK |
+------------+--------+---------+--------+------------+---------+
Q-quit R-refresh H-health G-GTID Lists U-UUIDs L-log entries
NOTE
The [...] in the preceding listing represents a screen refresh. The failover console is designed to fill a text command window (terminal). Thus, the line that reads, “MySQL Replication Failover Utility” appears on the top line of the window.
The console displays the master information at the top, including the current log file and position as well as the GTID executed set. Below that is a health report—the same as the replication administration utility, mysqlrpladmin.
At the bottom of the screen is the menu. Select from the following items using the key specified as the capital letter preceding the label:
Quit
Exit the console.
Refresh
Refreshes the health report. Use this command while viewing the health report to refresh the data before the next interval.
Health
Displays the health report. Use this command to switch the view to the health report.
GTID Lists
Shows the GTIDs for the master’s executed set, the slave’s executed GTIDs, slave’s purged GTIDs, and slave’s owned GTIDs. Pressing G repeatedly will cycle through all of the lists. Use this command to switch the view to the list of UUIDs.
UUIDs
Shows the UUIDs for all servers. Use this command to switch the view to the list of UUIDs.
Log Entries
Read and display the rows in the failover log file. This item is displayed only if this log file is enabled.
The failover console is designed to check the status of the master at fixed intervals. The default is every 15 seconds. You can change this frequency using the --interval option.
One of the interesting features of the failover console is the ability to generate a log of the operations taking place. Each statement and status item is saved in the log. You can turn on the log with the --log-file option, specifying a path and filename for the log file. The log file is appended rather than rewritten by default, but you can use the --log-age=N option to tell the utility to overwrite entries older than N number of days.
The log file can be very useful in situations where you need to keep a permanent record of events or if you desire a higher level of audit capability.
Another useful option is the --rediscover option. This instructs the utility to rerun the slave discovery feature on each interval. Use this option if you want the failover console to detect when new slaves are added.
Failover modes
The failover console permits several modes of operation. This permits you to run the failover console in the manner most appropriate to your environment or requirements. The following describes each mode (the default mode is AUTO):
AUTO
Execute automatic failover to the list of candidates first. If no candidate slaves are viable, continue to locate a viable candidate from the list of slaves. If no slaves are found to be a viable candidate, generate an error and exit.
Once a candidate is found, the utility will conduct a failover to the best slave. The command will test each candidate slave listed for the prerequisites. Once a candidate slave is elected, it is made a slave of each of the other slaves, thereby collecting any transactions that were executed on other slaves but not the candidate. In this way, the candidate becomes the most up-to-date slave.
ELECT
This mode is the same as AUTO except that, if no candidates specified in the list of candidate slaves are viable, it does not check the remaining slaves, but generates an error and exits. Use this mode if you have a subset of slaves you want to use for failover, where the remaining slaves are not eligible. For example, you may want to exclude slaves with older or inferior hardware.
FAIL
Produces an error and does not failover when the master is down. This mode is used to provide periodic health monitoring without taking a failover action.
The failover event
A failover event occurs when the master can neither be reached via a database connection nor pinged. This check occurs once per interval. When both tests fail, the failover event is initiated.
The failover detection is also tunable. You can use the --ping option to tell the utility how many ping attempts to use before considering the master offline. You can use an external script to control the failover detection. Extension points explains how to use an external script to initiate the failover event.
The following process summarizes the steps executed during the failover event. This is a generalized list based on the default failover mode. The process is slightly different for slave election depending on the mode (see Failover modes):
§ A new candidate slave is elected as follows. If the --candidate-slaves option is specified, the slaves are tested in the order they appear. If none of these slaves meet the prerequisites in Candidate slave, and the --slaves option is specified, the slaves are tested in the order they appear. If none of these slaves are elected, the utility will test each slave it can discover. Because the prerequisites are not stringent, it is likely that the first candidate slave will be the first slave listed in the --candidate-slaves option.
§ Once the candidate slave is elected, it is made a slave of every other slave. This utilizes the new replication protocol that ensures that the candidate slave retrieves any transactions that have executed on another slave but not this candidate slave.
§ Now that the candidate slave is up to date with all transactions, it is made the new master.
§ Lastly, the remaining slaves are connected to the new master and replication is restarted.
When this process runs, the failover console switches temporarily into a list mode where it lists status statements for each step of the process. If you use the --verbose option, the utility will display all of the details of the operations.
The following example shows a failover event in progress. Notice that you can see all of the GTIDs involved and even the CHANGE MASTER commands as they are run. If you turned on the log feature, all of these statements would appear in the log file as well:
Failover starting in 'auto' mode...
# Checking eligibility of slave localhost:13002 for candidate.
# GTID_MODE=ON ... Ok
# Replication user exists ... Ok
# Candidate slave localhost:13002 will become the new master.
# Preparing candidate for failover.
# LOCK STRING: FLUSH TABLES WITH READ LOCK
# Connecting candidate to localhost:13003 as a master to retrieve
unprocessed GTIDs.
# Change master command for localhost:13002
# CHANGE MASTER TO MASTER_HOST = 'localhost', MASTER_USER = 'rpl',
MASTER_PASSWORD = 'rpl', MASTER_PORT = 13003, MASTER_AUTO_POSITION=1
# UNLOCK STRING: UNLOCK TABLES
# Waiting for candidate to catch up to slave localhost:13003.
# Slave localhost:13002:
# QUERY = SELECT SQL_THREAD_WAIT_AFTER_GTIDS('0035A78A-32AF-11E2-8807-
6F5662E76235:1-2', 3)
# Return Code = 0
# Slave localhost:13002:
# QUERY = SELECT SQL_THREAD_WAIT_AFTER_GTIDS('42077312-32AC-11E2-87F5-
4FD43CAEB376:1-2', 3)
# Return Code = 0
# Slave localhost:13002:
# QUERY = SELECT SQL_THREAD_WAIT_AFTER_GTIDS('498880AE-32B1-11E2-8815-
C19FD75A3D21:1-2', 3)
# Return Code = 0
# Slave localhost:13002:
# QUERY = SELECT SQL_THREAD_WAIT_AFTER_GTIDS('74151132-32AE-11E2-8803-
E93E7AABEB97:1-2', 3)
# Return Code = 0
# Slave localhost:13002:
# QUERY = SELECT SQL_THREAD_WAIT_AFTER_GTIDS('7CB05E3E-32AC-11E2-87F6-
336560B463D4:1-3', 3)
# Return Code = 0
# Slave localhost:13002:
# QUERY = SELECT SQL_THREAD_WAIT_AFTER_GTIDS('9E6957E4-32AF-11E2-880B-
C19ED44E0636:1-2', 3)
# Return Code = 0
# Slave localhost:13002:
# QUERY = SELECT SQL_THREAD_WAIT_AFTER_GTIDS('F37C4048-32AF-11E2-880D-
CFD6C34C3629:1-2', 3)
# Return Code = 0
# LOCK STRING: FLUSH TABLES WITH READ LOCK
# Connecting candidate to localhost:13004 as a master to retrieve
unprocessed GTIDs.
# Change master command for localhost:13002
# CHANGE MASTER TO MASTER_HOST = 'localhost', MASTER_USER = 'rpl',
MASTER_PASSWORD = 'rpl', MASTER_PORT = 13004, MASTER_AUTO_POSITION=1
# UNLOCK STRING: UNLOCK TABLES
# Waiting for candidate to catch up to slave localhost:13004.
# Slave localhost:13002:
# QUERY = SELECT SQL_THREAD_WAIT_AFTER_GTIDS('0035A78A-32AF-11E2-8807-
6F5662E76235:1-2', 3)
# Return Code = 0
# Slave localhost:13002:
# QUERY = SELECT SQL_THREAD_WAIT_AFTER_GTIDS('42077312-32AC-11E2-87F5-
4FD43CAEB376:1-2', 3)
# Return Code = 0
# Slave localhost:13002:
# QUERY = SELECT SQL_THREAD_WAIT_AFTER_GTIDS('498880AE-32B1-11E2-8815-
C19FD75A3D21:1-2', 3)
# Return Code = 0
# Slave localhost:13002:
# QUERY = SELECT SQL_THREAD_WAIT_AFTER_GTIDS('74151132-32AE-11E2-8803-
E93E7AABEB97:1-2', 3)
# Return Code = 0
# Slave localhost:13002:
# QUERY = SELECT SQL_THREAD_WAIT_AFTER_GTIDS('940ABCDC-32AC-11E2-87F7-
9F158C80DED6:1-3', 3)
# Return Code = 5
# Slave localhost:13002:
# QUERY = SELECT SQL_THREAD_WAIT_AFTER_GTIDS('9E6957E4-32AF-11E2-880B-
C19ED44E0636:1-2', 3)
# Return Code = 0
# Slave localhost:13002:
# QUERY = SELECT SQL_THREAD_WAIT_AFTER_GTIDS('F37C4048-32AF-11E2-880D-
CFD6C34C3629:1-2', 3)
# Return Code = 0
# LOCK STRING: FLUSH TABLES WITH READ LOCK
# Connecting candidate to localhost:13005 as a master to retrieve
unprocessed GTIDs.
# Change master command for localhost:13002
# CHANGE MASTER TO MASTER_HOST = 'localhost', MASTER_USER = 'rpl',
MASTER_PASSWORD = 'rpl', MASTER_PORT = 13005, MASTER_AUTO_POSITION=1
# UNLOCK STRING: UNLOCK TABLES
# Waiting for candidate to catch up to slave localhost:13005.
# Slave localhost:13002:
# QUERY = SELECT SQL_THREAD_WAIT_AFTER_GTIDS('0035A78A-32AF-11E2-8807-
6F5662E76235:1-2', 3)
# Return Code = 0
# Slave localhost:13002:
# QUERY = SELECT SQL_THREAD_WAIT_AFTER_GTIDS('42077312-32AC-11E2-87F5-
4FD43CAEB376:1-2', 3)
# Return Code = 0
# Slave localhost:13002:
# QUERY = SELECT SQL_THREAD_WAIT_AFTER_GTIDS('498880AE-32B1-11E2-8815-
C19FD75A3D21:1-2', 3)
# Return Code = 0
# Slave localhost:13002:
# QUERY = SELECT SQL_THREAD_WAIT_AFTER_GTIDS('4AA055C2-32AF-11E2-8808-
366E88604744:1-2', 3)
# Return Code = 5
# Slave localhost:13002:
# QUERY = SELECT SQL_THREAD_WAIT_AFTER_GTIDS('59D25A04-32AF-11E2-8809-
6D4E4056F0AF:1-2', 3)
# Return Code = 0
# Slave localhost:13002:
# QUERY = SELECT SQL_THREAD_WAIT_AFTER_GTIDS('5D3211AC-32B0-11E2-880F-
F6735C743197:1-2', 3)
# Return Code = 0
# Slave localhost:13002:
# QUERY = SELECT SQL_THREAD_WAIT_AFTER_GTIDS('74151132-32AE-11E2-8803-
E93E7AABEB97:1-2', 3)
# Return Code = 0
# Slave localhost:13002:
# QUERY = SELECT SQL_THREAD_WAIT_AFTER_GTIDS('9E6957E4-32AF-11E2-880B-
C19ED44E0636:1-2', 3)
# Return Code = 0
# Slave localhost:13002:
# QUERY = SELECT SQL_THREAD_WAIT_AFTER_GTIDS('A680695C-32AC-11E2-87F7-
797D07AB4557:1-3', 3)
# Return Code = 0
# Slave localhost:13002:
# QUERY = SELECT SQL_THREAD_WAIT_AFTER_GTIDS('C903D9AC-32AF-11E2-880C-
6D4F415B0402:1-2', 3)
# Return Code = 0
# Slave localhost:13002:
# QUERY = SELECT SQL_THREAD_WAIT_AFTER_GTIDS('F37C4048-32AF-11E2-880D-
CFD6C34C3629:1-2', 3)
# Return Code = 0
# Creating replication user if it does not exist.
# Stopping slaves.
# Performing STOP on all slaves.
# Executing stop on slave localhost:13002 Ok
# Executing stop on slave localhost:13003 Ok
# Executing stop on slave localhost:13004 Ok
# Executing stop on slave localhost:13005 Ok
# Switching slaves to new master.
# Change master command for localhost:13002
# CHANGE MASTER TO MASTER_HOST = 'localhost', MASTER_USER = 'rpl',
MASTER_PASSWORD = 'rpl', MASTER_PORT = 13002, MASTER_AUTO_POSITION=1
# Change master command for localhost:13003
# CHANGE MASTER TO MASTER_HOST = 'localhost', MASTER_USER = 'rpl',
MASTER_PASSWORD = 'rpl', MASTER_PORT = 13002, MASTER_AUTO_POSITION=1
# Change master command for localhost:13004
# CHANGE MASTER TO MASTER_HOST = 'localhost', MASTER_USER = 'rpl',
MASTER_PASSWORD = 'rpl', MASTER_PORT = 13002, MASTER_AUTO_POSITION=1
# Change master command for localhost:13005
# CHANGE MASTER TO MASTER_HOST = 'localhost', MASTER_USER = 'rpl',
MASTER_PASSWORD = 'rpl', MASTER_PORT = 13002, MASTER_AUTO_POSITION=1
# Starting slaves.
# Performing START on all slaves.
# Executing start on slave localhost:13003 Ok
# Executing start on slave localhost:13004 Ok
# Executing start on slave localhost:13005 Ok
# Checking slaves for errors.
# localhost:13003 status: Ok
# localhost:13004 status: Ok
# localhost:13005 status: Ok
# Failover complete.
# Discovering slaves for master at localhost:13002
Failover console will restart in 5 seconds.
Once the failover event is complete, the console is redrawn with the new master information and the updated list of slaves in the health report. Based on the previous examples, the resulting health report after failover follows:
MySQL Replication Failover Utility
Failover Mode = auto Next Interval = Mon Nov 19 20:28:03 2012
Master Information
------------------
Binary Log File Position Binlog_Do_DB Binlog_Ignore_DB
clone-bin.000001 7073
GTID Executed Set
0035A78A-32AF-11E2-8807-6F5662E76235:1-2 [...]
Replication Health Status
+------------+--------+---------+--------+------------+---------+
| host | port | role | state | gtid_mode | health |
+------------+--------+---------+--------+------------+---------+
| localhost | 13002 | MASTER | UP | ON | OK |
| localhost | 13003 | SLAVE | UP | ON | OK |
| localhost | 13004 | SLAVE | UP | ON | OK |
| localhost | 13005 | SLAVE | UP | ON | OK |
+------------+--------+---------+--------+------------+---------+
Q-quit R-refresh H-health G-GTID Lists U-UUIDs L-log entries
Notice that the original master on port 13001 is no longer displayed and the elected slave has become the new master with all slaves connected.
Extension points
To make the failover utility more flexible, it supports four extension points that you can use to call your own scripts. This can be very helpful in tailoring your fault tolerant application to interact with the failover console. The following lists the extension points available and how each can be used (they are listed in the order in which they occur during a failover event):
--exec-fail-check
This option permits you to provide an application-specific failover event. This replaces the default failover detection criteria (master cannot be reached and cannot be pinged) with your own event detection. A return code of 0 indicates that failover should not take place. A return code other than 0 indicates that failover should take place. The script is run at the start of each interval. The timeout option is not used in this case.
--exec-before
The utility runs this script before the failover event occurs. You can use this to tell your application to halt all writes and prepare for changing the master.
--exec-after
The utility runs this script after the failover event occurs but before the slaves are switched to the new master. You can use this to inform your application that the new master is ready.
--exec-post-failover
The utility runs this utility after the slaves are redirected to the new master and the health report is generated. You can use this to inform your application that it can read from the slaves again.
Creating Your Own Utilities
Now that you know what the MySQL Utilities are and how they are used with replication, you may have ideas for new uses of these utilities or even new utilities that you would like to have that are specific to your environment. Fortunately, MySQL Utilities was designed with this kind of major extension in mind. This section covers the architecture and organization of the MySQL Utilities. We will also discuss an example of a custom utility that you can create yourself or use as a template for custom replication utilities.
Architecture of MySQL Utilities
Utilities are built using a single script responsible for defining and validating options and arguments. The script (also referred to by the name of the utility) references a series of modules that contain Python classes and methods for the operations they perform. These are called command modules. These are the interface to a larger set of Python classes and methods that are designed to model specific components or behaviors of the server. We call the files that contain these classes and methods common modules. Both command and common modules use the Connector/Python connector to connect to a MySQL Server.
The MySQL Utilities library therefore is the collection of all of the command and common modules. These files are stored together under the same folder. If you were to download the MySQL Utilities source code, you would see folders named /scripts, /mysql/utilities/command, and/mysql/utilities/common.
Figure 17-3 shows the relationships between the parts of MySQL Utilities and therefore how each utility is built. For example, the mysqldbcopy script is implemented in the /scripts/mysqldbcopy.py file and calls a command module named /mysql/utilities/command/dbcopy.py, which calls several modules such as server.py, options.py, and database.py located in the /mysql/utilities/common folder.
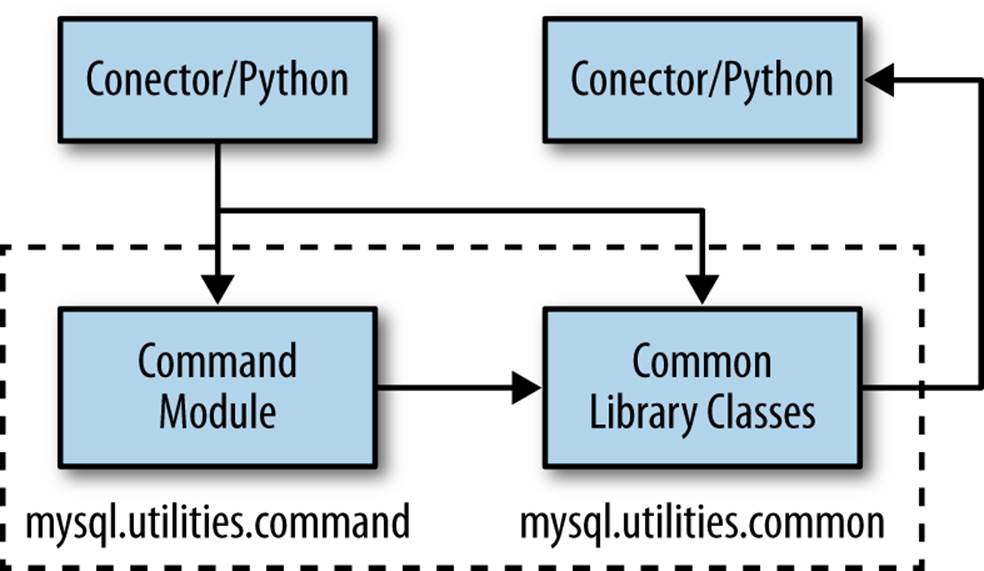
Figure 17-3. Architecture of MySQL Utilities
Custom Utility Example
This section contains an example of a custom utility built by combining features from existing utilities. Suppose you want a utility that copies all of the databases and users from one server to another. Furthermore, you want the utility to create a new instance of the server and use that as the destination for the copy. This utility can be very handy for creating test environments for development and diagnosis of data problems.
We will begin with a brief list of operations needed and a detailed look at the code for each operation. We conclude with a complete listing of the resulting source code.
Operations
If we skip the housekeeping operations, such as defining options and validating parameters and values, we can create a simple list of operations for the new utility. These can be combined into three major sections. First, we need to connect to the server and discover what needs to be copied. Second, we need to create a clone of that server. Lastly, we need to perform the copy to the new server. We can expand this list of operations into the following eight steps:
1. Set up the parameters.
2. Connect to the original server.
3. Find all of the databases.
4. Find all of the users.
5. Make a clone of the original server.
6. Connect to the new server.
7. Copy all of the databases.
8. Copy all of the users.
If you consider the available utilities, you’ll find a utility that can copy databases, a utility that can copy (clone) users, and a server that can clone a running or offline server. Once you consider the architecture of the utilities, it is easy to see that our solution is a mash-up of these three utilities. In fact, we can study those utilities and discover the command modules they use, then re-create the same calls in our new utility.
The following section explains each of the operations in more detail.
Sample code
We begin with setting up the parameters for the utility. Because we are reusing parts of other utilities, we can identify the options we need to use from studying how the utilities are created.
If you set aside those options that are provided for additional elective features, we find we need only a few options. If we minimize the list, we find that not many options are needed. From the server clone utility, we see we need --new-data, --new-port, and --new-id. From the database copy utility, we need to list the databases with --databases. All of the utilities have the --server option in common, which we need in order to connect to the original server for the copy and clone operations. We also need the --users option to identify the users we want to copy.
Now that we have a list of options, we can start a new file named cloneserver.py and copy the options from the other utilities. The following shows the options needed:
parser = optparse.OptionParser(
version=VERSION_FRM.format(program=os.path.basename(sys.argv[0])),
description=DESCRIPTION,
usage=USAGE,
add_help_option=False)
parser.add_option("--help", action="help")
# Set up utility-specific options:
# Connection information for the source server
parser.add_option("--server", action="store", dest="server",
type="string", default="root@localhost:3306",
help="connection information for original server in " + \
"the form: user:password@host:port:socket")
# Data directory for new instance
parser.add_option("--new-data", action="store", dest="new_data",
type="string", help="the full path to the location "
"of the data directory for the new instance")
# Port for the new instance
parser.add_option("--new-port", action="store", dest="new_port",
type="string", default="3307", help="the new port "
"for the new instance - default=%default")
# Server id for the new instance
parser.add_option("--new-id", action="store", dest="new_id",
type="string", default="2", help="the server_id for "
"the new instance - default=%default")
# List of databases
parser.add_option("-d", "--databases", action="store", dest="dbs_to_copy",
type="string", help="comma-separated list of databases "
"to include in the copy (omit for all databases)",
default=None)
# List of users
parser.add_option("-u", "--users", action="store", dest="users_to_copy",
type="string", help="comma-separated list of users "
"to include in the copy (omit for all users)",
default=None)
NOTE
The current release of MySQL Utilities uses a module named optparse, which will eventually be replaced by argparse.
The next operation, connecting to the server, can be accomplished as follows. Notice we must import a helper method to parse the server option value, then import the Server class, build a dictionary of the options, and finally call the connect() method. The use of a Python dictionary to contain options is a common practice in all utilities:
# Parse the connection information
from mysql.utilities.common.options import parse_connection
try:
conn = parse_connection(opt.server)
except:
parser.error("Server connection values invalid or"
" cannot be parsed.")
# Connect to original server
from mysql.utilities.common.server import Server
server_options = {'conn_info’ : conn, 'role’ : "source"}
srv1 = Server(server_options)
srv1.connect()
Now that we have a connection to a MySQL server, we can build a list of databases. If we consider the case where the user may want to copy all of the databases, we can check the database option and, if none are listed, get a list of all of the databases on the server. We can do the same for users. The following shows one example of how we can accomplish this:
# Get list of databases from the server if not specified in options
print "# Getting databases..."
db_list = []
if opt.dbs_to_copy is None:
for db in server1.get_all_databases():
db_list.append((db[0], None))
else:
for db in opt.dbs_to_copy.split(","):
db_list.append((db, None))
# Get list of all users from the server
print "# Getting users..."
user_list=[]
if opt.users_to_copy is None:
users = server1.exec_query("SELECT user, host "
"FROM mysql.user "
"WHERE user != 'root' and user != ''")
for user in users:
user_list.append(user[0]+'@'+user[1])
else:
for user in opt.users_to_copy.split(","):
user_list.append(user)
The next major operation is to clone the server. Because we have minimized the options, we’ll make a few with specific defaults. It would not be difficult to make these into options if desired. The following shows the code needed to make the clone. Because this is the first operation that calls the command modules, we would expect a bit of complexity. However, the opposite is true. Utility command modules are a very high level (sometimes called macro-level) of encapsulation, making the command modules very powerful and the script file very simple.
As you may suspect, this code is very similar to the connection code for the original server. The following shows the code for this operation:
# Parse source connection values
try:
conn = parse_connection(opt.server)
except:
parser.error("Server connection values invalid or cannot be parsed.")
# Get a server class instance
print "# Connecting to server..."
server_options = {
'conn_info' : conn,
'role' : "source",
}
server1 = Server(server_options)
try:
server1.connect()
except UtilError, e:
print "ERROR:", e.errmsg
You might be wondering how we handle errors. The utilities make extensive use of exceptions. For normal operations that have known errors, command modules return typical return codes of False or True, but when a catastrophic error occurs, like invalid user credentials, the library modules throw an exception.
Now we are ready to copy the database and users identified previously. As you may expect, there are command modules for each of these operations that accept a server connection:
print "# Copying databases..."
try:
dbcopy.copy_db(conn, dest_values, db_list, options)
except exception.UtilError, e:
print "ERROR:", e.errmsg
exit(1)
# Build dictionary of options
options = {
"overwrite" : True,
"quiet" : True,
"globals" : True
}
print "# Cloning the users..."
for user in user_list:
try:
res = userclone.clone_user(conn, dest_values, user,
(user,), options)
except exception.UtilError, e:
print "ERROR:", e.errmsg
exit(1)
And that’s all of the code for the new utility! Lets take a look at the completed code and see an example of its execution.
Putting it all together
Now that you have seen the code involved with each operation, let’s take a look at the completed source code. Example 17-3 shows all of the sample code plus the typical housekeeping and setup code for managing a typical utility.
Example 17-3. Completed source code
import optparse
import os
import sys
from mysql.utilities import VERSION_FRM
from mysql.utilities.command import dbcopy
from mysql.utilities.command import serverclone
from mysql.utilities.command import userclone
from mysql.utilities.common.server import Server
from mysql.utilities.common.options import parse_connection
from mysql.utilities import exception
# Constants
NAME = "example - copy_server "
DESCRIPTION = "copy_server - copy an existing server"
USAGE = "%prog --server=user:pass@host:port:socket " \
"--new-dir=path --new-id=server_id " \
"--new-port=port --databases=db list " \
"--users=user list"
# Setup the command parser
parser = optparse.OptionParser(
version=VERSION_FRM.format(program=os.path.basename(sys.argv[0])),
description=DESCRIPTION,
usage=USAGE,
add_help_option=False)
parser.add_option("--help", action="help")
# Setup utility-specific options:
# Connection information for the source server
parser.add_option("--server", action="store", dest="server",
type="string", default="root@localhost:3306",
help="connection information for original server in " + \
"the form: user:password@host:port:socket")
# Data directory for new instance
parser.add_option("--new-data", action="store", dest="new_data",
type="string", help="the full path to the location "
"of the data directory for the new instance")
# Port for the new instance
parser.add_option("--new-port", action="store", dest="new_port",
type="string", default="3307", help="the new port "
"for the new instance - default=%default")
# Server id for the new instance
parser.add_option("--new-id", action="store", dest="new_id",
type="string", default="2", help="the server_id for "
"the new instance - default=%default")
# List of databases
parser.add_option("-d", "--databases", action="store", dest="dbs_to_copy",
type="string", help="comma-separated list of databases "
"to include in the copy (omit for all databases)",
default=None)
# List of users
parser.add_option("-u", "--users", action="store", dest="users_to_copy",
type="string", help="comma-separated list of users "
"to include in the copy (omit for all users)",
default=None)
# Now we process the rest of the arguments.
opt, args = parser.parse_args()
# Parse source connection values
try:
conn = parse_connection(opt.server)
except:
parser.error("Server connection values invalid or cannot be parsed.")
# Get a server class instance
print "# Connecting to server..."
server_options = {
'conn_info' : conn,
'role' : "source",
}
server1 = Server(server_options)
try:
server1.connect()
except UtilError, e:
print "ERROR:", e.errmsg
# Get list of databases from the server if not specified in options
print "# Getting databases..."
db_list = []
if opt.dbs_to_copy is None:
for db in server1.get_all_databases():
db_list.append((db[0], None))
else:
for db in opt.dbs_to_copy.split(","):
db_list.append((db, None))
# Get list of all users from the server
print "# Getting users..."
user_list=[]
if opt.users_to_copy is None:
users = server1.exec_query("SELECT user, host "
"FROM mysql.user "
"WHERE user != 'root' and user != ''")
for user in users:
user_list.append(user[0]+'@'+user[1])
else:
for user in opt.users_to_copy.split(","):
user_list.append(user)
# Clone the server
print "# Cloning server instance..."
try:
res = serverclone.clone_server(conn, opt.new_data, opt.new_port,
opt.new_id, "root", None, False, True)
except exception.UtilError, e:
print "ERROR:", e.errmsg
exit(1)
# Set connection values
dest_values = {
"user" : conn.get("user"),
"passwd" : "root",
"host" : conn.get("host"),
"port" : opt.new_port,
"unix_socket" : os.path.join(opt.new_data, "mysql.sock")
}
# Build dictionary of options
options = {
"quiet" : True,
"force" : True
}
print "# Copying databases..."
try:
dbcopy.copy_db(conn, dest_values, db_list, options)
except exception.UtilError, e:
print "ERROR:", e.errmsg
exit(1)
# Build dictionary of options
options = {
"overwrite" : True,
"quiet" : True,
"globals" : True
}
print "# Cloning the users..."
for user in user_list:
try:
res = userclone.clone_user(conn, dest_values, user,
(user,), options)
except exception.UtilError, e:
print "ERROR:", e.errmsg
exit(1)
print "# ...done."
Example 17-4 shows the output of this example. Here we see the new utility is used to copy two databases, all of the users, and create a new server.
Example 17-4. Example execution
$ copy_server --new-port=3307 --server=root:pass@localhost \
--new-data=/Volumes/Source/testabc -d db1,db2
# Connecting to server...
# Getting databases...
# Getting users...
# Cloning server instance...
# Cloning the MySQL server running on localhost.
# Creating new data directory...
# Configuring new instance...
# Locating mysql tools...
# Setting up empty database and mysql tables...
# Starting new instance of the server...
# Testing connection to new instance...
# Success!
# Setting the root password...
# Connection Information:
# -uroot -proot --socket=/Volumes/Source/testabc/mysql.sock
#...done.
# Copying databases...
# Cloning the users...
# ...done.
Suggestions
The example project is very helpful in producing a running clone of an existing server. However, if we consider how this can be used in replication, we may consider it would be more useful if it had the ability to optionally make the new server a clone of the original server. This would, in effect, create a new utility that can be used to provision slaves. How cool is that?
To do this, you would need to use the command module for the replication utility described in Architecture of MySQL Utilities. The following example gives a hint of the code you will need to use. We leave this modification for you to explore as an exercise. Start by identifying the required options and adding them to the file:
from mysql.utilities.command.setup_rpl import setup_replication
...
res = setup_replication(m_values, s_values, opt.rpl_user,
options, opt.test_db)
Conclusion
MySQL replication is a powerful feature that is easy to set up and administer for a small number of servers. When the topology grows to many servers or acquires complexity such as tiered servers, geographically remote sites, or configuration for data segregation via filtering, managing replication can become a challenge.
In this chapter, we presented a set of utilities you can use to manage your replication servers for operations like copying databases, cloning users, and setting up and checking replication. We also presented two powerful utilities designed to make switchover in a single command and to provide automatic failover.
Now that you know how to achieve high availability with MySQL, you can use MySQL Utilities to further enhance your MySQL installation.
Joel clicked the key sequence to save his latest version of his manifesto of managing MySQL replication. “That’s done,” he said with the satisfaction of a job completed.
Joel’s new email tone chimed. With some trepidation, he glanced at his inbox. As he suspected, his boss was asking about the status of his writing project. He clicked on Reply and composed a simple response, then attached the new file.
A knock on his doorjamb distracted him before he could hit Send. “Joel, I’ve got a candidate on line 4 who knows MySQL. Why don’t you check him out and quiz him on replication with that new document you’ve written?” As his boss hurried off, Joel sent the email and then reached for his phone. “How does he do that?” Joel wondered.
All materials on the site are licensed Creative Commons Attribution-Sharealike 3.0 Unported CC BY-SA 3.0 & GNU Free Documentation License (GFDL)
If you are the copyright holder of any material contained on our site and intend to remove it, please contact our site administrator for approval.
© 2016-2026 All site design rights belong to S.Y.A.