MySQL High Availability (2014)
Part I. High Availability and Scalability
Chapter 3. MySQL Replication Fundamentals
Joel jumped as a sharp rap on his door announced his boss’s unapologetic interruption. Before Joel could say “come in,” the boss stepped into his doorway and said, “Joel, we’re getting complaints that our response time is getting slow. See what you can do to speed things up. The administrator told me there are too many read operations from the applications. See what you can do to offload some of that.”
Before Joel could respond, Mr. Summerson was out the door and on his way elsewhere. “I suppose he means we need a bigger server,” Joel thought.
As if he had read Joel’s mind, Mr. Summerson stuck his head back in the doorway and said, “Oh, and by the way, the startup we bought all the equipment from had a bunch of servers we haven’t found any use for yet. Can you take a look at those and see what you can do with them? OK, Joel?” Then he was gone again.
“I wonder if I’ll ever get used to this,” Joel thought as he pulled his favorite MySQL book off the shelf and glanced at the table of contents. He found the chapter on replication and decided that might fit the bill.
MySQL replication is a very useful tool when used correctly, but it can also be a source of considerable headaches when it experiences a failure or when it is configured or used incorrectly. This chapter will cover the fundamentals of using MySQL replication by beginning with a simple setup to get you started and then introducing some basic techniques to store in your “replication toolkit.”
This chapter covers the following replication use cases:
High availability through hot standby
If a server goes down, everything will stop; it will not be possible to execute (perhaps critical) transactions, get information about customers, or retrieve other important data. This is something that you want to avoid at (almost) any cost, because it can severely disrupt your business. The easiest solution is to configure an extra server with the sole purpose of acting as a hot standby, ready to take over the job of the main server if it fails.
Report generation
Creating reports from data on a server will degrade the server’s performance, in some cases significantly. If you’re running lots of background jobs to generate reports, it’s worth creating an extra server just for this purpose. You can get a snapshot of the database at a certain time by stopping replication on the report server and then running large queries on it without disturbing the main business server. For example, if you stop replication after the last transaction of the day, you can extract your daily reports while the rest of the business is humming along at its normal pace.
Debugging and auditing
You can also investigate queries that have been executed on the server—for example, to see whether particular queries were executed on servers with performance problems, or whether a server has gone out of sync because of a bad query.
Basic Steps in Replication
This chapter will introduce several sophisticated techniques for maximizing the efficiency and value of replication, but as a first step, we will set up the simple replication shown in Figure 3-1—a single instance of replication from a master to a slave. This does not require any knowledge of the internal architecture or execution details of the replication process (we’ll explore these before we take on more complicated scenarios).
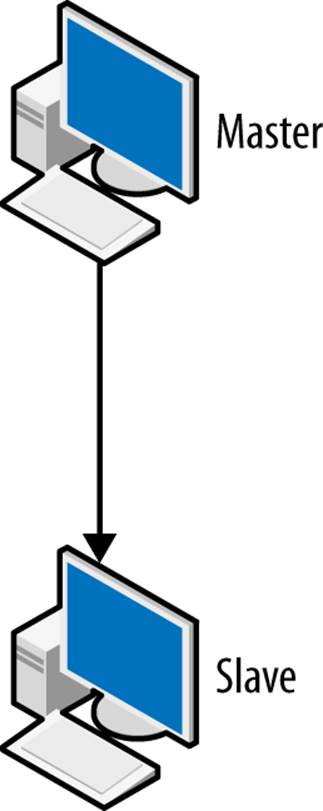
Figure 3-1. Simple replication
Setting up basic replication can be summarized in three easy steps:
1. Configure one server to be a master.
2. Configure one server to be a slave.
3. Connect the slave to the master.
Unless you plan replication from the start and include the right configuration options in the my.cnf files, you will have to restart each server to carry out steps 1 and 2.
NOTE
To follow the procedures in this section, it is easiest if you have a shell account on the machine with privileges to change the my.cnf file as well as an account on the server with ALL privileges granted.[3]
You should be very restrictive in granting privileges in a production environment. For precise guidelines, consult Privileges for the User Configuring Replication.
Configuring the Master
To configure a server so that it can act as master, ensure the server has an active binary log and a unique server ID. We will examine the binary log in greater detail later, but for now it is sufficient to say that it keeps a record of all the changes the master has made so that they can be repeated on the slave. The server ID is used to distinguish two servers from each other. To set up the binary log and server ID, you have to take the server down and add the log-bin, log-bin-index, and server-id options to the my.cnf configuration file as shown in Example 3-1. The added options are in boldface.
Example 3-1. Options added to my.cnf to configure a master
[mysqld]
user = mysql
pid-file = /var/run/mysqld/mysqld.pid
socket = /var/run/mysqld/mysqld.sock
port = 3306
basedir = /usr
datadir = /var/lib/mysql
tmpdir = /tmp
log-bin = master-bin
log-bin-index = master-bin.index
server-id = 1
The log-bin option gives the base name for all the files created by the binary log (as you will see later, the binary log consists of several files). If you create a filename with an extension to log-bin, the extension will be ignored and only the file’s base name will be used (i.e., the name without the extension).
The log-bin-index option gives the name of the binary log index file, which keeps a list of all binlog files.
Strictly speaking, it is not necessary to give a name in the log-bin option. The default value is hostname-bin. The value for hostname is taken from the option for pid-file, which by default is the name of the host (as given by the gethostname(2) system call). If an administrator later changes the machine’s hostname, the binlog files will change names as well, but they will be tracked correctly in the index file. However, it is a good idea to create a name that is unique for the MySQL server and not tied to the machine the server is running on because it can be confusing to work with a series of binlog files that suddenly change name midstream.
If no value is provided for log-bin-index, the default value will be the same base name as for the binlog files (hostname-bin if you don’t give a default for log-bin). This means that if you do not provide a value for log-bin-index, the index file will change its name when you change the name of the host. So if you change the name of the host and start the server, it will not find the index file and therefore assume that it does not exist, and this will give you an empty binary log.
Each server is identified by a unique server ID, so if a slave connects to the master and has the same server-id as the master, an error will be generated indicating that the master and the slave have the same server ID.
Once you have added the options to the configuration file, start the server again and finish its configuration by adding a replication user.
After you make the change to the master’s configuration file, restart the master for the changes to take effect.
The slave initiates a normal client connection to the master and requests the master to send all changes to it. For the slave to connect, a user with special replication privileges is required on the master. Example 3-2 shows a standard mysql client session on the master server, with commands that add a new user account and give it the proper privilege.
Example 3-2. Creating a replication user on the master
master> CREATE USER repl_user;
Query OK, 0 rows affected (0.00 sec)
master> GRANT REPLICATION SLAVE ON *.*
-> TO repl_user IDENTIFIED BY 'xyzzy';
Query OK, 0 rows affected (0.00 sec)
NOTE
There is nothing special about the REPLICATION SLAVE privilege except that the user can retrieve the binary log from the master. It is perfectly viable to have a normal user account and grant that user the REPLICATION SLAVE privilege. It is, however, a good idea to keep the replication slave user separate from the other users. If you do that, you can remove the user if you need to disallow certain slaves from connecting later.
Configuring the Slave
After configuring the master, you must configure the slave. As with the master server, you need to assign each slave a unique server ID. You may also want to consider adding the names of the relay log and the relay log index files to the my.cnf file (we will discuss the relay log in more detail in Replication Architecture Basics) using the options relay-log and relay-log-index. The recommended configuration options are given in Example 3-3, with the added options highlighted.
Example 3-3. Options added to my.cnf to configure a slave
[mysqld]
user = mysql
pid-file = /var/run/mysqld/mysqld.pid
socket = /var/run/mysqld/mysqld.sock
port = 3306
basedir = /usr
datadir = /var/lib/mysql
tmpdir = /tmp
server-id = 2
relay-log-index = slave-relay-bin.index
relay-log = slave-relay-bin
Like the log-bin and log-bin-index options, the defaults for the relay-log and relay-log-index options depend on the hostname. The default for relay-log is hostname-relay-bin and the default for relay-log-index is hostname-relay-bin.index. Using the default introduces a problem in that if the hostname of the server changes, it will not find the relay log index file and will assume there is nothing in the relay logfiles.
After editing the my.cnf file, restart the slave server for the changes to take effect.
PRIVILEGES FOR THE USER CONFIGURING REPLICATION
To configure the connection of the slave to the master for replication, it is necessary to have an account with certain privileges, in addition to a shell account with access to critical files. For security reasons, it is usually a good idea to restrict the account used for configuring the master and slave to just the necessary privileges. To create and drop users, the account needs to have the CREATE USER privilege. To grant the REPLICATION SLAVE to the replication account, it is necessary to have the REPLICATION SLAVE privilege with the GRANT OPTION.
To perform further replication-related procedures (shown later in this chapter), you need a few more options:
§ To execute the FLUSH LOGS command (or any FLUSH command), you need the RELOAD privilege.
§ To execute SHOW MASTER STATUS and SHOW SLAVE STATUS, you need either the SUPER or REPLICATION CLIENT privilege.
§ To execute CHANGE MASTER TO, you need the SUPER privilege.
For example, to give mats sufficient privileges for all the procedures in this chapter, issue the following:
server> GRANT REPLICATION SLAVE, RELOAD, CREATE USER, SUPER
-> ON *.*
-> TO mats@'192.168.2.%'
-> WITH GRANT OPTION;
Connecting the Master and Slave
Now you can perform the final step in setting up basic replication: directing the slave to the master so that it knows where to replicate from. To do this, you need four pieces of information about the master:
§ A hostname
§ A port number
§ A user account on the master with replication slave privileges
§ A password for the user account
You already created a user account with the right privileges and a password when configuring the master. The hostname is given by the operating system and can’t be configured in the my.cnf file, but the port number can be assigned in my.cnf (if you do not supply a port number, the default value of 3306 will be used). The final two steps necessary to get replication up and running are to direct the slave to the master using the CHANGE MASTER TO command and then start replication using START SLAVE:
slave> CHANGE MASTER TO
-> MASTER_HOST = 'master-1',
-> MASTER_PORT = 3306,
-> MASTER_USER = 'repl_user',
-> MASTER_PASSWORD = 'xyzzy';
Query OK, 0 rows affected (0.00 sec)
slave> START SLAVE;
Query OK, 0 rows affected (0.15 sec)
Congratulations! You have now set up your first replication between a master and a slave! If you make some changes to the database on the master, such as adding new tables and filling them in, you will find that they are replicated to the slave. Try it out! Create a test database (if you do not already have one), create some tables, and add some data to the tables to see that the changes replicate over to the slave.
Observe that either a hostname or an IP address can be given to the MASTER_HOST parameter. If a hostname is given, the IP address for the hostname is retrieved by calling gethostname(3), which, depending on your configuration, could mean resolving the hostname using a DNS lookup. The steps for configuring such lookups are beyond the scope of this book.
A Brief Introduction to the Binary Log
What makes replication work is the binary log (or just binlog), which is a record of all changes made to the database on a server. You need to understand how the binary log works in order to have control over replication or to fix any problems that arise, so we’ll give you a bit of background in this section.
Figure 3-2 shows a schematic view of the replication architecture, containing a master with a binary log and a slave that receives changes from the master via the binary log. We will cover the replication architecture in detail in Chapter 8. When a statement is about to finish executing, it writes an entry to the end of the binary log and sends the statement parser a notification that it has completed the statement.
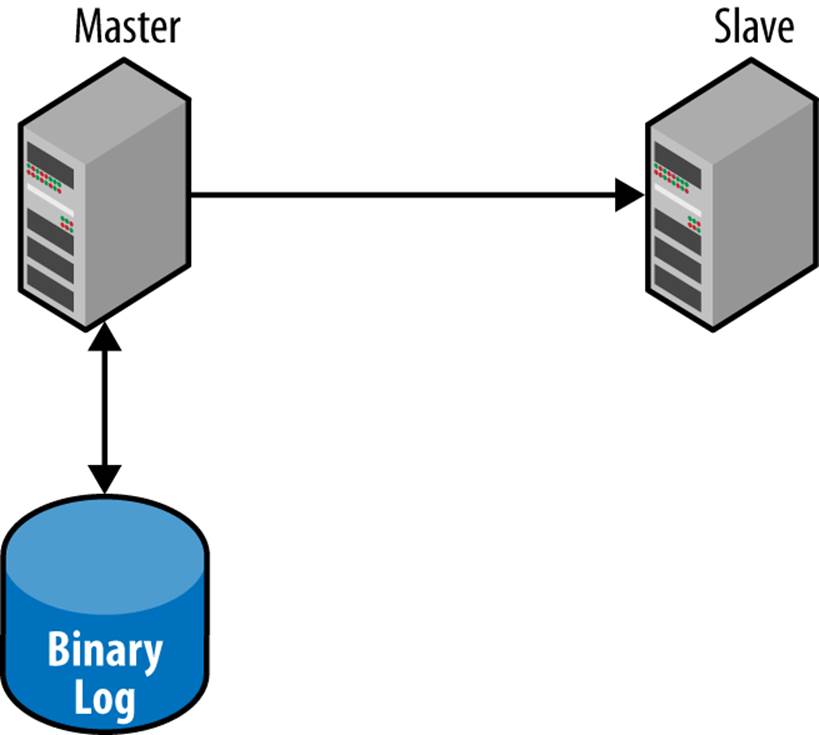
Figure 3-2. Role of the binary log in replication
Usually only the statement that is about to finish executing is written to the binary log, but there are some special cases where other information is written—either in addition to the statement or instead of the statement. It will soon be clear why this is so, but for the time being, you can pretend that only the statements that are being executed are being written to the binary log.
What’s Recorded in the Binary Log
The purpose of the binary log is to record changes made to the tables in the database. The binary log can then be used for replication, as well as for point-in-time-recovery (PITR) , discussed in Chapter 15) and in some limited cases for auditing.
Note that the binary log contains only changes made to the database, so for statements that do not change any data in the database, no entry is written to the binary log.
Traditionally, MySQL replication records changes by preserving the SQL statement that made the change. This is called statement-based replication. Because statement-based replication re-executes the statements on the slave, the result on the slave can differ from the master if the context of the master and slave are not exactly the same. This is the reason why as of version 5.1, MySQL also offers row-based replication. In contrast to statement-based replication, row-based replication individually records each change to a row in the binary log. In addition to being more convenient, row-based replication can offer some speed advantages in certain situations.
To imagine the difference, consider a complex update that uses a lot of joins or WHERE clauses. Instead of re-executing all the logic on the slave in statement-based replication, all you really need to know is the state of the row after the change. On the other hand, if a single update changes 10,000 rows, you’d rather record just the statement instead of 10,000 separate changes as row-based replication does.
We will cover row-based replication in Chapter 8, explaining its implementation and its use. In the examples that follow, we’ll focus on statement-based replication because it’s easier to understand with respect to database management activities.
Watching Replication in Action
Using the replication example from the previous section, let’s take a look at the binlog events for some simple statements. Let’s start by connecting a command-line client to the master and executing a few commands to get a binary log:
master> CREATE TABLE tbl (text TEXT);
Query OK, 0 rows affected (0.04 sec)
master> INSERT INTO tbl VALUES ("Yeah! Replication!");
Query OK, 1 row affected (0.00 sec)
master> SELECT * FROM tbl;
+--------------------+
| text |
+--------------------+
| Yeah! Replication! |
+--------------------+
1 row in set (0.00 sec)
master> FLUSH LOGS;
Query OK, 0 rows affected (0.28 sec)
The FLUSH LOGS command forces the binary log to rotate, which will allow us to see a “complete” binlog file in all its glory. To take a closer look at this file, use the SHOW BINLOG EVENTS command, as shown in Example 3-4.
Example 3-4. Checking what events are in the binary log
master> SHOW BINLOG EVENTS\G
*************************** 1. row ***************************
Log_name: mysql-bin.000001
Pos: 4
Event_type: Format_desc
Server_id: 1
End_log_pos: 107
Info: Server ver: 5.5.34-0ubuntu0.12.04.1-log, Binlog ver: 4
*************************** 2. row ***************************
Log_name: mysql-bin.000001
Pos: 107
Event_type: Query
Server_id: 1
End_log_pos: 198
Info: use `test`; CREATE TABLE tbl (text TEXT)
*************************** 3. row ***************************
Log_name: mysql-bin.000001
Pos: 198
Event_type: Query
Server_id: 1
End_log_pos: 266
Info: BEGIN
*************************** 4. row ***************************
Log_name: mysql-bin.000001
Pos: 266
Event_type: Query
Server_id: 1
End_log_pos: 374
Info: use `test`; INSERT INTO tbl VALUES ("Yeah! Replication!")
*************************** 5. row ***************************
Log_name: mysql-bin.000001
Pos: 374
Event_type: Xid
Server_id: 1
End_log_pos: 401
Info: COMMIT /* xid=188 */
*************************** 6. row ***************************
Log_name: mysql-bin.000001
Pos: 401
Event_type: Rotate
Server_id: 1
End_log_pos: 444
Info: mysql-bin.000002;pos=4
6 rows in set (0.00 sec)
In this binary log, we can now see six events: a format description event, three query events, one XID event, and a rotate event. The query event is how statements executed against the database are normally written to the binary log, the XID event is used for transaction management, whereas the format description and rotate events are used by the server internally to manage the binary log. We will discuss these events in more detail in Chapter 8, but for now, let’s take a closer look at the columns given for each event:
Event_type
This is the type of the event. We have seen three different types here, but there are many more. The type of the event denotes what information is transported to the slave. Currently—in MySQL 5.1.18 to 5.5.33—there are 27 events (several of them are not used, but they are retained for backward compatibility), and in 5.6.12 there are 35, but this is an extensible range and new events are added as required.
Server_id
This is the server ID of the server that created the event.
Log_name
This is the name of the file that stores the event. An event is always contained in a single file and will never span two files.
Pos
This is the position of the file where the event starts (i.e., the first byte of the event).
End_log_pos
This gives the position in the file where the event ends and the next event starts. This is one higher than the last byte of the event, so the bytes in the range Pos to End_log_pos − 1 are the bytes containing the event and the length of the event can be computed as End_log_pos − Pos.
Info
This is human-readable text with information about the event. Different information is printed for different events, but you can at least count on the query event to print the statement that it contains.
The first two columns, Log_name and Pos, make up the binlog position of the event and will be used to indicate the location or position of an event. In addition to what is shown here, each event contains a lot of other information—for example, a timestamp, which is the number of seconds since the Epoch (a classic Unix moment in time, 1970-01-01 00:00:00 UTC).
The Binary Log’s Structure and Content
As we explained, the binary log is not actually a single file, but a set of files that allow for easier management (such as removing old logs without disturbing recent ones). The binary log consists of a set of binlog files with the real contents as well as a binlog index file, which keeps track of which binlog files exist. Figure 3-3 shows how a binary log is organized.
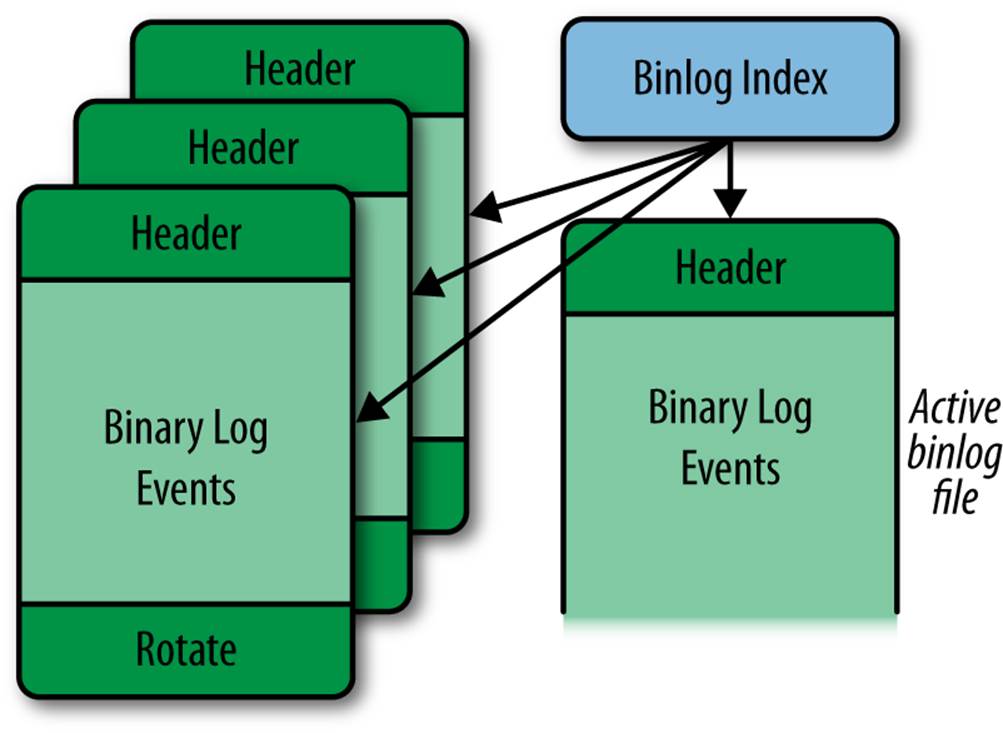
Figure 3-3. Structure of the binary log
One binlog file is the active binlog file. This is the file that is currently being written to (and usually read from as well).
Each binlog file starts with a format description event and ends with a rotate event. The format description log event contains, among other things, the version of the server that produced the file and general information about the server and binary log. The rotate event tells where the binary log continues by giving the filename of the next file in the sequence.
Each file is organized into binary log events, where each event makes a standalone, atomic piece of the binary log. The format description log event contains a flag that marks the file as properly closed. While a binlog file is being written, the flag is set, and when the file is closed, the flag is cleared. This way, it is possible to detect corrupt binlog files in the event of a crash and allow replication to recover.
If you try to execute additional statements at the master, you will observe something strange—no changes are seen in the binary log:
master> INSERT INTO tbl VALUES ("What's up?");
Query OK, 1 row affected (0.00 sec)
master> SELECT * FROM tbl;
+--------------------+
| text |
+--------------------+
| Yeah! Replication! |
| What's up? |
+--------------------+
1 row in set (0.00 sec)
master> SHOW BINLOG EVENTS\G
same as before
What happened to the new event? Well, as you already know, the binary log consists of several files, and the SHOW BINLOG EVENTS statement shows only the contents of the first binlog file. This is contrary to what most users expect, which is to see the contents of the active binlog file. If the name of the first binlog file is master-bin.000001 (containing the events shown previously), you can take a look at the events in the next binlog file, in this case named master-bin.000002, using the following:
master> SHOW BINLOG EVENTS IN 'master-bin.000002'\G
*************************** 1. row ***************************
Log_name: mysql-bin.000002
Pos: 4
Event_type: Format_desc
Server_id: 1
End_log_pos: 107
Info: Server ver: 5.5.34-0ubuntu0.12.04.1-log, Binlog ver: 4
*************************** 2. row ***************************
Log_name: mysql-bin.000002
Pos: 107
Event_type: Query
Server_id: 1
End_log_pos: 175
Info: BEGIN
*************************** 3. row ***************************
Log_name: mysql-bin.000002
Pos: 175
Event_type: Query
Server_id: 1
End_log_pos: 275
Info: use `test`; INSERT INTO tbl VALUES ("What's up?")
*************************** 4. row ***************************
Log_name: mysql-bin.000002
Pos: 275
Event_type: Xid
Server_id: 1
End_log_pos: 302
Info: COMMIT /* xid=196 */
4 rows in set (0.00 sec)
You might have noticed in Example 3-4 that the binary log ends with a rotate event and that the Info field contains the name of the next binlog file and position where the events start. To see which binlog file is currently being written, you can use the SHOW MASTER STATUS command:
master> SHOW MASTER STATUS\G
*************************** 1. row ***************************
File: master-bin.000002
Position: 205
Binlog_Do_DB:
Binlog_Ignore_DB:
1 row in set (0.00 sec)
Now that you’ve finished taking a look at the binary log, stop and reset the slave and drop the table:
master> DROP TABLE tbl;
Query OK, 0 rows affected (0.00 sec)
slave> STOP SLAVE;
Query OK, 0 rows affected (0.08 sec)
slave> RESET SLAVE;
Query OK, 0 rows affected (0.00 sec)
After that, you can drop the table and reset the master to start fresh:
master> DROP TABLE tbl;
Query OK, 0 rows affected (0.00 sec)
master> RESET MASTER;
Query OK, 0 rows affected (0.04 sec)
The RESET MASTER command removes all the binlog files and clears the binlog index file. The RESET SLAVE statement removes all files used by replication on the slave to get a clean start.
WARNING
Neither the RESET MASTER nor the RESET SLAVE command is designed to work when replication is active, so:
§ When executing the RESET MASTER command (on the master), make sure that no slaves are attached.
§ When executing the RESET SLAVE command (on the slave), make sure that the slave does not have replication active by issuing a STOP SLAVE command.
We will cover the most basic events in this chapter, but for the complete list with all its gory details, refer to the MySQL Internals Manual.
Adding Slaves
Now that you know a little about the binary log, we are ready to tackle one of the basic problems with the way we created a slave earlier. When we configured the slave, we provided no information about where to start replication, so the slave will start reading the binary logs on the master from the beginning. That’s clearly not a very good idea if the master has been running for some time: in addition to making the slave replay quite a lot of events just to ramp up, you might not be able to obtain the necessary logs, because they might have been stored somewhere else for safekeeping and removed from the master (we’ll discuss that more in Chapter 15 when we talk about backups and PITR).
We need another way to create new slaves—called bootstrapping a slave—without starting replication from the beginning.
The CHANGE MASTER TO command has two parameters that will help us here: MASTER_LOG_FILE and MASTER_LOG_POS. (Starting with MySQL 5.6, there is another, even easier way to specify positions: Global Transaction Identifiers, or GTIDs. Read more about them in Chapter 8.) You can use these to specify the binlog position at which the master should start sending events instead of starting from the beginning.
Using these parameters to CHANGE MASTER TO, we can bootstrap a slave using the following steps:
1. Configure the new slave.
2. Make a backup of the master (or of a slave that has been replicating the master). See Chapter 15 for common backup techniques.
3. Write down the binlog position that corresponds to this backup (in other words, the position following the last event leading up to the master’s current state).
4. Restore the backup on the new slave. See Chapter 15 for common restore techniques.
5. Configure the slave to start replication from this position.
Depending on whether you use the master or a slave as a baseline in step 2, the procedure differs slightly, so we will start by describing how to bootstrap a new slave when you only have a single server running that you want to use as master—this is called cloning the master.
Cloning the master means taking a snapshot of the server, which is usually accomplished by creating a backup. There are various techniques for backing up the server, but in this chapter, we have decided to use one of the simpler techniques: running mysqldump to create a logical backup. Other options are to create a physical backup by copying the database files, online backup techniques such as MySQL Enterprise Backup, or even volume snapshots using Linux LVM (Logical Volume Manager). The various techniques will be described fully in Chapter 15, along with a discussion of their relative merits.
Cloning the Master
The mysqldump utility has options that allow you to perform all the steps in this section in a single step, but to explain the necessary operations, we will perform all the steps here individually. You will see a more compact version later in this section.
To clone the master, as shown in Figure 3-4, start by creating a backup of the master. Because the master is probably running and has a lot of tables in the cache, it is necessary to flush all tables and lock the database to prevent changes before checking the binlog position. You can do thisusing the FLUSH TABLES WITH READ LOCK command:
master> FLUSH TABLES WITH READ LOCK;
Query OK, 0 rows affected (0.02 sec)
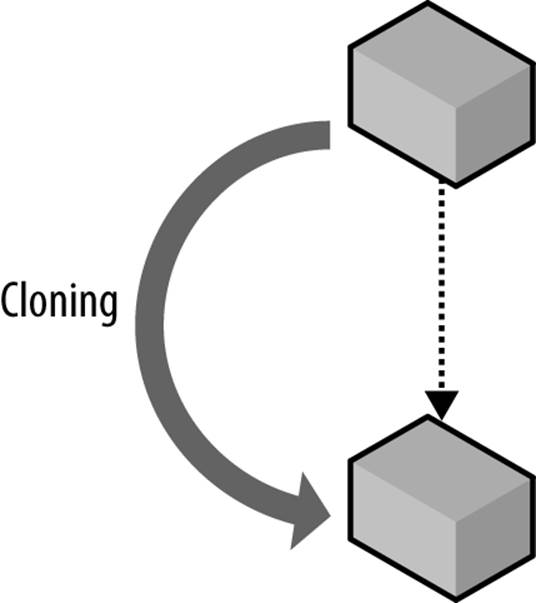
Figure 3-4. Cloning a master to create a new slave
Once the database is locked, you are ready to create a backup and note the binlog position. Note that at this point you should not disconnect mysql from the server as that will release the lock that you just took. Because no changes are occurring on the master, the SHOW MASTER STATUScommand will correctly reveal the current file and position in the binary log. We will go through the details of the SHOW MASTER STATUS and the SHOW MASTER LOGS commands in Chapter 8.
master> SHOW MASTER STATUS\G
*************************** 1. row ***************************
File: master-bin.000042
Position: 456552
Binlog_Do_DB:
Binlog_Ignore_DB:
1 row in set (0.00 sec)
The position of the next event to write is master-bin.000042, 456552, which is where replication should start, given that everything before this point will be in the backup. Once you have jotted down the binlog position, you can create your backup. The easiest way to create a backup of the database is to use mysqldump:
$ mysqldump --all-databases --host=master-1 >backup.sql
Because you now have a faithful copy of the master, you can unlock the tables of the database on the master and allow it to continue processing queries:
master> UNLOCK TABLES;
Query OK, 0 rows affected (0.23 sec)
Next, restore the backup on the slave using the mysql utility:
$ mysql --host=slave-1 <backup.sql
You have now restored the backup of the master on the slave and can start the slave. Recalling the binlog position of the master that you wrote down previously, configure the slave using CHANGE MASTER TO and start the slave:
slave> CHANGE MASTER TO
-> MASTER_HOST = 'master-1',
-> MASTER_PORT = 3306,
-> MASTER_USER = 'slave-1',
-> MASTER_PASSWORD = 'xyzzy',
-> MASTER_LOG_FILE = 'master-bin.000042',
-> MASTER_LOG_POS = 456552;
Query OK, 0 rows affected (0.00 sec)
slave> START SLAVE;
Query OK, 0 rows affected (0.25 sec)
It is possible to have mysqldump perform many of the previous steps automatically. To make a logical backup of all databases on a server called master, enter:
$ mysqldump --host=master -all-databases \
> --master-data=1 >backup-source.sql
The --master-data=1 option makes mysqldump write a CHANGEMASTER TO statement with the file and position in the binary log, as given by SHOW MASTER STATUS.
You can then restore the backup on a slave using:
$ mysql --host=slave-1 <backup-source.sql
Note that you can only use --master-data=1 to get a CHANGE MASTER TO statement for the master. When cloning the slave later, it is necessary to perform all the steps given in the following section.
Congratulations! You have now cloned the master and have a new slave up and running. Depending on the load of the master, you might need to allow the slave to catch up from the position you jotted down, but that requires far less effort than starting from the beginning.
Depending on how long the backup took, there might be a lot of data to catch up to, so before bringing the slave online, you might want to read through Managing Consistency of Data.
Cloning a Slave
Once you have a slave connected to the master, you can use the slave instead of the master to create new slaves. That way, you can create a new slave without bringing the master offline. If you have a large or high-traffic database, the downtime could be considerable, considering both the time to create the backup and the time for the slaves to catch up.
The process of cloning a slave is illustrated in Figure 3-5 and is basically the same as for a master, but it differs in how you find the binlog position. You also need to take into consideration that the slave you are cloning from is replicating a master.
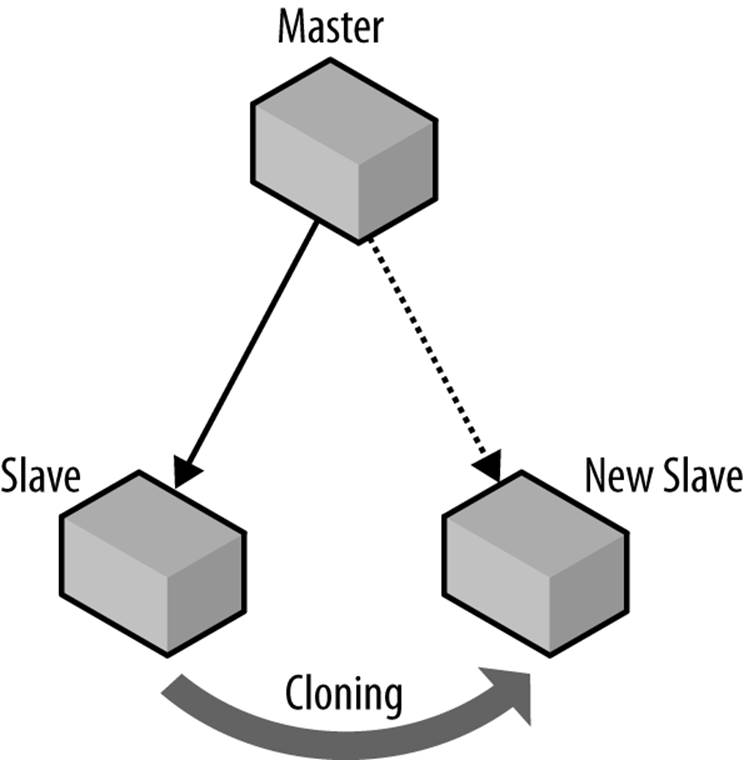
Figure 3-5. Cloning a slave to create a new slave
The first thing you have to do before starting a backup is to stop the slave so that no more changes occur on it. If replication is running while you create the backup, you will have an inconsistent backup image if changes are made to the database while it is being backed up. The exception is if you use some form of online backup method—such as MySQL Enterprise Backup—in which case you do not need to stop the slave before creating the backup. Here is what you will see when you stop the slave:
original-slave> STOP SLAVE;
Query OK, 0 rows affected (0.20 sec)
After the slave is stopped, you can flush the tables as before and create the backup. Because you created a backup of the slave (not the master), use the SHOW SLAVE STATUS command instead of SHOW MASTER STATUS to determine where to start replication. The output from this command is considerable, and it will be covered in detail in Chapter 8, but to get the position of the next event in the binary log of the master that the slave will execute, note the value of the fields Relay_Master_Log_File and Exec_Master_Log_Pos:
original-slave> SHOW SLAVE STATUS\G
...
Relay_Master_Log_File: master-bin.000042
...
Exec_Master_Log_Pos: 546632
After creating the backup and restoring it on the new slave, configure replication to start from this position and start the new slave:
new-slave> CHANGE MASTER TO
-> MASTER_HOST = 'master-1',
-> MASTER_PORT = 3306,
-> MASTER_USER = 'slave-1',
-> MASTER_PASSWORD = 'xyzzy',
-> MASTER_LOG_FILE = 'master-bin.000042',
-> MASTER_LOG_POS =546632;
Query OK, 0 rows affected (0.19 sec)
new-slave> START SLAVE;
Query OK, 0 rows affected (0.24 sec)
Cloning the master and cloning the slave differ only on some minor points, which means that our Python library will be able to combine the two into a single procedure for creating new slaves by creating the backup at a source server and connecting the new slave to a master.
A common technique for making backups is to call FLUSH TABLES WITH READ LOCK and then to create a copy of the database files while the MySQL server is locked with the read lock. This is usually much faster than using mysqldump, but FLUSH TABLES WITH READ LOCK is not safe for use with InnoDB!
FLUSH TABLES WITH READ LOCK does lock the tables, preventing any new transactions from starting, but there are several activities going on in the background that FLUSH TABLES WITH READ LOCK does not prevent.
Use one of the following techniques to create a backup of InnoDB tables safely:
§ Shut down the server and copy the files. This can be an advantage if the database is big, as restoring data with mysqldump can be slow.
§ Use mysqldump after performing FLUSH TABLES WITH READ LOCK (as we did earlier). The read lock is preventing changes while the data is read. The database may be locked for a long time if there is a lot of data to be read. Note, however, that it is possible to take a consistent snapshot using the --single-transaction option, but this is only possible when using InnoDB tables. For more information, see The mysqldump Utility.
§ Use a snapshot solution such as LVM (on Linux) or ZFS (on Solaris) while locking the database with FLUSH TABLES WITH READ LOCK.
§ Use MySQL Enterprise Backup (or XtraBackup) to do an online backup of MySQL.
Scripting the Clone Operation
The Python library clones a master simply by copying the database from the master using the Server object that represents the master. To do this, it uses a clone function, which you will see in Example 3-6.
Cloning a slave is similar, but the backup is taken from one server, while the new slave connects to another server to perform replication. It is easy to support cloning both a master and a slave by using two different parameters: a source parameter that specifies where the backup should be created and a use_master parameter that indicates where the slave should connect after the backup is restored. A call to the clone method looks like the following:
clone(slave = slave[1], source = slave[0], use_master = master)
The next step is to write some utility functions to implement the cloning function, which will also come in handy for other activities. Example 3-5 shows the following functions:
fetch_master_pos
Fetches the binlog position from a master (i.e., the position of the next event the master will write to the binary log).
fetch_slave_pos
Fetches the binlog position from a slave (i.e., the position of the next event to read from the master).
replicate_from
Accepts as arguments a slave, a master, and a binlog position, and directs the slave to replicate from the master starting with the given position.
The replicate_from function reads the field repl_user from the master to get the name and password of the replication user. If you look at the definition of the Server class, you’ll find that there is no such field. It is added by the Master role when the server is imbued.
Example 3-5. Utility functions to fetch the master and slave positions of a server
_CHANGE_MASTER_TO = """CHANGE MASTER TO
MASTER_HOST=%s, MASTER_PORT=%s,
MASTER_USER=%s, MASTER_PASSWORD=%s,
MASTER_LOG_FILE=%s, MASTER_LOG_POS=%s"""
def replicate_from(slave, master, position):
slave.sql(_CHANGE_MASTER_TO, (master.host, master.port,
master.repl_user.name,
master.repl_user.passwd,
position.file, position.pos))
def fetch_master_pos(server):
result = server.sql("SHOW MASTER STATUS")
return Position(server.server_id, result["File"], result["Position"])
def fetch_slave_pos(server):
result = server.sql("SHOW SLAVE STATUS")
return Position(server.server_id, result["Relay_Master_Log_File"],
result["Exec_Master_Log_Pos"])
These are all the functions needed to create the clone function. To clone a slave, the calling application passes a separate use_master argument, causing clone to direct the new slave to that master for replication. To clone a master, the calling application omits the separate use_masterargument, causing the function to use the “source” server as a master.
Because there are many ways to create a backup of a server, Example 3-6 restricts the method to one choice, using mysqldump to create a logical backup of the server. Later, we will demonstrate how to generalize the backup procedure so that you can use the same basic code to bootstrap new slaves using arbitrary backup methods.
Example 3-6. Function to clone either the master or the slave
def clone(slave, source, use_master = None):
from subprocess import call
backup_file = open(server.host + "-backup.sql", "w+")
if master is not None:
source.sql("STOP SLAVE")
lock_database(source)
if master is None:
position = fetch_master_position(source)
else:
position = fetch_slave_position(source)
call(["mysqldump", "--all-databases", "--host='%s'" % source.host],
stdout=backup_file)
if master is not None:
start_slave(source)
backup_file.seek() # Rewind to beginning
call(["mysql", "--host='%s'" % slave.host], stdin=backup_file)
if master is None:
replicate_from(slave, source, position)
else:
replicate_from(slave, master, position)
start_slave(slave)
Performing Common Tasks with Replication
Each of the common use cases for replication—scale-out, hot standbys, and so forth—involve their own implementation details and possible pitfalls. We’ll show you how to perform some of these tasks and how to enhance the Python library to support them.
NOTE
Passwords are omitted from the examples in this section. When configuring the accounts to control the servers, you can either allow access only from certain hosts that control the deployment (by creating accounts such as mats@'192.168.2.136'), or you can supply passwords to the commands.
Reporting
Most businesses need a lot of routine reports: weekly reports on the items sold, monthly reports on expenses and revenues, and various kinds of heavy data mining to spot trends or identify focus groups for the marketing department.
Running these queries on the master can prove to be troublesome. Data-mining queries can require a lot of computing resources and can slow down normal operations only to find out that, say, a focus group for left handed scissors might not be worthwhile to conduct. In addition, these reports are typically not very urgent (compared to processing normal transactions), so there is no need to create them as quickly as possible. In other words, because these reports are not time-critical, it does not matter much if they take two hours to complete instead of one.
A better idea is to dust off a spare server (or two, if you have enough reporting requirements) and set it up to replicate from the master. When you need to do the reporting, you can stop replication, run your reporting applications, then start replication again, all without disturbing the master.
Reporting often needs to cover a precise interval, such as a summary of all sales for the day, so it is necessary to stop replication at the right moment so you don’t get any sales for the following day in the report. Because there is no way to stop the slave when it sees an event with a certain date or time, it has to be done some other way.
Let’s pretend that reports are needed once each day, and that all transactions from midnight to midnight shall be included. It is necessary to stop the reporting slave at midnight so that no events from after midnight are executed on the slave and all events from before midnight are executed on the slave. The intention is not to do this manually, so let’s consider how we can automate the procedure. The following steps will accomplish what we want:
1. Just before midnight, perhaps five minutes before midnight, stop the reporting slave so that no events come from the master.
2. After midnight, check the binary log on the master and find the last event that was recorded before midnight. Obviously, if you do this before midnight, you might not have seen all events for the day yet.
3. Record the binlog position of this event and start the slave to run until this position.
4. Wait until the slave has reached this position and stopped.
The first issue is how to schedule the jobs correctly. There are different ways to do this, depending on the operating system. Although we won’t go into all the details here, you can see how to schedule tasks for Unix-like operating systems, such as Linux, in Scheduling tasks on Unix.
Stopping the slave is as simple as executing STOP SLAVE and noting the binlog position after the slave is stopped:
slave> STOP SLAVE;
Query OK, 0 rows affected (0.25 sec)
slave> SHOW SLAVE STATUS\G
...
Relay_Master_Log_File: capulet-bin.000004
...
Exec_Master_Log_Pos: 2456
1 row in set (0.00 sec)
The remaining three steps are executed before the actual reporting starts and usually as part of the script that does the actual reporting. Before outlining the script, let’s consider how to perform each step.
To read the contents of the binary log, invoke a utility called mysqlbinlog. This will be introduced in detail later, but this utility is used in the second step. The mysqlbinlog utility has the two handy options, --start-datetime and --stop-datetime, which you can use to read only a portion of the binary log. So to get all events from the time that you stopped the slave to just before midnight, use the following command:
$ mysqlbinlog --force --read-from-remote-server --host=reporting.bigcorp.com \
> --start-datetime='2009-09-25 23:55:00'
> --stop-datetime='2009-09-25 23:59:59' \
> binlog files
The timestamp stored in each event is the timestamp when the statement started executing, not the timestamp when it was written to the binary log. The --stop-datetime option will stop emitting events on the first timestamp after the date/time supplied, so it is possible that there is an event that started executing before the date/time but was written to the binary log after the date/time. Such an event is not included in the range given.
Because the master is writing to the binary logs at this time, it is necessary to supply the --force option. Otherwise, mysqlbinlog will refuse to read the open binary log. To execute this command, it is necessary to supply a set of binlog files to read. Since the names of these files are dependent on configuration options, the names of these files have to be fetched from the server. After that, it is necessary to figure out the range of binlog files that needs to be supplied to the mysqlbinlog command. Getting the list of binlog filenames is easy to do with the SHOW BINARY LOGS command:
master> SHOW BINARY LOGS;
+--------------------+-----------+
| Log_name | File_size |
+--------------------+-----------+
| capulet-bin.000001 | 24316 |
| capulet-bin.000002 | 1565 |
| capulet-bin.000003 | 125 |
| capulet-bin.000004 | 2749 |
+--------------------+-----------+
4 rows in set (0.00 sec)
In this case, there are only four files, but there could potentially be quite a lot more. Scanning a large list of files that were written before the slave was stopped is just a waste of time, so it is a good idea to try to reduce the number of files to read in order to find the correct position to stop at. Because you recorded the binlog position in the first step, when the slave was stopped, it is an easy matter to find the name of the file where the slave stopped and then take that name and all the following names as input to the mysqlbinlog utility. Typically, this will only be one file (or two in the event that the binary log was rotated between stopping the slave and starting the reporting).
When executing the mysqlbinlog command with just a few binlog files, you will get a textual output for each with some information about the event:
$ mysqlbinlog --force --read-from-remote-server --host=reporting.bigcorp.com \
> --start-datetime='2009-09-25 23:55:00'
> --stop-datetime='2009-09-25 23:59:59' \
> capulet-bin.000004
/*!40019 SET @@session.max_insert_delayed_threads=0*/;
/*!50003 SET @OLD_COMPLETION_TYPE=@@COMPLETION_TYPE,COMPLETION_TYPE=0*/;
DELIMITER /*!*/;
# at 4
#090909 22:16:25 server id 1 end_log_pos 106 Start: binlog v 4, server v...
ROLLBACK/*!*/;
.
.
.
# at 2495
#090929 23:58:36 server id 1 end_log_pos 2650 Query thread_id=27 exe...
SET TIMESTAMP=1254213690/*!*/;
SET /*!*/;
INSERT INTO message_board(user, message)
VALUES ('mats@sun.com', 'Midnight, and I'm bored')
/*!*/;
The interesting part here is the end_log_pos of the last event in the sequence (in this case, 2650), because this is where the next event after midnight will be written.
If you were paying attention to the output from the previous command, you saw that there is no information about which binlog file this byte position is referring to, and it is necessary to have a file to find the event. If a single file is supplied to the mysqlbinlog command, the filename is obvious, but if two files are supplied, it is necessary to figure out if the last event for the day is in the first or the second file.
If you look at the line containing the end_log_pos, you will also see that the event type is there. Because every binlog file starts with a format description event—a line for such an event appears in the previous output—you can check these events to determine the location of the event you want. If there are two format description events in the output, the event is in the second file, and if there is just one, it is in the first file.
The final step before starting the reporting work is to start replication and stop it at exactly the position where the event after midnight will be written (or has already been written, should that be the case). To do this, you can use the lesser-known syntax START SLAVE UNTIL. This command accepts a master logfile and a master log position where the slave should stop, and then starts the slave. When the slave reaches the given position, it will automatically stop:
report> START SLAVE UNTIL
-> MASTER_LOG_POS='capulet-bin.000004',
-> MASTER_LOG_POS=2650;
Query OK, 0 rows affected (0.18 sec)
Like the STOP SLAVE command (without the UNTIL), the START SLAVE UNTIL command will return immediately—not, as could be expected, when the slave has reached the position where it should stop. So commands issued after START SLAVE UNTIL continue to be executed as long as the slave is running. To wait for the slave to reach the position you want it to stop at, use the MASTER_POS_WAIT function, which will block while waiting for the slave to reach the given position:
report> SELECT MASTER_POS_WAIT('capulet-bin.000004', 2650);
Query OK, 0 rows affected (231.15 sec)
At this point, the slave has stopped at the last event for the day, and the reporting process can start analyzing the data and generating reports.
Handling reporting in Python
Automating this in Python is quite straightforward; Example 3-7 shows the code for stopping reporting at the right time.
The fetch_remote_binlog function reads a binary log from a remote server using the mysqlbinlog command. The contents of the file(s) will be returned as an iterator over the lines of the file. To optimize the fetches, you can optionally provide a list of files to scan. You can also pass a start date/time and a stop date/time to limit the date/time range of the result. These will be passed to the mysqlbinlog program.
The find_datetime_position function does the work of scanning the binlog lines to find the last end_log_pos as well as keeping track of how many start events have been observed. It also contacts the reporting server to find out where it stopped reading the binlog file and then contacts the master to get the binlog files and find the right one to start the scan from.
Example 3-7. Python code for running replication to a datetime
def fetch_remote_binlog(server, binlog_files=None,
start_datetime=None, stop_datetime=None):
fromsubprocessimport Popen, PIPE
ifnotbinlog_files:
binlog_files = [
row["Log_name"] for row inserver.sql("SHOW BINARY LOGS")]
command = ["mysqlbinlog",
"--read-from-remote-server",
"--force",
"--host=%s" % (server.host),
"--user=%s" % (server.sql_user.name)]
if server.sql_user.passwd:
command.append("--password=%s" % (server.sql_user.passwd))
if start_datetime:
command.append("--start-datetime=%s" % (start_datetime))
if stop_datetime:
command.append("--stop-datetime=%s" % (stop_datetime))
return iter(Popen(command + binlog_files, stdout=PIPE).stdout)
def find_datetime_position(master, report, start_datetime, stop_datetime):
fromitertoolsimport dropwhile
frommysql.replicantimport Position
importre
all_files = [row["Log_name"] for row inmaster.sql("SHOW BINARY LOGS")]
stop_file = report.sql("SHOW SLAVE STATUS")["Relay_Master_Log_File"]
files = list(dropwhile(lambda file: file != stop_file, all_files))
lines = fetch_remote_binlog(server, binlog_files=files,
start_datetime=start_datetime,
stop_datetime=stop_datetime)
binlog_files = 0
last_epos = None
for line inlines:
m = re.match(r"#\d{6}\s+\d?\d:\d\d:\d\d\s+"
r"server id\s+(?P<sid>\d+)\s+"
r"end_log_pos\s+(?P<epos>\d+)\s+"
r"(?P<type>\w+)", line)
if m:
if m.group("type") == "Start":
binlog_files += 1
if m.group("type") == "Query":
last_epos = m.group("epos")
return Position(files[binlog_files-1], last_epos)
You can now use these functions to synchronize the reporting server before the actual reporting job:
master.connect()
report.connect()
pos = find_datetime_position(master, report,
start_datetime="2009-09-14 23:55:00",
stop_datetime="2009-09-14 23:59:59")
report.sql("START SLAVE UNTIL MASTER_LOG_FILE=%s, MASTER_LOG_POS=%s",
(pos.file, pos.pos))
report.sql("DO MASTER_POS_WAIT(%s,%s)", (pos.file, pos.pos))
.
.
code for reporting
.
.
As you can see, working with replication is pretty straightforward. This particular example introduces several of the critical concepts that we will be using later when talking about scale-out: how to start and stop the slave at the right time, how to get information about binlog positions or figure it out using the standard tools, and how to integrate it all into an automated solution for your particular needs.
Scheduling tasks on Unix
To easiest way ensure the slave is stopped just before midnight and the reporting is started after midnight is to set up a job for cron(8) that sends a stop slave command to the slave and starts the reporting script.
For example, the following crontab(5) entries would ensure that the slave is stopped before midnight, and that the reporting script to roll the slave forward is executed, say, five minutes after midnight. Here we assume that the stop_slave script will stop the slave, and the daily_reportwill run the daily report (starting with the synchronization described earlier):
# stop reporting slave five minutes before midnight, every day
55 23 * * * $HOME/mysql_control/stop_slave
# Run reporting script five minutes after midnight, every day
5 0 * * * $HOME/mysql_control/daily_report
Assuming that you put this in a crontab file, reporttab, you can install the crontab file using the crontab reporttab command.
Scheduling tasks on Windows
To start the Task Scheduler in Windows, open the search feature (Windows key+R) and enter taskschd.msc. Depending on your security settings and version of Windows, you may need to respond to the User Account Control (UAC) dialog box to continue. To create a new task trigger by time, choose Create Basic Task from the Action pane. This opens the Create Basic Task Wizard, which will guide you through the steps to create a simple task. On the first pane of the wizard, name the task and provide an optional description, then click Next.
The second pane allows you to specify the frequency of the firing of the task. There are many options here for controlling when the task runs: a single run, daily, weekly, and even when you log on or when a specific event occurs. Click Next once you’ve made your choice. Depending on the frequency you chose, the third pane will allow you to specify the details (e.g., date and time) of when the task fires. Click Next once you have configured the trigger timing options.
The fourth pane is where you specify the task or action to occur when the task event occurs (when the task fires). You can choose to start a program, send an email message, or display a message to the user. Make your selection and click Next to move to the next pane. Depending on the action you chose on the previous pane, here you can specify what happens when the task fires. For example, if you chose to run an application, you enter the name of the application or script, any arguments, and which folder the task starts in.
Once you have entered all of this information, click Next to review the task on the final pane. If you’re satisfied all is set correctly, click Finish to schedule the task. You can click Back to return to any of the previous screens and make changes. Finally, you have the option to open the Properties page after you click Finish if you want to make additional changes to the task.
Conclusion
In this chapter, we have presented an introduction to MySQL replication, including a look at why replication is used and how to set it up. We also took a quick look into the binary log. In the next chapter, we examine the binary log in greater detail.
Joel finished giving Mr. Summerson his report on how he was going to balance the load across four new slaves, along with plans for how the topology could be expanded to handle future needs.
“That’s fine work, Joel. Now explain to me again what this slave thing is.”
Joel suppressed a sigh and said, “A slave is a copy of the data on the database server that gets its changes from the original database server called the master…”
[3] On Windows, the command-line prompt (CMD) or PowerShell can be used in place of the Unix “shell.”