MySQL High Availability (2014)
Part I. High Availability and Scalability
Chapter 6. MySQL Replication for Scale-Out
Joel stood and stretched and figured it was time for a soda. As he walked around his desk, headed to the break room, his boss met him at his door. “Good afternoon, sir.”
“Hey, Joel. We just sold a bunch of licenses for our new applications. The marketing people tell me we can expect to see an increase in load of at least tenfold on the database server.”
Joel raised his eyebrows. He had added a single slave just last week and that had improved the load problem, but not entirely.
“We need to scale out, Joel.”
“Yes, sir. I’ll get right on it.”
Mr. Summerson tapped Joel on the shoulder and smiled, then walked down the hall to his office.
Joel stood still for a few moments as he pondered what “scale out” meant and formed a plan. “I’ve got to do a little more reading,” he mumbled as he headed to the break room.
When the load starts to increase—and if you are running a successful deployment, it is just a matter of when it will start to increase—you can handle it in two ways. The first is to buy larger and more powerful servers to handle the increased load, which is called scaling up, whereas the second is to add more servers to handle the increased load, which is called scaling out. Of these two, scaling out is by far the more popular solution because it usually involves buying a batch of low-cost standard servers and is much more cost-effective.
In addition to handling an increased load, additional servers can support high availability and other business requirements. When used effectively, scaling out puts the combined resources—such as computing power—of all the servers to best use.
This chapter doesn’t go into all the hardware, network, and other considerations involved in scaling out—those are beyond the scope of this book and are covered to some degree in High Performance MySQL, but we will talk about how to set up replication in MySQL to make the best use of scale-out. After some basic instructions for replication, we’ll start to develop a Python library that makes it easy to administer replication over large sets of servers, and we’ll examine how replication fits into your organization’s business needs.
All the code in this chapter (as well as the other chapters of the book) can be found in the MySQL Replicant source code repository at Launchpad.
The most common uses for scaling out and replication are:
Load balancing for reads
The master is occupied with updating data, so it can be wise to have separate servers to answer queries. Because queries only need to read data, you can use replication to send changes on the master to slaves—as many as you feel you need—so that they have current data and can process queries.
Load balancing for writes
High-traffic deployments distribute processing over many computers, sometimes several thousand. Here, replication plays a critical role in distributing the information to be processed. The information can be distributed in many different ways based on the business use of your data and the nature of the use:
§ Distributed based on the information’s role. Rarely updated tables can be kept on a single server, while frequently updated tables are partitioned over several servers.
§ Partitioned by geographic region so that traffic can be directed to the closest server.
Disaster avoidance through hot standby
If the master goes down, everything will stop—it will not be possible to execute (perhaps critical) transactions, get information about customers, or retrieve other critical data. This is something that you want to avoid at (almost) any cost as it can severely disrupt your business. The easiest solution is to configure a slave with the sole purpose of acting as a hot standby, ready to take over the job of the master if it fails.
Disaster avoidance through remote replication
Every deployment runs the risk of having a data center go down due to a disaster, be it a power failure, an earthquake, or a flood. To mitigate this, use replication to transport information between geographically remote sites.
Making backups
Keeping an extra server around for making backups is very common. This allows you to make your backups without having to disturb the master at all, because you can take the backup server offline and do whatever you like with it.
Report generation
Creating reports from data on a server will degrade the server’s performance, in some cases significantly. If you’re running lots of background jobs to generate reports, it’s worth creating a slave just for this purpose. You can get a snapshot of the database at a certain time by stopping replication on the slave and then running large queries on it without disturbing the main business server. For example, if you stop replication after the last transaction of the day, you can extract your daily reports while the rest of the business is humming along at its normal pace.
Filtering or partitioning data
If the network connection is slow, or if some data should not be available to certain clients, you can add a server to handle data filtering. This is also useful when the data needs to be partitioned and reside on separate servers.
Scaling Out Reads, Not Writes
It is important to understand that scaling out in this manner scales out reads, not writes. Each new slave has to handle the same write load as the master. The average load of the system can be described as follows:

So if you have a single server with a total capacity of 10,000 transactions per second, and there is a write load of 4,000 transactions per second on the master, while there is a read load of 6,000 transactions per second, the result will be:

Now, if you add three slaves to the master, the total capacity increases to 40,000 transactions per second. Because the write queries are replicated as well, each query is executed a total of four times—once on the master and once on each of the three slaves—which means that each slave has to handle 4,000 transactions per second in write load. The total read load does not increase because it is distributed over the slaves. This means that the average load now is:

Notice that in the formula, the capacity is increased by a factor of 4, as we now have a total of four servers, and replication causes the write load to increase by a factor of 4 as well.
It is quite common to forget that replication forwards to each slave all the write queries that the master handles. So you cannot use this simple approach to scale writes, only reads. In the next chapter, you will see how to scale writes using a technique called sharding.
The Value of Asynchronous Replication
MySQL replication is asynchronous, a type of replication particularly suitable for modern applications such as websites.
To handle a large number of reads, sites use replication to create copies of the master and then let the slaves handle all read requests while the master handles the write requests. This replication is considered asynchronous because the master does not wait for the slaves to apply the changes, but instead just dispatches each change request to the slaves and assumes they will catch up eventually and replicate all the changes. This technique for improving performance is usually a good idea when you are scaling out.
In contrast, synchronous replication keeps the master and slaves in sync and does not allow a transaction to be committed on the master unless the slave agrees to commit it as well (i.e., synchronous replication makes the master wait for all the slaves to keep up with the writes).
Asynchronous replication is a lot faster than synchronous replication, for reasons our description should make obvious. Compared to asynchronous replication, synchronous replication requires extra synchronizations to guarantee consistency. It is usually implemented through a protocol called two-phase commit, which guarantees consistency between the master and slaves, but requires extra messages to ping-pong between them. Typically, it works like this:
1. When a commit statement is executed, the transaction is sent to the slaves and the slave is asked to prepare for a commit.
2. Each slave prepares the transaction so that it can be committed, and then sends an OK (or ABORT) message to the master, indicating that the transaction is prepared (or that it could not be prepared).
3. The master waits for all slaves to send either an OK or an ABORT message:
a. If the master receives an OK message from all slaves, it sends a commit message to all slaves asking them to commit the transaction.
b. If the master receives an ABORT message from any of the slaves, it sends an ABORT message to all slaves asking them to abort the transaction.
4. Each slave is then waiting for either an OK or an ABORT message from the master.
a. If the slaves receive the commit request, they commit the transaction and send an acknowledgment to the master that the transaction is committed.
b. If the slaves receive an abort request, they abort the transaction by undoing any changes and releasing any resources they held, then send an acknowledgment to the master that the transaction was aborted.
5. When the master has received acknowledgments from all slaves, it reports the transaction as committed (or aborted) and continues with processing the next transaction.
What makes this protocol slow is that it requires a total of four messages, including the messages with the transaction and the prepare request. The major problem is not the amount of network traffic required to handle the synchronization, but the latency introduced by the network and by processing the commit on the slave, together with the fact that the commit is blocked on the master until all the slaves have acknowledged the transaction. In contrast, asynchronous replication requires only a single message to be sent with the transaction. As a bonus, the master does not have to wait for the slave, but can report the transaction as committed immediately, which improves performance significantly.
So why is it a problem that synchronous replication blocks each commit while the slaves process it? If the slaves are close to the master on the network, the extra messages needed by synchronous replication make little difference, but if the slaves are not nearby—maybe in another town or even on another continent—it makes a big difference.
Table 6-1 shows some examples for a server that can commit 10,000 transactions per second. This translates to a commit time of 0.1 ms (but note that some implementations, such as MySQL Cluster, are able to process several commits in parallel if they are independent). If the network latency is 0.01 ms (a number we’ve chosen as a baseline by pinging one of our own computers), the transaction commit time increases to 0.14 ms, which translates to approximately 7,000 transactions per second. If the network latency is 10 ms (which we found by pinging a server in a nearby city), the transaction commit time increases to 40.1 ms, which translates to about 25 transactions per second! In contrast, asynchronous replication introduces no delay at all, because the transactions are reported as committed immediately, so the transaction commit time stays at the original 10,000 per second, just as if there were no slaves.
Table 6-1. Typical slowdowns caused by synchronous replication
|
Latency (ms) |
Transaction commit time (ms) |
Equivalent transactions per second |
Example case |
|
0.01 |
0.14 |
~7,100 |
Same computer |
|
0.1 |
0.5 |
~2,000 |
Small LAN |
|
1 |
4.1 |
~240 |
Bigger LAN |
|
10 |
40.1 |
~25 |
Metropolitan network |
|
100 |
400.1 |
~2 |
Satellite |
The performance of asynchronous replication comes at the price of consistency. Recall that in asynchronous replication the transaction is reported as committed immediately, without waiting for any acknowledgment from the slave. This means the master may consider the transaction committed when the slave does not. As a matter of fact, it might not even have left the master, but is still waiting to be sent to the slave.
There are two problems with this that you need to be aware of:
§ In the event of crashes on the master, transactions can “disappear.”
§ A query executed on the slaves might return old data.
Later in this chapter, we will talk about how to ensure you are reading current data, but for now, just remember that asynchronous replication comes with its own set of caveats that you have to handle.
Managing the Replication Topology
A deployment is scaled by creating new slaves and adding them to the collection of computers you have. The term replication topology refers to the ways you connect servers using replication. Figure 6-1 shows some examples of replication topologies: a simple topology, a tree topology, a dual-master topology, and a circular topology.
These topologies are used for different purposes: the dual-master topology handles fail-overs elegantly, for example, and circular replication and dual masters allow different sites to work locally while still replicating changes over to the other sites.
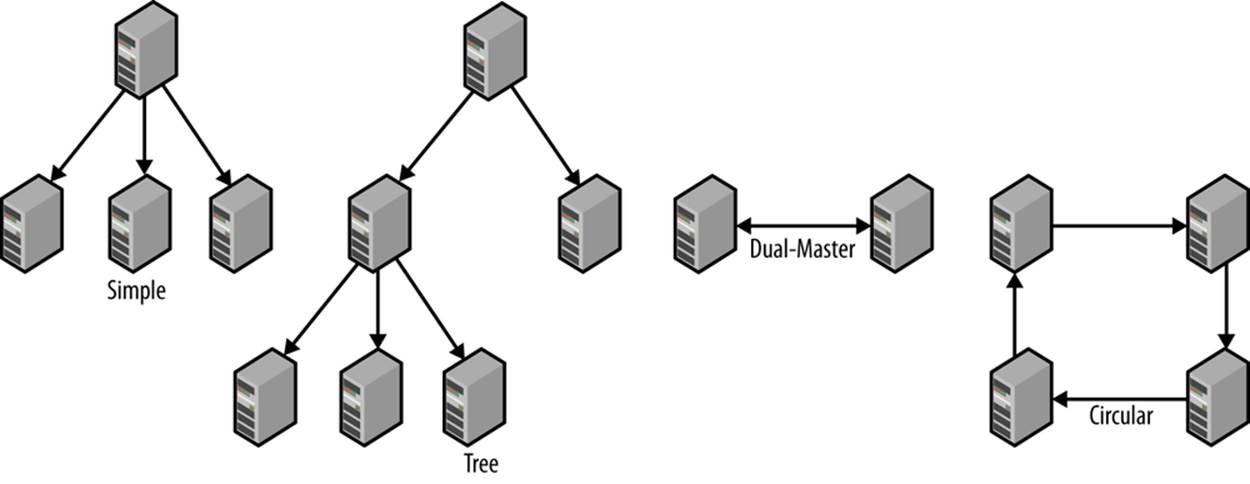
Figure 6-1. Simple, tree, dual-master, and circular replication topologies
The simple and tree topologies are used for scale-out. The use of replication causes the number of reads to greatly exceed the number of writes. This places special demands on the deployment in two ways:
It requires load balancing
We’re using the term load balancing here to describe any way of dividing queries among servers. Replication creates both reasons for load balancing and methods for doing so. First, replication imposes a basic division of the load by specifying writes to be directed to the masters while reads go to the slaves. Furthermore, you sometimes have to send a particular query to a particular slave.
It requires you to manage the topology
Servers crash sooner or later, which makes it necessary to replace them. Replacing a crashed slave might not be urgent, but you’ll have to replace a crashed master quickly.
In addition to this, if a master crashes, clients have to be redirected to the new master. If a slave crashes, it has to be taken out of the pool of load balancers so no queries are directed to it.
To handle load balancing and management, you should put tools in place to manage the replication topology, specifically tools that monitor the status and performance of servers and tools to handle the distribution of queries.
For load balancing to be effective, it is necessary to have spare capacity on the servers. There are a few reasons for ensuring you have spare capacity:
Peak load handling
You need to have margins to be able to handle peak loads. The load on a system is never even, but fluctuates up and down. The spare capacity necessary to handle a large deployment depends a lot on the application, so you need to monitor it closely to know when the response times start to suffer.
Distribution cost
You need to have spare capacity for running the replication setup. Replication always causes a “waste” of some capacity on the overhead of running a distributed system. It involves extra queries to manage the distributed system, such as the extra queries necessary to figure out where to execute a read query.
One item that is easily forgotten is that each slave has to perform the same writes as the master. The queries from the master are executed in an orderly manner (i.e., serially), with no risk of conflicting updates, but the slave needs extra capacity for running replication.
Administrative tasks
Restructuring the replication setup requires spare capacity so you can support temporary dual use, like when moving data between servers.
Load balancing works in two basic ways: either the application asks for a server based on the type of query, or an intermediate layer—usually referred to as a proxy—analyzes the query and sends it to the correct server.
Using an intermediate layer to analyze and distribute the queries (as shown in Figure 6-2) is by far the most flexible approach, but it has two disadvantages:
§ There is a performance degradation when using a proxy because of two reasons: processing resources have to be spent on analyzing queries and there is an extra hop introduced for the queries that now have to go through the proxy. Processing the query may delay it—because it has to be parsed and analyzed twice (once by the proxy and again by the MySQL server)—but the latency introduced by the extra hop is likely to exceed the time for analyzing the query. Depending on the application, this may or may not be a problem.
§ Correct query analysis can be hard to implement, sometimes even impossible. A proxy will often hide the internal structure of the deployment from the application programmer so that it should not be necessary to make the hard choices. For this reason, the client may send a query that can be very hard to analyze properly and might require a significant rewrite before being sent to the servers.
One of the tools that you can use for proxy load balancing is MySQL Proxy. It contains a full implementation of the MySQL client protocol, and therefore can act as a server for the real client connecting to it and as a client when connecting to the MySQL server. This means that it can be fully transparent: a client can’t distinguish between the proxy and a real server.
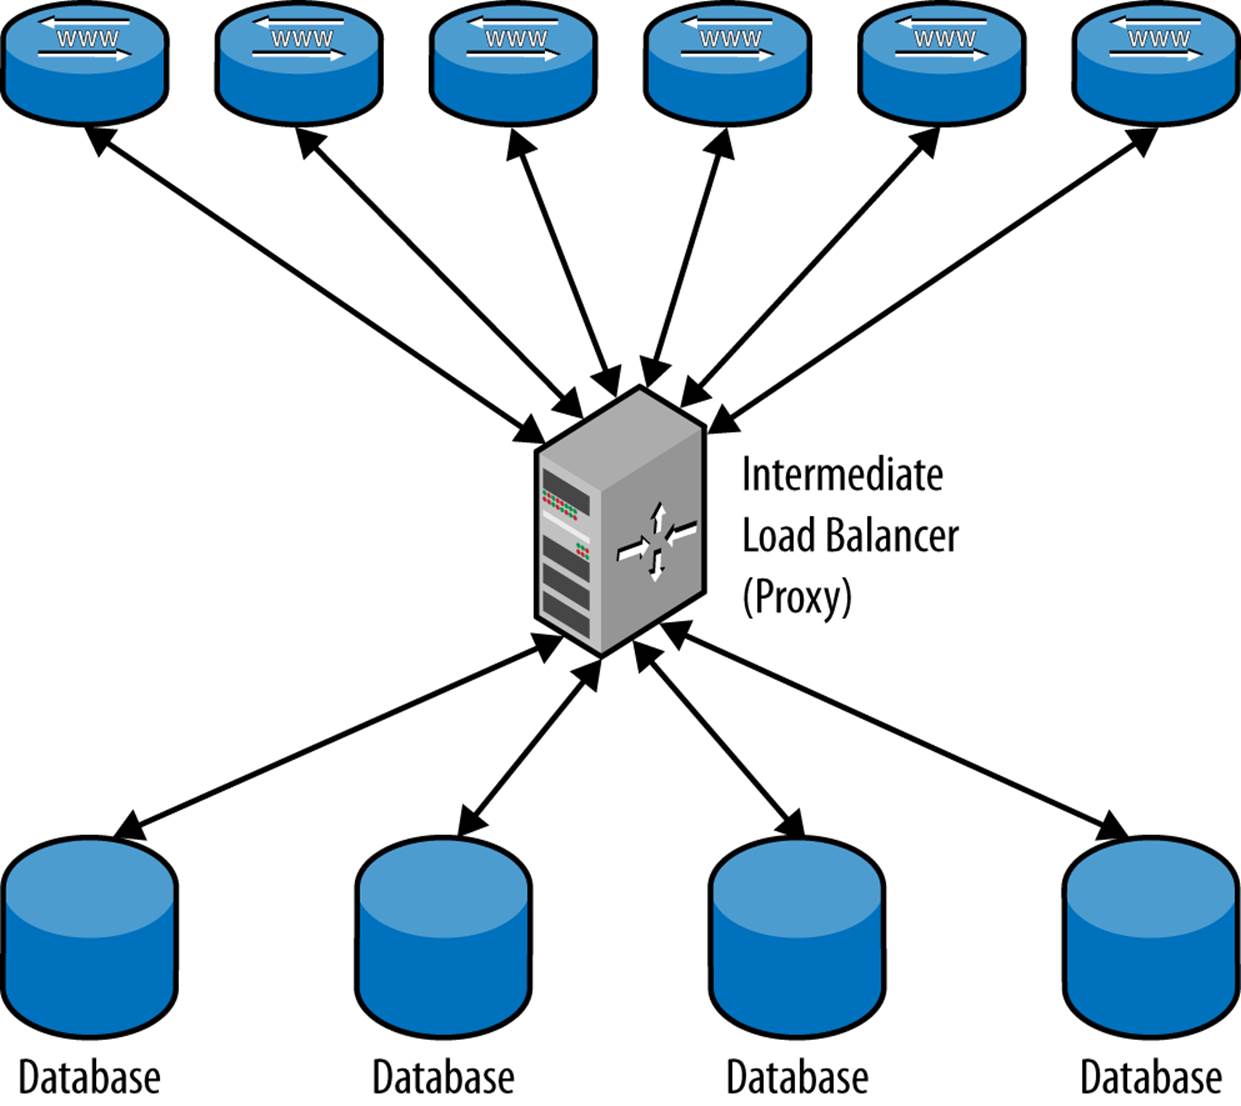
Figure 6-2. Using a proxy to distribute queries
The MySQL Proxy is controlled using the Lua programming language. It has a built-in Lua engine that executes small—and sometimes not so small—programs to intercept and manipulate both the queries and the result sets. Because the proxy is controlled using a real programming language, it can carry out a variety of sophisticated tasks, including query analysis, query filtering, query manipulation, and query distribution.
Configuration and programming of the MySQL Proxy are beyond the scope of this book, but there are extensive publications about it online. Some of the ones we find useful are:
Jan Kneschke
Jan Kneschke is the original author of the MySQL Proxy and has several good presentations and posts about the Proxy.
The MySQL Reference Manual
The MySQL Proxy section of the MySQL Reference Manual contain the details of the implementation as well as an introduction to writing scripts for the MySQL Proxy.
The precise methods for using a proxy depend entirely on the type of proxy you use, so we will not cover that information here. Instead, we’ll focus on using a load balancer in the application layer. There are a number of load balancers available, including:
§ Hardware
§ Simple software load balancers, such as Balance
§ Peer-based systems, such as Wackamole
§ Full-blown clustering solutions, such as the Linux Virtual Server
It is also possible to distribute the load on the DNS level and to handle the distribution directly in the application.
Application-Level Load Balancing
The most straightforward approach to load balancing at the application level is to have the application ask the load balancer for a connection based on the type of query it is going to send. In most cases, the application already knows whether the query is going to be a read or write query, and which tables will be affected. In fact, forcing the application developer to consider these issues when designing the queries may produce other benefits for the application, usually in the form of improved overall performance of the system. Based on this information, a load balancer can provide a connection to the right server, which the application can then use to execute the query.
A load balancer on the application layer needs to have a store with information about the servers and what queries they should handle. Functions in the application layer send queries to this store, which returns the name or IP address of the MySQL server to query. The lookup procedure can either be placed in the application, or inside the connector if it supports it. Many connectors support ways for providing information about servers without a central store, but then you need to have means for seeding the connectors with this information, or provide it through the application.
Example of an application-level load balancer
Let’s develop a simple load balancer like the one shown in Figure 6-3 for use by the application layer. PHP is being used for the presentation logic because it’s so popular on web servers. It is necessary to write functions for updating the server pool information and functions to fetch servers from the pool.
The pool is implemented by creating a table with all the servers in the deployment in a common database that is shared by all nodes. In this case, we just use the host and port as primary key for the table (instead of creating a host ID) and create a common database to contain the tables of the shared data.
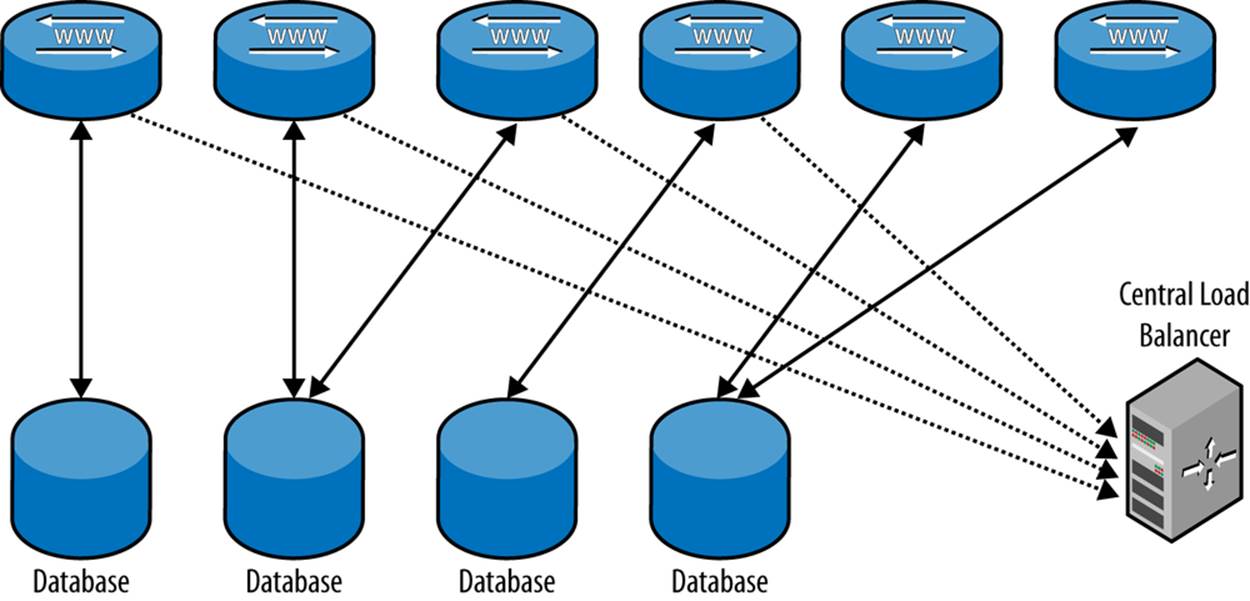
Figure 6-3. Load balancing on the application level
You should duplicate the central store so that it doesn’t create a single point of failure. In addition, because the list of available servers does not often change, load balancing information is a perfect candidate for caching.
For the sake of simplicity—and to avoid introducing dependencies on other systems—we demonstrate the application-level load balancer using a pure MySQL implementation. There are many other techniques that you can use that do not involve MySQL. The most common technique is to use round-robin DNS; another alternative is using Memcached, which is a distributed in-memory key/value store.
Also note that the addition of an extra query (to query the common database) is a significant overhead for high-performing systems and should be avoided. This is traditionally done using a cache for the information, but we start with an implementation without caches. You will see how to add caches in Example 6-5.
The load balancer lists servers in the load balancer pool, separated into categories based on what kind of queries they can handle. Information about the servers in the pool is stored in a central repository. The implementation consists of a table in the common database given in Example 6-1, the load balancer in Example 6-2 for querying the load balancer from the application, and the Python functions in Example 6-3 for updating information about the servers.
Example 6-1. Database tables for the load balancer
CREATETABLE nodes (
host VARCHAR(28) NOT NULL,
port INTUNSIGNEDNOT NULL,
sock VARCHAR(80)
type ENUM('OL','RO','RW') NOT NULL DEFAULT '',
PRIMARYKEY (host, port)
);
The store contains the host and the port of the server, as well as if it is an offline (OL), read-only (RO), or read-write (RW) server. The offline setting can be used for maintenance.
Example 6-2 shows code for implementing a load balancer. It consists of a dictionary class responsible for dealing out connections to servers.
Example 6-2. Load balancer in PHP
define('DB_OFFLINE', 'OL')
define('DB_RW', 'RW');
define('DB_RO', 'RO');
$FETCH_QUERY = <<<END_OF_QUERY
SELECT host, port FROM nodes ![]()
WHERE FIND_IN_SET(?, type)
ORDER BY RAND() LIMIT 1
END_OF_QUERY;
classDictionary { ![]()
private $server;
publicfunction __construct($host, $user, $pass, $port = 3306) {
$this->server = new mysqli($host, $user, $pass, 'metainfo', $port);
}
publicfunction get_connection($user, $pass, $db, $hint) { ![]()
global $FETCH_QUERY;
$type = $hint['type'];
if ($stmt = $this->server->prepare($FETCH_QUERY)){
$stmt->bind_param('s', $type);
$stmt->execute();
$stmt->bind_result($host, $port);
if ($stmt->fetch())
returnnew mysqli($host, $user, $pass, $db, $port);
}
returnnull;
}
}
![]()
A simple SELECT will suffice to find all the servers that can accept the query. Because we want just a single server, we limit the output to a single line using the LIMIT modifier to the SELECT query, and to distribute queries evenly among available servers, we use the ORDER BY RAND()modifier.
![]()
A dictionary class is introduced (and will be used in the remainder of the book) whose responsibility is to deal out connections to MySQL instances. When a dictionary class instance is constructed, information about the MySQL server that stores the information needs to be provided. This server stores information about each server in the deployment, in order to manage the connections to them.
![]()
The get_connection function is used to request a connection to a server in the deployment. What server to connect to is decided based on a hint passed to get_connection. The hint is an associative array with information about what sort of connection is requested, and the function will deliver a connection to a server matching the criteria. In this case, the hint conveys only whether a read-only or read-write server is requested.
The final task is to provide utility functions for adding and removing servers and for updating the capabilities of a server. Because these are mainly to be used from the administration logic, we’ve implemented this function in Python using the Replicant library. The utility consists of three functions, demonstrated in Example 6-3:
pool_add(common, server, type)
Adds a server to the pool. The pool is stored at the server denoted by common, and the type to use is a list—or other iterable—of values to set.
pool_del(common, server)
Deletes a server from the pool.
pool_set(common, server, type)
Changes the type of the server.
Example 6-3. Administrative functions for the load balancer
frommysql.replicant.errorsimport (
Error,
)
fromMySQLdbimport IntegrityError
classAlreadyInPoolError(Error):
pass
_INSERT_SERVER = ("INSERT INTO nodes(host, port, sock, type)"
"VALUES (%s, %s, %s, %s)")
_DELETE_SERVER = ("DELETE FROM nodes"
" WHERE host = %s AND port = %s")
_UPDATE_SERVER = ("UPDATE nodes SET type = %s"
" WHERE host = %s AND port = %s")
def pool_add(common, server, types=None):
if types isNone:
types = []
common.use("common")
try:
common.sql(_INSERT_SERVER,
(server.host, server.port, server.socket, ','.join(types)))
except IntegrityError:
raise AlreadyInPoolError
def pool_del(common, server):
common.use("common")
common.sql(_DELETE_SERVER,
(server.host, server.port))
def pool_set(common, server, types=None):
if types isNone:
types = []
common.use("common")
common.sql(_UPDATE_SERVER,
(','.join(types), server.host, server.port))
These functions can be used as shown in the following examples:
pool_add(common, master, ['READ', 'WRITE'])
for slave inslaves:
pool_add(common, slave, ['READ'])
With everything in place, the load balancer can be used as in Example 6-4, where the dictionary is set up to use central.example.com for the central repository. After that, get_connection can be used to get connections to the server based on the hint provided.
Example 6-4. PHP code using the load balancer
$DICT = new Dictionary("central.example.com", "mats", "");
$QUERY = <<<END_OF_QUERY
SELECT first_name, last_name, dept_name
FROM employees JOIN dept_emp USING (emp_no)
JOIN departments USING (dept_no)
WHERE emp_no = ?
END_OF_QUERY;
$mysql = $DICT->get_connection('mats', 'xyzzy', 'employees',
array('type' => DB_RO));
$stmt = $mysql->prepare($QUERY);
if ($stmt) {
$stmt->bind_param("d", $emp_no);
$stmt->execute();
$stmt->bind_result($first_name, $last_name, $dept_name);
while ($stmt->fetch())
print "$first_name $last_name $dept_name\n";
$stmt->close();
}
else {
echo "Error: " . $mysql->error;
}
In Example 6-2, a query is sent to the central repository for each query dispatched. This doubles the number of queries sent out by the application, and can lead to performance degradation. To solve this, you should cache the data from the central repository and fetch the information from the cache instead, as shown in Example 6-5.
Caches require a strategy for when to invalidate the cache. In this case, a simple time to live caching strategy is employed, where the cache is reloaded if it is too old. This is a very simple implementation, but it means that any changes to the topology are not recognized immediately. If any changes are made to the topology and you change the information in the centralized store, you have to keep the old servers available until the timer expires; the information is guaranteed to be reloaded from the centralized store.
Example 6-5. Caching a load balancer in PHP
define('DB_RW', 'RW');
define('DB_RO', 'RO');
define('TTL', 60); ![]()
$FETCH_QUERY = <<<END_OF_QUERY
SELECT host, port, type FROM nodes ![]()
END_OF_QUERY;
classDictionary {
private $server;
private $last_update;
private $cache;
publicfunction __construct($host, $user, $pass, $port = 3306)
{
$this->server = new mysqli($host, $user, $pass,
'metainfo', $port);
}
publicfunction get_connection($user, $pass, $db, $hint)
{
if (time() > $this->last_update + TTL) ![]()
$this->update_cache();
$type = $hint['type'];
if (array_key_exists($type, $this->cache)) {
$servers = $this->cache[$type];
$no = rand(0, count($servers) - 1);
list($host, $port) = $servers[$no]; ![]()
returnnew mysqli($host, $user, $pass, $db, $port);
}
else
returnnull;
}
privatefunction update_cache() {
global $FETCH_QUERY;
if ($stmt = $this->server->prepare($FETCH_QUERY)){ ![]()
$cache = array();
$stmt->execute();
$stmt->bind_result($host, $port, $type);
while ($stmt->fetch()) ![]()
$cache[$type][] = array($host, $port);
$this->cache = $cache;
$this->last_update = time();
}
o }
}
![]()
This constant is used for the “time to live” for the cache. A long time means that the centralized store is not queried as often, but it also means that changes in the topology are not recognized as fast.
![]()
In contrast to Example 6-2, the entire contents of the centralized store are loaded with the query. In this case, it is assumed that the entire contents can be loaded, but for really large data sets, it might be more sensible to create a query that does not load parts of the dictionary table that are not going to be used.
![]()
Check the last time the cache was updated. If it was more than TTL seconds ago, the cache will be updated. After this if statement has executed, it is guaranteed that the cache is up-to-date (or at least as up-to-date as it can be).
![]()
Fetch the host and the port from the cache instead of from the server, as done in Example 6-2. Here, a random server is picked, but other policies are possible.
![]()
Here we only update the cache if it is possible to prepare the query on the server. If the server cannot be contacted for some reason, you still have to be able to execute queries. In this code, it is assumed that the current contents of the cache can be used, at least for a while longer, while the database with the information restarts.
![]()
Here the cache is filled based on the type of the server. Each entry in the cache contains a list of candidate servers for that type.
MySQL native driver replication and load balancing plug-in
The PHP team at MySQL has created several plug-ins to the MySQL Native Driver (mysqlnd). One of these plug-ins can be used for handling read-write splitting, load-balancing using a few different strategies, and failover handling. You can find more information on PHP.net.
In contrast to the example implementation used earlier, mysqlnd_ms uses a configuration file containing information about where to failover. This means that it is very efficient (all the info is in memory), but also that it is static.
The information about the masters and the slaves is stored in a configuration file in JSON format similar to the file in Example 6-6. Here, the master is assumed to be read-write and the slaves are all read-only servers.
Example 6-6. Example of mysqlnd_ms configuration file
{
"myapp": {
"master": [
{ "host": "master1.example.com" }
],
"slave": [
{ "host": "slave1.example.com", "port": "3306" },
{ "host": "slave2.example.com", "port": "3307" },
{ "host": "slave3.example.com", "port": "3308" }
]
}
}
}
When a connection is established, the hostname is used as a key into the structure in Example 6-6, and if a match is found, the connection information in one of the entries under the key is used instead. Which connection information is used depends on the policy set for the load balancer. The load balancer investigates the statement to decide where to send it. Any statement starting with SELECT is considered a read-only statement and will be sent to the slave, while any other statement is sent to the master. You can see example code for using mysqlnd_ms in Example 6-7.
Example 6-7. PHP code for using mysqlnd_ms
$QUERY = <<<END_OF_QUERY
SELECT first_name, last_name, dept_name ![]()
FROM employees JOIN dept_emp USING (emp_no)
JOIN departments USING (dept_no)
WHERE emp_no = ?
END_OF_QUERY;
$mysqli = new mysqli("myapp", "mats", "xyzzy", "employees"); ![]()
$stmt = $mysql->prepare($QUERY);
if ($stmt) {
$stmt->bind_param("d", $emp_no);
$stmt->execute();
$stmt->bind_result($first_name, $last_name, $dept_name);
while ($stmt->fetch())
print "$first_name $last_name $dept_name\n";
$stmt->close();
}
else {
echo "Error: " . $mysql->error;
}
![]()
The query contains SELECT first, so the plug-in will assume that this is a read query and should be sent to a read slave.
![]()
Note that the hostname given is not a real hostname, but rather a reference to the myapp key in the configuration file. The plug-in will use this information to dispatch the query to the correct server.
Hierarchical Replication
Although the master is quite good at handling a large number of slaves, there is a limit to how many slaves it can handle before the load becomes too high for comfort (roughly 70 slaves for each master seems to be a practical limit, but as you probably realize, this depends a lot on the application), and an unresponsive master is always a problem. In those cases, you can add an extra slave (or several) as a relay slave (or simply relay), whose only purpose is to lighten the load of replication on the master by taking care of a bunch of slaves. Using a relay in this manner is called hierarchical replication. Figure 6-4 illustrates a typical setup with a master, a relay, and several slaves connected to the relay.
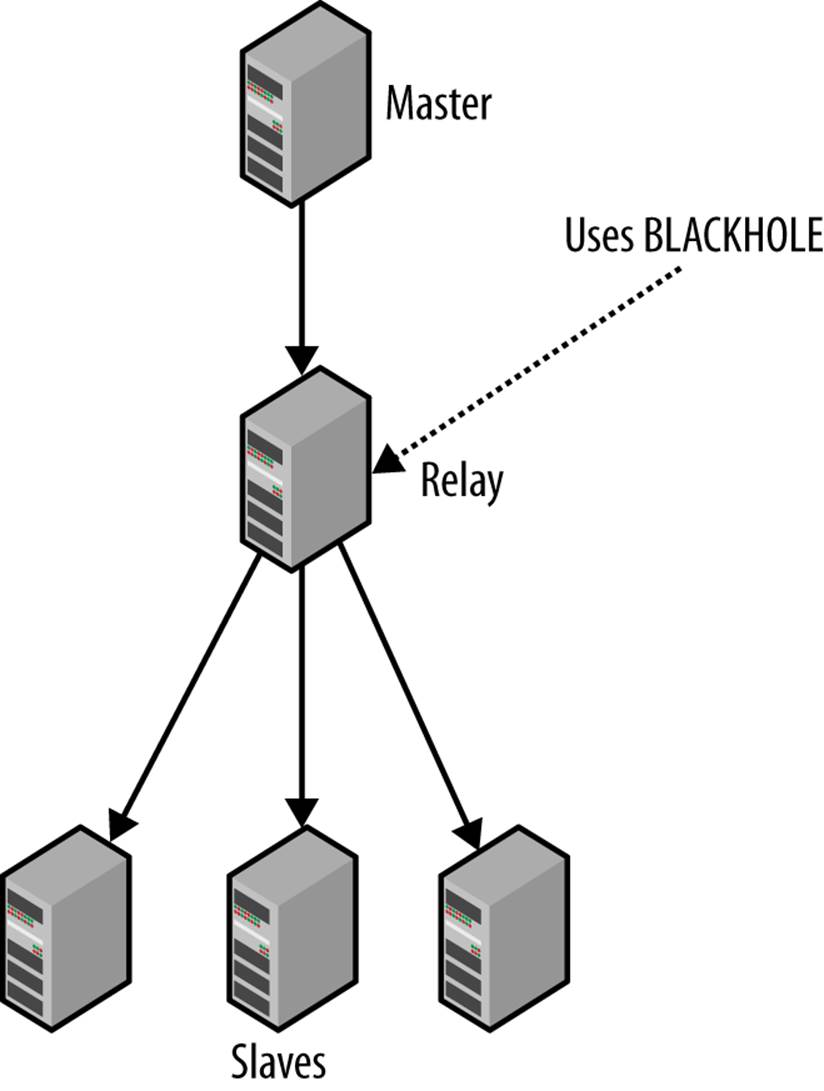
Figure 6-4. Hierarchical topology with master, relay, and slaves
By default, the changes the slave receives from its master are not written to the binary log of the slave, so if SHOW BINLOG EVENTS is executed on the slave in the previous setup, you will not see any events in the binlog. The reason for this is that there is no point in wasting disk space by recording the changes; if there is a problem and, say, the slave crashes, you can always recover by cloning the master or another slave.
On the other hand, the relay server needs to keep a binary log to record all the changes, because the relay passes them on to other slaves. Unlike typical slaves, however, the relay doesn’t need to actually apply changes to a database of its own, because it doesn’t answer queries.
In short, a typical slave needs to apply changes to a database, but not to a binary log. A relay server needs to keep a binary log, but does not apply changes to a database.
To avoid writing changes to the database, it is necessary to keep tables around (so the statements can be executed), but the changes should just be thrown away. A storage engine named Blackhole was created for purposes just like this one. The Blackhole engine accepts all statements and always reports success in executing them, but any changes are just thrown away. A relay introduces an extra delay that can cause its slaves to lag further behind the master than slaves that are directly connected to the master. This lag should be balanced against the benefits of removing some load from the master, because managing a hierarchical setup is significantly more difficult than managing a simple setup.
Setting Up a Relay Server
Setting up a relay server is quite easy, but we have to consider what to do with tables that are being created on the relay as well as what to do with tables that already exist on the relay when we change its role. Not keeping data in the databases will make processing events faster and reduce the lag for the slaves at the end of the replication process, because there is no data to be updated. To set up a relay server, we thus have to:
1. Configure the slave to forward any events executed by the slave thread by writing them to the binlog of the relay slave.
2. Change the storage engine for all tables on the relay server to use the BLACKHOLE storage engine to preserve space and improve performance.
3. Ensure that any new tables added to the relay also use the BLACKHOLE engine.
Configuring the relay server to forward events executed by the slave thread is done by adding the log-slave-updates option to my.cnf, as demonstrated earlier.
In addition to setting log-slave-updates, it is necessary to change the default storage engine using the default-storage-engine in the my.cnf file. You can temporarily change the storage engine on the relay by issuing the command SET STORAGE_ENGINE = 'BLACKHOLE', but that setting will not persist if the server is restarted.
The final task is to change the storage engine for all tables already on the relay server to use BLACKHOLE. Do this using the ALTER TABLE statement to change the storage engine for each table on the server. Because the ALTER TABLE statements shouldn’t be written to the binary log (the last thing we want is for slaves to discard the changes they receive!), turn off the binary log temporarily while executing the ALTER TABLE statements. This is shown in Example 6-8.
Example 6-8. Changing the engine for all tables in database windy
relay> SHOW TABLES FROM windy;
+-----------------+
| Tables_in_windy |
+-----------------+
| user_data |
.
.
.
| profile |
+-----------------+
45 row in set (0.15 sec)
relay> SET SQL_LOG_BIN = 0;
relay> ALTER TABLE user_data ENGINE = 'BLACKHOLE';
.
.
.
relay> ALTER TABLE profile ENGINE = 'BLACKHOLE';
relay> SET SQL_BIN_LOG = 1;
This is all you need to turn a server into a relay server. The usual way you come to employ a relay is to start with a setup in which all slaves attach directly to a master and discover after some time that it is necessary to introduce a relay server. The reason is usually that the master has become too loaded, but there could be architectural reasons for making the change as well. So how do you handle that?
You can use what you learned in the previous sections and modify the existing deployment to introduce the new relay server by:
1. Connecting the relay server to the master and configuring it to act as a relay server.
2. Switching over the slaves one by one to the relay server.
Adding a Relay in Python
Let’s turn to the task of developing support for administering relays by extending our library. Because we have a system for creating new roles and imbuing servers with those roles, let’s use that by defining a special role for the relay server. This is shown in Example 6-9.
Example 6-9. Role definition for relay
frommysql.replicantimport roles
classRelay(roles.Role):
def __init__(self, master):
super(Relay, self).__init__()
self.__master = master
def imbue(self, server):
config = server.get_config()
self._set_server_id(server, config)
self._enable_binlog(server)
config.set('mysqld', 'log-slave-updates' '1')
server.put_config(config)
server.sql("SET SQL_LOG_BIN = 0")
for db inlist of databases:
for table inserver.sql("SHOW TABLES FROM %s", (db)):
server.sql("ALTER TABLE %s.%s ENGINE=BLACKHOLE",
(db,table))
server.sql("SET SQL_LOG_BIN = 1")
Specialized Slaves
In the simple scale-out deployment—like the one described thus far—all slaves receive all data and can therefore handle any kind of query. It is, however, not very common to distribute requests evenly over the different parts of the data. Instead, there is usually some data that needs to be accessed very frequently and some that is rarely accessed. For example, consider the needs of an ecommerce site:
§ The product catalog is browsed almost all the time.
§ Data about items in stock may not be requested very often.
§ User data is not requested very often, because most of the critical information is recorded using session-specific information stored in the browser as cookies.
§ On the other hand, if cookies are disabled, the session data will be requested from the server with almost every page request.
§ Newly added items are usually accessed more frequently than old items (e.g., “special offers” might be accessed more frequently than other items).
It would clearly be a waste of resources to keep the rarely accessed data on each and every slave just in case it is requested. It would be much better to use the deployment shown in Figure 6-5, where a few servers are dedicated to keeping rarely accessed data, while a different set of servers are dedicated to keeping data that is accessed frequently.

Figure 6-5. Replication topology with master and specialized slaves
To do this, it is necessary to separate tables when replicating. MySQL can do this by filtering the events that leave the master or, alternatively, filtering the events when they come to the slave.
Filtering Replication Events
The two different ways of filtering events are called master filters when the events are filtered on the master and slave filters when the events are filtered on the slave. The master filters control what goes into the binary log and therefore what is sent to the slaves, while slave filters control what is executed on the slave. For the master filters, events for filtered-out tables are not stored in the binary log at all, while for slave filters, the events are stored in the binary log and also sent to the slave and not filtered out until just before they are going to be executed.
This means that it is not possible to use PITR to recover these databases properly—if the databases are stored in the backup image, they will still be restored when restoring the backup, but any changes made to tables in the database since that moment will not be recovered, because the changes are not in the binary log.
If slave filters are used, all changes are sent over the network.
This clearly wastes network bandwidth, especially over long-haul network connections.
Later in this chapter, you will see a detailed discussion of the relative merits of master and slave filtering and an approach that allows the binary log to remain intact while still saving network bandwidth.
Master filters
There are two configuration options for creating master filters:
binlog-do-db=db
If the current database of the statement is db, the statement will be written to the binary log; otherwise, the statement will be discarded.
binlog-ignore-db=db
If the current database of the statement is db, the statement will be discarded; otherwise, the statement will be written to the binary log.
If you want to replicate everything except a few databases, use binlog-ignore-db. If you want to replicate just a few databases, use binlog-do-db. Combining them is not recommended, because the logic for deciding whether a database should be replicated or not is complicated (seeFigure 4-3). The options do not accept lists of databases, so if you want to list several databases, you have to repeat an option multiple times.
As an example, to replicate everything except the top and secret databases, add the following options to the configuration file:
[mysqld]
...
binlog-ignore-db = top
binlog-ignore-db = secret
WARNING
Using binlog-*-db options to filter events means that the two databases will not be stored in the binary log at all, and hence cannot be recovered using PITR in the event of a crash. For that reason, it is strongly recommended that you use slave filters, not master filters, when you want to filter the replication stream. You should use master filters only for data that can be considered volatile and that you can afford to lose.
Slave filters
Slave filtering offers a longer list of options. In addition to being able to filter the events based on the database, slave filters can filter individual tables and even groups of table names by using wildcards.
In the following list of rules, the replicate-wild rules look at the full name of the table, including both the database and table name. The pattern supplied to the option uses the same patterns as the LIKE string comparison function—that is, an underscore (_) matches a single character, whereas a percent sign (%) matches a string of any length. Note, however, that the pattern must contain a period to be legitimate. This means that the database name and table name are matched individually, so each wildcard applies only to the database name or table name.
replicate-do-db=db
If the current database of the statement is db, execute the statement.
replicate-ignore-db=db
If the current database of the statement is db, discard the statement.
replicate-do-table=db_name.tbl_name
replicate-wild-do-table=db_pattern.tbl_pattern
If the name of the table being updated is table or matches the pattern, execute updates to the table.
replicate-ignore-table=db_name.tbl_name
replicate-wild-ignore-table=db_pattern.tbl_pattern
If the name of the table being updated is table or matches the pattern, discard updates to the table.
These filtering rules are evaluated just before the server decides whether to execute them, so all events are sent to the slave before being filtered.
Using Filtering to Partition Events to Slaves
So what are the benefits and drawbacks of filtering on the master versus filtering on the slave? At a brief glance, it might seem like a good idea to structure the databases so that it is possible to filter events on the master using the binlog-*-db options instead of using the replicate-*-dboptions. That way, the network is not laden with a lot of useless events that will be removed by the slave anyway. However, as mentioned earlier in the chapter, there are problems associated with filtering on the master:
§ Because the events are filtered from the binary log and there is only a single binary log, it is not possible to “split” the changes and send different parts of the database to different servers.
§ The binary log is also used for PITR, so if there are any problems with the server, it will not be possible to restore everything.
§ If, for some reason, it becomes necessary to split the data differently, it will no longer be possible, because the binary log has already been filtered and cannot be “unfiltered.”
It would be ideal if the filtering could be on the events sent from the master and not on the events written to the binary log. It would also be good if the filtering could be controlled by the slave so that the slave could decide which data to replicate. For MySQL version 5.1 and later, this is not possible, and instead, it is necessary to filter events using the replicate-* options—that is, to filter the events on the slave.
As an example, to dedicate a slave to the user data stored in the two tables users and profiles in the app database, shut down the server and add the following filtering options to the my.cnf file:
[mysqld]
...
replicate-wild-do-table=app.users
replicate-wild-do-table=app.profiles
If you are concerned about network traffic—which could be significant if you replicate over long-haul networks—you can set up a relay server on the same machine as the master, as shown in Figure 6-6 (or on the same network segment as the master), whose only purpose is to produce a filtered version of the master’s binary log.

Figure 6-6. Filtering by putting master and relay on the same machine
Managing Consistency of Data
As discussed earlier in the chapter, one of the problems with asynchronous replication is managing consistency. To illustrate the problem, let’s imagine you have an ecommerce site where customers can browse products and put items they want to purchase in a cart. You’ve set up your servers so that when a user adds an item to the cart, the change request goes to the master, but when the web server requests information about the contents of the cart, the query goes to one of the slaves tasked with answering such queries. Because the master is ahead of the slave, it is possible that the change has not reached the slave yet, so a query to the slave will then find the cart empty. This will, of course, come as a big surprise to the customer, who will then promptly add the item to the cart again only to discover that the cart now contains two items, because this time, the slave managed to catch up and replicate both changes to the cart. This situation clearly needs to be avoided or you will risk a bunch of irritated customers.
To avoid getting data that is too old, it is necessary to somehow ensure that the data provided by the slave is recent enough to be useful. As you will see, the problem becomes even trickier when a relay server is added to the mix. The basic idea of handling this is to somehow mark each transaction committed on the master, and then wait for the slave to reach that transaction (or later) before trying to execute a query on the slave.
With the introduction of global transaction identifiers (GTID) in MySQL 5.6, failing over slaves and clients has become significantly simpler because most of the techniques described here are handled automatically. The global transaction IDs are described in detail in Global Transaction Identifiers, but this chapter will to a large extent focus on the old solution for the benefit of users that have not transitioned to MySQL 5.6 yet. The differences between pre-5.6 and 5.6-based solution are highlighted in the reminder of the chapter.
Prior to MySQL 5.6, the problem needed to be handled in different ways depending on whether there are any relay servers between the master and the slave.
Consistency in a Nonhierarchical Deployment
When all the slaves are connected directly to the master, it is very easy to check for consistency. In this case, it is sufficient to record the binlog position after the transaction has been committed and then wait for the slave to reach this position using the previously introducedMASTER_POS_WAIT function. But it is not possible to get the exact position where a transaction was written in the binlog. Why? Because in the time between the commit of a transaction and the execution of SHOW MASTER STATUS, several events can be written to the binlog.
This does not matter, because in this case, it is not necessary to get the exact binlog position where the transaction was written; it is sufficient to get a position that is at or later than the position of the transaction. Because the SHOW MASTER STATUS command will show the position where replication is currently writing events, executing this after the transaction has committed will be sufficient for getting a binlog position that can be used for checking consistency.
Example 6-10 shows the PHP code for processing an update to guarantee that the data presented is not stale.
Example 6-10. PHP code for avoiding read of stale data
function fetch_master_pos($server) {
$result = $server->query('SHOW MASTER STATUS');
if ($result == NULL)
returnNULL; // Execution failed
$row = $result->fetch_assoc();
if ($row == NULL)
returnNULL; // No binlog enabled
$pos = array($row['File'], $row['Position']);
$result->close();
return $pos;
}
function sync_with_master($master, $slave) {
$pos = fetch_master_pos($master);
if ($pos == NULL)
returnFALSE;
if (!wait_for_pos($slave, $pos[0], $pos[1]))
returnFALSE;
returnTRUE;
}
function wait_for_pos($server, $file, $pos) {
$result = $server->query(
"SELECT MASTER_POS_WAIT('$file', $pos)");
if ($result == NULL)
returnFALSE; // Execution failed
$row = $result->fetch_row();
if ($row == NULL)
returnFALSE; // Empty result set ?!
if ($row[0] == NULL || $row[0] < 0)
returnFALSE; // Sync failed
$result->close();
returnTRUE;
}
function commit_and_sync($master, $slave) {
if ($master->commit()) {
if (!sync_with_master($master, $slave))
returnNULL; // Synchronization failed
returnTRUE; // Commit and sync succeeded
}
returnFALSE; // Commit failed (no sync done)
}
function start_trans($server) {
$server->autocommit(FALSE);
}
Example 6-10 contains the functions commit_and_sync and start_trans together with three support functions, fetch_master_pos, wait_for_pos, and sync_with_master. The commit_and_sync function commits a transaction and waits for it to reach a designated slave. It accepts two arguments, a connection object to a master and a connection object to the slave. The function will return TRUE if the commit and the sync succeeded, FALSE if the commit failed, and NULL if the commit succeeded but the synchronization failed (either because there was an error in the slave or because the slave lost the master).
The function works by committing the current transaction and then, if that succeeds, fetching the current master binlog position through SHOW MASTER STATUS. Because other threads may have executed updates to the database between the commit and the call to SHOW MASTER STATUS, it is possible (even likely) that the position returned is not at the end of the transaction, but rather somewhere after where the transaction was written in the binlog. As mentioned earlier, this does not matter from an accuracy perspective, because the transaction will have been executed anyway when we reach this later position.
After fetching the binlog position from the master, the function proceeds by connecting to the slave and executing a wait for the master position using the MASTER_POS_WAIT function. If the slave is running, a call to this function will block and wait for the position to be reached, but if the slave is not running, NULL will be returned immediately. This is also what will happen if the slave stops while the function is waiting (like if an error occurs when the slave thread executes a statement). In either case, NULL indicates the transaction has not reached the slave, so it’s important to check the result from the call. If MASTER_POS_WAIT returns 0, it means that the slave had already seen the transaction and therefore synchronization succeeds trivially.
To use these functions, it is sufficient to connect to the server as usual, but then use the functions to start, commit, and abort transactions. Example 6-11 shows examples of their use in context, but the error checking has been omitted because it is dependent on how errors are handled.
Example 6-11. Using the start_trans and commit_and_sync functions
require_once './database.inc';
start_trans($master);
$master->query('INSERT INTO t1 SELECT 2*a FROM t1');
commit_and_sync($master, $slave);
WARNING
PHP scripts have a maximum execution time, which defaults to 30 seconds. If the script exceeds this time, execution will be terminated. You need to keep that in mind when using the code in Example 6-10 by either running in safe mode, or changing the maximum execution time.
Consistency in a Hierarchical Deployment
Thanks to the global transaction identifiers introduced in MySQL 5.6, managing consistency in a MySQL 5.6 server is just as easy as in Consistency in a Nonhierarchical Deployment. Because the transaction identifier does not change between machines, it does not matter how many relay servers there are between the origin of the transaction and the server you connect to.
Managing consistency in a hierarchical deployment before MySQL 5.6 is significantly different from managing consistency in a simple replication topology where each slave is connected directly to the master. Because the positions are changed by every intermediate relay server, it is not possible to wait for a master position at the ultimate slave (the slave at the bottom at the hierarchy). Instead, it is necessary to figure out another way to wait for the transactions to reach the ultimate slave. There are basically two alternatives that you can use to ensure you are not reading stale data.
The first solution is to use the global transaction identifiers shown in Appendix B to handle slave promotions and to poll the slave repeatedly until it has processed the transaction. In contrast with the global transaction identifiers in MySQL 5.6, there is no wait function that we can use for these, so it is necessary to poll repeatedly.
The MASTER_POS_WAIT function is quite handy when it comes to handling the wait, so if it were possible to use that function, it would solve a lot of problems. The second solution, illustrated in Figure 6-7, uses this function to connect to each of the relay servers in the path from the master to the final slave to ensure the change propagates to the slave. It is necessary to connect to each relay slave between the master and the slave, because it is not possible to know which binlog position will be used on each of the relay servers.
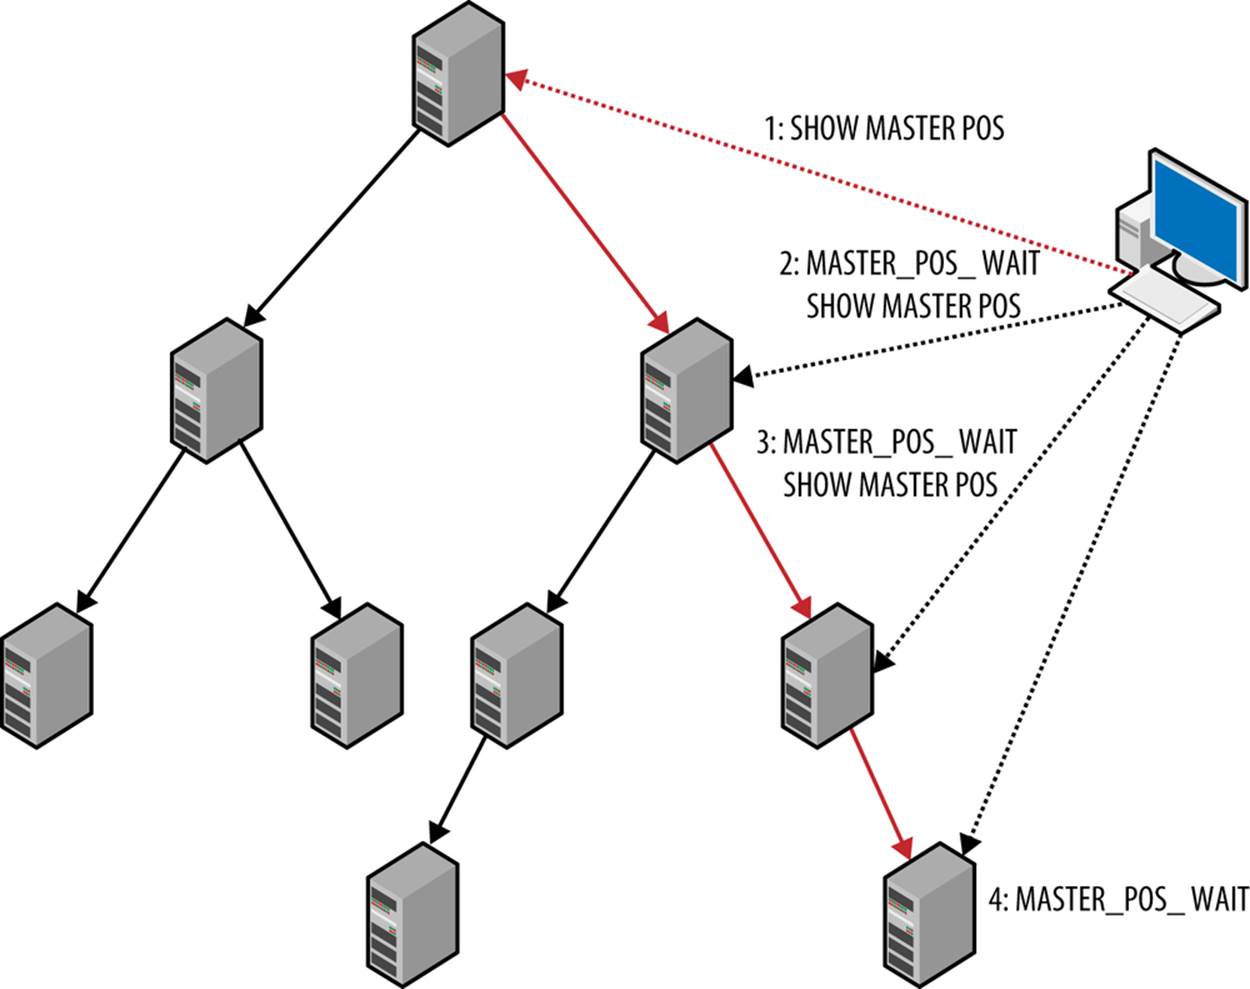
Figure 6-7. Synchronizing with all servers in a relay chain
Both solutions have their merits, so let’s consider the advantages and disadvantages of each of them.
If the slaves are normally up-to-date with respect to the master, the first solution will perform a simple check of the final slave only and will usually show that the transaction has been replicated to the slave and that processing can proceed. If the transaction has not been processed yet, it is likely that it will be processed before the next check, so the second time the final slave is checked, it will show that the transaction has reached the slave. If the checking period is small enough, the delay will not be noticeable for the user, so a typical consistency check will require one or two extra messages when polling the final slave. This approach requires only the final slave to be polled, not any of the intermediate slaves. This can be an advantage from an administrative point as well, because it does not require keeping track of the intermediate slaves and how they are connected.
On the other hand, if the slaves normally lag behind, or if the replication lag varies a lot, the second approach is probably better. The first solution will repeatedly poll the slave, and most of the time will report that the transaction has not been committed on the slave. You can handle this by increasing the polling period, but if the polling period has to be so large that the response time is unacceptable, the first solution will not work well. In this case, it is better to use the second solution and wait for the changes to ripple down the replication tree and then execute the query.
For a tree of size N, the number of extra requests will then be proportional to log N. For instance, if you have 50 relay servers and each relay server handles 50 final slaves, you can handle all 2,500 slaves with exactly two extra requests: one to the relay server and then one to the final slave.
The disadvantages of the second approach are:
§ It requires the application code to have access to the relay slaves so that they can connect to each relay server in turn and wait for the position to be reached.
§ It requires the application code to keep track of the architecture of your replication so that the relay servers can be queried.
Querying the relay servers will slow them down, because they have to handle more work, but in practice, this might turn out not to be a problem. By introducing a caching database connection layer, you can avoid some of the traffic. The caching layer will remember the binlog position each time a request is made and query the relay only if the binlog position is greater than the cached one. The following is a rough stub for the caching function:
function wait_for_pos($server, $wait_for_pos) {
if (cached position for $server > $wait_for_pos)
returnTRUE;
else {
code to wait for position and update cache
}
}
Because the binlog positions are always increasing—once a binlog position is passed it remains passed—there is no risk of returning an incorrect result. The only way to know for sure which technique is more efficient is to monitor and profile the deployment to make sure queries are executed fast enough for the application.
Example 6-12 shows sample code to handle the first solution; it queries the slave repeatedly to see whether the transaction has been executed. This code uses the Last_Exec_Trans table introduced in Chapter 5 by checking it on the master, and then repeatedly reading the table on the slaveuntil it finds the correct transaction.
Example 6-12. PHP code for avoiding read of stale data using polling
function fetch_trans_id($server) {
$result = $server->query(
"SELECT server_id, trans_id FROM Last_Exec_Trans");
if ($result == NULL)
returnNULL; // Execution failed
$row = $result->fetch_assoc();
if ($row == NULL)
returnNULL; // Empty table !?
$gid = array($row['server_id'], $row['trans_id']);
$result->close();
return $gid;
}
function wait_for_trans_id($server, $server_id, $trans_id) {
if ($server_id == NULL || $trans_id == NULL)
returnTRUE; // No transactions executed, in sync
$server->autocommit(TRUE); ![]()
$gid = fetch_trans_id($server); ![]()
if ($gid == NULL)
returnFALSE;
list($current_server_id, $current_trans_id) = $gid;
while ($current_server_id != $server_id || $current_trans_id < $trans_id) {
usleep(500000); // Wait half a second
$gid = fetch_trans_id($server);
if ($gid == NULL)
returnFALSE;
list($current_server_id, $current_trans_id) = $gid;
}
returnTRUE;
}
function commit_and_sync($master, $slave) {
if ($master->commit()) {
$gid = fetch_trans_id($master);
if ($gid == NULL)
returnNULL;
if (!wait_for_trans_id($slave, $gid[0], $gid[1]))
returnNULL;
returnTRUE;
}
returnFALSE;
}
function start_trans($server) {
$server->autocommit(FALSE);
}
The two functions commit_and_sync and start_trans behave the same way as in Example 6-10, and can therefore be used in the same way as in Example 6-11. The difference is that the functions in Example 6-12 internally call fetch_trans_id and wait_for_trans_id instead offetch_master_pos and wait_for_pos. Some points worth noting in the code:
![]()
Autocommit is turned on in wait_for_trans_id before starting to query the slave. This is necessary because if the isolation level is REPEATABLE READ or stricter, the select will find the same global transaction identifier every time. To prevent this, each SELECT is committed as a separate transaction by turning on autocommit. An alternative is to use the READ COMMITTED isolation level.
![]()
To avoid unnecessary sleeps in wait_for_trans_id, the global transaction identifier is fetched and checked once before entering the loop.
This code requires access only to the master and slave, not to the intermediate relay servers.
Example 6-13 includes code for ensuring you do not read stale data. It uses the technique of querying all servers between the master and the final slave. This method proceeds by first finding the entire chain of servers between the final slave and the master, and then synchronizing each in turn all the way down the chain until the transaction reaches the final slave. The code reuses the fetch_master_pos and wait_for_pos from Example 7-8, so they are not repeated here. The code does not implement any caching layer.
Example 6-13. PHP code for avoiding reading stale data using waiting
function fetch_relay_chain($master, $final) {
$servers = array();
$server = $final;
while ($server !== $master) {
$server = get_master_for($server);
$servers[] = $server;
}
$servers[] = $master;
return $servers;
}
function commit_and_sync($master, $slave) {
if ($master->commit()) {
$server = fetch_relay_chain($master, $slave);
for ($i = sizeof($server) - 1; $i > 1 ; --$i) {
if (!sync_with_master($server[$i], $server[$i-1]))
returnNULL; // Synchronization failed
}
}
}
function start_trans($server) {
$server->autocommit(FALSE);
}
To find all the servers between the master and the slave, we use the function fetch_relay_chain. It starts from the slave and uses the function get_master_for to get the master for a slave. We have deliberately not included the code for this function, as it does not add anything to our current discussion. However, this function has to be defined for the code to work.
After the relay chain is fetched, the code synchronizes the master with its slave all the way down the chain. This is done with the sync_with_master function, which was introduced in Example 6-10.
One way to fetch the master for a server is to use SHOW SLAVE STATUS and read the Master_Host and Master_Port fields. If you do this for each transaction you are about to commit, however, the system will be very slow.
Because the topology rarely changes, it is better to cache the information on the application servers, or somewhere else, to avoid excessive traffic to the database servers.
In Chapter 5, you saw how to handle the failure of a master by, for example, failing over to another master or promoting a slave to be a master. We also mentioned that once the master is repaired, you need to bring it back to the deployment. The master is a critical component of a deployment and is likely to be a more powerful machine than the slaves, so you should restore it to the master position when bringing it back. Because the master stopped unexpectedly, it is very likely to be out of sync with the rest of the deployment. This can happen in two ways:
§ If the master has been offline for more than just a short time, the rest of the system will have committed many transactions that the master is not aware of. In a sense, the master is in an alternative future compared to the rest of the system. An illustration of this situation is shown inFigure 6-8.
§ If the master committed a transaction and wrote it to the binary log, then crashed just after it acknowledged the transaction, the transaction may not have made it to the slaves. This means the master has one or more transactions that have not been seen by the slaves, nor by any other part of the system.
If the original master is not too far behind the current master, the easiest solution to the first problem is to connect the original master as a slave to the current master, and then switch over all slaves to the master once it has caught up. If, however, the original master has been offline for a significant period, it is likely to be faster to clone one of the slaves and then switch over all the slaves to the master.
If the master is in an alternative future, it is not likely that its extra transactions should be brought into the deployment. Why? Because the sudden appearance of a new transaction is likely to conflict with existing transactions in subtle ways. For example, if the transaction is a message in a message board, it is likely that a user has already recommitted the message. If a message written earlier but reported as missing—because the master crashed before the message was sent to a slave—suddenly reappears, it will befuddle the users and definitely be considered an annoyance. In a similar manner, users will not look kindly on shopping carts suddenly having items added because the master was brought back into the system.
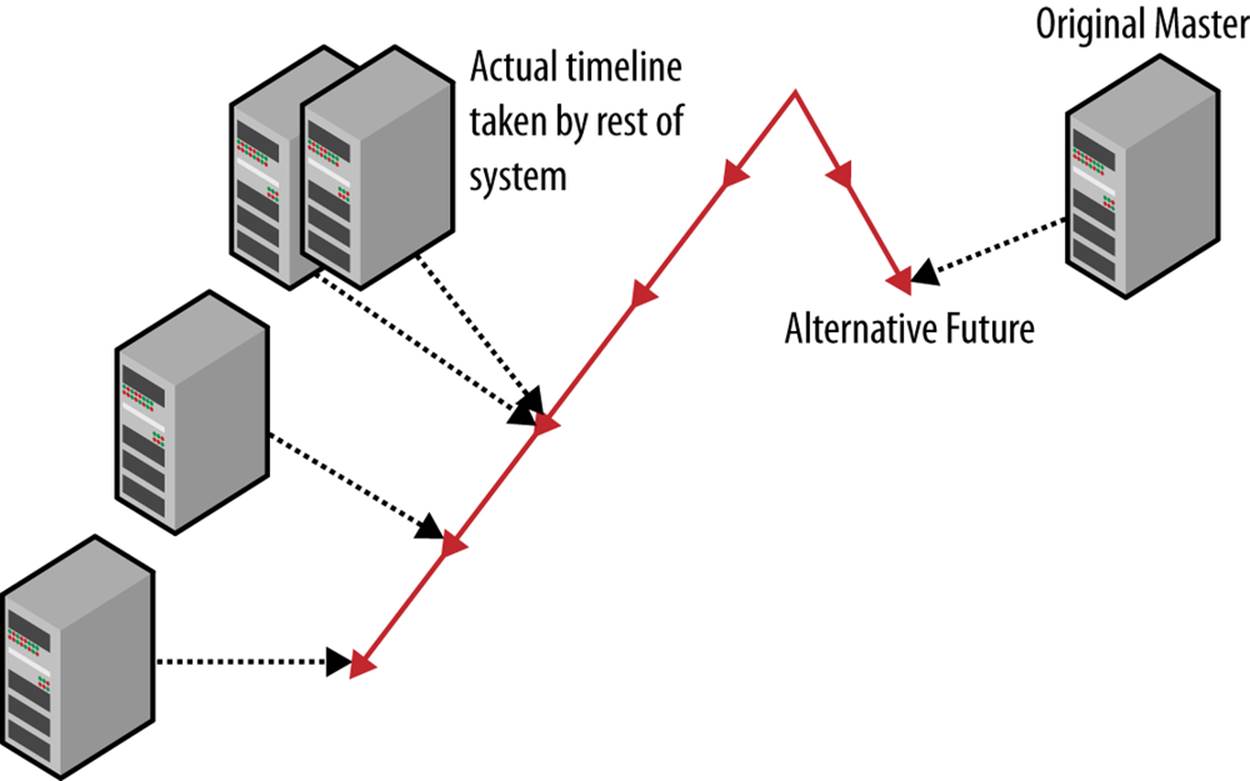
Figure 6-8. Original master in an alternative future
In short, you can solve both of the out-of-sync problems—the master in an alternative future and the master that needs to catch up—by simply cloning a slave to the original master and then switching over each of the current slaves in turn to the original master.
These problems, however, highlight how important it is to ensure consistency by checking that changes to a master are available on some other system before reporting the transaction as complete, in the event that the master should crash. The code that we have discussed in this chapter assumes that a user will try to read the data immediately, and therefore checks that it has reached the slave before a read query is carried out on the server. From a recovery perspective, this is excessive; it is sufficient to ensure the transaction is available on at least one other machine (e.g., on one of the slaves or relay servers connected to the master). In general, you can tolerate n−1 failures if you have the change available on n servers.
As of MySQL 5.6, you can use global transaction identifiers to handle this. Simply use the WAIT_UNTIL_SQL_THREAD_AFTER_GTIDS function instead of the MASTER_POS_WAIT in Example 6-10, leading to the definition of wait_for_pos:
function wait_for_pos($server, $gtids) {
$result = $server->query(
"SELECT WAIT_UNTIL_SQL_THREAD_AFTER_GTIDS($gtids)");
if ($result == NULL)
return FALSE; // Execution failed
$row = $result->fetch_row();
if ($row == NULL)
return FALSE; // Empty result set ?!
if ($row[0] == NULL || $row[0] < 0)
return FALSE; // Sync failed
$result->close();
return TRUE;
}
You can find a full description of global transaction identifiers in Global Transaction Identifiers.
Conclusion
In this chapter, we looked at techniques to increase the throughput of your applications by scaling out, whereby we introduced more servers to handle more requests for data. We presented ways to set up MySQL for scaling out using replication and gave practical examples of some of the concepts. In the next chapter, we will look at some more advanced replication concepts.
A rap on Joel’s door drew his attention to Mr. Summerson standing in the doorway. “I like your report on scaling out our servers, Joel. I want you to get started on that right away. Use some of those surplus servers we have down in the computer room.”
Joel was happy he had decided to send his boss a proposal first. “Yes, sir. When do we need these online?”
Mr. Summerson smiled and glanced at his watch. “It’s not quitting time yet,” he said and walked away.
Joel wasn’t sure whether he was joking or not, so he decided to get started right away. He picked up his now-well-thumbed copy of MySQL High Availability and his notes and headed to the computer room. “I hope I set the TiVo,” he muttered, knowing this was going to be a late night.
All materials on the site are licensed Creative Commons Attribution-Sharealike 3.0 Unported CC BY-SA 3.0 & GNU Free Documentation License (GFDL)
If you are the copyright holder of any material contained on our site and intend to remove it, please contact our site administrator for approval.
© 2016-2026 All site design rights belong to S.Y.A.