MySQL High Availability (2014)
Part I. High Availability and Scalability
Chapter 5. Replication for High Availability
Joel was listening to his iPod when he noticed his boss standing directly in front of his desk. He took off his headphones and said, “Sorry, sir.”
Mr. Summerson smiled and said, “No problem, Joel. I need you to figure out some way to ensure we can keep our replicated servers monitored so that we don’t lose data and can minimize downtime. We’re starting to get some complaints from the developers that the system is too inflexible. I can deal with the developers, but the support people tell me that when we have a failure it takes too long to recover. I’d like you to make that your top priority.”
Joel nodded. “Sure, I’ll look at load balancing and improving our recovery efforts in replication.”
“Excellent. Give me a report on what you think we need to do to solve this problem.”
Joel watched his boss leave his office. “OK, let’s find out what this high availability chapter has to say,” he thought, as he opened his favorite MySQL book.
Buying expensive machines known for their reliability and ensuring that you have a really good UPS in case of power failures should give you a highly available system. Right?
Well, high availability is actually not that easy to achieve. To have a system that is truly available all the time, you have to plan carefully for any contingency and ensure that you have redundancy to handle failing components. True high availability—a system that does not go down even in the most unexpected circumstances—is hard to achieve and very costly.
The basic principles for achieving high availability are simple enough; implementing the measures is the tricky part. You need to have three things in place for ensuring high availability:
Redundancy
If a component fails, you have to have a replacement for it. The replacement can be either idly standing by or part of the existing deployment.
Contingency plans
If a component fails, you have to know what to do. This depends on which component failed and how it failed.
Procedure
If a component fails, you have to be able to detect it and then execute your plans swiftly and efficiently.
If the system has a single component whose failure will cause the entire system to fail, the system has a single point of failure. If a system has a single point of failure, it puts a severe limit on your ability to achieve high availability, which means that one of your first goals is to locate these single points of failure and ensure you have redundancy for them.
Redundancy
To understand where redundancy might be needed, you have to identify every potential point of failure in the deployment. Even though it sounds easy—not to mention a tad tedious and boring—it requires some imagination to ensure that you really have found them all. Switches, routers, network cards, and even network cables are single points of failure. Outside of your architecture, but no less important, are power sources and physical facilities. But what about services needed to keep the deployment up? Suppose all network management is consolidated in a web-based interface? Or what if you have only one staff person who knows how to handle some types of failure?
Identifying the points of failure does not necessarily mean that you have to eliminate them all. Sometimes it is just not possible for economical, technical, or geographic reasons, but being aware of them helps you with planning.
Some things that you should consider, or at least make a conscious decision about whether to consider, are cost of duplicating components, the probability of failure for different components, the time to replace a component, and risk exposure while repairing a component. If repairing a component takes a week and you are running with the spare as the single point of failure during this time, you are taking a certain risk that the spare could be lost as well, which may or may not be acceptable.
Once you have identified where you need redundancy, you have to choose between two fundamental alternatives: you can either keep duplicates around for each component—ready to take over immediately if the original component should fail—or you can ensure you have extra capacity in the system so that if a component fails, you can still handle the load. This choice does not have to be made in an all-or-nothing fashion: you can combine the two techniques so that you duplicate some components and use extra capacity for some other parts of the system.
On the surface, the easiest approach is to duplicate components, but duplication is expensive. You have to leave a standby around and keep it up-to-date with the main component all the time. The advantages of duplicating components are that you do not lose performance when switching and that switching to the standby is usually faster than restructuring the system, which you would have to do if you approached the problem by creating spare capacity.
Creating spare capacity lets you use all the components for running the business, possibly allowing you to handle higher peaks in your load. When a component breaks, you restructure the system so that all remaining components are in use. It is, however, important to have more capacity than you normally need.
To understand why, consider a simple case where you have a master that handles the writes—actually, you should have two, because you need to have redundancy—with a set of slaves connected to the master whose only purpose is to serve read requests.
Should one of the slaves fail, the system will still be responding, but the capacity of the system will be reduced. If you have 10 slaves, each running at 50% capacity, the failure of one slave will increase the load on each slave to 55%, which is easy to handle. However, if the slaves are running at 95% capacity and one of the slaves fails, each server would have to handle 105% of the original load to handle the same load, which is clearly not possible. In this case, the read capacity of the system will be reduced and the response time will be longer.
And planning for the loss of one server is not sufficient: you have to consider the probability of losing more than one server and prepare for that situation as well. Continuing with our previous example, even if each server is running at 80% capacity, the system will be able to handle the loss of one server. However, the loss of two servers means that the load on each remaining server will increase to 100%, leaving you with no room for unexpected bursts in traffic. If this occurs once a year, it might be manageable, but you have to know how often it is likely to happen.
Table 5-1 gives example probabilities for losing 1, 2, or 3 servers in a setup of 100 servers, given different probabilities of losing a single server. As you can see, with a 1% probability of losing a server, you have a 16% risk of losing three or more servers. If you are not prepared to handle that, you’re in for some problems if it actually happens.
NOTE
For a stochastic variable X representing the number of servers lost, the probabilities are calculated using the binomial tail distribution:
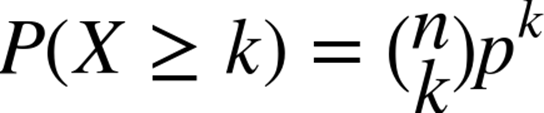
Table 5-1. Probabilities of losing servers
|
Probability of losing a single server |
1 |
2 |
3 |
|
1.00% |
100.00% |
49.50% |
16.17% |
|
0.50% |
50.00% |
12.38% |
2.02% |
|
0.10% |
10.00% |
0.50% |
0.02% |
To avoid such a situation, you have to monitor the deployment closely to know what the load is, figure out the capacity of your system through measurements, and do your math to see where the response times will start to suffer.
Planning
Having redundancy is not sufficient; you also need to have plans for what to do when the components fail. In the previous example, it is easy to handle a failing slave, because new connections will be redirected to the working slaves, but consider the following:
§ What happens with the existing connections? Just aborting and returning an error message to the user is probably not a good idea. Typically, there is an application layer between the user and the database, so in this case the application layer has to retry the query with another server.
§ What happens if the master fails? In the previous example, only the slaves failed, but the master can also fail. Assuming you have added redundancy by keeping an extra master around (we will cover how to do that later in the chapter), you must also have plans for moving all the slaves over to the new master.
This chapter will cover some of the techniques and topologies that you can use to handle various situations for failing MySQL servers. There are basically three server roles to consider: master failures, slave failures, and relay failures. Slave failures are just failures of slaves that are used for read scale-out. The slaves that also act as masters are relay slaves and need special care. Master failures are the most important ones to handle quickly, because the deployment will be unavailable until the master is restored.
Slave Failures
By far, the easiest failures to handle are slave failures. Because the slaves are used only for read queries, it is sufficient to inform the load balancer that the slave is missing, and the load balancer will direct new queries to the functioning slaves. There have to be enough slaves to handle the reduced capacity of the system, but apart from that, a failing slave does not normally affect the replication topology and there are no specific topologies that you need to consider to make slave failure easier to manage.
When a slave has failed, there are inevitably some queries that have been sent to the slave that are waiting for a reply. Once these connections report an error resulting from a lost server, the queries have to be repeated with a functioning slave.
Master Failures
If the master fails, it has to be replaced to keep the deployment up, and it has to be replaced quickly. The moment the master fails, all write queries will be aborted, so the first thing to do is to get a new master available and direct all clients to it.
Because the main master failed, all the slaves are now without a master as well, meaning that all the slaves have stale data, but they are still up and can reply to read queries.
However, some queries may block if they are waiting for changes to arrive at the slave. Some queries may make it into the relay log of the slave and therefore will eventually be executed by the slave. No special consideration has to be taken on the behalf of these queries.
For queries that are waiting for events that did not leave the master before it crashed, the situation is bleaker. In this case, it is necessary to ensure they are handled. This usually means they are reported as failures, so the user will have to reissue the query.
Relay Failures
For servers acting as relay servers, the situation has to be handled specially. If they fail, the remaining slaves have to be redirected to use some other relay or the master itself. Because the relay has been added to relieve the master of some load, it is likely that the master will not be able to handle the load of a batch of slaves connected to one of its relays.
Disaster Recovery
In the world of high availability, “disaster” does not have to mean earthquakes or floods; it just means that something went very bad for the computer and it is not local to the machine that failed.
Typical examples are lost power in the data center—not necessarily because the power was lost in the city; just losing power in the building is sufficient.
The nature of a disaster is that many things fail at once, making it impossible to handle redundancy by duplicating servers at a single data center. Instead, it is necessary to ensure data is kept safe at another geographic location, and it is quite common for companies to ensure high availability by having different components at different offices, even when the company is relatively small.
Procedures
After you have eliminated all single points of failure, ensured you have sufficient redundancy for the system, and made plans for every contingency, you should be ready for the last step.
All your resources and careful planning are of no use unless you can wield them properly. You can usually manage a small site with a few servers manually with very little planning, but as the number of servers increases, automation becomes a necessity—and if you run a successful business, the number of servers might have to increase quickly.
You’re likely better off if you plan from day one to have automation—if you have to grow, you will be busy handling other matters and will probably not have time to create the necessary automation support.
Some of the basic procedures have already been discussed, but you need to consider having ready-made procedures for at least the following tasks:
Adding new slaves
Creating new slaves when you need to scale is the basis for running a big site. There are several options for creating new slaves. They all circle around methods for taking a snapshot of an existing server, usually a slave, restoring the snapshot on a new server, and then starting replication from the correct position.
The time for taking a snapshot will, of course, affect how quickly you can bring the new slave up; if the backup time is too long, the master may have issued a lot of changes, which means that the new slave will take longer to catch up. For this reason, the snapshot time is important.Figure 5-1 shows the snapshot time when the slave has caught up. You can see that when the slave is stopped to take a snapshot, the changes will start to accumulate, which will cause the outstanding changes to increase. Once the slave is restarted, it will start to apply the outstanding changes and the number of outstanding changes will decrease.
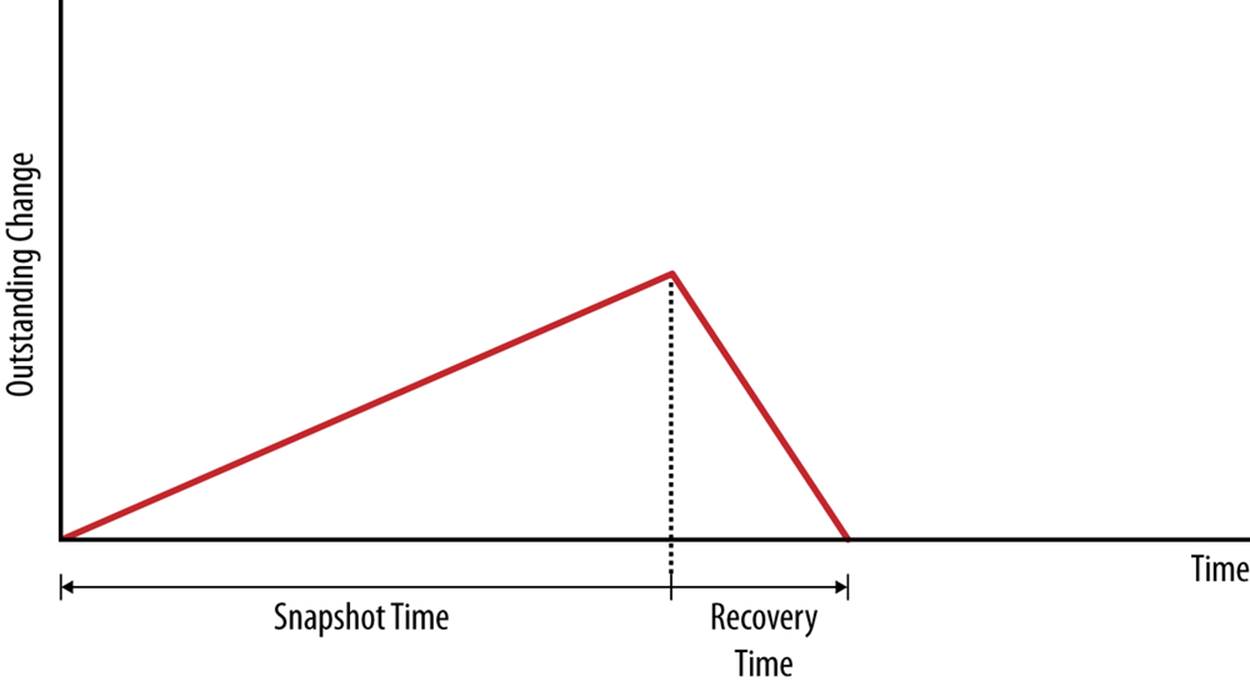
Figure 5-1. Outstanding changes when taking a snapshot
Some different methods of taking a snapshot include the following:
Using mysqldump
Using mysqldump is safe but slow. If you use InnoDB tables, mysqldump has options to allow you to take a consistent snapshot, meaning you do not have to bring the server offline. There are also options that allow you to get the master and slave positions for the snapshot so that replication will start at the right position.
Copying the database files
This is relatively fast, but requires you to bring the server offline before copying the files. It also require you to manage the positions for starting replication at the right place, something that mysqldump does for you.
Using an online backup method
There are different methods available, such as the MySQL Enterprise Backup and XtraBackup.
Using LVM to get a snapshot
On Linux, it is possible to take a snapshot of a volume using Logical Volume Manager (LVM). It does require that you prepare beforehand, because a special LVM volume has to be created. Just like copying the database files, this method requires you to manage the replication positions yourself.
Using filesystem snapshot methods
The Solaris ZFS, for example, has built-in support for taking snapshots. This is a very fast technique for creating backups, but it is similar to the other techniques (except for mysqldump). It also requires you to manage the replication positions yourself.
If it should be necessary to use a different engine when restoring, you have to use mysqldump: all the other methods have to restore to the same engine that was used for taking the backup.
Techniques for creating new slaves are covered in Chapter 3, and the different backup methods are covered in Chapter 15.
Removing slaves from the topology
Removing slaves from the setup only requires notifying the load balancer that the slave is absent. An example load balancer—with methods for adding and removing servers—can be found in Chapter 6.
Switching the master
For routine maintenance, it is common to have to switch all the slaves of a master over to a secondary master as well as notify load balancers of the master’s absence. This procedure can and should be handled with no downtime at all, so it should not affect normal operations.
Using slave promotion (described later in this chapter) is one way to handle this, but it might be easier to use a hot standby instead (also covered later in this chapter).
Handling slave failures
Your slaves will fail—it is just a matter of how often. Handling slave failures must be a routine event in any deployment. It is only necessary to detect that the slave is absent and remove it from the load balancer’s pool, as described in Chapter 6.
Handling master failures
When the master goes down suddenly, you have to detect the failure and move all the slaves over to a standby, or promote one of the slaves to be the new master. Techniques for this are described later in this chapter.
Upgrading slaves
Upgrading slaves to new versions of the server should usually not be a problem. However, bringing the slave out of the system for the upgrade requires removing it from the load balancer and maybe notifying other systems of the slave’s absence.
Upgrading masters
To upgrade the master, you first need to upgrade all the slaves to ensure that they can read all the replication events of the master. To upgrade the master, it is usually necessary to either use a standby as a master while you are performing the upgrade or promote one of the slaves to be the master for the duration of the upgrade.
Hot Standby
The easiest topology for duplicating servers is hot standby, shown in Figure 5-2. The hot standby is a dedicated server that just duplicates the main master. The hot standby server is connected to the master as a slave, so that it reads and applies all changes. This setup is often called primary-backup configuration, where the primary is the master and the “backup” is the secondary. There can be multiple hot standbys.
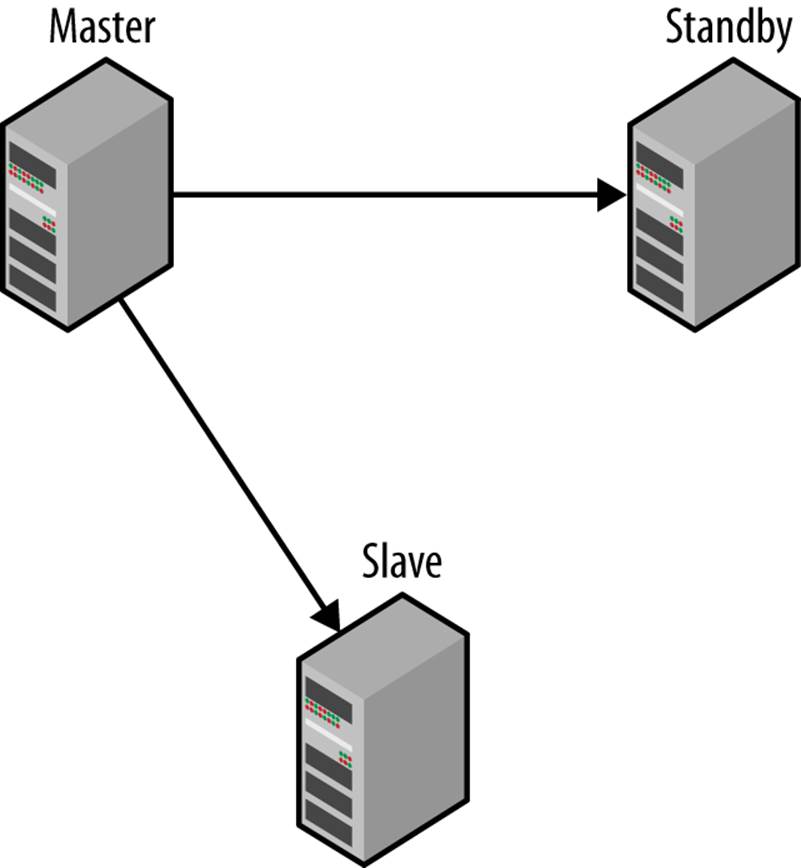
Figure 5-2. Master with a hot standby
Failure is inevitable, at least when you run a large deployment. It is not a question of if servers fail, but when and how often they fail. The idea in this topology is that when the main master fails, the hot standby provides a faithful replica of the master, and all the clients and slaves can therefore be switched over to the hot standby and continue operating. Operations can proceed with hardly a lapse, and the hot standby gives you a chance to fix or replace the main master. After you have repaired the master, you have to bring it back on track and either set it to be the hot standby, or redirect the slaves to the original master again. As with many ideas, the reality is not always that rosy.
All these are relevant issues, but for starters, let’s just consider the first case: that of switching over to a hot standby when the primary is still running, as illustrated in Figure 5-3.
MySQL 5.6 introduced the concept of global transaction identifiers, which significantly simplifies this problem of handling failover. However, because MySQL 5.6 is relatively new, this section demonstrates how to perform failover before MySQL 5.6. For a description of how to handle failover using global transaction identifiers, have a look in Global Transaction Identifiers, where you will also see how to set the server up for using global transaction identifiers. If you are using a pre-MySQL 5.6 server and want to use global transaction identifiers, you have to roll them yourself. An example of how to do this can be found in Appendix B.
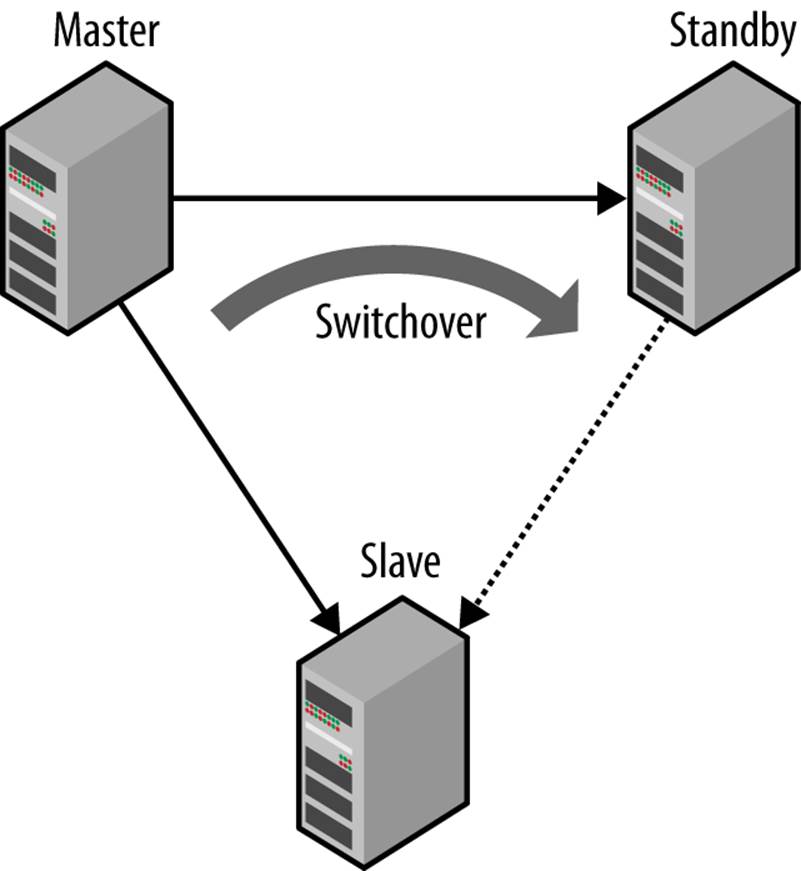
Figure 5-3. Switching over from a running master to a standby
Handling a switchover
The main challenge with switching over to a standby before MySQL 5.6 is to perform the switchover in such a way that the slave starts replicating from the standby at precisely the position where it stopped replicating from the original master. If the positions were easy to translate—for example, if the positions were the same on both the master and the standby—we would not have a problem. Unfortunately, the positions may be different on the master and the standby for a number of reasons. The most common cause is when a standby was not attached to the master when the master was started. But even if they were attached from the start, events cannot be guaranteed to be written the same way to the binary log on the standby as they were written to the binary log on the master.
The basic idea for performing the switchover is to stop the slave and the standby at exactly the same position and then just redirect the slave to the standby. Because the standby hasn’t made any changes after the position where you stopped it, you can just check the binlog position on the standby and direct the slave to start at that position. This task has to be performed manually, because just stopping the slave and the standby will not guarantee that they are synchronized.
To do this, stop both the slave and the standby and compare the binlog positions. Because both positions refer to positions on the same master—the slave and standby are both connected to the same master—you can check the positions just by comparing the filename and the byte position lexicographically (in that order):
standby> SHOW SLAVE STATUS\G
...
Relay_Master_Log_File: master-bin.000096
...
Exec_Master_Log_Pos: 756648
1 row in set (0.00 sec)
slave> SHOW SLAVE STATUS\G
...
Relay_Master_Log_File: master-bin.000096
...
Exec_Master_Log_Pos: 743456
1 row in set (0.00 sec)
In this case, the standby is ahead of the slave: they are in the same file, but the standby is at position 756648 whereas the slave is at 743456. So just write down the slave position of the standby (756648) and stop the slave from running until it has caught up with the standby. To have the slave catch up with the standby and stop at the right position, use the START SLAVE UNTIL command, as we did when stopping the reporting slave earlier in this chapter:
slave> START SLAVE UNTIL
-> MASTER_LOG_FILE = 'master-bin.000096',
-> MASTER_LOG_POS = 756648;
Query OK, 0 rows affected (0.18 sec)
slave> SELECT MASTER_POS_WAIT('master-bin.000096', 756648);
Query OK, 0 rows affected (1.12 sec)
The slave and standby have now stopped at exactly the same position, and everything is ready to do the switchover to the standby using CHANGE MASTER to direct the slave to the standby and start it. But what position should you specify? Because the file and position that the master recorded for its stopping point are different from the file and position recorded by the standby for the same point, it is necessary to fetch the position that the standby recorded while recording the changes as a master. To do this, execute SHOW MASTER STATUS on the standby:
standby> SHOW MASTER STATUS\G
*************************** 1. row ***************************
File: standby-bin.000019
Position: 56447
Binlog_Do_DB:
Binlog_Ignore_DB:
1 row in set (0.00 sec)
Now you can redirect the slave to the standby using the correct position:
slave> CHANGE MASTER TO
-> MASTER_HOST = 'standby.example.com',
-> MASTER_PORT = 3306,
-> MASTER_USER = 'repl_user',
-> MASTER_PASSWORD = 'xyzzy',
-> MASTER_LOG_FILE = '
standby-bin.000019',
-> MASTER_LOG_POS =56447;
Query OK, 0 rows affected (0.18 sec)
slave> START SLAVE;
Query OK, 0 rows affected (0.25 sec)
If the opposite is true—if the slave is ahead of the standby—you can just switch the roles of the standby and the slave in the previous steps. This is possible because the master is running and can provide either the slave or the standby with the missing changes. In the next section, we will consider how to handle the situation in which the master has stopped unexpectedly and hence cannot provide either the slave or the standby with the missing changes.
Handling a switchover in Python
Example 5-1 shows the Python code for switching a slave over to another master. The replicate_to_position function instructs a server to read from the master only to the given position. When the procedure returns, the slave will have stopped at exactly this position. Theswitch_to_master directs a slave to a new master. The procedure assumes that both the server on which it executes and the new master are connected to the same original master. If they are not, the positions are not comparable and the procedure will raise an exception. The procedure allows the position on the master to be given explicitly instead of computed, which we will use later in the chapter when implementing fail-over.
Example 5-1. Procedure for switching to a new master
frommysql.replicant.commandsimport (
fetch_slave_position,
fetch_master_position,
change_master,
)
def replicate_to_position(server, pos):
server.sql("START SLAVE UNTIL MASTER_LOG_FILE=%s, MASTER_LOG_POS=%s",
(pos.file, pos.pos))
server.sql("SELECT MASTER_POS_WAIT(%s,%s)", (pos.file, pos.pos))
def switch_to_master(server, standby, master_pos=None):
server.sql("STOP SLAVE")
server.sql("STOP SLAVE")
if master_pos isNone:
server_pos = fetch_slave_position(server)
standby_pos = fetch_slave_position(standby)
if server_pos < standby_pos:
replicate_to_position(server, standby_pos)
elif server_pos > standby_pos:
replicate_to_position(standby, server_pos)
master_pos = fetch_master_position(standby)
change_master(server, standby, master_pos)
standby.sql("START SLAVE")
server.sql("START SLAVE")
Dual Masters
One frequently mentioned setup for high availability is the dual masters topology. In this setup, two masters replicate each other to keep both current. This setup is very simple to use because it is symmetric. Failing over to the standby master does not require any reconfiguration of the main master, and failing back to the main master again when the standby master fails in turn is very easy.
Servers can be either active or passive. If a server is active it means that the server accepts writes, which are likely to be propagated elsewhere using replication. If a server is passive, it does not accept writes and is just following the active master, usually to be ready to take over when it fails.
When using dual masters, there are two different setups, each serving a different purpose:
Active-active
In an active-active setup, writes go to both servers, which then transfer changes to the other master.
Active-passive
In this setup, one of the masters, called the active master, handles writes while the other server, called the passive master, just keeps current with the active master.
This is almost identical to the hot standby setup, but because it is symmetric, it is easy to switch back and forth between the masters, each taking turns being the active master.
Note that this setup does not necessarily let the passive master answer queries. For some of the solutions that you’ll see in this section, the passive master is a cold standby.
These setups do not necessarily mean that replication is used to keep the servers synchronized—there are other techniques that can serve that purpose. Some techniques can support active-active masters, while other techniques can only support active-passive masters.
The most common use of an active-active dual masters setup is to have the servers geographically close to different sets of users—for example, in branch offices at different places in the world. The users can then work with the local server, and the changes will be replicated over to the other master so that both masters are kept in sync. Because the transactions are committed locally, the system will be perceived as more responsive. It is important to understand that the transactions are committed locally, meaning that the two masters are not consistent (i.e., they might not have the same information). The changes committed to one master will be propagated to the other master eventually, but until that has been done, the masters have inconsistent data.
This has two main consequences that you need to be aware of:
§ If the same information is updated on the two masters—for example, a user is accidentally added to both masters—there will be a conflict between the two updates and it is likely that replication will stop.
§ If a crash occurs while the two masters are inconsistent, some transactions will be lost.
To some extent, you can avoid the problem with conflicting changes by allowing writes to only one of the servers, thereby making the other master a passive master. This is called an active-passive setup. The active server is called the primary and the passive server is called the secondary.
Losing transactions when the server crashes is an inevitable result of using asynchronous replication, but depending on the application, it does not necessarily have to be a serious problem. You can limit the number of transactions that are lost when the server crashes by using a new feature in MySQL 5.5 called semisynchronous replication. The idea behind semisynchronous replication is that the thread committing a transaction blocks until at least one slave acknowledges that it has received the transaction. Because the events for the transaction are sent to the slave after the transaction has been committed to the storage engine, the number of lost transactions can be kept down to at most one per thread.
Similar to the active-active approach, the active-passive setup is symmetrical and therefore allows you to switch easily from the main master to the standby and back. Depending on the way you handle the mirroring, it may also be possible to use the passive master for administrative tasks such as upgrading the server and use the upgrade server as the active master once the upgrade is finished without any downtime at all.
One fundamental problem that has to be resolved when using an active-passive setup is the risk of both servers deciding that they are the primary master. This is called the split-brain syndrome. This can occur if network connectivity is lost for a brief period, long enough to have the secondary promote itself to primary, but then the primary is brought online again. If changes have been made to both servers while they are both in the role of primary, there may be a conflict. In the case of using a shared disk, simultaneous writes to the disks by two servers are likely to cause “interesting” problems with the database (i.e., problems that are probably disastrous and difficult to pinpoint). In other words, two running MySQL servers are not allowed to shard the same data directory, so it is necessary to ensure that at most one MySQL server using the data directory is active at any time (you can find a more elaborate discussion on this in Shared disks).
The easiest and most common way to prevent such a situation is to ensure that the server that was deemed “dead” is really not active. This is done using a technique called, somewhat morbidly, STONITH (Shoot The Other Node In The Head). This can be accomplished in several different ways, such as connecting to the server and executing a kill -9 (if the server can be reached), turning of the network card to isolate the server, or turning the power switch on the machine. If the server is truly unreachable (e.g., it ended up on a different partition), you have to use a “poison pill” so that when the server is accessible again, it will “commit suicide.”
Shared disks
A straightforward dual masters approach is shown in Figure 5-4, where a pair of masters is connected using a shared disk architecture such as a storage area network (SAN). In this approach, both servers are connected to the same SAN and are configured to use the same files. Because one of the masters is passive, it will not write anything to the files while the active master is running as usual. If the main server fails, the standby will be ready to take over.
The advantage of this approach is that, because the binlog files are on a shared disk, there is no need for translating binlog positions. The two servers are truly mirror images of each other, but they are running on two different machines. This means that switching over from the main master to the standby is very fast. There is no need for the slaves to translate positions to the new master; all that is necessary is to note the position where the slave stopped, issue a CHANGE MASTER command, and start replication again.
When you failover using this technique, you have to perform recovery on the tables, because it is very likely that updates were stopped midstream. Each storage engine behaves differently in this situation. For example, InnoDB has to perform a normal recovery from the transaction log, as it would in the event of a crash, whereas if you use MyISAM you probably have to repair the tables before being able to continue operation. Of these two choices, InnoDB is preferred because recovery is significantly faster than repairing a MyISAM table.
You should also consider the time it takes to warm up the caches, which can be lengthy.
Notice that the position uses the server ID of the main server, but it represents the same position on the standby because it uses the same files and is a mirror image of the main server. Because the position contains the server ID as well, this will also catch any mistakes made by the user, such as passing a master that is not a mirror image of the main master.
Setting up dual masters using shared disks is dependent on the shared storage solution used, a discussion that is beyond the scope of this book.
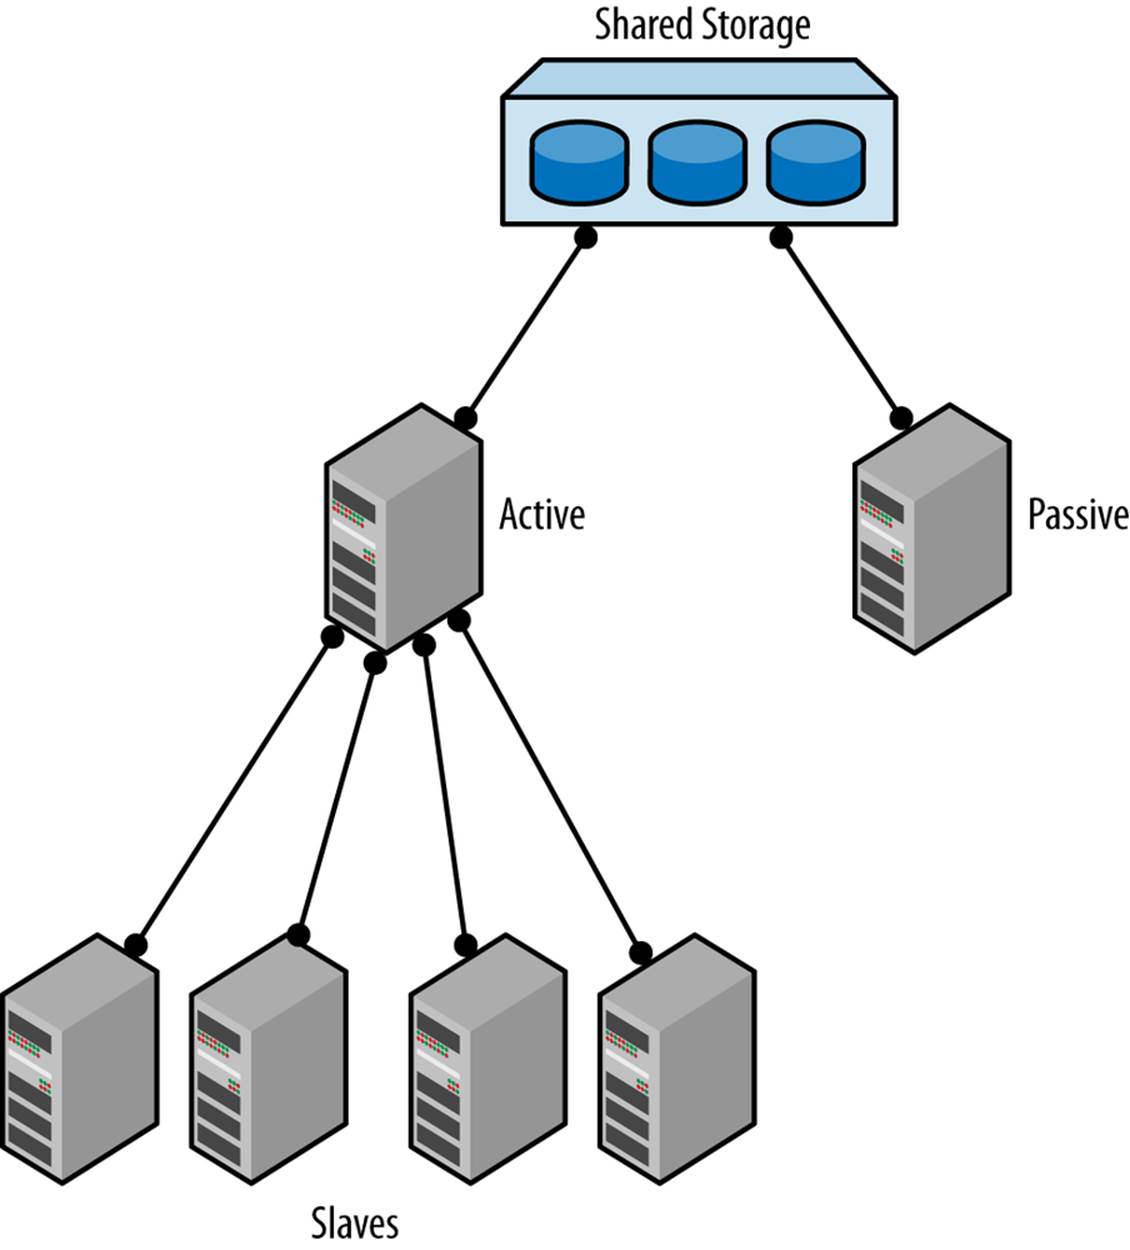
Figure 5-4. Dual masters using a shared disk
The problem with using shared storage is that the two masters are using the same files for storing data, so you have to be very careful when doing any administrative tasks on the passive master. Overwriting the configuration files, even by mistake, can be fatal. It is not sufficient to enforce one server to be read-only because there are files written (e.g., by InnoDB) even when the server is in read-only mode.
The handling of split-brain syndrome depends on which shared disk solution is used and is beyond the scope of this book. One example, however, occurs when using SCSI, which has support for reserving disks by servers. This allows a server to detect that it is really not the primary anymore by noticing that the disks are reserved by another server, and bringing itself offline.
Replicated disks using DRBD
The Linux High Availability project contains a lot of useful tools for maintaining high availability systems. Most of these tools are beyond the scope of this book, but there is one tool that is interesting for our purposes: Distributed Replicated Block Device (DRBD), which is software for replicating block devices over the network.
Figure 5-5 shows a typical setup of two nodes where DRBD is used to replicate a disk to a secondary server. The setup creates two DRBD block devices, one on each node, which in turn write the data to the real disks. The two DRBD processes communicate over the network to ensure any changes made to the primary are replicated over to the secondary. To the MySQL server, the device replication is transparent. The DRBD devices look and behave like normal disks, so no special configuration is needed for the servers.
You can only use DRBD in an active-passive setup, meaning that the passive disk cannot be accessed at all. In contrast with the shared disk solution outlined earlier and the bidirectional replication implementation described later in this chapter, the passive master cannot be accessed at all.
Similar to the shared disk solution, DRBD has the advantage of not needing to translate positions between the two masters because they share the same files. However, failing over to the standby master takes longer than in the shared disk setup described earlier.
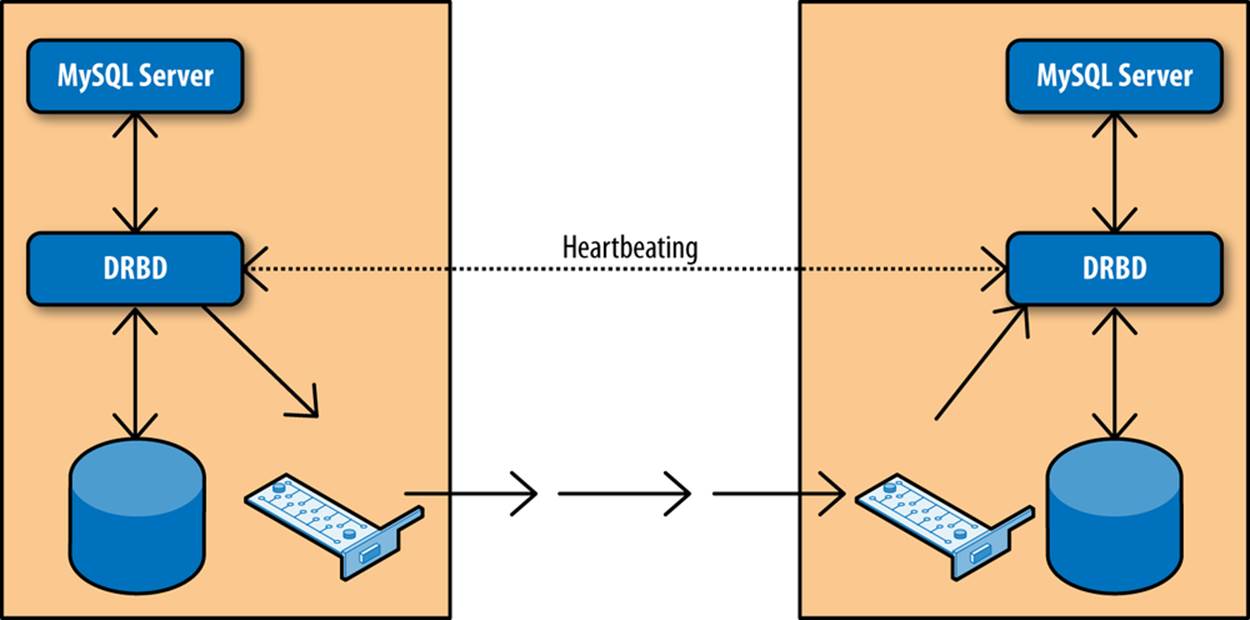
Figure 5-5. Using DRBD to replicate disks
For both the shared disk and the DRBD setup, it is necessary to perform recovery of the database files before bringing the servers online. Because recovery of MyISAM tables is quite expensive, it is recommended that you use a transactional engine with good recovery performance for the database tables. InnoDB is the proven solution in this case, but investigating alternative transactional engines might prove to be well-invested time.
The mysql database contains strictly MyISAM tables so you should, as a general principle, avoid unnecessary changes to these tables during normal operations. It is, of course, impossible to avoid when you need to perform administrative tasks.
One advantage of DRBD over shared disks is that for the shared disk solution, the disks actually provide a single point of failure. Should the network to the shared disk array go down, it is possible that the server will not work at all. In contrast, replicating the disks means that the data is available on both servers, which reduces the risk of a total failure.
DRBD also has support built in to handle split-brain syndrome and can be configured to automatically recover from it.
Bidirectional replication
When using dual masters in an active-passive setup, there are no significant differences compared to the hot standby solution outlined earlier. However, in contrast to the other dual-masters solutions outlined earlier, it is possible to have an active-active setup (shown in Figure 5-6).
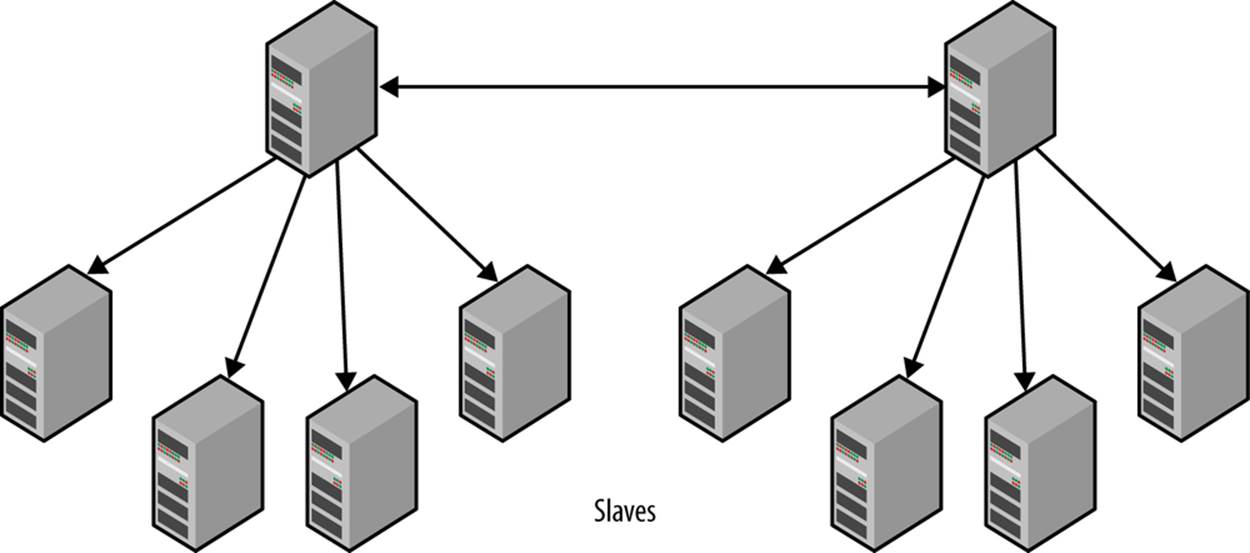
Figure 5-6. Bidirectional replication
Although controversial in some circles, an active-active setup does have its uses. A typical case is when there are two (or more) offices working with local information in the same database (e.g., sales data or employee data) and each office wants low response times when working with the database, while ensuring the data is available in both places. In this case, the data is naturally local to each office—each salesperson is normally working with his own sales and rarely, if ever, makes changes to another salesperson’s data.
Use the following steps to set up bidirectional replication:
1. Ensure both servers have different server IDs.
2. Ensure both servers have the same data (and that no changes are made to either system until replication has been activated).
3. Create a replication user and prepare replication (using the information in Chapter 1) on both servers.
4. Start replication on both servers.
WARNING
When using bidirectional replication, be forewarned that replication includes no concept of conflict resolution. If both servers update the same piece of data, you will have a conflict that may or may not be noticed. If you are lucky, replication will stop at the offending statement, but you shouldn’t count on it. If you intend to have a high availability system, you should ensure, at the application level, that two servers do not try to update the same data.
Even if data is naturally partitioned—as in the example given previously with two offices in separate locations—it is critical to put provisions in place to ensure data is not accidentally updated at the wrong server.
In this case, the application has to connect to the server responsible for the employee and update the information there, not just update the information locally and hope for the best.
If you want to connect slaves to either of the servers, you have to ensure the log-slave-updates option is enabled. The other master is also connected as a slave, so an obvious question is this: what happens to events that the server sends out when they return to the server?
When replication is running, the server ID of the server that created the event is attached to each event. This server ID is then propagated further when the slave writes the event to its binary log. When a server sees an event with the same server ID as its own server ID, that event is simply skipped and replication proceeds with the next event.
Sometimes, you want to process the event anyway. This might be the case if you have removed the old server and created a new one with the same server ID and you are in the process of performing a PITR. In those cases, it is possible to disable this checking using the replicate-same-server-id configuration variable. However, to prevent you from shooting yourself in the foot, you cannot set this option at the same time that log-slave-updates is set. Otherwise, it would be possible to send events in a circle and quickly thrash all the servers. To prevent that from happening, MySQL prevents events from being forwarded if replicate-same-server-id is set.
When using an active-active setup, there is a need to handle conflicts in a safe way, and by far the easiest way—and indeed the only recommended way to handle an active-active setup—is to ensure the different active servers write to different areas.
One possible solution is to assign different databases—or different tables—to different masters. Example 5-2 shows a setup that uses two different tables, each updated by different masters. To make it easy to view the split data, a view is created that combines the two tables.
Example 5-2. Different tables for different offices
CREATETABLE Employee_Sweden (
uid INT AUTO_INCREMENT PRIMARYKEY,
name VARCHAR(20)
);
CREATETABLE Employee_USA (
uid INT AUTO_INCREMENT PRIMARYKEY,
name VARCHAR(20)
);
-- This view is used when reading from the two tables simultaneously.
CREATE VIEW Employee AS
SELECT 'SWE', uid, name FROM Employee_Sweden
UNION
SELECT 'USA', uid, name FROM Employee_USA;
This approach is best to use if the split is natural in that, for example, different offices have different tables for their local data and the data only needs to be combined for reporting purposes. This might seem easy enough, but the following issues can complicate usage and administration of the tables:
Reads and writes to different tables
Because of the way the view is defined, you cannot update it. Writes have to be directed at the real tables, while reads can either use the view or read directly from the tables.
It might therefore be necessary to introduce application logic to handle the split into reads and writes that go to different tables.
Accurate and current data
Because the two tables are managed by different sites, simultaneous updates to the two tables will cause the system to temporarily enter a state where both servers have information that is not available on the other server. If a snapshot of the information is taken at this time, it will not be accurate.
If accurate information is required, generate methods for ensuring the information is accurate. Because such methods are highly application-dependent, they will not be covered here.
Optimization of views
When using views, two techniques are available to construct a result set. In the first method—called MERGE—the view is expanded in place, optimized, and executed as if it were a SELECT query. In the second method—called TEMPTABLE—a temporary table is constructed and populated with the data.
If the server uses a TEMPTABLE view, it performs very poorly, whereas the MERGE view is close to the corresponding SELECT. MySQL uses TEMPTABLE whenever the view definition does not have a simple one-to-one mapping between the rows of the view and the rows of the underlying table—for example, if the view definition contains UNION, GROUP BY, subqueries, or aggregate functions—so careful design of the views is paramount for getting good performance.
In either case, you have to consider the implications of using a view for reporting, as it might affect performance.
If each server is assigned separate tables, there will be no risk of conflict at all, given that updates are completely separated. However, if all the sites have to update the same tables, you will have to use some other scheme.
The MySQL server has special support for handling this situation in the form of two server variables:
auto_increment_offset
This variable controls the starting value for any AUTO_INCREMENT column in a table (i.e., the value that the first row inserted into the table gets for the AUTO_INCREMENT column). For subsequent rows, the value is calculated using auto_increment_increment.
auto_increment_increment
This is the increment used to compute the next value of an AUTO_INCREMENT column.
NOTE
There are session and global versions of these two variables and they affect all tables on the server, not just the tables created. Whenever a new row is inserted into a table with an AUTO_INCREMENT column, the next value available in this sequence is used:
valueN = auto_increment_offset + N*auto_increment_increment
You should notice that the next value is not computed by adding the auto_increment_increment to the last value in the table.
Building on the previous example, auto_increment_increment to ensure new rows added to a table are assigned numbers from different sequences of numbers depending on which server is used. The idea is that the first server uses the sequence 1, 3, 5… (odd numbers), while the second server uses the sequence 2, 4, 6… (even numbers).
Continuing with Example 5-2, Example 5-3 uses these two variables to ensure the two servers use different IDs when inserting new employees into the Employee table.
Example 5-3. Two servers writing to the same table
-- The common table can be created on either server
CREATETABLE Employee (
uid INT AUTO_INCREMENT PRIMARYKEY,
name VARCHAR(20),
office VARCHAR(20)
);
-- Setting for first master
SET GLOBAL AUTO_INCREMENT_INCREMENT = 2;
SET GLOBAL AUTO_INCREMENT_OFFSET = 1;
-- Setting for second master
SET GLOBAL AUTO_INCREMENT_INCREMENT = 2;
SET GLOBAL AUTO_INCREMENT_OFFSET = 2;
This scheme handles the insertion of new items in the tables, but when entries are being updated, it is still critical to ensure the update statements are sent to the correct server (i.e., the server responsible for the employee). Otherwise, data is likely to be inconsistent. If updates are not done correctly, the slaves will normally not stop—they will just replicate the information, which leads to inconsistent values on the two servers.
For example, if the first master executes the statement:
master-1> UPDATE Employee SET office = 'Vancouver' WHERE uid = 3;
Query OK, 1 rows affected (0.00 sec)
and at the same time, the same row is updated at the second server using the statement:
master-2> UPDATE Employee SET office = 'Paris' WHERE uid = 3;
Query OK, 1 rows affected (0.00 sec)
the result will be that the first master will place the employee in Paris while the second master will place the employee in Vancouver (note that the order will be swapped because each server will update the other server’s statement after its own).
Detecting and preventing such inconsistencies is important because they will cascade and create more inconsistency over time. Statement-based replication executes statements based on the data in the two servers, so one inconsistency can lead to others.
If you take care to separate the changes made by the two servers as outlined previously, the row changes will be replicated and the two masters will therefore be consistent.
If users use different tables on the different servers, the easiest way to prevent such mistakes is to assign privileges so that a user cannot accidentally change tables on the wrong server. This is, however, not always possible and cannot prevent the case just shown.
Slave Promotion
The procedures described so far work well when you have a master running that you can use to synchronize the standby and the slave before the switchover, but what happens when the master dies all of a sudden? Because replication has stopped in its tracks with all slaves (including the standby), there is no way to know what is on each slave. If the standby is ahead of all the slaves that need to be reassigned, there is no problem, because you can run replication on each slave to the place where the standby stopped. You will lose any changes that were made on the master but not yet sent to the standby. We will cover how to handle the recovery of the master in this case separately.
If the standby is behind one of the slaves, you shouldn’t use the standby as the new master, because the slave knows more than the standby. As a matter of fact, it would be better if the slave that has replicated most events from the common master (which is now “more knowledgeable”) were the master instead!
This is exactly the approach taken to handle master failures using slave promotion: instead of trying to keep a dedicated standby around (which then might not be the best candidate), ensure that any one of the slaves connected to the master can be promoted to master and take over at the point where the master was lost. By selecting the “most knowledgeable” slave as the new master, you guarantee that none of the other slaves will be more knowledgeable than the new master, so they can connect to the new master and read events from it.
There is, however, a critical issue that needs to be resolved: osynchronizing all slaves with the new master so that no events are lost or repeated. The problem in this situation is that all of the slaves need to read events from the new master.
The traditional method for promoting a slave
Before delving into the final solution, let us first take a look at the traditionally recommended way for handling slave promotion. This will work as a good introduction to the problem.
Figure 5-7 shows a typical setup with a master and several slaves.
For the traditional method of slave promotion, the following are required:
§ Each promotable slave must have a user account for the replication user.
§ Each promotable slave should run with log-bin with the binary log enabled.
§ Each promotable slave should run without the log-slave-updates option (the reason will become obvious shortly).
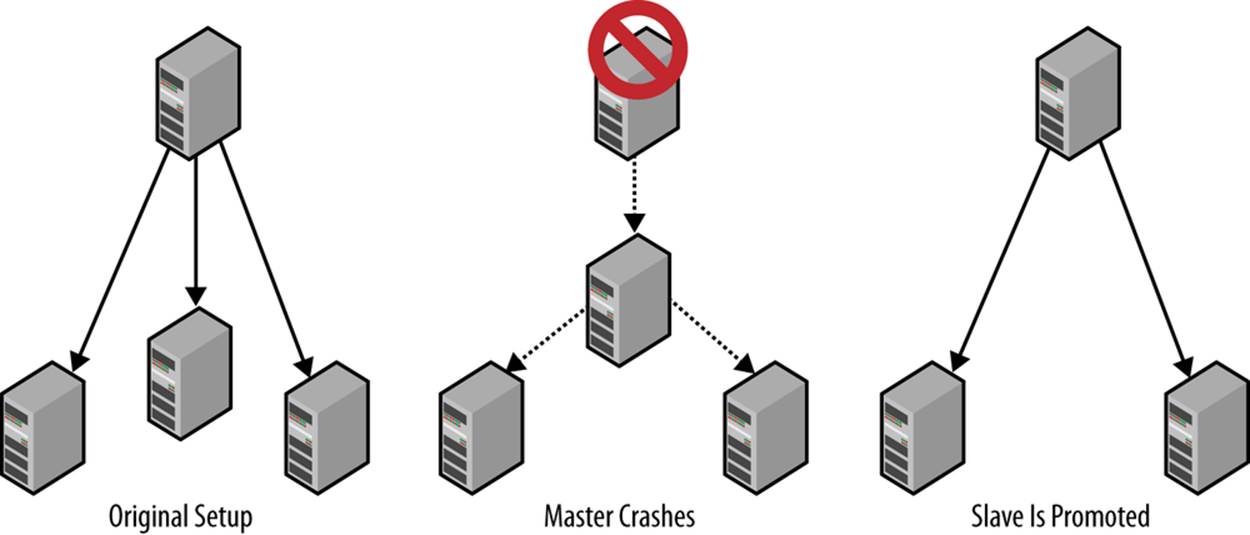
Figure 5-7. Promoting a slave to replace a failed master
Assume you are starting with the original setup shown in Figure 5-7 and that the master fails. You can promote a slave to be the new master by doing the following:
1. Stop the slave using STOP SLAVE.
2. Reset the slave that is going to be the new master using RESET MASTER. This will ensure the slave starts as the new master and that any connecting slave will start reading events from the time the slave was promoted.
3. Connect the other slaves to the new master using CHANGE MASTER. Because you reset the new master, you can start replication from the beginning of the binary log, so it is not necessary to provide any position to CHANGE MASTER.
Unfortunately, this approach is based on an assumption that is not generally true—that the slaves have received all changes that the master has made. In a typical setup, the slaves will lag behind the master to various degrees. It might be just a few transactions, but nevertheless, they lag behind. This means that each slave needs to fetch the missing transactions somehow, and if none of the other slaves have a binary log enabled, there is no way to provide these changes to the slaves. The situation can be handled by figuring out what slave has seen most of the master’s changes (the most knowlegeable slave) and then synchronize all the other slaves with the most knowledgeable slave by either copying the entire database, or using something like the mysqldbcompare to get the changes to the slaves.
Regardless of that, this approach is so simple that it is useful if you can handle lost transactions or if you are operating under a low load.
A revised method for promoting a slave
The traditional approach to promoting a slave is inadequate in most cases because slaves usually lag behind the master. Figure 5-8 illustrates the typical situation when the master disappears unexpectedly. The box labeled “binary log” in the center is the master’s binary log and each arrow represents how much of the binary log the slave has executed.
Figure 5-8. Binary log positions of the master and the connected slaves
In the figure, each slave has stopped at a different binlog position, and even the most knowledgeable slave has not got all the transactions from the now defunct master. The transactions that have not been replicated to the new master are lost forever (it will become clear why in Consistency in a Hierarchical Deployment), and the transactions missing from the lagging slaves have to be transferred from the most knowledgeable slave. The situation is resolved by promoting one slave (the most knowledgeable one) to be the new master and then synchronizing the other slaves to it. InExample 5-4, you can find code to order the slaves based on their master positions. This works if the slaves are connected to the same master, which means that the coordinates are comparable.
Example 5-4. Python code to find the best slave
frommysql.replicant.commandsimport (
fetch_slave_position,
)
def fetch_gtid_executed(server):
server.connect()
result = server.sql(
"SELECT server_id, trans_id FROM Last_Exec_Trans"
)
server.disconnect()
return result
def order_slaves_on_position(slaves):
entries = []
for slave inslaves:
pos = fetch_slave_position(slave)
gtid = fetch_gtid_executed(slave)
entries.append((pos, gtid, slave))
entries.sort(key=lambda x: x[0])
return [ entry[1:2] for entry inentries ]
NOTE
With the introduction of native support for GTIDs in MySQL version 5.6, this problem was eliminated. A complete description of GTIDs can be found in Global Transaction Identifiers.
The critical problem lies in translating the positions for each slave (which are the positions in the now-defunct master) to positions on the promoted slave. In versions prior to 5.6, the history of events executed and the binlog positions they correspond to on the slaves are lost in the replication process. Each time the slave executes an event that has arrived from the master, it writes a new event to its binary log, with a new binary log position. The slave’s position has no relation to the master’s binlog position of the same event. The only option that remains is to implement an alternative version of GTIDs and scan the binary log of the promoted slave. The alternative implementation of GTIDs is described in Appendix B. You can see a Python implementation of slave promotion in Example 5-5.
Example 5-5. Slave promotion in Python
def promote_best_slave(slaves):
entries = order_slaves_on_position(slaves) ![]()
_, master = entries.pop() ![]()
for gtid, slave inentries:
pos_on_master = find_position_from_gtid(master, gtid) ![]()
switch_to_master(master, slave, pos_on_master) ![]()
![]()
Here the positions of each slave are fetched using the function introduced in Appendix B, which uses SHOW SLAVE STATUS to fetch the position of the last executed event.
![]()
Pick the slave with the highest position to promote to master. If there are several that have the highest position, pick either one.
![]()
This will connect to the promoted slave and scan the binary log to find the GTID of the last executed transaction for each slave. This step will give you a binlog position on the promoted slave for each GTID that you collected.
![]()
Reconnect each slave to the promoted slave, starting at the position retrieved from the new master’s binary log.
Circular Replication
After reading about dual masters, you might wonder whether it is possible to set up a multimaster with more than two masters replicating to each other. Because each slave can only have a single master, it is possible to get this configuration only by setting up replication in a circular fashion.
Before MySQL 5.6, this this was not a recommended setup, but it is certainly possible. With the introduction of global transaction IDs in MySQL 5.6, many of the reasons for rejecting circular replication are no longer valid, because the main problem is to get it to work correctly in the presence of failure.
Using a circular replication setup with three or more servers can be quite practical for reasons of locality. As a real-life example, consider the case of a mobile phone operator with subscribers all over Europe. Because mobile phone users travel around quite a lot, it is convenient to have the registry for the customers close to the actual phone, so by placing the data centers at some strategic places in Europe, it is possible to quickly verify call data and also register new calls locally. The changes can then be replicated to all the servers in the ring, and eventually all servers will have accurate billing information. In this case, circular replication is a perfect setup: all subscriber data is replicated to all sites, and updates of data are allowed in all data centers.
Setting up circular replication (as shown in Figure 5-9) is quite easy. Example 5-6 provides a script that sets up circular replication automatically, so where are the complications? As in every setup, you should ask yourself, “What happens when something goes wrong?”
Example 5-6. Setting up circular replication
def circular_replication(server_list):
frommysql.replicant.commandsimport change_master
for source, target inzip(server_list, server_list[1:] + [server_list[0]]):
change_master(target, source)
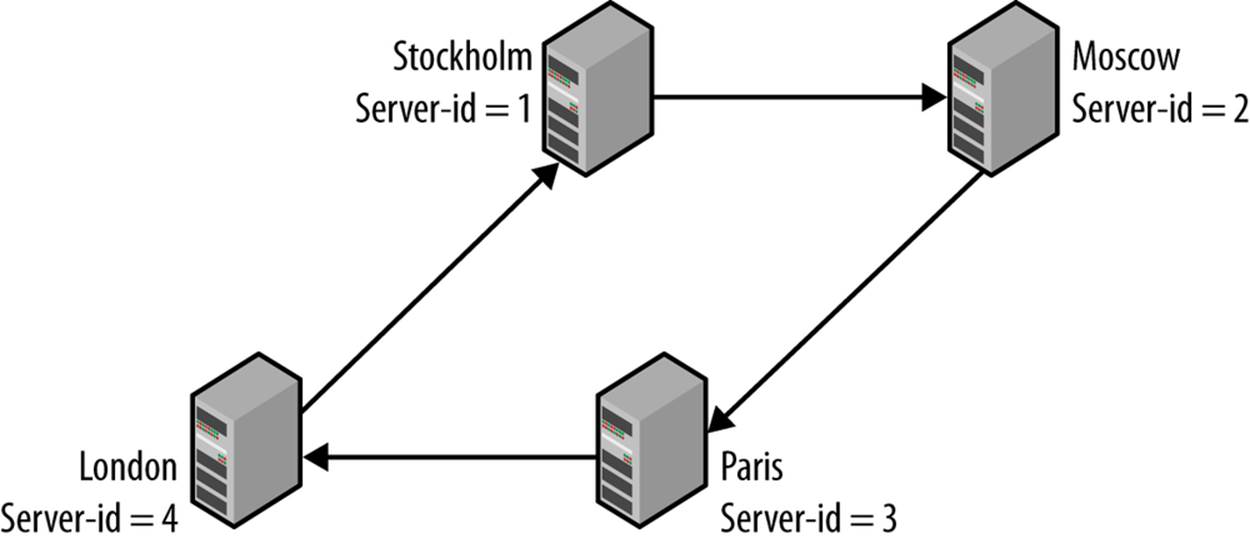
Figure 5-9. Circular replication setup
In Figure 5-9, there are four servers named for the cities in which they are located (the names are arbitrarily picked and do not reflect a real setup). Replication goes in a circle: Stockholm to Moscow to Paris to London and back to Stockholm. This means that Moscow is upstream of Paris, but downstream of Stockholm. Suppose that Moscow goes down suddenly and unexpectedly. To allow replication to continue, it is necessary to reconnect the “downstream” server Paris to the “upstream” server Stockholm to ensure the continuing operation of the system.
Figure 5-10 shows a scenario in which a single server fails and the servers reconnect to allow replication to continue. Sounds simple enough, doesn’t it? Well, it’s not really as simple as it looks. There are basically three potential problems:
§ The downstream server—the server that was slave to the failed master—needs to connect to the upstream server and start replication from what it last saw. How is that position decided?
§ Suppose that the crashed server has managed to send out some events before crashing. What happens with those events?
§ We need to consider how we should bring the failed server into the topology again. What if the server applied some transactions of its own that were written to the binary log but not yet sent out? It is clear that these transactions are lost, so we need to handle this.
As you will see, all of these issues are easy to solve with the global transaction identifiers introduced in MySQL 5.6. When detecting that one of the servers failed, just use the CHANGE MASTER command to connect the downstream server to the upstream server using theMASTER_AUTO_POSITION=1 option:
paris> CHANGE MASTER TO
-> MASTER_HOST='stockholm.example.com',
-> MASTER_AUTO_POSITION = 1;
Because each server remembers what transactions were seen, any transactions that was sent out by the failing server will be applied to each remaining server in the ring exactly once. This means that it automatically handles the second and third issues from our list.
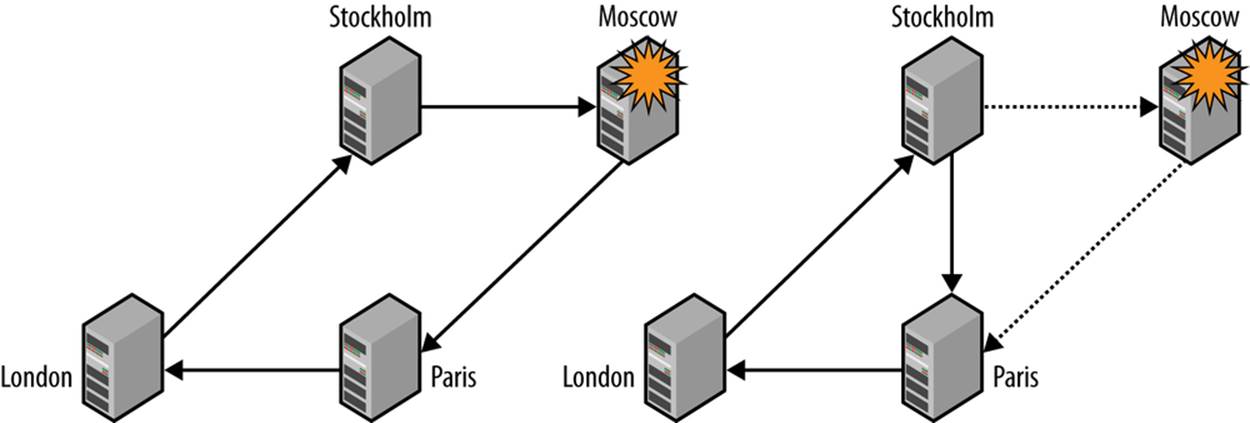
Figure 5-10. Changing topology in response to a failing server
Because the failed server can be in an alternative future (see Figure 6-8) compared to the other servers, bringing the server back in the ring will cause the missing transaction to “suddenly appear” (from the perspective of the application using the database), and this might not be what you want. The safest way to bring it into the circle again is to restore the server from one of the servers in the ring and reconnect the circle so that the new server is in the ring again.
Conclusion
High availability is a nontrivial concept to implement in practice. In this chapter, we presented a look into high availability and how you can achieve it with MySQL. In the next chapter, we will look more at high availability as we examine a companion topic: scaling out.
Joel’s email notification chime sounded. He clicked on his email and opened the latest message. It was from Mr. Summerson, who made comments about his report. He read it through and at the bottom found what he expected. It read, “I like the redundancy ideas and especially the hot standby strategy. Make this happen.”
Joel sighed as he realized his plans for getting to know some of his coworkers were going to have to wait. He had a lot of work to do.
All materials on the site are licensed Creative Commons Attribution-Sharealike 3.0 Unported CC BY-SA 3.0 & GNU Free Documentation License (GFDL)
If you are the copyright holder of any material contained on our site and intend to remove it, please contact our site administrator for approval.
© 2016-2026 All site design rights belong to S.Y.A.