High Performance MySQL (2012)
Chapter 8. Optimizing Server Settings
In this chapter, we’ll explain a process by which you can create a good configuration file for your MySQL server. It is a roundabout trip, with many points of interest and side trips to scenic overlooks. These are necessary, because determining the shortest path to a good configuration doesn’t start with studying configuration options and asking which ones you should set or how you should change them, nor does it start with examining server behavior and asking whether any configuration options can improve it. It’s best to begin with an understanding of MySQL’s internals and behavior. You can then use that knowledge as a guide for how MySQL should be configured. Finally, you can compare the desired configuration to the current configuration and correct any differences that are important and worthwhile.
People often ask, “What’s the optimal configuration file for my server with 32 GB of RAM and 12 CPU cores?” Unfortunately, it’s not that simple. The server should be configured for the workload, data, and application requirements, not just the hardware. MySQL has scores of settings that you can change—but you shouldn’t. It’s usually better to configure the basic settings correctly (and there are only a few that really matter in most cases) and spend more time on schema optimization, indexes, and query design. After you’ve set MySQL’s basic configuration options correctly, the potential gains from further changes are usually small.
On the other hand, the potential downside of fiddling with the configuration can be great. We’ve seen more than one “highly tuned” server that was crashing constantly, stalling, or performing slowly due to unwise settings. We’ll spend a bit of time on why that can happen and what not to do.
So what should you do? Make sure the basics such as the InnoDB buffer pool and log file size are appropriate, set a few safety and sanity options if you wish to prevent bad behavior (but note that these usually won’t improve performance—they’ll only avoid problems), and then leave the rest of the settings alone. If you begin to experience a problem, diagnose it carefully with the techniques shown in Chapter 3. If the problem is caused by a part of the server whose behavior can be corrected with a configuration option, then you might need to change it.
Sometimes you might also need to set specific configuration options that can have a significant performance impact in special cases. However, these should not be part of a basic server configuration file. You should set them only when you find the specific performance problems they address. That’s why we don’t suggest that you approach configuration options by looking for bad things to improve. If something needs to be improved, it should show up in query response times. It’s best to start your search with queries and their response times, not with configuration options. This could save you a lot of time and prevent many problems.
Another good way to save time and trouble is to use the defaults unless you know you shouldn’t. There is safety in numbers, and a lot of people are running with default settings. That makes them the most thoroughly tested settings. Unexpected bugs can arise when you change things needlessly.
How MySQL’s Configuration Works
We’ll begin by explaining MySQL’s configuration mechanisms, before covering what you should configure in MySQL. MySQL is generally pretty forgiving about its configuration, but following these suggestions might save you a lot of work and time.
The first thing to know is where MySQL gets configuration information: from command-line arguments and settings in its configuration file. On Unix-like systems, the configuration file is typically located at /etc/my.cnf or /etc/mysql/my.cnf. If you use your operating system’s startup scripts, this is typically the only place you’ll specify configuration settings. If you start MySQL manually, which you might do when you’re running a test installation, you can also specify settings on the command line. The server actually reads the contents of the configuration file, removes any comment lines and newlines, and then processes it together with the command-line options.
NOTE
A note on terminology: because many of MySQL’s command-line options correspond to server variables, we sometimes use the terms option and variable interchangeably. Most variables have the same names as their corresponding command-line options, but there are a few exceptions. For example, --memlock sets the locked_in_memory variable.
Any settings you decide to use permanently should go into the global configuration file, instead of being specified at the command line. Otherwise, you risk accidentally starting the server without them. It’s also a good idea to keep all of your configuration files in a single place so that you can inspect them easily.
Be sure you know where your server’s configuration file is located! We’ve seen people try unsuccessfully to configure a server with a file it doesn’t read, such as /etc/my.cnf on Debian servers, which look in /etc/mysql/my.cnf for their configuration. Sometimes there are files in several places, perhaps because a previous system administrator was confused as well. If you don’t know which files your server reads, you can ask it:
$ which mysqld
/usr/sbin/mysqld
$ /usr/sbin/mysqld --verbose --help | grep -A 1 'Default options'
Default options are read from the following files in the given order:
/etc/mysql/my.cnf ~/.my.cnf /usr/etc/my.cnf
This applies to typical installations, where there’s a single server on a host. You can design more complicated configurations, but there’s no standard way to do this. The MySQL server distribution used to include a now-deprecated program called mysqlmanager, which can run multiple instances from a single configuration with separate sections. (This was a replacement for the even older mysqld_multi script.) However, many operating system distributions don’t include or use this program in their startup scripts. In fact, many don’t use the MySQL-provided startup script at all.
The configuration file is divided into sections, each of which begins with a line that contains the section name in square brackets. A MySQL program will generally read the section that has the same name as that program, and many client programs also read the client section, which gives you a place to put common settings. The server usually reads the mysqld section. Be sure you place your settings in the correct section in the file, or they will have no effect.
Syntax, Scope, and Dynamism
Configuration settings are written in all lowercase, with words separated by underscores or dashes. The following are equivalent, and you might see both forms in command lines and configuration files:
/usr/sbin/mysqld --auto-increment-offset=5
/usr/sbin/mysqld --auto_increment_offset=5
We suggest that you pick a style and use it consistently. This makes it easier to search for settings in your files.
Configuration settings can have several scopes. Some settings are server-wide (global scope); others are different for each connection (session scope); and others are per-object. Many session-scoped variables have global equivalents, which you can think of as defaults. If you change the session-scoped variable, it affects only the connection from which you changed it, and the changes are lost when the connection closes. Here are some examples of the variety of behaviors of which you should be aware:
§ The query_cache_size variable is globally scoped.
§ The sort_buffer_size variable has a global default, but you can set it per-session as well.
§ The join_buffer_size variable has a global default and can be set per-session, but a single query that joins several tables can allocate one join buffer per join, so there might be several join buffers per query.
In addition to setting variables in the configuration files, you can also change many (but not all) of them while the server is running. MySQL refers to these as dynamic configuration variables. The following statements show different ways to change the session and global values ofsort_buffer_size dynamically:
SET sort_buffer_size = <value>;
SET GLOBAL sort_buffer_size = <value>;
SET @@sort_buffer_size := <value>;
SET @@session.sort_buffer_size := <value>;
SET @@global.sort_buffer_size := <value>;
If you set variables dynamically, be aware that those settings will be lost when MySQL shuts down. If you want to keep the settings, you’ll have to update your configuration file as well.
If you set a variable’s global value while the server is running, the values for the current session and any other existing sessions are not affected. This is because the session values are initialized from the global value when the connections are created. You should inspect the output of SHOW GLOBAL VARIABLES after each change to make sure it’s had the desired effect.
Variables use different kinds of units, and you have to know the correct unit for each variable. For example, the table_cache variable specifies the number of tables that can be cached, not the size of the table cache in bytes. The key_buffer_size is specified in bytes, whereas still other variables are specified in number of pages or other units, such as percentages.
Many variables can be specified with a suffix, such as 1M for one megabyte. However, this works only in the configuration file or as a command-line argument. When you use the SQL SET command, you must use the literal value 1048576, or an expression such as 1024 * 1024. You can’t use expressions in configuration files.
There is also a special value you can assign to variables with the SET command: the keyword DEFAULT. Assigning this value to a session-scoped variable sets that variable to the corresponding globally scoped variable’s value; assigning it to a globally scoped variable sets the variable to the compiled-in default (not the value specified in the configuration file). This is useful for resetting session-scoped variables back to the values they had when you opened the connection. We advise you not to use it for global variables, because it probably won’t do what you want—that is, it doesn’t set the values back to what they were when you started the server.
Side Effects of Setting Variables
Setting variables dynamically can have unexpected side effects, such as flushing dirty blocks from buffers. Be careful which settings you change online, because this can cause the server to do a lot of work.
Sometimes you can infer a variable’s behavior from its name. For example, max_heap_table_size does what it sounds like: it specifies the maximum size to which implicit in-memory temporary tables are allowed to grow. However, the naming conventions aren’t completely consistent, so you can’t always guess what a variable will do by looking at its name.
Let’s take a look at some commonly used variables and the effects of changing them dynamically:
key_buffer_size
Setting this variable allocates the designated amount of space for the key buffer (or key cache) all at once. However, the operating system doesn’t actually commit memory to it until it is used. Setting the key buffer size to one gigabyte, for example, doesn’t mean you’ve instantly caused the server to actually commit a gigabyte of memory to it. (We discuss how to watch the server’s memory usage in the next chapter.)
MySQL lets you create multiple key caches, as we explain later in this chapter. If you set this variable to 0 for a nondefault key cache, MySQL discards any indexes cached in the specified cache, begins to cache them in the default cache, and deletes the specified cache when nothing is using it anymore. Setting this variable for a nonexistent cache creates it. Setting the variable to a nonzero value for an existing cache will flush the specified cache’s memory. This blocks all operations that try to access the cache until the flush is finished.
table_cache_size
Setting this variable has no immediate effect—the effect is delayed until the next time a thread opens a table. When this happens, MySQL checks the variable’s value. If the value is larger than the number of tables in the cache, the thread can insert the newly opened table into the cache. If the value is smaller than the number of tables in the cache, MySQL deletes unused tables from the cache.
thread_cache_size
Setting this variable has no immediate effect—the effect is delayed until the next time a connection is closed. At that time, MySQL checks whether there is space in the cache to store the thread. If so, it caches the thread for future reuse by another connection. If not, it kills the thread instead of caching it. In this case, the number of threads in the cache, and hence the amount of memory the thread cache uses, does not immediately decrease; it decreases only when a new connection removes a thread from the cache to use it. (MySQL adds threads to the cache only when connections close and removes them from the cache only when new connections are created.)
query_cache_size
MySQL allocates and initializes the specified amount of memory for the query cache all at once when the server starts. If you update this variable (even if you set it to its current value), MySQL immediately deletes all cached queries, resizes the cache to the specified size, and reinitializes the cache’s memory. This can take a long time and stalls the server until it completes, because MySQL deletes all of the cached queries one by one, not instantaneously.
read_buffer_size
MySQL doesn’t allocate any memory for this buffer until a query needs it, but then it immediately allocates the entire chunk of memory specified here.
read_rnd_buffer_size
MySQL doesn’t allocate any memory for this buffer until a query needs it, and then it allocates only as much memory as needed. (The name max_read_rnd_buffer_size would describe this variable more accurately.)
sort_buffer_size
MySQL doesn’t allocate any memory for this buffer until a query needs to do a sort. However, when there’s a sort, MySQL allocates the entire chunk of memory immediately, whether the full size is required or not.
We explain what these variables do in more detail elsewhere, and this isn’t an exhaustive list. Our goal here is simply to show you what behavior to expect when you change a few common variables.
You should not raise the value of a per-connection setting globally unless you know it’s the right thing to do. Some buffers are allocated all at once, even if they’re not needed, so a large global setting can be a huge waste. Instead, you can raise the value when a query needs it.
The most common example of a variable that you should probably keep small and raise only for certain queries is sort_buffer_size, which controls how large the sort buffer should be for filesorts. MySQL performs some work to initialize the sort buffer after allocating it.
In addition, the sort buffer is allocated to its full size even for very small sorts, so if you make it much larger than the average sort requires, you’ll be wasting memory and adding allocation cost. This can be surprising to those readers who think of memory allocation as an inexpensive operation. Without digging into all of the technical details, it’s enough to say that memory allocation includes setting up the address space, which can be relatively expensive; in Linux in particular, memory allocation uses a couple of strategies with varying cost depending on the size.
In summary, a large sort buffer can be very expensive, so don’t increase its size unless you know it’s needed.
When you find a query that needs a larger sort buffer to perform well, you can raise the sort_buffer_size value just before the query and then restore it to DEFAULT afterward. Here’s an example of how to do this:
SET @@session.sort_buffer_size := <value>;
-- Execute the query...
SET @@session.sort_buffer_size := DEFAULT;
Wrapper functions can be handy for this type of code. Other variables you might set on a per-connection basis are read_buffer_size, read_rnd_buffer_size, tmp_table_size, and myisam_sort_buffer_size (if you’re repairing tables).
If you need to save and restore a possibly customized value, you can do something like the following:
SET @saved_<unique_variable_name> := @@session.sort_buffer_size;
SET @@session.sort_buffer_size := <value>;
-- Execute the query...
SET @@session.sort_buffer_size := @saved_<unique_variable_name>;
NOTE
The sort buffer size is one of the settings that is the focus of far too much “tuning.” Some people seem to have the idea that bigger is better, and we’ve even seen servers with this variable set to 1 GB. Perhaps not surprisingly, this can cause the server to try to allocate too much memory and crash, or simply to burn a lot of CPU time when initializing the sort buffer for a query; see MySQL bug 37359 for more on this.
Don’t assign too much importance to the sort buffer size. Do you really need your queries to allocate 128 MB of memory to sort 10 rows and return them to the client? Think about what kinds of sorting your queries are doing, and how much, and try to avoid them with proper indexing and query design (see Chapter 5 and Chapter 6) rather than trying to make the sorting operation itself faster. And you should definitely profile your queries to see whether sorting is where you should focus your attention anyway; see Chapter 3 for an example of a query that performs a sort but doesn’t spend much of its time sorting.
Getting Started
Be careful when setting variables. More is not always better, and if you set the values too high, you can easily cause problems: you might run out of memory, causing your server to swap, or run out of address space.[109]
You should always have a monitoring system in place to measure whether a change improves or hurts your server’s overall performance in real life. Benchmarks aren’t enough, because they’re not real. If you don’t measure your server’s actual performance, you might hurt performance without knowing it. We’ve seen many cases where someone changed a server’s configuration and thought it improved performance, when in fact the server’s performance worsened overall because of a different workload at a different time of day or day of the week.
If you take notes, perhaps with comments in the configuration file, you might save yourself (and your colleagues) a lot of work. An even better idea is to place your configuration file under version control. This is a good practice anyway, because it lets you undo changes. To reduce the complexity of managing many configuration files, simply create a symbolic link from the configuration file to a central version control repository.
Before you start changing your configuration, you should optimize your queries and your schema, addressing at least the obvious things such as adding indexes. If you get deep into tweaking the configuration and then change your queries or schema, you might need to reevaluate the configuration. Keep in mind that unless your hardware, workload, and data are completely static, chances are you’ll need to revisit your configuration later. And in fact, most people’s servers don’t even have a steady workload throughout the day—meaning that the “perfect” configuration for the middle of the morning is not right for midafternoon! Obviously, chasing the mythical “perfect” configuration is completely impractical. Thus, you don’t need to squeeze every last ounce of performance out of your server; in fact, the return for such an investment of time will probably be very small. We suggest that you stop at “good enough,” unless you have reason to believe you’re forgoing a significant performance improvement.
Iterative Optimization by Benchmarking
You might be expected (or believe that you’re expected) to set up a benchmark suite and “tune” your server by changing its configuration iteratively in search of optimal settings. This usually is not something we advise most people to do. It requires so much work and research, and the potential payoff is so small in most cases, that it can be a huge waste of time. You are probably better off spending that time on other things such as checking your backups, monitoring changes in query plans, and so on.
It’s also very hard to know what side effects your changes might have over the long run. If you change an option and it appears to improve your benchmark, but your benchmark doesn’t measure everything that’s important, or you don’t run it long enough to detect changes in the system’s long-term steady-state behavior, you might cause problems such as periodic server stalls or sporadic slow queries. These can be difficult to detect.
We do sometimes run sets of benchmarks to examine or stress particular parts of the server so we can understand their behavior better. A good example is the many benchmarks we’ve run over the years to understand InnoDB’s flushing behavior, in our quest to develop better flushing algorithms for various workloads and types of hardware. It often happens that we benchmark extensively with different settings to understand their effects and how to optimize them. But this is not a small undertaking—it can take many days or weeks—and it is also not beneficial for most people to do, because such tunnel vision about a specific part of the server often obscures other concerns. For example, sometimes we find that specific combinations of settings enable better performance in edge cases, but the configuration options are not really practical for production usage, due to factors such as wasting a huge amount of memory or optimizing for throughput while ignoring the impact on crash recovery altogether.
If you must do this, we suggest that you develop a custom benchmark suite before you begin configuring your server. You need something that represents your overall workload and includes edge cases such as very large and complex queries. Replaying your actual workload against your actual data is usually a good approach. If you have identified a particular problem spot—such as a single query that runs slowly—you can also try to optimize for that case, but you risk impacting other queries negatively without knowing it.
The best way to proceed is to change one or two variables, a little at a time, and run the benchmarks after each change, being sure to run them long enough to observe the steady-state behavior. Sometimes the results will surprise you; you might increase a variable a little and see an improvement, then increase it a little more and see a sharp drop in performance. If performance suffers after a change, you might be asking for too much of some resource, such as too much memory for a buffer that’s frequently allocated and deallocated. You might also have created a mismatch between MySQL and your operating system or hardware. For example, we’ve found that the optimal sort_buffer_size might be affected by how the CPU cache works, and the read_buffer_size needs to be matched to the server’s read-ahead and general I/O subsystem configuration. Larger is not always better, and can be much worse. Some variables are also dependent on others, which is something you learn with experience and by understanding the system’s architecture.
WHEN BENCHMARKING IS GOOD
There are exceptions to our advice not to benchmark. We sometimes do advise people to run some iterative benchmarks, although usually in a different context than “server tuning.” Here are some examples:
§ If you’re approaching a large investment, such as purchasing a number of new servers, you can run benchmarks to understand your hardware needs. (The context here is capacity planning, not server tuning.) In particular, we like to run benchmarks with different amounts of memory allocated to the InnoDB buffer pool, which helps us draw a “memory curve” that shows how much memory is really needed and how it impacts the demands on the storage systems.
§ If you want to understand how long it will take InnoDB to recover from a crash, you can repeatedly set up a replica, crash it intentionally, and “benchmark” how long InnoDB takes to recover after restarting. The context here is for high availability planning.
§ For read-mostly applications, it can be a great idea to capture all queries with the slow query log (or from TCP traffic with pt-query-digest), use pt-log-player to replay it against the server with full slow query logging enabled, and then analyze the resulting log with pt-query-digest. This lets you see how various types of queries perform with different hardware, software, and server settings. For example, we once helped a customer assess the performance changes of a migration to a server with much more memory, but with slower hard drives. Most queries became faster, but some analytical queries slowed down because they remained I/O-bound. The context of this exercise was workload comparison.
[109] A common mistake we’ve seen is to set up a server with twice as much memory as your existing server, and—using the old server’s configuration as a baseline—create the new server’s configuration by multiplying everything by two. This doesn’t work.
What Not to Do
Before we get started with server configuration, we want to encourage you to avoid a few common practices that we’ve found to be risky or harmful. Warning: rants ahead!
First, you should not “tune by ratio.” The classic “tuning ratio” is the rule of thumb that your key cache hit ratio should be higher than some percentage, and you should increase the cache size if the hit rate is too low. This is very wrong advice. Regardless of what anyone tells you, the cache hit ratio has nothing to do with whether the cache is too large or too small. To begin with, the hit ratio depends on the workload—some workloads simply aren’t cacheable no matter how big the cache is—and secondly, cache hits are meaningless, for reasons we’ll explain later. It sometimes happens that when the cache is too small, the hit rate is low, and increasing the cache size increases the hit rate. However, this is an accidental correlation and does not indicate anything about performance or proper sizing of the cache.
The problem with correlations that sometimes appear to be true is that people begin to believe they will always be true. Oracle DBAs abandoned ratio-based tuning years ago, and we wish MySQL DBAs would follow their lead.[110] We wish even more fervently that people wouldn’t write “tuning scripts” that codify these dangerous practices and teach them to thousands of people. This leads to our second suggestion of what not to do: don’t use tuning scripts! There are several very popular ones that you can find on the Internet. It’s probably best to ignore them.[111]
We also suggest that you avoid the word “tuning,” which we’ve used liberally in the past few paragraphs. We favor “configuration” or “optimization” instead (as long as that’s what you’re actually doing; see Chapter 3). The word “tuning” conjures up images of an undisciplined novice who tweaks the server and sees what happens. We suggested in the previous section that this practice is best left to those who are researching server internals. “Tuning” your server can be a stunning waste of time.
On a related topic, searching the Internet for configuration advice is not always a great idea. You can find a lot of bad advice in blogs, forums, and so on.[112] Although many experts contribute what they know online, it is not always easy to tell who is qualified. We can’t give unbiased recommendations about where to find real experts, of course. But we can say that the credible, reputable MySQL service providers are a safer bet in general than what a simple Internet search turns up, because people who have happy customers are probably doing something right. Even their advice, however, can be dangerous to apply without testing and understanding, because it might have been directed at a situation that differed from yours in a way you don’t understand.
Finally, don’t believe the popular memory consumption formula—yes, the very one that MySQL itself prints out when it crashes. (We won’t repeat it here.) This formula is from an ancient time. It is not a reliable or even useful way to understand how much memory MySQL can use in the worst case. You might see some variations on this formula on the Internet, too. These are similarly flawed, even though they add in more factors that the original formula doesn’t have. The truth is that you can’t put an upper bound on MySQL’s memory consumption. It is not a tightly regulated database server that controls memory allocation. You can prove that very simply by logging into the server and running a number of queries that consume a lot of memory:
mysql> SET @crash_me_1 := REPEAT('a', @@max_allowed_packet);
mysql> SET @crash_me_2 := REPEAT('a', @@max_allowed_packet);
# ... run a lot of these ...
mysql> SET @crash_me_1000000 := REPEAT('a', @@max_allowed_packet);
Run that in a loop, creating new variables each time, and you’ll eventually run the server out of memory and crash it! And it requires no privileges to execute.
The points we’ve tried to illustrate in this section have sometimes made us unpopular with people who perceive us as arrogant, think that we’re trying to discredit others and set ourselves up as the sole authority, or feel that we’re trying to promote our services. It is not our intention to be self-serving. We have simply seen so much bad advice that appears legitimate if you are not experienced enough to know better, and helped clean up the wreckage so many times, that we think it is important to debunk a few myths and warn our readers to be careful whose expertise they trust. We’ll try to avoid ranting from here on.
[110] If you are not convinced that “tuning by ratio” is bad, please read Optimizing Oracle Performance by Cary Millsap (O’Reilly). He even devotes an appendix to the topic, with a tool that can artificially generate any cache hit ratio you wish, no matter how badly your system is performing! Of course, it’s all for the purpose of illustrating how useless the ratio is.
[111] An exception: we maintain a (good) free online configuration tool at http://tools.percona.com. Yes, we’re biased.
[112] Q: How is query formed? A: They need to do way instain DBAs who kill thier querys, becuse these querys cant frigth back?
Creating a MySQL Configuration File
As we mentioned at the beginning of this chapter, we don’t have a one-size-fits-all “best configuration file” for, say, a 4-CPU server with 16 GB of memory and 12 hard drives. You really do need to develop your own configurations, because even a good starting point will vary widely depending on how you’re using the server.
MySQL’s compiled-in default settings aren’t all great, although most of them are fine. They are designed not to use a lot of resources, because MySQL is intended to be very versatile, and it does not assume it is the only thing running on the server on which it is installed. By default, MySQL uses just enough resources to start and run simple queries with a little bit of data. You’ll certainly need to customize it if you have more than a few megabytes of data.
You can start with one of the sample configuration files included with the MySQL server distribution, but they have their own problems. For example, they have a lot of commented-out settings that might tempt you to think that you should choose values and uncomment them (it’s a bit reminiscent of an Apache configuration file). And they have a lot of prose comments that explain the options, but these explanations are not always well-balanced, complete, or even correct. Some of the options don’t even apply to popular operating systems at all! Finally, the samples are perpetually out of date for modern hardware and workloads.
MySQL experts have had many conversations about how to fix these problems over the years, but the issues remain. Here’s our suggestion: don’t use those files as a starting point, and don’t use the samples that ship with your operating system’s packages either. It’s better to start from scratch.
That’s what we’ll do in this chapter. It’s actually a weakness that MySQL is so configurable, because it makes it seem as though you should spend a lot of time on configuration, when in fact most things are fine at their defaults, and you are often better off setting and forgetting. That’s why we’ve created a sane minimal sample configuration file for this book, which you can use as a good starting point for your own servers. You must choose values for a few of the settings; we’ll explain those later in this chapter. Our base file looks like this:
[mysqld]
# GENERAL
datadir = /var/lib/mysql
socket = /var/lib/mysql/mysql.sock
pid_file = /var/lib/mysql/mysql.pid
user = mysql
port = 3306
storage_engine = InnoDB
# INNODB
innodb_buffer_pool_size = <value>
innodb_log_file_size = <value>
innodb_file_per_table = 1
innodb_flush_method = O_DIRECT
# MyISAM
key_buffer_size = <value>
# LOGGING
log_error = /var/lib/mysql/mysql-error.log
log_slow_queries = /var/lib/mysql/mysql-slow.log
# OTHER
tmp_table_size = 32M
max_heap_table_size = 32M
query_cache_type = 0
query_cache_size = 0
max_connections = <value>
thread_cache_size = <value>
table_cache_size = <value>
open_files_limit = 65535
[client]
socket = /var/lib/mysql/mysql.sock
port = 3306
This might seem too minimal in comparison to what you’re used to seeing,[113] but it’s actually more than many people need. There are a few other types of configuration options that you are likely to use as well, such as binary logging; we’ll cover those later in this and other chapters.
The first thing we configured is the location of the data. We chose /var/lib/mysql for this, because it’s a popular location on many Unix variants. There is nothing wrong with choosing another location; you decide. We’ve put the PID file into the same location, but many operating systems will want to place it in /var/run instead. That’s fine, too. We simply needed to have something configured for these settings. By the way, don’t let the socket and PID file be located according to the server’s compiled-in defaults; there are some bugs in various MySQL versions that can cause problems with this. It’s best to set these locations explicitly. (We’re not advising you to choose different locations; we’re just advising you to make sure the my.cnf file mentions those locations explicitly, so they won’t change and break things if you upgrade the server.)
We also specified that mysqld should run as the mysql user account on the operating system. You’ll need to make sure this account exists, and that it owns the data directory. The port is set to the default of 3306, but sometimes that is something you’ll want to change.
We’ve chosen the default storage engine to be InnoDB, and this is worth explaining. We think InnoDB is the best choice in most situations, but that’s not always the case. Some third-party software, for example, might assume the default is MyISAM, and will create tables without specifying the engine. This might cause the software to malfunction if, for example, it assumes that it can create full-text indexes. And the default storage engine is used for explicitly created temporary tables, too, which can cause quite a bit of unexpected work for the server. If you want your permanent tables to use InnoDB but any temporary tables to use MyISAM, you should be sure to specify the engine explicitly in the CREATE TABLE statement.
In general, if you decide to use a storage engine as your default, it’s best to configure it as the default. Many users think they use only a specific storage engine, but then discover another engine has crept into use because of the configured default.
We’ll illustrate the basics of configuration with InnoDB. All InnoDB really needs to run well in most cases is a proper buffer pool size and log file size. The defaults are far too small. All of the other settings for InnoDB are optional, although we’ve enabled innodb_file_per_table for manageability and flexibility reasons. Setting the InnoDB log file size is a topic that we’ll discuss later in this chapter, as is the setting of innodb_flush_method, which is Unix-specific.
There’s a popular rule of thumb that says you should set the buffer pool size to around 75% or 80% of your server’s memory. This is another accidental ratio that seems to work okay sometimes, but isn’t always correct. It’s a better idea to set the buffer pool roughly as follows:
1. Begin with the amount of memory in the server.
2. Subtract out a bit for the operating system and perhaps for other programs, if MySQL isn’t the only thing running on the server.
3. Subtract some more for MySQL’s memory needs; it uses various buffers for per-query operations, for example.
4. Subtract enough for the InnoDB log files, so the operating system has enough memory to cache them, or at least the recently accessed portion thereof. (This advice applies to standard MySQL; in Percona Server, you can configure the log files to be opened with O_DIRECT, bypassing the operating system caches.) It might also be a good idea to leave some memory free for caching at least the tail of the binary logs, especially if you have replicas that are delayed, because they can sometimes read old binary log files on the master, causing some pressure on its memory.
5. Subtract enough for any other buffers and caches that you configure inside MySQL, such as the MyISAM key cache or the query cache.
6. Divide by 105%, which is an approximation of the overhead InnoDB adds on to manage the buffer pool itself.
7. Round the result down to a sensible number. Rounding down won’t change things much, but overallocating can be a bad thing.
We were a bit blasé about some of the amounts of memory involved here—what exactly is “a bit for the operating system,” anyway? That varies, and we’ll discuss it in some depth later in this chapter and the rest of this book. You need to understand your system and estimate how much memory you think it’ll need to run well. This is why one-size-fits-all configuration files are not possible. Experience and sometimes a bit of math will be your guide.
Here’s an example. Suppose you have a server with 192 GB of memory, and you want to dedicate it to MySQL and to use only InnoDB, with no query cache and not very many connections to the server. If your log files are 4 GB in total, you might proceed as follows: “I think that 2 GB or 5% of overall memory, whichever is larger, should be enough for the OS and for MySQL’s other memory needs; subtract 4 GB for the log files; use everything else for InnoDB.” The result is about 177 GB, but it’s probably a good idea to round that down a bit. You might configure the server with 168 GB or so of buffer pool. If the server tends to run with a fair amount of unallocated memory in practice, you might set the buffer pool larger when there is an opportunity to restart it for some other purpose.
The result would be very different if you had a number of MyISAM tables and needed to cache their indexes, naturally. It would also be quite different on Windows, which has trouble using large amounts of memory in most MySQL versions (although it’s improved in MySQL 5.5), or if you chose not to use O_DIRECT for some reason.
As you can see, it’s not crucial to get this setting precisely right from the beginning. It’s better to start with a safe value that’s larger than the default but not as large as it could be, run the server for a while, and see how much memory it really uses. These things can be hard to anticipate, because MySQL’s memory usage isn’t always predictable: it can depend on factors such as the query complexity and concurrency. With a simple workload, MySQL’s memory needs are pretty minimal—around 256 KB per connection. But complex queries that use temporary tables, sorting, stored procedures, and so forth can use a lot more RAM.
That’s why we chose a pretty safe starting point. You can see that even the conservative setting for InnoDB’s buffer pool is actually 87.5% of the server’s installed RAM—more than 75%, which is why we said that simple ratios aren’t the right approach.
We suggest that when it comes to configuring the memory buffers, you err on the side of caution, rather than making them too large. If you make the buffer pool 20% smaller than it could be, you’ll likely impact performance only a small amount—maybe a few percent. If you set it 20% too large, you’ll probably cause much more severe problems: swapping, thrashing the disks, or even running out of memory and crashing hard.
This InnoDB configuration example illustrates our preferred approach to configuring the server: understand what it does internally and how that interacts with the settings, and then decide.
TIME CHANGES EVERYTHING
The need to configure MySQL’s memory buffers precisely has become less important over time. When a powerful server had 4 GB of memory, we worked hard to balance its resources so it could run a thousand connections. This typically required us to reserve a gigabyte or so for MySQL’s needs, which was a quarter of the server’s total memory and greatly influenced how we sized the buffer pool.
Nowadays a comparable server has 144 GB of memory, but we typically see about the same number of connections in most applications, and the per-connection buffers haven’t really changed much either. As a result, we might generously reserve 4 GB of memory for MySQL, which is a drop in the bucket. It doesn’t impact how we size the buffer pool very much.
Most of the other settings in our sample file are pretty self-explanatory, and many of them are a matter of judgment. We’ll explore several of them in the rest of this chapter. You can see that we’ve enabled logging, disabled the query cache, and so on. We’ll also discuss some safety and sanity settings later in this chapter, which can be very helpful for making your server more robust and helping prevent bad data and other problems. We don’t show those settings here.
One setting to explain here is the open_files_limit option. We’ve set this as large as possible on a typical Linux system. Open filehandles are very cheap on modern operating systems. If this setting isn’t large enough, you’ll see error 24, “too many open files.”
Skipping all the way to the end, the last section in the configuration file is for client programs such as mysql and mysqladmin, and simply lets them know how to connect to the server. You should set the values for client programs to match those you chose for the server.
Inspecting MySQL Server Status Variables
Sometimes you can use the output from SHOW GLOBAL STATUS as input to your configuration to help customize the settings better for your workload. For the best results, look both at absolute values and at how the values change over time, preferably with several snapshots at peak and off-peak times. You can use the following command to see incremental changes to status variables every 60 seconds:
$ mysqladmin extended-status -ri60
We will frequently refer to changes in status variables over time as we explain various configuration settings. We will usually expect you to be examining the output of a command such as the one we just showed. Other helpful tools that can provide a compact display of status counter changes are Percona Toolkit’s pt-mext or pt-mysql-summary.
Now that we’ve shown you the preliminaries, we’ll take you on a guided tour of some server internals, interleaved with advice on configuration. This will give you the background you’ll need to choose appropriate values for configuration options when we return to the sample configuration file later.
[113] Question: where are the settings for the sort buffer size and read buffer size? Answer: they’re off minding their own business. Leave them at their defaults unless you can prove the defaults are not good enough.
Configuring Memory Usage
Configuring MySQL to use memory correctly is vital to good performance. You’ll almost certainly need to customize MySQL’s memory usage for your needs. You can think of MySQL’s memory consumption as falling into two categories: the memory you can control, and the memory you can’t. You can’t control how much memory MySQL uses merely to run the server, parse queries, and manage its internals, but you have a lot of control over how much memory it uses for specific purposes. Making good use of the memory you can control is not hard, but it does require you to know what you’re configuring.
As shown previously, you can approach memory configuration in steps:
1. Determine the absolute upper limit of memory MySQL can possibly use.
2. Determine how much memory MySQL will use for per-connection needs, such as sort buffers and temporary tables.
3. Determine how much memory the operating system needs to run well. Include memory for other programs that run on the same machine, such as periodic jobs.
4. Assuming that it makes sense to do so, use the rest of the memory for MySQL’s caches, such as the InnoDB buffer pool.
We go over each of these steps in the following sections, and then we take a more detailed look at the various MySQL caches’ requirements.
How Much Memory Can MySQL Use?
There is a hard upper limit on the amount of memory that can possibly be available to MySQL on any given system. The starting point is the amount of physically installed memory. If your server doesn’t have it, MySQL can’t use it.
You also need to think about operating system or architecture limits, such as restrictions 32-bit operating systems place on how much memory a given process can address. Because MySQL runs in a single process with multiple threads, the amount of memory it can use overall might be severely limited by such restrictions—for example, 32-bit Linux kernels limit the amount of memory any one process can address to a value that is typically between 2.5 and 2.7 GB. Running out of address space is very dangerous and can cause MySQL to crash. This is pretty rare to see these days, but it used to be common.
There are many other operating system–specific parameters and oddities that must be taken into account, including not just the per-process limits, but also stack sizes and other settings. The system’s glibc libraries can also impose limits per single allocation. For example, you might not be able to set innodb_buffer_pool larger than 2 GB if that’s all your glibc libraries support in a single allocation.
Even on 64-bit servers, some limitations still apply. For example, many of the buffers we discuss, such as the key buffer, are limited to 4 GB on a 64-bit server in 5.0 and older MySQL versions. Some of these restrictions are lifted in MySQL 5.1, and the MySQL manual documents each variable’s maximum value.
Per-Connection Memory Needs
MySQL needs a small amount of memory just to hold a connection (thread) open. It also requires a base amount of memory to execute any given query. You’ll need to set aside enough memory for MySQL to execute queries during peak load times. Otherwise, your queries will be starved for memory, and they will run poorly or fail.
It’s useful to know how much memory MySQL will consume during peak usage, but some usage patterns can unexpectedly consume a lot of memory, which makes this hard to predict. Prepared statements are one example, because you can have many of them open at once. Another example is the InnoDB data dictionary (more about this later).
You don’t need to assume a worst-case scenario when trying to predict peak memory consumption. For example, if you configure MySQL to allow a maximum of 100 connections, it theoretically might be possible to simultaneously run large queries on all 100 connections, but in reality this probably won’t happen. For example, if you set myisam_sort_buffer_size to 256M, your worst-case usage is at least 25 GB, but this level of consumption is highly unlikely to actually occur. Queries that use many large temporary tables, or complex stored procedures, are the most likely causes of high per-connection memory consumption.
Rather than calculating worst cases, a better approach is to watch your server under a real workload and see how much memory it uses, which you can see by watching the process’s virtual memory size. In many Unix-like systems, this is reported in the VIRT column in top, or VSZ in ps. The next chapter has more information on how to monitor memory usage.
Reserving Memory for the Operating System
Just as with queries, you need to reserve enough memory for the operating system to do its work. The best indication that the operating system has enough memory is that it’s not actively swapping (paging) virtual memory to disk. (See the next chapter for more on this topic.)
You should reserve at least a gigabyte or two for the operating system—more for machines with a lot of memory. We suggest starting with 2 GB or 5% of total memory as the baseline, whichever is greater. Add in some extra for safety, and add in some more if you’ll be running periodic memory-intensive jobs on the machine (such as backups). Don’t add any memory for the operating system’s caches, because they can be very large. The operating system will generally use any leftover memory for these caches, and we consider them separately from the operating system’s own needs in the following sections.
Allocating Memory for Caches
If the server is dedicated to MySQL, any memory you don’t reserve for the operating system or for query processing is available for caches.
MySQL needs more memory for caches than anything else. It uses caches to avoid disk access, which is orders of magnitude slower than accessing data in memory. The operating system might cache some data on MySQL’s behalf (especially for MyISAM), but MySQL needs lots of memory for itself, too.
The following are the most important caches to consider for most installations:
§ The InnoDB buffer pool
§ The operating system caches for InnoDB log files and MyISAM data
§ MyISAM key caches
§ The query cache
§ Caches you can’t really configure, such as the operating system’s caches of binary logs and table definition files
There are other caches, but they generally don’t use much memory. We discussed the query cache in detail in the previous chapter, so the following sections concentrate on the caches InnoDB and MyISAM need to work well.
It is much easier to configure a server if you’re using only one storage engine. If you’re using only MyISAM tables, you can disable InnoDB completely, and if you’re using only InnoDB, you need to allocate only minimal resources for MyISAM (MySQL uses MyISAM tables internally for some operations). But if you’re using a mixture of storage engines, it can be very hard to figure out the right balance between them. The best approach we’ve found is to make an educated guess and then observe the server in operation.
The InnoDB Buffer Pool
If you use mostly InnoDB tables, the InnoDB buffer pool probably needs more memory than anything else. The InnoDB buffer pool doesn’t just cache indexes: it also holds row data, the adaptive hash index, the insert buffer, locks, and other internal structures. InnoDB also uses the buffer pool to help it delay writes, so it can merge many writes together and perform them sequentially. In short, InnoDB relies heavily on the buffer pool, and you should be sure to allocate enough memory to it, typically with a process such as that shown earlier in this chapter. You can use variables from SHOW commands or tools such as innotop to monitor your InnoDB buffer pool’s memory usage.
If you don’t have much data, and you know that your data won’t grow quickly, you don’t need to overallocate memory to the buffer pool. It’s not really beneficial to make it much larger than the size of the tables and indexes that it will hold. There’s nothing wrong with planning ahead for a rapidly growing database, of course, but sometimes we see huge buffer pools with a tiny amount of data. This isn’t necessary.
Large buffer pools come with some challenges, such as long shutdown and warmup times. If there are a lot of dirty (modified) pages in the buffer pool InnoDB can take a long time to shut down, because it writes the dirty pages to the data files upon shutdown. You can force it to shut down quickly, but then it just has to do more recovery when it restarts, so you can’t actually speed up the shutdown and restart cycle time. If you know in advance when you need to shut down, you can change the innodb_max_dirty_pages_pct variable at runtime to a lower value, wait for the flush thread to clean up the buffer pool, and then shut down once the number of dirty pages becomes small. You can monitor the number of dirty pages by watching the Innodb_buffer_pool_pages_dirty server status variable or using innotop to monitor SHOW INNODB STATUS.
Lowering the value of the innodb_max_dirty_pages_pct variable doesn’t actually guarantee that InnoDB will keep fewer dirty pages in the buffer pool. Instead, it controls the threshold at which InnoDB stops being “lazy.” InnoDB’s default behavior is to flush dirty pages with a background thread, merging writes together and performing them sequentially for efficiency. This behavior is called “lazy” because it lets InnoDB delay flushing dirty pages in the buffer pool, unless it needs to use the space for some other data. When the percentage of dirty pages exceeds the threshold, InnoDB will flush pages as quickly as it can to try to keep the dirty page count lower. InnoDB will also go into “furious flushing” mode when there isn’t enough space left in the transaction logs, which is one reason that large logs can improve performance.
When you have a large buffer pool, especially in combination with slow disks, the server might take a long time (many hours or even days) to warm up after a restart. In such cases, you might benefit from using Percona Server’s feature to reload the pages after restart. This can reduce warmup times to a few minutes. MySQL 5.6 will introduce a similar feature. This is especially beneficial on replicas, which pay an extra warmup penalty due to the single-threaded nature of replication.
If you can’t use Percona Server’s fast warmup feature, some people issue full-table scans or index scans immediately after a restart to load indexes into the buffer pool. This is crude, but can sometimes be better than nothing. You can use the init_file setting to accomplish this. You can place SQL into a file that’s executed when MySQL starts up. The filename must be specified in the init_file option, and the file can include multiple SQL commands, each on a single line (no comments are allowed).
The MyISAM Key Caches
The MyISAM key caches are also referred to as key buffers; there is one by default, but you can create more. Unlike InnoDB and some other storage engines, MyISAM itself caches only indexes, not data (it lets the operating system cache the data). If you use mostly MyISAM, you should allocate a lot of memory to the key caches.
The most important option is the key_buffer_size. Any memory not allocated to it will be available for the operating system caches, which the operating system will usually fill with data from MyISAM’s .MYD files. MySQL 5.0 has a hard upper limit of 4 GB for this variable, no matter what architecture you’re running. MySQL 5.1 allows larger sizes. Check the current documentation for your version of the server.
When you’re deciding how much memory to allocate to the key caches, it might help to know how much space your MyISAM indexes are actually using on disk. You don’t need to make the key buffers larger than the data they will cache. You can query the INFORMATION_SCHEMA tables and sum up the INDEX_LENGTH column to find out the size of the files storing the indexes:
SELECT SUM(INDEX_LENGTH) FROM INFORMATION_SCHEMA.TABLES WHERE ENGINE='MYISAM';
If you have a Unix-like system, you can also use a command like the following:
$ du -sch `find /path/to/mysql/data/directory/ -name "*.MYI"`
How big should you set the key caches? No bigger than the total index size or 25% to 50% of the amount of memory you reserved for operating system caches, whichever is smaller.
By default, MyISAM caches all indexes in the default key buffer, but you can create multiple named key buffers. This lets you keep more than 4 GB of indexes in memory at once. To create key buffers named key_buffer_1 and key_buffer_2, each sized at 1 GB, place the following in the configuration file:
key_buffer_1.key_buffer_size = 1G
key_buffer_2.key_buffer_size = 1G
Now there are three key buffers: the two explicitly created by those lines and the default buffer. You can use the CACHE INDEX command to map tables to caches. You can tell MySQL to use key_buffer_1 for the indexes from tables t1 and t2 with the following SQL statement:
mysql> CACHE INDEX t1, t2 IN key_buffer_1;
Now when MySQL reads blocks from the indexes on these tables, it will cache the blocks in the specified buffer. You can also preload the tables’ indexes into the cache with the init_file option and the LOAD INDEX command:
mysql> LOAD INDEX INTO CACHE t1, t2;
Any indexes you don’t explicitly map to a key buffer will be assigned to the default buffer the first time MySQL needs to access the .MYI file.
You can monitor key buffer usage with information from SHOW STATUS and SHOW VARIABLES. You can calculate the percentage of the buffer in use with this equation:
100 - ( (Key_blocks_unused * key_cache_block_size) * 100 / key_buffer_size )
If the server doesn’t use all of its key buffer after it’s been running for a long time, you can consider making the buffer smaller.
What about the key buffer hit ratio? As we explained previously, this number is useless. For example, the difference between 99% and 99.9% looks small, but it really represents a tenfold increase. The cache hit ratio is also application-dependent: some applications might work fine at 95%, whereas others might be I/O-bound at 99.9%. You might even be able to get a 99.99% hit ratio with properly sized caches.
The number of cache misses per second is much more empirically useful. Suppose you have a single hard drive that can do 100 random reads per second. Five misses per second will not cause your workload to be I/O-bound, but 80 per second will likely cause problems. You can use the following equation to calculate this value:
Key_reads / Uptime
Calculate the number of misses incrementally over intervals of 10 to 100 seconds, so you can get an idea of the current performance. The following command will show the incremental values every 10 seconds:
$ mysqladmin extended-status -r -i 10 | grep Key_reads
Remember that MyISAM uses the operating system cache for the data files, which are often larger than the indexes. Therefore, it often makes sense to leave more memory for the operating system cache than for the key caches. Even if you have enough memory to cache all the indexes, and the key cache miss rate is very low, cache misses when MyISAM tries to read from the data files (not the index files!) happen at the operating system level, which is completely invisible to MySQL. Thus, you can have a lot of data file cache misses independently of your index cache miss rate.
Finally, even if you don’t have any MyISAM tables, bear in mind that you still need to set key_buffer_size to a small amount of memory, such as 32M. The MySQL server sometimes uses MyISAM tables for internal purposes, such as temporary tables for GROUP BY queries.
The MyISAM key block size
The key block size is important (especially for write-intensive workloads) because of the way it causes MyISAM, the operating system cache, and the filesystem to interact. If the key block size is too small, you might encounter read-around writes, which are writes that the operating system cannot perform without first reading some data from the disk. Here’s how a read-around write happens, assuming the operating system’s page size is 4 KB (typically true on the x86 architecture) and the key block size is 1 KB:
1. MyISAM requests a 1 KB key block from disk.
2. The operating system reads 4 KB of data from the disk and caches it, then passes the desired 1 KB of data to MyISAM.
3. The operating system discards the cached data in favor of some other data.
4. MyISAM modifies the 1 KB key block and asks the operating system to write it back to disk.
5. The operating system reads the same 4 KB of data from the disk into the operating system cache, modifies the 1 KB that MyISAM changed, and writes the entire 4 KB back to disk.
The read-around write happened in step 5, when MyISAM asked the operating system to write only part of a 4 KB page. If MyISAM’s block size had matched the operating system’s, the disk read in step 5 could have been avoided.[114]
Unfortunately, in MySQL 5.0 and earlier there’s no way to configure the key block size. However, in MySQL 5.1 and later you can avoid read-around writes by making MyISAM’s key block size the same as the operating system’s. The myisam_block_size variable controls the key block size. You can also specify the size for each key with the KEY_BLOCK_SIZE option in a CREATE TABLE or CREATE INDEX statement, but because all keys are stored in the same file, you really need all of them to have blocks as large as or larger than the operating system’s to avoid alignment issues that could still cause read-around writes. (For example, if one key has 1 KB blocks and another has 4 KB blocks, the 4 KB block boundaries might not match the operating system’s page boundaries.)
The Thread Cache
The thread cache holds threads that aren’t currently associated with a connection but are ready to serve new connections. When there’s a thread in the cache and a new connection is created, MySQL removes the thread from the cache and gives it to the new connection. When the connection is closed, MySQL places the thread back into the cache, if there’s room. If there isn’t room, MySQL destroys the thread. As long as MySQL has a free thread in the cache it can respond rapidly to connection requests, because it doesn’t have to create a new thread for each connection.
The thread_cache_size variable specifies the number of threads MySQL can keep in the cache. You probably won’t need to configure this value unless your server gets many connection requests. To check whether the thread cache is large enough, watch the Threads_created status variable. We generally try to keep the thread cache large enough that we see fewer than 10 new threads created each second, but it’s often pretty easy to get this number lower than 1 per second.
A good approach is to watch the Threads_connected variable and try to set thread_cache_size large enough to handle the typical fluctuation in your workload. For example, if Threads_connected usually stays between 100 and 120, you can set the cache size to 20. If it stays between 500 and 700, a thread cache of 200 should be large enough. Think of it this way: at 700 connections, there are probably no threads in the cache; at 500 connections, there are 200 cached threads ready to be used if the load increases to 700 again.
Making the thread cache very large is probably not necessary for most uses, but keeping it small doesn’t save much memory, so there’s little benefit in doing so. Each thread that’s in the thread cache or sleeping typically uses around 256 KB of memory. This is not very much compared to the amount of memory a thread can use when a connection is actively processing a query. In general, you should keep your thread cache large enough that Threads_created doesn’t increase very often. If this is a very large number, however (e.g., many thousand threads), you might want to set it lower because some operating systems don’t handle very large numbers of threads well, even when most of them are sleeping.
The Table Cache
The table cache is similar in concept to the thread cache, but it stores objects that represent tables. Each object in the cache contains the associated table’s parsed .frm file, plus other data. Exactly what else is in the object depends on the table’s storage engine. For example, for MyISAM, it holds the table data and/or index file descriptors. For merge tables it might hold many file descriptors, because merge tables can have many underlying tables.
The table cache can help you reuse resources. For instance, when a query requests access to a MyISAM table, MySQL might be able to give it a file descriptor from the cached object. Although this does avoid the cost of opening a file descriptor, that’s not as expensive as you might think. Opening and closing file descriptors is very fast on local storage; the server should be able to do it a million times a second easily (it’s different on network-attached storage, though). The real benefit of the table cache is for MyISAM tables, where it lets the server avoid modifying the MyISAM file headers to mark a table as “in use.”[115]
The table cache’s design is one of the areas where the separation between the server and the storage engines is not completely clean, for historical reasons. The table cache is a little less important for InnoDB, because InnoDB doesn’t rely on it for as many purposes (such as holding file descriptors; it has its own version of a table cache for this purpose). However, even InnoDB benefits from caching the parsed .frm files.
In MySQL 5.1, the table cache is separated into two parts: a cache of open tables and a table definition cache (configured via the table_open_cache and table_definition_cache variables). Thus, the table definitions (the parsed .frm files) are separated from the other resources, such as file descriptors. Opened tables are still per-thread, per-table-used, but the table definitions are global and can be shared among all connections efficiently. You can generally set table_definition_cache high enough to cache all your table definitions. Unless you have tens of thousands of tables, this is likely to be the easiest approach.
If the Opened_tables status variable is large or increasing, the table cache might not be large enough, and you can consider increasing the table_cache system variable (or table_open_cache, in MySQL 5.1). However, note that this counter increases when you create and drop temporary tables, so if you do that a lot, you’ll never get the counter to stop increasing.
One downside to making the table cache very large is that it might cause longer shutdown times when your server has a lot of MyISAM tables, because the key blocks have to be flushed and the tables have to be marked as no longer open. It can also make FLUSH TABLES WITH READ LOCKtake a long time to complete, for the same reason.
More seriously, the algorithms that check the table cache aren’t very efficient; more on this later.
If you get errors indicating that MySQL can’t open any more files (use the perror utility to check what the error number means), you might need to increase the number of files MySQL is allowed to keep open. You can do this with the open_files_limit server variable in your my.cnf file.
The thread and table caches don’t really use much memory, and they can be beneficial when they conserve resources. Although creating a new thread and opening a new table aren’t really expensive compared to other things MySQL might do, the overhead can add up. Caching threads and tables can sometimes improve efficiency.
The InnoDB Data Dictionary
InnoDB has its own per-table cache, variously called a table definition cache or data dictionary, which you cannot configure in current versions of MySQL. When InnoDB opens a table, it adds a corresponding object to the data dictionary. Each table can take up 4 KB or more of memory (although much less space is required in MySQL 5.1). Tables are not removed from the data dictionary when they are closed.
As a result, the server can appear to leak memory over time, due to an ever-increasing number of entries in the dictionary cache. It isn’t truly leaking memory; it just isn’t implementing any kind of cache expiration. This is normally a problem only when you have many (thousands or tens of thousands) large tables. If this is a problem for you, you can use Percona Server, which has an option to limit the data dictionary’s size by removing tables that are unused. There is a similar feature in the yet-to-be-released MySQL 5.6.
The other performance issue is computing statistics for the tables when opening them for the first time, which is expensive because it requires a lot of I/O. In contrast to MyISAM, InnoDB doesn’t store statistics in the tables permanently; it recomputes them each time it starts, and thereafter when various intervals expire or events occur (changes to the table’s contents, queries against the INFORMATION_SCHEMA, and so on). If you have a lot of tables, your server can take hours to start and fully warm up, during which time it might not be doing much other than waiting for one I/O operation after another. You can enable the innodb_use_sys_stats_table option in Percona Server (also in MySQL 5.6, but called innodb_analyze_is_persistent) to store the statistics persistently on disk and solve this problem.
Even after startup, InnoDB statistics operations can have an impact on the server and on individual queries. You can turn off the innodb_stats_on_metadata option to avoid time-consuming refreshes of table statistics. This can make a big difference when tools such as IDEs are querying the INFORMATION_SCHEMA tables.
If you use InnoDB’s innodb_file_per_table option (described later), there’s a separate limit on the number of .ibd files InnoDB can keep open at any time. This is handled by the InnoDB storage engine, not the MySQL server, and is controlled by innodb_open_files. InnoDB doesn’t open files the same way MyISAM does: whereas MyISAM uses the table cache to hold file descriptors for open tables, in InnoDB there is no direct relationship between open tables and open files. InnoDB uses a single, global file descriptor for each .ibd file. If you can afford it, it’s best to set innodb_open_files large enough that the server can keep all .ibd files open simultaneously.
[114] Theoretically, if you could ensure that the original 4 KB of data was still in the operating system’s cache, the read wouldn’t be needed. However, you have no control over which blocks the operating system decides to keep in its cache. You can find out which blocks are in the cache with the fincore tool, available at http://net.doit.wisc.edu/~plonka/fincore/.
[115] The concept of an “opened table” can be a little confusing. MySQL counts a table as opened many times when different queries are accessing it simultaneously, or even when a single query refers to the same table more than once, as in a subquery or a self-join. MyISAM’s index files contain a counter that MyISAM increments when the table is opened and decrements when it is closed. This lets MyISAM see when the table wasn’t closed cleanly: if it opens a table for the first time and the counter is not zero, the table wasn’t closed cleanly.
Configuring MySQL’s I/O Behavior
A few configuration options affect how MySQL synchronizes data to disk and performs recovery. These can affect performance dramatically, because they involve expensive I/O operations. They also represent a trade-off between performance and data safety. In general, it’s expensive to ensure that your data is written to disk immediately and consistently. If you’re willing to risk the danger that a disk write won’t really make it to permanent storage, you can increase concurrency and/or reduce I/O waits, but you’ll have to decide for yourself how much risk you can tolerate.
InnoDB I/O Configuration
InnoDB permits you to control not only how it recovers, but also how it opens and flushes its data, which greatly affects recovery and overall performance. InnoDB’s recovery process is automatic and always runs when InnoDB starts, though you can influence what actions it takes. Leaving aside recovery and assuming nothing ever crashes or goes wrong, there’s still a lot to configure for InnoDB. It has a complex chain of buffers and files designed to increase performance and guarantee ACID properties, and each piece of the chain is configurable. Figure 8-1 illustrates these files and buffers.
A few of the most important things to change for normal usage are the InnoDB log file size, how InnoDB flushes its log buffer, and how InnoDB performs I/O.
The InnoDB transaction log
InnoDB uses its log to reduce the cost of committing transactions. Instead of flushing the buffer pool to disk when each transaction commits, it logs the transactions. The changes transactions make to data and indexes often map to random locations in the tablespace, so flushing these changes to disk would require random I/O. InnoDB assumes it’s using conventional disks, where random I/O is much more expensive than sequential I/O because of the time it takes to seek to the correct location on disk and wait for the desired part of the disk to rotate under the head.
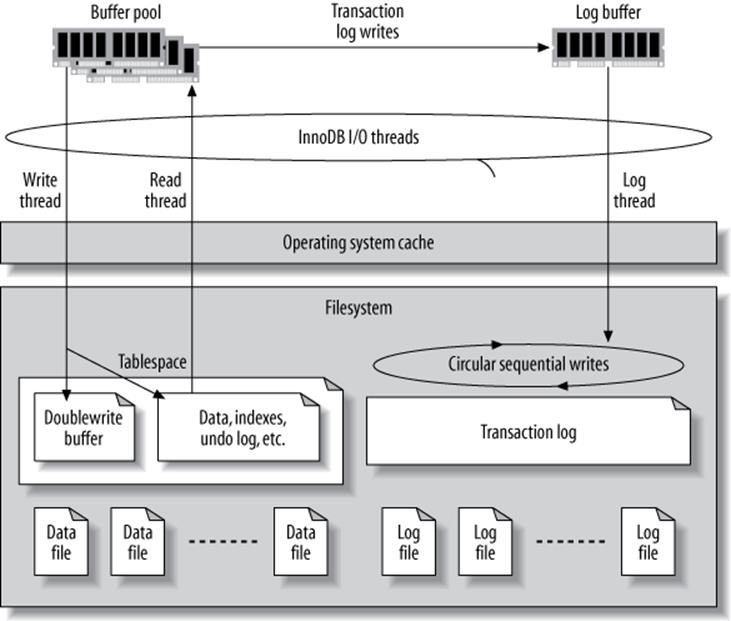
Figure 8-1. InnoDB’s buffers and files
InnoDB uses its log to convert this random disk I/O into sequential I/O. Once the log is safely on disk, the transactions are permanent, even though the changes haven’t been written to the data files yet. If something bad happens (such as a power failure), InnoDB can replay the log and recover the committed transactions.
Of course, InnoDB does ultimately have to write the changes to the data files, because the log has a fixed size. It writes to the log in a circular fashion: when it reaches the end of the log, it wraps around to the beginning. It can’t overwrite a log record if the changes contained there haven’t been applied to the data files, because this would erase the only permanent record of the committed transaction.
InnoDB uses a background thread to flush the changes to the data files intelligently. This thread can group writes together and make the data writes sequential, for improved efficiency. In effect, the transaction log converts random data file I/O into mostly sequential log file and data file I/O. Moving flushes into the background makes queries complete more quickly and helps cushion the I/O system from spikes in the query load.
The overall log file size is controlled by innodb_log_file_size and innodb_log_files_in_group, and it’s very important for write performance. The total size is the sum of each file’s size. By default there are two 5 MB files, for a total of 10 MB. This is much too small for a high-performance workload. You need hundreds of megabytes, or even gigabytes, of log files.
InnoDB uses multiple files as a single circular log. You usually don’t need to change the default number of logs, just the size of each log file. To change the log file size, shut down MySQL cleanly, move the old logs away, reconfigure, and restart. Be sure MySQL shuts down cleanly, or the log files will actually have entries that need to be applied to the data files! Watch the MySQL error log when you restart the server. After you’ve restarted successfully, you can delete the old log files.
Log file size and the log buffer
To determine the ideal size for your log files, you’ll have to weigh the overhead of routine data changes against the recovery time required in the event of a crash. If the log is too small, InnoDB will have to do more checkpoints, causing more log writes. In extreme cases, write queries might stall and have to wait for changes to be applied to the data files before there is room to write into the log. On the other hand, if the log is too large, InnoDB might have to do a lot of work when it recovers. This can greatly increase recovery time, although this process is much more efficient in newer MySQL versions.
Your data size and access patterns will influence the recovery time, too. Suppose you have a terabyte of data and 16 GB of buffer pool, and your total log size is 128 MB. If you have a lot of dirty pages (i.e., pages whose changes have not yet been flushed to the data files) in the buffer pool and they are uniformly spread across your terabyte of data, recovery after a crash might take a long time. InnoDB will have to scan through the log, examine the data files, and apply changes to the data files as needed. That’s a lot of reading and writing! On the other hand, if the changes are localized—say, if only a few hundred megabytes of data are updated frequently—recovery might be fast, even when your data and log files are huge. Recovery time also depends on the size of a typical modification, which is related to your average row length. Short rows let more modifications fit in the log, so InnoDB might need to replay more modifications on recovery.[116]
When InnoDB changes any data, it writes a record of the change into its log buffer, which it keeps in memory. InnoDB flushes the buffer to the log files on disk when the buffer gets full, when a transaction commits, or once per second—whichever comes first. Increasing the buffer size, which is 1 MB by default, can help reduce I/O if you have large transactions. The variable that controls the buffer size is called innodb_log_buffer_size.
You usually don’t need to make the buffer very large. The recommended range is 1 to 8 MB, and this usually will be enough unless you write a lot of huge BLOB records. The log entries are very compact compared to InnoDB’s normal data. They are not page-based, so they don’t waste space storing whole pages at a time. InnoDB also makes log entries as short as possible. They are sometimes even stored as the function number and parameters of a C function!
There’s an additional circumstance where a larger value might be beneficial: when it can reduce contention during allocation of space in the buffer. When we’re configuring servers with a large amount of memory, we’ll sometimes allocate 32 to 128 MB of log buffer simply because spending such a relatively small amount of extra memory is not detrimental and it can help avoid pressure on a bottleneck. The bottleneck shows up as contention on the log buffer mutex when it’s a problem.
You can monitor InnoDB’s log and log buffer I/O performance by inspecting the LOG section of the output of SHOW INNODB STATUS, and by watching the Innodb_os_log_written status variable to see how much data InnoDB writes to the log files. A good rule of thumb is to watch it over intervals of 10 to 100 seconds and note the peak value. You can use this to judge whether your log buffer is sized right. For example, if you see a peak of 100 KB written to the log per second, a 1 MB log buffer is probably plenty.
You can also use this metric to decide on a good size for your log files. If the peak is 100 KB per second, a 256 MB log file is enough to store at least 2,560 seconds of log entries, which is likely to be enough. As a rule of thumb, you can make your total log file size large enough to hold an hour’s worth of server activity.
How InnoDB flushes the log buffer
When InnoDB flushes the log buffer to the log files on disk, it locks the buffer with a mutex, flushes it up to the desired point, and then moves any remaining entries to the front of the buffer. It is possible that more than one transaction will be ready to flush its log entries when the mutex is released. InnoDB has a group commit feature that can commit all of them to the log in a single I/O operation, but this is broken in MySQL 5.0 when the binary log is enabled. We wrote about group commit in the previous chapter.
The log buffer must be flushed to durable storage to ensure that committed transactions are fully durable. If you care more about performance than durability, you can change innodb_flush_log_at_trx_commit to control where and how often the log buffer is flushed. Possible settings are as follows:
0
Write the log buffer to the log file and flush the log file every second, but do nothing at transaction commit.
1
Write the log buffer to the log file and flush it to durable storage every time a transaction commits. This is the default (and safest) setting; it guarantees that you won’t lose any committed transactions, unless the disk or operating system “fakes” the flush operation.
2
Write the log buffer to the log file at every commit, but don’t flush it. InnoDB schedules a flush once every second. The most important difference from the 0 setting (and what makes 2 the preferable setting) is that 2 won’t lose any transactions if the MySQL process crashes. If the entire server crashes or loses power, however, you can still lose transactions.
It’s important to know the difference between writing the log buffer to the log file and flushing the log to durable storage. In most operating systems, writing the buffer to the log simply moves the data from InnoDB’s memory buffer to the operating system’s cache, which is also in memory. It doesn’t actually write the data to durable storage. Thus, settings 0 and 2 usually result in at most one second of lost data if there’s a crash or a power outage, because the data might exist only in the operating system’s cache. We say “usually” because InnoDB tries to flush the log file to disk about once per second no matter what, but it is possible to lose more than a second of transactions in some cases, such as when a flush gets stalled.
In contrast, flushing the log to durable storage means InnoDB asks the operating system to actually flush the data out of the cache and ensure it is written to the disk. This is a blocking I/O call that doesn’t complete until the data is completely written. Because writing data to a disk is slow, this can dramatically reduce the number of transactions InnoDB can commit per second when innodb_flush_log_at_trx_commit is set to 1. Today’s high-speed drives[117] can perform only a couple of hundred real disk transactions per second, simply because of the limitations of drive rotation speed and seek time.
Sometimes the hard disk controller or operating system fakes a flush by putting the data into yet another cache, such as the hard disk’s own cache. This is faster but very dangerous, because the data might still be lost if the drive loses power. This is even worse than settinginnodb_flush_log_at_trx_commit to something other than 1, because it can cause data corruption, not just lost transactions.
Setting innodb_flush_log_at_trx_commit to anything other than 1 can cause you to lose transactions. However, you might find the other settings useful if you don’t care about durability (the D in ACID). Maybe you just want some of InnoDB’s other features, such as clustered indexes, resistance to data corruption, and row-level locking. This is not uncommon when using InnoDB to replace MyISAM solely for performance reasons.
The best configuration for high-performance transactional needs is to leave innodb_flush_log_at_trx_commit set to 1 and place the log files on a RAID volume with a battery-backed write cache. This is both safe and very fast. In fact, we dare say that any production database server that’s expected to handle a serious workload needs to have this kind of hardware.
Percona Server extends innodb_flush_log_at_trx_commit to make it a per-session variable, instead of global for the whole server. This allows applications with varying performance and durability needs to use the same database, and avoids the one-size-fits-all solution offered by standard MySQL.
How InnoDB opens and flushes log and data files
The innodb_flush_method option lets you configure how InnoDB actually interacts with the filesystem. Despite its name, it can affect how InnoDB reads data, not just how it writes it. The Windows and non-Windows values for this option are mutually exclusive: you can useasync_unbuffered, unbuffered, and normal only on Windows, and you cannot use any other values on Windows. The default value is unbuffered on Windows and fdatasync on all other systems. (If SHOW GLOBAL VARIABLES shows the variable with an empty value, that means it’s set to the default.)
WARNING
Changing how InnoDB performs I/O operations can impact performance greatly, so be sure you understand what you’re doing before you change anything!
This is a slightly confusing option, because it affects both the log files and the data files, and it sometimes does different things to each kind of file. It would be nice to have one configuration option for the logs and another for the data files, but they’re combined. Here are the possible values:
fdatasync
The default value on non-Windows systems: InnoDB uses fsync() to flush both data and log files.
InnoDB generally uses fsync() instead of fdatasync(), even though this value seems to indicate the contrary. fdatasync() is like fsync(), except it flushes only the file’s data, not its metadata (last modified time, etc.). Therefore, fsync() can cause more I/O. However, the InnoDB developers are very conservative, and they found that fdatasync() caused corruption in some cases. InnoDB determines which methods can be used safely; some options are set at compile time and some are discovered at runtime. It uses the fastest safe method it can.
The disadvantage of using fsync() is that the operating system buffers at least some of the data in its own cache. In theory, this is wasteful double buffering, because InnoDB manages its own buffers more intelligently than the operating system can. However, the ultimate effect is very system- and filesystem-dependent. The double buffering might not be a bad thing if it lets the filesystem do smarter I/O scheduling and batching. Some filesystems and operating systems can accumulate writes and execute them together, reorder them for efficiency, or write to multiple devices in parallel. They might also do read-ahead optimizations, such as instructing the disk to preread the next sequential block if several have been requested in sequence.
Sometimes these optimizations help, and sometimes they don’t. You can read your system’s manpage for fsync(2) if you’re curious about exactly what your version of fsync() does.
innodb_file_per_table causes each file to be fsync()ed separately, which means writes to multiple tables can’t be combined into a single I/O operation. This might require InnoDB to perform a higher total number of fsync() operations.
O_DIRECT
InnoDB uses the O_DIRECT flag, or directio(), depending on the system, on the data files. This option does not affect the log files and is not necessarily available on all Unix-like operating systems. At least GNU/Linux, FreeBSD, and Solaris (late 5.0 and newer) support it. Unlike theO_DSYNC flag, it affects both reads and writes.
This setting still uses fsync() to flush the files to disk, but it instructs the operating system not to cache the data and not to use read-ahead. This disables the operating system’s caches completely and makes all reads and writes go directly to the storage device, avoiding double buffering.
On most systems, this is implemented with a call to fcntl() to set the O_DIRECT flag on the file descriptor, so you can read the fcntl(2) manpage for your system’s details. On Solaris, this option uses directio().
If your RAID card does read-ahead, this setting will not disable that. It disables only the operating system’s and/or filesystem’s read-ahead capabilities.
You generally need a RAID card with a write cache set to a write-back policy if you use O_DIRECT, because that’s typically the only thing that keeps performance good. Using O_DIRECT when there is no buffer between InnoDB and the actual storage device, such as when you have no write cache on your RAID card, can cause performance to degrade greatly. This is a bit less of a problem nowadays with multiple write threads (and native asynchronous I/O introduced in MySQL 5.5), but it’s still the case in general.
This setting can cause the server’s warmup time to increase significantly, especially if the operating system’s cache is very large. It can also make a small buffer pool (e.g., a buffer pool of the default size) much slower than buffered I/O would. This is because the operating system won’t “help out” by keeping more of the data in its own cache. If the desired data isn’t in the buffer pool, InnoDB will have to read it directly from disk.
This setting does not impose any extra penalty on the use of innodb_file_per_table. However, the reverse can be true: if you do not use innodb_file_per_table, you can suffer from some serialization of I/O when you use O_DIRECT. This happens because some filesystems (including all of Linux’s ext filesystems) have a per-inode mutex. When you use O_DIRECT with such filesystems, you really need innodb_file_per_table to be enabled. We delve more into filesystems in the next chapter.
ALL_O_DIRECT
This option is available in Percona Server and MariaDB. It lets the server open the log files, not just the data files, in the same way that standard MySQL opens the data files.
O_DSYNC
This option sets the O_SYNC flag on the open() call for the log files. It makes all writes synchronous—in other words, writes do not return until the data is written to disk. This option does not affect the data files.
The difference between the O_SYNC flag and the O_DIRECT flag is that O_SYNC doesn’t disable caching at the operating system level. Therefore, it doesn’t avoid double buffering, and it doesn’t make writes go directly to disk. With O_SYNC, writes modify the data in the cache, and then it is sent to the disk.
While synchronous writes with O_SYNC might sound very similar to what fsync() does, the two can be implemented very differently on both the operating system and the hardware level. When the O_SYNC flag is used, the operating system might pass a “use synchronous I/O” flag down to the hardware level, telling the device not to use caches. On the other hand, fsync() tells the operating system to flush modified buffers to the device, followed by an instruction for the device to flush its own caches, if applicable, so it is certain that the data has been recorded on the physical media. Another difference is that with O_SYNC, every write() or pwrite() operation syncs data to disk before it finishes, blocking the calling process. In contrast, writing without the O_SYNC flag and then calling fsync() allows writes to accumulate in the cache (which makes each write fast), and then flushes them all at once.
Again, despite its name, this option sets the O_SYNC flag, not the O_DSYNC flag, because the InnoDB developers found bugs with O_DSYNC. O_SYNC and O_DSYNC are similar to fysnc() and fdatasync(): O_SYNC syncs both data and metadata, whereas O_DSYNC syncs data only.
async_unbuffered
This is the default value on Windows. This option causes InnoDB to use unbuffered I/O for most writes; the exception is that it uses buffered I/O to the log files when innodb_flush_log_at_trx_commit is set to 2.
This setting causes InnoDB to use the operating system’s native asynchronous (overlapped) I/O for both reads and writes on Windows 2000, XP, and newer. On older Windows versions, InnoDB uses its own asynchronous I/O, which is implemented with threads.
unbuffered
Windows-only. This option is similar to async_unbuffered but does not use native asynchronous I/O.
normal
Windows-only. This option causes InnoDB not to use native asynchronous I/O or unbuffered I/O.
nosync and littlesync
For development use only. These options are undocumented and unsafe for production; they should not be used.
If that all seemed like a lot of explanation with no advice, here’s the advice: if you use a Unix-like operating system and your RAID controller has a battery-backed write cache, we recommend that you use O_DIRECT. If not, either the default or O_DIRECT will probably be the best choice, depending on your application.
The InnoDB tablespace
InnoDB keeps its data in a tablespace, which is essentially a virtual filesystem spanning one or many files on disk. InnoDB uses the tablespace for many purposes, not just for storing tables and indexes. It keeps its undo log (old row versions), insert buffer, doublewrite buffer (described in an upcoming section), and other internal structures in the tablespace.
Configuring the tablespace
You specify the tablespace files with the innodb_data_file_path configuration option. The files are all contained in the directory given by innodb_data_home_dir. Here’s an example:
innodb_data_home_dir = /var/lib/mysql/
innodb_data_file_path = ibdata1:1G;ibdata2:1G;ibdata3:1G
That creates a 3 GB tablespace in three files. Sometimes people wonder whether they can use multiple files to spread load across drives, like this:
innodb_data_file_path = /disk1/ibdata1:1G;/disk2/ibdata2:1G;...
While that does indeed place the files in different directories, which represent different drives in this example, InnoDB concatenates the files end-to-end. Thus, you usually don’t gain much this way. InnoDB will fill the first file, then the second when the first is full, and so on; the load isn’t really spread in the fashion you need for higher performance. A RAID controller is a smarter way to spread load.
To allow the tablespace to grow if it runs out of space, you can make the last file autoextend as follows:
...ibdata3:1G:autoextend
The default behavior is to create a single 10 MB autoextending file. If you make the file autoextend, it’s a good idea to place an upper limit on the tablespace’s size to keep it from growing very large, because once it grows, it doesn’t shrink. For example, the following example limits the autoextending file to 2 GB:
...ibdata3:1G:autoextend:max:2G
Managing a single tablespace can be a hassle, especially if it autoextends and you want to reclaim the space (for this reason, we recommend disabling the autoextend feature, or at least setting a reasonable cap on the space). The only way to reclaim space is to dump your data, shut down MySQL, delete all the files, change the configuration, restart, let InnoDB create new empty files, and restore your data. InnoDB is completely unforgiving about its tablespace—you cannot simply remove files or change their sizes. It will refuse to start if you corrupt its tablespace. It is likewise very strict about its log files. If you’re used to casually moving files around with MyISAM, take heed!
The innodb_file_per_table option lets you configure InnoDB to use one file per table in MySQL 4.1 and later. It stores the data in the database directory as tablename.ibd files. This makes it easier to reclaim space when you drop a table, and it can be useful for spreading tables across multiple disks. However, placing the data in multiple files can actually result in more wasted space overall, because it trades internal fragmentation in the single InnoDB tablespace for wasted space in the .ibd files. This is more of an issue for very small tables, because InnoDB’s page size is 16 KB. Even if your table has only 1 KB of data, it will still require at least 16 KB on disk.
Even if you enable the innodb_file_per_table option, you’ll still need the main tablespace for the undo logs and other system data. It will be smaller if you’re not storing all the data in it, but it’s still a good idea to disable autoextend, because you can’t shrink the file without reloading all your data.
Some people like to use innodb_file_per_table just because of the extra manageability and visibility it gives you. For example, it’s much faster to find a table’s size by examining a single file than it is to use SHOW TABLE STATUS, which has to perform more complex work to determine how many pages are allocated to a table.
There is a dark side to innodb_file_per_table: slow DROP TABLE performance. This can be severe enough to cause a noticeable server-wide stall, for two reasons:
§ Dropping the table unlinks (deletes) the file at the filesystem level, which can be very slow on some filesystems (ext3, we’re looking at you). You can shorten the duration of this with tricks on the filesystem: link the .ibd file to a zero-sized file, then delete the file manually, instead of waiting for MySQL to do it.
§ When you enable this option, each table gets its own tablespace inside InnoDB. It turns out that removing the tablespace actually requires InnoDB to lock and scan the buffer pool while it looks for pages belonging to this tablespace, which is very slow on a server with a large buffer pool. If you’re going to be dropping a lot of InnoDB tables (including temporary tables) and you use innodb_file_per_table, you might benefit from the fix included with Percona Server, which lets the server lazily invalidate the pages belonging to the dropped tables. You just need to set the innodb_lazy_drop_table option.
What’s the final recommendation? We suggest that you use innodb_file_per_table and cap the size of your shared tablespace to make your life easier. If you run into any circumstances that make this painful, as noted above, consider one of the fixes we suggested.
We should also note that you don’t actually have to store your InnoDB files in a traditional filesystem. Like many traditional database servers, InnoDB offers the option of using a raw device—i.e., an unformatted partition—for its storage. However, today’s filesystems can handle sufficiently large files that you shouldn’t need to use this option. Using raw devices might improve performance by a few percentage points, but we don’t think this small increase justifies the disadvantages of not being able to manipulate the data as files. When you store your data on a raw partition, you can’t use mv, cp, or any other tools on it. Ultimately, the tiny performance gains you get from using raw devices aren’t worth the extra hassle.
Old row versions and the tablespace
InnoDB’s tablespace can grow very large in a write-heavy environment. If transactions stay open for a long time (even if they’re not doing any work) and they’re using the default REPEATABLE READ transaction isolation level, InnoDB won’t be able to remove old row versions, because the uncommitted transactions will still need to be able to see them. InnoDB stores the old versions in the tablespace, so it continues to grow as more data is updated. Sometimes the problem isn’t uncommitted transactions, but just the workload: the purge process is only a single thread until recent versions of MySQL, and it might not be able to keep up with the number of old row versions that need to be purged.
In either case, the output of SHOW INNODB STATUS can help you pinpoint the problem. Look at the history list length; it shows the size of the undo log, in units of pages.
You can corroborate this by examining the first and second lines of the TRANSACTIONS section, which show the current transaction number and the point to which the purge has completed. If the difference is large, you might have a lot of unpurged transactions. Here’s an example:
------------
TRANSACTIONS
------------
Trx id counter 0 80157601
Purge done for trx’s n:o <0 80154573 undo n:o <0 0
The transaction identifier is a 64-bit number composed of two 32-bit numbers (it’s a hexadecimal number in newer versions of InnoDB), so you might have to do a little math to compute the difference. In this case it’s easy, because the high bits are just zeros: there are 80,157,601 – 80,154,573 = 3,028 potentially unpurged transactions (innotop can do this math for you). We said “potentially” because a large difference doesn’t necessarily mean there are a lot of unpurged rows. Only transactions that change data will create old row versions, and there might be many transactions that haven’t changed any data (conversely, a single transaction could have changed many rows).
If you have a large undo log and your tablespace is growing because of it, you can force MySQL to slow down enough for InnoDB’s purge thread to keep up. This might not sound attractive, but there’s no alternative. Otherwise, InnoDB will keep writing data and filling up your disk until the disk runs out of space or the tablespace reaches the limits you’ve defined.
To throttle the writes, set the innodb_max_purge_lag variable to a value other than 0. This value indicates the maximum number of transactions that can be waiting to be purged before InnoDB starts to delay further queries that update data. You’ll have to know your workload to decide on a good value. As an example, if your average transaction affects 1 KB of rows and you can tolerate 100 MB of unpurged rows in your tablespace, you could set the value to 100000.
Bear in mind that unpurged row versions impact all queries, because they effectively make your tables and indexes larger. If the purge thread simply can’t keep up, performance can decrease dramatically. Setting the innodb_max_purge_lag variable will slow down performance too, but it’s the lesser of the two evils.[118]
In newer versions of MySQL, and even in older versions of Percona Server and MariaDB, the purging process is significantly improved and separated from other internal housekeeping tasks. You can even create multiple dedicated purge threads to do this background work more quickly. This is a better option than throttling the server, if you can take advantage of it.
The doublewrite buffer
InnoDB uses a doublewrite buffer to avoid data corruption in case of partial page writes. A partial page write occurs when a disk write doesn’t complete fully, and only a portion of a 16 KB page is written to disk. There are a variety of reasons (crashes, bugs, and so on) that a page might be partially written to disk. The doublewrite buffer guards against data corruption if this happens.
The doublewrite buffer is a special reserved area of the tablespace, large enough to hold 100 pages in a contiguous block. It is essentially a backup copy of recently written pages. When InnoDB flushes pages from the buffer pool to the disk, it writes (and flushes) them first to the doublewrite buffer, then to the main data area where they really belong. This ensures that every page write is atomic and durable.
Doesn’t this mean that every page is written twice? Yes, it does, but because InnoDB writes several pages to the doublewrite buffer sequentially and only then calls fsync() to sync them to disk, the performance impact is relatively small—generally a few percentage points, not double, although the overhead is more noticeable on solid-state drives, as we’ll discuss in the next chapter. More importantly, this strategy allows the log files to be much more efficient. Because the doublewrite buffer gives InnoDB a very strong guarantee that the data pages are not corrupt, InnoDB’s log records don’t have to contain full pages; they are more like binary deltas to pages.
If there’s a partial page write to the doublewrite buffer itself, the original page will still be on disk in its real location. When InnoDB recovers, it will use the original page instead of the corrupted copy in the doublewrite buffer. However, if the doublewrite buffer succeeds and the write to the page’s real location fails, InnoDB will use the copy in the doublewrite buffer during recovery. InnoDB knows when a page is corrupt because each page has a checksum at the end; the checksum is the last thing to be written, so if the page’s contents don’t match the checksum, the page is corrupt. Upon recovery, therefore, InnoDB just reads each page in the doublewrite buffer and verifies the checksums. If a page’s checksum is incorrect, it reads the page from its original location.
In some cases, the doublewrite buffer really isn’t necessary—for example, you might want to disable it on replicas. Also, some filesystems (such as ZFS) do the same thing themselves, so it is redundant for InnoDB to do it. You can disable the doublewrite buffer by settinginnodb_doublewrite to 0. In Percona Server, you can configure the doublewrite buffer to be stored in its own file, so you can separate this workload from the rest of the server’s work by placing it on separate disk drives.
Other I/O configuration options
The sync_binlog option controls how MySQL flushes the binary log to disk. Its default value is 0, which means MySQL does no flushing and it’s up to the operating system to decide when to flush its cache to durable storage. If the value is greater than 0, it specifies how many binary log writes happen between flushes to disk (each write is a single statement if autocommit is set, and otherwise a transaction). It’s rare to set this option to anything other than 0 or 1.
If you don’t set sync_binlog to 1, it’s likely that a crash will cause your binary log to be out of sync with your transactional data. This can easily break replication and make point-in-time recovery impossible. However, the safety provided by setting this option to 1 comes at high price. Synchronizing the binary log and the transaction log requires MySQL to flush two files in two distinct locations. This might require a disk seek, which is relatively slow.
As with the InnoDB log file, placing the binary log on a RAID volume with a battery-backed write cache can give a huge performance boost. In fact, writing and flushing the binary logs is actually more expensive than writing and flushing the InnoDB transaction logs, because unlike the InnoDB transaction logs, every write to the binary logs increases their size. That requires a metadata update at the filesystem level for every write. Thus, setting sync_binlog=1 can be much more detrimental to performance than setting innodb_flush_log_at_trx_commit=1, especially on network filesystems such as NFS.
A non-performance-related note on the binary logs: if you want to use the expire_logs_days option to remove old binary logs automatically, don’t remove them with rm. The server will get confused and refuse to remove them automatically, and PURGE MASTER LOGS will stop working. The solution, should you find yourself entangled in this situation, is to manually resync the hostname-bin.index file with the list of files that still exist on disk.
We cover RAID in more depth in the next chapter, but it’s worth repeating here that good-quality RAID controllers, with battery-backed write caches set to use the write-back policy, can handle thousands of writes per second and still give you durable storage. The data gets written to a fast cache with a battery, so it will survive even if the system loses power. When the power comes back, the RAID controller will write the data from the cache to the disk before making the disk available for use. Thus, a good RAID controller with a large enough battery-backed write cache can improve performance dramatically and is a very good investment. Of course, solid-state storage is another option; we also cover that in the next chapter.
MyISAM I/O Configuration
Let’s begin by considering how MyISAM performs I/O for its indexes. MyISAM normally flushes index changes to disk after every write. If you’re going to make many modifications to a table, however, it might be faster to batch these writes together.
One way to do this is with LOCK TABLES, which defers writes until you unlock the tables. This can be a valuable technique for improving performance, because it lets you control exactly which writes are deferred and when the writes are flushed to disk. You can defer writes for precisely the statements you want.
You can also defer index writes by using the delay_key_write variable. If you do this, modified key buffer blocks are not flushed until the table is closed.[119] The possible settings are as follows:
OFF
MyISAM flushes modified blocks in the key buffer (key cache) to disk after every write, unless the table is locked with LOCK TABLES.
ON
Delayed key writes are enabled, but only for tables created with the DELAY_KEY_WRITE option.
ALL
All MyISAM tables use delayed key writes.
Delaying key writes can be helpful in some cases, but it doesn’t usually create a big performance boost. It’s most useful with smaller data sizes, when the key cache’s read hit ratio is good but the write hit ratio is bad. It also has quite a few drawbacks:
§ If the server crashes and the blocks haven’t been flushed to disk, the index will be corrupt.
§ If many writes are delayed, it’ll take longer for MySQL to close a table, because it will have to wait for the buffers to be flushed to disk. This can cause long table cache locks in MySQL 5.0.
§ FLUSH TABLES can take a long time, for the reason just mentioned. This in turn can increase the time it takes to run FLUSH TABLES WITH READ LOCK for a logical volume manager (LVM) snapshot or other backup operation.
§ Unflushed dirty blocks in the key buffer might not leave any room in the buffer for new blocks to be read from disk. Therefore, queries might stall while waiting for MyISAM to free up some space in the key buffer.
In addition to configuring MyISAM’s index I/O, you can configure how MyISAM tries to recover from corruption. The myisam_recover option controls how MyISAM looks for and repairs errors. You have to set this option in the configuration file or at the command line. You can view, but not change, the option’s value with this SQL statement (this is not a typo—the system variable has a different name from the corresponding command-line option):
mysql> SHOW VARIABLES LIKE 'myisam_recover_options';
Enabling this option instructs MySQL to check MyISAM tables for corruption when it opens them, and to repair them if problems are found. You can set the following values:
DEFAULT (or no setting)
Instructs MySQL to try to repair any table that is marked as having crashed or not marked as having been closed cleanly. The default setting performs no other actions upon recovery. In contrast to how most variables work, this DEFAULT value is not an instruction to reset the variable to its compiled-in value; it essentially means “no setting.”
BACKUP
Makes MySQL write a backup of the data file into a .BAK file, which you can examine afterward.
FORCE
Makes recovery continue even if more than one row will be lost from the .MYD file.
QUICK
Skips recovery unless there are delete blocks. These are blocks of deleted rows that are still occupying space and can be reused for future INSERT statements. This can be useful because MyISAM recovery can take a very long time on large tables.
You can use multiple settings, separated by commas. For example, BACKUP,FORCE will force recovery and create a backup. This is what we used in our sample configuration file earlier in this chapter.
We recommend that you enable this option, especially if you have just a few small MyISAM tables. Running a server with corrupted MyISAM tables is dangerous, because they can sometimes cause more data corruption and even server crashes. However, if you have large tables, automatic recovery might be impractical: it causes the server to check and repair all MyISAM tables when they’re opened, which is inefficient. During this time, MySQL tends to block connections from performing any work. If you have a lot of MyISAM tables, it might be a good idea to use a less intrusive process that runs CHECK TABLES and REPAIR TABLES after startup.[120] Either way, it is very important to check and repair the tables.
Enabling memory-mapped access to data files is another useful MyISAM option. Memory mapping lets MyISAM access the .MYD files directly via the operating system’s page cache, avoiding costly system calls. In MySQL 5.1 and newer, you can enable memory mapping with themyisam_use_mmap option. Older versions of MySQL use memory mapping for compressed MyISAM tables only.
[116] For the curious, Percona Server’s innodb_recovery_stats option can help you understand your server’s workload from the standpoint of performing crash recovery.
[117] We’re talking about spindle-based disk drives with rotating platters, not solid-state hard drives, which have completely different performance characteristics.
[118] Note that the way this ought to be implemented is a topic of some debate; see MySQL bug 60776 for the details.
[119] The table can be closed for several reasons. For example, the server might close the table because there’s not enough room in the table cache, or someone might execute FLUSH TABLES.
[120] Some Debian systems do this automatically, which is a swing of the pendulum too far in the other direction. It’s not a good idea to just configure this behavior by default as Debian does; the DBA should decide.
Configuring MySQL Concurrency
When you’re running MySQL in a high-concurrency workload, you might run into bottlenecks you wouldn’t otherwise experience. This section explains how to detect these problems when they happen, and how to get the best performance possible under these workloads for MyISAM and InnoDB.
InnoDB Concurrency Configuration
InnoDB is designed for high concurrency, and it has improved dramatically in the last few years, but it’s still not perfect. The InnoDB architecture still shows some roots in limited-memory, single-CPU, single-disk systems. Some aspects of InnoDB’s performance can degrade in high-concurrency situations, and your only recourse is to limit concurrency. You can use the techniques shown in Chapter 3 to diagnose concurrency problems.
If you have problems with InnoDB concurrency, the solution is usually to upgrade the server. In comparison with current versions, older versions such as MySQL 5.0 and early MySQL 5.1 were an unmitigated disaster under high concurrency. Everything queued on global mutexes such as the buffer pool mutex, and the server practically ground to a halt. If you upgrade to one of the newer versions of MySQL, you don’t need to limit concurrency in most cases.
If you do, here’s how it works. InnoDB has its own “thread scheduler” that controls how threads enter its kernel to access data, and what they can do once they’re inside the kernel. The most basic way to limit concurrency is with the innodb_thread_concurrency variable, which limits how many threads can be in the kernel at once. A value of 0 means there is no limit on the number of threads. If you are having InnoDB concurrency problems in older MySQL versions, this variable is the most important one to configure.[121]
It’s impossible to name a good value for any given architecture and workload. In theory, the following formula gives a good value:
concurrency = Number of CPUs * Number of Disks * 2
But in practice, it can be better to use a much smaller value. You will have to experiment to find the best value for your system.
If more than the allowed number of threads are already in the kernel, a thread can’t enter the kernel. InnoDB uses a two-phase process to try to let threads enter as efficiently as possible. The two-phase policy reduces the overhead of context switches caused by the operating system scheduler. The thread first sleeps for innodb_thread_sleep_delay microseconds, and then tries again. If it still can’t enter, it goes into a queue of waiting threads and yields to the operating system.
The default sleep time in the first phase is 10,000 microseconds. Changing this value can help in high-concurrency environments, when the CPU is underused with a lot of threads in the “sleeping before entering queue” status. The default value can also be much too large if you have a lot of small queries, because it adds 10 milliseconds to query latency.
Once a thread is inside the kernel, it has a certain number of “tickets” that let it back into the kernel for “free,” without any concurrency checks. This limits how much work it can do before it has to get back in line with other waiting threads. The innodb_concurrency_tickets option controls the number of tickets. It rarely needs to be changed unless you have a lot of extremely long-running queries. Tickets are granted per-query, not per-transaction. Once a query finishes, its unused tickets are discarded.
In addition to the bottlenecks in the buffer pool and other structures, there’s another concurrency bottleneck at the commit stage, which is largely I/O-bound because of flush operations. The innodb_commit_concurrency variable governs how many threads can commit at the same time. Configuring this option might help if there’s a lot of thread thrashing even when innodb_thread_concurrency is set to a low value.
Finally, there’s a new solution that might be worth considering: using a thread pool to limit concurrency. The original thread pool implementation was in the abandoned MySQL 6.0 source tree, and had serious flaws. But it’s been reimplemented in MariaDB, and Oracle has recently released a commercial plugin to provide a thread pool for MySQL 5.5. We don’t have enough experience with either of these to guide you, so we’ll confuse you further by pointing out that neither implementation seemed to satisfy Facebook, which has met its unique needs with so-called “admission control” features in its own private branch of MySQL. Hopefully by the fourth edition of this book we’ll have some more knowledge to share on thread pools and when they work or don’t work.
MyISAM Concurrency Configuration
MyISAM allows concurrent inserts and reads under some conditions, and it lets you “schedule” some operations to try to block as little as possible.
Before we look at MyISAM’s concurrency settings, it’s important to understand how MyISAM deletes and inserts rows. Delete operations don’t rearrange the entire table; they just mark rows as deleted, leaving “holes” in the table. MyISAM prefers to fill the holes if it can, reusing the spaces for inserted rows. If there are no holes, it appends new rows to the end of the table.
Even though MyISAM has table-level locks, it can append new rows concurrently with reads. It does this by stopping the reads at the last row that existed when they began. This avoids inconsistent reads.
However, it is much more difficult to provide consistent reads when something is changing the middle of the table. MVCC is the most popular way to solve this problem: it lets readers read old versions of data while writers create new versions. However, MyISAM doesn’t support MVCC as InnoDB does, so it doesn’t support concurrent inserts unless they go at the end of the table.
You can configure MyISAM’s concurrent insert behavior with the concurrent_insert variable, which can have the following values:
0
MyISAM allows no concurrent inserts; every insert locks the table exclusively.
1
This is the default value. MyISAM allows concurrent inserts, as long as there are no holes in the table.
2
This value is available in MySQL 5.0 and newer. It forces concurrent inserts to append to the end of the table, even when there are holes. If there are no threads reading from the table, MySQL will place the new rows in the holes. The table can become more fragmented than usual with this setting.
You can also configure MySQL to delay some operations to a later time, when they can be combined for greater efficiency. For instance, you can delay index writes with the delay_key_write variable, which we mentioned earlier in this chapter. This involves the familiar trade-off: write the index right away (safe but expensive), or wait and hope the power doesn’t fail before the write happens (faster, but likely to cause massive index corruption in the event of a crash because the index file will be very out of date).
You can also give INSERT, REPLACE, DELETE, and UPDATE queries lower priority than SELECT queries with the low_priority_updates option. This is equivalent to globally applying the LOW_PRIORITY modifier to UPDATE queries. It’s actually a very important option when you use MyISAM; it lets you get decent concurrency for SELECT queries that would otherwise starve in the presence of a very small number of queries getting top priority for write locks.
Finally, even though InnoDB’s scalability issues are more often talked about, MyISAM has also had problems with mutexes for a long time. In MySQL 4.0 and earlier, a global mutex protected any I/O to the key buffer, which caused scalability problems with multiple CPUs and multiple disks. MySQL 4.1’s key buffer code is improved and doesn’t have this problem anymore, but it still holds a mutex on each key buffer. This is an issue when a thread copies key blocks from the key buffer into its local storage, rather than reading from the disk. The disk bottleneck is gone, but there’s still a bottleneck when accessing data in the key buffer. You can sometimes work around this problem with multiple key buffers, but this approach isn’t always successful. For example, there’s no way to solve the problem when it involves only a single index. As a result, concurrentSELECT queries can perform significantly worse on multi-CPU machines than on a single-CPU machine, even when these are the only queries running. MariaDB offers segmented (partitioned) key buffers, which can help significantly when you experience this problem.
[121] In fact, in some workloads, the system that implements the concurrency limits itself can become a bottleneck, so sometimes it needs to be enabled, and at other times it needs to be disabled. Profiling will show you which to do.
Workload-Based Configuration
One goal of configuring your server is to customize it for your specific workload. This requires intimate knowledge of the number, type, and frequency of all kinds of server activities—not just queries, but other activities too, such as connecting to the server and flushing tables.
The first thing you should do, if you haven’t done it already, is become familiar with your server. Know what kinds of queries run on it. Monitor it with tools such as innotop, and use pt-query-digest to create a query report. It’s helpful to know not only what your server is doing overall, but what each MySQL query spends a lot of time doing. Chapter 3 explains how to find this out.
Try to log all queries when your server is running at full capacity, because that’s the best way to see what kinds of queries suffer most. At the same time, capture snapshots of the process list and aggregate them by their state or command (innotop can do this for you, or you can use the scripts shown in Chapter 3). For example, are there a lot of queries copying results to temporary tables, or sorting results? If so, you might need to optimize the queries, and potentially look at the configuration settings for temporary tables and sort buffers.
Optimizing for BLOB and TEXT Workloads
BLOB and TEXT columns are a special type of workload for MySQL. (We’ll refer to all of the BLOB and TEXT types as BLOB here for simplicity, because they belong to the same class of data types.) There are several restrictions on BLOB values that make the server treat them differently from other types. One of the most important considerations is that the server cannot use in-memory temporary tables for BLOB values.[122] Thus, if a query involving BLOB values requires a temporary table—no matter how small—it will go to disk immediately. This is very inefficient, especially for otherwise small and fast queries. The temporary table could be most of the query’s cost.
There are two ways to ease this penalty: convert the values to VARCHAR with the SUBSTRING() function (see Chapter 4 for more on this), or make temporary tables faster.
The best way to make temporary tables faster is to place them on a memory-based filesystem (tmpfs on GNU/Linux). This removes some overhead, although it’s still much slower than using in-memory tables. Using a memory-based filesystem is helpful because the operating system tries to avoid writing data to disk.[123] Normal filesystems are cached in memory too, but the operating system might flush normal filesystem data every few seconds. A tmpfs filesystem never gets flushed. The tmpfs filesystem is also designed for low overhead and simplicity. For example, there’s no need for the filesystem to make any provisions for recovery. That makes it faster.
The server setting that controls where temporary tables are placed is tmpdir. Monitor how full the filesystem gets to ensure you have enough space for temporary tables. If necessary, you can even specify several temporary table locations, which MySQL will use in a round-robin fashion.
If your BLOB columns are very large and you use InnoDB, you might also want to increase InnoDB’s log buffer size. We wrote more about this earlier in this chapter.
For long variable-length columns (e.g., BLOB, TEXT, and long character columns), InnoDB stores a 768-byte prefix in-page with the rest of the row.[124] If the column’s value is longer than this prefix length, InnoDB might allocate external storage space outside the row to store the rest of the value. It allocates this space in whole 16 KB pages, just like all other InnoDB pages, and each column gets its own page (columns do not share external storage space). InnoDB allocates external storage space to a column a page at a time until 32 pages are used; then it allocates 64 pages at a time.
Note that we said InnoDB might allocate external storage. If the total length of the row, including the full value of the long column, is shorter than InnoDB’s maximum row length (a little less than 8 KB), InnoDB will not allocate external storage even if the long column’s value exceeds the prefix length.
Finally, when InnoDB updates a long column that is placed in external storage, it doesn’t update it in place. Instead, it writes the new value to a new location in external storage and deletes the old value.
All of this has the following consequences:
§ Long columns can waste a lot of space in InnoDB. For example, if you store a column value that is one byte too long to fit in the row, it will use an entire page to store the remaining byte, wasting most of the page. Likewise, if you have a value that is slightly more than 32 pages long, itmight actually use 96 pages on disk.
§ External storage disables the adaptive hash index, which needs to compare the full length of columns to verify that it has found the right data. (The hash helps InnoDB find “guesses” very quickly, but it must check that its “guess” is correct.) Because the adaptive hash index is completely in-memory and is built directly “on top of” frequently accessed pages in the buffer pool, it doesn’t work with external storage.
§ Long values can make any query with a WHERE clause that doesn’t use an index run slowly. MySQL reads all columns before it applies the WHERE clause, so it might ask InnoDB to read a lot of external storage, then check the WHERE clause and throw away all the data it read. It’s never a good idea to select columns you don’t need, but this is a special case where it’s even more important to avoid doing so. If you find your queries are suffering from this limitation, you can try to use covering indexes to help.
§ If you have many long columns in a single table, it might be better to combine the data they store into a single column, perhaps as an XML document. That lets all the values share external storage, rather than using their own pages.
§ You can sometimes gain significant space and performance benefits by storing long columns in a BLOB and compressing them with COMPRESS(), or compressing them in the application before sending them to MySQL.
Optimizing for Filesorts
Recall from Chapter 6 that MySQL has two filesort algorithms. It uses the two-pass algorithm if the total size of all the columns needed for the query, plus the ORDER BY columns, exceeds max_length_for_sort_data bytes. It also uses this algorithm when any of the required columns—even those not used for the ORDER BY—is a BLOB or TEXT column. (You can use SUBSTRING() to convert such columns to types that can work with the single-pass algorithm.)
MySQL has two variables that can help you control how it performs filesorts. You can influence MySQL’s choice of algorithm by changing the value of the max_length_for_sort_data variable.[125] Because the single-pass algorithm creates a fixed-size buffer for each row it will sort, the maximum length of VARCHAR columns is what counts toward max_length_for_sort_data, not the actual size of the stored data. This is one of the reasons why we recommend you make these columns only as large as necessary.
When MySQL has to sort on BLOB or TEXT columns, it uses only a prefix and ignores the remainder of the values. This is because it has to allocate a fixed-size structure to hold the values and copy the prefix from external storage into that structure. You can specify how large this prefix should be with the max_sort_length variable.
Unfortunately, MySQL doesn’t really give you any visibility into which sort algorithm it uses. If you increase the max_length_for_sort_data variable and your disk usage goes up, your CPU usage goes down, and the Sort_merge_passes status variable begins to grow more quickly than it did before the change, you’ve probably forced more sorts to use the single-pass algorithm.
[122] Recent versions of Percona Server lift this restriction in some cases.
[123] Data can still go to disk if the operating system swaps it.
[124] This is long enough to create a 255-character index on a column, even if it’s utf8, which might require up to three bytes per character. This prefix is specific to the Antelope InnoDB file format; it doesn’t apply to the Barracuda format, which is available in MySQL 5.1 and newer (though not enabled by default).
[125] MySQL 5.6 will introduce changes to the way the sort buffer is used in queries with a LIMIT clause and will fix a problem that caused a large sort buffer to perform an expensive setup routine, so when you upgrade to MySQL 5.6 you should carefully check any customizations you’ve made to these settings.
Completing the Basic Configuration
We’re done with the tour of server internals—hope you enjoyed the trip! Now let’s return to our sample configuration file and see how to choose values for the settings that remain.
We’ve already discussed how to choose values for the general settings such as the data directory, the InnoDB and MyISAM caches, logs, and a few other things. Let’s go over what remains:
tmp_table_size and max_heap_table_size
These settings control how large an in-memory temporary table using the Memory storage engine can grow. If an implicit temporary table’s size exceeds either of these settings, it will be converted to an on-disk MyISAM table so it can keep growing. (An implicit temporary table is one that you don’t create yourself; the server creates it for you to hold an intermediate result while executing a query.)
You should simply set both of these variables to the same value. We’ve chosen the value 32M for our sample configuration file. This might not be enough, but beware of setting this variable too large. It’s good for temporary tables to live in memory, but if they’re simply going to be huge, it’s actually best for them to just use on-disk tables, or you could run the server out of memory.
Assuming that your queries aren’t creating enormous temporary tables (which you can often avoid with proper indexing and query design), it’s a good idea to set these variables large enough that you don’t have to go through the process of converting an in-memory table to an on-disk table. This procedure will show up in the process list.
You can look at how the server’s SHOW STATUS counters change over time to understand how often you create temporary tables and whether they go to disk. You can’t tell whether a table was created in memory and then converted to on-disk or just created on-disk to begin with (perhaps because of a BLOB column), but you can at least see how often the tables go to disk. Examine the Created_tmp_disk_tables and Created_tmp_tables variables.
max_connections
This setting acts like an emergency brake to keep your server from being overwhelmed by a surge of connections from the application. If the application misbehaves, or the server encounters a problem such as a stall, a lot of new connections can be opened. But opening a connection does no good if it can’t execute queries, so being denied with a “too many connections” error is a way to fail fast and fail cheaply.
Set max_connections high enough to accommodate the usual load that you think you’ll experience, as well as a safety margin to permit logging in and administering the server. For example, if you think you’ll have 300 or so connections in normal operations, you might set this to 500 or so. If you don’t know how many connections you’ll get, 500 is not an unreasonable starting point anyway. The default is 100, but that’s not enough for a lot of applications.
Beware also of surprises that might make you hit the limit of connections. For example, if you restart an application server, it might not close its connections cleanly, and MySQL might not realize they’ve been closed. When the application server comes back up and tries to open connections to the database, it might be refused due to the dead connections that haven’t timed out yet.
Watch the Max_used_connections status variable over time. It is a high-water mark that shows you if the server has had a spike in connections at some point. If it reaches max_connections, chances are a client has been denied at least once, and you should probably use the techniques shown in Chapter 3 to capture server activity when that occurs.
thread_cache_size
You can compute a reasonable value for this variable by observing the server’s behavior over time. Watch the Threads_connected status variable and find its typical maximum and minimum. You might want to set the thread cache large enough to hold the difference between the peak and off-peak usage, and go ahead and be generous, because if you set it a bit too high it’s not a big problem. You might set it two or three times as large as needed to hold the fluctuations in usage. For example, if the Threads_connected status variable seems to vary between 150 and 175, you could set the thread cache to 75. But you probably shouldn’t set it very large, because it isn’t really useful to keep around a huge amount of spare threads waiting for connections; a ceiling of 250 is a nice round number (or 256, if you prefer a power of two).
You can also watch the change over time in the Threads_created status variable. If this value is large or increasing, it’s another clue that you might need to increase the thread_cache_size variable. Check Threads_cached to see how many threads are in the cache already.
A related status variable is Slow_launch_threads. A large value for this status variable means that something is delaying new threads upon connection. This is a clue that something is wrong with your server, but it doesn’t really indicate what. It usually means there’s a system overload, causing the operating system not to schedule any CPU time for newly created threads. It doesn’t necessarily indicate that you need to increase the size of the thread cache. You should diagnose the problem and fix it rather than masking it with a cache, because it might be affecting other things, too.
table_cache_size
This cache (or the two caches into which it was split in MySQL 5.1) should be set large enough to keep from reopening and reparsing table definitions all the time. You can check this by inspecting the value of Open_tables and the change over time in the value of Opened_tables. If you see many Opened_tables per second, your table_cache value might not be large enough. Explicit temporary tables can also cause a growing number of opened tables even when the table cache isn’t fully used, though, so it might be nothing to worry about. Your clue would be that Opened_tables grows constantly even though Open_tables isn’t as large as table_cache_size.
Even if the table cache is useful, you should not set this variable too large. It turns out that the table cache can be counterproductive in two circumstances.
First, MySQL doesn’t use a very efficient algorithm to check the cache, so if it’s really big, it can get really slow. You probably shouldn’t set it higher than 10,000 in most cases, or 10,240 if you like those powers of two.[126]
The second reason to avoid setting this very large is that some workloads simply aren’t cacheable. If the workload isn’t cacheable, and everything is going to be a cache miss no matter how large you make the cache, forget the cache and set it to zero! This helps you avoid making the situation worse; a cache miss is better than an expensive cache check followed by a cache miss. What kinds of workloads aren’t cacheable? If you have tens or hundreds of thousands of tables and you use them all pretty uniformly, you probably can’t cache them all, and you’re better off setting this variable small. This is sometimes appropriate on systems that have a very large number of collocated applications, none of which is very busy.
A reasonable starting value for this setting is 10 times as big as max_connections, but again, keep it under 10,000 or so in most cases.
There are several other kinds of settings that you will frequently include in your configuration file, including binary logging and replication settings. Binary logging is useful for enabling point-in-time recovery and for replication, and replication has a few settings of its own. We’ll cover the important settings in the chapters on replication and backups, later in this book.
[126] Have you heard the joke about powers of two? There are 10 types of people in the world: those who understand binary, and those who don’t. There are also another 10 types of people: those who think binary/decimal jokes are funny, and those who have sex. We won’t say whether or not we think that’s hilarious.
Safety and Sanity Settings
After your basic configuration settings are in place, you might wish to enable a number of settings that make the server safer and more reliable. Some of them influence performance, because safety and reliability are often more costly to guarantee. Some are just sensible, however: they prevent silly mistakes such as inserting nonsensical data into the server. And some don’t make a difference in day-to-day operation, but prevent bad things from happening in edge cases.
Let’s look at a collection of useful options for general server behavior first:
expire_logs_days
If you enable binary logging, you should enable this option, which causes the server to purge old binary logs after the specified number of days. If you don’t enable it, you will eventually run the server out of disk space, and it will freeze or crash. We suggest setting this option large enough that you can recover from at least two backups ago (in case the most recent backup fails). Even if you take backups every day, still leave yourself at least 7 to 14 days’ worth of binary logs. Our experience shows that you’ll be grateful for a week or two of binary logs when you have some unusual problem, such as rebuilding a replica and then trying to get it caught up again with the master. You want to keep enough binary logs around to give yourself some breathing room for operations such as these.
max_allowed_packet
This setting prevents the server from sending too large a packet, and also controls how large a packet it will accept. The default is probably too small, but it can also be set dangerously large. If it’s set too small, sometimes problems can occur in replication, typically when the replica can’t retrieve data from the master that it needs for replication. You might increase the setting from its default to 16 MB or so.
It’s not documented, but this option also controls the maximum size of a user-defined variable, so if you need very large variables, be careful—they can be truncated or set to NULL if they exceed the size of this variable.
max_connect_errors
If something goes wrong with your networking for a moment, there is an application or configuration error, or there is another problem such as privileges that prevent connections from completing successfully for a brief period of time, clients can get blacklisted and will be unable to connect again until you flush the host cache. The default setting for this option is so small that this problem can happen too easily. You might want to increase it, and in fact, if you know that the server is adequately secured against brute-force attacks, you can just make it very large to effectively disable host blacklisting.
skip_name_resolve
This setting disables another networking- and authentication-related trap: DNS lookups. DNS is one of the weak points in MySQL’s connection process. When you connect to the server, by default it tries to determine the hostname from which you’re connecting and uses that as part of the authentication credentials. (That is, your credentials are your username, hostname, and password—not just your username and password.) But to verify your hostname, the server needs to perform both a reverse and a forward DNS lookup. This is all fine until DNS starts to have problems, which is pretty much a certainty at some point in time. When that happens, everything piles up and eventually the connection times out. To prevent this, we strongly recommend that you set this option, which disables DNS lookups during authentication. However, if you do this you will need to convert all of your hostname-based grants to use IP addresses, wildcards, or the special hostname “localhost,” because hostname-based accounts will be disabled.
sql_mode
This setting can accept a variety of options that modify server behavior. We don’t recommend changing these just for the fun of it; it’s better to let MySQL be MySQL in most ways and not try to make it behave like other database servers. (Many client and GUI tools expect MySQL to have its own flavor of SQL, for example, so if you change it to speak more ANSI-compliant SQL some things might break.) However, several of the settings are very useful, and some might be worth considering in your specific cases. You might want to look at the documentation for the following options and consider using them: STRICT_TRANS_TABLES, ERROR_FOR_DIVISION_BY_ZERO, NO_AUTO_CREATE_USER, NO_AUTO_VALUE_ON_ZERO, NO_ENGINE_SUBSTITUTION, NO_ZERO_DATE, NO_ZERO_IN_DATE, and ONLY_FULL_GROUP_BY.
However, be aware that it might not be a good idea to change these settings for existing applications, because doing so might make the server incompatible with the application’s expectations. It’s pretty common for people to unwittingly write queries that refer to columns not in the GROUP BY clause or use aggregate functions, for example, so if you want to enable the ONLY_FULL_GROUP_BY option it’s a good idea to do it in a development or staging server first, and only deploy it in production once you’re sure everything is working.
sysdate_is_now
This is another setting that might be backward-incompatible with applications’ expectations. But if you don’t explicitly desire the SYSDATE() function to have nondeterministic behavior, which can break replication and make point-in-time recovery from backups unreliable, you might want to enable this option and make its behavior deterministic.
A few options control replication behavior and are very helpful for preventing problems on replicas:
read_only
This option prevents unprivileged users from making changes on replicas, which should be receiving changes only from the master, not from the application. We strongly recommend setting replicas to read-only mode.
skip_slave_start
This option prevents MySQL from taking the bit between its teeth and attempting to start replication automatically. You want to disable automatic starting because it is unsafe after a crash or other problem; a human needs to examine the server manually and determine that it is safe to start replication.
slave_net_timeout
This option controls how long it’ll be before a replica notices that its connection to its master has failed and needs to be reconnected. The default option, one hour, is way too long. Set it to a minute or less.
sync_master_info, sync_relay_log, and sync_relay_log_info
These options, available in MySQL 5.5 and newer, correct longstanding problems with replicas: they don’t sync their status files to disk, so if the server crashes it can be anyone’s guess what the replica’s position relative to the master actually was, and there can be corruption in the relay logs. These options make replicas much more likely to be recoverable after a crash. They are not enabled by default, because they cause extra fsync() operations on replicas, which can slow them down. We suggest enabling these options if you have decent hardware, and disabling them if there is a problem with replication that you can trace to latency caused by fsync().
There’s a less intrusive way to do this in Percona Server, enabled with the innodb_overwrite_relay_log_info option. This makes InnoDB store the replication position in the InnoDB transaction logs, which is fully transactional and doesn’t require any extra fsync() operations. During crash recovery, InnoDB will check the replication metadata files and update them to have the correct position if they’re out of date.
Advanced InnoDB Settings
Recall our discussion of InnoDB’s history in Chapter 1: it was first built in, then available in two versions, and now the newer version of the engine is once again built into the server. The newer InnoDB code has more features and is much more scalable. If you’re using MySQL 5.1, you should configure MySQL explicitly to ignore the old version of InnoDB and use the newer version. It will improve server performance greatly. You’ll need to enable the ignore_builtin_innodb option, and then configure the plugin_load option to enable InnoDB as a plugin. Consult the InnoDB manual for the exact syntax for your platform.[127]
Several options are available in the newer version of InnoDB, once you’ve enabled it. Some of these are quite important for server performance, and there are also a couple of safety and sanity options:
innodb
This rather innocuous-looking option is actually very important. If you set its value to FORCE, the server will not be able to start unless InnoDB can start. If you use InnoDB as your default storage engine, this is definitely what you want. You do not want the server to start when InnoDB fails because of some error such as a misconfiguration, because a badly behaved application could then connect to the server and cause who knows what harm and confusion. It’s much better for the server to fail as a whole, which will force you to look at the error log instead of believing that the server started okay.
innodb_autoinc_lock_mode
This option controls how InnoDB generates autoincrementing primary key values, which can be a bottleneck in some cases, such as high-concurrency inserts. If you have many transactions waiting on the autoincrement lock (you can see this in SHOW ENGINE INNODB STATUS), you should investigate this setting. We won’t repeat the manual’s explanation of the options and their behaviors.
innodb_buffer_pool_instances
This setting divides the buffer pool into multiple segments in MySQL 5.5 and newer, and is probably one of the most important ways to improve MySQL’s scalability on multicore machines with a highly concurrent workload. Multiple buffer pools partition the workload so that some of the global mutexes are not such hot contention points.
It is not yet clear what kind of guidelines we should develop for choosing the number of buffer pool instances. We have run most of our benchmarks with eight instances, but we probably won’t understand some of the subtleties of multiple buffer pool instances until MySQL 5.5 has been deployed more widely for a longer time.
We don’t mean that to imply that MySQL 5.5 isn’t deployed widely in production. It’s just that the most extreme cases of mutex contention we’ve helped solve have been for very large, very conservative users, for whom an upgrade can require many months to plan, validate, and execute. These users are sometimes running a highly customized version of MySQL, which makes it doubly important for them to be careful with upgrades. When more of these folks upgrade to MySQL 5.5 and stress it in their own unique ways, we’ll probably learn some interesting things about multiple buffer pools that we haven’t seen yet. Until then, we can say that it appears to be very beneficial to run with eight buffer pool instances.
It’s worth noting that Percona Server takes a different approach to solving InnoDB’s mutex contention issues. Instead of partitioning the buffer pool—an admittedly tried-and-true approach in many systems like InnoDB—we opted to divide some of the global mutexes into smaller, more special-purpose mutexes. Our benchmarks show that the best improvement of all comes from a combination of the two approaches, which is available in Percona Server version 5.5: multiple buffer pools and more fine-grained mutexes.
innodb_io_capacity
InnoDB used to be hardcoded to assume that it ran on a single hard disk capable of 100 I/O operations per second. This was a bad default. Now you can inform InnoDB how much I/O capacity is available to it. InnoDB sometimes needs this set quite high (tens of thousands on extremely fast storage such as PCI-E flash devices) to flush dirty pages in a steady fashion, for reasons that are quite complex to explain.
innodb_read_io_threads and innodb_write_io_threads
These options control how many background threads are available for I/O operations. The default in recent versions of MySQL is to have four read threads and four write threads, which is enough for a lot of servers, especially with the native asynchronous I/O available in MySQL 5.5. If you have many hard drives and a high-concurrency workload, and you see that the threads are having a hard time keeping up, you can increase the number of threads, or you can simply set them to the number of physical spindles you have for I/O (even if they’re behind a RAID controller).
innodb_strict_mode
This setting makes InnoDB throw errors instead of warnings for some conditions, especially invalid or possibly dangerous CREATE TABLE options. If you enable this option, be certain to check all of your CREATE TABLE options, because it might not let you create some tables that used to be fine. Sometimes it’s a bit pessimistic and overly restrictive. You wouldn’t want to find this out when you were trying to restore a backup.
innodb_old_blocks_time
InnoDB has a two-part buffer pool least recently used (LRU) list, which is designed to prevent ad hoc queries from evicting pages that are used many times over the long term. A one-off query such as those issued by mysqldump will typically bring a page into the buffer pool LRU list, read the rows from it, and move on to the next page. In theory, the two-part LRU list will prevent this page from displacing pages that will be needed for a long time by placing it into the “young” sublist and only moving it to the “old” sublist after it has been accessed multiple times. But InnoDB is not configured to prevent this by default, because the page has multiple rows, and thus the multiple accesses to read rows from the page will cause it to be moved to the “old” sublist immediately, placing pressure on pages that need a long lifetime. This variable specifies the number of milliseconds that must elapse before a page can move from the “young” part of the LRU list to the “old” part. It’s set to 0 by default, and setting it to a small value such as 1000 (one second) has proven very effective in our benchmarks.
[127] In Percona Server, there’s only one version of InnoDB and it’s built in, so you don’t need to disable one version and load another one to replace it.
Summary
After you’ve worked through this chapter, you should have a server configuration that is much better than the defaults. Your server should be fast and stable, and you should not need to tweak the configuration unless you run into an unusual circumstance.
To review, we suggest that you begin with our sample configuration file, set the basic options for your server and workload, add safety and sanity options as desired, and, if appropriate, configure the new options available in the InnoDB plugin and in MySQL 5.5. That’s really all you need to do.
The most important options are these two, assuming that you use InnoDB, which most people should:
§ innodb_buffer_pool_size
§ innodb_log_file_size
Congratulations—you just solved the vast majority of real-world configuration problems we’ve seen! If you use our configuration tool at http://tools.percona.com, you will get good suggestions for a starting point on these and other configuration options.
We’ve also made a lot of suggestions about what not to do. The most important of these are not to “tune” your server; not to use ratios, formulas, or “tuning scripts” as a basis for setting the configuration variables; not to trust advice from unknown people on the Internet; and not to go hunting in SHOW STATUS counters for things that look bad. If something is actually wrong, it’ll show up in your server profiling.
There are a few significant settings we didn’t discuss in this chapter, which are important for specific types of hardware and workloads. We delayed discussion of these settings because we believe that any advice on settings needs to be paired with an explanation of the internal processes at work. This brings us to the next chapter, which will show you how to optimize your hardware and operating system for MySQL, and vice versa.
All materials on the site are licensed Creative Commons Attribution-Sharealike 3.0 Unported CC BY-SA 3.0 & GNU Free Documentation License (GFDL)
If you are the copyright holder of any material contained on our site and intend to remove it, please contact our site administrator for approval.
© 2016-2026 All site design rights belong to S.Y.A.