Learning Nagios 4 (2014)
Chapter 9. Monitoring using SNMP
The previous chapter talked about different approaches to verify remote computers and the services they offer. This chapter covers another way to monitor remote machines and devices.
Simple Network Management Protocol (SNMP) is designed to monitor and manage various devices connected to a network. Its main purpose is to create a standardized way to get and set parameters, regardless of the underlying hardware. The protocol allows the retrieval of information from a device and the setting of options, and covers the means for a device to notify other machines about a failure.
In this chapter, we will learn what SNMP is and how it works. We will also learn to configure SNMP on various types of machines and how to retrieve information using Nagios plugins.
Introducing SNMP
SNMP is an industry standard and all major hardware and software vendors support it. All commonly used operating systems can provide information using SNMP. Microsoft offers SNMP for its Windows platform. UNIX systems have SNMP daemons that receive requests from other machines.
SNMP also offers a standardized, hierarchical way to group and access information, called Management Information Base (MIB), which defines the attributes that can be accessed and the data types associated with them. This allows the creation of attributes that all devices should use to provide information on standard parameters, such as network configuration, usage, and potential threats. It also allows custom parameters to be created so that they do not interfere with other devices' data.
Most operating systems come with various utilities that allow communication with other devices over SNMP. These utilities can be used to verify which attributes are available on specific devices and what their values are at the moment.
SNMP is designed so that it is easy to implement and can provide a uniform way to access information on various machines. It is designed so that the footprint of the SNMP services is minimal. This allows devices with very limited storage size and operating memory to use the protocol. SNMP uses User Datagram Protocol (UDP) (http://en.wikipedia.org/wiki/User_Datagram_Protocol) that requires much fewer resources than TCP. It also uses one packet for sending a single request or response operation, so the protocol itself is stateless.
Each machine that is managed by SNMP has an application that responds to requests from local machines and remote computers. Such an application is called an agent. For UNIX systems, it is usually a daemon working in the background. Many devices with embedded systems have SNMP support included in the system's core. In all of these cases, a device needs to listen for SNMP requests and respond accordingly.
All agents are usually managed by one or more machines called the SNMP managers. This is a computer that queries agents for data and may set their attributes. Usually, this is an application running in the background that communicates over SNMP and stores the information in a data storage.
By default, SNMP uses UDP port 161 to communicate with the agent and port 162 to send information from the agent to the manager. In order to use SNMP, these ports need to be passed correctly by all network routers and should not be filtered by the firewalls.
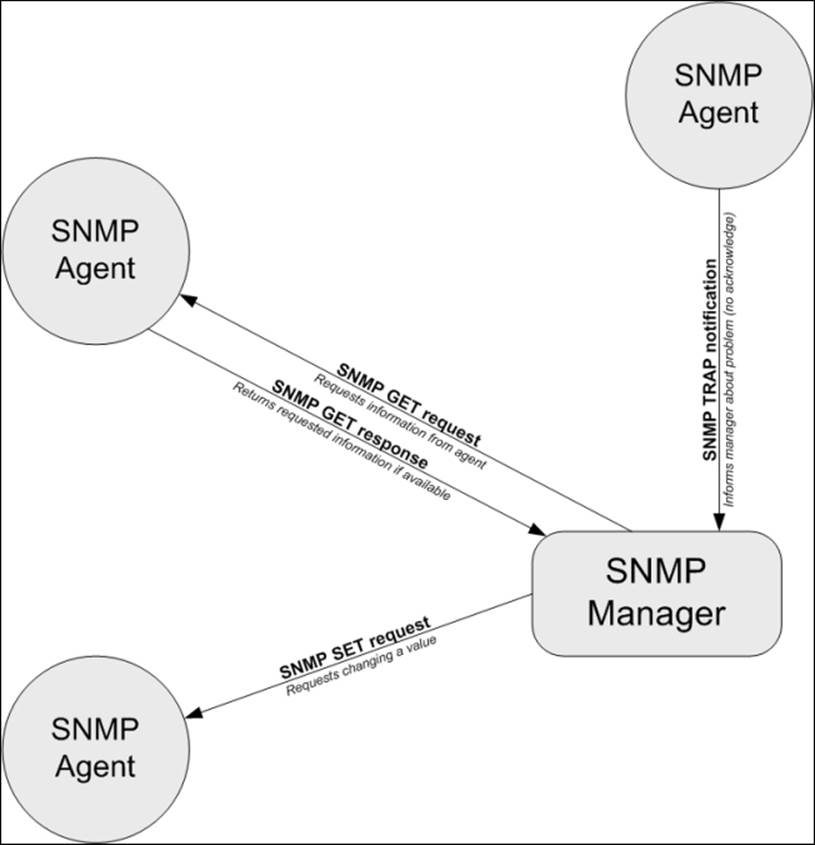
There are two types of communication used by SNMP: the first is when a manager sends requests to an agent. These can be GET requests in which the manager wants to retrieve information from an agent. If the information needs to be modified, a SET request is sent out.
Another type of communication is when an agent wants to notify a manager about a problem. In such cases, an SNMP trap is sent out. An agent needs to know the IP address of the manager to send out the information. A manager needs to listen for SNMP traps and should react to the issue.
The following is an illustration of possible SNMP communication types:
SNMP has several versions through which an agent can communicate. SNMPv1 was the first version of the protocol that featured GET, SET, and TRAP operations. The standard defines scalar data objects, which is a single value as well as tabular objects, which are a table of objects. It also featured the GETNEXT operation that allows iterating over the tables of data objects.
The security model related to SNMPv1 is relatively unsophisticated. A GET, SET, or GETNEXT request is authenticated based on the IP address of the manager and the community string that it uses. All SNMP devices communicating over SNMPv1 use the community string to verify that a request—whether none, only GET, or both GET and SET operations—can be performed. By default, the private community string allows reading and writing information, while the public community string only allows reading.
SNMP Version 2 introduced improvements in terms of both performance and security. Instead of using GET and GETNEXT, it used a GETBULK operation that allows the retrieval of all entries in a table in a single operation. It also introduced an inform packet—this is a trap that requires an acknowledgement from the manager. This tackles the problem of a single UDP packet getting lost, thus preventing a trap from being received by the manager. This version also introduced a party-based security model, which did not gain wide acceptance due to its complexity.
The most common Version 2 implementation is Community-Based Simple Network Management Protocol 2 (SNMPv2c). It uses the features of Version 2 without implementing the new security model, but uses the community string mechanism that was introduced in SNMPv1.
User-Based Network Management Protocol version 2 (SNMPv2u) is another variant of SNMP Version 2. This includes greater security than SNMPv2c, but does not include all of the security features originally developed for SNMPv2.
SNMP Version 3 introduced a more improved security model than SNMPv2 and includes authentication, privacy, and access control; one of the security frameworks uses the functionalities from SNMPv2u. This standard is now gaining more attention than SNMPv2, mostly because it offers better security without the high-level complexity of SNMPv2.
Most SNMP server implementations that are integrated with operating systems support SNMPv1, SNMPv2c, and SNMPv3. Some devices only support SNMPv1, while others also offer SNMPv2. Packets from different SNMP versions are incompatible, so a device using only SNMPv1 will not recognize a SNMPv2c packet.
In many cases, devices that are used across your network will offer a different subset of the versions they support. There are multiple ways to work in such an environment.
The best approach is to use a proxy agent. A proxy agent is usually an application on a computer or a physical device. Some SNMP management software use SNMPv3, and devices that do not support this version will need to have the packets translated. In such cases, all requests from the manager are received by the proxy agent; the proxy agent translates all packets and passes them to the actual agent, and sends the results back to the manager. The proxy agent receives traps from the actual agent. It then passes them to the manager as a trap or translates the packet using a newer SNMP version.
Often, SNMP managers allow the configuration of the SNMP version that should be used for specific devices.
Understanding data objects
SNMP uses Object Identifiers (OIDs) (http://en.wikipedia.org/wiki/Object_identifier) to identify the data objects that it refers to. OIDs define a unique object for a specified SNMP agent. The object is identified using a hierarchical definition, similar to how domains work on the Internet.
Object identifiers are a series of numbers separated by periods. Each number represents a part of the tree. Often, the first number in the series is also preceded by a period to indicate that this is an OID—this is not necessary though. An example of an OID is.1.3.6.1.2.1.1.5.0, which maps to the system name of a machine.
As it is very hard to memorize, read, and compare OIDs written as a series of numbers, there is a standard for naming and describing the MIB tree. The standard is called Management Information Base (MIB) (http://en.wikipedia.org/wiki/Management_Information_Base). It describes how various parameters are defined—how they are named, as well as what types of values these objects may return. Each MIB definition is a text file written in a subset of the ASN.1 notation (http://en.wikipedia.org/wiki/ASN.1). A file can describe a small or large subset of the MIB trees. Currently, the standard is MIB SMIv2 that defines all commonly used attributes along with additional information, which can be used by visualization applications.
MIB files describe fields that can be used in SNMP and define parent nodes in the hierarchy, the numeric identifier, and the type of data that this field is associated with. SNMP uses the following basic data types:
· String: A string, written as bytes, that can have 0 to 65535 bytes
· Integer and Integer32: A signed 32-bit integer value
· Counters32 and Counter64: These are nonnegative integers that increase and are reset to 0 after they reach the maximum value
· Gauges: These are nonnegative integers that can increase and decrease within a defined minimum-maximum range
· Time tick: This defines a time span, where the value of 100 represents one second
· IP address: This represents an address from the IP protocol family; SNMPv1 only supports IPv4, while Version 2 and 3 support both IPv4 and IPv6
In many cases, an enumeration field is returned as an integer. This means that some predefined numbers represent several predefined values. A good example is the ifType field when defining network interfaces—this specifies the type of network interface. Some examples are 23 for a Point-to-Point Protocol (PPP) (http://en.wikipedia.org/wiki/Point-to-Point_Protocol) connection and 6 for Ethernet interfaces.
An example OID is .1.3.6.1.2.1.1.5.0. The following table describes each element, both as string and as corresponding numbers:
|
Identifier |
Description |
|
1 |
iso: This is the iso standard tree |
|
3 |
org: Organizations—this node is a placeholder for all national and international organizations |
|
6 |
dod: Department of Defense—this is the node for the U.S. Department of Defense |
|
1 |
internet: Subnode for the Internet—since the Internet was originally a project for the U.S. military defense, its placeholder is under the dod subtree |
|
2 |
mgmt.: This is the Systems management node |
|
1 |
mib-2: This is the Management Information Base and a Version 2 root node |
|
1 |
system: This is the Operating system information |
|
5 |
sysName: This is the name of the machine and is usually a fully qualified domain name |
|
0 |
This is an index of the elements; in this case, it is always 0 |
The string representation of this OID is iso.org.dod.internet.mgmt.mib-2.system.sysName.0. It is also often referred to as SNMPv2-MIB::sysName.0.
The .1.3.6.1.2.1 part of the OID defines the root elements for all MIB-2 standardized parameters. All of the standard SNMP parameters that various devices use are under this OID node or its descendants. This node is also called the SNMPv2-MIB namespace; hence the SNMPv2-MIB::sysName.0 OID also maps to the same object.
The MIB tree has a few major nodes that are the bases for many other subtrees that may be significant to you under various circumstances, which are as follows:
· .1.3.6.1.2.1: This stands for iso.org.dod.internet.mgmt.mib-2, which is the base for all of the attributes that are available on a majority of SNMP-aware devices.
· .1.3.6.1.4.1: This stands for iso.org.dod.internet.private.enterprise, which is the root node for all corporations and companies that use private objects. It is used by companies such as Microsoft, Motorola, and many other hardware and software vendors.
The most important node is .1.3.6.1.2.1, which is used by all SNMP-aware devices to report information. This part of the MIB tree is the root node for a majority of standard objects. It is also mandatory for all SNMP-enabled devices to provide at least the basic part of information in this subtree. For example, information such as contact information, location, system name, and the type should be provided by all SNMP-aware devices.
SNMP can be used to retrieve different kinds of information. This information is usually grouped into various categories. All categories also have corresponding aliases with which they are usually referenced to avoid putting the entire structure in every OID definition or MIB name. All applications that offer communication over SNMP allow the specification of attributes using both OID and MIB names. Let's go over a few of the most important sections of the MIB tree.
Information in IF-MIB, IP-MIB, IPv6-MIB, RFC1213-MIB, IP-FORWARD-MIB, TCP-MIB, and UDP-MIB describe network connectivity—interfaces, IP configuration, routing, forwarding, and the TCP and UDP protocols. They allow the querying of the current configuration as well as the currently active and listening sockets.
Data contained in SNMPv2-MIB and HOST-RESOURCES-MIB describes a system's information and the current parameters. This can include information on the disk storage, current processes, installed applications, and hardware that the computer is running on.
Working with SNMP and MIB
Different operating systems can come with different SNMP applications. Many hardware vendors also offer additional software that manage multiple machines using SNMP, for example, HP OpenView or Sun Management Center. For this section and the following ones, we will use the Net-SNMP package (http://net-snmp.sourceforge.net/). This package is included in all Linux distributions and works with almost all UNIX operating systems.
In order to install this package on Ubuntu Linux, run the following command:
apt-get install snmp
For yum-based Linux distributions, the package is called net-snmp and the command to install it is as follows:
yum install net-snmp
The Net-SNMP project homepage also offers binaries for several platforms, including HP-UX and Fedora Linux. Fedora packages should also work on Red Hat Enterprise Linux systems.
It is also possible to build everything from the source for various UNIX operating systems such as AIX, HP-UX, and Solaris. Exact instructions are provided on the project page (http://net-snmp.sourceforge.net/).
After a successful installation, we should be able to run any SNMP-related command, such as snmpget, and check the Net-SNMP version by using the following command:
root@ubuntu:~# snmpget -V
NET-SNMP version: 5.3.1
Assuming we do have a host with the SNMP agent set up, and it is accepting the SNMP protocol Version 1, we can now try to communicate with it and query its host name by using the following command:
root@ubuntu:~# snmpget -v 1 -c public 192.168.2.2 \
iso.org.dod.internet.mgmt.mib-2.system.sysName.0
SNMPv2-MIB::sysName.0 = STRING: WAG354G
As you can see, the device returned the system name as WAG354G. This is actually a Linksys/Cisco router, and the only way to access its information is over the web interface or SNMP.
The Net-SNMP package comes with a couple of very useful commands that can be used to check the current values as well as dump a part of or the whole MIB tree. These commands vary from simple tools to query a single attribute to very complex ones that print out a report of partitions, which is like df on a remote system. There are also commands to display tables and to set parameters remotely.
Throughout this section and the following ones, we'll mainly use SNMP Version 1 as it is supported by almost all SNMP-enabled devices. When using SNMP in production, it's better to check which devices accept the SNMP versions and use one that is most recent and handled correctly by a device.
The first command that's worth getting familiar with is snmpget. This allows the querying of a single or multiple attributes over SNMP.
The syntax of the command is as follows:
snmpget [options] IP-address OID [OID] ...
All of the Net-SNMP commands accept a huge number of parameters. The following parameters are used throughout this chapter and are worth knowing:
|
Option |
Description |
|
-h |
This provides help |
|
-V |
This prints the Net-SNMP version |
|
-c |
This specifies the community name to be used |
|
-v |
This specifies the SNMP version to be used; it should be either 1, 2c, or 3 |
|
-r |
This specifies the number of retries |
|
-t |
This indicates the timeout in seconds |
|
-O |
This denotes output options and should be one or more of the following: n: This prints OIDs as numerical values without expanding them from MIB e: This prints enum and OID fields as numbers instead of string values v: This prints values only, instead of the name = value format f: This prints full OID names and disallows shortcuts such as SNMPv2-MIB |
The -O option allows the retrieval of values without having to apply MIB shortcuts, thus giving us the ability to see the entire branch. It also allows output to be changed so that only values along with data types are printed, instead of the object names themselves.
An example of this command is as follows:
# snmpget –O ef -v 1 -c public rtr SNMPv2-MIB::sysObjectID.0
.iso.org.dod.internet.mgmt.mib-2.system.sysObjectID.0 = OID: .iso.org.dod.internet.private.enterprises.ucdavis.ucdSnmpAgent.linux
Note
All of the previous options can also be used with other Net-SNMP commands.
Net-SNMP also offers a command to iterate through either the entire MIB tree or only a part of it. The snmpwalk command accepts the same options as shown earlier. Most versions of Net-SNMP's snmpwalk command do not require the passing of any OID to work. For older versions, in order to list the entire tree, .1 can be specified as the OID.
The following command will list the entire MIB tree of an SNMPv1 agent:
root@ubuntu:~# snmpwalk -v 1 -c public 192.168.2.2
Depending on the underlying operating system and the SNMP agent itself, the actual data may be different. Please note that if the device is not on a local network, then this operation may take a very long time to complete.
In order to retrieve only a part of the MIB tree, simply pass the prefix of the tree you are interested in. An example is shown in the following command line:
root@ubuntu:~# snmpwalk -v 1 -c public 192.168.2.2 1.3.6.1.2.1.1
The preceding command will limit the query to the iso.org.dod.internet.mgmt.mib-2.system node and its children. It will also be completed much faster than querying the entire tree.
Walking over a part of a tree is mainly useful when trying to check the objects that are available on a remote device that does not respond quickly to SNMP requests—either because of a network lag or the computations required for some objects. It is also commonly used to find out which values are available in a specified part of the MIB tree.
Another useful utility is the snmptable command. It allows the listing of various SNMP tables and shows them in a human-readable form. The syntax is as follows:
snmptable [options] IP-address OIDprefix
For example, to list all TCP/IP connections, the following command can be used:
root@:~# snmptable -v 1 -c public 192.168.2.2 tcpConnTable
SNMP table: TCP-MIB::tcpConnTable
connState connLocalAddress connLocalPort connRemAddress connRemPort
listen 0.0.0.0 23 0.0.0.0 0
listen 0.0.0.0 80 0.0.0.0 0
listen 0.0.0.0 199 0.0.0.0 0
Net-SNMP also allows the setting of new object values that can be used to reconfigure various devices, which can be performed using the snmpset command. The syntax for this command is as follows:
snmpset [options] IP-address OID type value [OID type value] ...
This command accepts all of the same standard options as does the snmpget command. A single command invocation can be used to set more than one parameter by specifying more than one set of OIDs. Each set operation needs to specify the new value along with the data type it should be set to.
The value type can be one of the types listed in the following table:
|
Type |
Description |
|
i |
Integer |
|
u |
Unsigned integer |
|
s |
String |
|
x |
Hex string—each letter is specified as 2 hex digits |
|
d |
Decimal string—each letter is specified as 1-2 digits |
|
n |
NULL object |
|
o |
OID—for objects that accept other objects |
|
t |
Timeticks |
|
a |
IP address |
|
B |
Series of bits |
The most common types are String, Integer, and OID. The first two require the passing of either a number or text that the object's value should be set to. Setting an OID type of object requires providing either a full OID identifier or a string that can be matched by the MIB definitions.
An example of how to set a system's contact name and host name is as follows:
root@ubuntu:~# snmpset -v 2c -c private 192.168.2.2 \
SNMPv2-MIB::sysContact.0 s admin@net.home \
SNMPv2-MIB::sysName.0 s RTR
SNMPv2-MIB::sysContact.0 = STRING: admin@net.home
SNMPv2-MIB::sysName.0 = STRING: RTR
Some attributes cannot be set via SNMP. For example, it is not possible to modify objects that are used for the monitoring system. These "unsettable" attributes usually include the IP address configuration, counters, or diagnostic information—for example, TCP/UDP connection tables, process lists, installed applications, and performance counters. Many devices tend to support command-line administration over SNMP, and in this case, the parameters may be read-only.
MIB definitions specify which attributes are explicitly read-only. Using a graphical tool to find out which attributes can be modified will ease the automatic device configuration over the SNMP protocol.
Using graphical tools
Using SNMP and the MIB tree is not a simple task. Many people, not very familiar with command-line tools and the large amounts of information returned, may feel a bit overwhelmed by it. This is where graphical tools come in handy. There are lots of freely available tools that can visualize SNMP; however, we will discuss only a few of them here.
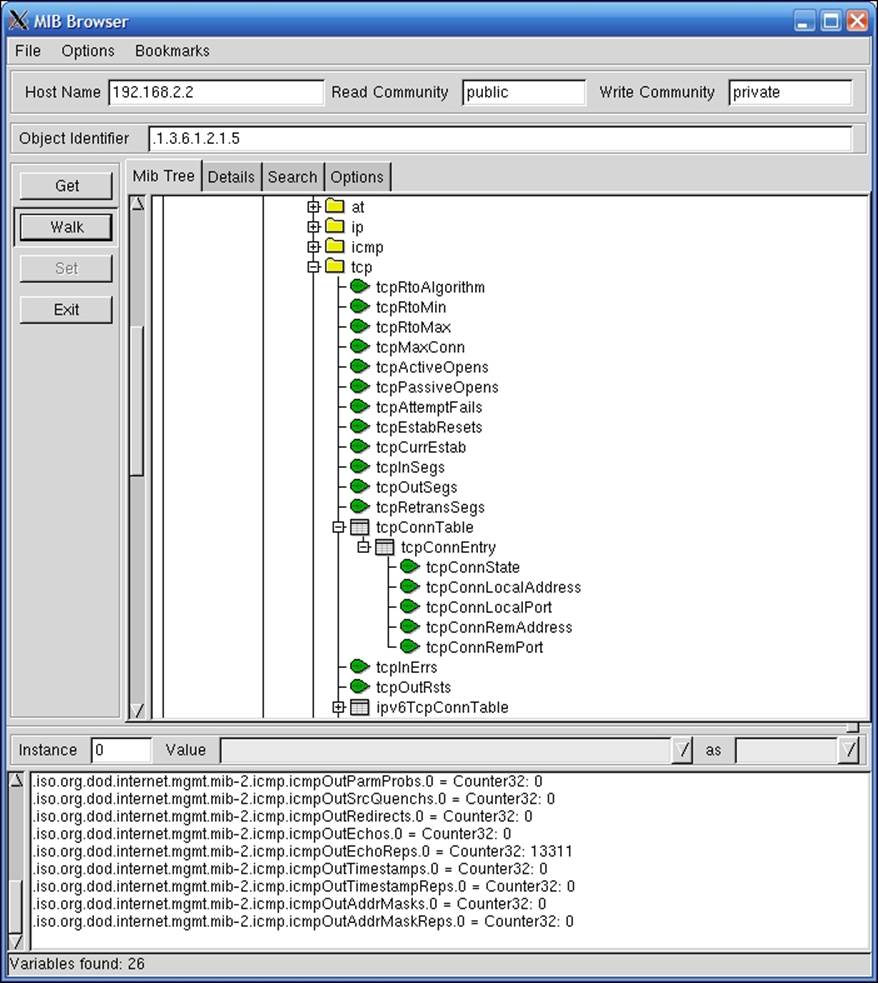
The first tool is called mbrowse (http://www.kill-9.org/mbrowse/). It is a graphical tool used to browse the MIB tree, query attributes, and run a complete or partial walk through the MIB tree. This tool uses the SNMPv1 and the SNMPv2c protocols. It uses the Net-SNMP libraries and shares the same MIB definitions.
The following screenshot shows the tool with a result from a walk and an expanded TCP tree:
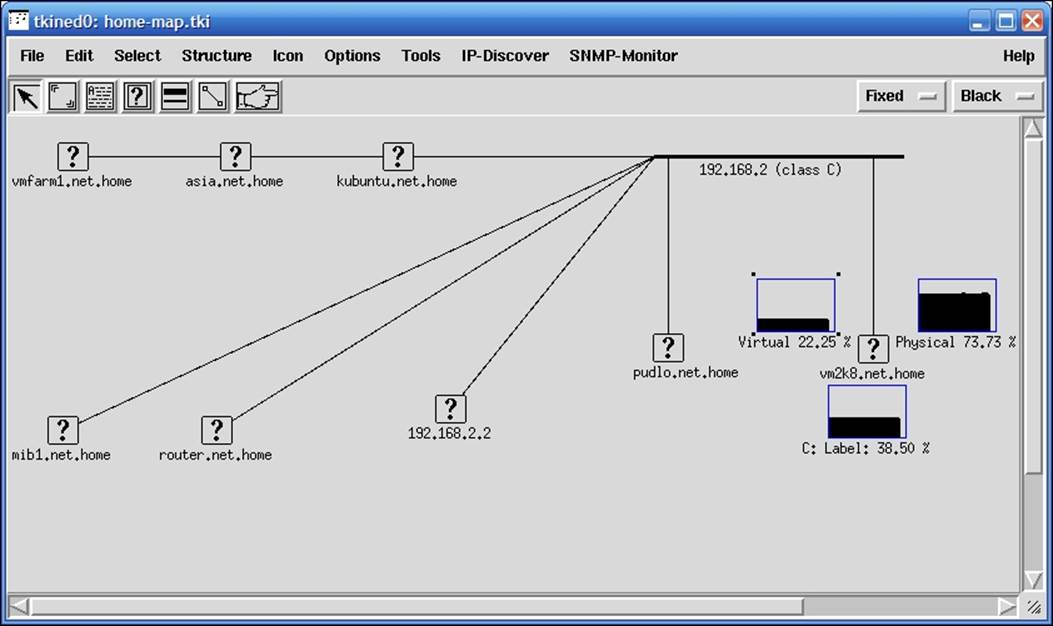
Another interesting tool is Tcl/tK based Interactive Network EDitor (TkIned) from the Scotty package (https://trac.eecs.iu-bremen.de/projects/scotty/). This is a graphical tool that uses Tk for the graphical interface and Scotty for the SNMP protocol. It allows the browsing of the MIB tree, the monitoring of hosts over SNMP, and the visualization of your network by clicking on the layout.
This tool also has another very interesting feature. Based on one or more IP network addresses, it can automatically detect your networks and try to find hosts that respond to SNMP requests. It uses the default public/private community pair and communicates over the SNMPv1 and SNMPv2c protocols. This allows the detection of various operating systems and devices that are configured to respond to these communities, which are still default in many cases.
The tool can be configured to monitor various parameters such as disk usage or system load over the SNMP protocol. The results are graphed and updated in real time. This can serve as a backup system to verify up-to-date values for various attributes. Once the SNMP or ICMP checks are set up, they are done periodically until removed from the map.
The following screenshot shows the tool after an IP-discover option has been run, where the tool has been configured to monitor the disk and memory usage of a Windows machine:
The layout of the machines on the chart can be freely edited. There is also a wide set of icons that can be associated with particular hosts.
Setting up an SNMP agent
The previous section talked about how to communicate with SNMP agents. If you have a network device such as a router or a WiFi, WiMax, or DSL gateway, it is highly probable that it will also come with a built-in SNMP agent.
The next step is to set up the SNMP agent on one or more computers so that we can use SNMP to monitor servers or workstations. In this way, a majority of the networked equipment will allow monitoring from a single machine using the SNMP protocol.
Let's start with various UNIX boxes. The SNMP agent is a part of Net-SNMP, and several distributions usually come with command-line tools, libraries, and the SNMP agent as optional packages.
In our case, we will install the SNMP agent on Ubuntu Linux by running the following command:
apt-get install snmpd
This will cause the SNMP daemon, which is a part of Net-SNMP, to be installed. By default, the Ubuntu Linux SNMP agent only accepts connections on 127.0.0.1; this is for security reasons. In many cases, an SNMP agent is used mainly by tools such as MRTG to gather usage statistics.
To change this, we will need to either specify the IP address that the SNMP agent should listen on in the SNMPDOPTS variable of the /etc/default/snmpd file, or remove it completely—it should be the last argument in the SNMPDOPTS variable.
If the SNMP agent should listen on all available IP addresses, then the line should look similar to the following example:
SNMPDOPTS='-Lsd -Lf /dev/null -u snmp -I -smux -p /var/run/snmpd.pid'
The preceding options are standard snmpd options and may differ depending on the Linux distribution and version.
Changing this option requires restarting the SNMP agent by invoking the /etc/init.d/snmpd restart command.
After a successful installation, the SNMP agent should be up and running, and making a walk over the entire tree should produce some output.
To verify that the SNMP agent we have just set up is working properly, simply launch the following command on the same machine to see if it will return information retrieved from the localhost:
snmpwalk -v 1 -c public 127.0.0.1
The agent that we have just installed supports the SNMPv1, SNMPv2c, and SNMPv3 protocol versions. It also features an extensive security model that you can configure to provide a more secure setup.
The Net-SNMP agent allows you to define one or more OIDs along with all the subnodes that can be retrieved by specific security groups. These groups can be mapped to specific communities that originate from all or specific IP addresses. Security groups are also mapped using SNMP versions used by the remote machine.
A sample configuration that allows read-only access from all of the hosts is as follows:
com2sec readonly default public
group readonlyGroup v1 readonly
group readonlyGroup v2c readonly
group readonlyGroup usm readonly
view all included .1 80
access readonlyGroup "" any noauth exact all none none
syslocation Home
syscontact Administrator <admin@yourcompany.com>
The first line defines a mapping between the community and a security group—readonly. The next three lines assign readonlyGroup access rights to this group. The next two lines grant read-only access to all objects from the .1 OID node and its children, which is the main OID node. The last two lines specify the system administrator and the location at which the machines are stored.
For the SNMPv3 model, it is also possible to specify one or more users by calling the snmpusm command (http://linux.die.net/man/1/snmpusm). It allows real-time configuration of the user list for local or remote SNMPv3 agents.
SNMP can also be set up on all modern Microsoft Windows operating systems. As with UNIX systems, it is necessary to install an SNMP agent. In order to do this on Windows XP and Windows 2003 Server, we need to perform the following steps:
1. We first need to go to the Control Panel.
2. Next, we need to select the Add or Remove Programs applet and select the Add/Remove Windows Components option. The following window will be displayed:
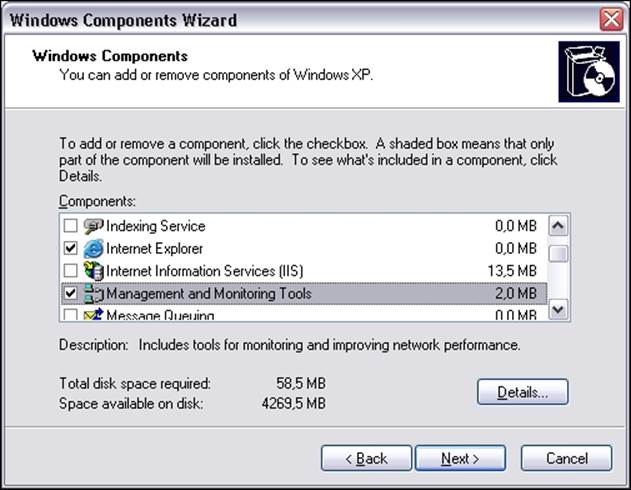
3. Then, select both Simple Network Management Protocol and WMI SNMP Provider from the next window (shown in the following screenshot) to proceed with the installation of SNMP management and monitoring tools:
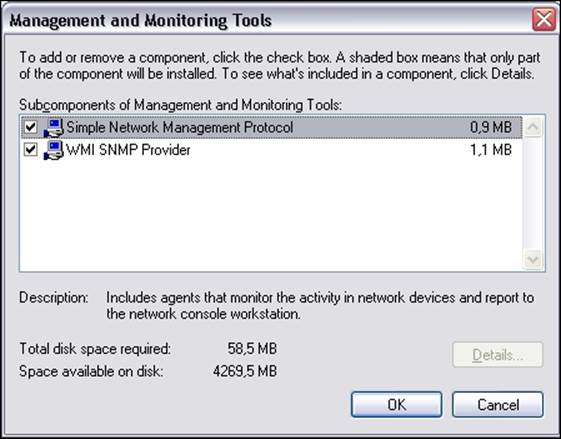
4. Next, we need to select Management and Monitoring Tools, as shown in the preceding screenshot. We can also click on the Details button and choose Simple Network Management Protocol. The WMI SNMP Provider allows the retrieval of the SNMP parameters over WMI and can be left unchecked if you do not need it.
The Windows SNMP agent exports information about the system in the same way as other platforms. You can use it to query the underlying hardware, the operating system version, and the network configuration, along with the currently active connections. It is also possible to list active processes and monitor the system load. The Windows SNMP agent also exports details of all of the installed applications along with security patches from Microsoft. This mechanism can be used to monitor whether all critical system patches are installed. It can also be used to track software license monitor compliance by checking installed and/or running software and keeping count of which machines have license-restricted software applied.
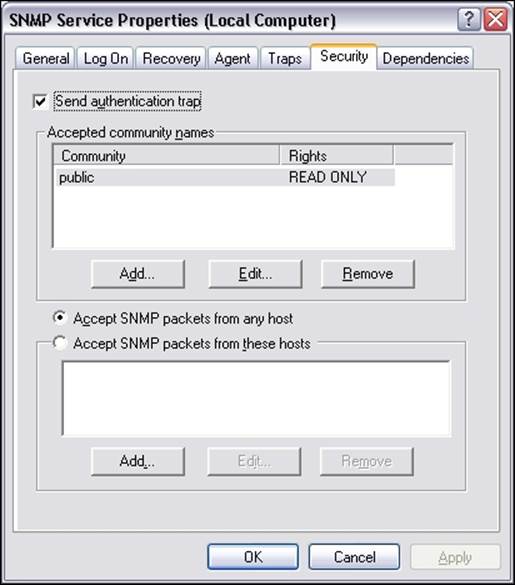
After successful installation, we can go to the Administrative Tools folder and run the Services applet. When selecting SNMP Service and choosing Properties, the following service properties window, along with the SNMP configuration, is displayed:
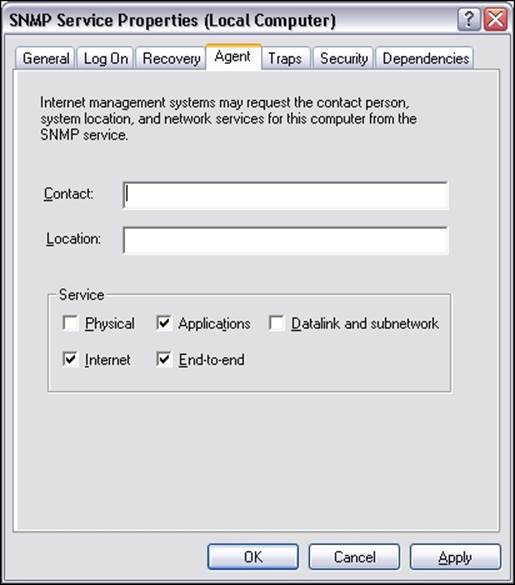
The window has three additional tabs—Agent, Traps, and Security. The Agent tab allows you to configure which parts are exported over SNMP and offers the setting up of contact and location information, as shown in the following screenshot:
The Security tab allows you to configure how SNMP information from this host can be accessed. The Windows SNMP agent offers support for SNMPv1 and SNMPv2c, so the security model is based on a community string and IP addresses for authentication.
The agent can accept SNMP queries either from all hosts or only from the specific hosts listed in the bottom part of the tab. There is also the possibility of specifying one or more readable and writable communities. By default, only queries on the public community string are accepted and allowed read-only access.
The Traps tab allows configuration of Windows to send or forward traps to specific IP addresses and indicate which SNMP community is to be used for communication.
Using SNMP from Nagios
Now that we are able to query information from Windows and UNIX boxes, it would be good to know how to integrate SNMP checks with Nagios. The Nagios plugins package comes with a plugin called check_snmp for checking SNMP parameters and validating their value. The plugin uses the snmpget and snmpgetnext commands from Net-SNMP, and it does not work without these commands. The syntax of the check_snmp command is as follows:
check_snmp -H <ip_address> -o <OID> [-w warn_range] [-c crit_range]
[-C community] [-s string] [-r regex] [-R regexi]
[-l label] [-u units] [-d delimiter] [-D output- delimiter]
[-t timeout] [-e retries] [-p port-number]
[-m miblist] [-P snmp version] [-L seclevel] [-U secname]
[-a authproto] [-A authpasswd] [-X privpasswd]
The following table describes the commonly-used options accepted by the plugin. Options that are required are marked in bold.
|
Option |
Description |
|
-H, --hostname |
Host name or IP address of the machine to connect to; this option must be specified |
|
-o, --oid |
OID to get from the remote machine; can be specified either as dot-separated numbers or as a name, multiple elements can be specified and need to be separated with commas or spaces |
|
-w |
Specifies the min:max range of values outside of which a warning state should be returned; for integer results only |
|
-c |
Specifies the min:max range of values outside of which a critical state should be returned; for integer results only |
|
-P, --protocol |
Specifies the SNMP protocol version; accepted values are 1, 2c, and 3 |
|
-C, --community |
Specifies the community string to be used; for SNMPv1 and SNMPv2c, this defaults to public |
|
-s, --string |
Returns a critical state unless the result is an exact match to the value specified in this parameter |
|
-r, --regex |
Returns a critical state if the result does not match the specified regular expression; is case sensitive |
|
-R, --eregi |
Returns a critical state if the result does not match the specified regular expression; is case insensitive |
|
-t, --timeout |
Specifies the period in seconds after which it is assumed that no response has been received and the operation times out |
|
-e, --retries |
Specifies the number of retries that should be performed if no answer is received |
|
-n, --next |
Uses the getnext request instead of get to retrieve the following attribute after the specified one |
|
-d, --delimiter |
Specifies the delimiter which should be used to match values in the output from the Net-SNMP commands; defaults to an equal sign(=) |
|
-D, --output-delimiter |
Specifies the character used to separate output if multiple OIDs are provided |
Depending on which exact flags are passed, the plugin behavior is different. In all cases, the plugin will return critical if the SNMP agent could not be contacted or if the specified OID does not exist. If none of the -s, -r/-R, -w, and -c flags are specified, the plugin will return OK as long as the OID is not retrieved. Specifying -s will cause the check to fail if the value returned by the SNMP get request is different from the value supplied to this option. It is worth noting that this option uses an exact match, not a substring.
An example would be to make sure that the exact location is specified in an SNMP agent. This can be checked by the following command:
root@ubuntu:~# /opt/nagios/plugins/check_snmp -H 10.0.0.1 -P 2c \
-o SNMPv2-MIB::sysLocation.0 -s "Miami Branch"
SNMP OK - VMware | SNMPv2-MIB::sysLocation.0=Miami Branch
Matching a part of text can be done with the -r or -R option. The first one is a case-sensitive match. The latter option ignores the case while matching the resulting value. Similarly, to make sure that the contact information field contains e-mail information, the following command can be used:
root@ubuntu:~# /opt/nagios/plugins/check_snmp -H 10.0.0.1 -P 2c \
-o SNMPv2-MIB::sysContact.0 -r "@"
SNMP OK – root@company.com | SNMPv2-MIB::sysContact.0=root@company.com
It is also possible to match the specific value ranger for integer results, in which case the values indicate acceptable ranges for specific values. If the result is outside of a specified range, a WARNING or CRITICAL state is returned. It is possible to specify separate ranges for critical and warning checks.
Typical usage can be to monitor system load or the number of processes running on a specific host.
The following is an example of how to check whether the number of system processes is less than 20:
root@ubuntu:~# /opt/nagios/plugins/check_snmp -H 10.0.0.1 -P 2c \
-o HOST-RESOURCES-MIB::hrSystemProcesses.0 -w 0:20 -c 0:30
SNMP CRITICAL - *33* | HOST-RESOURCES-MIB::hrSystemProcesses.0=33
The check will return CRITICAL status if the number of processes is 30 or more. A WARNING status will be returned if the number of processes is 20 or more. If the number is less than 20, an OK status will be returned.
In all cases, it is advised that you first use the snmpwalk command and check which objects can be retrieved from a specific agent.
Nagios also comes with SNMP plugins written in Perl that allow the checking of network interfaces and their statuses. These plugins require the installation of the Perl Net::SNMP package. For Ubuntu Linux, the package name is libnet-snmp-perl.
The syntax of the plugins is as follows:
check_ifstatus -H hostname [-v version] [-C community]
check_ifoperstatus -H hostname [-v version] [-C community]
[-k index] [-d name]
The following table describes the options accepted by the plugins. Required options are marked in bold:
|
Option |
Description |
|
-H, --hostname |
The host name or the IP address of the machine to connect to; this option must be specified |
|
-v, --snmp_version |
Specifies the SNMP protocol version to be used; acceptable values are 1 and 2c |
|
-C, --community |
Specifies the SNMP community string to be used |
|
-k, --key |
Specifies the index of the network interface to be checked (ifIndex field) |
|
-d, --descr |
Specifies the regular expression to match the interface description (ifDescr field) against |
The check_ifstatus plugin simply checks whether the status of all of the interfaces is up or whether they are down for administrative purposes. If at least one interface is down, a critical status is reported even if all other interfaces are set up properly.
The check_ifoperstatus plugin allows you to check the status of a specific network interface. It is possible to specify either the index of the interface or an expression to match the device name against. An example to check the eth1 interface is as follows:
root@ubuntu:~# /opt/nagios/plugins/check_ifoperstatus -H 10.0.0.1 \-d eth1
OK: Interface eth1 (index 3) is up.
As we also checked the index that eth1 is associated with, we can now use the -k option to check the interface status, as follows:
root@ubuntu:~# /opt/nagios/plugins/check_ifoperstatus -H 10.0.0.1 –k 3
OK: Interface eth1 (index 3) is up.
The main difference is that by using the -d flag, you make sure that changes to the indexes of the network interfaces shifting your configuration are not affected. On the other hand, using the -k flag is faster. If you are sure that your interfaces will not change, it's better to use -k; otherwise, you should use -d.
The next step is to configure the Nagios commands and services for the SNMP usage. We will define a command and a corresponding service. We will also show how custom variables can be used to standardize command definitions.
The following is a generic command used to query SNMP:
define command
{
command_name check_snmp
command_line $USER1$/check_snmp –P 1 –H $HOSTADDRESS$
-o $ARG1$ $ARG2$
}
Using the Nagios 3 functionality, we can also define the _SNMPVERSION and _SNMPCOMMUNITY parameters in the host object for all of the SNMP-aware devices and use them in the command as follows:
define host
{
use generic-host
host_name linuxbox01
address 10.0.2.1
_SNMPVERSION 2c
_SNMPCOMMUNITY public
}
define command{
command_name check_snmp
command_line $USER1$/check_snmp –H $HOSTADDRESS$ -o $ARG1$
–P $_HOSTSNMPVERSION$ -C $_HOSTSNMPCOMMUNITY$ $ARG2$
}
Next, we should define one or more services that will communicate over SNMP.
Let's check for a number of processes and add some constraints that we want monitored, as shown in the following commands:
define service
{
use generic-service
hostgroup_name snmp-aware
service_description Processes
check_command check_snmp!HOST-RESOURCES-MIB::hrSystemProcesses.0!-w 0:250
–c 0:500
}
Please note that the preceding check_command statement needs to be specified on a single line. This check will monitor the number of processes running on a system.
It's worth mentioning that for Microsoft Windows systems, the number of processes that should trigger a warning and critical state should be much lower than shown in the preceding example.
Receiving traps
SNMP traps work in an opposite way to GET and SET requests. That is, the agent sends a message to the SNMP manager, as a UDP packet, when a problem occurs. For example, a link down or system crash message can be sent out to the manager so that administrators are alerted instantly. Traps differ across versions of the SNMP protocols. For SNMPv1, they are called traps and are messages that do not require any confirmation by the manager. For SNMPv2, they are called informs and require the manager to acknowledge that they have received the inform message.
In order to receive traps or informs, the SNMP software needs to accept incoming connections on UDP port 162, which is the standard port for sending and receiving SNMP trap/inform packets. In some SNMP management software, trap notifications are handled within separate applications, while in others, they are integrated into an entire SNMP manager backend.
For a Net-SNMP trap, the daemon is a part of the SNMP daemons, but is a separate binary, called snmptrapd. By default, it is not started. To change this, we will need to modify the /etc/default/snmpd file and change the TRAPDRUN variable to yes, as shown in the following command:
TRAPDRUN=yes
Changing this option requires restarting the SNMP agent by invoking the service snmpd restart command.
On Ubuntu Linux, the trap listening daemon configuration file is /etc/snmp/snmptrapd.conf. For other systems, it may be in a different location.
The daemon can log specified SNMP traps/informs. It can be configured to run predefined applications or to forward all or specific packets to other managers.
A sample configuration that logs all incoming traps but only if they originate from the SNMPv1 and SNMPv2c private community would look like this:
authCommunity log,execute,net private
This option enables the logging of traps from the private community originating from any address. It also allows the execution of handler scripts and forwarding traps to other hosts. But this requires additional configuration directives.
Each change in the snmptrapd.conf file requires a restart of the snmpd service.
Usually, traps will be received from a device such as a network router or another computer from which we want to receive traps. We will need two machines with Net-SNMP installed—one for sending the trap and another that will process it. We can use any machine for sending the traps. However, the one processing it should be the one where Nagios is installed, so we can pass it on later. For the purpose of this section, we will use another computer and define a test MIB definition.
We need to create an MIB file called NAGIOS-TRAP-TEST-MIB.txt that will define the types of traps and their OIDs. On Ubuntu, the file should be put in /usr/share/snmp/mibs; for other platforms, it should be in the same location as the SNMPv2-SMI.txt file.
The contents of the file should be as follows:
NAGIOS-TRAP-TEST-MIB DEFINITIONS ::= BEGIN
IMPORTS enterprises FROM SNMPv2-SMI;
nagiostests OBJECT IDENTIFIER ::= { enterprises 0 }
nagiostraps OBJECT IDENTIFIER ::= { nagiostests 1 }
nagiosnotifs OBJECT IDENTIFIER ::= { nagiostests 2 }
nagiosTrap TRAP-TYPE
ENTERPRISE nagiostraps
VARIABLES { sysLocation }
DESCRIPTION "SNMPv1 notification"
::= 1
nagiosNotif NOTIFICATION-TYPE
OBJECTS { sysLocation }
STATUS current
DESCRIPTION "SNMPv2c notification"
::= { nagiosnotifs 2 }
END
This contains definitions for both the SNMPv1 trap called nagiosTrap and the inform packet for SNMPv2c called nagiosNotif. The file should be copied to all of the machines that will either send or receive these trap/inform packets. In this example, we are using a subtree of the enterprises branch in SNMPv2-MIB, but this should not be used in any production environment as this is a reserved part of the MIB tree.
In order to send such a trap as an SNMPv1 packet, we need to invoke the following command on the machine that will send the traps, replacing the IP address with the actual address of the machine that is running the snmptrapd process:
root@ubuntu2:~# snmptrap -v 1 -c private 192.168.2.51 \
NAGIOS-TRAP-TEST-MIB::nagiostraps "" 6 nagiosTrap "" \
SNMPv2-MIB::sysLocation.0 s "Server Room"
Sending an SNMPv2c notification will look like this:
root@ubuntu2:~# snmptrap -v 2c -c private 192.168.2.51 "" \
NAGIOS-TRAP-TEST-MIB::nagiosNotif \
SNMPv2-MIB::sysLocation.0 s "Server Room"
Please note that, in both the cases, there is no confirmation that the packet was received. In order to determine this, we need to check the system logs—usually the /var/log/syslog or /var/log/messages files. The following command should return log entries related to traps:
root@ubuntu:~# grep TRAP /var/log/syslog /var/log/messages
Now that we know how to send traps, we should take care so that we handle them properly. The first thing that needs to be done is to add scripts as event handlers for the traps that we previously defined. We need to add these handlers on the machine that has the Nagios daemon running.
To do this, add the following lines to snmptrapd.conf and restart the snmpd service:
traphandle NAGIOS-TRAP-TEST-MIB::nagiostraps /opt/nagios/bin/passMessage
traphandle NAGIOS-TRAP-TEST-MIB::nagiosnotifs /opt/nagios/bin/passMessage
We now need to create the actual /opt/nagios/bin/passMessage script that will forward information about the traps to Nagios (as seen in the following code):
#!/bin/sh
CMD=/var/nagios/rw/nagios.cmd
read ORIGHOSTNAME
read ORIGIP
# parse IP address
IPADDR='echo "$ORIGIP" | sed 's,^...: \[,,;s,\]:.*$,,''
HOST=""
# map IP address to host and service definition
case $IPADDR in
192.168.2.52)
HOST=ubuntu2
SVC=TrapTest
;;
esac
if [ "x$HOST" = "x" ] ; then
exit 1
fi
# send check result to Nagios
CLK='date +%s'
echo "[$CLK] PROCESS_SERVICE_CHECK_RESULT;$HOST;$SVC;2;Trap received"
exit 0
When used for a volatile service, this offers a convenient way to track SNMP traps and notifications in Nagios. Such a service will remain in a critical state until a problem is acknowledged via the web interface.
Using Nagios to track SNMP traps also allows you to merge it with powerful event handling mechanisms inside Nagios. This can cause Nagios to perform other checks or try to recover from the error when a trap is received.
Using additional plugins
NagiosExchange hosts a large number of third-party plugins under the Check Plugins, Software, SNMP category (visit http://exchange.nagios.org/directory/Plugins/Network-Protocols/SNMP). These allow the monitoring of the system load over SNMP, the monitoring of processes and storage space, and the performance of many other types of checks. You can also find checks that are dedicated to specific hardware, such as Cisco or Nortel routers. There are also plugins for monitoring bandwidth usage. There are also dedicated SNMP-based check plugins that allow the monitoring of many aspects of Microsoft Windows without installing dedicated Nagios agents on these machines. This includes checks for the IIS web server, checking whether WINS and DHCP processes are running, and so on.
The Manubulon website (http://nagios.manubulon.com/) also offers a very wide variety of SNMP plugins. These offer checks for specific processes that are running and monitoring the system load, CPU usage and network interfaces, and options specific to routers.
Another interesting SNMP use is to monitor the network bandwidth usage. In this case, Nagios can be integrated with the Multi Router Traffic Grapher (MRTG) package (see http://www.mrtg.org/). This is a utility that allows the creation of graphs of bandwidth usage on various network interfaces that also use SNMP to gather information on traffic. Nagios offers a check_mrtg plugin (see http://nagiosplugins.org/man/check_mrtg) that can be used to retrieve bandwidth usage information from the MRTG log files.
Most companies that need bandwidth monitoring already use MRTG as it is the most popular solution for this task. That is why it is a good idea to integrate Nagios if you already have MRTG set up. Otherwise, it is better to use a dedicated bandwidth monitoring system.
Summary
SNMP can be used by Nagios in various ways. As the protocol is widely supported by operating systems and network devices, it is a great choice for monitoring a wide variety of machines. SNMP features a standardized way of describing typical parameters that describe a device—hardware, network connectivity, applications and services, and much more. This makes accessing this information from Nagios very easy. SNMP is enabled by default on many operating systems and on most network devices, which makes it very easy to monitor such devices in Nagios.
In this chapter we learned what SNMP is and saw the different versions of the protocol—SNMPv1, SNMPv2c, and SNMPv3. We also learned what OIDs are and how they are used to access data over SNMP. This chapter also covered how to access SNMP data graphically using various tools. This can be of great help when starting with SNMP in order to better understand it.
We learned how to use SNMP from Nagios—both for querying various SNMP-enabled devices as well as for receiving SNMP traps from other devices on the network. We also looked at additional Nagios plugins that can be used to query data over SNMP.
The next chapter will talk about monitoring Microsoft Windows machines using NSClient++. It will also describe setting up multiple Nagios instances and distributed monitoring.
All materials on the site are licensed Creative Commons Attribution-Sharealike 3.0 Unported CC BY-SA 3.0 & GNU Free Documentation License (GFDL)
If you are the copyright holder of any material contained on our site and intend to remove it, please contact our site administrator for approval.
© 2016-2026 All site design rights belong to S.Y.A.