Neo4j Essentials (2015)
Chapter 4. Querying and Structuring Data
Reading and writing are two important aspects of any data store / database. Efficient writing of records to data structures is as important as reading records from these data structures. Reading and writing are closely linked to each other, where over engineering or focus on one process may lead to performance degradation of the other. It is important to keep a balance between performances gained by one process over the other and these are often categorized as architectural trade-offs.
Reads (using patterns) uncover the hidden patterns within data but writes in comparison to reads have a different set of challenges such as handling transactions, aligning to the principles of ACID—Atomicity, Consistency of records, Isolation, and Durability of data and transactions.
Essentially, in graph databases, reading and writing together define the shape of data, which is the important aspect of graph data structures.
In the last chapter, we covered the read aspects of Neo4j, and in this chapter we will talk and discuss about the write aspects of Neo4j.
This chapter will cover the following topics:
· Cypher write queries
· Writing data in legacy indexes and schema
· Unicity and other schema constraints
· Cypher optimizations
Cypher write queries
In this section, we will discuss Cypher write queries and the way they are formulated and applied to nodes, relationships, and paths using Cypher.
Working with nodes and relationships
As we discussed in the earlier chapters, graph data structures essentially consist of two core elements: nodes and relationships. Nodes and relationships in Neo4j are created using the CREATE statement.
Let's see how CREATE can be used to create nodes and relationships:
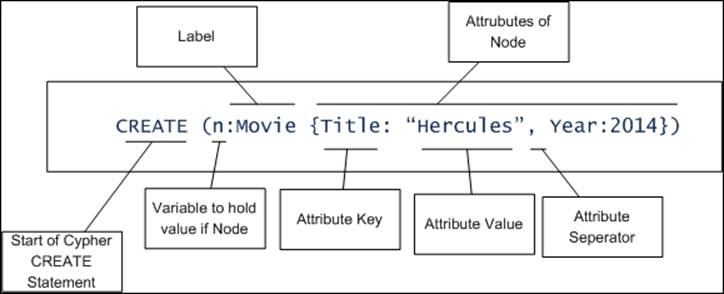
· Creating a node with one or more labels and attributes:
· CREATE (n:Movie {Title: "Hercules", Year:2014});
The preceding CREATE statement does many things. Let's understand the different parts of this statement:
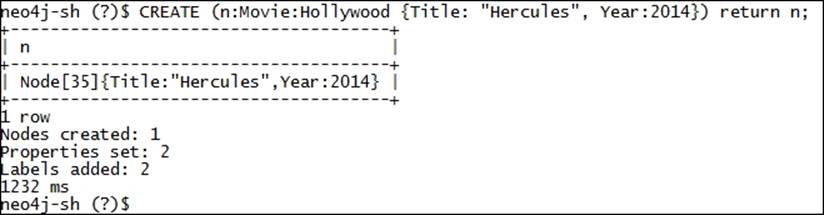
We can also create the node with multiple labels and return some value to the invoking program:
CREATE (n:Movie:Hollywood {Title: "Hercules", Year:2014}) return n;
Execute the preceding CREATE statement on <$NEO4J_HOME>/bin/neo4j-shell and it will print the value of variable n on the console, as shown in the following screenshot:
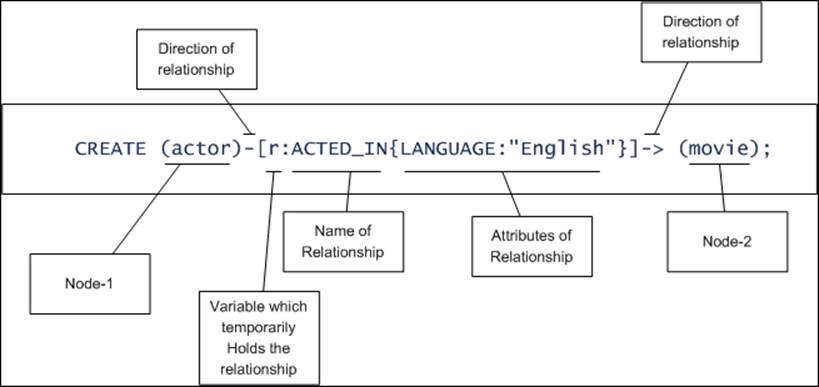
· Creating a relationship between two nodes with attributes:
Relationships are shown using a line with an arrow ahead such as --> or <--. It is also known as a directed relationship, as it shows the flow or direction of the relationship from one node to another; for example, let's create two nodes and create a relationship between them:
CREATE (actor:Actor {Name: "Russell Crowe", Age: 50})
CREATE (movie:Movie {Title: "NOAH", Year:2014})
CREATE (actor)-[r:ACTED_IN{Language:"English"}]-> (movie);
The first two CREATE statements in the preceding block of code create two distinct nodes and the last statement creates the relationship between the nodes. Similar to nodes, relationships can also have one or more attributes. The preceding statement needs to be executed as one single command on your Neo4j shell.
There is another way of writing cypher queries where we can combine multiple statements into one single statement. Extending the preceding example, we can combine all three CREATE statements into one single CREATE statement and add a RETURN in the end to see the actual value of nodes and relationships persisted in the Neo4j database:
CREATE (actor:Actor {Name: "Russell Crowe", Age: 50})-[r:ACTED_IN{Language:"English"}]->(movie:Movie {Title: "NOAH", Year:2014}) return actor,r,movie;
We can also capture the pattern defined in the preceding statement in a variable and then return the variable to the invoking program:
CREATE p = (:Actor {Name: "Russell Crowe", Age: 50})-[:ACTED_IN{LANGUAGE:"English"}]->(:Movie {Title: "NOAH", Year:2014})<-[:DIRECTED{LANGUAGE:"English"}]-(:Actor {Name: "Darren Aronofsky", Age: 45})
return p;
Capturing patterns in a variable also helps in situations where all parts of patterns are not already in the scope of a single CREATE or MATCH. For example, in the preceding query, we are creating three nodes and two relationships in one go, which otherwise is not possible with a single CREATE statement.
Working with MERGE
MERGE is used to match a given element and return a value if it exists or create a new one if it does not exist. MERGE internally performs two sequential operations of first matching the given set of elements using MATCH, and if it does not exist, using CREATE to create the missing elements.
Another benefit of MERGE is that it avoids loading duplicate data. MERGE works on exact matches and follows the principle of all or nothing. It will either perform an exact match or create the complete pattern, but in any case, it will not be executed on partial elements of the provided pattern.
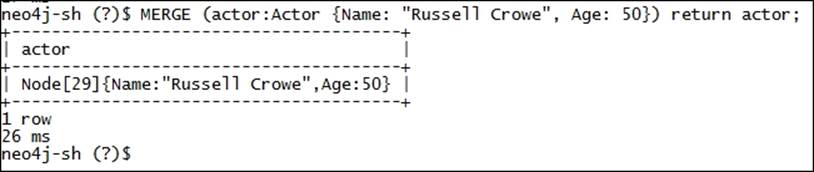
MERGE (actor:Actor {Name: "Russell Crowe", Age: 50}) return actor;
The preceding statement will first check the existence of the node with the given label and properties and will then return or create and return based on the results of the MATCH statement.
MERGE is accompanied and followed with ON CREATE and ON MATCH. These allow us to perform additional changes to the nodes, properties, and relationships depending upon the result of the MERGE command:
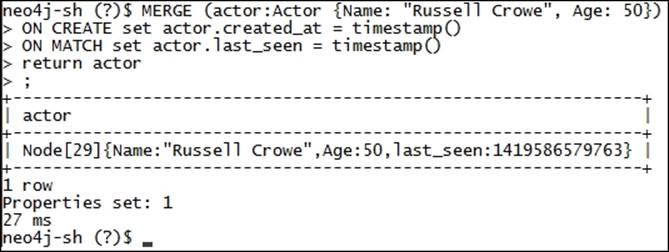
MERGE (actor:Actor {Name: "Russell Crowe", Age: 50})
ON CREATE set actor.created_at = timestamp()
ON MATCH set actor.last_seen = timestamp()
return actor;
The preceding statement will first try to match the given node. If the match is successful, then it will ignore ON CREATE and execute the pattern defined in ON MATCH and will create another property by name of last_seen and associate it with the provided node, as shown in the following screenshot:
MERGE can also be used with relationships where it checks whether a relationship exists, and if not, then it creates a new one:
MATCH (actor:Actor {Name: "Russell Crowe", Age: 50}), (movies:Movie {Title: "NOAH", Year: 2014})
MERGE (actor)-[r:ACTED_IN{Language:"English"}]->(movies)
return actor,r,movies;
The preceding statement has three parts. In the first statement, it defines the MATCH clause and instructs to match the existence of the given nodes. In the second statement, it defines the MERGE statement and instructs either to create a new relationship, or if it matches, then return the existing one. Finally, in the last statement, we used return actor,r,movies and printed everything on the console.
Writing data in legacy indexing
We briefly touched upon the history of schema and legacy indexing in the last chapter under the Schema and legacy indexing section.
Let's quickly recap important aspects of schema and legacy indexing:
· Schema was introduced in Neo4j 2.0, where it provides the feature of creating indexes and constraints on the properties of nodes within a label scope
· Once schema is defined on a label, it will automatically be used by the Cypher query planner
· In legacy / manual indexing, users need to manually create/update/delete the indexes
· Searching legacy indexes is also a manual process where users need to provide the code for searching the indexes for faster retrieval
· Legacy indexes are still supported, but it is just to provide backward compatibility for Neo4j applications that are developed and are running on Neo4j 1.9.9 or earlier
Further in this chapter, we will see how writes and searches are performed in legacy indexes and schema.
Legacy indexes can be created and managed by using the Java APIs exposed by Neo4j. Let's see the usage and syntax of Java APIs for managing legacy indexes.
The following is a piece of Java code that creates two manual indexes each on nodes and relationships:
import org.neo4j.graphdb.*;
import org.neo4j.graphdb.factory.*;
import org.neo4j.graphdb.index.*;
public class CreateOrUpdateLegacyIndexes {
public static void main(String[] args) {
new CreateOrUpdateLegacyIndexes().addDataToNodeIndex();
}
public void addDataToNodeIndex() {
String DBLocation = "$Neo4J_HOME/data/graph.db";
// Get the reference of Graph Service
GraphDatabaseService graphDb = new GraphDatabaseFactory()
.newEmbeddedDatabase(DBLocation);
//Start the Transaction.
//try-with-resources is available only with Java 1.7 and above.
try (Transaction tx = graphDb.beginTx()) {
// Getting reference of Index Manager API
IndexManager indexMgr = graphDb.index();
// Creating New Index for Nodes and Relationship
Index<Node> actorsIndex = indexMgr.forNodes("ArtistIndex");
RelationshipIndex rolesIndex = indexMgr.forRelationships("RolesIndex");
tx.success();
tx.close();
} catch (Exception e) {
e.printStackTrace();
}
}
}
The preceding code will create two empty indexes, one called ArtistIndex for indexing nodes and the other called RolesIndex. Now, for indexing nodes and relationships, you need to manually add or remove each of the index entries by using methods provided inorg.neo4j.graphdb.index.Index or org.neo4j.graphdb.index.RelationshipIndex API.
Let's continue the preceding example and add nodes to the ArtistIndex. Add the following code snippet just before tx.success();
// Creating a Node
Node node = graphDb.createNode();
// Adding Label and properties to Node
node.addLabel(DynamicLabel.label("Actors"));
node.setProperty("Name", "Ralph Macchio");
// Adding Node and its properties to the Index
actorsIndex.add(node, "Name", node.getProperty("Name"));
Note
In order to understand the preceding code, follow the comments provided within the code. This needs to be followed for the other Java code snippets given in this chapter.
Next, extending the same example, let's populate an index for relationships and add the following code snippet just before tx.success();:
// Creating new node and Adding Label and properties
Node movieNode = graphDb.createNode();
movieNode.addLabel(DynamicLabel.label("Movie"));
movieNode.setProperty("Title", "The Karate Kid II");
// Define a relationship Type
DynamicRelationshipType actsIn = DynamicRelationshipType.withName( "ACTS_IN" );
//Create a relationship between Actor and Movie
//and define its property
Relationship role1 = node.createRelationshipTo( movieNode, actsIn);
role1.setProperty( "Role", "Daniel LaRusso" );
rolesIndex.add(role1, "Role",role1.getProperty( "Role" ) );
The next step is to search the legacy indexes. Legacy API provides the following kinds of searches:
· Exact search: This allows us to search for the exact key-value pair
· Search for more than 1 key value pair: This allows us to search with * or ?.
· Full text: Legacy index API extends Lucene APIs, so it also provides full text searches
Continuing with the same example, add the following code snippet just before tx.success(); for searching nodes:
//Search the ActorsIndex by using the exact Match of Key and value
IndexHits<Node> hits = actorsIndex.get( "Name", "Ralph Macchio" );
Node searchNode = hits.next();
System.out.println("Node ID = "+searchNode.getId()+", Name = "+searchNode.getProperty("Name"));
//Search the ActorsIndex for more than one property
hits = actorsIndex.query("Name","*a*");
Node searchNode1 = hits.next();
System.out.println("Node ID = "+searchNode1.getId()+", Name = "+searchNode1.getProperty("Name"));
And we are done!!!
For compiling and running the preceding code snippets, perform the following steps and execute it from IDE itself:
1. Stop your Neo4j server (if it is already running).
2. Initialize the Java variable DBLocation with the location of your Neo4j database as per your local filesystem, which is generally available at <$NEO4J_HOME>/data/graph.db.
3. Provide all JAR files from <$NEO4J_HOME>/lib/ in the classpath.
4. Compile and execute the preceding code.
For deleting and removing indexes, you need to invoke the delete() and remove() methods of org.neo4j.graphdb.index.Index.
Note
There is no operation for updating the index entries. First, the index entries need to be removed and added again to perform the update operations.
Neo4j also provides options to manage the behavior of the indexes. We can create a full text search index or case-insensitive search index:
//Creating and initializing Full text Search Index
Index<Node> indexFullText = graphDb.index().forNodes( "full_text_search_index",MapUtil.stringMap( IndexManager.PROVIDER, "lucene", "type", "fulltext" ));
//Creating and initializing an exact search index, which is case insensitive.
Index<Node> indexCaseInSensitive = graphDb.index().forNodes( "exact-case-insensitive",MapUtil.stringMap( "type", "exact", "to_lower_case", "true" ) );
Writing data in a schema
Neo4j 2.0 introduces the schema for managing the indexes and constraints. Legacy indexes are still supported but are deprecated and would be removed from the later versions of Neo4j. The rationale behind schema was to provide an API that leverages indexes as soon as they are defined by the users. The objective was to have an automatic process for inserting/updating and searching the indexes without any manual intervention. At the time of writing this book, Neo4j Version 2.1.5 was released and APIs in schema were available to provide core features of indexes but still there were some features such as full-text searches case-insensitive searches, or spatial searches that are still in development and are due to be released in the upcoming versions of Neo4j.
Let's see the usage of various APIs in the schema package for managing indexes using Java and REST APIs.
Managing schema with Java API
In this section, you will learn about the various ways of performing CRUD operations over indexes provided by schema using the Java API.
The following Java code creates the index on the Movie Label:
GraphDatabaseService graphDb = new GraphDatabaseFactory()
.newEmbeddedDatabase(DBLocation);
// Get the Schema from the Graph DB Service
Schema schema = graphDb.schema();
// Create Index on the provided Label and property
IndexDefinition indexDefinition = schema.indexFor(DynamicLabel.label("Movie")).on("Title").create();
The following Java code fetches all indexes from the Neo4j database and prints them on the console:
GraphDatabaseService graphDb = new GraphDatabaseFactory()
.newEmbeddedDatabase(DBLocation);
// Get the Schema from the Graph DB Service
Schema schema = graphDb.schema();
// Iterate through all Indexes and Print the Labels and Properties
for (IndexDefinition inDef : schema.getIndexes()) {
System.out.println("Label = " + inDef.getLabel().name() + ", Property Keys = " + inDef.getPropertyKeys());
}
The following Java code deletes all the indexes on the Movie label:
GraphDatabaseService graphDb = new GraphDatabaseFactory()
.newEmbeddedDatabase(DBLocation);
// Get the Schema from the Graph DB Service
Schema schema = graphDb.schema();
// Iterate through all Indexes on a Label Movies and delete them
for (IndexDefinition inDef : schema.getIndexes(DynamicLabel.label("Movie"))) {
inDef.drop();
}
For compiling and running each of the preceding code snippets, perform the following steps and execute it from the IDE itself. You should now see that indexes are being created/listed/dropped on the Movies label:
1. Stop your Neo4j server (if it is already running).
2. Provide all JAR files from <$NEO4J_HOME>/lib/ in the classpath.
3. Apart from org.neo4j.graphdb.* and org.neo4j.graphdb.factory.* add or import org.neo4j.graphdb.schema.* as an additional package.
4. Wrap the code around the transaction in a try and catch block: try (Transaction tx = graphDb.beginTx()) {}. try-with-resources is available only with Java 1.7 and above.
5. Initialize the Java variable DBLocation with the location of your Neo4j database as per your local filesystem, which is generally available at <$NEO4J_HOME>/data/graph.db.
Note
Updating / Inserting data is an automatic process, so there are no APIs that provide operations for updating or inserting data.
Managing schema with REST
Let's create/retrieve/delete indexes using the REST API and use tools such as SoapUI or extensions to the Chrome / Firefox browser (advanced REST client or REST easy), which support testing of REST-based services / representation to execute the JSON request with the provided configuration.
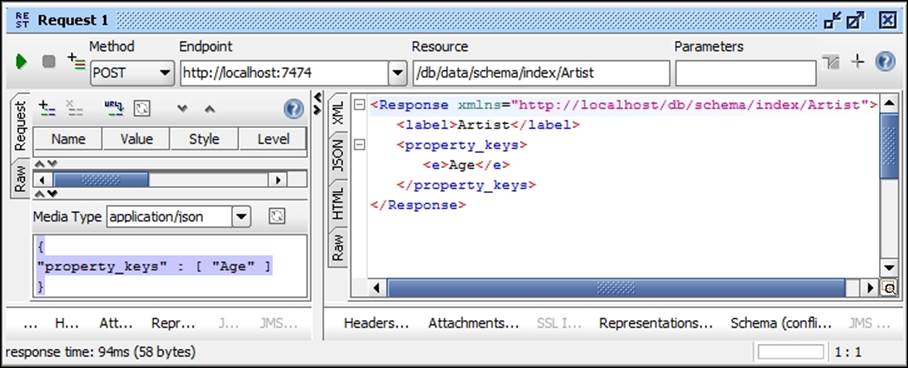
Creating an index on Artists(Age). Use the following configuration in your REST-based testing tool:
· The request method type is POST
· The request URL for creating an index is http://<HOST>:<PORT>/db/data/schema/ index/Artist
· The headers are Accept: application/json; charset=UTF-8 and Content-Type: application/json
· Put the following JSON request in the box provided for posting JSON request and execute it:
{"property_keys" : [ "Age" ]}
The preceding REST request will return the label and property on which the index is created—Artists(Age). The response of the preceding REST request will be similar to the results shown in the following screenshot:
To get all indexes on the Artist label, use the following configuration in your REST-based testing tool and execute the request:
· Request method type: GET
· Request URL for fetching index: http://<HOST>:<PORT>/db/data/schema/ index/Artist
· Headers: Accept: application/json; charset=UTF-8
The preceding request will fetch all the indexes created on the Artist label.
To delete the index on the Age property, which is tagged with the Artist label, use the following configuration in your REST-based testing tool and execute the request:
· Request method type: DELETE
· Request URL for deleting index: http://<HOST>:<PORT>/db/data/schema/ index/Artist/Age
· Headers: Accept: application/json; charset=UTF-8 and Content-Type: application/json
The preceding request will delete the index on the Age property, which is tagged with the Artist label.
Unicity and other schema constraints
Neo4j 2.0 introduced operations for applying constraints on labels and properties. This not only helps in maintaining the data integrity but also provides shape to our data. The current version of Neo4j 2.1.5 only supports unique constraints, which ensure unicity or uniqueness of data residing in Neo4j.
Let's see the process of applying unique constraints in REST and Java.
Applying unicity constraints with REST
Let's create/retrieve/delete the unique constraints using REST API and use tools such as SoapUI or extensions to the Chrome / Firefox browser (advanced REST client or REST easy), which supports testing of REST-based services / representation to execute the JSON request with the provided configuration.
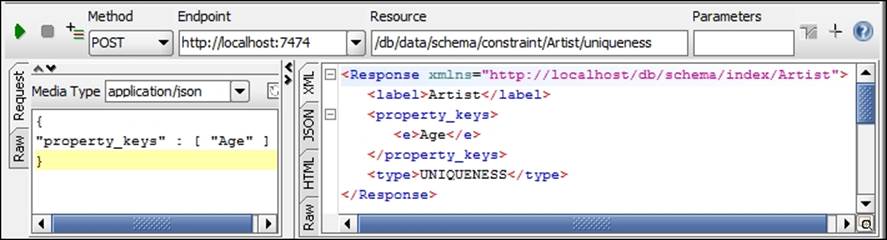
To create a constraint on Artist(Age), use the following configuration in your REST-based testing tool:
· The request method type is POST
· The request URL for creating a constraint is http://<HOST>:<PORT>/db/data/schema/constraint/Artist/uniqueness
· The headers are Accept: application/json; charset=UTF-8 and Content-Type: application/json
· Put the following JSON request in the box provided for posting the JSON request and execute it:
{"property_keys" : [ "Age" ]}
The response of the preceding REST request will be similar to the results shown in the following screenshot:
To get all constraints on the Artist label, use the following configuration in your REST-based testing tool and execute the request:
· The request method type is GET
· The request URL for fetching constraints on the Artist label is http://<HOST>:<PORT>/db/data/schema/constraint/Artist
· The headers are Accept: application/json; charset=UTF-8
The preceding request will fetch all the constraints created on the Artist label.
Note
For deleting the constraint, you need to use DELETE as the request method type and append the property to the URL on which the index needs to be deleted, for example, DELETE /db/data/schema/constraint/Artist/ uniqueness /Age where Artist is the label and Ageis the property.
Applying unicity constraints with Java
Let's create/retrieve/delete the unique constraints using the Java API.
The following Java code creates a unique constraint on the Artist label:
// Get Object of Graph Service
GraphDatabaseService graphDb = new GraphDatabaseFactory()
.newEmbeddedDatabase(DBLocation);
// Open a Transaction
try (Transaction tx = graphDb.beginTx()) {
//Get Schema from Graph Database Service
Schema schema = graphDb.schema();
//Define Unique Constraint and Label and Property
ConstraintCreator creator = schema.constraintFor(DynamicLabel.label("Artist")).assertPropertyIsUnique("Age");
//Create the Constraint
creator.create();
tx.success();
tx.close();
} catch (Exception e) {e.printStackTrace();}
The following Java code lists all constraints on the Artist label:
// Get Object of Graph Service
GraphDatabaseService graphDb = new GraphDatabaseFactory()
.newEmbeddedDatabase(DBLocation);
// Open a Transaction
try (Transaction tx = graphDb.beginTx()) {
Schema schema = graphDb.schema();
for (ConstraintDefinition def : schema.getConstraints(DynamicLabel.label("Artist"))) {
System.out.println("Label = Artist," + "Type of Constraint = "+ def.getConstraintType());
System.out.print("ON Properties = ");
for (String keys : def.getPropertyKeys()) {
System.out.print(keys);
}
System.out.println();
}
} catch (Exception e) {e.printStackTrace();}
Perform the following steps to compile and run the preceding code snippets from the IDE:
1. Stop your Neo4j server (if it is already running).
2. Provide all the JAR files from <$NEO4J_HOME>/lib/ in the classpath.
3. Add or import org.neo4j.graphdb.schema.* as an additional package.
4. Wrap the code around the transaction in a try and catch block: try (Transaction tx = graphDb.beginTx()) {}. try-with-resources is available only with Java 1.7 and above.
5. Initialize the Java variable, DBLocation, with the location of your Neo4j database as per your local filesystem, which is generally available at <$NEO4J_HOME>/data/graph.db.
The constraints can be deleted by using ConstraintDefinition#drop.
Note
Creating the constraint automatically creates the index on the same column and will be deleted as soon as the constraint is dropped.
Cypher optimizations
Cypher query execution engine plans and selects the best possible path to execute a given query in the shortest possible time, but human (or rather developer) intervention is necessary for optimizing those aspects of the query that are dependent upon the understanding of the data and the domain.
Although there is no single universal method of achieving optimum performance, we do have some guidelines, which if followed and used appropriately, could give you the best results.
Let's discuss these guidelines and see how they can help us in achieving optimal performance for our Cypher queries:
· Divide and conquer: The fundamental law of performance / optimization is, "You need to measure first and then optimize," and it is true for Cypher too. We need to plan and strategize our efforts. So as a first step, divide your complete Cypher query into multiple pieces and see how each of the pieces perform with respect to the number of records and time. Next, start from the worst performing piece and try tuning it. In the majority of cases, half of the problem is solved just by knowing what to optimize; otherwise, it takes a good amount of time and effort just to uncover the areas that require tuning/optimization.
Note
Append your Cypher queries with profile keywords to get the execution plan and statistics.
· Plan for the worst: Always tune your queries on the worst or minimum hardware and see the blazing fast speed on production boxes.
· Execution engine and plans: Cypher internally creates an execution plan for each and every Cypher query. Once the plan is created, it is cached and re-used in the future for the same set of Cypher queries. Enabling Cypher to re-use the cache plans saves a good amount of time and resources. There are two different ways that enable the Cypher to cache/re-use execution plans:
· Using parameters: Replacing literals with parameters in your Cypher will enable the execution engine to re-use the cached query plans, though parameters of the query might be different. It is similar to the PreparedStatement in the java.sql package.
· Execution engine: Re-use the object of ExecutionEngine. Though it is a small thing, if it is not taken care of, it can cause a considerable degradation of Cypher queries.
· Patterns in the WHERE clause: It is not that you cannot use it but it comes with a cost, which if taken care of, can considerably improve the time of the execution. Patterns in WHERE should be used only for the not conditions otherwise all other patterns can be used either in Match or we can combine two Match statements using the WITH clause. Always remember to use the WHERE condition only to filter the result set and-for all other cases such as selecting the results-use MATCH.
· Indexing/Constraints: Cypher uses indexes and constraints to scan the nodes and relationships. Depending upon your dataset and query, you should carefully analyze and see whether all the required indexes and constraints are AVAILABLE and ONLINE.
· Data filtering: Data should be filtered as early as possible with the least possible matches involved. It helps in scanning smaller result sets as we move forward and evaluate the rest of the query.
· Data model: In Neo4j, everything is based on the data model. A good understanding of the data model provides a good sense of structure of the graph, organization of nodes, relationships, highly / sparsely connected nodes, and so on. It is important to understand the data model for writing efficient queries to retrieve the data.
Optimization and tuning are very subjective and may vary from case to case, but all the guidelines mentioned earlier will help you to uncover and solve performance pitfalls for most of the scenarios. However, there is still room for the rarest of rare cases, and for all those, drop your queries at http://stackoverflow.com/questions/tagged/neo4j or https://support.neo4j.com/.
Summary
In this chapter, you have learned about the basic concepts and syntactical details of Cypher write queries for inserting data. We also talked about inserting data in schema and legacy indexing using Java and REST APIs. Finally, we also discussed standards for optimizing Cypher queries.
In the next chapter, we will discuss the integration and relationship of Neo4j and Java. We will also talk about Java APIs exposed by Neo4j and their applicability.
All materials on the site are licensed Creative Commons Attribution-Sharealike 3.0 Unported CC BY-SA 3.0 & GNU Free Documentation License (GFDL)
If you are the copyright holder of any material contained on our site and intend to remove it, please contact our site administrator for approval.
© 2016-2026 All site design rights belong to S.Y.A.