Neo4j Essentials (2015)
Chapter 6. Spring Data and Neo4j
Ease of development and availability of tools/technologies for Rapid Application Development (RAD) is one of the key factors in the adoption of new technologies.
There is always a need for greater productivity and reduced complexity in the area of software development and implementation so that value to the business / stakeholders can be delivered in the shortest possible time. No matter how familiar developers are with the low-level APIs, working with various tools for faster and quicker development is always recommended, so that the focus is on solving business problems and not on the technology.
This has been an underlying theme in a movement to change the way programmers approach for developing web or desktop applications using the Java platform.
Let's introduce Spring as a framework for RAD. Spring provides Inversion of Control (IoC) and a DI-based (Dependency Injection) simplified programming model that helps developers to focus on the business logic and leave the rest to the framework. It delivers enterprise services such as web services, JMS, database access, and so on by exposing a POJO-based (Plain Old Java Object) development, using template programming models, which is naturally reusable in a variety of runtime environments.
In the last chapter, we covered the Java APIs provided by Neo4j, and in this chapter we will discuss the best of both worlds, that is, Spring and Neo4j.
This chapter will cover the following topics:
· Spring Data philosophy
· First steps – Neo4jTemplate
· Spring Data repositories and entities
· Advanced mapping using AspectJ
Spring Data philosophy
One of the most critical functions of any enterprise application is to provide the components or a pattern for performing Create, Read, Update, and Delete (CRUD) operations over the enterprise data. Keeping aside the complexity involved in defining the data structures for storing the data, the data access itself has many pitfalls. Starting from managing connections, code for querying, unwrapping results and transforming them into Java objects, and last but not least, handling exceptions is really painful, and over a period of time, it becomes unmanageable and the code starts smelling. Developers are very careful in coding for each of these processes and eventually they end up spending significant time in handling these processes. As a result, there is less time to deal with or define business logic, or it may result in long development cycles.
Over and above, the complete code is very much specific to a database and you are in real trouble if a new data source is introduced or the existing one is replaced!!!
Spring comprehended the severity of the architectural problems with the traditional data access patterns and introduced an additional module Spring Data access.
One of the important goals of Spring is to provide a simple programming model that is based on object-oriented principles, where developers need to code for interfaces and not implementations.
Continuing the legacy of Spring, Spring Data access is also based on object-oriented principles and extends/leverages the POJO-based template programming model and provides an abstraction over the complex piece of data access code.
Spring Data access was developed for relational data structures also known as RDBMS, such as Oracle, MySQL, SQL Server, and so on, and provides different templates for using and leveraging various ORM frameworks, such as Hibernate, iBatis, EclipseLink, and so on.
Spring Data access abstracted the underlying implementation of various databases and ORM frameworks from developers and provided data in the form of objects that can be linked to each other by annotations or configurations. Now developers need to make the changes in Object Oriented Data Model (OODM), which will be further persisted within the database by the Spring Framework. OODM is database independent and can be used or re-used with any type of RDBMS or DBMS.
Some of the notable features of Spring Data access are:
· Session management: Spring provides efficient, easy, and safe handling of various sessions/connections to the underlying databases. It transparently creates and binds a session, using either a declarative or programmatic approach.
· Resource management: Spring contexts easily handle the location and configuration of various ORM frameworks, raw JDBC connections, or session factories.
· Integrated transaction management: Spring provides an easy way to handle and declare transactions either declaratively or programmatically. In both cases, frameworks handle all transaction semantics and perform rollback or commit based on the outcome of the query execution.
· Handling exception: Spring wraps all database or ORM exceptions into standard exceptions. This allows developers to handle most persistence exceptions, which are non-recoverable, only in the appropriate layers, without annoying boilerplate catches / throws and exception declarations.
· Vendor lock-in: This is another benefit of Spring Data access where we can switch or change our underlying database at any point of time without worrying much about the datastore in use.
· Ease of testing: Spring's inversion of control makes it easy to create Mock Objects that can be easily configured and used for unit testing of individual pieces of code. This is another benefit when we code for Interfaces and not implementations.
But that was not enough!!!
Spring Data access was only for relational models but there are other non-relational models such as key-value stores, document stores, graph databases, and column stores, which still followed the conventional model of coding.
The rising popularity of NoSQL databases for handling non-relational datasets led developers again into the same problems where they were dealing with the low-level APIs of non-relational data stores, managing connections, code for querying, unwrapping results and transforming them into Java objects, and so on.
Spring again came forward and re-designed the complete data access layer for relational, non-relational data, cloud data, MapReduce, and so on, into a single project called Spring Data—http://projects.spring.io/spring-data/—for providing a consistent approach to data access.
The objective of Spring Data was to provide a consistent programming model for accessing the data from various type of data stores, irrespective of the format and type of underlying data, which can be in any of these forms: key-value, document, graph, or column.
Spring Data is also referred to as the umbrella project, which contains many subprojects that are specific to a given database. All these subprojects are developed by working together with many of the companies and developers that are behind these new technologies.
Spring Data Neo4j is based on similar principles and is a subproject of Spring Data that enables POJO-based development for the Neo4j graph database by leveraging Spring's familiar template programming model.
Spring Data Neo4j offers annotation-based configuration of entities and then maps them to nodes and relationships within the Neo4j database. It also provides advanced repositories that are built on the Spring repository infrastructure—http://docs.spring.io/spring-data/data-commons/docs/current/reference/html/#repositories.
Spring Data Neo4j repositories support annotated and named queries for the Neo4j Cypher Query Language and come with typed repository implementations that provide methods for locating node and relationship entities.
There are several types of basic repository interfaces and implementations as follows:
· CRUDRepository: This interface/implementation is the base class that provides basic CRUD operations over Nodes and Relationships
· IndexRepository / NamedIndexRepository: This interface/implementation leverages Neo4J Indexing APIs to perform searching or scanning of indexes
· CypherDslRepository: This interface/implementation provides wrapper and integration with Neo4j APIs for executing Cypher Queries
· TraversalRepository: This interface/implementation provides wrapper and integration with the Neo4j traversal API, and also provides convenience methods for searching and traversals
· RelationshipOperationsRepository: This interface/implementation performs CRUD operations over relationships
· SpatialRepository: This interface/implementation is a special type of repository that provides geographic searches
· SchemaIndexRepository: This interface/implementation deals with Neo4j Schema APIs, which was introduced with Neo4j 2.0 and above
Apart from repositories, there are a few more notable features provided by Spring Data Neo4j:
· Support for property graphs
· Object graph mapping via annotated POJO entities
· Advanced mapping mode via AspectJ
· Neo4jTemplate with convenient APIs for performing common operations with exception translation and optional transaction management
· Support for Cypher and Gremlin Query Languages
· Cross-store support for partial JPA—Graph entities
· Support for transparently accessing the Neo4j server via its REST API
· Support for running as extensions in the Neo4j server
In this section, we have discussed the objective and philosophy of Spring Data and various features of Spring Data Neo4j, which helps in quick and faster development.
Let's move forward and learn the basic and advanced usage of Spring Data Neo4j in the upcoming sections.
First step – Neo4jTemplate
Neo4jTemplate, also known as org.springframework.data.neo4j.support.Neo4jTemplate, is one of the convenience classes that provide methods for performing CRUD operations over the Neo4j database. It provides functionality that is analogous to org.neo4j.graphdb .GraphDatabaseService provided by Neo4j. Apart from CRUD operations, it also provides various methods for searching and querying the Neo4j database.
Let's perform the following steps and set up a Maven-based Spring Data Neo4j project and then use Neo4jTemplate to perform CRUD and search operations:
1. Download Maven 3.2.3 from http://maven.apache.org/download.cgi.
2. Once the archive is downloaded, browse the directory on your filesystem and extract it.
3. Define the system environment variable M2_HOME=<location of extracted Archive file >.
4. Add $M2_HOME/bin/ to your $PATH variable.
5. Next, open your console and browse the location where you want to create your new maven project and execute the following command:
6. mvn archetype:generate -DgroupId=org.neo4j.spring.samples -DartifactId=Spring-Neo4j -DarchetypeArtifactId=maven-archetype-quickstart -DinteractiveMode=false
Note
Using appropriate plugins, you can create maven projects from the IDE itself. For example, in Eclipse, you can install and use M2E plugin—http://eclipse.org/m2e/ .
7. It will take some time as maven will download the required dependencies to create your project. You will see a directory Spring-Neo4j being created as soon as the command is successfully completed.
8. Next, open your Spring-Neo4J\pom.xml file and add the following properties just below the <name>Spring-Neo4J </name> tag. These properties hold the version of various dependencies that will be used within the project:
9. <properties>
10. <!-- Generic properties -->
11. <java.version>1.7</java.version>
12. <project.build.sourceEncoding>UTF-8 </project.build.sourceEncoding>
13. <project.reporting.outputEncoding>UTF-8 </project.reporting.outputEncoding>
14. <!-- Spring -->
15. <spring-framework.version>4.1.2.RELEASE</spring-framework.version>
16. <spring-data.version>3.2.1.RELEASE</spring-data.version>
17.
18. <!-- Hibernate / JPA -->
19. <hibernate.version>4.2.0.Final</hibernate.version>
20. <hibernate-jpa.version>1.0.0.Final</hibernate-jpa.version>
21. <!-- Logging -->
22. <logback.version>1.0.13</logback.version>
23. <slf4j.version>1.7.5</slf4j.version>
24. <!-- Test -->
25. <junit.version>4.11</junit.version>
26. <!---Neo4j version -->
27. <neo4j.version>2.1.5</neo4j.version>
</properties>
28. Change the version of JUnit to ${junit.version}.
29. Next, within the <dependencies> section, add the following Spring dependencies:
30.<dependency>
31. <groupId>org.springframework</groupId>
32. <artifactId>spring-core</artifactId>
33. <version>${spring-framework.version}</version>
</dependency>
Repeat the same process and change the value of <artifactId> and define the dependency for spring-context, spring-aspects, spring-context-support, and spring-tx.
34. Now, let's add the following dependencies for Spring Data Neo4j and Neo4j libraries:
35.<dependency>
36. <groupId>org.springframework.data</groupId>
37. <artifactId>spring-data-neo4j</artifactId>
38. <version>${spring-data.version}</version>
39.</dependency>
40.<dependency>
41. <groupId>org.springframework.data</groupId>
42. <artifactId>spring-data-neo4j-aspects</artifactId>
43. <version>${spring-data.version}</version>
44.</dependency>
45.<dependency>
46. <groupId>org.neo4j</groupId>
47. <artifactId>neo4j</artifactId>
48. <version>${neo4j.version}</version>
49.</dependency>
50.<dependency>
51. <groupId>org.hibernate</groupId>
52. <artifactId>hibernate-validator</artifactId>
53. <version>${hibernate.version} </version>
54.</dependency>
55.<dependency>
56. <groupId>org.hibernate.javax.persistence</groupId>
57. <artifactId>hibernate-jpa-2.0-api</artifactId>
58. <version>${hibernate-jpa.version}</version>
59. <optional>true</optional>
60. <scope>compile</scope>
61.</dependency>
62.<dependency>
63. <groupId>javax.cache</groupId>
64. <artifactId>cache-api</artifactId>
65. <version>1.0.0</version>
</dependency>
66. Let's also add dependencies for logging APIs, which are used by Spring under the <dependencies> section of pom.xml:
67.<!-- Logging with SLF4J & LogBack -->
68.<dependency>
69. <groupId>org.slf4j</groupId>
70. <artifactId>slf4j-api</artifactId>
71. <version>${slf4j.version}</version>
72. <scope>compile</scope>
73.</dependency>
74.<dependency>
75. <groupId>ch.qos.logback</groupId>
76. <artifactId>logback-classic</artifactId>
77. <version>${logback.version}</version>
78. <scope>runtime</scope>
</dependency>
Our Maven-based Spring Data Neo4j project is ready with all its dependencies. Now we need to create and configure our domain model, which will contain Movies, Actors, and their associations, similar to what we created in Chapter 3, Pattern Matching in Neo4j.
Let's perform the following steps to create and configure the domain model using Spring Data Neo4j. All Java source files should be stored at Spring-Neo4j\src\main\java.
1. Create an org.neo4j.spring.samples.domain.Artist.java class with the following attributes:
2. package org.neo4j.spring.samples.domain;
3.
4. import org.springframework.data.neo4j.annotation.*;
5.
6. public class Artist {
7.
8. private Long graphId;
9. private String id;
10. private String name;
11. private int year_Of_Birth;
}
12. Define the getters and setters for each of the properties defined in Artist.java and you get a POJO.
13. Now, let's annotate this class with @NodeEntity. This is to indicate and inform the Spring framework that this POJO (Artist.java) is an entity of a node, which will be persisted in the Neo4j database.
14. Next annotate the property graphId with @GraphId. This is to indicate that this field will be used to store the unique node IDs generated by Neo4j.
15. There is another property, id, which we have created to store a user-generated unique ID. This is to make sure that we do not depend upon GraphId for uniqueness of our nodes. Let's define a unique index on the id property by annotating it with@Indexed(unique=true). This is similar to creating a unique index on a node property in the Neo4j database.
The rest of the attributes, that is, name and year_Of_Birth, would be used to store the name of the artist and his year of birth. The updated Artist.java class would look like this:
package org.neo4j.spring.samples.domain;
import org.springframework.data.neo4j.annotation.*;
@NodeEntity
public class Artist {
@GraphId
private Long graphId;
@Indexed ( unique=true )
private String id;
private String [] workedAs;
private String name;
private int year_Of_Birth;
…
//Define getters and setters for all properties.
}
16. Next, create a org.neo4j.spring.samples.domain.Movie.java class and define the following properties and annotation:
17.package org.neo4j.spring.samples.domain;
18.
19.import org.springframework.data.neo4j.annotation.*;
20.
21.@NodeEntity
22.public class Movie {
23. @GraphId
24. private Long graphId;
25.
26. @Indexed ( unique=true )
27. private String id;
28. private String title;
29. private int year;
30.…
31. //Define getters and setters for all properties.
}
32. Now we will define another POJO that will define the relationship between Artist and Movie. Let's create org.neo4j.spring.samples.domain.Role.java as follows:
33.package org.neo4j.spring.samples.domain;
34.
35.import org.springframework.data.neo4j.annotation.*;
36.
37.@RelationshipEntity(type="ACTED_IN")
38.public class Role {
39.
40. @GraphId
41. private Long graphId;
42.
43. @StartNode
44. Private Artist artist;
45. @EndNode
46. private Movie movie;
47.
48. private String role_name;
49. //Default No Argument Constructor
50. public Role(){}
51.
52. //Argument constructor to set the properties
53. public Role(Artist artist, Movie movie, String role_name){
54. //Invoke setters methods of artist, movie and role_name
55. }
56.…
57. //Define getters and setters for all properties.
}
In the preceding code, we have annotated the relationship class with @RelationshipEntity and the type of relationship will be ACTED_IN, which indicates that this bean is defining the relationship between two nodes, namely Artist and Movies. We have also specified attributes for Artist and Movie and annotated them with @StartNode and @EndNode, which defines the START and END of the relationship between these two nodes.
Until now, we have created two nodes and one relationship class, which defines the relationship between the nodes. Now it is time to configure these domain entities so that the framework can identify and process these entities. So let's define the Spring configuration file Spring-Neo4j/src/main/resources/Application-Config.xml.
1. Define the following schemas in your Application-Config.xml file:
2. <?xml version="1.0" encoding="UTF-8"?>
3. <beans xmlns="http://www.springframework.org/schema/beans"
4. xmlns:xsi="http://www.w3.org/2001/XMLSchema-instance"
5. xmlns:context="http://www.springframework.org/schema/context"
6. xmlns:neo4j="http://www.springframework.org/schema/data/neo4j"
7. xmlns:repository="http://www.springframework.org/schema/data/repository"
8. xmlns:tx="http://www.springframework.org/schema/tx"
9. xsi:schemaLocation="
10.http://www.springframework.org/schema/beans
11.http://www.springframework.org/schema/beans/spring-beans-3.2.xsd
12.http://www.springframework.org/schema/data/neo4j
13.http://www.springframework.org/schema/data/neo4j/spring-neo4j-2.2.xsd
14.http://www.springframework.org/schema/data/repository
15.http://www.springframework.org/schema/data/repository/spring-repository-1.7.xsd
16.http://www.springframework.org/schema/tx
17.http://www.springframework.org/schema/tx/spring-tx-3.0.xsd
18.http://www.springframework.org/schema/context
19.http://www.springframework.org/schema/context/spring-context-3.1.xsd
20.">
</beans>
21. The preceding XML configuration defines the schema for Spring context, Neo4j, and Spring transactions. Next, between the <beans></beans> tags define the following:
22.<!-- This is declared to activate annotations in beans already registered in the application context (no matter if they were defined with XML or by package scanning). This instructs the framework that the classes are using annotations and Spring should automatically wire values into properties, methods, and constructors.
23.-->
24.<context:annotation-config/>
25.
26.<!-- enable the configuration of transactional behavior based on annotations -->
27.
28.<tx:annotation-driven mode="proxy"/>
29.
30.
31.<!-- Neo4j Specific configuration, where first parameter is the directory which defines the location of the database and second parameter is the directory/ package which will contain the domain classes.
32.-->
33.
<neo4j:config storeDirectory="data/spring.data" base-package="org.neo4j.spring.samples"/>
Note
Follow the comments provided within the preceding configuration file to understand the purpose and role of various tags.
34. Next we need a class that can populate our domain objects and persist in the database. Let's create org.neo4j.spring.samples.PersistNeo4JData and configure it as a bean with the Application-Config.xml file. Edit your Application-Config.xml file and add the following code between the <beans></beans> tags:
<bean id = "persistNeo4JData" class="org.neo4j.spring.samples.PersistNeo4JData"></bean>
35. Now, let's write some persistence code in the PersistNeo4JData.java file as shown in the following code:
36.package org.neo4j.spring.samples;
37.
38.import org.neo4j.spring.samples.domain.*;
39.import org.springframework.beans.factory.annotation.*;
40.import org.springframework.data.neo4j.support.*;
41.import org.springframework.transaction.annotation.*;
42.
43.public class PersistNeo4JData {
44.
45.@Autowired
46.private Neo4jTemplate neo4jTemplate;
47.
48.@Transactional
49.public void addData() {
50. // Create Movie
51. Movie rocky = new Movie();
52. rocky.setTitle("Rocky");
53. rocky.setYear(1976);
54. rocky.setId(rocky.getTitle() +"-"+String.valueOf(rocky.getYear()));
55.
56. // Create Artists
57. Artist artist = new Artist();
58. artist.setName("Sylvester Stallone");
59. artist.setWorkedAs(new String[] { "Actor", "Director" });
60. artist.setYear_Of_Birth(1946);
61. artist.setId(artist.getName() +"-"+artist.getYear_Of_Birth());
62.
63. // create Relationship
64. Role role = new Role(artist, rocky, "Rocky Balboa");
65.
66. neo4jTemplate.save(artist);
67. neo4jTemplate.save(rocky);
68. neo4jTemplate.save(role);
69.
70. }
}
In the preceding code, we have defined the addData() method, which creates the object of Movie and Artist, provides appropriate values to its properties, and then defines an Object of Role, which further defines the relationship between Artist and Movie. TheaddData() method is annotated with @Transactional, which will inform the Spring framework to start a new transaction while executing this method.
Easy and clean isn't it?
We have only written the business logic; all the boilerplate code such as wrapping your Neo4j code within a transaction will be handled by the framework.
The interesting part is the declaration of:
@Autowired
private Neo4jTemplate neo4jTemplate;
Neo4jTemplate, as we explained in the beginning of this section, is the convenience class that provides methods to perform CRUD operations over the Neo4j database. @Autowired instructs the Spring Framework to automatically create (or provide reference of the already created Object of Class Neo4jTemplate) the Object of Neo4jTemplate and assign its reference to the given variable.
Next, using Neo4jTemplate, we first persist Artist, then Movie, and finally Role, which defines the association between Artist and Movie:
neo4jTemplate.save(artist);
neo4jTemplate.save(rocky);
neo4jTemplate.save(role);
71. Lastly, we need a main class that can bring up our Spring framework and invoke addData(). Let's define org.neo4j.spring.samples.MainClass.java and add following code:
72.package org.neo4j.spring.samples;
73.import org.springframework.context.ApplicationContext;
74.import org.springframework.context.support.ClassPathXmlApplicationContext;
75.
76.public class MainClass {
77.
78.String[] configs = { "classpath:Application-Config.xml" };
79.
80.public static void main(String[] args) {
81. MainClass mainClass = new MainClass();
82. mainClass.setup();
83.}
84.
85. public void setup(){
86. //Read the Spring configuration file and bring up the Spring framework, so that all required beans can be initialized.
87. ApplicationContext context = new ClassPathXmlApplicationContext(configs);
88. System.out.println("Spring Context Created");
89. //Get the Object of PersistNeo4JData from the Spring Context.
90. PersistNeo4JData data = (PersistNeo4JData) context.getBean("persistNeo4JData");
91. //Invoke addData() method to persist our neo4j nodes and relationships.
92. data.addData();
93.
94. }
}
And we are done !!! Now, in the next step, let's execute our code.
95. Open your console, browse the root directory of your project, that is, Spring-Neo4j, and execute the following Maven commands:
96.mvn install
97.mvn exec:java -Dexec.cleanupDaemonThreads=false -Dexec.mainClass="org.neo4j.spring.samples.MainClass"
Note
Suppress DEBUG logs generated by the Spring framework by adding a new file —Spring-Neo4j\src\main\resources\logback.xml. The content of this new file should be similar to https://github.com/qos-ch/logback/blob/master/logback-examples/src/main/java/chapters/configuration/sample0.xml. Now change <root level="debug"> to <root level="warn">.
Wait for the successful execution and completion of the preceding Maven commands and you will see that the data is persisted in your Neo4j database. To verify whether we have successfully persisted the data, open your console and execute the following command to open the Neo4j shell—$NEO4J_HOME/bin/neo4j-shell –path <path of Database file where we created the initial data>—and execute the following Cypher query:
Match (n)-[r]->(n1) return n.name as Artist,type(r) as Relationship, n1.title as Movie;
The output is shown in the following screenshot:

We can also verify the same by enhancing our Spring Data Neo4j code and adding some methods for searching the Neo4j database.
Let's add a new method searchData() in PersistNeo4JData and add the following code in this new method:
@Transactional
public void searchData(){
System.out.println("Retrieving Roles from Database");
Result<Role> result = neo4jTemplate.findAll(org.neo4j.spring.samples.domain.Role.class);
while (result.iterator().hasNext()) {
Role role = result.iterator().next();
System.out.println(role.toString());
}
System.out.println("Artists and Roles retrieved from Database");
}
Next, import org.springframework.data.neo4j.conversion.* as a new package in PersistNeo4JData and invoke the searchData() method from MainClass.java.
Note
In order to see some meaningful values on the console, add a toString() method in Role.java, which returns a formatted string containing the values of the attributes.
The preceding code will fetch the value of the attributes defined directly in Role.java, but it will not fetch the values of the referenced objects such as Artist and Movie.
In order to fetch the values of the referenced objects, we need to define the @Fetch annotation for the referenced object, so that Spring can eagerly load the values of the referenced objects. By default, relationships do not fetch the values unless we ask them to do so. This is also beneficial in scenarios where we have large graphs and do not want to load everything in memory.
For example, Role.java will be modified to eagerly load the object's data—Artist and Movie—as shown in the following code:
package org.neo4j.spring.samples.domain;
import org.springframework.data.neo4j.annotation.*;
@RelationshipEntity(type="ACTED_IN")
public class Role {
@StartNode @Fetch
private Artist artist;
@EndNode @Fetch
private Movie movie;
private String roleName;
…
//Define getters and setters for all properties.
}
There are two more important annotations which can be used with our domain model / entities:
· @RelatedTo: This annotation is used for the fields to define the type of relationship within the node entity. For example, we can define a collection in Artist.java and define the relationship with the Movie object there itself:
· @RelatedTo(type="ACTED_IN", direction=Direction.OUTGOING)
private Set<Movie> movies;
· @RelatedToVia: This annotation is used for the fields to define the type of relationship within the node entity. It provides the read-only iterator for iterating over the related entities fetched while reading data from the database. For example, we can define a collection in Artist.java and define the relationship with the Movie object, so that when we read the Artist object, we also read the related Movies:
· @RelatedToVia(type="ACTED_IN",direction=Direction.OUTGOING)
private Iterable<Role> roles;
It can be applied only to the classes that are annotated with @RelationshipEntity.
Neo4jTemplate defines various convenience methods for performing CRUD and search operations. Refer to http://docs.spring.io/autorepo/docs/spring-data-neo4j/3.2.x/api/org/springframework/data/neo4j/support/Neo4jTemplate.html for complete details about the other methods exposed by Neo4jTemplate.
Spring Data repositories and entities
The objective of Spring Data is to provide an abstract layer of interfaces to developers and hide all complexity of accessing data from the underlying data store. Spring Data repositories were introduced for the same cause and it exposes a generic interfaceorg.springframework.data.repository.Repository which is extended and implemented by the domain-specific repositories.
Spring Data Neo4j was designed and developed to extend the same concept and provides a generic repository interface org.springframework.data.neo4j.repository.GraphRepository, which implements CRUDRepository, IndexRepository, SchemaIndexRepository, andTraversalRepository.
Developers can extend the generic repository interface and can define repositories specific to their domain models, which can contain only domain-specific methods or operations and all generic and common methods for performing CRUD operations or traversing or indexing will be injected/provided by the framework.
Let's extend our Spring Data Neo4j example that we created in the previous section and create repositories for the search operation:
1. Create a new interface org.neo4j.spring.samples.repositories.MovieRepository that extends GraphRepository:
2. package org.neo4j.spring.samples.repositories;
3.
4. import org.neo4j.spring.samples.domain.Movie;
5. import org.springframework.data.neo4j.repository.GraphRepository;
6. import org.springframework.stereotype.Repository;
7.
8. @Repository
9. public interface MovieRepository extends GraphRepository<Movie>{
}
We have annotated our repository with @Repository so that the Spring framework can consider it as a Spring managed repository and inject all the required implementations of common CRUD operations, traversing and indexing.
10. Now, let's modify our Application-Config.xml file and add the following piece of configuration anywhere between the <beans></beans> tags:
<neo4j:repositories base-package="org.neo4j.spring.samples.repositories"/>
The preceding configuration provides the framework with the location and package of user-defined repositories. Spring framework will further scan the provided package, that is, org.neo4j.spring.samples.repositories and search for all interfaces that are marked with @Repository and will inject the implementation required for performing CRUD and other search operations.
11. Next, let's enhance PersistNeo4JData and define the getAllMovies() method and add @Autowired MovieRepository movieRepo; as an instance variable. @Autowire will instruct the Spring framework to automatically create the object of implementation provided for theMovieRepository interface—or its parent interface, that is, GraphRepository—and assign its reference to the given variable.
12. Import java.util.Iterator as an additional package in PersistNeo4JData.
13. Let's see the implementation of the getAllMovies() method that is very simple and straightforward:
14.@Transactional
15.public void getAllMovies() {
16.
17.Iterator<Movie> iterator = movieRepo.findAll().iterator();
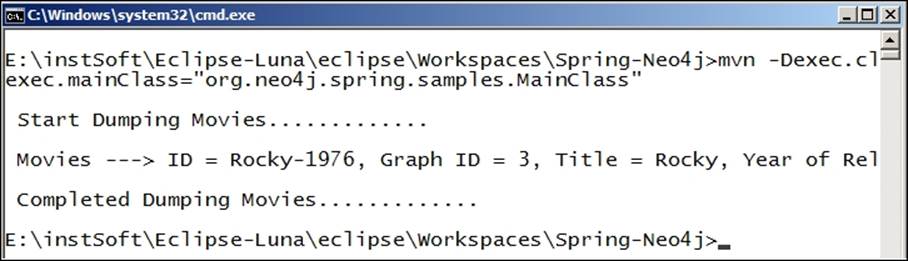
18.System.out.println("\n Start Dumping Movies.............\n");
19.while (iterator.hasNext()) {
20. Movie movie = iterator.next();
21. System.out.println(" Movies ---> ID = " + movie.getId() + ", Graph ID = "+ movie.getGraphId() + ", Title = " + movie.getTitle() + ", Year of Release = " + movie.getYear());
System.out.println("\n Completed Dumping of Movies.............\n");
In the preceding method, we are fetching all movies from our Neo4j database and then printing it on the console. The implementation of the findAll() method will be injected by Spring and added to our MovieRepository. For other available methods, refer tohttp://docs.spring.io/autorepo/docs/spring-data-neo4j/3.1.0.RC1/api/org/springframework/data/neo4j/repository/CRUDRepository.html.
22. Next, invoke this new method from MainClass.java; open your console and execute the following Maven command:
23.$M2_HOME/bin/mvn -Dexec.cleanupDaemonThreads=false -q exec:java -D
24.exec.mainClass="org.neo4j.spring.samples.MainClass"
The output after execution of the preceding command is shown in the following screenshot:
We can also declare some custom methods that are based on the results of custom Cypher queries, which we might have written to traverse our domain model.
For example, we can declare the following method in our MovieRepository.java class and then replace movieRepo.findAll() with movieRepo.getAllMovies() in PersistNeo4JData.java:
@Query("match (n) return n;")
public Iterable<Movie> getAllMovies();
We have annotated the preceding method with the @Query annotation, which will instruct the framework to execute the given query and provide the results back to users via Iterable<Movie>. So whenever the user invokes getAllMovies(), the framework will execute the given Cypher query and provide the results.
The results will be the same, but the point here is when we did not provide any implementation of either of the methods, then who provided them? The answer is, Spring Data does that for you. All the boilerplate code has been automatically injected into your repositories and you just need to focus on your domain model and queries.
In this section, we have explored the Spring Data repositories and how they can be used to avoid all boilerplate code; thus, developers need to focus only on the business logic and the domain-specific queries, which not only results in faster development cycles but also provides a much cleaner and readable code.
Let's move further and discuss advanced mapping of entities with AspectJ.
Advanced mapping mode – AspectJ
In the previous sections, we have used simple mapping mode for performing CRUD and search operations over entities. Spring Data also provides "Advanced mapping mode" with AspectJ for modeling and working with Spring Neo4j entities.
Spring Data Neo4j heavily depends on AspectJ and especially the advanced mapping mode, which is nothing more than the dynamic instrumentation of Java classes provided by AspectJ.
AspectJ is an API that provides implementation of aspect-oriented programming in Java language. Aspect-oriented programming (AOP) aims to increase the modularity and re-usability by separation of cross-cutting concerns.
It helps developers to isolate the auxiliary and cross-cutting concerns such as security, logging, and so on from the business logic and helps components to focus on core concerns.
AOP defines the following main concepts:
· Cross-cutting concerns: Common code or secondary requirements / needs for various components within the system such as security, logging, and so on. These secondary requirements remain the same for all components within a system.
· Advice: An advice is a code which is developed to implement the secondary requirement.
· Pointcut: This is the place where we want to apply the advices.
· Aspect: A combination of the pointcut and the advice is termed as an aspect.
An application developer could find difficulty in implementing the pointcut language, but developers working with Spring or Spring Data do not have to worry about that. Spring does all heavy loading and provides implementation of various cross-cutting concerns and further exposes it to developers via annotations.
Spring Data Neo4j leverages the concept of aspect-oriented programming and implements advices and exposes these advices to users via annotations.
For example, Spring leverages AspectJ and scans the Java packages and classes, and as soon as it encounters annotations such as @NodeEntity, it introduces a new interface called org.springframework.data.neo4j.aspects.core.NodeBacked ororg.springframework.data.neo4j.aspects.core.RelationshipBacked for @RelationshipEntity.
Further, these new interfaces are implemented by the aspects provided by Spring. For example, NodeBacked is implemented by Neo4jNodeBacking and RelationshipBacked is implemented by Neo4jRelationshipBacking.
You can find all these aspects under org.springframework.data.neo4j.aspects and the source can be downloaded from GitHub at https://github.com/spring-projects/spring-data-neo4j/tree/master/spring-data-neo4j-aspects/src.
All these aspects are injected as dependencies to the backing interfaces, and in some cases, calls to methods are intercepted and delegated to the specific implementations of the graph databases. Spring also introduces new methods and properties to the annotated classes.
Perform the following steps to enable advanced mapping mode in your Spring project:
1. Edit your Spring-Neo4j/pom.xml and add the following Maven plugin to include the AspectJ compilation just before the </project> tag:
2. <plugins>
3. <build><plugin>
4. <groupId>org.codehaus.mojo</groupId>
5. <artifactId>aspectj-maven-plugin</artifactId>
6. <version>1.4</version>
7. <configuration>
8. <outxml>true</outxml>
9. <aspectLibraries>
10. <aspectLibrary>
11. <groupId>org.springframework</groupId>
12. <artifactId>spring-aspects</artifactId>
13. </aspectLibrary>
14. <aspectLibrary>
15. <groupId>org.springframework.data</groupId>
16. <artifactId>spring-data-neo4j-aspects</artifactId>
17. </aspectLibrary>
18. </aspectLibraries>
19. <source>1.7</source>
20. <target>1.7</target>
21.</configuration>
22.<executions><execution>
23. <goals><goal>compile</goal>
24. <goal>test-compile</goal>
25. </goals> </execution> </executions>
26. <dependencies> <dependency>
27. <groupId>org.aspectj</groupId>
28. <artifactId>aspectjrt</artifactId>
29. <version>${aspectj.version}</version>
30. </dependency> <dependency>
31. <groupId>org.aspectj</groupId>
32. <artifactId>aspectjtools</artifactId>
33. <version>${aspectj.version}</version>
34. </dependency> </dependencies>
35. </plugin> </plugins>
</build>
36. Next, open your PersistNeo4JData.java and replace neo4jTemplate.save(artist); with ((NodeBacked)artist).persist(); and also import org.springframework.data.neo4j.aspects.core.NodeBacked. You can also replace the calls to the Role object with RelationshipBackedin the same manner as we did for nodes.
The modifications made in the preceding steps assume that your project and entities are already compiled and enhanced with the AspectJ compiler. So in the next step, recompile your project by executing the following Maven command:
mvn clean install
And we are done!!! You can execute your project as you were doing it earlier and there should be no changes in the output.
All your domain entities (.class files) such as Artist, Movie, and Role are enhanced and modified to use the advices provided by the Spring Neo4j aspects.
Now you can also use the methods provided by the NodeBacked interface at http://docs.spring.io/spring-data/neo4j/docs/current/api/org/springframework/data/neo4j/aspects/core/class-use/NodeBacked.html.
AspectJ performs the byte code instrumentation in three different modes:
· Compile-time weaving: Instrumentation is performed at compile time itself using AspectJ compiler (AJC)
· Load-time weaving: Instrumentation is performed as the classes are loaded in memory
· Run-time weaving: Instrumentation is performed when the objects are created in memory
As of now, Spring Data only supports compile-time weaving, which means all classes should be compiled with the AJC.
In this section, we explored the advanced mapping mode of Spring Data Neo4j entities using ApsectJ. We also enhanced our examples and enabled the aspects in our examples by introducing AJC in our build process and further used the modified libraries / classes in our example.
Summary
In this chapter, you learned about the role of Spring / Spring Data as a framework for quick and fast development of Neo4j-based applications. You learned about the philosophy and evolution of Spring Data and also implemented examples using Spring Data and Neo4j for simple mapping and advanced mapping.
In the next chapter, we will discuss Neo4j architecture and deployment. We will also talk about monitoring options available for Neo4j deployments.
All materials on the site are licensed Creative Commons Attribution-Sharealike 3.0 Unported CC BY-SA 3.0 & GNU Free Documentation License (GFDL)
If you are the copyright holder of any material contained on our site and intend to remove it, please contact our site administrator for approval.
© 2016-2026 All site design rights belong to S.Y.A.