Oracle PL/SQL Programming (2014)
Part VI. Advanced PL/SQL Topics
A language as mature and rich as PL/SQL is packed full of features that you may not use on a day-to-day basis, but that may make the crucial difference between success and failure. This part of the book focuses on those features. Chapter 23 explores the security-related challenges we face as we build PL/SQL programs. Chapter 24 contains an exploration of the PL/SQL architecture, including PL/SQL’s use of memory. Chapter 25 provides guidance for PL/SQL developers who need to address issues of globalization and localization. Chapter 26 offers an introduction to the object-oriented features of Oracle. Two additional chapters, describing invoking Java and C code from PL/SQL applications, are available in full on the book’s website under the “Download Example Code” tab.
Chapter 23. Application Security and PL/SQL
Many PL/SQL developers view security as something that only database or security administrators need to be concerned about. It’s certainly true that some aspects of security are the responsibility of DBAs—for example, performing user and privilege management tasks and setting the password for the listener. However, it would be a gross mistake to believe that security is merely a DBA activity, and one that does not belong on the plates of PL/SQL developers. For one thing, security is not an end unto itself; rather, it’s an ongoing concern and a means to an end. For another, a lot of administrators are more likely to spend their efforts securing the database as a whole rather than programming the security features of an individual application.
You’ve probably heard that “a chain is only as strong as its weakest link.” This adage could have been written about application security. Every element of the entire infrastructure—application, architecture, middleware, database, operating system—contributes to the overall security of that infrastructure, and a failure of security in any single component compromises the security and increases the vulnerability of the entire system. Understanding the building blocks of security and incorporating them into your application design is not just desirable, it’s essential.
Security Overview
Oracle security topics fall into three general categories:
§ Those that are exclusively in the DBA, system administrator, and network administrator domains. Topics in this category—for example, user and privilege management—are beyond the scope of this book.
§ Those that are important to developers and application architects and that are not necessarily the responsibility of the DBA. One example is the issue of selecting invoker rights versus definer rights while creating stored code; this choice is typically made during the application design phase itself by the developer, not by the DBA. Topics in this category are covered elsewhere in this book; for example, the topic of rights is covered in Chapter 24.
§ Those that are generally considered DBA topics but that developers and application architects need to know about and from which they can derive a good deal of unconventional value. These include encryption, row-level security, application contexts, and fine-grained auditing. These topics are the subject of this chapter.
How can the features and tools described in this chapter help PL/SQL developers and application architects? Let’s answer that question by looking at each topic in turn:
Encryption
The answer here is obvious: encryption is vitally important to data protection and is actively applied in many application design situations. You need a working knowledge of the Oracle features and tools available to perform encryption, including transparent data encryption (TDE), which was introduced in Oracle Database 10g Release 2, and transparent table encryption (TTE), which was introduced in Oracle Database 11g.
Row-level security (RLS)
When you design an application, you must be aware of the architecture being used for access and authorization of data. RLS allows you to restrict the rows a user can see. A clear understanding of RLS helps you write better code, even if you don’t implement RLS yourself. In many cases, RLS actually makes applications simpler to understand and easier to implement. In some special cases, it even allows an off-the-shelf application to be compliant with the established security practices followed in your organization.
Application contexts
Related to row-level security, application contexts are sets of name/value pairs that can be defined in a session through the execution of a specially defined stored procedure. Application contexts are most commonly used to control access to database resources according to rules that vary depending on the current user. They can be very useful application development resources.
Fine-grained auditing (FGA)
FGA provides a mechanism to record the fact that certain users have issued certain statements against a table and that certain conditions are met. FGA provides a number of features of value to developers. For example, FGA lets you implement what is in essence a SELECT trigger, a user-written procedure executed automatically every time a piece of data is selected from the table.
Oracle security is an enormous topic; this chapter can only touch on those aspects of most value to PL/SQL developers. For more information on these and related Oracle security operations, see Oracle PL/SQL for DBAs by Arup Nanda and Steven Feuerstein. There are also many excellent security books on the market that you should consult if you need to understand the intricacies of the security topics introduced in this chapter. Oracle’s Security Technology Center provides several resources on this topic as well.
Encryption
In the simplest terms, encryption means disguising data, or altering the contents in such a way that only the original user knows how to restore them. Let’s consider a very simple and ubiquitous example. I use my bank ATM card on a regular basis to withdraw money (perhaps a bit more than I should). Every time I do so, I need the PIN to access my account. Unfortunately, I am a rather forgetful person, so I decide that I will write down the PIN on something that I will always have when I use my ATM card—the ATM card itself.
Being a smart fellow, I realize that writing my PIN on the card increases rather dramatically the vulnerability of the card; anyone who steals the card will see the PIN written right on it. Goodbye life savings! What can I do to prevent a thief from learning the PIN after stealing my card, yet also allow me to easily remember my PIN?
After a few minutes’ consideration, I come up with a clever idea: I will alter the contents in some predetermined manner. In this case, I add a single-digit number to the PIN and write that new number on the ATM card. Let’s say the single-digit number is 6. My PIN is 6523. After adding 6 to it, it becomes 6529, which is what I write on the card. If a thief gets my card, he will see 6529, but that’s meaningless as a PIN. He’s highly unlikely to be able to figure out the actual value from that number, because to do so he would need to know how I altered the original number. Even if he knows that I added a number, he he’ll have to guess the number (6, in this case). In other words, I just encrypted my PIN and made it difficult for a thief to know the actual value.
Let’s pause for a moment here and examine the mechanics before I return to this example and admit that I haven’t been terribly clever after all. I need to know two things to perform encryption (that is, to scramble my PIN beyond recognition):
§ The method by which the value is altered—in this case, by adding a number to the source number
§ The specific number that I added—in this case, 6
The first of these, the method part, is known as an algorithm. The second, the number part, is known as the key. These are the basic components of any encryption system, as shown in Figure 23-1. You can keep one component the same but vary the other to produce a different set of encrypted data.
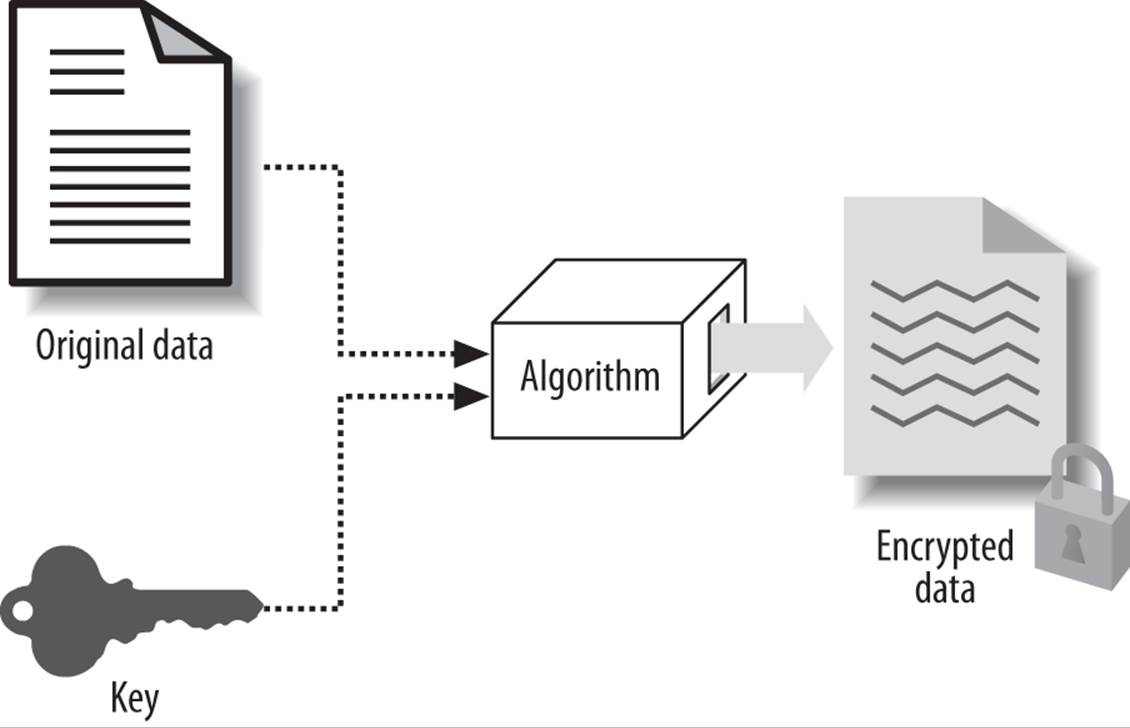
Figure 23-1. Encryption basics
With truly secure systems, the encryption algorithm is not, of course, as simplistic as the one I’ve described. The actual logic of the algorithm is extremely complex. It’s beyond the scope of this chapter to delve into the exact mechanics of an encryption algorithm, and it’s not necessary for you to understand the logic to start building an encryption system. You should, however, know the different basic types of algorithms and their relative merits. Most accepted encryption algorithms are in the public domain, so the choice of algorithm alone does not provide security. The security comes from varying the other variable you can control—the encryption key.
One critical challenge with building an encryption infrastructure is to build an effective key management system. If the intruder gets access to the encryption keys, the encrypted data is vulnerable, regardless of the sophistication of the algorithm. On the other hand, some users (e.g., applications) will legitimately need access to the keys, and that access must be easy enough for the applications to handle. The challenge here is to balance the simplicity of access and the security of the keys. Later in this chapter, I’ll provide an example showing how you can create and manage an effective key-management system.
Key Length
In my earlier example of PIN encryption, there is a serious flaw. Because the algorithm is assumed to be universally known, the thief may know that I am simply adding a number to the PIN to encrypt it. Of course, he does not initially know what number. But suppose he starts guessing. It’s not that difficult: all he has to do is guess 10 times—he’s looking for a number between 0 and 9, because I’m using a single-digit number. It might be easy for the thief to decrypt my encrypted PIN, after all, merely by guessing a number up to a maximum of 10 times. But suppose I use a two-digit number. Now the thief will have to guess a number between 0 and 99, a total of 100 times, making it more difficult to guess. Increasing the number of digits of the key makes it more difficult to crack the code. Key length is extremely important in increasing the security of any encrypted system.
Of course, in real-life computer encryptions, the keys are not one or two digits, and they are not just numbers. Their length is typically at least 56 bits and may be as long as 256 bits. The length of the key depends upon the algorithm chosen, as I describe in the following section.
NOTE
The longer the key, the more difficult it is to crack the encryption. However, longer keys also extend the elapsed time needed to do encryption and decryption because the CPU has to do more work.
Algorithms
There are many widely used and commercially available encryption algorithms, but I’ll focus here on those Oracle supports for use in PL/SQL applications. All of these fall into the category of private key (sometimes called symmetric) algorithms; see the “Public or Private?” sidebar for a summary of the differences between these and the public key (sometimes called asymmetric) algorithms.
PUBLIC OR PRIVATE?
With private key (symmetric) encryption, you use a key to encrypt data and then use the same key to decrypt that data. During decryption, you must have access to the encryption key, which has to be transmitted to you somehow. This may not be convenient in situations where the data is transmitted from one location to another, as the key management becomes complex and insecure.
In contrast, with public key (asymmetric) encryption, the intended receiver generates two keys. He keeps one—known as the private key—with him and sends the other one—known as the public key—to the intended sender. The sender then encrypts the data using the public key, but the encrypted data can only be decrypted using the private key, which is with the recipient. The sender never knows the private key and cannot tamper with the data. Public keys can be given out well in advance of any actual transfer and can be reused. Because there is no exchange of keys, key management becomes extremely easy, reducing the burden on one aspect of the encryption.
Public and private keys are statistically related, so theoretically it is possible to guess the private key from the public key, albeit rather laboriously. To reduce the risk of brute-force guessing, very high key lengths are used—typically 1,024-bit keys, instead of the 64-, 128-, or 256-bit keys used in symmetric encryption.
Oracle provides asymmetric encryption at two points:
§ During transmission of data between the client and the database
§ During authentication of users
Both of these functions require use of Oracle’s Advanced Security Option, an extra-cost option that is not provided by default. This tool simply enables asymmetric key encryption on those functions; it does not provide a toolkit that PL/SQL developers can use to build an encryption solution for stored data.
The only developer-oriented encryption tool available in Oracle provides for symmetric encryption. For this reason, I focus on symmetric encryption, not asymmetric encryption, in this chapter.
The following algorithms are the ones most commonly used with Oracle:
Data Encryption Standard (DES)
Historically, DES has been the predominant standard used for encryption. It was developed more than 20 years ago for the National Bureau of Standards (later renamed the National Institute of Standards and Technology, or NIST) and has since become an ISO standard. There is a great deal to say about DES and its history, but my purpose here is not to describe the algorithm but simply to summarize its use inside the Oracle database. This algorithm requires a 64-bit key but discards 8 of them, using only 56 bits. An intruder would have to use up to 72,057,594,037,927,936 combinations to guess the key.
DES was an adequate algorithm for decades, but it now shows signs of age. Today’s powerful computers are capable of cracking open even the large number of combinations needed to expose the key.
Triple DES (DES3)
NIST went on to solicit development of another scheme based on the original DES that encrypts data twice or thrice, depending upon the mode of calling. A hacker trying to guess a key would have to face 2,112, then 2,168 combinations in double- and triple-pass encryption routines, respectively. DES3 uses a 128-bit or 192-bit key, depending on whether it is using a two-pass or three-pass scheme.
Triple DES was also acceptable for some time, but now it too shows signs of age and has become susceptible to determined attacks.
Advanced Encryption Standard (AES)
In November 2001, Federal Information Processing Standards Publication 197 announced the approval of a new standard, the Advanced Encryption Standard, which became effective in May 2002. The full text of the standard can be obtained from NIST.
Padding and Chaining
When a piece of data is encrypted, it is not encrypted as a whole by the algorithm. It’s usually broken into chunks of 8 bytes each, and then each chunk is operated on independently. Of course, the length of the data may not be an exact multiple of 8. In that case, the algorithm adds some characters to the last chunk to make it 8 bytes long. This process is known as padding. This padding also has to be done correctly so an attacker won’t be able to figure out what was padded and then guess the key from there. To securely pad the values, you can use a predeveloped padding method implemented in Oracle, known as Public Key Cryptography System #5 (PKCS#5). There are several other padding options allowing for padding with zeros and for no padding at all. Later in this chapter, I’ll show how you can use these options.
When data is divided into chunks, there needs to be a way to connect the adjacent chunks, a process known as chaining. The security of an encryption system also depends upon how chunks are connected and encrypted—independently or in conjunction with the adjacent chunks. The most common chaining format is Cipher Block Chaining (CBC); with the Oracle database, you can select that format via a constant defined in the CHAIN_CBC built-in package. Other chaining options include the Electronic Code Book format (CHAIN_ECB), Cipher Feedback (CHAIN_CFB), and Output Feedback (CHAIN_OFB). Later in this chapter, I’ll demonstrate these options.
The DBMS_CRYPTO Package
Now that I’ve introduced the most basic building blocks of encryption, let’s see how to create an encryption infrastructure in PL/SQL with Oracle’s built-in package DBMS_CRYPTO.
NOTE
The DBMS_CRYPTO package was introduced in Oracle Database 10g. In earlier Oracle database versions, the DBMS_OBFUSCATION_TOOLKIT package provided similar (but not identical) functionality. That package is still available, but it has been deprecated in favor of the newer package.
Recall that to perform encryption, you need four components in addition to the input value:
§ The encryption key
§ The encryption algorithm
§ The padding method
§ The chaining method
The encryption key is something you supply. The other components are provided by Oracle. You choose them by selecting the appropriate constants from the DBMS_CRYPTO package, as described in the following sections.
Algorithms
The constants listed in Table 23-1, defined in DBMS_CRYPTO, allow you to choose a specific algorithm and key length. Because these are defined as constants in the package, you must reference them in the form PackageName.ConstantName—for example, DBMS_CRYPTO.ENCRYPT_DES selects the Data Encryption Standard.
Table 23-1. DBMS_CRYPTO algorithm constants
|
Constant |
Effective key length |
Description |
|
ENCRYPT_DES |
56 |
Data Encryption Standard (similar to the one provided in DBMS_OBFUSCATION_TOOLKIT) |
|
ENCRYPT_3DES_2KEY |
112 |
Modified Triple Data Encryption Standard; operates on a block three times with two keys |
|
ENCRYPT_3DES |
156 |
Triple Data Encryption Standard; operates on a block three times |
|
ENCRYPT_AES128 |
128 |
Advanced Encryption Standard |
|
ENCRYPT_AES192 |
192 |
Advanced Encryption Standard |
|
ENCRYPT_AES256 |
256 |
Advanced Encryption Standard |
|
ENCRYPT_RC4 |
|
The only stream cipher, which is used to encrypt streaming data rather than discrete data being transmitted or data at rest |
Padding and chaining
For padding and chaining, the constants listed in Table 23-2 are available in the DBMS_CRYPTO package.
Table 23-2. DBMS_CRYPTO padding and chaining constants
|
Constant |
Padding/chaining method |
|
PAD_PCKS5 |
Padding with Public Key Cryptography System #5 |
|
PAD_ZERO |
Padding with zeros |
|
PAD_NONE |
No padding is done; when the data is assumed to be exactly 8 bytes (or a multiple thereof) in length, this padding method is chosen |
|
CHAIN_CBC |
Cipher Block Chaining, the most common method used |
|
CHAIN_CFB |
Cipher Feedback |
|
CHAIN_ECB |
Electronic Code Book |
|
CHAIN_OFB |
Output Feedback |
You will rarely need to be concerned about the exact padding or chaining methods to use; they offer advanced functionality seldom needed in typical system development. The most common choices are PKCS#5 for padding and CBC for chaining. In this chapter, I use these options unless otherwise noted.
Encrypting Data
Let’s move on to how you can actually use Oracle’s encryption facilities in your applications. I’ll start with a very simple example of encrypting the string “Confidential Data” using the DBMS_CRYPTO.ENCRYPT function. This function takes four arguments:
src
Provides the source, or the input data to be encrypted. It must be of the datatype RAW.
key
Provides the encryption key, also in RAW. The length of this key must be as required by the algorithm chosen. For instance, if I choose DES, the key length must be at least 64 bits.
typ
Specifies the three static components—the algorithm, the padding mechanism, and the chaining method—by adding together the appropriate packaged constants.
iv
Specifies the optional initialization vector (IV), another component of the encryption that adds a little “salt” to the encrypted value, making the “pattern” more difficult to guess. (This topic is beyond the scope of this chapter.)
In the following examples, let’s assume the following:
Algorithm
Advanced Encryption Standard 128-bit
Chaining method
Cipher Block Chaining
Padding mechanism
Public Key Cryptography Standard #5
These three are specified in the typ parameter of the call to the function:
DBMS_CRYPTO.ENCRYPT_AES128
+ DBMS_CRYPTO.CHAIN_CBC
+ DBMS_CRYPTO.PAD_PKCS5;
Note how these have been added together. Had I chosen no padding instead of PKCS#5, I would have used:
DBMS_CRYPTO.ENCRYPT_AES128
+ DBMS_CRYPTO.CHAIN_CBC
+ DBMS_CRYPTO.PAD_NONE;
Similarly, I can choose any specific algorithm and chaining method.
Next I must choose the key. Assume that I want to use “1234567890123456” for the key. The datatype of this value is VARCHAR2. To use it in the ENCRYPT function, I must first convert it to RAW. To do so, I use the STRING_TO_RAW function in the built-in package UTL_I18N (this package is explained later in the chapter). Here is a code snippet that does exactly that:
DECLARE
l_raw RAW (200);
l_in_val VARCHAR2 (200) := 'Confidential Data';
BEGIN
l_raw := utl_i18n.string_to_raw (l_in_val, 'AL32UTF8');
END;
I have converted the VARCHAR2 variable l_in_val to RAW. Now, I’ll encrypt the input value:
/* File on web: enc.sql */
1 DECLARE
2 l_key VARCHAR2 (2000) := '1234567890123456';
3 l_in_val VARCHAR2 (2000) := 'Confidential Data';
4 l_mod NUMBER
5 := DBMS_CRYPTO.encrypt_aes128
6 + DBMS_CRYPTO.chain_cbc
7 + DBMS_CRYPTO.pad_pkcs5;
8 l_enc RAW (2000);
9 BEGIN
10 l_enc :=
11 DBMS_CRYPTO.encrypt (utl_i18n.string_to_raw (l_in_val, 'AL32UTF8'),
12 l_mod,
13 utl_i18n.string_to_raw (l_key, 'AL32UTF8')
14 );
15 DBMS_OUTPUT.put_line ('Encrypted=' || l_enc);
16 END;
The output is:
Encrypted=C0777257DFBF8BA9A4C1F724F921C43C70D0C0A94E2950BBB6BA2FE78695A6FC
The following table analyzes the preceding code, line by line.
|
Line(s) |
Description |
|
2 |
The key is defined here. As you can see, the key is exactly 16 characters long, which AES requires. Here I specified a 128-bit key size. Most computers follow an 8-bit word size, which means that each byte is 8 bits long. Thus, 128 bits means (128/8=) 16 bytes. Had I chosen AES192 instead, I would have specified a 192-bit- or (192/8=) 24-byte-long key. If the key length is not adequate, Oracle raises the KeyBadSize exception. |
|
3 |
The input value, which needs to be encrypted. This need not conform to any length restrictions, so you can use a value of any length. If it’s not a multiple of 8 bytes, the algorithm automatically pads the input value. |
|
4–7 |
I specify the algorithm, the padding method, and the chaining method. |
|
8 |
I define a variable to hold the encrypted value. Note that the output is in RAW. |
|
11 |
The input value is converted from VARCHAR2 to RAW. |
|
13 |
As with the input value, the function also expects the key to be RAW. I convert it here. |
|
15 |
Finally, I display the encrypted value, also in RAW, as a hexadecimal string. In a real system, you won’t display the value, as it is meaningless; you will probably do something else with the value, such as store it in a table or pass it to the calling procedure to be used elsewhere. |
You have now seen the basic workings of the ENCRYPT function. Using ENCRYPT, you can build a generic function to encrypt data. In this function, I will use the AES algorithm with a 128-bit key, PCKS#5 as the padding method, and CBC as the chaining method. Consequently, the only variables a user of the function must provide are the input value to be encrypted and the key:
/* File on web: get_enc_eval.sql */
FUNCTION get_enc_val (p_in_val IN VARCHAR2, p_key IN VARCHAR2)
RETURN VARCHAR2
IS
l_enc_val RAW (4000);
BEGIN
l_enc_val :=
DBMS_CRYPTO.encrypt (src => utl_i18n.string_to_raw (p_in_val,
'AL32UTF8'
),
key => utl_i18n.string_to_raw (p_key,
'AL32UTF8'
),
typ => DBMS_CRYPTO.encrypt_aes128
+ DBMS_CRYPTO.chain_cbc
+ DBMS_CRYPTO.pad_pkcs5
);
RETURN l_enc_val;
END;
Before I close the section, there is one more thing to note. Here I have used the function UTL_I18N.STRING_TO_RAW, rather than UTL_RAW.CAST_TO_RAW, to convert the VARCHAR2 data to RAW. Why?
The ENCRYPT function requires the input to be RAW and also requires a specific character set—AL32UTF8, which may not be the character set of the database. Therefore, while converting a VARCHAR2 string to RAW for use in encryption, I have to perform two conversions:
§ From the current database character set to the character set AL32UTF8
§ From VARCHAR2 to RAW
Both of these conversions are performed by the STRING_TO_RAW function in the built-in package UTL_IL8N; character set conversion is not performed by the CAST_TO_RAW function.
NOTE
The UTL_IL8N package is provided as part of Oracle’s Globalization Support architecture and is used to perform globalization (or internationalization, which is often shortened to “i18n”; that name is made up of the starting letter i, the ending letter n, and the 18 letters in between). For detailed information about globalization, see Chapter 25.
Encrypting LOBs
Large object datatypes, such as CLOB and BLOB, can also be encrypted. Examples of BLOB data include signature files and photocopies of legal documents. Because such files are sensitive and are inside the database, you may need to encrypt them. Rather than call the ENCRYPT functionthat I have been using in the previous examples, I have to use the overloaded procedure version of ENCRYPT, as shown in the next example:
/* File on web: enc_lob.sql */
DECLARE
l_enc_val BLOB;
l_in_val CLOB;
l_key VARCHAR2 (16) := '1234567890123456';
BEGIN
DBMS_CRYPTO.encrypt (dst => l_enc_val,
src => l_in_val,
key => utl_i18n.string_to_raw (l_key, 'AL32UTF8'),
typ => DBMS_CRYPTO.encrypt_aes128
+ DBMS_CRYPTO.chain_cbc
+ DBMS_CRYPTO.pad_pkcs5
);
END;
The output is stored in the variable l_enc_val, which can then be passed on to a different program or stored in the table.
NOTE
For LOB data only, use the procedure version of ENCRYPT; for all other datatypes, use the function version. Make sure that you convert the values to RAW (and the CLOBs to BLOBs) before passing them to the ENCRYPT function.
SecureFiles
Large objects (LOBs) underwent a complete makeover in Oracle Database 11g and are now called SecureFiles. The traditional LOBs (now known as BasicFiles), such as CLOBs and BLOBs, are still available, but I recommend that you not use them anymore. Wherever you used LOBs in the past, you should now use SecureFiles. SecureFiles offer the same functionality as LOBs, as well as additional features such as compression, deduplication, filesystem-like caching, the ability to stop redo logging, and more. For more information on using SecureFiles, see Chapter 13.
Decrypting Data
There wouldn’t be much point to encrypting data if I couldn’t decrypt it at some point so that it could be read and used. To do this, I will use ENCRYPT’s sister function, DECRYPT. Its calling structure is identical to that of ENCRYPT; it also takes four arguments:
src
The encrypted value
key
The key used previously to encrypt
typ
The combination of algorithm, padding, and chaining, exactly as in ENCRYPT
iv
The initialization vector, as in ENCRYPT
The DECRYPT function also returns the unencrypted value in RAW; that value will need to be converted to another format for easy viewing.
NOTE
While decrypting an encrypted value, you must use exactly the same algorithm, key, padding method, and chaining method used during encryption.
Let’s see how decryption works. Here I have encrypted a value, stored the encrypted value in a SQL*Plus variable, and later used that as an input to the DECRYPT function:
/* File on the web decval.sql */
1 REM Define a variable to hold the encrypted value
2 VARIABLE enc_val varchar2(2000);
3 DECLARE
4 l_key VARCHAR2 (2000) := '1234567890123456';
5 l_in_val VARCHAR2 (2000) := 'Confidential Data';
6 l_mod NUMBER
7 := DBMS_CRYPTO.encrypt_aes128
8 + DBMS_CRYPTO.chain_cbc
9 + DBMS_CRYPTO.pad_pkcs5;
10 l_enc RAW (2000);
11 BEGIN
12 l_enc :=
13 DBMS_CRYPTO.encrypt (utl_i18n.string_to_raw (l_in_val, 'AL32UTF8'),
14 l_mod,
15 utl_i18n.string_to_raw (l_key, 'AL32UTF8')
16 );
17 DBMS_OUTPUT.put_line ('Encrypted=' || l_enc);
18 :enc_val := RAWTOHEX (l_enc);
19 END;
20 /
21 DECLARE
22 l_key VARCHAR2 (2000) := '1234567890123456';
23 l_in_val RAW (2000) := HEXTORAW (:enc_val);
24 l_mod NUMBER
25 := DBMS_CRYPTO.encrypt_aes128
26 + DBMS_CRYPTO.chain_cbc
27 + DBMS_CRYPTO.pad_pkcs5;
28 l_dec RAW (2000);
29 BEGIN
30 l_dec :=
31 DBMS_CRYPTO.decrypt (l_in_val,
32 l_mod,
33 utl_i18n.string_to_raw (l_key, 'AL32UTF8')
34 );
35 DBMS_OUTPUT.put_line ('Decrypted=' || utl_i18n.raw_to_char (l_dec));
36 END;
This code needs some explanation, shown in the following table.
|
Line(s) |
Description |
|
22 |
I declare the key for decryption. Note that the same key is used to encrypt and decrypt. |
|
23 |
Because the variable enc_val is in hexadecimal, I convert it to RAW. |
|
25–27 |
As with encryption, I specify the algorithm, padding method, and chaining method as a single parameter. Note that they are the same as those used in encryption. They must be, in order for the decryption to work correctly. |
|
33 |
As with encryption, the key must be in RAW, so I convert it from VARCHAR2 to RAW. |
The output of the preceding code segment is “Confidential Data,” the same as the input given.
NOTE
To decrypt an encrypted LOB value, you must use the overloaded procedure version of DECRYPT because you will have used the procedure version of ENCRYPT.
Performing Key Generation
So far I have focused on the process of encryption and decryption, and I have assumed a very simple key in the examples—“1234567890123456”. The security of the encryption system depends entirely on the security of the key—that is, the difficulty a potential attacker would have inguessing the value of the key. My key should therefore be random enough to be resistant to easy guessing.
There is a standard algorithm for creating a random number, defined by ANSI’s standard X9.31: Pseudo-Random Number Generator (PRNG). Oracle implements this algorithm in the RANDOMBYTES function in the DBMS_CRYPTO package. The function takes one argument—the length of the random string generated—and returns a RAW value of that length. Here is how I use it to create a 16-byte value:
DECLARE
l_key RAW (16);
BEGIN
l_key := DBMS_CRYPTO.randombytes (16);
END;
Of course, the generation of a string of random bytes has to be for some reason, and what better reason than to use it as an encryption key? Using this function, you can generate a key of any length suitable for the algorithm chosen.
Performing Key Management
You’ve learned the basics of how to use encryption and decryption and how to generate keys. But that’s the easy part; I’ve simply shown how to use Oracle’s supplied functionality to get the job done. Now comes the most challenging part in the encryption infrastructure—managing the key. Our applications will need to have access to the key to decrypt the encrypted values, and this access mechanism should be as simple as possible. On the other hand, because the key is literally the “key” to safeguard the encrypted values, it should not be too accessible. A proper key management system balances the simplicity of key access against prevention of unauthorized access to the keys.
There are essentially three different types of key management:
§ A single key for the entire database
§ A single key for each row of tables with encrypted data
§ A combination of the preceding two
The following sections describe these different approaches to key management.
A single key for the database
With this approach, a single key can access any data in the database. As shown in Figure 23-2, the encryption routine reads only one key from the key location and encrypts all the data that needs to be protected.

Figure 23-2. Single database key approach
This key could be stored in a variety of locations:
In the database
This is the simplest strategy of all. The key is stored in a relational table, perhaps in a schema used specifically for this purpose. Because the key is inside the database, it is automatically backed up as a part of the database; older values can be obtained by flashback queries of the database, and the key is not vulnerable to theft from the operating system. The simplicity of this approach is also its weakness; because the key is just data in a table, anyone with the authority to modify that table (such as any DBA) could alter the key and disrupt the encryption infrastructure.
In the filesystem
The key is stored in a file, which may then be read by the encryption procedure, using the UTL_FILE built-in package. By setting the appropriate privileges on that file, you can ensure that it cannot be changed from within the database.
On some removable media controlled by the end user
This approach is the safest one; no one except the end user can decrypt the values or alter the key, not even the DBA or system administrator. Examples of removable media include a USB stick, a DVD, and a removable hard drive. A major disadvantage of removable media is the possibility of key loss. The responsibility of safekeeping the key lies with the end user. If the key is ever lost, the encrypted data is also lost—permanently.
The biggest disadvantage of this approach is its dependence on a single point of failure. If an intruder breaks into the database and determines the key, the entire database becomes immediately vulnerable. In addition, if you want to change the key, you will need to change all of the rows in all the tables, which may be quite an extensive task in a large database.
A single key for each row
This approach calls for a single key per row of the table, as shown in Figure 23-3. If you use this approach, you create a different table to hold the keys. The source table and the key table are linked by the primary key of the source table.
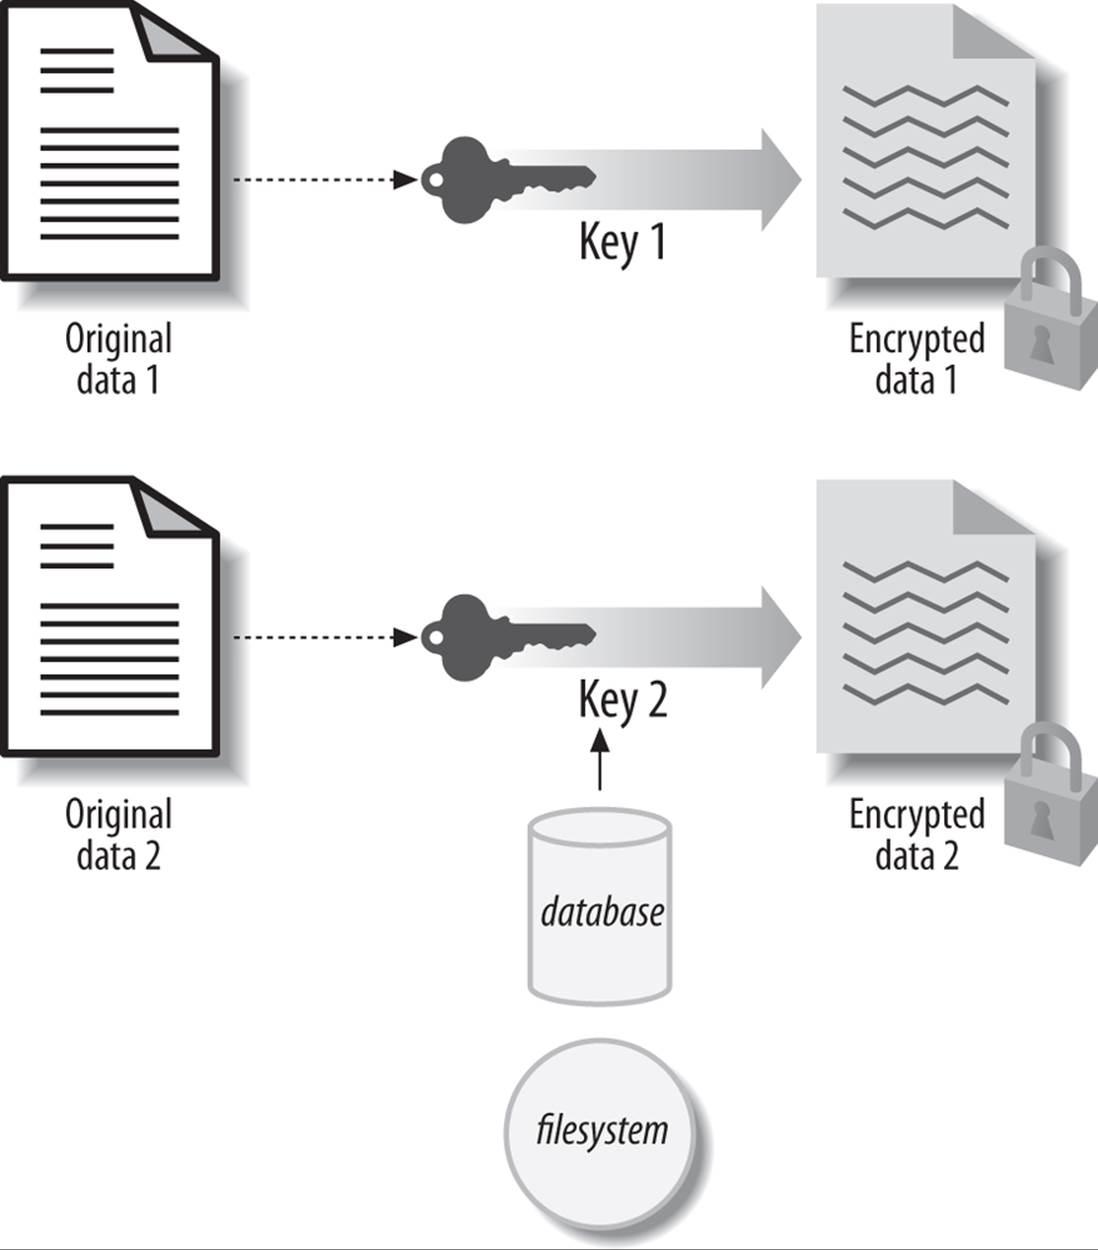
Figure 23-3. Single key per row approach
The biggest advantage of this approach is the fact that each row is protected by a different key. If a single key is compromised, only one row, not the entire database, is vulnerable. When a key is changed, it does not affect the entire database; only one row is affected, and that row can easily be changed.
On the other hand, a major disadvantage of this approach is that the key must always be in the database. Storing keys on filesystems so that they are available to the database may not even be feasible. This approach also makes it difficult to protect against a database file theft in which both keys and encrypted data may be stolen.
A combined approach
The combined approach attempts to marry a high degree of security with the maximum possible flexibility. You create a different key for each row, but also have a master key (see Figure 23-4). The encryption process does not simply use the key stored for each row. Instead, the row key and a new single master key are combined via a bitwise XOR operation, and the resulting value is used as the encryption key for that row. To decrypt the value, you need to know the row key (stored in the database) and the master key (stored elsewhere). By storing these keys separately, you can increase the level of security for your encryption architecture.
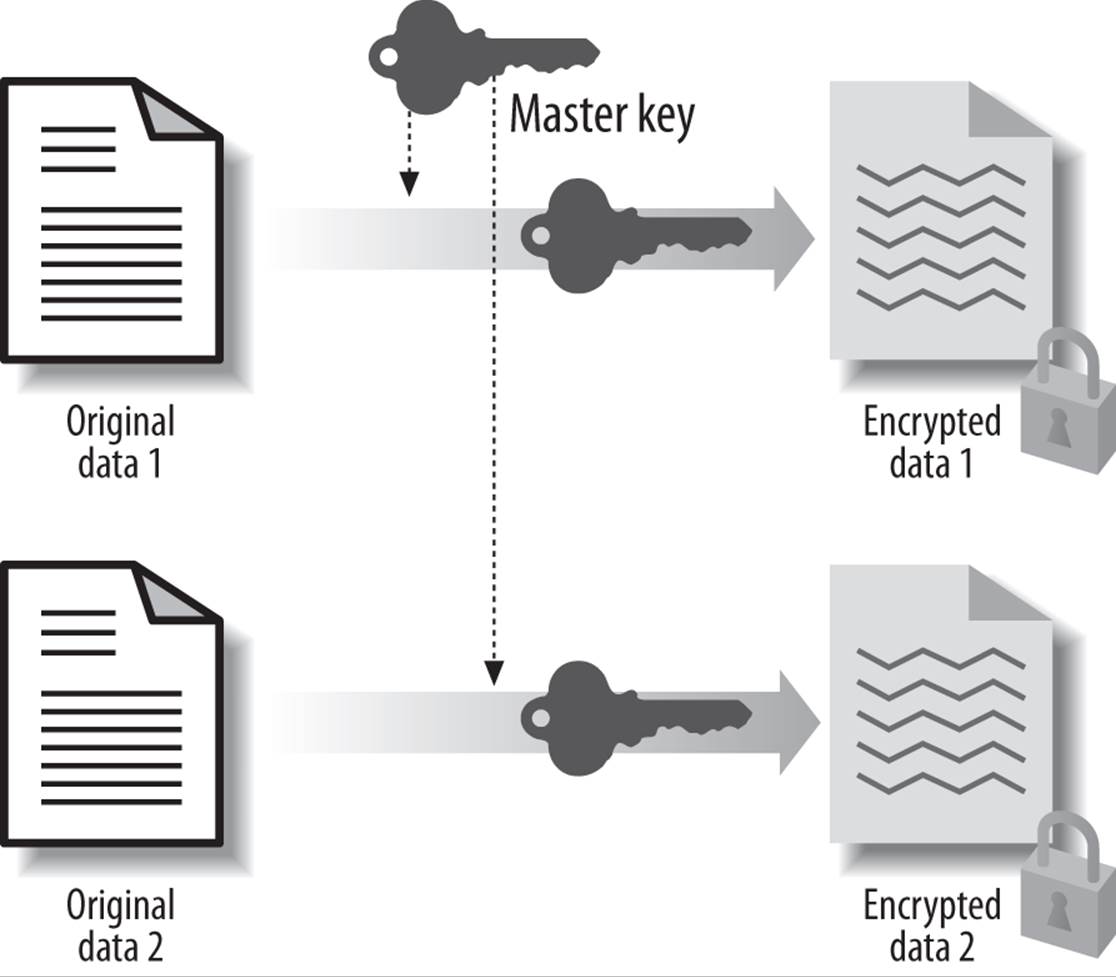
Figure 23-4. Combined master key approach
The disadvantage of the combined approach is the same as that of the single key strategy: if the master key is lost, you have lost your ability to decrypt the data. However, you can mitigate this risk to some extent by backing up the master key to a different location.
NOTE
This approach is not the same as re-encrypting the encrypted value with a different key. The DBMS_CRYPTO package does not allow you to re-encrypt an encrypted value. If you attempt to do so, you will encounter the ORA-28233: source data was previously encrypted error.
Now let’s see how I can use this approach in a real application. Here I use the same example shown earlier for decryption. I add a new variable called l_master_key in line 5, which accepts a value from the user (the substitution variable &master_key). In lines 14 through 17 I XOR the key and the master key, and the result is used as the encryption key in line 21, instead of the l_key variable:
/* File on web: combined_master_key.sql */
1 REM Define a variable to hold the encrypted value
2 VARIABLE enc_val varchar2(2000);
3 DECLARE
4 l_key VARCHAR2 (2000) := '1234567890123456';
5 l_master_key VARCHAR2 (2000) := '&master_key';
6 l_in_val VARCHAR2 (2000) := 'Confidential Data';
7 l_mod NUMBER
8 := DBMS_CRYPTO.encrypt_aes128
9 + DBMS_CRYPTO.chain_cbc
10 + DBMS_CRYPTO.pad_pkcs5;
11 l_enc RAW (2000);
12 l_enc_key RAW (2000);
13 BEGIN
14 l_enc_key :=
15 UTL_RAW.bit_xor (utl_i18n.string_to_raw (l_key, 'AL32UTF8'),
16 utl_i18n.string_to_raw (l_master_key, 'AL32UTF8')
17 );
18 l_enc :=
19 DBMS_CRYPTO.encrypt (utl_i18n.string_to_raw (l_in_val, 'AL32UTF8'),
20 l_mod,
21 l_enc_key
22 );
23 DBMS_OUTPUT.put_line ('Encrypted=' || l_enc);
24 :enc_val := RAWTOHEX (l_enc);
25 END;
26 /
27 DECLARE
28 l_key VARCHAR2 (2000) := '1234567890123456';
29 l_master_key VARCHAR2 (2000) := '&master_key';
30 l_in_val RAW (2000) := HEXTORAW (:enc_val);
31 l_mod NUMBER
32 := DBMS_CRYPTO.encrypt_aes128
33 + DBMS_CRYPTO.chain_cbc
34 + DBMS_CRYPTO.pad_pkcs5;
35 l_dec RAW (2000);
36 l_enc_key RAW (2000);
37 BEGIN
38 l_enc_key :=
39 UTL_RAW.bit_xor (utl_i18n.string_to_raw (l_key, 'AL32UTF8'),
40 utl_i18n.string_to_raw (l_master_key, 'AL32UTF8')
41 );
42 l_dec := DBMS_CRYPTO.decrypt (l_in_val, l_mod, l_enc_key);
43 DBMS_OUTPUT.put_line ('Decrypted=' || utl_i18n.raw_to_char (l_dec));
44 END;
When I execute this block, I see the following output in SQL*Plus. Note that I supply the master key first to encrypt the value, and then provide the same master key while decrypting:
Enter value for master_key: MasterKey0123456
old 3: l_master_key varchar2(2000) := '&master_key';
new 3: l_master_key varchar2(2000) := 'MasterKey0123456';
Encrypted=C2CABD4FD4952BC3ABB23BD50849D0C937D3EE6659D58A32AC69EFFD4E83F79D
PL/SQL procedure successfully completed.
Enter value for master_key: MasterKey0123456
old 3: l_master_key varchar2(2000) := '&master_key';
new 3: l_master_key varchar2(2000) := 'MasterKey0123456';
Decrypted=ConfidentialData
PL/SQL procedure successfully completed.
It asked for the master key, which I supplied correctly, and the correct value came up. But what happens if I supply an incorrect master key?
Enter value for master_key: MasterKey0123456
old 3: l_master_key varchar2(2000) := '&master_key';
new 3: l_master_key varchar2(2000) := 'MasterKey0123456';
Encrypted=C2CABD4FD4952BC3ABB23BD50849D0C937D3EE6659D58A32AC69EFFD4E83F79D
PL/SQL procedure successfully completed.
Enter value for master_key: MasterKey0123455
old 3: l_master_key varchar2(2000) := '&master_key';
new 3: l_master_key varchar2(2000) := 'MasterKey0123455';
declare
*
ERROR at line 1:
ORA-28817: PL/SQL function returned an error.
ORA-06512: at "SYS.DBMS_CRYPTO_FFI", line 67
ORA-06512: at "SYS.DBMS_CRYPTO", line 41
ORA-06512: at line 15
Note the error here: the use of a wrong master key did not expose the encrypted data. This enhanced security mechanism relies on two different keys, and both keys must be present for you to successfully decrypt the data. If you hide the master key, it will be enough to prevent unauthorized decryption.
If the master key is stored with the client and it is sent over the network, a potential attacker could use a tool to “sniff” the value as it passes by. To prevent this from occurring, you can use a variety of approaches:
§ You could create a virtual LAN (VLAN) between the application server and the database server that protects the network traffic between them to a great extent.
§ You could modify the master key in some predetermined way, such as by reversing the characters, so that an attacker could potentially get the master key that passes over the network, but not the master key actually used.
§ Finally, for a really secure solution, you could use Oracle’s Advanced Security Option (an extra-cost option) to secure the network traffic between the client and the server.
There is no perfect key management solution. The approach you choose will be determined by the nature of your application and your best attempts to balance security against ease of access. The three approaches described in the previous sections represent three major types of key management techniques and are intended to give you a jumpstart on figuring out your own key management approach. You might very well come up with a better idea that could be more appropriate to your specific situation. For example, you might consider a hybrid approach, such as using different keys for critical tables.
Cryptographic Hashing
Encryption provides a way to ensure that only authorized people can see your data. It does so by disguising sensitive data. In some cases, however, you may not be interested in disguising data but simply in protecting it from manipulation. A classic example is the need to store passwords securely. Another might have to do with making sure data is not unduly altered. Suppose that you have stored payment information for vendors. That data by itself may not be sensitive enough to require encryption, but you may want a way to ensure that someone does not alter the numbers to increase a payment amount. How can you do that?
The answer lies in a process known as cryptographic hashing. When you apply a cryptographic hash function to a value, you generate a new value that cannot be reverse engineered to the original value and is very likely to be unique (see the upcoming warning regarding the uniqueness of hash values). Hash functions are also deterministic, meaning that as long as you provide the same input value, the hash function will return the same hash value.
Hashing is not encryption because you can’t decipher the original value from the hash value. Using hashing, you can generate an opaque representation of the input data and store it separate from the main data. When the time comes to validate the authenticity of the data, you simply generate the hash value again and compare it against the stored hash value. If the source data has been changed, the hash value will be different, and you can take appropriate action.
WARNING
It is theoretically possible that two different input values will produce the same hash value. However, by relying on widely used algorithms such as MD5 and SHA-2, you are ensured that the probability of a hash conflict is a statistically remote 1 in 1038. If you cannot afford to take even that chance, you will need to write conflict resolution logic around your use of the hash function.
There are two types of hashing available in Oracle: Message Digest (MD5) and Secure Hash Algorithm (SHA-1 and SHA-2), both implemented in the HASH function of the DBMS_CRYTPO package. The HASH function takes two arguments:
src
Input data for which the hash value should be generated. The value must be of datatype RAW, as with the ENCRYPT function. If the value to be hashed is a VARCHAR2 or NUMBER, you must convert it to RAW.
typ
Type of hashing; it may be MD4, MD5, SHA-1, or various forms of SHA-2. The parameter is passed as a predefined constant in the DBMS_CRYPTO package, as in the encryption routines. The constants are:
DBMS_CRYPTO.HASH_SH1
DBMS_CRYPTO.HASH_SH256
DBMS_CRYPTO.HASH_SH384
DBMS_CRYPTO.HASH_SH512
DBMS_CRYPTO.HASH_MD5
DBMS_CRYPTO.HASH_MD4
The constants with SHA in their name, of course, are for SHA hashing. SH1 is for the SHA-1 method of hashing. SHA-2 is a newer and cryptographically more secure method of SHA hashing that is available in PL/SQL starting with Oracle Database 12c. Three types of SHA-2 hashing are available—SHA256, SHA384, and SHA512—named after the length of the key they use. Let’s look at an example. I declare a local variable with my source value and another to hold the hash value. I then call the HASH function, specifying SHA-1 as the hash method:
/* File on web: hash.sql */
1 DECLARE
2 l_in_val VARCHAR2 (2000) := 'CriticalData';
3 l_hash RAW (2000);
4 BEGIN
5 l_hash :=
6 DBMS_CRYPTO.HASH (src => utl_i18n.string_to_raw (
7 l_in_val, 'AL32UTF8'
8 ),
9 typ => DBMS_CRYPTO.hash_sh1
10 );
11 DBMS_OUTPUT.put_line ('Hash=' || l_hash);
12 * END;
The output is the following hash value:
Hash=9222DE984C1A7DD792F680FDFD3EA05CB6CA59A9
Of course, you will usually not display the hash value; you will either store it or send it to the recipient for further verification.
Hashing has many uses beyond cryptography. Web applications, for example, are stateless; an application session does not necessarily correspond to a “session” in the Oracle instance. Consequently, you cannot depend on the application of row-level locks to avoid lost updates. After a web page retrieves a row, another application might change it. How does a web session know whether a row retrieved earlier has been changed? One solution is to generate and cache the hash value of the row data. Then, at any later time, when the application needs to work with a row, it can do a second hash, compare the values, and quickly determine whether the row is current.
Using Message Authentication Codes
Hashing is designed to verify the authenticity of data, not to protect it from prying eyes. The idea is to generate the hash value and store it in some place other than the data itself. You can later regenerate the hash value and compare it against the stored hash value. There is a little problem, however: what if an intruder updates the main data, calculates the hash value as well, and updates the stored hash value?
To protect against that possibility, you can create a kind of password-protected hash value, known as a message authentication code (MAC). A MAC is a hash value combined with a key. If you use a different key, the same input data will produce a different MAC. As with a hash, you can’t decipher the main data from the MAC; it is one-way encryption. The presence of the key makes it impossible for an intruder to come up with the same MAC value, unless she guesses the key (so don’t use anything obvious!).
The MAC function in the DBMS_CRYPTO package implements the MAC algorithm. It accepts three parameters:
src
Input value (RAW).
key
Key used to calculate the MAC value.
typ
Algorithm used. As with hashing, there are three choices: MD4, MD5, or SHA-1.The parameter is passed as a predefined constant in the DBMS_CRYPTO package. (See the list in the previous section. The only difference is that MAC constants have “HMAC” in their names replacing “HASH”; for example, the SHA-1 MAC constant is named HMAC_SH1 instead of HASH_SH1.)
I’ll use the same example shown for hashing, except that I will make it secure by adding a key: “1234567890123456”. The key and input value both must be RAW; if they are not, I have to convert them:
DECLARE
l_in_val VARCHAR2 (2000) := 'Critical Data';
l_key VARCHAR2 (2000) := 'SecretKey';
l_mac RAW (2000);
BEGIN
l_mac :=
DBMS_CRYPTO.mac (src => utl_i18n.string_to_raw (l_in_val,'AL32UTF8'),
typ => DBMS_CRYPTO.hmac_sh1,
KEY => utl_i18n.string_to_raw (l_key, 'AL32UTF8')
);
DBMS_OUTPUT.put_line ('MAC=' || l_mac);
-- let's use a different key
l_key := 'Another Key';
l_mac :=
DBMS_CRYPTO.mac (src => utl_i18n.string_to_raw (l_in_val,'AL32UTF8'),
typ => DBMS_CRYPTO.hmac_sh1,
KEY => utl_i18n.string_to_raw (l_key, 'AL32UTF8')
);
DBMS_OUTPUT.put_line ('MAC=' || l_mac);
END;
The output is:
MAC=7A23524E8B665A57FE478FBE1D5BFE2406906B2E
MAC=0C0E467B588D2AD1DADE7393753E3D67FCCE800C
As expected, when a different key is used, the same input value provides a different MAC value. So if an intruder updates the MAC value, she may not know the key used initially; she will therefore generate a different MAC value, which won’t match the previously generated value and hence will raise alarms.
NOTE
This example is very simplistic. In the real world, such an operation would require the generation of a much more complex and difficult-to-guess key.
Using Transparent Data Encryption
In the previous sections, you learned how to build an encryption infrastructure from the ground up. You may need such an infrastructure if your organization is to satisfy the many compliance-related regulations and directives in play these days, or you may simply want to protect your database from potential attacks. As we worked through the examples in these sections, I’m sure you noticed that building the encryption-related components (e.g., trigger, package) was relatively simple and straightforward. The most difficult part of the infrastructure was clearly the management of the encryption keys. While it’s important to make these keys available to applications, access to the keys must be restricted to protect them from theft, and that can be tricky.
Starting with Oracle Database 10g Release 2, a feature known as transparent data encryption (TDE) makes encrypting data extremely easy. All you have to do is declare a column as encrypted; Oracle does the rest. The column value is intercepted when entered by the user, encrypted, and then stored in encrypted format. Afterward, when the column is queried, the value is decrypted automatically, and then the decrypted text (cleartext) is returned to the user. The user does not even need to know that encryption and decryption are taking place—hence the term transparent. It’s all done inside the Oracle code without any need for triggers or complex procedural logic.
Here is an example that uses TDE. To declare the column SSN of the table ACCOUNTS as being encrypted, simply specify:
ALTER TABLE accounts MODIFY (ssn ENCRYPT USING 'AES256')
The Oracle database instantly encrypts the column SSN using the AES algorithm and a 256-bit key. The key is stored in a data dictionary table, but to protect the key from theft it is also encrypted using a master key, which is stored in a separate location known as a wallet. The wallet, by default, is in the location $ORACLE_BASE/admin/$ORACLE_SID/wallet; however, you can always specify a different location in the file SQLNET.ORA. When a user inserts the data, specifying:
INSERT INTO accounts (ssn) VALUES ('123456789')
the actual value is stored in encrypted format in the datafiles, the redo logfiles and their archives, and consequently the backup files. When a user subsequently queries the data, the encrypted value is automatically decrypted, and the original value is shown. The wallet must be opened by the DBA or a security administrator before the preceding statements are issued.
Starting with Oracle Database 12c, the encryption clause includes another parameter that further protects the encrypted value: it adds a 20-byte MAC value to each of the encrypted values. If someone tampers with the encrypted value, the MAC value of the tampered-with data will differ from the original MAC value and the integrity will be violated, alerting you that the data has been compromised. However, because this feature adds the MAC value it increases the space used by the column, which could be a concern in space-challenged databases. You can disable this feature by using an optional clause:
ALTER TABLE accounts MODIFY (ssn ENCRYPT USING 'AES256' NOMAC)
Given how easy it is to use TDE, the big question is: does it make everything you’ve learned in this chapter about encryption obsolete?
ENCRYPTION IN A NUTSHELL
§ Oracle provides two packages to implement encryption and related activities: DBMS_CRYPTO (available starting in Oracle Database 10g) and DBMS_OBFUSCATION_TOOLKIT. If you are running Oracle Database 10g or later, you should be using DBMS_CRYPTO.
§ Four components are required to encrypt an input value: a key, an algorithm, a padding method, and a chaining method.
§ The longer the key is, the more difficult it is to guess it and the more secure the encryption is.
§ To decrypt, you must use the same combination of algorithm, key, padding, and chaining used during encryption.
§ The biggest challenge in building an encryption system is the management of the keys. Safekeeping the keys while making them easily accessible to applications is vital to a successful encryption system.
§ Hashing is the generation of some seemingly random value from an input value. The input value cannot be guessed from the hash value. A hash function, when applied to a value, produces the same hash value every time.
§ A message authentication code (MAC) is identical to a hash, except that a key is supplied during the generation of the MAC value.
Not at all! The goal of TDE is a limited one: to protect the database files mentioned earlier from potential theft by encrypting sensitive data using minimal effort. Note, however, that the emphasis is on the word transparent—that is, while encryption is done automatically, so is decryption. Within the database, Oracle does not differentiate between users. When a user queries the database, Oracle supplies the cleartext value regardless of who the authorized user may be.
In many cases, you will still need to build a more sophisticated system in which the cleartext value will be exposed only if the user making the request is actually authorized to see that value; in all other cases, the encrypted value will be returned. It is not possible to satisfy this requirement using TDE because TDE decrypts everything indiscriminately. You can, however, achieve this objective by building your own infrastructure using the techniques described in this chapter.
TDE comes with some limitations. For one thing, you can’t have a foreign key column encrypted by TDE; that’s quite a limitation in many business applications. For another, you can create only b*tree indexes on the columns under TDE. These restrictions are irrelevant, however, when you roll out your own encryption routine using PL/SQL.
When deciding whether TDE serves your purposes, the other aspect you must consider is automation. In TDE, the wallet (in which the master key is stored) must be opened by the DBA using a command such as the following:
ALTER SYSTEM SET ENCRYPTION WALLET OPEN AUTHENTICATED BY "pooh";
Here, the password of the wallet is pooh. If the database datafiles (or the redo logs or backups of those files) are stolen, the encrypted columns will remain encrypted because the thief will not know the password, which would allow him to open the wallet.
After every database startup, the wallet must be explicitly opened by the DBA for the encrypted columns to be inserted or accessed. If the wallet is not open, the inserts and accesses to these columns fail. So, that is one extra step that needs to be performed after the database is opened. In addition, you will have to ensure that the person opening the database knows the wallet password.
To make such a process easier and more automatic, you might ordinarily consider creating a database startup trigger that calls the ALTER SYSTEM command (just shown) to open the wallet. If you do, however, this startup trigger will remove the only protection from the wallet and, subsequently, the encrypted columns. So, if you are using TDE, you should never use such a startup trigger, and you must be prepared to perform the extra step after each database startup. If you build your own encryption infrastructure, however, it is available as soon as the database is; no additional step is necessary, and no wallet passwords need to be remembered and entered.
In summary, TDE is a limited capability. It offers a quick and easy way to encrypt datafiles, redo logs, and backup files. However, it does not protect the data by discriminating among users; it always decrypts upon access. If you need to have more control over the decryption process, then you will have to rely on your own encryption infrastructure.
Transparent Tablespace Encryption
The problems with TDE and, to a lesser extent, user-written encryption with regard to application performance can be summed up as follows:
§ TDE negates the use of indexes for queries with a range scan, since there is no pattern correlation of the table data to the index entry. User-written encryption offers only limited opportunities to use indexes.
§ Querying the encrypted data requires decryption of that data, which results in significant additional CPU consumption.
The impact of these problems means that in real-world application development TDE is often rejected as unfeasible, while the extensive coding requirements for user-written encryption via DBMS_CRYPTO pose a significant challenge for many organizations.
To address these drawbacks, Oracle Database 11g introduced a new feature: transparent tablespace encryption (TTE). With TTE, a user can define an entire tablespace, rather than an individual table, as encrypted. Here is an example of creating an encrypted tablespace:
TABLESPACE securets1
DATAFILE '+DG1/securets1_01.dbf'
SIZE 10M
ENCRYPTION USING 'AES128'
DEFAULT STORAGE (ENCRYPT)
Whenever you create an object in this tablespace, it will be converted to an encrypted format via an AES algorithm using a 128-bit key. You must have already set up the wallet and opened it as described in the previous section. The encryption key is stored in the ENC$ table in an encrypted manner, and the key to that encryption is stored in the wallet, as it is in TDE. Of course, the wallet must be opened prior to tablespace creation.
You may be wondering how an encrypted tablespace can avoid the problems of table-based encryption. The key difference is that the data in the tablespace is encrypted only on disk; as soon as the data is read, it decrypted and placed in the SGA’s buffer cache as cleartext. Index scans operate on the buffer cache, thereby bypassing the problem of unmatched encrypted data. Similarly, since the data is decrypted and placed in the buffer cache only once (at least until it is aged out), the decryption occurs just once, rather than every time that data is accessed. As a consequence, as long as the data remains in the SGA, performance is not affected by encryption. It’s the best of both worlds—security by encryption and minimized performance impact.
Since the issues seem to have been resolved, does TTE spell doom for the user-written encryption procedures shown in this chapter? Not at all!
When you encrypt a tablespace, all the objects—indexes and tables—are encrypted, regardless of whether you need them to be encrypted or not. That’s fine when you need to encrypt all or most of the data in the tablespace. But what if you only need encryption for a fraction of the total data volume? With TTE, your application will experience the performance impact of decryption for much more data than is really necessary. The Oracle database minimizes this impact, but it cannot completely avoid it. As a result, you may still choose to implement user-written encryption when you need to encrypt data selectively in your application’s tables.
In addition, encrypted tablespaces can only be created; you can’t convert an existing tablespace from cleartext to encrypted (nor can you change an encrypted tablespace to cleartext). Instead, you must create a tablespace as encrypted and then move your objects into it. If you decide to introduce encryption into an existing database, the TTE approach may not be feasible, given the enormous volumes of many production databases. User-written encryption allows you to tightly control how much of the data will be encrypted (and then decrypted).
Clearly, user-written encryption still has its charm and its place in real-world applications. You can implement transparent tablespace encryption much more quickly and easily, but you will need to validate that the “brute force” approach of total encryption works for your application.
ENCRYPTION AND EXADATA
Exadata, the powerful database machine from Oracle, has more than made its mark on the Oracle Database computing stage. Since it is a regular Oracle Database running on specialized hardware, all the concepts described in this chapter apply to Exadata without any elaboration. There is, however, a feature related to encryption so powerful that it does require a special mention. Unlike traditional storages, the storage in Exadata is “intelligent” in two ways. First, it may know about the distribution of data on the disks, which allows it to filter out the nonrelevant blocks right on the disks through a construct called the storage index. Second, through the software it runs—Exadata Storage Server—it can perform certain types of operations, such as applying a MIN or MAX function, instead of relying on the database to perform them on the dataset. This feature is known as cell offloading, to signify the offloading to the storage cells (the storage of Exadata) of some processing traditionally done by the database.
With the storage layer doing some heavy lifting that is typically done by the database layer, there is a general reduction in overall I/O and data transfer between cells and database nodes; hence, Exadata can deliver some serious punch in terms of database performance. Of course, not all types of functions can be offloaded to storage cells, but one important task that can be is decryption. The compression is done by the database, but the decryption is done by the storage cells. Because data can potentially be filtered at the cells, this leads to even better performance, since the database not only gets the unencrypted blocks but also the relevant blocks from the storage.
Row-Level Security
Row-level security (RLS) is a feature introduced in Oracle8i Database that allows you to define security policies on tables (and specific types of operations on tables) that restrict which rows a user can see or change in a table. Much of the functionality is implemented with the built-in package DBMS_RLS.
Oracle has for years provided security at the table level and, to some extent, at the column level—that is, privileges may be granted (or denied) to allow users to access only some tables or columns. For example, you can grant specific users privileges to insert only into certain tables while allowing them to select from other tables, or you can allow users to update only certain columns of specific tables. If you use views, you can also restrict how the tables get populated from the views using INSTEAD OF triggers (described in Chapter 19). All of these privileges are based on one assumption: that you can achieve security simply by restricting access to certain tables and columns. But when that access is granted, the users have access to see all the rows of the table. What if you need to limit the visibility of rows in a table, based on criteria such as the identity of the user or other application-specific characteristics?
Consider, for example, one of the demonstration tables provided with the database—EMP in schema HR. The table has 14 rows of data, with primary keys (employee numbers) ranging from 7369 to 7934.
Suppose that you have given a user named Lora access to see this table, but you want to add a restriction so that Lora can see and modify only employees who get a commission (i.e., those for whom the COMM field is NOT NULL).
One way to solve this problem is to create a view on top of the table, but what if a user is able to (or needs to) gain access to the underlying table? In some cases, a user may have a legitimate need to access the table directly—for example, to create stored program units that work with the table. A view-based implementation simply won’t work. Instead, you can turn to RLS. With RLS, you can instruct the Oracle database to limit the set of rows a user can see based on some arbitrary rules you define. It will be impossible for the user to evade these rules.
NOTE
In Oracle, RLS is also sometimes referred to as the virtual private database (VPD) or fine-grained access control (FGAC).
If, for example, you enable RLS on the table EMP with the rule just described, then when Lora issues the following query:
SELECT * FROM emp
she will see only 4 rows—not 14—even though the query itself has no WHERE clause:
7499 ALLEN SALESMAN 7698 20-FEB-81 1,600 300 30
7521 WARD SALESMAN 7698 22-FEB-81 1,250 500 30
7654 MARTIN SALESMAN 7698 28-SEP-81 1,250 1,400 30
7844 TURNER SALESMAN 7698 08-SEP-81 1,500 0 30
Similarly, when she updates the table without a WHERE clause, only those rows she is allowed to see are updated:
SQL> UPDATE hr.emp SET comm = 100
2 /
4 rows updated.
It’s as if the other 10 rows do not even exist for Lora. The database accomplishes this seeming act of magic (“Now you see it, now you don’t!”) by adding a predicate (a WHERE clause) to any DML written by users against the table. In this case, the query SELECT * FROM EMP wasautomatically rewritten to:
SELECT * FROM emp WHERE comm IS NOT NULL
To achieve this kind of transparent, row-level security on a table, you must define an RLS policy on that table. This policy determines whether or not a restriction should be enabled during data access. You may want only UPDATEs to be restricted for users while SELECTs from the table remain unrestricted, or you may want to restrict access for SELECTs only if the user selects a certain column (e.g., SALARY), not others. These instructions are placed in the policy. The policy is associated with a policy function, which generates the predicate (COMM IS NOT NULL, in this case) to be applied to the queries.
To summarize, at a high level, RLS consists of three main components:
Policy
A declarative command that determines when and how to apply the policy: during queries, insertions, deletions, updates, or combinations of these operations.
Policy function
A PL/SQL function that is called whenever the conditions specified in the policy are met.
Predicate
A string that is generated by the policy function and then applied to the user’s or users’ SQL statements, indicating limiting conditions.
Conceptually, this behavior is illustrated in Figure 23-5. A policy is like a sieve that checks the rows of the table against the predicate generated. If they satisfy the predicate, they’re allowed to pass through the sieve; otherwise, they are not shown to the user.
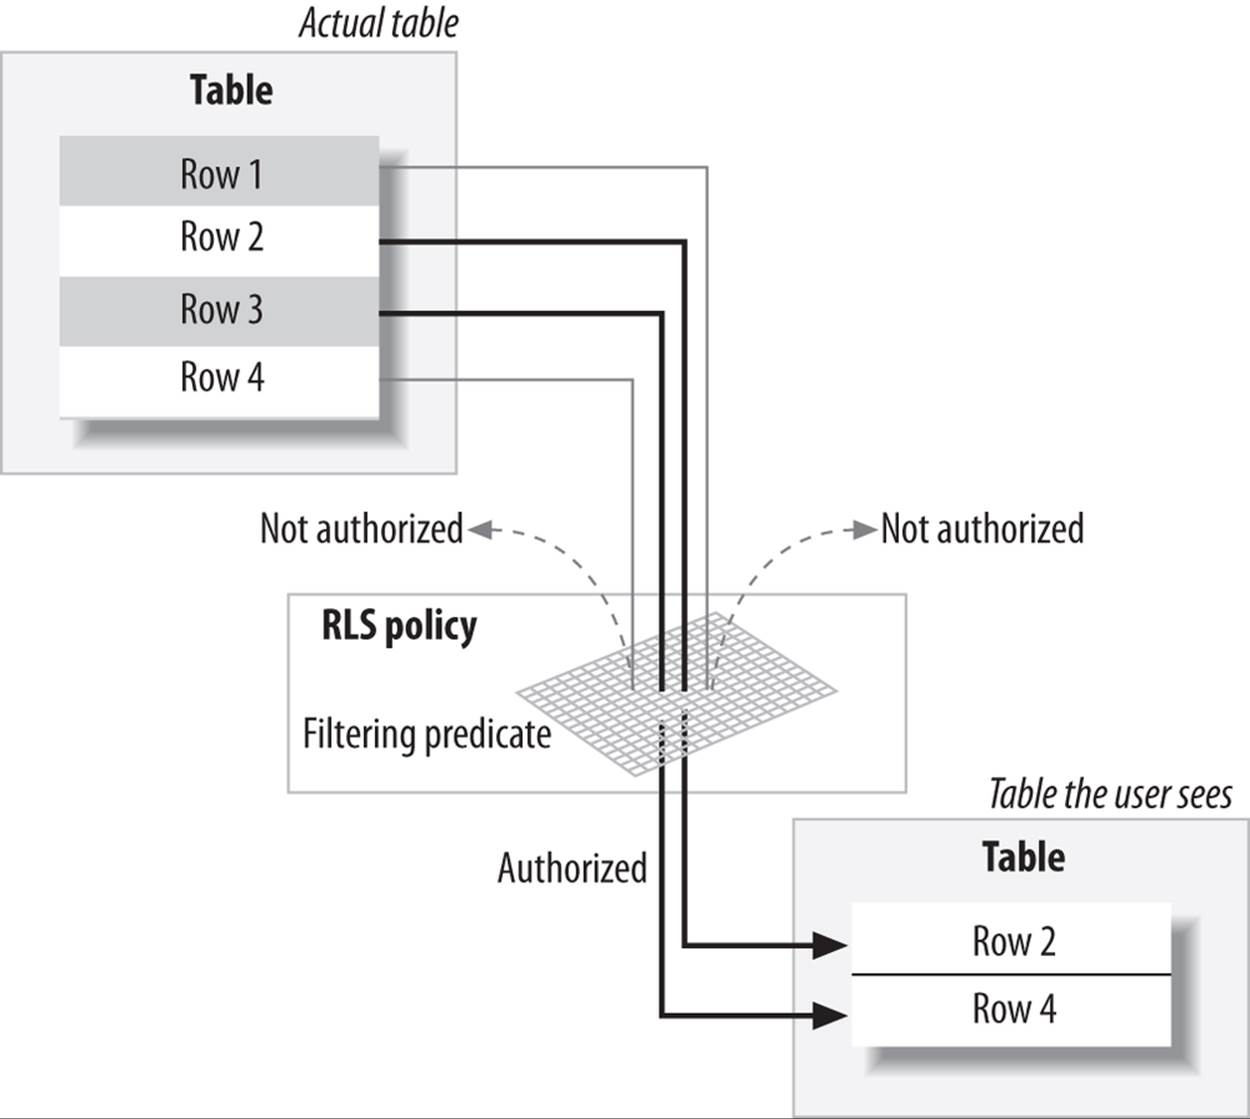
Figure 23-5. Row-level security infrastructure
Why Learn About RLS?
At first glance, row-level security may seem to be a topic for DBAs and security administrators, not for PL/SQL developers or even application architects. Why should a PL/SQL developer learn more about it?
Security is everybody’s business now
RLS was initially designed for security, and security has traditionally been the bailiwick of DBAs. In the 21st century, however, we all find ourselves in a more security-conscious environment. A myriad of laws, regulations, and guidelines constrain our applications. Increasingly, developers need to be aware of the security aspects of the various tools they use to construct their programs. Application architects, in particular, need a working knowledge of how to apply RLS early in the design process.
RLS is not just for security
Take a closer look at the RLS concept. It’s a sieve, and the developer of the function controls how the sieve should filter. Suppose that you have a third-party application to support that now has two different functional areas going into the same table; you may have to make some changes in the application’s queries to make sure that these functional areas are clearly delineated. But that means making changes to application, which may be undesirable. RLS may come to the rescue here. You can use RLS to create a logical separation of the rows inside the same table so that two applications will see different sets of data. This clearly benefits application development while keeping the overall system highly maintainable.
You can use RLS to perform some tricks that aren’t possible otherwise
Remember that RLS applies a function-generated predicate to your queries. If you generate a predicate 1=2 that always evaluates to FALSE, what will be the output of your queries? “No rows found,” because the WHERE clause will always evaluate to FALSE. Thus, if you define a 1=2 policy on DELETEs, INSERTs, and UPDATEs, but not on SELECTs, you can effectively stop users from making changes to a table, while still allowing them to read the data. Oracle by default allows a tablespace, but not a specific table, to be read-only. But RLS gives you a way to make the table itself read-only.
Other approaches don’t work here. If you simply revoke UPDATE or INSERT grants from the user, that will invalidate the procedures. If you define a procedure using the definer rights model (the default, described in Chapter 24), then you won’t be able to revoke a privilege from a particular user.
Let’s try to jump-start your learning about RLS by looking at some examples.
A Simple RLS Example
In this example, I’ll use the same EMP table referenced earlier this section. The requirement that I will implement is as follows:
Users cannot see employees whose salaries are greater than $1,500.
I will therefore need to construct the following:
§ A predicate that will be added automatically to the users’ SQL statements
§ A policy function that generates that predicate
§ A policy to call that function and apply the predicate transparently
In this case, the predicate should be:
SALARY <= 1500
Next, I write the policy function to return this:
FUNCTION authorized_emps (
p_schema_name IN VARCHAR2,
p_object_name IN VARCHAR2
)
RETURN VARCHAR2
IS
l_return_val VARCHAR2 (2000);
BEGIN
l_return_val := 'SAL <= 1500';
RETURN l_return_val;
END authorized_emps;
When the function is executed, it will return the string “SAL <= 1500.” Let’s just confirm that using this code segment:
DECLARE
l_return_string VARCHAR2 (2000);
BEGIN
l_return_string := authorized_emps ('X', 'X');
DBMS_OUTPUT.put_line ('Return String = "' || l_return_string || '"');
END;
The output is:
Return String = "SAL <= 1500"
You might be wondering why I would pass in those arguments, if the function always returns the same value regardless of their values. This is actually a requirement of RLS, which I’ll explain later.
Finally, I create the policy using the ADD_POLICY function provided in Oracle’s DBMS_RLS built-in package:
1 BEGIN
2 DBMS_RLS.add_policy (object_schema => 'HR',
3 object_name => 'EMP',
4 policy_name => 'EMP_POLICY',
5 function_schema => 'HR',
6 policy_function => 'AUTHORIZED_EMPS',
7 statement_types => 'INSERT, UPDATE, DELETE, SELECT'
8 );
9 END;
Here I am adding a policy named EMP_POLICY (line 4) on the table EMP (line 3) owned by the schema HR (line 2). The policy will apply the filter coming out of the function AUTHORIZED_EMPS (line 6) owned by schema HR (line 5) whenever any user performs INSERT, UPDATE, DELETE, or SELECT operations (line 7). Earlier I wrote the function AUTHORIZED_EMPS to create and return the predicate strings to be applied to the user queries.
Once this policy is in place, if a user selects from the table or tries to change it, he will be able to operate on only those rows where SAL <= 1500.
The policy EMP_POLICY is applied to the table EMP when a user performs a SELECT, INSERT, DELETE, or UPDATE. The predicate of the policy function is applied to the policy. As long as the policy function returns a valid predicate string, it’s applied to the query. Depending on the business needs, you can write the policy function in any way, as long as you follow certain rules:
§ The policy may be a standalone or packaged function, but never a procedure.
§ It must return a VARCHAR2 value, which will be applied as a predicate. Note that this means your predicates cannot be greater than 32,767 bytes in length.
§ It must have exactly two input parameters, in the following order:
§ schema, which owns the table on which the policy has been defined
§ object_name, which identifies the table(s) or view(s)
NOTE
To have no restrictions on access, you can specify a policy function that returns one of the following as a predicate:
§ NULL.
§ 1=1 or some other expression that always evaluates to TRUE. Because the return value has to be of type VARCHAR2, you can’t return the Boolean TRUE.
Similarly, to have a restriction for all rows, you can have a predicate that always evaluates to FALSE—for example, 1=2.
You can define more than one policy on a table. There is no precedence—that is, no defined order in which the policies are applied to the queries on the table. When you issue a SQL statement against the table, the query is appended to the predicates returned by all the policies.
To see the policies defined on a table, you can check the data dictionary view DBA_POLICIES, which shows the name of the policy, the object on which it is defined (and its owner), the policy function name (and its owner), and much more.
Starting with Oracle Database 10g, the parameter statement_types can have another value—INDEX. When you specify that, access to the rows even when creating indexes is also restricted. Suppose a user is trying to create a function-based index on the SAL column; the index creation script will need all the values of the column, effectively bypassing the security. To get around this, you can specify INDEX as a value in the parameter, as shown here:
1 BEGIN
2 DBMS_RLS.add_policy (object_schema => 'HR',
3 object_name => 'EMP',
4 policy_name => 'EMP_POLICY',
5 function_schema => 'HR',
6 policy_function => 'AUTHORIZED_EMPS',
7 statement_types => 'INSERT, UPDATE, DELETE, SELECT, INDEX'
8 );
9 END;
Then, if the user attempts to create a function-based index, Oracle will raise the following error:
ORA-28133: full table access is restricted by fine-grained security
Now you’ve seen how to create a policy. You can also drop a policy using the DROP_POLICY function in the DBMS_RLS package. To drop a policy using EMP_POLICY, I would issue the following statement:
BEGIN
DBMS_RLS.drop_policy (object_schema => 'HR',
object_name => 'EMP',
policy_name => 'EMP_POLICY'
);
END;
Note that policies are not database schema objects—that is, no user owns them. Any user with the EXECUTE privilege on the DBMS_RLS package can create a policy. Similarly, any user with the EXECUTE privilege can drop that policy. Therefore, it’s important that you revoke EXECUTE privileges on the package from anyone who doesn’t need them.
Let’s examine a slight twist here. The user, instead of updating any other column, updates the SAL column, which is the column used in the predicate. It will be interesting to see the result:
SQL> UPDATE hr.emp SET sal = 1200;
7 rows updated.
SQL> UPDATE hr.emp SET sal = 1100;
7 rows updated.
Only seven rows are updated, as expected. Now let’s change the updated amount. After all, everyone deserves a better salary:
SQL> UPDATE hr.emp SET sal = 1600;
7 rows updated.
SQL> UPDATE hr.emp SET sal = 1100;
0 rows updated.
As you may have predicted, the second update does not change any rows because the first update moved all of the rows in the table beyond the reach of a user whose RLS policy dictates a filtering predicate of SAL <= 1500. Thus, after the first update, all the rows were invisible to the user.
This is a potentially confusing situation in which the updates might themselves update the data to change the visibility of the table rows. During application development, this may create bugs or at least introduce some degree of unpredictability. To counter this behavior, let’s take advantage of another parameter of DBMS_RLS.ADD_POLICY named update_check. Let’s take a look at the impact of setting update_check to TRUE while creating a policy on the table:
BEGIN
DBMS_RLS.add_policy (
object_name => 'EMP',
policy_name => 'EMP_POLICY',
function_schema => 'HR',
policy_function => 'AUTHORIZED_EMPS',
statement_types => 'INSERT, UPDATE, DELETE, SELECT',
update_check => TRUE
);
END;
After this policy is placed on the table, if the user performs the same update, she now gets an error:
SQL> UPDATE hr.emp SET sal = 1600;
UPDATE hr.emp SET sal = 1600
*
ERROR at line 1:
ORA-28115: policy with check option violation
The ORA-28115 error is raised because the policy now prevents any updates to the column value that will make the rows move in and out of RLS coverage. But suppose that the user updates SAL to a value that does not affect the visibility of the rows:
SQL> UPDATE hr.emp SET sal = 1200;
7 rows updated.
Because the new value of the SAL column—1200—will still make these seven rows visible, this update is allowed.
NOTE
Set the update_check parameter to TRUE when defining a policy to avoid what may appear to be unpredictable behavior in the application.
Static Versus Dynamic Policies
In the earlier example, I talked about a policy that returns a predicate string that is a constant, “SAL <= 1500.” In real life that is not very common, except in some specialized applications such as goods warehouses. In most cases, you will need to build the filter based on the user issuing the query. For example, the HR application may require that a user sees only records of his department. This is a dynamic requirement because it needs to be evaluated for each employee who is logged in.
And that isn’t the only rule I need to apply to this situation. The table is protected by the RLS policy, which prevents users from seeing all the records. But what if the owner of that table, HR, selects from the table? The HR user too will see only those records. That isn’t right: the owner must be able to see all the records. To let HR see all the records, I have two options:
§ Grant a special privilege to the user HR so that RLS policies do not apply to HR.
§ Define the policy function so that if the calling user is the schema owner, the restrictive predicate is not applied.
With the first approach, the policy function needs no change. The DBA can grant the following privilege to HR:
GRANT EXEMPT ACCESS POLICY TO hr;
This removes the application of any RLS policies from the user HR. Because no policy, regardless of which table it is defined on, will be applied, you should use this approach with great caution. In fact, considering the risk of a breach in security, it is probably something you should avoid altogether.
The other approach involves modifying the policy function to take care of this problem. Here is the policy function needed to handle this complexity:
1 FUNCTION authorized_emps (
2 p_schema_name IN VARCHAR2,
3 p_object_name IN VARCHAR2
4 )
5 RETURN VARCHAR2
6 IS
7 l_deptno NUMBER;
8 l_return_val VARCHAR2 (2000);
9 BEGIN
10 IF (p_schema_name = USER)
11 THEN
12 l_return_val := NULL;
13 ELSE
14 SELECT deptno
15 INTO l_deptno
16 FROM emp
17 WHERE ename = USER;
18
19 l_return_val := 'DEPTNO = ' || l_deptno;
20 END IF;
21
22 RETURN l_return_val;
23 END;
The following table examines this function in detail.
|
Line(s) |
Description |
|
10 |
I check to see whether the calling user is the owner of the table. If so, I return NULL as a predicate, which means that no restriction will be placed on the table during access. |
|
14–19 |
I determine the department number of the user and then construct the predicate as “DEPTNO = user’s department number”. |
|
22 |
Finally, I return the predicate. |
There is an interesting fringe benefit to this approach. The policy function returns DEPTNO as a limiting predicate, so I can apply this policy to any table that has a DEPTNO column.
The preceding example showed one extreme case of a dynamic policy function. When each record is returned, the policy executes the policy function, checks the predicate, and decides whether or not to pass the record. This is certainly an expensive approach, because the database will go through the parse-execute-fetch cycle each time.
If the predicate remains the same, I can optimize the performance of the application by eliminating unnecessary calls to the function. Starting with Oracle9i Database, the ADD_POLICY procedure has a parameter called static_policy, which defaults to FALSE. If the parameter is set to TRUE, the policy function is executed only once at the beginning of the session. This value should be used only if you are absolutely sure that the predicate string will remain the same throughout the session.
Starting with Oracle Database 10g, there are several types of “dynamic” policies. You can set any of these policies in the parameter policy_type in the ADD_POLICY procedure. The valid values are:
DBMS_RLS.DYNAMIC
DBMS_RLS.CONTEXT_SENSTIVE
DBMS_RLS.SHARED_CONTEXT_SENSITIVE
DBMS_RLS.SHARED_STATIC
DBMS_RLS.STATIC
The default behavior is DYNAMIC. If the parameter static_policy is set to TRUE, the default value of policy_type is DBMS_RLS.STATIC. If static_policy is FALSE, then the policy_type is set to DBMS_RLS.DYNAMIC. In these two policy types—static and dynamic—the policies behave just as they would in Oracle9i Database with the parameter static_policy set to TRUE and FALSE, respectively.
In the following sections, I’ll show the other types of policies supported in Oracle Database 10g and later.
NOTE
The new policy types provide excellent performance benefits over the default dynamic type. However, beware of the side effects of these policy types. For example, because static polices do not reexecute the function, they may produce unexpected output.
Shared static policies
A shared static policy is similar to a static one, except that the same policy function is used in policies on multiple objects. In a previous example you saw how the function AUTHORIZED_EMPS was used as a policy function in the policies on both the DEPT and EMP tables. Similarly, you can have the same policy—not merely the same function—defined on both tables. This is known as a shared policy. If it can be considered static, then the policy is declared as shared static (DBMS_RLS.SHARED_STATIC). Using this type, here is how I can create the same policy on both of the tables:
1 BEGIN
2 DBMS_RLS.drop_policy (object_schema => 'HR',
3 object_name => 'DEPT',
4 policy_name => 'EMP_DEPT_POLICY'
5 );
6 DBMS_RLS.add_policy (object_schema => 'HR',
7 object_name => 'DEPT',
8 policy_name => 'EMP_DEPT_POLICY',
9 function_schema => 'RLSOWNER',
10 policy_function => 'AUTHORIZED_EMPS',
11 statement_types => 'SELECT, INSERT, UPDATE, DELETE',
12 update_check => TRUE,
13 policy_type => DBMS_RLS.SHARED_STATIC
14 );
15 DBMS_RLS.add_policy (object_schema => 'HR',
16 object_name => 'EMP',
17 policy_name => 'EMP_DEPT_POLICY',
18 function_schema => 'RLSOWNER',
19 policy_function => 'AUTHORIZED_EMPS',
20 statement_types => 'SELECT, INSERT, UPDATE, DELETE',
21 update_check => TRUE,
22 policy_type => DBMS_RLS.SHARED_STATIC
23 );
24 END;
By declaring a single policy on both tables, I have instructed the database to cache the result of the policy function once and then use it multiple times.
Context-sensitive policies
As you learned earlier, static policies, although quite efficient, can be dangerous; because they do not re-execute the function every time, they may produce unexpected results. Hence, Oracle provides another type of policy—context-sensitive—which reexecutes the policy function only when the application context changes in the session (see Application Contexts). Here’s an example of using this type of policy:
1 BEGIN
2 DBMS_RLS.drop_policy (object_schema => 'HR',
3 object_name => 'DEPT',
4 policy_name => 'EMP_DEPT_POLICY'
5 );
6 DBMS_RLS.add_policy (object_schema => 'HR',
7 object_name => 'DEPT',
8 policy_name => 'EMP_DEPT_POLICY',
9 function_schema => 'RLSOWNER',
10 policy_function => 'AUTHORIZED_EMPS',
11 statement_types => 'SELECT, INSERT, UPDATE, DELETE',
12 update_check => TRUE,
13 policy_type => DBMS_RLS.CONTEXT_SENSITIVE
14 );
15 DBMS_RLS.add_policy (object_schema => 'HR',
16 object_name => 'EMP',
17 policy_name => 'EMP_DEPT_POLICY',
18 function_schema => 'RLSOWNER',
19 policy_function => 'AUTHORIZED_EMPS',
20 statement_types => 'SELECT, INSERT, UPDATE, DELETE',
21 update_check => TRUE,
22 policy_type => DBMS_RLS.CONTEXT_SENSITIVE
23 );
24 END;
When you use the context-sensitive policy type (DBMS_RLS.CONTEXT_SENSITIVE), performance is generally not as good as with SHARED_STATIC, but better than with DYNAMIC. Here is an example of the time differences for a particular query. To measure the time, I will use the built-in timer DBMS_UTILITY.GET_CPU_TIME:
DECLARE
l_start_time PLS_INTEGER;
l_count PLS_INTEGER;
BEGIN
l_start_time := DBMS_UTILITY.get_time;
SELECT COUNT ( * )
INTO l_count
FROM hr.emp;
DBMS_OUTPUT.put_line (DBMS_UTILITY.get_time - l_start_time);
END;
The difference in the output of the function call between the beginning and the end is the time elapsed in centiseconds (hundredths of a second). When this query is run under different conditions, I get different response times, as shown in the following table.
|
Policy type |
Response time (cs) |
|
Dynamic |
133 |
|
Context-sensitive |
84 |
|
Static |
37 |
Shared context-sensitive policies
Shared context-sensitive policies are similar to context-sensitive policies, except that the same policy is used for multiple objects, as you saw with shared static policies.
UPGRADE STRATEGY FOR ORACLE DATABASE 10G/11G POLICY TYPES
I recommend that you do the following when upgrading from Oracle9i Database to Oracle Database 10g or higher:
1. Initially use the default type (dynamic).
2. Once the upgrade is complete, try to recreate the policy as context-sensitive and test the results thoroughly, with all possible scenarios, to eliminate any potential caching issues.
3. For those policies that can be made static, convert them to static and test thoroughly.
Using Column-Sensitive RLS
Let’s revisit the example of the HR application used in the previous sections. I designed the policy with the requirement that no user should have permission to see all records. A user can see only the data about the employees in his department. However, there may be cases in which that policy is too restrictive.
Suppose that you want to protect the data so people can’t snoop around for salary information. Consider the following two queries:
SELECT empno, sal FROM emp
SELECT empno FROM emp
The first query shows salary information for employees, the very information you want to protect. In this case, you want to show only the employees in the user’s own department. But the second query shows only the employee numbers. Should you filter that as well so that it shows only the employees in the same department?
The answer might vary depending upon the security policy in force at your organization. There may well be a good reason to let the second query show all employees, regardless of the department to which they belong. In such a case, will RLS be effective?
In Oracle9i Database, RLS doesn’t help; in Oracle Database 10g and later, however, an ADD_POLICY parameter, sec_relevant_cols, makes this easy. In the preceding scenario, for example, you want the filter to be applied only when SAL and COMM columns are selected, not any other columns. You can write the policy as follows (note the new parameter):
BEGIN
/* Drop the policy first. */
DBMS_RLS.drop_policy (object_schema => 'HR',
object_name => 'EMP',
policy_name => 'EMP_POLICY'
);
/* Add the policy. */
DBMS_RLS.add_policy (object_schema => 'HR',
object_name => 'EMP',
policy_name => 'EMP_POLICY',
function_schema => 'RLSOWNER',
policy_function => 'AUTHORIZED_EMPS',
statement_types => 'INSERT, UPDATE, DELETE, SELECT',
update_check => TRUE,
sec_relevant_cols => 'SAL, COMM'
);
END;
After this policy is put in place, queries on HR.EMP have different results:
SQL> -- harmless query, only EMPNO is selected
SQL> SELECT empno FROM hr.emp; ... rows are here ...
14 rows selected.
SQL> -- sensitive query, SAL is selected
SQL> SELECT empno, sal FROM hr.emp; ... rows are here ...
6 rows selected.
Note that when the column SAL is selected, the RLS policy kicks in, preventing the display of all rows; it filters out the rows where DEPTNO is something other than 30—that is, the DEPTNO of the user executing the query.
Column sensitivity does not just apply to being in the select list, but applies whenever the column is referenced, either directly or indirectly. Consider the following query:
SQL> SELECT deptno, count(*)
2 FROM hr.emp
3 WHERE sal> 0
4 GROUP BY deptno;
DEPTNO COUNT(*)
---------- ----------
30 6
Here, the SAL column has been referenced in the WHERE clause, so the RLS policy applies, causing only the records from department 30 to be displayed. Consider another example:
SQL> SELECT *
2 FROM hr.emp
3 WHERE deptno = 10;
no rows selected
Here the column SAL has not been referenced explicitly, but it is implicitly referenced by the SELECT * clause, so the RLS policy kicks in, filtering all but the rows from department 30. Because the query called for department 10, no rows were returned.
Let’s examine a slightly different situation now. In the previous case, I did protect the SAL column values from being displayed for those rows the user was not authorized to see. However, in the process I suppressed the display of the entire row, not just that particular column. Now suppose that new requirements call for masking only the column, not the entire row, and for displaying all other nonsensitive columns. Can this be done?
It’s easy, using another ADD_POLICY parameter, sec_relevant_cols_opt. Let’s recreate the policy with the parameter set to DBMS_RLS.ALL_ROWS, as follows:
BEGIN
DBMS_RLS.drop_policy (object_schema => 'HR',
object_name => 'EMP',
policy_name => 'EMP_POLICY'
);
DBMS_RLS.add_policy (object_schema => 'HR',
object_name => 'EMP',
policy_name => 'EMP_POLICY',
function_schema => 'RLSOWNER',
policy_function => 'AUTHORIZED_EMPS',
statement_types => 'SELECT',
update_check => TRUE,
sec_relevant_cols => 'SAL, COMM',
sec_relevant_cols_opt => DBMS_RLS.all_rows
);
END;
If I issue the same type of query now, the results will be different:
SQL> -- Show a "?" for the NULL values in the output.
SQL> SET NULL ?
SQL> SELECT *
2 FROM hr.emp
3 ORDER BY deptno
4 /
EMPNO ENAME JOB MGR HIREDATE SAL COMM DEPTNO
------ ---------- --------- ------ --------- ------ ------ ------
7782 CLARK MANAGER 7839 09-JUN-81 ? ? 10
7839 KING PRESIDENT ? 17-NOV-81 ? ? 10
7934 MILLER CLERK 7782 23-JAN-82 ? ? 10
7369 SMITH CLERK 7902 17-DEC-80 ? ? 20
7876 ADAMS CLERK 7788 12-JAN-83 ? ? 20
7902 FORD ANALYST 7566 03-DEC-81 ? ? 20
7788 SCOTT ANALYST 7566 09-DEC-82 ? ? 20
7566 JONES MANAGER 7839 02-APR-81 ? ? 20
7499 ALLEN SALESMAN 7698 20-FEB-81 1,600 300 30
7698 BLAKE MANAGER 7839 01-MAY-81 2,850 ? 30
7654 MARTIN SALESMAN 7698 28-SEP-81 1,250 1,400 30
7900 JAMES CLERK 7698 03-DEC-81 950 ? 30
7844 TURNER SALESMAN 7698 08-SEP-81 1,500 0 30
7521 WARD SALESMAN 7698 22-FEB-81 1,250 500 30
14 rows selected.
Notice that all 14 rows have been shown, along with all the columns, but that the values for SAL and COMM have been made NULL for the rows that the user is not supposed to see—that is, the employees of departments other than 30.
RLS here lets you satisfy cases in which rows must be displayed, but sensitive values must be hidden. Prior to Oracle Database 10g, you would have had to use views to accomplish the same thing, and the operations were a good deal more complicated.
WARNING
Use this feature with caution, because in certain cases it may produce unexpected results. Consider this query issued by, say, MARTIN:
SQL> SELECT COUNT(1), AVG(sal) FROM hr.emp;
COUNT(SAL) AVG(SAL)
---------- ----------
14 1566.66667
The result shows 14 employees and an average salary of $1,566—but this is actually the average of the 6 employees MARTIN is authorized to see, not all 14 employees. This may create some confusion as to which values are correct. When the schema owner, HR, issues the same query, you see a different result:
SQL> CONN hr/hr
Connected.
SQL> SELECT COUNT(1), AVG(sal) FROM hr.emp;
COUNT(SAL) AVG(SAL)
---------- ----------
14 2073.21429
Because the results can vary depending on which user issues the query, you need to be careful to interpret the results accordingly; otherwise, this feature may introduce difficult-to-trace bugs into your application.
RLS Debugging
RLS is a somewhat complex feature, relying on a variety of elements in the Oracle architecture. You may encounter errors, either as a result of problems in the design or through misuse by users. Fortunately, for most errors, RLS produces a detailed trace file in the directory specified by the database initialization parameter USER_DUMP_DEST.
Interpreting errors
The most common error you will encounter, and the easiest to deal with, is ORA-28110: Policy function or package has error. The culprit here is a policy function with errors. Fixing your compilation errors and recompiling the function (or the package containing the function) should cure the problem.
You may also encounter runtime errors, such as a datatype mismatch or a VALUE_ERROR exception. In these cases, Oracle raises the ORA-28112: failed to execute policy function error and produces a trace file. Here is an excerpt from a trace file:
----------------------------------------------------------
Policy function execution error:
Logon user : MARTIN
Table/View : HR.EMP
Policy name : EMP_DEPT_POLICY
Policy function: RLSOWNER.AUTHORIZED_EMPS
ORA-01422: exact fetch returns more than requested number of rows
ORA-06512: at "RLSOWNER.AUTHORIZED_EMPS", line 14
ORA-06512: at line 1
The trace file shows that MARTIN was executing the query when this error occurred. Here, the policy function simply fetched more than one row. Examining the policy function, you notice that it has a segment as follows:
SELECT deptno
INTO l_deptno
FROM hr.emp
WHERE ename = USER
It seems that there is more than one employee with the name MARTIN: the number of rows fetched is more than one, which caused this problem. The solution is to either handle the error via an exception or just use something else as a predicate to get the department number.
The ORA-28113: policy predicate has error exception occurs when the policy function does not construct the predicate clause correctly. Here is an excerpt from the trace file for this error:
Error information for ORA-28113:
Logon user : MARTIN
Table/View : HR.EMP
Policy name : EMP_DEPT_POLICY
Policy function: RLSOWNER.AUTHORIZED_EMPS
RLS predicate :
DEPTNO = 10,
ORA-00907: missing right parenthesis
It shows that the predicate returned by the policy function is:
DEPTNO = 10,
This is syntactically incorrect, so the policy application failed and so did MARTIN’s query. You can fix this by correcting the policy function logic to return a valid value as the predicate.
Performing direct path operations
If you are using direct path operations—for example, SQL*Loader’s direct path load or a direct path insert using the APPEND hint (INSERT /*+ APPEND */ INTO ...), or direct path export—you need to be aware that the RLS policies on affected tables will not be invoked. After all, the point of these direct path operations is to bypass the SQL layer. You will have to take special precautions to deal with this situation.
In the case of exports, it’s rather easy. Here is what happens when I export the table EMP, protected by one or more RLS policies, with the DIRECT=Y option:
About to export specified tables via Direct Path ...
EXP-00080: Data in table "EMP" is protected. Using conventional mode.
EXP-00079: Data in table "EMP" is protected. Conventional path may only be
exporting partial table.
The export is done successfully, but as you can see in the output, the output mode is conventional, not direct, as I wanted it to be. And in the process of performing the operation, the export still applied the RLS policies to the table—that is, the user can export only the rows she is authorized to see, not all of them.
WARNING
Because the operation of exporting a table under RLS may still successfully complete, you might get a false impression that all rows have been exported. However, be aware that only the rows the user is allowed to see, not all of them, are exported. In addition, even though the export was supposed to be run in direct mode, it runs in conventional mode.
Now when I try to do a SQL*Loader direct path load/direct path insert, I get an error:
SQL> INSERT /*+ APPEND */
2 INTO hr.EMP
3 SELECT *
4 FROM hr.emp
5 WHERE rownum < 2;
from hr.emp
*
ERROR at line 4:
ORA-28113: policy predicate has error
The error message is a little confusing—the policy predicate didn’t actually have an error. The RLS policy was not applied because this was a direct path operation, but the error message didn’t show that. You can fix this situation either by temporarily disabling the policy on the table EMP or by exporting through a user who has the EXEMPT ACCESS POLICY system privilege.
ROW-LEVEL SECURITY IN A NUTSHELL
§ RLS automatically applies a predicate (to be attached to a WHERE clause) to the queries issued by users so that only certain rows are visible.
§ The predicate is generated by a policy function written by the user.
§ A policy on a table determines under what circumstances the predicate should be imposed and what policy function to execute.
§ More than one policy can be defined on a table.
§ The same policy can be applied to more than one table.
§ The type of policy (dynamic, static, etc.) determines how often to execute the policy function.
§ When a table is loaded via a direct path operation, the SQL layer is bypassed and the RLS policy cannot be enforced, resulting in an error.
Viewing SQL statements
During debugging, it may be necessary to see the exact SQL statement rewritten by Oracle when an RLS policy is applied. In this way you will leave nothing to chance or interpretation. You can see the rewritten statement through two different approaches:
Use VPD views
One option is to use the dictionary view V$VPD_POLICY. The VPD in the name stands for virtual private database, another name for row-level security. This view shows all the query transformations:
SQL> SELECT sql_text, predicate, POLICY, object_name
2 FROM v$sqlarea, v$vpd_policy
3 WHERE hash_value = sql_hash
SQL_TEXT PREDICATE
----------------------------- ------------------------------
POLICY OBJECT_NAME
------------------------------ ------------------------------
select count(*) from hr.emp DEPTNO = 10
EMP_DEPT_POLICY EMP
The column SQL_TEXT shows the exact SQL statement issued by the user, while the column PREDICATE shows the predicate generated by the policy function and applied to the query. Using this view, you can identify the statements issued by the users and the predicates applied to them.
Set an event
The other option is to set an event in the session like this:
SQL> ALTER SESSION SET EVENTS '10730 trace name context forever, level 12';
Session altered.
SQL>SELECT COUNT(*) FROM hr.emp;
After the query finishes, you will see a trace file generated in the directory specified by the database initialization parameter USER_DUMP_DEST. Here is what the trace file shows:
Logon user : MARTIN
Table/View : HR.EMP
Policy name : EMP_DEPT_POLICY
Policy function: RLSOWNER.AUTHORIZED_EMPS
RLS view :
SELECT "EMPNO","ENAME","JOB","MGR","HIREDATE","SAL","COMM","DEPTNO"
FROM "HR"."EMP" "EMP" WHERE (DEPTNO = 10)
This clearly shows the statement as it was rewritten by the RLS policy.
Using either of these methods, you will be able to see the exact way that user queries are rewritten.
Application Contexts
In the discussion of row-level security in the previous section, I made a critical assumption: the predicate (i.e., the limiting condition that restricts the rows of the table) was the same. In my examples, it was based on the department number of the user. What if I have a new requirement: users can now see employee records based not on department numbers but on a list of privileges maintained for that reason. A table named EMP_ACCESS maintains the information about which users can access which employee information:
SQL> DESC emp_access
Name Null? Type
----------------- -------- ------------
USERNAME VARCHAR2(30)
DEPTNO NUMBER
Here is some sample data:
USERNAME DEPTNO
------------------------------ ----------
MARTIN 10
MARTIN 20
KING 20
KING 10
KING 30
KING 40
Here I observe that Martin can see departments 10 and 20, but King can see 10, 20, 30, and 40. If an employee’s name is not here, he cannot see any records. This new requirement means that I must generate the predicate dynamically inside the policy function.
The requirements also state that users can be reassigned privileges dynamically by updating the EMP_ACCESS table, and that it is not an option to log off and log in again. Hence, a LOGON trigger (see Chapter 19) will not help in this case.
The solution? One option is to create a package with a variable to hold the predicate and let the user execute a PL/SQL code segment to assign the value to the variable. Inside the policy function, you will be able to see the value of the packaged variable and apply that as the predicate. Is this an acceptable approach? Consider this option carefully: if the user can reassign another value to the package variable, what prevents him from assigning a very powerful value, such as that for King? Martin could log in, set the variable to all departments, and then SELECT from the table to see all the records. There is no security in this case, and that is unacceptable. This scenario is precisely why you should put the code for setting the variable values in the LOGON trigger, where the user will not have a chance to make a change.
Using Application Contexts
The possibility that a user may change the value of the package variable dynamically requires us to rethink our strategy. We need a way to set a global variable by some secure mechanism so that unauthorized alteration will not be possible. Fortunately, Oracle provides this capability throughapplication contexts. An application context is analogous to a global package variable; once set, it can be accessed throughout the session and reset. However, that’s where the similarity ends. The important difference is that in contrast to a package variable, an application context is not set by mere value assignment; rather, it needs a call to a procedure to set the value—and that is what makes it more secure. Let’s explore this further with an example.
An application context is similar to a structure in the C language or a record in PL/SQL: it has attributes, and attributes are assigned values. However, unlike its counterparts in C and PL/SQL, the attributes are not named during the creation of the context; instead, they are named and assigned at runtime. Application contexts reside in the program global area, by default, unless they are defined as global contexts. Since the PGA is private to a session, the values are not visible to another session.
Here, I use the CREATE CONTEXT command to define a new context called dept_ctx:
SQL> CREATE CONTEXT dept_ctx USING set_dept_ctx;
Context created.
USING set_dept_ctx indicates that there is a procedure named set_dept_ctx, and that only that procedure can set or change attributes of the context dept_ctx; this cannot be done in any other way.
I have not yet specified any attributes of the context; I have simply defined the overall context (name and secure mechanism for changing it). To do that, I need to create the procedure. Inside this procedure, I will assign values to the context attributes using the SET_CONTEXT function in the built-in package DBMS_SESSION, as shown in the following example:
PROCEDURE set_dept_ctx (p_attr IN VARCHAR2, p_val IN VARCHAR2)
IS
BEGIN
DBMS_SESSION.set_context ('DEPT_CTX', p_attr, p_val);
END;
To set the attribute named DEPTNO to the value 10, I specify:
SQL> EXEC set_dept_ctx ('DEPTNO','10')
PL/SQL procedure successfully completed.
To obtain the current value of an attribute, I call the SYS_CONTEXT function, which accepts two parameters—the context name and the attribute name. Here is an example:
SQL> DECLARE
2 l_ret VARCHAR2 (20);
3 BEGIN
4 l_ret := SYS_CONTEXT ('DEPT_CTX', 'DEPTNO');
5 DBMS_OUTPUT.put_line ('Value of DEPTNO = ' || l_ret);
6 END;
7 /
Value of DEPTNO = 10
I can use this function to get some predefined contexts—for example, to obtain the IP addresses and terminal names of the client:
BEGIN
DBMS_OUTPUT.put_line ( 'The Terminal ID is '
|| SYS_CONTEXT ('USERENV', 'TERMINAL')
);
END;
The output is:
The Terminal ID is pts/0
Here I am taking advantage of the predefined application context USERENV, which has a set of attributes (such as TERMINAL, IP_ADDRESS, and OS_USER), whose values are assigned automatically by Oracle. I cannot modify the values of these context attributes; I can only obtain their values.
Security in Contexts
All that the procedure set_dept_ctx does is call the supplied program DBMS_SESSION.SET_CONTEXT with appropriate parameters. Why do I need to use a procedure to do that? Can’t I just call the built-in function directly? Let’s see what happens if a user calls the same code segment to set the value of the attribute DEPTNO to 10:
SQL> BEGIN
2 DBMS_SESSION.set_context
3 ('DEPT_CTX', 'DEPTNO',10);
4 END;
5 /
begin
*
ERROR at line 1:
ORA-01031: insufficient privileges
ORA-06512: at "SYS.DBMS_SESSION", line 82
ORA-06512: at line 2
Note the error ORA-01031: insufficient privileges; that’s puzzling because the user Martin does have the EXECUTE privilege on DBMS_SESSION, so that is clearly not the issue here. You can verify this by regranting the EXECUTE privilege on this package and reexecuting the same code segment; you will still get the same error.
The answer lies in the fact that you cannot assign application contexts directly by calling the built-in package; they must be assigned through the program unit associated with the context at the time of its creation. This makes the program unit trusted for the context; hence, it’s known as thetrusted program of the application context.
NOTE
While creating an application context, you must specify its trusted program. Only the trusted program can set the values inside that context, and it cannot set values for any other context.
Contexts as Predicates in RLS
So far you have learned that a procedure must be used to set a context value, which is akin to a global variable. You might be tempted to ask: how is that useful? Doesn’t it increase the complexity rather unnecessarily without achieving any definite purpose?
The answer is no, because the trusted procedure is the only way to set context values; it acts as a gatekeeper to the context. We can perform arbitrarily complex authentication and verification steps inside the trusted program to ensure that the attribute assignments are valid. We can even completely eliminate passing parameters and set the values from a predetermined set of values without any input from the user. For example, from our requirement definition we know that we need to set the application context value to a string of department numbers picked from the table EMP_ACCESS, not passed by the user. This application context is then used in the policy function. Let’s see how to meet this requirement.
First I need to modify the policy function:
/* File on web: authorized_emps_3.sql */
1 FUNCTION authorized_emps (
2 p_schema_name IN VARCHAR2,
3 p_object_name IN VARCHAR2
4 )
5 RETURN VARCHAR2
6 IS
7 l_deptno NUMBER;
8 l_return_val VARCHAR2 (2000);
9 BEGIN
10 IF (p_schema_name = USER)
11 THEN
12 l_return_val := NULL;
13 ELSE
14 l_return_val := SYS_CONTEXT ('DEPT_CTX', 'DEPTNO_LIST');
15 END IF;
16
17 RETURN l_return_val;
18 END;
Here, the policy function expects the department numbers to be passed through the attribute DEPTNO_LIST of the context dept_ctx (line 14). To set this value, I need to modify the trusted procedure of the context:
/* File on web: set_dept_ctx_2.sql */
1 PROCEDURE set_dept_ctx
2 IS
3 l_str VARCHAR2 (2000);
4 l_ret VARCHAR2 (2000);
5 BEGIN
6 FOR deptrec IN (SELECT deptno
7 FROM emp_access
8 WHERE username = USER)
9 LOOP
10 l_str := l_str || deptrec.deptno || ',';
11 END LOOP;
12
13 IF l_str IS NULL
14 THEN
15 -- No access records found, so no records
16 -- should be visible to this user.
17 l_ret := '1=2';
18 ELSE
19 l_str := RTRIM (l_str, ',');
20 l_ret := 'DEPTNO IN (' || l_str || ')';
21 DBMS_SESSION.set_context ('DEPT_CTX', 'DEPTNO_LIST', l_ret);
22 END IF;
23 END;
It’s time to test the function. First Martin logs in and counts the number of employees. Before he issues the query, he needs to set the context:
SQL> EXEC rlsowner.set_dept_ctx
PL/SQL procedure successfully completed.
SQL> SELECT SYS_CONTEXT ('DEPT_CTX', 'DEPTNO_LIST') FROM DUAL;
SYS_CONTEXT('DEPT_CTX','DEPTNO_LIST')
-------------------------------------
DEPTNO IN (20,10)
SQL> SELECT DISTINCT deptno FROM hr.emp;
DEPTNO
----------
10
20
Here Martin sees only the employees of departments 10 and 20, as per the EMP_ACCESS table. Now suppose that Martin’s department changes to department number 30; his access should now be changed to department 30. The security administrator updates the table to reflect the changes:
SQL> DELETE emp_access WHERE username = 'MARTIN';
2 rows deleted.
SQL> INSERT INTO emp_access VALUES ('MARTIN',30);
1 row created.
SQL> COMMIT;
Commit complete.
When Martin reissues the same queries, he will see different results:
SQL> EXEC rlsowner.set_dept_ctx
PL/SQL procedure successfully completed.
SQL> SELECT SYS_CONTEXT ('DEPT_CTX','DEPTNO_LIST') FROM DUAL;
SYS_CONTEXT('DEPT_CTX','DEPTNO_LIST')
-------------------------------------------------------------
DEPTNO IN (30)
SQL> SELECT DISTINCT deptno FROM hr.emp;
DEPTNO
----------
30
This change takes effect automatically. Because Martin can’t set the context attributes himself, this arrangement is inherently more secure than setting a global package variable would be. In addition, using the context-sensitive policy (in row-level security) in Oracle Database 10g and later improves the performance. The policy function is executed only when the context changes; the cached values are used until that happens. This makes the policy faster than the default dynamic policy type. You define a policy as of the type context-sensitive by using the following additional parameter in the DBMS_RLS.add_policy procedure:
policy_type => DBMS_RLS.context_sensitive
So how is this approach different from creating a dynamically generated policy function on the fly from the emp_access table? In the case of a policy function, it must be executed to get the predicate value—the list of departments, in this case. Consider a table with millions of queries against it; the policy function gets executed that many times, each time hitting the emp_access table—a sure shot to terrible performance. You can define the policy as static so the function is not executed as many times, but that means that if the emp_access table records change, the policy function will not pick up the change and will produce the wrong result. Defining a context-sensitive policy with application contexts achieves the best of both words—the policy function is reexecuted unless the context value changes. The context value resides in memory, so it can be accessed very quickly.
As of Oracle Database 12c, the context-sensitive policy has an even better advantage. In addition to the parameter policy_type, you can also define two different parameters—the namespace (or, more simply, the name) and the attribute of the context whose change should trigger a reevaluation of the policy function. In the preceding example I have used a context named DEPT_CTX, and more specifically an attribute called DEPTNO_LIST, to show the list of department numbers the user is allowed to see. You could direct the policy function to be reexecuted only if the department number list changes. To do so, you will need to alter the policy to add the context and attribute dependencies, as in:
BEGIN
DBMS_RLS.alter_policy (object_schema => 'HR',
object_name => 'EMP',
policy_name => 'EMP_POLICY',
alter_option => DBMS_RLS.add_attribute_association,
namespace => 'DEPTNO_CTX',
attribute => 'DEPTNO_LIST');
END;
Here is an example of the complete add_policy procedure call:
BEGIN
DBMS_RLS.add_policy (object_schema => 'HR',
object_name => 'EMP',
policy_name => 'EMP_POLICY',
function_schema => 'RLSOWNER',
policy_function => 'AUTHORIZED_EMPS',
statement_types => 'SELECT',
update_check => TRUE,
sec_relevant_cols => 'SAL, COMM',
sec_relevant_cols_opt => DBMS_RLS.all_rows,
policy_type => DBMS_RLS.context_sensitive,
namespace => 'DEPT_CTX',
attribute => 'DEPTNO_LIST'
);
END;
Identifying Nondatabase Users
Application contexts are useful well beyond the situations I’ve described so far. The most important use of application contexts is to distinguish between different users who cannot be identified through unique sessions. This is quite common in web applications that typically use a connection pool—a pool of connections to the database using a single user, named, for example, CONNPOOL. Web users connect to the application server, which in turn uses one of the connections from the pool to get to the database. This is shown in Figure 23-6.
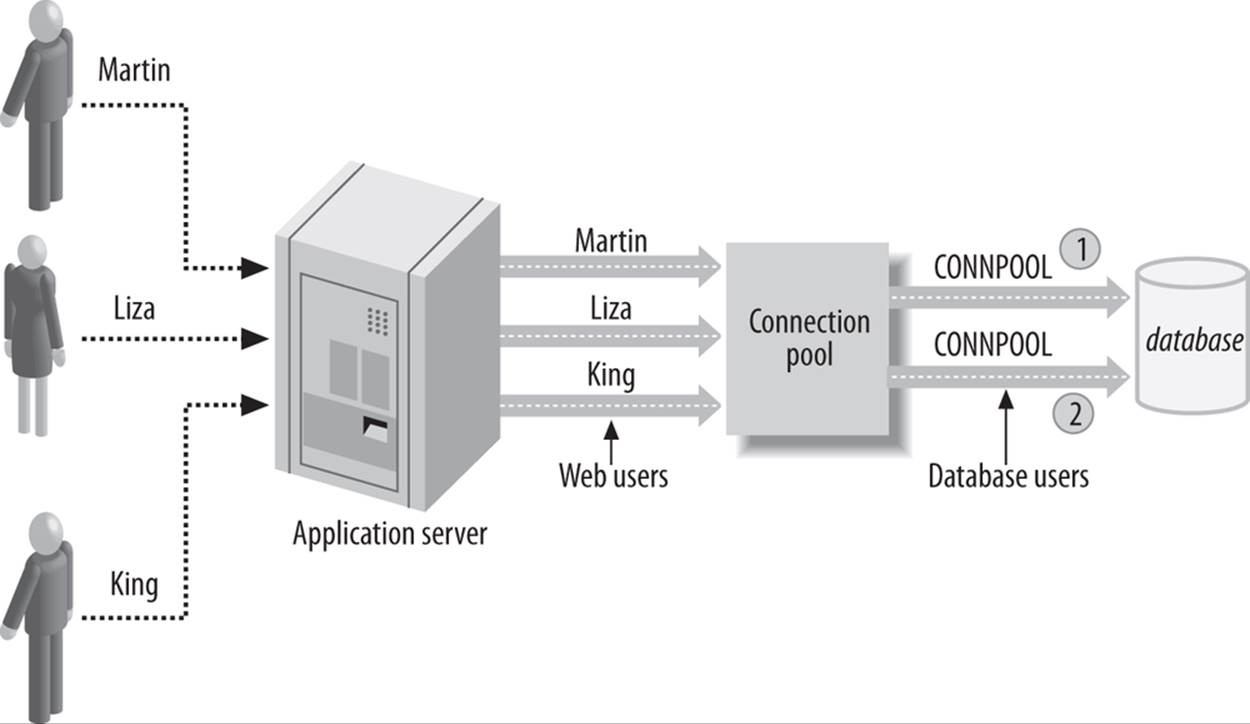
Figure 23-6. Application users and RLS
Here, the users Martin and King are not database users; they are web users, and the database has no knowledge of them. The connection pool connects to the database using the user ID CONNPOOL, which is a database user. When Martin requests something from the database, the pool might decide to use the connection labeled 1 to get it from the database. After the request is complete, the connection becomes idle. If, at this point, King requests something, the pool might decide to use the same connection (labeled 1). Hence, from the database’s perspective, a session (which is actually the connection from the pool) is from the user CONNPOOL. As a consequence, the examples I showed earlier (where the USER function was used to identify the user) will not work to identify the user making the calls. The USER function will always return CONNPOOL because that is the user connected to the database.
This is where the application context comes into the picture. Assume that there is a context named WEB_CTX with an attribute named WEBUSER. The client sets this value to the name of the actual user (e.g., ‘MARTIN’) when it sends the request to the connection pool, as follows:
BEGIN
set_web_ctx ('WEBUSER', 'MARTIN');
END;
The RLS policy can be based on this value instead of on the database username. In that case, the policy function will be slightly different, as shown here:
/* File on web: authorized_emps_4.sql */
1 FUNCTION authorized_emps (
2 p_schema_name IN VARCHAR2,
3 p_object_name IN VARCHAR2
4 )
5 RETURN VARCHAR2
6 IS
7 l_deptno NUMBER;
8 l_return_val VARCHAR2 (2000);
9 BEGIN
10 IF (p_schema_name = USER)
11 THEN
12 l_return_val := NULL;
13 ELSE
14 SELECT deptno
15 INTO l_deptno
16 FROM emp
17 WHERE ename = SYS_CONTEXT ('WEB_CTX', 'WEBUSER');
18
19 l_return_val := 'DEPTNO = ' || l_deptno;
20 END IF;
21
22 RETURN l_return_val;
23 END;
Note line 17. The original code showed the following:
WHERE ename = USER;
Now it is:
WHERE ename = SYS_CONTEXT ('WEB_CTX','WEBUSER');
That selects the name of the web user and matches it against the ENAME column.
APPLICATION CONTEXTS IN A NUTSHELL
§ Contexts are like global package variables; once set, they retain their values and can be accessed for the duration of the session. Each session, furthermore, can set the variable differently. Contexts reside in the PGA.
§ Contexts can have one or more named attributes, each of which can be set to a value. Attributes are defined at runtime.
§ To set a value for an attribute you call its trusted procedure, specified in the CREATE CONTEXT statement. This trusted procedure has the attribute name and a value as its only arguments.
§ Contexts, once defined, can be retrieved via the SYS_CONTEXT function.
Fine-Grained Auditing
Fine-grained auditing (FGA) provides a mechanism to record the fact that some user has issued certain statements against a table and that certain conditions are met. The mechanism records the user’s exact SQL statement as well as other details such as the time, terminal, and so on.
Traditional auditing in Oracle is the mechanism by which Oracle records which schema performed which action: Joe executed procedure X, John selected something from table Y, etc. The records of all these activities—known as the audit trail—go into a single table in the SYS schema, AUD$, which is exposed to users through several data dictionary views—for example, DBA_AUDIT_TRAIL. Audit trails can also be written to operating system files instead of to database tables. Regardless of where this information is written, the basic problem with regular auditing still remains: it merely keeps track of who executed what statement, not specifically what was done. For example, it shows that Joe selected some records from table ACCOUNTS, but not which particular records. If you want to know the values changed, you can place DML triggers (discussed inChapter 19) on the tables and capture the values in some table you have defined. But because it’s not possible to define a trigger on SELECT statements, that option will not work for Joe’s case either.
This is where Oracle’s FGA comes in. FGA functionality is available via the built-in package DBMS_FGA. Introduced in Oracle9i Database, FGA originally applied only to SELECT statements; from Oracle Database 10g, it applies to all DML statements.
NOTE
Don’t confuse FGA with FGAC, which stands for fine-grained access control (a synonym for row-level security). That topic was discussed earlier in this chapter.
Using FGA, you can record the activity of SELECT, INSERT, UPDATE, and DELETE statements in the audit trail (albeit a different audit trail, not the AUD$ table). In this audit trail, you will find not only the information on who did what, but a whole lot of other information, such as the exact SQL statement entered by the user, the system change number (SCN), the values of bind variables (if used), and more.
One of the best aspects of FGA is that it can be applied selectively, for specific activities. For example, you may want to perform an audit when someone selects the SAL column, but not any of the other columns, or you may want to record an audit trail only when someone selects the SAL column and the value of SAL is at least 1500. This selective recording reduces the amount of audit information that is generated.
Another very useful feature of FGA is that it can be directed to execute a user-defined procedure automatically. This ability can be exploited in a variety of ways, as I’ll describe in the following sections.
Why Learn About FGA?
FGA is a close cousin of regular auditing, clearly a DBA-centric feature, so why should PL/SQL developers be interested in it? There are several reasons:
Security
As I’ve noted for the other features described in this chapter, learning to leverage Oracle’s built-in security features is simply part of good design for application developers and architects today. FGA should be a part of your overall design repertoire.
Performance
A more immediately compelling reason is the practical value of the information returned by FGA. In addition to capturing information about who issues what statements, FGA is able to identify the exact SQL statements issued. If you enable FGA on a table, all of the SQL statements against that table will be captured in the FGA audit trails. You can later analyze this information to help you identify patterns in issuing these statements. This analysis can help you decide whether you need to add or modify indexes or make any other changes that will help improve performance.
Bind values
FGA captures bind values as well, and any well-designed application uses a lot of bind variables. How do you know what different values are passed during the application run? The answer may help you decide whether or not you need to define an index. FGA trails will reveal the kind of information that will help you make such decisions.
Handler modules
FGA can optionally execute a procedure, known as a handler module, whenever certain audit conditions are satisfied. If FGA is placed on SELECT statements, the handler module will execute for each SELECT from the table. This is akin to specifying a trigger on a SELECT statement—something that Oracle does not support but that might be highly desirable. For example, suppose that whenever someone selects the salary of a company executive, a message should be sent to an advanced queue, which is then sent to a different database. You can implement a handler module to achieve the same objective that a trigger on SELECTs would provide you.
Let’s take a closer look at how you can apply FGA in your application.
WARNING
For FGA to work correctly, your database must be in cost-based optimizer (CBO) mode, the queries must be using the CBO (i.e., they must not be using RULE hints), and the tables (or views) in the query must have been analyzed, at least with estimates. If these conditions are not met, FGA might produce false positives: it might write an audit trail even if the column was not actually selected.
A Simple FGA Example
Let’s start with a simple example—the same EMP table in the HR schema described in the earlier section on row-level security. Suppose that because of privacy regulations, you want to record a trail whenever someone selects the SAL and COMM columns. To reduce the size of the trail being generated, you may want to record the activity only when any of the selected records has a salary of $150,000 or more (not unreasonable considered the typical starting salaries of executives today). Finally, you may also want to trigger auditing when someone queries the salary of employee 100 (you).
With these objectives in mind, let’s start building the FGA infrastructure. As with RLS, the first step is to define an FGA policy on the table to be audited. The policy defines the conditions under which the auditing should be triggered and the actions taken. I add the policy using the ADD_POLICY procedure from the built-in package DBMS_FGA:
1 BEGIN
2 DBMS_FGA.add_policy (object_schema => 'HR',
3 object_name => 'EMP',
4 policy_name => 'EMP_SEL',
5 audit_column => 'SAL, COMM',
6 audit_condition => 'SAL >= 150000 OR EMPID = 100'
7 );
8 END;
Here I have defined an FGA policy named EMP_SEL in line 4, passed to the parameter policy_name. The policy is defined on the table EMP (line 3) owned by HR (line 2). That policy asks for the creation of an audit trail whenever any user selects two columns, SAL and COMM (audited columns, line 5). But the audit trail is written only if the value of SAL in that record is at least $150,000, or if the employee ID is 100 (audit condition, line 6).
The parameters audit_column and audit_condition can be omitted. If they are omitted, every SELECT from table EMP in the HR schema will be audited.
Starting with Oracle Database 10g, because FGA can be applied to regular DML as well, I can define the specific statements on which the policy should be effective via a new parameter, statement_types:
1 BEGIN
2 DBMS_FGA.add_policy (object_schema => 'HR',
3 object_name => 'EMP',
4 policy_name => 'EMP_DML',
5 audit_column => 'SALARY, COMM',
6 audit_condition => 'SALARY >= 150000 OR EMPID = 100,
7 statement_types => 'SELECT, INSERT, DELETE, UPDATE'
8 );
9 END;
WARNING
Although both FGA and RLS rely on a policy, the significance of this element is quite different in each feature. They do have some similarities, though. Like its namesake in RLS, a policy in FGA is not a “schema object”—that is, no user owns it. Anyone with the EXECUTE privilege on the DBMS_FGA package can create a policy and drop one created by a different user, so ask your DBA to be very choosy when granting the EXECUTE privilege on this built-in package; granting to PUBLIC renders all of your auditing records suspect—at best.
In this case, the audit trail is written only when:
§ The user selects one or both columns, SAL and COMM.
§ The SAL value is at least 150,000, or the EMPID is 100.
Both conditions must be true for the audit record to be written. If one condition is true but the other one is not, then the action is not audited. If the user does not retrieve either the SAL or the COMM column in the query, either explicitly or implicitly, the trail is not generated even if the record being accessed has a value of 150,000 or more in the SAL column. For example, suppose that Jake’s salary is $160,000, and his EMPID is 52. A user who merely wants to find his manager’s name issues:
SELECT mgr
FROM emp
WHERE empid = 52;
Because the user has not selected the SAL or the COMM column, the action is not audited. However, the query:
SELECT mgr
FROM emp
WHERE sal >= 160000;
generates a trail. Why? Because the SAL column is present in the WHERE clause, the user has accessed it; hence, the audited column condition was fulfilled. Also, the SAL of the records retrieved is more than 150,000; hence, the audit condition is fulfilled. Because both conditions have been fulfilled, the audit trail is triggered.
The audit condition need not reference the columns of the table on which the policy is defined; it can reference other values, such as pseudocolumns, as well. This becomes useful if you want to audit only a certain set of users, not all of them. Suppose you want to record accesses to table EMP made by Scott. You could define the policy as:
BEGIN
DBMS_FGA.add_policy (object_schema => 'HR',
object_name => 'EMP',
policy_name => 'EMP_SEL',
audit_column => 'SALARY, COMM',
audit_condition => 'USER=''SCOTT'''
);
END;
Access How Many Columns?
In my example in the previous section, I specified a list of relevant columns as follows:
audit_column => 'SAL, COMM'
This indicates that if a user accesses either the SAL or the COMM column, the action is logged. However, in some cases you may have a finer requirement that asks for logging only if all the columns named in the list are referenced, not just one of them. For example, in the employee database, you may want FGA to write a trail only if someone accesses SAL and EMPNAME together. If only one column is accessed, the action is not likely to uncover sensitive information because the user needs the name to match to a salary. Suppose the user issues a query:
SELECT salary FROM hr.emp;
This displays the salaries of all employees, but without a name next to each salary, the information is useless to a user who wants to know the salary of a particular employee. Similarly, if the user issues:
SELECT empname
FROM hr.emp;
the query returns the names of the employees; without the SAL column, however, the salary information is protected. However, if the user issues:
SELECT empname, salary FROM hr.emp;
this query will enable the user to see what salary is paid to each employee—the very information that should be protected.
Of the three cases I’ve shown, the last one is the only one that will trigger generation of the audit trail (and the only one in which a trail would provide meaningful information). In Oracle9i Database, there was no provision to specify the combination of columns as an audit condition; in Oracle Database 10g and later, this is possible through the audit_colum_opts parameter in the ADD_POLICY procedure. By default, the value of the parameter is DBMS_FGA.ANY_COLUMNS, which triggers an audit trail if any of the columns is referenced. If you specify DBMS_FGA.ALL_COLUMNS as the value of the parameter, the audit trail is generated only if all of the columns are referenced. In my example, if I want to have an FGA policy that creates an audit record only if the user selects both the SALARY and EMPNAME columns, I can create the policy as:
BEGIN
DBMS_FGA.add_policy (object_schema => 'HR',
object_name => 'EMP',
policy_name => 'EMP_DML',
audit_column => 'SALARY, EMPNAME',
audit_condition => 'USER=''SCOTT''',
statement_types => 'SELECT, INSERT, DELETE, UPDATE',
audit_column_opts => DBMS_FGA.all_columns
);
END;
This feature is extremely useful in limiting audit records to only relevant ones and thus helping to limit the trail to a manageable size.
Checking the Audit Trail
The FGA audit trails are recorded in the table FGA_LOG$, owned by SYS. A data dictionary view DBA_FGA_AUDIT_TRAIL is the external interface to this view, and you can check there for audit trails:
SELECT db_user, sql_text
FROM dba_fga_audit_trail
WHERE object_schema = 'HR' AND object_name = 'EMP'
This query produces the following output:
DB_USER SQL_TEXT
------- -----------------------------------------------
SCOTT select salary from hr.emp where empid = 1
In addition to capturing the user and the SQL statement, the FGA trail also captures several other helpful pieces of information. Here are the important columns of the view:
TIMESTAMP
The time when the activity occurred.
SCN
The system change number when the activity occurred. This is useful when a value selected now is immaterial. You can use Oracle’s flashback queries to look back at a previous SCN.
OS_USER
The operating system user connected to the database.
USERHOST
The terminal or client machine from which the user is connected.
EXT_NAME
In some cases, the user may be externally authenticated, for example via LDAP. In such cases, the username supplied to those external authentication mechanisms may be relevant; it is captured in this column.
FINE-GRAINED AUDITING IN A NUTSHELL
§ FGA can record SELECT accesses to a table (in Oracle9i Database) or all types of DML access (in Oracle Database 10g and later) into an audit table named FGA_LOG$ in the SYS schema.
§ You can limit the generation of audit trail information so that the trail is produced only if certain columns are selected or certain conditions are met.
§ For FGA to work correctly, the cost-based optimizer must be used; otherwise, more false positives will occur.
§ The trail is recorded through an autonomous transaction. Thus, if the DML fails, the trail will still exist, and that may also lead to false positives.
§ The audit trail shows the exact statement issued by the user, the values of the bind variables (if any), the system change number at the time of the query, and various attributes of the session, such as the database username, the operating system username, the timestamp, and much more.
§ In addition to writing an entry into the audit trail, FGA can also automatically execute a procedure known as a handler module.
Using Bind Variables
Back when I introduced FGA, I mentioned bind variables. Let’s look more deeply into when you would use FGA with these variables. Let’s assume that a user did not specify a statement such as the following:
SELECT salary
FROM emp
WHERE empid = 100;
but instead used:
DECLARE
l_empid PLS_INTEGER;
BEGIN
SELECT salary
FROM emp
WHERE empid = l_empid;
END;
FGA captures the values of bind variables along with the SQL text issued. The values recorded can be seen in the column SQL_BIND in the view DBA_FGA_AUDIT_TRAIL. In the preceding case, you specify the following code:
SQL> SELECT sql_text,sql_bind from dba_fga_audit_trail;
SQL_TEXT SQL_BIND
---------------------------------------------- -----------------------
select * from hr.emp where empid = :empid #1(3):100
Notice the format in which the captured bind variable is displayed:
#1(3):100
where:
#1
Indicates the first bind variable. If the query had more than one bind variable, the others would have been shown as #2, #3, and so on.
(3)
Indicates the actual length of the value of the bind variable. In this example, Scott used 100 as the value, so the length is 3.
:100
Indicates the actual value of the bind variable, which in this case is 100.
The SQL_BIND column contains the string of values if more than one bind variable is used. For instance, if the query is:
DECLARE
l_empid PLS_INTEGER := 100;
l_salary NUMBER := 150000;
TYPE emps_t IS TABLE OF emp%ROWTYPE;
l_emps empts_t;
BEGIN
SELECT * BULK COLLECT INTO l_emps
FROM hr.emp
WHERE empid = l_empid OR salary > l_salary;
END;
the SQL_BIND column will look like this:
#1(3):100 #2(5):150000
WARNING
The SQL text and bind variable information are captured only if the audit_trail parameter in the ADD_POLICY procedure is set to DB_EXTENDED (the default), not to DB.
Using Handler Modules
As I mentioned earlier, FGA can optionally execute PL/SQL stored program units such as stored procedures. If the stored procedure, in turn, encapsulates a shell or OS program, it can execute that as well. This stored program unit is known as the handler module. In the earlier example where I built the mechanism to audit accesses to the EMP table, I could optionally specify a stored procedure—standalone or packaged—to be executed as well. If the stored procedure is owned by user FGA_ADMIN and is named myproc, I will have to call the policy creation procedure, ADD_POLICY, with two new parameters, handler_schema and handler_module:
BEGIN
DBMS_FGA.add_policy (object_schema => 'HR',
object_name => 'EMP',
policy_name => 'EMP_SEL',
audit_column => 'SALARY, COMM',
audit_condition => 'SALARY >= 150000 OR EMPID = 100',
handler_schema => 'FGA_ADMIN',
handler_module => 'MYPROC'
);
END;
Whenever the policy’s audit conditions are satisfied and the relevant columns are referenced, not only is the action recorded in the audit trails, but the procedure fga_admin.myproc is executed as well. The procedure is automatically executed every time the audit trails are written, as anautonomous transaction. (See the discussion of autonomous transactions in Chapter 14.) It has to have exactly three parameters—the schema name, the table name, and the policy name. Here is the structure of a handler module procedure:
PROCEDURE myproc (
p_table_owner IN VARCHAR2,
p_table_name IN VARCHAR2,
p_fga_policy IN VARCHAR2
)
IS
BEGIN
-- the code is here
END;
How is that useful? In several ways. For starters, this allows you to build your own audit handler program that can write to your own tables, not just to the standard audit trail tables. You can write the messages to a queue table to be placed in a different database, ask for an email to be sent to security administrators, or simply count the number of times the audit conditions are satisfied. The possibilities are endless.
WARNING
If the handler module fails for any reason, FGA does not report an error when you query data from the table. Instead, it simply silently stops retrieving the rows for which the handler module has failed. This is a tricky situation because you will never know that the handler module has failed; however, not all rows will be returned, producing erroneous results. This makes it important that you thoroughly test your handler modules.
All materials on the site are licensed Creative Commons Attribution-Sharealike 3.0 Unported CC BY-SA 3.0 & GNU Free Documentation License (GFDL)
If you are the copyright holder of any material contained on our site and intend to remove it, please contact our site administrator for approval.
© 2016-2026 All site design rights belong to S.Y.A.