Oracle Database 12c DBA Handbook (2015)
PART
III
High Availability
CHAPTER
16
Miscellaneous High Availability Features
In this chapter, you will see the implementation details for features that can significantly enhance the availability of your database applications. Some of these features, such as the LogMiner options, are enhancements of features available in earlier versions of Oracle. Others, such as the use of the recycle bin and the FLASHBACK DATABASE command, have been introduced in Oracle Database 10g and enhanced in Oracle Database 11g and 12c. Other Flashback options, such as Flashback Table and Flashback Query, which rely solely on undo data, were thoroughly covered in Chapter 7. In this chapter, you will see how to use the following features to enhance the availability of your database:
![]() Flashback Drop
Flashback Drop
![]() Flashback Database
Flashback Database
![]() LogMiner
LogMiner
![]() Online object-reorganization options
Online object-reorganization options
Flashback Drop relies on a construct introduced in Oracle Database 10g, the recycle bin, which behaves much like the recycle bin on a Windows-based computer: if there is enough room in the tablespace, dropped objects can be restored to their original schema with all indexes and constraints intact. Flashback Database relies on data stored in the fast recovery area, a new storage area also introduced in Oracle Database 10g. LogMiner, available since Oracle9i, relies on archived redo log files to see the changes made to tables, indexes, and other database structures (DDL operations) over time.
Recovering Dropped Tables Using Flashback Drop
When you drop a table (and its associated indexes, constraints, and nested tables), Oracle does not immediately release the table’s disk space for use by other objects in the tablespace. Instead, the objects are retained in the recycle bin until purged by the owner or the space occupied by the dropped objects is needed for new objects.

TIP
To leverage the features of the recycle bin, you must set the initialization parameter RECYCLEBIN to ON.
In this example, consider the AUTHOR table, defined as follows:

Now, assume that the table is dropped accidentally. This can happen when a user with privileges on a table that exists in multiple environments intends to drop a table in a development environment but is pointing to the production database when the command is executed.

How can the table be recovered? As of Oracle Database 10g, a dropped table does not fully disappear. Its blocks are still maintained in its tablespace, and it still counts against your space quota. You can see the dropped objects by querying the RECYCLEBIN data dictionary view. Note that the format for the OBJECT_NAME column may differ between versions:
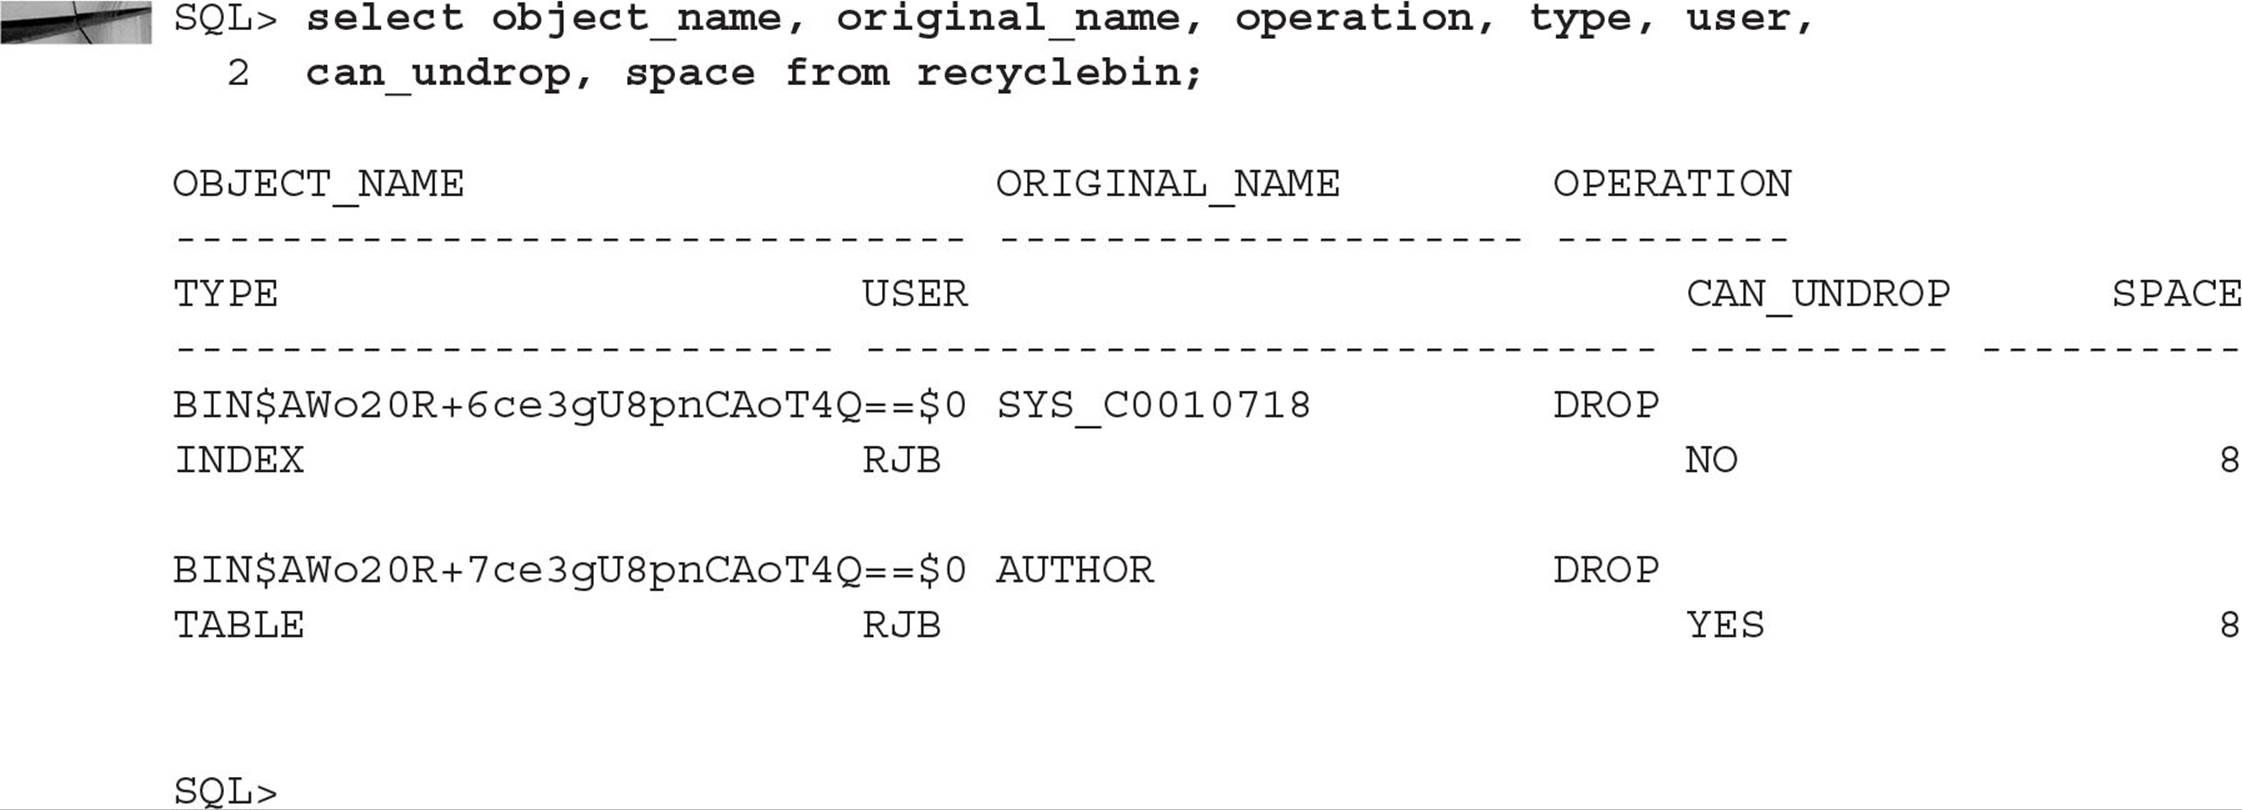
RECYCLEBIN is a public synonym for the USER_RECYCLEBIN data dictionary view, showing the recycle bin entries for the current user. DBAs can see all dropped objects via the DBA_RECYCLEBIN data dictionary view.
NOTE
As of Oracle Database 12c release 1 (12.1.0.2), the recycle bins are local to the root container and each pluggable database and do not have a CON_ID column. This makes sense, because the tablespaces that are shared across all containers, such as SYSTEM, UNDO, and optionally TEMP, do not support the recycle bin even in a non-CDB environment.
As shown in the preceding listing, a user has dropped the AUTHOR table and its associated primary key index. Although they have been dropped, they are still available for flashback. The index cannot be recovered by itself (its CAN_UNDROP column value is NO, while the AUTHOR table’s CAN_UNDROP value is YES).
You can use the FLASHBACK TABLE TO BEFORE DROP command to recover the table from the recycle bin:

The table has been restored, along with its rows, indexes, and statistics.
What happens if you drop the AUTHOR table, re-create it, and then drop it again? The recycle bin will contain both of the tables. Each entry in the recycle bin will be identified via its SCN and the timestamp for the drop.
NOTE
The FLASHBACK TABLE TO BEFORE DROP command does not recover referential constraints.
To purge old entries from the recycle bin, use the PURGE command. You can purge all your dropped objects, all dropped objects in the database (if you are a DBA), all objects in a specific tablespace, or all objects for a particular user in a specific tablespace. You can use the RENAME TO clause of the FLASHBACK TABLE command to rename the table as you flash it back.
By default, the recycle bin is enabled in Oracle Database 12c. You can use the initialization parameter RECYCLEBIN to turn the recycle bin on and off; you can also turn the recycle bin on and off at the session level, as in this example:
![]()
Temporarily disabling the recycle bin functionality does not affect objects currently in the recycle bin; even when the recycle bin is disabled, you can still recover objects currently in the recycle bin. Only objects dropped while the recycle bin is disabled cannot be recovered.
The Flashback Database Command
The FLASHBACK DATABASE command returns the database to a past time or SCN, providing a fast alternative to performing incomplete database recovery. Following a FLASHBACK DATABASE operation, in order to have write access to the flashed-back database, you must reopen it with an ALTER DATABASE OPEN RESETLOGS command. You must have the SYSDBA system privilege in order to use the FLASHBACK DATABASE command.
NOTE
The database must have been put in FLASHBACK mode with an ALTER DATABASE FLASHBACK ON command. The database must be mounted in exclusive mode but not open when that command is executed.
The syntax for the FLASHBACK DATABASE command is as follows:

You can use either the TO SCN or TO TIMESTAMP clause to set the point to which the entire database should be flashed back. You can flash back TO BEFORE a critical point (such as a transaction that produced an unintended consequence for multiple tables). Use the ORA_ROWSCN pseudo-column to see the SCNs of the most recent row transactions.
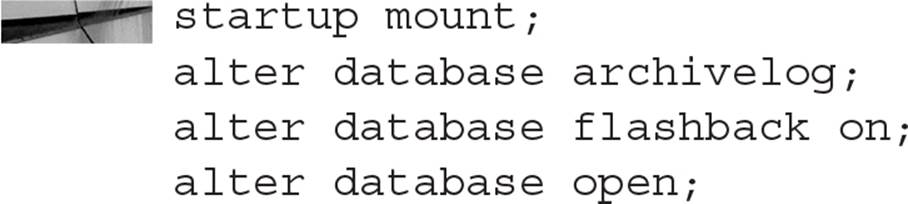
If you have not already done so, you will need to shut down your database and enable flashback during the startup process using this sequence of commands:
NOTE
In a multitenant environment, you cannot flash back just a single PDB. The FLASHBACK DATABASE operation applies to the entire CDB (including the root container and all PDBs).
Two initialization parameter settings control how much flashback data is retained in the database. The DB_FLASHBACK_RETENTION_TARGET initialization parameter sets the upper limit (in minutes) for how far back in time the database can be flashed back. The DB_RECOVERY_FILE_DEST initialization parameter sets the size of the fast recovery area (see Chapter 13 for more information on setting up the fast recovery area). Note that the FLASHBACK TABLE command uses data already stored in the undo tablespace (it does not create additional entries), whereas the FLASHBACK DATABASE command relies on flashback logs stored in the fast recovery area.
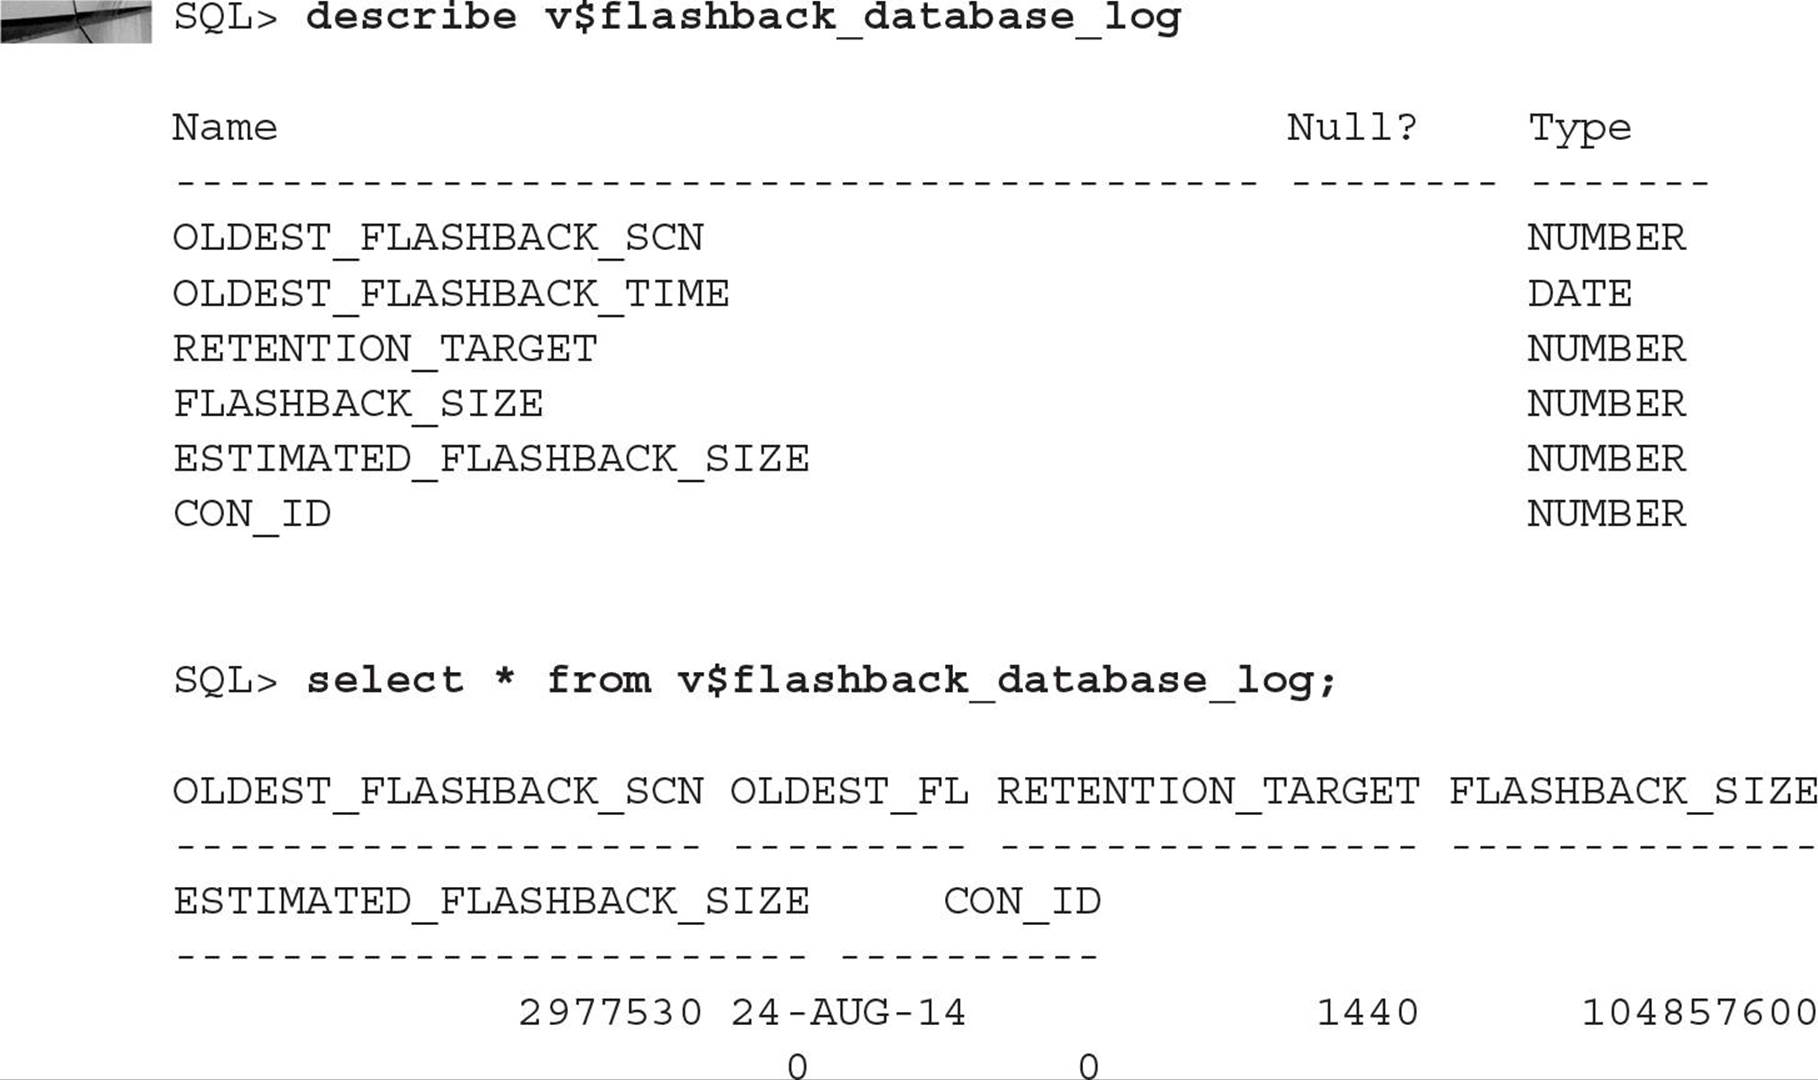
You can determine how far back you can flash back the database by querying the V$FLASHBACK_DATABASE_LOG view. The amount of flashback data retained in the database is controlled by the initialization parameter and the size of the fast recovery area. The following listing shows the available columns in V$FLASHBACK_DATABASE_LOG and sample contents:
You can verify the database’s flashback status by querying V$DATABASE; the FLASHBACK_ON column will have a value of YES if the flashback has been enabled for the database:

With the database open for over an hour, verify that the flashback data is available and then flash it back—you will lose all transactions that occurred during that time:

Note that the FLASHBACK DATABASE command requires that the database be mounted in exclusive mode, which will affect its participation in any RAC clusters (see Chapter 12).
When you execute the FLASHBACK DATABASE command, Oracle checks to make sure all required archived and online redo log files are available. If the logs are available, the online datafiles are reverted to the time or SCN specified.
If there is not enough data online in the archive logs and the flashback area, you will need to use traditional database recovery methods to recover the data. For example, you may need to use a file system recovery method or a recent full RMAN backup followed by rolling the data forward.
Once the flashback has completed, you must open the database using the RESETLOGS option in order to have write access to the database:
![]()
To turn off the Flashback Database option, execute the ALTER DATABASE FLASHBACK OFF command when the database is mounted but not open:

You can use the Flashback options to perform an array of actions, including recovering old data, reverting a table to its earlier state, maintaining a history of changes on a row basis, and quickly restoring an entire database. All these actions are greatly simplified if the database has been configured to support Automatic Undo Management (AUM). Also, note that the FLASHBACK DATABASE command requires the modification of the database status. Although these requirements can present additional burdens to DBAs, the benefits involved in terms of the number of recoveries required and the speed with which those recoveries can be completed may be dramatic.
Using LogMiner
Oracle uses online redo log files to track every change that is made to user data and the data dictionary. The information stored in the redo log files is used to re-create the database, in part or in full, during recovery. To enable recovery of the database to a point in time after the database backup was made, you can maintain archived copies of the redo log files. The LogMiner utility provides a vital view into the modifications that have occurred within your database.
When you use LogMiner, you see both the changes that have been made (the SQL_redo column) and the SQL you can use to reverse those changes (the SQL_undo column). Thus, you can review the history of the database, without actually applying any redo logs, and obtain the code to reverse any problematic transactions. Using LogMiner, you can pinpoint the transaction under which corruption first occurred so that you can determine the correct point in time or System Change Number (SCN) to use as the endpoint for a database recovery.
If there were a small number of transactions that required rolling back, prior to LogMiner, you would have to restore the table to an earlier state (either using Flashback Table or recovering a single table using RMAN backups) and apply archived log files to bring the table forward to just before the corruption. When restoring the table and applying the archived log files, you would risk losing later transactions that you would like to retain. You can now use LogMiner to roll back only the transactions that are problematic without losing later, valid transactions.
LogMiner in its original form has had some limitations associated with its use. With the original approach, you could only review one log file at a time, and the interface to the tool was cumbersome to use. LogMiner includes a viewer for use with Oracle Cloud Control 12c. Both the manual approach to using LogMiner and the EM Cloud Control LogMiner Viewer are presented within this section.
How LogMiner Works
To run the LogMiner utility, you must have the EXECUTE privilege on the DMBS_LOGMNR package, the EXECUTE_CATALOG_ROLE role, the SELECT ANY DICTIONARY system privilege, and the SELECT ANY TRANSACTION system privilege. LogMiner requires a data dictionary to fully translate the redo log file contents and translate internal object identifiers and datatypes to object names and external data formats. If a data dictionary is not available, LogMiner will return the data in hex format and the object information as internal object IDs.
You have three choices for obtaining a data dictionary for LogMiner use:
![]() Extract the data dictionary information to a flat file.
Extract the data dictionary information to a flat file.
![]() Extract the data dictionary to redo log files.
Extract the data dictionary to redo log files.
![]() Use the online data dictionary from the current database.
Use the online data dictionary from the current database.
The LogMiner analysis usually requires that the data dictionary in use was generated from the same database that generated the redo log files. However, if you are using a flat file format or are using the data dictionary from redo log files, you can analyze the redo log files either from the database on which LogMiner is running or from another database. If, however, you are using the online catalog from the current database, you can only analyze redo log files from the current database.
Since you can run LogMiner from one database against the redo log files in another database, the character sets used on both databases must match. The hardware platform must also match the one used when the redo log files were generated.
Extracting the Data Dictionary
One potential problem with extracting the data dictionary to a flat file is that while you are extracting the data dictionary, someone else could be issuing DDL statements. Therefore, the extracted data dictionary could be out of sync with the database. When you use a flat file to store the data dictionary, fewer system resources are required than when you use redo log files.
When you extract the data dictionary to redo log files, no DDL statements can be processed during the time in which the data dictionary is extracted. Therefore, the dictionary will be in sync with the database; the extraction is more resource intensive, but the extraction process is faster.
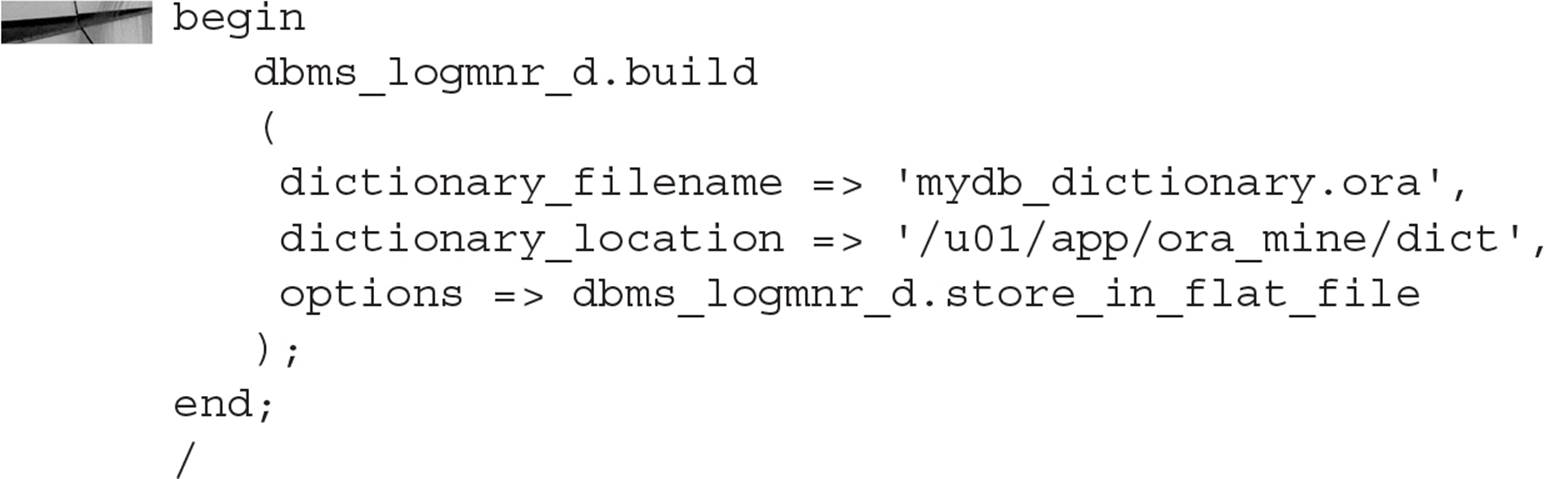
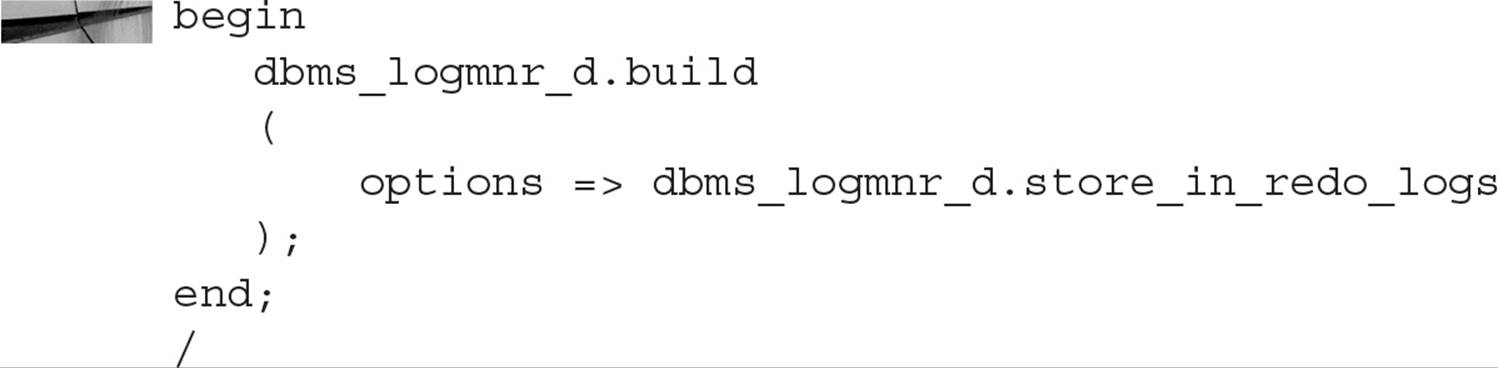
To extract the data dictionary to either a flat file or to redo log files, you use the procedure DBMS_LOGMNR_D.BUILD. The data dictionary file is placed in a directory. Therefore, you must have write permission for the directory in which the file will be placed. To define the location of the directory, use the initialization parameter UTL_FILE_DIR. For example, to specify the location /u01/app/ora_mine as the location for the LogMiner output, run the following command and restart the database:
![]()
To execute the DBMS_LOGMNR_D.BUILD procedure, you must specify a filename for the dictionary, the directory pathname for the file, and whether you want the dictionary written to a flat file or redo log files. To extract the data dictionary to a flat file located in the directory /u01/app/ora_mine/dict with the filename mydb_dictionary.ora, you issue the following command:
Once you have the dictionary stored in a flat file, you can copy it to another platform to run LogMiner. You may need to run dbmslmd.sql on the other database to establish the correct environment. The dbmslmd.sql file can be found in the $ORACLE_HOME/rdbms/admin directory on a Linux system.
You can use DBMS_LOGMNR_D.STORE_IN_REDO_LOGS as the other option, which is more common if you’re analyzing logs generated on the same database:
Analyzing One or More Redo Log Files
To analyze redo log files using LogMiner, follow these steps:
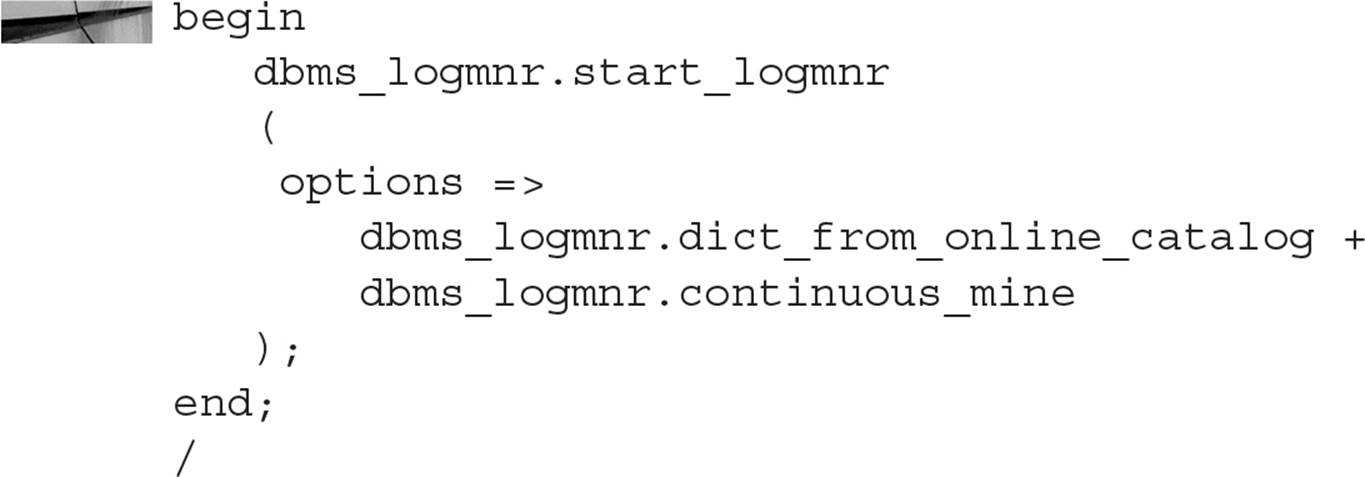
1. Start the LogMiner utility using the DBMS_LOGMNR.START_LOGMNR procedure. You can specify which redo log files to use when starting LogMiner by specifying the first log to use.
2. Query V$LOGMNR_CONTENTS to see the results.
3. Once you have finished viewing the redo logs, use DBMS_LOGMNR.END_LOGMNR to end the session:
![]()
The available subprograms for the DBMS_LOGMNR package are described in Table 16-1.
Table 16-2 shows the parameters for the START_LOGMNR procedure.
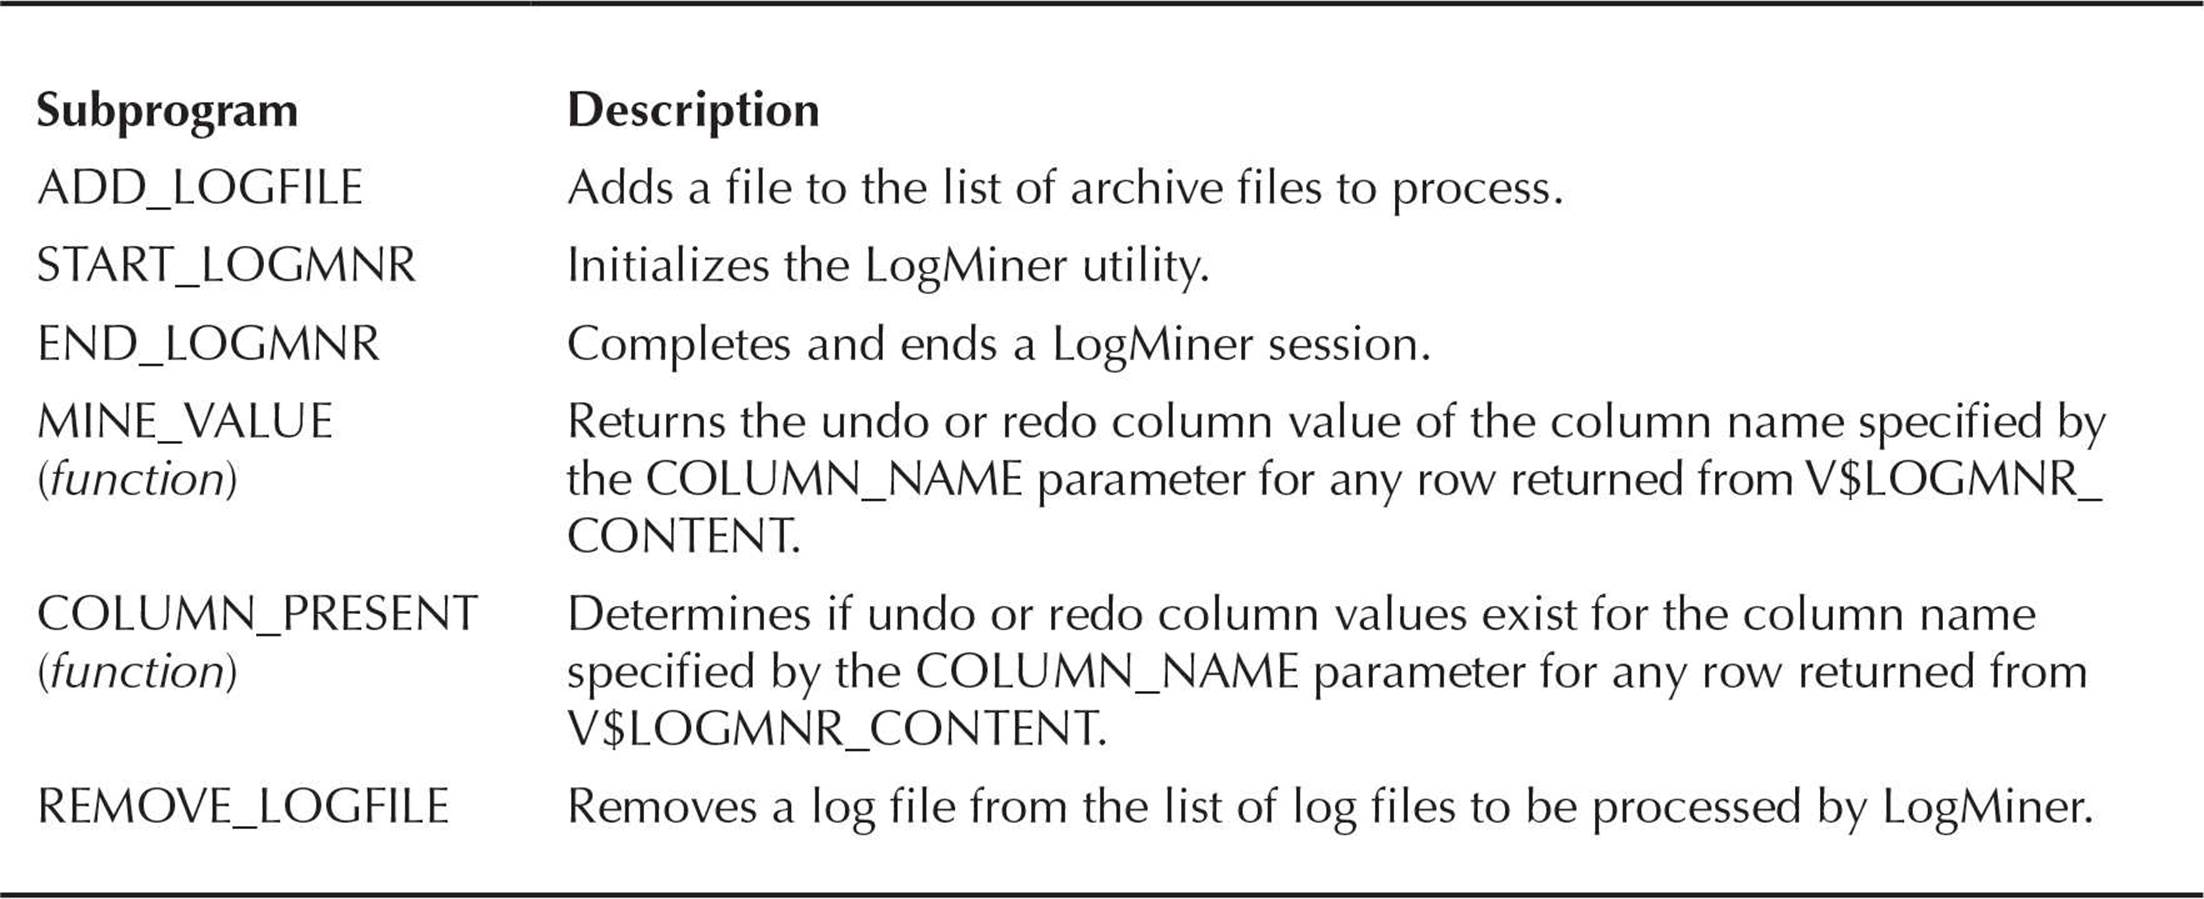
TABLE 16-1. DBMS_LOGMNR Subprograms
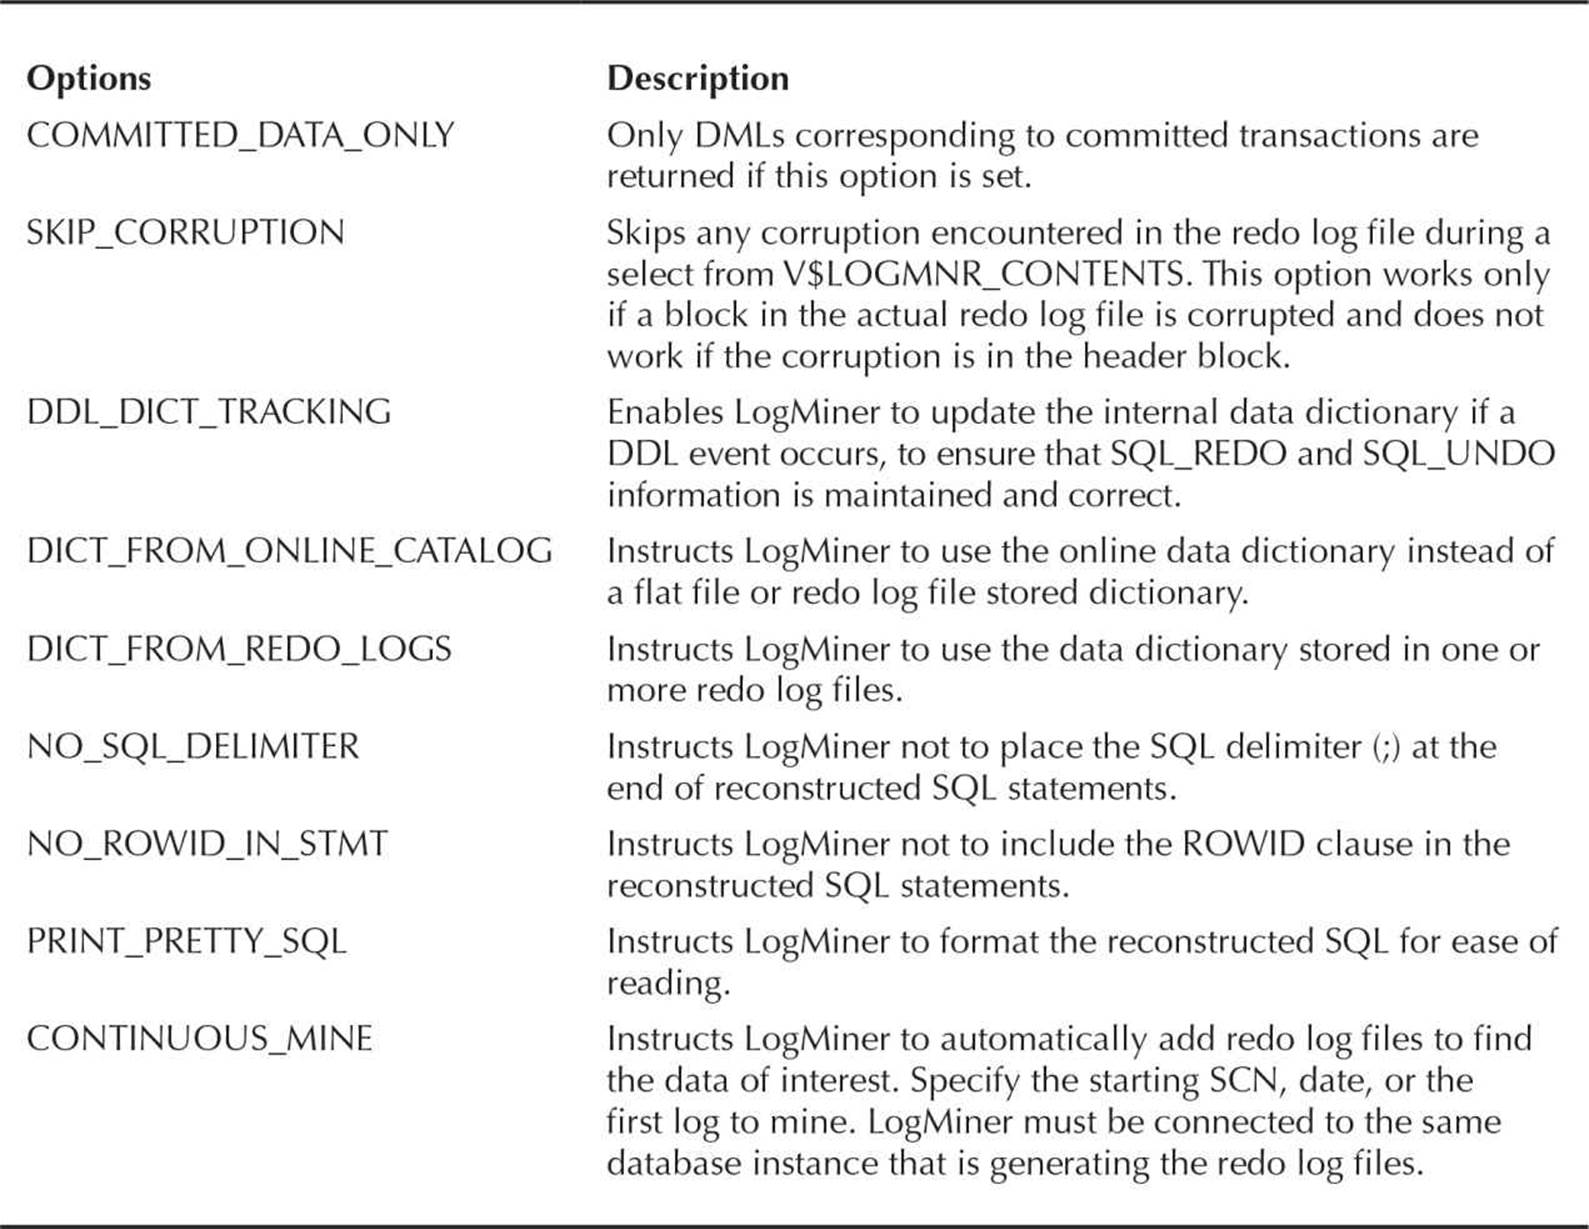
TABLE 16-2. Values for the START_LOGMNR Options
To create a list of the redo log files that are available for analysis, you run the procedure DBMS_LOGMNR.ADD_LOGFILE with the NEW option as follows; this example uses a Linux file system:
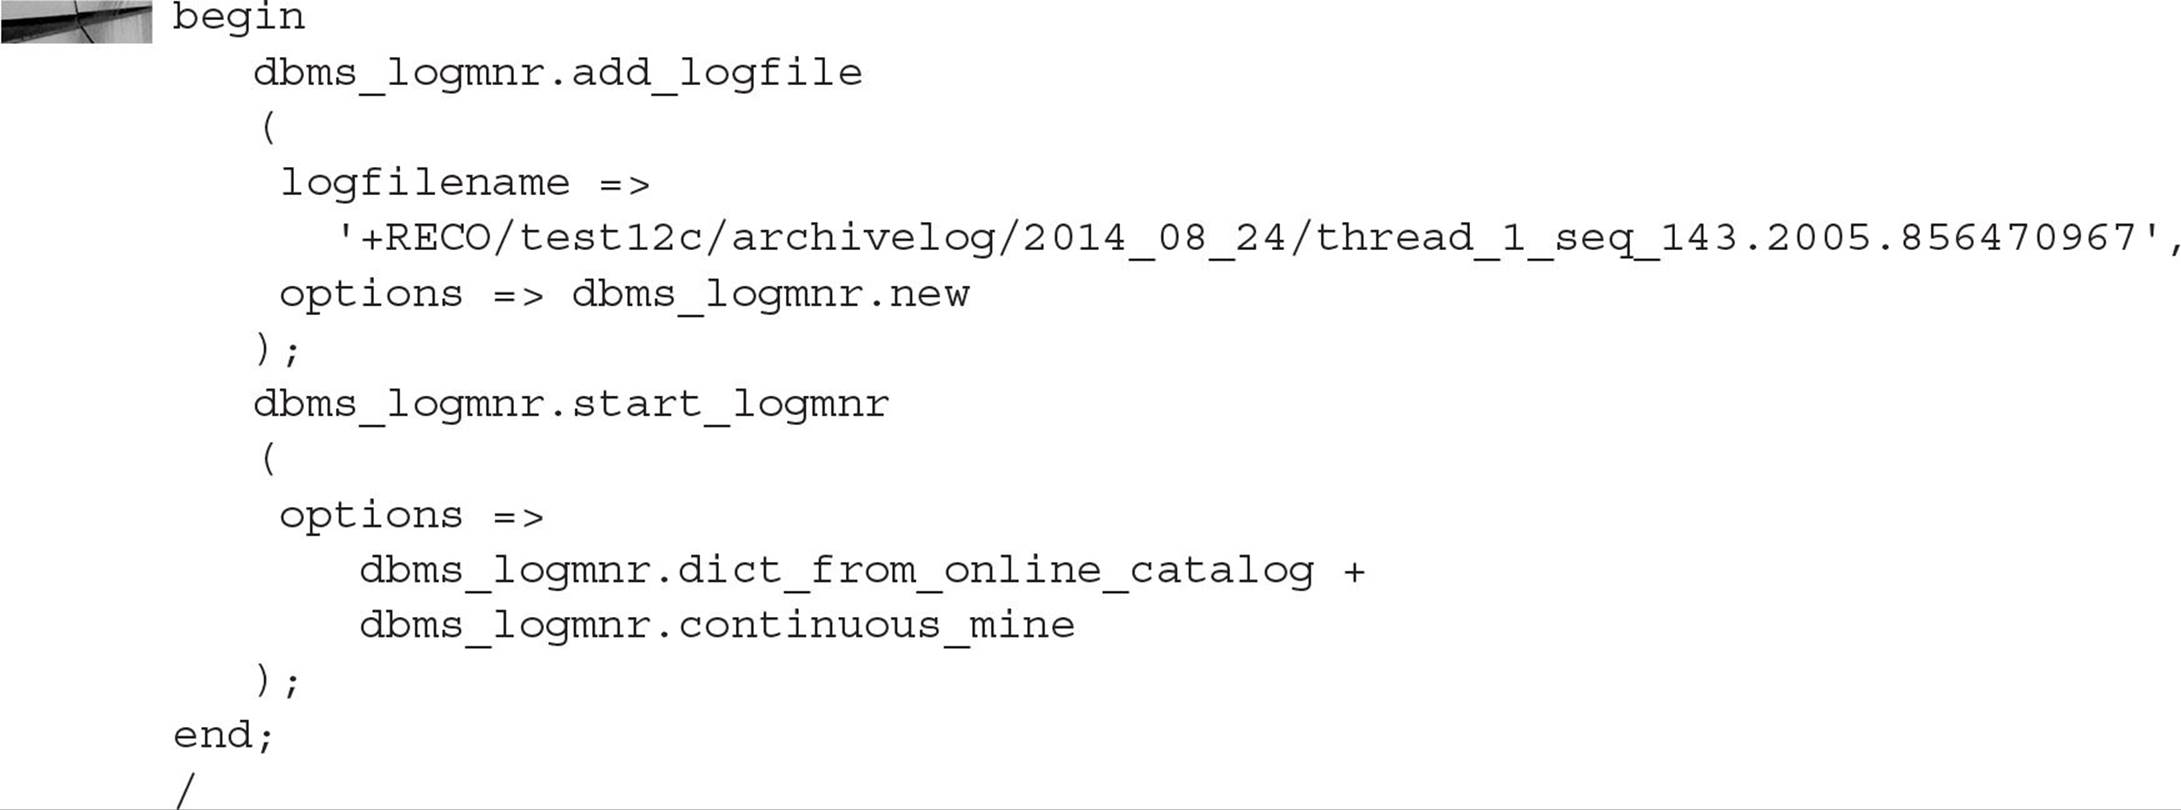
After you’ve told LogMiner the location of the data dictionary and added the first redo log file, you can begin analyzing the redo log files using the DBMS_LOGMNR.START_LOGMNR package:
If you do not enter start and end times or a range of SCN numbers, the entire file is read for every SELECT statement that you issue. To look at the redo and undo code, you select the SQL_REDO and SQL_UNDO columns as follows:

Be sure to turn off LogMiner when you’re done:
![]()
Until Oracle Database 11g, a DBA had to use the Java-based LogMiner console, which was difficult to install and not completely integrated with Oracle Enterprise Manager Database Control (the predecessor to EM Cloud Control). This integration further enhances ease of use by integrating a task-based log mining operation with Flashback Transaction. Figure 16-1 shows the OEM interface for LogMiner.
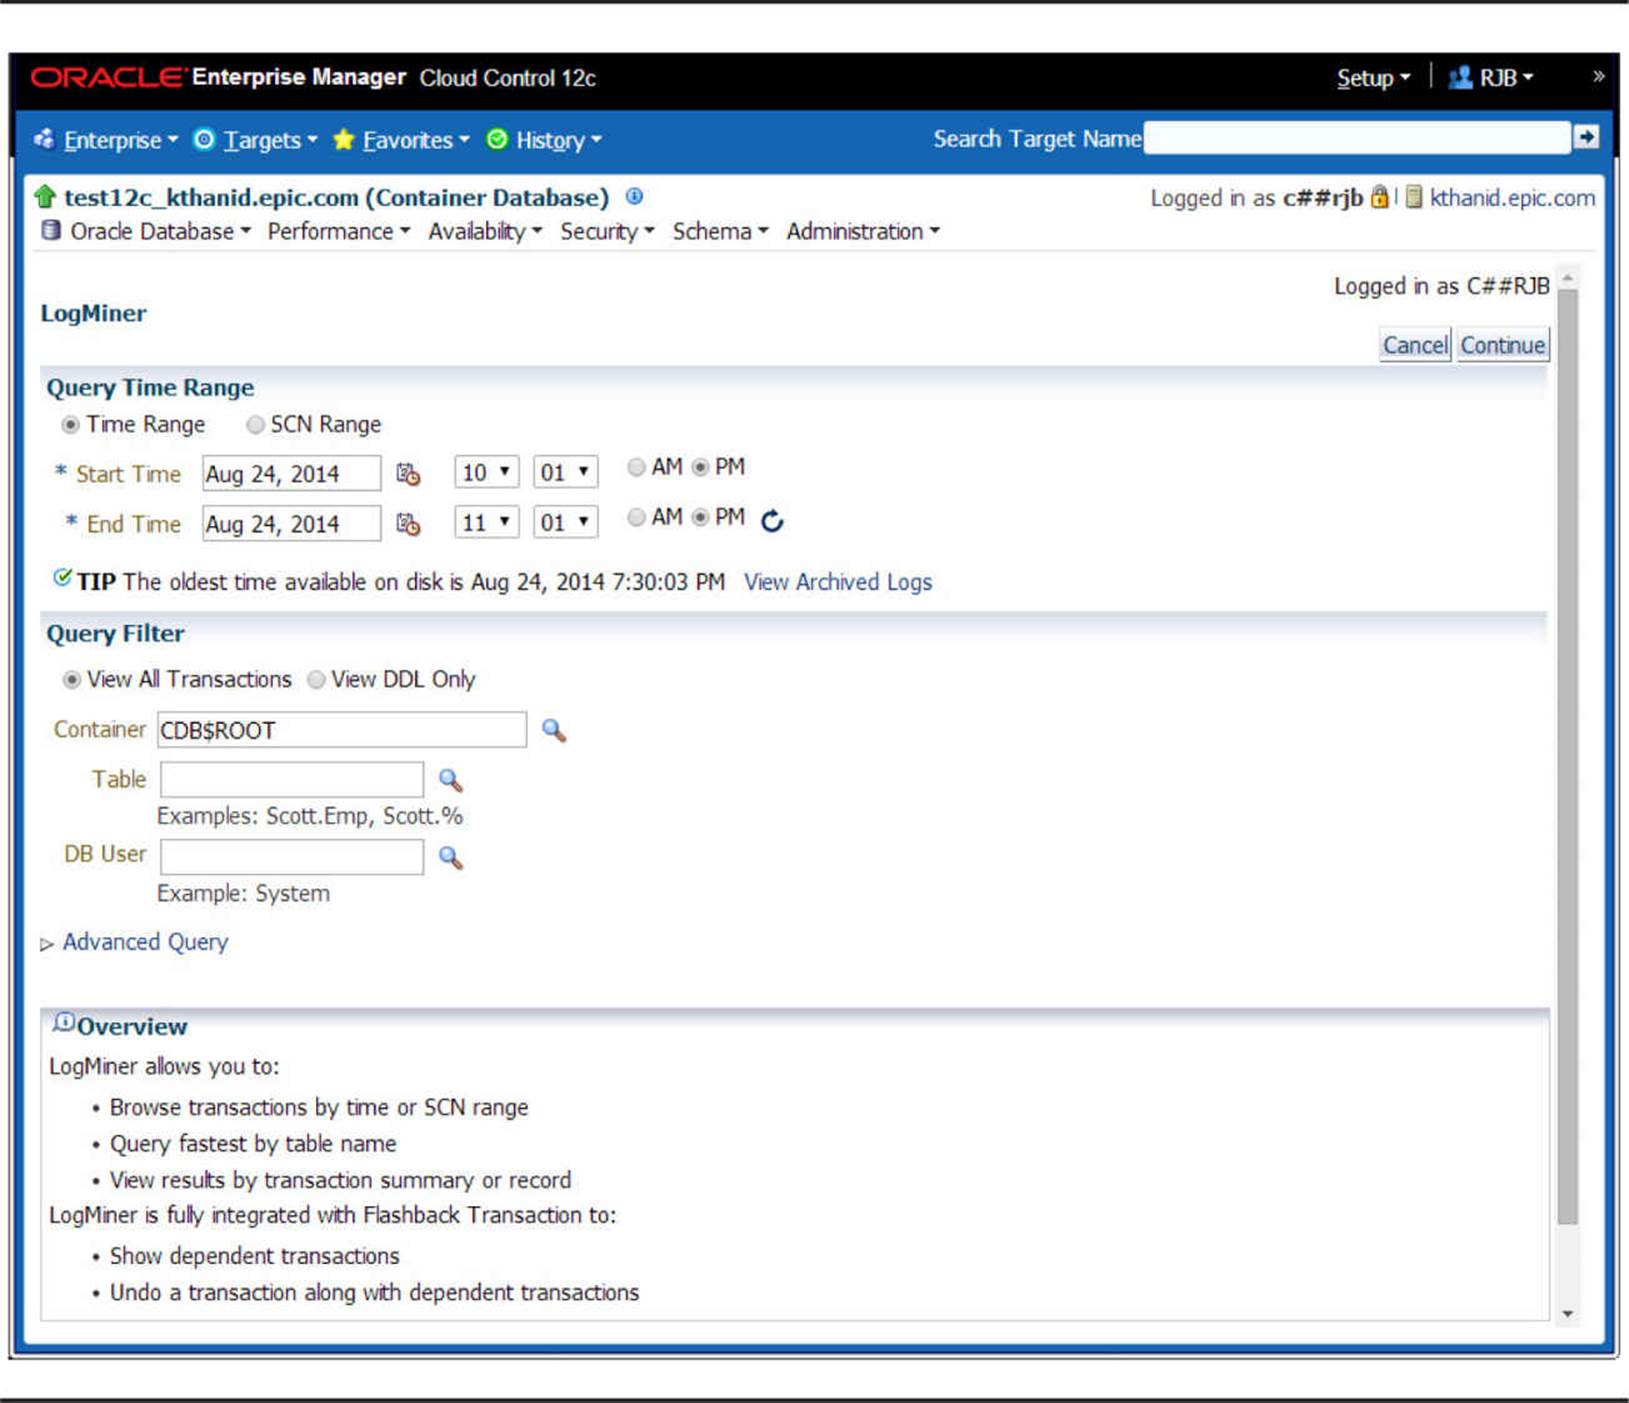
FIGURE 16-1. OEM LogMiner and Flashback Transaction interface
Online Object Reorganization
You can reorganize many database objects online. Options include the following:
![]() Creating indexes online
Creating indexes online
![]() Rebuilding indexes online
Rebuilding indexes online
![]() Coalescing indexes online
Coalescing indexes online
![]() Rebuilding index-organized tables online
Rebuilding index-organized tables online
![]() Using the DBMS_REDEFINITION package to redefine a table online
Using the DBMS_REDEFINITION package to redefine a table online
![]() Moving a datafile online
Moving a datafile online
In the following sections, you will see examples of each of these operations.
Creating Indexes Online
You can create and rebuild indexes while the base tables are accessible to end users. DDL operations are not allowed while the index is being built. To build an index online, use the ONLINE clause of the CREATE INDEX command, as shown in the following example:
![]()
Rebuilding Indexes Online
When you use the REBUILD clause of the ALTER INDEX command, Oracle uses the existing index as the data source for the new index. As a result, you must have adequate space to store two copies of the index while the operation is taking place. You can use the ALTER INDEX REBUILD command to change the storage characteristics and tablespace assignment for an index.
To rebuild the index online, use the REBUILD ONLINE clause of the ALTER INDEX command, as shown in the following example:
![]()
Coalescing Indexes Online
You can coalesce an index to reclaim space within the index. When you coalesce an index, you cannot move it to another tablespace (as you can with a rebuild). Coalescing does not require storage space for multiple copies of the index, so it may be useful when you are attempting to reorganize an index in a space-constrained environment.
To coalesce an index, use the COALESCE clause of the ALTER INDEX command. All index coalesces are online operations. The following is a sample coalesce:
![]()
Rebuilding Index-Organized Tables Online
You can use the ALTER TABLE … MOVE ONLINE command to rebuild an index-organized table (IOT) online. The overflow data segment, if present, is rebuilt if you specify the OVERFLOW keyword. For example, if the BOOKSHELF table is an index-organized table, you can rebuild it online via the following command:
![]()
When using this command, you cannot perform parallel DML. Also, the MOVE ONLINE option is only available for nonpartitioned index-organized tables.
Redefining Tables Online
You can change a table’s definition while it is accessible by the application users. For example, you can partition a previously nonpartitioned table while it is being used—a significant capability for high-availability OLTP applications.
As of Oracle Database 11g, there are very few restrictions on what types of tables cannot be redefined online. Here are the key restrictions:
![]() After redefining a table with materialized view logs, the dependent materialized views must be refreshed with a complete refresh.
After redefining a table with materialized view logs, the dependent materialized views must be refreshed with a complete refresh.
![]() The overflow table of an IOT must be redefined at the same time as the base IOT.
The overflow table of an IOT must be redefined at the same time as the base IOT.
![]() Tables with fine-grained access control cannot be redefined online.
Tables with fine-grained access control cannot be redefined online.
![]() Tables with BFILE columns cannot be redefined online.
Tables with BFILE columns cannot be redefined online.
![]() Tables with LONG and LONG RAW columns can be redefined, but the LONG and LONG RAW columns must be converted to CLOBs and BLOBs.
Tables with LONG and LONG RAW columns can be redefined, but the LONG and LONG RAW columns must be converted to CLOBs and BLOBs.
![]() Tables in the SYS and SYSTEM schemas cannot be redefined online.
Tables in the SYS and SYSTEM schemas cannot be redefined online.
![]() Temporary tables cannot be redefined online.
Temporary tables cannot be redefined online.
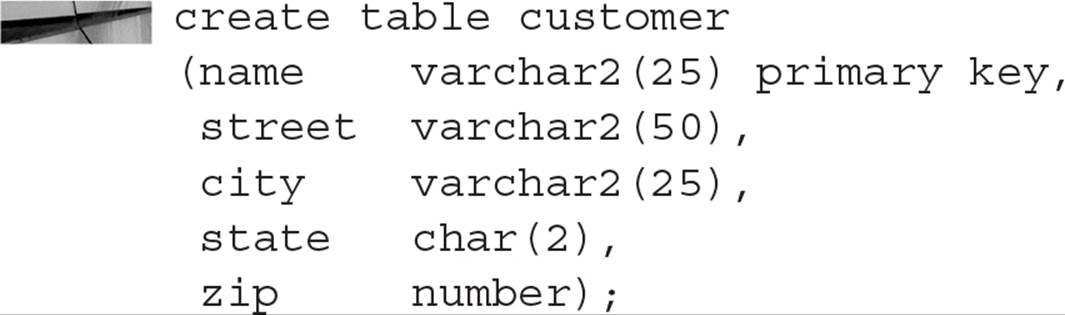
The following example shows the steps involved in redefining a table online. First, verify that the table can be redefined. For this example, the CUSTOMER table will be created in the SCOTT schema and then redefined:
Next, verify that the table can be redefined by executing the CAN_REDEF_TABLE procedure of the DBMS_REDEFINITION package. Its input parameters are the username and the table name:
![]()
The table is a candidate for online redefinition if the procedure returns the message
![]()
If it returns an error, the table cannot be redefined online, and the error message will give the reason.
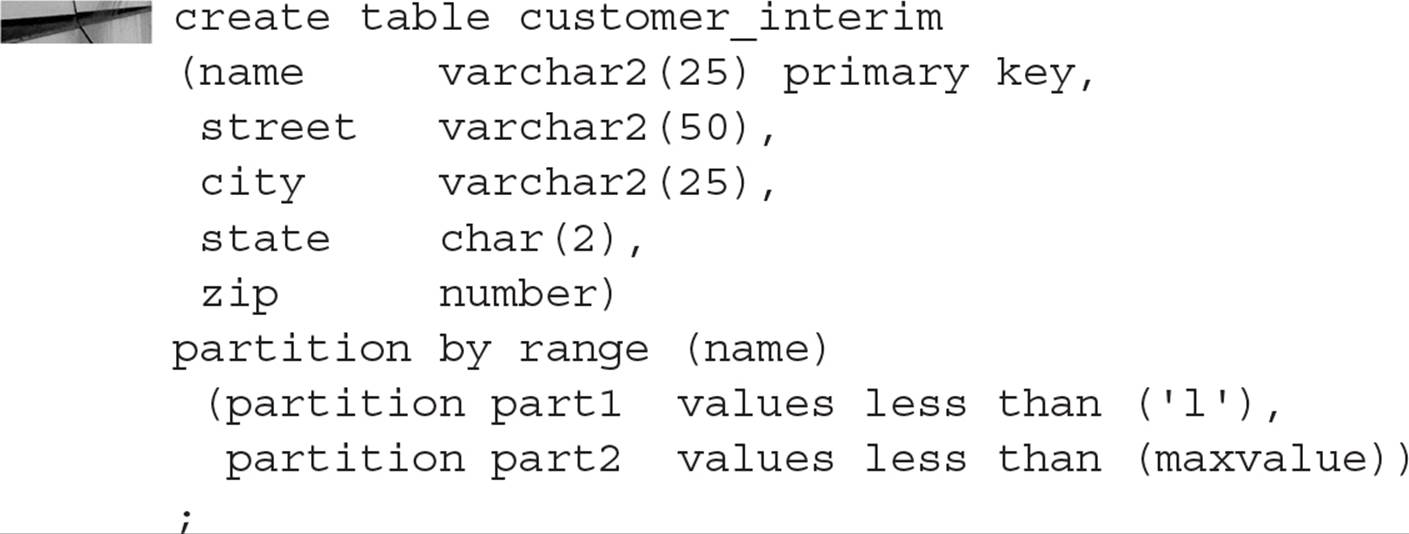
Next, create an interim table, in the same schema, with the desired attributes of the redefined table. For example, we can partition the CUSTOMER table (to simplify this example, the TABLESPACE and STORAGE clauses for the partitions are not shown):
You can now execute the START_REDEF_TABLE procedure of the DBMS_REDEFINITION package to start the redefinition process. Its input variables are the schema owner, the table to be redefined, the interim table name, and the column mapping (similar to the list of column names in a select query). If no column mapping is supplied, all the column names and definitions in the original table and the interim table must be the same.

Next, create any triggers, indexes, grants, or constraints required on the interim table. In this example, the primary key has already been defined on CUSTOMER_INTERIM; you could add the foreign keys, secondary indexes, and grants at this point in the redefinition process. Create the foreign keys disabled until the redefinition process is complete.
NOTE
To avoid that manual step, you can use the COPY_TABLE_DEPENDENTS procedure to create all dependent objects on the interim table. Dependent objects supported via this method include triggers, indexes, grants, and constraints.
When the redefinition process completes, the indexes, triggers, constraints, and grants on the interim table will replace those on the original table. The disabled referential constraints on the interim table will be enabled at that point.
To finish the redefinition, execute the FINISH_REDEF_TABLE procedure of the DBMS_REDEFINITION package. Its input parameters are the schema name, original table name, and interim table name:

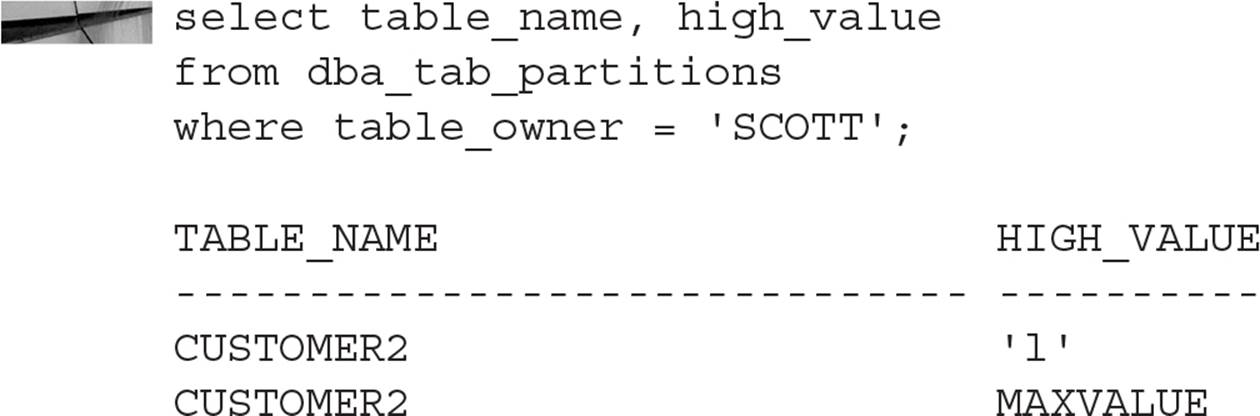
You can verify the redefinition by querying the table:
To abort the process after executing the START_REDEF_TABLE procedure, execute the ABORT_REDEF_TABLE procedure (the input parameters are the schema, original table name, and interim table name).
Moving a Datafile Online
As of Oracle Database 12c, you can move a datafile while it’s online. You might do this for a number of reasons:
![]() Migrating all datafiles to new storage
Migrating all datafiles to new storage
![]() Relocating infrequently used tablespaces to lower-cost or slower storage
Relocating infrequently used tablespaces to lower-cost or slower storage
![]() Moving read-only datafiles to optical media
Moving read-only datafiles to optical media
![]() Moving datafiles into ASM storage from file system storage
Moving datafiles into ASM storage from file system storage
Regardless of the reason, you want to keep your database as available as possible to users who have no idea that one or more datafiles in a tablespace are being moved. Here is an example of moving a datafile to an ASM diskgroup from a file system directory:

When performing a move operation, ensure that there is enough space for a copy of the datafile at the destination location, because the source file must remain available until the operation is complete.
Summary
Many features of Oracle Database aid in maximizing ease of maintenance, availability, and recoverability. Some of the Flashback features of Oracle Database 12c fall into all three categories.
If you routinely have extra disk space available in each tablespace, then enable the recycle bin so that you can recover objects that were inadvertently dropped by a user, without having to resort to a more costly and time-consuming recovery effort.
Similarly, if you have set aside part of your fast recovery area for incremental changes to your database, then you can use Flashback Database to rewind the entire database to a point in time in the very recent past. This operation will typically be a fraction of the time required when using the only methods available in previous versions of the database, such as performing a full database restore operation and then recovering to a point in time right before the logical corruptions occurred.
Log Miner is a more precise tool—more like a scalpel than a hatchet—and if you have ARCHIVELOG mode enabled, you can query the archived redo log files to find out who made what changes and when. Having identified the changes, you can use Log Miner to extract the DML and DDL commands needed to reverse a very narrow set of changes while maintaining the logical consistency of the database.
Every version of Oracle Database brings new features that enable or enhance high availability. Oracle Database 12c is no exception. Creating or rebuilding tables and indexes, in addition to moving an entire datafile, can happen online with no downtime and minimal impact to online users.


All materials on the site are licensed Creative Commons Attribution-Sharealike 3.0 Unported CC BY-SA 3.0 & GNU Free Documentation License (GFDL)
If you are the copyright holder of any material contained on our site and intend to remove it, please contact our site administrator for approval.
© 2016-2026 All site design rights belong to S.Y.A.