Learning Informatica PowerCenter 9.x (2014)
Chapter 5. Using the Workflow Manager Screen – Advanced
In the previous chapter, we discussed the basics of the Workflow Manager screen. In this chapter, we will take forward what we covered in the previous chapter. We will talk about the advanced topics of the Workflow Manager screen. We will start the chapter with a discussion on various tasks. As mentioned in the previous chapter, tasks are the basic building blocks of Workflow Manager. Later in the chapter, we will discuss worklet, parameter files, scheduling, and so on.
Working with tasks
As mentioned in the previous chapter, tasks are the basic building blocks of workflows. Every task has a different functionality, as every transformation has a different functionality. We need to use tasks as per our requirement in the workflow or worklet. Tasks can be created as reusable or as nonreusable.
You can create reusable tasks in Task Developer and nonreusable tasks in Workflow Manager.
Before we talk about each task in detail, let's take a look at the different tasks that we have:
|
Name of task |
Details |
|
Session task |
This is used to execute a mapping. |
|
Email task |
This is used to send success or failure e-mail notifications. |
|
Command task |
This is used to execute Unix shell or Perl scripts or commands. It can also be used to execute DOS commands in Windows. |
|
Timer task |
This is used to add some time gap or delay between two tasks. |
|
Assignment task |
This is used to assign a value to a workflow variable. |
|
Control task |
This is used to control the flow of the workflow by stopping or aborting the workflow in the case of an error. |
|
Decision task |
This is used to check the status of multiple tasks and hence control the execution of the workflow based on the condition defined in the decision task. |
|
Event Wait task |
This is used to wait for a particular event to occur. Usually, it is called the file watcher task. |
|
Event-Raise task |
This is used to trigger user-defined events. |
|
Link task |
This is used to link tasks to each other. You can also define conditions in the link to control the execution of the workflow. |
Before we move on, let's talk about an important topic. Consider that we have two workflows: wf_WORKFLOW1 and wf_WORKFLOW2. The Wf_WORKFLOW1 workflow contains the session task and the command task. We have a requirement in which wf_WORKFLOW1 triggers wf_WORKFLOW2 upon successful completion.
For the session task and the command task, wf_WORKFLOW1 will be called the parent workflow.
For wf_WORKFLOW2, wf_WORKFLOW1 will be called the top-level workflow, because wf_WORKFLOW1 triggers wf_WORKFLOW2.
Configuring a task
In the previous chapter, we discussed how to create tasks in Workflow Manager and Task Developer. After we create a task, we can configure the options in the General tab of every task as shown in the following screenshot:
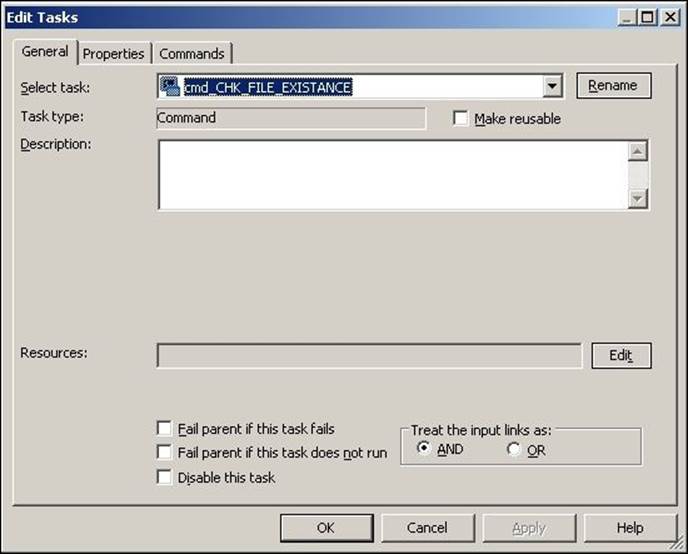
Every task has properties that are similar to how we control the workflow in the General tab:
· Fail parent if this task fails: When you check this option, the workflow or worklet will fail if the task in that workflow or worklet fails
· Fail parent if this task does not run: When you check this option, the workflow or worklet will fail if the task in that workflow or worklet does not run
· Disable this task: When you check this option, the task in the workflow or worklet will become invisible, and it will not run in a sequence
· Treat input link as: When you check this option, Informatica PowerCenter will run the task if all or one of the input link conditions become true
The session task
In the previous chapter, we discussed the basic properties of the session task.
The Session task is used to execute a mapping. It is the most widely used task among all the tasks of Workflow Manager. As you must have seen earlier, there are lots of properties that we can define in the session task. In the previous chapter, we discussed some of these properties, for example, the Mapping tab of the Session task. We learned how to provide the source, target, and lookup transformation details required to move the data. We will discuss the remaining properties in this chapter.
Tabs of the session task
Double-click on the session task to see the various tabs, as shown in the following screenshot:
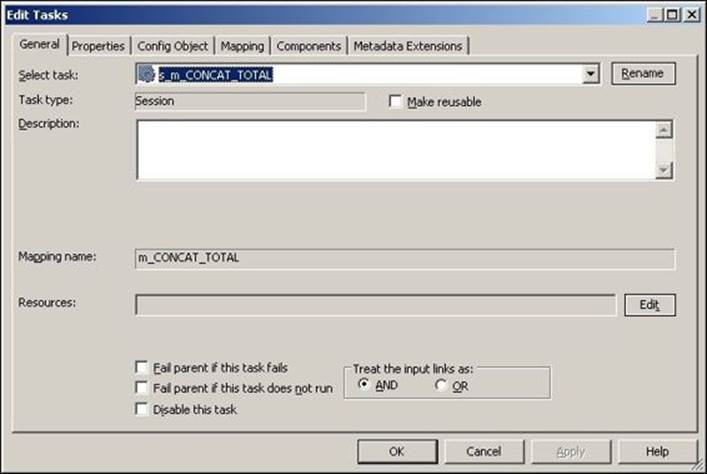
The various tabs of the session task are as follows:
· General: As discussed in the preceding section, you can define the session name, rename the session name, and mention the description and other tasks related properties, as shown in the preceding section. We have discussed the General tab properties in the preceding section.
· Properties: You can define the session log's filename, commit interval, test load setting, recovery settings, and other performance-related properties. The following screenshot shows you the General Options properties that can be defined under the Properties tab:
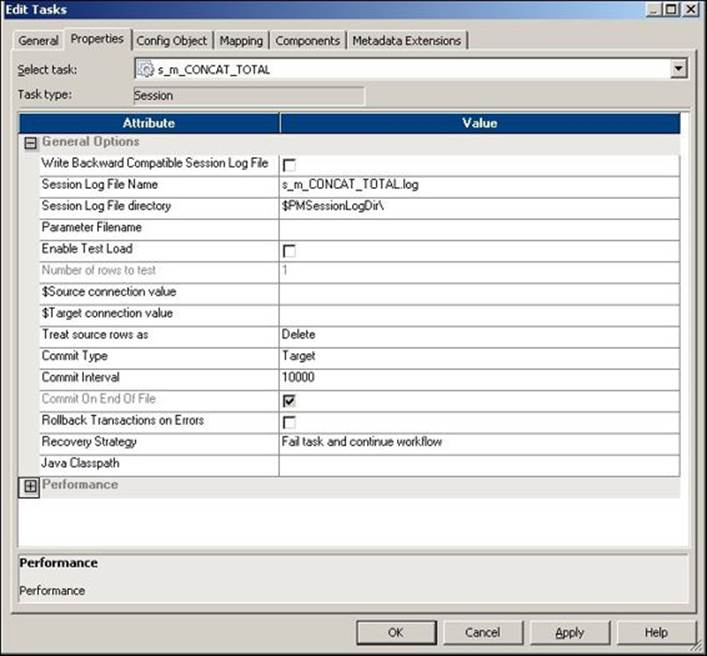
The description of the property shown in the preceding screenshot is as follows:
|
Property |
Description |
|
Write Backward Compatible Session Log File |
You can select this option if you wish to write the generated session logs to a file. If you select this option, Informatica PowerCenter creates a log file, else it generates a normal session log file. |
|
Session Log File Name |
With this, you can define the session log filename. The default session log filename is SESSION_NAME.log. You can also define the parameters in this option. We will discuss the parameter file in detail later in the chapter. When you define the parameter, pass the value from the parameter file. |
|
Session Log File Directory |
With this, you can define the session log file directory. You can also define the parameters in this option. When you define the parameter, pass the value from the parameter file. |
|
Parameter Filename |
If you use the parameters and variables in your code, you need to pass the values from the parameter file. You can define the parameters' filename and path here. |
|
Enable Test Load |
You can select this option to allow only a few records to pass through the mapping. This option is useful when you are in the testing phase of your project. |
|
Number of rows to test |
When you select the Enable Test Load option, you can define the number of records you wish to flow from Mapping. Suppose you have 10,000 records to process. You can check the Enable Test Load option and mention the number of records you wish to test. So, if you define 100 records, Informatica will only process 100 records out of the 10,000 records. |
|
$Source connection value |
You can define the Database Connection value here. Consider that your database connection's name is ORACLE. If you define ORACLE at this place, you can select $Source in the Mapping tab for the source connection. |
|
$Target connection value |
You can define the Database Connection value here. Consider that your database connection's name is ORACLE. If you define ORACLE at this place, you can select $Target in the Mapping tab for the target connection. |
|
Treat source rows as |
This property allows you to treat records as INSERT, UPDATE, DELETE, or DATA DRIVEN for the records that come from a source. The default property is INSERT, which indicates all the records that come from a source will be inserted into the target. The DATA DRIVEN property is selected when you use the update strategy transformation in Mapping. We will talk about the update strategy transformation in Chapter 7, The Lifeline of Informatica – Transformations. |
|
Commit Type |
You can select either a source-based or a target-based commit type. The default property is the target-based commit type. If you select a source-based commit type, Informatica commits the data into the target-based commit type for commit interval and flush latency intervals. Flush latency is the time interval for which you wish to commit the data. If you define the flush latency as 5 seconds and the commit interval as 10,000, Informatica will commit the data to the target-based commit type for whichever interval it reached first. Flush latency is a property defined by the Informatica PowerCenter administrator. So, you need not be worried about how to set up this property. In most cases, data is committed based on the commit interval, so we don't use the flush latency property frequently. If you select the target-based commit type, Informatica commits the data based on the commit interval. |
|
Commit On End Of File |
This option is selected by default. This property indicates that the records will be committed to the target. If the file contains a smaller number of records, then the commit interval is defined. |
|
Rollback Transactions on Errors |
When you select this option, Informatica will roll back the records at the next commit interval. This only happens if there is a nonfatal error. |
|
Recovery Strategy |
Using this property, you can recover the session task if the session happens to fail. Various options are available in this property, which you can select based on your requirement: · Fail session and continue the workflow: If you select this option, you cannot recover your session task. The session will fail if it encounters an error but will continue the workflow. · Restart Task: If you select this option, the session task restarts when the workflow is recovered after a failure. · Resume from last checkpoint: If you select this option, Informatica saves the start of the session task and resumes the session from the last checkpoint. |
|
Java Classpath |
Use this option if you wish to use different types of Java packages in a Java transformation. |
The following screenshot shows you the Performance properties that can be defined under the Properties tab:

The description of the properties shown in the preceding screenshot is as follows:
|
Property |
Description |
|
DTM buffer size |
This indicates how much memory you wish to assign for the DTM processes. When you create a session, Informatica assigns a specific value for the DTM. You can make the value Auto, so Informatica keeps on increasing the value automatically, if required. |
|
Collect performance data |
If you select this option, Informatica collects the performance data as it runs the session. Usually, you do not select this option unless you really need to find the performance. This option can actually hamper your performance in some way, because it takes some time to collect the performance details. So, unless it's very important, do not check this option. |
|
Write performance data to repository |
You can save the performance collected for the session run to the repository so that you can check the details later. This again hampers the performance, so unless required, do not check this option. |
|
Incremental Aggregation |
If you wish to make use of incremental aggregation, check this option. We will discuss this in more detail later in the chapter. |
|
Reinitialize aggregate cache |
If you are using incremental aggregation, you can use this option. When you use incremental aggregation, Informatica stores the data of the previous run in the cache memory. If you wish to reinitialize the value, select this option. We will discuss this in more detail later in the chapter. |
|
Enable high precision |
If you select this option, Informatica processes the decimal data to a precision of 28. Usually, you leave this option unchecked. |
|
Session retry on deadlock |
If you select this option, Informatica tries to load the data into target if it finds the deadlock. So, instead of giving an error, it tries to load the data again. This option is available only for normal load and not for bulk load setting. |
|
Allow Temporary View for Pushdown |
If you select this option, Informatica creates a temporary view in the database when you use the Pushdown feature. Pushdown optimization is a feature that we will discuss with performance in the next chapter. |
|
Allow Temporary Sequence for Pushdown |
If you select this option, Informatica creates a temporary sequence in the database when you use the Pushdown feature. |
|
Allow Pushdown for User Incompatible Connections |
This property indicates that the user through which you are accessing the database used in the session has read permission. If the user does not have the read permission, the session task fails. |
|
Session Sort Order |
You can select the sort order for your session. The default sort order is binary. |
In the Config Object tab, you can select the Advanced setting, Log Options, the Error handling properties, and Partitioning Options.
The advanced settings under the Config Object tab are shown in the following screenshot:
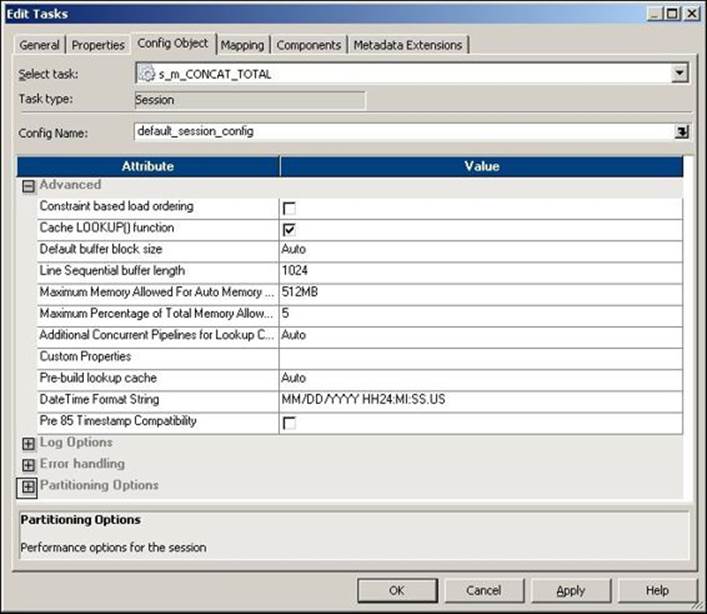
The description of the properties shown in the preceding screenshot is as follows:
|
Property |
Description |
|
Constraint based load ordering |
If you check this option, the data is loaded into the target based on the relationship between the primary key and the foreign key wherever possible. |
|
Cache LOOKUP() function |
This property is related to the lookup transformation functionality. By default, lookup transformation performs a row-by-row operation. If you check this option, Informatica overrides mapping level lookup settings. |
|
Default buffer block size |
This option specifies the size of the buffer block you wish to assign for the data cache and index cache movement from the source to the target. By default, it is set to Auto, so the size is automatically increased as required. |
|
Line Sequential Buffer Length |
This property is related to the number of bytes in an individual record in a flat file. The default value is 1024 bytes. If your records have a larger byte length, increase the value as per the requirement. |
|
Maximum Memory Allowed For Auto Memory Attributes |
This setting is related to the amount of memory allocated to the session cache at runtime. |
|
Maximum Percentage of Total Memory Allowed for Auto Memory Attributes |
This setting is related to the percentage of memory allocated to the session cache at runtime. |
|
Additional Concurrent Pipelines for Lookup Cache Creation |
This setting is related to the creation of concurrent caches by creating an additional pipeline for the lookup transformation. By default, the value is set to Auto, which indicates that the value will be decided at runtime. Informatica caches the data either concurrently or sequentially. If you set this property to 0, Informatica processes the lookup cache sequentially. |
|
Custom Properties |
You can customize some of the default properties for the session. Usually, we need not change the settings. |
The Log Options setting under the Config Object tab is shown in the following screenshot:
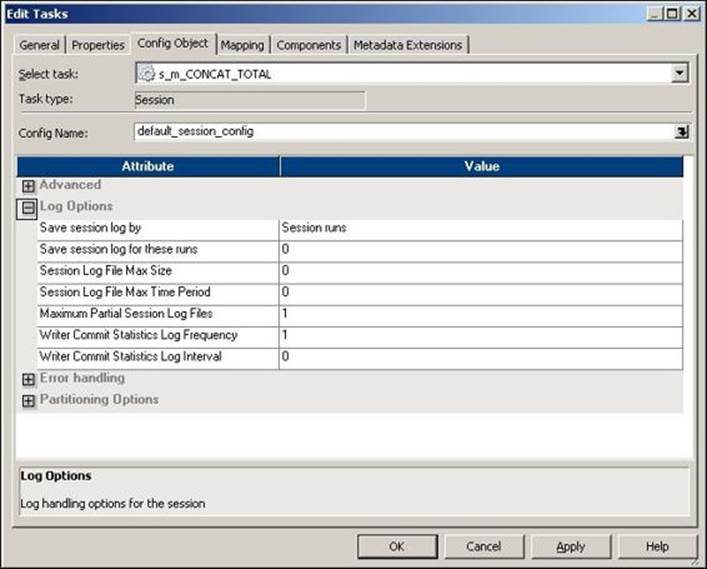
The description of the property shown in the preceding screenshot is as follows:
|
Property |
Description |
|
Save session log by |
You have the option to save the session log file by either session runs or timestamp. When you set the option as a session run, Informatica saves a specific number of session log files. You can set the number of log files to be saved in the Save Session Log for These Runs option. When you set the option as Timestamp, Informatica saves the session log file by appending the timestamp to the log filename. When you save the history of session log files, you can use the files to compare the files in case of any errors. |
|
Save session log for these runs |
This option allows you to define the number of session log files you wish to save in order to maintain the history of log files. By default, the session log files are overwritten. The maximum number of history you can maintain is 2,147,483,647. |
|
Session Log File Max Size |
With this, you can define the maximum size of the session log file. If the log file size exceeds the value defined in this property, a new log file is created. The default value is 0. |
|
Session Log File Max Time Period |
With this, you can define the maximum number of hours for which the information is written for a session log file. If the maximum time exceeds the value defined in this property, a new log file is created. The default value is 0. |
|
Maximum Partial Session Log Files |
With this, you can define the maximum number of log files to be saved. If the number of files exceeds the value defined in this property, the oldest file is overwritten. |
|
Writer Commit Statistics Log Frequency |
With this, you can define the frequency at which the commit statistics are written to the session log. The default value is 1. |
|
Writer Commit Statistics Log Interval |
With this, you can define the time interval at which the commit statistics are written to the session log. The time is defined in minutes. |
The Error handling properties under the Config Object tab is shown in the following screenshot:
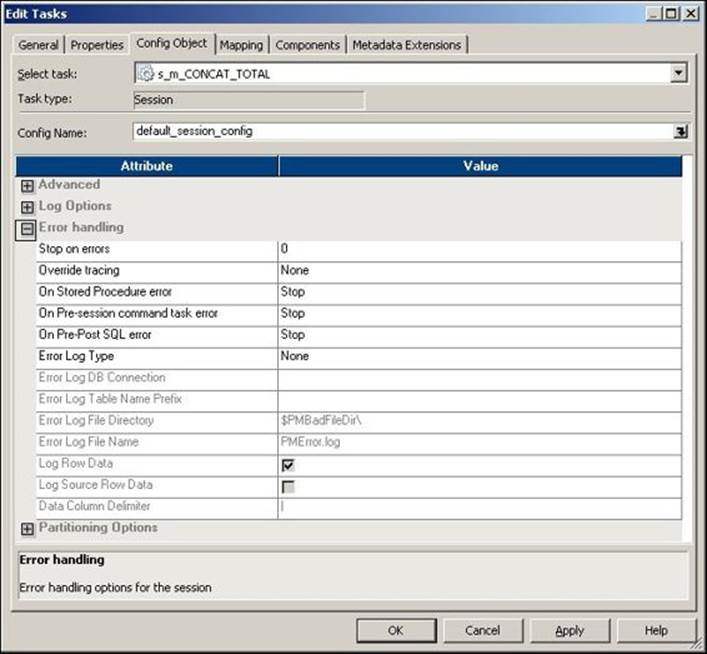
The description of the property shown in the preceding screenshot is as follows:
|
Property |
Description |
|
Stop on errors |
This option defines the number of errors till you do not wish to fail the workflow. If you set this as 5, Informatica will keep on running till it encounters 5 error rows. On sixth error record, Informatica will fail the workflow. |
|
Override tracing |
You can override the tracing level set in the mapping. If you defined the tracing level as Terse in Mapping and you selected the Normal Tracing level in Session, Informatica will take the tracing level as normal and reject the setting in the mapping. Various options that are available are None, Terse, Normal, Verbose Initialization, and Verbose Data. |
|
On Stored Procedure error |
You can select this option to define what should happen if there is any pre- or post-session stored procedure error. If you select the Stop option, the session will fail if it encounters an error in the stored procedure. If you select the Continue option, the session will continue even if it encounters an error in Stored Procedure. |
|
On Pre-session command task error |
You can use this option when you use the Pre-session Command task in the Session task. If you select the Stop option, the session will fail if it encounters an error in the pre-session command. If you select the Continue option, the session will continue even if it encounters an error in the pre-session command. |
|
On Pre-Post SQL error |
You can use this option when you use a pre- or post- SQL command in the session task. If you select the Stop option, the session will fail if it encounters an error in the pre- or post- SQL command. If you select the Continue option, the session will continue even if it encounters an error in the pre- or post- SQL command. |
|
Error Log Type |
You can use this option to define the type of error log to be generated. The available options are Flat File, Relational Database, or None. The default setting is set to None. |
|
Error Log DB Connection |
If you select Error Log Type as Relational Database, this option gets enabled. You can specify the Database Connection details for Error Log. |
|
Error Log Table Name Prefix |
With this, you can mention the table name you created to store the error logs. |
|
Error Log File Directory |
If you select the error log type as Flat File, this option gets enabled. You can specify the file directory details for the error log. |
|
Error Log File Name |
With this, you can mention the name of the error log file. |
|
Log Row Data |
If you select this option, you can save the row-level transformation data into the log. |
|
Log Source Row Data |
If you select this option, you can save the source-row-level data into the log. The data is not saved by default. |
|
Data Column Delimiter |
You can define the delimiters to be used when saving the row data and source row data. The default delimiter is the (|) pipeline. |
The Partitioning Options property under the Config Object tab is shown in the following screenshot:
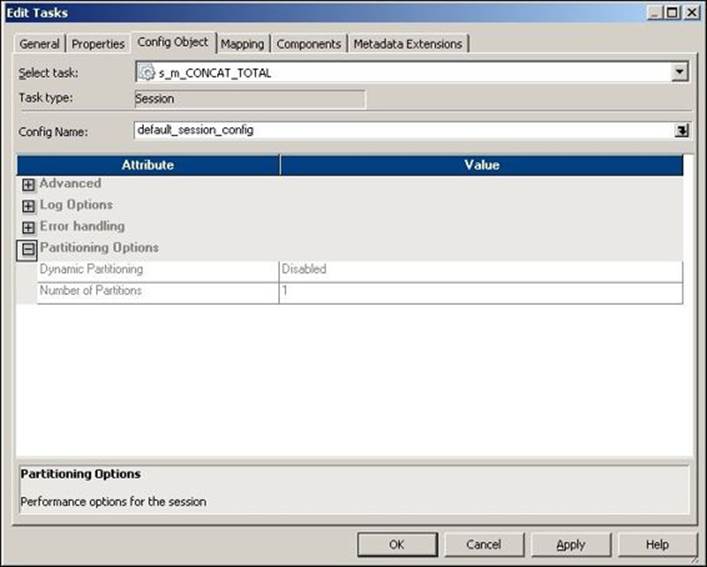
The description of the property shown in the preceding screenshot is as follows:
|
Property |
Description |
|
Dynamic Partitioning |
You can enable the partitioning option for which you run the process. The default setting is disabled. This is available only if you have the partitioning license available. The various options available are Based on number of partitions, Based on number of nodes in grid, Based on source partitioning, and Based on number of CPUs. |
|
Number of Partitions |
You can define the number of partitions you wish to set. |
Edit Tasks also has the following tabs:
· Mapping: With this you can define the session, target, and lookup transformation path or connection. We discussed this tab in the previous chapter.
· Components: With this, you can define pre- or post- Command and Email tasks. This acts as a replacement for the Command and Email tasks.
The Components tab is shown in the following screenshot:

The description of the property shown in the preceding screenshot is as follows:
|
Property |
Description |
|
Pre-Session Command |
You can use this option as a replacement for the command task used before the session task. You can define reusable or nonreusable types and also define the shell command you wish to mention in the command task. Informatica executes the pre-session command before it executes the session task. We will talk about the command task in detail later in the chapter. |
|
Post-Session Success Command |
You can use this option as a replacement for the post-session success command task used after the session task. You can define reusable or nonreusable types and also define the shell command you wish to mention in the command task. Informatica executes the post-session command after the successful completion of the session task. You need not define any condition in the link. |
|
Post-Session Failure Command |
You can use this option as a replacement for the post-session failure command task used after the session task. You can define reusable or nonreusable types and also define the shell command you wish to mention in the command task. Informatica executes the post-session command if the session task fails. |
|
On Success E-mail |
You can use this option as a replacement for the post-session success Email task used after the Session task. You can define reusable or nonreusable types and also define the e-mail properties you wish to mention in the Email task. Informatica executes the Post-Session E-mail after the successful execution of the session task. |
|
On Failure E-mail |
You can use this option as a replacement for the post-session failure Email task used after the Session task. You can define reusable or nonreusable types and also define the e-mail property you wish to mention in the Email task. Informatica executes the post-session e-mail if the session task fails. |
|
Pre-session variable assignment |
You can assign values to various parameters and variables used in the mapping and session before the session is executed. |
|
Post-session on success variable assignment |
You can assign values to various parameters and variables used in the workflow and worklet after the session is executed successfully. |
|
Post-session on failure variable assignment |
You can assign values to various parameters and variables used in the workflow and worklet if the session task fails. |
The Metadata Extensions tab helps define metadata-extension-related properties. Usually, we do not use this tab. It is used to define general information related to the workflow or to define the project-level information that can be used in future for reference purposes.
Creating a session task
To create a session task in Workflow Manager or Task Developer, perform the following steps:
1. In Workflow Manager or Task Developer, navigate to Tasks | Create.
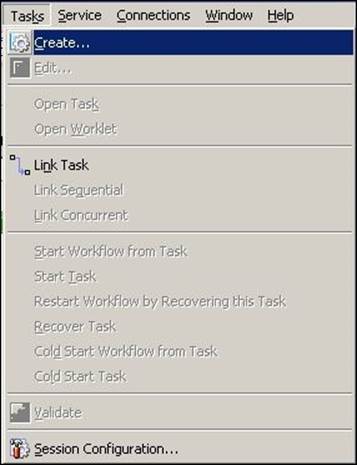
Tip
This step is the first step to be performed when creating any task.
2. From the list of tasks, select the Session task and specify the name of the session task as s_TASK_NAME. For our reference, we are using the session task name as s_CONCAT_TOTAL or s_m_CONCAT_TOTAL, where m_CONCAT_TOTAL is the mapping name for which we are creating the session. Click on Create.

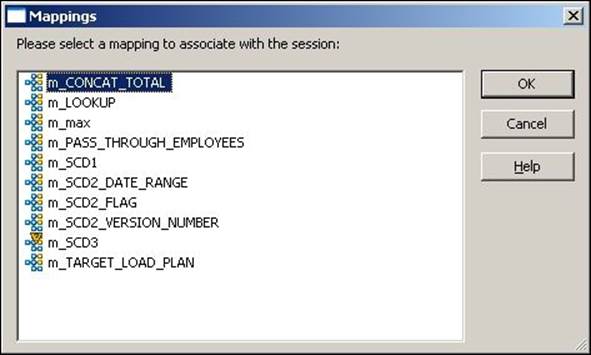
3. In the next window, select the mapping you wish to associate in the session. When you run the session, it makes the data flow from the source to the target in the mapping you selected. Note that once you associate a mapping to a session, you cannot change the mapping. Click on OK, and then click on Done.
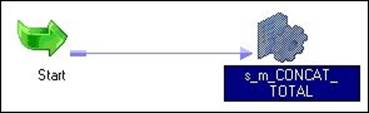
The session task appears in Workflow Manager or Task Developer. Use the Link task to connect the start task to the session task:
The command task
The command task is used to execute shell scripts or standalone shell commands. You can define one or more commands or scripts in a command task. If you define multiple command or scripts in the same command task, the task executes the commands in a sequence.
You can define Unix/Perl commands for Unix servers or DOS commands for Windows servers. If your Informatica server is installed on a Unix operating system, you will be able to execute Unix commands. If the Informatica server is installed on Windows, you can use DOS commands.
Creating a command task
To create a command task in Workflow Manager or Task Developer, perform the following steps:
1. In Workflow Manager or Task Developer, navigate to Tasks | Create (refer to the screenshot shown in the Creating a Session task section).
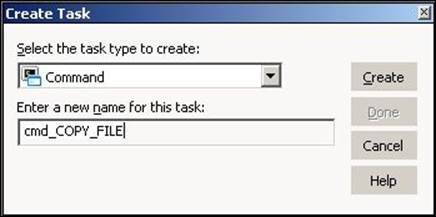
2. From the list of tasks, select the Command task and specify the name of the command task, which is cmd_TASK_NAME. For our reference, we are using the command task name as cmd_COPY_FILE. Click on Create, and then click on Done.
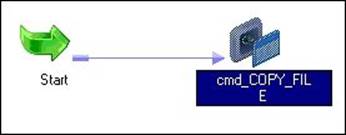
The task appears in Workflow Manager or Task Developer. Use the link task to connect the start task to the command task.
3. Double-click on the command task to open the task in the edit view. Click on Commands.
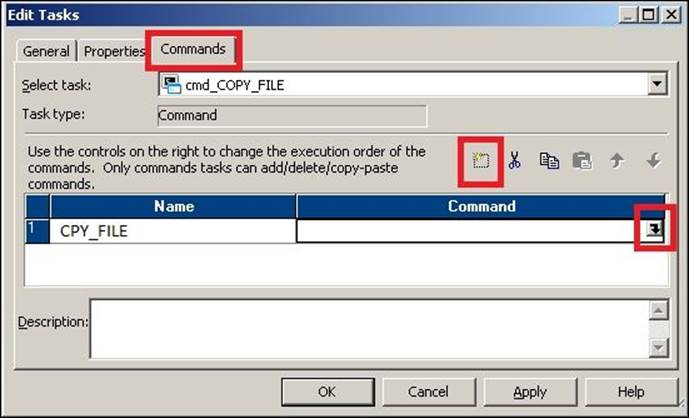
Add a new command by clicking on the Add a new Command option, as shown in the preceding screenshot. In the Name column, enter the name of the command. For our reference, we are using COPY_FILE as the command name.
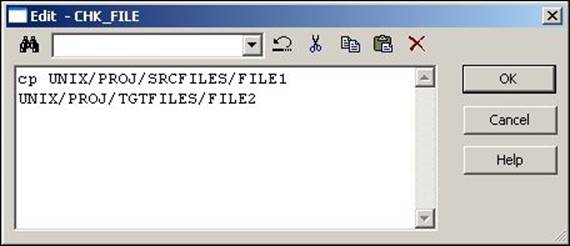
4. Click on the edit button to open Command Editor and write the command that you wish to execute. If you wish to execute Unix scripts, write the Unix script's path and name, otherwise simply define the Unix command. Click on OK to close the edit view.
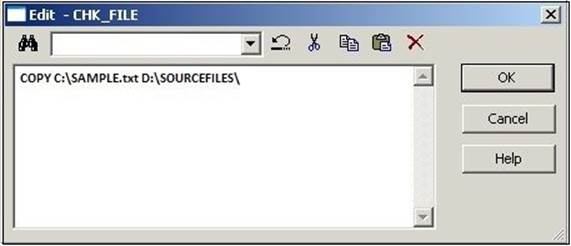
A sample Windows command is indicated in the following screenshot:
The e-mail task
The Email task is used to send success or failure e-mail notifications. You can use the Email task to send e-mail notifications to inform about the success or failure of a particular part of a workflow. You can use your mail server to send e-mail notifications. Your admin team will configure the mail server with Informatica to send e-mail notifications. Once you configure your mail server with Informatica, when an e-mail task gets triggered, the e-mail is sent directly from your mailbox.
You can configure the Email task to send e-mail notifications, or you can also configure the session task to send e-mail notifications. We have discussed the latter option in the session task.
Creating an e-mail task
To create an Email task in Workflow Manager or Task Developer, follow these steps:
1. In Workflow Manager or Task Developer, navigate to Tasks | Create.
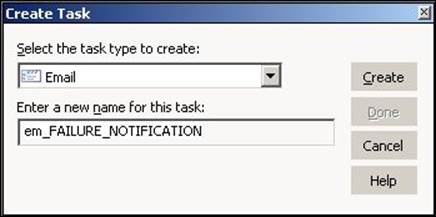
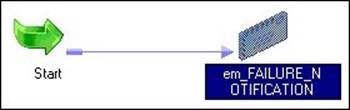
2. From the list of tasks, select the Email task and specify the name of the Email task, which is em_TASK_NAME. For our reference, we are using the Email task name as em_FAILURE_NOTIFICATION. Click on Create, and then click on Done.
The task appears in Workflow Manager or Task Developer. Use the Link task to connect the start task to the Email task:
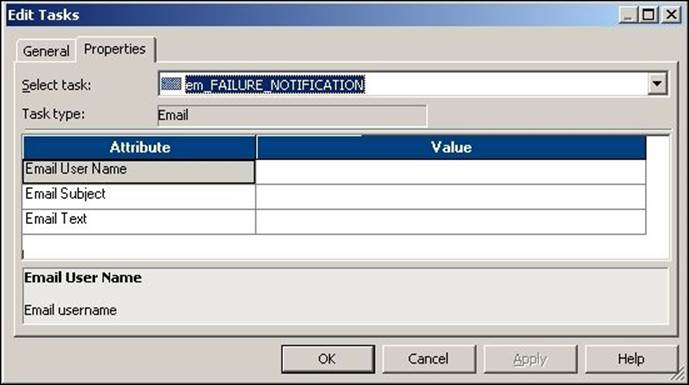
3. Double-click on the Email task to open the task in the edit view. Click on Properties.
4. Click on OK to close the edit view.
5. Add the details in the Email task as follows:
o The Email user name: Mention the name of the e-mail address to which you wish to send e-mail notifications. If you wish to send an e-mail to multiple users, separate the e-mail IDs by comma.
o Subject: Enter the subject of the e-mail you wish to send.
o Text: Click to open the e-mail editor to enter the text that you wish to send with the e-mail. You can attach the log file, workflow name, repository name, and so on using the variables available in the e-mail task editor.
The assignment task
The assignment task is used to assign a value to user-defined variables in Workflow Manager.
Before you can define a variable in the assignment task, you need to add the variable in Workflow Manager. To add a variable to the Workflow, perform the following steps:
1. In Workflow Manager, open the workflow for which you wish to define user-defined variables. Navigate to Workflow | Edit | Variables.
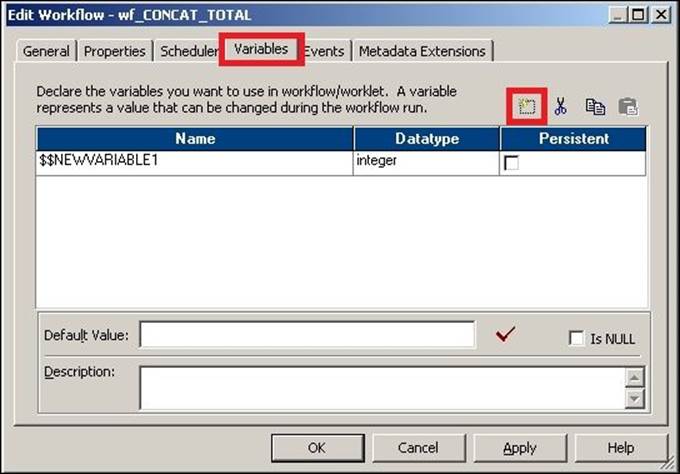
2. Click on the Add a new variable option to add new variables to the workflow, as shown in the preceding screenshot.
A new variable is created, as shown in the preceding screenshot. The new variable that is created is $$NEWVARIABLE1. You can change the name of the variable and its data type.
Creating an assignment task
To create an assignment task in Workflow Manager, follow these steps:
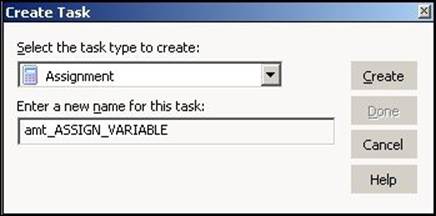
1. In Workflow Manager, navigate to Task | Create.
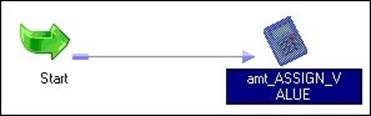
2. From the list of tasks, select Assignment Task and specify the name of the assignment task, which is amt_TASK_NAME. For our reference, we are using the assignment task's name as amt_ASSIGN_VALUE. Then, click on Done.
The task appears in Workflow Manager. Use the link task to connect the start task to the assignment task.
3. Double-click on the assignment task to open the task in the edit view. Navigate to Expressions | Add a new Expression.
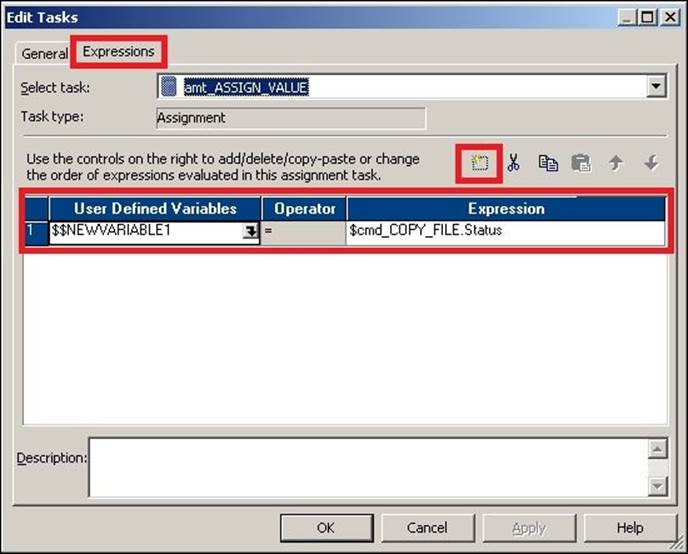
Select the user-defined variable you added at the Workflow level. We have added $$NEWVARIABLE1.
4. Assign the value that you wish to assign to the variable. We have assigned the status of the cmd_COPY_FILE command task from the Expressions tab in the assignment task, as shown in the preceding screenshot. Then, click on OK.
The timer task
The timer task is used to add a time gap between the executions of two tasks. In other words, you can specify the time in the timer task to wait before the process triggers the next task in the workflow. Also, another option in the timer task allows you to start the next task after a particular time gap in the workflow.
The timer task has two types of settings:
· Absolute Time: This option enables you to specify the time when you want the next task to start in the workflow.
· Relative Time: This option enables you start the next task by comparing the start time of the timer task. If you mention Relative time as 10 minutes, Informatica PowerCenter will wait for 10 minutes at the timer task before it triggers the next task in the workflow.
Creating a timer task
To create a timer task in Workflow Manager, perform the following steps:
1. In Workflow Manager, navigate to Tasks | Create.
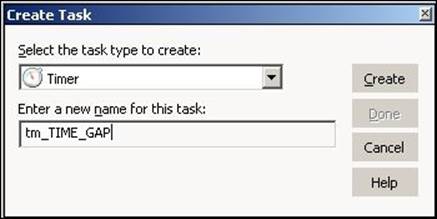
2. From the list of tasks, select the Timer task and specify the name of the timer task, which is tm_TASK_NAME. For our reference, we are using the Timer task's name as tm_TIME_GAP. Click on Create, and then click on Done.
The timer task appears in Workflow Manager. Use the link task to connect the start task to the timer task.
3. Double-click on the Timer task to open the task in the edit view. Click on Timer. Based on your requirement, select the Relative time or Absolute time option. Then, click on OK.
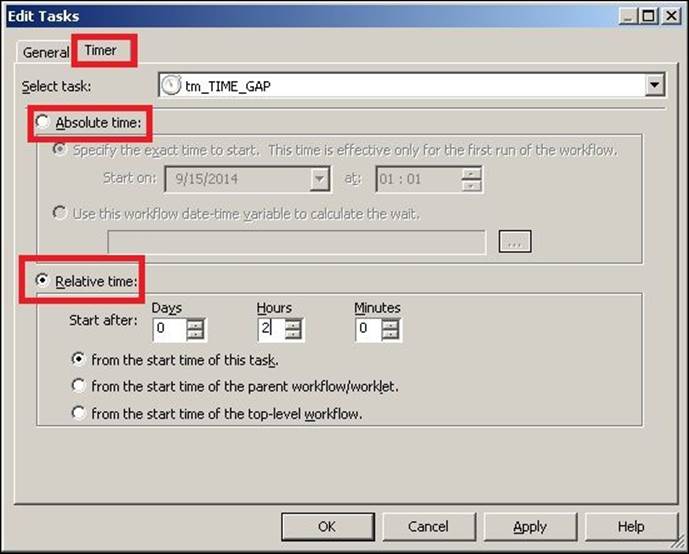
For reference, we have selected Relative time in the preceding screenshot. Based on the selection, our timer task will start the execution after 2 hours from the end of previous task.
The control task
The control task is used to control the execution of the workflow. You can stop, abort, or fail the parent workflow or top-level workflow by defining the appropriate condition in the control task.
The control task acts as a green signal or red signal. If you use a control task in a branch in the workflow and if everything is moving smoothly, that is, there are no issues with the process, the control task will not even get triggered. It will act invisible. However, if the process catches up with the issue, the control task will take control, and based on the option you select in the properties, it will stop, abort, or fail the workflow or the top-level workflow.
Creating a control task
To create a control task in Workflow Manager, perform the following steps:
1. In Workflow Manager, navigate to Task | Create.
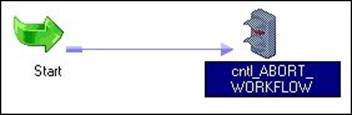
2. From the list of tasks, select the Control task and specify the name of the control task, which is cntl_TASK_NAME. For our reference, we are using the control task name as cntl_ABORT_WORKFLOW. Click on Create, and then click on Done.

The control task appears in Workflow Manager. Use the link task to connect the start task to the control task.
3. Double-click on the control task to open the task in the edit view. Click on Properties.
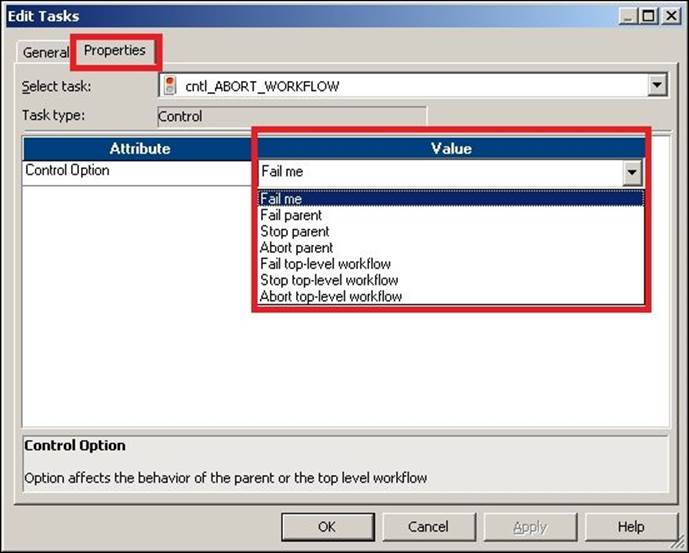
4. Select a particular option from the drop-down list as per your requirements. The various options are present in the control task properties:
o Fail Me: If you select this option, the control task will show you the FAILED status in Workflow Monitor if the task is triggered.
o Fail Parent: If you select this option, the workflow will fail and you will see the status as FAILED in Workflow Monitor.
o Stop Parent: If you select this option, the workflow will stop, and you will see the status as STOPPED in Workflow Monitor.
o Abort Parent: If you select this option, the Workflow will abort and you will see the status as ABORTED in Workflow Monitor.
o Fail Top-Level Workflow: If you select this option, the top-level workflow will fail and you will see the status as FAILED in Workflow Monitor.
o Stop Top-Level Workflow: If you select this option, the top-level workflow will stop and you will see the status as STOPPED in Workflow Monitor.
o Abort Top-Level Workflow: If you select this option, the top-level workflow will abort and you will see the status as ABORTED in Workflow Monitor.
The decision task
You can control the execution of the workflow by defining the condition in the decision task. The decision task allows you to specify the condition using which you can control the execution of branches in a workflow. In other words, you can check the condition of multiple tasks, and based on that, you can decide whether you wish to trigger the next task or not.
Consider the workflow shown in the next screenshot. As you can see, the session task should be triggered only if the two tasks before the decision task are successful. We can define the condition in the two link tasks, but the problem in that case will be that the session task will be triggered even if one task is successful. This issue can be resolved using the decision task. You can define the condition in the decision task that will make the session task execute only if the two tasks are successful.

Creating a decision task
To create a decision task in Workflow Manager, follow these steps:
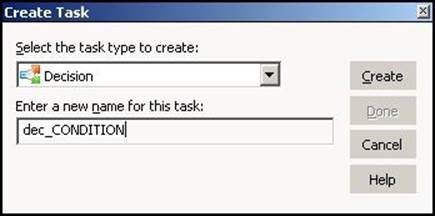
1. In Workflow Manager, navigate to Tasks | Create.
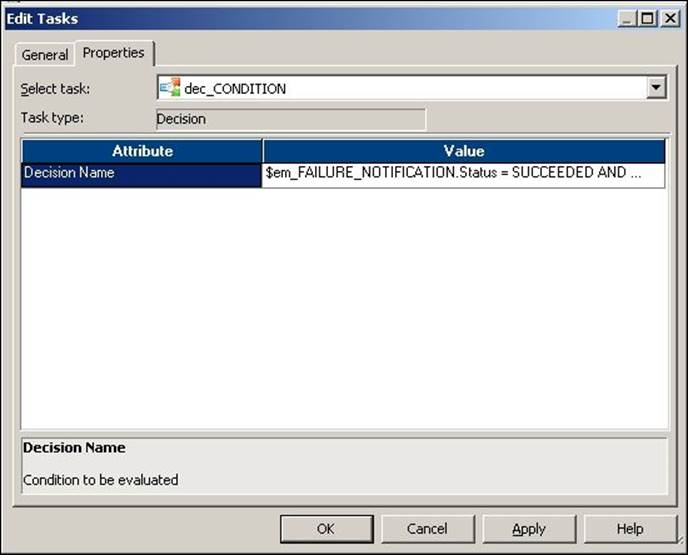
2. From the list of tasks, select the Decision task and specify the name of the decision task, which is dec_TASK_NAME. For our reference, we are using the decision task named dec_CONDITION. Click on Create, and then click on Done.
The decision task appears in Workflow Manager. Use the link task to connect the start task to the control task. In our case, we are implementing a scenario where the s_m_max session task should be triggered only after the successful execution of the em_FAILURE_NOTIFICATION Email task and the s_m_CONCAT_TOTAL session task, as shown in the preceding screenshot:
3. Double-click on the decision task to open the task in the edit view. Click on Properties and mention the condition under Value. As per our requirement, we have defined the condition as $em_FAILURE_NOTIFICATION.Status = SUCCEEDED AND $s_m_CONCAT_TOTAL.Status = SUCCEEDED. Now, click on OK.
Event tasks – event wait and event raise
An event is simply a functionality that you wish to implement in a workflow. Informatica PowerCenter has some system-defined events, and you can define user-defined events as well.
There are two types of events:
· The Event Wait task: This is the task that waits for a particular event to occur. You can define the event for which the Event Wait task should wait. Once triggered, the Event Wait task will wait infinitely for the specified event. As soon the event occurs, the Event Wait succeeds and triggers the next task in the workflow.
In the Event Wait task, you can define system-defined events (predefined events) or user-defined events.
· Event Raise task: As opposed to Event Wait, the Event Raise task triggers a particular event in the workflow.
You can define only user-defined events in the Event Raise task.
Informatica PowerCenter events can be of two types—predefined or user-defined:
· Predefined events: These are also referred to as system-defined events. They are generally called file-watch events. You can use these events to wait for a specified file at a specific location. Once the file arrives at the path mentioned, the Event Wait or File Watcher triggers the rest of the tasks in the workflow.
· User-defined events: You can create an event of your own based on the requirement. An Event Raise task is nothing but a sequence of tasks in the workflow. To use a user-defined task, define the event under the workflow.
Before you can use user-defined events under event tasks, you need to create the event at the workflow level. Perform the following steps to add the event to the workflow:
1. Open the workflow in the Workflow Manager for which you wish to add a user-defined event, and then navigate to Workflow | Edit | Events.
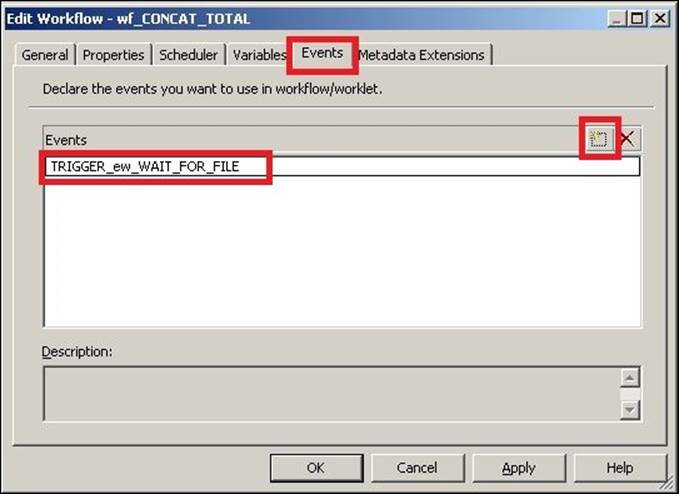
2. Add a new event, as shown in the preceding screenshot. Then, click on OK.
Creating an event (wait/raise) task
To create an Event Wait or Event Raise task in Workflow Manager, perform the following steps:
1. In Workflow Manager, navigate to Task | Create.
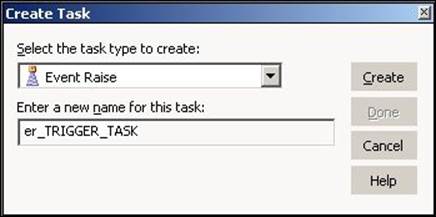
2. From the list of tasks, select the Event Wait or Event Raise task and specify the name of the task, which is ew_TASK_NAME or er_TASK_NAME. For our reference, we are using the Event Wait task name as ew_WAIT_FOR_FILE and the Event Raise task name as er_TRIGGER_TASK. Click onCreate, and then click on Done.
The dialog box for the Event Wait task is shown as follows:
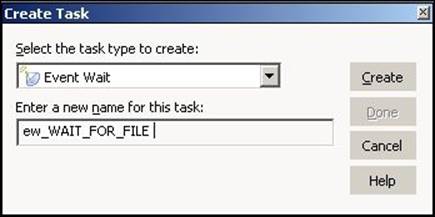
The dialog box for the Event Wait task is shown as follows:
The Event (Wait/Raise) task appears in Workflow Manager. Use the link task to connect the start task with the event tasks.
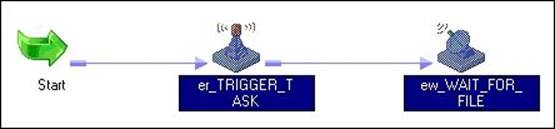
Note that you can use the Event Wait and Event Raise tasks individually as well. We have used both the tasks together for reference purposes.
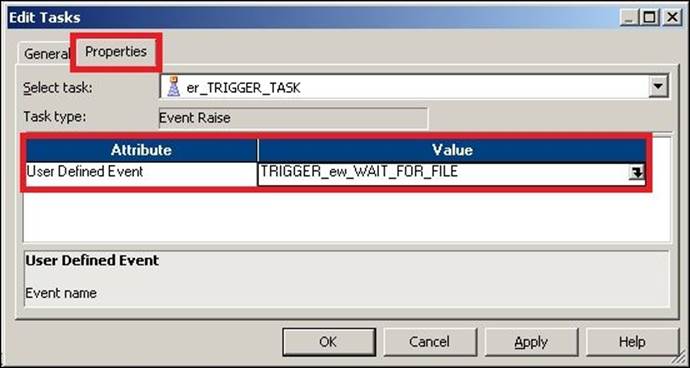
3. Double-click on the Event Raise task and click on Properties. Add a new user-defined event, as shown in the following screenshot:
4. Double-click on the Event Wait task to open the task in the edit view. If you wish to use the Predefined task, specify the path and filename in the option. If you wish to use the User-Defined name, click on the add new event option. Then, click on OK.
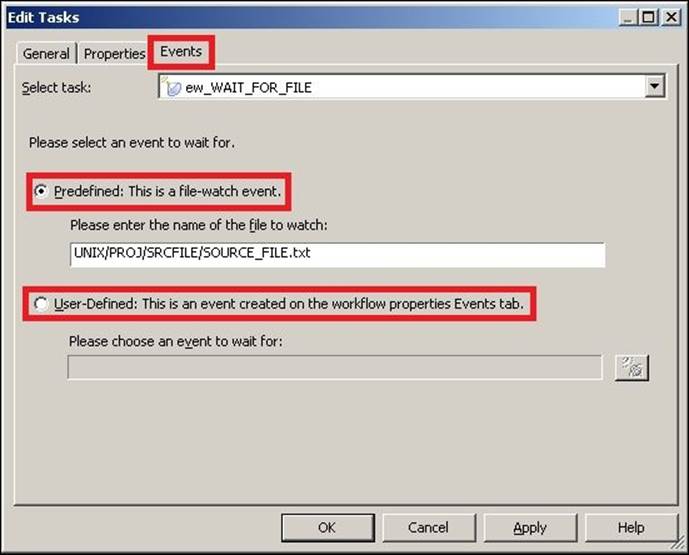
For our reference, we have added a predefined event called the file-watch event. We have added UNIX/PROJ/SRCFILES/SOURCE_FILE.txt as the event wait file.
The link task
The link task is used to control the execution of the workflow. You can have multiple branches in the workflow that can be triggered using the link task. By now, you must have understood that we use the link task to connect two tasks and also connect the start task with other tasks in a workflow. You can define the condition in the link task using which you can control the flow of the workflow.
You can define various conditions based on the tasks from which you are connecting the link.
Creating a link task
To create a Link task to connect two tasks, follow these steps:
1. In Workflow Manager, navigate to Task | Link task.
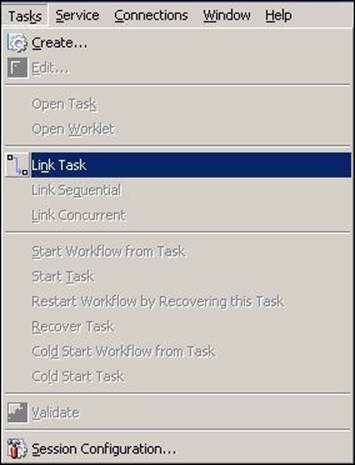
2. Drag the link between the tasks you wish to link.
Worklets – groups of tasks
Group of tasks that can be reused in multiple workflows are called worklets. Worklets are similar to mapplets in Mapping Designer. As you know from the previous chapter, you use mapplets instead of multiple transformations; similarly, you can use worklets instead of multiple tasks. When you wish to reuse the functionality implemented using multiple tasks, a worklet is your answer. As reusing a reusable task itself is a rare occurrence, you do not frequently reuse the logic of individual tasks, which makes using a worklet a more rare occurrence in Informatica. Worklets can surely save your time, as you can reuse an existing functionality. Similar to workflows, worklets should also start with a Start task.
Creating a worklet
To create a worklet, perform the following steps:
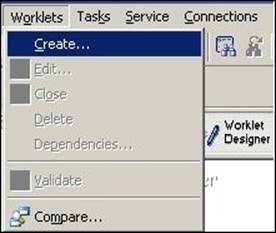
1. In Worklet Manager, navigate to Worklets | Create.
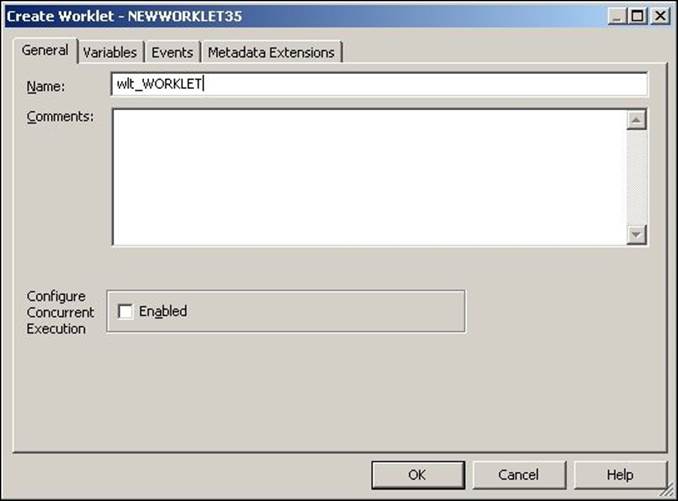
2. Specify the name of the worklet. For our reference, we are using the worklet name wlt_WORKLET; then, click on Done.
The start task appears in Worklet Manager.
3. Drag the existing reusable task from the navigator under Sessions or Tasks to your worklet. We have dragged the existing reusable session, which is s_m_CONCAT_TOTAL, to the worklet. Use the link task to connect the start task to the session task.
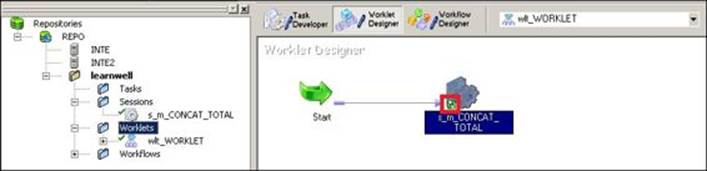
The small green icon at the bottom of session task, which is indicated in the preceding screenshot, represents it as a reusable task. The worklet gets added to the navigator under worklets.
Schedulers
Scheduling is one of the most important aspects of any technology we use. We need to schedule the process so that the process regularly gets executed at the specified interval. Using the schedule, you can define the frequency with which you wish to execute the workflow. Based on the frequency you have defined, the workflow will automatically get triggered. Informatica PowerCenter comes with an internal scheduler. To create a schedule, perform the following steps:
1. Open the workflow in the Workflow Manager for which you wish to define a scheduler, and navigate to Workflows | Schedulers.

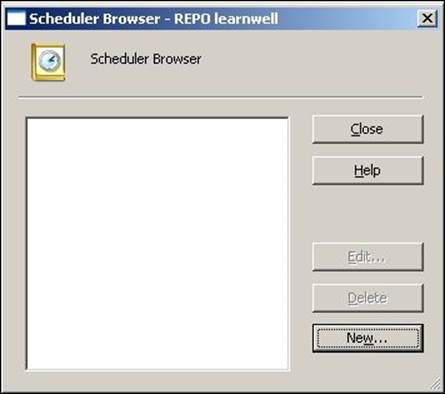
2. In the new window, you can add a scheduler. Then, click on New.
3. In the new window, specify the name of the scheduler as per your requirement, and click on Schedule.

Various options present on the schedule screen are described as follows:
|
Option |
Description |
|
Run on Integration Service initialization |
When you check this option, the workflow will get triggered as per your defined schedule. When you check this option, various options under the schedule option get enabled, and you can specify the time at and frequency with which you wish to execute the workflow. |
|
Run on demand |
When you check this option, you can run the workflow manually. |
|
Run continuously |
When you check this option, the workflow will keep on running continuously from the time you define as the start time. |
|
Run once |
This option indicates that the workflow will run only once at the scheduled time. |
|
Run Every |
When you check this option, you can schedule the workflow to run at a particular interval. If you wish to run the workflow every day, mention 1 under Days and define Start data and End date. |
|
Customized Repeat |
With this, you can customize the schedule with which you wish to run your workflow. This option is helpful in scenarios where you might only need to run your workflow on Mondays. |
|
Start Date/Start Time |
This option indicates the date at and the time from which you wish to schedule your workflow. |
|
End On |
This option indicates the date till which you wish to schedule your workflow. |
|
End after |
This option indicates the number of times you wish to let the workflow run. |
|
Forever |
If you check this option, the schedule will keep on running forever with no end date. |
File List – the indirect way
File List is a concept that provides you with an easier way to merge the data and load it into the target. As the name suggests, it is specifically related to flat files. This is an indirect way of passing the source file. We saw earlier that we can define the source path and the source file name under the mapping tab in the session task. There is another property in the session task called the Source File type, where you can select the Direct or Indirect option, as shown in the following screenshot:
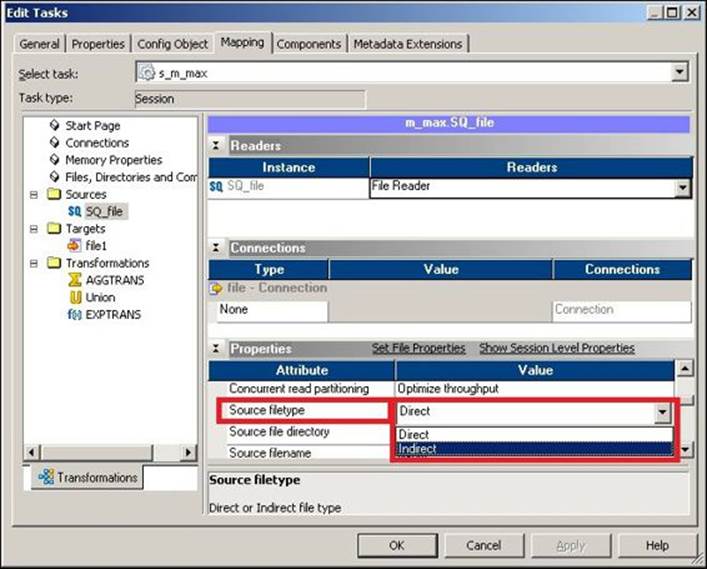
When we select Source filetype as Direct, Informatica directly goes to the defined Source file directory path and extracts the data from the filename defined in the Source filename option. When you select Source filetype as Indirect, Informatica reads the data from the file mentioned indirectly. Let's look at an example to understand this concept.
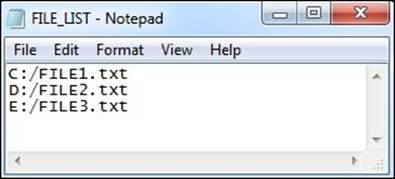
Consider that you have been provided with three source files with the same structure but different data. The names of the source files are C:/FILE1.txt, D:/FILE2.txt, and E:/FILE3.txt. The requirement is to merge the data into a target file. You can achieve the requirement using union transformation, which we are going to discuss in Chapter 7, The Lifeline of Informatica – Transformations, in the Union transformations section. The indirect file type concept helps you achieve the same requirement in an easier way. Remember to implement the File List concept—the files you are willing to merge should have exactly the same data type. To implement the file list, we will create another file with a name such as FILE_LIST.txt. Then, add the names of all the three files with the path in FILE_LIST.txt, as follows:
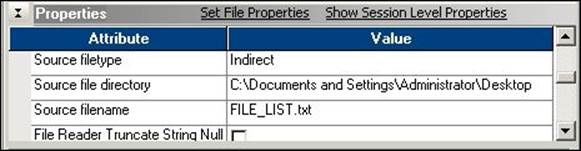
Define the properties in the session task for Indirect file type, as shown in the following screenshot:
The mapping will be as simple as Source - Source Qualifier - Target.
When you define Source filetype as Indirect, Informatica reads the name of the files from FILE_LIST.txt and extracts the data one by one from the files mentioned in FILE_LIST.txt. This way, the data will be appended in the target.
Incremental aggregation
This concept is related to Aggregator transformation. When you have data, which in increasing but the existing data remains constant, you can utilize the incremental aggregation functionality to achieve the output faster and enhance the performance. When you select the Incremental Aggregation option in the Session properties, Informatica saves the result of the last run in the cache and replaces the value in the next run and hence enhances the performance. To understand this concept, let's look at an example.
Consider that you have a file containing the salary of employees, and you wish to get the sum of the salaries of all the employees. Then, consider that we have three employees in the month of JAN, six employees in the month of FEB, and nine employees in the month of MARCH, as shown in the following screenshot:
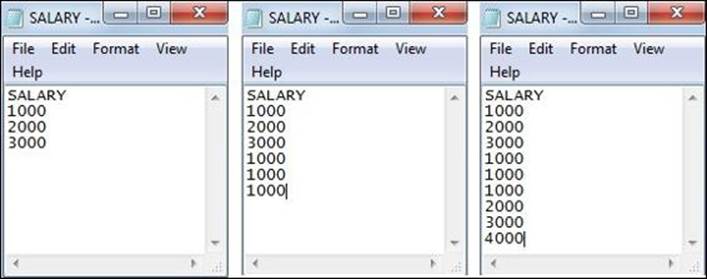
As you can see, the data in the file is increasing—the first file has the data of employees present in the month of JAN, the second file has the data of employees in the month of FEB, and the third file has the data for MARCH. To get the sum of the salaries of all the employees, we will use the Aggregator transformation. As the number of records is increasing, the time taken for the calculation will also increase. Also, note that the previous data does not change; only the new data is added to the file. To save time, we use the concept of incremental aggregation. This option is present in the session task, as shown in the screenshot of the Properties tab in the preceding Tabs of Session task section.
When you run the file for the month of JAN, the Aggregator transformation will calculate the value of three records and give the corresponding output, which is 6000 in our case. When you do not check the Incremental Aggregation option, Informatica again calculates the six records in the file for the month of FEB and gives you the result, which is 9000 in our case. If you use the Incremental Aggregation option, the aggregator cache will save the value of the last run, which is 6000. When you run the same process for the month of FEB, Informatica replaces the first three records of the file with the value stored in the cache and adds new records to get the result. This results in faster calculation, as the number of records to be calculated reduces.
The basic criterion in order to use incremental aggregation is that the data from the previous run should remain the same.
If the records from the previous run change, the result will be incorrect, as Informatica will not consider the changed value and will replace that value with the value stored in the cache. To handle this, make sure that you check the Reinitialize aggregate cache box. When you check this option, Informatica reinitializes the aggregate cache value and stores the new value. It is important to note that you need to uncheck the Reinitialize aggregate cache option if your data is not changing, otherwise it will always keep on reinitializing the cache, which will indirectly hamper the performance.
The parameter file – parameters and variables
It is always a best practice of coding that you should never hardcode the values. The same applies to Informatica as well. It is always better to pass the values using parameters or variables instead of hardcoding them. When you define parameters or variables in the code, you need to pass the values to those parameters and variables. Parameter files serve this purpose. Any value that you hardcode can be passed through a parameter file. You can define the parameter file at the session level and the workflow level.
You must have noticed the system defined $PMSourceFileDir\ or $PMTargetFileDir\ variables. Similar to them, we can define the user-defined variables. You can define the variable at both the mapping level and the workflow level.
Note
If the value that is passed remains constant across the session run, it is called the parameter, and if the value changes across the session run, it is called the variable.
Let's take a look at an example to understand the parameter file. You are aware that Informatica has three different repositories to cater to the need of three regions. Let's say we have three repositories—REPO_DEV, REPO_TEST, and REPO_PROD—that serve development, testing, and production regions, respectively. Also, we have three Oracle databases corresponding to three regions, which are ORACLE_DEV, ORACLE_TEST, and ORACLE_PROD, respectively. When you start the coding in the development region under REPO_DEV, you will hardcode the database connection value to ORACLE_DEV. Your code is working successfully, and when you want to deploy the code to the test region, you will need to manually replace the database connection value with ORACLE_TEST. Changing the code after the testing is not allowed. The same case applies when you wish to deploy the code from the test to the production.
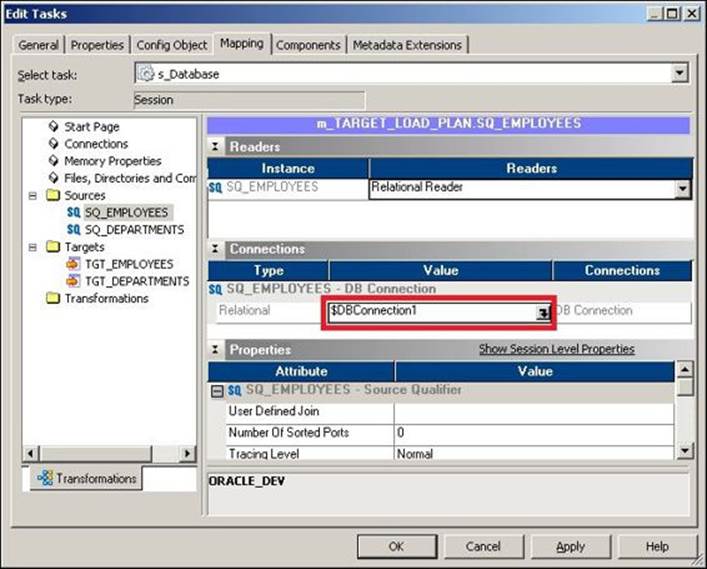
The solution comes as a parameter file. Parameter files serve the purpose of passing the value based on the region in which you are running the code. We are defining the parameter file to pass the value for the source database connection ($DBCONNECTION1), target file name ($TGTFILENAME), e-mail recipient ($EMAILUSER), and a mapping-level variable for location ($$LOCATION). We are using examples of a session-level variable, workflow-level variable, and mapping-level variable so that you understand clearly how they work.
Defining session-level variables
The variables that are defined under the session task are called session-level variables. There are various values that can be passed via variables, such as the source, target database connection value, source/target filename, source/target file path, session log file name/path, and so on. The session task does most of the work in the Workflow Manager screen and hence has been assigned special privileges. To pass the value through a variable, simply replace the hardcoded value with a variable of your choice. As shown in the following screenshot, we are using a database connection variable as $DBCONNECTION1:
Similarly, assign the value to the target filename ($TGTFILENAME). As we define the target filename under the session task, it will be referred to as a session-level variable.
Defining workflow-level variables
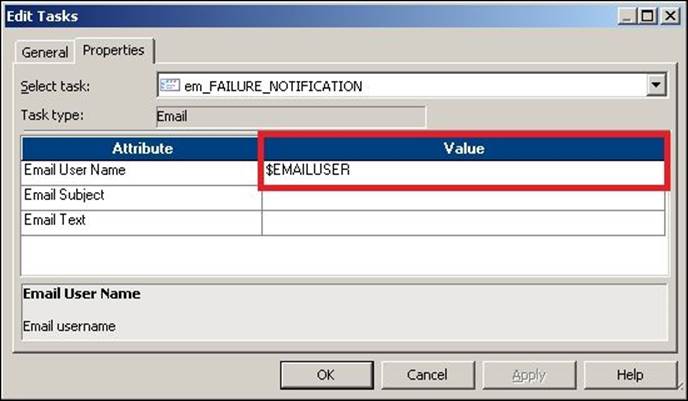
The variables that are defined under various tasks are called workflow-level variables. Note that you can define the session-level variables under the workflow as well as in the parameter file. In our case, we are passing the e-mail user value as variable. To assign the value, simply replace the hardcoded value with the variable in the Email task, as shown in the following screenshot:
Defining mapping-level variables
As mentioned earlier, you can define variables for the hardcoded values in the mapping inside transformations as well. You need to define parameters or variables under Mapping before you can use them in transformations, otherwise the mapping will become invalid. To add the value, perform the following steps:
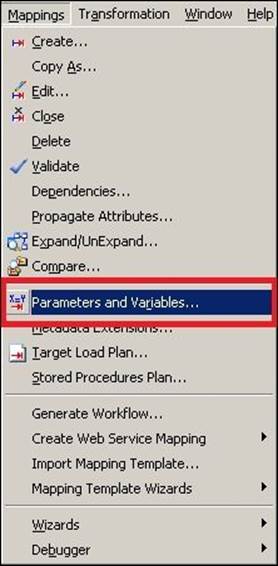
1. Open the mapping for which you wish to add variables in Mapping Designer, and navigate to Mappings | Parameters and Variables.
2. In the next screen, click on Add a new variable to this table. Define the variable as select the type as Parameter and Variable based on your requirement. Now, click on OK.
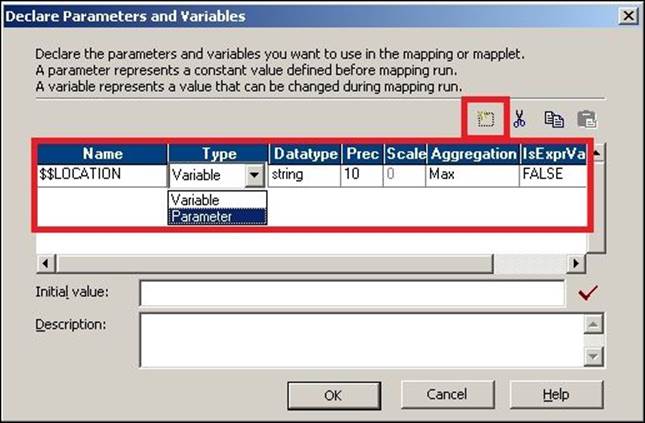
As you can see, the mapping-level variables are always defined as $$.
3. Open the transformation for which you wish to assign a variable or parameter. We are using filter transformations to pass the value.
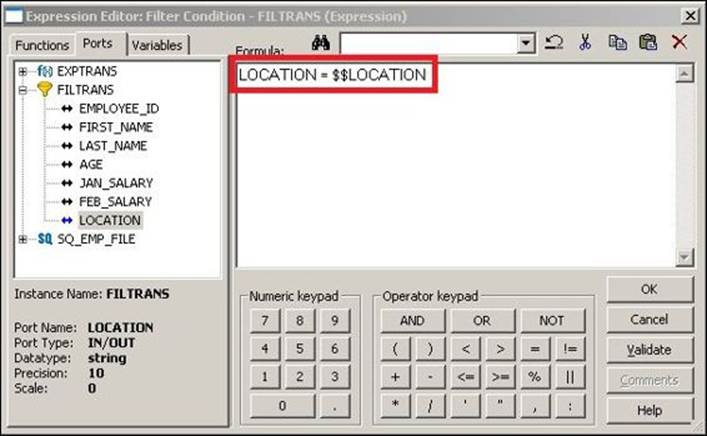
As you can see, we have assigned $$LOCATION to filter the condition.
With this, we are done with defining the variable or parameters. Next, we will see how to pass the values to them using the parameter file.
Creating the parameter file
A parameter file is nothing but a simple .txt file that contains the value of the variable to be passed to variables. A sample parameter file for the variable defined in the preceding steps is as follows:

As you can see, the parameter file contains the values of the variables to be replaced in the three regions. Informatica matches the repository name against the name of the repository defined in the parameter file and replaces the values of the variables internally before it runs the workflow. The name of workflow for which you defined the parameter file is wf_EMP. So, if you are running workflow in the production region, Informatica will match the REPO_PROD repository name with the same name in the parameter file and internally replace the variables with the value and execute the workflow with the replaced values.
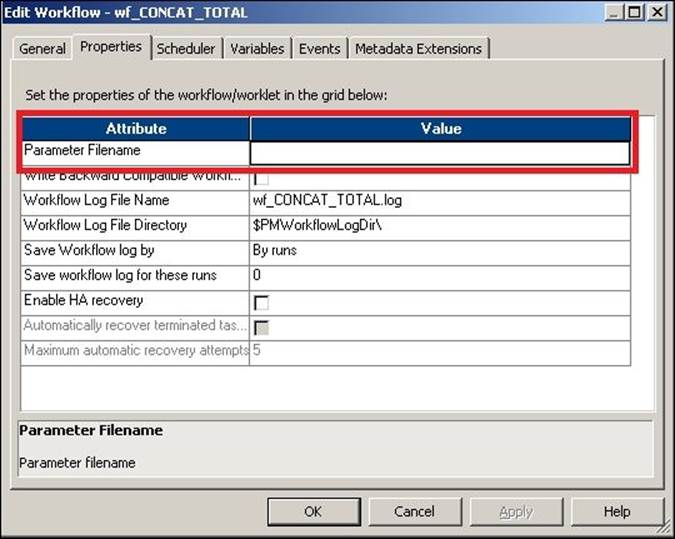
Mentioning the parameter file at the workflow level
To define the parameter file at the workflow level, open Workflow Manager and navigate to Workflow | Edit | Properties. Specify the path and name of the parameter file for the attribute, as indicated in the following screenshot:
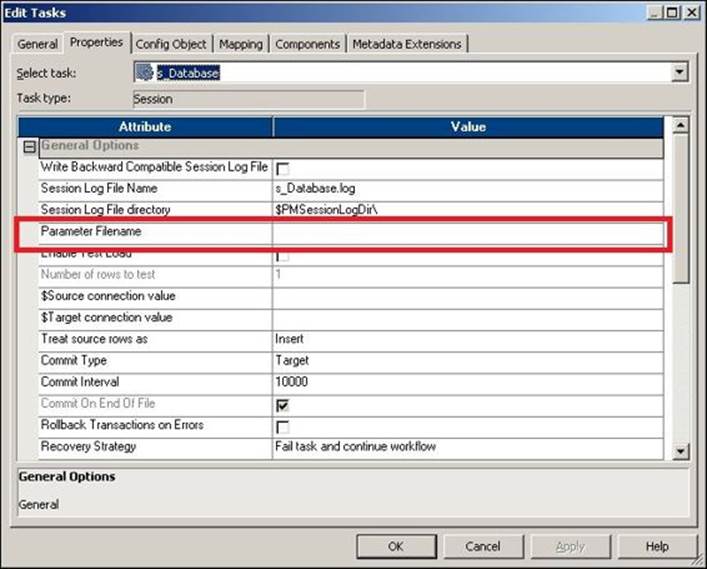
Mentioning the parameter file at the session level
To define the parameter file at the session level, open the session in Workflow Manager, double-click on the session task, and click on Properties. Specify the path and name of the parameter file for the attribute, as indicated in the following screenshot:
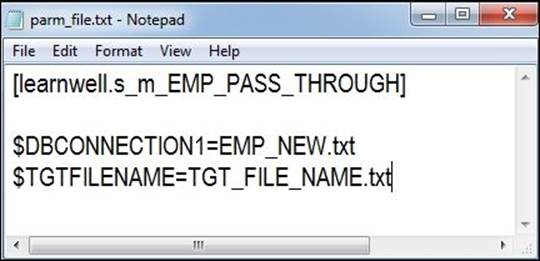
We have learned how to use the parameters and variables, create the parameter file, and define the parameter file. Another importance of the parameter file is that if the value of any variable is changing, you need not modify the code; simply change the value in the parameter file, and the changed value will take effect the next time you run the code.
Also, note that parameter files can also be used to replace the value for an individual session run. Parameter files can also be defined at the folder level as against at the repository level, as seen earlier. It is not mandatory that you define the workflow for all three regions. A sample parameter file for an individual session run (s_m_EMP_PASS_THROUGH) defined at the folder level (learnwell) is shown in the following screenshot:
Summary
In this chapter, we talked about the various aspects of the Workflow Manager screen. We saw the detailed properties of the session task. We also saw the various tasks present in Workflow Manager. We learned how to create tasks and use them in a workflow.
We also learned how to work with worklets, which are groups of tasks that allow us to reuse the existing functionality that was implemented. We also talked about schedulers, which help us schedule the workflow to run at specific intervals. Later in the chapter, we talked about another topic called the file list, which provides us with a simpler way of merging the data with multiple files. Next, we covered incremental aggregation, which allows us to process the aggregate calculations faster by storing the value of the previous run. Last, we discussed the parameters file using which we can easily pass the values of variables and parameters.
In the next chapter, we are going to talk about our third client tool—the workflow monitor—where we will talk about looking at different views of monitoring workflows. We will also discuss logs and how to rectify errors using log files.
All materials on the site are licensed Creative Commons Attribution-Sharealike 3.0 Unported CC BY-SA 3.0 & GNU Free Documentation License (GFDL)
If you are the copyright holder of any material contained on our site and intend to remove it, please contact our site administrator for approval.
© 2016-2026 All site design rights belong to S.Y.A.