Idiot's Guides: 3D Printing (2015)
PART 3
Setting Up and Printing
CHAPTER 12
Leveling the Bed and Adjusting the Z Height
In This Chapter
![]()
· Why your bed needs to be level
· Manually leveling or auto-leveling your bed
· How to set your Z height
You’ve already learned how important it is for the first layer of a print to stick well to the bed. The material the build platform is made from is important, as are the surface treatments you apply to it. But the filament will never stick well to the bed if it’s not level or if your Z height isn’t set properly.
The Z height is how far the nozzle is from the print bed. It’s important, because it determines how much the filament is pushed onto the bed as it is extruded. The bed being level is equally important, because otherwise the Z height will change depending on what area of the bed the nozzle is over. In this chapter, I go over how to get the bed and Z height where you need them to be.
Why Does Your Bed Need to Be Leveled?
When I say the bed needs to be level, I don’t mean it needs to be level relative to Earth; you don’t even want to touch a bubble level for this. Instead, the bed needs to be level relative to the axes of the 3D printer. Basically, the Z axis needs to be perpendicular to the build platform, and the X and Y axes need to be perfectly parallel to the build platform.
Why does it matter? A level bed ensures the nozzle is always a consistent height above the bed. The first layer of a print is very sensitive to how far the nozzle is from the bed. Too high, and the filament won’t stick well; too low, and the nozzle will drag through the filament.
The acceptable height is a very small window (usually only one tenth of a millimeter or so). So even if the bed is only slightly off level, it could easily make parts of the bed too high or too low.
For example, imagine you had a 150mm-wide bed and had your Z height set at .25mm at one end. If the bed were just 1° off from level, the Z height at the other end of the bed would be more than 2.8mm. That could easily cause your print to fail, because the filament wouldn’t adhere well at the far end.
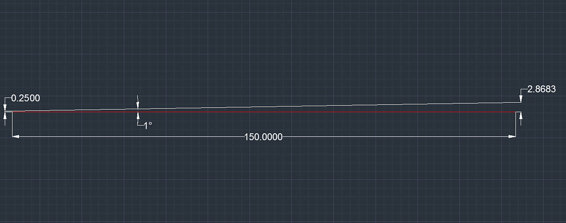
Even at just 1° from level, the print would be ruined.
This makes leveling virtually a necessity in order to print successfully. It should be the first thing you do when you first set up a 3D printer, and then fairly frequently to make sure the bed stays level. There are two ways to level a print bed: manual leveling and auto-leveling.
Manual Leveling
Most consumer 3D printers out right now require that you manually level the print bed. It’s virtually impossible to manufacture a printer with a perfectly level bed that stays level, so most manufacturers include some sort of leveling mechanism in the design.
The build platform is generally attached to three or four screws with springs, and you tighten or loosen the screws in order to adjust the height of the bed at each point. Other mechanisms are used in some printers, but all of them have to provide some way of adjusting the height in at least three places in order to keep the bed level relative to both the X axis and the Y axis.
![]()
HOT TIP
Leveling a build platform also requires it to be completely flat. If the bed is warped or bent at all, it will be impossible to level. There will always be part of the bed that isn’t completely parallel to the X and Y axes. This is why glass and borosilicate are so commonly used for build platforms; those materials are easy to make and keep flat. Other materials, like aluminum, are still used for build platforms but can pretty easily become warped. Still, even with a perfectly flat build platform, the bed still has to be leveled.
To level the bed, all you’ll need is a piece of paper. The idea here is that you’ll set your Z height at one corner so the nozzle just barely touches the bed. You then place the piece of paper between the nozzle and bed and pull it out. Pay attention to how much force it takes to pull the paper out and how much resistance there is.
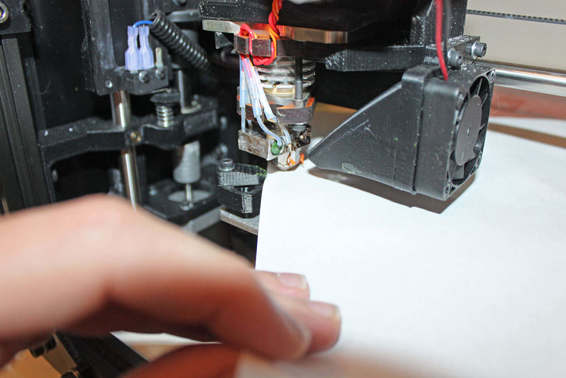
Manually leveling the build platform by using a piece of paper to measure resistance.
For the first corner, you’ll just want a small amount of resistance that can be overcome easily with a little force (without tearing the paper). You then raise the nozzle and move it onto to another corner (preferably the one diagonally across the bed) and lower it on the paper there. Pull the paper out and pay attention to how much resistance it takes. If takes more resistance to pull the paper out on the second point than it did on the first, you’ll need to lower that corner a bit. If it takes less resistance, you’ll need to raise that corner. Fine-tune it until it takes approximately the same amount of resistance as the first corner.
Next, repeat the process for the third and fourth corners. The resistance it takes to pull the paper out should be equal between all four corners. Once all four corners have equal resistance, the bed will be level.
One thing you should keep in mind is that this process isn’t quite as simple as it seems in theory. It takes some time to do and can be fairly frustrating. It might take you a few tries to get a sense for how much resistance you need to feel in the paper, and once you start printing, you may notice that filament adheres better in some places than others. If that’s the case, you can just make some fine adjustments, like a quarter turn of the screws.
Auto-Leveling
As you can imagine, manually leveling the print bed isn’t exactly a fun process. It can be time consuming and frustrating. For that reason, many 3D printer manufacturers have released printers that include auto-leveling.
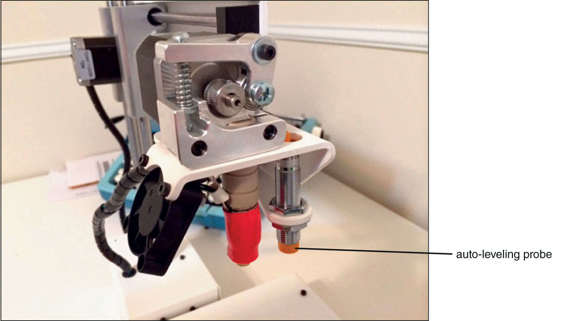
The auto-leveling probe on a Printrbot Simple.
So how does auto-leveling work? It doesn’t physically adjust the bed at all. In fact, auto-leveling systems don’t have any moving parts at all. Instead, they work completely in the firmware of the 3D printer.
Auto-leveling systems essentially work by virtually leveling the bed. They do this by raising and lowering the nozzle depending on what point of the bed it’s at. They do this to keep the nozzle at a consistent height above the bed, no matter what point it’s at.
For this system to work, the printer’s firmware has to know how much to raise or lower the nozzle depending on where it is at in the X and Y directions. This is done with either a physical probe (basically just a switch), an inductive probe (which is triggered when it senses metal), or an optical probe (which is triggered when it gets close enough to see the bed). The firmware controls the process and moves the probe to three corners of the bed to measure their heights relative to each other.
![]()
FASCINATING FACT
The probes used in auto-leveling systems can either be triggered by physical contact or by sensing the bed without touching it. In this way, the probes work similarly to end stop switches.
Once the firmware has the height information for each of the three corners, it can use that information to determine how far off level the bed is. It basically constructs a flat plane from the three points, which represents the actual bed. It then knows how far to move the nozzle up and down at different points on the bed.
For example, if one corner is 1mm lower than another corner, the printer knows to lower the nozzle by 1mm when it’s at that corner. Of course, it doesn’t just suddenly lower or raise the nozzle when it reaches a corner. It will move the nozzle up or down gradually as it approaches each corner as necessary to keep the nozzle at a constant distance from the bed.
This makes auto-leveling a very convenient feature; however, it does have a couple of drawbacks. The first is that it relies on the accuracy of the probe, which may not always be perfect. The second is that it has no way to compensate for warped beds. For instance, if one corner of the bed was warped, you could still manually level the bed and just avoid printing in that corner, which can’t happen when you use auto-leveling.
However, those are relatively minor drawbacks. For most people, the convenience of auto-leveling far outweighs the potential problems. And for that reason, auto-leveling is rapidly becoming more popular and common.
How to Adjust Your Z Height
Once your bed has been leveled, you can work on setting your Z height. The Z height is how far the tip of the nozzle is from the surface of the print bed. This will be just a fraction of a millimeter and needs to be set very precisely.
Unfortunately, setting it isn’t just a matter of whipping out a ruler and measuring a specific distance. The necessary gap between the nozzle and the bed can vary dramatically depending on a number of factors, such as the following:
· Filament size
· Nozzle size
· Layer height
· Other print settings
All of those factors have one result: how much plastic is being squeezed out of the nozzle. That, in turn, determines how much of a gap needs to be between the nozzle and the bed. Technically, you could probably calculate what the ideal height is. But even if you did calculate it, it would be difficult to manually set it to that height.
So how do people go about actually setting the Z height then? It’s mostly a matter of trial and error that goes like this:
· Set the nozzle close to the bed with just a tiny gap, and start printing.
· If the filament doesn’t stick, lower the nozzle.
· If the filament is getting smashed into the bed by the nozzle, raise the nozzle.
You can go back and forth like this a few times until you get it right.
Setting the Z Height Manually or Automatically
On most 3D printers, you’ll be setting the Z height manually. There is some sort of screw mechanism to raise or lower the Z stop (where the end stop switch makes contact), so you just make small adjustments with the screw to change the Z height.
However, on printers with auto-leveling, the probe usually acts as your end stop switch. In that case, either the probe itself is physically adjusted to change the Z height, or it’s done in software. If it’s done in software, the idea is to specify how much the nozzle needs to be raised back up after the probe is triggered.
Both systems work well, though manual adjustments usually tend to be quicker. That’s because you don’t have to fiddle with any settings in the firmware—all you have to do is make a quick turn on the adjustment screw.
Knowing the “Correct” Z Height
Knowing what the “correct” Z height is takes a little experience. As I said, you’re looking for how the extruded filament sticks to the bed. If it’s just barely clinging on (or worse, doesn’t stick at all), it’s obviously too high. This will usually look like a thread just lying on the bed. When the Z height is too high, it’s obvious why there is going to be a problem: the filament just won’t stick well.
Noticing when it’s too low is a bit more difficult though. In that case, it will look like a flat line, almost like it’s being drawn onto the bed. Unfortunately, the reason this is a problem isn’t always a problem until later.
![]()
HOT TIP
Always pay close attention to your first layer. It’s the most important part of the print, and is vital to the success of the print. Even if you’ve leveled your bed and set your Z height properly, it’s possible that it could need to be recalibrated (it’s normal for 3D printers to need recalibration occasionally). Watching the first layer is the best way to make sure it’s correctly adjusted.
What happens is that the filament still has to go somewhere, so it tends to expand out. As each new line of filament is added next to the previous one, waves start to develop in the lines from the nozzle dragging through it. Eventually, this adds up and the nozzle will be bouncing all over the place on these waves, ruining your accuracy in the first few layers.
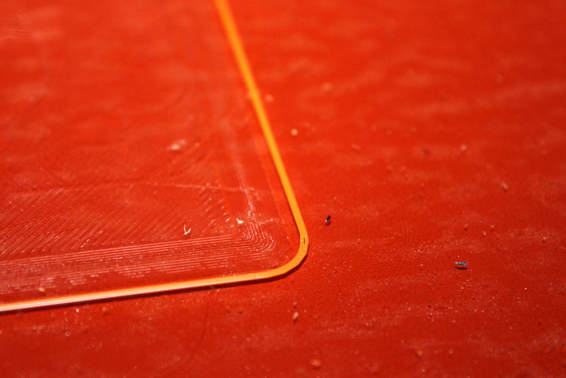
The first filament lines on the first layer should adhere well without be squished by the nozzle. As you can see with this layer, the nozzle was too low and squished the filament on the corner.
So what should it look like? You want a nice three-dimensional shape, but not so much so that it’s just a thread of filament lying on the bed. If the filament naturally comes out in a circular cross-section, you’re looking for it to have a sort of squished oval cross-section on the bed.
Learning what the perfect Z height looks like will take some experience. You’ll need to see the effects of it being too high and being too low. Luckily, it doesn’t take long to get it right. It should also be apparent pretty soon in the printing process if it’s not right.
In the end, leveling the bed and setting the Z height are all about getting that first layer right. If you get that first layer right, you can usually count on the print turning out well.
The Least You Need to Know
· It’s imperative that the bed be level in order to successfully print a part.
· Manually leveling the bed isn’t a fun process, but it can be done with just a piece of paper.
· Many manufacturers are now including auto-leveling systems, which are more convenient than manual leveling. They tell the printer to either raise or lower the nozzle based on readings from a probe.
· Properly setting your Z height is as important as leveling the bed. It needs to be set so the filament adheres well without being smashed by the nozzle.
All materials on the site are licensed Creative Commons Attribution-Sharealike 3.0 Unported CC BY-SA 3.0 & GNU Free Documentation License (GFDL)
If you are the copyright holder of any material contained on our site and intend to remove it, please contact our site administrator for approval.
© 2016-2026 All site design rights belong to S.Y.A.