Idiot's Guides: 3D Printing (2015)
PART 3
Setting Up and Printing
CHAPTER 13
Slicing and Printing
In This Chapter
![]()
· Explanations of all of the slicer settings
· How to prepare your object for printing
· How to get a print started
So you’ve got your printer all unpacked and set up. Your bed is leveled and your Z height is set up. You know practically everything there is to know about the history of 3D printing and how different kinds of 3D printers work. Now it’s time to actually start printing!
To do that, you need to get your slicing software configured. You also need to learn about how to set up a new print and how to run it. In this chapter, I go over both these things. Don’t worry, you’re in the home stretch. Soon you’ll be in 3D printing bliss!
Configuring Your Slicing Software
If you’ve followed Chapter 11, you have already set up your host software, and most likely the host software had slicing software bundled with it. (If you took my recommendation, you’re using Slic3r, which is bundled with Repetier.) You have also entered 3D printer-specific settings in the host software. However, you still need to do the same for your slicing software.
Why? Because they’re still separate pieces of software, even if they were bundled together. Technically, both pieces of software can be used independently of each other. So each has its own settings and needs to be configured individually.
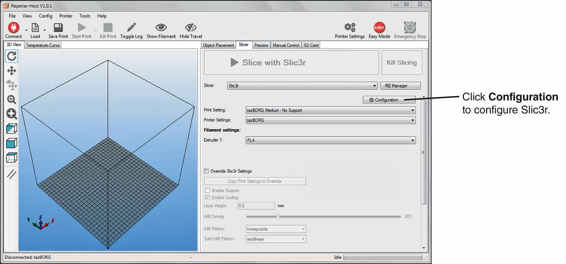
The Slic3r configuration can be found within the Repetier software.
If you’re using Repetier, configuring Slic3r is pretty easy. From the Slicer tab in Repetier, you can just click the Configuration button to begin. If you’re using another software combination, you can find similar settings within the particular slicing software you’re using.
However, you shouldn’t lament if you’re using something other than Slic3r. It’s all pretty much the same, and similar settings will be found in all slicing software (maybe with a slightly different name). For that reason, I’m now going to cover what each of the slicer settings actually does. Once you understand what the settings actually do, you’ll have no trouble using them regardless of what they’re called.
Slicer Settings Explained
In general, the slicing settings you’ll be configuring can be roughly divided into three different types: printer settings, filament settings, and print settings. In the Slic3r configuration window, these are helpfully divided up into three separate tabs for your convenience.
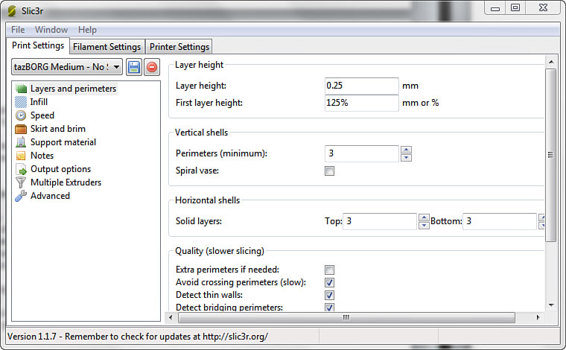
The settings in the Slic3r configuration window are divided into three types: print settings, filament settings, and printer settings. This shows the different tabs for them in the window.
In other slicing software, they might be divided up differently (or not divided up at all). Still, it’s a good idea to think of them as separate kinds of settings. This will help you mentally organize them into those settings you’ll need to tweak frequently, occasionally, or rarely.
![]()
HOT TIP
Most software will allow you to save multiple configurations. This lets you quickly switch between predefined settings that you set up for specific types of prints, specific filaments, and even for multiple 3D printers. I advise you to take advantage of multiple configurations, so you can reuse settings without constantly tweaking them.
Printer Settings
The printer settings are the settings you should rarely have to modify. Ideally, you’ll just set them up once and then never touch them again—or at least not until you get a new 3D printer. These tell the slicing software a little bit about the printer itself, so it knows what it’s working with.
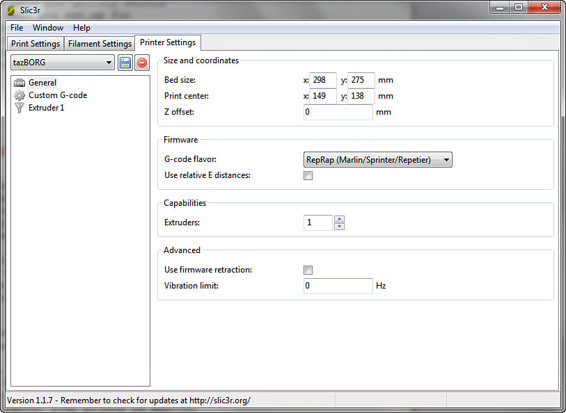
The printer settings, which you’ll rarely change, give the slicing software info about the printer.
Printer settings are the first thing you should configure. Luckily, there isn’t a whole lot to set up here. The following are the settings you’ll encounter (keep in mind that these may be in separate sections of the Printer Settings tab):
Bed size: This is an easy one to start with! All you have to do is enter the size of your print bed in the X and Y directions.
Print center: As you might expect, this is just the X and Y coordinates for the center of the bed. Generally, you just divide the bed size by 2 and enter those numbers here. But you can modify this if you want it to center your prints in another spot.
G-code flavor: Here you’ll specify what kind of G-code your printer uses. This might be a head-scratcher at first, but different control boards can actually interpret G-code slightly differently. If you don’t see your specific printer or control board listed, it’s usually safe to use “RepRap.”
Use relative E distances: You can check this box if you want to use relative G-code distances (as opposed to absolute coordinates). Unless your manufacturer says you need to check this, just leave it unchecked.
Extruders: The number of extruders your 3D printer has can be entered here. Normally it’ll be just 1, but if you have multiple extruders, you can specify that here. If you do, it will add sections to set up the additional extruders.
Use firmware retraction: This lets your firmware handle the retraction settings (as opposed to having your slicing software do it manually). In most cases, you’ll want to leave this off unless you have a reason not to. However, if the software retraction settings don’t work properly, you can use the firmware settings.
Vibration limit: You can attempt to reduce printer vibration problems with this setting. However, it’s difficult to get it to work right, and the vibrations usually aren’t substantial. I recommend you leave this at 0 to disable it.
Start G-code: Whatever you enter here will be added to the beginning of every G-code file the slicer outputs. So these G-code functions will be performed at the beginning of every print. Usually, people use this for things like homing all the axes (G28) or auto-leveling (G29).
End G-code: This works like the starting G-code, except it goes at the end (crazy, huh?). This is most often used to turn off everything on the printer, so it doesn’t stay hot when you’re away. For now, you can just leave the default commands there.
Layer change G-code: This also adds G-code, except it puts the G-code in between every layer. You can add code here that you want to be executed every time the layer changes (for instance, you could add a pause to let the previous layer cool before starting a new one).
Tool change G-code: G-code entered here will be inserted anytime the printer switches from using one extruder to using another. You can completely ignore this if you only have one extruder.
Nozzle diameter: This is where you need to enter the physical diameter of the nozzle opening on your hot end. If you don’t know it, don’t just guess! This is an important setting, so look up your nozzle diameter if you’re not sure.
Position: If you have more than one extruder, this setting specifies how far apart the two nozzles of the extruders are.
Retraction length: Retraction reverses the extruder to pull the filament back out of the hot end slightly. This improves print quality by reducing blobs when line segments are completed. For this, 1mm or 2mm is usually a good setting to try.
Lift Z: This actually lifts the nozzle up (by the specified amount) when a line segment is finished and the printer is moving to another position. This can help keep the nozzle from dragging across your print.
Speed: This is just the speed the extruder will retract filament. Whatever the default is should work fine (usually 20 to 40 mm/s).
Extra length on restart: If you’re having problems with filament not extruding immediately after a retraction, you can use this setting to extrude a little extra. However, you will have to experiment with the length to use.
Minimum travel after retraction: You can use this setting to skip retractions on moves that only cover a short distance. That distance can be adjusted to your liking.
Retract on layer change: This forces a retraction when you move up to the next layer of a print.
Wipe while retracting: To further reduce blobs and stringing, you can use this setting to physically wipe the nozzle on the print between moves. Personally, I recommend that you turn this off, because it has a tendency to mess up the surface as it wipes (as you might expect from dragging the hot nozzle on the plastic).
Filament Settings
These are settings you shouldn’t have to modify often but that you will have to adjust occasionally. Basically, they’re settings that define the specifications of your particular filament and how it should be used by the printer.
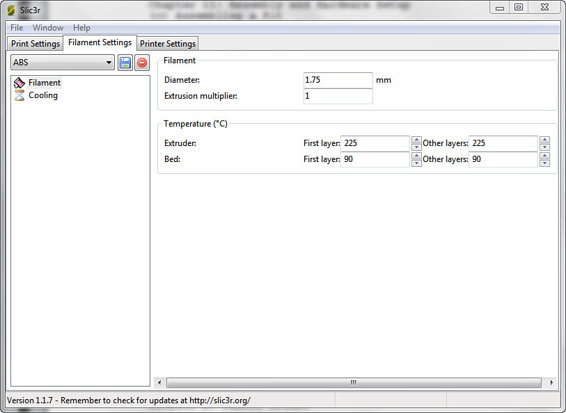
The filament settings are there for you to enter the specifications of the filament you’re using.
You’ll usually need to modify these whenever you put a new roll of filament on (at least slightly). This is because every material, manufacturer, color, and even specific roll is slightly different. The diameter of the filament, ideal extrusion temperature, bed temperature, and cooling settings will all vary.
The following are the different filament settings you’ll deal with:
Diameter: This setting is easily one of the biggest causes of print quality problems. While you can just set it to 1.75mm or 3.00mm, the actual filament is rarely actually that size. Instead, for every roll of filament you get, you should measure the diameter in a few places with calipers and enter the average measurement here. This ensures that the slicing software accurately calculates how much filament to extrude.
![]()
DEFINITION
Calipers are a common measurement tool used in a wide range of fields and industries. They come in both analog and digital varieties and are used to measure lengths, distances, and depths. Calipers are capable of very high precision and commonly come in 6- to 12-inch sizes (though larger and smaller ones exist).
Extrusion multiplier: You can use this setting to fine-tune how much filament is being extruded. For example, if you notice the printer is overextruding, you can set it to .95 so it only extrudes 95 percent of what it normally calculates is necessary.
First layer extruder temperature: This is where you set the temperature for the filament you’re using. The first layer can be set independently because some people like to make the first layer hotter in order for it to stick better.
Other layers extruder temperature: This is the filament extrusion temperature for the rest of the layers (after the first one).
First layer bed temperature: If you have a heated bed, you can set its temperature for the first layer here.
Other layers bed temperature: This is where you set the bed temperature for the rest of the layers.
Keep fan always on: If you have a print fan you want to run all the time, check this. However, I recommend you don’t do so for ABS, as it causes warping problems.
Enable auto cooling: This lets the slicing software decide when to turn the fan on, depending on what you specify in the other settings.
Fan speed: This is the minimum and maximum fan speed used at any time during the print. Different fans respond to this differently (for example, some won’t even turn on at all below a certain number). Pay attention to how your fan acts and sounds, and fine-tune it with these settings.
Bridges fan speed: Bridges are parts of the print where the filament has to be extruded across an empty space with no other material below it. To keep these from drooping, it’s recommended that you cool it quickly with a fan. So if you have a fan, enter a number to turn this up.
Disable fan for the first: As I mentioned previously, some people like their first layer to be hot to help it stick. With this setting, you can turn off the fan for a specified number of layers in the beginning to help with adhesion.
Enable fan if layer print time is below: If a particular layer of the print is very small, there may not be adequate time for it to cool before the next layer is added. You can use this setting to force the fan to come on to cool those small layers.
Slow down if layer print time is below: In extreme cases (very small layers), the fan isn’t enough to cool the layer before the next is added. This can cause the layers to sort of melt and deform. This setting forces the printer to slow down on these layers to give them time to cool.
Min print speed: This is slowest the printer is allowed to move on those small layers. Setting this too low can make small parts take a very long time to print.
Print Settings
So you’re at the final tab of the slicer settings. Do you want the good news or bad news first? Let’s start with the bad news: this tab has the most settings by far. The good news is that a lot of these settings are for advanced usage. For the time being, it’s best to just leave those at the defaults or automatic setting.
![]()
HOT TIP
A lot of the print settings are for really fine-tuning specific areas of the print, meaning they’re really for advanced users. So if you don’t see a setting listed in this chapter, don’t fret! Just leave it at the default or automatic setting and move on. You can always look up the specific setting if you’re really curious about it.
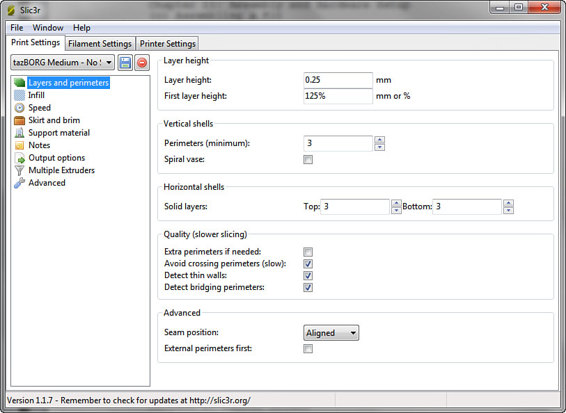
The Print Settings tab can be a scary place, but many of the settings can (and should) be left on their defaults.
The following are the various print settings you’ll encounter:
Layer height: If you purchased your printer, the manufacturer probably gave you a recommendation for this setting. If not, you can safely set this to about 65 to 75 percent of your nozzle diameter.
First layer height: Often, it’s good to make your first layer bigger to improve adhesion. A good number to start with is 125 percent.
Perimeters (minimum): In order to give the walls of the part a nice, solid structure, you need to specify a minimum number of solid perimeters. Two to four are good starting points.
Spiral vase: This nifty feature allows the entire part to be created from one continuous layer that slowly rises. However, it really only works with a single perimeter and no infill. So you should only use this for tall, hollow objects (like a vase), meaning you should normally leave this black or unchecked.
Solid layers (top): This is how many solid (noninfill) layers are on the top. It’s similar to perimeters, just for horizontal walls. Again, 2 to 4 should work well.
Solid layers (bottom): This is same thing as the previous setting, just for the bottom layers.
Fill density: Infill is used on the interior of the part to avoid having to make it solid. This reduces weight, filament usage, and warping. For parts that need to be strong, use 50 to 80 percent. For parts that don’t need to be strong, use 20 to 50 percent.
Fill pattern: This indicates what kind of pattern will be used for the infill. Honeycomb and rectilinear normally work the best (with rectilinear usually the fastest).
Top/bottom fill pattern: If you want a different pattern for the top and bottom layers, you can specify it here. However, I’d recommend sticking with rectilinear.
Speed settings: Unfortunately, I can’t make recommendations for these settings, as they’re very highly dependent on your specific printer. Start with the manufacturer’s recommendations or with the defaults.
Skirt loops: In order to get the extruder flowing well before you actually start printing the part, you can have it print a couple of loops around the part. This has the dual purpose of allowing you to make sure it’s completely on the print bed. You can just enter the number of loops you want the printer to make before it starts printing the actual part.
Distance from object: This is how far the loops will be printed from the edges of the part. This needs to be farther than the brim (if you use it), which I’ll go over in a moment. If the part is very large and barely fits on the bed, you may need to reduce this to make the overall print smaller.
Skirt height: You can use this to make the skirt very tall to build a sort of wall around your part. This can help reduce drafts on the part in order to avoid warping.
Minimum extrusion length: You can set this if you want to make sure the skirt uses a certain amount of filament. Usually, you can just leave this at 0 unless you have extrusion issues (such as underextrusion in the beginning).
Brim width: A brim is a sort of base that’s printed around your part. This can be useful for making sure the base of the part stays stuck to the bed and for keeping tall, thin parts upright. You can specify the width of the brim around the part, and the brim can easily be removed after the print is finished.
Support settings: If the part has overhangs and will require supports, you can turn on the support generation here. However, I recommend using the default and/or automatic settings for the best results.
Raft: A raft serves a similar purpose to the brim, except it’s printed underneath the part. You can specify the thickness of the raft, as well as the interfacing layers with the part.
Multiple extruders: If you’re using multiple extruders, this section is for you. Essentially, it allows you to specify which extruders are used for different operations. For example, you could use one extruder for supports and the other for the actual part.
![]()
HOT TIP
When setting up multiple extruders, the settings that tend to be the most confusing are the offset settings. These are important, because they tell the slicing software where the second extruder is in relation to the first extruder. The nozzles of the two extruders must be at the same height, so this will specify how far the center of the second nozzle is from the first (in both the X and Y directions). If these are even a little off, the filament extruded by the second extruder will be deposited in the wrong place.
Preparing for and Running a Print
After you’ve put in your filament, printer, and print settings, it’s time to get down to preparing for and running a print. This is where you’ll spend most of your time when you’re printing things. Because you’ll frequently be modifying your print settings for specific kinds of parts, you’ll always need to do the preparation and running steps to make sure your part comes out correctly.
Host Preparation
Preparing your print is a pretty simple but important process. I’ll go over each specific step in more detail in the project sections of this book, but let me cover the general idea here.
I recommend that you begin by connecting to your printer and heating up the hot end and heated bed (if you have one). This will give it time to warm up while you’re doing the rest of the steps. You can then load the part or parts you want to print.
With the parts loaded, you’ll be able to view them in the Object Placement tab in Repetier. Here, you can move them around, rotate them, duplicate them, delete them, and so on. You should also take a moment to make sure everything fits on the bed and that they’re all oriented properly. (Trying to print a part upside down will usually result in failure.)
If everything looks good, you can move over to the Slicer tab. If you’re in Repetier and using Slic3r, make sure Slic3r is selected under the Slicer drop-down box. Below that, you’ll notice drop-down menus for your Print Setting, Printer Setting, and Filament Setting configurations. Make sure the ones you’re intending to use are selected. Once you’ve verified those, you can click the Slice with Slic3r button.
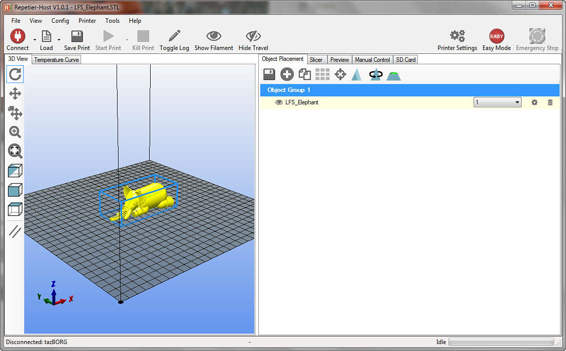
After loading your part(s), make sure they fit on your bed and are oriented properly. As you can see, this model of an elephant fits on the bed and is right side up.
Running a Print
Slicing your object or objects can take anywhere from a few seconds to hours depending on the complexity of the part, how powerful your computer is, and the settings you chose (for example, supports take more time to process). But once it’s finished slicing, you should be presented with a preview of the print.
Look over the preview, which shows you where the slicing software is intending for the printer to actually extrude plastic. It should look like your original part but broken down into lines. If you’re using supports, those will be shown as well. This is your chance to catch any serious setting problems that might cause the printer to do unexpected things.
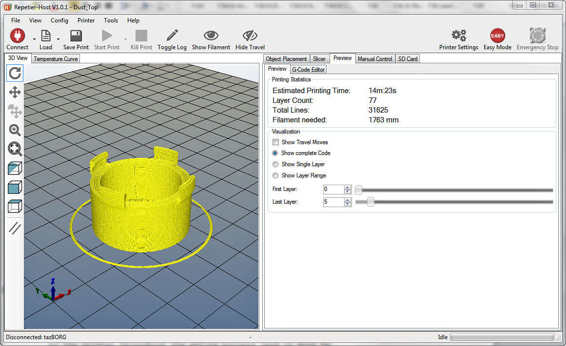
The preview shows the part to be printed broken down into lines.
If everything looks good, you can go ahead and push Start Print to start printing the part. Your printer must remain connected to the printer throughout the entire process (and it must be turned on, of course). It might take your printer a minute or two to start moving if it still needs to reach the required temperature.
Once it starts printing, don’t go running off quite yet. Stick around for a few minutes while it prints the first layer. Your first layer is by far the most important one, because it’s the foundation for the entire part. Make sure it sticks well to the bed and that the filament is extruding well. Then, in anywhere from a few minutes to a day or two, your part will be done!
The Least You Need to Know
· Most of the filament, printer, and print settings are important, so take the time to learn what they do. But when in doubt, stick with the defaults.
· Make sure your objects are placed and oriented correctly and that they fit on the bed before slicing.
· Always take a quick look at the preview to make sure everything looks right before starting a print.
· The first layer of a print is always the most important one. It’s well worth your time to stick around for a few minutes to make sure that first layer goes well.