Canon EOS 70D: The Guide to Understanding and Using Your Camera (2014)
Chapter 10. The Shoot3 Menu
Shoot3

Figure 10-1. The Shoot3 tab selection
Expo.Comp./AEB
This menu item gives you access to Exposure Compensation, which gives you the ability to lighten or darken your next exposure based on your assessment of the current exposure. Trying to make such a determination based on what you can see in the post-capture Review screen on the LCD Monitor can be difficult; I strongly recommend that you press the INFO button to bring up one of the display screens that provide at least the brightness histogram. If the peaks displayed in the histogram are all contained within (yet are close to) the left and right borders, then you have a technically good exposure. Your sense of artistic expression, however, may differ from what is considered technically correct, and exploring your creativity is certainly encouraged.
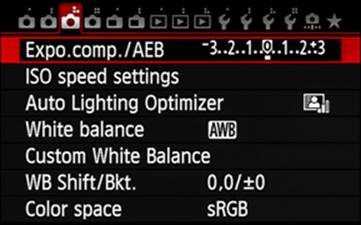
Figure 10-2. Selecting the Expo.Comp./AEB option
If the information gleaned from the histogram leads you to want to change the exposure, this Exposure Compensation option is a simple way to do it. Select the Shoot3 menu, then select the Expo.Comp./AEB option, and press SET. This will bring up the Exposure Comp./AEB Setting panel (Figure 10-3), with a red-bordered, white rectangle centered under the zero. This is the midpoint on a scale ranging from −5 EV through 0 to +5 EV.
To the left of this scale is the ![]() icon for Exposure Compensation, and to the right of the scale is the icon (
icon for Exposure Compensation, and to the right of the scale is the icon (![]() ) for the Multi-controller (though the Quick Control Dial also works), which is used to alter the Exposure Compensation value. If you prefer to use the touch feature, you can touch the scale to set an approximate value, then touch the white minus or plus icons for fine-tuning of your selection. I suggest that you start by changing the setting by +/− 2, then fine-tune from there. If you jump immediately to +/− 5, you will most likely see only a completely blown-out white screen or a similarly affected dark screen. Of course, you may have a situation that warrants such extreme treatment. Once you’ve identified a good starting point, you may find that there is a point between two integer values that is best. By default, this scale will allow settings of 1/3 EV, though you can use the Exposure Level Increments option in the C.Fn I-1 menu to set these fractional increments to either 1/2 or 1/3 EV. Be aware this will also affect the Flash Exposure Compensation settings.
) for the Multi-controller (though the Quick Control Dial also works), which is used to alter the Exposure Compensation value. If you prefer to use the touch feature, you can touch the scale to set an approximate value, then touch the white minus or plus icons for fine-tuning of your selection. I suggest that you start by changing the setting by +/− 2, then fine-tune from there. If you jump immediately to +/− 5, you will most likely see only a completely blown-out white screen or a similarly affected dark screen. Of course, you may have a situation that warrants such extreme treatment. Once you’ve identified a good starting point, you may find that there is a point between two integer values that is best. By default, this scale will allow settings of 1/3 EV, though you can use the Exposure Level Increments option in the C.Fn I-1 menu to set these fractional increments to either 1/2 or 1/3 EV. Be aware this will also affect the Flash Exposure Compensation settings.
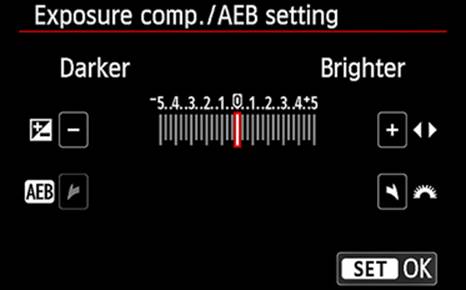
Figure 10-3. The Expo.Comp./AEB Setting screen
Exposure Compensation is not magic; it simply aides in determining what changes to make to shutter speed or aperture in order to adjust an exposure to the appropriate extent. If you have set ISO to Auto, then ISO will be the first option changed, within the limits of the values set for Auto ISO Range in the ISO Speed Settings option of the Shoot3 menu. Outside of that range, shutter speed or aperture will be changed depending on the setting of the Mode Dial.
In Figure 10-4, you can see that Exposure Compensation has been set to brighten the image by 4 EV.

Figure 10-4. The Exposure Compensation scale
In Figure 10-5, you can see an extreme example of applying Automatic Exposure Bracketing. In this instance, the Exposure Compensation has been set to 4 EV, and bracketing has been set to 2 2/3 EV. This will allow you to grab a shot with +1 1/3 EV brightening, but also grab the same shot at +4 EV, as well as one at +6 2/3 EV. That’s the beauty of Automatic Exposure Bracketing (AEB); it allows bracketing by as much as 3 EV, even if that requires going beyond the Exposure Compensation limit of 5 EV.
Just as the line with the scale for Exposure Compensation shows an icon at each end, the next line down (the Automatic Exposure Bracketing scale) also shows an icon at each end: the left icon merely indicates support for the Automatic Exposure Bracketing function, but the right icon indicates that the Main Dial is used to make the adjustment for the bracketing. Roll the Main Dial clockwise (as viewed from the back of the camera) to add to the extent of bracketing; roll it counterclockwise to reduce the extent of bracketing. If you rotate the Main Dial counterclockwise to zero, the second scale disappears; it is displayed only for non-zero values. If you have set the bracketing values you want, but wish to change the point on the scale for Exposure Compensation, simply scroll the Quick Control Dial. The bracketing values will follow the movement of the Exposure Compensation indicator.
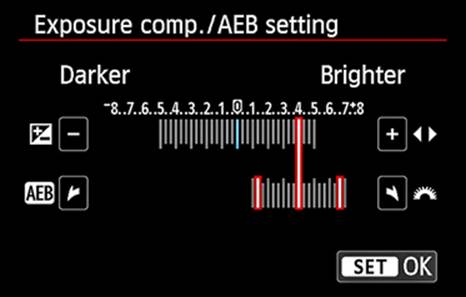
Figure 10-5. An extreme example of Automatic Exposure Bracketing
Notice that the scale in Figure 10-4 spans from −5 through +5, and the vertical marks for Exposure Compensation cover the same extent. Then, in Figure 10-5, notice that the scale has expanded from −8 to +8, but the Exposure Compensation marks still cover only −5 through +5. That’s due to the +/− 3 EV range allowed for bracketing. The AEB scale will always be centered on the Exposure Compensation setting. In the case of the settings shown in Figure 10-5, the three exposures would be shot at 1 1/3, 4, and 6 2/3 EV over the camera’s metered exposure. In the most extreme case, with the Exposure Compensation setting at +5 EV, and AEB set at 3 EV, the three exposures would be at +2, +5 and +8 EV, requiring the scale to be extended to include that range.
This exposure feature does utilize the Number of Bracketed Shots value set in the C.Fn I-5 menu, allowing you to grab as many as seven shots, with bracketing distributed across those several shots. Figure 10-5 shows three red vertical lines on the AEB scale; that reflects the C.Fn I-5 setting of three bracketed shots. As you change the C.Fn I-5 value, the number of red vertical lines displayed on the AEB scale will change accordingly. Unlike with Flash Exposure Compensation, if you have one of the continuous-shooting options selected, you need only press and hold the Shutter button. The specified number of images will be captured if you hold the Shutter button down long enough. Be aware that if you are shooting in Av mode, even with ISO set to automatic, shutter times can still become relatively long—consider using a tripod!
ISO Speed Settings
When you select this option on the Shoot3 menu, it will show another four options, all related to configuring the ISO for your style of shooting. The first of those options is ISO Speed. Either touch the ISO Speed option or select the ISO Speed option and press the SET button to access the array of possible settings. By default, this array starts at ISO 100 and continues through ISO 12,800, in 1/3-stop increments (see Figures 10-8 and 10-9). As shown in Figure 10-10, you can use the ISO Speed Setting Increments option in the C.Fn I-2 menu to change the increments to a full stop. Full-stop values (the white numerals above the long gray dashes) will be displayed with either increment selection, but in full-stop mode, there will be no unnumbered intermediate marks for the one-third stop increments (as seen in Figure 10-11).
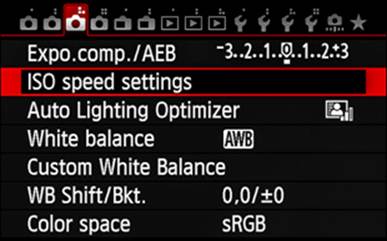
Figure 10-6. Selecting the ISO Speed Settings option
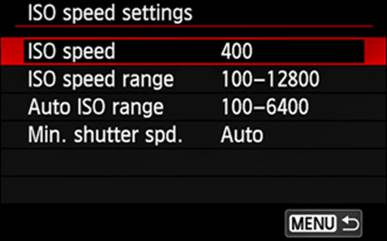
Figure 10-7. Selecting the ISO Speed option
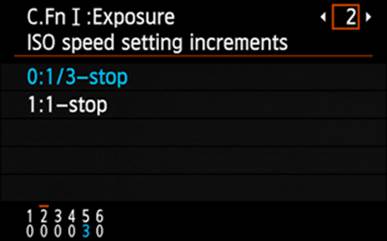
Figure 10-8. The ISO Speed Setting Increments option set to one-third stop
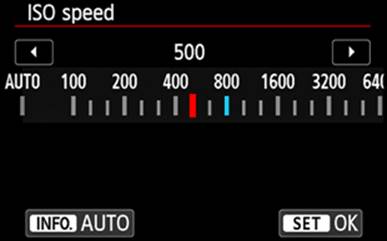
Figure 10-9. The ISO Speed scale showing one-third stop increments
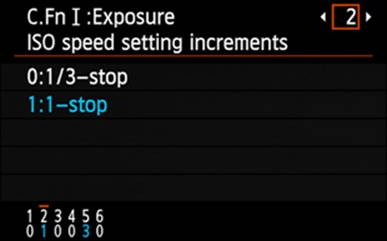
Figure 10-10. The ISO Speed Setting Increments option set to one stop
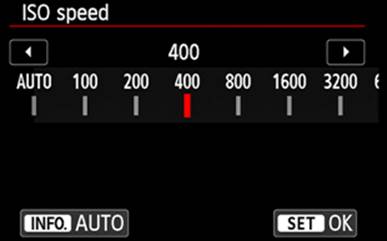
Figure 10-11. The ISO Speed scale showing full-stop increments
While in this menu, pressing the INFO button will cause the Auto value to be selected, negating the need to scroll back to the left edge of this array. Press the SET button to record the selection and return to the ISO Speed Settings menu.

Figure 10-12. Selecting the ISO Speed Range option
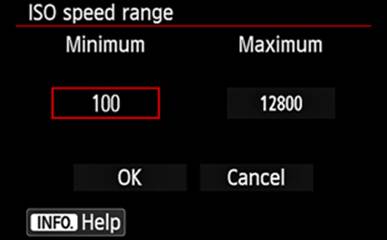
Figure 10-13. The ISO Speed Range panel
To give you more control over the possible ISO values available for use, open the ISO Speed Range option, shown in Figure 10-12. A display similar to that in Figure 10-13 is presented. The red-bordered rectangle identifies the current value. To change that value, press the SET button. For the Minimum value, if the current value is not at 100 or at 12800/H (or for the Maximum value, if the current value is not at 200 or at H(25600)), then the red rectangle will have a white arrowhead above and below it to indicate there are ISO values yet available. Use the Quick Control Dial, the Multi-controller, or the touch feature to scroll through the available ISO values. When you’ve selected the desired value, touch that displayed value or press the SET button. When you’ve made all the adjustments you want, touch the OK icon or scroll to the OK text and press the SET button. Press the INFO button to open a three-page series of help panels.
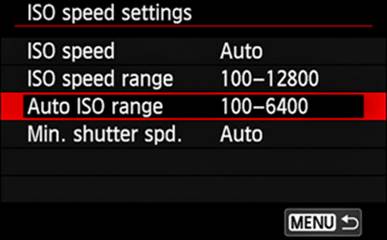
Figure 10-14. Selecting the Auto ISO Range option
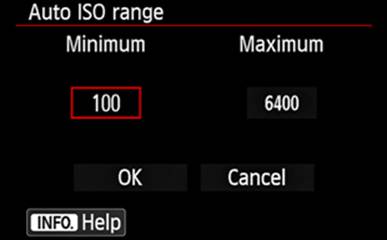
Figure 10-15. Setting the Auto ISO Range values
Though you may like the convenience of Auto ISO, you probably don’t want it to cover the entire range of possible values.
The Auto ISO Range option, shown in Figure 10-14, allows you to place some constraints on the range of available ISO values when ISO Speed is set to Auto. As with setting values for ISO Speed Range, changing values is a matter of selecting the variable to be changed, pressing the SET button, using the Quick Control Dial, Multi-controller, or the touch feature to scroll to the desired value, then pressing the SET button. Note that the ISO increments available are full-stop increments, regardless of the setting for C.Fn I-2.
For shooting with Auto ISO in either the P (Program AE) or Av (Aperture-Priority AE) mode, you may want to establish a shutter speed that is the slowest you would expect to encounter. That’s precisely the purpose of the fourth ISO option.
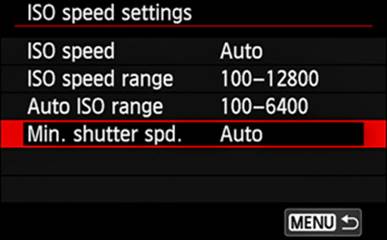
Figure 10-16. Selecting the Min. Shutter Spd. option
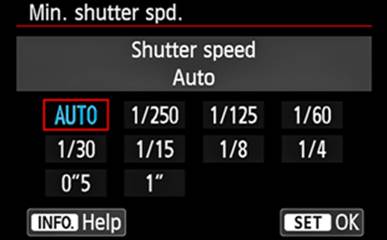
Figure 10-17. Setting the minimum shutter speed value
Once you select the Min. Shutter Spd. option as shown in Figure 10-16, the Min. Shutter Spd. panel shown in Figure 10-17 will open, showing the available shutter speeds. Use the Quick Control Dial, the Multi-controller, or the touch feature to locate the value you want, and then either touch that displayed value or press the SET button, which will record your selection and return you to the ISO Speed Settings menu. Note that if the camera determines it needs an ISO value greater than the value you set for the Auto ISO Range, the camera will ignore this threshold value and use whatever shutter speed is necessary to achieve a correct exposure.
Pressing the INFO button will open the two-page series of help panels.
Auto Lighting Optimizer
This feature has the ability to automatically enhance both brightness and contrast in an image, but it can create havoc with other settings.
The camera has some sense of what a good image should look like, in terms of brightness and contrast. When you select any option other than Disable, the camera will attempt to brighten the image if necessary, and to improve contrast. The other three options are Low, Standard, and High, with Standard being the default. Also, by default, Auto Lighting Optimizer is disabled when you set the Mode Dial to M (Manual) or B (Bulb). If you wish Auto Lighting Optimizer to be operational when in Manual or Bulb mode, press the INFO button while on this panel to deselect Disabled in M or B Modes setting, indicated by the checkmark being deleted.
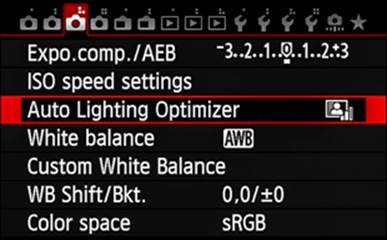
Figure 10-18. Selecting the Auto Lighting Optimizer option
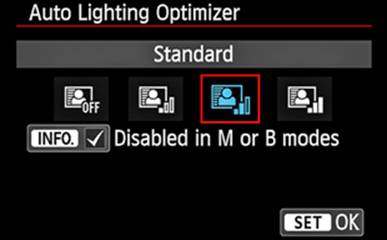
Figure 10-19. Selecting an Auto Lighting Optimizer setting
Now for the havoc: If you use Exposure Compensation or Flash Exposure Compensation to darken a picture, that effort may fail because Auto Lighting Optimizer will attempt to brighten the picture. For such a situation, set Auto Lighting Optimizer to Disable. If you have enabled Highlight Tone Priority (in the Shoot4 menu), the Auto Lighting Optimizer will be automatically set to Disable; you can have one or the other, but not both. The same is true when HDR mode or Multiple Exposure shooting is set. (Auto Lighting Optimizer is automatically re-enabled when these two options are disabled.) Using Auto Lighting Optimizer can push an otherwise acceptable image over the noise threshold if a significant amount of brightness must be added.
White Balance
There’s always a bit of confusion about hot and cold colors, and how that relates to the Kelvin temperatures that photographers use to express color, especially color correction. The common associations between the color blue and cold and the color red and warmth do not apply to color temperature; color temperatures more closely correspond with the color of a piece of steel being heated: it first glows with a warm, orange color, then moves through several shades to an intense blue-white color at a much higher temperature. In 1848, Lord Kelvin conceived the idea of an absolute zero temperature, and built a temperature scale based on that, with the degree increments being the same as the degree increment in the Celsius temperature scale. Zero degrees Celsius (the freezing point for water, also known as 32 degrees Fahrenheit) is equivalent to 273 K. (The Kelvin scale does not use the word degree, nor is the degree symbol used in expressing a Kelvin temperature.) The lowest Kelvin temperature the EOS 70D can emulate is 2000 K, or (2000–273) × (9/5) = 3108.6 degrees Fahrenheit, which would produce a very reddish cast to a photo. Kelvin temperatures up to 10000 are supported, which would introduce a blue cast.
Color film and digital cameras use a Kelvin temperature of around 5200 as the color of daylight. Light of any different color generally requires some modification in order to produce an image with well-balanced color. That modification can come from external lighting, colored filters placed on the lens, or—for digital cameras—internal modification based on a white balance setting.
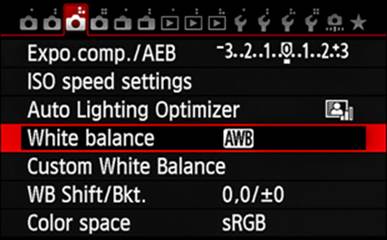
Figure 10-20. Selecting the White Balance option
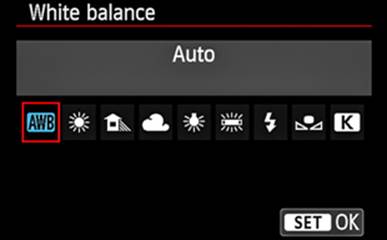
Figure 10-21. Choosing from the array of White Balance settings
Most digital cameras utilize an automatic white balance that does a very good job of color correction, so long as there is sufficient white or near-white in the image for the camera to use as base reference. However, if you are shooting under a large number of incandescent or fluorescent lights, or shooting in a room with strong colors on the ceiling, floor, or walls, you’ll see that these tend to overpower the automatic white balance (AWB). For those times, the EOS 70D provides a number of predetermined white balance corrections.
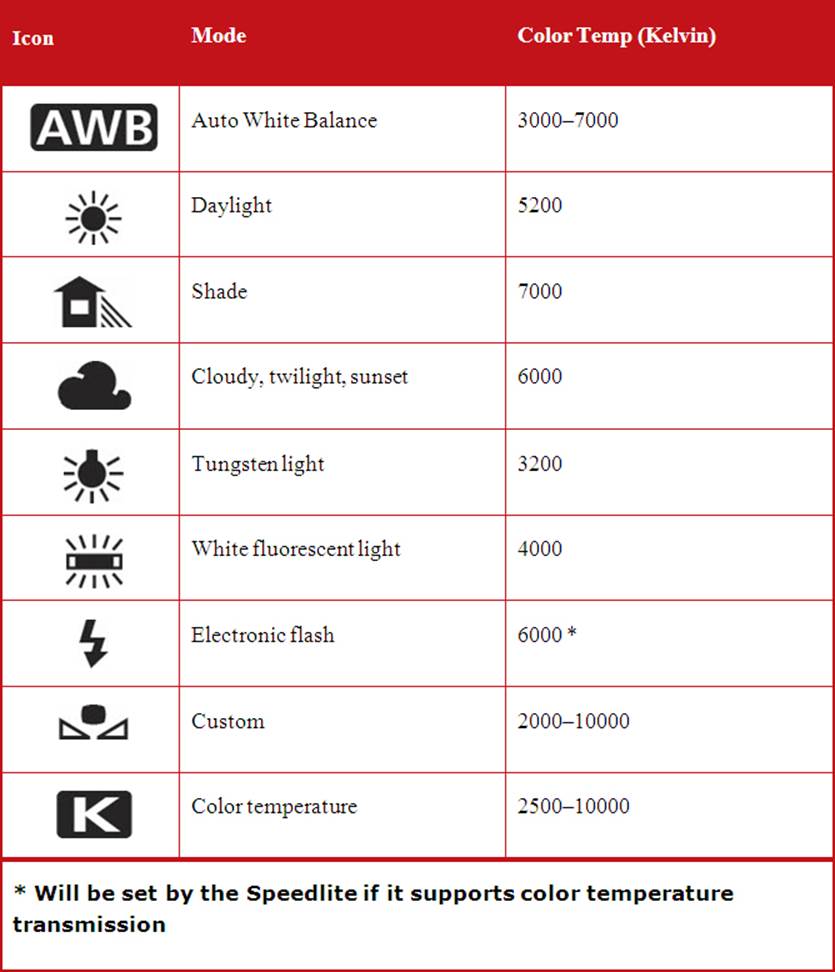
Table 10–1. White Balance options
A word on using the Fluorescent setting: The typical household “warm white” fluorescent is about 2700 K, while “neutral white” fluorescents are 3000 K, “cool white” fluorescents (popular in offices) are 4100 K, and “daylight” fluorescents run from 5000 K to 6500 K. So, if you are shooting in a typical office setting, choosing the Fluorescent setting may work very well for you.
Otherwise, you may want to use the K option, which allows you to set the color temperature in 100 K increments; once the K option is selected, simply rotate the Main Dial to choose the desired Kelvin temperature, then press the SET button.
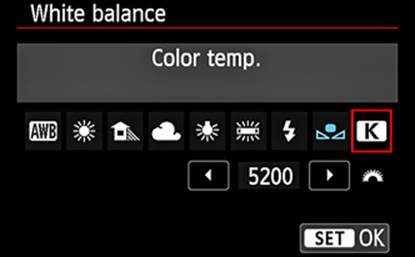
Figure 10-22. Using the K option to specify a color temperature
Custom White Balance
There are times when the available lighting is such a mix of colors that it’s difficult to determine which predetermined white balance setting should be used. This is especially true when an area is illuminated by a mix of incandescent, fluorescent, and quartz halogen bulbs. To address that problem, the EOS 70D can create a custom white balance setting.
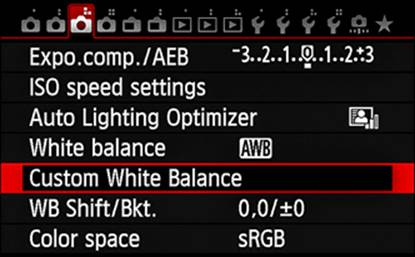
Figure 10-23. Selecting the Custom White Balance option
The procedure is relatively straightforward, requiring a clean sheet of totally opaque white material or (preferably) an 18% gray card. The image of the white material or gray card should completely fill the viewfinder, and be placed so that the ambient light you’re concerned about becomes the source of illumination for the photo. With the correct exposure set, photograph the target. Now, in the Shoot3 menu, select the Custom White Balance option, and use the Main Dial, the Quick Control Dial, or the touch feature to scroll to the image of the white material or 18% gray card (as shown in Figure 10-24). Select OK and then press SET to have that image stored as the Custom White Balance reference.
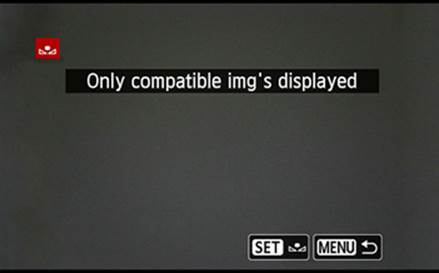
Figure 10-24. Choosing the appropriate image
The screen shown in Figure 10-25 should remind you to go back to the Shoot3 menu and select the White Balance option. Use the Quick Control Dial or the touch feature to scroll across to the Custom icon as seen in Figure 10-25 and touch the SET icon or press SET.
Set up for your shoot under these lighting conditions, using this Custom White Balance setting, and your challenging lighting problems should be diminished, possibly eliminated.
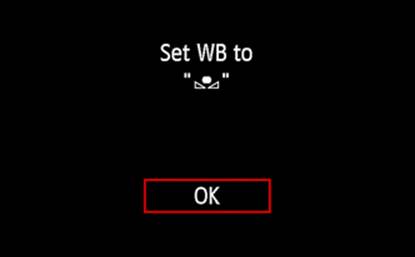
Figure 10-25. The Custom White Balance reminder
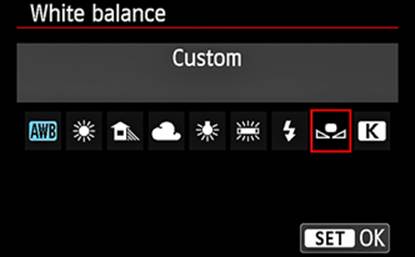
Figure 10-26. The Custom White Balance option on the White Balance panel
WB Shift/Bkt.
It is possible to change white balance in very small increments on the blue-amber axis, the green-magenta axis, or both.
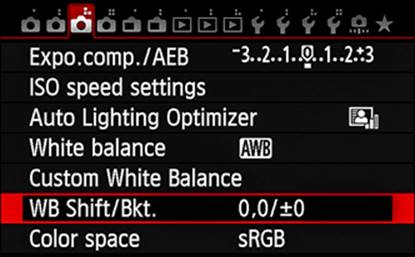
Figure 10-27. Selecting the WB Shift/Bkt. option

Figure 10-28. The White Balance Shift And Bracket panel
In the Shoot3 menu, when you select the WB Shift/Bkt. option, a panel showing a grid with a square dot at the intersection of the two axes is displayed, as shown in Figure 10-28. You can touch the white arrows, or you can use the Multi-controller to reposition this white dot. If you move that square up, you are adding green to the final white balance; moving it down adds magenta, right adds amber, and left adds blue. However, you can select only one value for each axis, as shown in Figure 10-29, in which white balance will be shifted 5 units of amber and 4 units of green. Any of the four colors can be shifted by as many as 9 units. Touch the SET icon or press the SET button when you’re ready to return to the Shoot3 menu.

Figure 10-29. Shifting both amber and green for white balance adjustment
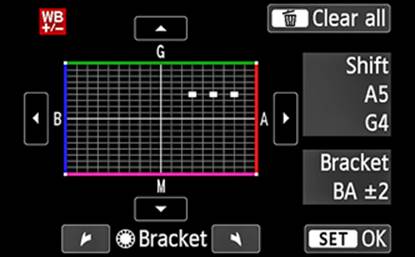
Figure 10-30. White Balance bracketing
This Shoot3 menu option also allows you to bracket the white balance shift you’ve created. With the square already in its shifted position, you can use the right-arrow touch feature or you can rotate the Quick Control Dial clockwise to add bracketing on the blue-amber axis, or you can use the left touch icon or rotate the Quick Control Dial counterclockwise to add bracketing on the green-magenta axis. The total number of bracketed exposures is determined by the Number Of Bracketed Shots value in the C.Fn I-5 menu. Figure 10-30 shows that the Shift was set at 5 units of amber and 4 units of green, with 2 units of amber added for bracketing. Touch the SET icon or press the SET button when you’re ready to return to the Shoot3 menu.
Because these adjustments are all made in-camera, the shooting behavior of White Balance Bracketing is quite different from Auto Exposure Bracketing: in White Balance Bracketing, I recommend you use the Single Shooting option in Drive Mode. Each time the shutter is released, a number of images equal to the Number Of Bracketed Shots value set in C.Fn I-5 will be created. The bracketing is applied to each image in-camera, and then written to the memory card. When capturing an image using the Continuous Shooting drive mode options, all the white-balance bracketing values will be applied to each of those images, which is probably not what you expected. Because Auto Exposure Bracketing can result in changes to shutter speed or aperture (or even both), you must take a new image for each bracketing value. You will hear a separate mirror-slap for each bracketing value—not so for White Balance Bracketing.
Color Space
Any color space encompasses a range of reproducible colors, with unique characteristics for each color space. The EOS 70D can record images in one of two color spaces: sRGB or Adobe RGB. The Adobe RGB option tends to produce images that appear a bit flat, color-wise, on uncalibrated computer monitors and printers. Post-processing is generally required in order to achieve images of good color, which is why using Adobe RGB is advantageous—it provides more latitude for such corrections.
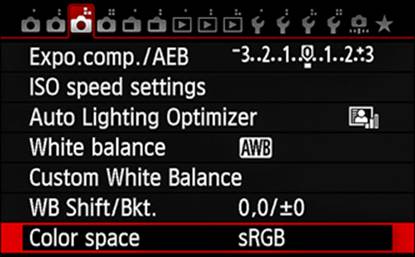
Figure 10-31. Selecting the Color Space option

Figure 10-32. The Color Space choices
Cameras are usually set for sRGB for recording kids’ birthday parties, athletic competitions, and other milestones. For photography like fine art, weddings, and portraits, the camera is most likely set for Adobe RGB.
All materials on the site are licensed Creative Commons Attribution-Sharealike 3.0 Unported CC BY-SA 3.0 & GNU Free Documentation License (GFDL)
If you are the copyright holder of any material contained on our site and intend to remove it, please contact our site administrator for approval.
© 2016-2026 All site design rights belong to S.Y.A.