Canon EOS 70D: The Guide to Understanding and Using Your Camera (2014)
Chapter 16. The Custom Functions Menu
Overview of the Custom Functions Menu

Figure 16-1. The Custom Functions tab
The Custom Functions menu is structured a bit differently than menus we’ve seen thus far. Take a look at Figure 16-3. This figure only shows the current setting for the Exposure Level Increments function; you cannot modify a setting on this screen.

Figure 16-2. Selecting the Exposure option
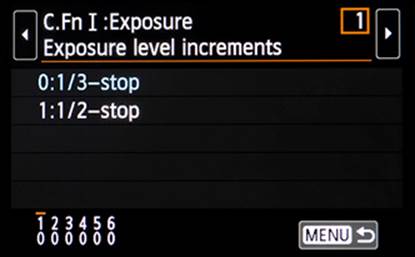
Figure 16-3. Reviewing the current Exposure setting
In the upper-right corner of the screen, notice the orange-bordered box that contains a numeric value. The numeric value identifies which one of several functions is available for adjustment.
There are two rows of numerals in the lower-left corner, one above the other. The top row (digits 1 through 6 in Figure 16-3) identifies the individual functions available on this C.Fn I: Exposure menu, while the lower row of values represents an index (or displacement) into a table of possible settings for each custom function. There will be a very small orange line above the function identifier in the upper row (the identifier is above the number 1 in Figure 16-3), and the number of that marked identifier will agree with the value in the orange-bordered box. To select a different function in a given Custom Function menu, scroll through the set with the touch feature (note the touch-sensitive left-and-right arrows at the ends of the top line), the Quick Control Dial, or the Multi-controller.
With the correct function selected, touch the desired setting, which will create an orange border around that selection, and then touch the SET icon; alternatively, press the SET button to open the settings menu for that function (see Figure 16-4), and use either the Quick Control Dial or the Multi-controller to highlight the desired setting with an orange-bordered rectangle. Then press the SET button. If you are ready to return to the menu shown in Figure 16-2, touch the MENU icon or press the MENU button. In Figure 16-4, you can see a numeric value to the left of the colon associated with each setting. When you press SET, that numeric value—the index value—is placed in the bottom row of the current-setting screen, underneath the related function identifier.
Figure 16-4. Choosing an Exposure Level Increments setting
In both Figures 16-3 and 16-4, you should note the 0:1/3-stop line, which is in pale blue. That color is used to show the current setting; the orange-bordered rectangle is used to identify the setting to be selected. On the very bottom of Figure 16-4, you can see the INFO-button icon next to the word Help. Either touch that INFO icon or press the INFO button. Many of these function-setting screens do have a built-in help file. If there is a red line down the right side of the help screen, there is more text to be displayed. Touch one of the arrows that appear to the right of the red line, or use the Quick Control Dial or the Multi-controller to scroll through these screens. Touch the INFO icon or press the INFO button again to return to the function-setting screen.
With the exception of this chapter, all screen shots showing the data that appears on the LCD Monitor have been acquired by capturing the output from the camera’s HDMI port. However, when the HDMI port is being captured while processing the Custom Functions menus, the EOS 70D does not generate touch-enabled screens. Canon does not appear interested in addressing this inconsistency, so I have photographed each of the Custom Functions screens. As a result, you may find some minor compositional inconsistencies between these figures and those for the other menus, but all data are valid and as presented on the LCD Monitor.
C.Fn I: Exposure

Figure 16-5. Selecting the Exposure option
Exposure Level Increments
When setting shutter speed, aperture, exposure compensation, flash exposure compensation, or auto exposure bracketing, the adjustments are made in fractional increments of a stop. The choice of one of these settings over the other is a personal one, influenced by the degree of control you wish to exert.
As an example, if this option is set to 1/3 stop, then available shutter speeds might be 1/15, 1/20, 1/25, 1/30, 1/40, 1/50, 1/60, 1/80, and 1/100. Compare that to the shutter speeds available when the option is set to 1/2 stop: 1/15, 1/20, 1/30, 1/45, 1/60, and 1/90.
This setting is used for shutter speed, aperture, exposure compensation, automatic exposure bracketing, flash exposure compensation, and anywhere that adjustments are made in terms of incremental exposure levels.

Figure 16-6. The status of the Exposure Level Increments setting

Figure 16-7. Choosing the Exposure Level Increments setting
ISO Speed Setting Increments
Select the ISO Speed Setting Increments option if you would like to reduce the number of increments available for selecting ISO speed; the overall range of ISO speeds is not diminished, just the size of each increment.
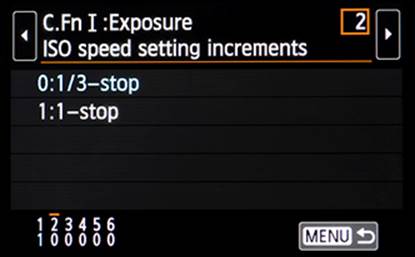
Figure 16-8. Choosing the ISO Speed Setting Increments setting
In Figure 16-9, the gray vertical marks on the panel show all the ISO speeds available when the 1/3-stop increment is selected, and Figure 16-10 shows the ISO settings available when the one-stop increment is selected. This is another example of an unusual use of a common button in the Shoot3 menu: in this situation, pressing the INFO button will not display a help panel, but will automatically select the AUTO ISO Speed setting.
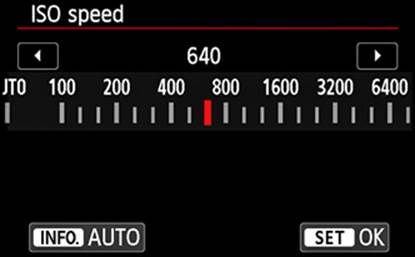
Figure 16-9. The lower end of available ISO Speed values when increment size equals 1/3 stop, as specified in the Shoot3 menu

Figure 16-10. The lower end of available ISO Speed values when increment size equals 1 stop, as specified in the Shoot3 menu
Bracketing Auto Cancel
Auto Exposure Bracketing and White Balance Bracketing can be extremely valuable tools—until they become a major problem by bracketing even when you don’t want bracketing. Too often, we get caught up in the moment and lose track of what we need to undo.
With Bracketing Auto Cancel set to Off, the camera will remember the bracketing settings until you change them, even though you may not have used the camera for several hours (days, weeks). By then, you may be working on an entirely different task, but have forgotten that bracketing was set when you last powered off the camera. If you select the On setting (which is the default), the camera will automatically release the bracketing settings when you power off the camera. Auto Exposure Bracketing will also be turned off if the flash is ready to fire, or if you switch to Movie shooting.
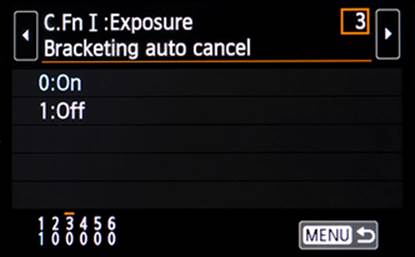
Figure 16-11. Choosing a Bracketing Auto Cancel setting
Bracketing Sequence
The Bracketing Sequence option allows you to instruct the camera regarding the order in which these incremental pictures will be captured. If you are bracketing exposures in preparation for working with one of the HDR (high dynamic range) software packages, you will probably need to select the “−, 0, +” setting. (The built-in HDR feature has its own bracketing sequence. It always captures three images, using exposure bracketing that you specify as part of that HDR setup.)
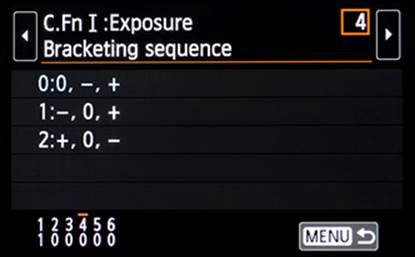
Figure 16-12. Choosing a Bracketing Sequence setting
Other than that, you should select a setting consistent with how you expect the series to be presented. The minus sign represents the underexposed segment of the bracketed series, and the plus sign represents the overexposed segment. The zero represents the normal exposure.
Number of Bracketed Shots
Heretofore, bracketing had been thought of as taking one correct exposure, one underexposure, and one overexposure. With the advent of sophisticated HDR software, the desire for more incremental images has led to the introduction of even more under- and overexposed images. With the Number Of Bracketed Shots option, you can choose settings for five or seven images, in addition to the standard option for three images. There’s even a strange, two-image setting. For Auto Exposure Bracketing, you would normally use the Main Dial to establish the magnitude of variance on each side of the normal exposure, but with the two-image setting in this menu option, you use the Main Dial to determine not only the magnitude, but also the direction of variance from the normal exposure.
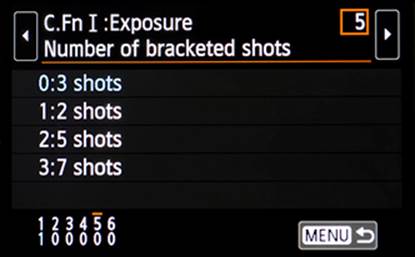
Figure 16-13. Choosing a Number Of Bracketed Shots setting
Safety Shift
The Safety Shift option is of little, if any, value to the knees-and-elbows wildflower photographer, or to photographers who enjoy the luxury of being able to plan their shoots, and who have significant control of the environment in which they work. However, photojournalists, sports photographers, and possibly even wedding photographers on occasion, will appreciate this when-all-else-fails menu option. You can select the Disable option to ensure the camera will never override your well-considered settings, but if you need the security that this option offers, you have two choices:
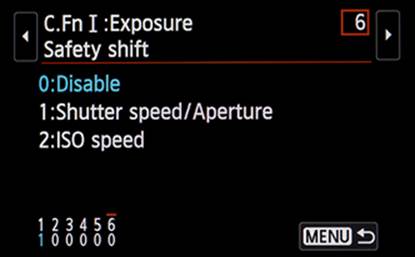
Figure 16-14. Choosing the Safety Shift setting
Shutter Speed/Aperture. If the subject’s brightness changes and a good exposure can’t be determined based on the current autoexposure settings, the camera will override the manually set shutter speed or aperture in order to obtain a good exposure.
ISO Speed. If the subject’s brightness changes and a good exposure can’t be determined based on the current autoexposure settings, the camera will override the manually set ISO speed in order to obtain a good exposure.
C.Fn II: Autofocus
In this section, the initialism AF is used to represent autofocus, consistent with the use of the term in the Canon Instruction Manual.
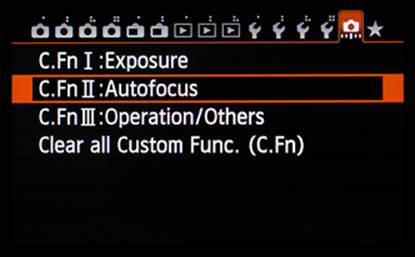
Figure 16-15. Selecting the Autofocus custom function
Tracking Sensitivity
This function applies only when AF Operation, accessed from the AF button or from the Quick Control screen, is set to AI Servo.
Often, while you are concentrating on tracking a mobile subject, another object enters the viewfinder’s image. Tracking Sensitivity attempts to let you predetermine how you want the autofocusing system to behave when that occurs. If you want the camera to ignore such an intrusion, such as when a seagull swoops past the pelican you have focused on, set the scale to the minus side. However, if you want to attempt to move the focus to the new subject, essentially ignoring the old subject (an example being a skier exploding over the crest of a snow bank when the camera is focused on the sky), set the scale to the plus side.
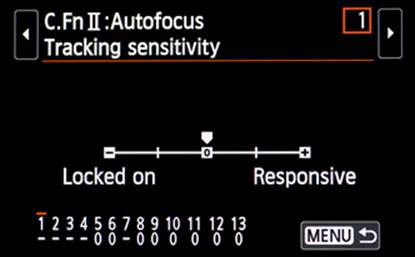
Figure 16-16. Selecting the Tracking Sensitivity option
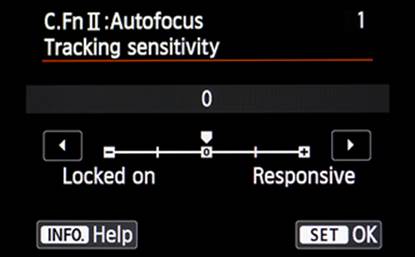
Figure 16-17. Choosing a Tracking Sensitivity setting
The user interface for the screen shown in Figure 16-16 (and many others in the Custom Functions menus) could use some help: there is no explanation for how to start the process to change this setting. Touching the MENU icon or pressing the MENU button in Figure 16-16 simply returns you to the previous menu screen. If you wish to change the setting, either touch the graphic line or press the SET button. With the screen shown in Figure 16-17, you can change the setting by touching the arrows at the ends of the graphic line or even by directly touching the graphic line at the appropriate place. You can also use the Quick Control Dial or the Multi-controller to position the pointer at the desired location. To make this selection the current setting, touch the SET icon or press the SET button.
Accel./Decel. Tracking
This function applies only when AF Operation, accessed from the AF button or from the Quick Control Dial, is set to AI Servo.
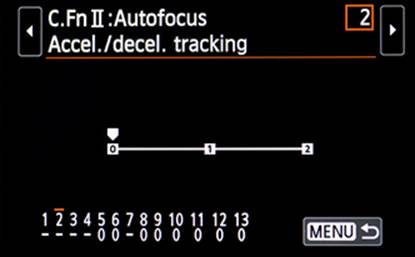
Figure 16-18. Choosing an Accel./Decel. Tracking setting
There are two general classes of mobile subjects: those that are on a single course and moving at a consistent speed, and those that do not maintain a single course and/or speed. For smooth-moving subjects, such as a gliding heron or egret, set this value to 0. However, if you’re trying to photograph a fox chasing a rabbit or if your subject is a basketball player in motion, set the value to 1 or 2, depending on the degree of randomness in speed or direction.
AI Servo 1st Image Priority
This function applies only when AF Operation, accessed from the AF button or from the Quick Control Dial, is set to AI Servo.

Figure 16-19. Choosing an AI Servo 1st Image Priority setting
As its name implies, the AI Servo 1st Image Priority option applies to the first exposure in a continuous shooting situation. The AI Servo 2nd Image Priority option applies to the second exposure and all subsequent exposures while the Shutter button is held down.
This option has three choices. Equal Priority attempts to ensure a balance between release timing and achieving focus. Release Priority allows the shutter to operate even if the camera is not focused. Focus Priority requires that focus be achieved before the shutter will be released; with a subject that is flitting across the viewfinder in an unpredictable manner, you may never achieve focus.
AI Servo 2nd Image Priority
This function applies only when AF Operation, accessed from the AF button or from the Quick Control screen, is set to AI Servo.
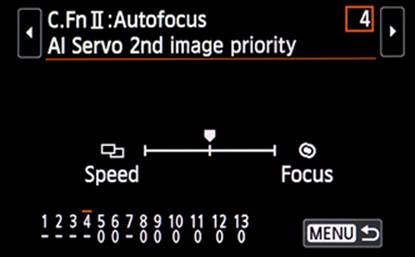
Figure 16-20. Choosing an AI Servo 2nd Image Priority setting
With this option, you can specify what priority to give to the second and subsequent exposures when using continuous shooting. Equal Priority and Focus Priority work just as they do in the 1st Image Priority setting, but the Release Priority has been replaced with a Speed Priority setting (as is necessary with continuous shooting). When you select Speed Priority, the camera will maintain the speed of continuous shooting, regardless of focus.
If I wanted to capture a sequence of photos that clearly identified a competitor as he was breathlessly approaching the finish line, but I also needed a shot of that competitor crossing the finish line, I would probably set up AI Servo 1st Image Priority to use Focus Priority. It would give me a sharp photo of the competitor, regardless of his immediate place on the course. I would set the AI Servo 2nd Image Priority to use Speed Priority to ensure that somewhere in that string of continuously shot pictures would be one showing the competitor crossing the finish line, regardless of just how sharp the image would be.
AF-Assist Beam Firing
Most Canon Speedlites have the ability to generate a brief series of low-power flashes that can be used to assist the camera in focusing. By default, the Enable choice is set. However, there are times and places where this burst of light would be inappropriate, and the Disable setting is a better choice. There are some Speedlites that also have an infrared (IR) beam that can be used for AF assist. With the IR AF Assist Beam Only setting selected, there will be no visible-light flashes for AF assist.
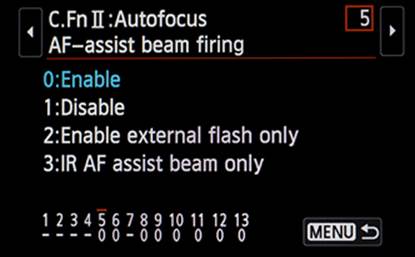
Figure 16-21. Choosing an AF-Assist Beam Firing setting
Lens Drive When AF Impossible
Not often, but frequently enough to be a real bother, you may focus on an object that the autofocus system just cannot resolve. This can happen when you are trying to focus on a large subject with little detail or contrast, leaving nothing for the auto-focusing system to work with. (With the EOS 70D, all focus points are cross-type, which eliminates many of the problems encountered by a camera that lacks this feature.) You might simply be too close to your subject for the lens that is currently mounted. The typical result is that the lens oscillates between its focusing limits, trying to find a reasonable object on which to focus.
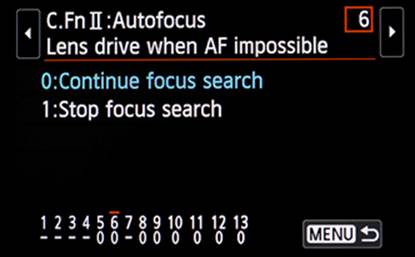
Figure 16-22. Choosing the Lens Drive When AF Impossible setting
This option has two settings. With the Continue Focus Search setting, the lens will continue to try to find focus; that’s good if the problem is one that you can resolve by changing the focus point. However, if you know the autofocus system is not going to be able to find focus, select the Stop Focus Search setting and use manual focus. The Stop Focus Search is commonly set when using very long telephoto lenses; otherwise, the lens can spend an inordinate amount of time attempting to achieve focus.
Select AF Area Selec. Mode
In an effort to give the user more control over the autofocus system, the EOS 70D has introduced a new button, supporting a new function: the ability to partition the AF area. There are three settings displayed in Figure 16-23, but look carefully: the left-most setting cannot be changed—it will always be available for selection when pressing the AF Area Selection Mode button.
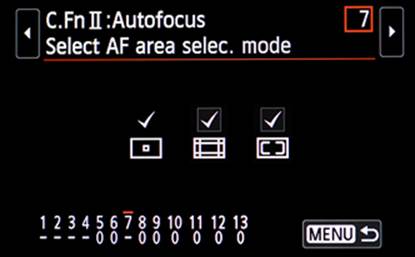
Figure 16-23. Reviewing the AF Area Selection modes currently supported
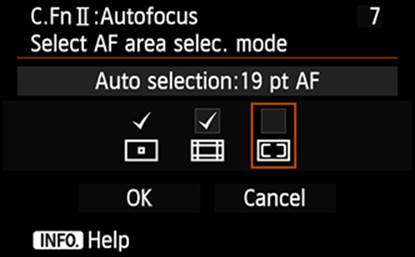
Figure 16-24. Choosing the AF Area Selection mode settings
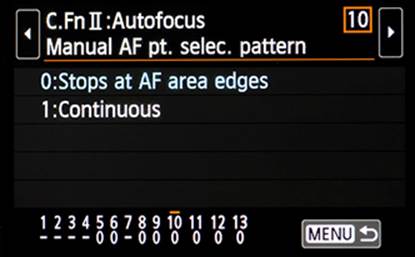
Figure 16-25. Choosing an AF Point Selection Pattern setting
The three settings are (left-to-right) Manual Single-Point ( ![]() ), Manual Zone (
), Manual Zone ( ![]() ), and Automatic 19-Point (
), and Automatic 19-Point ( ![]() ). By default, all three settings are selected. If you wish to change a setting (remember, the left-most setting—Manual Single Point—cannot be changed), touch one of the two icons in Figure 16-23, or press the SET button and then use the Quick Control Dial or the Multi-controller to select the desired setting, and again press the SET button. That will open the screen shown in Figure 16-24. While on this screen, you can also select the other setting if you wish. When you are done selecting settings, touch the OK icon, or use the Quick Control Dial or the Multi-controller to select the OK icon and then press the SET button.
). By default, all three settings are selected. If you wish to change a setting (remember, the left-most setting—Manual Single Point—cannot be changed), touch one of the two icons in Figure 16-23, or press the SET button and then use the Quick Control Dial or the Multi-controller to select the desired setting, and again press the SET button. That will open the screen shown in Figure 16-24. While on this screen, you can also select the other setting if you wish. When you are done selecting settings, touch the OK icon, or use the Quick Control Dial or the Multi-controller to select the OK icon and then press the SET button.
AF Area Selection Method
The factory setting for this option requires that you press the AF Area Selection button repetitively to navigate from one AF area selection method to another, as displayed in the viewfinder. Some photographers find this an awkward process, so Canon has provided an alternate procedure via this option. When you set this setting to Main Dial, you will still need to press the AF Area Selection button once, but then you can use the Main Dial to navigate the AF area selection icons displayed in the top of the viewfinder.
Orientation Linked AF Point
The Orientation Linked AF Point option is an interesting feature; I’m still trying to decide whether I’ll bother with using it, but for some, it could be a very nice extension of the camera’s autofocus capabilities. When the camera comes from the factory, this option is set to Same For Both Vertic./Horiz., which is what most of us have used for a considerable time. But certain photographers, such as wildlife photographers, find that while the majority of their photos are shot in landscape orientation, the best shots are those serendipitous portrait-orientation shots they’re able to capture as they encounter their subject head-on. Too many of those types of shots are lost because the camera requires adjustments for the portrait-orientation photo. The subject has long since departed the scene by the time the photographer sets the focus mode and selects the focus point.
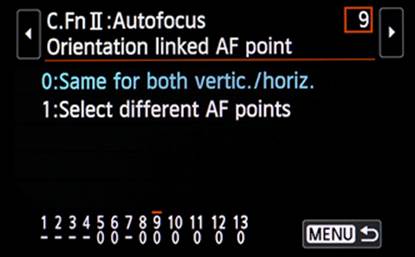
Figure 16-26. Choosing the Orientation Linked AF Point setting
That scenario is precisely the situation the Select Different AF Points setting is for. Once this setting is established, you can establish an AF area selection mode and an AF point for each of three orientations: normal landscape mode, portrait mode with the grip at the top, and portrait mode with the grip at the bottom. Simply rotating the camera will automatically recall the settings from the last time they were selected for that particular orientation and make them active. Fortunately, Canon has determined that the body must rotate about 50 degrees before the change occurs, eliminating false starts caused by too sensitive a rotation sensor.
Manual AF Pt. Selec. Pattern
With AI Servo AF enabled, whenever you have the AF Point Selection Mode set to Manual Selection: Single-Point AF (![]() ) or Auto Selection: Zone AF (
) or Auto Selection: Zone AF (![]() ), you may want the selected focus point to stop at the edge of the 19-point AF area when you are manually scrolling that focus point, or you may want to be able to wrap around to the opposite side of the AF area and continue scrolling. The default is to stop at the edge, but this Custom Function will allow you to change that setting.
), you may want the selected focus point to stop at the edge of the 19-point AF area when you are manually scrolling that focus point, or you may want to be able to wrap around to the opposite side of the AF area and continue scrolling. The default is to stop at the edge, but this Custom Function will allow you to change that setting.

Figure 16-27. Choosing a Manual AF Pt. Selec. Pattern setting
AF Point Display During Focus
The autofocus system in the EOS 70D consists of 19 focus points. By appropriate selection of AF Point Selection Mode, you can exercise control over how many points—from one to as many as 19—will be active. Frequently, you will find that you need to be able to quickly confirm which AF point(s) is being used by the camera. That’s the purpose of this Custom Function.
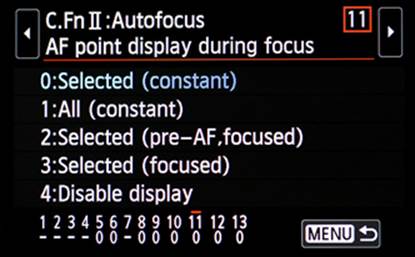
Figure 16-28. Choosing an AF Point Display During Focus setting
You can touch any one of these four lines and then touch the SET icon to enable the related setting, or you can use the Quick Control Dial or the Multi-controller to select a setting and then press the SET button.
By choosing the Selected (Constant) setting, the camera will superimpose a black rectangle on the viewfinder’s image frame, showing the current AF points being used.
With AF Operation set to One Shot AF and AF Point Selection Mode set to Manual Selection 1 Pt AF, the camera will use only your preselected focus point. With AF Operation set to One Shot AF and AF Point Selection Mode set to Manual Selection: Zone AF, the camera will use only your preselected zone, but will find the one (or more) focus point closest to the camera. With AF Operation set to One Shot AF and AF Point Selection Mode set to Auto Selection: 19 Pt AF, the camera will use the entire area covered by the 19-point autofocus area to find all those points at which focus is achieved. Remember, with AF Operation set to One Shot AF, once the camera selects the focus point(s), they are locked until you release the Shutter button and again press it halfway.
With AF Operation set to AI Servo, the camera will respond to your choice of AF Point Selection Mode just as it did with AF Operation set to One Shot, except that the selected focus point will change as the subject moves or the camera is repositioned for a new composition.
VF Display Illumination
When multiple AF points are active, or you’ve simply forgotten where that single active AF point is, it’s very satisfying to see one or more little red-bordered rectangles showing which points are in focus. The green in-focus circle on the status line in the viewfinder indicates that somethingunder one or more of the active viewpoints is in focus, but it does not indicate specifically where.
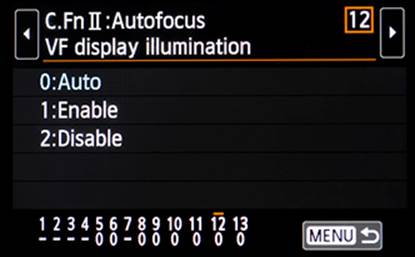
Figure 16-29. Choosing a VF Display Illumination setting
To see those little red-bordered rectangles, set this option to either Auto or Enable. For Auto, the camera will determine if it is necessary to illuminate the in-focus AF points, based on the ambient light. For Enable, the illumination is constant, regardless of ambient light. Setting this option to Disable will result in the red illumination being shut off. Since the AI Servo AF mode is constantly searching for focus, there will be no illumination in that mode.
AF Microadjustment
Even Canon recognizes that nothing is perfect. With great attention to manufacturing processes, equipment, and materials, there can still be minor imperfections in camera bodies and lenses. Sometimes an imperfection in a body will cancel out an imperfection in a lens, but in other instances, the imperfections can have a cumulative effect, creating an observable problem.
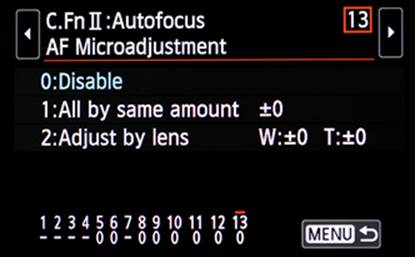
Figure 16-30. Choosing an AF Microadjustment setting
AF Microadjustment is intended to allow the camera to compensate for some degree of error in focusing. With a prime lens (a lens with a single focal length), it gives you the ability to adjust the focus point either closer to or farther from the camera. With a zoom lens, it lets you make such an adjustment at each end of the zoom range. For this to work well, you really need to mount the camera on a tripod and use a well-defined target at a constant distance. You may find that a focus calibration system, such as one from LensAlign, further enhances this process.
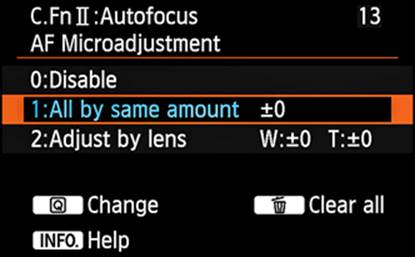
Figure 16-31. Choosing an All By Same Amount setting
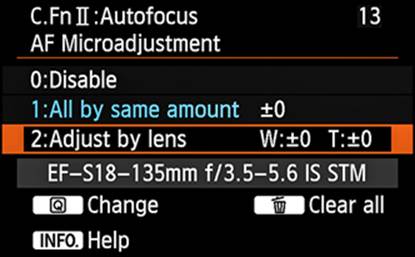
Figure 16-32. Choosing an Adjust By Lens setting, with the mounted lens identified
If you determine that there is sufficient error to warrant using this function to affect some degree of correction, you may want to switch lenses and camera bodies in an effort to identify the source. When the error is found to be in the camera body, you will likely choose to use the All By Same Amount option (Figure 16-31), thereby allowing any lens mounted to the body to inherit the correction. If the problem is found in a lens, you’ll choose the Adjust By Lens option (Figure 16-32), allowing a different correction to be created for each lens. Note that this function will recognize most lenses by serial number, and for those lenses that cannot be recognized, you can enter the lens’s serial number manually. The process for entering a lens’s serial number is not intuitive, but it is quite simple. Touch the INFO icon or press the INFO button to view the lens info, which will be a string of 10 zeros (see Figure 16-33). Either touch the specific digit you wish to replace or use the Quick Control Dial or the Multi-controller to select that specific digit, then use the up-and-down arrows to select the correct value for that digit, and press the Set button. You can now use the Quick Control Dial or the Multi-controller to select the next digit to be changed.
Repeat as necessary. Finally, either touch the OK icon or select OK and press the SET button. That allows you to customize the adjustment for every lens if you wish, and to ensure that the correct adjustment is applied for each lens.
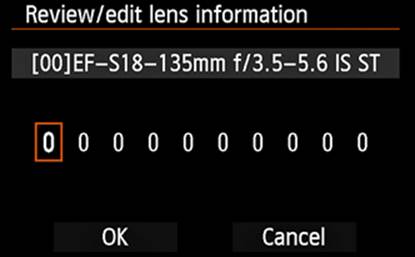
Figure 16-33. The lens information screen, with no serial number available
C.Fn III: Operation/Others
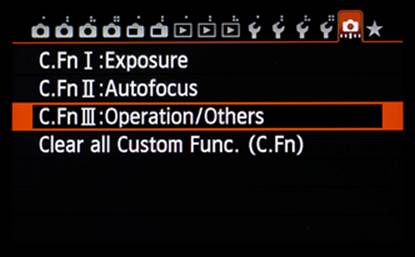
Figure 16-34. Selecting the Operation/Others custom function
Dial Direction During Tv/Av
The Main Dial is used to set the aperture when in Av (Aperture-Priority AE) mode, or the shutter speed when in Tv (Shutter-Priority) mode. The Normal setting lets you increase the aperture or shutter-speed setting when the Main Dial is rotated clockwise (as viewed from the back of the camera), and decrease the aperture or shutter-speed setting by rotating the Main Dial counterclockwise. Some camera manufacturers use the opposite convention, and if you happen to be using one of those cameras as well as an EOS 70D, you may want to select the Reverse Direction setting for consistency.
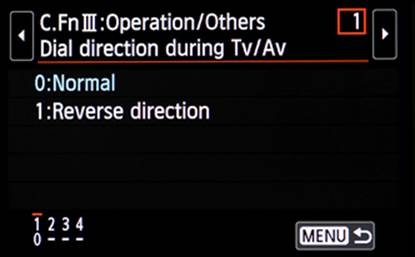
Figure 16-35. Choosing a Dial Direction During Tv/Av setting
Multi Function Lock
If you find that some of the controls on the camera seem to have a mind of their own and randomly change to new values (surely, swinging along on your shoulder, rubbing against your body, couldn’t cause that...), you can eliminate a good deal of the problem by selecting appropriate options on the Multi Function Lock menu. Select the Multi Function Lock option, which will open the screen shown in Figure 16-36, and then press SET. For each of the settings that you want to reverse, use the Quick Control Dial or the Multi-controller to select the control, and then press the SET button. Repeat as necessary to select all that you wish to change. Finally, select OK and press the SET button.
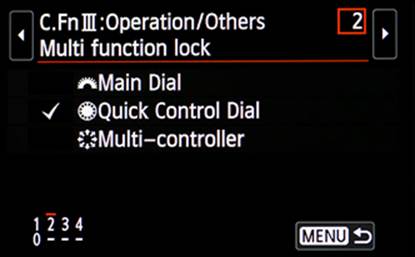
Figure 16-36. Choosing a Multi Function Lock setting
Notice that the silhouette of a camera uses an orange-bordered rectangle or circle to show the position of the control associated with an orange-bordered box around the item represented by the currently selected setting; checkmarks show which settings are currently active.
Now, when you rotate the Multi Function Lock switch (just below the Quick Control Dial) counter-clockwise, the functions of the selected controls will be disabled, but the control will still rotate or move. There will be no unexpected changes to settings caused by accidental movement of those controls. When you need the function of the control, simply rotate the switch clockwise, restoring all the controls’ operations.
Camera functions that require pressing a button prior to using one of these controls are not affected by the setting of this custom function.
Warnings In Viewfinder
The EOS 70D provides many situation-specific tools. Some are essentially one-shot applications, while others remain active for a much longer time. Four of these are different enough from the norm that Canon has provided a visual reminder that one or more of these specific tools is currently active. Selecting one or more of these settings will cause an exclamation-point icon to be displayed in the lower-right corner of the image frame, as displayed in the viewfinder.
Select the Warnings In Viewfinder option, and then for each setting either touch the line for that condition or select the condition and press the SET button. When you have completed your selections, either touch the OK icon, or select OK and press the SET button. Note that the icon is black, and can be very easily lost if that area of the displayed image is dark.
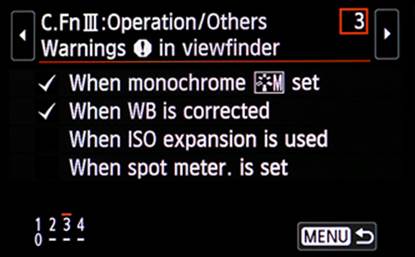
Figure 16-37. Choosing a Warnings In Viewfinder setting
Custom Controls
There are a total of 47 settings available under this menu option, allowing you significant flexibility in developing the most efficient system based on how you choose to work. This is accomplished by assigning alternate functions to specific buttons or dials.
After selecting the Custom Controls menu option, touch any one of the option offerings or press the SET button to see the icons (and their current settings) and the full spectrum of customizable buttons, dials, and other controls, as shown in Figure 16-38. Use either the Quick Control Dial or the Multi-controller to select an icon for customization, press SET, and then use either the Quick Control Dial or the Multi-controller to select a setting to associate with that icon and press SET. Repeat the process to customize additional icons. When you’re finished, touch the MENU icon or press the MENU button to return to the C.Fn III menu.
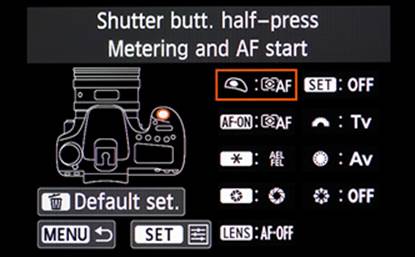
Figure 16-38. Choosing a Custom Control setting
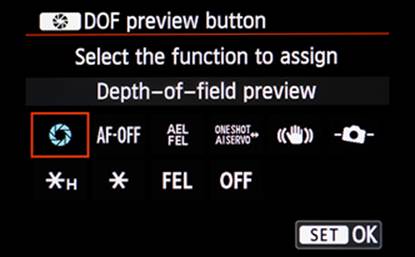
Figure 16-39. Choosing a function for the Depth-of-Field Preview button
As you scroll through the functions available for some of the icons, keep an eye out for instructions on how to use a function with its new customization. For example, if you choose to customize the SET button to set ISO speed, the text above the display of available settings reads “Set ISO speed (hold btn, turn),” in which the word “btn” refers to the SET button.
Clear All Custom Func. (C.Fn)
If you’re confused about how some custom functions relate to other custom functions, it may be time to clear all the custom functions and recreate the set, watching closely to determine when an apparent incompatibility is introduced. The Clear All Custom Func. (C.Fn) option will clear all the custom functions except for the Custom Controls option on the C.Fn III menu. (The Custom Controls can be deleted, or more accurately, reset to their default values by pressing the Erase button while on the Custom Controls screen, selecting OK, and pressing the SET button.)
All materials on the site are licensed Creative Commons Attribution-Sharealike 3.0 Unported CC BY-SA 3.0 & GNU Free Documentation License (GFDL)
If you are the copyright holder of any material contained on our site and intend to remove it, please contact our site administrator for approval.
© 2016-2026 All site design rights belong to S.Y.A.