Canon EOS 70D: The Guide to Understanding and Using Your Camera (2014)
Chapter 3. Managing Dials, Buttons, Knobs ...

Looking at the body of the Canon EOS 70D, you may be impressed with the number of control devices Canon has been able to crowd onto the top, front, and back of this camera. In addition, some of these controls are capable of being given new personalities, greatly expanding the number of adjustments you can make to customize the camera to your own style and needs. Just remember not to hand the camera off to another photographer if you’ve been making changes to the default actions!
Dials
The EOS 70D has two multi-purpose dials and one single-purpose dial. There’s also the dioptric adjustment knob, which is really a dial, though it does nothing that would directly affect the result of an image capture. The Main Dial and the Quick Control Dial are used for a variety of purposes, depending on the context of the moment, but the Mode Dial serves the singular purpose of allowing you to choose which one of the several camera functions you want to start with.
The Mode Dial
The button in the center of the Mode Dial must be depressed before the dial can be rotated. In Figure 3-1, the red arrow points to a white index mark on the side of the reflex housing, next to the Mode Dial. Once you’ve determined which setting you want to use, press and hold the button in the center of the Mode Dial, rotate the dial so that your desired setting is positioned at the index mark, then release the center button. The Mode Dial can be set regardless of the camera’s power switch setting.
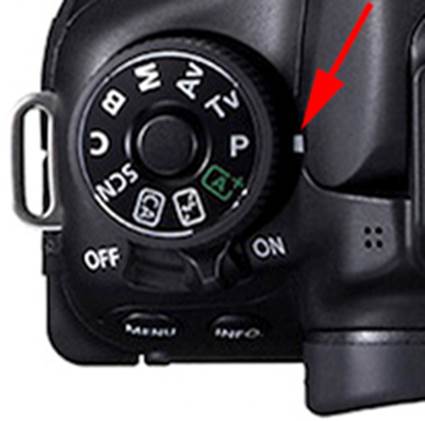
Figure 3-1. The Mode Dial index
The Main Dial
The Main Dial has two different states that it will recognize. If you have pressed one of the numerous function buttons, then the Main Dial (and often the Quick Control Dial) is used to select one of the options associated with that function button. However, if you have not pressed a function button in the preceding six seconds, then rotating the Main Dial will change the aperture if the Mode Dial is in the Av (aperture value) position, or change the shutter speed if the Mode Dial is in the Tv (time value) position. If the Mode Dial is in the P (Program AE) position, pressing the shutter button halfway and rotating the Main Dial will cause both the aperture and the shutter-speed setting to be changed, within the limits of the set ISO speed. If you have set the ISO to Auto, it will be determined when you press the shutter button halfway just prior to rotating the Main Dial.
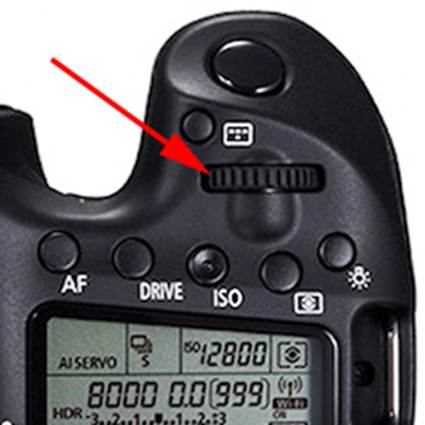
Figure 3-2. The Main Dial
The Main Dial is also a major means of navigating menus or the Quick Control screen, generally in a horizontal direction. (The Quick Control Dial is used for vertical navigation.)
For many of the buttons on the camera, the Main Dial, often in conjunction with a complementary action from the Quick Control Dial, allows you to identify a specific option provided by that button; pressing the SET button activates the function of that option. There are some exceptions: for example, while in playback, either the Quick Control Dial or the Main Dial will allow you to scroll through your images. The SET button has no effect on this operation.
There are four function buttons across the top of the LCD Panel. When pressed, each button is active for six seconds, awaiting dial input from you. Each function on these buttons needs only one level of input, so either the Main Dial or the Quick Control Dial can be used for controlling the selection of values available. While you are navigating menus or changing operating values, you will need to pay attention to the LCD Monitor. When you see the Main Dial icon ( ![]() ), the Main Dial will be used to make adjustments.
), the Main Dial will be used to make adjustments.
The Quick Control Dial
This dial works in conjunction with the Main Dial. You can use either dial for some occasions, such as scrolling through a series of images in playback or through the characters on the “keyboard” for creating copyright information in the Set Up4 menu, but in most instances, the Quick Control Dial is used to navigate vertically through a list of menu options, and the Main Dial navigates horizontally across menus.
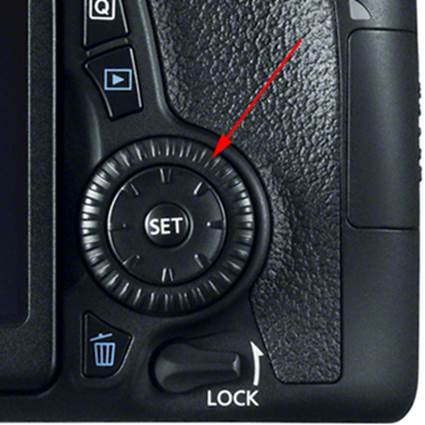
Figure 3-3. The Quick Control Dial
There are a few instances in which two variables are displayed on the same screen. An example is the Exposure Compensation/AEB setting screen from the Shoot3 menu. On that screen, rotating the Quick Control Dial adjusts the Exposure Compensation setting, and the Main Dial adjusts the Automatic Exposure Bracketing setting. If in doubt as to which dial controls what, look at the right end of the two scales for the icon of the controlling dial: ![]() represents the Main Dial, and
represents the Main Dial, and ![]() represents the Quick Control Dial.
represents the Quick Control Dial.
The Dioptric Adjustment Knob
This knob is the means by which you customize the view through the viewfinder to match your own eyes. If you wear glasses, determine whether you compose and focus with or without them. The dioptric adjustment has no way to dynamically determine whether you are wearing glasses, and there’s no mechanism for storing a with glasses setting and a without glasses setting. I compose and focus both with and without my glasses, so I adjust for one, then note the number and direction of clicks to the other position. In that way, I can set the dioptric adjustment knob fairly quickly to give me the sharpest possible view, regardless of whether I’m wearing glasses or not. That’s another of those private, individual settings that may make you reluctant to hand your camera off to another photographer.
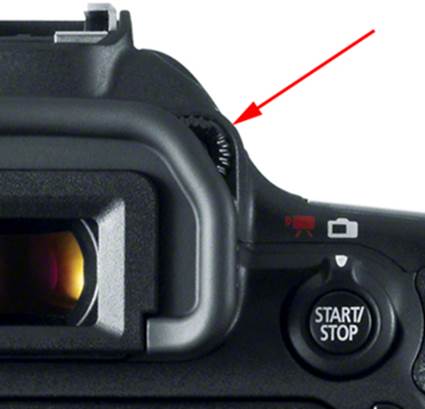
Figure 3-4. The Dioptric Adjustment knob
Buttons
The Quick Control Button
The Quick Control button brings up the Quick Control screen when the camera is in still-image shooting mode. If the camera is in playback mode, there is a playback-oriented customized Quick Control screen (actually, more of an overlay on whatever is already on the LCD Monitor), and when in Movie mode, there is yet another customized Quick Control overlay. There’s even a customized, though brief, Quick Control overlay for Live View mode. The intent of the Quick Control button is to give you immediate access to options that relate to your current activity. If the camera has shut down the meters, even though the power switch is still on, pressing the Quick Control button won’t do anything; press the Shutter button halfway and then press the Quick Control button again. Otherwise, you can be in the middle of almost anything and press the Quick Control button to open a Quick Control screen.
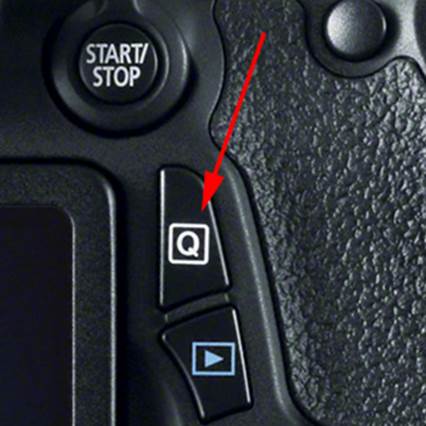
Figure 3-5. The Quick Control button
As with most other Canon DSLRs, while in the Quick Control screen or one of the overlays, navigation between options is accomplished with the Multi-controller, though selection is done with the Quick Control Dial or the Main Dial. However, with the EOS 70D, you now have access to the fastest possible way to select and enable options: simply by using the touch feature on the LCD Monitor. When shooting images, once an option is selected on the Quick Control screen, you can use the touch feature to set variables, or—with the option selected—press the SET button to open a setting screen dedicated to that option and its variables.
The Index/Reduce/Magnify Buttons
The Magnify button (indicated by the blue icon of a magnifying glass with a plus sign) is important when playing back images and when shooting in Live View mode. The navigation is much the same for both. During image playback (or while viewing a scene in Live View), press the Magnify button to start the magnification functions.
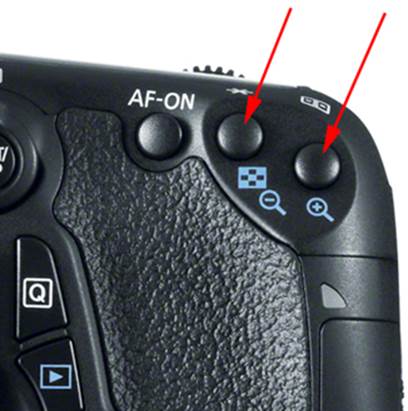
Figure 3-6. The Index/Reduce/Magnify buttons
During playback, you have access to all the images on the memory card. You may find it helpful to view several thumbnails at a time to locate a specific image. If that’s the case, press the Index/Reduce button to view four thumbnails at once, or press the Index/Reduce button again to view nine thumbnails at once. The Quick Control Dial is used for selecting the next image within a thumbnail index, and the Main Dial is used to display the next entire thumbnail index. Once you see an index that contains the desired image, use the Quick Control Dial to select it, and then press the SET button to display the image at full 1x magnification. (Of course, this whole procedure is much simpler when you use the touch feature.)
When you want to magnify an image from the memory card, repeated presses of the Magnify button will change the magnification of the display from 1x to 10x. Use the Multi-controller to reposition the white rectangle until it coincides with the area you’d like to see enlarged.
For an image being composed on the LCD Monitor while in Live View mode, press the Magnify button for 5x enlargement; press it again for 10x enlargement. Pressing the Magnify button a third time results in the enlargement returning to 1x. Like using the Magnify button during image playback, you can use the Multi-controller to select the critical part of the Live View composition. The small white rectangle inside a white border represents the portion of the full image that is being displayed. For macro photography or any photography that would benefit from being able to use an enlarged image for critical focusing, the combination of Live View and Magnify is truly noteworthy. Be aware, though, that the image you’re seeing on the LCD Monitor is a simulated image and can appear sharper than the final recorded image. Even so, you have achieved the sharpest possible capture.
The Shutter Button
The Shutter button has acquired some significant responsibilities over the years. In the days of the Kodak box camera, taking a picture was a three-step process: you looked in the viewfinder to compose the picture, pressed the shutter-release button to expose the film, and wound the film to the next frame. In the EOS 70D, the Shutter button performs two critical functions.
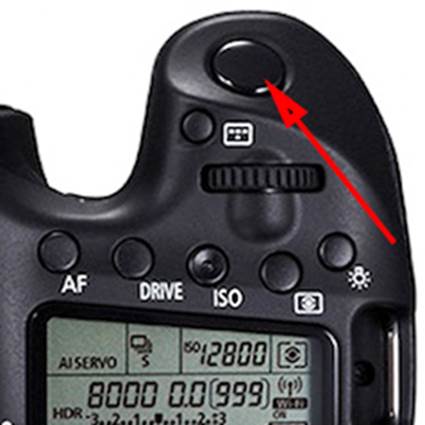
Figure 3-7. The Shutter button
First, pressing the Shutter button halfway turns on the exposure and autofocus meters, allowing the camera to determine if the selected aperture, shutter speed, and ISO will produce a good exposure. The camera will also attempt to achieve focus based on a number of options you have specified in the mode you’ve selected. There are computers in most of the lenses we use today, and there are computers in the camera. If you have an external flash, it almost certainly has one or more computers, and all these computers must share information to ensure proper exposure. In addition, the lens needs a discrete period of time to achieve focus. If you simply compose a picture and mash the Shutter button all the way down, there will be a delay before the shutter actually operates, during which time the camera is attempting to focus and determine exposure factors. The subject could move in that time.
Second, after the activities initiated when the Shutter button was pressed only halfway down have finished, pushing the Shutter button the remainder of the way down causes the camera to stop the lens aperture down to the pre-determined value, start the shutter movement, and trigger the flash.
Through Custom Controls, accessible from either the Quick Control screen or the Custom Functions C.Fn III-4 menu, you can change the function of the shutter button between Metering and AF Start, Metering Start, and AE Lock.
The Depth-of-Field Preview Button
This button is a macro photographer’s delight. In truth, it’s not just macro photographers who should be concerned about depth of field and how to control it. If everything in a picture is in sharp focus, then how do you direct the audience to the subject of the image? By opening the aperture a stop or two, you can make the depth of field—that range of depth that is in focus—shallower. That will generally force the picture elements around your subject to appear a bit blurred or soft. The eye and the brain work together so well in this kind of situation that the soft elements are accepted as supporting the subject, and the subject is allowed to stand out from that background. Rather than gambling on the final result, press the Depth-of-Field Preview button to see the final image, looking especially closely at the subject and the competing background. Adjust the aperture to get the desired result.
Macro photographers are typically chasing the other end of that problem. With the subject so close, depth of field is pretty shallow already. The problem comes from the fact that in an SLR camera, the lens aperture is wide open until the Shutter button is pressed. That allows the maximum amount of light that lens can transmit to be used for composition and focusing. However, with the lens aperture wide open, the depth of field is as shallow as that lens can make it. Peering into the throat of a beautiful flower, you would like to have all elements, from the anthers to the ovaries, in focus. At a distance of 10 inches with a lens set at f/2.8, it’s not going to happen. You know that as you stop the aperture down, the depth of field increases, but by how much? That’s where the Depth-of-Field Preview button justifies its existence: when you press it, the lens diaphragm is stopped down to your preset value, allowing you to see through the viewfinder the image that will be placed on the image sensor. The downside to this is that as the lens diaphragm is stopped down, less light is transmitted, which makes it more difficult to see the image.
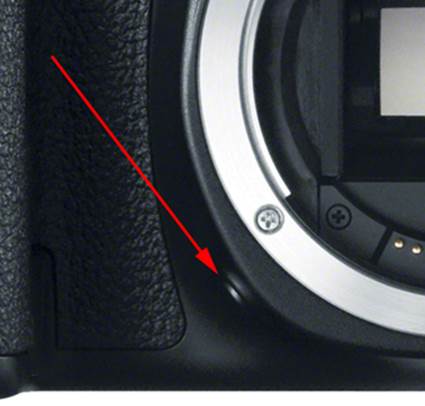
Figure 3-8. The Depth-of-Field Preview button
Be aware that the Depth-of-Field Preview button also works while in Live View, and Live View artificially brightens the image on the monitor, which can be a real advantage when you’re trying to get critical focus on an otherwise dark screen.
Through Custom Controls, accessible from either the Quick Control screen or the Custom Functions C.Fn III-4 menu, you can change the function of this button between Depth-of-Field Preview, AF Stop, AE Lock, AE-Lock (Hold), FE Lock, AE Lock/FE Lock, One Shot & AI Servo toggle, IS Start, VF Electronic Level, and OFF.
The Lens Release Button
This button allows the removal of the currently mounted lens, either in preparation for mounting a different lens or for mounting the camera’s body cap as you prepare to place the camera back in a camera bag (many photographers find they have more latitude in placement of body and lenses in the bag if they dismount the lens from the body as they finish their shoot).

Figure 3-9. The Lens Release button
Pressing the Lens Release button causes the Lens Lock pin to be withdrawn from the lens mounting flange, allowing the lens to be rotated in a counterclockwise direction (viewed from the front, as shown here) for removal. When you mount a lens, you can ignore the Lens Release button. The Lens Lock pin will be depressed by the lens, but will snap into the Lens Lock pin socket as the lens is fully rotated into position.
The Mode Dial Lock Release Button
Canon cameras that predate the EOS 60D (August 2010) do not provide a Mode Dial lock. Without this locking mechanism, sometimes the Mode Dial would accidentally get rotated to a position other than what the photographer had set it to. The Mode Dial Lock ensures that the Mode Dial is not accidentally rotated, but it adds another mechanical procedure (pressing the Mode Dial Lock Release Button) to the process of taking a picture. Actually, I don’t find it that much of a hassle. I’ve adopted a procedure in which the Mode Dial Lock Release button is pressed with the forefinger, and the thumb and middle finger are used to rotate the Mode Dial. This works with either hand.
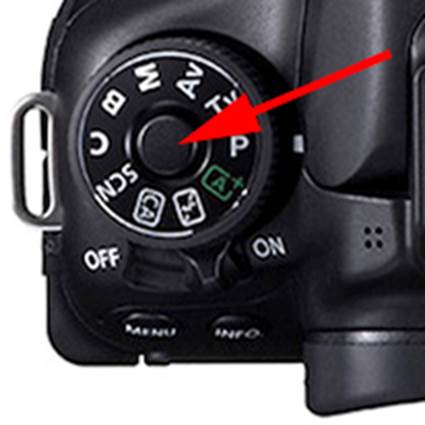
Figure 3-10. The Mode Dial Release button
The MENU Button
The MENU button provides access to options for configuring camera settings and exploiting camera features. Part Four of this book covers each of these options.
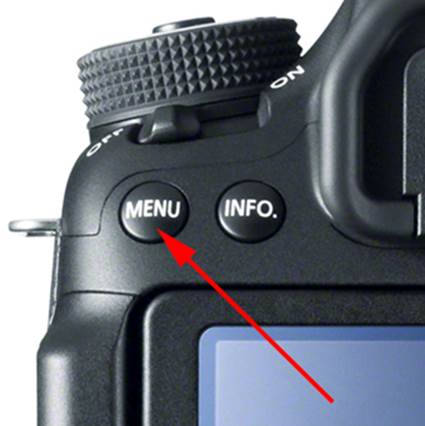
Figure 3-11. The MENU button
The INFO Button
This button provides access to a significant amount of data, as well as to the built-in electronic level. In shooting mode, there are four states of display for the INFO button, and successive presses of the button cause the next display to be shown. The first display is of the major camera settings, the second display provides the built-in electronic level, the third display shows the shooting functions, and the fourth is a blank screen.
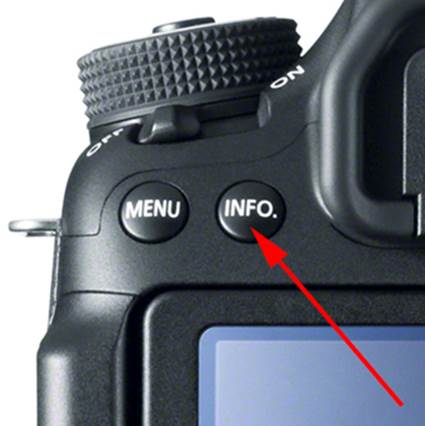
Figure 3-12. The INFO button
In playback mode, the INFO button also has four different states. One state superimposes nothing on the displayed image, and the second state displays a minimum of exposure-related information superimposed on the image. The third state reduces the image to roughly a quarter of the screen and adds a brightness histogram over another quarter of the screen; the remainder of the area shows the exposure data for that image. The fourth state replaces the brightness histogram with the RGB histogram, and the brightness histogram is moved to the lower-right quadrant. Note that the fourth state (lower-right quadrant in Figure 3-13a) will show GPS data in the lower-left quadrant (as seen in Figure 3-13-b) if such data was captured as a part of the image.
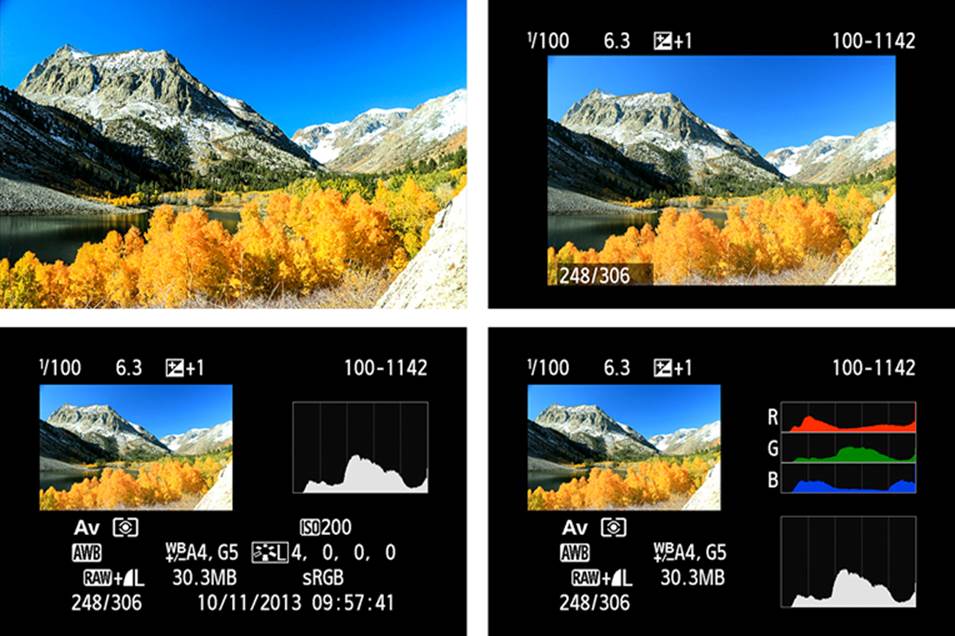
Figure 3-13a. Four states of INFO during image playback
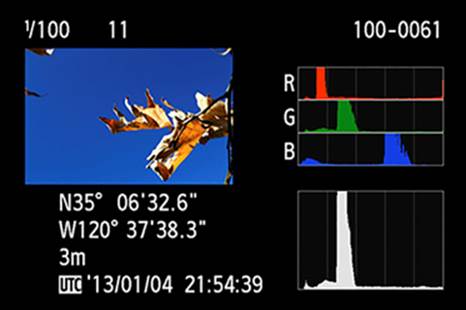
Figure 3-13b. The forth state of INFO during image playback when GPS data is avalable. (Captured with an EOS 6D, which has built-in GPS.)
The SET Button
This is often the last button pressed in setting variables. A variable’s value is not committed until the SET button is pressed. An exception is using the Main Dial or the Quick Control Dial to alter aperture or shutter speed; in this case, the SET button is not used. In a few instances, you may find other buttons being used in ways beyond their defined role in order to accomplish all that a menu needs; read each screen carefully before you commit an action to ensure that you use the buttons as expected by that application. If you are setting values by using the function buttons, pressing the Set button will immediately accept the new value; however, you can also simply wait for the six-second time-out of the function button to have the new value accepted.
The Quick Control screen, activated by pressing the Quick Control button, is a unique case. The Multi-controller is used to navigate the screen to a specific selection, but the SET button must be used to open the selected option. The Main Dial and the Quick Control Dial can be used to change option values, either in the Quick Control screen or in the option-specific screen (opened by pressing the SET button on the selected option in the Quick Control screen). Or, with the Quick Control screen displayed, avoid all that drudgery and simply touch your way to success.
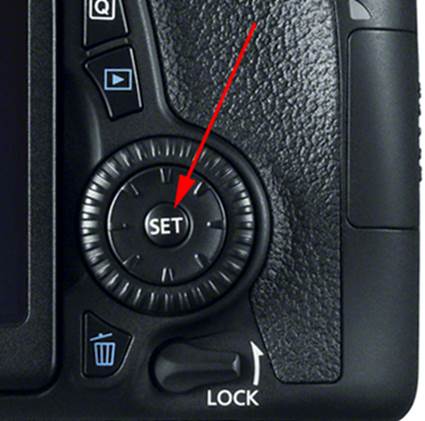
Figure 3-14. The SET button
Through Custom Controls, accessible from either the Quick Control screen or the Custom Functions C.Fn III-4 menu, you can change the function of the SET button to a variety of options, including OFF, Image Quality, Picture Style, Menu, ISO Speed, and Flash Exposure Compensation.
The AF Point Selection Button
The AF Point Selection button allows you to use the Multi-controller (this is one of the instances in which the Multi-controller can be used for diagonal navigation), the Quick Control Dial, or the Main Dial to navigate to the AF point you’ll use in focusing. Pressing the SET button will allow you to reselect the center AF point when the AF Area Selection Mode is set to either 1 Pt AF or to 19 Pt AF, or to the center AF area if AF Area Selection Mode is set to Zone AF.
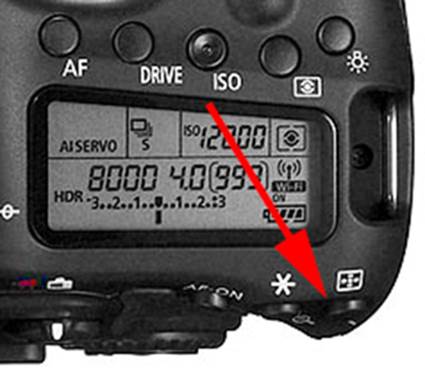
Figure 3-15. The AF Point Selection button
The AE Lock/FE Lock Button
This button, below the white asterisk icon, provides a means of capturing the exposure factors you want when the point of focus is somewhere else. Compose your picture, making a mental note of the location of the focus point, and then move the camera so that the center of the viewfinder is on the part of the scene that you want to use for exposure. Press and release the AE Lock/FE Lock button to lock the exposure parameters, and recompose your picture (ensuring the focus point is in the correct position); then press the Shutter button. If you wish to take multiple photos with the original locked exposure values, simply continue to hold the AE Lock/FE Lock button down while you recompose, focus, and shoot the subsequent exposures.
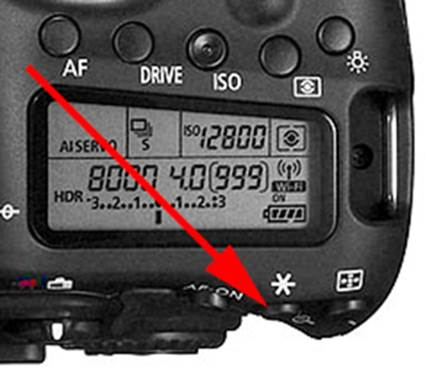
Figure 3-16. The AF Lock / FE Lock button
Through Custom Controls, accessible from either the Quick Control screen or the Custom Functions C.Fn III-4 menu, you can change the function of this button between AE Lock/FE Lock, Metering and AF Start, AE Lock, AF Stop, FE Lock, AE-Lock (Hold), and OFF. There’s also an AE-Lock (While Button Pressed) option available in the Custom Functions C.Fn III-4 menu for the Shutter button.
The Autofocus Start Button
The Autofocus Start button sits just below the AF-ON label on the camera. Its role is to provide an alternative to pressing the shutter button halfway to start the autofocus operation. This function enables what many people refer to as “back-button focus.”
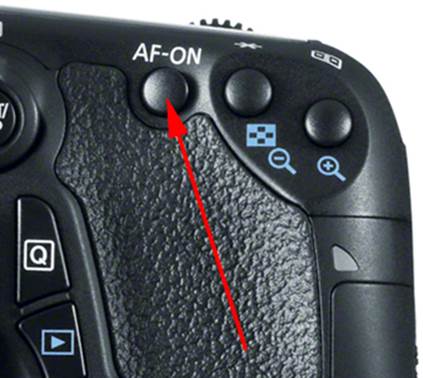
Figure 3-17. The Autofocus Start button
Through Custom Controls, accessible from either the Quick Control screen or the Custom Functions C.Fn III-4 menu, you can change the function of this button between Metering and AF Start, AE Lock/FE Lock, AE Lock, AF Stop, FE Lock, AE-Lock (Hold), and OFF.
The AF (Autofocus Operation Selection) Button
The AF button is the leftmost of the top-panel function buttons. Within six seconds of pressing this button, you can rotate either the Main Dial or the Quick Control Dial to select the AF mode: One Shot, AI Focus, or AI Servo.
Of course, this option can be set from the Quick Control screen as well.
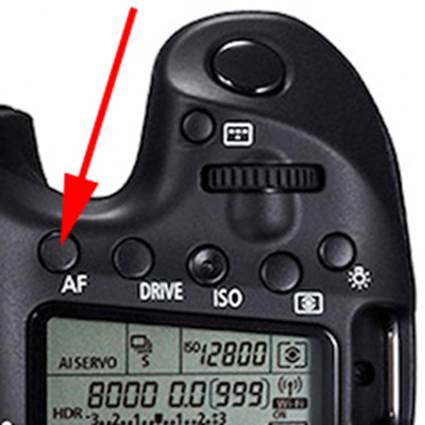
Figure 3-18. The AF button
The DRIVE (Drive Mode Selection) Button
The second of the top-panel function buttons, this is the means for selecting between single-exposure shooting and continuous shooting, with silent options available for both. This button also allows you to choose between a 2-second and a 10-second self-timer (delayed shutter release).
As with the other top-panel function buttons, the related options can also be set from the Quick Control screen.
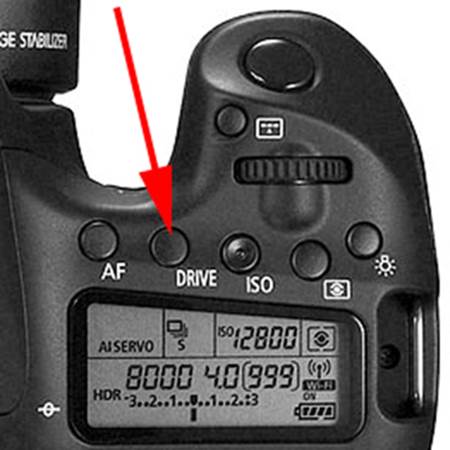
Figure 3-19. The DRIVE button
The ISO (ISO Speed Setting) Button
The ISO button is another of the top-panel function buttons. Within six seconds of pressing this button, you can rotate either the Main Dial or the Quick Control Dial to select an ISO speed value or set the ISO speed to AUTO.
Again, this option can be set from the Quick Control screen as well.
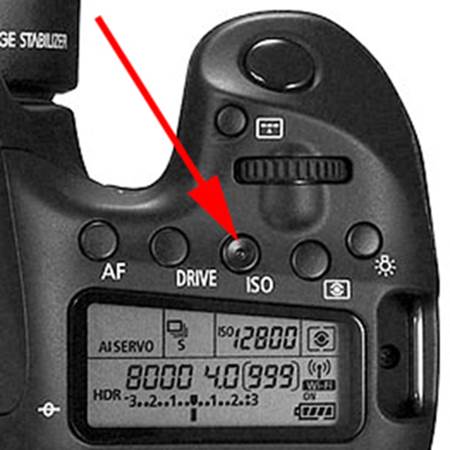
Figure 3-20. The ISO button
The Metering Mode Selection Button
This is the rightmost of the top-panel function buttons on the EOS 70D. It’s another six-second button: within six seconds of pressing it, you can rotate either the Main Dial or the Quick Control Dial to change the metering mode, choosing from Evaluative metering, Partial metering, Spot metering, and Center-weighted average metering.
As with the preceding top-panel function buttons, this option can also be set from the Quick Control screen.
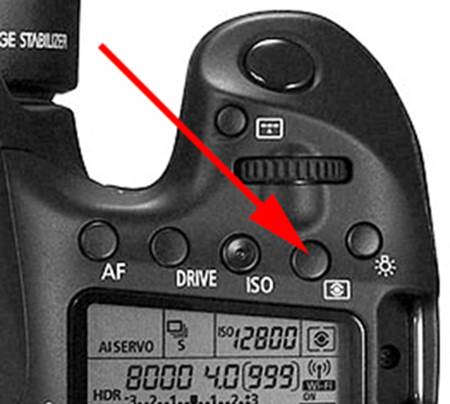
Figure 3-21. The Metering Mode Selection button
The LCD Panel Illumination Button
This is not one of the top-panel function buttons, even though it is placed in the same row with them. Pressing this button will turn on the backlighting for the LCD Panel, and the backlighting will self-extinguish after six seconds. If you need to turn off the light before it self-extinguishes, you can press the button again. If the Mode Dial is set to Bulb, the backlight will immediately turn off when the Shutter button is completely pressed.
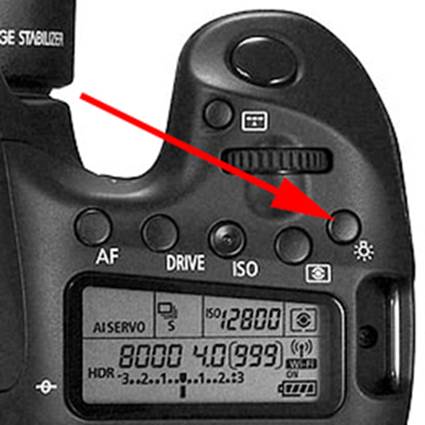
Figure 3-22. The LCD Panel Illumination button
The AF Area Selection Mode Button
In an effort to provide improved control over autofocus, the EOS 70D has added this button to give the user the opportunity to select all or part of the area covered by the nineteen focus points from which focus will be determined and tracked. Generally, you will want to use the AF Area Selection Mode button to select an AF area before you use the AF Point Selection button to choose a specific area or a specific single focus point within the area covered by the nineteen focus points.

Figure 3-23. The AF Area Selection Mode button
The Playback Button
The Playback button is used to access and display the images on the memory card. While in image playback, you can press the Magnify button to enlarge a portion of an image for further scrutiny. Press the Index/Reduce button to back off the magnification or to view an index of images. You can press the INFO button to allow related exposure data to be overlaid on a displayed image. You can use either the Main Dial or the Quick Control Dial to scroll through the images (scrolling is controlled by setting the Image Jump parameter on the Play2 menu). The EOS 70D has an interesting feature: with the Image Jump parameter set to “Jump 10 images,” you can use the Main Dial to jump forward or backward 10 images at a time. The Quick Control Dial will allow you to move forward or back one image at a time.
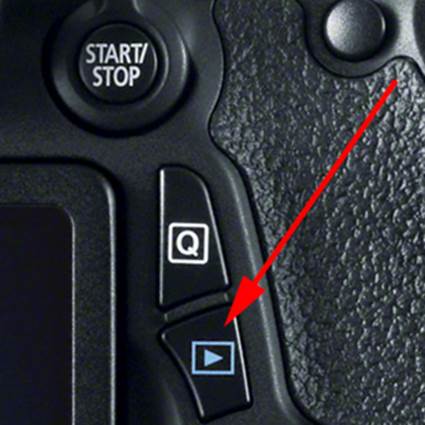
Figure 3-24. The Playback button
The Erase Button
As its name implies, the Erase button is the means to delete a selected image from the current folder.
In playback, locate the image you wish to delete, and press the Erase button. At the bottom of the screen, use the Quick Control Dial to select the Erase option, and press SET. The image is now gone. There is no Windows-style recycle bin, and no way to recover an erased image. If you have Image Quality set up to record both a RAW file and a JPEG file, remember that both files have the same file name but different extensions: by choosing either file name for erasure, you will erase both files. If there are multiple files to be deleted, use the Erase Images option in the Play1 menu.
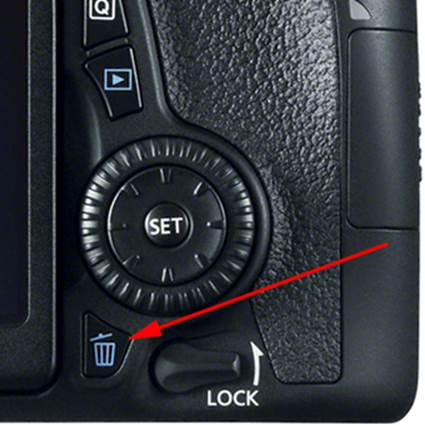
Figure 3-25. The Erase button
I choose not to use the camera’s built-in erase functions, and instead I wait until I transfer images to my computer. I find it much faster to work on my computer, and I’m less likely to introduce a problem. I guess I don’t multitask as well as I think I used to. When I go out to take pictures, I want to focus on photography, not the backroom tasks associated with physical maneuvering among images.
The Start/Stop Button
Indicated by the red arrow in the figure, this button supports two very specific functions in the Canon EOS 70D: shooting in Live View mode and shooting in Movie mode. The button is a toggle, which means that each press of the button switches the current function from Stop to Start or from Start to Stop.

Figure 3-26. The Start / Stop button
With the Live View/Movie shooting switch (indicated by the green arrow) set to Movie, this button is used to start or stop the recording of the movie. When the switch is set to Live View, pressing the Start button causes the mirror to flip up out of the light path and the candidate image to be displayed on the LCD Monitor. However, the image is not captured until the shutter is released.
The Multi-controller
The Multi-controller might appear to be a dial, but it’s really a non-rotating ring set carefully inside the Quick Control Dial. It has eight raised marks, four for the up/down and left/right movements, and four for the diagonal movements. The ring provides eight points around a circle, which is plenty for this function. The Multi-controller is useful for controlling the movement of the active screen component in selecting a focus point, selecting characters from a pseudo-keyboard when creating copyright information, navigating the options on the Quick Control display, etc. While the Quick Control Dial or the Main Dial will generally provide these types of services, the rotation of those dials is usually limited to up-and-down or left-and-right motions, respectively. The ability of the Multi-controller to provide both up-and-down and left-and-right motion, as well as diagonal motion, makes the Multi-controller my preferred tool.
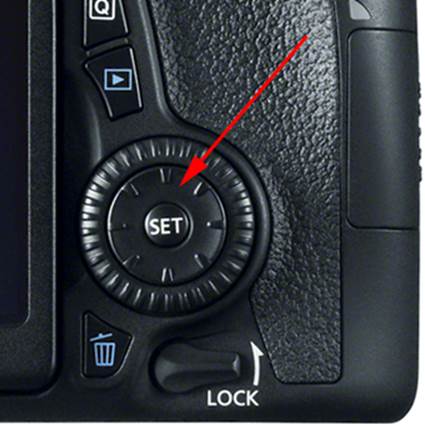
Figure 3-27. The Multi-controller ring
Switches
The Power Switch
The Power switch is certainly the most critical control on the camera. Though a few actions can be performed without the power switch being in the ON position, there is nothing in the realm of composition, automatic focusing, or automatic exposure that is enabled until that switch is placed in the ON position. As with most DSLR cameras, the Canon EOS 70D is intended to be a battery-powered, portable image-capturing device. With the developments in battery technology over the past decade, new lithium-ion batteries, like the one this camera uses, accept and hold more charge, and can be recharged more times than the NiCad and NiMH batteries, and earlier lithium batteries. Even so, there is only a finite amount of battery service available, and there are numerous devices and camera features that place their own specific power needs on the battery. Unless you’re going to be away from your camera for only a short period of time, set the power switch to OFF or set the Auto Power Off option in the Set Up2 menu to a small number.
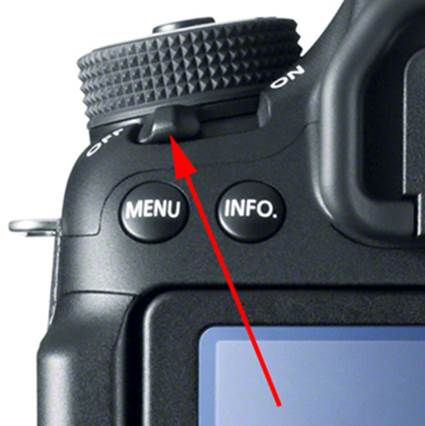
Figure 3-28. The Power switch
Second only to the computers involved in actually setting the camera for an image capture, the large LCD Monitor on the back of the camera is the biggest user of battery power. It gives us a brief view of a just-captured image, access to settings with a press of the Quick Control button, use of the electronic level available via the INFO button, and most of all, a viewfinder image when we’re shooting in Live View or shooting a movie.
Then there are the lenses! In addition to their integrated computers, most of the lenses used on this class of camera have Canon’s Optical Image Stabilizer technology, which uses a significant amount of battery power. They also often feature Ultrasonic Motor (USM) or Stepping Motor (STM) focusing, which use a significant amount of power when the lens is being focused (which in AI Servo mode can be near-constant). All that power must come from the camera and its power source, typically the battery (or batteries if you’re using the BG-E14 battery grip).
I often find myself needing prolonged access to the camera and its functions, especially the menus. For that, I’ve been able to justify buying the Canon ACK-E6 AC Adapter Kit. This kit allows me to remove the battery and replace it with a battery-shaped adapter, which has a long (about 7 ½ feet) cable attached to a power-supply brick that plugs into a typical AC outlet via another cord. Now I can disable the Auto Power Off option, and not worry about whether or not I’ll have enough battery power to complete some sequence of procedures, such as sensor cleaning, when it’s essential that the mirror remain out of the way. Many studio photographers who have little or no need to remove their camera from the tripod use this device. Be very critical as you browse the Internet for comparable items—I spent the extra money and bought Canon.
The Live View/Movie Shooting Switch
Indicated by the green arrow, this is a simple two-position rotary switch wrapped around the Start/Stop button, which is indicated by the red arrow. This switch must be in the Movie position (indicated by the red silhouette of a video camera body) in order to set movie-related menus and functions, as well as to actually record a movie. The recording of a movie is initiated by pressing the Start/Stop button, and is terminated by pressing the Start/Stop button again.
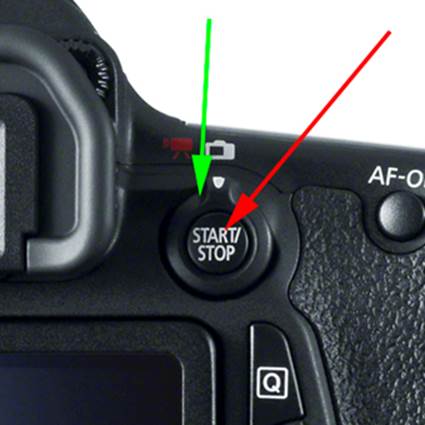
Figure 3-29. The Live View / Movie Shooting switch
When the switch is in the Live View position, indicated by the white silhouette of a camera body, you can press the Start/Stop button and have the opportunity to use that million-dot, three-inch LCD Monitor for composing your photo. As with normal still-photo work, you press the Shutter button to capture the image.
The Multi-function Lock Switch
This switch is a form of insurance. Too many photographers have lost good pictures because a dial had been inadvertently turned to a position other than what the photographer set.
You can use the Multi-function Lock option on the Custom Functions C.Fn III-2 menu to determine which controls you would like to be able to lock. Then with the lock switch rotated upwards, the selected controls (the Main Dial, the Quick Control Dial, and/or the Multi-controller) will be disabled for functions that do not require pressing another button before using the selected control. That is, if the Main Dial was selected in the C.Fn III-2 menu and the lock switch was rotated upwards, the Main Dial would not be usable for changing the aperture while the Mode Dial is in Av mode, or for changing the shutter speed while in Tv mode. However, when you press another button first, such as the DRIVE button, the Main Dial is available for the normal parameter-selection process.
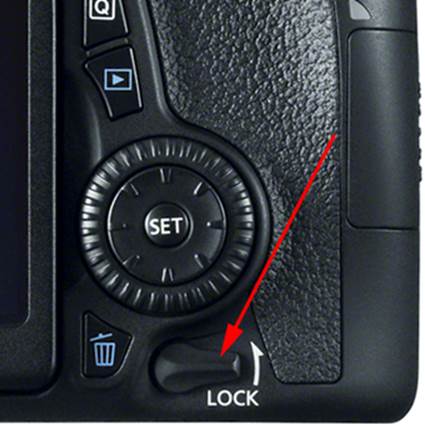
Figure 3-30. The Multi-function Lock switch
All materials on the site are licensed Creative Commons Attribution-Sharealike 3.0 Unported CC BY-SA 3.0 & GNU Free Documentation License (GFDL)
If you are the copyright holder of any material contained on our site and intend to remove it, please contact our site administrator for approval.
© 2016-2026 All site design rights belong to S.Y.A.