Canon EOS 70D: The Guide to Understanding and Using Your Camera (2014)
Chapter 4. Finding and Interpreting Image-Related Information

Before an Exposure
External Information
On the camera body. It seems a bit obvious, but the settings of dials and switches can be overlooked, which will give you results that are quite different from what you expect.
Start with the power switch: is the camera powered on? Then check the Mode Dial: is the camera set to the exposure mode you wish to work in? Do you have the correct autofocus area set and the appropriate focus point selected? Is the camera properly set for capturing a single image each time the Shutter button is pressed, or should it be set for continuous shooting? If you’re using electronic flash, is the flash mounted, charged, and powered on?
On the lens. What’s the position of the AF/MF switch (what Canon calls the Focus Mode switch)? Is the Stabilizer switch on or off? And, of course, is the lens cap removed?
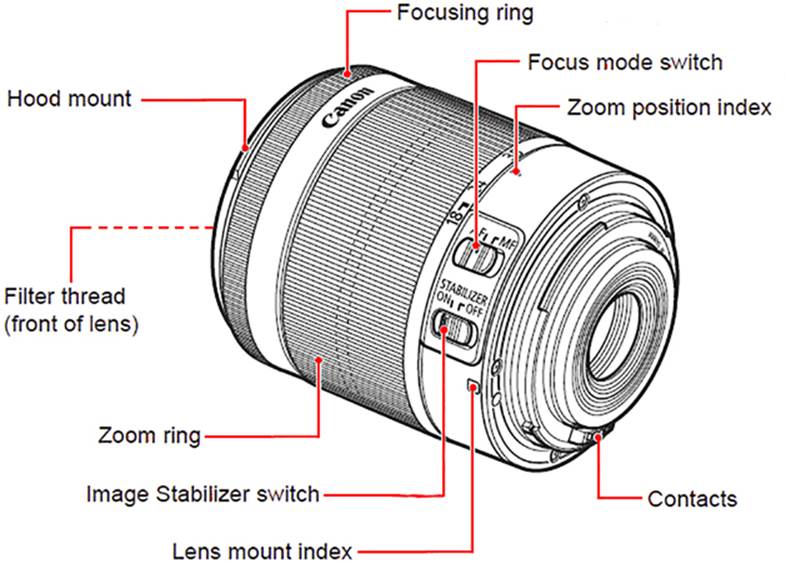
Figure 4-1. The Canon EF-S 18-55mm f/3.5-5.6 IS STM lens
On the tripod. For panorama shooters especially, you will want to ensure that the camera is level for every shot in the panorama series. (I have a nice little bubble level that fits into the hot shoe on my camera for this purpose.) If the tripod yoke (where the legs come together) is not level, you’ll have to readjust your camera every time you pan for the next frame in the panoramic picture. If you ensure that the tripod is level, all you need to do is simply rotate the tripod head for each shot. There’s a very nice electronic level built into the functions of the EOS 70D INFO button; however, the EOS 70D level works only to identify body rotation around the axis of the lens, not up-or-down tilt, so you may still need that bubble level in the hot shoe.
Internal Information
LCD Panel. The LCD Panel is the main status-reporting system for the camera. Whether you are confirming values for a coming shot or modifying values after pressing one of the buttons near the LCD Panel, this panel can dynamically alter the data being displayed to give you easy access to many control parameters. Figure 4-2 displays all the information that can be presented on the LCD Panel. Of course, not all that data is presented at any one time. I’ve borrowed this image from the Instruction Manual, but have made a few minor changes to it.
An outlined area that provides AF Operation information is found in the upper-left corner. When you press the Autofocus Operation Selection button, the panel is cleared of everything except the field that relates to this function. Using either the Quick Control Dial or the Main Dial, you can scroll through each of the AF Operation settings. The last one you display becomes the new value. If you have a good idea what each of these icons represents, this is a very fast means to make short-term changes. However, to see a brief description for each of the options, you may want to use the LCD Monitor. If the INFO screen is set at Shooting Settings, then this information is being displayed there already. Otherwise, simply press the Q button to display the AF Operation options on the LCD Monitor’s Quick Control screen. While viewing the Quick Control screen, you can use the touch feature to very quickly set these values.
When you press the DRIVE button, the LCD Panel is cleared except for an outlined area in the upper left, where you will see the current drive mode. Scroll through the set of drive mode options by rotating either the Quick Control Dial or the Main Dial.
The third button is the ISO Speed Setting. The current ISO speed is displayed toward the upper right of the LCD Panel. Rotating either the Main Dial or the Quick Control Dial allows you to select a new ISO value.
If you select the ISO Speed Settings parameter in the Shoot3 menu, then select the ISO speed range and press SET, you can specify the minimum and maximum ISO values to be used. This range of values will appear on the LCD Monitor’s Quick Control screen as well as in the scrollable set of values displayed on the LCD Panel.
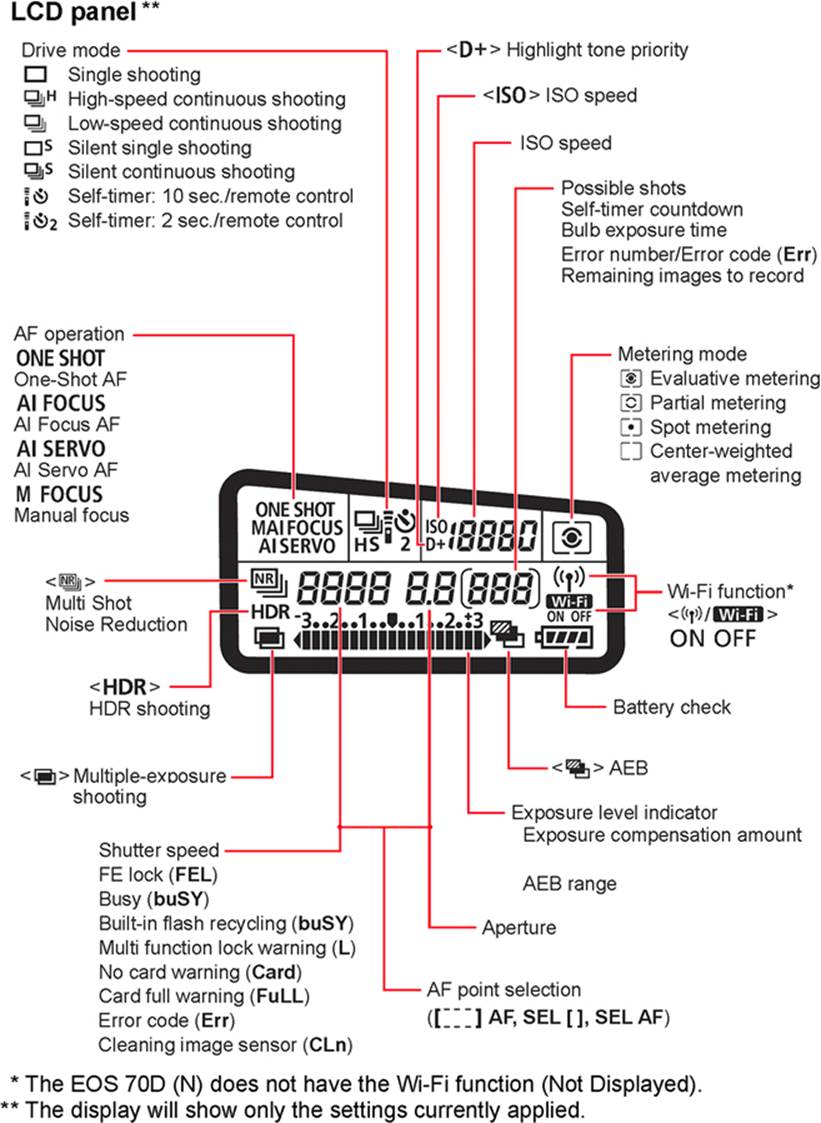
Figure 4-2. The complete EOS 70D LCD Panel
LCD Monitor. In normal shooting, if you simply turn the camera on, the LCD Monitor will be blank until you press the Shutter button all the way down. After an image is captured, the camera will briefly display this new image in the display format that is currently selected (see “It’s All in the LCD Monitor,” at the end of this chapter). The image review time is set in the Image Review parameter of the Shoot1 menu, which provides up to eight seconds of display (unless you choose the Hold option). That’s not enough time for an extensive review of composition, saturation, exposure, and other factors, but if you press the INFO button during that time, the camera will give you the time established for Auto Power Off (in the Set Up2 menu) to carefully review the image and the camera parameters that contributed to creating it.
INFO button. By default, pressing the INFO button while the LCD Monitor is dark results in the Camera Settings screen being displayed. Pressing the INFO button again displays the electronic level, and pressing it a third time causes the Shooting Functions screen to be displayed. (To delete one or more of these displays, use the INFO Button Display Options parameter in the Set Up3 menu.)
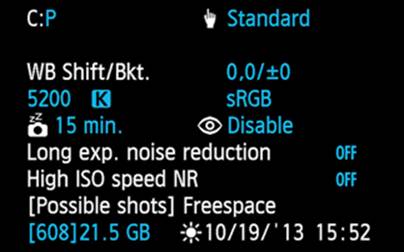
Figure 4-3. The Camera Settings screen
The Camera Settings screen, as seen in Figure 4-3, shows a rather static collection of image-influencing data, the exceptions being the Possible Shots value that indicates the number of exposures remaining on the memory card, and the Freespace value that shows the amount of available space on the memory card.
The electronic level is surprisingly accurate (plus or minus one degree). It recognizes camera-body rotation (rotation around the axis of the lens), known by Canon as horizontal level. As the body is rotated to an angle greater than 45 degrees—in either direction—the display changes orientation from landscape to portrait mode, allowing the level to be used just as effectively in portrait mode photography.
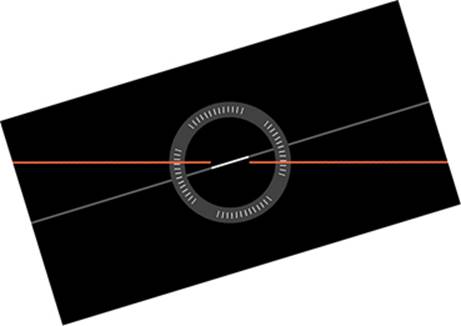
Figure 4-4. Rotation counter-clockwise from landscape
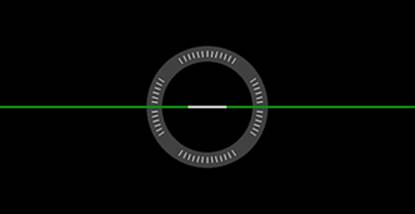
Figure 4-5. Level, in landscape

Figure 4-6. Level, in portrait
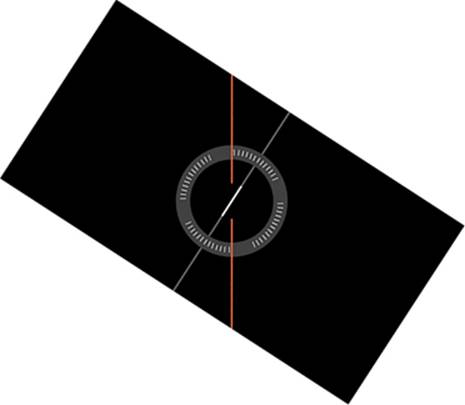
Figure 4-7. Rotated clockwise from portrait
The red line indicates that the camera is not level, and the green line indicates that the camera is level, in either the horizonal (landscape) aspect or the vertical (portrait) aspect. The short white line in the center of the circle indicates the current orientation, either landscape or portrait.
The Shooting Functions screen gives you a reasonably comprehensive display of the camera factors that influence exposure. If you press the Q button or touch the Q icon while this Shooting Functions screen is displayed, the screen is replaced with the Quick Control screen (see Figure 4-9). The Quick Control screen looks a great deal like the Shooting Functions screen, but has active fields that you can select by navigating with the Multi-controller. You can then use the Main Dial or the Quick Control Dial to scroll through the available options for each field. To make things much faster, use the touch feature instead of the Multi-controller and various dials.
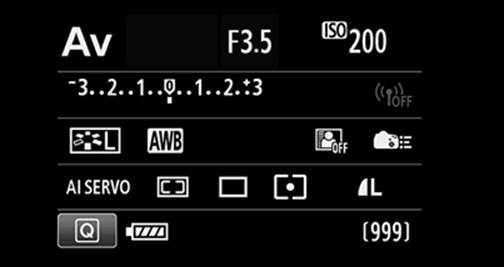
Figure 4-8. The Shooting Functions screen
Q button. Also known as the Quick Control button, this button has become my means of modifying exposure-controlling parameters.
You can navigate the Quick Control screen on the LCD Monitor by using the Multi-controller, pressing SET, then using the Main Dial or the Quick Control Dial to select the appropriate value and pressing SET. This can also be performed in what I consider a more elegant manner: press the Q button, and then use the touch feature to select the option to be changed. Select the desired value and press the U-turn icon in the lower-left corner to close the Quick Control screen. Either way gives you a much larger display with more information regarding the available options.
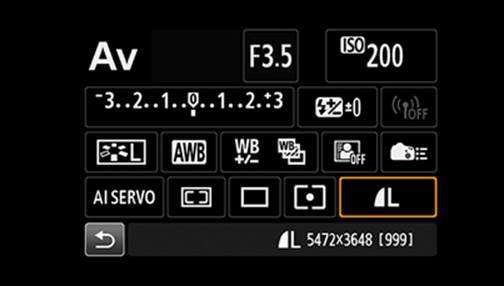
Figure 4-9. The Quick Control screen
MENU button. The MENU button brings a broad selection of menus to the LCD Monitor. There are Shooting menus that provide options that affect exposure, Playback menus to optimize the viewing of images already recorded on the memory card (as well as to offer some degree of post-processing right in the camera), Set Up menus that allow refinement of many factory-default values, and a Custom Function menu that allows customized configuration of many camera functions. There is even a My Menu menu to which you can save six of your most frequently used menu options. Part Four of this book is dedicated to menus and their options.
Live View. While working in macro photography, I’ve found Live View to be a valuable tool. An image created in the viewfinder is just as accurate as one displayed on the LCD Monitor while in Live View mode, but Live View’s larger screen allows more precise composition, especially at the edges of the image. A major advantage of Live View is the ability to press the Magnify button and have the displayed image magnified five times, centered on the focusing rectangle. Pressing the Magnify button again causes the original image to be magnified 10 times. (Pressing the Magnify button a third time resets the magnification to 1x.) This can be especially advantageous when dealing with a subject such as a simple flower blossom: often, you’ll want to ensure that the pollen-bearing anthers are in focus, but you also want to have those tiny dots at the base of the blossom in focus. With Live View Mode, I usually set the aperture somewhere in the f/11 to f/16 range, set the lens to MF (manual focus), compose the picture, use the touch feature or the Multi-controller to position the focusing rectangle over the area containing the anthers and the dotted base of the blossom, press the Magnify button once or twice to enlarge the view, and use the focusing ring on the lens to fine-tune my focus. Then comes the best part: I press the Depth-of-Field Preview button to see just how much of the enlarged area will be in focus. While continuing to press the Depth-of-Field Preview button, I make that final manual focus adjustment to yield an in-focus set of anthers as well as in-focus dots on the bottom of the blossom. Next I press the shutter button all the way down.
In normal processing, when you press the Depth-of-Field Preview button, the image darkens because the lens stops down to the aperture that will be used in the actual image capture. In Live View, the image does not darken and can actually brighten a bit, making that final focusing confirmation more specific and simple. Live View becomes even more valuable when you’re working with some older lenses that have great optics but don’t support all the automatic features today’s DSLRs expect. Setting all controls to manual, start in Live View and proceed through composition, focus, exposure, and capture.
Viewfinder. With the lens cap removed and the camera turned on, you should be able to see almost the complete view (about 98%) that the lens is capable of transmitting, as well as the spot metering circle in the center of the image and the currently-selected autofocus point.
Depressing the Shutter button halfway turns the camera’s meters on, and the results are displayed at the bottom of the viewfinder screen.
• At the extreme left, an exclamation mark will appear if you have selected any of the Warnings in the Viewfinder options in the Custom Functions C.Fn III-3 menu.
• To the right of that is an icon showing the approximate battery level. If illuminated but not flashing, the asterisk icon indicates that AE Lock is in effect. If the icon is blinking, it indicates that AE Bracketing is in effect.
• The lightning bolt icon indicates that the flash is ready.
• The asterisk shown with the flash-ready icon indicates that FE Lock is in effect. If that asterisk icon is flashing, the indication is that FE Bracketing is in effect.
• There is also an H that can appear with the flash-ready icon to indicate that high-speed sync has been set.
• The combination icon is displayed when the Shutter button is depressed halfway if Flash Exposure Compensation is in effect.
• Then come shutter speed and aperture.
• Next is the exposure level indicator, showing amount of exposure compensation, amount of flash exposure compensation, or AEB (auto-exposure bracketing) range.
• The ISO indicator serves to identify the contents of the field to its right.
• The D+ indicates that Highlight Tone Priority is in effect.
• The ISO Speed field shows the ISO value, either the preset ISO speed or the effective ISO when in Auto ISO mode.
• The maximum burst count is used if you are shooting continuously. Note that if the camera is capable of more than 99 continuous shots, the digits 99 will be displayed here until the count remaining falls below that point.
• At the far right is the green AF focus confirmation light.
• Under certain conditions, the following can be displayed (usually with no other data in the viewfinder) in the area normally used to display the shutter speed and aperture:
Busy (buSY) indicator
FE Lock (FEL)
Multi-function lock warning (L)
AF point selection icon
Error code (Err)
Memory card full warning (FuLL)
Other memory card warnings (Card)
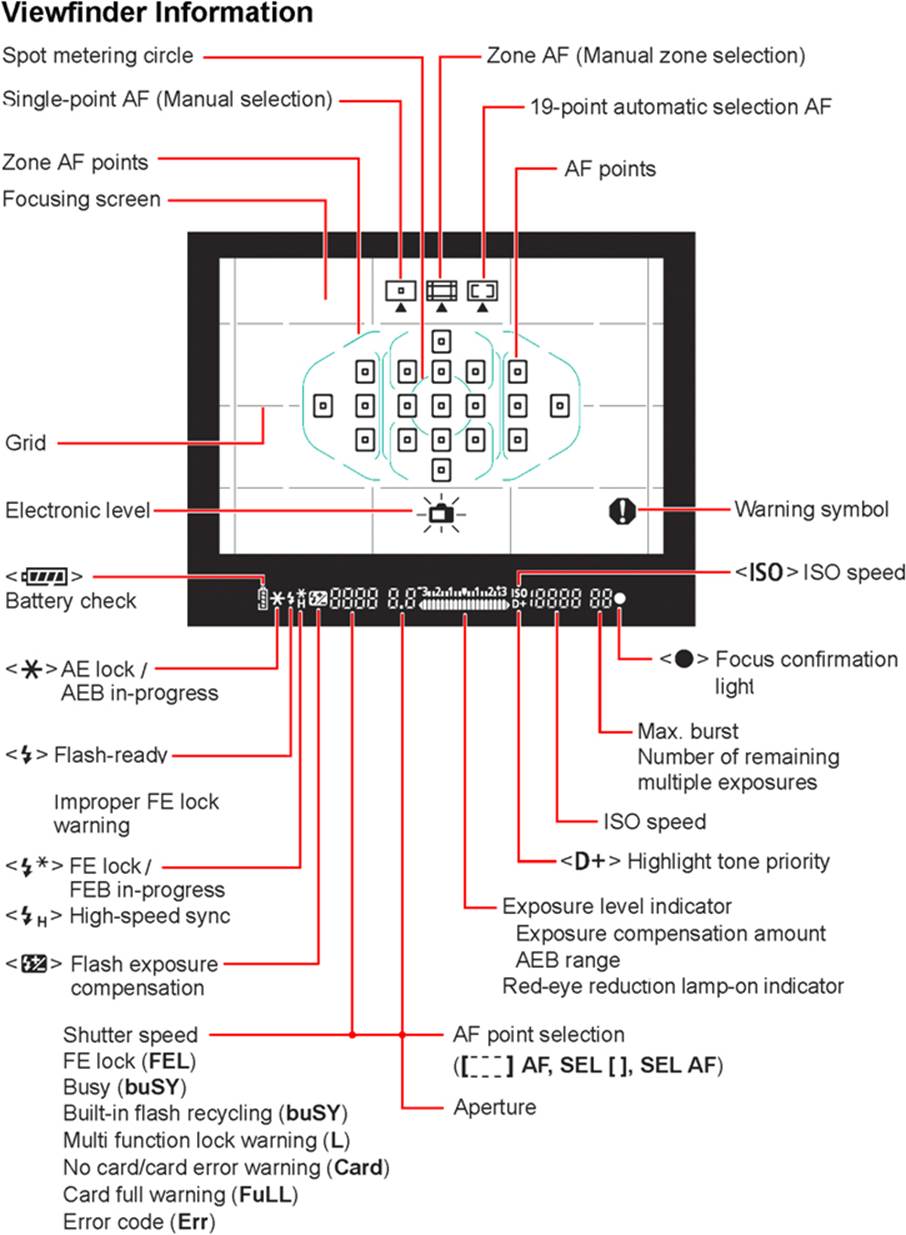
Figure 4-10. The complete viewfinder display. (Rather than attempt to recreate this page, I’ve borrowed it directly from Canon’s Instruction Manual.)
After an Exposure
It’s All in the LCD Monitor

Figure 4-11. The four INFO screens available in playback
The INFO button is the major tool for evaluating after-the-exposure images, either in Image Review mode (right after an exposure) or during playback. In either of these modes, the INFO button gives you four different screens styles to choose from:
1. (In the upper-left corner) A full-screen display of the image, with no other data.
2. (In the upper-right corner) A full-screen display of the image, with basic exposure data, folder and file information, and image number.
3. (In the lower-left corner) A quarter-screen display of the image, basic exposure data, folder and file information, the image number, and a quarter-screen brightness histogram, all above a field showing the date and time of day, image quality and size, exposure priority setting, AF type, ISO setting, Picture Style, color space, and White Balance setting.
4. (In the lower-right corner) A quarter-screen display of the image, basic exposure data, folder and file information, a set of RGB histograms, a brightness histogram, and a subset of camera settings (mode, White Balance setting, AF type, image quality and size, and image number). Note that if GPS data is recorded with an image, then that GPS data (north and west coordinates, elevation, UTC date and time) will replace the camera settings data that would appear below the image (see Figure 4-12).
Whichever screen style you have selected at the time when you exit the INFO screen is the screen style that will be displayed immediately after a new exposure or after you press the Playback button.
Data that is not specific to the memory card (e.g., folder and file data) is captured as EXIF data, and recorded as part of the image. To view this EXIF data in Adobe Bridge CC, select the image and click the Metadata tab (from the Essentials tab, ensure that the Metadata tab is selected [under the Preview window]). In Canon’s Digital Photo Pro (DPP) 3.13, select an image and then click Info on the menu bar. See Figure 4-13.
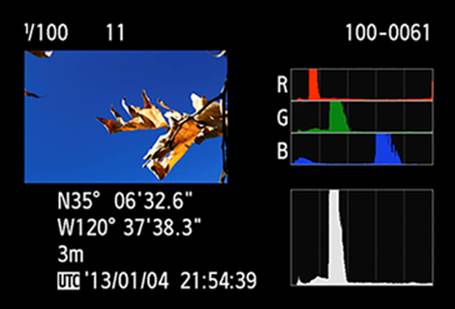
Figure 4-12. A typical “fourth screen”, when GPS data is available
Immediately after the exposure. The period of time for Image Review is factory set at two seconds. My reflexes are not as good as they used to be, so I’ve used the Image Review function in the Shoot1 menu to extend that time to eight seconds. That gives me sufficient time to confirm that something close to what I wanted has been captured, and decide whether I want to press the INFO button to look at other details of the exposure. Once on the INFO screen, the display time-out is determined by the Auto Power Off function in the Set Up2 menu, which provides a set of values ranging from 1 minute to 30 minutes, and even a Disable option that lets the camera continue to display the screen until you press another button or power off the camera.
During playback. Pressing the Playback button instructs the camera to display the most recently captured image in the format of the last INFO screen. Pressing the INFO button restructures the display based on the next INFO screen format. During playback, the Main Dial or the Quick Control Dial can be used to scroll through the captured images. Though a bit slower (unusual for the touch feature!), swiping your finger across the LCD Monitor will also let you scroll through these recorded images.
In the camera’s menu system, there are three menus of options for managing the playback of images on the memory card. We will discuss this subject of playback and related functions later.
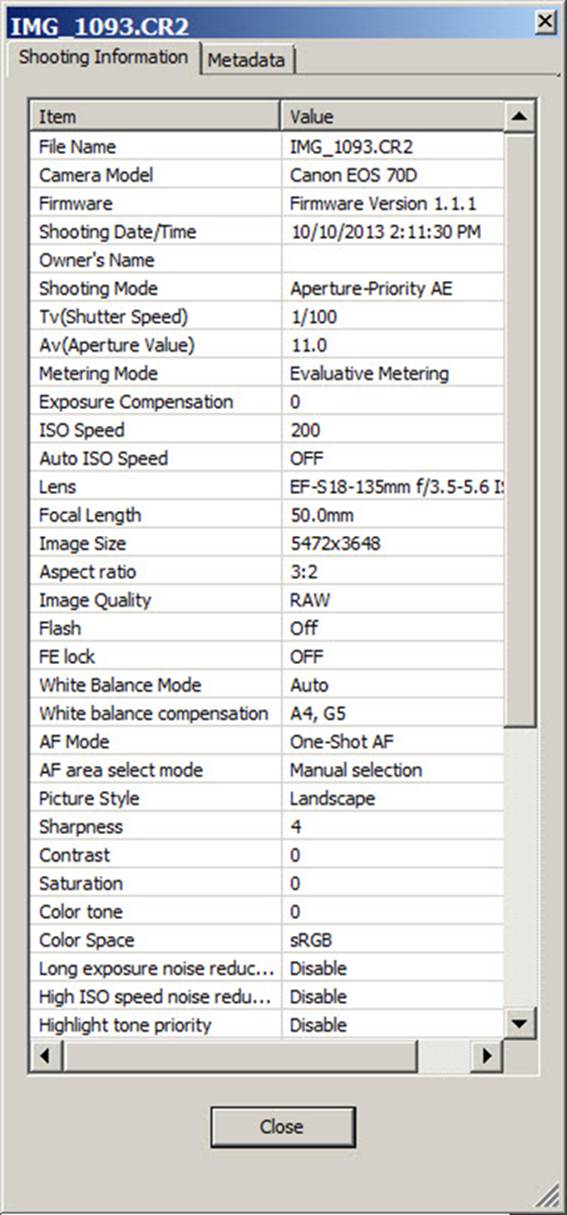
Figure 4-13. Canon DPP’s Info screen of EXIF data
All materials on the site are licensed Creative Commons Attribution-Sharealike 3.0 Unported CC BY-SA 3.0 & GNU Free Documentation License (GFDL)
If you are the copyright holder of any material contained on our site and intend to remove it, please contact our site administrator for approval.
© 2016-2026 All site design rights belong to S.Y.A.