Mastering the Olympus OM-D E-M1 (2015)
Chapter 2. Screen Displays for Camera Control
Image © Darrell Young
The Olympus OM-D E-M1 has very deep text menus to configure hundreds of camera settings, which we will consider in other chapters. The camera also has quite a few visual and touch screen displays for people who want to make basic camera adjustments with the built-in Live View monitor and touch screen.
The E-M1 is unusual in that it presents you with multiple ways to configure your favorite settings. Many settings can be adjusted visually, with the screens discussed in this chapter, or by using the text-based menu system. In some cases the menus let you configure things more deeply and offer more settings than the visual screens. Therefore, as we discuss the individual settings on the visual touch screens in this chapter, there will often be references to later chapters with even deeper configuration settings in the menus.
We will also explore various controls that allow the camera to use the visual side of the user interface, such as the Exposure (P, S, A, M), Scene (SCN), iAUTO, and Art modes; Photo Story; the video recording system; high dynamic range (HDR) imaging; and the Metering system.
To start our exploration of the camera’s visual touch interface, let’s first examine the important touch screens you may use nearly every time you take pictures, depending on your style of photography.
Note: In the other chapters of this book, I use numbered, step-by-step instructions to describe how to use the menu screens and subfunctions. In this chapter, I use paragraphs instead of numbered steps because describing how to use a visual screen requires a lot of words. Using the step-by-step method would not have allowed me to break some of the long, descriptive paragraphs into sections, and would have made the text difficult to read.
Super Control Panel
The Super Control Panel (figure 2.1A) is one of the first screens the camera will display when a new E-M1 is turned on for the first time.
As described in chapter 1, Camera Setup and Control Reference, you will need to set the camera’s date as one of the first steps. The red arrow in figure 2.1A points to the date. When you first turn on the camera it will list the month, day, and year in this location (abbreviated and in the form most used in your geographic area).

Figure 2.1A: The Super Control Panel
The Super Control Panel is a visual form of a few of the camera’s text menus, exposing some important settings for easy access. It contains 21 settings or functions that you can adjust, and each of them has a secondary screen. To access the Super Control Panel if it is not displayed on the rear monitor, simply press the LV button at the left of the viewfinder.
The Super Control Panel defaults to AF Area mode, which allows you to select one of the 81 AF points for targeted autofocus when you use a Micro Four Thirds lens (37 AF points with an older Four Thirds lens). Therefore, if you simply press the left or right keys on the Arrow pad when the Super Control Panel is active, you may find that the camera has changed to AF Area mode and displays a grid of 81 AF points on the screen. If that happens, select the middle AF point and press the OK button, which will return you to the Super Control Panel. We will discuss AF Area mode later in this section.
Using camera controls
When the Super Control Panel is active, press the OK button, and one of the settings, usually ISO, will be highlighted. When any function is highlighted, you can scroll around the Super Control Panel with the Arrow pad keys until the function you want to adjust is highlighted.
When a function is highlighted you can either turn the Front Dial to see the choices scroll by in the highlighted area, or you can press the OK button to enter the secondary screens for that Super Control Panel function.
Using the touch screen
If you prefer, you can use the touch screen to access the features on the Super Control Panel. If nothing is highlighted on the Super Control Panel, you must double-tap the screen to wake it up. When it is awake, simply touch one of the settings to highlight it. Double-tapping a setting will open a secondary screen in which you can make adjustments. Secondary Super Control Panel screens are not touch sensitive, so you must use normal camera controls (e.g., Arrow pad, Front Dial, and OK button) to change the settings. We will discuss this in more detail under the Touch Screen subheading, on page 76, later in this chapter.
Let’s examine each of the functions in the Super Control Panel.
ISO Sensitivity
The ISO function changes the camera’s sensitivity to light. The higher the ISO, the greater the sensitivity, and vice versa. Higher ISO sensitivities can add grainy digital noise to the darker areas of your image; therefore, keep the ISO as low as possible for the current lighting conditions.
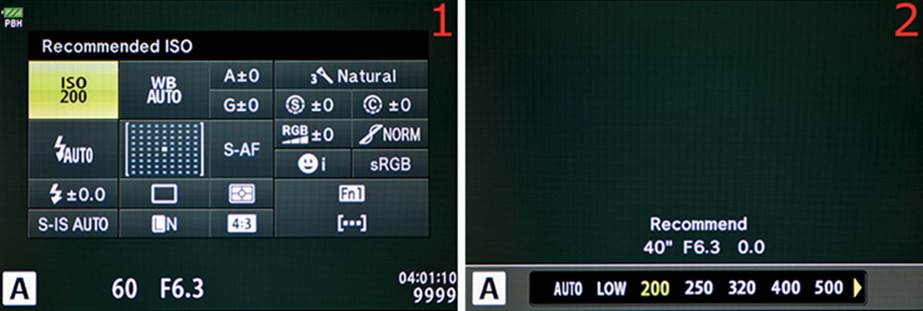
Figure 2.1B: Choosing an ISO sensitivity value or AUTO
The camera recommends ISO 200 as a base—you will see Recommended ISO displayed on the Super Control Panel and Recommend displayed on the secondary screen when you have ISO 200 selected (figure 2.1B). Of course, the ISO is variable, and you can change it to meet your needs.
To access the ISO sensitivity function, use the Arrow pad keys to highlight the ISO position, as shown in figure 2.1B, image 1. You can turn the Front Dial to select a new ISO sensitivity value, or you can press the OK button to enter the secondary ISO screen (figure 2.1B, image 2).
When the secondary ISO screen is active you will see a range of ISO sensitivity values at the bottom of the screen (figure 2.1B, image 2). Use the Arrow pad keys to scroll left or right and select an ISO sensitivity value, which will be highlighted. In figure 2.1B, image 2, you can see that200 is selected. The range of ISO values runs from LOW (ISO 100) to ISO 25600. You can also select AUTO, which allows the camera to select an ISO value depending on the ambient light conditions. AUTO is a great choice when you do not have time to adjust the ISO yourself. However, be aware that the camera will use high ISO values to get the picture in dark conditions, regardless of whether ISO noise is introduced. For the best quality, control the ISO sensitivity yourself.
When you have selected the ISO sensitivity value you want to use, press the OK button and the camera will return to the Super Control Panel with nothing selected.
Note: Olympus considers ISO 100 (LOW) to be an extended ISO value in the E-M1. The recommended base ISO is 200. When LOW is selected you will see ISO Extension displayed on the main Super Control Panel and Extension displayed on the secondary ISO screen. This simply means that LOW approximates ISO 100, which is outside the normal ISO range for the camera. Do not worry, ISO LOW works great, and I use it much of the time to capture low-noise images when the ambient light allows it.
Settings Recommendation: I usually leave my camera set to ISO 200, and I find that it has low noise for everyday photography. When I shoot landscapes on a tripod, I often set it to LOW (ISO 100). The camera does well up to about ISO 1600, even though the Micro Four Thirds sensor is small. I would use ISO values above 1600 only in emergencies because the noise levels may become objectionable. You should test this for yourself to see where your noise tolerance lies.
White Balance
The E-M1 offers a wide range of preset white balance (WB) values, plus several custom WB settings, for a total of 13 WB settings.
As you may know, WB affects how the image records color in the ambient light. White should record as white; it should not have a tint. Other colors should be recorded as they appear in real life.
This is a very important setting for people who shoot JPEG files. It is difficult to change the hue of a JPEG image after the fact, and the change lowers the quality of the image due to compression losses when the file is modified and saved more than once.
A photographer who shoots in RAW does not have to worry as much about WB because it can be changed after the fact in computer software, with no damage to the image. However, it is still good for RAW shooters to use the best WB because it saves time in the post-processing workflow (the digital darkroom).
Let’s see how to select a WB value from the Super Control Panel.

Figure 2.1C: Choosing a WB type
First let’s examine where the WB function is located on the Super Control Panel. It is highlighted in figure 2.1C, image 1. Use the Arrow pad keys to select that setting, and press the OK button to enter the secondary WB screen. Alternatively, you can turn the Front Dial to scroll through the 13 WB values shown at the bottom of the secondary screen without entering the secondary screen.
On the secondary screen you can select a WB value by scrolling left or right with the Arrow pad keys to highlight the WB value you want to use then pressing the OK button to lock in a value. I chose AUTO (figure 2.1C, image 2).
There are several preset WB values, as follows (in order of appearance on the screen): AUTO WB; five named WB values for specific light types (Sunny, Shadow, Cloudy, Incandescent, Fluorescent); an Underwater WB; a Flash WB; four custom Capture WB values that you can use for ambient light readings from a gray or white card; and CWB (custom white balance), which allows you to directly set a Kelvin (K) WB value from 2000 (cool blue) to 14000 (warm red). For a detailed study of each of these WB types, see the Custom Menu chapter under the Custom Menu > G. [Record Mode]/Color/WB > WB function on page 396. The Super Control Panel WB screen is a lite version of the function settings provided in the WB Custom Menu, as discussed on page 396. In this chapter we will discuss how to select settings. In the Custom Menu chapter we will discuss how, why, and when.
Fine-Tuning the WB
Notice the A±0 and G±0 selections to the right of the WB function in figure 2.1D, image 1. These selections allow you to fine-tune the currently selected WB value if you want to change the hue. A stands for amber, and G stands for green.
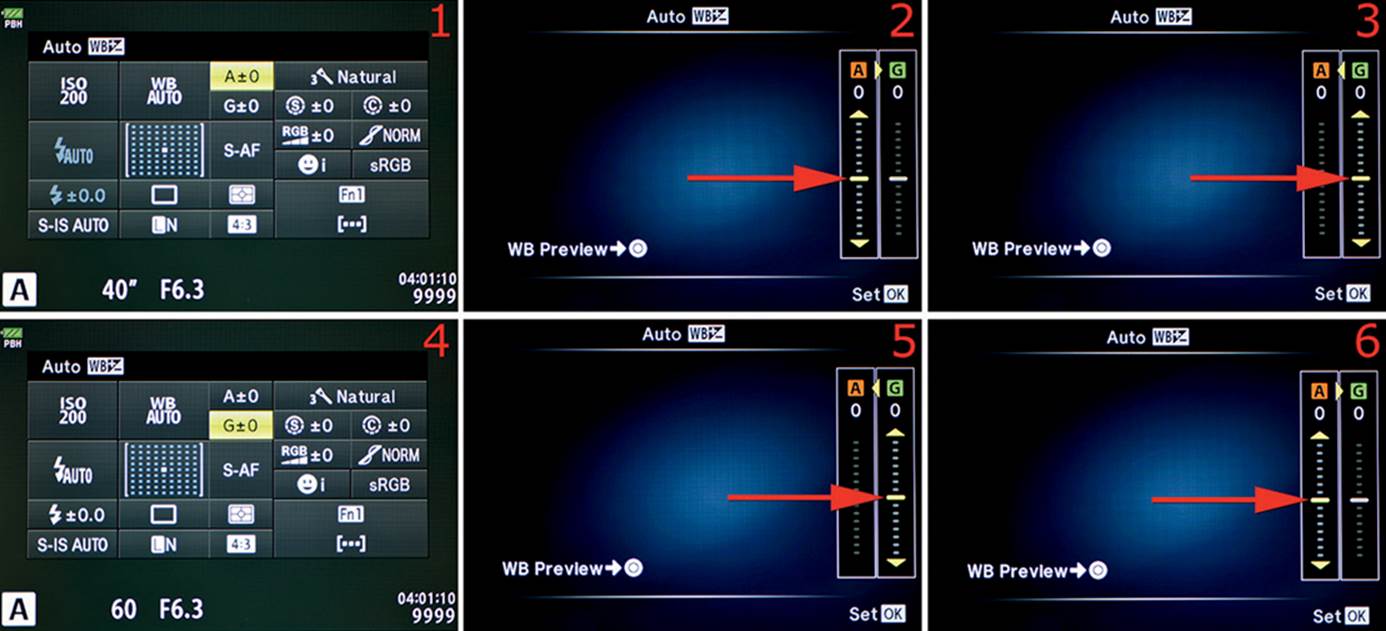
Figure 2.1D: Fine-tuning the amber and green white balance settings
Referring to figure 2.1D, select either the A±0 setting (image 1) or the G±0 setting (image 4) and press the OK button to enter the secondary screen. To adjust the A±0 or G±0 setting, use the screens shown in images 2 and 3, or 5 and 6 (respectively).
In image 2 the red arrow is pointing to the adjustment indicator for the A setting. The A±0 amber setting can be fine-tuned over a range of 14 increments (A+7 to A-7). Move the yellow bar shown at the point of the red arrow up (+) or down (-) with the Arrow pad keys. Press the Movie button to take a temporary picture with the new setting and display it on the screen. If you like the adjusted hue, press the OK button to Set the new value for the A (amber) fine-tuning value. In a similar manner, adjust the G (green) setting (image 3). You can reset the fine-tuning by returning the yellow indicator bar back to 0 for both A and G.
Repeat the previous instructions for the G±0 setting (figure 2.1D, images 4–6).
Capture WB Ambient Light Reading
Let’s examine how to do an ambient light reading from a white or gray card under the current light source and assign it to one of the four Capture WB memory locations for taking pictures later under the same light source.
In figure 2.1E, image 1, the first of four Capture WB values has been selected by turning the Front Dial. Use this setting to select a previously created Capture WB ambient light reading or to create a new one and save it in a Capture WB memory location. If you have not yet created anyCapture WB readings, read the following paragraphs.
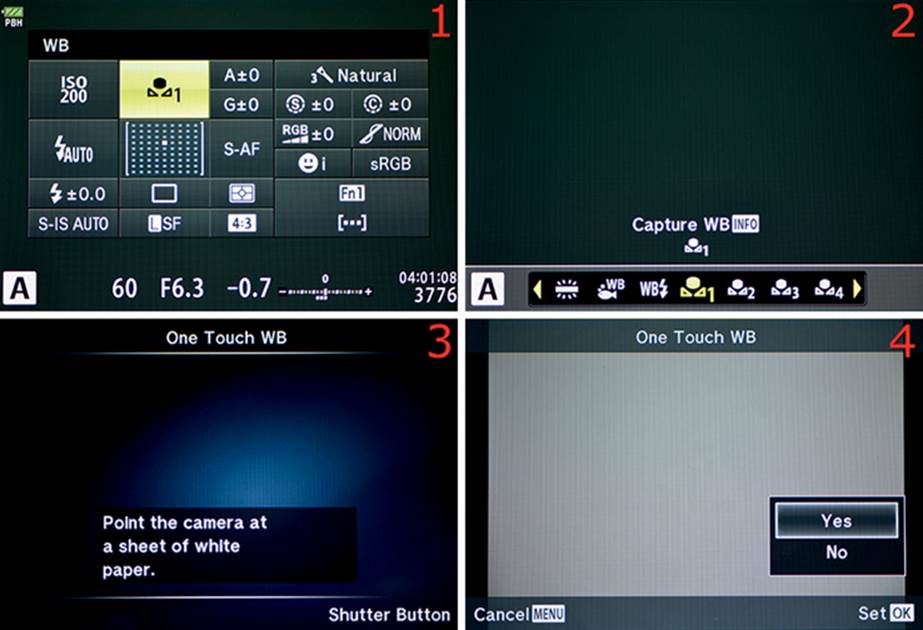
Figure 2.1E: Capturing an ambient WB reading from a gray or white card
To create and store a new Capture WB value, press the OK button when WB is selected on the Super Control Panel. Now scroll to one of the four Capture WB memory locations. You can identify the four Capture WB memory locations by their flower icons with numbers 1–4 (figure 2.1E, image 2). Notice also in image 2 that INFO is displayed after the Capture WB label. If you press the Info button while one of the Capture WB memory locations is selected, the camera will prepare for a Capture WB reading from a white or gray card.
Figure 2.1E, image 3, shows the screen that appears next. It tells you to Point the camera at a sheet of white paper. You can also use a standard gray card. After you have positioned the white or gray card in front of the lens, press the Shutter button to take a picture. The camera does not store the picture on the memory card. Instead, it makes an accurate WB reading from the white or gray card. The camera will not attempt to focus on the card; it will simply fire the shutter.
Note: If the camera cannot successfully make a Capture WB reading, it will display the following message to let you know the reading was unsuccessful: X [Flower icon] WB NG Retry.
Figure 2.1E, image 4, shows the screen after a successful Capture WB reading has been made. You can now decide whether you want to store the WB reading in the currently selected Capture WB location. To store the WB reading select Yes and press the OK button. If you do not want to save it, select No and press the OK button, or press the Menu button to cancel.
Your new Capture WB reading is now stored in the memory location you selected and has been applied to the camera for immediate or later use.
CWB Custom WB Kelvin Value
If you know how to use direct Kelvin (K) WB values and want to input your own custom white balance (CWB), you can input a range from 2000 K (cool) to 14000 K (warm), which is a significantly broader range than many other camera brands. Let’s see how it works.
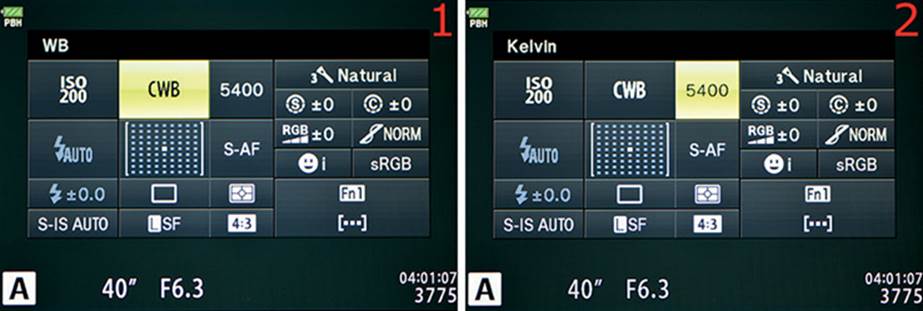
Figure 2.1F: Creating a custom white balance (CWB) reading
Select CWB by highlighting the WB function and turning the Front Dial until CWB appears (figure 2.1F, image 1).
Scroll to the right to select the K value (figure 2.1F, image 2), and rotate the Front Dial to select a K value between 2000 K (cool blue) and 14000 K (warm red). I chose 5400 K.
Press the OK button to lock in the CWB setting.
An alternate way to set a CWB value is to use the WB secondary screen, as follows.
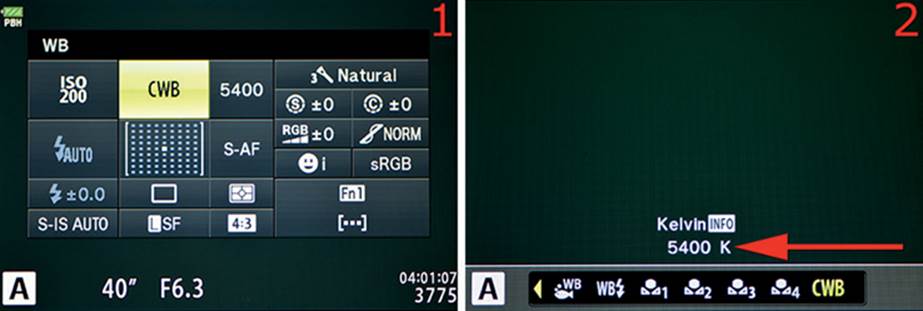
Figure 2.1G: Creating a custom white balance (CWB) reading with secondary screen
Highlight the WB function, as seen in figure 2.1G, image 1, and press the OK button to open the secondary WB screen (figure 2.1G, image 2).
Scroll until you find the CWB setting, which is located all the way to the right (the 13th setting). Press the Info button to highlight the value (figure 2.1G, image 2, red arrow), and rotate the Front Dial to select a K value between 2000 K (cool blue) and 14000 K (warm red). I chose 5400K.
Press the OK button to lock in the CWB setting.
Settings Recommendation: The WB system in the E-M1 is pretty flexible. I use AUTO WB most of the time. However, when I shoot without flash indoors, I have found that the camera makes fairly warm images—sometimes a bit too warm under incandescent light. Therefore, I often find a white subject and do a One Touch WB reading so the color temperature more closely matches the light. (One Touch WB is not available from the Super Control Panel. See page 399 for instructions.) You could also do a Capture WB ambient light reading, as previously described, or set the WB manually to something like Incandescent or Fluorescent when you are shooting under those light sources. For the best solution, shoot in a JPEG+RAW mode, which allows you to change the WB of the RAW file after the fact (Shooting Menu 1 > [Record Mode]).
Picture Mode
Individual Picture Modes impart a specific look to images. There are 23 modes available under the Super Control Panel main and secondary screens.
In this chapter we will discuss how to select individual Picture Modes. In the Shooting Menu 1 chapter, under the Picture Mode heading on page 136, we will discuss the how, when, and why of each Picture Mode in much greater detail.
Picture Modes permanently add stylish looks to JPEG images. RAW shooters can use the current Picture Mode setting or change Picture Modes after an image is taken and then save the file as a JPEG with a new look.
Let’s see how to select a Picture Mode, which also includes 14 of the camera’s ART modes.
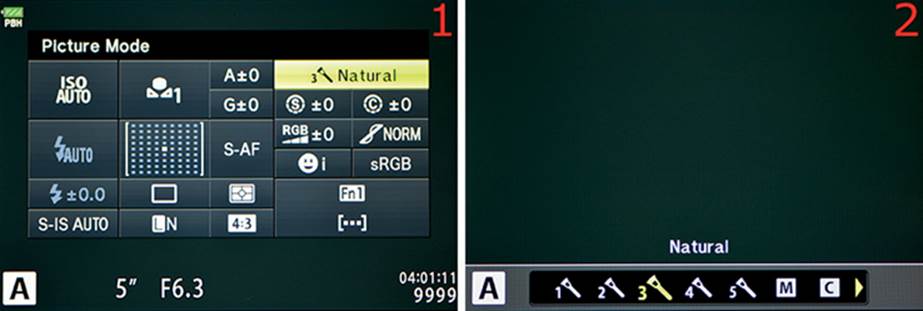
Figure 2.1H: Selecting a Picture Mode
In figure 2.1H, image 1, the Picture Mode function is highlighted. When you rotate the Front Dial a series of 23 Picture Modes will scroll by. When the Picture Mode you want to use is in the highlighted area, it is selected.
Another way to select a Picture Mode is to highlight Picture Mode (figure 2.1H, image 1) and press the OK button, which will open the secondary screen (figure 2.1H, image 2). Highlight the mode you want to use then press the OK button to select it. I chose 3, which is Natural Picture Mode.
Partial Color Picture Mode
The Picture Mode called ART 14 Partial Color allows you to choose a narrow range of color to appear in your image; all other hues become shades of gray. Let’s see how to use it.
Choose the Picture Mode position on the Super Control Panel (figure 2.1I, image 1) and press the OK button to enter the secondary screen.
Scroll to the right until you reach the last Picture Mode selection, ART 14 (figure 2.1I, image 2). Press the Info button to open the Partial Color screen.
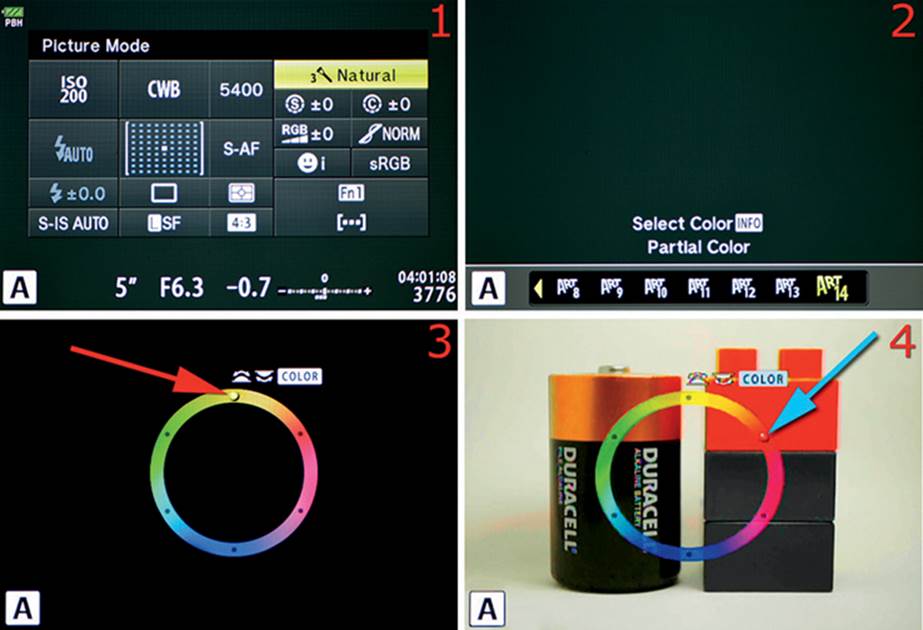
Figure 2.1I: Using the ART 14 Partial Color Picture Mode
The Partial Color screen (figure 2.1I, image 3) allows you to select a narrow range of color to include in your image, with all other colors rendered in grayscale. I left the cap on my lens in image 3 so you can see the Partial Color screen with a black background. Notice the small indicator at the top of the color circle (red arrow). You can move this indicator into the color range areas with either the Front Dial or Rear Dial. The colors of the rainbow are available to you as you move the indicator.
In figure 2.1I, image 4, you can see that I moved the indicator into the red zone of the color wheel (blue arrow). Notice that this zone allows the red block in the image to display in red, and the lower two blocks, which are actually green and blue, display in shades of gray. Also notice that the copper color of the battery top is displayed. As you move the indicator around the color wheel, you will see changes in the colors of your image. The colors fade to gray as you move the indicator into and out of the color ranges. When you have selected the color range that gives you thePartial Color look you desire, press the OK button and take the picture.
When you are done, be sure to cancel Partial Color mode by selecting a Picture Mode other than ART 14.
Note: We will discuss the Partial Color system again, in greater detail, in the Shooting Menu 1 chapter under the Partial Color (Art 14) subheading on page 172.
Picture Mode: Sharpness, Contrast, Saturation, and Gradation
Most of the Picture Modes allow you to fine-tune several variables. Non-ART color Picture Modes provide four specific fine-tuning adjustments: Contrast, Sharpness, Saturation, and Gradation.
Let’s see how to adjust these values for Picture Modes that allow it.
Sharpness
In figure 2.1J, image 1, you can see that 3 Natural Picture Mode is selected. In the highlighted area just below Natural, an S in a circle and a ±0 symbol is displayed. This is the Sharpness setting. Sharpness affects how well you can see fine details in an image.
When you adjust the Sharpness it applies only to the Picture Mode shown in the Super Control Panel; it does not affect any other Picture Modes. With S±0 highlighted, press the OK button to open the secondary screen.
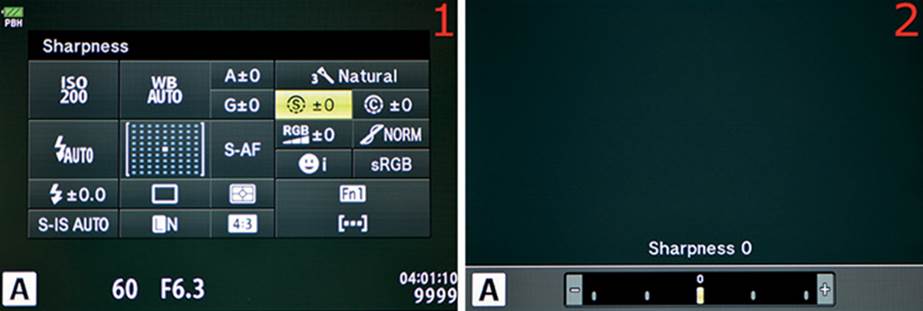
Figure 2.1J: Fine-tuning Sharpness
On the secondary screen (figure 2.1J, image 2) you can adjust the Picture Mode Sharpness over a range of four increments (+2 to –2). Move the yellow indicator bar under the 0 to the left or right with the Arrow pad keys (toward the – or + signs) to add or subtract Sharpness for that Picture Mode. Press the OK button to lock in your choice.
Contrast
In figure 2.1K, image 1, you can see that the 3 Natural Picture Mode is selected. The highlighted area just below Natural shows a C in a circle and a ±0 symbol. This is the Contrast setting.
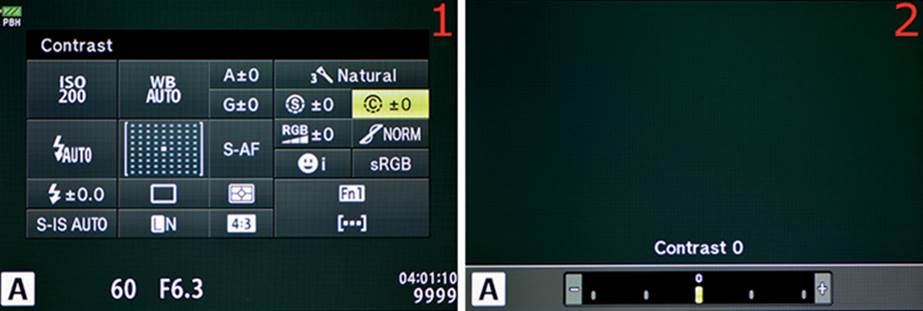
Figure 2.1K: Fine-tuning Contrast
Contrast affects the relationship between light and dark in the image. High-contrast images have very dark blacks, very bright whites, and strong colors. Low-contrast images often have weak light and dark areas and muted colors.
When you adjust the Contrast setting it applies only to the Picture Mode shown in the Super Control Panel; it does not affect any other Picture Modes. With C±0 highlighted, press the OK button to open the secondary screen.
On the secondary screen (figure 2.1K, image 2) you can adjust the Picture Mode Contrast over a range of four increments (+2 to –2). Move the yellow indicator bar under the 0 to the left or right with the Arrow pad keys (toward the – or + signs) to add or subtract Contrast for that Picture Mode. Press the OK button to lock in your choice.
Saturation
In figure 2.1L, image 1, you can see that the 3 Natural Picture Mode is selected. RGB and a ±0 symbol is displayed in the highlighted area below Natural. This is the Saturation setting.
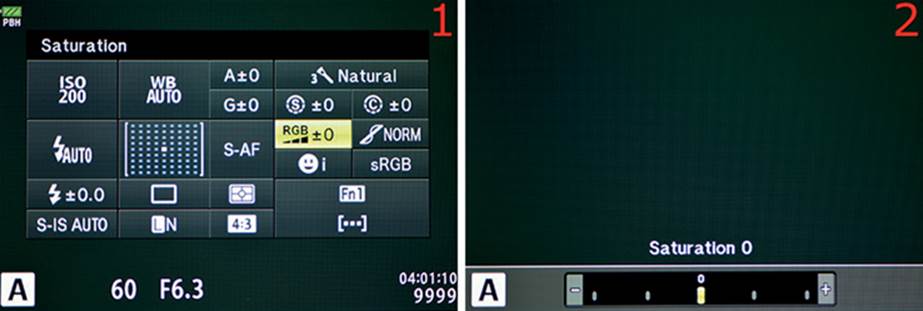
Figure 2.1L: Fine-tuning Saturation
Saturation affects how strong the colors in an image appear. A high-saturation image will have strong, bold colors; a low-saturation image will have weaker, muted colors.
When you adjust the Saturation setting it applies only to the Picture Mode shown in the Super Control Panel; it does not affect any other Picture Modes. With RGB±0 high-lighted, press the OK button to open the secondary screen.
On the secondary screen (figure 2.1L, image 2) you can adjust the Picture Mode Saturation over a range of four increments (+2 to –2). Move the yellow indicator under the 0 to the left or right with the Arrow pad keys (toward the – or + signs) to add or subtract color Saturation for that Picture Mode. Press the OK button to lock in your choice.
Gradation
In figure 2.1M, image 1, you can see that the 3 Natural Picture Mode is selected. On a new E-M1, NORM is displayed in the highlighted area below Natural; however, on a preowned camera it might show AUTO, HIGH, or LOW. This is the Gradation setting.
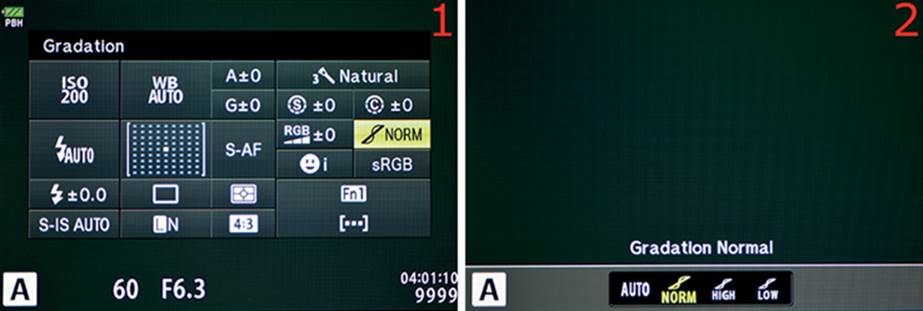
Figure 2.1M: Fine-tuning Gradation
Gradation affects the smoothness with which colors change into other shades. Here are the four Gradation settings and a brief description of each:
• AUTO: The camera divides the image into detailed regions and adjusts the brightness for each region on an individual basis. The camera decides how to handle gradation, with special attention on resolving the smoothness between areas of very high contrast.
• NORM: This is the default. It provides a smooth look between contrast and color changes for everyday photography.
• HIGH: This mode is best used for high-key subjects that tend to have very bright highlights and little darkness in the image.
• LOW: This mode is best used for low-key subjects that tend to be dark and have few bright areas in the image.
When you adjust the Gradation it applies only to the Picture Mode displayed in the Super Control Panel; it does not affect any other Picture Modes. With NONE (or another mode) highlighted, press the OK button to open the secondary screen.
On the secondary screen (figure 2.1M, image 2) you can adjust the Picture Mode Gradation by using the Arrow pad keys to select one of the four available modes: AUTO, NORM, HIGH, and LOW. Your Gradation choice affects only the current Picture Mode. Press the OK button to lock in your choice.
Monotone Picture Mode
The Monotone Picture Mode is a little different than the color Picture Modes. It has the normal Sharpness and Contrast adjustments as discussed in the previous subsections. However, Monotone does not have Saturation or Gradation settings. Instead, it substitutes a B&W Filter and Pict. Tone setting in place of Saturation and Gradation.
B&W Filter
In figure 2.1N, image 1, you can see that the M Monotone Picture Mode is selected. Below that is an F in a circle, followed by N. The F stands for B&W Filter, and N is one of the settings (Neutral).
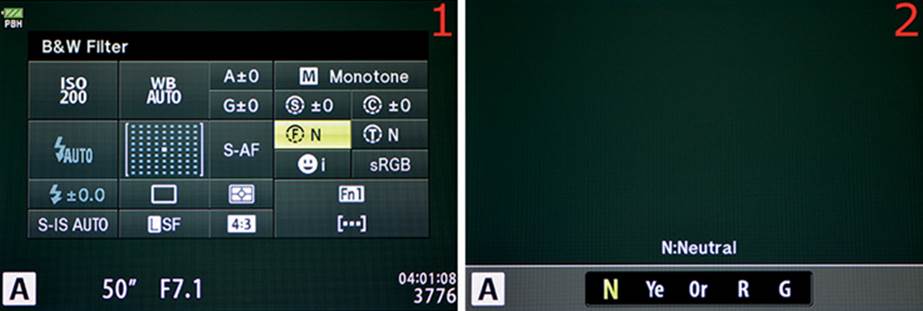
Figure 2.1N: Using the B&W Filter mode
The B&W Filter setting gives you four filter effects that allow you to change how the camera records various colors. Like glass lens filters that can be used to darken the sky or lighten the clouds, you can achieve similar effects with the four filters in the E-M1. Here are the four B&W Filtersettings, with a brief description of each:
• N (Neutral): Makes a normal black-and-white image.
• Ye (Yellow): Makes clearly defined white clouds and a sky with normal brightness.
• Or (Orange): Moderately emphasizes blue skies and sunset colors.
• R (Red): Strongly emphasizes red and crimson colors. Makes blue skies with clouds that are dark and contrasty.
• G (Green): Strongly emphasizes green and red.
On the secondary screen (figure 2.1N, image 2) you can choose one of the Monotone Picture Mode B&W Filters by scrolling to it and highlighting it with the Arrow pad keys. Your choice affects the Monotone Picture Mode only. Press the OK button to lock in your choice.
Pict. Tone
In figure 2.1O, image 1, you can see that the M Monotone Picture Mode is selected. A circled T followed by N is highlighted below Monotone. The T stands for Pict. Tone, and N is one of the settings (Neutral).
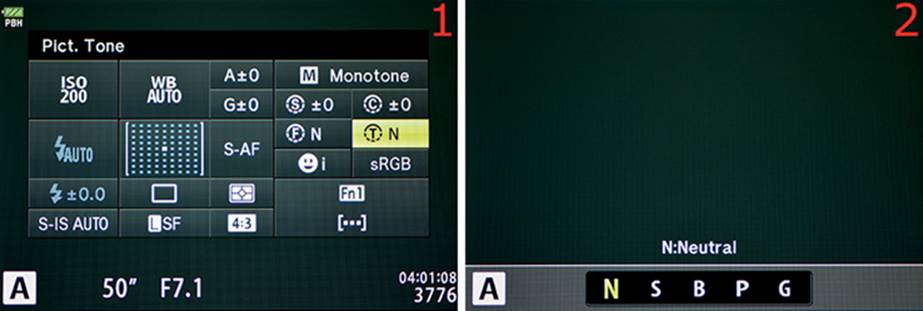
Figure 2.1O: Using the Pict. Tone setting
The Pict. Tone setting gives you four special effects that allow you to change how the camera records various colors. Here are the four Pict. Tone settings, with a brief description of each:
• N (Neutral): Makes a normal black-and-white image.
• S (Sepia): Makes a monotone image with a sepia (brownish) color.
• B (Blue): Makes a monotone image with a light blue tint.
• P (Purple): Makes a monotone image with a light purple tint.
• G (Green): Makes a monotone image with a light green tint.
On the secondary screen (figure 2.1O, image 2) you can choose a Pict. Tone setting by scrolling to it and highlighting it with the Arrow pad keys. Your choice affects the Monotone Picture Mode only. Press the OK button to lock in your choice.
Note: ART Picture Modes provide fine-tuning controls in a different way. The adjustments to the ART Modes are not available from the Super Control Panel. Instead, you must use the Shooting Menu 1 > Picture Mode settings to adjust the Filter Types and Add Effects. See the Shooting Menu 1 chapter under the subheading Using Art Picture Modes on page 152.
Settings Recommendation: For everyday shooting I usually choose Natural Picture Mode. However, for some types of nature shooting I may use Vivid Picture Mode to pop the colors. When I need the widest dynamic range for nature shooting, I may use the Muted Picture Mode then later increase the saturation and contrast manually for the best look. For portraits I often use Portrait Picture Mode to preserve natural-looking skin tones. When I am feeling adventurous, I even use some of the Art Modes. They can be quite fun! It’s good that we have so many choices.
![]() Face Priority AF Mode
Face Priority AF Mode
The ![]() Face Priority AF mode is designed to make your camera extra sensitive to human faces. When this mode is enabled, the E-M1 will detect human faces, adjust the focus to capture them sharply, and tweak the camera’s metering system to expose more accurately for human skin tones.
Face Priority AF mode is designed to make your camera extra sensitive to human faces. When this mode is enabled, the E-M1 will detect human faces, adjust the focus to capture them sharply, and tweak the camera’s metering system to expose more accurately for human skin tones.
Additionally, you can select Eye Priority and even choose which eye to focus on. When any type of ![]() Face Priority is active, the camera looks for human faces in the subject area and gives them priority for exposure. It then uses the selected type of
Face Priority is active, the camera looks for human faces in the subject area and gives them priority for exposure. It then uses the selected type of ![]() Face Priority to decide how to autofocus. Let’s examine the five available modes:
Face Priority to decide how to autofocus. Let’s examine the five available modes:
• Off: ![]() Face Priority is off.
Face Priority is off.
• ![]() : The camera uses
: The camera uses ![]() Face Priority for autofocus and exposure.
Face Priority for autofocus and exposure.
• ![]() i: The camera uses the pupil of the nearest eye for the best autofocus.
i: The camera uses the pupil of the nearest eye for the best autofocus.
• ![]() iR: The camera uses the pupil of the right eye for the best autofocus.
iR: The camera uses the pupil of the right eye for the best autofocus.
• ![]() iL: The camera uses the pupil of the left eye for the best autofocus.
iL: The camera uses the pupil of the left eye for the best autofocus.
In figure 2.1P, image 1, you can see that ![]() i (Face and nearest Eye Priority) is turned on. Highlight the
i (Face and nearest Eye Priority) is turned on. Highlight the ![]() Face Priority position on the Super Control Panel. You can now use the Front Dial of the camera to scroll through the various modes and stop scrolling when your favorite mode appears. Alternately, you can use the secondary screen to select a mode, as described next.
Face Priority position on the Super Control Panel. You can now use the Front Dial of the camera to scroll through the various modes and stop scrolling when your favorite mode appears. Alternately, you can use the secondary screen to select a mode, as described next.
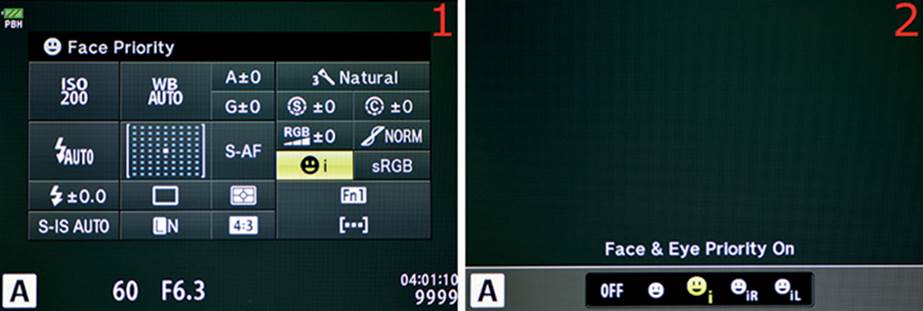
Figure 2.1P: Selecting a Face & Eye Priority mode
Figure 2.1P, image 2, shows the ![]() Face Priority modes along the bottom of the screen. Use the Arrow pad keys to scroll back and forth until the mode you want to use is highlighted. Press the OK button to lock in your choice.
Face Priority modes along the bottom of the screen. Use the Arrow pad keys to scroll back and forth until the mode you want to use is highlighted. Press the OK button to lock in your choice.
Settings Recommendation: I have found that the camera works well with some form of ![]() Face Priority mode always active. It focuses normally on nonhuman subjects when no face is present, and it uses face detection only when it can detect human faces. I normally leave
Face Priority mode always active. It focuses normally on nonhuman subjects when no face is present, and it uses face detection only when it can detect human faces. I normally leave ![]() i (Face & Eye Priority) set to On.
i (Face & Eye Priority) set to On.
Color Space
The Color Space setting allows you to change the color gamut that your camera uses. That means the camera can capture colors over a narrower or wider range. Adobe RGB can capture color over a wider range than sRGB. Adobe RGB can capture about 50 percent of the color range that an average human eye can see, whereas sRGB can capture about 35 percent.
However, there are other factors to consider before you select a Color Space setting. For instance, websites, basic home inkjet printing, and retail color printing labs normally use sRGB because most amateur shooters use that camera setting. Commercial printers (books and magazines) and stock photo agencies prefer Adobe RGB.
This subject in considered in greater detail in the Custom Menu chapter under the subheading Color Space on page 407. Please read that section to more fully understand the consequences of selecting one Color Space setting over the other.
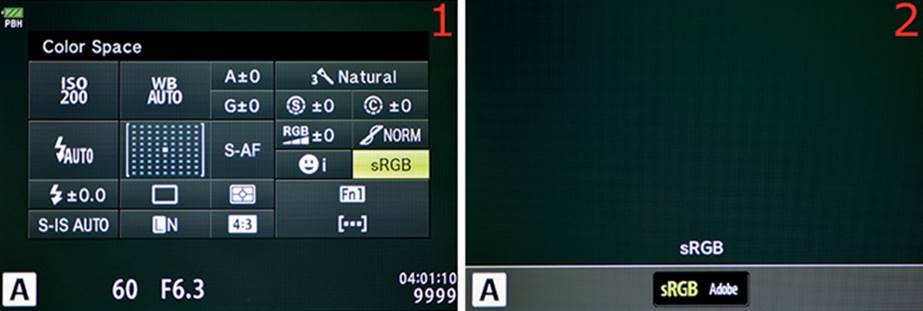
Figure 2.1Q: Choosing a Color Space
In figure 2.1Q, image 1, you can see that sRGB is selected. This is the Color Space position on the Super Control Panel. When it is highlighted, use the Front Dial to toggle between the two Color Spaces, and stop turning the dial when your favorite appears. Alternately, you can use the secondary screen to select a Color Space, as described next.
Figure 2.1Q, image 2, shows the Color Space selections along the bottom of the screen. Use the Arrow pad keys to scroll back and forth until the mode you want to use is highlighted. Press the OK button to lock in your choice.
Settings Recommendation: As a stock photographer who licenses images online, I generally use the Adobe RGB Color Space because it maps well to CMYK offset printing that is used by commercial printers. Most stock sites expect you to submit images with the Adobe RGB Color Space. However, when I am shooting snapshots for online use, I use sRGB because it better matches the requirements of websites and home color inkjet printers.
Flash Mode
The E-M1 offers you a choice of eight flash modes. Let’s examine each mode and see what it does:
• Flash Auto: The camera controls the flash. It will fire when the camera senses that the light is too low for a good picture. It will not fire when the camera meter says the ambient light is sufficient.
• Redeye: This mode tries to cause the subject’s pupils to contract by firing a preflash and blinking the red AF illuminator light on the camera body twice before the main flash fires. This may reduce the eerie red-eye look that can be seen in so many pictures.
• Fill in: This mode puts the flash entirely in your control. The flash will fire each time you take a picture, and it will attempt to balance the flash with ambient light (it fills in).
• Flash Off: The flash is off and will not fire.
• Red-Eye Slow: This mode executes the same actions as the Redeye mode mentioned previously; however, it also uses Slow flash, as described next. Basically, the camera fires a preflash to reduce red eye and also uses shutter speeds that can get very slow in dim ambient light. Therefore, this mode helps you use mostly ambient light to illuminate the subject, adds some fill light from the flash, and does red-eye reduction for good measure.
• Slow: This mode fires the flash as soon as the first curtain of the shutter is fully open. Then, if the ambient light is dim, it allows the shutter to remain open to pull in background light. If you are shooting in low light it is best to use a tripod for this mode (and other modes that use Slow), or at least brace yourself against a solid object when you take the picture. Otherwise, you may have a well-exposed subject with ghosting from camera movement after the flash fires. If a subject is moving when you use this mode, a ghosted trail may appear in front of the subject. Basically, Slow mode fires the flash at the beginning of the shutter speed time and allows the camera to continue gathering light for the rest of the time the shutter is open.
• Slow2: This mode operates like Slow mode, except it fires the flash at the end of the shutter speed time, just before the second shutter curtain closes. In effect, the camera has already made an ambient light exposure before it fires the flash. For that reason, this mode is often called rear-curtain or second-curtain flash. If the subject is moving, a ghosted trail may appear behind the subject. Many people use this mode to imply motion in photographs.
• Manual Value: You can manually choose a flash power, as described in the paragraphs accompanying figure 2.1S. You can choose from the range of full power (Full) to 1/64 of full power.
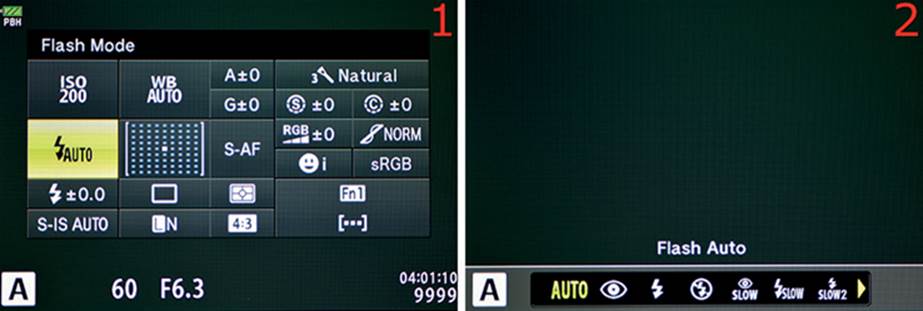
Figure 2.1R: Choosing a Flash Mode
In figure 2.1R, image 1, you can see that the Flash Mode position is highlighted. You can turn the Front Dial to scroll through the eight available modes and stop when the symbol of the mode you want to use is highlighted. If you don’t know what the symbols mean, it may be best to use the secondary screen because it displays both the symbol and the name of the mode above the symbol area. Press the OK button to enter the secondary screen.
In figure 2.1R, image 2, the secondary screen is open. Along the bottom of the screen you can scroll left or right with the Arrow pad keys and select the mode you prefer. The name of the mode will appear where you can see Flash Auto in image 2. I chose AUTO; the word AUTO is highlighted, and the words Flash Auto are displayed above the symbol area. Press the OK button to lock in your chosen Flash Mode.
Manual Value Flash Mode
For studio shooters or individuals who prefer to very carefully control the flash output, Manual Value Flash Mode is available. This mode, as described in the previous list, allows you to manually choose a flash output power from a range of 1/64 power to Full power. Let’s see how to use the Manual Value mode.
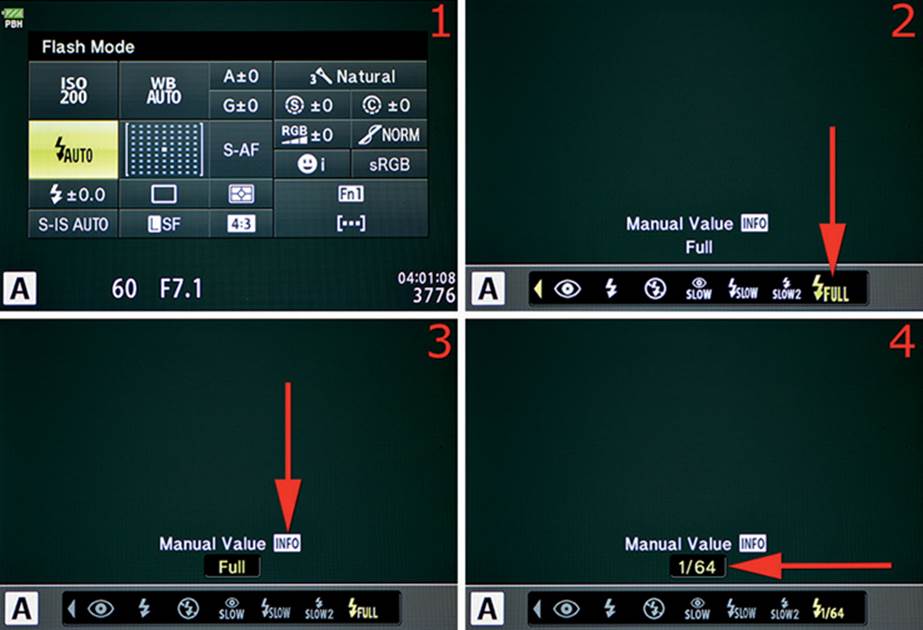
Figure 2.1S: Choosing a Manual Value for manual flash output control
In figure 2.1S, image 1, the Flash Mode position is highlighted. Press the OK button to open the secondary screen.
Choose the Manual Value flash symbol at the far right end of the Flash Mode choices by highlighting it (figure 2.1S, image 2). If this mode has not been moved from maximum power, it will display a small lightning bolt symbol and the word Full.
Press the Info button to enable the adjustment system (figure 2.1S, image 3). Notice that the word Full just below Manual Value Info becomes a field that accepts input when you press the Info button.
Rotate the Front Dial to change the values in the input field. I chose 1/64 power, which is the lowest output setting (figure 2.1S, image 4). Again, the range of flash output is from 1/64 to Full.
After you have chosen the value you want to use, press the OK button to lock it in.
Settings Recommendation: I use the Fill in flash mode most of the time. It seems to balance the flash well with ambient light, and the mode lets me, not the camera, decide when to use flash. When I first got my E-M1, I was shooting a graduation ceremony and could not get the flash to fire when I photographed the graduation cake with white icing. After much frustration, I realized that the E-M1 defaults to AUTO flash. The camera thought there was sufficient light without flash, so it would not fire the flash. I no longer use AUTO mode! However, if you are shooting for fun or don’t have much experience with flash, AUTO is good for helping you decide when to use flash. The other modes (e.g., Slow, Slow2) are available for when you want special effects. Redeye seems to help somewhat for reducing the red-eye effect in portraits, but you should warn the subjects to stand still until after the second flash—first there is the preflash to reduce pupil size, then the main flash fires.
AF Area Mode and ![]() Face Priority
Face Priority
The AF Area mode affects which AF point, or points, are used when you initiate autofocus. You can select a single point anywhere in the grid of 81 AF points (37 AF points with an older Four Thirds lens), or you can use a group of AF points. You can move the individual AF point or the group of AF points around the grid by pressing the Arrow pad keys. This allows you to move one or more points to a particular area of the subject—such as an eye—as you view it on the Live View screen or through the electronic viewfinder (EVF) to ensure the best autofocus.
The ![]() Face Priority mode allows you to choose different ways to detect human faces. We discussed
Face Priority mode allows you to choose different ways to detect human faces. We discussed ![]() Face Priority in a previous section of this chapter,
Face Priority in a previous section of this chapter, ![]() Face Priority AF Mode. The interface we will discuss here is another way to access the
Face Priority AF Mode. The interface we will discuss here is another way to access the ![]() Face Priority system.
Face Priority system.
Let’s discuss how to use AF Area mode and see how ![]() Face Priority mode can be accessed from this screen.
Face Priority mode can be accessed from this screen.
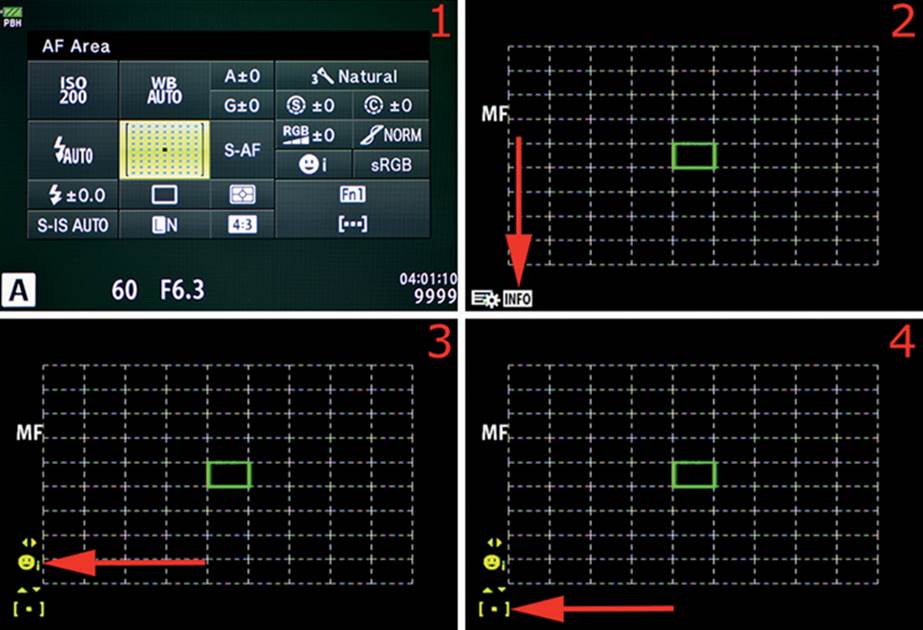
Figure 2.1T: Choosing a ![]() Face Priority mode, AF point location, AF point size, and AF point pattern
Face Priority mode, AF point location, AF point size, and AF point pattern
In figure 2.1T, image 1, you can see that the AF Area mode position is highlighted. Press the OK button keys to see a larger version of the grid. You can use the Arrow pad buttons to move the AF point to any of the locations in the grid and press the OK button to select it for autofocus.
In figure 2.1T, image 2, the center AF point is selected. You can move the AF point with the Arrow pad buttons, or you can change it to a group of points (figure 2.1U) that can also be moved around the screen. In figure 2.1T, image 2 (red arrow) you can see that INFO is displayed. Press the Info button to open two more adjustments. Once you have pressed the INFO button, scrolling left or right with the Arrow pad buttons changes ![]() Face Priority modes and scrolling up or down changes AF Area modes.
Face Priority modes and scrolling up or down changes AF Area modes.
In figure 2.1T, image 3 (red arrow), you can see the ![]() Face Priority adjustment, and below that is the AF Area mode adjustment. Let’s first consider the
Face Priority adjustment, and below that is the AF Area mode adjustment. Let’s first consider the ![]() Face Priority mode adjustment. Select a
Face Priority mode adjustment. Select a ![]() Face Priority setting by pressing the left or right Arrow pad keys, which will scroll though the five
Face Priority setting by pressing the left or right Arrow pad keys, which will scroll though the five ![]() Face Priority settings. Here is a list of the five settings and what they do:
Face Priority settings. Here is a list of the five settings and what they do:
• Off: ![]() Face Priority is off.
Face Priority is off.
• ![]() : The camera uses
: The camera uses ![]() Face Priority for autofocus and exposure.
Face Priority for autofocus and exposure.
• ![]() i: The camera uses the pupil of the nearest eye for the best autofocus.
i: The camera uses the pupil of the nearest eye for the best autofocus.
• ![]() iR: The camera uses the pupil of the right eye for the best autofocus.
iR: The camera uses the pupil of the right eye for the best autofocus.
• ![]() iL: The camera uses the pupil of the left eye for the best autofocus.
iL: The camera uses the pupil of the left eye for the best autofocus.
The ![]() Face Priority setting causes the camera to use the human faces it detects to calculate the best exposure, and it varies the autofocus method depending on which you select. In figure 2.1T, image 3,
Face Priority setting causes the camera to use the human faces it detects to calculate the best exposure, and it varies the autofocus method depending on which you select. In figure 2.1T, image 3, ![]() Face Priority is set to
Face Priority is set to ![]() i (nearest eye autofocus). Scroll left or right until the
i (nearest eye autofocus). Scroll left or right until the ![]() Face Priority mode you want to use is displayed.
Face Priority mode you want to use is displayed.
Now let’s consider the AF Area mode adjustment. In figure 2.1T, image 4 (red arrow), you can see the AF Area mode adjustment. Scroll up or down with the Arrow pad keys to see a series of AF Area modes (figure 2.1U).
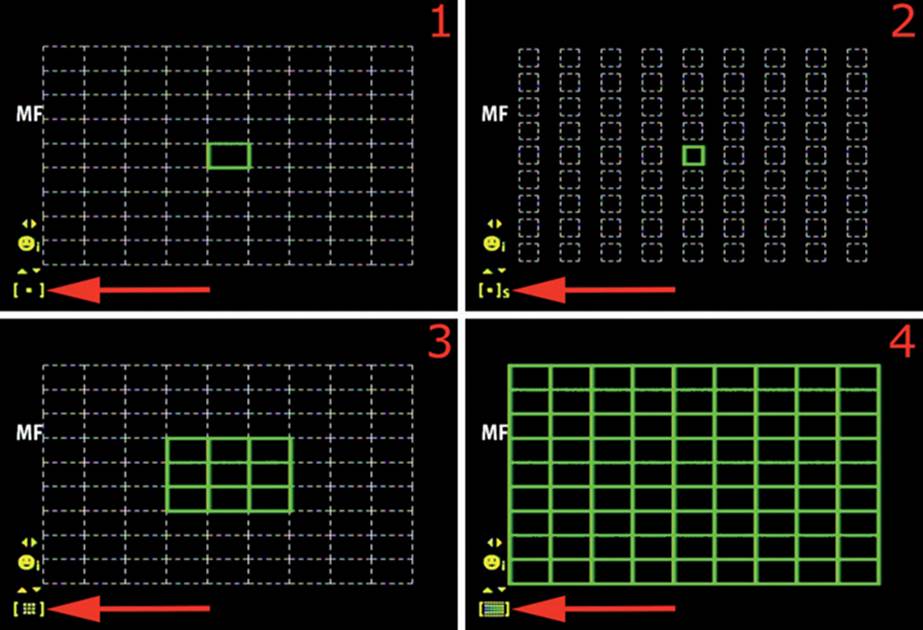
Figure 2.1U: Four AF point arrangements
Figure 2.1U, image 1 (red arrow), shows the normal grid of 81 AF points that is available when you use a Micro Four Thirds lens. (Figure 2.1V, image 2, shows the 37-point grid that is available for older Four Thirds lenses.)
In figure 2.1U, image 2 (red arrow), the small mode has been selected, which reduces the size of the AF points for very precise focusing on a specific area of the subject.
Figure 2.1U, image 3 (red arrow), shows a group of nine AF points that you can move around the grid. This works great for tracking.
Figure 2.1U, image 4 (red arrow), shows that AUTO AF Area mode is selected, which allows the camera to select the AF point.
Note: All these screens display the type of focus you are using. I chose manual focus (MF) in figure 2.1U. You can see MF in the top left area of the images. In figure 2.1V, image 2, you can see that I chose Single-frame autofocus (S-AF). You can also use Continuous autofocus (C-AF); however, in C-AF the camera cannot detect pupils in ![]() Face Priority mode. Select an autofocus mode (e.g., S-AF, C-AF) by using the instructions in the AF Mode subsection later in this chapter.
Face Priority mode. Select an autofocus mode (e.g., S-AF, C-AF) by using the instructions in the AF Mode subsection later in this chapter.
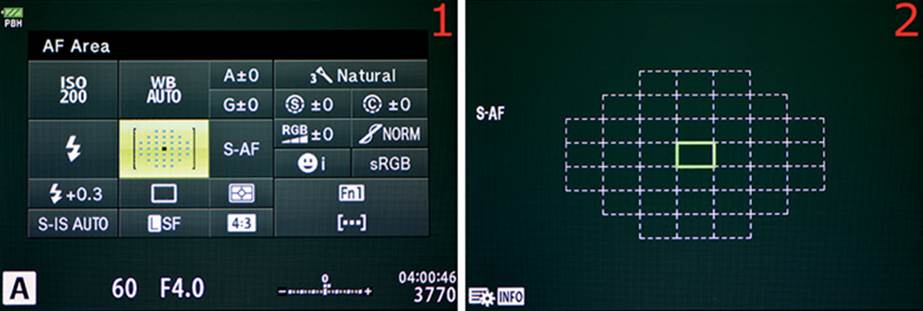
Figure 2.1V: The 37 AF points for Four Thirds lenses
If you are using an older Four Thirds lens, the available AF point grid will contain 37 points instead of 81 points. Notice that figure 2.1V shows the smaller grid in both images.
[•••] AF Area Select Button Task
If you prefer not to use the Super Control Panel to select an AF point type and size, there is a Button task called [•••] AF Area Select that can be assigned to one of the programmable buttons (Button Functions) mentioned in the Camera Setup and Control Reference chapter.
In fact, the [•••] AF Area Select button task is already assigned to the Fn1 button by default. Therefore, if you have a brand new E-M1, pressing the Fn1 button should open the AF Area mode screen, allowing you to choose both AF points and ![]() Face Priority settings, as previously described. Assigning Button tasks is discussed on page 297.
Face Priority settings, as previously described. Assigning Button tasks is discussed on page 297.
Settings Recommendation: Most of the time my style of photography is well served with the normal single AF point in figure 2.1U, image 1. I rarely use the other modes. The nine-point group mode does come in handy for actions shots, and I may use the full 81-point AUTO AF mode when I am shooting at a party and don’t want to bother with moving the AF point. AUTO mode with ![]() Face Priority set to
Face Priority set to ![]() i seems to work great at parties. Experiment with these modes to see which you like best in different styles of photography.
i seems to work great at parties. Experiment with these modes to see which you like best in different styles of photography.
AF Mode
The AF Mode function provides several focus methods. Four of them are for autofocus, and one is for manual focus. One of the autofocus methods will allow focus tracking.
This subject is considered in more depth in the Custom Menu chapter under the AF Mode subheading on page 274 (see Custom Menu > A. AF/MF > AF Mode). Let’s examine each of the modes and see how to select one:
• Single AF (S-AF): When you hold the Shutter button halfway down, the camera autofocuses on the subject, beeps once, and locks focus. In the top-right corner of the EVF (or Live View screen) you will see a small green dot. This indicates that the focus is good. If the subject moves, the focus may no longer be accurate; therefore, you must release the Shutter button and press it halfway again to update the focus. S-AF is best for static subjects or subjects that move very slowly. The AF point target indicator is a small green rectangle.
• Continuous AF (C-AF): Similar to S-AF, the camera will focus when you hold the Shutter button down, and it beeps when it has acquired good focus, up to two times. It also displays the round green good focus indicator at the top right of the camera screens. However, if the subject moves, the camera continues autofocusing on the subject. Unlike S-AF, the camera never really locks the focus permanently; it continues to seek the best autofocus at all times. If you change to a different subject, or if the subject moves, the camera will do its best to automatically update the focus. The AF point target indicator is a small green rectangle.
• Manual focus (MF): When you use MF mode you are entirely responsible for focusing the camera. The AF point target indicator is not used. Since the E-M1 does not have a split-prism screen to assist with focus, you may want to enable focus Peaking and/or Magnify under the Custom Menu > A. AF/MF > MF Assist > Peaking [or Magnify] setting. Peaking makes it easy to see when the subject is in focus because it outlines the edges of the subject in white (or black) to indicate where the best focus is currently located. Peaking is discussed and samples are provided in the Custom Menu chapter under the MF Assist heading and the Peaking subheading on page 286. In the MF Assist section of that chapter I also discuss the Magnify function, which automatically zooms in to pixel-peeping levels when you turn the lens focus ring, and it results in extremely accurate manual focus. Combining Peaking and Magnify makes manual focus easy.
• Single AF + MF (S-AF+MF): This mode is almost exactly like the S-AF mode, with its focus lock, beep, and round green good focus indicator. However, it offers one powerful extra feature: manual focus fine-tuning. After you press the Shutter button halfway and the camera has autofocused and locked focus on the subject (S-AF), you can fine-tune the focus with the lens focus ring (MF). If you have focus Peaking and Magnify enabled, as discussed in the previous paragraph, the camera will use those features during fine-tuning. The AF point target indicator is a small green rectangle.
• AF Tracking (C-AF+TR): This mode is for autofocus with subject tracking. For general use this mode works like C-AF mode, with continuous autofocus updating. However, if the subject moves, the camera will carefully track it and lock on to its location with the bigger focus point target indicator while continuously updating the focus as the subject moves. To help you understand how to use this feature, select C-AF+TR, then focus on a small subject. Move the camera around and you will see the AF point target indicator stay locked on the subject. It is effective at staying with a subject as long as the light is reasonably good and the subject is not moving too quickly. The AF point target indicator is a larger green square with bars sticking out of each side.
Now let’s examine how to select one of the focus modes.
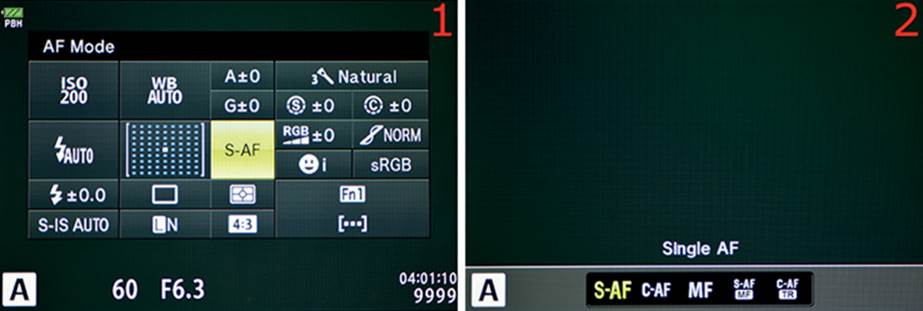
Figure 2.1W: Choosing an Autofocus (AF) mode
In figure 2.1W, image 1, you can see that the AF Mode position is highlighted (S-AF). Turn the Front Dial, and the five AF Modes will scroll by. Stop scrolling on the mode you want to use. If you prefer to use the secondary screen to select a mode, press the OK button to open it.
Figure 2.1W, image 2, shows the secondary AF Mode screen with Single AF selected. Use the Arrow pad keys to scroll left or right until the mode you want to use is highlighted. Press the OK button to lock in the AF Mode.
Settings Recommendation: I like to use S-AF+MF mode so I can use autofocus most of the time, but I can still turn the focus ring to enable manual focus, along with Peaking and Magnify. The S-AF mode is fine for slow shooting with well-defined, static subjects. C-AF works quite well when I am shooting something like a wedding and the bride and groom are walking toward me. I use MF mode most often when I am taking macro shots and need to carefully control where the focus falls, due to the shallow depth of field in that type of photography. The tracking mode (C-AF+TR) works well for moving subjects, especially larger wildlife, cars, and airplanes. Small birds are harder to track because they move so quickly and tax the AF tracking system. However, with careful use, even small bird photography is possible with the E-M1.
Flash Intensity Control (Compensation)
Flash Intensity Control is similar to a flash compensation system. If you are taking pictures and the background of the subject is exposed well but the subject is overexposed, you may want to dial back the power or intensity of the flash unit. If the subject is underexposed and the background is well exposed, you may want to increase the flash output to light the subject a little better. Flash Intensity Control gives you the power to do either. In effect, you are dialing in flash exposure compensation. Let’s see how to adjust it.
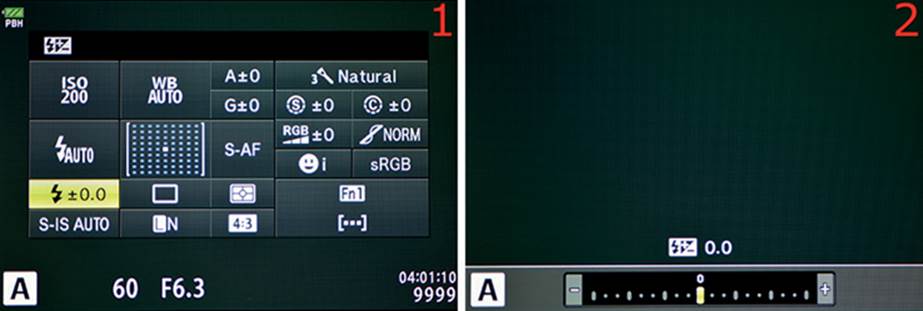
Figure 2.1X: Choosing a Flash Intensity Control exposure compensation value
Select the Flash Intensity Control symbol, a small lightning bolt followed by ±0.0, as shown in figure 2.1X, image 1. The 0.0 represents the EV value that can be dialed in, over a range of six EV steps (+3.0 to –3.0). Turn the Front Dial to change the flash intensity. You will see the EV value change to plus or minus, depending on which direction you turn the dial. As expected, turning the dial toward + makes the flash put out more power, and turning it toward – makes it put out less power. Stop turning the dial when you see the EV compensation value you want to use. You can also use the secondary screen if you want a more visual representation of the flash intensity change. Press the OK button to open the secondary screen.
Figure 2.1X, image 2, shows the secondary screen with a 6-stop (EV step) scale (+3.0 to –3.0). Use the Arrow pad keys to move the indicator bar left or right on the scale, toward the + or – signs. The positive or negative EV value will display where 0.0 is located in image 2. Press the OK button to lock in your flash intensity choice.
Settings Recommendation: I tend to shoot a little brighter than many photographers because I use RAW mode for the best image quality most of the time. When you use RAW (ORF) image quality mode, the picture files have more overexposure headroom than you might think. Therefore, I generally leave the Flash Intensity Control set to +0.3, for a one-third stop overexposure. When you shoot JPEG files it is important to watch the histogram closely to prevent unrecoverable overexposure (highlight data loss), especially when shooting up close.
Sequential Shooting/Self-Timer
The camera’s Sequential shooting/Self-timer system is designed to let you control the frame rate of the camera when you are shooting in bursts. It also lets you control remote shooting with three Self-timer controls. These six modes are called Release modes. Let’s examine each of the modes and see how they work:
• Single-Frame shooting: This mode causes the camera to take one picture each time you fully press the Shutter button.
• Sequential High (H): The camera will take a continuous series of pictures at about 10 frames per second (fps). Autofocus, exposure, and white balance are frozen at the values determined by the camera for the first picture and are not updated during the series.
• Sequential Low (L): The camera will take a continuous series of pictures at about 6.5 fps with firmware 2.0 or 9 fps with firmware 3.0. Autofocus, exposure, and white balance are updated for each picture in the series, based on which autofocus mode you selected (e.g., S-AF, C-AF, MF) and whether you are using autoexposure lock (AEL) or autofocus lock (AFL).
• Self-timer 12 sec (12s): The camera will take a single photograph 12 seconds after you press the Shutter button all the way down. The orange focus assist light on the front of the camera will shine solid for 10 seconds, then it will blink for 2 seconds before the shutter fires and the picture is taken.
• Self-timer 2 sec (2s): The camera will take a single photograph two seconds after you press the Shutter button all the way down. The orange focus assist light on the front of the camera will blink for two seconds before the shutter fires and the picture is taken.
• Self-timer Custom (C): This variable self-timer function allows you to select the number of images the camera will take when the self-timer expires (Frame), the time in seconds the camera will wait before firing (Timer), and the period of time between each picture (Interval Time) if you have selected more than one picture with the Frame setting. You can also choose whether or not to have the camera autofocus between each picture.
Now let’s examine how to select one of the modes.

Figure 2.1Y: Choosing a Sequential shooting or Self-timer Release mode
In figure 2.1Y, image 1, the Sequential shooting/Self-timer position is highlighted. Turn the Front Dial, and the six modes will scroll by. Refer to the previous list to determine which of the modes works best for your current needs. Stop scrolling on the mode you want to use. If you prefer to use the secondary screen to select a mode, press the OK button to open it.
Figure 2.1Y, image 2, shows the secondary Sequential shooting/Self-timer screen with Single (Single-frame shooting) mode selected. Use the Arrow pad keys to scroll left or right until you see the mode you want to use. Press the OK button to lock in your selection.
If you choose the Self-timer Custom mode, which is on the far right end of the mode selections, you can make several custom adjustments to how the Self-timer works. Let’s consider the Self-timer Custom mode more closely.
Self-Timer Custom Mode
The Self-timer Custom mode allows the camera to automatically take one or a series of pictures with one press of the Shutter button. This allows you to take consecutive pictures without touching the camera and introducing new vibrations, which results in sharper pictures.
You can adjust the number of frames, the self-timer wait time, the interval between frames, and whether the camera autofocuses between each frame. Let’s see how.
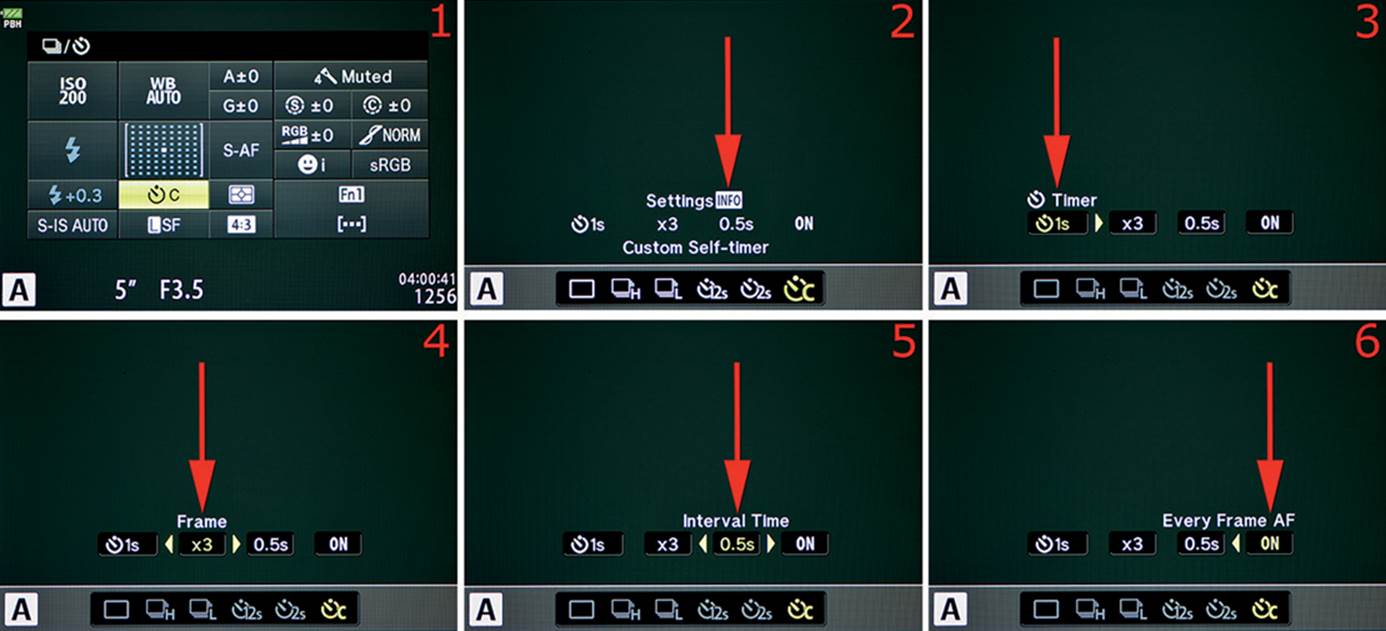
Figure 2.1Z: Adjusting the Self-timer Custom mode
In figure 2.1Z, image 1, the Sequential shooting/Self-timer position is highlighted. Rotate the Front Dial, and the six modes will scroll by. Stop scrolling on the Self-timer Custom (C) mode, as pictured in image 1. You cannot adjust the settings of the Custom mode unless you use the secondary screen. It will simply use the last settings you configured or the default settings. Press the OK button to open the secondary screen.
Figure 2.1Z, image 2, shows the secondary Sequential shooting/Self-timer screen with Custom Self-timer (C) mode selected. Press the Info button to open the custom setting fields. Descriptions of the four custom settings are as follows:
• Timer: Choose the timeout period (Timer) before the first Frame is taken during the self-timer cycle (figure 2.1Z, image 3). You can choose from as short as 1 second (1s) to as long as 30 seconds (30s). The camera will fire the first Frame only after the Timer delay you selected has expired. This gives you time to get in position, even if you must run a distance from the camera to be in the frame or need the delay for some other reason. Scroll up or down with the Arrow pad keys to choose a value. When you have chosen a value, scroll to the right.
• Frame: This setting allows you to choose the total number of pictures (Frames) the camera will take during the self-timer cycle (figure 2.1Z, image 4). I chose three Frames (x3). You have a choice of from 1 (x1) to 10 (x10) Frames. Scroll up or down with the Arrow pad keys to choose a value. When you have chosen a value, scroll to the right.
• Interval Time: This setting controls the time between Frames after the first Frame is taken (figure 2.1Z, image 5). The camera will delay for the amount of time specified in the Timer setting, then it will use the Interval Time to pause between the rest of the Frames. Scroll up or down with the Arrow pad keys to choose a value. When you have chosen a value, scroll to the right.
• Every Frame AF: Select either On or Off from the Every Frame AF field (figure 2.1Z, image 6). On tells the camera to autofocus for every shot in the Self-timer series of pictures, and Off means the camera will autofocus on the first frame of the series only. After you have selected the value, press the OK button to save your settings. Prepare the camera for shooting and press the Shutter button to start the initial Self-timer (Timer) countdown.
Note: The camera will remember your Self-timer Custom settings and will use them over and over until you change them. If these settings are useful for most of your Self-timer photography, simply select Self-timer Custom to use the settings in the future.
These Release modes are considered in more detail under the Shooting Menu 2 chapter in the Sequential/Self-timer Shooting subsection on page 194.
Settings Recommendation: As a nature photographer and a portrait photographer, I normally use Single-frame shooting. However, if I’m at an event such as a car race or airplane show, I often switch to Sequential Low (L), which gives me a shooting speed of about 6.5 fps with firmware 2.0 or 9 fps with firmware 3.0, with autofocus between each frame. I rarely use the Sequential High (H) setting because I normally do not need a speed of 10 frames per second, and I want autofocus between frames, which H mode does not provide.
When it is time to use the Self-timer, I normally choose the 12s setting and take a single picture. However, if I want to be creative and use the Self-timer for multiple frames, I often use the Self-timer Custom setting.
Metering Mode
The E-M1 has five light meter types that give you great flexibility in how you expose your images. Using the different meter styles built in to the camera will help you make some of the most well exposed images you’ve ever created.
We will consider more detail about the Metering mode types in the Custom Menu chapter under the Metering subheading on page 370. In the meantime, let’s look more closely at the five types of light meters built in to the camera and discuss their differences:
• ESP: The camera meters the image with a grid of 324 metered areas that cover the frame. It uses complex mathematical computations to arrive at an excellent exposure. This metering mode works best for portraits when ![]() Face Priority is enabled.
Face Priority is enabled.
• Ctr-Weighted: The camera averages the light between the subject and the background. It places more emphasis on exposure for the center area of the EVF or Live View screen, with less emphasis on parts of the scene that are farther away from the center.
• Spot: The camera uses a small circle in the center of the EVF or Live View screen for metering. This circle is equivalent to 2 percent of the frame, and all metering takes place in this 2 percent area. Therefore, you must place this stationary spot on the area of the subject that you want to correctly meter by moving the camera then using autoexposure lock (AEL/AFL button) to lock the exposure while you recompose the image. Or you can take multiple readings of different areas of the scene, determine the total light range, and set the exposure manually.
• Spot Hilight (HI): This type of metering is similar to standard Spot metering in that the camera uses a small circle in the center of the frame to meter. The metering circle is equivalent to 2 percent of the frame. This metering mode is different from standard Spot metering because the camera tries to make white areas (highlights) stay white by increasing the exposure beyond a normal Spot reading to give a bright, high-key look to the image.
• Spot Shadow (SH): This type of metering is also similar to normal Spot metering in that the camera uses a small circle in the center of the frame to meter. The metering circle is equivalent to 2 percent of the frame. This metering mode is different from normal Spot metering because the camera tries to make dark areas (shadows) stay dark by decreasing the exposure below a normal Spot reading to give a low-key look to the image.
Now let’s examine how to select one of the metering modes.
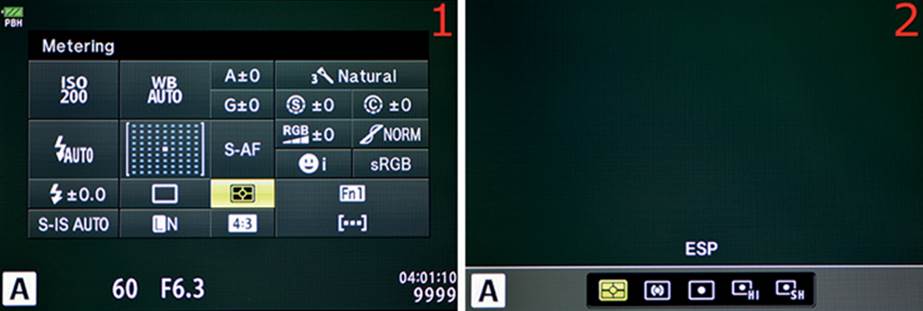
Figure 2.1AA: Choosing a Metering mode
In figure 2.1AA, image 1, the Metering position is highlighted. Turn the Front Dial, and the five modes will scroll by. Refer to the previous list to determine which of the modes works best for your needs. Stop scrolling on the mode you want to use. If you prefer to use the secondary screen to select a mode, press the OK button to open it.
Figure 2.1AA, image 2, shows the secondary Metering screen with ESP metering mode selected. Use the Arrow pad keys to scroll left or right until you see the mode you want to use. Press the OK button to lock in the mode.
Settings Recommendation: Digital ESP metering (ESP) is a very effective form of metering. I rarely have to use the other metering modes. Sometimes I might use the Spot meter to meter a bright subject against a darker background, but otherwise I am quite happy with ESP. Be sure to use a form of ![]() Face Priority when you are taking portraits with ESP. That seems to make the camera extra sensitive to exposing faces accurately, even if the background is dark and could cause some facial overexposure.
Face Priority when you are taking portraits with ESP. That seems to make the camera extra sensitive to exposing faces accurately, even if the background is dark and could cause some facial overexposure.
Button Function Task Assignment
In the Camera Setup and Control Reference chapter we examined each of the external controls on the camera body. Recall that a number of the buttons are programmable; that is, you can assign a task to the button and change it to another task later. The 28 Button tasks are listed in the Appendix.
The Button Function Task Assignment position on the Super Control Panel is a shortcut to the Custom Menu > B. Button/Dial/Lever > Button Function settings. These Button Function settings allow you to assign Button tasks directly to the programmable buttons. We will cover the Button function task assignments in great detail in the Custom Menu chapter, under the Button Function (Programmable Buttons) subheading on page 297.
Since the full description of how to use this function is lengthy, there is no need to repeat it here. This section will give a brief explanation of how to do a single button assignment, with the understanding that you will refer to the later material for a complete description.
Note: Olympus uses the term Button function to describe the physical button control to which a task can be assigned. The functionality that can be assigned to the button (what it does) is called a Button task (my words, to make it easier to understand). Therefore, in this book you will read that a particular Button task has been assigned to a certain Button function, which simply means the button (Button function) has been given a task (Button task) to do when you press the button. As previously mentioned, there is a list of 28 Button tasks in the Appendix.
Let’s see how to assign a Button task to the Fn1 Function.
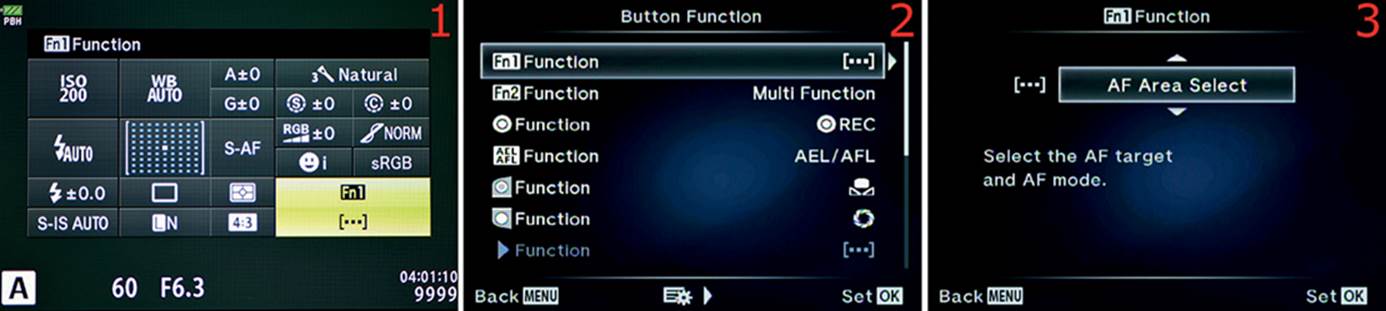
Figure 2.1AB: Assigning a task to a Button function (such as Fn1)
In figure 2.1AB, image 1, you can see that the Fn1 Button Function position is highlighted. You can scroll through the various Button Functions (e.g., Fn1, Fn2) by turning the Front Dial. Stop turning the dial when the setting you want to use is highlighted. Select a Button Function to which you want assign a Button task. Press the OK button, and a secondary screen will open.
Figure 2.1AB, image 2, shows the Button Function selection menu. On this screen you will find a list of 12 Button Functions. Highlight the one to which you want to assign a Button task, and scroll to the right. In this example we are working with the Fn1 Function.
Figure 2.1AB, image 3, displays an up/down menu that you can scroll through by pressing up or down on the Arrow pad keys. There are many Button tasks listed in this up/down menu. Refer to the Appendix at the back of the book for a list of 28 Button tasks that you can assign to the Fn1 Function. Not all tasks are available for all buttons. After you have assigned a Button task, the task will execute when you press the Fn1 button on the upper-right corner on the back of the E-M1. You can see in figure 2.1AB, image 3, that I selected the factory default Button task called [•••] AF Area Select. Choose a Button task from the menu.
Press the OK button to lock in the task for the Fn1 Function.
Settings Recommendation: This camera is very flexible and powerful due to the large number of tasks you can assign to the individual buttons, dials, and levers. You will spend a lot of time examining and making decisions about which Button task to assign to which Button Function. Please get used to calling the camera buttons Button Functions, not just buttons, at least when you are making task assignments. That’s what Olympus does, and if you do not understand this, it will be difficult to configure your camera later. The same goes for the dials and levers. They are called Dial Functions and Lever Functions instead of just dials and levers. The entire B. Button/Dial/Lever section of the Custom Menu is devoted to assigning various tasks to Button, Dial, and Lever Functions.
Image Stabilizer
The 5-axis image stabilization (IS) system in the E-M1 is world class and renowned as one of the best IS systems in any camera today. It will cut down on camera shake when you handhold the E-M1, allowing you to use slower shutter speeds, smaller apertures, and lower ISOs while still getting sharp images.
Since the IS system is built in to the camera, it will work with any lens you use, including brands that require a nonintelligent adapter with no electronic connection to the camera. If you have Nikon or Canon (or other brand) lenses from one of your DSLRs, you can buy an inexpensive adapter to use them on the E-M1.
Basically, the IS system will stabilize the image with virtually any lens that can be mounted on the camera. This subject will be examined in greater detail in the Shooting Menu 2 chapter under the Image Stabilizer subheading on page 198. The following is a list of the various modes available in the Image Stabilizer menu:
• Off: No image stabilization is provided.
• S-IS 1: This is a general automatic mode that allows the Image Stabilizer to compensate in five directions (roll, pitch, yaw, vertical, and horizontal). It automatically corrects for movement in any or all of the directions (axes) at any time. It is not as sensitive to panning as S-IS AUTO.
• S-IS 2: The image stabilization system corrects only for the vertical axis (Vertical IS). Use this mode when you are moving the camera vertically and are not concerned about horizontal correction. If you are panning horizontally, such as at a car race, and are holding the camera in a horizontal (landscape) orientation, this mode may perform well for you.
• S-IS 3: The image stabilization system corrects only for horizontal camera shake (Horizontal IS). If you are panning horizontally, such as at a car race, and are holding the camera in a vertical (portrait) orientation, this mode may perform well for you.
• S-IS AUTO: Olympus suggests this mode when you are unsure what you will be shooting and want to be prepared for any kind of movement. The camera automatically chooses the best type of image stabilization for the subject it detects. This is the factory default mode.
Let’s see how to configure the IS system.
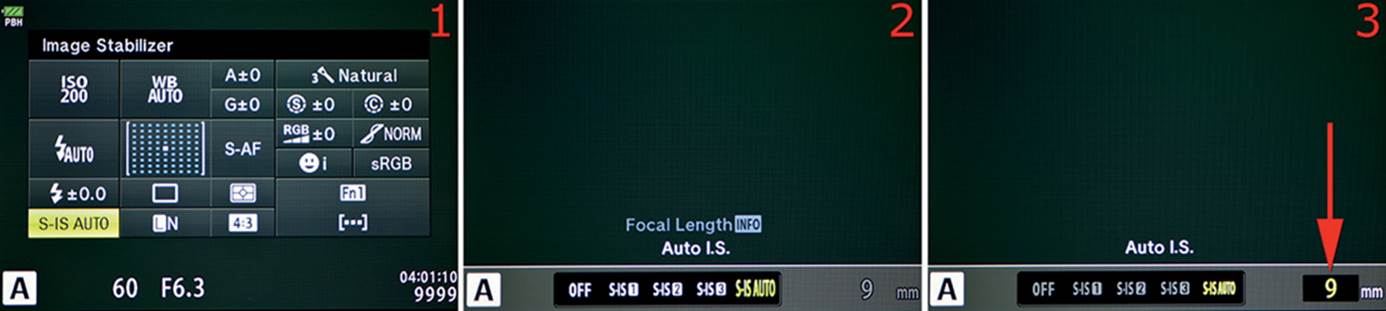
Figure 2.1AC: Choosing an image stabilization method
Figure 2.1AC, image 1, shows the Image Stabilizer setting highlighted with S-IS AUTO selected. You can scroll through the five IS settings by turning the Front Dial. Stop turning the dial when the setting you want to use is highlighted. If you prefer to use the secondary screens, or if you are using a lens that is not a Micro Four Thirds or Four Thirds type that is attached to the camera with an adapter that does not have electronic connections for communication with the camera (a dumb adapter), press the OK button to open the secondary screen.
Figure 2.1AC, image 2, shows the Image Stabilizer settings in a row at the bottom of the screen. Refer to the previous IS settings list and use the left or right Arrow pad keys to move along the row until you highlight the setting you want to use. Press the OK button to lock in the setting. I selected Auto I.S. (S-IS AUTO). If you are using a Micro Four Thirds or Four Thirds lens, press the OK button and the IS system is ready to use. Skip the rest of this step and the next step. However, if you are using a dumb lens adapter with any type of lens, you will need to input the focal length of the mounted lens. Press the Info button to move to the Focal Length screen.
Figure 2.1AC, image 3 (red arrow), allows you to register a focal length for a lens that is mounted on the camera with a dumb adapter. Press up or down on the Arrow pad keys to select a focal length. The range of focal length choices are from 8mm to 1000mm. I chose 9mm in figure 2.1AC, image 3 (red arrow), which is the default. This focal length value is not used when you have a Micro Four Thirds lens mounted directly on the camera or when you mount a Four Thirds lens on a communicating (smart) adapter (e.g., an Olympus MMF-3). In those situations, the lens electronically communicates the focal length to the E-M1 body. After you have selected a value, press the OK button to lock it in.
Note: If you are using a zoom lens (not a prime lens) on a dumb adaptor you will have to estimate the focal length you will most often use and set that value in the screen shown in figure 2.1AC, image 3. If you use a different focal length than the one you entered, the IS system may not be quite as effective. However, since the 5-axis IS system is one of the best in the world, I am sure it will work quite well at any focal length you may use on a dumb adapter. You may want to experiment for the best results, especially at extreme angles of view, such as long telephoto or superwide.
Additionally, if you are using a tripod Olympus recommends that you set IS to off. If you are using a lens with built-in image stabilization, the lens stabilization settings (switch) have priority over the camera body stabilization settings. If you are using S-IS AUTO along with a lens that has built-in stabilization, the camera body stabilization will back up the lens stabilization by automatically using S-IS 1, instead of S-IS AUTO.
Settings Recommendation: I have found that S-IS AUTO works beautifully for still images of any type. If you do a lot of panning, the S-IS AUTO mode is particularly effective. The camera allows you to disable certain types of IS directional correction (e.g., horizontal or vertical). Refer to the list of IS modes and select the mode that works best for your circumstances.
Record Mode (Image Quality)
The Record Mode function allows you to choose the image quality for your pictures. You can shoot in RAW (ORF) mode or in various JPEG sizes and pixel counts, including Large (L), Middle (M), and Small (S). You can also choose from several JPEG compression levels, including Super Fine (SF), Fine (F), Normal (N), and Basic (B).
This chapter will discuss how to choose an image quality for taking still pictures. However, there is a lot to discuss in making these choices. There is deeper information on this subject available in the Shooting Menu 1 chapter under the Record Mode subheading on page 175. Be sure to read that information before you shoot too many important images so you can make the best image quality choices.
On the Super Control Panel menus, you will see JPEG size and compression rate names combined. For instance, a Large-size, Fine-compression rate JPEG will be listed as LF, and a Medium-size, Normal-compression rate JPEG will be shown as MN.
The size for RAW mode, or the RAW file in a combination mode (e.g., LF+RAW), is always Large (L) with a 4608 × 3456 pixel ratio. RAW files always contain all available image data and cannot be resized in-camera. JPEG images have adjustable sizes, pixel counts, and compression rates.
Let’s see how to select an image quality Record Mode.
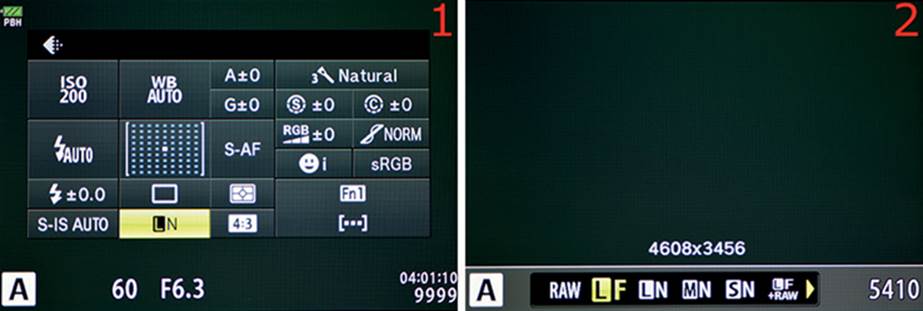
Figure 2.1AD: Choosing an image quality (Record Mode) setting
Figure 2.1AD, image 1, shows the [Record Mode] position highlighted with Large Normal (LN) JPEG image quality selected. You may select one of the nine image quality settings by turning the Front Dial until the mode you want is displayed in the highlighted position. If you want to use the secondary screen to select a new image quality, press the OK button to open the secondary screen.
Figure 2.1AD, image 2, shows the image quality secondary screen. You will find nine image quality choices along the bottom of the screen. Use the Arrow pad keys to scroll left or right until you highlight the mode you want to use, and press the OK button to lock in the mode. The approximate number of images that can be held on the current memory card is displayed on the bottom-right side of the secondary screen. The 64 GB memory card in my camera can currently hold 5410 more images. This number will vary depending on which image quality setting you have chosen.
Note: When it is enabled in the Custom Menu, there is also a JPEG Large Super Fine (LSF) image quality Record Mode. It will not appear in any of the image quality menus unless you enable it with the Custom Menu > G. [Record Mode]/Color/WB > [Record Mode] Set function. Enabling this option is discussed in the Custom Menu chapter under the [Record Mode] Set subheading on page 392.
Settings Recommendation: Because of its smaller sensor, I want my E-M1 to capture the best possible quality, so I most often use the RAW setting. However, shooting in RAW requires that I post-process the files and later convert them to JPEGs. If I need to give images to someone quickly, I may use the LSF+RAW setting and shoot both file types at the same time. This gives me the best of both worlds: a RAW file for when I have time to make a masterpiece, and a JPEG file for immediate use.
Even if you do not know how to post-process RAW files, I suggest that you capture both RAW and JPEG files so you will have an uncompressed original (RAW) file for especially good images later, when you have learned the needed post-processing skills. Shooting a Large Super Fine JPEG (LSF) and a RAW file at the same time is as easy as selecting it from the Super Control Panel menu. Just look for LF+RAW or LSF+RAW. The camera will write both file formats to the memory card at the same time. The Large Super Fine (LSF) JPEG setting will be available onlyafter you enable it, as previously described.
Aspect
The E-M1 is a Micro Four Thirds camera, which describes the aspect ratio of the sensor (4:3). Other camera brands have sensors with different aspect ratios. The Aspect function on the E-M1 allows you to change the normal 4:3 image aspect ratio to a different ratio that more closely matches the aspect ratios of other camera brands. In other words, the length and width of the image is cropped into a new relationship. The five available ratios are 4:3, 16:9, 3:2, 1:1, and 3:4.
The new Aspect ratio changes the final shape of the image, which means the camera has to crop the picture. Therefore, use a different ratio only when you must to prevent quality losses when an image is enlarged.
Image Aspect ratio is discussed in more detail in the Shooting Menu 1 chapter under the Image Aspect subheading on page 186, including samples of the different ratios.
Let’s examine how to select one of the five image Aspect ratios.

Figure 2.1AE: Choosing an image Aspect ratio
Figure 2.1AE, image 1, shows the Aspect position highlighted on the Super Control Panel with the 4:3 Aspect ratio selected. To select a different Aspect ratio, turn the Front Dial and the Aspect ratios will scroll by. Stop scrolling when the ratio you want to use is highlighted. You can also use the Aspect secondary screen to select an Aspect ratio. Press the OK button to open the secondary screen.
Figure 2.1AE, image 2, shows a list of five Aspect ratios across the bottom of the screen. There is also a handy guide above the line of ratios that shows the pixel dimensions of the corresponding Aspect ratio. I chose the default 4:3 Aspect, which displays pixel dimensions of 4608×3456. You can determine the megapixel (MP) rating of each Aspect ratio by multiplying the pixel dimensions. For instance, 4,608 × 3,456 = 15,925,248, or approximately 16 MP. If you scroll through the rest of the settings and multiply the rest of the pixel dimensions, you will see that all but the4:3 ratio results in images of less than 16 MP. That is, Aspects other than 4:3 create smaller images due to cropping. Choose the Aspect you want to use by scrolling left or right with the Arrow pad keys, highlighting the ratio you want to use, then pressing the OK button to lock in the Aspect.
Note: As you change Aspect ratios, the electronic viewfinder (EVF) will adjust to the new shape so you can accurately shoot with the new Aspect. As a test, change the Aspect ratio, then hold your camera up to your eye to see the difference in the black EVF borders.
Settings Recommendation: I rarely change the Aspect ratio of the image with this function. I prefer to simply crop the image after the fact in my computer. However, if you need a specific Aspect ratio but don’t have time to crop your images, the camera is ready to provide the ratio you need with no hassle and only minor image quality loss.
We will now consider another set of screens called Live Control, which many people prefer over the Super Control Panel.
Live Control
Live Control is another convenient way to access the most-often used camera configuration items. We have already considered the Super Control Panel in detail; now we will consider Live Control, which accesses basically the same settings as the Super Control Panel. In the next several chapters we will cover the same functions again, along with a large number of other functions that are not available from the Super Control Panel or Live Control.
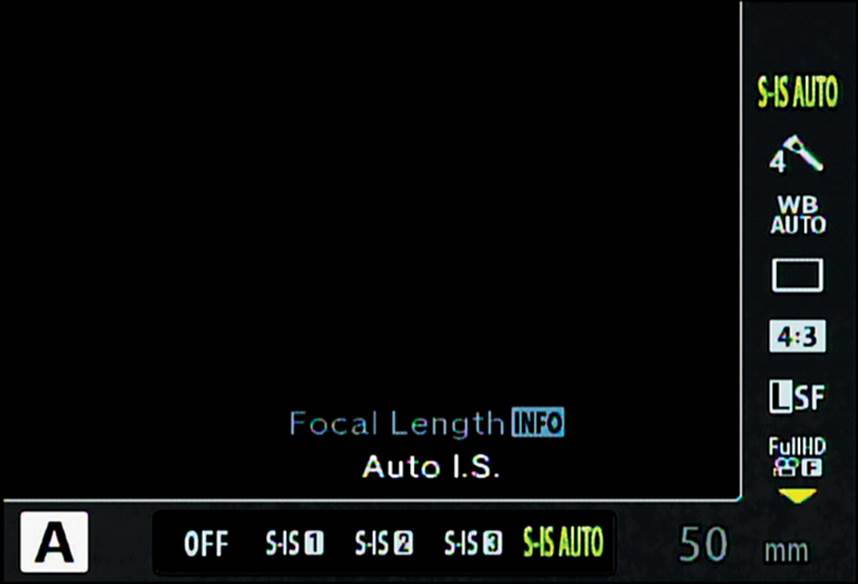
Figure 2.2A: Live Control functions (right side)
As you proceed through the 14 Live Control settings, keep in mind that Live Control is just another front end to the same settings as in the Super Control Panel. To avoid repeating material, this section about Live Control will show you how to do basic setting configurations and provide page number cross-references to the Super Control Panel section in this chapter, and to other chapters, for more details.
Live Control is a very convenient type of camera control system. In some ways it is more convenient than the Super Control Panel. While the Super Control Panel will be used mostly by photographers who dislike using Live View and would rather use the electronic viewfinder (EVF) to take pictures, Live Control is for those who don’t mind having both Live View and the EVF available at all times. Live Control and the Super Control Panel are mutually exclusive. When you enable one of them, it disables the other.
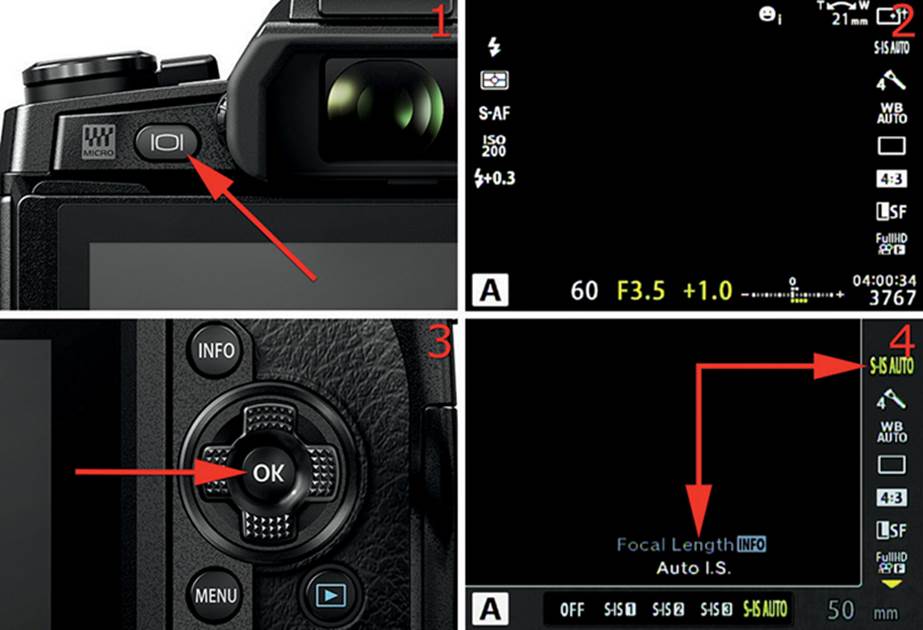
Figure 2.2B: Enabling the Live View and Live Control screens
To toggle between the Super Control Panel and Live View, simply press the LV button (figure 2.2B, image 1).
The Live View screen will open, as shown in figure 2.2B, image 2, which has the lens cap on for maximum contrast. Normally both the Live View screen (image 2) and the Live Control screen (image 4) will display the subject.
When you see the Live View screen on the back of your camera (figure 2.2B, image 2), press the OK button (figure 2.2B, image 3) to open Live Control (image 4).
The Live Control screen is shown in figure 2.2B, image 4. This screen has a menu of 14 items on the right side; seven of them are shown at one time. In figure 2.2B, image 4, the Image Stabilizer (IS) mode is selected, which is currently set to S-IS AUTO (Auto I.S). Each of the 14 items on the right side of the screen can be selected by scrolling up or down with the Arrow pad keys. When a menu item is highlighted on the right side of the screen, its settings are available along the bottom of the screen (figure 2.2B, image 4, red arrows). Notice at the bottom of image 4 that you can see the settings for the IS system. Scroll left or right with the Arrow pad keys to highlight the setting you want to use.
After you have selected a setting, press the OK button to lock it in.
Necessary Repetition of Setting Information
Now let’s consider each of the 14 items on the Live Control screen. Much of the material in this section is also provided in the previous Super Control Panel section because the 14 Live Control functions access many of the same settings as the Super Control Panel in a slightly different way.
Because this is a reference manual for the E-M1, it is best to allow some repetition to prevent you from having to flip around in the book so much. There are differences in how you set most of the features, and Live Control is often simpler to use.
Since this section is a somewhat lighter discussion of how to set many of the same functions we have already discussed in the Super Control Panel section, there will be less detail. You should be able to determine how to use a certain function immediately; however, if you want greater detail, refer to the page number cross-references to help you find it.
Image Stabilizer
The E-M1’s 5-axis Image Stabilizer compensates for camera shake in five axes: roll, pitch, yaw, vertical, and horizontal. With this feature enabled you can handhold your camera at much lower shutter speeds.
The following is a list of modes that are available in the Image Stabilizer menu:
• Off: No image stabilization is provided.
• S-IS1: This is a general automatic mode that allows the Image Stabilizer to compensate in five directions. It automatically corrects for movement in any or all of the directions (axes) at any time. It is not as sensitive to panning as S-IS AUTO.
• S-IS2: The image stabilization system corrects only for the vertical axis (Vertical IS). Use this mode when you are moving the camera vertically and are not concerned about horizontal correction. If you are panning horizontally, such as at a car race, and are holding the camera in a horizontal (landscape) orientation, this mode may perform well for you.
• S-IS3: The image stabilization system corrects only for horizontal camera shake (Horizontal IS). If you are panning horizontally, such as at a car race, and are holding the camera in a vertical (portrait) orientation, this mode may perform well for you.
• S-IS AUTO: Olympus suggests this mode when you are unsure what you will be shooting and want to be prepared for any kind of movement. The camera automatically chooses the best type of image stabilization for the subject it detects. This is the factory default mode.
Let’s see how to configure the IS system.
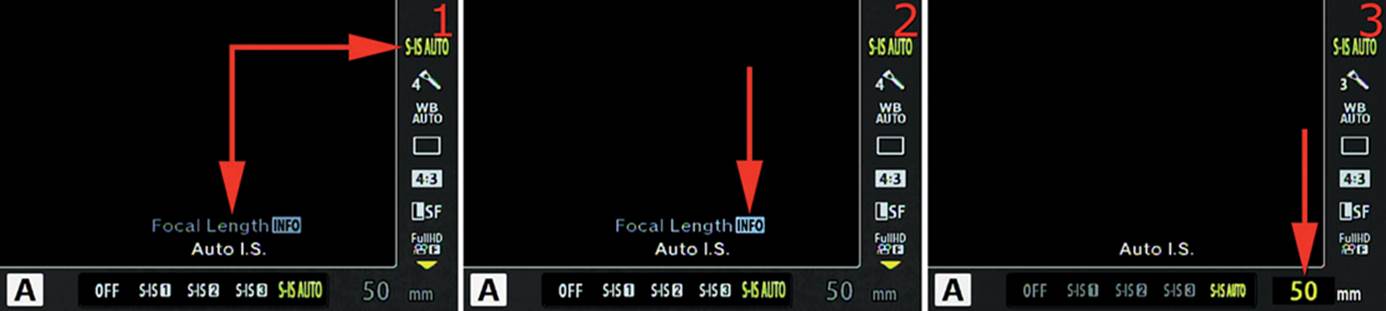
Figure 2.2C: Image Stabilizer function on the Live Control screen
Figure 2.2C, image 1, shows that the Image Stabilizer (IS) system has been selected. On the right side of the screen you will see that the Image Stabilizer (S-IS AUTO) is the first menu item. At the bottom of the screen you can see all five of the IS settings. Use the Arrow pad keys to scroll left or right until the setting you want to use is highlighted. If you are using a Micro Four Thirds or Four Thirds lens, press the OK button and the IS system is ready to use. Skip the rest of this step and the next two steps. If you are using a lens mounted on an adapter that does not communicate with the camera body (a dumb adapter), you will need to complete the following two steps to get the best performance from the IS system.
Figure 2.2C, image 2 (red arrow), shows how to start the process of letting the camera know the focal length of the lens that is mounted on a dumb adapter. With any of the IS settings highlighted, press the Info button to open the Focal Length registration screen.
Figure 2.2C, image 3 (red arrow), allows you to register a focal length for a lens that is mounted on a dumb adapter. Press up or down on the Arrow pad keys to select a focal length. The range of focal length choices are from 8mm to 1000mm. I chose 50mm (red arrow).
Note: The focal length shown in figure 2.2C, image 3 (red arrow), is not used when you have a Micro Four Thirds lens mounted directly on the camera or when you mount a Four Thirds lens on a communicating (smart) adapter (e.g., an Olympus MMF-3). In those situations, the lens electronically communicates the focal length to the E-M1 body.
Deeper Information: This subject will be examined in greater detail in the Shooting Menu 2 chapter under the Image Stabilizer subheading on page 198.
Settings Recommendation: I have found that S-IS AUTO works well for still images of any type. If you do a lot of panning, the S-IS AUTO mode is particularly effective. The camera allows you to disable certain types of IS directional correction (e.g., horizontal or vertical). Refer to the list of IS modes and select the mode that works best for your circumstances.
Picture Mode
Individual Picture Modes impart a specific look to JPEG images. RAW shooters can use the current Picture Mode setting or change Picture Modes after the image has been taken and then save the file as a JPEG with a new look. There are 23 modes available at the bottom of the Live Control screen, including several Art Modes. Let’s discuss how to select individual Picture Modes.
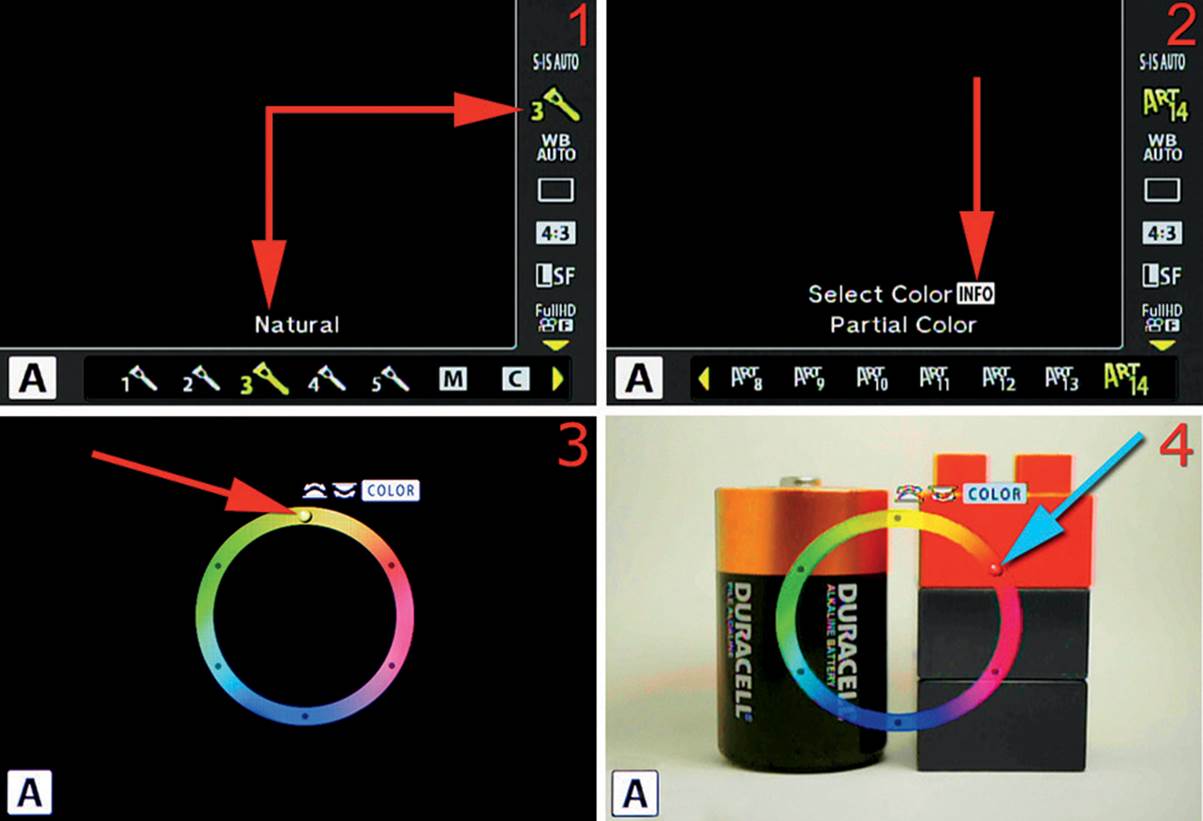
Figure 2.2D: Selecting a Picture Mode and using the Partial Color system
In figure 2.2D, image 1, the Picture Mode function is highlighted on the right. At the bottom of the screen you can see several of the 23 Picture Modes. Use the left or right Arrow pad keys to scroll through the settings at the bottom of the screen until you have located the mode you want to use. I chose 3, the Natural Picture Mode. Press the OK button to lock in the mode, and skip the rest of these steps. The Art 14 or Partial Color mode requires additional input. If you would like to use this mode, follow the upcoming steps.
The ART 14 Partial Color Picture Mode allows you to choose a narrow range of color to appear in your image, and all other hues become shades of gray. Scroll to the right until you reach the last Picture Mode selection, which is ART 14 (figure 2.2D, image 2). Press the Info button to open the Partial Color screen.
The Partial Color screen (figure 2.2D, image 3) allows you to select a narrow color range to include in your image, and all other colors will be rendered in grayscale. I left the cap on my lens in image 3 so you can see the Partial Color screen with a black background. Notice the small indicator at the top of the color circle (red arrow). You can move this indicator into the color range areas with either the Front Dial or Rear Dial. The colors of the rainbow are available to you as you move the indicator.
In figure 2.2D, image 4, you can see that I have moved the indicator into the red zone of the color wheel (blue arrow). Notice that this zone allows the red block in the image to display in red, and the lower two blocks, which are actually green and blue, display in shades of gray. Also notice that the copper color of the battery top is displayed. As you move the indicator around the color wheel, you will see changes in the colors of your image. The colors fade to gray as you move the indicator into and out of the color ranges. When you have selected the color range that gives you the Partial Color look you desire, press the OK button and take the picture.
When you are done, be sure to cancel Partial Color mode by selecting a Picture Mode other than ART 14.
Deeper Information: In the chapter named Shooting Menu 1, under the Picture Mode heading on page 136, we will discuss the how, when, and why of each Picture Mode in much greater detail. We will have a deeper discussion of the Partial Color system in the Shooting Menu 1chapter under the Partial Color (Art 14) subheading on page 172.
Additionally, you can fine-tune the Sharpness, Contrast, Saturation, and Gradation of several Picture Controls. Refer to the Super Control Panel section earlier in this chapter under the Picture Mode: Sharpness, Contrast, Saturation, and Gradation subheading on page 19.
Settings Recommendation: For everyday shooting I usually choose Natural Picture Mode. However, for some types of nature shooting I may use Vivid Picture Mode to pop the colors. When I need the widest dynamic range for nature shooting, I may use the Muted Picture Mode then later increase the saturation and contrast manually for the best look. For portraits I often use Portrait Picture Mode to preserve natural-looking skin tones. When I am feeling adventurous, I even use some of the Art Modes. They can be quite fun! It’s good that we have so many choices.
White Balance
The E-M1 offers several preset White Balance (WB) values (e.g., Sunny, Cloudy, Incandescent). In addition, you can take an ambient light reading (Capture WB) and directly input a Kelvin (K) color temperature (custom white balance, CWB), for a total of 13 WB settings. Let’s see how to select a WB value from the Live Control screen.
In figure 2.2E you can see the WB position highlighted on the right and the available WB settings in the bottom row. I chose WB AUTO. To change the WB value, scroll left or right with the Arrow pad keys and highlight the WB value you want to use, then press the OK button.
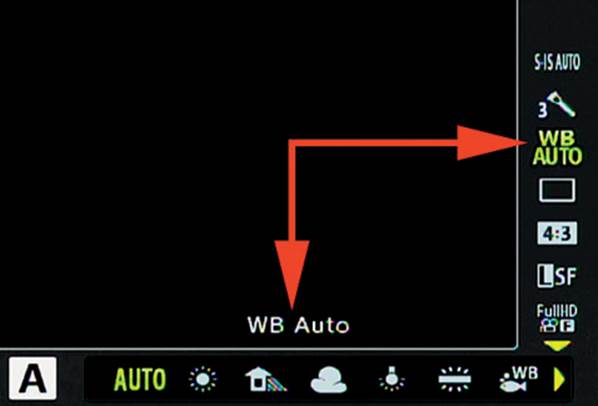
Figure 2.2E: Selecting a WB mode
Capture WB Ambient Light Reading
Next let’s examine how to do an ambient light reading from a white or gray card under the current light source and assign it to one of the four Capture WB memory locations for taking pictures later under the same light source.
In figure 2.2F, image 1, you can see that I chose WB AUTO. Now we will read the ambient light source, set the WB to that source, and save the reading into a memory location for immediate and future use.
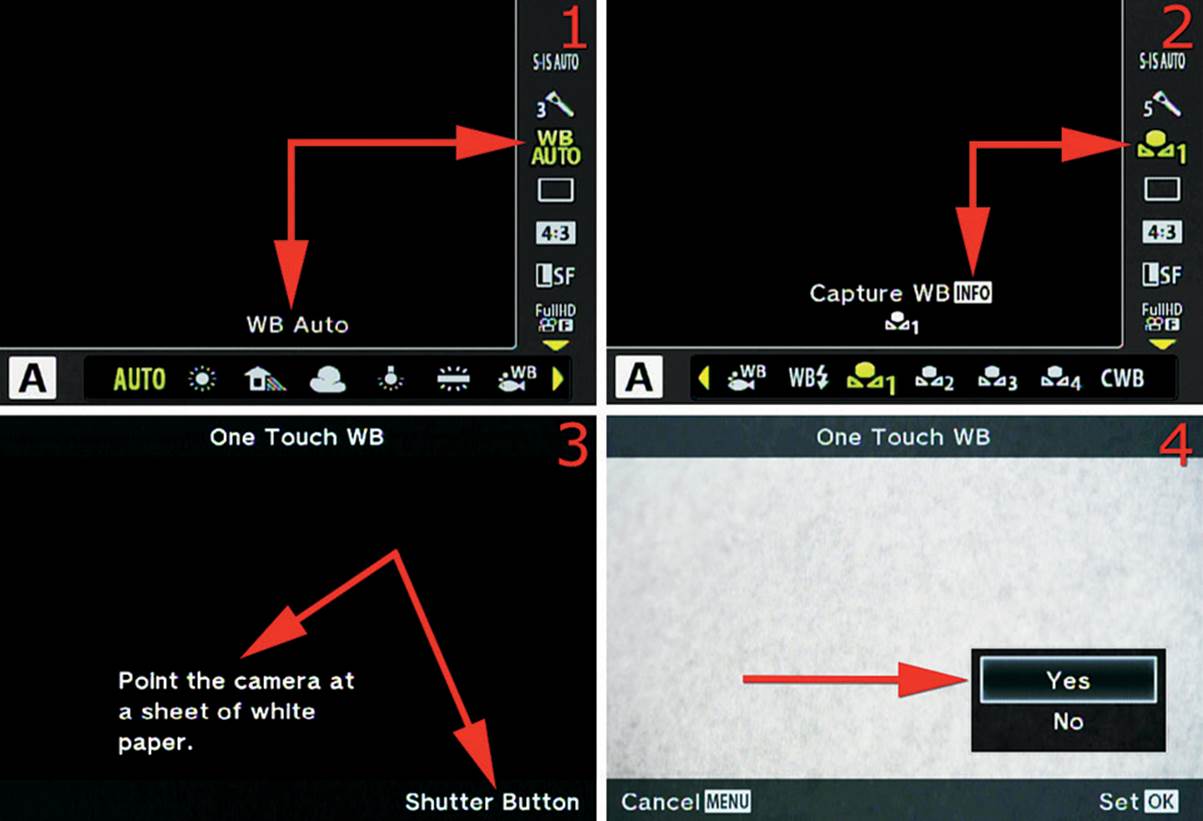
Figure 2.2F: Capturing an ambient WB reading from a gray or white card
In figure 2.2F, image 2, I have scrolled to the right and highlighted the first of four Capture WB settings. You can see that the first one is highlighted, and three more follow it. Notice on the right side that the highlighted symbol has changed to match the selected WB setting. You can use theCapture WB settings to select a previously created Capture WB ambient light reading or to create a new one and save it in one of the four Capture WB memory locations.
To create a Capture WB reading, locate one of the four Capture WB memory locations; they are indicated by a flower icon followed by a number from 1–4 (figure 2.2F, image 2). Capture WB 1 is currently selected. Notice that INFO is displayed after the Capture WB label. If you press the Info button while one of the Capture WB memory locations is selected, the camera will prepare for a Capture WB reading from a white or gray card.
Figure 2.2F, image 3, shows the next screen, which tells you to Point the camera at a sheet of white paper. You can also use a standard gray card. After you have positioned the white or gray card in front of the lens, press the Shutter button to take a picture. The camera does not store the picture on the memory card. Instead, it makes an accurate WB reading from the white or gray card. The camera will not attempt to focus on the card; it will simply fire the shutter.
Note: If the camera cannot successfully make a Capture WB reading, the camera will display the following message to let you know the reading was unsuccessful: X [Flower icon] WB NG Retry.
Figure 2.2F, image 4, shows the screen after a successful Capture WB reading has been made. You can now decide whether you want to store the WB reading in the currently selected Capture WB location. To store the WB reading, select Yes and press the OK button. If you do not want to save it, select No and press the OK button, or press the Menu button to cancel.
CWB Custom WB Kelvin Value
If you know how to use direct Kelvin (K) WB values and want to input your own custom white balance (CWB), you can input a range from 2000 K (cool) to 14000 K (warm). Let’s see how it works.
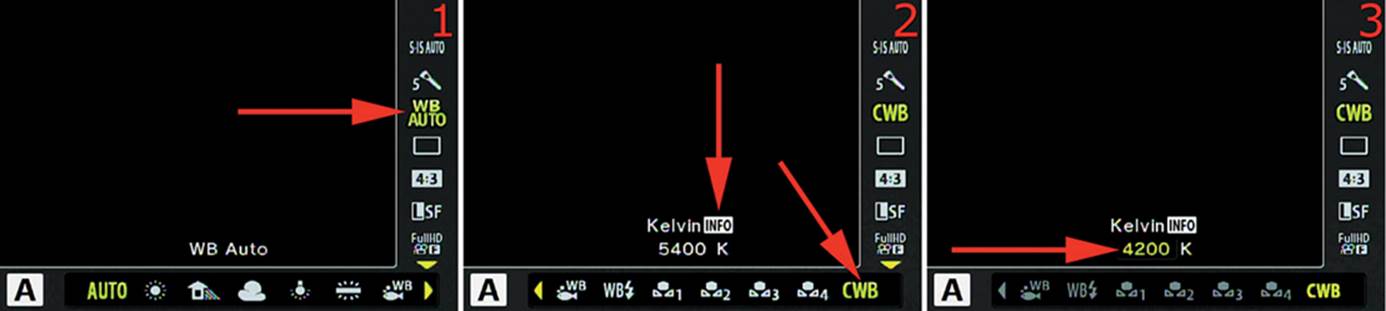
Figure 2.2G: Selecting a Kelvin (K) WB value
In figure 2.2G, image 1, you can see that we are starting from the WB AUTO setting again. At the bottom of the screen, use the Arrow pad keys to scroll all the way to the right of the 13 WB settings to find the CWB setting.
In figure 2.2G, image 2 (right red arrow), you can see that I selected CWB (the 13th setting). The current Kelvin (K) reading is 5400 K (left red arrow), but we will change it. Press the Info button to open the next screen, which will allow you to change the K value.
Figure 2.2G, image 3, shows that the K value has been changed to 4200 K (a cooler value). To change the value, press the up or down Arrow pad keys to select a K value between 2000 K (cool) and 14000 K (warm). Press the OK button to lock in the CWB setting.
Deeper Information: For a detailed study of each of these WB types see the Custom Menu chapter under the Custom Menu > G. [Record Mode]/Color/WB > WB function on page 396. The Live Control WB screen is a lite version of the function settings provided in the WB Custom Menu. In this chapter we’ve discussed how to select settings. In the Custom Menu chapter we will discuss how, why, and when.
If you want to fine-tune the hue of the WB for a particular Picture Mode, you can do so with the extra control screens discussed in the Super Control Panel section earlier in this chapter. Look under the subheading Fine-Tuning the WB on page 23.
Settings Recommendation: The WB system in the E-M1 is pretty flexible. I use AUTO WB most of the time. The range of choices at your fingertips guarantees that you can use an accurate WB and capture true colors. Why not take time to shoot some pictures with the various WB values to see how the camera changes the color balance? Also experiment with taking an ambient Capture WB reading from a white or gray card. That experience is vital if you find yourself in a situation where you must carefully control the color.
Sequential Shooting/Self-Timer
The camera’s Sequential shooting/Self-timer system is designed to let you control the frame rate of the camera when you are shooting in bursts. It also lets you control remote shooting with three Self-timer controls. Let’s examine each of the modes and see how they work:
• Single: This mode causes the camera to take one picture each time you fully press the Shutter button.
• Sequential H: The camera will take a continuous series of pictures at about 10 frames per second (fps). Autofocus, exposure, and white balance are frozen at the values determined by the camera for the first picture and are not updated during the series.
• Sequential L: The camera will take a continuous series of pictures at about 6.5 fps with firmware 2.0 or 9 fps with firmware 3.0. Autofocus, exposure, and white balance are updated for each picture in the series.
• [Self-timer] 12 sec: The camera will take a single photograph 12 seconds after you press the Shutter button all the way down. The orange focus assist light on the front of the camera will shine solid for 10 seconds, then it will blink for 2 seconds before the shutter fires and the picture is taken.
• [Self-timer] 2 sec: The camera will take a single photograph two seconds after you press the Shutter button all the way down. The orange focus assist light on the front of the camera will blink for two seconds before the shutter fires and the picture is taken.
• [Self-timer] C (Custom Self-timer): This variable self-timer function allows you to select the number of images the camera will take when the self-timer expires (Frame), the time in seconds the camera will wait before firing (Timer), and the period of time between each picture (Interval Time) if you have selected more than one picture with the Frame setting. You can also choose whether or not to have the camera autofocus between each picture (Every Frame AF).
Now let’s examine how to select one of the modes.
In figure 2.2H, image 1, the Sequential shooting/Self-timer position is highlighted. You can see all six modes at the bottom of the screen. Single (Single-frame shooting) is currently selected. The first three modes are Sequential shooting modes (Single, Sequential H, and Sequential L), and the last three are Self-timer modes (12 sec, 2 sec, and Custom Self-timer). Refer to the previous list to determine which of the modes works best for your current needs. To select a mode, use the Arrow pad keys to scroll left or right and highlight the mode you want to use. Press the OK button to select it. Figure 2.2H, images 2–6, show the Custom Self-timer screens. The Custom Self-timer (C) gives you fine control over how the camera’s self-timer system works. The next few paragraphs describe how to use it.
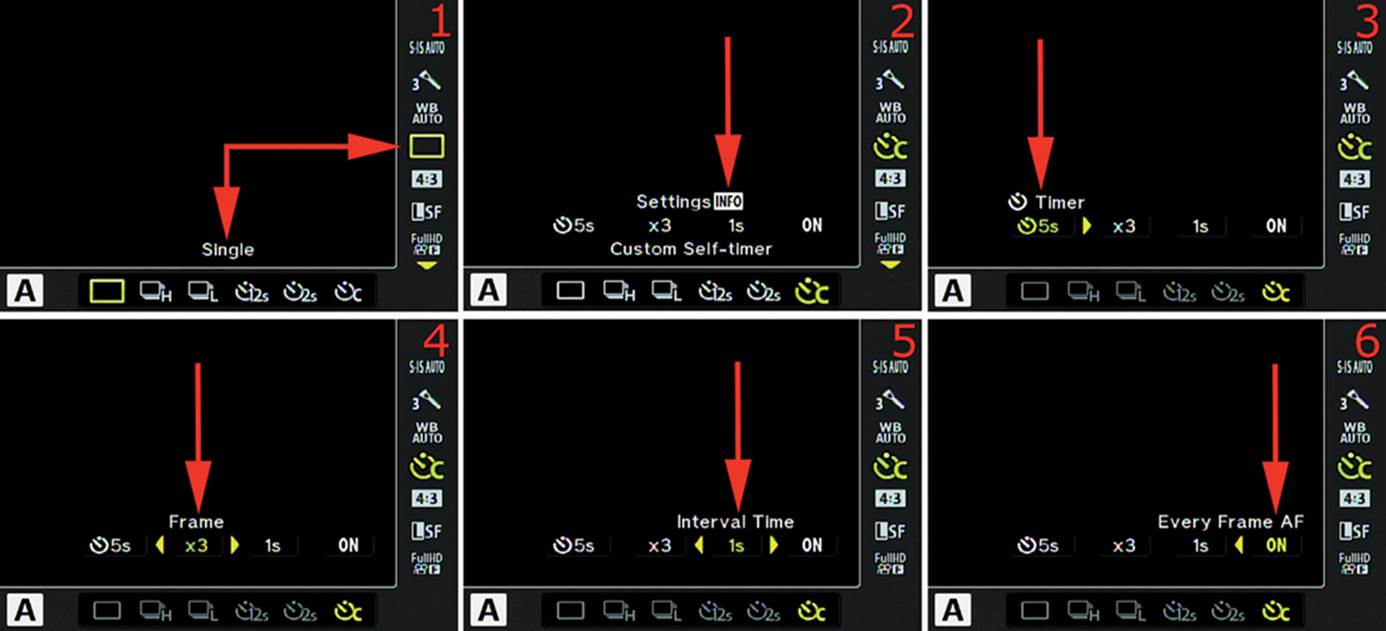
Figure 2.2H: Selecting a Sequential shooting or Self-timer mode
Figure 2.2H, image 2, shows the Sequential shooting/Self-timer screen with Custom Self-timer (C) mode selected. Press the Info button to open the custom setting fields. The four custom settings are as follows:
• Timer: Choose the timeout period (Timer) before the first Frame is taken during the self-timer cycle (figure 2.2H, image 3). You can choose from as short as 1 second (1s) to as long as 30 seconds (30s). The camera will fire the first Frame only after the Timer delay you selected has expired. This gives you time to get in position, even if you must run a distance from the camera to be in the frame or need the delay for some other reason. Scroll up or down with the Arrow pad keys to choose a value. When you have chosen a value, scroll to the right.
• Frame: This setting allows you to choose the total number of pictures (Frames) the camera will take during the self-timer cycle (figure 2.2H, image 4). I chose three Frames (x3). You have a choice of from 1 (x1) to 10 (x10) Frames. Scroll up or down with the Arrow pad keys to choose a value. When you have chosen a value, scroll to the right.
• Interval Time: This setting controls the time between Frames after the first Frame is taken (figure 2.2H, image 5). The camera will delay for the amount of time specified in the Timer setting, then will use the Interval Time to pause between the rest of the Frames. I chose 1 second (1s). Scroll up or down with the Arrow pad keys to choose a value. When you have chosen a value, scroll to the right.
• Every Frame AF: Select either On or Off from the Every Frame AF field (figure 2.2H, image 6). On tells the camera to autofocus for every shot in the Self-timer series of pictures, and Off means the camera will autofocus on the first frame of the series only. After you have selected the value, press the OK button to save your settings. Prepare the camera for shooting and press the Shutter button to start the initial Self-timer (Timer) countdown.
Note: The camera will remember your Self-timer Custom settings and will use them over and over until you change them. If these settings are useful for most of your Self-timer photography, simply select Self-timer Custom to use the settings in the future.
Deeper Information: These Release modes are considered in more detail under the Shooting Menu 2 chapter in the Sequential/Self-timer Shooting subsection on page 194.
Settings Recommendation: As a nature and portrait photographer, I normally use Single-frame shooting. However, if I’m at an event such as an auto race, I will often switch to Sequential Low (L), which gives me a shooting speed of about 6.5 fps with firmware 2.0 or 9 fps with firmware 3.0, with autofocus between each frame. I rarely use the Sequential High (H) setting because I normally do not need a speed of 10 frames per second, and I want autofocus between frames, which H mode does not provide.
When it is time to use the Self-timer, I normally choose the 12s setting and take a single picture. However, if I want to be creative and use the Self-timer for multiple frames, I often use the Self-timer Custom setting.
Aspect
The E-M1 is a Micro Four Thirds camera, which describes the aspect ratio of the sensor (4:3). Other camera brands have sensors with different aspect ratios. The Aspect function on the E-M1 allows you to change the Micro Four Thirds (4:3) standard image aspect ratio to various different Aspect ratios that more closely match the ratios of other brands. In other words, the length and width of the image is cropped into a new relationship. The five available ratios are 4:3, 16:9, 3:2, 1:1, and 3:4.
The new Aspect ratio changes the final shape of the image, which means the camera has to crop the picture. Therefore, use a different ratio only when you must to prevent quality losses when an image is enlarged.
Let’s examine how to select one of the five image Aspect ratios.
Figure 2.2I shows the Aspect position highlighted on the Live Control screen with the 4:3 Aspect ratio selected. There are five Aspect ratios displayed across the bottom of the screen. There is also a handy guide above the line of ratios that shows the pixel dimensions of the corresponding Aspect ratio. I chose the default 4:3 Aspect ratio, which displays pixel dimensions of 4608×3456. Choose the Aspect ratio you want to use by scrolling left or right with the Arrow pad keys. When the ratio you want to use is displayed, stop scrolling and press the OK button to lock in the setting.
Note: As you change to a different Aspect ratio, the electronic viewfinder (EVF) and Live View screen will adjust to the new shape so you can accurately shoot with the new Aspect ratio.
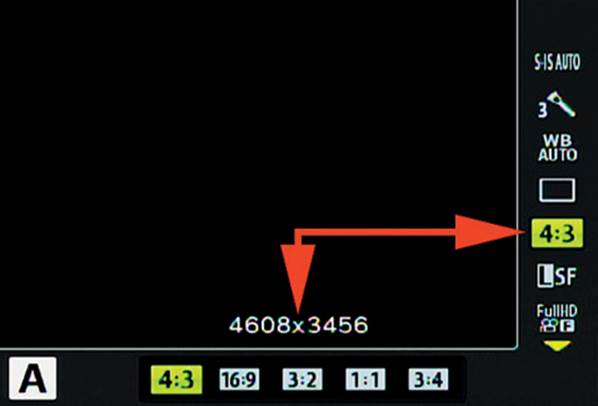
Figure 2.2I: Selecting an image Aspect ratio (pixel ratio)
Deeper Information: Image Aspect ratio is discussed in more detail in the Shooting Menu 1 chapter under the Image Aspect subheading on page 186, including picture samples of the different ratios.
Settings Recommendation: I rarely change the Aspect ratio of the image with this function. I prefer to simply crop the image after the fact in my computer. However, if you need a specific Aspect ratio but don’t have time to crop your images, the camera is ready to provide the ratio you need with no hassle and only minor image quality loss.
Record Mode (Image Quality)
The Record Mode function allows you to choose the image quality for your pictures. You can shoot in RAW (ORF) mode or in various JPEG sizes and pixel counts, including Large (L), Middle (M), and Small (S). You can also choose from several JPEG compression levels, including Super Fine (SF), Fine (F), Normal (N), and Basic (B).
On the Live Control image quality settings, you will see JPEG size and compression rate names combined. For instance, a Large-size, Super Fine compression rate JPEG will be listed as LSF, and a Large-size, Fine compression rate JPEG will be listed as LF.
The size for RAW mode, or the RAW file in a combination mode (e.g., LF+RAW), is always Large (L) with a 4608 × 3456 pixel ratio. Let’s examine how to select an image quality Record Mode.
Figure 2.2J shows the image quality position highlighted with Large Super Fine (LSF) selected. You can select one of the nine image quality settings by scrolling left or right with the Arrow pad keys until the mode you want to use is highlighted. The approximate number of images that can be held on the current memory card is displayed on the bottom-right side of the screen. The 64 GB memory card in my camera can currently hold 3767 more images. This number will vary depending on which image quality setting you have chosen. Press the OK button to lock in the image quality.
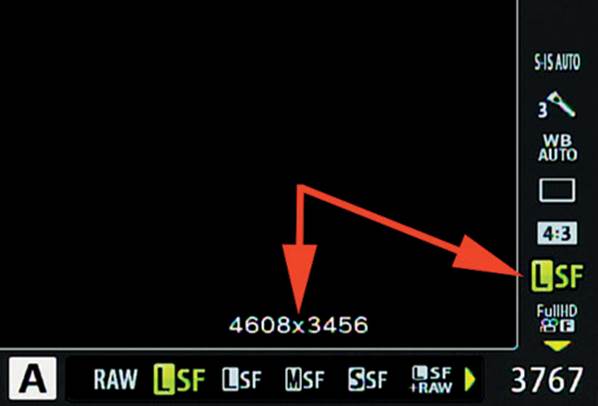
Figure 2.2J: Choosing a JPEG, RAW, or JPEG+RAW image quality Record Mode
Deeper Information: There is deeper information on this subject in the Shooting Menu 1 chapter under the [Record Mode] subheading on page 175. Be sure to read that information before you shoot too many important images so you can make the best image quality choices.
Additionally, you may have noticed in figure 2.2I that I used the Custom Menu > G. [Record Mode]/Color/WB > [Record Mode] Set function to change all my image quality choices to Super Fine (LSF, MSF, SSF). The JPEG Super Fine (SF) Record Mode is available only when it is enabled in the Custom Menu. It will not show up in any of the image quality menus unless you enable it. Instructions are provided in the Custom Menu chapter under the [Record Mode] Set subheading on page 392.
Settings Recommendation: Because of its smaller sensor, I want my E-M1 to capture the best possible quality, so I most often use the RAW setting. However, shooting in RAW requires that I post-process the files and later convert them to JPEGs. If I need to give images to someone quickly, I may use the LSF+RAW setting and shoot both file types at the same time. This gives me the best of both worlds: a RAW file for when I have time to make a masterpiece, and a JPEG file for immediate use. For fun shooting, you may set your camera to one of the JPEG modes so you won’t have to store the extra RAW file, yet you will still have great images to e-mail, print, or use on Instagram, Facebook, or Google+.
Video Frame Size, Rate, and Format
This function allows you to choose the frame size (e.g., 1080p, 720p) and bit rate (e.g., Fine, Normal) for your video recordings. It also lets you to choose the video format (container) for your videos (e.g., MOV or AVI Motion JPEG). The following is a description of the six video types:
Full HD Video (MOV format)
• FullHD-F: This is the best-quality video setting. It offers Full HD (1920 × 1080) or 1080p at 30 fps (actually, 29.97 Mbps), with a Fine (F) bit rate of 24 Mbps. A one-minute video is approximately 177 MB in size. A FullHD-F video uses the MOV file format (container) for ease of viewing with an Apple QuickTime compatible video player. The video has a 16:9 aspect ratio with H.264 MPEG-4 AVC compression.
• FullHD-N: This setting is the second best video quality mode. It offers Full HD (1920 × 1080) or 1080p at 30 fps (actually, 29.97 Mbps), with a Normal (N) bit rate of 16 Mbps. A one-minute video is approximately 130 MB in size and uses the MOV file format (container) for viewing with an Apple QuickTime compatible video player. The video has a 16:9 aspect ratio with H.264 MPEG-4 AVC compression.
• HD-F: This setting provides an HD (1280 × 720) or 720p video at 30 fps (actually, 29.97 Mbps), with a Fine (F) bit rate of 12 Mbps and a MOV file format (container). A one-minute video is approximately 81 MB in size and plays on an Apple QuickTime compatible video player. The video has a 16:9 aspect ratio with H.264 MPEG-4 AVC compression.
• HD-N: This setting offers an HD (1280 × 720) or 720p video at 30 fps (actually, 29.97 Mbps), with a Normal (N) bit rate of 8 Mbps and a MOV file format (container). A one-minute video is approximately 67 MB in size and plays on an Apple QuickTime compatible video player. The video has a 16:9 aspect ratio with H.264 MPEG-4 AVC compression.
Motion JPEG Video (AVI format)
• HD: This setting gives you an HD (1280 × 720) or 720p video that uses an AVI file format (container). It has a 30 fps video recording speed. A one-minute video is approximately 243 MB in size. The AVI file format will play on a Windows Media Player compatible video player. The video has a 16:9 aspect ratio and Motion JPEG compression.
• SD: This setting gives you an SD (640 × 480) or 480p video that uses an AVI file format (container). It has a 30 fps video recording speed. A one-minute video is approximately 122 MB in size. The AVI file format will play on a Windows Media Player compatible video player. The video has a 4:3 aspect ratio and Motion JPEG compression.
Note: The HD and SD formats have extra-large file sizes, compared to the four previous MOV formats, because they use Motion JPEG compression in an AVI container. Each individual frame of the video is a small compressed JPEG file. This type of video is easy to post-process, but it’s much larger to store.
The FullHD-F, FullHD-N, HD-F, and HD-N formats are created with H.264 MPEG-4 AVC compression in a MOV container. Although they are not as easy to post-process, they provide efficient, high-quality videos that take up much less space.
If you use certain ART filters that have a heavy processing overhead while recording Motion JPEG HD or SD video, you may not be able to shoot at a full 30 fps.
Now let’s examine how to choose a video type.
Figure 2.2K shows the video type position highlighted (right arrow), with FullHD-F selected (MOV 1920×1090 Fine). Along the bottom of the screen are six video type settings (you can see only four of them without scrolling). Referring to the previous lists of video types, use the Arrow pad keys to scroll left or right and highlight the video format you want to use. Press the OK button to lock in the setting.
Notice at the bottom-right corner of figure 2.2K that you can see the approximate maximum video recording time for the memory card that is currently in the camera. My 64 GB card can record a little more than four hours (04:00:34) of video in the currently selected FullHD-F format (the card contains other images). When I format the 64 GB card, this screen says I can record the following to the blank card:
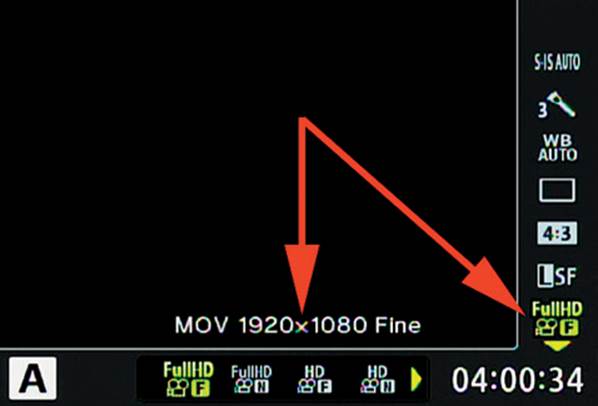
Figure 2.2K: Choosing a video recording type
• FullHD-F: 05:23:54
• FullHD-N: 07:52:04
• HD-F: 10:12:02
• HD-N: 14:30:00
• HD: 03:40:46
• SD: 07:03:14
Settings Recommendation: I normally shoot video in the FullHD-F format because I want great quality and a reduced file size (compared to Motion JPEG video). If you want to learn how to post-process video, you may want to shoot some short videos with a Motion JPEG AVI type selected (HD or SD). It is much easier to work with these videos in basic video editing software because every frame contains a small compressed JPEG picture.
Editing videos that use H.264 MPEG-4 AVC compression is more difficult because of the way the video is stored in each frame. The individual frames store only things that have changed (the motion), and the entire scene is recorded as key frame every few frames. To work with this type of video in editing software, you must have experience working with H.264 MPEG-4 AVC compressed videos.
If all you want to do is shoot great video, I suggest that you experiment with the first four modes using the MOV format to get the smallest file sizes.
Flash Mode
The E-M1 offers you a choice of eight flash modes. Let’s examine each mode and see what it does:
• Flash Auto: The camera controls the flash. It will fire when the camera senses that the light is too low for a good picture. It will not fire when the camera meter says the ambient light is sufficient.
• Redeye: This mode tries to cause the subject’s pupils to contract by firing a preflash and blinking the red AF illuminator light on the camera body twice before the main flash fires. This may reduce the eerie red-eye look that can be seen in so many pictures.
• Fill In: This mode puts the flash entirely in your control. The flash will fire each time you take a picture, and it will attempt to balance with ambient light (it fills in).
• Flash Off: The flash is off and will not fire.
• Red-Eye Slow: This mode executes the same actions as the Redeye mode mentioned previously; however, it also uses Slow flash, as described next. Basically, the camera fires a preflash to reduce red eye and also uses shutter speeds that can get very slow in dim ambient light. Therefore, this mode helps you use mostly ambient light to illuminate the subject, adds some fill light from the flash, and does red-eye reduction for good measure.
• Slow: This mode fires the flash as soon as the first curtain of the shutter is fully open. Then, if the ambient light is dim, it allows the shutter to remain open to pull in background light. If you are shooting in low light it is best to use a tripod for this mode (and other modes that use Slow), or at least brace yourself against a solid object when you take the picture. Otherwise, you may have a well-exposed subject with ghosting from camera movement after the flash fires. If a subject is moving when you use this mode, a ghosted trail may appear in front of the subject. Basically, Slow mode fires the flash at the beginning of the shutter speed time and allows the camera to continue gathering light for the rest of the time the shutter is open.
• Slow2: This mode operates like the Slow mode, except it fires the flash at the end of the shutter speed time, just before the second shutter curtain closes. In effect, the camera has already made an ambient light exposure before it fires the flash. For that reason, this mode is often called rear-curtain or second-curtain flash. If the subject is moving, a ghosted trail may appear behind the subject. Many people use this mode to imply motion in photographs.
• Manual Value: You can manually choose a flash power, as described in the paragraphs accompanying figure 2.2L. You can choose from the range of full power (Full) to 1/64 of full power.
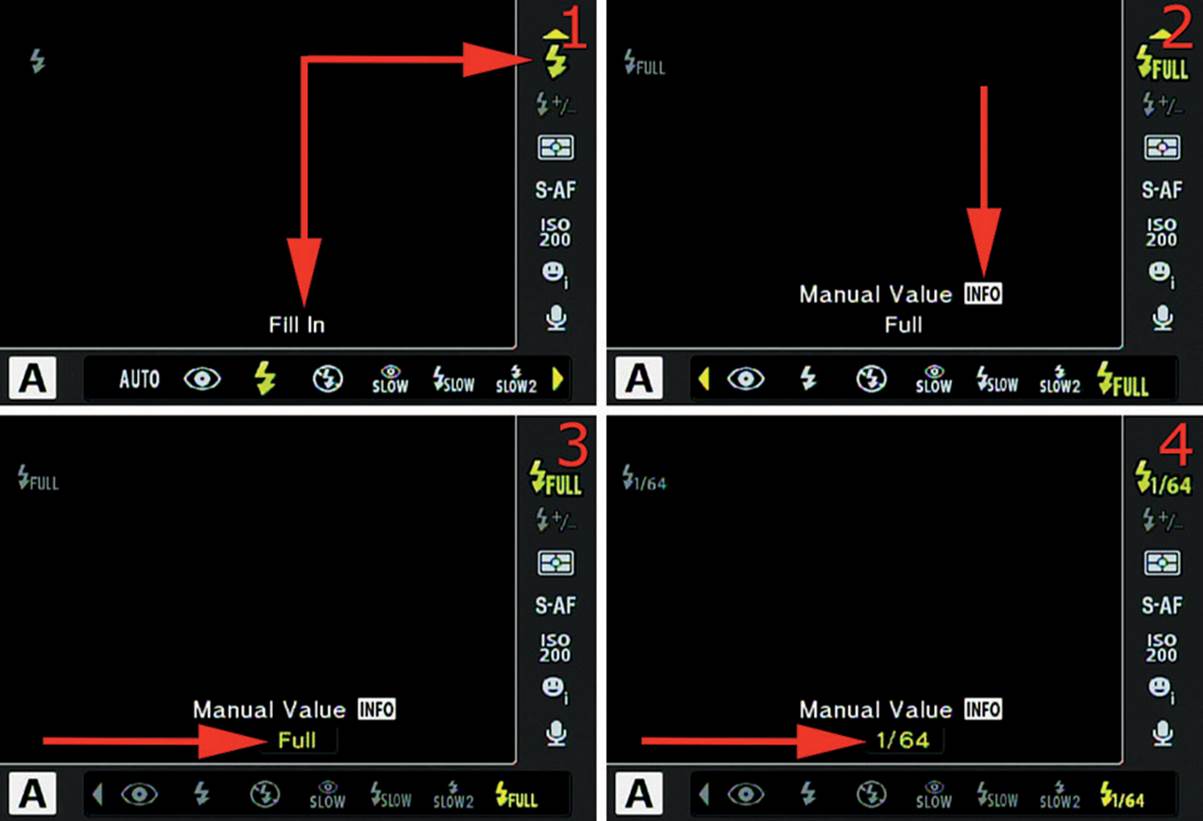
Figure 2.2L: Choosing a Flash Mode and using Manual flash
In figure 2.2L, image 1, you can see that the flash mode position is highlighted, with Fill In mode selected on the bottom of the screen. If you don’t know what a symbol means, look at the text above the symbol (image 1, red arrow). To choose one of the eight available flash modes, refer to the previous flash mode list, then use the left or right Arrow pad keys to scroll through the modes. Stop when the symbol of the mode you want to use is highlighted. Press the OK button to lock in the flash mode.
If you are shooting in a studio and need to carefully control the flash manually, you can use the Manual Value mode. In figure 2.2L, image 2, the Manual Value flash symbol at the far right end of the eight modes is selected. If this mode has not been moved from maximum power, it will display a small lightning bolt symbol and the word FULL. After you select Manual Value, press the Info button to enable the adjustment system.
In figure 2.2L, image 3, notice that the word Full, just below Manual Value Info, becomes a field that accepts input when you press the Info button. Scroll up or down with the Arrow pad keys, and you will see the values change in the field that previously reported Full. In figure 2.2L, image 4, you can see that I chose 1/64 power, which is the lowest output setting. Again, the range of flash output is from 1/64 to Full. After you have selected the value you want to use, press the OK button to lock it in.
Settings Recommendation: I use the Fill In flash mode most of the time. It seems to balance the flash well with ambient light, and the mode lets me, not the camera, decide when to use flash. However, if you are shooting for fun or don’t have much experience with flash, Flash Auto mode is good for helping you know when to use flash. The other modes (e.g., Slow, Slow2) are available for when you want special effects. Redeye seems to help somewhat for reducing the red-eye effect in portraits.
Flash Intensity Control (Compensation)
Flash Intensity Control is similar to a flash compensation system. If you are taking pictures and the background of the subject is exposed well but the subject is overexposed, you may want to dial back the power or intensity of the flash unit. If the subject is underexposed and the background is well exposed, you may want to increase the flash output to light the subject a little better. Flash Intensity Control gives you the power to do either. In effect, you are dialing in flash exposure compensation. Let’s see how to adjust it.
Select the Flash Intensity Control symbol, a small lightning bolt followed by +/– (figure 2.2M, right arrow). The +/–0.0 symbol at the bottom of the screen represents the EV compensation value that you can choose, which ranges over six EV steps (+3.0 to –3.0 EV).
Press the left or right Arrow pad keys to change the flash intensity. You will see the EV value change to plus or minus, depending on which direction you move the indicator. As expected, moving it toward + makes the flash put out more power, and moving it toward – makes it put out less power. Set the indicator at the EV compensation value you want to use. The positive or negative EV value will display where 0.0 is located. For instance, to add 1 stop (1 EV step) of flash power, move the indicator to the right until +1.0 appears above the indicator scale. Press the OK buttonto lock in your flash intensity choice.
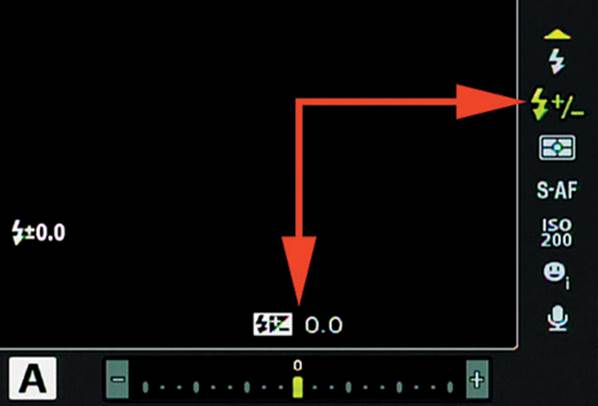
Figure 2.2M: Choosing a Flash Intensity Control exposure compensation value
Settings Recommendation: I tend to shoot a little brighter than many photographers because I use RAW mode for the best image quality most of the time. When you use RAW (ORF) image quality mode, the picture files have more overexposure headroom than you might think. Therefore, I generally leave the Flash Intensity Control set to +0.3, for a one-third stop overexposure. When you shoot JPEG files it is important to watch the histogram closely to prevent unrecoverable overexposure (highlight data loss), especially when shooting up close.
Metering Mode
The E-M1 has five light meter types that give you great flexibility in how you expose your images. Let’s look more closely at the five types of light meters built in to the camera and discuss their differences:
• ESP: The camera meters the image with a grid of 324 metered areas that cover the frame. It uses complex mathematical computations to arrive at an excellent exposure. This metering mode works best for portraits when ![]() Face Priority is enabled.
Face Priority is enabled.
• Ctr-Weighted: The camera averages the light between the subject and the background. It places more emphasis on exposure for the center area of the EVF or Live View screen, with less emphasis on parts of the scene that are farther away from the center.
• Spot: The camera uses a small circle in the center of the EVF or Live View screen for metering. This circle is equivalent to 2 percent of the frame, and all metering takes place in this 2 percent area. Therefore, you must place this stationary spot on the area of the subject that you want to correctly meter by moving the camera then using autoexposure lock (AEL/AFL button) to lock the exposure while you recompose the image. Or you can take multiple readings of different areas of the scene, determine the total light range, and set the exposure manually.
• Spot Hilight (HI): This type of metering is similar to standard Spot metering in that the camera uses a small circle in the center of the frame to meter. The metering circle is equivalent to 2 percent of the frame. This metering mode is different from standard Spot metering because the camera tries to make white areas (highlights) stay white by increasing the exposure beyond a normal Spot reading to give a bright, high-key look to the image.
• Spot Shadow (SH): This type of metering is also similar to normal Spot Metering in that the camera uses a small circle in the center of the frame to meter. The metering circle is equivalent to 2 percent of the frame. This metering mode is different from normal Spot metering because the camera tries to make dark areas (shadows) stay dark by decreasing the exposure below a normal Spot reading to give a low-key look to the image.
Let’s examine how to select one of the metering modes.
In figure 2.2N, the Metering position is highlighted on the right, with ESP Metering mode selected at the bottom of the screen. Refer to the previous list of Metering modes, then use the Arrow pad keys to scroll left or right until the mode you want to use is highlighted. Press the OK buttonto lock in the mode.
Deeper Information: We will consider more detail about the Metering mode types in the Custom Menu chapter under the Metering subheading on page 370.
Settings Recommendation: Digital ESP metering (ESP) is a very effective form of metering. I rarely have to use the other metering modes. Sometimes I might use the Spot meter to meter a bright subject against a darker background, but otherwise I am quite happy with ESP. Be sure to use a form of ![]() Face Priority when you are taking portraits with ESP. That seems to make the camera extra sensitive to exposing faces accurately, even if the background is dark and could cause some facial overexposure.
Face Priority when you are taking portraits with ESP. That seems to make the camera extra sensitive to exposing faces accurately, even if the background is dark and could cause some facial overexposure.
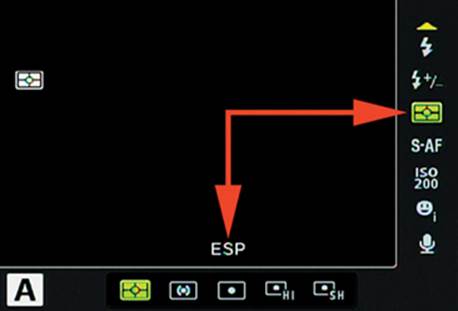
Figure 2.2N: Choosing a Metering mode
AF Mode
The AF Mode function provides several focus methods. Four of them are for autofocus and one is for manual focus. Also, one of the autofocus methods will allow focus tracking. Let’s examine each of the modes and see how to select one:
• Single AF (S-AF): When you hold the Shutter button halfway down, the camera auto-focuses on the subject, beeps once, and locks focus. In the top-right corner of the EVF (or Live View screen) you will see a small green dot. This indicates that the focus is good. If the subject moves, the focus may no longer be accurate; therefore, you must release the Shutter button and press it halfway again to update the focus. S-AF is best for static subjects or subjects that move very slowly. The AF point target indicator is a small green rectangle.
• Continuous AF (C-AF): Similar to S-AF, the camera will focus when you hold the Shutter button down, and it beeps when it has acquired good focus, up to two times. It also displays the round green good focus indicator at the top right of the camera screens. However, if the subject moves, the camera continues autofocusing on the subject. Unlike S-AF, the camera never really locks the focus permanently; it continues to seek the best autofocus at all times. If you change to a different subject, or if the subject moves, the camera will do its best to automatically update the focus. The AF point target indicator is a small green rectangle.
• Manual focus (MF): When you use MF mode you are entirely responsible for focusing the camera. The AF point target indicator is not used. You may want to enable focus Peaking and/or Magnify under the Custom Menu > A. AF/MF > MF Assist > Peaking [or Magnify] setting to make manual focusing easy and accurate. See the following Deeper Information subheading for more information on those two modes.
• Single AF + MF (S-AF+MF): This mode is almost exactly like the S-AF mode, with its focus lock, beep, and round green good focus indicator. However, it offers one powerful extra feature: manual focus fine-tuning. After you press the Shutter button halfway and the camera has autofocused and locked focus on the subject (S-AF), you can fine-tune the focus with the lens focus ring (MF). If you have focus Peaking and Magnify enabled, as discussed in the previous paragraph, the camera will use those features during fine-tuning. The AF point target indicator is a small green rectangle.
• AF Tracking (C-AF+TR): This mode is for autofocus with subject tracking. For general use this mode works like C-AF mode, with continuous autofocus updating. However, if the subject moves, the camera will carefully track it and lock on to its location with the bigger focus point target indicator while continuously updating the focus as the subject moves. To help you understand how to use this feature, select C-AF+TR, then focus on a small subject. Move the camera around and you will see the AF point target indicator stay locked on the subject. It is effective at staying with a subject as long as the light is reasonably good and the subject is not moving too quickly. The AF point target indicator is a larger green square with bars sticking out of each side.
Now let’s examine how to select one of the focus modes.
In figure 2.2O you can see that the AF Mode position is highlighted, with S-AF mode selected. Refer to the previous list of focus modes, then use the Arrow pad keys to scroll left or right until the mode you want to use is highlighted. Press the OK button to lock in the AF Mode.
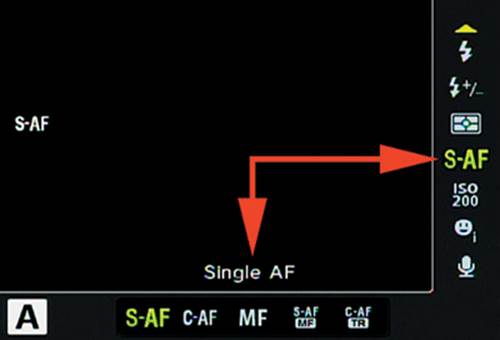
Figure 2.2O: Choosing a focus mode
Deeper Information: This subject is considered more thoroughly in the Custom Menu chapter under the AF Mode subheading on page 274 (see Custom Menu > A. AF/MF > AF Mode).
Since the E-M1 does not have a split-prism screen to assist with Manual focus (MF), you may want to enable focus Peaking and/or Magnify. Peaking makes it easy to see when the subject is in focus because it outlines the edges of the subject in white (or black) to indicate where the best focus is currently located. Peaking is discussed and samples are provided in the Custom Menu chapter under the MF Assist heading and the Peaking subheading on page 286. In the MF Assist section of that chapter I also discuss the Magnify function, which automatically zooms in to pixel-peeping levels when you turn the lens focus ring, and it results in extremely accurate manual focus. Combining Peaking and Magnify makes manual focus easy.
Settings Recommendation: I like to use S-AF+MF mode so I can use autofocus most of the time, but I can still turn the focus ring to enable manual focus, along with Peaking and Magnify. The S-AF mode is fine for slow shooting with well-defined, static subjects. C-AF works quite well when I am shooting something like a wedding and the bride and groom are walking toward me. I use MF mode most often when I am taking macro shots and need to carefully control where the focus falls, due to the shallow depth of field in that type of photography. The tracking mode (C-AF+TR) works well for moving subjects, especially larger wildlife, cars, and airplanes.
ISO Sensitivity
The ISO function changes the camera’s sensitivity to light. The higher the ISO, the greater the sensitivity, and vice versa. Higher ISO sensitivities can add grainy digital noise to the darker areas of your image; therefore, keep the ISO as low as possible for the current lighting conditions.
In figure 2.2P, the ISO sensitivity position is highlighted on the right. You will see a range of ISO sensitivity values at the bottom of the screen. Use the Arrow pad keys to scroll left or right and select an ISO sensitivity value.
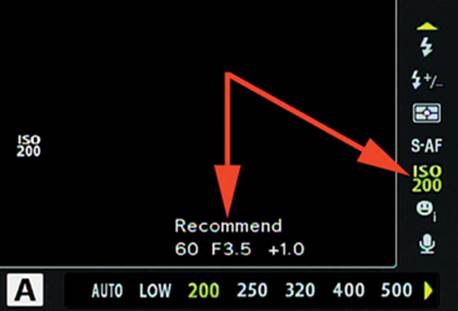
Figure 2.2P: Choosing an ISO sensitivity
In figure 2.2P I chose ISO 200. The camera recommends ISO 200 as a base—you will see Recommend at the bottom of the screen when you select ISO 200. Of course, the ISO is variable, and you can change it to meet your needs. The range of ISO values runs from LOW (ISO 100) to ISO 25600.
You can also select AUTO, which allows the camera to select an ISO depending on the ambient light conditions. AUTO is a great choice when you do not have time to adjust the ISO yourself, and it also shows on the bottom of the screen as Recommend. However, be aware that the camera will use high ISO values to get the picture in dark conditions, regardless of whether ISO noise is introduced. For the best quality, control the ISO sensitivity yourself.
When you have selected the ISO sensitivity value you want to use, press the OK button to lock it in.
Note: Olympus considers ISO 100 (LOW) to be an extended ISO value in the E-M1. The recommended base ISO is 200. When LOW is selected you will see ISO Extension displayed at the bottom of the screen. This simply means that LOW approximates ISO 100, which is outside the normal ISO range for the camera. Do not worry, ISO LOW works great, and I use it much of the time to capture low-noise landscape and portrait images when the ambient light allows it.
Settings Recommendation: I usually leave my camera set to ISO 200 because it has low noise for everyday photography. When I shoot landscapes on a tripod, I often set it to LOW (ISO 100). The camera does well up to about ISO 1600, even though the Micro Four Thirds sensor is small. I would use ISO values above 1600 only in emergencies because the noise levels may become objectionable. You should test this for yourself to see where your noise tolerance lies.
![]() Face Priority AF Mode
Face Priority AF Mode
The ![]() Face Priority AF mode is designed to make your camera extra sensitive to human faces. When this mode is enabled, the E-M1 will detect human faces, adjust the focus to capture them sharply, and tweak the ESP metering to expose more accurately for human skin tones.
Face Priority AF mode is designed to make your camera extra sensitive to human faces. When this mode is enabled, the E-M1 will detect human faces, adjust the focus to capture them sharply, and tweak the ESP metering to expose more accurately for human skin tones.
Additionally, you can select Eye Priority and even choose which eye to focus on. When any type of ![]() Face Priority is active, the camera looks for human faces in the subject area and gives them priority for exposure. It then uses the selected type of
Face Priority is active, the camera looks for human faces in the subject area and gives them priority for exposure. It then uses the selected type of ![]() Face Priority to decide how to autofocus. Let’s examine the five available modes:
Face Priority to decide how to autofocus. Let’s examine the five available modes:
• Off: ![]() Face Priority is off.
Face Priority is off.
• ![]() : The camera uses
: The camera uses ![]() Face Priority for autofocus and exposure.
Face Priority for autofocus and exposure.
• ![]() i: The camera uses the pupil of the nearest eye for the best autofocus.
i: The camera uses the pupil of the nearest eye for the best autofocus.
• ![]() iR: The camera uses the pupil of the right eye for the best autofocus.
iR: The camera uses the pupil of the right eye for the best autofocus.
• ![]() iL: The camera uses the pupil of the left eye for the best autofocus.
iL: The camera uses the pupil of the left eye for the best autofocus.
In figure 2.2Q, on the right, you can see that I chose ![]() Face Priority, and
Face Priority, and ![]() i or Face & Eye Priority is displayed on the bottom of the screen. Refer to the previous list of
i or Face & Eye Priority is displayed on the bottom of the screen. Refer to the previous list of ![]() Face Priority settings, then use the Arrow pad keys to scroll left or right until the mode you want to use is highlighted. Press the OK button to lock in your choice.
Face Priority settings, then use the Arrow pad keys to scroll left or right until the mode you want to use is highlighted. Press the OK button to lock in your choice.
Deeper Information: This subject is also considered, with more detail, in the Custom Menu chapter, under the ![]() Face Priority subheading on page 291.
Face Priority subheading on page 291.
Settings Recommendation: I have found that the camera works well with some form of ![]() Face Priority mode always active. It focuses normally on nonhuman subjects when no face is present, and it uses face detection only when it can detect human faces. I normally leave
Face Priority mode always active. It focuses normally on nonhuman subjects when no face is present, and it uses face detection only when it can detect human faces. I normally leave ![]() i (Face & Eye Priority) set to On.
i (Face & Eye Priority) set to On.
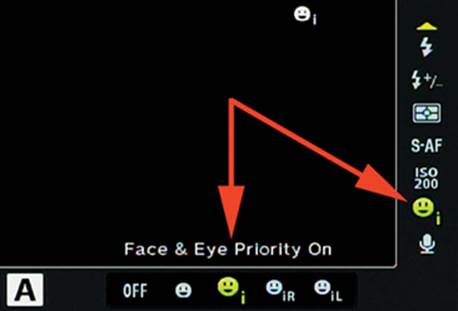
Figure 2.2Q: Selecting a Face & Eye Priority mode
Movie Sound
This simple function turns the camera’s built-in stereo sound recorder on or off when you are recording videos. If you are recording sound with an external digital audio recorder, you may not want the camera to record sound at all. Or you may be shooting a family video and do want to record stereo sound.
Let’s see how to enable or disable video sound recording.
Figure 2.2R shows the movie sound recorder position highlighted on the right with Movie [Sound] On selected at the bottom of the screen. Use the left or right Arrow pad keys to select On or Off, then press the OK button to lock in your choice.
Settings Recommendation: I leave the Movie sound recorder turned on all the time. I do not use an external audio recorder; therefore, I want my camera to use the built-in stereo mic system (found on either side of the EVF on top of the camera). If you shoot professional video, you may need to disable the sound recorder feature, and this function makes it easy to do so.
Now let’s examine the various icons you will find on the Live View screen and in the electronic viewfinder (EVF), which is usually a duplicate of the Live View screen.
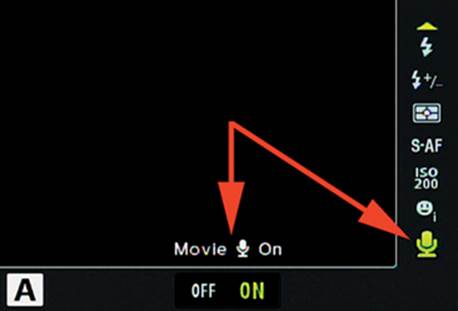
Figure 2.2R: Enabling or disabling video sound recording
Live View and Electronic Viewfinder Screens
Screen Icons
The 1,037k dot resolution, 3.0 inch (7.6 cm) Live View screen on the back of the camera and the 2.36 M dot resolution electronic viewfinder (EVF) usually have the same appearance. You can select from three EVF styles, as shown in figure 2.3A.
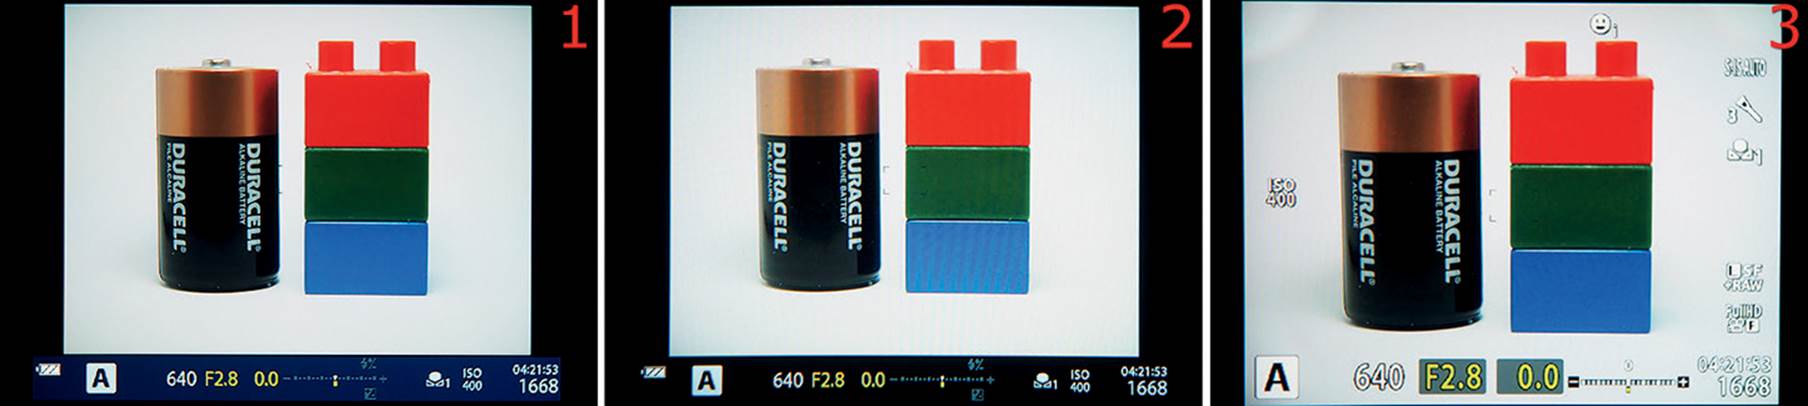
Figure 2.3A: EVF screen styles 1, 2, and 3
Two of the three EVF styles are very similar (figure 2.3A, images 1 and 2). They have sparse screens that display only information that is absolutely necessary. Because they are similar to displays from the old film days, they are considered retro styles.
Style 1 has a blue band at the bottom of the screen with white and yellow text (image 1), and style 2 has a black bar with white and yellow text (image 2). Both of these styles limit information mostly to the bottom bar, although they display some of the symbols shown in figure 2.3B in upper areas of the screen.
Style 3 (figure 2.3A, image 3) is the default EVF style. It is modern and magnifies the subject more for ease of viewing, plus it displays more symbols and text while you shoot. Style 3 matches the Live View monitor virtually all the time, so when you switch from the EVF to the Live View monitor, there will be no change in the appearance of the screen. This cuts down on confusion when you are shooting quickly.
To change to a different EVF style, use the Custom Menu > J. Built-In EVF > Built-In EVF style function, as discussed in the Custom Menu chapter under the Built-In EVF Style subheading on page 428.
Figure 2.3B is a screen that reflects EVF style 3 and the normal Live View screen. EVF styles 1 and 2 have similar symbols. Most photographers leave the camera set to style 3 so the EVF and Live View screen will match.
Let’s discuss the symbols you will see on the EVF and Live View screens. Each of the numbered items are identified in the following list.
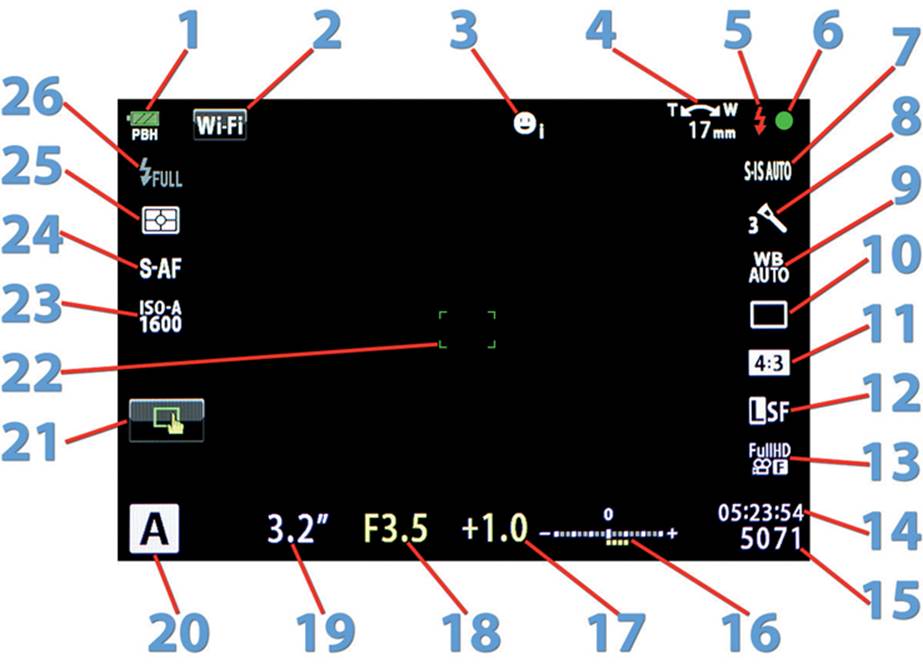
Figure 2.3B: Live View and EVF screen symbols
1. Battery level: When an HLD-7 battery pack is mounted, PBH stands for power battery holder.
2. Wi-Fi: Enables the Wi-Fi system upon your touch.
3. ![]() Face Priority: Displays the current Face Priority mode setting.
Face Priority: Displays the current Face Priority mode setting.
4. Lens focal length: Displays the focal length of the lens as you turn the zoom ring. Also shows the direction to turn the lens for telephoto (T) and wide angle (W).
5. Flash: Shows the status of the flash unit that is mounted on the Hot shoe. It blinks while the flash unit is recharging and shines solid when the flash unit is ready.
6. AF confirmation mark: Lets you know when the autofocus system has acquired good focus.
7. Image Stabilizer: Confirms the Image Stabilizer (IS) mode.
8. Picture Mode: Confirms which Picture Mode the camera is using.
9. White Balance (WB): Confirms the WB mode.
10. Sequential shooting/Self-timer: Confirms the Sequential shooting mode or the Self-timer mode.
11. Aspect ratio: Confirms the image Aspect ratio.
12. Record Mode: Confirms the image quality mode (JPEG and RAW modes).
13. Video Mode: Confirms the video frame size, bit rate, and format.
14. Video recording time: Reports the hours, minutes, and seconds of available video recording time for the current memory card.
15. Image capacity: Reports the available image capacity for the current memory card.
16. Exposure Compensation and Flash Intensity indicator scale: If a yellow line of dots appears below the scale, it indicates the amount of the current Exposure Compensation. If a line appears above the scale, it shows the amount of the Flash Intensity setting.
17. Numerical Exposure Compensation value: Shows the current Exposure Compensation value (–2.0 to +3.0).
18. Aperture: Confirms the current aperture.
19. Shutter speed: Confirms the current shutter speed.
20. Shooting mode: Shows the current shooting mode on the Mode Dial.
21. Touch screen operations control: Confirms the current touch screen mode. Use it to select other touch screen modes.
22. AF point indicator: Shows the currently active moveable AF point.
23. ISO sensitivity: Confirms the current ISO sensitivity level and ISO mode.
24. AF mode: Confirms the current autofocus (AF) mode.
25. Metering mode: Confirms the current Metering mode.
26. Flash Mode: Confirms the current Flash Mode.
Note: When the Live View screen or EVF is active, pressing one of the Arrow pad keys opens the AF Area Select screen, with its grid of 81 AF points, which allows you to move the AF point indicator (number 22) to a location on the subject, such as an eye. Try it!
Touch Screen
The 3-inch touch screen on the back of your E-M1 can be quite useful. You can use the touch screen to execute various camera functions, including the following:
• Set certain camera settings through the Super Control Panel
• Initiate autofocus only or initiate autofocus and also take a picture
• Zoom in up to 14x to see extreme detail for focusing before taking a picture
• Swipe to view pictures on the monitor
• Zoom in and out on pictures you are viewing on the monitor
• Enable or disable the wireless LAN (Wi-Fi) function
• Use the Live Guide system when iAUTO is selected on the Mode Dial
Let’s examine the main functions the touch screen offers and see how they work.
Enabling or Disabling the Touch Screen
Some photographers may not want to use the touch screen. You can disable it by setting the Custom Menu K. Utility > Touch Screen Settings function to Off (figure 2.3C).
Most E-M1 users enjoy using the touch screen. Most of us have become used to smart-phones and tablets, and the practice of touching a screen to execute an app or function is becoming second nature. However, keep this function in mind if you want to enable or disable the touch screen in the future. The default setting is On.
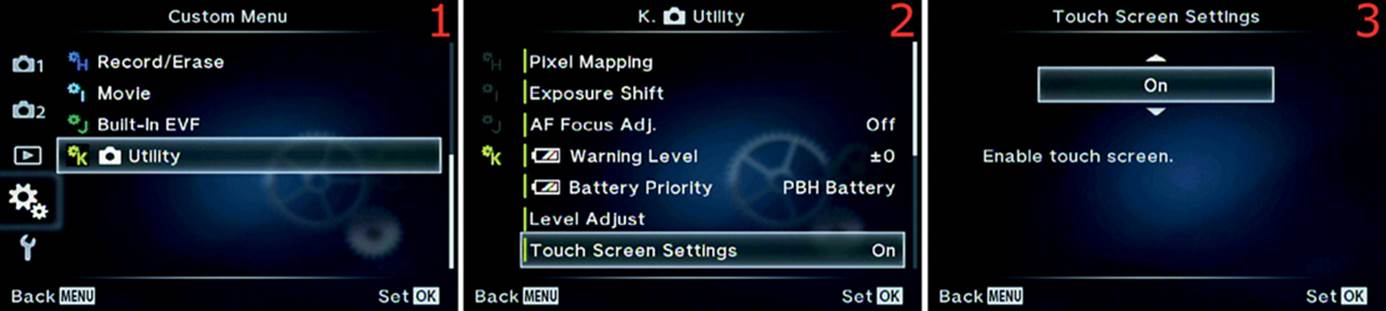
Figure 2.3C: Enabling or disabling the touch screen (default is On)
Use these steps to enable or disable the touch screen:
1. Select K. Utility from the Custom Menu and scroll to the right (figure 2.3C, image 1).
2. Select Touch Screen Settings from the K. Utility menu and scroll to the right (figure 2.3C, image 2).
3. Press up or down on the Arrow pad keys to use the up/down menu. Select On to enable the touch screen and Off to disable it (figure 2.3C, image 3).
4. Press the OK button to Set your choice.
Settings Recommendation: There are certain times when accidentally touching the screen could cause you to take a picture. For instance, let’s say you are a photojournalist and are using the tiltable screen while you hold the camera over your head to see above a crowd. You have the touch screen enabled, and while you adjust the angle of the screen you accidentally touch it, causing the camera to take a picture or focus on something other than the subject. In that kind of situation, disabling the touch screen makes sense.
However, for most of us, the touch screen offers excellent features and is enjoyable to use. After all, we are using one of the most high-tech cameras ever invented. Why not use it to the fullest? Other photographers are jealous that their cameras don’t have a touch screen. Your E-M1 does!
Now let’s consider how to use the touch screen.
Touching the Super Control Panel
In this chapter we have already considered how to use the Super Control Panel, but we examined it mostly from the perspective of using external controls. Let’s briefly examine how to use the Super Control Panel from the touch screen.
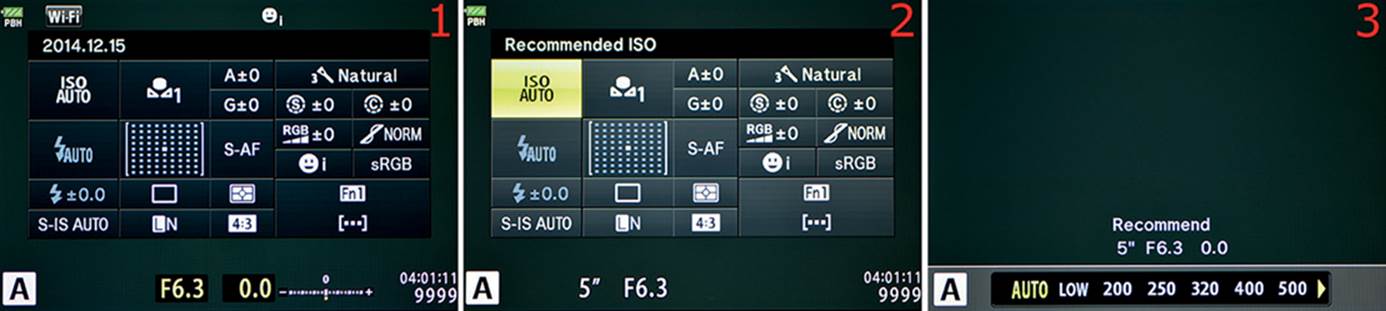
Figure 2.3D: Using the touch screen with the Super Control Panel
Figure 2.3D, image 1, shows the Super Control Panel when the camera is first turned on. The screen has nothing highlighted and awaits your OK button press to select one of the settings. However, you are not limited to just pressing the OK button; you can also use the touch screen to select a setting on the Super Control Panel. While the Super Control Panel is in the state seen in image 1—with no setting highlighted—touching the screen does nothing. However, if you first double-tap the screen on the setting you want to use, it will unlock and that function will be highlighted. After that you can touch other functions and they will be immediately highlighted.
Figure 2.3D, image 2, shows that I have double-tapped the ISO function and it has become highlighted. I could simply touch a different function and it would become highlighted. While a function is highlighted you can turn the Front Dial to scroll the settings for that function and stop when the one you want to use is highlighted. Or when a function is highlighted, you can double-tap it to open the secondary screen for that function (figure 2.3D, image 3). You must then use physical camera controls to select settings from the secondary screen. Unfortunately, the secondary screens are not touch sensitive.
Settings Recommendation: Double-tapping the Super Control Panel is easy and fast. It prevents me from accidentally using the Arrow pad keys and opening the Super Control Panel’s default [•••] AF Area Select setting instead of scrolling around on the Super Control Panel as I expected. Remember that any time you use the Arrow pad keys on the Super Control Panel with no function highlighted, the camera defaults to showing you the 81-point AF grid so you can select an AF point for autofocus. I keep forgetting this and find myself grinding my teeth when I discover I have, yet again, opened the [•••] AF Area Select screen when I didn’t mean to.
To save myself some aggravation, I simply double-tap the Super Control Panel to select the function I want to adjust, then I use the physical camera controls to make adjustments.
Touch Focusing with Drag and Zoom In
The camera touch screen has two modes for autofocus. The first one allows you to touch any area of the screen to focus on a certain area of the subject, drag the focus to somewhere else on the screen, or zoom in over an adjustable range (3x to 14x) to see extreme subject detail for very accurate focus. The second one lets you take a picture by touch (instead of with the Shutter button), which I will discuss in the upcoming subsection Touch Focusing and Taking a Picture.
Let’s see how to use the touch screen for high-detail autofocus or manual focus.
Figure 2.3E is the Live View screen with the cap on the lens to show maximum contrast. Normally you will see your subject on this screen behind an overlay of the symbols. Have your camera in hand while you walk through these steps to make sure you understand how to use the touch features correctly.
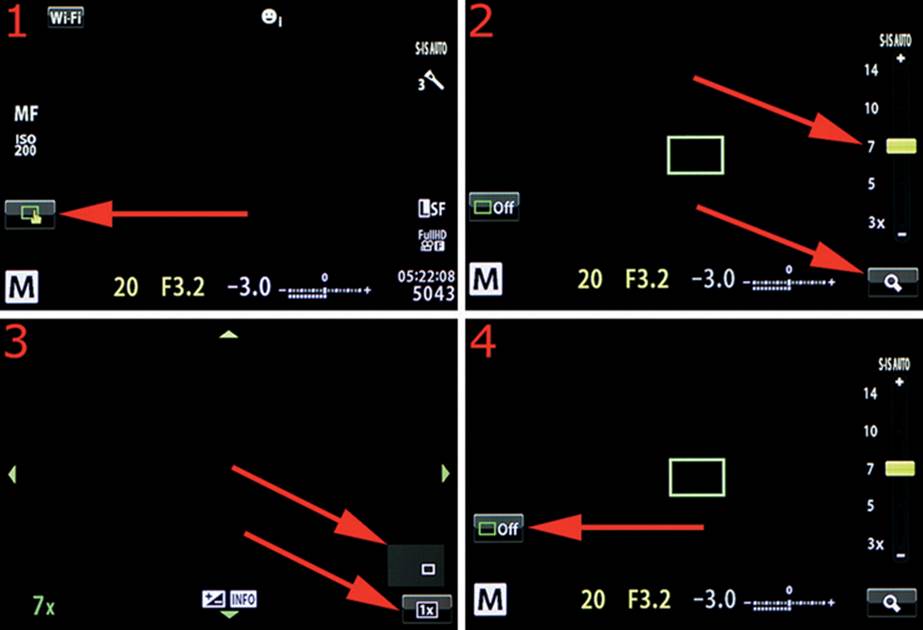
Figure 2.3E: Using Autofocus with the zoom-in touch screen method
In figure 2.3E, image 1, repeatedly tap the symbol shown at the red arrow until you see the hand and finger touching a green rectangle. This represents the touch focus only mode. After the symbol is selected, touch the portion of the subject that you want to have in sharpest focus. The camera will autofocus at that location and display a green AF target rectangle that shows where you touched.
You can now do one of several things: press the Shutter button and take a picture, change the size of the AF target rectangle and drag it to any point on the screen with your finger, or make the camera zoom in for extreme detail focusing.
With figure 2.3E as a guide, let’s consider each of these actions:
• Take a picture: In figure 2.3E, image 2, touch the screen to focus on a particular area of the subject, then press the Shutter button all the way down to take a picture.
• Drag the AF target rectangle: With your finger touching the screen over the green AF target rectangle in the middle of figure 2.3E, image 2, drag the AF target to any point on the Live View screen, then lift your finger and reapply it to activate autofocus and take a picture.
• Zoom in for extreme focus detail: The top red arrow in figure 2.3E, image 2, points to the zoom scale on the Live View screen. This scale appears for only a few seconds and then disappears. You can touch the screen again to make it reappear. With your finger, you can slide the indicator from 3x to 14x, and you will see the AF target change size to match. This changes the area inside the AF target rectangle and makes it more or less sensitive to the exact area it is focusing on. The 14x position is extremely sensitive to detail and uses a very small AF target rectangle that covers a very small area of the subject. The 3x position uses a much larger AF target area and makes the AF target rectangle less sensitive to specific details in the subject because autofocus is based on a larger area. You can drag the resized AF target rectangle with your finger to a different area of the subject. Then you can refocus by lifting your finger and touching the screen again, or you can simply take a picture with the Shutter button. You can also move the AF target area on the Live View screen with the Arrow pad keys. If you want to confirm the area that the camera is using for autofocus, you can touch the magnifying glass symbol at the bottom-right corner of the screen (figure 2.3E, image 2, bottom red arrow). If the symbol has disappeared, touch the screen again to make it reappear. The magnifying glass symbol will make the camera zoom in and display the subject at whatever magnification you previously selected.
When you touch the magnifying glass symbol at the bottom-right of figure 2.3E, image 2, the zoomed-in view will be displayed on the screen (figure 2.3E, image 3), and the zoom level you selected will be indicated in green at the bottom-left of the screen (I chose 7x). You can move the zoomed view around by sliding your finger on the screen. A small white rectangle will appear in a larger gray rectangle; this shows you where in the image your AF target is located (figure 2.3E, image 3, top red arrow). The small white rectangle represents the AF target area within the screen, and the gray rectangle represents a full-size view of the subject on the Live View screen. Touch focus does not work when the lens is zoomed in; you must press the Shutter button halfway down to autofocus, then press it the rest of the way down to take a picture. Or you can touch the1x symbol at the bottom right of the screen (figure 2.3E, image 3, bottom red arrow) to return to the normal 1:1 view before you take the picture. Be sure not to move the camera, or the autofocus may be out of date when you zoom back out. If the 1x button is not displayed, touch the screen again to make it appear.
Now that you have touch focused, zoomed in and out, and taken a picture, it is time to leave the special mode that allows you to zoom in. If you don’t, the AF target rectangle will stay on the screen in whatever size you previously chose. To exit touch focus mode, touch the symbol shown in figure 2.3E, image 4 (red arrow). The symbol is a green rectangle followed by the word Off. The camera will now return to normal nontouch operation.
Settings Recommendation: The touch focus, drag, and zoom method is a fast way to get a zoomed-in view of a subject that requires high-detail focusing. It works for both autofocus and when you are manually focusing. Touch focus does not work when you focus manually, but the zooming feature does. When you use Manual focus the camera does not show focus Peaking, even if it is enabled for normal manual focus. Learn to use this method for when you really need it, such as during macro shooting.
Touch Focusing and Taking a Picture
We discussed how to use touch focus in the previous subsection. Now we will look at the second mode for the touch screen. It works like the camera on a smartphone or tablet. You can focus on a particular area of the subject by touching that area, and then you take the picture. However, the E-M1 does it in a slightly different way. Instead of separating the focus and picture-taking actions, it combines the two. When you touch an area of the subject on the Live View screen, the camera will immediately autofocus and take a picture. Let’s examine how it works.
Figure 2.3F shows a Live View screen with the lens cap on for maximum contrast. The red arrow points to the symbol that indicates you can touch the screen to focus and take a picture. It looks like a hand with a finger touching the side of a button. If a different symbol is displayed, tap it repeatedly until the correct symbol appears.
To focus and take a picture with the Live View screen, compose the picture and touch the area of the subject that you want to focus on. The camera will autofocus on that area then take a picture.
Settings Recommendation: Taking a picture with the touch method is simpler than using a smartphone camera app. All you have to do is lightly touch the screen, and the camera will autofocus and snap the picture. This is convenient for some types of shooting, such as when you use the tilted screen over the top of a crowd or low to the ground for macro shooting. Give it a try!
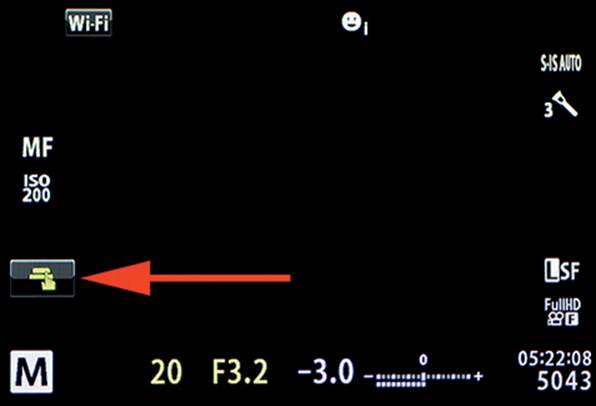
Figure 2.3F: Enabling the touch function
Touch Screen Image Viewing
The touch screen system makes it easy for you to do full-frame, indexed, or calendar playback of images on your memory card. It works like a smartphone or tablet for full-frame image viewing, where you swipe left or right to view pictures. You cannot pinch or spread two fingers to zoom in and out, but the E-M1 has an easy-to-use zoom slider.
You can also select one or more images for protection to prevent the Shooting Menu 1 > Card Setup > All Erase function and the Delete (red trash can) button from removing the images (formatting the memory card will still remove them, though).
Additionally, you can create a Share Order to mark images for sharing with your tablet or smartphone after you install the Olympus Image Share (OI.Share) app.
Let’s see how to use the touch screen image viewing system.
Full-Frame Image Viewing
Using the touch system to view your images is the ultimate in simplicity. You simply pull up an image and swipe left or right to view other pictures.
In figure 2.3G, image 1, you can see the Playback button. Press it to open the full-frame image viewing system. Figure 2.3G, image 2, shows a picture of a sleeping baby on the monitor. To change to a different picture, just swipe left or right. Give it a try!
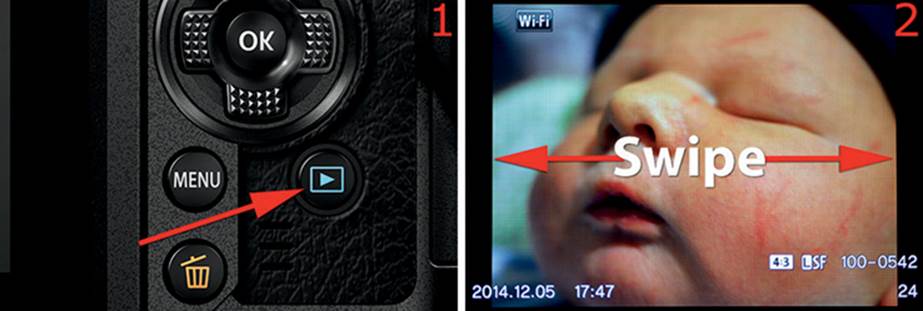
Figure 2.3G: Full-frame image viewing with the swipe method
Note: When a picture is displayed on the monitor in full-frame Playback mode, you can turn the Front Dial, or press the left or right Arrow pad keys, to scroll through your pictures.
Zooming In on a Full-Frame Image
You can zoom in and out on the image displayed on the monitor with magnifications from 1x (full frame) to 14x. Let’s see how.
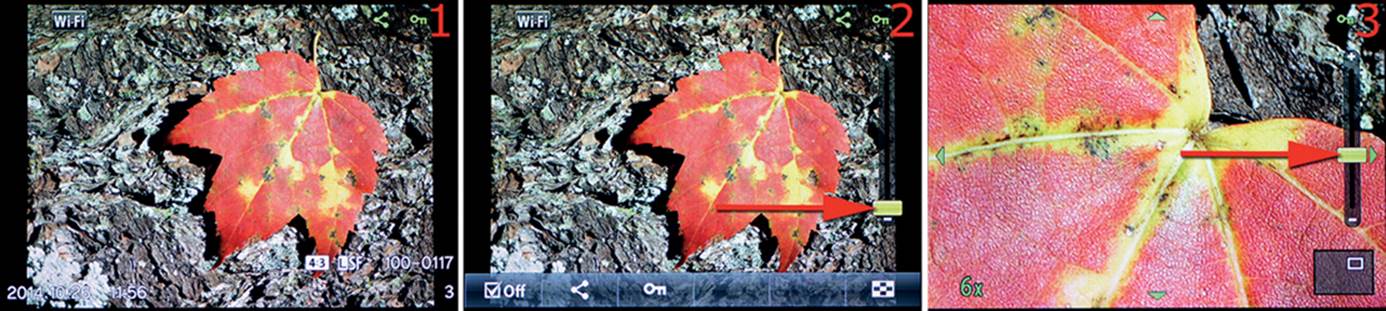
Figure 2.3H: Zooming in on an image
Figure 2.3H, image 1, is a picture of a maple leaf on a log in direct sunshine. To zoom in, touch the screen. A control bar on the bottom of the screen will open, along with a sliding zoom control (figure 2.3H, images 2 and 3, red arrows). Use your finger to slide the zoom control up or down.
In figure 2.3H, image 2, the zoom indicator is at the bottom of the scale, which is the 1x full-frame position. In image 3 the zoom indicator is at the middle of the scale at the 6x zoom position. The zoom magnification of 6x is displayed in green at the bottom left of the monitor (figure 2.3H, image 3). At 6x, the leaf is much larger and you can see more detail. Zooming in to 14x brings in very fine detail so you can see if the image is sharp.
Note: When you view a full-frame picture on the monitor, you can turn the Rear Dial counterclockwise to zoom in. This can be a faster way to zoom in. After you zoom in on a picture, you can scroll around the frame with the Arrow pad keys, as indicated by green arrow tips on each edge of the frame.
Index and Calendar Image Viewing
If you want to scroll through 25 image thumbnails instead of a single image in full-frame mode, you can use Index viewing. When the Index is displayed, you can scroll around within the thumbnails to find an image you want to view in full-frame mode.
Additionally, you can view a monthly Calendar that shows one thumbnail for each day you took pictures. Days with no pictures do not have a thumbnail. Let’s see how to use these features.
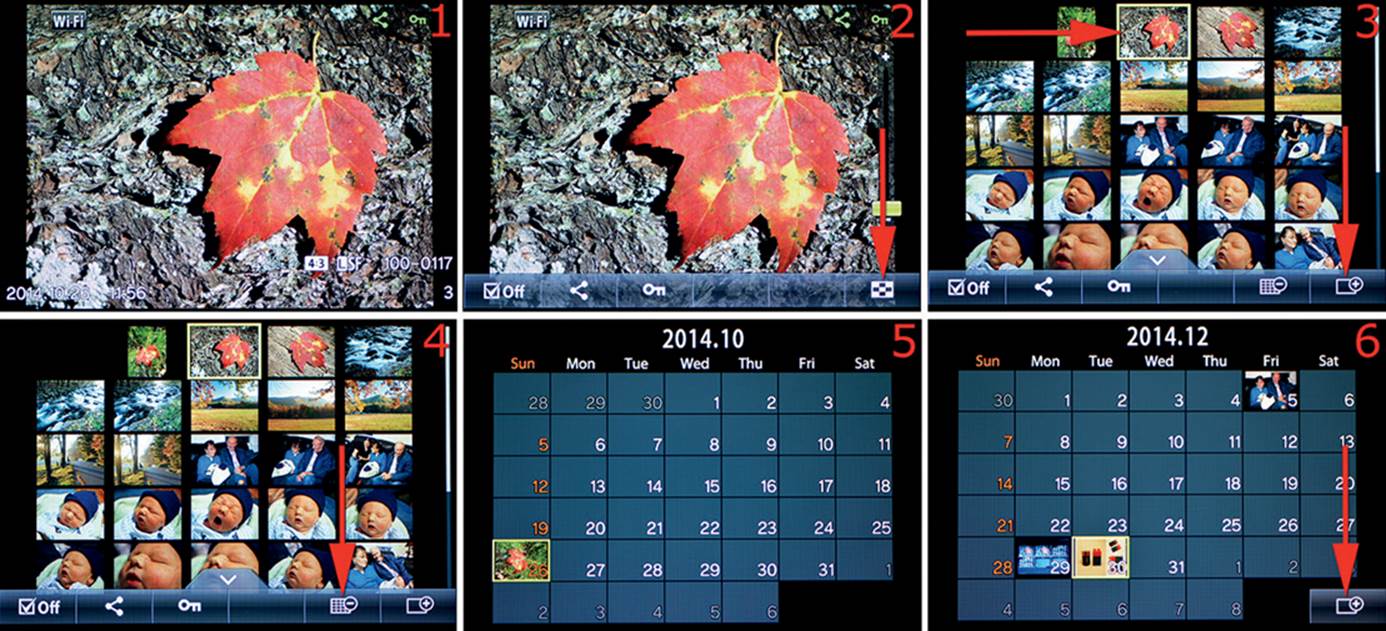
Figure 2.3I: Using the Index and Calendar
Figure 2.3I, image 1, shows a full-frame picture. To use the Index and Calendar system, touch the monitor to open the control bar on the bottom of the screen (figure 2.3I, image 2). The Index symbol is on the right end of the control bar. Touch it to open the Index of 25 thumbnails (figure 2.3I, image 3).
In figure 2.3I, image 3, notice that the current image of the leaf is at the top red arrow. When the Index is open you can tap any thumbnail to open the corresponding image to a full-frame size. To scroll through additional thumbnails, slide your finger up or down on the screen. Or you can use the Arrow pad keys to scroll around within the thumbnails, then press the OK button to open an image to full size. In figure 2.3I, image 3, the bottom red arrow is pointing to the symbol that returns the display back to full-frame mode with the control bar at the bottom of the monitor.
Note: Touching an image in Index view will open it to full-frame size only if the symbol at the left end of the control bar says Off with a check mark (figure 2.3I, image 3). If the symbol says On with a check mark, touching a thumbnail will mark the corresponding image for other functions, such as deletion protection (Protect), sharing with a smart device (Share Order), or targeted multi-image deletion (Erase selected). We will discuss each of these functions in upcoming subsections.
The Calendar symbol is shown in figure 2.3I, image 4 (red arrow). Touch this symbol to open Calendar mode.
Figure 2.3I, image 5, shows the Calendar mode. October 2014 is displayed (2014.10), and you can see that I took pictures only on October 26 because that is the only date that has a thumbnail. If you touch the thumbnail for a certain day, the Calendar will open to full-frame mode, and the first image you took on that day will be displayed. You can swipe up or down on the Calendar to see other months.
In figure 2.3I, image 6, you can see that I swiped down to December 2014 (2014.12) and that I took pictures on December 5, 29, and 30. I could touch any of those days to see a full-frame image of the first picture I took. In the bottom-right corner of image 6, you can see the symbol that returns the camera to full-frame mode. If the symbol is not displayed, touch the screen anywhere, except on a thumbnail, and it will reappear for a few seconds.
Note: When you view a full-frame picture on the monitor, turning the Rear Dial clockwise opens the Index and Calendar modes, which can be faster. If you use the Rear Dial to enter the Index or Calendar mode, the control bar will be condensed into a tab at the bottom center of the screen. Touch the tab to open the control bar.
Protecting an Image from Accidental Deletion
When you are taking pictures, some will be excellent and others will not be as good. While you are deleting some of the less desirable images, you may accidentally delete an image you want to keep, then you have to stop using that card until you run an image recovery program on it. To avoid this scenario, you can protect your excellent images against deletion immediately after you take them.
The protection function of the E-M1 allows you to select one or many images and mark them against deletion. The camera will not delete the image, even if asked to, unless you format the card. Let’s see how it works.
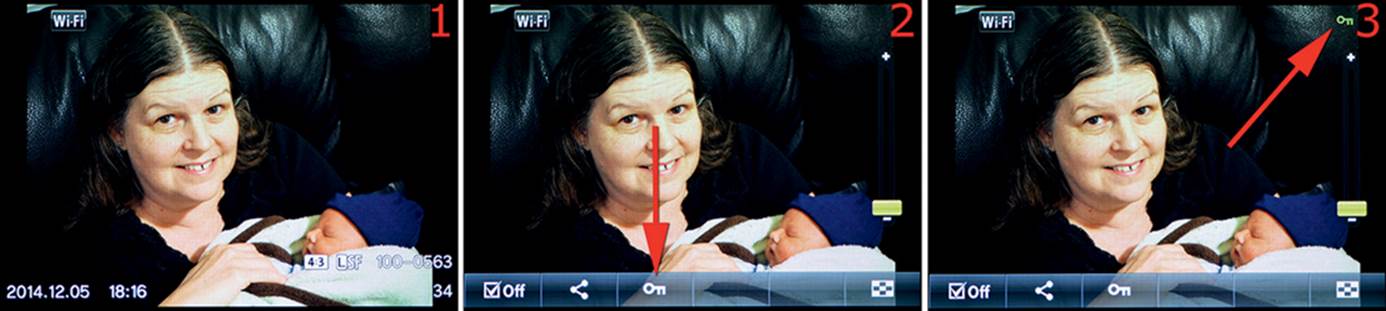
Figure 2.3J: Setting deletion protection on an individual image
Press the Playback button to display an image from the memory card (figure 2.3J, image 1), then touch the monitor to open the control bar at the bottom of the screen.
Figure 2.3J, image 2 (red arrow), shows the control bar. The arrow points to a key symbol that you can touch to add protection to the currently displayed image.
Figure 2.3J, image 3 (red arrow), shows the Protect (key) symbol that appears when you touch the symbol on the control bar. You can toggle protection on and off by repeatedly touching the key symbol on the control bar. When the key symbol is displayed at the top-right corner of the image, the image is protected from deletion (except during card formatting).
Now let’s examine how to protect multiple images while using the Index format for viewing thumbnails on the monitor.
Protecting Multiple Images from Accidental Deletion
If you would like to set deletion protection on a group of images, the camera gives you an interface that makes it relatively easy to do so. You will use the 25-image Index display to select images by touching their thumbnails then setting protection. Let’s see how.
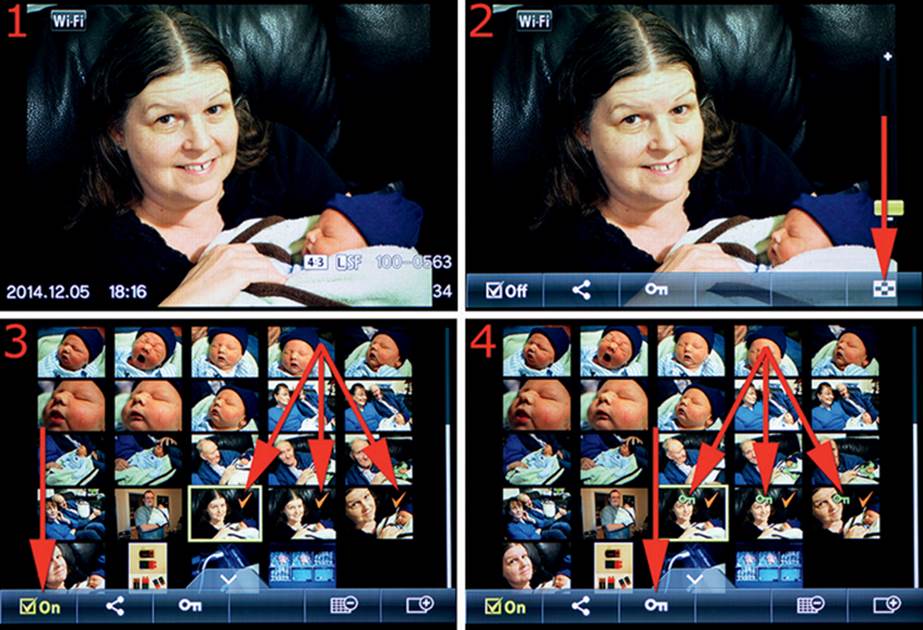
Figure 2.3K: Setting deletion protection on multiple images
Press the Playback button to display a picture from the memory card (figure 2.3K, image 1), then touch the monitor to open the control bar at the bottom of the screen.
Figure 2.3K, image 2, shows the open control bar, and the red arrow points to the Index symbol. Touch the symbol to open the 25-image thumbnail Index.
Figure 2.3K, image 3, shows the open Index. The left red arrow points to a symbol with a check mark and the word On. Notice in figure 2.3K, image 2, that the same symbol is a check mark with the word Off. By touching this symbol repeatedly you can toggle it from On to Off. When Onis selected you can touch multiple images, and a red check mark will appear in the upper-right corner of each thumbnail. If you touch a thumbnail with Off displayed, the camera will open the thumbnail to a full-frame display. Therefore, to select multiple images for protection (add red check marks), be sure that On with a check mark is displayed on the control bar. In figure 2.3K, image 3, the three red arrows on the right are pointing to three consecutive images that I want to protect from deletion. These three images are ready for the next step.
After you have selected the images you want to protect, touch the Protect key symbol (figure 2.3K, image 4, left red arrow). The key symbol will appear on all images with red check marks (figure 2.3K, image 4, three red arrows on right). Now lightly touch the Shutter button, and the camera will switch back to the Live View screen. Your selected images are protected.
Note: To unprotect a group of protected images, you can use an item on the Playback Menu to reset all protected images at once: Playback Menu > Reset Protect (select Yes under Reset Protect, then press the OK button). This is faster than unprotecting individual images.
There is another way to apply protection, which we will discuss in a later section of this chapter on page 93. It involves using the menu that pops up when you press the OK button while a single image is displayed on the monitor.
Creating a Share Order
The E-M1 allows you to import images into an app called Olympus Image Share (OI.Share). You can use the camera’s Wi-Fi system to send images to your smartphone or tablet. When you use the Share Order function to create a Share Order, OI.Share will ask if you want to import marked images when you connect the camera to a smart device.
Let’s examine how to create a Share Order and how to use it to import pictures.
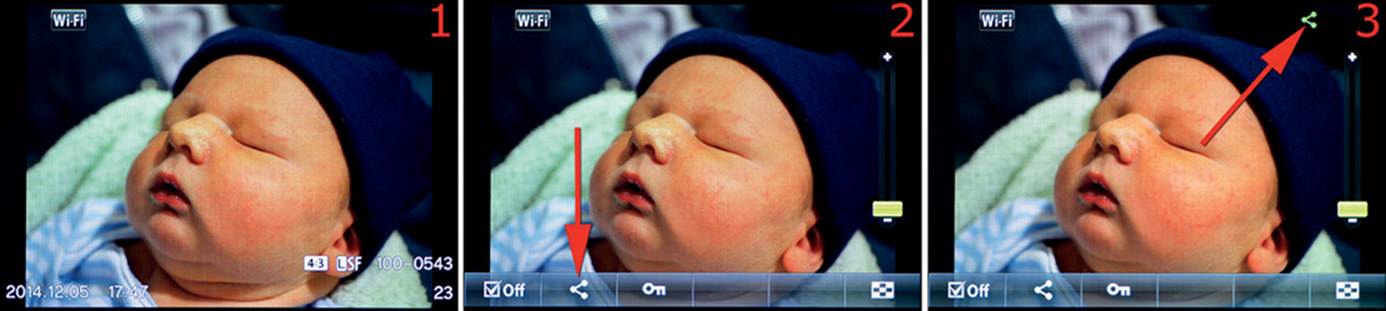
Figure 2.3L: Creating a Share Order for a single image
Press the Playback button to display an image (figure 2.3L, image 1), then touch the monitor to open the control bar at the bottom of the screen.
In figure 2.3L, image 2 (red arrow), the control bar is open. The arrow points to the share symbol that adds the image to the current Share Order or automatically creates a new one. Touch the share symbol.
The share symbol appears on the image when you touch it on the control bar (figure 2.3L, image 3, red arrow). You can toggle the Share Order for that image by repeatedly touching the share symbol on the control bar. When the share symbol is displayed on the image, it is in the current Share Order, and it will automatically be shared with a smart device through the OI.Share app.
Now let’s examine how to add multiple images to a Share Order while using the Index format for viewing thumbnails on the monitor.
Press the Playback button to display a picture from the memory card (figure 2.3M, image 1), then touch the monitor to open the control bar at the bottom of the screen.
Figure 2.3M, image 2, shows the control bar open, and the red arrow points to the Index symbol. Touch the symbol to open the 25-image thumbnail Index.
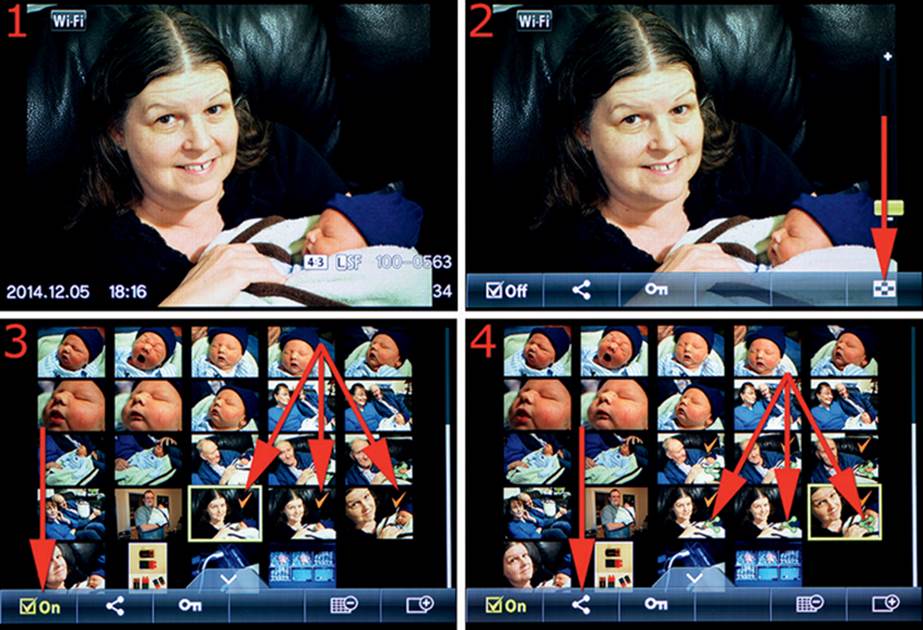
Figure 2.3M: Creating a Share Order for multiple images
Figure 2.3M, image 3, shows the open Index. The left red arrow points to a symbol with a check mark and the word On. Notice in figure 2.3M, image 2, that the same symbol is a check mark with the word Off. By touching this symbol repeatedly you can toggle it from On to Off. When On is selected you can touch multiple images, and a red check mark will appear in the upper-right corner of each thumbnail. If you touch a thumbnail with Off displayed, the camera will open the thumbnail to a full-frame display. In figure 2.3M, image 3, the three red arrows on the right are pointing to three consecutive images that will be added to a Share Order for transmission through OI.Share. These three images are ready for the next step.
After you have selected the images you want to add to the Share Order, touch the share symbol (figure 2.3M, image 4, left red arrow). The share symbol will appear on images that have red check marks (figure 2.3M, image 4, three red arrows on the right). Now lightly touch the Shutter button, and the camera will switch back to the Live View screen. Your selected images are in a Share Order and are ready to share as soon as you connect OI.Share to your camera’s Wi-Fi system.
Note: To remove all images from the existing Share Order, you can use an item on the Setup Menu to reset all shared images at once: Setup Menu > Wi-Fi Settings > Reset share Order (select Yes under Reset share Order and press the OK button). This is faster than removing individual images from the Share Order.
Importing Images from a Share Order
An upcoming subsection, Wireless LAN (Wi-Fi) System, will discuss how to use the Wi-Fi system to connect the E-M1 with a tablet (page 90). Figure 2.3N is a screenshot of OI.Share after it has been connected to my E-M1.
Figure 2.3N shows OI.Share as it responds to a Share Order. The app finds the Share Order on the memory card and automatically offers to import marked files when you choose Save (red arrow).
As mentioned previously, we will discuss how to connect the camera and OI.Share in an upcoming subsection, but here is a preview of the process.
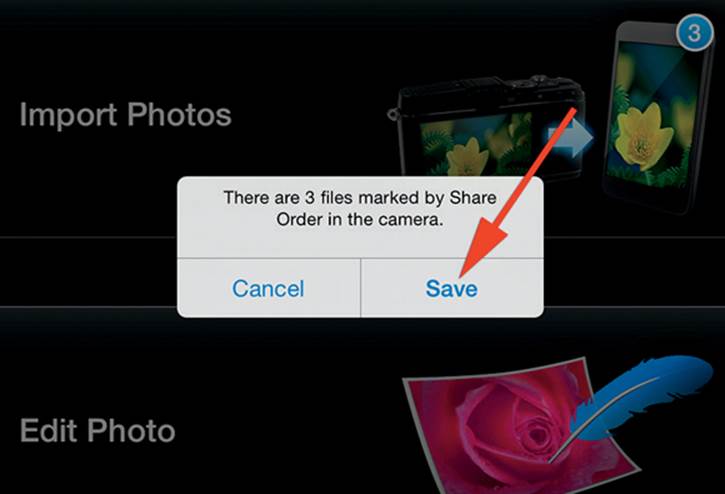
Figure 2.3N: Importing images from a Share Order to OI.Share
Erasing a Single Image
The camera allows you to delete a single image very quickly. Any image that is displayed on the screen and is not marked with the image protection key symbol can be deleted by using the following steps.
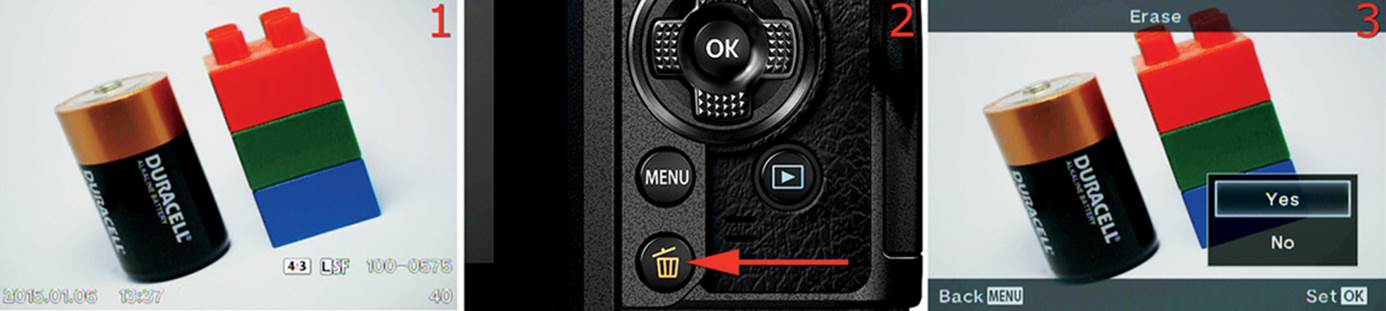
Figure 2.3O: Erasing a single image that is displayed on the monitor
Figure 2.3O, image 1, is a badly composed image. The first step to delete an unwanted image is to display it on the monitor.
Figure 2.3O, image 2, shows the Erase button, which has a red trash can symbol. Press the Delete button once.
Figure 2.3O, image 3, shows the menu that opens after you have pressed the Erase button. You have the choice of Yes or No. Select Yes and press the OK button to delete the current image, or press No to cancel.
Next let’s see how to delete a few selected images by using the Index thumbnail system.
Erasing a Few Selected Images
If you need to delete a few images to save space, you can use the camera’s multi-image deletion method. It allows you to use the Index thumbnail system to examine 25 images at a time and choose several for deletion. Let’s examine how it works.
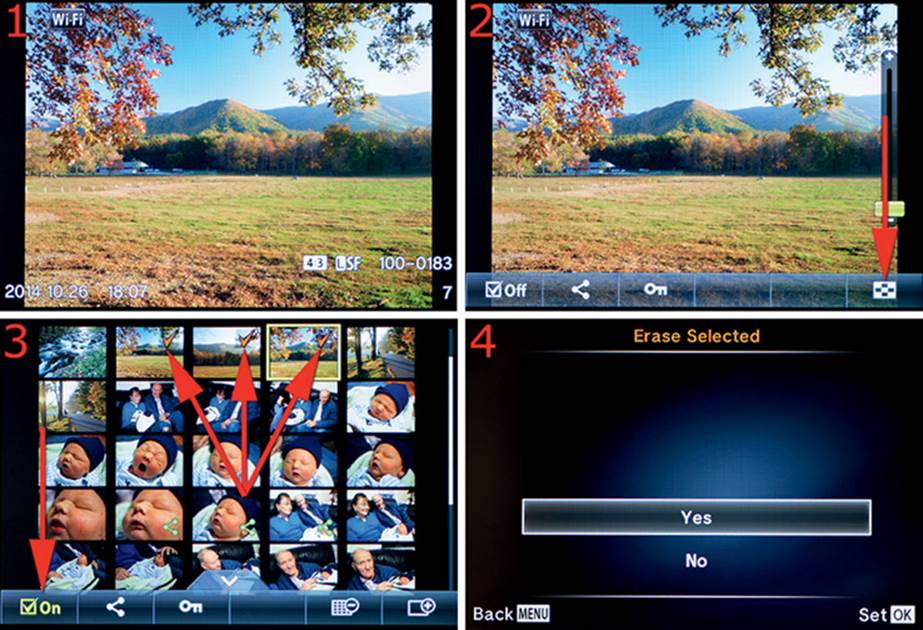
Figure 2.3P: Erasing a few selected images
Press the Playback button to display a picture on the monitor (figure 2.3P, image 1), then touch the monitor to open the control bar at the bottom of the screen.
Figure 2.3P, image 2, shows the open control bar, and the red arrow points to the Index symbol. Touch the symbol to open the 25-image thumbnail Index.
Figure 2.3P, image 3, shows the open Index. The left red arrow points to a symbol with a check mark and the word On. When On is selected you can touch multiple images, and a red check mark will appear in the upper-right corner of each thumbnail. Be sure that On is selected for this function because if you touch a thumbnail with Off displayed, the camera will open the thumbnail to a full-frame display. In figure 2.3P, image 3, the three red arrows at the top are pointing to three consecutive images that we will delete. I touched these thumbnails to make the red check marks appear. After you select the images you want to delete, press the Delete button (with the trash can icon) (figure 2.3O, image 2).
Figure 2.3P, image 4, shows the confirmation screen that appears after you press the Delete button. To delete the images, select Yes and press the OK button, or select No to cancel.
Note: There are two other, more radical, ways to erase all images on the memory card: All Erase and Format. All Erase deletes all images that are not marked with a Protect key symbol, and Format erases all images on the memory card regardless of protection. All Erase is discussed onpage 130, and Format is discussed on page 131.
Wireless LAN (Wi-Fi) System
One of the powerful features of the E-M1 is its ability to communicate with a smartphone or tablet (smart device). You can use a smart device to control the camera, change settings, and take pictures. You can also transfer pictures to your smart device.
Let’s examine how to use the touch screen on your camera to start a Wi-Fi session.
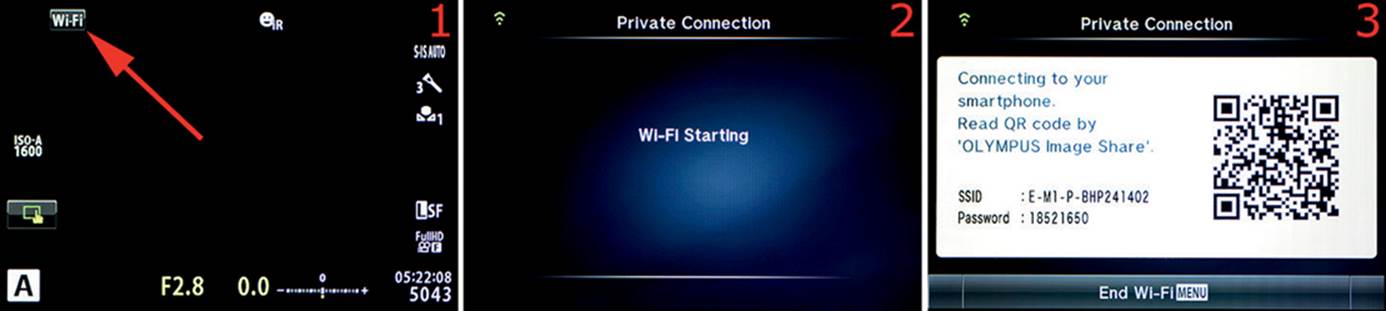
Figure 2.3Q: Initiating a Wi-Fi session
In figure 2.3Q, image 1, you can see the Wi-Fi symbol on the Live View screen. Touch the symbol to start a Wi-Fi session.
Figure 2.3Q, image 2, shows the screen that appears while the Wi-Fi system is activating.
Figure 2.3Q, image 3, shows a Private Connection screen that lets you know a Wi-Fi session is active.
Now activate the Olympus Image Share (OI.Share) app on your smart device. Use OI.Share to scan the QR code on the right side of the Private Connection screen (figure 2.3Q, image 3). The rest of the operation is fairly automated within OI.Share. See the following Deeper Informationparagraph for information about making a good connection.
Deeper Information: Using the Wi-Fi system is a rather detailed subject. The previous discussion explained only how to start the process of making an initial Wi-Fi connection by using the touch screen. However, the camera and smart device interface process and the use of OI.Share requires a lengthy description. Please refer to the Playback Menu chapter, under the Connection to Smartphone (or Tablet) subheading on page 269, for complete information. We will consider how to make a wireless connection between your smart device and camera, along with configuration information for OI.Share.
Working with Images In-Camera
Some people do not enjoy working with computers, yet they want to shoot in RAW format and convert their images to JPEGs, or even edit JPEGs, in-camera. The E-M1 gives you a fully featured post-processing system that you can use without a computer. You can shoot RAW images, or JPEG+RAW images, and later post-process the RAW image in the camera and save the processed image to the memory card.
Additionally, the camera has several other functions that allow you to do various things with the pictures on the memory card. You can edit, share, protect, voice annotate, rotate, overlay, print, erase, or create a slideshow with images you have already taken—all without using a computer.
The functions described in this section are available in two places: first, by pressing the OK button when an image is displayed on the monitor; and second, by using the function selections that are available when you press the Menu button. Several of these settings, such as the image editing functions, are rather comprehensive and require lengthy explanations. This section will give you an overview of these functions and will direct you to deeper information that is provided elsewhere in this book.
RAW Data Edit
RAW Data Edit allows you to convert a file from RAW to JPEG in-camera. If you prefer to shoot RAW files for maximum image quality and you quickly need a JPEG for some reason, you can create one without using a computer. This item will not appear on the RAW/JPEG menu when a JPEG-only image is displayed on the monitor.
Let’s look at an overview of how to access the RAW file editing system from the visual screens, then refer to the deeper information that is provided later in this book.
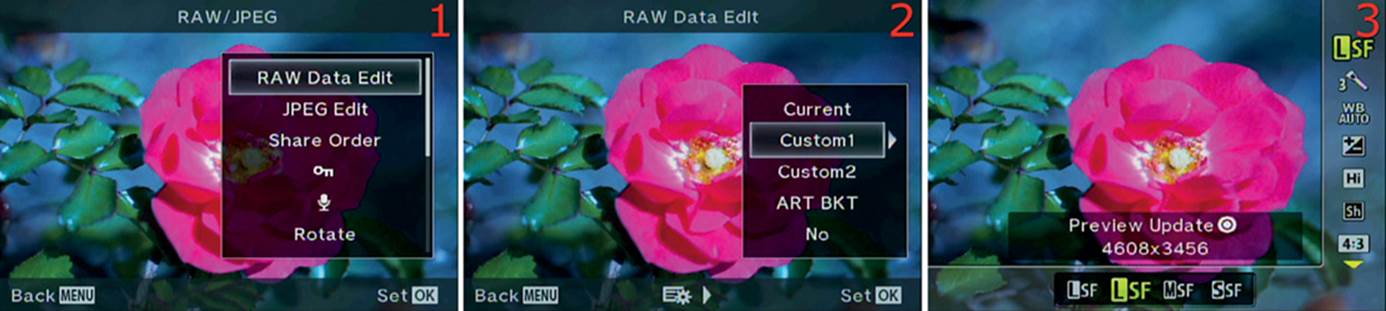
Figure 2.4A: Using the RAW Data Edit in-camera post-processing functions
Figure 2.4A, image 1, shows the RAW Data Edit menu, which will appear when a RAW file is viewed on the monitor and the OK button is pressed once. Display a RAW file on the camera monitor, highlight RAW Data Edit, and press the OK button.
Figure 2.4A, image 2, shows the RAW Data Edit menu with its five choices. Several of the choices have secondary screens, such as the one seen in figure 2.4A, image 3. These screens allow you to manipulate all aspects of the image and resave the RAW file as a new JPEG image without making any changes to the original RAW file.
Deeper Information: This is a rather deep menu system with many individual sub-functions. These same functions are also accessible from the Playback Menu under the Edit selection. To learn more about the deep capabilities of the RAW Data Edit functions, please see the Playback Menu chapter, under the Edit subheading, on page 239.
JPEG Edit
The JPEG Edit function lets you make in-camera changes to your JPEG image files then save them as new files. It works only with JPEG files. This item will not appear on the RAW/JPEG menu when a RAW-only image is displayed on the monitor.
Let’s examine how to access the JPEG file editing system from the visual screens, then refer to the deeper information that is provided later in this book.

Figure 2.4B: Editing JPEG images
Figure 2.4B, image 1, shows the JPEG Edit menu, which appears when a JPEG file is displayed on the monitor and the OK button is pressed once. Display a JPEG file on your camera monitor, highlight JPEG Edit, and press the OK button.
Figure 2.4B, image 2, shows the JPEG Edit menu with its nine choices. These choices allow you to manipulate, resize, and resave the JPEG image as a new JPEG file, without making any changes to the original JPEG image.
Deeper Information: This is a deep menu system with nine individual subfunctions. These same functions are also accessible from the Playback Menu, under the Edit selection. To learn about the deep capability found in the JPEG Edit functions, please see the Playback Menu chapter, under the Edit subheading, on page 239.
Share Order
This chapter previously considered how to create a Share Order for individual images and groups of images (page 86). This function is another way the camera allows you to add individual images to an existing Share Order or to create a new one. When new images are added to a Share Order, the OI.Share app will automatically import them to your smartphone or tablet when you open the app and connect it to your camera with the Wi-Fi system. Let’s examine how it works.
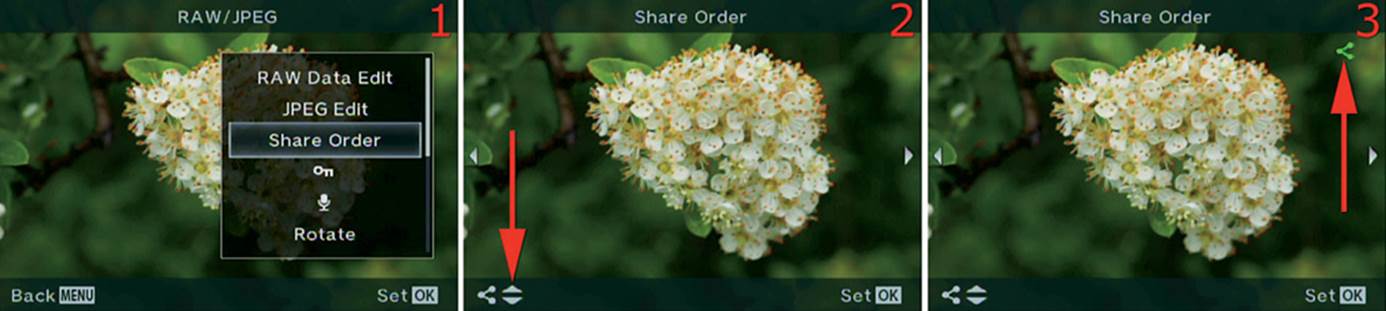
Figure 2.4C: Adding an image to a Share Order for sharing with a smart device
In figure 2.4C, image 1, I displayed an image on the monitor then pressed the OK button to open the RAW/JPEG menu. I can now select Share Order from the menu and press the OK button.
Figure 2.4C, image 2, shows the Share Order screen that allows you to add or remove the image from a Share Order. Press up or down with the Arrow pad keys to add the image to a Share Order (red arrow). A share symbol will appear in the upper-right corner of the image when it is shared (figure 2.4C, image 3, red arrow). You can toggle this symbol on or off to add or subtract the image from a Share Order.
Scroll to the right or left with the Arrow pad keys to select other images to add or remove from a Share Order.
Protecting Images
Previously in this chapter we discussed how to protect an individual image or a group of images from deletion (page 84). This function is an additional way to protect or unprotect individual images. When you add protection to an image, the camera will refuse to delete it except when you format the memory card. Let’s see how it works.
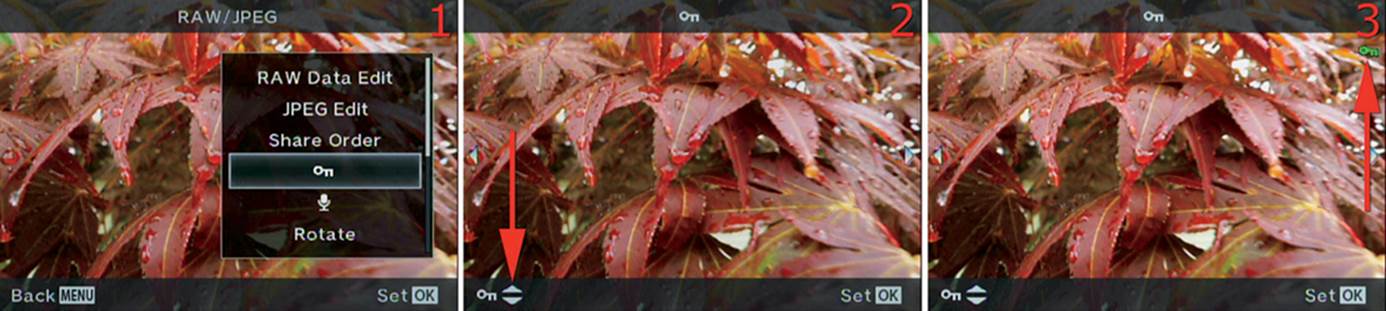
Figure 2.4D: Protecting an image from deletion
In figure 2.4D, image 1, I displayed an image on the monitor then pressed the OK button to open the RAW/JPEG menu. I can now select the Protect key symbol from the menu and press the OK button.
Figure 2.4D, image 2, shows the Protect screen that allows you to protect or unprotect the image. Press up or down with the Arrow pad keys to toggle protection (red arrow). A small key symbol will appear in the upper-right corner of the image when it is protected (figure 2.4D, image 3, red arrow).
Scroll to the right or left with the Arrow pad keys to select other images to which you want to add or remove deletion protection.
Voice Annotation
Voice Annotation lets you add a voice message up to 30 seconds long to an image file while you view it on the camera monitor. This will allow you to add some fairly detailed information about the image for later reference.
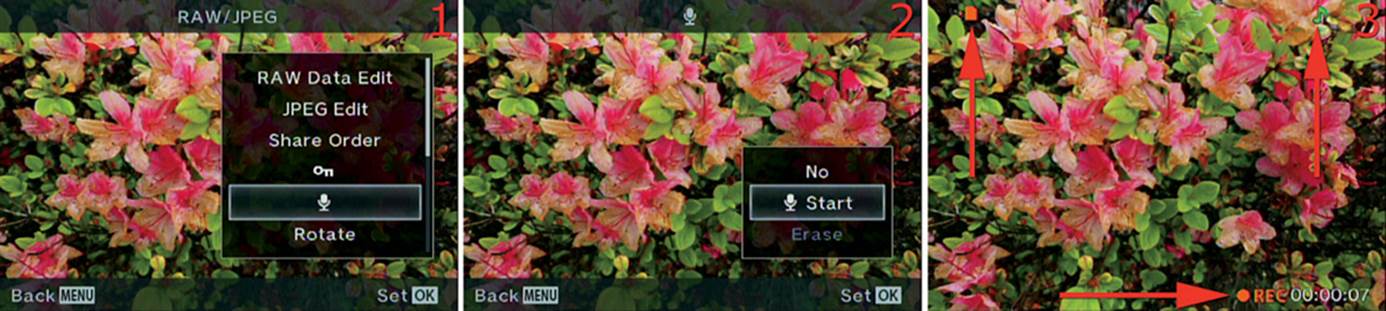
Figure 2.4E: Adding a voice message to an image file
Choose the image you want to add the voice message to and press the OK button to open the RAW/JPEG menu (figure 2.4E, image 1). Highlight the microphone symbol and press the OK button again.
Figure 2.4E, image 2, shows the screen that allows you to cancel (No), record (Start), or Erase a voice annotation for the displayed image. Highlight Start and press the OK button to begin recording your voice annotation.
Figure 2.4E, image 3, shows two symbols and a timer. The symbol at the top-left arrow is the card access symbol, which will blink during the recording process. The symbol at the top-right arrow is a small music note symbol. The note symbol informs you that a voice message is attached to the image. It will stay with the image when you view it on the camera unless you Erase the Voice Annotation. The bottom-right arrow points to a red REC symbol, which indicates that a message is being recorded. To the right of the REC symbol is a counter (00:00:07), which seems to imply that you can record a long message, but the camera will stop recording at exactly 30 seconds.
Deeper Information: The Voice Annotation functions are also accessible from the camera’s Playback Menu. You can read deeper information about the functions in the Playback Menu chapter, under the [Voice Annotation] subheading, on page 257.
Rotate Image
The Rotate Image function allows you to change how an image is displayed on the camera monitor. This function does not appear to affect images after you export them to an external device; on such a device, images are displayed as they were taken.
If a picture has a vertical orientation and you would rather display it horizontally on the camera monitor, use the following steps.
Figure 2.4F, image 1, shows a vertical image that would also look good as a horizontal image. With the image displayed on the monitor, press the OK button to open the RAW/JPEG menu.
Figure 2.4F, image 2, shows the menu with the Rotate selection highlighted. Choose Rotate and press the OK button.
Figure 2.4F, image 3 (red arrow), shows that pressing the up or down keys on the Arrow pad will rotate the image. The image is rotated to an upside-down direction. Images 4 and 5 show the image being rotated to two horizontal positions. I like the image rotated as shown in image 5.
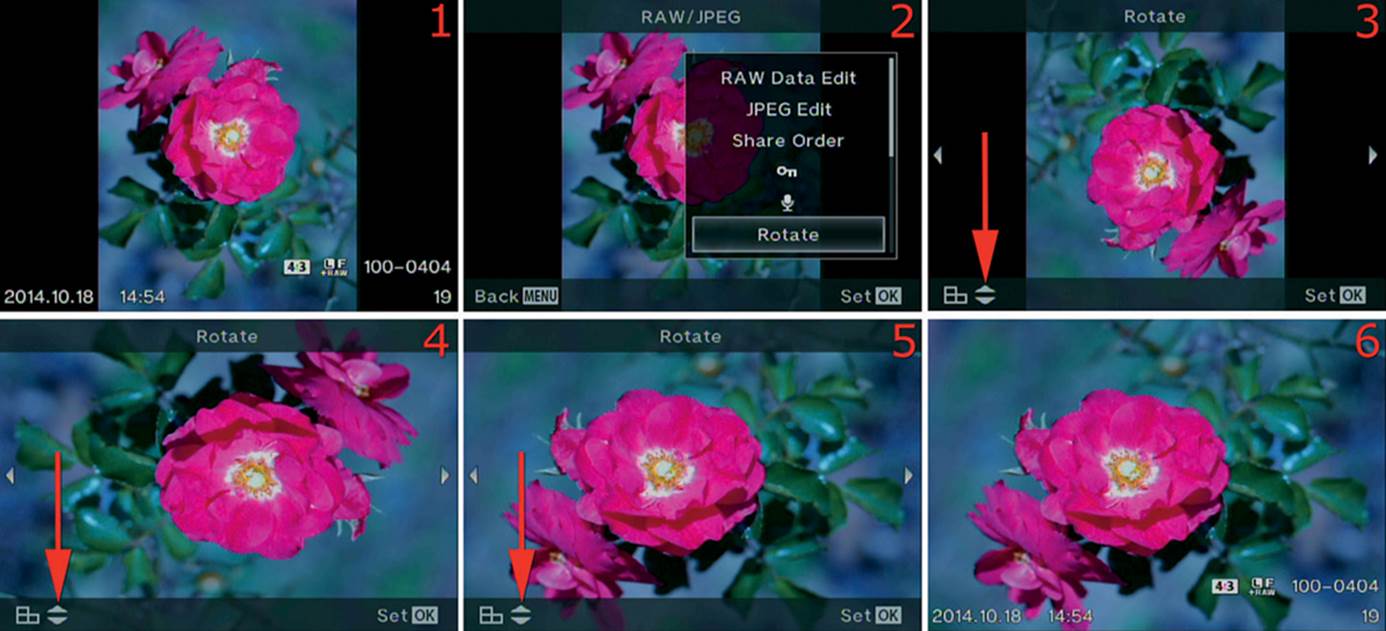
Figure 2.4F: Rotating images for in-camera display
When you are happy with how the image is rotated, press the OK button to lock the direction (figure 2.4F, image 6). The image will now be displayed in that direction when you view it on the camera monitor (compare images 1 and 6 for before and after).
Slideshow
When you have a card full of great pictures, you may want to share a slideshow with friends and family. The camera makes it easy and allows you to display timed still images or movies with background music, if you choose.
You have full control over which images are displayed, as well as the time intervals between JPEG images (a slideshow does not work with RAW files) and videos. You can also download several songs from Olympus to use as background music (BGM).
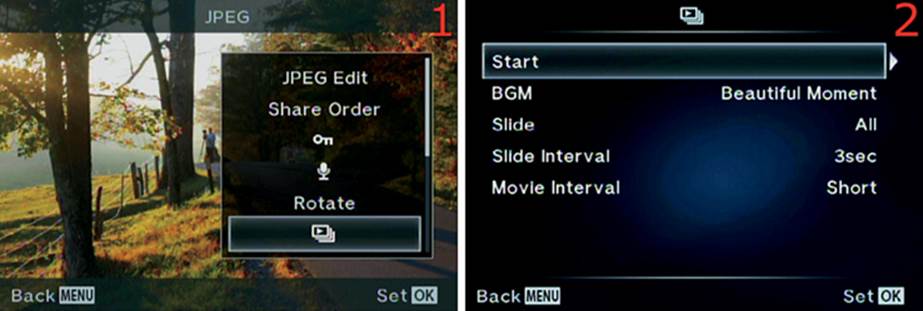
Figure 2.4G: Starting a Slideshow with default settings
It is extremely easy to start a slideshow with default values. Display any image on the monitor, and it will be the first one in the slideshow. Press the OK button to open the menu. Figure 2.4G, image 1, shows the JPEG menu with the Slideshow symbol highlighted. Press the OK button again to open the secondary menu, which is a duplicate of the screen found under the Playback Menu.
In figure 2.4G, image 2, I selected Start. Scroll to the right, or press the OK button with Start highlighted, and the camera will start a slideshow of JPEG images and videos with a three-second (3sec) delay between each image and video. The default is to play only a few seconds of videos then move on to the next item.
You can modify the settings in figure 2.4G, image 2, including the following: background music (BGM); whether the slideshow should include images only, videos only, or both images and videos (Slide); Slide Interval time; and Movie Interval (partial or full video play).
To stop a slideshow, press the Menu button or Playback button, or lightly press the Shutter button.
Deeper Information: Each of the items in figure 2.4G, image 2, are further explained in the Playback Menu chapter, under the [Slideshow] subheading, on page 232.
Image Overlay
Image Overlay allows you to take two or three images, vary their transparency, overlay them into one image, then save the image as a new JPEG file. Let’s see an overview of how it works.
Figure 2.4H: Creating a two-image overlay
In figure 2.4H, image 1, I selected an image to be the primary image, and I pressed the OK button to open the RAW/JPEG menu. Now I can select Image Overlay and press the OK button again to start the overlay process.
Figure 2.4H, image 2, offers an up/down menu with the choices of 2Images Merge or 3Images Merge. I chose 2Images Merge. Make your choice and press the OK button to move to the next screen.
In figure 2.4H, image 3, you can see that the right thumbnail is the primary image because it has a red check mark. It is also displayed in image 1. The red arrow in image 3 shows that another image is selected as the secondary image. It will be overlaid with the primary image. After you have selected the secondary image, press the OK button to use it.
Figure 2.4H, image 4, shows two overlay density controls in separate thumbnails, just under a preview of the overlaid image (blue box). You can use the density controls to visually set the density of each layer, with an adjustment range of x0.1 to x2.0. After you have modified the density to your liking (I left mine at the default), press the OK button.
Figure 2.4H, image 5, provides a larger preview of the overlaid image. You can select Yes to save the new overlaid image, or select No to return to the previous screen (density controls).
Select Yes and press the OK button to finalize the overlay process, and the new combined image will be saved and displayed on the monitor (figure 2.4H, image 6).
Deeper Information: The overlay process is covered in greater detail later in the book; see the Playback Menu chapter, under the Image Overlay subheading, on page 260.
Print Order
You can use Print Order to print JPEG images without doing much more than taking pictures then inserting a memory card into a Digital Print Order Format (DPOF) compatible printing device. The printing device will read the Print Order and output the number of prints you specify.
The Print Order function will not allow you to select RAW images, only JPEGs. We will now examine an overview of setting up a basic Print Order for a single image.
Figure 2.4I: Creating a DPOF Print Order for an individual image
On the camera monitor, display an image you want to print, then press the OK button to open the JPEG menu and select the Print Order symbol (figure 2.4I, image 1). Press the OK button again to open the next screen.
Figure 2.4I, image 2, shows the Print Order menu. You can choose a single image or All images. This overview will examine the single-image method. Refer to the upcoming Deeper Information paragraph for multiple-image Print Orders. Choose the top Print Order symbol from the menu and press the OK button to move to the next screen.
In figure 2.4I, image 3, you can see a small control in the top-right area of the screen. This control allows you to choose the number of prints you want for this image; the available range is 1 print (x1) to 10 prints (x10). Select the number of prints by pressing up or down on the Arrow padkeys. Press the OK button to set the number and move to the next screen.
In figure 2.4I, image 4, you can select No, Date, or Time. Select No if you do not want to use a Date or Time stamp. Select one or both of the other options to add a Date and Time stamp to your printed image. (Date and Time stamps will be covered in greater detail in a later chapter. See the upcoming Deeper Information subheading.) With your choice highlighted, press the OK button to move to the next screen.
Figure 2.4I, image 5, allows you to select Set to confirm your choices, which means this image will be added to the Print Order on the memory card, or you can select Cancel to stop the process.
When you remove the memory card from the camera and insert it into a DPOF-compatible printing device, the device’s software will offer you various choices based on what it finds in the Print Order.
Figure 2.4I, image 6, shows what a thumbnail of an image in a Print Order looks like. The red arrow points to a red symbol that is identical to the Print Order symbol in figure 2.4I, image 1.
Deeper Information: The Print Order processes for both single- and multiple-image Print Orders are covered in much greater detail in the Playback Menu chapter, under the Print Order subheading, on page 262.
Erase
The Erase function allows you to delete a single image (RAW or JPEG) or video that is displayed on the camera monitor. This is similar to erasing a single image by displaying it on the monitor and pressing the Delete button. However, it offers a different and more complex approach to deleting an image. Let’s see how it works.
Figure 2.4J: Deleting a single image (RAW or JPEG) or a video
On the camera monitor, display an image or video that you no longer want, then press the OK button to open the RAW/JPEG menu (figure 2.4J, image 1). At the bottom of the menu you can see the Erase function. Choose Erase, then press the OK button again to start the deletion process, which will be finalized on the next screen.
In figure 2.4J, image 2, you can see a small menu with the choices of Yes or No. Choose Yes and press the OK button to immediately delete the displayed image or video. Press No to cancel.
Mode Dial Setting Control Screens
The Mode Dial on top of the E-M1 has nine settings. Each setting has a control screen that lets you use the camera in specific ways.
Let’s examine each mode briefly. They will be used throughout the rest of this book as we discuss how they relate to photography with the E-M1 and individual camera settings.
Manual (M) Mode
Manual (M) is the ultimate mode for taking your time and getting it right. For photographers who want complete control of their cameras, M mode is best. The camera makes no decisions about the exposure triangle (shutter speed, aperture, and ISO sensitivity) for still pictures, leaving it up to the photographer to take full creative control of the exposure. You control the shutter speed with the Rear Dial and the aperture with the Front Dial.
Let’s examine the control screens you use in M mode.
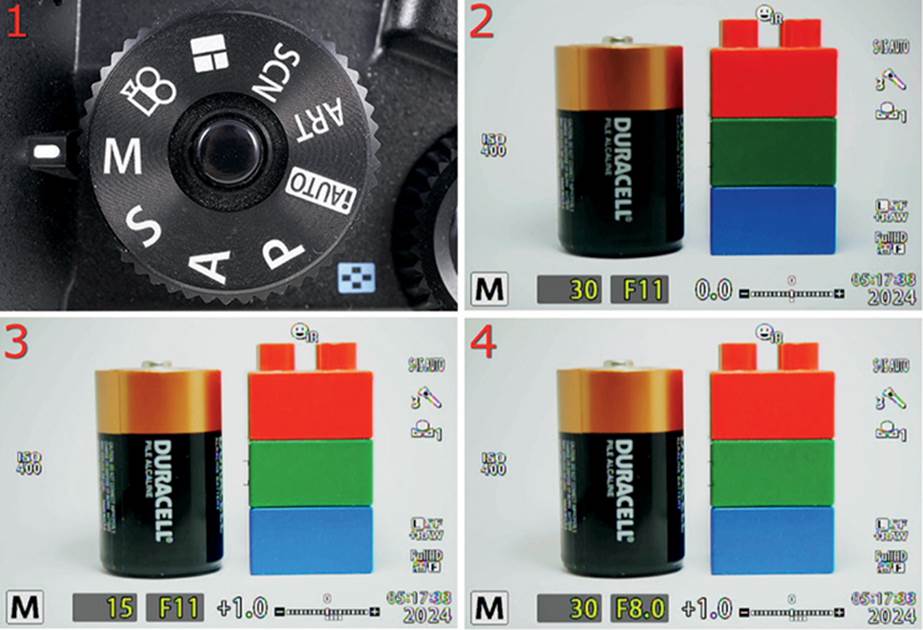
Figure 2.5A: Using Manual (M) mode on the Mode Dial
Figure 2.5A, image 1, shows the Mode Dial set to Manual (M) mode. With this mode you have full control of the shutter speed, aperture, and ISO, as well as exposure compensation. Notice in images 2–4 that an M appears in the lower-left corner of the Live View screen.
Figure 2.5A, image 2, shows a good exposure of my battery and blocks. The exposure control settings are displayed at the bottom of the screen (30 F11 0.0). Notice that both the shutter speed (30) and aperture (F11) settings are in dark rectangles, which means you have manual control of the settings. The current shutter speed is 1/30 sec (30) and is controlled with the Rear Dial. The current aperture is f/11 (F11) and is controlled with the Front Dial. Notice that to the right of 0.0, at the bottom of image 2, there is a –/+ exposure indicator that is currently zeroed out. There is a tiny square under the 0 point of the scale, and there are no other tiny squares along the bottom of the scale. This indicates that the exposure is good, and the camera is ready for you to press the Shutter button and take a picture. If you press the Info button, a small Live histogram (not shown) will appear on the screen. You can use the histogram to help gauge the exposure.
Figure 2.5A, image 3, shows that I have adjusted the shutter speed by 1 EV step (1 stop). It was set to 1/30 sec (30) in image 2, and now it is set to 1/15 sec (15). Turn the Rear Dial to change the shutter speed. Also, notice that since I added an extra stop (+1.0) of exposure, the –/+exposure indicator now displays +1.0, and there are several tiny squares under the –/+ exposure scale (image 3). The squares are extending toward the first major division on the + side of the scale, which represents 1 stop overexposure. The camera gives you both a numerical (e.g., 0.0, +1.0) value and a –/+ scale value. The numerical value can register a maximum of 3 stops (+3.0) overexposure and 3 stops underexposure (–0.3). The –/+ scale registers the same 3 stops. If you exceed 3 stops (3 EV steps) of over- or underexposure, the numerical exposure value and the squares under the –/+ scale blink rapidly.
Figure 2.5A, image 4, shows that I have restored the shutter speed to 1/30 sec (30) and adjusted the aperture from f/11 (F11) to f/8 (F8.0). You adjust the aperture with the Front Dial. Notice also that since 1/30 sec at f/11 is the correct exposure for this subject (image 2), and my camera is set to 1/30 sec at f/8 in image 4, the numeric exposure value and –/+ scale are both again registering 1 stop of overexposure (+1.0 EV).
Basically, you can use either the aperture or shutter speed to dial in the best exposure. This allows you to use the aperture to control depth of field and the shutter speed to control motion.
After you have the exposure set the way you want it, take your pictures.
Adjusting the ISO Sensitivity
If needed, you can make the camera more or less sensitive to light by raising or lowering the ISO sensitivity.
The ISO sensitivity, shown on the left side of figure 2.5B (ISO 400), can be accessed by pressing the OK button to open the Live Control. Look for the ISO setting, which is the third from the bottom setting on the right side of the Live Control (figure 2.5B, image 1).
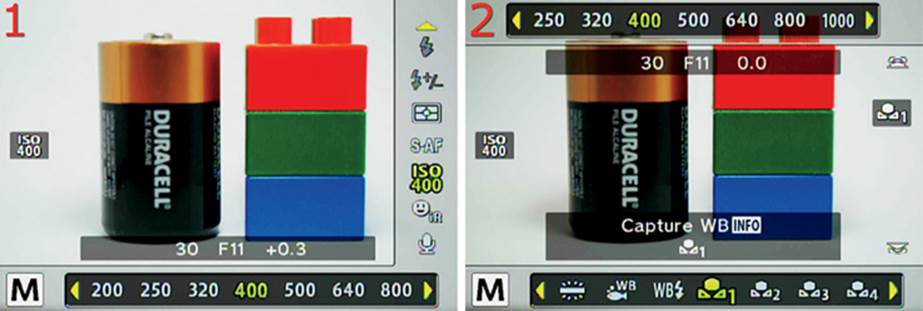
Figure 2.5B: Adjusting the ISO value in M mode
Or you can flip the Lever on the back of the camera (surrounding the AEL/AFL button) to the second position (2) and turn the Front Dial to adjust the ISO sensitivity (figure 2.5B, image 2) and White Balance. Flip the Lever back to its first (1) position to resume using the dials as exposure controls (shutter speed and aperture). You can also adjust the White Balance at the same time as the ISO sensitivity, if there is a need to do so.
Using the Live Histogram
Another excellent control screen to help with manual exposure is the Live histogram overlay, which will be discussed in detail later in the book. Many photographers use the histogram extensively. The availability of a Live histogram is one of the better features of a mirrorless camera. Cameras with mirrors can give you an after-the-fact histogram when you use the optical viewfinder, but the E-M1 mirrorless camera has a Live histogram available for the electronic viewfinder. It’s a powerful feature!
While using the Live View screen, press the Info button repeatedly until you see the Live histogram scale appear (figure 2.5C). It can help you judge exposure with great accuracy. If the histogram is cut off on the left side of the graph window, the image may be too dark. If it is cut off on the right, the image may be too light. Using the exposure meter and Live histogram together makes for some very accurate exposures.
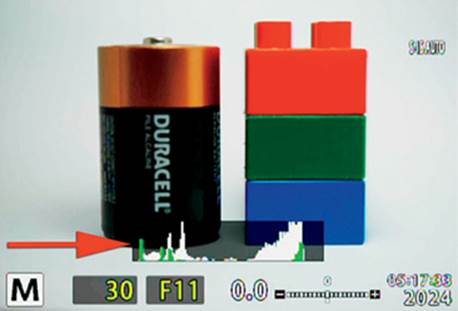
Figure 2.5C: Opening the Live histogram (red arrow) in M mode
Note: When you turn the Front and Rear Dials to change the shutter speed and aperture, each click of the dial changes the exposure by an amount equal to the value in the EV Step function at Custom Menu > E. Exp/[Meter]/ISO > EV Step. The factory default is 1/3 EV (1/3 stop) for each click. However, you can set the value to 1/2 EV or 1 EV per click in the EV Step function.
Next let’s consider Shutter priority (S) mode for photographers who need to control motion.
Shutter Priority (S) Mode
Shutter priority (S) mode is for photographers who shoot moving subjects and need to stop action, such as for sports photography. It is also used by photographers who need to blur motion, such as when shooting a waterfall.
S mode is a semiautomatic mode; the photographer takes manual control of the shutter speed, and the camera provides automated aperture control.
The ISO sensitivity can be set to either manual or automatic in S mode. Basically, a good exposure will be maintained when the camera and photographer work together.
Let’s see how to adjust the camera in S mode.
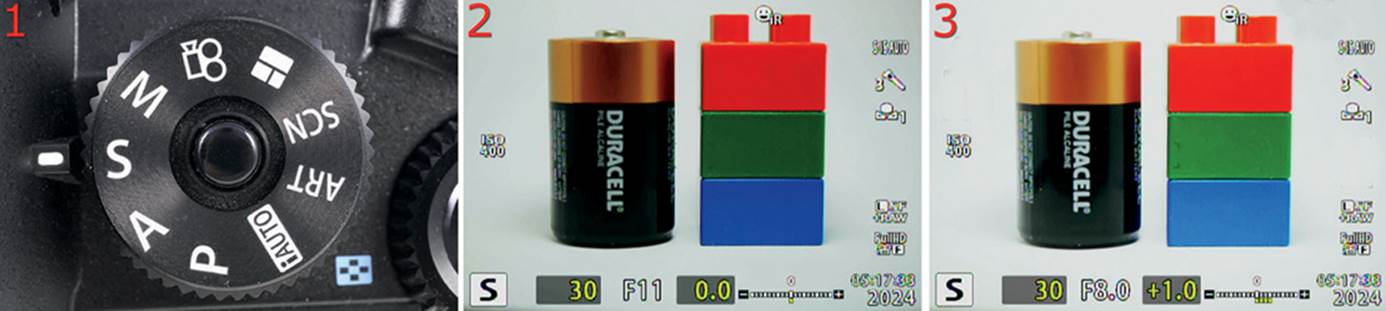
Figure 2.5D: Using Shutter priority (S) mode
Figure 2.5D, image 1, shows the Mode Dial set to Shutter priority (S) mode. When you use this mode you have full control of the shutter speed, and the camera automatically adjusts the aperture when you change the shutter speed so the exposure is always accurate. Notice in images 2 and 3 that an S appears in the lower-left corner of the Live View screen.
Figure 2.5D, image 2, shows a good exposure of my battery and blocks. You can see the exposure control settings at the bottom of the screen (30 F11 0.0). The current shutter speed is set to 1/30 sec (30) and is controlled with the Rear Dial. Notice that the shutter speed (30) is in a dark rectangle and the aperture (F11) is not. This indicates that you have manual control of the shutter speed, and the camera automatically controls the aperture. Also, notice that the 0.0 setting (exposure compensation) is in a dark rectangle, which means you can control it and override the camera’s automatic exposure value by adding or subtracting light. You control –/+ exposure compensation with the Front Dial. You can dial in exposure compensation over a range of 10 EV steps (–5.0 to +5.0). The –/+ scale shows the current compensation value in either a negative or positive direction.
Note: Be careful when you use exposure compensation because Live View can fool you. If the aperture number starts to blink on the monitor, the camera cannot provide additional compensation. The Live View monitor may continue to brighten or darken, but no light is being added or subtracted to the image (also see the next Note).
In figure 2.5D, image 3, I dialed in +1.0 EV of exposure compensation. The camera adjusted the aperture from F11 (image 2) to F8.0 (image 3) to provide one additional EV step of exposure. After you have the exposure set the way you want it, take your pictures.
While you use S mode, you can set the ISO sensitivity to AUTO and let the camera adjust it, or you can leave it set to a certain number (e.g., ISO 200, 400, 800) depending on the ambient light conditions. You can also select the Live histogram control overlay by pressing the Info buttonuntil the Live histogram appears on the screen.
Note: While you are making shutter speed adjustments with the Rear Dial, you may see the aperture number start to blink. This means the camera has reached its maximum or minimum aperture and cannot open or close the aperture any further, even though the monitor may brighten or darken. If this happens, you may want to consider using ISO AUTO so the camera can increase or decrease the ISO sensitivity to maintain a good exposure. Do not let the image you see on the Live View screen fool you when the aperture number is blinking.
Aperture Priority (A) Mode
Aperture priority (A) mode is for photographers who need to control the depth of field (zone of sharp focus), such as in portrait or landscape photography.
The A mode is a semiautomatic mode; the photographer manually controls the aperture, and the camera automatically controls the shutter speed.
The ISO sensitivity can be set to either manual or automatic in A mode. Basically, a good exposure will be maintained when the camera and photographer work together.
Let’s see how to adjust the camera in A mode.
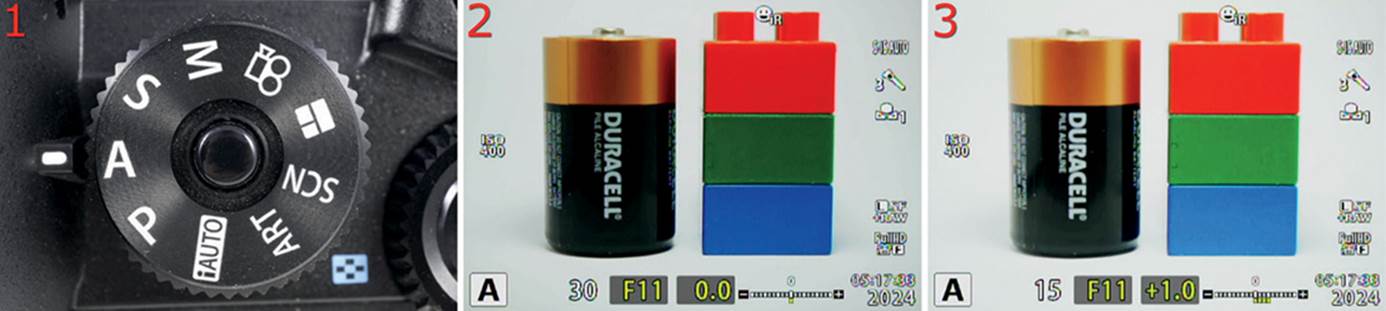
Figure 2.5E: Using Aperture priority (A) mode
Figure 2.5E, image 1, shows the Mode Dial set to Aperture priority (A) mode. When you use this mode you have full control of the aperture, and the camera automatically adjusts the shutter speed so the exposure is always accurate. When you use A mode at small apertures be sure the shutter speed does not get too slow to handhold. With the 5-axis Image Stabilizer (IS) built in to the E-M1, you may be able to get sharp pictures down to 1/15 sec (15) unless you are a shaky person. When you shoot at slow shutter speeds, use a monopod or tripod for the best results. Notice in images 2 and 3 that an A appears in the lower-left corner of the Live View screen when you use A mode.
Figure 2.5E, image 2, shows a good exposure of my battery and blocks. You can see the exposure control settings at the bottom of the screen (30 F11 0.0). The aperture is set to f/11 (F11) and is controlled with the Rear Dial. Notice that the aperture setting (F11) is in a dark rectangle and the shutter speed setting (30) is not. This indicates that you have manual control of the aperture, and the camera automatically controls the shutter speed. Also, notice that the 0.0 setting (exposure compensation) is in a dark rectangle, which means you can control it and override the camera’s automatic exposure value by adding or subtracting light. You control –/+ exposure compensation with the Front Dial. You can dial in exposure compensation over a range of 10 EV steps (–5.0 to +5.0). The –/+ scale shows the current compensation value in either a negative or positive direction.
Note: Be careful when you use exposure compensation because Live View can fool you. If the shutter speed number starts to blink on the monitor, the camera cannot provide additional compensation. The Live View monitor may continue to brighten or darken, but no light is being added or subtracted to the image (also see the next Note).
In figure 2.5E, image 3, I dialed in +1.0 EV of exposure compensation. The camera adjusted the shutter speed from 30 (image 2) to 15 (image 3) to provide one additional EV step of exposure. After you have the exposure set the way you want it, take your pictures.
While you use A mode, you can set the ISO sensitivity to AUTO and let the camera adjust it, or you can leave it set to a certain number (e.g., ISO 200, 400, 800) depending on the ambient light conditions. You can also select the Live histogram control overlay by pressing the Info buttonuntil the Live histogram appears on the screen.
Note: While you are making aperture adjustments with the Rear Dial, you may see the shutter speed number start blinking. This means the camera has reached its maximum 1/8000 second (8000) or minimum 60 second (60”) shutter speed and cannot adjust the shutter speed any further, even though the monitor may brighten or darken. If this happens, you may want to consider using ISO AUTO so the camera can increase or decrease the ISO sensitivity to maintain a good exposure. Do not let the image you see on the Live View screen fool you when the shutter speed number is blinking.
Program (P) Mode
Program (P) mode is a throwback to when full automation first arrived on cameras. In the olden days, P mode was the equivalent to today’s iAUTO mode. P mode provides fully automatic control of the shutter speed and aperture and lets the photographer concentrate on taking pictures. In a sense, the camera becomes a point-and-shoot camera when you use P mode.
However, unlike iAUTO mode, where the camera takes complete control of all aspects of getting the picture, P mode allows you to have some control for special circumstances. You can take control of the aperture by turning the Rear Dial and overriding the camera’s aperture choice. This allows you to shoot without thinking about camera settings, but when you need to, you can override the camera’s aperture setting with one of your own; the camera still controls the shutter speed.
When you override the aperture setting with the Rear Dial, you place the camera into a special version of the Program mode, called Program shift (Ps) mode. Ps mode is very similar to A mode, which we considered in the previous chapter subsection.
Let’s see how to use P mode and Ps mode.
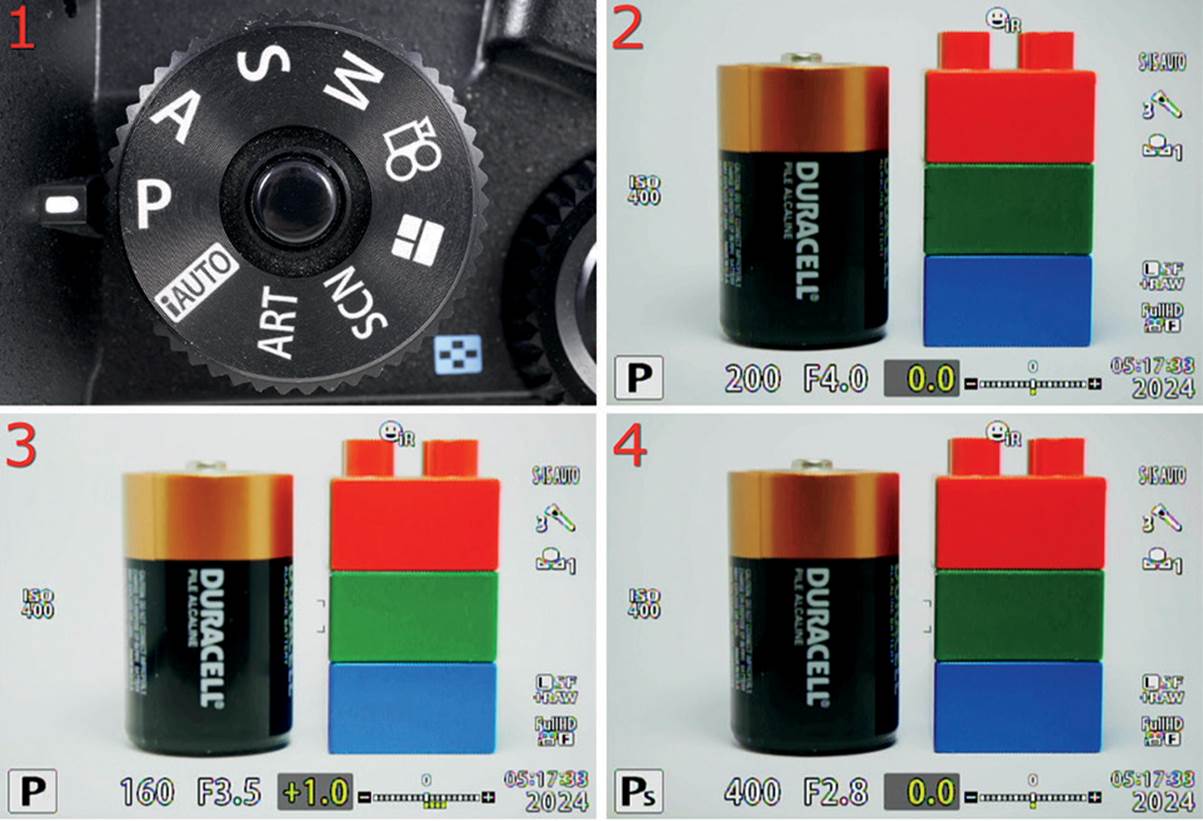
Figure 2.5F: Using Program (P) and Program shift (Ps) modes
Figure 2.5F, image 1, shows the Mode Dial set to Program (P) mode. Notice in images 2 and 3 that a P appears in the lower-left corner of the Live View screen when you use Program mode, and Ps appears when you use Program shift mode (image 4). Also notice that in images 2–4 the shutter speed and aperture numbers are not in dark rectangles (unlike M, A, and S modes). This indicates that the camera automatically controls the shutter speed and aperture in P mode, even though you can override the aperture setting in Ps mode.
In figure 2.5F, image 2, the shutter speed of 1/200 sec (200) and aperture of f/4.0 (F4.0) are just right for a good exposure. At this point I could take the picture and not worry about any of the settings. The camera is in control.
In figure 2.5F, image 3, I used the Front Dial to add +1.0 EV exposure compensation. The camera changed the shutter speed from 1/200 sec (200) to 1/160 sec (160) and the aperture from f/4.0 (F4.0) to f/3.5 (F3.5). This maintains a balanced exposure with +1.0 EV of compensation.
In figure 2.5F, image 4, I removed the exposure compensation value and overrode the aperture setting by turning the Rear Dial. The camera changed the P in the bottom-left corner to Ps. It is now using Program shift mode. I chose an aperture of f/2.8 (F2.8), which is 1 EV step more exposure than f/4.0 (image 2), or double the light. The camera changed the shutter speed from 1/200 sec (image 2) to 1/400 sec (image 4), or half the time, to compensate for the extra stop of light I added by opening the aperture. Double the light for half the time is an equivalent exposure, except the new settings will result in a shallower depth of field (larger aperture) and faster shutter speed. To exit Ps mode, turn the Rear Dial until the camera displays the original shutter speed. When you are ready, take your pictures.
iAUTO and the Live Guide System
When you place your E-M1 in iAUTO mode on the Mode Dial (figure 2.5G), it becomes a point-and-shoot camera. You press the Shutter button, and the camera does the rest. You can relax and take pictures without worrying about camera settings. Even for a professional photographer, a fully automatic mode is welcome at certain times.
Not every picture you take is destined to be a masterpiece, some are just for fun. When you’re at a party taking snapshots, as long as the image looks nice, who cares how it got that way? Using a fully automatic mode is good for fun photography, but it is not available on many professional cameras.
Figure 2.5G: Selecting iAUTO mode on the Mode Dial
Try iAUTO mode when you are taking snapshots and see if you enjoy using it. The camera software is capable of making nice images for sharing on social media sites, and the built-in Wi-Fi makes it easy to transfer the pictures.
Live Guide System
In addition to offering complete camera automation in iAUTO mode, the E-M1—continuing with the idea that everything should be configurable—also provides a way to fine-tune the images that are taken with fully automatic settings. It is called the Live Guide system.
This section is an overview of the Live Guides. There is more information on the Live Guide system later in the book. See the upcoming Deeper Information paragraph for more information.
Now let’s examine the Live Guides.
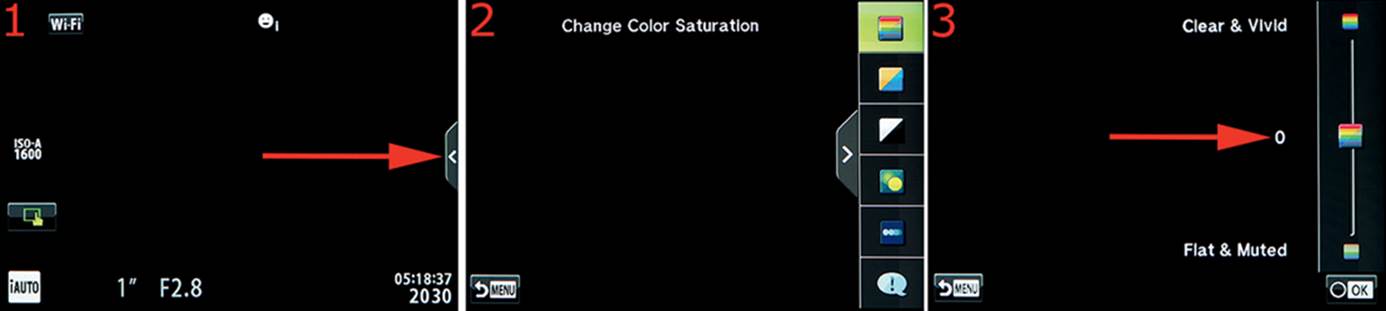
Figure 2.5H: Using the Live Guide system
Set the Mode Dial to iAUTO. You will see a small tab at the right side of the Live View screen (figure 2.5H, image 1). When you touch the tab, the Live Guide system will open. You can use Live Guides to change the appearance of the subject in various ways before you take a picture, or you can see Shooting Tips for various types of picture taking. Touch the Live Guides tab to open the Live Guide menu.
Figure 2.5H, image 2, displays the six Live Guide selections. Here are brief descriptions of what each guide does (top to bottom):
• Change Color Saturation: Visually change the color saturation of a subject just before you make the picture.
• Change Color Image: Visually change the color temperature of a subject just before you make the picture. You can make the color warmer (more red) or cooler (more blue).
• Change Brightness: Visually change the brightness of a subject in real time just before you make the picture.
• Blur Background: Change the lens aperture by moving the adjustment slider while visually previewing the depth of field (zone of sharp focus) just before you make the picture.
• Express Motions: Visually control the shutter speed by moving the adjustment slider.
• Shooting Tips: Get tips on various photographic subjects, including Child, Pet, Flower, and Cuisine photography. You will also find screens for suggestions on framing an image and using camera accessories.
If you slide your finger up and down the screen over the Live Guides, the highlighted area will follow your finger and stop when you lift it. Or you can simply touch one of the six Live Guide icons to open that guide’s secondary screen.
Figure 2.5H, image 3, shows the secondary screen for the Change Color Saturation Live Guide. Notice the slider on the right of the screen, which is currently at the zero (0) position. Slide the indicator toward the top to increase saturation or toward the bottom to reduce saturation. You will see the saturation change on the Live View screen as you move the indicator. When the saturation looks good, remove your finger and press the OK button to lock in the setting.
The rest of the Live Guides work in a similar manner. If your camera is using firmware update 2.0 or later, you can visually combine the effects of several Live Guides, and they will remain in effect for the current shooting session until you press the Menu button to cancel them (or turn the camera off). Before firmware version 2.0 you could use only one Live Guide at a time.
When you use a secondary screen for one of the Live Guides, you can touch the Menu icon in the lower-left corner of the screen (figure 2.5H, image 3) to return to the Live View screen, with a tab showing on the right, for later Live Guide usage (image 1).
Deeper Information: You can assign the Live Guide system to a camera button (as a Button task) for immediate access. There is a much deeper discussion of the Live Guide system in the Appendix under the Live Guide heading on page 482. The discussion is approached as a Button task instead of a subfunction of the iAUTO Mode dial setting; however, they both work the same.
ART Modes
The ART modes setting on the Mode Dial allows you to choose from 14 individual ART modes to take highly stylized images with specialized contrast, framing, and tinting (figure 2.5I). There are 15 Art modes on the menu; however, only 14 are designed to modify an image.
The 15th mode, ART BKT, allows you to take one picture and automatically bracket all 14 of the ART filters.
In other words, when ART BKT is selected and you take a picture, you can watch the monitor as the camera creates 14 copies of the image, each with a different ART filter applied. As a new copy is created, it will briefly appear on the monitor. When the process is done, the memory card will contain the original image with no ART filter applied, as well as 14 copies of the original image with a different ART filter applied to each image.
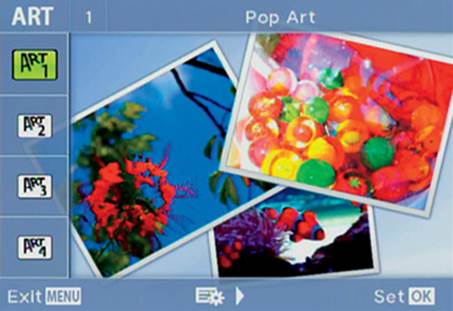
Figure 2.5I: ART Modes
ART modes are really a type of Picture Mode, which are in Shooting Menu 1. In addition to the 15 ART modes, there are also nine Picture Modes, which are discussed in greater detail in the Shooting Menu 1 chapter under the Picture Mode subheading (see page 136).
The following list examines each of the 15 Art Picture Modes:
• Pop Art (Art 1): This mode is like the Vivid Picture Mode on steroids. All colors are saturated to the max, and contrast is raised to an even higher level than in Vivid Mode. This mode is best when you are in a playful mood and want to create an exciting image. The intense colors will not be close to reality, but who needs reality when you are having fun?
• Soft Focus (Art 2): This mode provides a high-key and blurred effect. The contrast is very low, and there is an overall softness like fine gauze. The subject appears sharp, but it is covered with blur. The effect looks a bit like when you see yourself in a foggy mirror. It has a bright glowing effect that is sharp and blurry at the same time.
• Pale&Light Color (Art 3): This mode washes out all the colors and lowers the contrast so blacks become grays. You might think of this as being opposite of Pop Art or Vivid Modes. It gives an image a high-key, cooler, and pastel look.
• Light Tone (Art 4): This mode is similar to the Pale&Light Color Mode in that it lowers contrast and desaturates colors. However, instead of having a somewhat cool (bluish), high-key look, the colors look like they are overlaid with gray film and have a darker, low-key look. Light Tone makes the image look like the effect you see when an overdone high dynamic range (HDR) image has too few shadows.
• Grainy Film (Art 5): This mode provides an extremely high-contrast black-and-white effect. All colors become extra-dark shades of gray, and most highlight details become pure white. This mode would be great for shooting a bare tree in a snow-covered field on a misty, overcast day. This mode creates stark images and is best for low-contrast scenes because it will obliterate any detail in strongly colored or bright scenes by adding extreme contrast to the picture.
• Pin Hole (Art 6): This mode has a relatively saturated look like Vivid Mode, but it adds a heavy vignette effect to the corners of the image, as if the light rapidly diminishes. It’s as though you were using a pinhole camera to make the image, except the picture is nice and sharp. Primarily, Pin Hole provides a vignette effect.
• Diorama (Art 7): A diorama is a three-dimensional miniature in which small artificial objects are arranged and photographed to resemble real life. You can use Diorama Mode to create a reverse diorama, where real-life places like city scenes can be made to look artificial. This mode creates a band of sharpness either in a horizontal or vertical direction (it’s adjustable), and everything outside of the band is blurred, making the picture seem like it has a very limited depth of field.
• Cross Process (Art 8): This mode imitates an old method of developing film in chemicals that were designed for different types of film. Often there are odd colors and higher than normal contrast. Images shot with Cross Process have a green cast and high contrast.
• Gentle Sepia (Art 9): This mode converts all colors to monochrome and adds a warm, brownish effect that resembles less-saturated sepia toning. It could be used with old-fashioned clothing to imitate antique portrait pictures, or you could shoot a nature scene with this mode and make it look like a bygone era.
• Dramatic Tone (Art 10): This mode is unusual. It creates a low-key tone where normal highlights are darkened and dark tones are lightened. Bright colors are somewhat muted, and detail is maintained, even in dark areas. There is strong contrast without being overly bright. The look is dramatic and unlike anything I have seen from other camera brands.
• Key Line (Art 11): This mode converts the edges of the subject and the borders of contrast changes (color gradations) into line drawings. It maintains a lot of detail, unlike the cartoonish look from some other cameras. The color is mostly maintained, although it is more pastel and muted, and blacks become quite gray.
• Watercolor (Art 12): This mode gives colors and edges a watercolor effect that tends to blow out highlights and dark areas. Most detail is lost in a normal exposure, so experiment with underexposure when you use this mode. Dark tones and extreme highlights seem to turn stark white and disappear completely from the image, and other colors become pale and washed out.
• Vintage (Art 13): The Vintage Art Filter allows you to tint the image in such a way that it appears to be a faded, color-shifted image you would expect to see after a print has been hanging on a wall for many years.
• Partial Color (Art 14): The Partial Color Picture Mode is designed to let you use a previously configured Partial color setup. To choose a partial color, see the Shooting Menu 1 chapter under the Partial Color (Art 14) subheading on page 172. After you have configured a Partial Color, only that color will display, and other colors will appear as monotone shades.
• ART BKT (Art 15): This mode takes a single picture with no special effects, then it creates 14 copies of the picture and applies each of the ART filters. Taking one picture will result in 15 pictures being created. You can also have the camera apply the normal Picture Modes (e.g., Vivid, Natural) to the picture for up to seven additional copies. If you apply all ART filters and Picture Modes, one picture will result in 21 pictures being created. Please see the chapter Shooting Menu 2, under the subheading ART BKT (Art Mode Bracketing) on page 209, for information about ART bracketing.
As an example, let’s examine how to select the Grainy Film ART mode (refer to the upcoming Deeper Information paragraph for references to additional information later in the book).
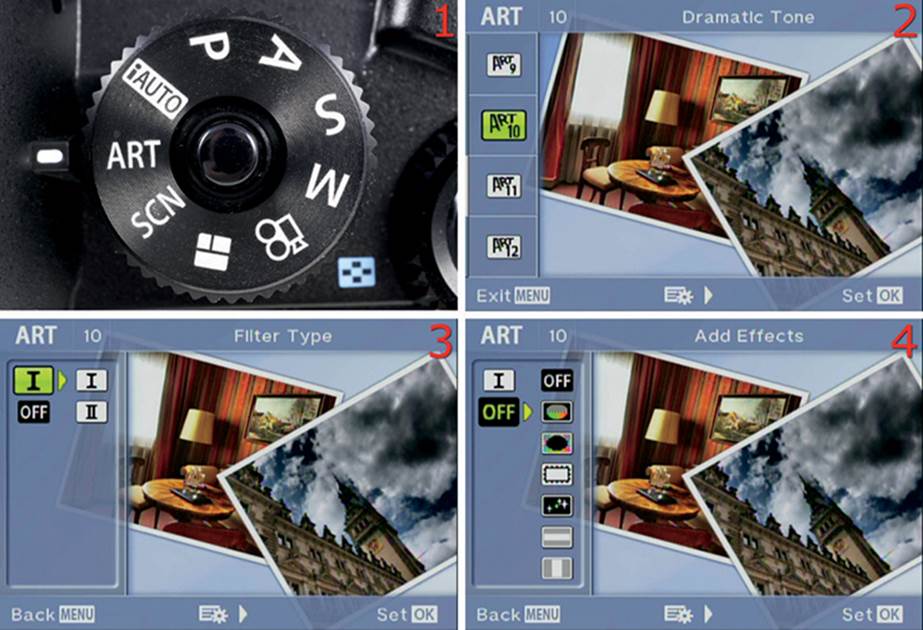
Figure 2.5J: Using an ART mode to add special effects to an image
Figure 2.5J, image 1, shows the Mode Dial set to ART. When you first choose ART mode on the dial, the camera will display a screen similar to the one seen in figure 2.5J, image 2. Usually it will display ART 1 Pop Art; however, if you have previously used ART modes, it will display the previous ART mode that was selected.
Figure 2.5J, image 2, shows that the ART 10 Dramatic Tone mode is selected. I chose this mode as an example because it offers both Filter Types and Add Effects. Other modes may offer only one or the other. Filter Types usually change something within the contrast or color balance of the image, and Add Effects does things like selective blurring, edge effects, and special framing. When you see the initial screen for an ART mode (such as image 2), scroll up or down with the Arrow pad keys to select an ART mode (ART 1–ART 15). Press the OK button to apply that mode and its default settings, skip the following two paragraphs, and take your pictures. To fine-tune the effects of the ART mode before you use it, scroll to the right to open the secondary screens.
Figure 2.5J, image 3, displays the Filter Type secondary screen, where you can select a Filter Type. Our example mode has Filter Type I and Filter Type II. Type I makes a color picture with dramatic tones. Type II makes a black-and-white image with dramatic tones. Scroll to the right to select either I or II. Most ART modes have at least Filter Types I and II, a few have a third filter (III), and a few have no filters. After you have highlighted the Filter Type you want to use, press the OK button to choose the filter. The highlight will pop back to the left so you can scroll down and select an Add Effects Type.
Figure 2.5J, image 4, shows the Add Effects secondary screen. This screen offers all sorts of special effects, including shaped frames, starbursts, soft focus, edge effects, pinhole effect, and blurring. Not all ART modes offer all Add Effects. It varies from ART mode to ART mode. Choose an Add Effect and press the OK button to use that effect. (To change ART modes, press the OK button while still on the Live View screen, and the ART mode selection screen will reopen). Take your pictures.
Deeper Information: These Art modes each have different internal settings. The settings allow you to change things like filter types and to add special effects. To fully understand how the Art mode system works, see the Shooting Menu 1 chapter under the subheading Art Picture Modes on page 141. For the ART BKT mode, see the chapter Shooting Menu 2 under the subheading ART BKT (Art Mode Bracketing) on page 209.
Note: To reopen the ART mode screen and select a different ART mode than the one you originally used, make sure the camera is still set to ART mode on the Mode Dial, then press the OK button. Also, the ART mode screen is touch sensitive. You can touch the small arrows at the top and bottom of the list of ART modes to scroll up and down. To select a mode, touch that mode’s main icon on the left. The camera will activate the mode and switch back to the Live View screen. I have not found a way to use the touch screen to open an ART mode’s secondary screens. Scroll with the right Arrow pad key to open the secondary screen.
SCN Modes
SCN (Scene) modes are special camera configurations that match a specific type of photography. The individual SCN modes are designed for inexperienced photographers who still want to get great images in difficult situations.
There are 25 SCN modes that are named for the type of photography they are used for. Each mode optimizes camera settings for a specific type of photography. They are simple to use because you only have to select the SCN mode that closely matches your current photography needs then shoot your pictures.
The SCN mode screen is touch sensitive. Simply touch an icon on the list that appears on the left side of the screen, and the camera will configure itself for that style of shooting.
Let’s examine the 25 SCN modes then look at an example:
• Portrait: Use this mode to take portraits of people.
• e-Portrait: This mode smooths skin tones so your portraits look good on an HDTV.
• Landscape: This mode adds saturation to blues and greens for excellent landscape pictures.
• Landscape + Portrait: This mode adds saturation to blues and greens for excellent landscape pictures while protecting skin tones for nature portrait sessions.
• Sport: This mode helps you capture fast action without excessive blur. It tends to use faster shutter speeds.
• Hand-held Starlight: This modes reduces blur when you are handholding your camera and shooting pictures of low-light scenes, such as a city view at night.
• Night Scene: Use this mode on a tripod. It is for shooting scenes in low light in the evening or at night. It may use very slow shutter speeds. This mode is not designed for handheld photography.
• Night + Portrait: Use the FL-LM2 flash attachment on your camera and ask portrait subjects to be still when you take night portraits with this mode. It uses slow shutter speeds to capture background lights and fill flash to light the subject.
• Children: Use this mode for taking pictures of active children playing.
• High Key: This mode emphasizes bright areas and highlights to make an image have a very bright look.
• Low Key: This mode emphasizes dark areas and enhances contrast to create a dark effect.
• DIS Mode: This mode attempts to reduce blur in a moving subject or, if the camera is moving, when you take action pictures. It uses Digital Image Stabilization techniques to stabilize the picture when movement is present.
• Macro: Use this mode to enhance the appearance of closeup (macro) pictures.
• Nature Macro: When you are taking closeup pictures of small objects in nature, such as a butterfly, use this mode to enhance the subject’s appearance.
• Candle: This mode enhances images taken in low ambient light conditions, such as by candlelight. It tends to impart a warm white balance to make inviting pictures.
• Sunset: This mode reproduces reds and yellows with extra saturation to make a beautiful sunset have even more saturated colors. Use it when you shoot the setting or rising sun.
• Documents: This high-contrast mode emphasizes the contrast between dark letters and white paper. Use it to make easy-to-read copies of text documents.
• Panorama: This mode uses special frames that let you overlap panorama images so you can later combine them in your computer. It works for horizontal and vertical panoramas.
• Fireworks: This mode uses very slow shutter speeds and small apertures to allow you to capture fireworks images. You will need to use at least a monopod, if not a tripod, with this mode. It is not designed for handholding your camera. My camera seems to consistently select a 4 second shutter speed at f/11, with –1.0 EV compensation.
• Beach & Snow: When you want to shoot a picture with lots of white, such as on a snowy day or at a white-sand beach, this mode will enhance the image for the prevalence of white.
• Fisheye Effect: This mode allows you to shoot semifisheye pictures when you use an M.Zuiko Digital 14–42mm f/3.5–5.6 II lens with an Olympus Fisheye Converter FCON-P01 mounted on it (figure 2.5K, image 1).
• Wide-Angle: This mode allows you to shoot super-wide-angle pictures when you use an M.Zuiko Digital 14–42mm f/3.5–5.6 II lens with an Olympus Fisheye Converter FCON-P01 mounted on it (figure 2.5K, image 1).
• Macro: This mode allows you to shoot macro (closeup) pictures when you use one of three M.Zuiko lenses (see the upcoming lens list) with an Olympus Macro Converter MCON-P01 mounted on it (figure 2.5K, image 2).
• 3D Photo: This mode takes pictures for display on a 3-D TV or monitor with a 3-D lens mounted on the camera. The camera monitor cannot display 3-D images. If you try to use a normal lens with this mode, the camera will inform you: This lens is not supported.
• Panning: This mode causes the camera to notice when you are panning with the subject, such as when you take a picture of a person riding by on a bicycle, and it will try to use the best shutter speed for the subject and provide a blurred background to imply motion.
Two of the 25 SCN modes require the use of a special fisheye adapter that fits the low-cost M.Zuiko Digital 14–42mm f/3.5–5.6 II lens only. The adapter is called the Fisheye Converter FCON-P01 (Figure 2.5K, image 1). If you have the 14–42mm lens and want to use the three SCN modes that require the adapter, you will need to purchase the adapter from a camera dealer.
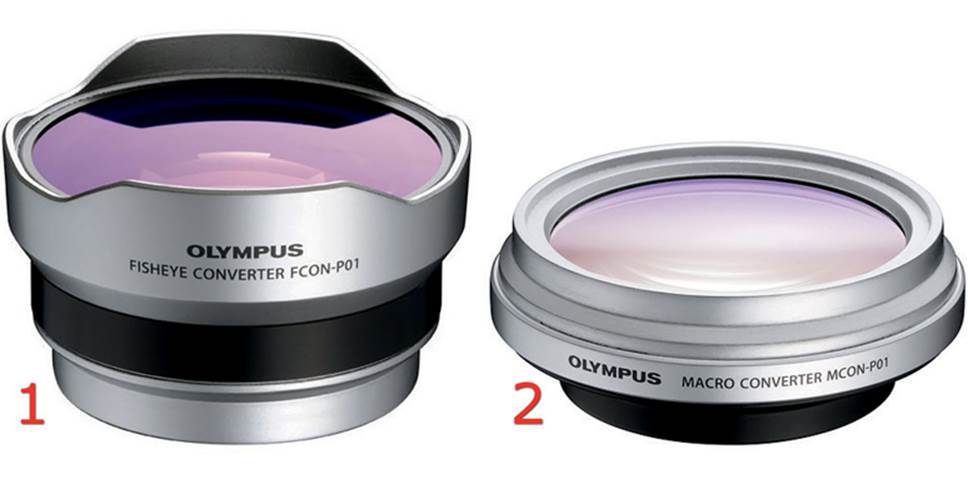
Figure 2.5K: Fisheye Converter FCON-P01 (left) and Macro Converter MCON-P01 (right)
The Macro SCN mode requires the Macro Converter MCON-P01 (figure 2.5K, image 2) to be mounted on one of the following three lenses:
• M.Zuiko Digital 14–42mm f/3.5–5.6 II
• M.Zuiko Digital ED 14–150mm f/4.0–5.6
• M.Zuiko Digital ED 40–150mm f/4.0–5.6
Now let’s examine how to choose a SCN mode and see what it does.
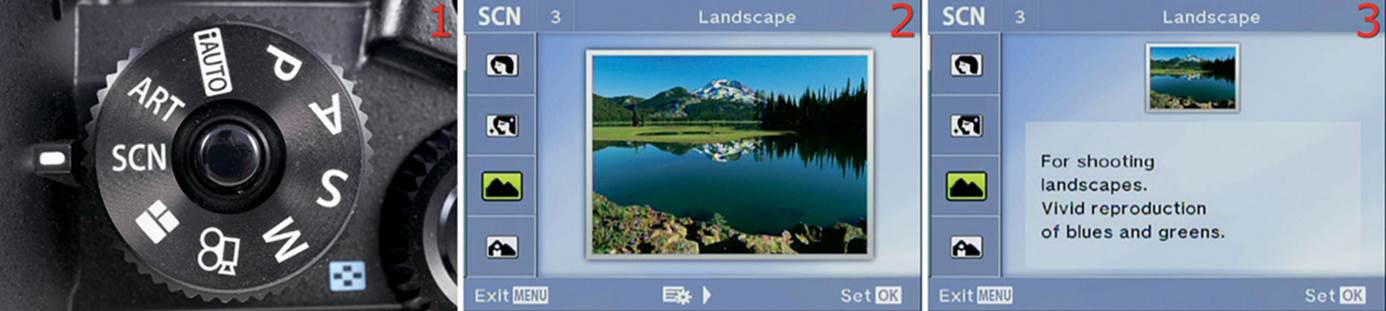
Figure 2.5L: Selecting a SCN mode
Figure 2.5L, image 1, shows the Mode Dial set to SCN mode. After you set the Mode Dial to SCN, the screen shown in image 2 will appear. If you select a SCN mode and decide to use another SCN mode later, you can get back to the SCN mode selection screen by pressing the OK buttonwhile the Live View screen is active.
Figure 2.5L, image 2, shows the main SCN mode screen and a list of 25 SCN modes on the left side of the screen. A picture and title will appear in the middle of the screen to let you know what a particular mode does. You can scroll up or down with the Arrow pad keys to select one of the 25 modes. You can also touch the arrow tips that appear above and below the modes to scroll, then touch a SCN mode icon to select it. Refer to the previous list to see which mode will work best for you. After you have highlighted a mode, you can scroll to the right to see a help screen that reminds you what it does (figure 2.5L, image 3). Now you can scroll left to select another mode, or press the OK button to lock in the SCN mode.
Settings Recommendation: If you are not sure how to set your camera for a certain type of photography, you can use the SCN modes. Try them and see how they work for you. You can use your camera for advanced photography without needing experience. Nothing replaces experience, but this advanced technology helps you enjoy your photography while you learn.
Photo Story
The Photo Story function allows you to combine multiple images into one individual picture—a photomontage. When you take a series of images, they are saved as part of an incomplete photomontage on the memory card until you finish shooting the Photo Story. When the Photo Story is completed, the E-M1 assembles the images into a montage, saves the montage, and saves each image in the montage as separate images.
The camera offers six Photo Story types with various filters, effects, and aspect ratios. Let’s examine them.
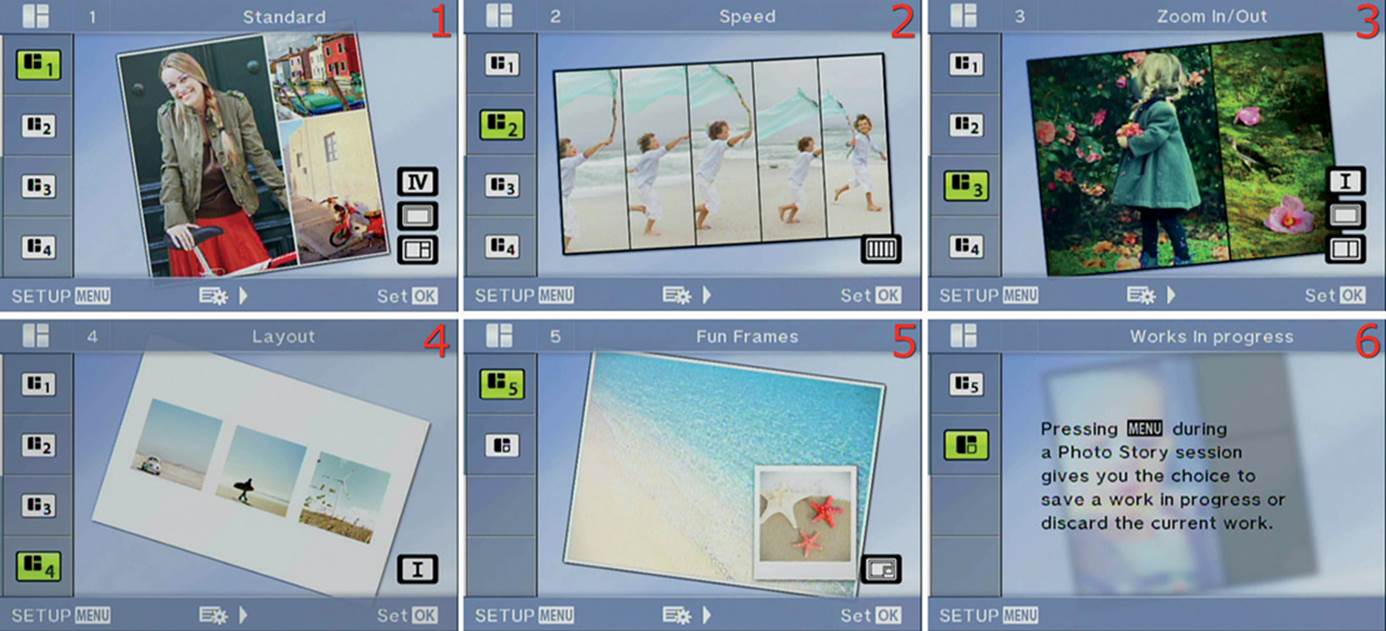
Figure 2.5M: Six Photo Story types
Figure 2.5M, images 1–6, show the Photo Story types you can use to create your own multi-image montages. The Photo Story types and brief descriptions are as follows:
• Standard: This Photo Story offers four frame edge types, four special effects, and four photo arrangements with various aspect ratios. It can be considered a general purpose Photo Story type.
• Speed: This Photo Story offers three photo arrangements with equal aspect ratios. Use this Photo Story type to capture sequential motion.
• Zoom In/Out: This Photo Story offers two frame edge types, two special effects, and two aspect ratios. One of the images is normal, and one is automatically zoomed in digitally for a closeup of the subject.
• Layout: This Photo Story offers four aspect ratios, all with wide white borders.
• Fun Frames: This Photo Story offers three photo arrangements: one with a small Polaroid-looking film image overlaying a larger image, one with sprocket holes along the edges, and one with five narrow stripes.
• Works in Progress: This is not exactly a Photo Story. It lets you continue with any Photo Story you started but didn’t finish. This function allows you to shoot a picture in one place, go to another place to shoot another picture, and so on, until you have filled all the frames. You don’t have to complete a Photo Story immediately. Instead, you can do part of it and continue adding images later. We will discuss this in more detail shortly.
Configuring a Photo Story Shooting Session
Now let’s examine how the Photo Story system works by choosing one of the Photo Story types and putting it through its paces. We will use the Standard Photo Story, which combines three images into one photomontage. Each type of Photo Story works basically the same way, so the following steps apply to all Photo Stories.
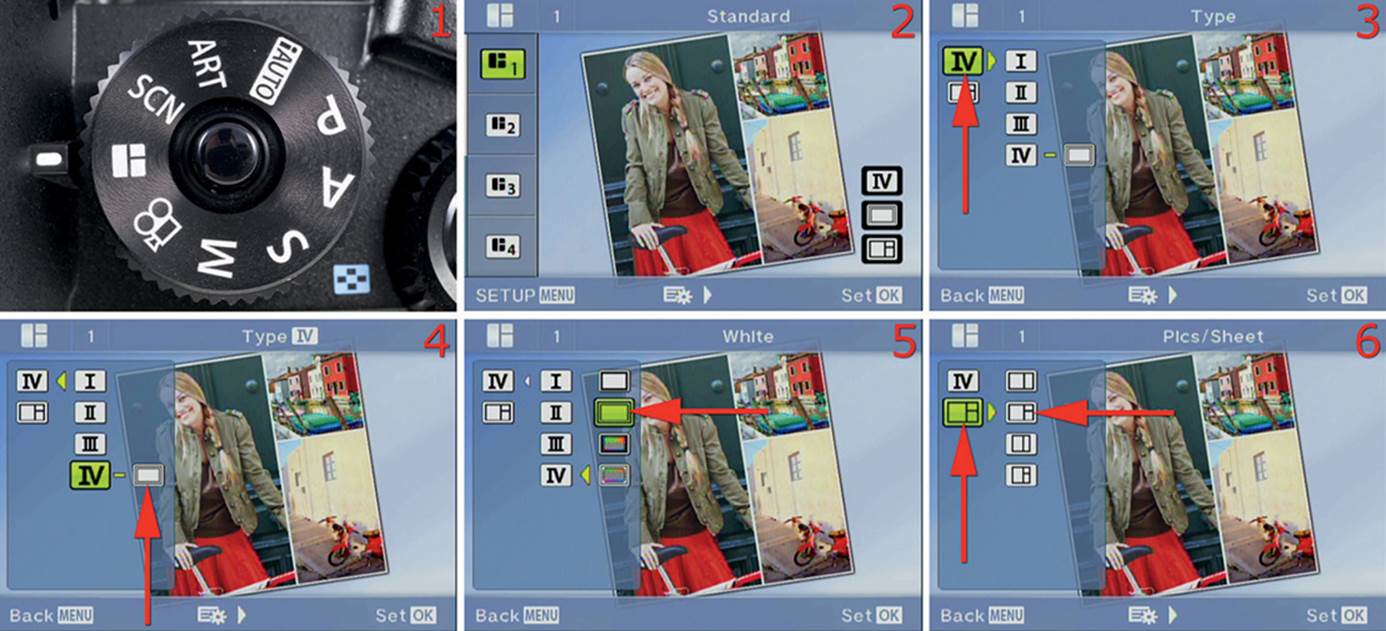
Figure 2.5N: Configuring a Photo Story
Figure 2.5N, image 1, shows that my camera is set to the Photo Story symbol on the Mode Dial. Use this Mode Dial position to begin your Photo Story. If you are about to take the first picture in your current Photo Story and decide you would rather use a different Photo Story type, simply press the Menu button and the camera will return to the main Photo Story screen. You can touch the screen to select a Photo Story, or you can use the Arrow pad keys to scroll up and down until you find the Photo Story you want to use.
In figure 2.5N, image 2, I selected the Standard Photo Story. To access the Photo Story’s secondary screen and make some adjustments, scroll to the right.
Figure 2.5N, image 3, shows the Photo Story’s Type selections. I selected Type IV. As you scroll up and down in Types I–IV, you will see different color balances, frame widths, and frame colors. When you see a Type that you want to use, press the OK button to lock it in.
In figure 2.5N, image 4, you can see that certain special effects are available. To the right of Type IV you can see a symbol (red arrow) that means special effects are available. Scroll to the right to access these special effects.
Figure 2.5N, image 5, displays the four special effects that you can use for this particular Type. I chose the White frame effect, which means the frames around the edges of the picture will be white. The four effects are as follows:
• Black: The frame lines will be black.
• White: The frame lines will be white.
• Black/Pin-Hole: The frame lines will be black, and the montage will have a dark vignette in the corners (the entire montage, not the individual pictures), as if it were taken with a pinhole camera.
• White/White Edge: The frame lines will be white, and the montage will have a white vignette in the corners (the entire montage, not the individual pictures).
These effects are somewhat similar to the Add Effects settings we discussed in the previous ART Modes section. Choose one of the four effects and press the OK button to lock it in.
Figure 2.5N, image 6, shows the Pics/Sheet selection, which allows you to select various aspect ratios for your montage. Basically, you can vary the number of pictures and the shape of each picture. Choose the Pics/Sheet setting you most enjoy and press the OK button to Set it.
Note: Not all Photo Story types offer all the settings. Some of them offer only the Type setting, and others offer only the Pics/Sheet setting. You should experiment with each Photo Story type until you learn how they work so you can quickly choose your favorite in the future.
Now let’s create a Photo Story montage (figure 2.5O).
Creating a New Photo Story
After we configure a Photo Story, we can create and combine images into a montage. Let’s see how it is done.
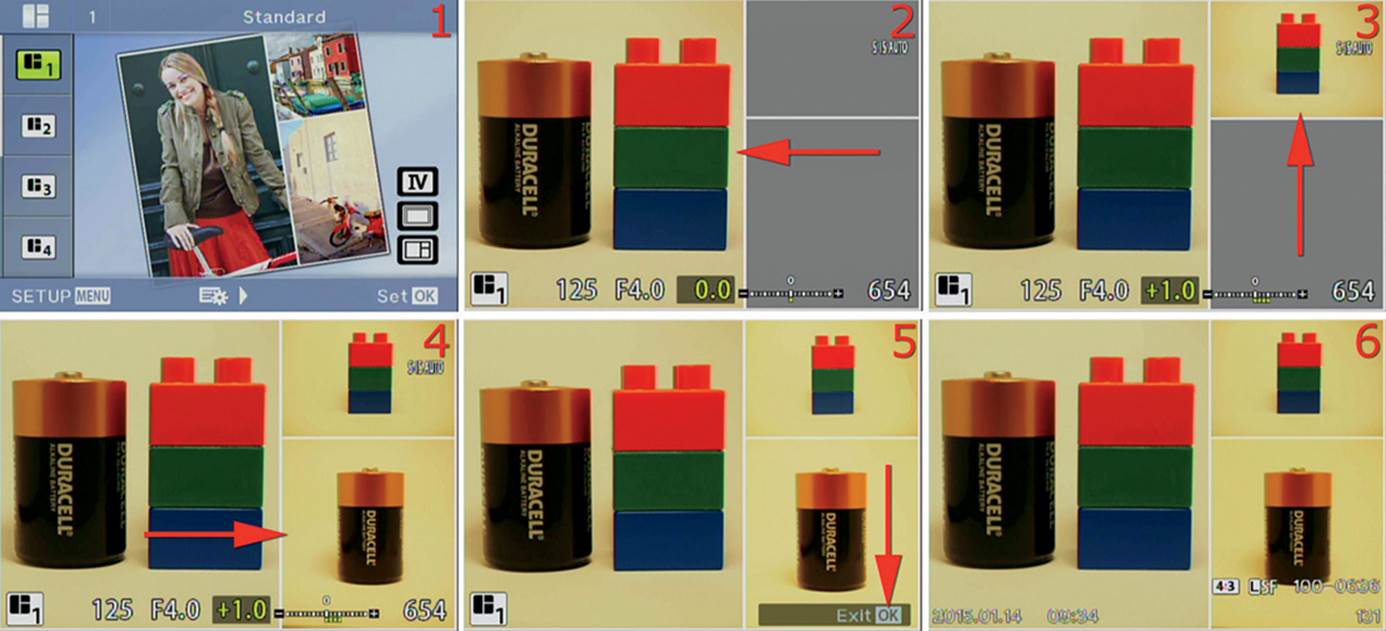
Figure 2.5O: Creating a Photo Story
Figure 2.5O, image 1, shows that I selected the Standard Photo Story. We configured it in the previous subsection. After you configure the Photo Story according to your needs, press the OK button to begin (or lightly press the Shutter button).
Figure 2.5O, image 2, shows the first frame of the Photo Story. The subject is in the frame on the left. There are several things to consider before you take the first picture. Before you capture an image, you can touch one of the frames on the monitor. The camera will highlight the frame and place the next picture in that frame. If you don’t touch a frame first, the camera will fill the frames in order. The Photo Story system uses AUTO White Balance, but you can change it for each picture in the montage. You can see in the figure that the colors of my images are off. I shot them on a white background under a basic fluorescent light. The bulb caused the background to be a very warm color. Before you shoot an image, you can control the White Balance by pressing the OK button, opening the Live Control, and setting an appropriate White Balance for the subject. The camera also allows you to set exposure compensation. I took my first image with no compensation; that is, with 0.0 at the numerical exposure compensation position (figure 2.5O, image 2, at the bottom center of the image).
Figure 2.5O, image 3, shows that I have already taken the first image (left frame) and that I am about to take the second image (top-right frame). Notice that I have dialed in +1.0 EV Exposure compensation for the second image to more closely match the brightness of the first image. Each image allows you to use a different Exposure compensation, White balance, Flash type, Flash compensation, AF mode, ISO sensitivity, Image stabilization, and RAW/JPEG format. All those settings are available just before you take a picture when you press the OK button and open the Live Control screen. Many other menu items are not available during a Photo Story session, so they are grayed out. After you select your settings, take the second picture.
Figure 2.5O, image 4, shows that I am ready to take the final picture for my Photo Story montage. Make any needed adjustments with Live Control, then take the final picture.
Figure 2.5O, image 5, shows a preliminary version of a Photo Story montage. To save the Photo Story (Exit), press the OK button.
A Busy screen will appear with a progress indicator while the Photo Story is being saved (not shown, between images 5 and 6). When the progress indicator is complete, the finished Photo Story will be displayed (figure 2.5O, image 6). You can scroll through Photo Story montages on themonitor just like normal images.
Note: At any time during the initial shooting of a Photo Story, if you decide you do not want the Photo Story, you can press the OK button with the incomplete Photo Story on the screen, and a menu will open with a Discard selection. Choose Discard and press the OK button to delete the entire Photo Story. Also, if you turn the Mode Dial to another setting or turn the camera off during an active Photo Story, the camera deletes the images in the shoot. If you want to save an incomplete Photo Story, save it before you exit the session to avoid losing the images. The next subsection explains how to save a Works in progress (incomplete) Photo Story.
Saving and Resuming a Works in Progress Photo Story
You do not have to finish a Photo Story in one shooting session. You can shoot a picture or two today, save the Works in progress, and return later to finish the montage. Let’s see how to save an incomplete Photo Story and reopen it to shoot the final images.
Figure 2.5P, image 1, shows a Photo Story shoot in progress. The first image (left frame) has been taken, and the second frame is ready for input. Instead of taking the second image, press the Menu button.
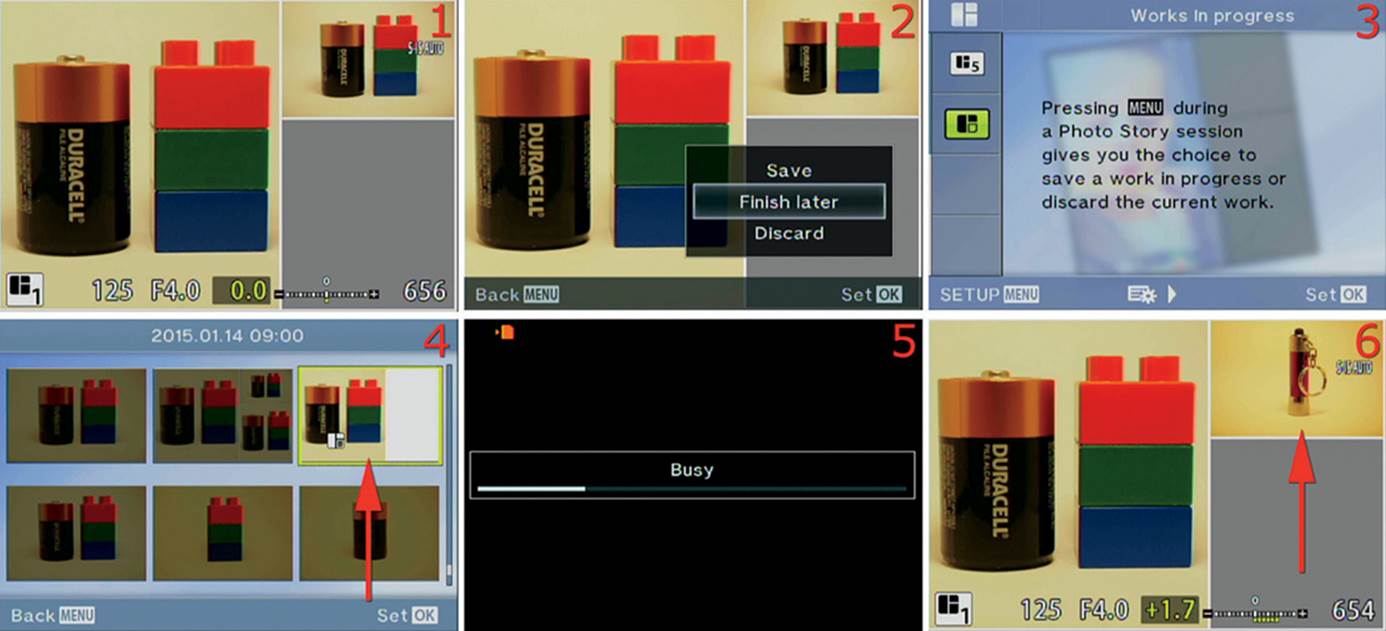
Figure 2.5P: Stopping and resuming a Photo Story
Figure 2.5P, image 2, shows the menu that opens when you press the Menu button during a Photo Story shoot. This menu offers three choices:
• Save cancels the rest of the Photo Story shoot. It saves individual copies of any images you have already taken and an incomplete copy of the Photo Story montage.
• Finish later saves the current status of the Photo Story, with all images bundled inside the shoot, but it does not save individual images yet. You can continue the shoot later.
• When you select Discard before you have saved an incomplete Photo Story (Works in progress), the camera deletes all images in the Photo Story. Be careful with Discard!
If you select Discard for a previously saved but incomplete Photo Story, the camera cancels the operation and does not delete the Photo Story. For now, select Finish later, and the camera will save the current status of the Photo Story as a Works in progress. The incomplete Photo Story is now waiting for future picture additions.
Suppose that between images 2 and 3 in figure 2.5P, some time has passed. You have traveled to a different location for the next picture in your Photo Story, or it could even be a different day. Now you want to continue the Photo Story shooting session. Set the Mode dial to the Photo Story symbol and turn the camera on. If you have been using the Photo Story system recently and have an incomplete Photo Story saved, the Works in progress screen will appear. If the screen does not appear, simply select the Works in progress icon on the Photo Story screen (the sixth choice, which is highlighted in figure 2.5P, image 3). Press the OK button or scroll to the right to open the secondary screen.
Figure 2.5P, image 4, shows current Photo Stories. The Works in progress Photo Stories are highlighted (red arrow). You can see that the highlighted Photo Story is missing some of its images because there is a white space on the right side of the thumbnail. Only Works in progress Photo Stories can be selected in this menu. Choose a Work in progress and press the OK button to open it. A Busy screen and progress indicator will appear (figure 2.5P, image 5), then the Works in progress Photo Story will open and is ready for new images to be added. I can now take more pictures and finish the Photo Story (figure 2.5P, image 6), using the steps provided in the previous subsection called Creating a New Photo Story.
Note: Being the curious type, I tested to see what the camera was doing with each image in the Photo Story before it was written to the memory card as a montage and individual images. I planned to shoot a couple of images in the Photo Story then, before I finished the session, delete one of the individual images. I wanted to see how the camera would handle losing one of the images before the shooting session was done. I discovered that the clever E-M1 does not save the individual images in the Photo Story until after the Photo Story is complete. That prevents accidental deletion of individual images in the Photo Story.
You can choose to save a Photo Story before you complete a shoot, and the E-M1 will keep all the images. You can also reopen and save a Work in progress Photo Story, without completing it, and the camera will keep all the individual images and the partially complete montage.
Movie Mode
The E-M1 has a full-featured video recording system that lets you create Full HD (1080p), HD (720p), or SD (480p) videos. It’s easy to use the Movie mode. Let’s see how.
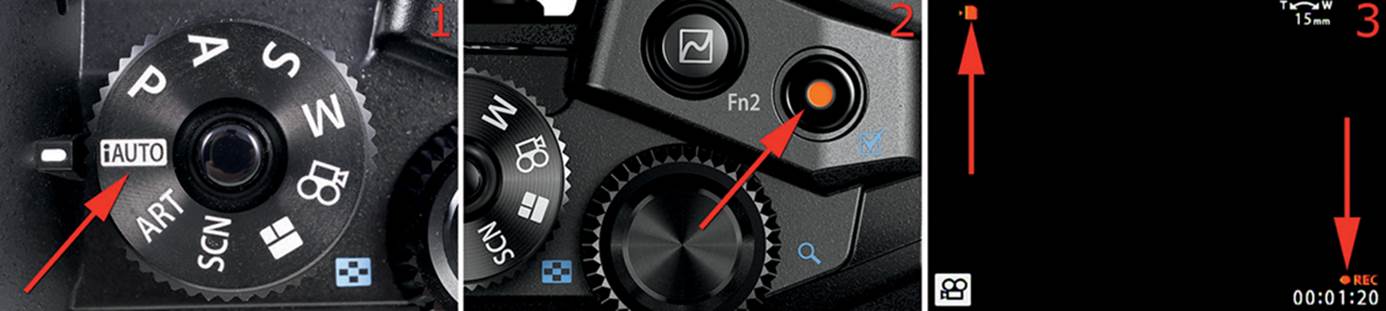
Figure 2.5Q: Starting a video recording
Figure 2.5Q, image 1, shows my camera set to iAUTO mode. This lets the camera act like a standard video recorder for everyday family events.
Figure 2.5Q, image 2, shows the Movie button, which has a red dot. When you are ready to record a video, press the Movie button.
Figure 2.5Q, image 3, shows a video being recorded with the lens cap on. Notice in the lower-right corner that there is a red dot followed by a REC symbol. It appears any time you are recording a video. Just below the REC symbol is a timer that counts the recording time, which can be as long as 29 minutes per video recording. I have recorded a video that is 01 minute, 20 seconds long (00:01:20). At the top-left corner of the screen, the card access symbol will blink as video is written to the memory card.
After you are finished recording a video, press the Movie button again to stop recording. This is a very basic way to record video. You can gain greater control over video recording by configuring the camera for more advanced operations (refer to the following Deeper Informationparagraph).
Geek Facts: Full HD (1080p) or standard HD (720p) video is recorded with the following maximum specifications, which vary depending on the settings at Shooting Menu 1 > Record Mode > Movie:
• Up to 1920×1080 (1080p) at 30 frames per second (fps)
• Bit rate of up to 24 Mbps
• H.264 MPEG-4 AVC compression or Motion JPEG compression
• Up to 29 minutes of recording time per video clip
• Up to 4 GB per video clip
• MOV container format for Full HD and standard HD (H.264)
• AVI container format for standard HD and SD (Motion JPEG)
Deeper Information: See the Shooting Menu 1 chapter, under the subheading Video Formats on page 183, for deeper information on video format specifications. Also, see the Custom Menu chapter, under the Custom Menu I. Movie heading (contains five subsections) on page 421, for deeper information on configuring the camera for advanced video recording.
Using Video Special Effects
A somewhat more advanced way to enjoy recording videos is to use the Movie mode setting on the Mode Dial. This allows you to record videos in a similar approach as previously described, but it adds five special effects for video recording that you activate with the touch screen. Let’s discuss each of the special effects.
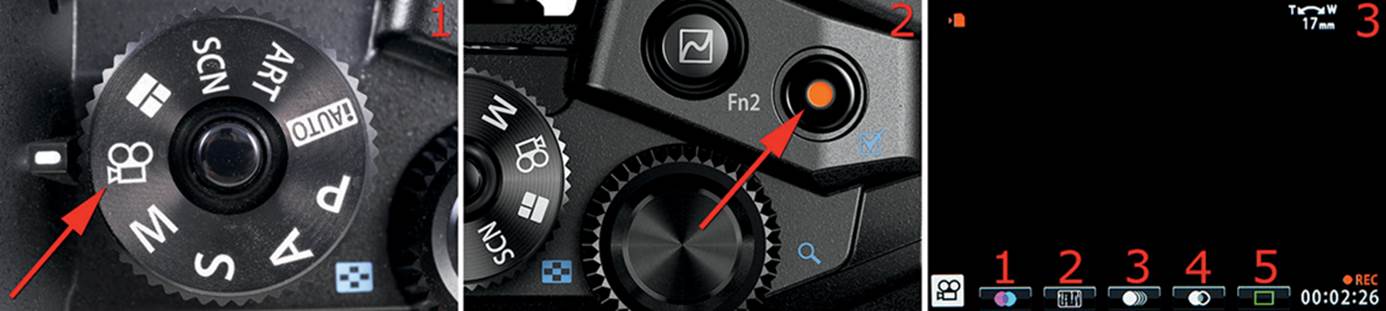
Figure 2.5R: Using the Movie mode and five video special effect modes
Figure 2.5R, image 1, shows that Movie mode is set on the Mode Dial.
Press the Movie button (figure 2.5R, image 2) to start the video recording.
Figure 2.5R, image 3, shows the video screen with an active recording. At the bottom of the screen there are five touch-activated special effects. Touch an effect icon to enable it, and touch it again to disable it. Let’s examine each of the five effects modes and see how to use them.
Art Fade
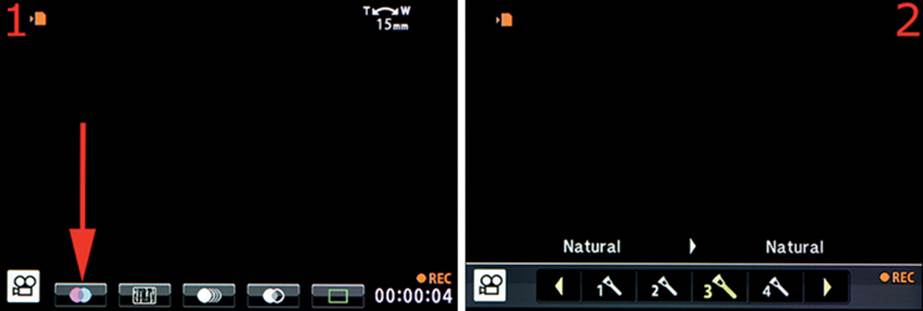
Figure 2.5S: Using the Art Fade effects mode
Figure 2.5S, image 1 (red arrow), shows the Art Fade effects icon. Touch the icon to open the secondary screen.
Figure 2.5S, image 2, shows the Art Fade screen. There are arrow tips to the left and right of the Picture Modes row along the bottom of the screen. The Natural Picture mode is currently selected. Touch one of the arrow tips to scroll through the Picture Modes until you see the mode you want to use. Touch the icon; when you remove your finger the new Picture Mode will be applied to the video recording. The effect will transition in gradually so the change will not be abrupt. The regular Picture Modes do not have strong effects, and they are hard to see on the Live View screen. However, you will see a pronounced effect when you use one of the ART modes. Before you use effects in a video recording, experiment with this mode to learn how it works.
Old Film
Figure 2.5T (red arrow) shows the Old Film effects icon. Touch the icon to enable Old Film effects, and touch it again to disable it. This effect adds random scratches and dust to the video, and it varies the brightness. It makes a video look like an old 1930s film. Be sure to try this in black-and-white!
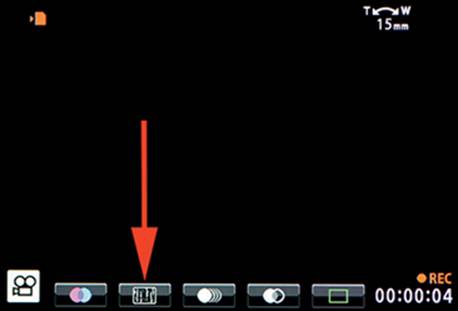
Figure 2.5T: Using the Old Film effects mode
Multi Echo
Figure 2.5U (red arrow) shows the Multi Echo effects icon. Touch the icon to enable the effect, and touch it again to disable the effect. This effect causes an echo to follow the main subject. It looks like the subject is repeated dozens of times in a continuous stream as it moves. Any movement in the frame is smeared in a strange, flowing way that is quite appealing.
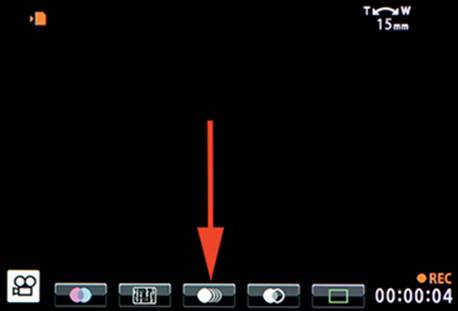
Figure 2.5U: Using the Multi Echo effects mode
One Shot Echo
Figure 2.5V (red arrow) shows the One Shot Echo effects icon. Touch the icon to instantly echo any movement in the frame. This is similar to the Multi Echo effect, except there is only one repetition that lasts about one second with smearing, instead of dozens of repetitions.
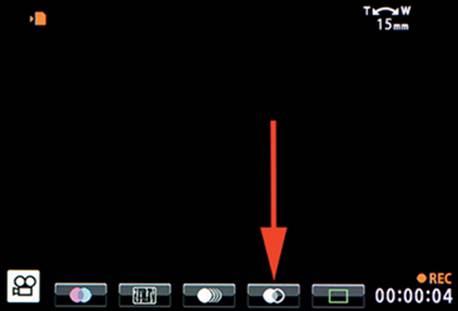
Figure 2.5V: Using the One Shot Echo effects mode
Movie Tele-Converter
Figure 2.5W, image 1 (red arrow), shows the Movie Tele-converter icon. Touch the icon to open the secondary screen.
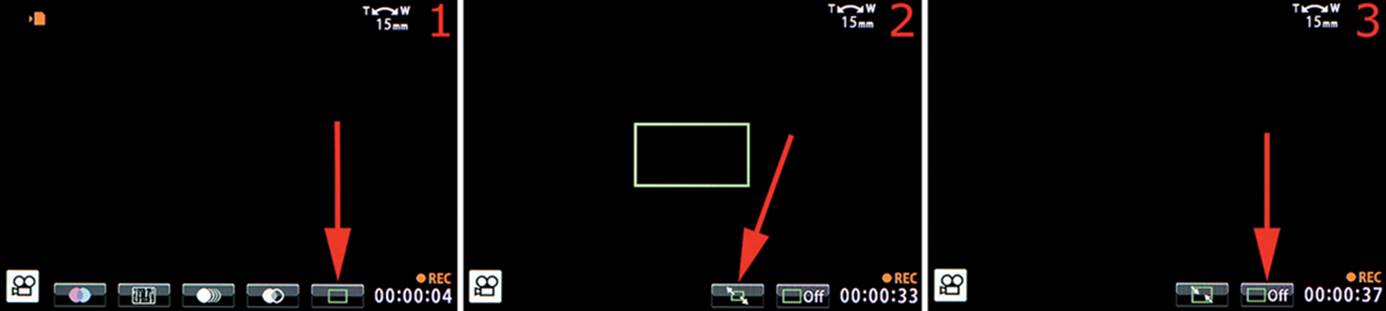
Figure 2.5W: Using the Movie Tele-converter effects mode
Figure 2.5W, image 2, shows the Movie Tele-converter secondary screen. You can see two button symbols on the bottom-right of the screen. The symbol at the red arrow in image 2 is the zoom symbol. The symbol at the red arrow in image 3 is the Off symbol that exits the mode. If you touch the zoom icon (image 2), the camera will instantly jump to a zoomed-in view of the subject. The zoom motion is sudden, not gradual. That adds instant drama to the video, but it can become aggravating if it is overused.
Since this digital zoom does not involve turning the lens or moving the camera, it is, in effect, a crop of the video frames. You would normally expect that to result in seriously reduced image quality, but it looks like the camera subsamples a small area of the image sensor and does not actually digitally zoom in or crop the video. The image quality remains good, without aliasing (stair steps) or losing sharpness. Press the Off symbol to close the function.
Note: These five effects modes are mutually exclusive, which means only one effect can be active at a time. If you touch a different icon than the one that is currently active, the camera ignores you. You have to close one and open another!
Snapping a Picture during a Video Recording
You can press the Shutter button all the way down during a video recording to take a picture. As soon as you snap the picture, the camera stops recording the video, takes the picture, and immediately resumes recording. Three files will be written to the memory card: the original video up to the point of the snapshot, the still picture, and the video recording that resumes after the still image is taken.
To finish this chapter we will examine three multifunction screens that are not touch sensitive. However, they need to be explained because they are activated by primary controls on the camera.
[Sequential Shooting]/[Self-Timer]/HDR Button Control Screen
The Sequential shooting/Self-timer/HDR button allows you to access three systems at any moment: Sequential shooting mode, Self-timer mode, and high dynamic range (HDR) mode. Let’s see how it works.
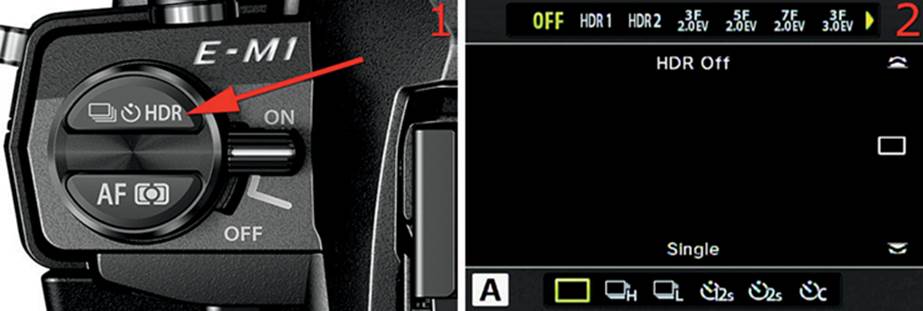
Figure 2.6: Accessing Sequential shooting, Self-timer, and HDR modes
Figure 2.6, image 1, shows the [Sequential shooting]/[Self-timer]/HDR button on the top left of the camera. Press this button to open a secondary adjustment screen.
Figure 2.6, image 2, shows the multipurpose screen with settings at the top and bottom. Turn the Front Dial to control the HDR system. Turn the Rear Dial to control the [Sequential shooting] and [Self-timer] modes.
After you have selected the settings you want to use, press the OK button.
Deeper Information: The Sequential shooting and Self-timer modes were discussed earlier in this chapter under both the Super Control Panel (page 19) and Live Control (page 52) main sections. Refer to those sections to review how to use the Sequential shooting and Self-timer modes.
The HDR system is covered extensively in the Shooting Menu 2 chapter, under the HDR subheading, on page 211.
AF/[Metering] Mode Button Control Screen
The AF/[Metering] mode button allows you to quickly access the autofocus (AF) and Metering modes. Let’s examine how to access them.
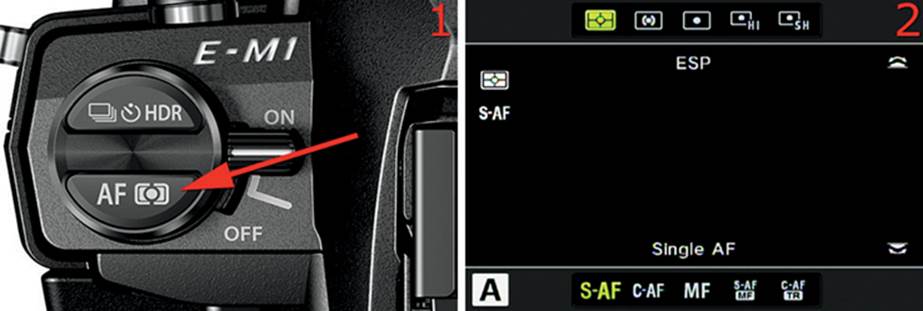
Figure 2.7: Accessing the Metering and AF modes
Figure 2.7, image 1, shows the AF/[Metering] mode button. Press this button to open the secondary screen.
Figure 2.7, image 2, shows the secondary screen with the Metering modes along the top and the AF modes along the bottom. Turn the Front Dial to select the Metering modes. Turn the Rear Dial to select the AF modes.
After you have made your selections, press the OK button.
Deeper Information: The Metering modes are covered in detail under the Super Control Panel section (page 46) and Live Control section (page 68) of this chapter. They are also covered in the Custom Menu chapter, under the Metering subheading, on page 370.
The AF modes are covered in detail under the Super Control Panel section (page 39) and Live Control section (page 70) of this chapter. They are also covered in the Custom Menu chapter, under the AF Mode subheading, on page 274.
Lever Control Screen
The Lever on the back of the camera allows you to quickly access the ISO sensitivity and White Balance (WB) systems. Let’s examine how to access them.
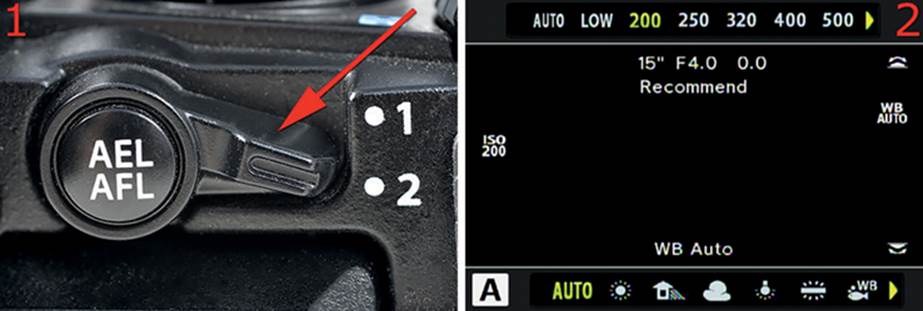
Figure 2.8: Accessing the ISO sensitivity and WB systems
You will normally leave the Lever on the camera set to the first (1) position. However, while you are taking pictures, you can quickly access the ISO sensitivity and WB systems. Flip the Lever to the second (2) position (figure 2.8, image 1) and turn the Front Dial or Rear Dial to open the secondary screen (figure 2.8, image 2).
When the secondary screen is open, turn the Front Dial to scroll through the ISO sensitivity values, and stop on the ISO value you want to use. Turn the Rear Dial to scroll through the WB selections, and stop on the one you want to use.
After you have made your selections, press the OK button.
Deeper Information: The ISO sensitivity modes are covered in detail under the Super Control Panel section (page 20) and Live Control section (page 71) of this chapter.
The WB modes are covered in detail under the Super Control Panel section (page 22) and Live Control section (page 57) of this chapter. They are also covered in the Custom Menu chapter, under the WB subheading, on page 396.
Author’s Conclusions
This chapter has introduced the many control screens you will see while you are using the Super Control Panel and the Live Control, Live Guides, Live View, and EVF screens. Many of these screens are discussed in greater detail throughout this book as they are applied to the hundreds of choices in the camera menus.
The next several chapters will be devoted to a deep examination of the E-M1 menu system, including Shooting Menu 1 and 2, the Playback Menu, Custom Menu, and Setup Menu.
The number of settings in the E-M1 makes it one of the most configurable, and complex, cameras available today. That complexity is manageable when you have a good guide, such as this book. Keep your camera in-hand as you work through this book and continue your journey to mastery of the Olympus OM-D E-M1 professional, mirrorless, interchangeable-lens camera. Now, let’s look at those deep menus!
Settings Recommendation: The camera has a help system that is active when you use the camera’s text-based menus. Although the help system is useful, it can sometimes get in the way of the menu selections. You can toggle the help system off and on by pressing the Info button when a menu is active. I use the help system when I have forgotten what a symbol means. When I am finished, I turn the help system off again.
All materials on the site are licensed Creative Commons Attribution-Sharealike 3.0 Unported CC BY-SA 3.0 & GNU Free Documentation License (GFDL)
If you are the copyright holder of any material contained on our site and intend to remove it, please contact our site administrator for approval.
© 2016-2026 All site design rights belong to S.Y.A.