Mastering the Olympus OM-D E-M1 (2015)
Chapter 3. Shooting Menu 1: Preliminary and Basic Shooting Options
Image © Darrell Young
Shooting Menu 1 is the first in a series of camera configuration menus that we will consider in great detail. The E-M1 is one of the most configurable cameras I’ve ever owned. With that powerful flexibility comes a great deal of complexity. Unfortunately, the user’s manual provided with the camera is woefully inadequate at helping you understand how to work with all these menus and their functions. Only through much experimentation and discussion with Olympus’s upper-level technical support have I been able to ferret out how all these functions work.
Therefore, this book is filled with hands-on knowledge derived from hundreds of hours of experimentation. You could probably do the same as me and struggle through the process of figuring it all out, but now you don’t have to. I’ve done it for you. At the very least, I hope that Mastering the Olympus OM-D E-M1 helps you better understand and enjoy your new camera.
Now, let’s get started on all these functions. It is best if you have your camera in hand and work through the functions one by one. Even if you don’t think you need a certain function right now, why not take time to at least examine each menu item? Then, if your needs change, you will remember that your camera can do a certain thing and you can research how to configure it for that need.
The following is a look at the menu we will consider in this chapter (figure 3.1). Let’s jump right in and start examining this camera’s deepest parts.
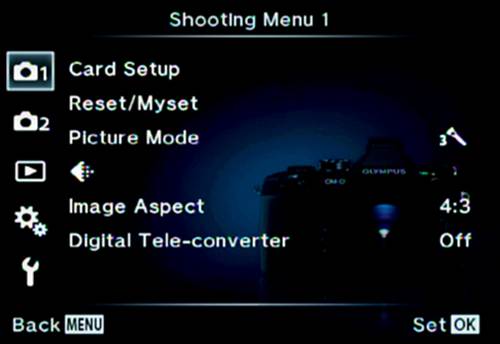
Figure 3.1: Shooting Menu 1
On Shooting Menu 1 you will find the following functions:
• Card Setup: This function allows you to delete all images or only nonprotected images, or you can format the memory card and delete everything.
• Reset/Myset: This function lets you save up to four camera configurations. In other words, you can set the many functions of the camera to work a certain way and then save those settings. Then you can configure the camera to work in a completely different way and save that configuration too. You can do this up to four times, with each configuration being a completely separate setup. Then you can choose one of the four configurations from the Myset menu. You can reset a configuration any time.
• Picture Mode: The camera has 23 Basic, Creative, and Art Picture Modes that you can use to change how your images look. Just as with different film types, you can create pictures to reflect your mood or suit your clients’ needs. From a standard look to a wildly outrageous one, you can create images that few other cameras can. In fact, you would normally have to use an expensive computer program like Adobe Photoshop to create some of the special effects that are built in to your camera.
• [Record Mode]: This function allows you to choose an image format for still photography, such as JPEG or RAW (ORF). For video, you can choose Full HD (1080), HD (720), or SD (480).
• Image Aspect: This function allows you to choose from various horizontal-to-vertical ratios. You can make pictures that vary in width and height, or they can be square.
• Digital Tele-converter: This simple function allows you to exceed the focal length of your lens by two times (2x), with a resulting loss in image quality. This is not a true zoom function. The camera merely enlarges the image in-camera and then crops a new image from the middle of the enlargement. Even though the subject appears to be closer when you see it on the camera monitor, it is an artificial enlargement that significantly reduces image quality.
• Keystone Comp.: This function allows the camera to digitally imitate the tilt and swing functions of a view camera or a tilt-shift lens. You can pull the edges of the image toward or away from you to correct distortion, such as the leaning-backwards effect you see when you use a wide-angle lens and point it up to photograph a tall building.
Let’s examine each of these menu items in detail and determine how you may best use them. We will start at the top of Shooting Menu 1 and work our way down the menu.
Card Setup
Card Setup allows you to prepare a memory card for use in your camera. There are two parts to Card Setup: All Erase and Format. What is the difference?
All Erase
All Erase allows you to remove all images that have not been previously lock protected on the memory card. In other words, a protected image is one that you mark so the All Erase function will not remove it.
When an image is protected, the camera will ignore it when you execute the All Erase function, even though it deletes all the other images on the memory card. This is an easy way to get rid of images you do not want to keep. (See page 93 for more information about protecting an image.)
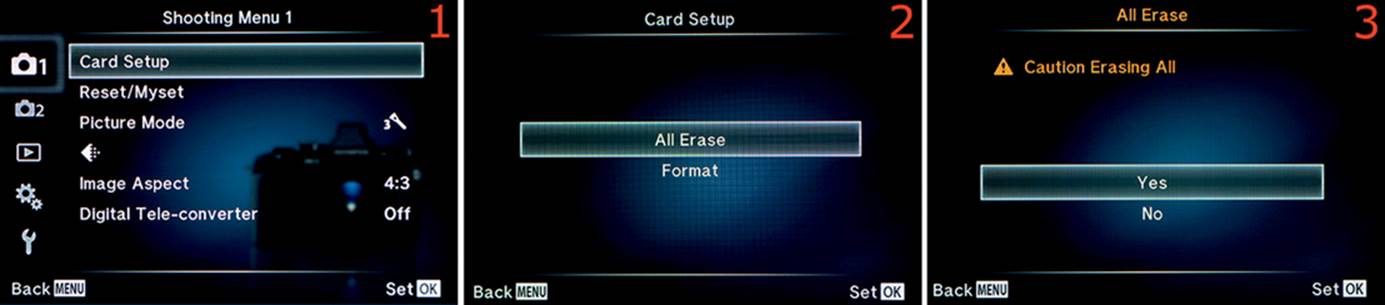
Figure 3.2A: Executing the All Erase function
Here are the steps to execute the All Erase function:
1. Select Card Setup from Shooting Menu 1 and scroll to the right (figure 3.2A, image 1).
2. Choose All Erase from the Card Setup menu and scroll to the right (figure 3.2A, image 2).
3. Select Yes from the All Erase menu. The camera will warn you, Caution Erasing All (figure 3.2A, image 3).
4. Press the OK button to erase all nonprotected images. Protected images will not be removed.
Format
The Format function deletes all images from the memory card, including protected images. Use this function when you get a new memory card or when you use a memory card that has been formatted in a different camera or in a computer. Formatting a card in the camera tends to cut down on long-term memory card problems.
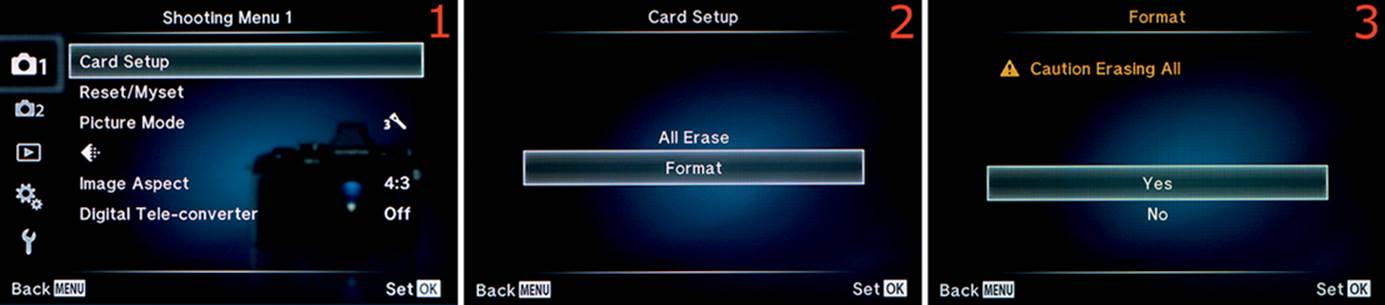
Figure 3.2B: Executing the Format function
Here are the steps to execute the Format function:
1. Select Card Setup from Shooting Menu 1 and scroll to the right (figure 3.2B, image 1).
2. Choose Format from the Card Setup menu and scroll to the right (figure 3.2B, image 2).
3. Select Yes from the Format menu. The camera will warn you, Caution Erasing All (figure 3.2B, image 3).
4. Press the OK button to erase all nonprotected images. Protected images will not be removed.
Note: Formatting a memory card doesn’t actually remove images from the card. Instead, it removes their entries from the memory card’s file allocation table (FAT) so the images can no longer be seen or found by the camera. However, you can use card recovery software to rescue the images if you do not write any new pictures to the card after you format it. That is a good thing to remember in case you accidentally format a card that contains images you wanted to keep.
Settings Recommendation: I always format a new memory card with the E-M1’s Format function before I use it. There is no way to know if the current format on the card is in good shape. Also, many other camera brands create their own folder structure when a card is formatted. It is wise to remove all traces of any other brand’s folder structure by formatting a used card in your E-M1. Why take any chances with your valuable images?
I don’t use the image protect system much, so the All Erase function is not that useful to me. However, you may want to protect your best images as you make them, and at the end of the day you can use All Erase to remove nonprotected images. Just be sure you haven’t missed any images you wanted to keep. This approach seems a bit dangerous to me!
Reset/Myset
If you want to use your camera for different styles of shooting, you can completely change how the camera functions for each style by saving a different camera configuration in each of the Myset storage locations. Then you can recall the configuration by selecting the corresponding location. The Myset storage locations are numbered from Myset1 through Myset4.
In effect, you have five memory locations for camera settings, the one currently in use (camera’s active memory) and the four saved Myset locations. When you recall one of the Myset locations, it replaces the settings configuration currently in use in the camera’s active memory, without changing the four Myset locations in any way. When you save a camera configuration to one of the four Myset locations, you are writing a copy of the settings in use by the camera’s active memory into one of the Myset locations. This allows you to recall favorite configurations at any time.
You can also reset the Shooting Menu (1 and 2) functions, or nearly all the camera’s settings, back to the factory defaults. First, let’s consider how to save camera configurations, then we will examine how to reset them.
Saving or Overwriting a Camera Configuration
Configure the camera so it meets your needs for a certain shooting style. Since you have four storage locations, you can repeat the following steps to save separate configurations.
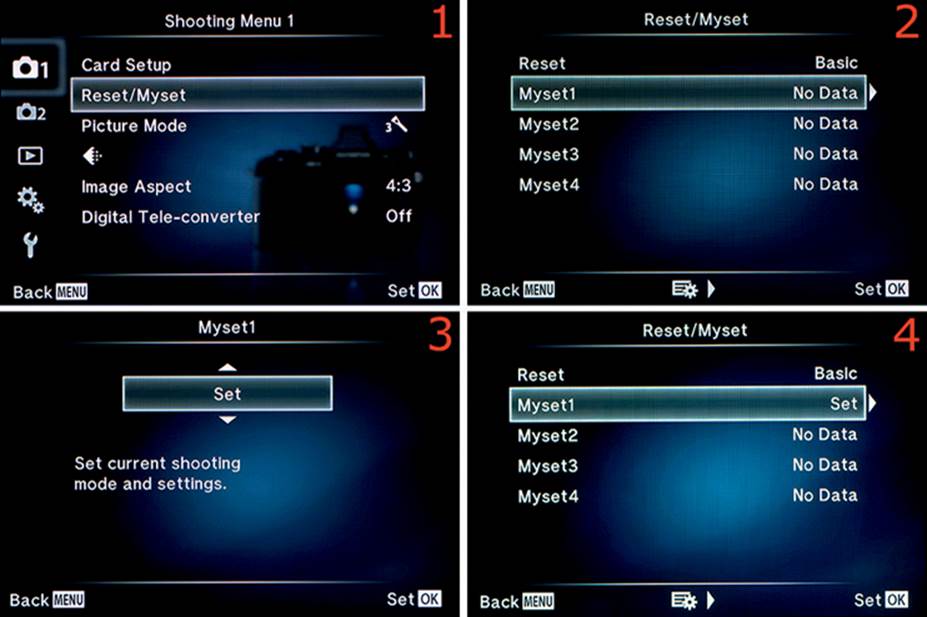
Figure 3.2C: Saving the current camera configuration to one of the Myset locations (Myset1 through Myset4)
Use these steps to save the current camera configuration to one of the Myset storage locations (Myset1 through Myset4):
1. Choose Reset/Myset from Shooting Menu 1 and scroll to the right (figure 3.2C, image 1).
2. You can choose one of four storage locations to save a configuration (Myset1 through Myset4). Select one of the Myset locations in which to save the current configuration. Choose one with NoData displayed if you want to save a new configuration, or choose one with Set displayed if you want to overwrite an existing configuration (figure 3.2C, image 2). If Set is not displayed after any of the Myset locations, there are no previously saved camera configurations. Once you have chosen the Myset location you want to use, scroll to the right.
3. Choose Set from the up/down menu to prepare for saving the configuration to that Myset location (figure 3.2C, image 3).
4. Press the OK button to save the current camera configuration. After the settings are saved, the camera will switch back to the Reset/Myset menu with your chosen Myset location highlighted, and Set will be displayed instead of NoData (figure 3.2C, image 4). You have now saved your camera settings, and you can recall this configuration any time by following the steps in the next section.
Recalling a Saved Camera Configuration
This function allows you to recall one of the camera configurations stored in Myset 1 through Myset 4. This action replaces the setting configuration you are currently using in the camera’s active memory with the setting configuration from the Myset storage location you choose to recall. Use the following steps to load a previously saved configuration:
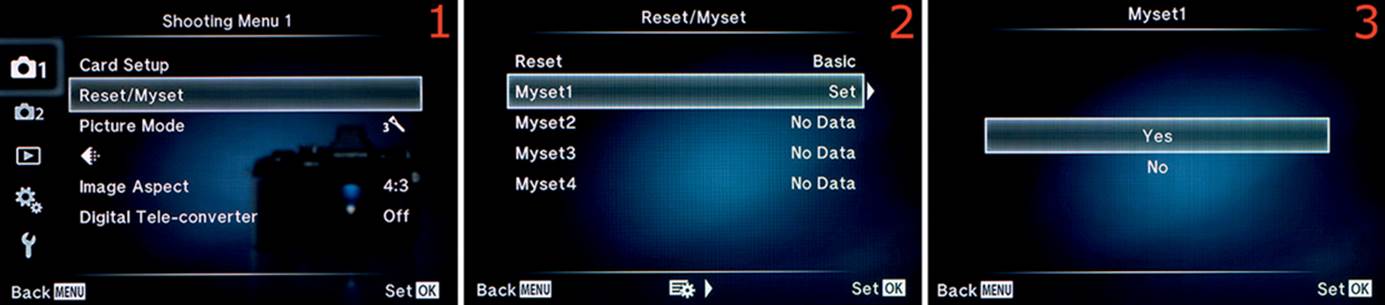
Figure 3.2D: Recalling a previously saved camera configuration
1. Choose Reset/Myset from Shooting Menu 1 and scroll to the right (figure 3.2D, image 1).
2. Highlight one of the previously saved Myset locations, indicated by Set instead of NoData, and press the OK button—do not scroll to the right (figure 3.2D, image 2). The Yes/No Myset menu will appear when you press the OK button.
3. Select Yes from the Myset menu (figure 3.2D, image 3), then press the OK button to switch the current configuration to the one saved in the Myset location you chose. Select No to cancel the operation.
Resetting One of the Myset Locations
If you want to erase a Myset location that has a camera configuration stored in it (displays Set) and return it to an empty state (displays NoData), use the following steps:
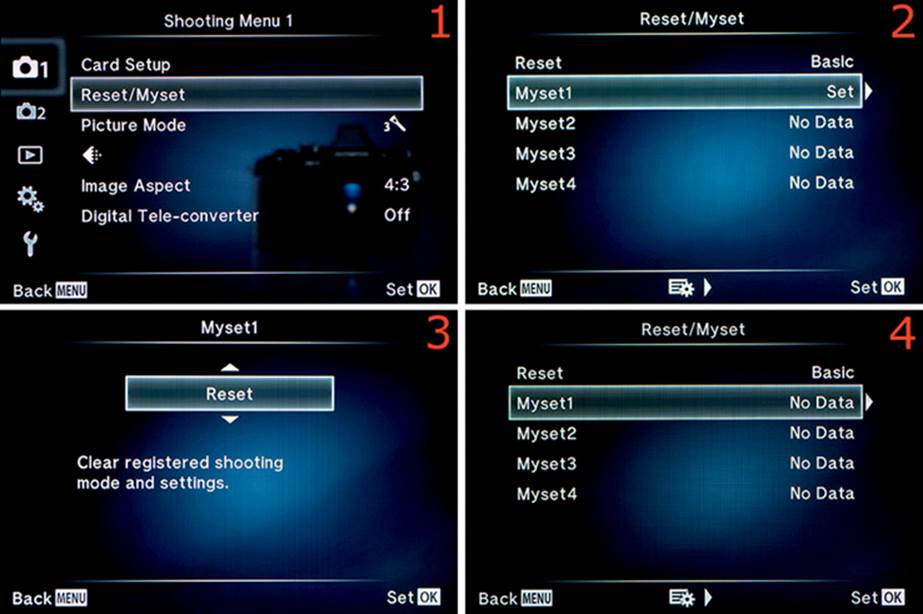
Figure 3.2E: Erasing a saved configuration from a Myset location
1. Select Reset/Myset from Shooting Menu 1 and scroll to the right (figure 3.2E, image 1).
2. Highlight the Myset location that you want to erase (figure 3.2E, image 2)—this will change the Set indicator back to NoData—and scroll to the right. If you reset a Myset location that is displaying NoData instead of Set, nothing will happen.
3. Choose Reset from the up/down menu to prepare for deleting the saved configuration from the Myset location you chose (figure 3.2E, image 3).
4. Press the OK button to delete the camera configuration. Afterward, the camera will switch back to the Reset/Myset menu with your chosen Myset location highlighted and with NoData displayed instead of Set (figure 3.2E, image 4). This Myset location is now empty and ready for a new configuration.
Resetting the Camera to Factory Default
There are two ways to return the camera to the default state when it left the factory. One approach resets only what Olympus considers to be basic items (Reset/Myset: Basic), and the other approach (Reset/Myset: Full) returns almost all settings back to the factory defaults. Basic resets general camera functions that are not controlled from the exterior (e.g., ISO, Metering, Picture Mode, Image Aspect), and Full resets even your carefully configured buttons, dials, and switches. See the note at the end of this section to see which functions are affected by these two reset methods.
If you want to start fresh, these two functions will be valuable to you. First, you must select either Basic or Full, then you can reset the functions.
Let’s examine how to reset the camera settings.
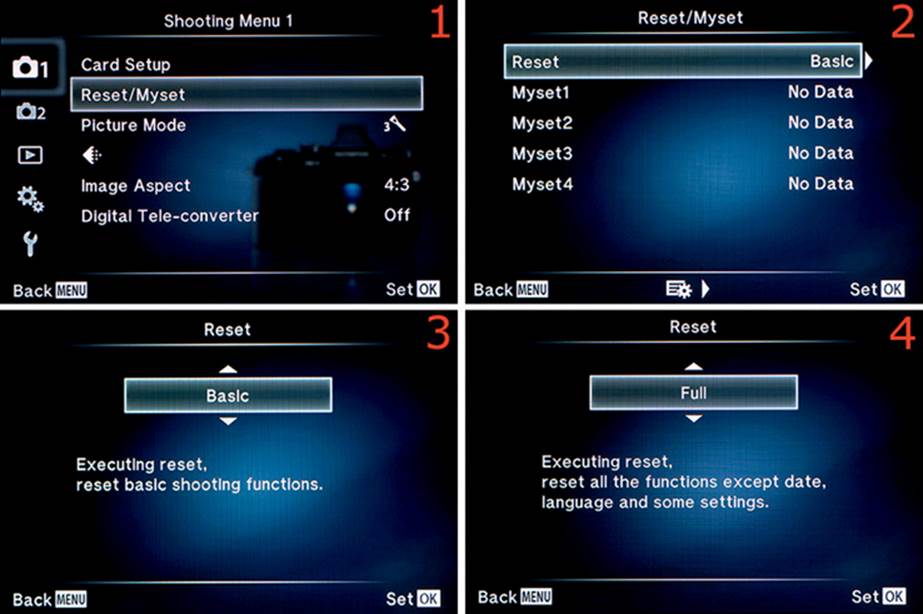
Figure 3.2F: Resetting the camera to factory default, step 1
In step 1 you will choose either a Basic reset or a Full reset. Choosing one of them does not execute a reset. You will need to use the steps accompanying figure 3.2G to do the actual reset. As previously mentioned, Basic resets only certain general functions, and Full resets virtually all camera functions (except for things like Date, Time, and Language), so choose carefully. Use the following steps to select which reset method you will use:
1. Select Reset/Myset from Shooting Menu 1 and scroll to the right (figure 3.2F, image 1).
2. Choose Reset from the Reset/Myset menu and scroll to the right (figure 3.2F, image 2).
3. Figure 3.2F, images 3 and 4, show both menu items from the same menu. Choose Basic or Full and press the OK button.
The camera will switch back to the Reset/Myset menu with your selection highlighted. Figure 3.2G shows the steps to execute the reset command. In this example, I chose Basic.
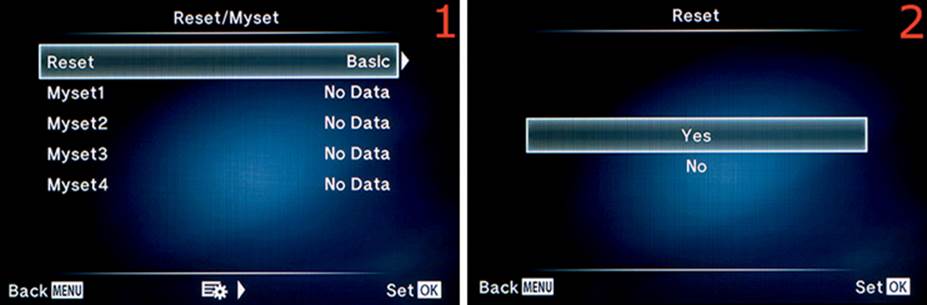
Figure 3.2G: Resetting the camera to the factory defaults, step 2
4. With Reset and your chosen reset method highlighted (Basic or Full), press the OK button (figure 3.2G, image 1).
5. The Reset menu will appear with Yes or No available (figure 3.2G, image 2).
6. Choose Yes if you want to execute the reset, and choose No if you want to cancel the operation. Press the OK button and the camera will immediately reset the functions to the factory defaults.
Note: There is an extensive Menu Directory list in the camera user’s manual on pages 142–147. This list shows which camera settings can be saved or reset with the Reset/Myset > Myset1 [through Myset4] > Set [or Reset] function. It also shows which settings can be reset to the factory defaults when you use the Reset/Myset > Reset > Basic [or Full] function. The Menu Directory is several pages long and quite dense because it lists virtually every function in the camera. When you look a function up in the list, notice if there is a check mark under the column labeled *1. If there is a check mark, that function can be saved in a Myset location; no check mark means it cannot be saved.
Picture Mode
Picture Mode allows you to choose one of 23 adjustable image effects for each shooting session. If you have ever used film, you know that there are distinct looks to each film type. No two films produce color that looks the same.
Picture Mode gives you the ability to impart a specific look to your images as if you were using different types of film or simply wanted to create special effects. You can use the Picture Modes as they are provided from the factory, or you can fine-tune Contrast, Sharpness, Saturation, and Gradation.
The Picture Mode settings you choose are applied permanently to JPEG images as soon as you press the Shutter button. Modifying and resaving a JPEG image causes gradual damage because of data losses that occur during compression, so be sure to select the best Picture Mode setting when you shoot.
When you shoot in RAW (ORF) mode, Picture Mode settings are not permanently applied to the image. Instead, the Picture Mode information is saved in the metadata of the image. The camera and your computer will display each RAW image with the Picture Mode settings temporarily applied; however, unlike with JPEG images, settings can be changed after the fact with RAW images with no damage. See the [Record Mode] section later in this chapter to find out how to choose an image quality mode.
There are five basic Picture Modes that you will use frequently, and there are 18 additional Creative and Art Picture Modes. This abundance of special effect modes gives you freedom to express yourself creatively with your pictures, from stoic to wildly overblown.
Figures 3.3A-1 through 3.3A-4 show the 23 Picture Modes. They are broken down into four groups to make them easier to see in this book. Each mode is set to the default level in the figure, which you can adjust. We will consider how to adjust the modes after we examine them.
Note: This section is a superset of the Art selection on the camera’s Mode dial. We discussed the Mode Dial Art settings in the chapter titled Screen Displays for Camera Control on page 108. The Mode Dial Art selection offers only 14 of the 23 Basic, Creative, and Art Picture Modes discussed in this section, so this is the master reference for both. When you adjust the Art Picture Modes, some of the settings in the Picture Mode menus affect how the Art Picture Modes work when you select them from the Mode Dial, and vice versa. Therefore, you will need to familiarize yourself with using Art Picture Modes from both the Art selection on the Mode Dial and the Art Picture Modes that are available in the Picture Mode menu screens.
Now, let’s discuss each of the available modes and how they affect your images.
In a printed book it is hard to reproduce the sometimes subtle shade variations in the various Picture Modes; therefore, you should take a picture in each mode and examine how each one looks on your computer or tablet. As we consider each of the Picture Modes, you will learn a lot more about them if you can see a sample on your tablet or monitor.
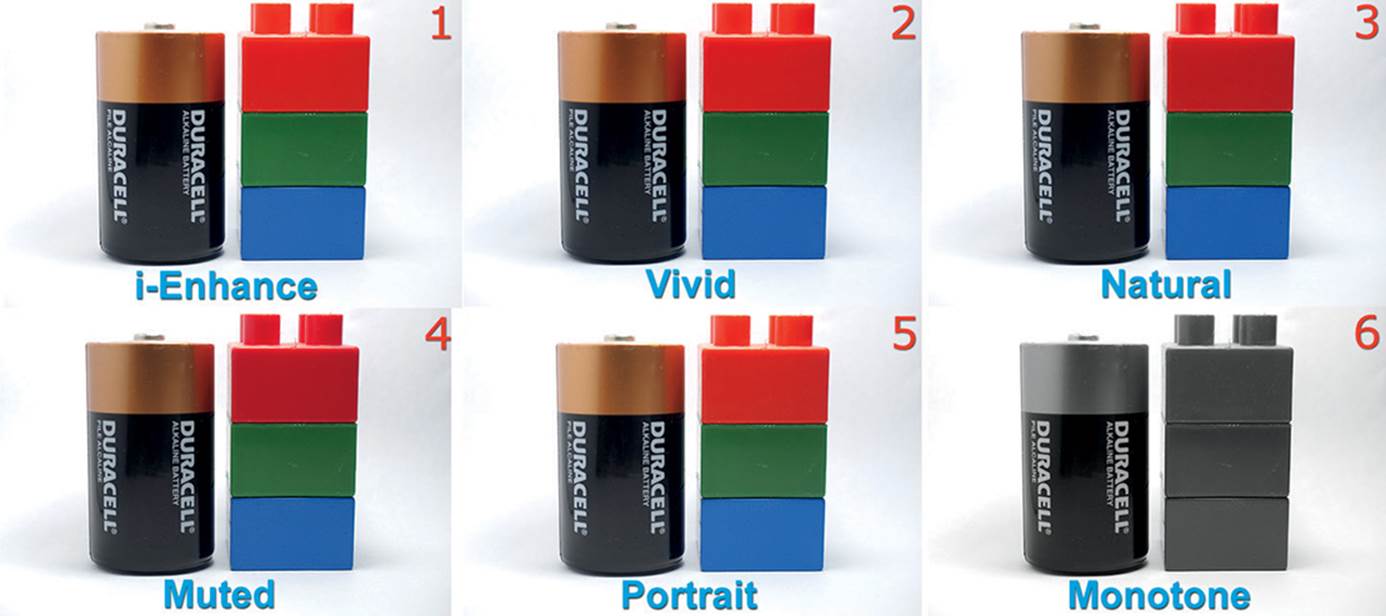
Figure 3.3A1
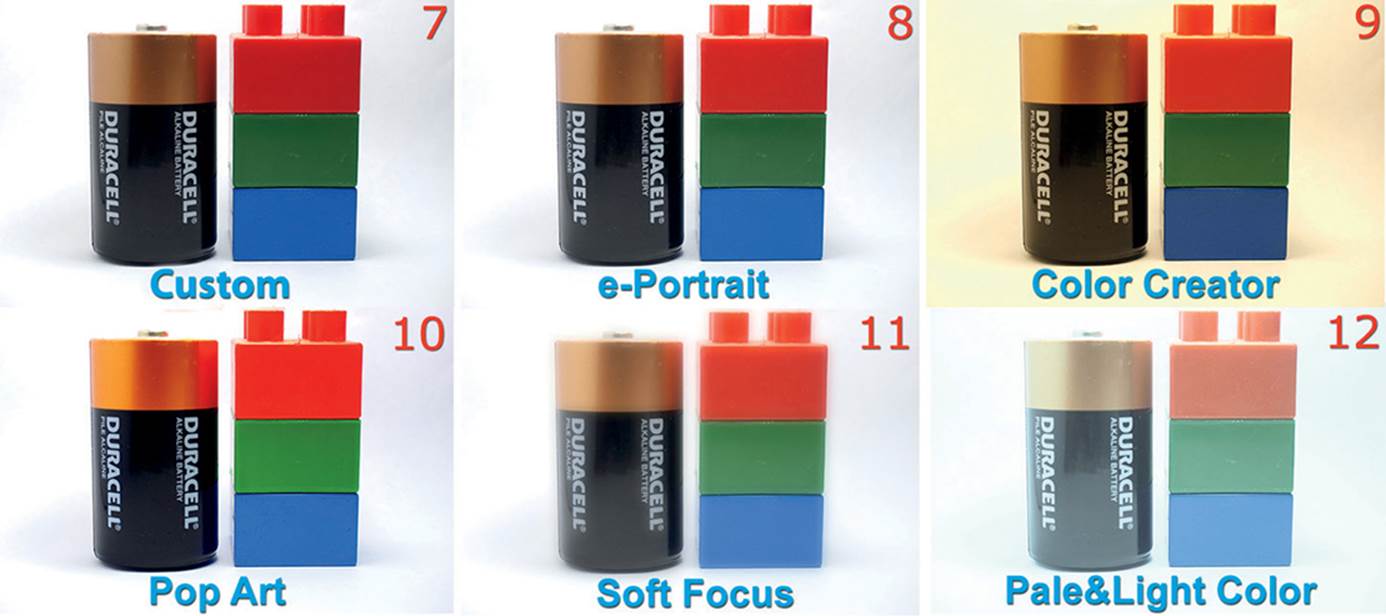
Figure 3.3A2
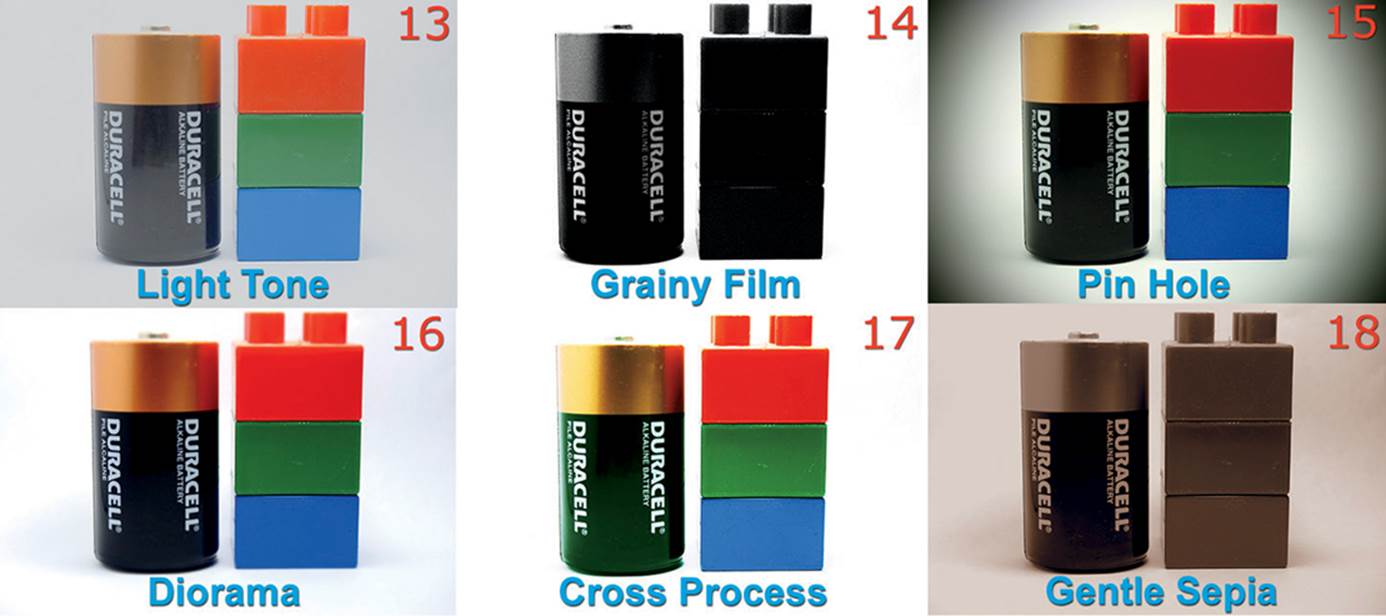
Figure 3.3A3
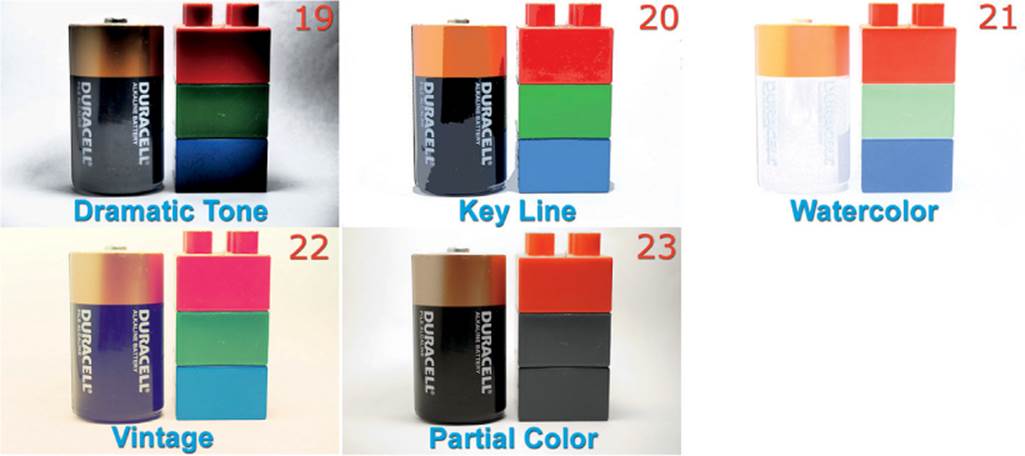
Figure 3.3A4
Basic Picture Modes
The five basic Picture Modes will be used most often by experienced photographers:
• i-Enhance: This mode gives your images “more impressive-looking results suited to the scene,” according to Olympus. The effect looks very similar to the Vivid Picture Mode, with a little less contrast. It will provide the snap of the saturated colors that Vivid Mode provides, but it will have a little more dynamic range due to slightly lighter blacks. From the description provided by Olympus, it seems the camera software may provide a little extra smarts so it can adjust to the scene in front of your lens.
• Vivid: This mode adds saturation and contrast to your images and creates pictures with deep color, dark blacks, and white whites. Vivid Mode produces images similar to Velvia transparency film by Fuji, which is a favorite of many landscape photographers. For images with a lot of color, Vivid Mode will make your pictures pop.
• Natural: This mode gives a more balanced look to your images, with color and contrast that is not too intense or muted. This is an excellent mode for general photography, and many photographers will use it much of the time. It is comparable to Provia transparency film from Fuji. It has enough saturation and contrast to create a beautiful image without going overboard.
• Muted: This Picture Mode is best for an image that will be post-processed later in a computer. It is a balanced setting that applies minimal camera processing so you can do more with the image during post-processing. The Muted Picture Mode has less saturation and weaker shadows, so the image will be less contrasty—that is, there will be more shadow and highlight detail. The look is comparable to color negative film, such as Fuji Superia or Kodak Gold.
• Portrait: This mode gives a more natural texture and coloration to skin. It is similar to the Muted Picture Mode, with emphasis on making sure that skin tones are rendered in a pleasing way. Skin tones get the most emphasis with Portrait Picture Mode, so it may be best for individuals and groups of people. It is similar to Fuji NPS or Kodak Portra color negative films.
The next 16 modes may be used by people who want to add special effects inside the camera, without using a computer. They are variations on the five basic Picture Modes, with strong changes in the Contrast, Sharpness, Saturation, and Gradation adjustments. These 16 special effect modes can save time and help you have fun with your camera.
Settings Recommendation: For JPEG shooting I normally use one of the basic Picture Modes. I usually use the Natural setting. Remember that a Picture Mode is applied to a JPEG image immediately and irreversibly, but you can change the Picture Mode of a RAW image after you shoot it, so it doesn’t really matter which mode you select. Your RAW conversion software will try to display the image the way you took it, but you can change it without much trouble.
We will look at the 4 Creative Modes and the 14 Art Picture Modes next. Many advanced photographers do not use Art Picture Modes because they would rather create their own art in Photoshop, Lightroom, or other imaging software. However, some of the Art Picture Modes included with the E-M1 are great fun, even for jaded professionals. If you would normally not consider using scene or effects modes with other camera brands, take a few minutes to play around with the E-M1’s Art Picture Modes. You might find something that you will use often, like I did!
Creative Modes
The Creative Modes allow you to do specialized things with your images, such as black-and-white shooting, skin tone smoothing, specialized color manipulation, and even the creation of your own Custom Picture Mode. Here are the four Creative Modes:
• Monotone: This mode allows black-and-white lovers to shoot in that style. Monotone Mode provides images with dark shadows and pleasing whites and grays. In fact, the monochrome images straight from the camera are perfectly usable and require little adjustment, unlike black-and-white images from some other cameras. You can use the image as a base for contrast and brightness adjustments, and few other post-processing adjustments are needed. The film that is closest to Monotone Mode may be Kodak Plus-X, without all the grain.
• Custom: This mode allows you to choose one of the five basic Picture Modes as a base, then you can adjust the mode’s Contrast, Sharpness, Saturation, and Gradation until it is just right for your needs. The camera will remember your adjustments and use them when you select this mode. We will examine how to adjust and save a Custom Mode in an upcoming subsection.
• e-Portrait: This mode is designed for when you are shooting a portrait session. According to Olympus, the e-Portrait Mode produces “smooth skin textures,” whereas the basic Portrait Mode “produces beautiful skin tones.” The camera does special in-camera post-processing (skin smoothing) on portraits made with e-Portrait Mode, as described in the upcoming subsection called Using e-Portrait Picture Mode. Comparing regular Portrait Mode pictures with e-Portrait Mode pictures does reveal a difference. The e-Portrait Mode gives a distinctly smoother appearance to the skin, which may be a blessing for older portrait subjects. Which do you like best: “beautiful skin tones” or “smooth skin textures”? Try both Portrait and e-Portrait Modes and see which you prefer.
• Color Creator: This mode lets you make on-the-fly adjustments to hue and saturation. If the image in your viewfinder or in the monitor live view does not show the hue or saturation you would like to see, you can make adjustments by using a color wheel. If the image seems a little cool, you can simply dial in some red to warm it up (either a little or a lot); if the color seems too muted, you can change the saturation from almost nothing to extremely saturated. We’ll discuss how to do this in an upcoming subsection.
Art Picture Modes
The Art Picture Modes give you great freedom in creating nonstandard photography. You can create special effects, such as pastel or wildly saturated colors, extreme grain, high- and low-key images, and specialized blurring.
Don’t completely discount these Art Picture Modes if you make a living with photography. There are some interesting effects that may be useful even for imaging professionals. For enthusiast photographers, the Art Picture Modes can provide a refreshing break from reality.
Here’s a list of the 14 Art Picture Modes:
• Pop Art: This mode is like the Vivid Mode on steroids. All colors are saturated to the max, and contrast is raised to an even higher level than in Vivid Mode. This mode is best when you are in a playful mood and want to create an exciting image. The intense colors will not be close to reality, but who needs reality when you are having fun?
• Soft Focus: This mode provides a high-key and blurred effect. The contrast is very low, and there is an overall softness like fine gauze. The subject appears sharp, but it is covered with blur. The effect looks a bit like when you see yourself in a foggy mirror. It has a bright glowing effect that is sharp and blurry at the same time.
• Pale&Light Color: This mode washes out all the colors and lowers the contrast so blacks become grays. You might think of this as being opposite of Pop Art or Vivid Modes. It gives an image a high-key, cooler, and pastel look.
• Light Tone: This mode is similar to the Pale&Light Color Mode in that it lowers contrast and desaturates colors. However, instead of having a somewhat cool (bluish), high-key look, the colors look like they are overlaid with gray film and have a darker, low-key look. Light Tone makes the image look like the effect you see when an overdone high dynamic range (HDR) image has too few shadows.
• Grainy Film: This mode provides an extremely high-contrast black-and-white effect. All colors become extra-dark shades of gray, and most highlight details become pure white. This mode would be great for shooting a bare tree in a snow-covered field on a misty, overcast day. This mode creates stark images and is best for low-contrast scenes because it will obliterate any detail in strongly colored or bright scenes by adding extreme contrast to the picture.
• Pin Hole: This mode has a relatively saturated look like Vivid Mode, but it adds a heavy vignette effect to the corners of the image, as if the light rapidly diminishes. It’s as though you were using a pinhole camera to make the image, except the picture is nice and sharp. Primarily, Pin Hole provides a vignette effect.
• Diorama: A diorama is a three-dimensional miniature in which small artificial objects are arranged and photographed to resemble real life. You can use Diorama Mode to create a reverse diorama, where real-life places like city scenes can be made to look artificial. This mode creates a band of sharpness either in a horizontal or vertical direction (it’s adjustable), and everything outside of the band is blurred, making the picture seem like it has a very limited depth of field. We will examine how to adjust this effect in a later subsection.
• Cross Process: This mode imitates an old method of developing film in chemicals that were designed for a different type of film. Often there are odd colors and higher than normal contrast. Images shot with Cross Process have a green cast and high contrast.
• Gentle Sepia: This mode converts all colors to monochrome and adds a warm, brownish effect that resembles less-saturated sepia toning. It could be used with old-fashioned clothing to imitate antique portrait pictures, or you could shoot a nature scene with this mode and make it look like a bygone era.
• Dramatic Tone: This mode is unusual. It creates a low-key tone where normal highlights are darkened and dark tones are lightened. Bright colors are somewhat muted, and detail is maintained, even in dark areas. There is strong contrast without being overly bright. The look is dramatic and unlike anything I have seen from other camera brands.
• Key Line: This mode converts the edges of the subject and the borders of contrast changes (color gradations) into line drawings. It maintains a lot of detail, unlike the cartoonish look from some other cameras. The color is mostly maintained, although it is more pastel and muted, and blacks become quite gray.
• Watercolor: This mode gives colors and edges a watercolor effect that tends to blow out highlights and dark areas. Most detail is lost in a normal exposure, so experiment with underexposure when you use this mode. Dark tones and extreme highlights seem to turn stark white and disappear completely from the image, and other colors become pale and washed out.
• Vintage: This mode provides three filter types that create a vintage look with varying levels of contrast and tinting. The colors are what you would expect to see from an old print that’s been hanging on a wall or in an album for a long time. The various filters allow for creativity within the range of vintage looks.
• Partial Color: This mode gives you a color wheel from which you can choose a particular color or range. Once you’ve chosen a color, all other colors are rendered in monochrome shades. In addition to the color wheel, you can choose from three filter effects within the partial color scheme. These affect the contrast of the image and mild tinting of the monochrome shades.
Choosing, Fine-Tuning, and Using Picture Modes
Now that we have examined each of the Picture Modes, let’s see how to select one and fine-tune it. Plus we’ll see how to use the modes that allow special configuration choices, such as Monotone, Custom, and Color Creator.
Selecting a Picture Mode
Selecting a Picture Mode is simple; you use two screens to select one. Let’s see how.
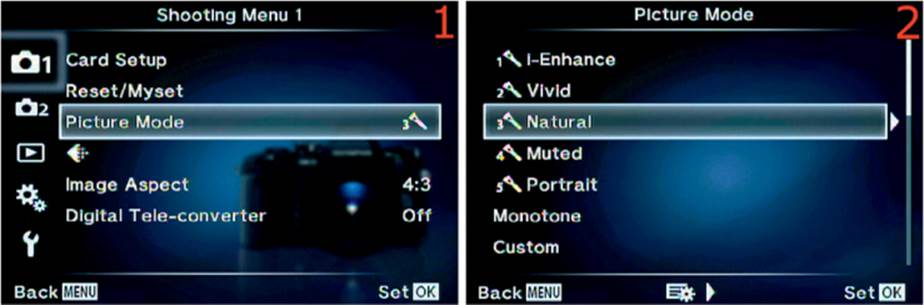
Figure 3.3B: Selecting a Picture Mode
Use these steps to select a Picture Mode:
1. Choose Picture Mode from Shooting Menu 1 and scroll to the right (figure 3.3B, image 1).
2. Select the Picture Mode you want to use and press the OK button. Natural is selected in figure 3.3B, image 2. The camera will switch back to the main Shooting Menu 1 screen, and you can take your pictures. As described in the next subsection, you can fine-tune the control if you want to change one of its parameters.
Fine-Tuning a Basic Picture Mode
Fine-tuning allows you to change the internal values of a Picture Mode. You can adjust Contrast, Sharpness, Saturation, and Gradation.
Contrast controls the ratio between dark and light in the image and extends or reduces the amount of detail. Sharpness lets the camera add or take away sharpness in the image. Saturation controls how vivid the colors look. Gradation modifies how the camera handles light and dark tones, such as a normal, bright (high-key), or dark (low-key) look.
Let’s fine-tune a basic Picture Mode, using Natural as an example.
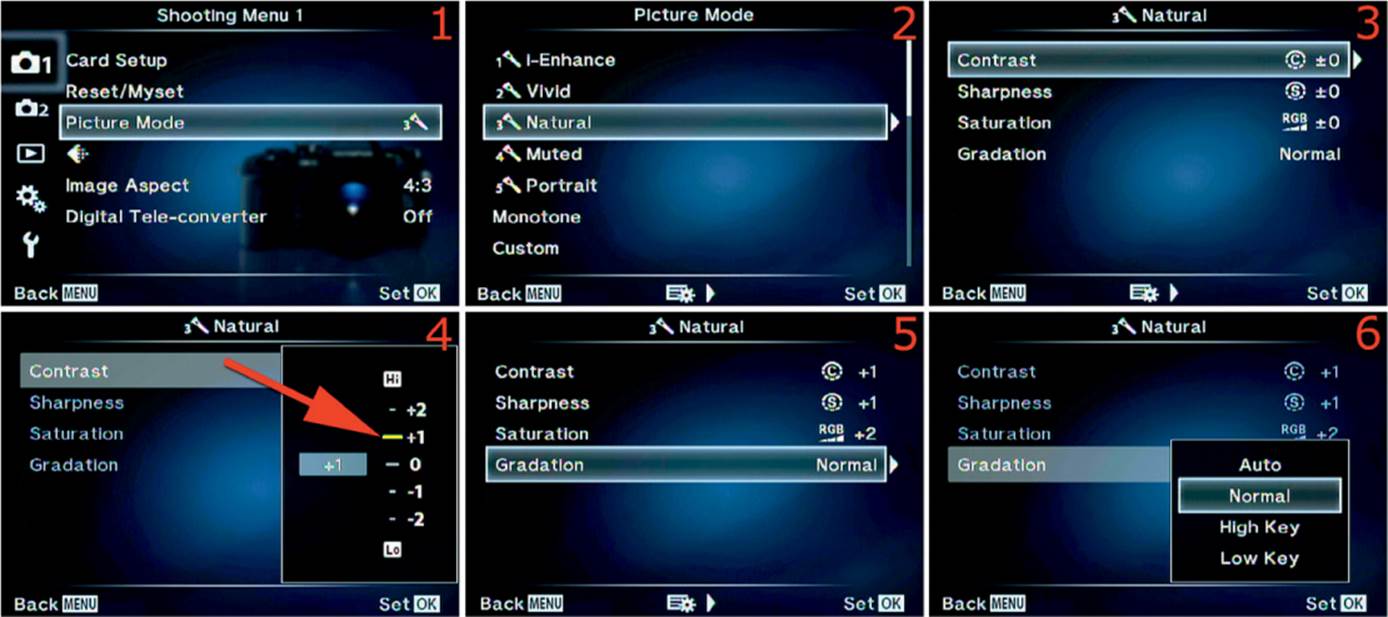
Figure 3.3C: Fine-tuning a Picture Mode
Use the following steps to fine-tune a basic Picture Mode (i-Enhance, Vivid, Natural, Muted, and Portrait):
1. Choose Picture Mode from Shooting Menu 1 and scroll to the right (figure 3.3C, image 1).
2. Select the Picture Mode you want to fine-tune then scroll to the right (figure 3.3C, image 2). I decided to work with Natural.
3. Contrast, Sharpness, and Saturation are adjusted the same way, so only the screens for Contrast are shown. Gradation is different, and we will consider it in steps 5 and 6. Highlight Contrast, Sharpness, or Saturation and scroll to the right (figure 3.3C, image 3).
4. Set the value on the scale from Hi (+2) to Lo (–2), or leave it at 0 for no change. In figure 3.3C, image 4, Contrast +1 is selected (red arrow). If you want to modify Sharpness or Saturation, repeat steps 3 and 4. In figure 3.3C, image 5, I set Contrast to +1, Sharpness to +1, and Saturationto +2. Experiment with the values to see how they affect your images. Press the OK button any time to save the setting. To change Gradation, move on to steps 5 and 6.
5. Choose Gradation from the menu and scroll to the right (figure 3.3C, image 5).
6. Choose one of the four values—Auto, Normal, High Key, or Low Key—and press the OK button (figure 3.3C, image 6). The four values have the following effects:
• Auto: Lets the camera choose the Gradation
• Normal: Makes a regular picture with no unusual Gradation changes
• High Key: Shifts the picture toward bright values
• Low Key: Shifts the picture toward dark values
The i-Enhance Picture Mode adds another setting called Effect (figure 3.3D, image 1). It controls the amount of enhancement (High, Standard, Low) the camera makes to the image. There are two additional screens for i-Enhance.
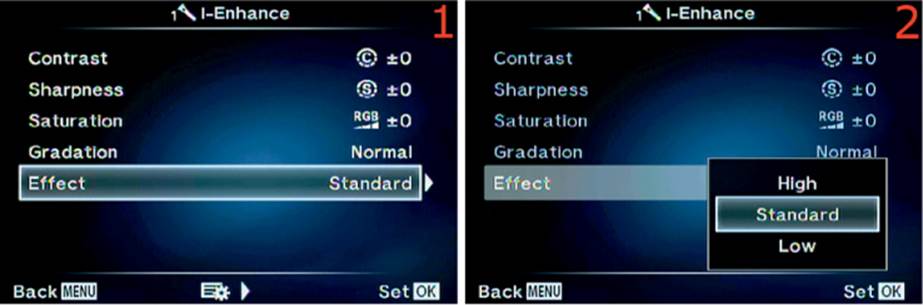
Figure 3.3D: The Effect setting for i-Enhance Mode
7. Select Effect from the menu and scroll to the right (figure 3.3D, image 1).
8. Highlight one of the three enhancement levels—High, Standard, or Low—and press the OK button to choose it (figure 3.3D, image 2). Experiment with this setting by taking pictures with all three enhancement levels.
9. When you have i-Enhance configured, scroll to the left until you return to the Picture Mode screen, then press the OK button to select the current Picture Mode. The camera will return to the Shooting Menu 1 screen with the symbol of the current mode displayed. Take your pictures.
Using Monotone Picture Mode
Monotone Picture Mode allows you to get creative with black-and-white images. You can use built-in color filters for changing the contrast, and you can even add toning, such as sepia, blue (cyanotype), and several others. Let’s examine how to use Monotone Mode.
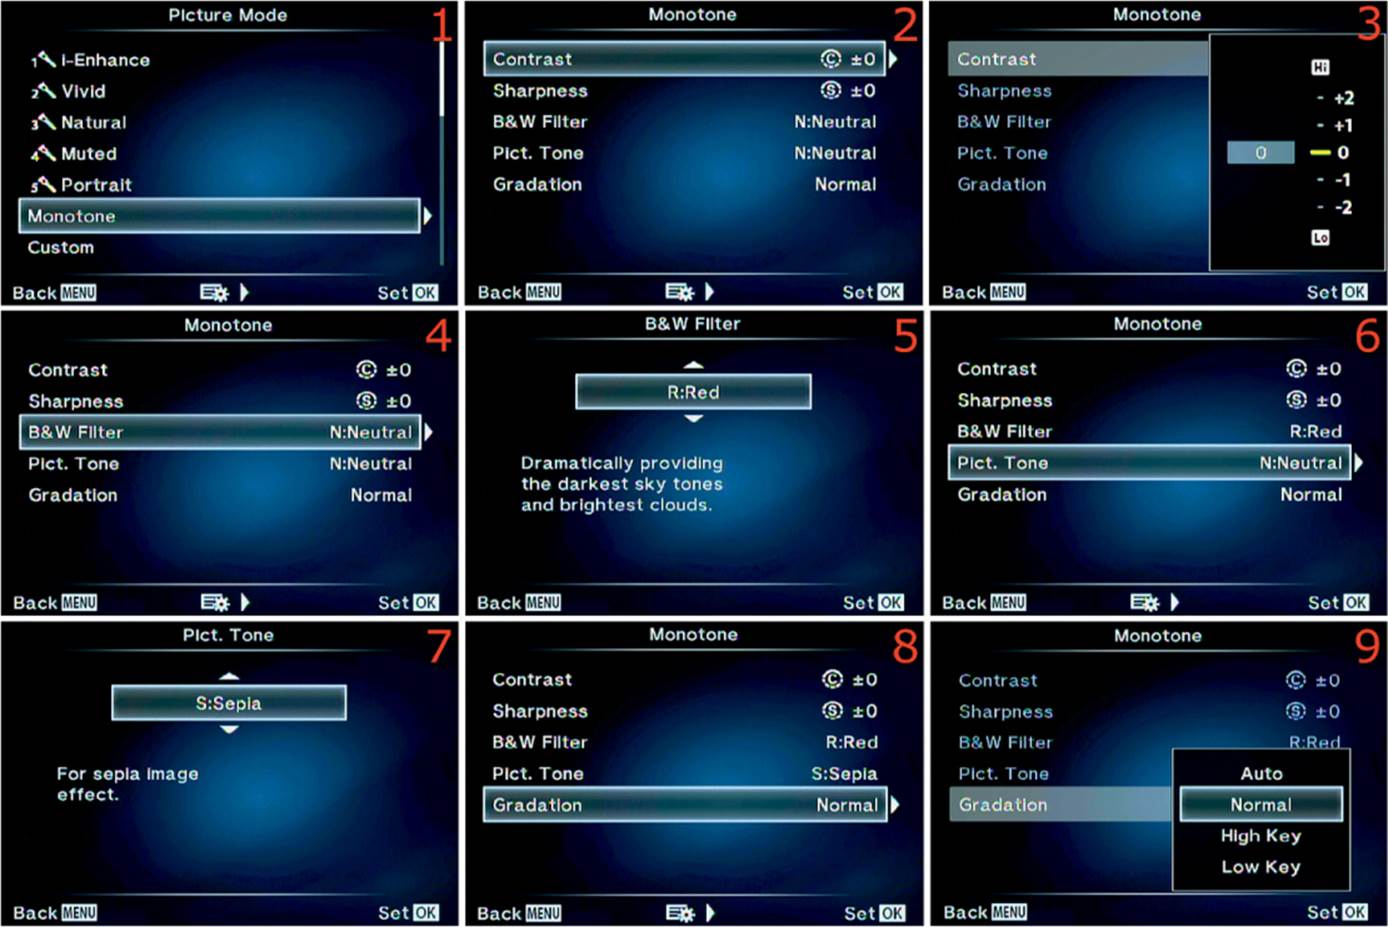
Figure 3.3E: Monotone Mode
Use these steps to control Monotone Mode:
1. Select Monotone from the Picture Mode menu and scroll to the right (figure 3.3E, image 1).
2. Choose Contrast or Sharpness and scroll to the right (figure 3.3E, image 2).
3. Contrast and Sharpness are adjusted using the same method. I’ll use Contrast as an example. The menu that opens for Contrast or Sharpness allows you to increase or decrease the setting, up to two levels in either direction. Set the value on the scale from Hi (+2) to Lo (–2), or leave it at 0for no change. Press the OK button to choose a value (figure 3.3E, image 3).
4. Select B&W Filter from the menu and scroll to the right (figure 3.3E, image 4).
5. You can now choose one of the following B&W Filter values from the up/down menu (figure 3.3E, image 5):
• N:Neutral: Provides a standard monochrome image
• G:Green: Improves skin tones for portraits
• R:Red: Creates dark skies and bright clouds for maximum sky contrast
• Or:Orange: Removes some of the foggy bluish haze when you use a telephoto lens for a distant subject
• Ye:Yellow: Increases the contrast between the sky and clouds, but not as much as the R:Red filter
6. Next, if you want to add a colored tone to your image, select Pict. Tone and scroll to the right (figure 3.3E, image 6).
7. Choose one of the values from the Pict. Tone up/down menu to achieve the following results (figure 3.3E, image 7):
• N:Neutral: Provides a standard monochrome image
• G:Green: Adds a green tone to a monochrome image
• P:Purple: Adds a purple tone to a monochrome image
• B:Blue: Adds a blue tone to a monochrome image, similar to the old-fashioned cyanotype look
• S:Sepia: Adds a warm brown tone to a monochrome image, which resembles an antique sepia look
8. To set the Gradation level, choose Gradation from the menu and scroll to the right (figure 3.3E, image 8).
9. Choose one of the four values—Auto, Normal, High Key, or Low Key—and press the OK button (figure 3.3E, image 9):
• Auto: Lets the camera choose the Gradation
• Normal: Makes a regular monochrome picture with no unusual Gradation changes
• High Key: Shifts a monochrome picture toward bright values
• Low Key: Shifts a monochrome picture toward dark values
10. When you have Monotone fully configured, scroll to the left until you return to the Picture Mode screen, then press the OK button to select the current Picture Mode. The camera will return to the Shooting Menu 1 screen with the symbol of the current mode displayed. Take your pictures.
Using Custom Picture Mode
Custom Picture Mode allows you to create your own Picture Mode and tweak it for your style of photography. Since Custom Mode lets you control the appearance of an image in exquisite detail, let’s carefully examine each step.
1. Choose Picture Mode from Shooting Menu 1 menu and scroll to the right (figure 3.3F, image 1).
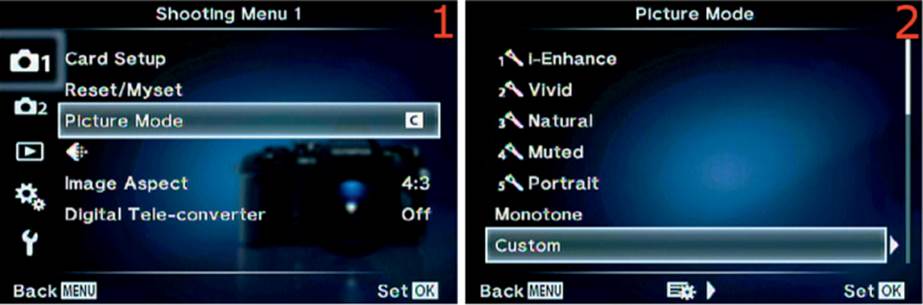
Figure 3.3F: Creating a Custom Picture Mode
2. Select Custom from the Picture Mode menu and scroll to the right (figure 3.3F, image 2).
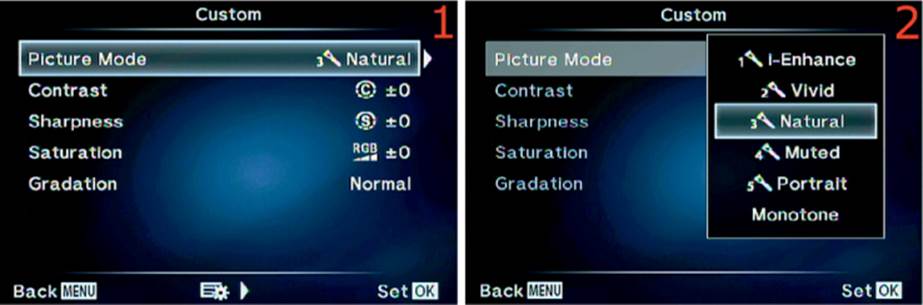
Figure 3.3G: Creating a Custom Picture Mode
3. Choose Picture Mode from the Custom Menu and scroll to the right (figure 3.3G, image 1).
4. Highlight one of the five basic Picture Modes or the Monotone Art Picture Mode as the base for your Custom Picture Mode. I highlighted Natural. Press the OK button to select the mode (figure 3.3G, image 2).

Figure 3.3H: Creating a Custom Picture Mode
5. Contrast, Sharpness, and Saturation are adjusted the same way, so I’ll use Contrast as an example. Highlight Contrast, Sharpness, or Saturation and scroll to the right (figure 3.3H, image 1).
6. Set the value on the scale from Hi (+2) to Lo (–2), or leave it at 0 for no change. In figure 3.3H, image 2, I selected Contrast 0. If you want to modify Sharpness or Saturation, repeat steps 5 and 6. Press the OK button to save the setting.
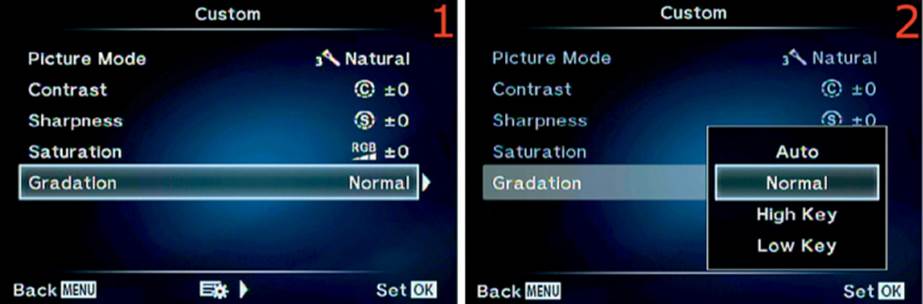
Figure 3.3I: Creating a Custom Picture Mode
7. To set the Gradation, choose Gradation from the menu and scroll to the right (figure 3.3I, image 1).
8. Choose Auto, Normal, High Key, or Low Key and press the OK button (figure 3.3I, image 2):
• Auto: Lets the camera choose the Gradation
• Normal: Makes a regular picture with no unusual Gradation changes
• High Key: Shifts the picture toward bright values
• Low Key: Shifts the picture toward dark values
9. When you have the Custom Picture Mode fully configured, scroll to the left until you return to the Picture Mode screen, then press the OK button to select the current Picture Mode. The camera will return to the Shooting Menu 1 screen with the symbol of the current mode displayed. Take your pictures.
Using e-Portrait Picture Mode
The e-Portrait Picture Mode is designed to make skin look smooth and translucent. It imitates the look of skin-smoothing plug-ins for Photoshop and is designed for taking pictures of faces. When you take a picture in e-Portrait Mode, the camera takes longer to write the image to the memory card, so the card access symbol will flash a little longer than usual.
Because the camera does internal image post-processing on skin tones, e-Portrait Mode cannot be used when you shoot video or if you bracket your images, whereas Portrait Picture Mode can be used in both of these situations because it does perform postprocessing to smooth the skin. You cannot adjust e-Portrait Mode.
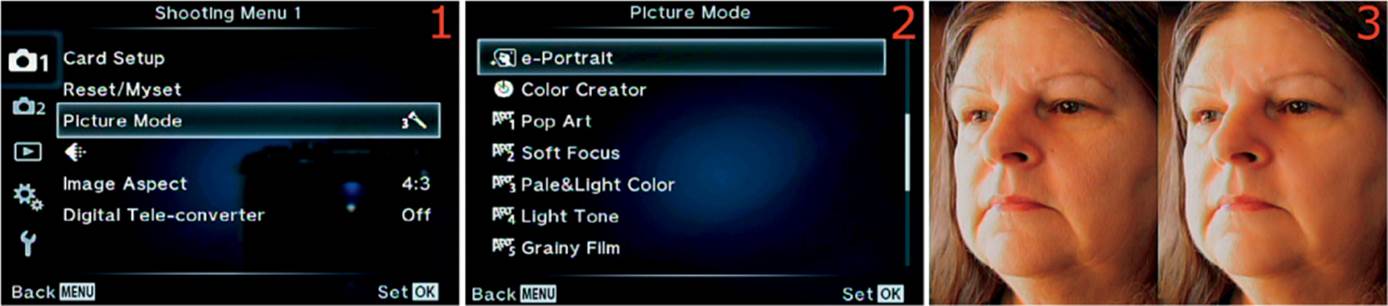
Figure 3.3J: e-Portrait Mode
Use these steps to select e-Portrait Mode:
1. Choose Picture Mode from Shooting Menu 1 and scroll to the right (figure 3.3J, image 1).
2. Highlight e-Portrait on the Picture Mode menu and press the OK button to select it (figure 3.3J, image 2). The camera will return to the Shooting Menu 1 screen and display the e-Portrait Mode symbol. Take your pictures.
Note: In figure 3.3J, image 3, you can see a before (left) and after (right) comparison of e-Portrait Mode. The image on the right has smoother skin tones.
Using Color Creator Picture Mode
Color Creator allows you to adjust the color of the subject by using a color wheel that controls hue and saturation while you look at the subject through the viewfinder or on the monitor.
Note: The Color Creator assignment wheel is available from within a group of functions called the Multi Function group. The factory default for the Multi Function group is assigned to the Fn2 button. We will consider how to access and use the Color Creator in the following steps. Keep in mind that you can change the button assignments on your E-M1, so you can assign the Multi Function group to some other button. If the Multi Function group containing the Color Creator wheel does not show up under the Fn2 button—because someone has reassigned Fn2—check theCustom Menu > Button/Dial/Lever > Button Function to see which button is assigned to Multi Function. Then you can use that button, or reassign the Fn2 button, to open the Multi Function group and see the Color Creator. This will become more obvious as we consider how to select the Color Creator.
First, let’s examine how to choose Color Creator from the Picture Mode menu. There are 11 steps to make on-the-fly color adjustments:

Figure 3.3K: Selecting Color Creator from the Picture Mode menu
1. Choose Picture Mode from Shooting Menu 1 and scroll to the right (figure 3.3K, image 1).
2. Highlight Color Creator and press the OK button to choose it (figure 3.3K, image 2). The camera will return to the Shooting Menu 1 screen and display a small round Color Creator icon to the right of Picture Mode. Take your pictures.
Now we will use external camera controls to bring up the Color Creator wheel on the viewfinder or monitor. Starting with step 3 it is important that you have your camera in your hand and operate it along with the instructions, otherwise they will make little sense. It is harder to describe what happens than to watch it unfold on your camera monitor or in the viewfinder.
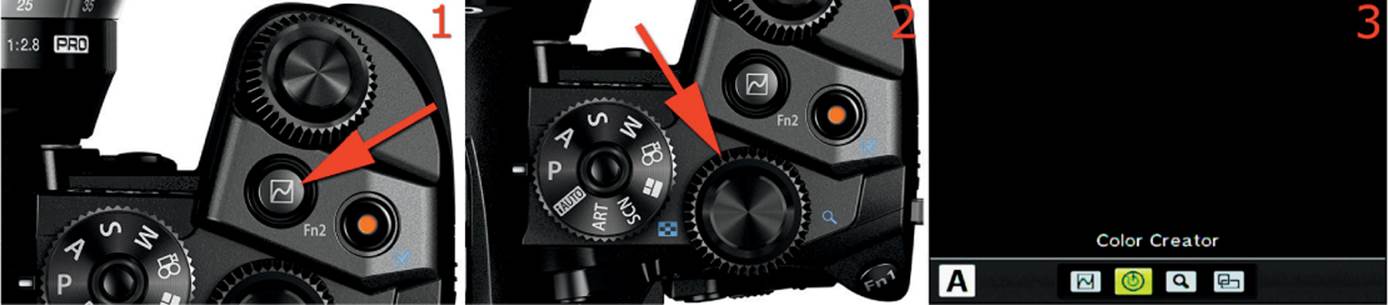
Figure 3.3L: Selecting Color Creator from the Multi Function group
Here are the steps to select Color Creator from the Multi Function group:
3. The Front Dial surrounds the Shutter button and is located above the Fn2 button (figure 3.3L, image 1, red arrow). The Rear Dial (figure 3.3L, image 2, red arrow) is below the Fn2 button. Remember the location of these two dials because we will use them to adjust the color, hue, and saturation starting in step 8.
4. Press and hold the Fn2 button (figure 3.3L, image 1, red arrow).
5. Rotate the Rear Dial one click (figure 3.3L, image 2, red arrow), and the Multi Function group will appear in the viewfinder or on the monitor.
6. Select the second item, Color Creator, from the horizontal menu at the bottom of the screen (figure 3.3L, image 3) by turning the Rear Dial.
7. Release the Fn2 button, and the camera will display the subject in the viewfinder or on the monitor. Take your pictures.
Now we will adjust the hue and saturation of the colors in the image by using the Color Creator wheel. The sample images are black so you can see the menus. Your camera will display the scene in front of the lens, and you will see the effect of the color change when you move the dials. Let’s see how.
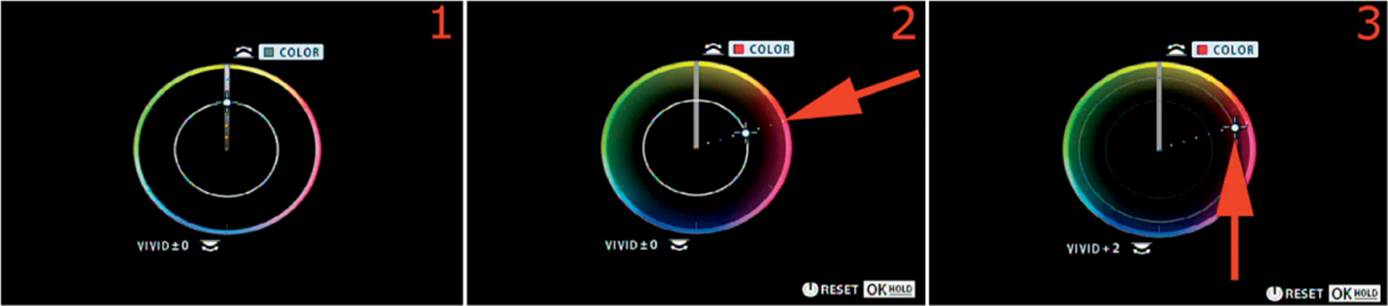
Figure 3.3M: Using the Color Creator wheel to change color, hue, and saturation
8. If you have followed steps 4–7 correctly, you can press the Fn2 button once (do not hold it) and the Color Creator adjustment wheel will appear in the viewfinder or on the monitor. If the Color Creator has not been adjusted in the past, you will see the wheel’s default appearance (figure 3.3M, image 1).
9. Turn the Front Dial and you will see a dotted line, which represents the hue, move in the direction you turned the dial (figure 3.3M, image 2, red arrow). As you rotate the dial, watch the subject carefully in the viewfinder or on the monitor. Its hue will change as you rotate through the red, green, blue, and yellow portions of the wheel. The dotted line will travel 360 degrees around the wheel until it is back at the 12 o’clock position, which represents neutral. You can see a small white box with the word Color at the top right of the Color Creator. To the left of that you will see a tiny square. As you rotate the Front Dial and as the dotted line travels around the wheel, you will see that square change color to indicate the hue that will be added to your image when you take a picture.
10. After you have chosen the hue you want, you can control the saturation. To do so, turn the Rear Dial and you will see a slightly larger dot with two horizontal lines and two vertical lines extending outward (figure 3.3M, image 3, red arrow). This dot will move away from or toward the middle of the circle as you turn the Rear Dial. You will see a smaller ring inside the Color Creator wheel that follows the dot as you move it. When the dot is closer to the middle of the Color Creator wheel, the saturation decreases; when the dot is closer to the outside of the Color Creatorwheel, the saturation increases. You will see the word Vivid with a number at the bottom left of the Color Creator wheel. The vividness, or saturation, will vary from –4 to +3, as indicated by the small number after the word Vivid.
11. Press the OK button to accept the color scheme. It will be applied to all the pictures you take until you reset the Color Creator to neutral. Take your pictures.
Note: To reset the Color Creator to neutral, bring it up in the viewfinder or on the monitor by pressing the Fn2 button (or whatever button is assigned to the Multi Function group). Then press and hold the OK button for about two seconds until the Color Creator resets to neutral hue and saturation, as shown in figure 3.3M, image 1.
Settings Recommendation: Because we accessed the Color Creator from Shooting Menu 1, we included the preliminary step of selecting Color Creator from the Picture Mode menu (figure 3.3K and steps 1 and 2). However, steps 1 and 2 are not absolutely necessary. Let’s say you have Natural Picture Mode selected and you suddenly want to add some oversaturated red to your image. If you had previously selected Color Creator from the Multi Function group, all you have to do is follow steps 3–11, using figures 3.3L and 3.3M.
Color Creator is available any time you open it with the Fn2 button. There is one small issue, though. If you select Color Creator with the Fn2 button, the camera will automatically select the Color Creator Picture Mode and leave it there until you change it to something else, such as Natural or Vivid. That’s not a problem unless you were previously shooting in Vivid Mode or with one of the Art Picture Modes. The camera does not revert to the previously selected Picture Mode after you take a picture. It stays in the Color Creator Mode you selected until you change it to another Picture Mode or reset the Color Creator to neutral.
Even if you reset the Color Creator to neutral and shoot in that Picture Mode, you will find that the colors in your image are less saturated and contrasty. If you compare the Picture Modes in figures 3.3A-1 through 3.3A-4, you will see that the neutral setting for Color Creator Picture Mode seems fairly close, and perhaps less contrasty, than the Muted Picture Mode.
If you want to regularly change the hue and saturation in your images, experiment with the Color Creator. If you leave it at neutral, your images will be less saturated and have lower contrast, and they will be easier to work with in post-processing on your computer. If you modify the hue and saturation in Color Creator, remember to change the camera to a different Picture Mode when you are done.
And remember, if you shoot RAW (ORF) images, it’s easy to change the color and contrast afterwards, so it doesn’t matter which Picture Mode you choose. We’ll discuss this a little more in the [Record Mode] section later in this chapter.
Using Art Picture Modes
There are 14 Art Picture Modes available in the E-M1. Each Art Picture Mode imparts a specific look to your images. If you like to convey different moods in your pictures and do not like post-processing RAW files on a computer, you might enjoy these Art Picture Modes (and maybe even the SCN or Scene Modes).
Each Art Picture Mode was briefly examined in the Screen Displays for Camera Control chapter on page 108. We used the shortcut of setting the Mode Dial to Art, pressing the OK button, and selecting one of the Art Picture Modes. This section provides more detail on how the modes work.
Pop Art (Art 1)
The Pop Art Picture Mode allows you to create very colorful and exciting images with various filters and effects. The filter is applied first, then the effect is added.
The available filters and effects include the following:
Filter types
• Filter Type I: A bright, exciting, oversaturated look is imparted to your images when you select this filter. If you are feeling wild, young, and free, this is the filter for you.
• Filter Type II: This filter is similar to Type I, but a low-key look is imparted. The colors are quite saturated, but the highlights are significantly toned down.
Add effects
• Off: No extra effects are added to the image. Only the filter is added.
• Soft Focus: A dreamy blur effect is added to the image.
• Pin Hole: The corners of the image are darkened to pure black.
• White Edge: The corners of the image are brightened to pure white.
• Frame: A white frame is added to the image, and a processed film look is added to the edges of the picture inside the frame.
• Star Light: A four-point star effect is added to points of light in the image.
• Blur Effect: Top and Bottom: A band of sharpness extends horizontally through the middle of the image, and the top and bottom of the image are blurred.
• Blur Effect: Left and Right: A band of sharpness extends vertically through the middle of the image, and the left and right sides of the image are blurred.
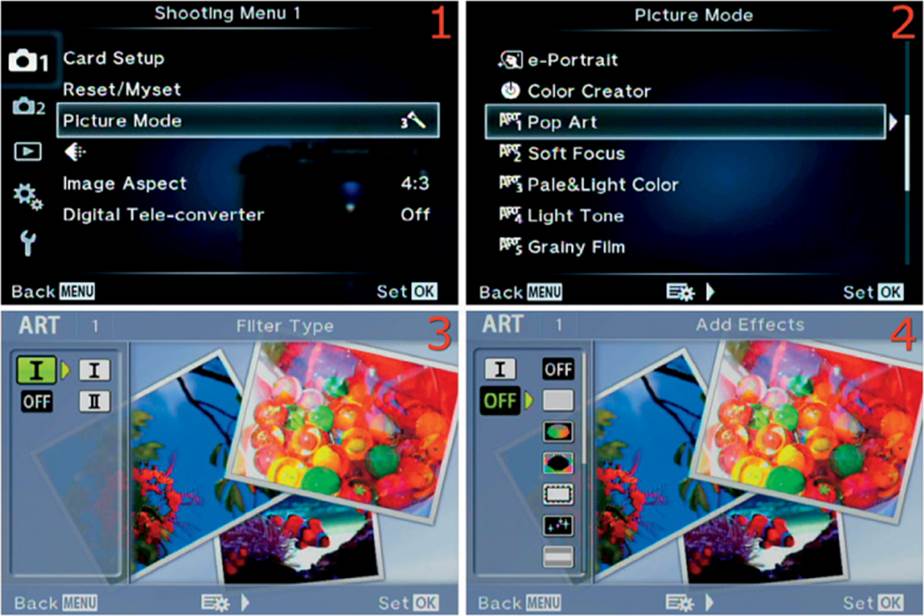
Figure 3.3N: Pop Art (Art 1) Picture Mode
Use these steps to select and use the Pop Art Picture Mode:
1. Choose Picture Mode from Shooting Menu 1 and scroll to the right (figure 3.3N, image 1).
2. Highlight Pop Art on the Picture Mode menu and press the OK button to select it for immediate use in default mode, which applies Filter Type I and no Add Effects. If you want to change the Filter Type and Add Effects settings before you take pictures, scroll to the right and proceed to step 3 (figure 3.3N, image 2).
3. Select a Filter Type (figure 3.3N, image 3). Your choices are I or II, as described in the previous list. Scroll to the right, then scroll up or down to highlight I or II, then press the OK button.
4. Select an Add Effects type (figure 3.3N, image 4). Scroll to the right, then scroll up or down to highlight one of the seven Add Effects types, or Off, as described in the previous list. Set the Add Effects type by pressing the OK button.
5. When you are done, scroll to the left until you return to the Picture Mode screen, then press the OK button to select the current Art Picture Mode. The camera will return to the Shooting Menu 1 screen with the symbol of the current mode displayed. Take your pictures.
Settings Recommendation: Pop Art Picture Mode applies strong colors and gives images an exciting, contrasty appearance. You will need to experiment to find your favorite look. I usually use Filter Type I because I like the bright look. I also like the Pop Art Soft Focus effect for some of my subjects.
Soft Focus (Art 2)
The Soft Focus Art Picture Mode makes images that have a dreamy blur. The image is still sharp, but a milky whiteness covers it. The higher contrast and slight blur makes the subject seem to glow. It is a very interesting effect, similar to old movies.
There are two special effects and an Off setting:
Add effects
• Off: No extra effects are added to the image.
• White Edge: The corners of the image are brightened to pure white.
• Star Light: A four-point star effect is added to points of light in the image.
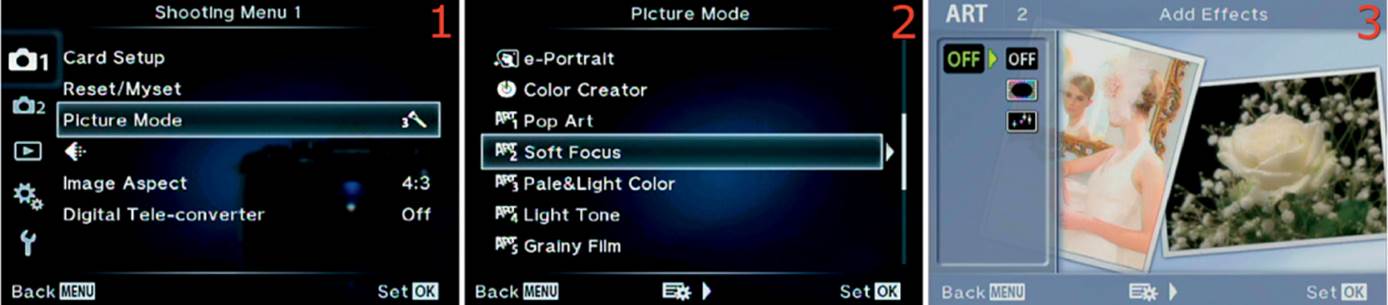
Figure 3.3O: Soft Focus (Art 2) Picture Mode
Use these steps to create Soft Focus images of your subject:
1. Choose Picture Mode from Shooting Menu 1 and scroll to the right (figure 3.3O, image 1).
2. Highlight Soft Focus on the Picture Mode menu and press the OK button to select it for immediate use in default mode, which uses no extra Add Effects. If you want to add one of the Add Effects settings before you take pictures, scroll to the right and proceed to step 3 (figure 3.3O, image 2).
3. Off will be highlighted on the Add Effects screen (figure 3.3O, image 3). Scroll to the right, then scroll down or up to highlight the Add Effect you want to use. Press the OK button to lock in the effect.
4. When you are done, scroll to the left until you return to the Picture Mode screen. Press the OK button to select the current Art Picture Mode. The camera will return to the Shooting Menu 1 screen with the symbol of the current mode displayed. Take your pictures.
Settings Recommendation: Soft Focus Mode is great in certain circumstances. I like to use it for some portraits, and I have seen some interesting wildlife shots made with this mode. The mild glowing fog is intriguing because the image remains sharp under the glow. Try this mode in some of your pictures, and it might become one of your favorites.
Pale&Light Color (Art 3)
The Pale&Light Color Art Picture Mode mildly desaturates the colors in your image and makes colors look pastel, and a low-contrast overlay is added to the image. The highlights become brighter—almost high key—and more shadow detail is apparent due to the lower contrast.
Pale&Light Color includes the following filters and effects:
Filter types
• Filter Type I: A pastel, high-key look is imparted to your images and gives them a cool whitish-blue appearance.
• Filter Type II: This filter is similar to Type I, but images look a little warmer and have a more reddish-yellow appearance.
Add effects
• Off: No extra effects are added to the image. Only the filter is added.
• Soft Focus: A dreamy blur effect is added to the image.
• Pin Hole: The corners of the image are darkened to pure black.
• White Edge: The corners of the image are brightened to pure white.
• Frame: A white frame is added to the image, and a processed film look is added to the edges of the picture inside the frame.
• Star Light: A four-point star effect is added to points of light in the image.
• Blur Effect: Top and Bottom: A band of sharpness extends horizontally through the middle of the image, and the top and bottom of the image are blurred.
• Blur Effect: Left and Right: A band of sharpness extends vertically through the middle of the image, and the left and right sides of the image are blurred.
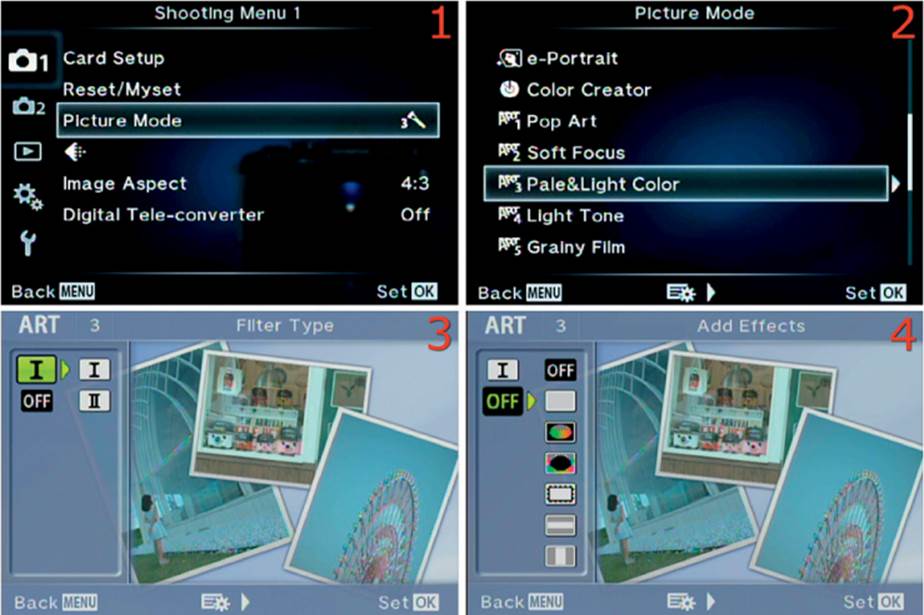
Figure 3.3P: Pale&Light Color (Art 3) Picture Mode
Use these steps to select and use the Pale&Light Color Picture Mode:
1. Choose Picture Mode from Shooting Menu 1 and scroll to the right (figure 3.3P, image 1).
2. Highlight Pale&Light Color on the Picture Mode menu and press the OK button to select it for immediate use in default mode, which applies Filter Type I and no Add Effects. If you want to change the Filter Type and Add Effects settings before you take pictures, scroll to the right and proceed to step 3 (figure 3.3P, image 2).
3. Select a Filter Type (figure 3.3P, image 3). Your choices are I or II, as described in the previous list. Scroll to the right, then scroll up or down to highlight Filter Type I or II. Set the Filter Type by pressing the OK button.
4. Select an Add Effects type (figure 3.3P, image 4). Scroll to the right, then scroll up or down to highlight one of the seven Add Effects types, or Off, as described in the previous list. Set the Add Effects type by pressing the OK button.
5. When you are done, scroll to the left until you return to the Picture Mode screen. Press the OK button to select the current Art Picture Mode. The camera will return to the Shooting Menu 1 screen with the symbol of the current mode displayed. Take your pictures.
Settings Recommendation: If you want to take pale, pastel images, this is the perfect Art Picture Mode. It creates a look that most cameras cannot duplicate. Try this on some shots of a friend reading a book on a park bench or with some other outdoor portrait. The effect is unique, so experiment with it to discover how you would like to use it.
Light Tone (Art 4)
The Light Tone Art Picture Mode increases the dynamic range of an image by dramatically lowering the contrast. Colors become muted, and dark tones become mostly gray with much more detail. This mode creates images that resemble the shadowless, overcooked HDR look that is popular these days. The highlights seem a little brighter, and the blacks turn into grays.
The effects available in Light Tone Art Picture Mode are as follows:
Add effects
• Off: No extra effects are added to the image.
• Frame: A white frame is added to the image, and a processed film look is added to the edges of the picture inside the frame.
• Blur Effect: Top and Bottom: A band of sharpness extends horizontally through the middle of the image, and the top and bottom of the image are blurred.
• Blur Effect: Left and Right: A band of sharpness extends vertically through the middle of the image, and the left and right sides of the image are blurred.
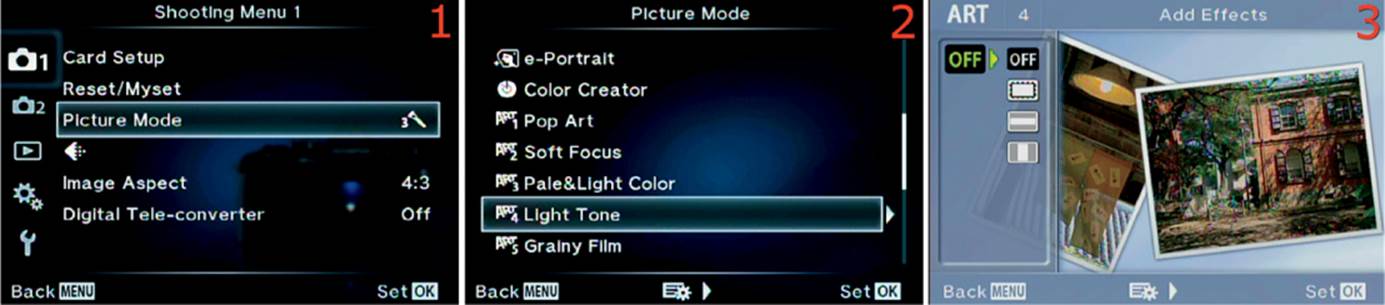
Figure 3.3Q: Light Tone (Art 4) Picture Mode
Use these steps to create Light Tone images:
1. Choose Picture Mode from Shooting Menu 1 and scroll to the right (figure 3.3Q, image 1).
2. Highlight Light Tone on the Picture Mode menu and press the OK button to select it for immediate use in default mode, which uses no extra Add Effects. If you want to add one of the three Add Effects settings before you take pictures, scroll to the right and proceed to step 3 (figure 3.3Q, image 2).
3. Off will be highlighted on the Add Effects screen (figure 3.3Q, image 3). Scroll to the right, then scroll down or up to highlight the Add Effect you want to use, as described in the previous list. Press the OK button to lock in the effect.
4. When you are done, scroll to the left until you return to the Picture Mode screen. Press the OK button to select the current Art Picture Mode. The camera will return to the Shooting Menu 1 screen with the symbol of the current mode displayed. Take your pictures.
Settings Recommendation: This mode will create images similar to the shadowless HDR look that is prevalent on many social media sites. It has a wider dynamic range and less shadow than normal. Any time you want to create an extremely low-contrast image, you may want to give Light Tone Mode a try.
Grainy Film (Art 5)
The Grainy Film Art Picture Mode was created for people who love extremely high-contrast, grainy black-and-white photography. It imitates photography from the days of yore when the Graflex Speed Graphic camera was the camera of choice for photojournalists and chemical darkrooms were in full swing. You can produce the bygone look of black-and-white film classics, similar to Kodak high-contrast panchromatic films, without all the chemicals.
Grainy Film Art Picture Mode includes two Filter Types, three Add Effects, five B&W Filter effects, and five Pict. Tone effects that modify the base black-and-white image:
Filter types
• Filter Type I: An extreme contrast is imparted to images that are created with this filter. The blacks are deep black, and the whites have little detail for maximum contrast.
• Filter Type II: This filter is similar to Type I. Although images still have high contrast, it is toned down a little.
Add effects
• Off: No extra effects are added to the image.
• Pin Hole: The corners of the image are darkened to pure black.
• White Edge: The corners of the image are brightened to pure white.
• Frame: A white frame is added to the image, and a processed film look is added to the edges of the picture inside the frame.
B&W Filter
B&W Filter lightens similar colors and darkens complimentary colors:
• N: The Neutral filter creates a normal black-and-white image, with colors rendered as shades of gray, but the image will have a much higher contrast and be far grainier than an image shot in Monotone Picture Mode.
• Ye: The Yellow filter creates a black-and-white image that lightens reds, darkens blues, and has little effect on greens.
• Or: The Orange filter creates a black-and-white image that somewhat darkens reds and greens; it more heavily darkens blues.
• R: The Red filter creates a black-and-white image that lightens reds, somewhat darkens greens, and more heavily darkens blues.
• G: The Green filter creates a black-and-white image that darkens reds, lightens greens, and darkens blues.
Pict. Tone
• N: The Neutral tone creates a grainy, high-contrast black-and-white image with no special toning.
• S: The Sepia tone gives an image a light brown tone that resembles the sepia images introduced in the 1880s.
• B: The Blue tone creates an image with a bluish color, similar to cyanotype images that were introduced in the 1840s.
• P: The Purple tone adds a light purple color to an image.
• G: The Green tone adds a light green color to an image.
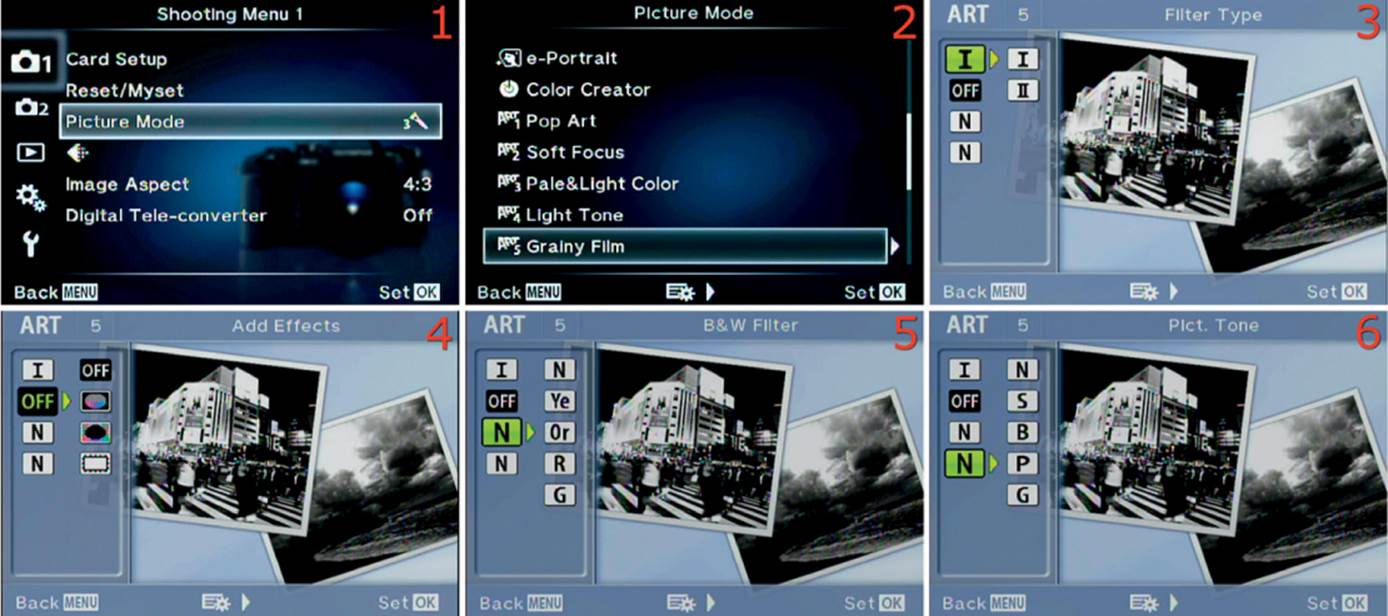
Figure 3.3R: Grainy Film (Art 5) Picture Mode
Use these steps to select and use the Grainy Film Picture Mode:
1. Choose Picture Mode from Shooting Menu 1 and scroll to the right (figure 3.3R, image 1).
2. Highlight Grainy Film on the Picture Mode menu and press the OK button to select it for immediate use in default mode, which applies Filter Type I and no Add Effects, B&W Filters, or Pict. Tones. If you want to change the filter, effect, and tone settings before you take pictures, scroll to the right and proceed to step 3 (figure 3.3R, image 2).
3. Select a Filter Type (figure 3.3R, image 3). Your choices are I or II, as described in the previous list. Scroll to the right, then scroll up or down to highlight Filter Type I or II. Set the Filter Type by pressing the OK button.
4. Select an Add Effects type (figure 3.3R, image 4). Scroll to the right, then scroll up or down to highlight one of the three Add Effects types, or Off, as described in the previous list. Set the Add Effects type by pressing the OK button.
5. Choose a B&W Filter effect by scrolling down to the first N (Neutral) and then scrolling to the right (figure 3.3R, image 5). Highlight one of the B&W Filter effects, as described in the previous list. Set the B&W Filter effect by pressing the OK button.
6. Select a Pict. Tone by scrolling down to the second N (Neutral) and then scrolling to the right (figure 3.3R, image 6). Highlight one of the Pict. Tone effects, as described in the previous list. Set the Pict. Tone by pressing the OK button.
7. When you are done, scroll to the left until you return to the Picture Mode screen. Press the OK button to select the current Art Picture Mode. The camera will return to the Shooting Menu 1 screen with the symbol of the current mode displayed. Take your pictures.
Settings Recommendation: If you are shooting outside on an overcast, gloomy winter day and want some dramatic contrast, the Grainy Film Mode will definitely do the job. This mode produces deep, dark blacks and burned-out whites with a heavy dose of grain thrown in. Try it out to create images that will get people talking.
Pin Hole (Art 6)
The Pin Hole Art Picture Mode is designed to imitate a pinhole camera, which is a simple box with a small hole in the side. The pinhole is covered, a piece of film is placed at the back of the box, and the box is put in position to take a picture. Then you uncover the hole to expose the film. After the film is processed, you have a pinhole picture.
Pinhole camera pictures are usually not sharp and have a lot of light falloff on the edges, but images from an E-M1 are sharp. Aren’t you glad you can make imitation pinhole pictures without going through all those steps?
The filters and effects in Pin Hole Art Picture Mode include the following:
Filter types
• Filter Type I: A slight greenish tint is added to the image.
• Filter Type II: A slight bluish tint is added to the image for a cooler look.
• Filter Type III: A slight reddish tint is added to the image for a warmer look.
Add effects
• Off: No extra effects are added to the image. Only the filter is added.
• Frame: A white frame is added to the image, and a processed film look is added to the edges of the picture inside the frame.
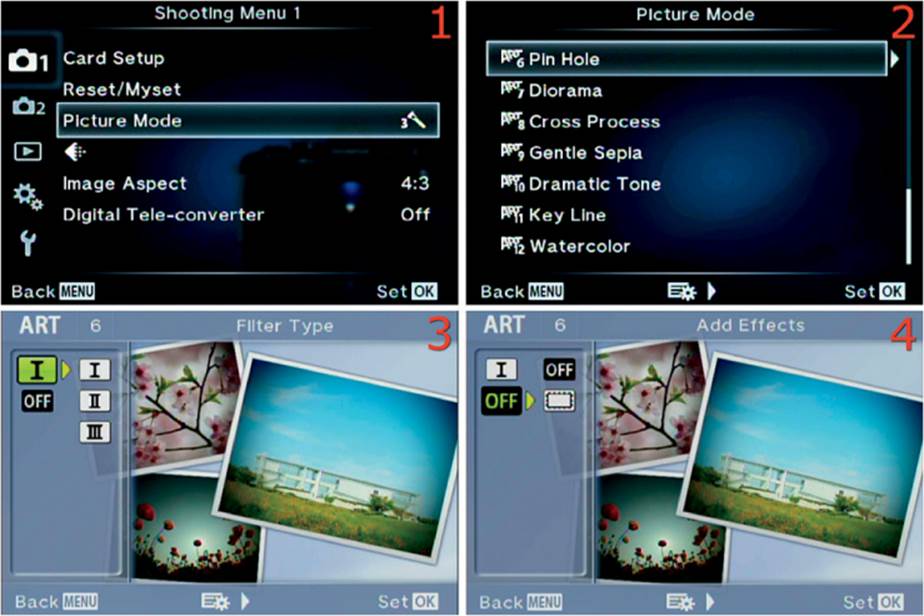
Figure 3.3S: Pin Hole (Art 6) Picture Mode
Use these steps to select and use Pin Hole Art Picture Mode:
1. Choose Picture Mode from Shooting Menu 1 and scroll to the right (figure 3.3S, image 1).
2. Highlight Pin Hole on the Picture Mode menu and press the OK button to select it for immediate use in default mode, which applies Filter Type I with no Add Effects. If you want to change the Filter Type and Add Effects settings before you take pictures, scroll to the right and proceed to step 3 (figure 3.3S, image 2).
3. Select a Filter Type (figure 3.3S, image 3). Your choices are I, II, or III as described in the previous list. Scroll to the right, then scroll up or down to highlight Filter Type I, II, or III. Set the Filter Type by pressing the OK button.
4. Select an Add Effects type (figure 3.3S, image 4). Scroll to the right, then scroll up or down to highlight an effect that is described in the previous list. Set the Add Effects type by pressing the OK button.
5. When you are done, scroll to the left until you return to the Picture Mode screen. Press the OK button to select the current Art Picture Mode. The camera will return to the Shooting Menu 1 screen with the symbol of the current mode displayed. Take your pictures.
Settings Recommendation: This mode is fun if you want to imitate a pinhole camera. However, I do not like the tones that are produced by any of the Filter Types. To me it would be better to offer normal picture colors, along with the green, blue, and red filter types. Then you could use this mode any time you want a picture with dark corners, which can be quite nice for emphasizing a subject. With the toning you are limited to special effects pictures. Try this mode and see if you like one or more of the tones.
Diorama (Art 7)
The Diorama Art Picture Mode allows you to shoot city scenes or any type of image in which you want normal-sized subjects to look like tiny artificial subjects. This effect is created through the use of a shallow depth of field (area of sharp focus) that can be produced when you take closeup pictures of small subjects. The camera emulates a shallow depth of field by artificially blurring either the top and bottom of the image, or the left and right sides, with a band of sharpness across the middle of the picture.
This Diorama Art Picture Mode includes the following filters and effects:
Filter types
• Filter Type I: A horizontal band of sharpness appears across the picture, with both the top and bottom of the image blurred.
• Filter Type II: A vertical band of sharpness appears along the picture, with both the left and right sides of the image blurred.
Add effects
• Off: No extra effects are added to image. Only the filter is added.
• Frame: A white frame is added to the image, and a processed film look is added to the edges of the picture inside the frame.
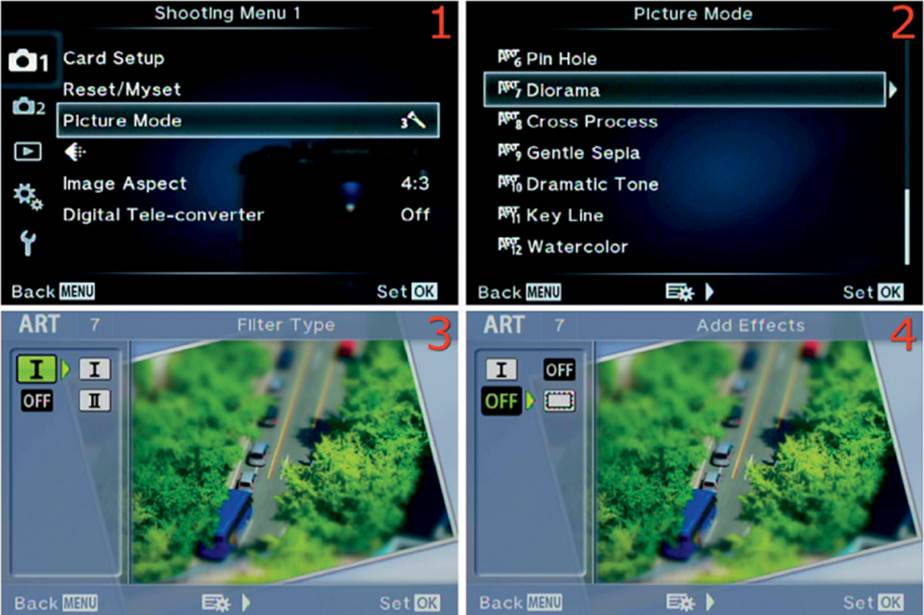
Figure 3.3T: Diorama (Art 7) Picture Mode
Use these steps to select and use the Diorama Art Picture Mode:
1. Choose Picture Mode from Shooting Menu 1 and scroll to the right (figure 3.3T, image 1).
2. Highlight Diorama on the Picture Mode menu and press the OK button to select it for immediate use in default mode, which applies Filter Type I and no Add Effects. If you want to change the Filter Type and Add Effects settings before you take pictures, scroll to the right and proceed to step 3 (figure 3.3T, image 2).
3. Select a Filter Type (figure 3.3T, image 3). Your choices are I or II as described in the previous list. Scroll to the right, then scroll up or down to highlight Filter Type I or II. Set the Filter Type by pressing the OK button.
4. Select an Add Effects type (figure 3.3T, image 4). Scroll to the right, then scroll up or down to highlight one of the effects as described in the previous list. Set the Add Effects type by pressing the OK button.
5. When you are done, scroll to the left until you return to the Picture Mode screen. Press the OK button to select the current Art Picture Mode. The camera will return to the Shooting Menu 1 screen with the symbol of the current mode displayed. Take your pictures.
Cross Process (Art 8)
The Cross Process Art Picture Mode applies an old-fashioned look that results when film is processed in chemicals that are intended for a different type of film. The results are usually odd colors and abnormal contrast. The Cross Process Mode therefore makes oddly colored (green or red toned) pictures with high contrast.
The filters and effects for Cross Process Art Picture Mode include the following:
Filter types
• Filter Type I: This filter adds a green tone and significantly increases the contrast.
• Filter Type II: This filter adds a red tone and significantly increases the contrast.
Add effects
• Off: No extra effects are added to the image. Only the filter is added.
• Pin Hole: The corners of the image are darkened to pure black.
• White Edge: The corners of the image are brightened to pure white.
• Frame: A white frame is added to the image, and a processed film look is added to the edges of the picture inside the frame.
• Blur Effect: Top and Bottom: A band of sharpness extends horizontally through the middle of the image, and the top and bottom of the image are blurred.
• Blur Effect: Left and Right: A band of sharpness extends vertically through the middle of the image, and the left and right sides of the image are blurred.
Use these steps to select and use Cross Process Art Picture Mode:
1. Choose Picture Mode from Shooting Menu 1 and scroll to the right (figure 3.3U, image 1).
2. Highlight Cross Process on the Picture Mode menu and press the OK button to select it for immediate use in default mode, which applies Filter Type I and no Add Effects. If you want to change the Filter Type and Add Effects settings before you take pictures, scroll to the right and proceed to step 3 (figure 3.3U, image 2).
3. Select a Filter Type (figure 3.3U, image 3). Your choices are I or II, as described in the previous list. Scroll to the right, then scroll up or down to highlight Filter Type I or II. Set the Filter Type by pressing the OK button.
4. Select an Add Effects type (figure 3.3U, image 4). Scroll to the right, then scroll up or down to highlight one of the five Add Effects types, or Off, as described in the previous list. Set the Add Effects type by pressing the OK button.
5. When you are done, scroll to the left until you return to the Picture Mode screen. Press the OK button to select the current Art Picture Mode. The camera will return to the Shooting Menu 1 screen with the symbol for the current mode displayed. Take your pictures.
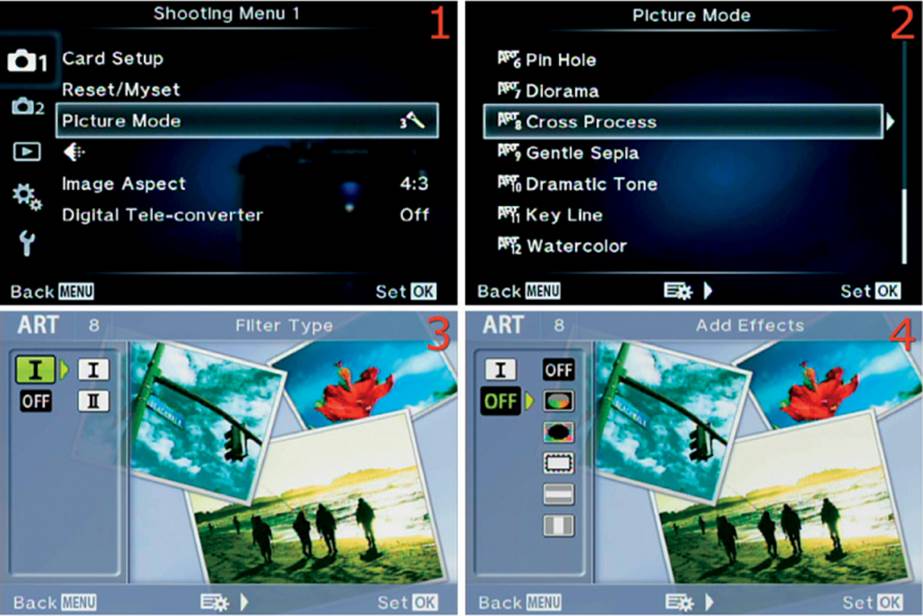
Figure 3.3U: Cross Process (Art 8) Picture Mode
Settings Recommendation: I guess the team that created the E-M1 remembers the good old film days. Some of these effects will mean little to a digital photographer who has not shot film or used a wet chemical darkroom. If you suddenly want a green or red toned, overexposed image, the camera stands ready to deliver.
Gentle Sepia (Art 9)
The Gentle Sepia Art Picture Mode allows you to take your images back to the 1880s by toning them with the sepia look that was common in those days. Sepia is a light brown tone that looks very old fashioned to our color-conditioned eyes. The result looks like a regular black-and-white image, with brown tones instead of gray ones.
No filters are available, but several Add Effects are available:
Add effects
• Off: No extra effects are added to the image.
• Soft Focus: A dreamy blur effect is added to the image.
• Pin Hole: The corners of the image are darkened to pure black.
• White Edge: The corners of the image are brightened to pure white.
• Frame: A white frame is added to the image, and a processed film look is added to the edges of the picture inside the frame.
• Blur Effect: Top and Bottom: A band of sharpness extends horizontally through the middle of the image, and the top and bottom of the image are blurred.
• Blur Effect: Left and Right: A band of sharpness extends vertically through the middle of the image, and the left and right sides of the image are blurred.
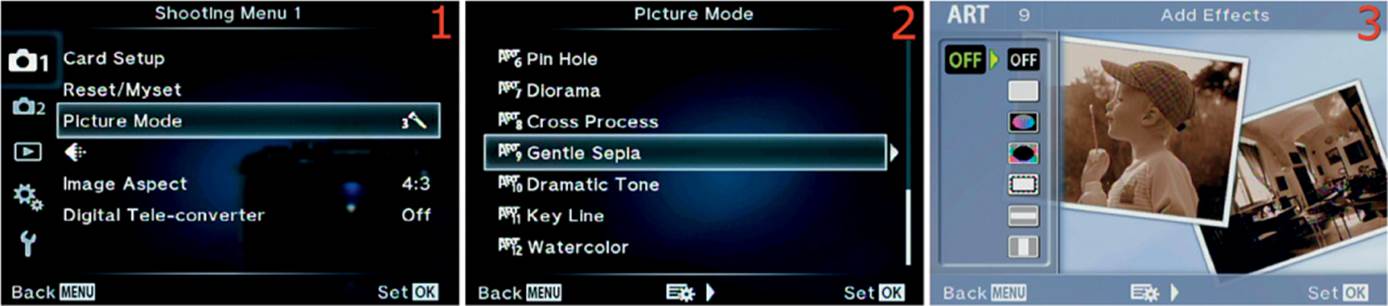
Figure 3.3V: Gentle Sepia (Art 9) Picture Mode
Use these steps to create Gentle Sepia images:
1. Choose Picture Mode from Shooting Menu 1 and scroll to the right (figure 3.3V, image 1).
2. Highlight Gentle Sepia on the Picture Mode menu and press the OK button to select it for immediate use in default mode, which does not use Add Effects. If you want to add one of the six Add Effects, scroll to the right and proceed to step 3 (figure 3.3V, image 2).
3. Off will be highlighted on the Add Effects screen (figure 3.3V, image 3). Scroll to the right, then scroll down or up to highlight the Add Effect you want to use, as described in the previous list. Press the OK button to lock in the effect.
4. When you are done, scroll to the left until you return to the Picture Mode screen. Press the OK button to select the current Art Picture Mode. The camera will return to the Shooting Menu 1 screen with the symbol for the current mode displayed. Take your pictures.
Settings Recommendation: If you enjoy old-fashioned things, why not dress up a few of your friends in vested suits and long dresses and have a Gentle Sepia portrait session? You could also try Gentle Sepia when you take Monotone shots. Instead of shooting only standard black-and-white images, you can add some sepia shots for variety.
Dramatic Tone (Art 10)
The Dramatic Tone Art Picture Mode adds a bit of drama to an image. All of the tones become edgy, with higher contrast and a mild low-key highlight effect. The filters allow you to switch between color and black-and-white images.
Colors are extra saturated in the color images, and dark tones have extra blackness in black-and-white images. They don’t have the grain or extreme contrast of Grainy Film Mode. The Dramatic Tone Art Picture Mode seems like a combination of the Monotone and Grainy Film Modes that uses the best features of each one.
The available filters and effects include the following:
Filter types
• Filter Type I: Dramatic color images, with higher contrast and more saturated colors, are produced.
• Filter Type II: Dramatic black-and-white images with higher contrast are produced. You can also add B&W Filter and Pict. Tone effects.
Add effects
• Off: No extra effects are added to the image. Only the filter is added.
• Pin Hole: The corners of the image are darkened to pure black.
• White Edge: The corners of the image are brightened to pure white.
• Frame: A white frame is added to the image, and a processed film look is added to the edges of the picture inside the frame.
• Star Light: A four-point star effect is added to points of light in the image.
• Blur Effect: Top and Bottom: A band of sharpness extends horizontally through the middle of the image, and the top and bottom of the image are blurred.
• Blur Effect: Left and Right: A band of sharpness extends vertically through the middle of the image, and the left and right sides of the image are blurred.
The following selections are available only when Filter Type II (black-and-white) is selected:
B&W Filter
B&W Filter lightens similar colors and darkens complimentary colors:
• N: The Neutral filter creates a normal black-and-white image, with colors rendered as shades of gray, but the image will have a much higher contrast and be far grainier than an image shot in Monotone Picture Mode.
• Ye: The Yellow filter creates a black-and-white image that lightens reds, darkens blues, and has little affect on greens.
• Or: The Orange filter creates a black-and-white image that somewhat darkens reds and greens; it more heavily darkens blues.
• R: The Red filter creates a black-and-white image that lightens reds, somewhat darkens greens, and more heavily darkens blues.
• G: The Green filter creates a black-and-white image that darkens reds, lightens greens, and darkens blues.
Pict. Tone
• N: The Neutral tone creates a grainy, high-contrast black-and-white image with no special toning.
• S: The Sepia tone gives an image a light brown tone that resembles the sepia images introduced in the 1880s.
• B: The Blue tone creates an image with a bluish color, similar to the cyanotype images that were introduced in the 1840s.
• P: The Purple tone adds a light purple color to an image.
• G: The Green tone adds a light green color to an image.
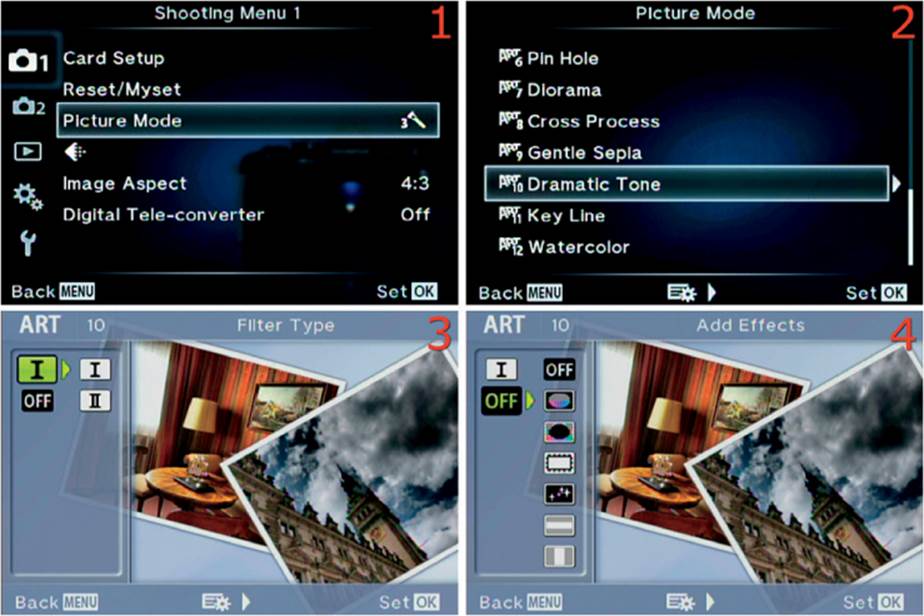
Figure 3.3W: Dramatic Tone (Art 10) Picture Mode
Use these steps to select and use the Dramatic Tone Picture Mode:
1. Choose Picture Mode from Shooting Menu 1 and scroll to the right (figure 3.3W, image 1).
2. Highlight Dramatic Tone on the Picture Mode menu and press the OK button to select it for immediate use in default mode, which applies Filter Type I (color) and no Add Effects, B&W Filters, or Pict. Tones. If you want to change the filter, effects, and tone settings before you take pictures, scroll to the right and proceed to step 3 (figure 3.3W, image 2).
3. Select a Filter Type (figure 3.3W, image 3). Your choices are I or II, as described in the previous list. Scroll to the right, then scroll up or down to highlight Filter Type I or II. Set the Filter Type by pressing the OK button.
4. Select an Add Effects type (figure 3.3W, image 4). Scroll to the right, then scroll up or down to highlight one of the six Add Effects types, or Off, as described in the previous list. Set the Add Effects type by pressing the OK button.
5. Steps 5 and 6 apply only if you selected Filter Type II (black-and-white). If you chose Filter Type I (color), skip steps 5 and 6 and go directly to step 7.
6. When you select Filter Type II (black-and-white) (figure 3.3X, image 1), you can choose a B&W Filter by scrolling down to the first N (figure 3.3X, image 2) then scrolling to the right. Highlight one of the B&W Filter effects, as described in the previous list. Set the B&W Filter effect by pressing the OK Button.
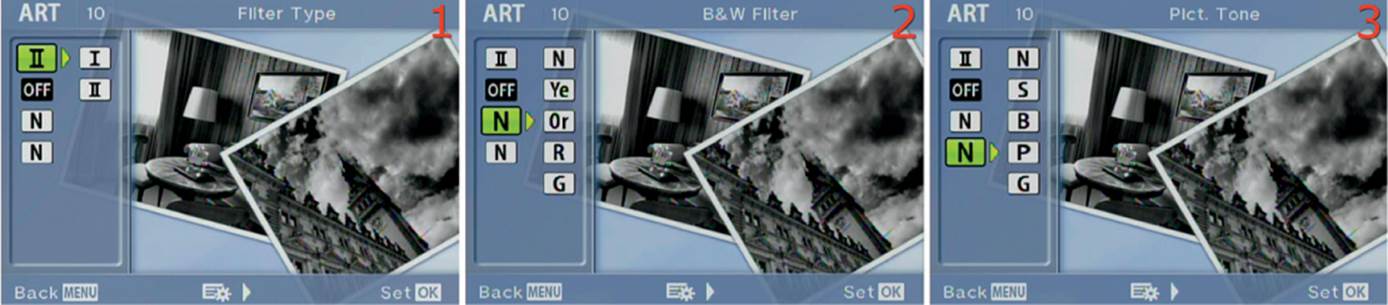
Figure 3.3X: Additional selections when Filter Type II is enabled
7. Select a Pict. Tone by scrolling down to the second N (figure 3.3X, image 3) and then scrolling to the right. Highlight one of the Pict. Tone effects, as described in the previous list. Set the Pict. Tone effect by pressing the OK button.
8. When you are done, scroll to the left until you return to the Picture Mode screen. Press the OK button to select the current Art Picture Mode. The camera will return to the Shooting Menu 1 screen with symbol for the current mode displayed. Take your pictures.
Settings Recommendation: This is a useful function if you like to shoot unique images. You can add drama to color images or extend the Monotone Picture Mode’s functionality with dramatic black-and-white images.
Why not experiment with Monotone, Grainy Film, and Dramatic Tone (using the B&W Filter) Picture Modes to see which black-and-white mode you might use at various times. The E-M1 gives you an amazing number of choices!
Key Line (Art 11)
The Key Line Art Picture Mode looks for contrast and color changes and uses them to modify an image into a line drawing with glowing pastel colors and indistinct puddles of color in areas where there is little depth of field (blur). The image takes on a somewhat painterly look while maintaining a degree of sharpness.
This mode’s available filters and effects include the following:
Filter types
• Filter Type I: Color line art images with medium contrast and pastel colors are created.
• Filter Type II: Color line art images with high contrast and pastel colors are created.
Add effects
• Off: No extra effects are added to the image. Only the filter is added.
• Soft Focus: A dreamy blur effect is added to the image.
• Pin Hole: The corners of the image are darkened to pure black.
• White Edge: The corners of the image are brightened to pure white.
• Frame: A white frame is added to the image, and a processed film look is added to the edges of the picture inside the frame.
• Star Light: A four-point star effect is added to points of light in the image.

Figure 3.3Y: Key Line (Art 11) Picture Mode
Use these steps to select and use the Key Line Art Picture Mode:
1. Choose Picture Mode from Shooting Menu 1 and scroll to the right (figure 3.3Y, image 1).
2. Highlight Key Line on the Picture Mode menu and press the OK button to select it for immediate use in default mode, which applies Filter Type I and no Add Effects. If you want to change the Filter Type and Add Effects settings before you take pictures, scroll to the right and proceed to step 3 (figure 3.3Y, image 2).
3. Select a Filter Type (figure 3.3Y, image 3). Your choices are I or II, as described in the previous list. Scroll to the right, then scroll up or down to highlight Filter Type I or II. Set the Filter Type by pressing the OK button.
4. Select an Add Effects type (figure 3.3Y, image 4). Scroll to the right, then scroll up or down to highlight one of the five Add Effects types, or Off, as described in the previous list. Set the Add Effects type by pressing the OK button.
5. When you are done, scroll to the left until you return to the Picture Mode screen. Press the OK button to select the current Art Picture Mode. The camera will return to the Shooting Menu 1 screen with the symbol for the current mode displayed. Take your pictures.
Settings Recommendation: You may enjoy experimenting with this mode if you have an image that has lots of color. You can feel like a painter, or even use your image as the base for an actual painting. Use it with some of Photoshop’s plug-ins or special tools to make it even more painterly. Have some fun with this one!
Watercolor (Art 12)
The Watercolor Art Picture Mode takes the Key Line Mode a step further. It keeps some detail and changes everything into a watery, pastel art form that some will like and others will avoid. Colors tend to change into other colors; for instance, most whites seem to look yellowish, although stronger colors seem to remain intact. Most highlight detail washes out to pure white, and dark colors turn light gray. This mode makes images into colorful, high-key puddles with some detail.
The available filters and effects include the following:
Filter types
• Filter Type I: This filter creates pastel colors and lines with medium contrast. There is little highlight detail.
• Filter Type II: This filter creates pastel colors and lines with low contrast. There is almost no highlight detail.
Add effects
• Off: No extra effects are added to the image. Only the filter is added.
• Soft Focus: A dreamy blur effect is added to the image.
• Pin Hole: The corners of the image are darkened to pure black.
• White Edge: The corners of the image are brightened to pure white.
• Frame: A white frame is added to the image, and a processed film look is added to the edges of the picture inside the frame.
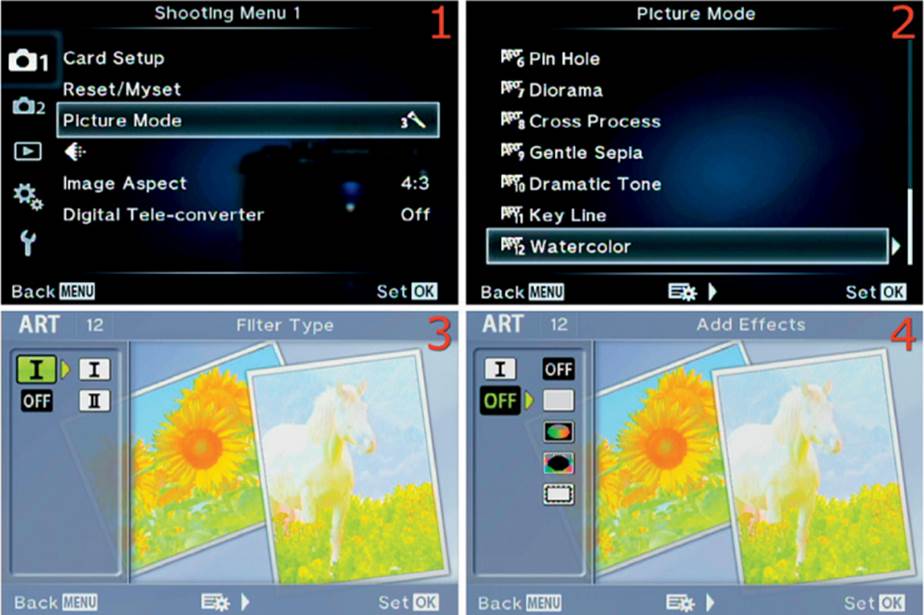
Figure 3.3Z: Watercolor (Art 12) Picture Mode
Use these steps to select and use the Watercolor Picture Mode:
1. Choose Picture Mode from Shooting Menu 1 and scroll to the right (figure 3.3Z, image 1).
2. Highlight Watercolor on the Picture Mode menu and press the OK button to select it for immediate use in default mode, which applies Filter Type I and no Add Effects. If you want to change the Filter Type and Add Effects settings before you take pictures, scroll to the right and proceed to step 3 (figure 3.3Z, image 2).
3. Select a Filter Type (figure 3.3Z, image 3). Your choices are I or II, as described in the previous list. Scroll to the right, then scroll up or down to highlight Filter Type I or II. Set the Filter Type by pressing the OK button.
4. Select an Add Effects type (figure 3.3Z, image 4). Scroll to the right, then scroll up or down to highlight one of the four Add Effects types, or Off, as described in the previous list. Set the Add Effects type by pressing the OK button.
5. When you are done, scroll to the left until you return to the Picture Mode screen. Press the OK button to select the current Art Picture Mode. The camera will return to the Shooting Menu 1 screen with the symbol for the current mode displayed. Take your pictures.
Settings Recommendation: This mode is almost too far out for me. There is so little highlight detail left that you would need to shoot in a darker area, or take a picture of a subject with very strong lines, to maintain any detail. Images taken in bright areas, or with low-texture subjects, can become featureless. If you use this mode, experiment in different light levels and in areas with different amounts of color and texture. Who knows, you may like it.
Vintage (Art 13)
The Vintage Picture Mode’s Filter Types allow you to tint an image so it looks like a faded, color-shifted image you would expect to see after a print has been hanging on a wall for many years. Vintage Picture Mode lets you choose from three Filter Types and nine Add Effects settings. The Add Effects settings offer virtually every special effect the camera can create, including two that are not available with any other Art Filter (i.e., the Shade Effect).
The available filters and effects are as follows:
Filter types
• Filter Type I: This filter creates a yellow-green pastel tint and lines with high contrast. There is little highlight detail.
• Filter Type II: This filter creates even lighter pastel colors with a more whitish, faded look, yet it retains high contrast. There is almost no highlight detail.
• Filter Type III: This filter creates more neutral and darker colors with a bit more highlight detail, yet it retains high contrast.
Add effects
• Off: No extra effects are added to the image. Only the filter is added.
• Soft Focus: A dreamy blur effect is added to the image.
• Pin Hole: The corners of the image are darkened to pure black.
• White Edge: The corners of the image are brightened to pure white.
• Frame: A white frame is added to the image, and a processed film look is added to the edges of the picture inside the frame.
• Star Light: A four-point star effect is added to points of light in the image.
• Blur Effect: Top and Bottom: A band of sharpness extends horizontally through the middle of the image, and the top and bottom of the image are blurred.
• Blur Effect: Left and Right: A band of sharpness extends vertically through the middle of the image, and the left and right sides of the image are blurred.
• Shade Effect: Top and Bottom: This effect provides a graduated darkening, similar to the Pin Hole effect. It is applied only to the top and bottom of the image.
• Shade Effect: Left and Right: This effect provides a graduated darkening, similar to the Pin Hole effect. It is applied only to the left and right sides of the image.
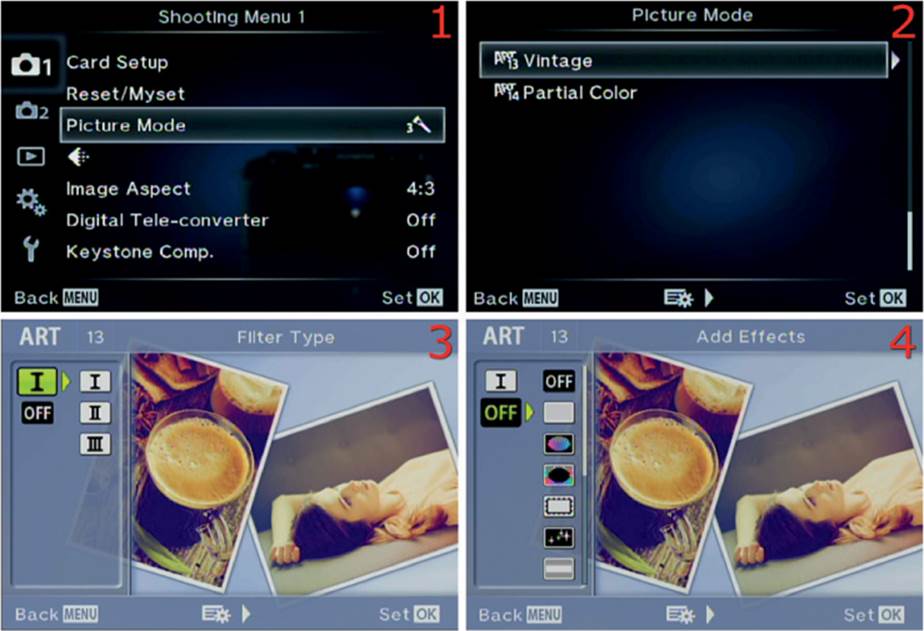
Figure 3.3ZA: Vintage (Art 13) Picture Mode
Use these steps to select and use the Vintage Picture Mode:
1. Choose Picture Mode from Shooting Menu 1 and scroll to the right (figure 3.3ZA, image 1).
2. Highlight Vintage on the Picture Mode menu and press the OK button to select it for immediate use in default mode, which applies Filter Type I and no Add Effects. If you want to change the Filter Type and Add Effects settings before you take pictures, scroll to the right and proceed to step 3 (figure 3.3ZA, image 2).
3. Select a Filter Type (figure 3.3ZA, image 3). Your choices are I, II, or III, as described in the previous list. Scroll to the right, then scroll up or down to highlight Filter Type I, II, or III. Set the Filter Type by pressing the OK button.
4. Select an Add Effects type (figure 3.3ZA, image 4). Scroll to the right, then scroll up or down to highlight one of the nine Add Effects types, or Off, as described in the previous list. Set the Add Effects type by pressing the OK button.
5. When you are done, scroll to the left until you return to the Picture Mode screen. Press the OK button to select the current Art Picture Mode. The camera will return to the Shooting Menu 1 screen with the symbol for the current mode displayed. Take your pictures.
Settings Recommendation: This mode provides an interesting way to tint your images. The three Filter Types provide colors that many people will like. I see this sort of thing a lot on Instagram and Facebook. Maybe the camera is imitating all the old filter effects you see from iPhone posts.
The Add Effects settings allow you to do all sorts of unusual things with the picture. This mode has more Add Effects types than any other Art Picture Mode. Therefore, you can experiment and enjoy your camera even more.
Partial Color (Art 14)
The Partial Color Picture Mode lets you use a previously configured Partial Color setup. After you have configured a Partial Color, all other colors will appear as monotone shades. You must use the ART Mode on the Mode Dial to choose a particular color. After you choose a color, it will appear as your Partial Color in any pictures you take while the Partial Color Picture Mode is selected.
Unfortunately, you cannot use the Shooting Menu 1 Partial Color selection to choose the Partial Color. You must configure the ART Mode on the Mode Dial before you use this Picture Mode. After you configure the Partial Color, the camera will use it to record pictures until you deselect Partial Color Picture Mode.
Let’s see how to choose a Partial Color.
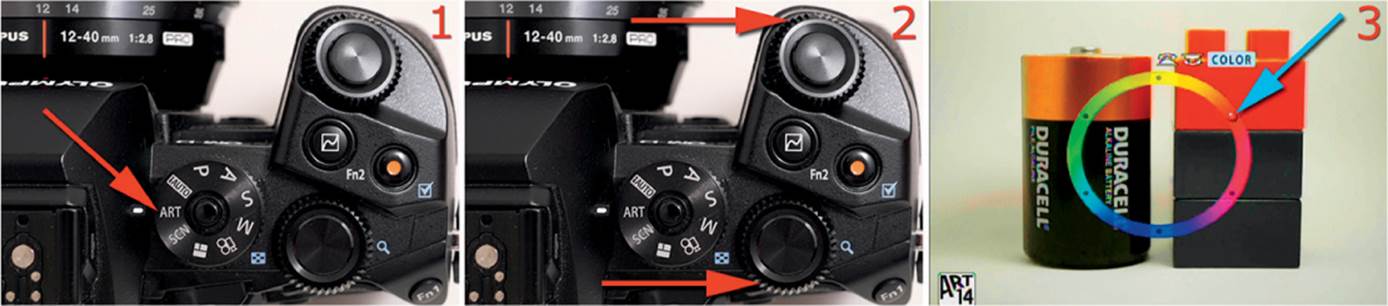
Figure 3.3ZB: Choosing a Partial Color in ART Mode on the Mode Dial
Use these steps to choose a Partial Color:
1. Set the Mode Dial to ART (figure 3.3ZB, image 1).
2. Turn either the Front Dial or the Rear Dial (figure 3.3ZB, image 2).
3. Move the indicator dot around the color circle until the color you want to use is shown as the Partial Color in the Live View display. As you can see from the blue arrow in figure 3.3ZB, image 3, I chose red. All red and reddish shades, such as the copper orange on the top of the battery, will be in color and the rest of the colors will be monotone shades of gray.
4. Take your pictures.
Note: If you select a Picture Mode other than Partial Color and use the ART Mode on the Mode Dial to take some Partial Color Pictures, the camera will use whatever Picture Mode you previously selected. When you leave the ART Mode set on the Mode Dial, it will not stay in Partial Color mode.
If you decide to take more pictures with the Partial Color you previously chose, simply select Partial Color Picture Mode. The camera will immediately use the Partial Color you selected while you were using the ART Mode until you change the Partial Color Picture Mode to another mode, such as Natural. (How to use Partial Color is described in more detail in the chapter titled Screen Displays for Camera Control on page 26.)
After you have selected Partial Color Picture Mode, you can modify how the chosen color and the other monotone shades are recorded by using a different Filter Type. You can also select one of the Add Effects types to change the picture borders and add other special effects.
The available filters and effects are as follows:
Filter types
• Filter Type I: This filter obeys the Partial Color you previously selected with the ART selection, camera dials, and color wheel. Filter Type I is a neutral filter. It renders all shades in the image in a neutral way.
• Filter Type II: This filter also obeys the Partial Color you previously selected with the ART selection, camera dials, and color wheel. Filter Type II gives the image a somewhat cooler look.
• Filter Type III: This filter also obeys the Partial Color you previously selected with the ART selection, camera dials, and color wheel. Filter Type III gives the image a somewhat warmer look.
Add effects
• Off: No extra effects are added to the image. Only the filter is added.
• Soft Focus: A dreamy blur effect is added to the image.
• Pin Hole: The corners of the image are darkened to pure black.
• White Edge: The corners of the image are brightened to pure white.
• Frame: A white frame is added to the image, and a processed film look is added to the edges of the picture inside the frame.
• Star Light: A four-point star effect is added to points of light in the image.
• Blur Effect: Top and Bottom: A band of sharpness extends horizontally through the middle of the image, and the top and bottom of the image are blurred.
• Blur Effect: Left and Right: A band of sharpness extends vertically through the middle of the image, and the left and right sides of the image are blurred.
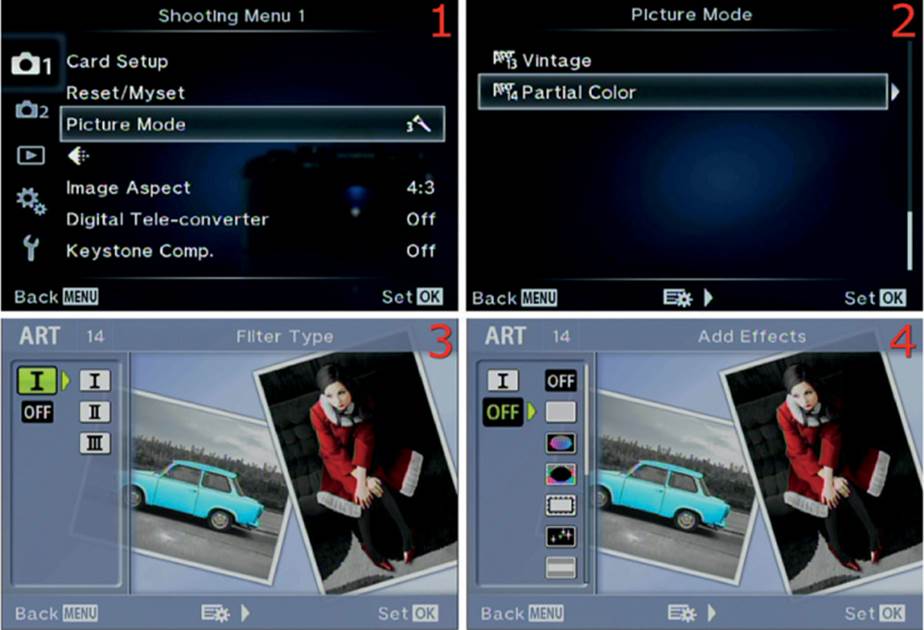
Figure 3.3ZC: Partial Color (Art 14) Picture Mode
Use these steps to select and use the Partial Color Picture Mode:
1. Choose Picture Mode from Shooting Menu 1 and scroll to the right (figure 3.3ZC, image 1).
2. Highlight Partial Color on the Picture Mode menu and press the OK button to select it for immediate use in default mode, which applies whatever Partial Color, Filter Type, and Add Effects settings you selected before entering the Partial Color Picture Mode (figure 3.3ZC, image 2). If you want to change the Filter Type and Add Effects settings before you take pictures, scroll to the right and proceed to step 3.
3. Select a Filter Type (figure 3.3ZC, image 3). Your choices are I, II, or III, as described in the previous list. Scroll to the right, then scroll up or down to highlight Filter Type I, II, or III. Set the Filter Type by pressing the OK button.
4. Select an Add Effects type (figure 3.3ZC, image 4). Scroll to the right, then scroll up or down to highlight one of the seven Add Effects types, or Off, as described in the previous list. Set the Add Effects type by pressing the OK button.
5. When you are done, scroll to the left until you return to the Picture Mode screen. Press the OK button to select the current Art Picture Mode. The camera will return to the Shooting Menu 1 screen with the symbol for the current mode displayed. Take your pictures.
Settings Recommendation: Shooting with only one or two colors in the image has become quite popular these days. Who hasn’t seen a lovely rose with the red showing and everything else in black-and-white? The firmware 2.0 update for the E-M1 allows you to easily shoot those interesting Partial Color pictures and videos.
Note: Don’t discount all these filter types and effects. You would have to work hard in a program such as Photoshop or Lightroom to obtain similar results. I suggest that you experiment with these modes and see what you can come up with!
Art Picture Mode Bracketing
As if the E-M1 is not amazing enough, it has one of the most unusual functions I have ever seen in a camera. You can take a single picture and the camera will make 14 duplicates while you watch. It applies each of the 14 Art Picture Modes to the new images. You end up with the original image plus 14 pictures that display each Art Mode. It takes only a few seconds and gives you a wide variety of images to choose from.
This function is not part of the menu-based Picture Mode system. It is available only when you select the Art Picture Modes from the Mode Dial on top of the camera. See the chapter called Screen Displays for Camera Control under Art Picture Mode selection number 15 (ART BKT)for information about how to use the Art Picture Mode bracketing function.
[Record Mode]
[Record Mode], also known as image quality or movie quality mode, provides the basic file formats your camera uses for taking still pictures and shooting video. Basically, the camera can capture still images in several varieties of JPEG, or in ORF files, which is the Olympus RAW image format. Additionally, the E-M1 has several high definition (HD) video modes and one standard definition (SD) mode. Let’s examine the still and video formats.
Still Image Formats
There are two still image formats available in the E-M1: JPEG and RAW (ORF). We will examine both of these formats and discuss their pros and cons, but first let’s see how to select a format.
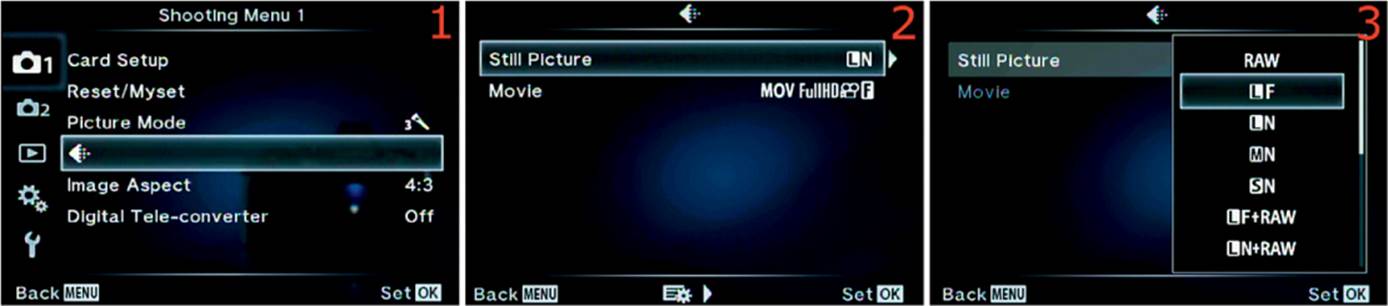
Figure 3.4A: Selecting a JPEG format
1. Select [Record Mode] (it looks like a diamond) from Shooting Menu 1 and scroll to the right (figure 3.4A, image 1).
2. Choose Still Picture from the [Record Mode] menu and scroll to the right (figure 3.4A, image 2).
3. You will see five basic modes and four combination modes (figure 3.4A, image 3). If the camera is set to the defaults, the basic modes are RAW, LF, LN, MN, and SN. (The menu shown in figure 3.4A, image 3, can be configured to reflect the modes you use most frequently. We will discuss how to change it in the note after these steps.) The JPEG+RAW combination modes create both a RAW file and a JPEG file each time you take a picture. The default selections for the combination modes are LF+RAW, LN+RAW, MN+RAW, and SN+RAW. You can’t see the last two combination modes in figure 3.4A, image 3, because you have to scroll down. We will talk more about RAW images in the next subsection. Highlight one of the basic or combination formats and press the OK button to select it. I chose Large Fine or (LF).
Note: There is another setting called Super Fine (SF). It is not enabled when your camera is new. Large Super Fine (LSF) creates even better images than Large Fine (LF). To make LSF available, you must adjust a setting under the Custom Menu, then LSF will appear instead of LF on the menu in figure 3.4A, image 3. In the Custom Menu, adjust the (G) [Record Mode] Set function to SF, as shown in figure 3.4B (see the next subsection).
Image Size, Pixel Count, and JPEG Compression Ratios
The E-M1 gives you a choice of several RAW or JPEG image sizes and pixel counts, including Large (L), Middle (M), and Small (S). You can also choose from several JPEG compression levels, including Super Fine (SF), Fine (F), Normal (N), and Basic (B). JPEG files have a certain compression ratio, depending on the compression rate (SF, F, N, and B). Table 3.1 lists the compression rate names and the compression ratio for that type of JPEG.
For instance, the Fine (F) compression ratio is 1:4, which means the file size will be 25 percent of the original file size (1 ÷ 4 = 0.25). The Normal (N) compression ratio is 1:8, which means the compressed JPEG is 12.5 percent of the original file size (1 ÷ 8 = 0.125). JPEG files are compressed with lossy compression, which means a large portion of the image data is thrown away. A 1:4 compression ratio, with a file size that is only 25 percent of the original file size, results in a permanent loss of 75 percent of the image data. That’s why you must take accurate JPEG pictures so you don’t have to post-process them later. When you change and resave a JPEG image, more compression is applied to an already compressed image and even more data is thrown away.
On the other hand, RAW files are compressed with automatic (you can’t change it) lossless compression that keeps all data and still compresses the image by 20 to 40 percent, depending on the complexity of the subject. The lossless compression of a RAW file does not throw away any data. Therefore, you can modify and resave a RAW file over and over with no data loss. You cannot disable the lossless compression on RAW files. Don’t worry, though, because the lossless compression of a RAW file is like the familiar ZIP format on your computer. All the original data returns when the file is uncompressed. Your RAW conversion software will decompress the RAW file without your intervention.
On your camera menus, you will see the size and compression rate names combined for JPEG settings. For instance, a Large-size, Fine-compression rate JPEG will be listed as LF, and a Medium-size, Normal-compression rate JPEG will be shown as MN.
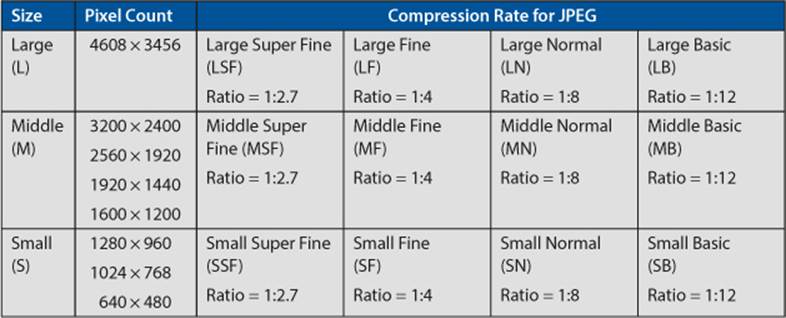
Table 3.1: JPEG format size, pixel count, and compression
Table 3.1 lists the available image sizes, pixel counts, and compression ratios in the E-M1. The size for RAW mode is always Large (L) 4608 × 3456. RAW files always contain all available image data and cannot be resized in-camera. JPEG images have adjustable sizes, pixel counts, and compression rates.
Figure 3.4B shows how to use the Custom Menu > G. [Record Mode]/Color/WB > [Record Mode] Set function to change the default choices for the compression rate (SF, F, N, and B). After you make a change on the Custom Menu screen shown in figure 3.4B, image 3, the Shooting Menu 1’s [Record Mode] (image quality) will offer you the compression choices you chose in the Custom Menu, instead of the factory default settings. Before making the change in the Custom Menu, your camera most likely offers you the following compression rates: LF, LN, MN, and SN.
Why settle for a Large Fine (LF) JPEG when a Large Super Fine (LSF) JPEG is available? I set my camera to use LSF, LF, MF, and SF. However, you may have a need for a normal (N) or basic (B) JPEG. The camera gives you the ability to make any of those settings available to theShooting Menu > [Record Mode] > Still Picture function by changing the settings in the Custom Menu > G. [Record Mode]/Color/WB > [Record Mode] Set function.
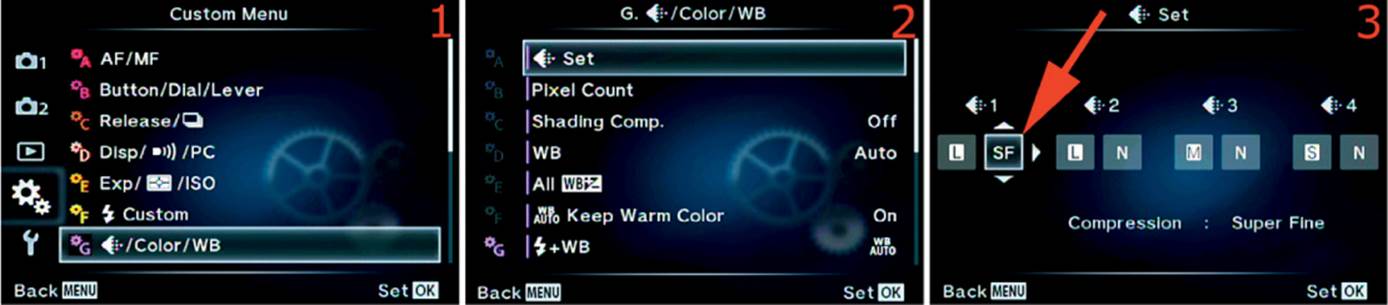
Figure 3.4B: Changing the default compression rate
The compression rate for JPEGs shown in table 3.1 is controlled through the Custom Menu, as shown in figure 3.4B. You can modify any of the four JPEG settings shown in figure 3.4B, image 3, and the new settings will replace the old ones. Large Super Fine (LSF) is selected in figure 3.4B, image 3. Your selections will also appear in other camera menus that offer JPEG size and compression settings (such as the menu shown in figure 3.4A, image 3). This is discussed in more detail in the Custom Menu chapter under the [Record Mode] Set subheading on page 392.
You can also choose a different pixel count if you need to shoot a smaller megapixel (MP) size than the camera’s native 4608 × 3456 pixel count (16 MP). Only JPEG images are affected by changing the pixel count. Figure 3.4C shows the screens used to choose a different MP size for your JPEG pictures.
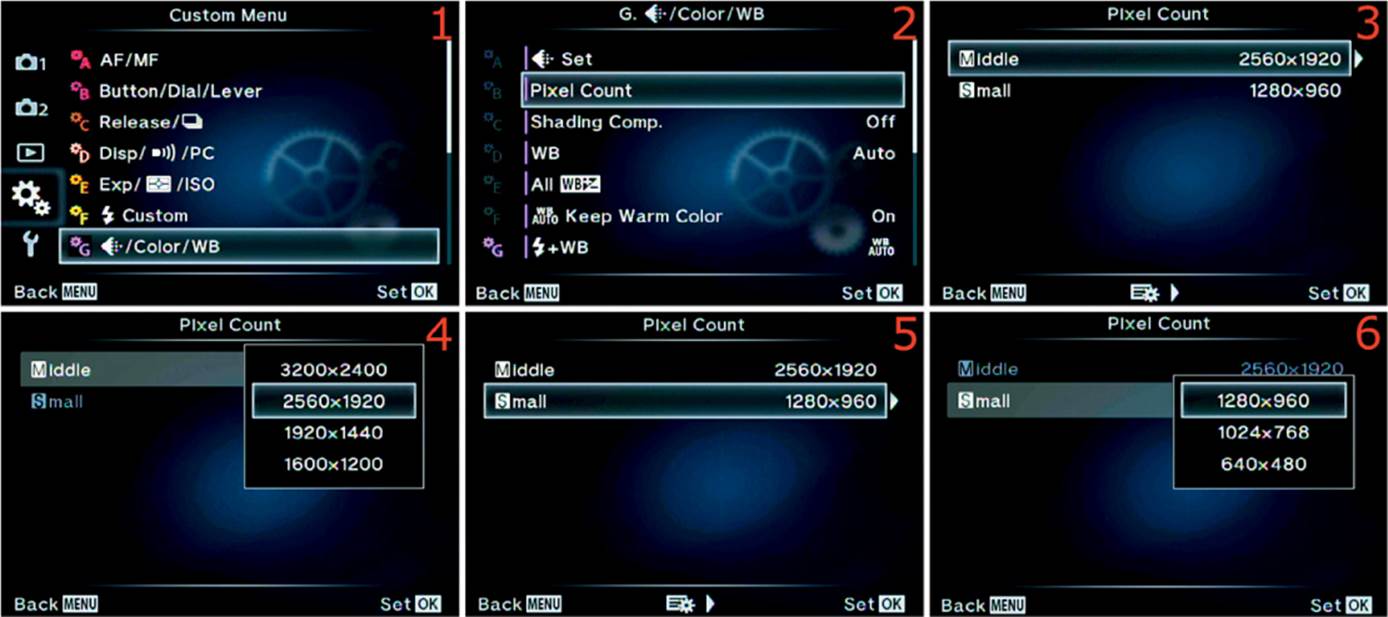
Figure 3.4C: Choosing a smaller MP size for your images
You can control the pixel count, as shown in table 3.1, with the Custom Menu (figure 3.4C). This is discussed in more detail in the Custom Menu chapter under the Pixel Count subheading on page 394.
Now, let’s examine the two available formats and see how they work.
JPEG Format
JPEG format is used by people who want excellent image quality but have little time for, or interest in, post-processing or converting images to another format. They want to use images immediately with no major adjustments.
The JPEG format applies your chosen camera settings to the image when it is taken. The image comes out of the camera ready to use, as long as you have exposed it properly and have configured all the other settings appropriately.
Since JPEG is a lossy format—because image compression permanently throws data away—you cannot modify and save a JPEG file more than a time or two before compression losses begin to degrade the image. Therefore, make sure to shoot JPEG images correctly in the first place.
The compression rate of a JPEG image affects the overall image quality. Super Fine mode will give you the best looking picture since the compression ratio is rather low. Each higher compression rate, Fine through Basic, throws away more color information, but the smaller file takes up less room on your computer. You will need to balance your desire for image quality with your available storage space.
Photographers who shoot a lot of images or don’t have time to post-process RAW often shoot JPEGs. That encompasses a lot of photographers.
Nature photographers might want to use RAW (ORF) format since they often have more time for processing images and wringing the last drop of quality out of them, but event or journalist photographers on deadlines may not have the time for, or interest in, processing images, so they often use the JPEG format.
Here are the pros and cons of capturing JPEG images:
JPEG positives
• Allows for the maximum number of images on a memory card and computer hard drive.
• Allows for the fastest transfer from the camera memory buffer to a memory card.
• Compatible with everything and everybody in imaging.
• Uses the printing industry standard of 8 bits.
• Produces high-quality, first-use images.
• No special software is needed to use the image right out of the camera (no post-processing).
• Immediate use on websites with minimal processing.
• Easy transfer across the Internet and as e-mail attachments.
JPEG negatives
• JPEG is a lossy format.
• You cannot manipulate a JPEG image more than once or twice before it degrades to an unusable state. Every time you modify and save a JPEG image, it loses more data and quality because of data compression losses.
Settings Recommendation: Because JPEG images are compressed, even the largest files do not take up that much space. Therefore, when I shoot JPEGs, I use Large Super Fine (LSF) most of the time. The only time I would use a higher compression rate is if I were running out of card space on an important shoot. Computer hard drives are cheap these days. Why limit the quality of your images just to save some storage space?
RAW (ORF) Format
RAW [Record Mode] is the image purist’s mode of choice. It’s important that you understand that RAW (ORF) file s are not really images—yet. The RAW format is merely a container that stores a small sample JPEG file, black-and-white image data, color information markers, and camera setting markers. The RAW file must be converted to another file type before you can use it.
When you take a picture in RAW format, the camera records the raw image data from the sensor and stores markers for how the camera’s color, sharpening, contrast, saturation, and so forth are set, but it does not apply the camera setting information to the image. In your post-processing software, the image will appear on-screen with the settings you initially configured in your E-M1 (or a best estimate). However, these settings are applied temporarily so you can see them.
If you don’t like the white balance you selected when you took the picture, simply apply a new white balance and the image will appear as if you had used that setting when you captured the image. If you used Natural Picture Mode and now want to use Vivid Picture Mode, you can apply it before the final conversion, and it will be as if you used it when you shot the picture. You can even apply an Art Picture Mode after the fact if you want to.
This is quite powerful! Virtually no camera settings are applied to a RAW file permanently. During post-processing you can apply completely different settings to the image and it will look like you used those settings when you took the picture. This allows a lot of flexibility later. You simply cannot do that with a JPEG file without causing compression damage.
RAW (ORF) is generally used by photographers who are concerned with maximum image quality and who have time to convert the images. When you shoot a RAW image, it is saved on the memory card in your camera, and later in your computer, as a file ending in ORF.
Here are the pros and cons of RAW (ORF) format:
RAW (ORF) positives
• Allows the manipulation of image data to achieve the highest-quality image available from the camera.
• All original details stay with the image for future processing needs.
• No conversions, sharpening, sizing, or color rebalancing will be performed by the camera. Your image data is untouched and pure!
• You can convert ORF files to any other image format by using your computer’s much more powerful processor instead of your camera’s processor.
• You have much more control over the final look of the image since you, not the camera, make the final decisions about the appearance of the image.
• The ORF file’s 14-bit format stores maximum color information for later use.
RAW (ORF) negatives
• Not often compatible with the publishing industry, except after conversion to another format.
• Requires post-processing with proprietary Olympus software or third-party software.
• Larger file sizes are created, so you must have more storage media.
• There is no industry-standard RAW format. Each camera manufacturer has its own proprietary format. Adobe has developed a generic RAW format called digital negative (DNG) that is becoming an industry standard. You can use various types of software, such as Adobe Lightroom, to convert your RAW images to DNG if you desire.
• The industry standard for home and commercial printing is currently 8 bits, not 14 bits.
Steps for RAW Conversion in Olympus Viewer 3 Software
Here are the basic steps to convert a RAW (ORF) file into JPEG or TIFF format by using the free Olympus Viewer 3 software:
1. Transfer the images from your camera to your computer.
2. When you see images on the computer screen in Viewer 3, you will see the word RAW in the upper-right corner of the RAW (ORF) images (or R+J when there is both a RAW and a JPEG image).
3. Right click the RAW image and select Open Edit Window.
4. On the right side of the screen under the Histogram display, you will see two tabs: Edit and Raw. Both of these screens allow you to change all sorts of things in the RAW image before you save it as a JPEG (or other format). The Raw tab even lets you change things like Picture Mode andWhite balance.
5. Make your changes, and the computer will update the image immediately after each change. The changes won’t be permanently saved until you save the file as another format.
6. When you are done adjusting the image, open the File menu and select Export. The Export Image window will open.
7. Select a file name, format (JPEG, TIFF), JPEG compression, and Resize for converting the image. Use Exif-JPEG or Exif-TIFF if you want to preserve the EXIF data in the image metadata (e.g., lens, focal length, shutter speed, aperture, ISO setting).
8. Press the Export by Batch Processing button. In the right-lower corner the software will show a progress bar that says Processing... and the number of images being converted in parenthesis (you can convert a large number of images in one batch).
9. Finish will appear where Processing... was previously, with a solid orange progress bar, after your images have been converted.
Settings Recommendation: I use the RAW (ORF) format most of the time. I think of a RAW file like I thought of my slides and negatives a few years ago. It’s my original image that must be saved and protected. I am primarily a nature photographer, so I make time to post-process each important image. You may not have time for that, or maybe you’re not interested in post-processing. In that case JPEG images may be more reasonable for your shooting style. The format you use most often will be dictated by your time constraints and digital workflow.
If you normally shoot JPEGs, experiment with the free Olympus Viewer 3 software by converting a few RAW images as previously described.
Combined JPEG+RAW Shooting (Two Images at Once)
Some photographers use one of the four [Record Mode] settings (partially shown in figure 3.4A, image 3). These JPEG+RAW modes save two images at the same time: one JPEG and one RAW. Here are the factory default settings for the combined format shooting:
• LF+RAW
• LN+RAW
• MN+RAW
• SN+RAW
These settings give you the best of both worlds because the camera saves an ORF file and a JPEG file each time you press the Shutter button.
You can use the RAW (ORF) file to store all the image data and later process it into a masterpiece, and you can use the JPEG file immediately with no adjustment.
The JPEG+RAW modes have the same features as their stand-alone modes. In other words, a RAW file in a JPEG+RAW mode works like a RAW file in RAW (ORF) mode, and a JPEG file in a JPEG+RAW mode works like a JPEG SF, F, N, or B file on its own.
Keep in mind that you can change the default settings for the combined modes by changing the Custom Menu (G) [Record Mode] Set values for JPEG compression (figure 3.4B). The JPEG compression modes you choose appear both in the camera menus for standard JPEG files and for the combined shooting modes.
Image Format Recommendation
Which format do I prefer? Why, RAW, of course! But it does require a bit of commitment to shoot in this format. RAW (ORF) files are not yet images and must be converted to another format for use. After they are converted, they can provide the highest-quality images your camera can possibly create.
When you shoot in RAW, the camera is simply an image-capturing device and you are the image manipulator. You decide the final format, compression ratio, size, color balance, and so forth. In RAW (ORF) mode, you get the best image your camera can produce. It is not modified by the camera software and is ready for your personal touch. No camera processing allowed!
If you get nothing else from this section, remember this: by letting your camera process images in any way, it modifies or throws away data. There is a finite amount of data for each image that can be stored in your camera, and later in your computer. With JPEG, your camera optimizes the image according to the assumptions recorded in its memory. Data is thrown away permanently, in varying amounts.
If you want to keep all the image data that was recorded with your images, you must store your originals in RAW format. Otherwise you’ll never be able to access the original data to change how it looks. A RAW file is the closest thing to a film negative or transparency that your digital camera can make. That’s important if you would like to modify the image later. If you are concerned with maximum quality, you should probably shoot and store your images in RAW format. Later, when you have the urge to make another masterpiece out of the original RAW image file, you’ll have all your original data intact for the highest-quality image.
Video Formats
The E-M1 not only lets you take excellent still images, but it also offers a series of excellent video modes that allow you to make movies up to 29 minutes long.
The camera has three video capture modes: 1080/30p, 720/30p, and 480/30p. They use two common compressed-video formats: H.264 MPEG-4 AVC and Motion JPEG. Table 3.2 lists the available video recording formats.
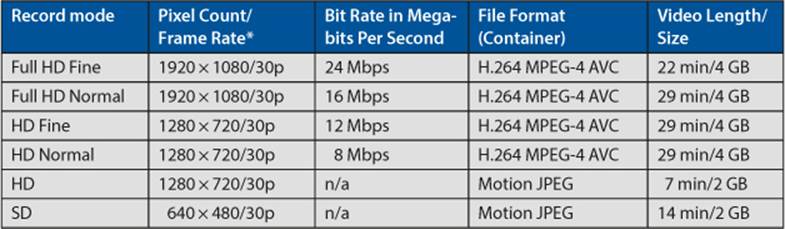
Table 3.2: Video [Record Mode] formats, pixel counts, frame and bit rates, video lengths, and file sizes
* Even though 30p is the listed video frame rate, the frame rate is actually 29.97 frames per second (fps) in the H.264 MPEG-4 AVC format. This may be important when you try to interface your camera with other devices. The Motion JPEG format also lists 30p as the frame rate, but that frame rate can vary when you use Art Picture Modes while shooting video. Some Art Picture Modes require more processing time and will slow the frame rate by various amounts, depending on the filter. Therefore, 30p is the best Motion JPEG frame rate you can expect, but it will often be less.
External Video Output
The E-M1 can send video out of its HDMI port for capture by an external recorder, such as the Atomos Blade (www.Atomos.com). However, the camera does not provide clean, uncompressed video when it uses the HDMI port, so the viewfinder and monitor screen overlays will appear in the video when you use an external video recorder.
You may want to play with capturing video from the camera’s USB A/V port. You’ll need an Olympus CB-AVC4 USB A/V cable. Similar to the output from the HDMI port, the viewfinder and monitor screen overlays will appear in output from the A/V port, too.
To get video free of the viewfinder and monitor screen overlays, you must use the standard video [Record Modes] listed in table 3.2 and as shown in figure 3.4D.
Note: When you use the HDMI port to send video to an external HDTV, monitor, or recorder, you can select the following output formats: 1080i, 720p, or 480p NTSC (576p PAL) by using the Custom Menu > Disp/[Sound]/PC > HDMI Out setting.
Video Container Formats
The H.264 MPEG-4 AVC and Motion JPEG file formats use MOV and AVI containers that hold the video, audio, and supporting data inside one file. When you are doing research on the Internet about these formats, add the words MOV or AVI containers to your search.
The H.264 MPEG-4 AVC format has an unusual way of compressing data. Instead of storing a series of discrete picture frames, it stores only areas of the frame with motion changes between key frames; the key frames store full pictures. This results in very compressed video with relatively high quality, but it is more difficult to edit the video because the editing software has to reconstruct individual frames.
The Motion JPEG format provides a series of small, very compressed JPEG images. Each image is an integral picture that you can easily edit. For people who like to do extensive editing, Motion JPEG may be the best option. However, this format makes much larger files than the H.264 format, so the video length and file size are seriously limited when you shoot in this format.
Selecting a Video Format
It’s easy to select a Movie (video) format, but you should carefully consider the previous information before you shoot.
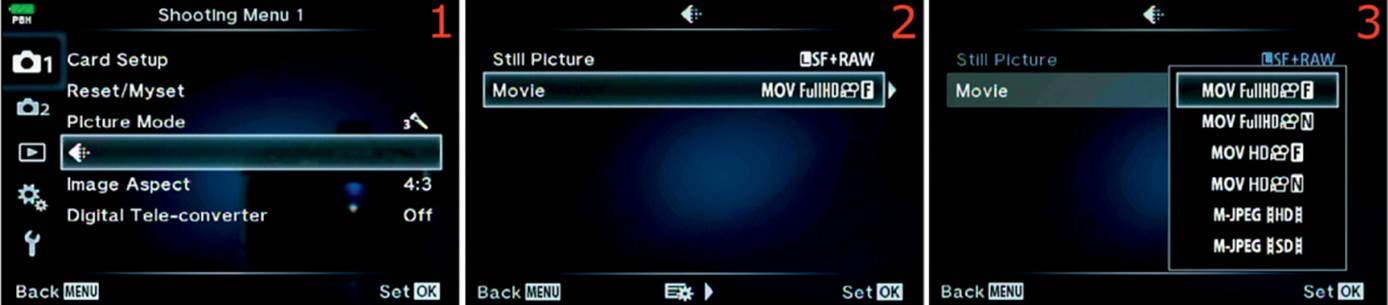
Figure 3.4D: Selecting a Movie mode for recording videos
Use the following steps to choose a [Record Mode]:
1. Select the [Record Mode] symbol (looks like a diamond shape) from Shooting Menu 1 and scroll to the right (figure 3.4D, image 1).
2. Choose Movie from the [Record Mode] menu and scroll to the right (figure 3.4D, image 2).
3. The Movie Record selection menu will display the six modes that are listed in table 3.2 (figure 3.4D, image 3). Highlight one of the modes. I chose MOV Full HD Fine. Press the OK button to lock it in, then shoot your movie!
Note: All modes that start with MOV use H.264 MPEG-4 AVC format and use a MOV container. The modes that start with M-JPEG use Motion JPEG format and use an AVI container. Refer to table 3.2 to review the limitations of each mode.
Making a Video Recording
After you have configured your camera for video capture, you are ready to record a video.
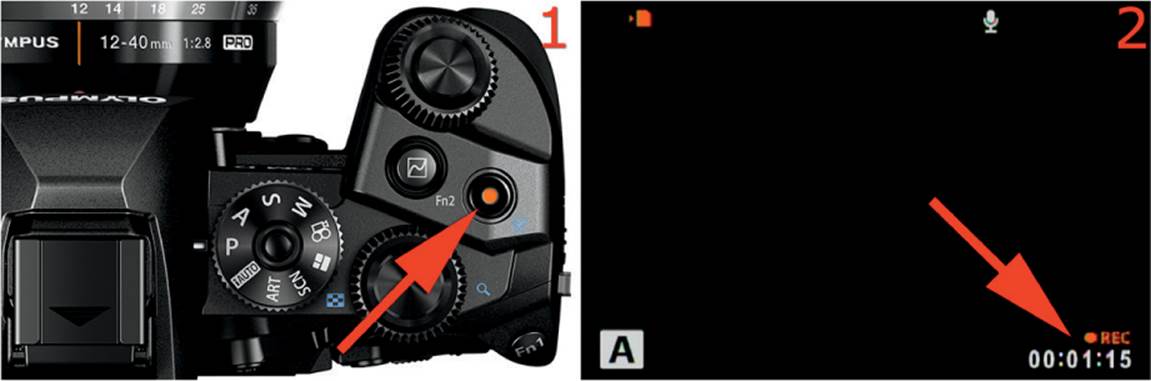
Figure 3.4E: Use the Movie button to start and stop a video recording
Use these steps to start, record, and stop a video capture session:
1. Start the video recording by pressing the Movie button (figure 3.4E, image 1).
2. A REC symbol will blink to indicate that video is being captured. The time counter just below the REC symbol will display the recording time. My video has been recording for 1 minute and 15 seconds, which is represented by 00:01:15 (figure 3.4E, image 2).
3. Press the Movie button again to stop the video. You’ve made a movie!
Settings Recommendation: I want my videos to have the greatest possible quality, so I normally shoot in MOV Full HD Fine (1080/30p at 24 Mbps) for up to 22 minutes of video. I record multiple segments and use Adobe Premier Pro to assemble the segments into a movie.
If I wanted to record for a longer time period (up to 29 minutes) and were willing to accept a little lower video quality, I might use the MOV Full HD Normal mode (1080/30p at 16 Mbps). That’s about as low I will allow my video quality to go. However, it might be fun to shoot some SD 480/30p videos just for fun and to post on social media sites.
One thing you need to carefully experiment with when you shoot video is the Image Stabilizer. This function is configured at Shooting Menu 2 > Image Stabilizer > Movie. You can select On or Off. If you are shooting video while you are walking straight forward or are not moving the camera from side to side, stabilization works amazingly well to keep the image stable. But if your video requires panning from side to side, you may not want to use image stabilization. The camera will attempt to correct the panning motion until it runs out of room to adjust, then it will make a little jump in your video. This looks strange and might even ruin the video. You will have to try it and see if the panning motion jumps are acceptable to you.
Image Aspect
The Image Aspect ratio of a picture is the ratio of the sides to each other. When the length of the sides change, the horizontal to vertical ratio changes.
The easiest way to understand Image Aspect is to see a group of images that were taken with the five available Image Aspect ratios, which are 4:3, 3:4, 1:1, 3:2, and 16:9.
I tried to maintain the size of the birdhouse in the images shown in figure 3.5A so you can see how the ratio affects the image frame. The E-M1 camera uses 4:3 as the default ratio. Many other camera brands use 3:2 as the default, which results in longer and more narrow images.
You can choose from five Image Aspect ratios. Be aware that changing the Image Aspect ratio also changes the megapixel rating of the image.

Figure 3.5A: Comparison of Image Aspect ratios
Image Aspect ratios apply only to JPEG images. When you shoot RAW images the camera will store a reference to the ratio in the metadata, and it will display the aspect ratio as a smaller frame inside the normal 4:3 image border.
Figure 3.5B: RAW image displaying a 1:1 Image Aspect ratio frame
Figure 3.5B shows a RAW image taken with the 1:1 Image Aspect ratio. The normal 4:3 image is displayed on the camera screens and in the Olympus Viewer 3 software. When you view the image it has a temporary frame that outlines the chosen aspect ratio, which, in this case, is 1:1.
If you later decide you do not want to use the ratio you chose, you can change it later without affecting the image size, but only if you shot the image in RAW format. With a JPEG you would have to crop the image, which discards part of the image, to change the aspect ratio.
Now, let’s examine how to choose an Image Aspect ratio.
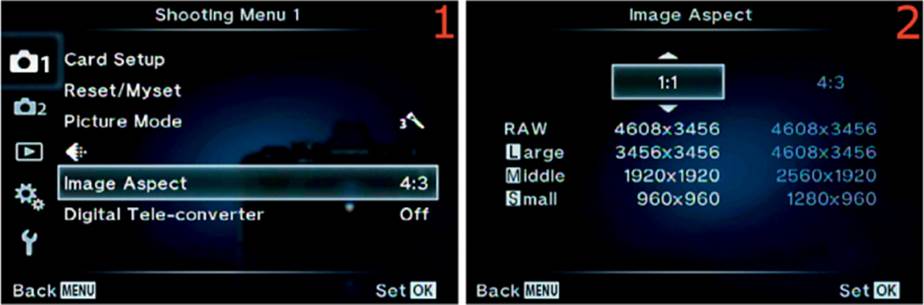
Figure 3.5C: Choosing an Image Aspect ratio
Use the following steps to choose an Image Aspect ratio:
1. Select Image Aspect from Shooting Menu 1 and scroll to the right (figure 3.5C, image 1).
2. Using the up/down menu, select one of the five Image Aspect ratios: 4:3, 3:4, 1:1, 3:2, or 16:9. I chose 1:1 (figure 3.5C, image 2).
3. Press the OK button, and the camera will display the Shooting Menu 1 screen with the selected Image Aspect showing.
Determining the Megapixel Size for a New Image Aspect Ratio
In figure 3.5C, image 2, you can see that pixel dimensions are displayed for each Image Aspect ratio you choose (below the up/down menu). The pixel dimensions of a RAW image will not change because the camera saves all the image data when you shoot in RAW (ORF).
However, you will see the Large, Middle, and Small JPEG pixel dimensions change with each Image Aspect ratio change. You can compare the new dimensions with the dimensions of the normal 4:3 Image Aspect ratio because they are displayed on the right side of the screen.
You can determine the megapixel size of the new image by multiplying the numbers in the pixel dimensions. For instance, in figure 3.5C, image 2, a Large JPEG is 3456 × 3456 when you use the 1:1 Image Aspect ratio. Multiply the numbers to find the megapixel size of the image:
3456 × 3456 = 11,943,936
The image will have a size of almost 12 MP (11.94 MP). This number will vary with each Image Aspect ratio.
Settings Recommendation: Image Aspect ratios are useful primarily for people who shoot a lot of JPEG images and don’t want to crop the image later. Basically the camera crops the image for you, in-camera, when you select an Image Aspect ratio other than the default of 4:3. If you shoot in RAW most of the time, you can safely ignore this function. RAW shooters are accustomed to post-processing their images, and adjusting the aspect ratio (cropping) is a common post-processing step.
Digital Tele-converter
Digital Tele-converter makes the camera function as if the mounted lens has a longer focal length than it really does.
Let’s say you have a 12–40mm lens on the camera. Normally the maximum zoom would be 40mm. However, when you enable the Digital Tele-converter you can zoom to 80mm instead of 40mm. Although this may seem appealing, the 2x zoom factor is not an optical zoom. Instead, the camera crops the image so it looks like the scene is twice as close. It then saves the image at the normal size with a loss of image quality. You could do the same thing by enlarging the image in your computer then cropping it.
Let’s see how to use this function in case you want to experiment with it.
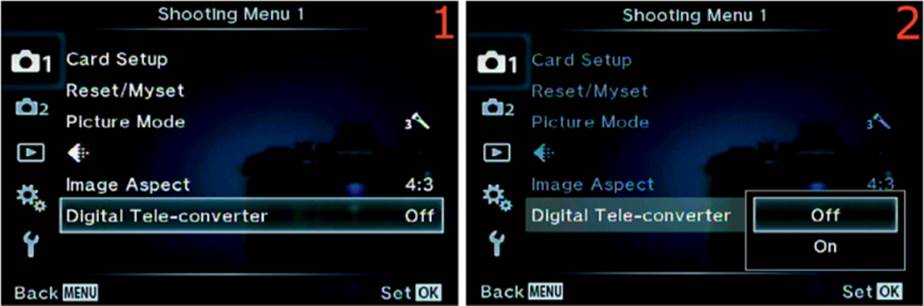
Figure 3.6: Enabling or disabling Digital Tele-converter
Use the following steps to use the Digital Tele-converter:
1. Select Digital Tele-converter from Shooting Menu 1 and scroll to the right (figure 3.6, image 1).
2. Highlight Digital Tele-converter and scroll to the right. A menu will open (figure 3.6, image 2). Scroll to choose Off or On.
3. Press the OK button to lock in your selection.
If you are shooting JPEG files, the camera will artificially double the focal length of your lens by cropping the image in-camera. Your 12–40mm lens becomes a 24–80mm lens, and the images will have much lower quality when they are enlarged.
If you are shooting in RAW mode, the camera captures all the image data and puts a frame around the area the Digital Tele-converter would have captured. The frame is displayed on the camera screens and in the Olympus Viewer 3 software. However, a RAW image is still a RAW image, and all the data is available.
Settings Recommendation: Unless you are in the woods without a long telephoto lens and you see Bigfoot or a yeti that you must capture, I would leave this function alone. Just shoot the image normally and crop it later. This type of function is offered on the cheapest point-and-shoot cameras, but cropping an image from the center of a picture and then enlarging it destroys the image quality.
Keystone Comp.
Keystone Comp. makes your E-M1 act like one of those big view cameras, with its tilts, swings, and excellent distortion correction. You use the function while you view the subject on the monitor, not later in post-processing. Keystone Comp. allows you to correct the odd leaning-backwards perspective distortion you see when you point a wide-angle lens upward to capture a tall subject (vertical plane tilt). Additionally, you can use this function to correct perspective distortion on a horizontal plane (swing). The results of this powerful function are easier to see than describe, so let’s examine how it works.
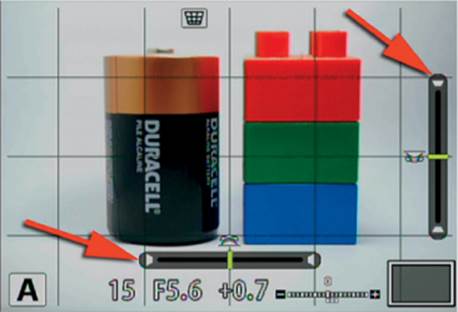
Figure 3.7A: Normal subject view with Keystone Comp. function set to on
In figure 3.7A you can see a battery and building blocks in a normal, straight-on configuration. Notice that there are two adjustable indicators on the screen (red arrows). The top red arrow points to the tilt control, which allows you to tilt the top or bottom of the image toward or away from you. Tilt correction is applied with the Rear Dial. The bottom red arrow points to the swing control, which allows you to swing the left or right side of the image toward or away from you. Swing correction is applied with the Front Dial.
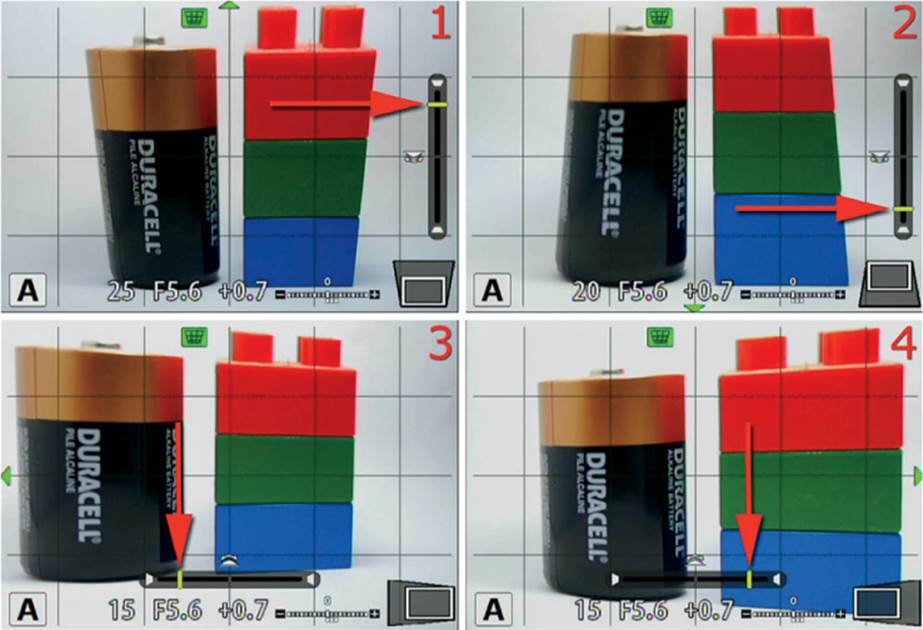
Figure 3.7B: Making adjustments to the subject with the Keystone Comp. function
In figure 3.7B I used the tilt-swing features of the Keystone Comp. function to make the subject swing left and right or tilt front to back—without moving the camera.
In image 1 the tilt indicator is at the top of the scale, and the camera is tilting the top edge of the image toward you. The bottom of the image stays the same.
In image 2 the tilt indicator is at the bottom of the scale, and the camera is tilting the bottom edge of the image toward you. The top of the image stays the same.
In image 3 the swing indicator is at the left side of the scale, and the camera is swinging the left side of the image toward you. The right side of the image stays the same.
In image 4 the swing indicator is at the right side of the scale, and the camera is swinging the right side of the image toward you. The left side of the image stays the same.
Now let’s examine how to enable and disable Keystone Comp.
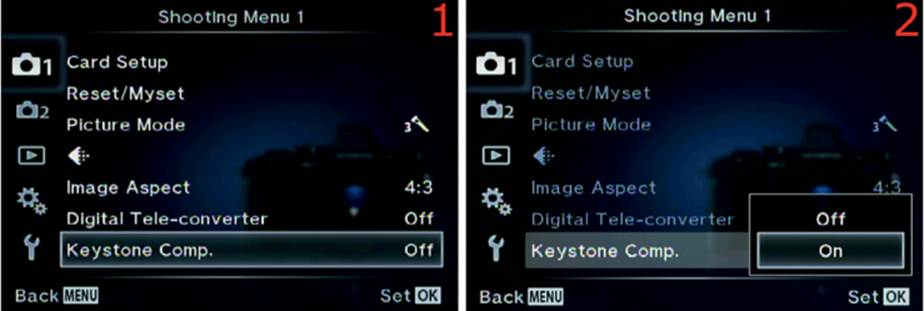
Figure 3.7C: Enabling or disabling Keystone Comp.
Use the following steps to use the Keystone Comp. function:
1. Select Keystone Comp. from Shooting Menu 1 and scroll to the right (figure 3.7C, image 1).
2. Highlight Keystone Comp. and scroll to the right. A menu will open (figure 3.7C, image 2). Scroll to choose Off or On. If you choose On, the camera will switch the Live View screen to Keystone Comp. mode, with the tilt-swing indicators (figure 3.7B). When the camera is in this mode you can’t easily change the exposure because the Front Dial and Rear Dial are tied up with Keystone Comp. adjustments. Therefore, it’s important to set the exposure correctly before you enter Keystone Comp. mode to take a picture.
3. Press the OK button to lock in your selection.
Settings Recommendation: Although this tilt and swing method is not quite up to the standards of a view camera’s tilt and swing system or an optical tilt-shift lens, it is a quick way to add some distortion correction on the fly. It tends to stretch the edges of images, so I don’t use this function for large adjustments. However, for a little tweaking it’s fun to use.
Author’s Conclusions
This is one complex little camera! However, with complexity comes great configurability and power. The next chapter will consider the more advanced options of Shooting Menu 2, which lets you control things like Frame Speed, Bracketing, HDR, Multiple Exposures, and Time Lapse.
All materials on the site are licensed Creative Commons Attribution-Sharealike 3.0 Unported CC BY-SA 3.0 & GNU Free Documentation License (GFDL)
If you are the copyright holder of any material contained on our site and intend to remove it, please contact our site administrator for approval.
© 2016-2026 All site design rights belong to S.Y.A.