Mastering the Olympus OM-D E-M1 (2015)
Chapter 4. Shooting Menu 2: Advanced Shooting Options
Image © Darrell Young
Shooting Menu 2 contains advanced shooting options for the E-M1. In this chapter we will discuss how to use functions that are used less often than the functions in Shooting Menu 1. The advanced options are important for expert use of this professional camera.
Here is a basic look at Shooting Menu 2 and its seven selections. We will take a closer look later in this chapter. Be sure to have your camera in hand and make adjustments as you work through the sections.
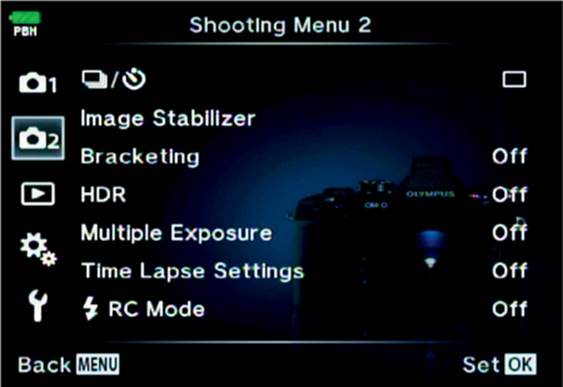
Figure 4.1: The seven functions in Shooting Menu 2
On Shooting Menu 2 you will find the following functions:
• [Sequential]/[Self-timer] shooting: You can choose single-frame shooting, [Sequential] H (high), or [Sequential] L (low) for taking either one picture at a time or continuous images up to 10 frames per second. Also, the camera has a Self-timer that offers various time lengths, intervals, and frame counts.
• Image Stabilizer: This option uses the camera’s 5-axis image stabilization capability. You can choose from several image stabilization modes when you shoot still pictures, or you can choose on or off for Movie mode.
• Bracketing: You can choose from a series of Bracketing types, including exposure, white balance, flash, ISO sensitivity, and Art Mode.
• HDR: You can chose a high dynamic range (HDR) mode, including several frame counts for the bracket, along with two special high-contrast modes.
• Multiple Exposure: You can shoot multiple frames and combine or overlay them in various ways to create one picture.
• Time Lapse Settings: You can shoot up to 999 frames with a specific time interval between the individual images. You can automatically combine pictures into a Time Lapse Movie.
• [Flash] RC Mode: The included FL-LM2 accessory flash unit can be used as a remote control (RC) wireless flash controller so you can use more powerful off-camera Olympus flash units.
Now, let’s consider each of these functions in detail.
[Sequential]/[Self-Timer] Shooting
The Sequential and Self-timer shooting modes use the same menu. They are known as release modes because they control when and how fast the camera releases the shutter and takes pictures.
The Sequential shooting modes control how many pictures your camera can take each second, in bursts, when you hold the Shutter button down. It is also known as the frames per second (fps) or frame rate setting.
The Self-timer modes allow you to select a specific time delay for taking hands-off pictures. You press the Shutter button and the camera will automatically take pictures a few seconds later.
Let’s look at the details of each mode:
• [Single-Frame] shooting: This mode causes the camera to take one picture each time you fully press the Shutter button.
• [Sequential] High (H): The camera will take a continuous series of pictures at about 10 fps. Autofocus, exposure, and white balance are frozen at the values determined by the camera for the first picture and are not updated during the series.
• [Sequential] Low (L): The camera will take a continuous series of pictures at about 6.5 fps with firmware 2.0 or 9 fps with firmware 3.0. Autofocus, exposure, and white balance are updated for each picture in the series, based on which autofocus mode you selected (e.g., S-AF, C-AF, MF) and whether you are using autoexposure lock (AEL) or autofocus lock (AFL).
• [Self-timer] 12 sec (12s): The camera will take a single photograph 12 seconds after you press the Shutter button all the way down. The orange focus assist light on the front of the camera will shine solid for 10 seconds, then it will blink for 2 seconds before the shutter fires and the picture is taken.
• [Self-timer] 2 sec (2s): The camera will take a single photograph 2 seconds after you press the Shutter button all the way down. The orange focus assist light on the front of the camera will blink for two seconds before the shutter fires and the picture is taken.
• [Self-timer] Custom (C): This variable self-timer function allows you to select the number of images the camera will take when the self-timer expires (Frame), the time in seconds the camera will wait before firing (Timer), and the period of time between each picture (Interval Time) if you have selected more than one picture with the Frame setting.
Note: The camera’s large internal memory buffer can hold a burst series of about 41 RAW (ORF) images, 79 Large Super Fine (LSF) JPEG images, or 114 Large Fine (LF) JPEG images while it writes them sequentially to the SD card. This is an impressive number of images, especially for RAW, and it proves this camera was designed for professional image making.
If you exceed the number of images that can be held in the internal memory buffer, the camera’s frame rate will slow down considerably as it writes images to the memory card.
Geek Facts: There is a chart on page 124 of the E-M1 user’s manual that shows the record modes, compression rates, and pixel ratios and how many images the camera can hold in its internal memory buffer during bursts, per selected mode. For instance, if you shoot Small Basic (SB) JPEGs, the camera can hold 10,170 images in its internal memory buffer as it writes them to the card.
Some of these numbers are merely projections because even at 10 fps (600 frames per minute) it would take almost 17 minutes to shoot 10,170 frames. Who is going to hold the Shutter button down for 17 minutes? It’s nice to know you could if you really wanted to!
Interestingly, if you multiply some of these numbers (file size x number of frames), it appears that the E-M1 has an internal memory buffer size of about 1.5 GB (e.g., Small Normal (SN) JPEGs at 0.2 MB each x 7,627 maximum images in the buffer = 1,525.4 MB or 1.5 GB).
Now, let’s look at how to select the individual modes and then examine how to configure the Self-timer Custom mode.
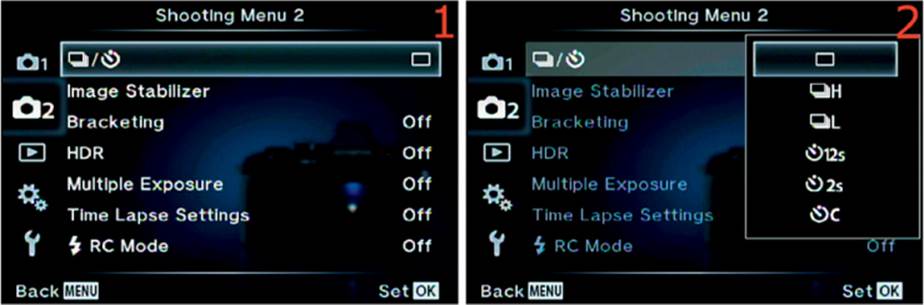
Figure 4.2A: Selecting a frame rate or self-timer mode
Use these steps to select one of the [Sequential]/[Self-timer] shooting modes:
1. Select the symbols for the [Sequential]/[Self-timer] shooting modes from Shooting Menu 2 and scroll to the right (figure 4.2A, image 1).
2. A small window will open with all the choices for the two modes. Scroll up or down and select the mode you want to use, then press the OK button to lock in your setting (figure 4.2A, image 2). I chose [Single-Frame] shooting mode.
If you use the [Self-timer] Custom (C) mode, you will have a series of additional menu screens to use, as described next.
[Self-timer] Custom (C) Mode
The [Self-timer] Custom mode allows the camera to automatically take one or a series of pictures with one press of the Shutter button. This allows you to take consecutive pictures without touching the camera and introducing new vibrations, which results in sharper pictures.
You can adjust the number of frames, the self-timer wait time, and the interval between frames. Let’s see how.

Figure 4.2B: Using Self-timer Custom mode and setting the number of frames
The following steps show you how to use the [Self-timer] Custom mode. First we’ll set the number of frames:
1. Select the symbols for the [Sequential]/[Self-timer] shooting mode from Shooting Menu 2 and scroll to the right (figure 4.2B, image 1).
2. A small window will open with all the choices for the two modes. Scroll down to the last item and highlight the [Self-timer] Custom (C) mode, then scroll to the right (figure 4.2B, image 2).
3. Highlight Frame and scroll to the right (figure 4.2B, image 3). In the next step we will choose the number of frames we want the camera to shoot after the Self-timer delay.
4. Use the up/down menu to choose from 1 to 10 frames (1f to 10f). The camera will take that number of pictures after it counts down the Self-timer delay you will choose for the Timer setting (coming up next). I chose 2f (two frames) (figure 4.2B, image 4).
5. Press the OK button to lock in your choice.
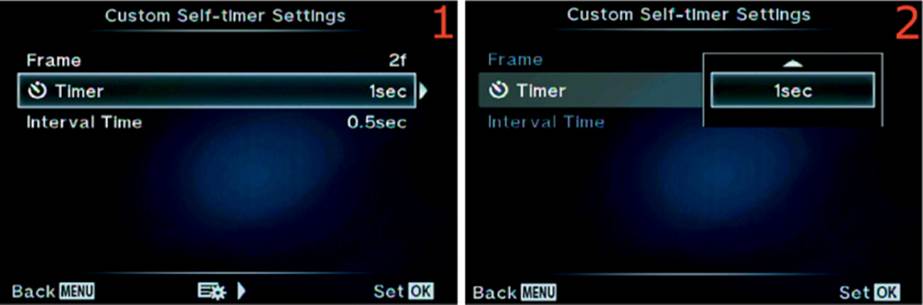
Figure 4.2C: Choose a Self-timer delay (Timer)
6. Now you can choose a Timer setting—the Self-timer delay. Highlight Timer on the menu and scroll to the right (figure 4.2C, image 1).
7. Use the up/down menu to select 1 to 30 seconds (1sec to 30sec), which the camera will use for counting down the Self-timer delay (figure 4.2C, image 2). The orange AF illuminator lamp will shine steadily until the last two seconds before the camera fires the shutter. The orange light will blink for the last two seconds and then take the picture or pictures, depending on the Frame setting you chose in steps 3 and 4 (figure 4.2B, images 3 and 4). I chose 1sec from the menu.
8. Press the OK button to set the Timer selection.
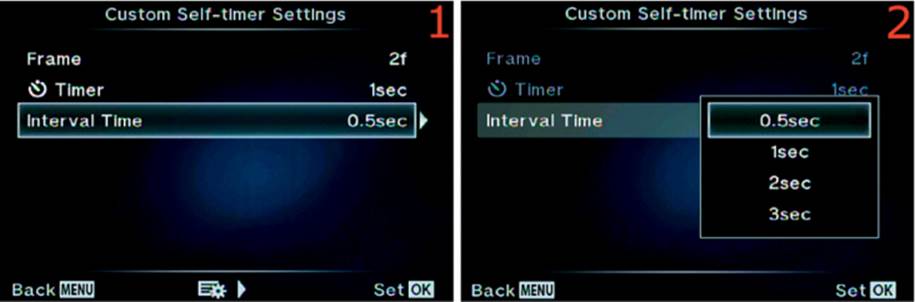
Figure 4.2D: Choose a delay between pictures (Interval Time)
9. Now you can choose a time delay or interval between the number of frames you selected. If you chose a Frame setting of at least 2f, the camera will pause for the amount of time you specify between pictures. Highlight Interval Time and scroll to the right (figure 4.2D, image 1).
10. A small window will open where you can choose an Interval Time of 0.5 second to 3 seconds (0.5sec to 3sec) between pictures. Highlight your choice and press the OK button to select it. I chose 0.5sec (figure 4.2D, image 2).
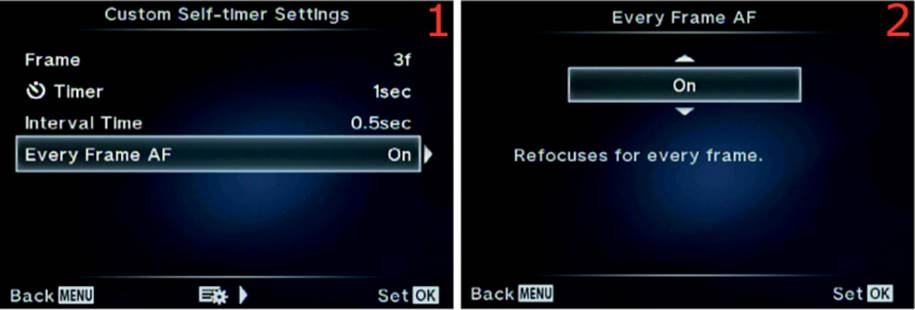
Figure 4.2E: Using autofocus during the self-timer operation
11. Next you must choose whether you want the camera to autofocus for each frame taken during the self-timer operation, or to autofocus on the first frame only. Choose Every Frame AF and scroll to the right (figure 4.2E, image 1). Scroll up or down to select On or Off from the Every Frame AF menu (figure 4.2E, image 2). If you select On, the camera will autofocus for every shot in the self-timer series. If you select Off, the camera will autofocus on the first frame of the series only.
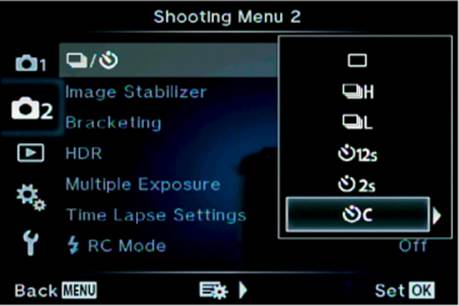
Figure 4.2F: Locking in the Self-timer Custom mode for immediate use
12. You are almost done, but you must make a final choice from the menu. When you pressed the OK button to choose the Interval Time in step 10, the camera switched back to the menu you started with when you began to configure the [Self-timer] Custom setting. Simply press the OK button again, with C highlighted, and the camera will stay in [Self-timer] Custom mode until you change it (figure 4.2F). Take your pictures.
Settings Recommendation: When you are taking your time and shooting something like beautiful landscapes one frame a time, the [Single-Frame] shooting mode is perfect. It takes one picture for each press of the Shutter button, which is what most of us need much of the time.
However, if you are a sports or action shooter, you will need to use the fast, continuous frame rate and large buffer size of the E-M1. Your primary choices are [Sequential] H and [Sequential] L. If the subject is moving from side to side in front of you in consistent lighting conditions so you can pan your camera, the 10 fps [Sequential] H setting will be quite useful. The autofocus, exposure, and white balance will be locked, so make sure the subject is not moving toward or away from you or moving through areas with different light levels or color temperatures. If the subject strays from a singular path or if the light changes, it may be better to use the [Sequential] L setting, which fires at 6.5 fps with firmware 2.0 or 9 fps with firmware 3.0. Although it is not quite as fast, the camera updates the focus, exposure, and white balance so you can track and shoot subjects that move toward or away from you and still capture sharp, well-exposed, and balanced pictures.
When you use the [Self-timer] shooting mode, you have two preset choices (12s and 2s), along with a completely customizable custom function. Why not experiment with the [Self-timer] Custom mode so you will know how to use it later?
Image Stabilizer
Image stabilization is critical for people who shoot a lot of handheld images and videos. Instead of getting blurry images from camera movement at slower shutter speeds, the amazing Image Stabilizer built into the E-M1 makes it one of the best cameras in the world for shooting handheld.
The vibration reduction in the camera’s 5-axis, sensor-shifting stabilizer system is one of the best—or perhaps the best—available today. It is built into the camera body, so any lens you mount on the camera has automatic stabilization and vibration reduction. While most other cameras and lens manufacturers offer only 2- or 3-axis image stabilization, the E-M1 takes it all the way to 5-axis. This is indeed a pro camera!
As shown in figure 4.3A, the camera compensates for moderate movement by shifting the sensor in several directions: roll, pitch, yaw, vertical, and horizontal. The following list describes each of the corrections:
• Axis 1, Roll: Imagine turning your camera like you would the steering wheel of a car, and you will understand roll. You rotate the camera clockwise or counterclockwise in a semicircle while keeping the lens level and pointing directly forward.
• Axis 2, Pitch: Imagine moving the front of the lens up or down, the way you look up to the sky or down to the ground. The end of the lens moves up or down like the tip of your nose.
• Axis 3, Yaw: Imagine turning the front of the lens left and right while you keep the end of the lens level. This is similar to how you turn your head to the left and right to see the area around you. Your nose stays level and your head turns.
• Axis 4, Vertical: Imagine picking up a box and setting it back down. That is a vertical up-and-down movement, with no rotation. Similarly, raising or lowering the camera body without tilting the lens or the camera body in any direction is vertical movement.
• Axis 5, Horizontal: When you clean a window and move your hand back and forth from left to right, that is horizontal motion. In a similar way, if you move the camera left and right without raising, lowering, or tilting it, that is horizontal motion.
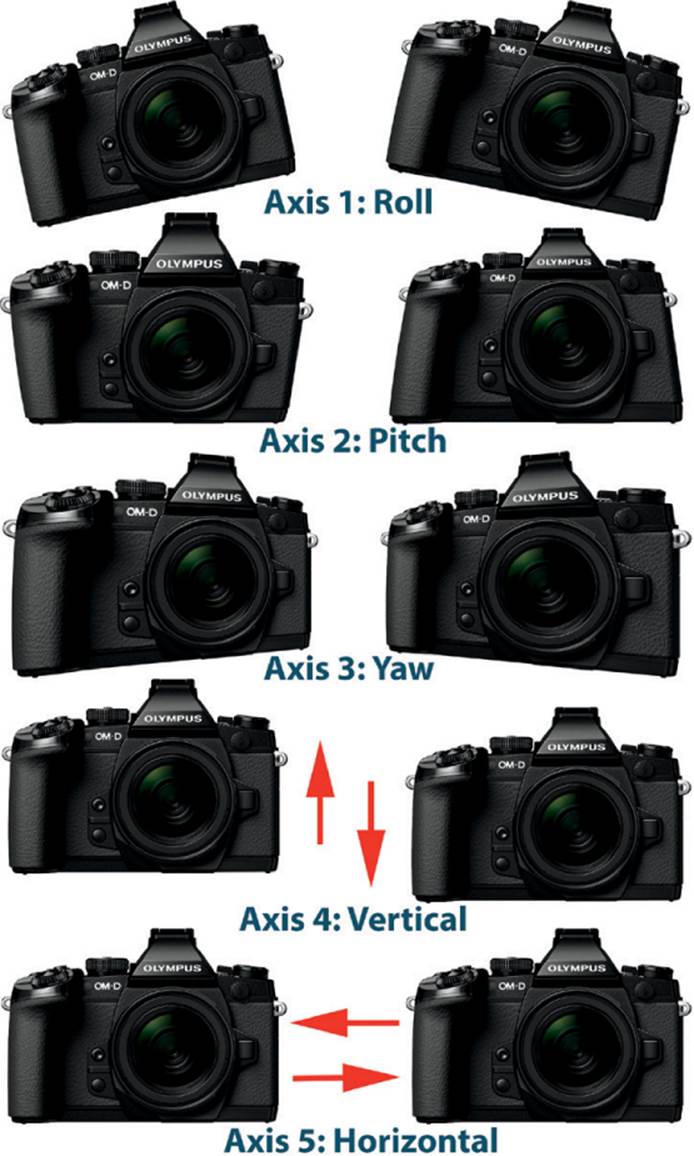
Figure 4.3A: The 5-axis, sensor-shifting Image Stabilizer system in the E-M1
The camera can compensate for all these motions. In fact, it compensates much more than you might expect, if you have used any other brands of image-stabilization or vibration-reduction systems. I’ve never used a better system!
Let’s discuss each type of Image Stabilizer mode and how to select them.
Still Image Stabilization
First let’s examine the image stabilization system for still images (not video). There are four Image Stabilizer modes, and Off:
• Off: No image stabilization is provided.
• S-I.S. 1: This is a general automatic mode that allows the Image Stabilizer to compensate in all five directions, as previously described. It automatically uses any or all of the axes at any time. It is not as sensitive to panning as S-I.S. AUTO.
• S-I.S. 2: The image stabilization system corrects only for the vertical axis (Vertical IS). Use this mode when you are moving the camera vertically and are not concerned about horizontal correction. If you are panning horizontally, such as at a car race, and are holding the camera in a horizontal (landscape) orientation, this mode may perform well for you.
• S-I.S. 3: The image stabilization system corrects only for horizontal camera shake (Horizontal IS). If you are panning horizontally, such as at a car race, and are holding the camera in a vertical (portrait) orientation, this mode may perform well for you.
• S-I.S. Auto: Olympus suggests this mode when you are unsure what you will be shooting and want to be prepared for any kind of movement. From shooting landscapes to tracking a deer bounding across a meadow and jumping over a fence, the camera automatically chooses the best type of image stabilization for the subject it detects. This is the factory default mode.
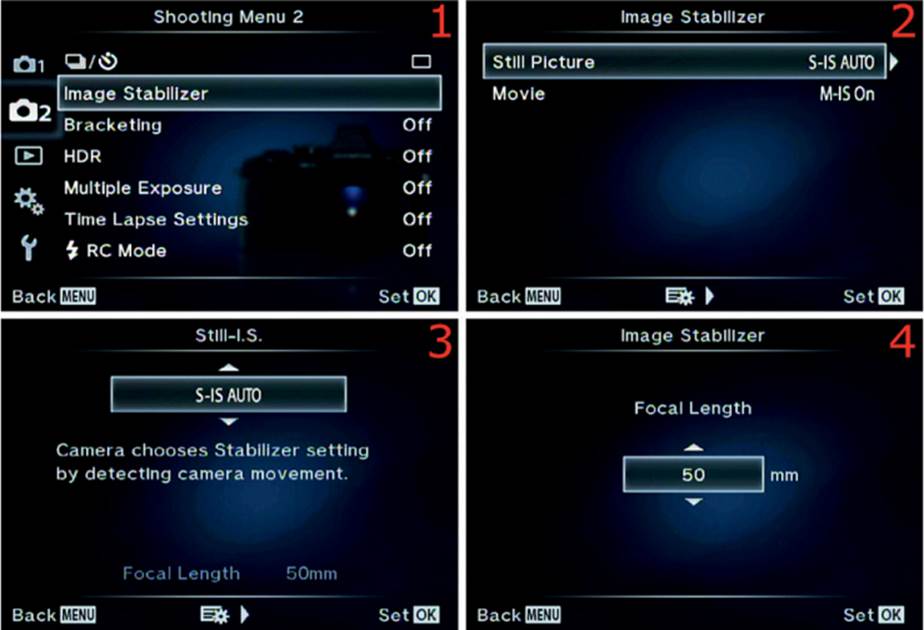
Figure 4.3B: Choosing an Image Stabilizer mode for still images
Use these steps to choose one of the Image Stabilizer modes for still images:
1. Select Image Stabilizer from Shooting Menu 2 and scroll to the right (figure 4.3B, image 1).
2. Highlight Still Picture on the Image Stabilizer menu and scroll to the right (figure 4.3B, image 2).
3. Use the up/down menu to choose one of the Image Stabilizer modes, or Off (figure 4.3B, image 3). I left the camera to the factory default of S-I.S. Auto. Press the OK button to lock in your choice. (If you are not using a Micro Four Thirds or Four Thirds lens on an intelligent adapter [e.g., an Olympus MMF-3], proceed to step 4. Why? When you are using a lens with no electronic connection to the camera [dumb adapter] that lens cannot transmit the focal length electronically to the E-M1 body.)
4. Choose a value from the up/down menu to register a Focal Length for a lens mounted on a lens adapter that does not have communication with the camera body (figure 4.3B, image 4). Press up or down on the Arrow Pad buttons to select a Focal Length. The range of Focal Length choices are from 8 mm to 1000 mm. My camera has 50 mm selected. The camera will not know what focal length is mounted on a dumb adapter unless you tell it with this screen (image 4). Once you have selected a value, press the OK button to lock it in.
Settings Recommendation: Most people leave the Image Stabilizer set to S-I.S. Auto. The camera seems to handle all sorts of angles and movement. If you pan your camera in specialized situations, such as at air shows or car races, and you could use stabilization for a certain type of movement, be sure to experiment with S-I.S. 2 and 3.
I don’t see any good reason to use S-I.S. 1 because it seems so similar to S-I.S Auto, without panning smarts. After shooting hundreds of images, I have come to trust the Image Stabilizer in my E-M1. I use S-I.S. Auto virtually all the time.
Movie Mode Stabilization
Next let’s consider how to use the image stabilization system for shooting videos. I have heard the S-I.S. system for video described as one of the best ever for shooting video. Although the Image Stabilizer does have some gotchas, the camera can definitely be held more steadily than most other cameras you’ve used to shoot video. It is almost as good as having a video frame with a stabilizer that you bolt the camera into. If you are standing fairly still or walking slowly, the camera will amaze you with how steady the video looks.
Here is a description of the two modes available for video stabilization:
• M-I.S. On: The camera uses 5-axis video correction at all times.
• M-I.S. Off: The camera provides no video stabilization.
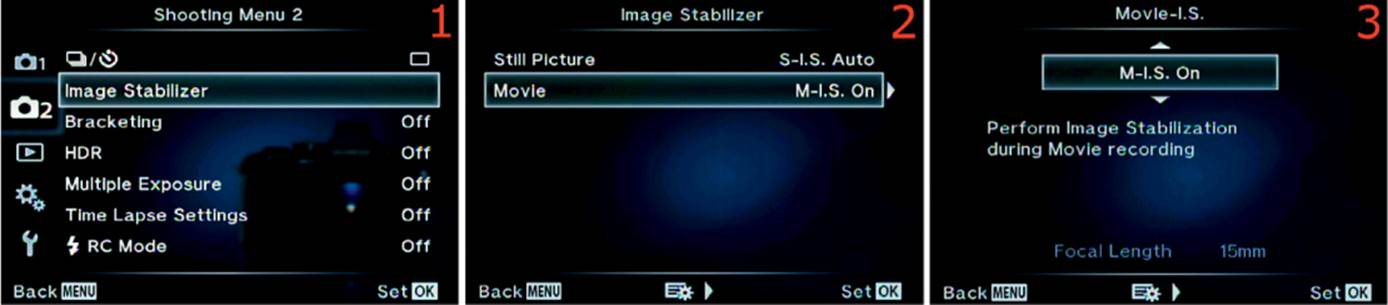
Figure 4.3C: Choosing an Image Stabilizer for Movie mode
Use these steps to choose one of the Image Stabilizer modes for video:
1. Select Image Stabilizer from Shooting Menu 2 and scroll to the right (figure 4.3C, image 1).
2. Highlight Movie on the Image Stabilizer menu and scroll to the right (figure 4.3C, image 2).
3. Choose either M-I.S. On or M-I.S. Off (figure 4.3C, image 3).
4. Press the OK button to lock in the setting.
Settings Recommendation: The one gotcha you will need to experiment with is the tendency for a jump to occur in the video when you are quickly panning from left to right. It seems that the camera tries to keep up with the panning, gives up, then does a major correction. This causes a jump in the video that can be distracting.
If you are walking along and shooting video ahead of you, without a lot of side-to-side movement, or if you are holding the camera still while you shoot video, the image stabilization system works well. The jumpiness occurs only with panning. Test it for yourself and see if it bothers you. It bothers me, so I leave M-I.S. Off for video.
Unfortunately, Olympus does not provide a way to turn off one direction of image stabilization for video, as with still images. If they did, I would turn off horizontal correction to stop the jumpiness.
Bracketing
Bracketing is when you take multiple images of the same subject using different settings, either to guarantee at least one balanced picture or to combine multiple pictures for various effects.
The E-M1 provides five bracketing methods that cover virtually all types of image bracketing: Auto Exposure (AE BKT), White Balance (WB BKT), Flash (FL BKT), ISO sensitivity (ISO BKT), and Art Bracketing (ART BKT).
This section describes how to configure bracketing. You will often have to return to this menu to configure how bracketing works, even though you can select it with external controls. First let’s consider how the camera shoots individual frames in a bracketed series.
Shooting a Bracketed Series of Images
You need to be aware of the options you have to shoot the bracketed series of frames. There are several choices:
• [Single-Frame] shooting: If you are using [Single-Frame] shooting, one picture in the bracket series will be taken with each full press of the Shutter button.
• [Sequential] H or L: If you switch to [Sequential] H or [Sequential] L mode, you can hold down the Shutter button and the camera will shoot only the number of images in the bracket, then it will stop.
• [Self-timer] Custom: For hands-off bracketing while the camera is on a tripod, you may use the [Self-timer] Custom mode while AE BKT is enabled. You simply set the Timer (e.g., 5sec delay) and the Interval Time (e.g., 0.5sec between frames) to whatever you want, and you set the Frame (e.g., 7f) to match the number of frames in the bracket. The camera will wait for the Timer delay to expire, shoot one of the bracketed frames, wait for the Interval Time to shoot the next frame, and continue this sequence until the series is completed. (See the previous subsection in this chapter, [Self-timer] Custom (C) Mode, to see how to use the self-timer.)
The shooting methods for bracketing in the previous list apply only to AE BKT, FL BKT, and ISO BKT. For WB BKT and ART BKT, you take only one picture and the camera creates multiple copies of that picture and applies effects.
When you take pictures in brackets that allow you to control individual frames, the camera always shoots frames with exposure variations in this order: normal exposure > underexposure > overexposure. For example, if you choose to shoot a seven-frame bracket (7f) in AE BKT, the camera will shoot the bracket in this sequence: normal exposure > underexposure 1 > underexposure 2 > underexposure 3 > overexposure 1 > overexposure 2 > overexposure 3.
Now, let’s consider the five bracketing types and see what each does.
AE BKT (Auto Exposure Bracketing)
Auto Exposure bracketing allows you to shoot from two to seven images in a bracket. The exposure of each shot varies by 0.3, 0.7, or 1.0 EV steps. Later you can select the best image from the series or combine the images into one high dynamic range (HDR) image.
Let’s examine how to select and use AE BKT.
Use these steps to configure AE BKT:
1. Choose Bracketing from Shooting Menu 2 and scroll to the right (figure 4.4A, image 1).
2. A small menu will open and allow you to select Off or On. Highlight On and scroll to the right (figure 4.4A, image 2). Or you can disable AE BKT by selecting Off and pressing the OK button (then skip the rest of these steps).
3. Highlight AE BKT and scroll to the right (figure 4.4A, image 3).
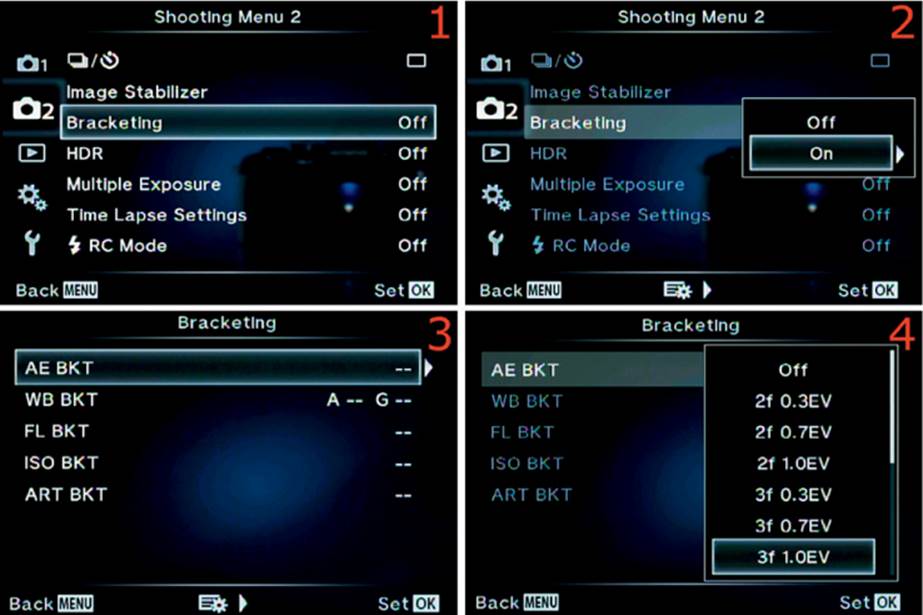
Figure 4.4A: Using Auto Exposure bracketing (AE BKT)
4. A menu will open with many bracketing choices that look like this: 3f 1.0EV (figure 4.4A, image 4). The first two characters represent the number of frames in the bracket, from two to seven frames (2f to 7f). The second group of characters represent the EV variation between images in the bracket. Your choices are 1/3 EV step (0.3EV), 2/3 EV step (0.7EV), and 1 EV step (1.0EV). If you choose 3f, 5f, or 7f, skip step 5 and go directly to step 6. If you choose 2f, move on to step 5 because the three 2f choices bring up an extra screen.
5. If you choose any of the three 2f choices, you will need to decide if the second image in the bracket will be overexposed (Over Exp. Pic.) or underexposed (Under Exp. Pic.). Figure 4.4B shows the screens you use to make your selection. Image 1 is the same as figure 4.4A, image 4, except 2f has been selected. Use the up/down menu shown in figure 4.4B, image 2, to choose either an overexposed image (Over Exp. Pic.) or an underexposed image (Under Exp. Pic.) for the second picture in the 2f bracket series. Press the OK button to lock in your choice, and take your pictures. Skip step 6.
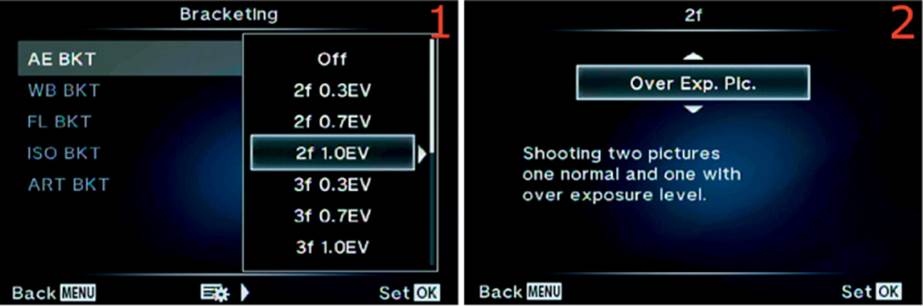
Figure 4.4B: A 2f exposure variance is selected
6. Highlight 3f, 5f, or 7f and press the OK button. The screen in figure 4.4A, image 2, will reappear. Select On and press the OK button to lock in your choice, then take your pictures.
Note: Be sure to disable AE BKT when you are done taking exposure-bracketed pictures.
Settings Recommendation: If you are shooting a two- or three-frame bracket it may be best to choose a 1.0EV. That will result in enough difference among the exposures to combine them or choose the best one. When you shoot a five- or seven-frame bracket, so much extra light is captured that you may get by with smaller variations between the images (e.g., 0.3EV or 0.7EV). Experiment with this to see what works for you. Auto Exposure bracketing is a useful tool for HDR shooters and people who want to have the best exposure and don’t mind the extra shots.
WB BKT (White Balance Bracketing)
White Balance (WB) bracketing lets you shoot one image and have the camera bracket the WB on the Amber–Blue (A–B) axis, the Green–Magenta (G–M) axis, or a combination of both axes (A–B + G–M).
You can select two, four, or six steps of color change for the A–B or G–M axis, or you can apply two, four, or six steps of color change to the combined A–B + G–M axes. The camera will create two WB-modified copies of the original image for each single-axis bracket (three images per axis), or eight copies plus the original image for the combined-axes bracket (nine images total). Tables 4.1–4.3 demonstrate this in an easy-to-understand pattern.
This function may seem complex, but you don’t have to fully understand it to successfully bracket the white balance of your image. You can simply fire off a bracket and look at the resulting images to choose the one you like. However, it’s more efficient to understand what happens when you use WB bracketing.
First let’s discuss how to configure WB BKT, then we will look at the WB bracket system in more detail.
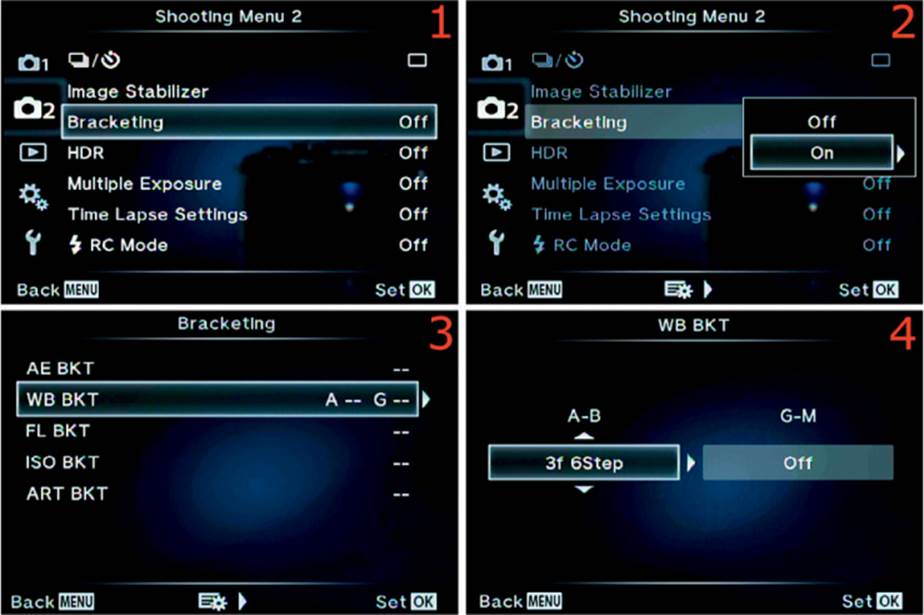
Figure 4.4C: Using White Balance bracketing (WB BKT)
Use these steps to configure WB BKT:
1. Choose Bracketing from Shooting Menu 2 and scroll to the right (figure 4.4C, image 1).
2. A small window will open where you can choose Off or On. Highlight On and scroll to the right (figure 4.4C, image 2). Or you can disable WB BKT by selecting Off and pressing the OK button (and skipping the rest of these steps).
3. Highlight WB BKT and scroll to the right (figure 4.4C, image 3).
4. You will see two up/down menus (figure 4.4C, image 4). One is for the A–B axis and the other is for the G–M axis. You can choose two steps (3f 2Step), four steps (3f 4Step), or six steps (3f 6Step) of color change. The 3f simply means the camera will create three images per axis. Select a value for one or both of the axes and press the OK button. The screen shown in figure 4.4C, image 2, will reappear. Highlight On and press the OK button again to lock in your WB BKT configuration. I chose to bracket the A–B axis only, and I used six steps (6Step) of color changes for maximum color shift in the bracket.
5. Take a single picture and the camera will create color-shifted copies to complete the bracketed series (refer to tables 4.1–4.3).
Note: Be sure to turn WB BKT off when you are done bracketing.
Tables 4.1–4.3 show the pattern the camera uses for White Balance bracketing. The tables demonstrate only the two-step version (3f 2Step) of WB BKT. All three bracketing variations use the same pattern with wider color steps or more intense color changes. As you increase the bracket from two steps (2Step) to four steps (4Step) to six steps (6Step), the color changes become more saturated. Therefore, you can substitute 4 or 6 for 2 in the tables and see that the 2Step, 4Step, and 6Step patterns work the same.
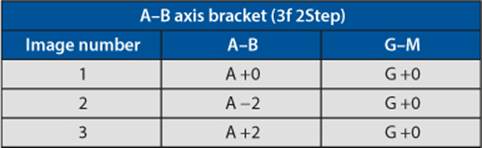
Table 4.1: The WB BKT A–B pattern (notice that G–M stays at 0)
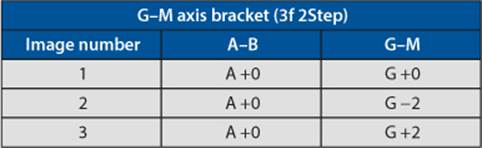
Table 4.2: The WB BKT G–M pattern (notice that A–B stays at 0)
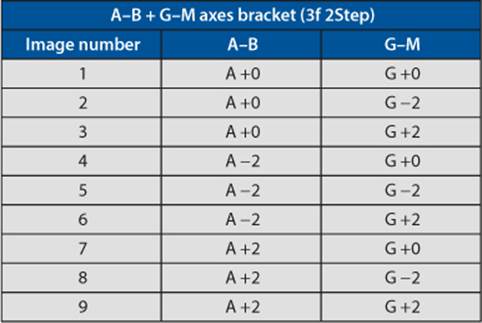
Table 4.3: The WB BKT combined A–B + G–M pattern
Settings Recommendation: This complex-sounding WB bracketing system is not as hard as it looks. Just remember that you can simply create the bracket and then select the image you like best. If none of them are color shifted enough for your liking, use more steps in the bracket—that is, switch from 3f 2Step to 3f 4Step, or even 3f 6Step.
FL BKT (Flash Bracketing)
Flash bracketing varies the light output of the flash over three frames (3f) so you can get the best exposure. You can select bracket levels of 0.3EV, 0.7EV, or 1.0EV, which gives you a difference of as little as 1/3 stop, and as much as 1 stop, between the images in the bracket.
The bracketing order for the three frames is normal > underexposed > overexposed. The camera will take a normal exposure with the flash and then two more exposures with under- and overexposure; the amount depends on the bracket levels you selected.
Let’s examine how this works.
Use these steps to configure FL BKT:
1. Choose Bracketing from Shooting Menu 2 and scroll to the right (figure 4.4D, image 1).
2. A small window will open and allow you to select Off or On. Highlight On from the menu and scroll to the right (figure 4.4D, image 2). Or you can disable FL BKT by selecting Off and pressing the OK button (and skipping the rest of these steps).
3. Highlight FL BKT on the Bracketing menu and scroll to the right (figure 4.4D, image 3).
4. You will now see a small popup menu with four choices (figure 4.4D, image 4). The available selections are three frames with a variance of 1/3 EV (3f 0.3EV), three frames with a variance of 2/3 EV (3f 0.7EV), and three frames with a variance of 1 EV (3f 1.0EV). Highlight your selection and press the OK button. The camera will switch back to the menu in figure 4.4D, image 2. Select On and press the OK button again to lock in your selection. Take your pictures.
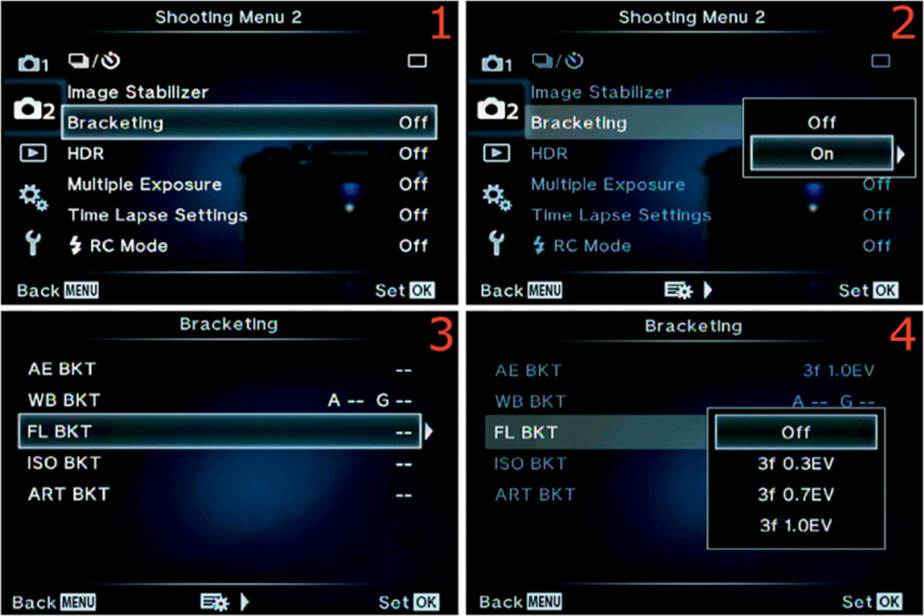
Figure 4.4D: Using Flash bracketing (FL BKT)
Note: Be sure to disable FL BKT when you are done taking flash bracketed pictures.
Settings Recommendation: The recharge cycle time of your flash unit will determine how quickly you can fire the three bracketed images in the series. When I used the FL-LM2 flash included with the camera, it took at least one second before I could fire the second and third images in the bracket. Evidently, the small flash unit takes a little longer to recharge itself for the next shot. However, when I used my Olympus FL-600R flash unit, I was able to fire the flash bracket series with no delay between the images.
A larger flash unit will perform better when you need rapid flash bracketing. If you can wait a moment between shots, the small included flash will suffice for closer subjects.
ISO BKT (ISO Bracketing)
ISO bracketing allows you to bracket three frames with bracket levels of 0.3EV, 0.7EV, or 1.0EV for two of the pictures. The bracket order for the three frames is normal > underexposed > overexposed.
The camera will take a picture at the ISO sensitivity you selected. You can then take two more pictures with different ISO settings: one underexposed and another overexposed. The amount of under- and overexposure depends on the EV you select.
There are two things you need to be aware of when you use ISO bracketing:
• Continuous bracketing: With other types of bracketing, when you use Sequential H or Sequential L modes and hold down the Shutter button, the E-M1 will take only the number of frames in the bracket and then stop taking pictures. However, with ISO BKT the camera will not stop taking pictures when it reaches the end of the bracket. If you hold down the Shutter button in Sequential H or Sequential L modes, the camera will continue firing at full speed until the image buffer is full, and the three-frame bracketing sequence will repeat. This feature allows you to bracket rapidly moving subjects while you track them with your camera.
• Nothing lower than Low ISO: If you have your camera set to Low ISO, which is below ISO 200 and is equivalent to ISO 100, it will not be able to shoot the underexposed frame of the bracket. Instead you will have two normal (Low or ISO 100) exposures and one overexposed image in the three-frame bracket (normal > normal > overexposed). Obviously, the camera cannot go below its lowest ISO value to capture an underexposed image.
Now, let’s see how to configure ISO bracketing.
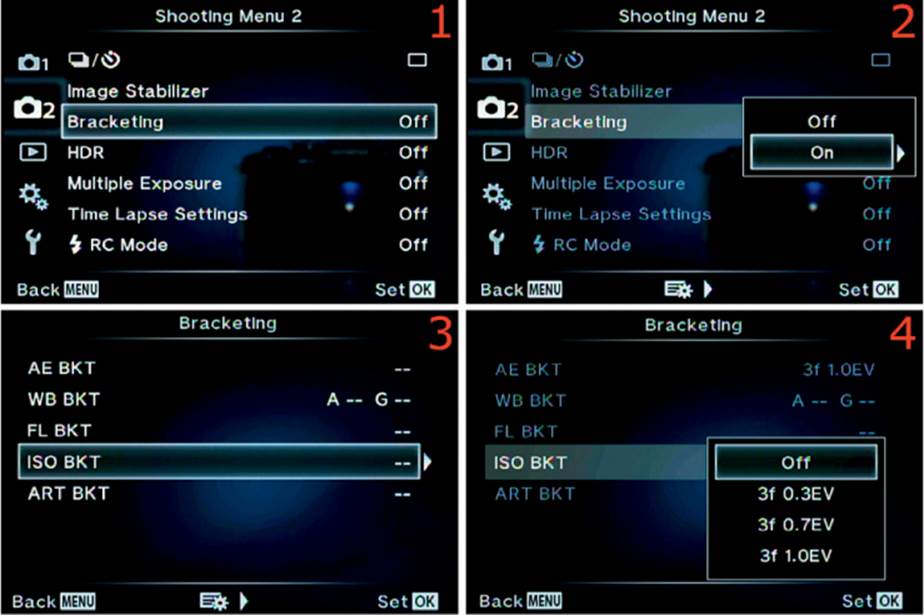
Figure 4.4E: Using ISO Bracketing (ISO BKT)
Use these steps to configure ISO BKT:
1. Choose Bracketing from Shooting Menu 2 and scroll to the right (figure 4.4E, image 1).
2. A small window will open where you can select Off or On. Highlight On and scroll to the right (figure 4.4E, image 2). Or you can disable ISO BKT by selecting Off and pressing the OK button (and skipping the rest of these steps).
3. Highlight ISO BKT on the Bracketing menu and scroll to the right (figure 4.4E, image 3).
4. You will see a small popup menu with four choices (figure 4.4E, image 4). The available selections are three frames with a variance of 1/3 EV (3f 0.3EV), three frames with a variance of 2/3 EV (3f 0.7EV), and three frames with a variance of 1 EV (3f 1.0EV). Highlight your selection and press the OK button. The camera will switch back to the menu in figure 4.4E, image 2. Select On and press the OK button again to lock in your selection. Take your pictures.
Note: Be sure to disable ISO BKT when you are finished.
Settings Recommendation: For subjects that have a lot of contrast, you will want to use a wider range of EV in the ISO BKT, such as 3f 1.0EV. For lower-contrast subjects you may be able to fine-tune the exposure by using 3f 0.3EV. Experiment with this setting so you’ll know how to use it when you need to make sure you get a good exposure.
ART BKT (Art Mode Bracketing)
When you use Art bracketing from the Art selection on the camera’s Mode dial, the camera will make copies of a picture and apply each of the Art Modes you select (shown in figure 4.4G). You can take just one picture and the camera will bracket, or copy, it and apply each of the selected Art Modes to the copies. This results in numerous copies of the original image with a different filter applied to each one.
You can choose from 14 Art Modes for ART BKT, and you can even add the normal basic filters to the bracket. This will create an additional 7 images. That’s up to 21 copies of a single image with all sorts of Art and Basic filters applied. Imagine that many pictures from a single shot—perhaps too many!
Let’s see how to select the filters you would like to use in the ART bracket.
Use these steps to configure ART BKT:
1. Choose Bracketing from Shooting Menu 2 and scroll to the right (figure 4.4F, image 1).
2. A small window will open where you can select Off or On. Highlight On and scroll to the right (figure 4.4F, image 2). Or you can disable ART BKT by selecting Off and pressing the OK button (and skipping the rest of these steps).
3. Highlight ART BKT on the Bracketing menu and scroll to the right (figure 4.4F, image 3).
4. You will see a small popup menu with two choices: On and Off (figure 4.4F, image 4). Highlight On and scroll to the right.
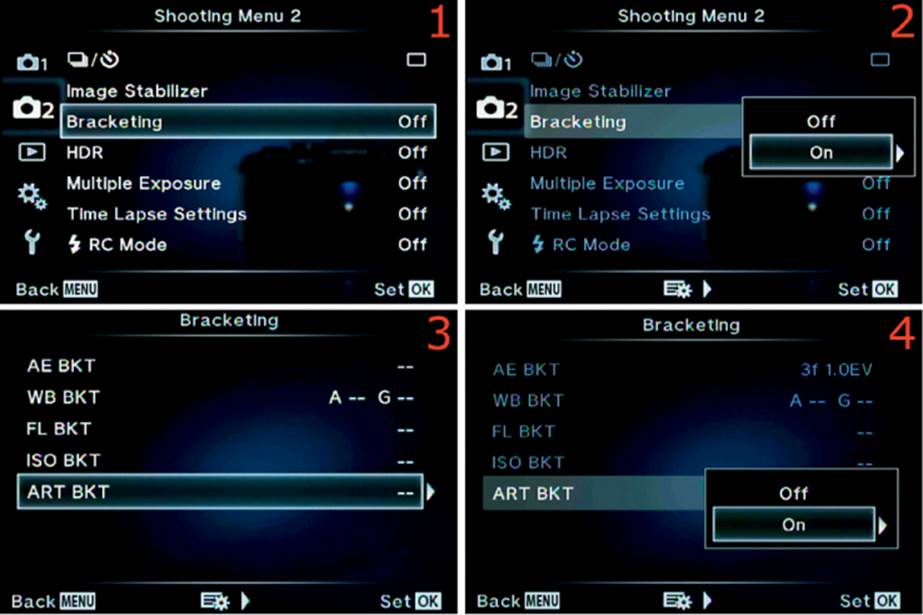
Figure 4.4F: Using Art Mode Bracketing (ART BKT)
5. The camera will display a list of 14 Art Modes that have already been checked and 7 unchecked Basic filters, as partially seen in figure 4.4G, images 1 and 2. Scroll up or down and check or uncheck any number of filters by highlighting a filter type and pressing the OK button. When you are done checking and unchecking filters, press the Menu button to return to the screen in figure 4.4F, image 4. Be sure On is highlighted and press the OK button again. The camera will return to the menu shown in figure 4.4F, image 3, except On will be displayed after ART BKT. Press the OK button once more and the camera will return to the screen in figure 4.4F, image 2. Select On and press the OK button a final time to enable Bracketing, and the camera is ready to use.
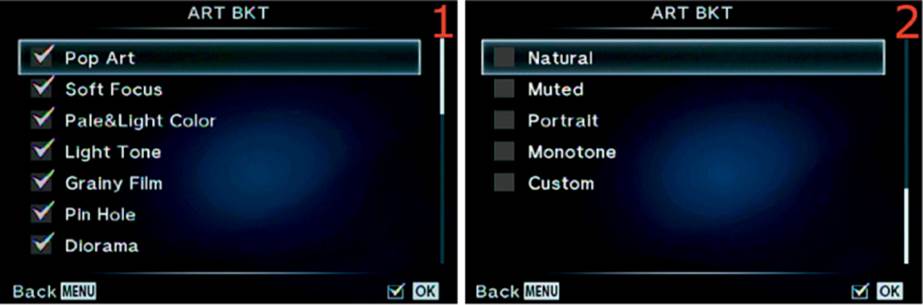
Figure 4.4G: Choosing an ART or Basic Filter
6. Take a single picture. The red card write symbol will flash in the upper-left corner of the viewfinder or monitor until all the copies (up to 21) are created. You will see each image displayed briefly—with a different filter applied—as it is created.
Note: Be sure to turn off ART BKT or you will create multiple pictures each time you press the Shutter button.
Settings Recommendation: This bracketing method is fun a time or two, but then you might wonder why you’re using it. About the only time I use ART BKT is when I want to show off the prowess of this camera. I usually say something like, “I bet your camera won’t do this!”
Unless you like a buffet of arty pictures to choose from, I don’t see the point of this function. Try it a time or two and see what you think. And remember, if you shoot in RAW mode, any of these filters can be applied after the fact in the Olympus Viewer 3 software.
Bracketing Chaos
Be sure to disable all forms of bracketing within their respective configuration screens when you are done with that bracketing type. If you don’t, the camera will stack the bracketing methods and use them at the same time.
Suppose you have AE BKT and ART BKT enabled simultaneously. The camera will create three AE BKT pictures with the normal > underexposure > overexposure AE bracketing, and it will also create up to 21 ART BKT images for each of the three AE BKT images. The camera will apply each AE BKT to every ART BKT image, and you could end up with dozens of images. Imagine what would happen if you have several bracketing methods turned on at the same time and take pictures—bracketing chaos!
Some forms of bracketing are mutually exclusive to other forms of bracketing. If you have a certain bracketing type enabled, another bracketing type will disable the previously selected type. Experiment by trying to enable multiple bracketing types and you will see what I mean.
Be careful with these bracketing methods. I have not seen any warnings when multiple bracketing types are enabled at the same time. This could be useful if that is your intention, but I am afraid that many people will forget to turn them off and will get results they never expected. Be aware that bracketing chaos is entirely possible!
HDR
High dynamic range (HDR) imaging allows you to shoot several images of the same scene, with different exposures, and combine them into one image either immediately in-camera or later during post-processing. The result is an image with a massive dynamic range that is more like what the human eye can see than what a camera can normally capture in just one image.
The camera offers two modes that automatically combine the images in-camera (HDR1 and HDR2). Five other modes shoot three, five, or seven images with different exposure values. You can combine them into a single HDR image during post-processing on your computer (figure 4.5A).
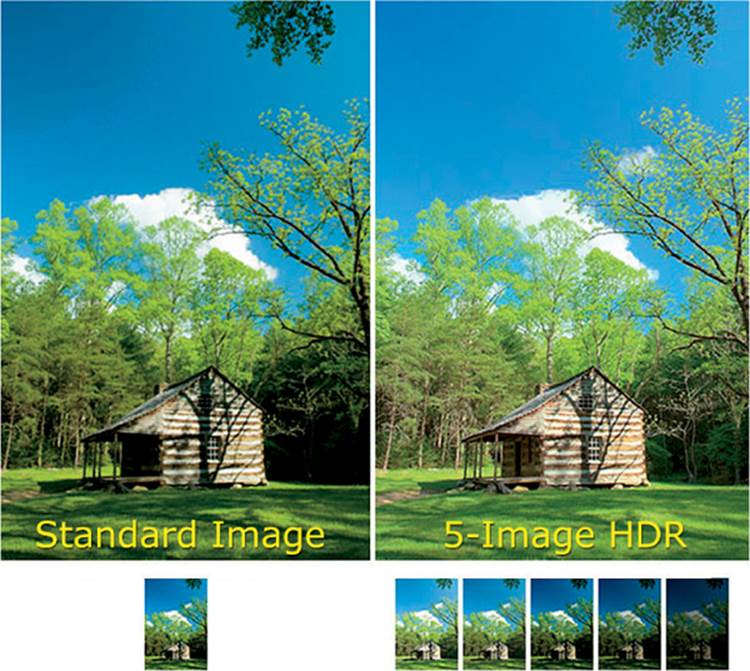
Figure 4.5A: A Standard picture compared to a five-image HDR picture
HDR1 and HDR2
If you have the camera set to RAW and enable the HDR1 or HDR2 setting, the camera will switch to a JPEG+RAW mode (if it is not already set to such a mode) and capture a normal RAW image; it will also combine the separate JPEG images into one HDR image. The result is two images: one RAW and one combined HDR JPEG.
If the camera is set to a JPEG mode, it will take three to seven pictures as JPEGs only and combine them into a single HDR JPEG.
The following are descriptions of each in-camera, automatic HDR mode:
• HDR1: The camera takes four images in rapid succession and combines them, in-camera, to create an HDR image that does not overdo the HDR look. It keeps some shadow contrast so the image does not look overprocessed. It looks more like a well-exposed image with a wider dynamic range than normal.
• HDR2: The camera takes four images in rapid succession and combines them, in-camera, to create a painterly, overprocessed HDR image with very light shadows that contain much more detail than normal.
Note: The HDR1 and HDR2 modes use ISO 200, the Picture Mode is set to Natural, and the Color Space is set to sRGB. The slowest available shutter speed you can choose as a base is 1 second. The camera will automatically make a maximum exposure of up to 4 seconds, as the longest exposure during the bracketed image series. Continuous autofocus (C-AF) will not function, so the camera automatically switches to Single autofocus (S-AF).
The Other Five HDR Modes
If you want to combine your own HDR images in your computer, the camera is ready to provide what you need.
In addition to the two automatic HDR modes, five other HDR modes create individual images with various exposure levels so you can combine them yourself in software like Photomatix Pro or Photoshop:
• 3f 2.0EV: Creates three frames (3f) with 2 EV steps between each frame (2.0EV). It uses the normal > underexposure > overexposure method of exposing the images.
• 5f 2.0EV: Creates five frames (5f) with 2 EV steps between each frame (2.0EV). It uses the normal > underexposure > underexposure > overexposure > overexposure method of exposing the images.
• 7f 2.0EV: Creates seven frames (7f) with 2 EV steps between each frame (2.0EV). It uses the normal > underexposure > underexposure > underexposure > overexposure > overexposure > overexposure method of exposing the images.
• 3f 3.0EV: Creates three frames (3f) with 3 EV steps between each frame (3.0EV). It uses the normal > underexposure > overexposure method of exposing the images.
• 5f 3.0EV: Creates five frames (5f) with 3 EV steps between each frame (3.0EV). It uses the normal > underexposure > underexposure > overexposure > overexposure method of exposing the images.
The camera will use whichever image quality mode you select—RAW or JPEG—to create the individual files.
If you are shooting in a JPEG+RAW mode, the camera will create all the HDR images for each mode. If you select 3f 2.0EV and shoot in JPEG+RAW mode, the camera will create two normally exposed images (one JPEG and one RAW), two underexposed images (one JPEG and one RAW), and two overexposed images (one JPEG and one RAW).
Let’s examine how to configure the HDR system.
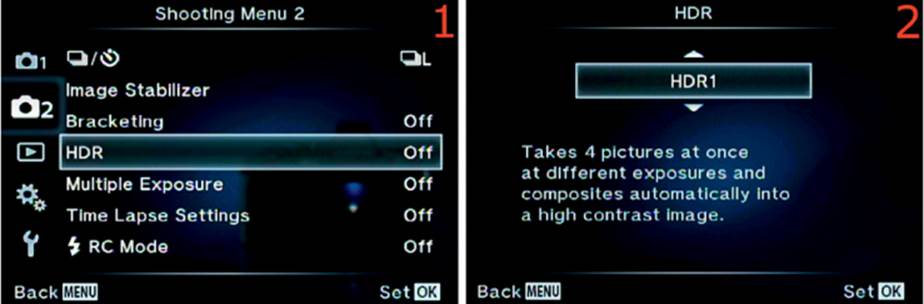
Figure 4.5B: Selecting and using an HDR mode
1. Choose HDR from Shooting Menu 2 and scroll to the right (figure 4.5B, image 1).
2. Use the up/down menu to select one of the HDR types (figure 4.5B, image 2). Your choices include HDR1 and HDR2, the five other HDR modes discussed in the previous list, and Off.
3. Press the OK button to lock in the HDR mode of your choice. If you select HDR1 or HDR2, the camera will automatically take four pictures with one press of the Shutter button, and then combine them into a single HDR image. In any of the other five HDR modes (e.g., 3F 2.0EV, 5F 2.0EV), you can use Sequential H or Sequential L release mode to shoot the frames in the HDR series. You can press and hold down the Shutter button until the camera stops taking pictures; the camera is smart enough to take only the selected number of pictures in the bracketed series. Or you can use Single-Frame shooting release mode to take one picture in the series at a time and allow the camera vibrations to die down between images (it’s good to use a tripod). Unfortunately, you cannot use the Self-timer to take the HDR image series.
Note: The HDR mode will remain enabled until you select Off from the up/down menu and press the OK button. Be sure to turn off HDR mode when you are done.
Settings Recommendation: You can let the camera combine the images for you, or you can combine them yourself in your computer. I find myself using the HDR1 or HDR2 automatic modes when I am just enjoying photography and want extra range in a certain image. It is very convenient to have the camera do it for you. However, when I am shooting landscapes and am concerned about maximum image quality, I prefer to do my own image combining and tone mapping with Photomatix Pro or Photoshop.
Fortunately, the camera lets us choose how we use HDR—for fun or for professional results.
Multiple Exposure
Multiple Exposure in the E-M1 lets you shoot two separate images and combine them into one image. This process differs from HDR because the exposures of the two images are the same.
There are three ways to use Multiple Exposure:
• Multiple Exposure without Auto Gain: Two images are taken with a standard exposure for each, then they are combined in-camera.
• Multiple Exposure with Auto Gain: Two images are taken at one-half exposure for each, then they are combined in-camera.
• Multiple Exposure with Overlay: You choose a RAW image from the memory card and then take another picture. The camera combines the image from the memory card with the new picture. You can repeat this action to add new exposures to the combined image. Just choose the combined image from the memory card again and shoot another new picture.
Standard Multiple Exposure with and without Auto Gain
The process is harder to describe than to perform. The camera displays the two images on the monitor or in the viewfinder, then you visually line up the two images you want to combine. After you learn about the Multiple Exposure options, the process is easy.
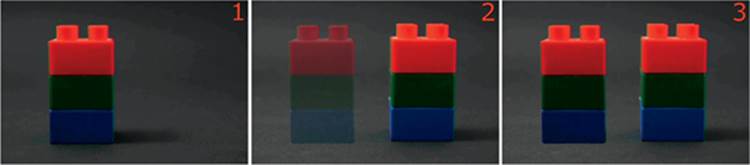
Figure 4.6A: A simulation of combining two images in-camera
Figure 4.6A is a simulation of how to combine two images. Image 1 is the first exposure, and image 2 is the second exposure—image 1 still shows up as a shadowy figure that overlays the live image. Image 3 is the combined image after you press the Shutter button. While you are shooting image 2, you can still see image 1 in your viewfinder or on the camera monitor, so it is easy to align the elements before you press the Shutter button. Use the following steps to try it.

Figure 4.6B: Combining two images in-camera
Use these steps to create a Multiple Exposure:
1. Choose Multiple Exposure from Shooting Menu 2 and scroll to the right (figure 4.6B, image 1).
2. Select Frame from the Multiple Exposure menu and scroll to the right (figure 4.6B, image 2).
3. A small window will open where you can choose Off or 2f (figure 4.6B, image 3). Activate the Multiple Exposure system by highlighting 2f and pressing the OK button. The camera is now ready to take two frames (2f) that will be combined.
4. Select Auto Gain from the Multiple Exposure menu and scroll to the right (figure 4.6B, image 4).
5. A small window will open with two choices: Off and On (figure 4.6B, image 5). Auto Gain affects how the exposure for the two images is made. If you enable Auto Gain (On), the camera will take the two images at half their normal exposure, which will make the background look normal after the two images are combined (because each image has half the needed exposure), and the subjects may be a little transparent. If you do not enable Auto Gain (Off), the camera exposes the two images normally, which will create a much brighter background in the final combined image. Choose On or Off and press the OK button. I chose On in figure 4.6B, image 6.
6. Now you can take the two pictures that the camera will combine. Figure 4.6B, image 7, shows what was displayed in my viewfinder and on my camera or monitor for the first picture. I snapped the picture.
7. Figure 4.6B, image 8, shows what was displayed in my viewfinder and on my camera monitor, including the shadowy figure of the first picture. I moved my camera around until the two images were lined up the way I wanted them, then I pressed the Shutter button.
8. The camera then overlaid the two images and combined them (figure 4.6B, image 9). In a printed book it is difficult to accurately simulate the steps because you cannot see the images being created. However, figure 4.6C shows the results of a Multiple Exposure operation without Auto Gain (image 1) and with Auto Gain (image 2).
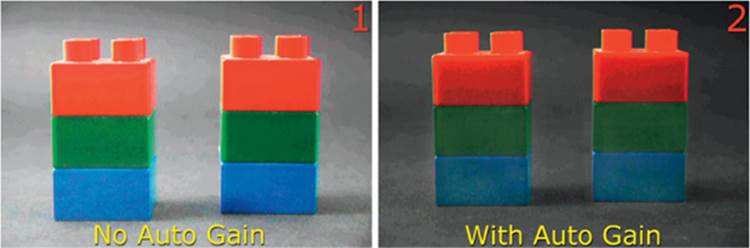
Figure 4.6C: Multiple Exposures without Auto Gain (image 1) and with Auto Gain (image 2)
Next, let’s consider how to use the Multiple Exposure Overlay system.
Multiple Exposure with Overlay
The Multiple Exposure Overlay function allows you to choose a RAW image from the memory card and take a new picture that overlays it. The two exposures are then combined (figure 4.6D).
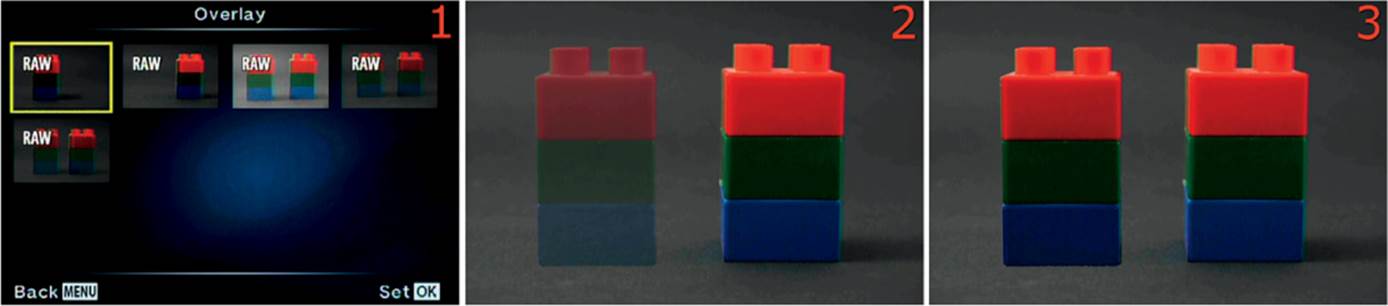
Figure 4.6D: Choosing a RAW image and then overlaying a new picture
This is similar to a normal Multiple Exposure, except the first image already resides in RAW format on the memory card. You chose it from a list of images on the camera monitor and then take the second image for the Multiple Exposure.
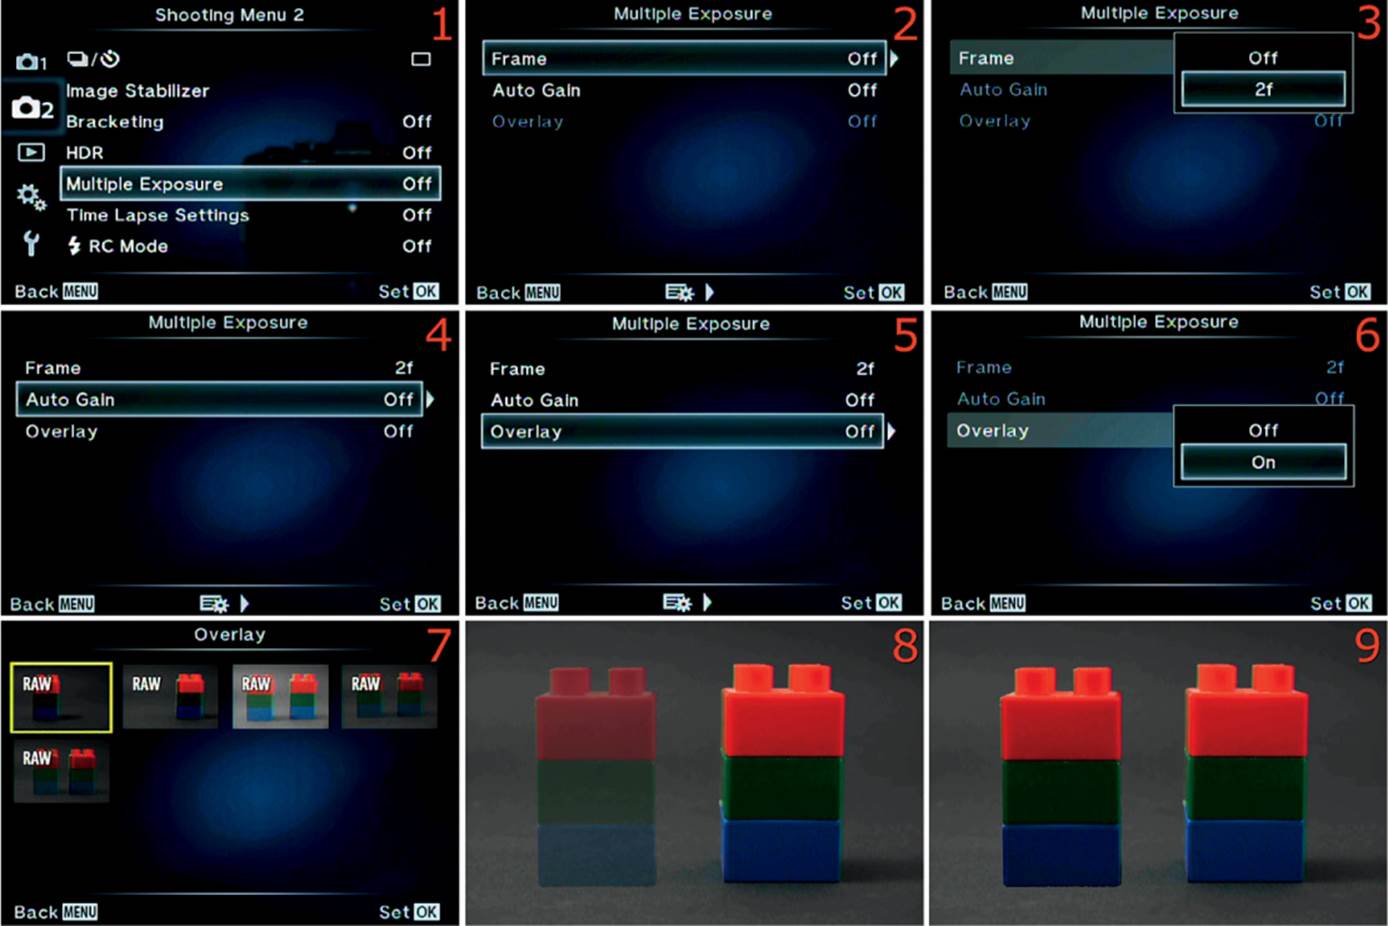
Figure 4.6E: Using the Multiple Exposure Overlay system
Use the following steps to overlay an existing RAW image with a new exposure. Make sure you shoot in RAW mode!:
1. Choose Multiple Exposure from Shooting Menu 2 and scroll to the right (figure 4.6E, image 1).
2. Select Frame from the Multiple Exposure menu and scroll to the right (figure 4.6E, image 2).
3. A small window will open and allow you to choose Off or 2f (figure 4.6E, image 3). Activate the Multiple Exposure system by highlighting 2f and pressing the OK button. The camera is now ready to combine two frames (2f).
4. Select Auto Gain from the Multiple Exposure menu and scroll to the right (figure 4.6E, image 4). I left out the next two screens to keep the figure to a manageable size, but choose On or Off, depending on whether you want to use Auto Gain.
5. Scroll down and select Overlay from the Multiple Exposure menu then scroll to the right (figure 4.6E, image 5).
6. Enable Overlay by selecting On from the small window, then press the OK button (figure 4.6E, image 6).
7. Now you will see a list of all the RAW images on your memory card (figure 4.6E, image 7). A yellow rectangle will surround one of the RAW images. Move the rectangle to the image you want to use as the base for the overlay to select it. I chose a stack of blocks positioned on the left side of the frame.
8. The RAW image you selected in step 7 will be faintly displayed on the monitor or in the viewfinder (figure 4.6E, image 8). You will also see the current scene in front of your lens. Compose the current subject in relation to the RAW image and press the Shutter button.
9. The camera will combine the current subject with the RAW image (figure 4.6E, image 9). You can keep taking pictures and the camera will continue to combine them. You can see the combined image on the monitor or in the viewfinder before you press the Shutter button, so you can make some creative compositions.
Note: Remember that you can combine many exposures into one image. Start at step 7 (figure 4.6E, image 7) and choose a previously combined RAW image to be the base for the Multiple Exposure Overlay, then take a new picture to add to the Multiple Exposure.
Settings Recommendation: Multiple Exposures and Overlays are a lot of fun. You could take a picture of one person and create a twin using Multiple Exposure. Or you could take a RAW picture and later overlay a different subject (or two).
Time Lapse Settings
The Time Lapse function allows you to automatically take a series of images—from 1 to 999—over a period of time and later use the images individually or combine them into a Time Lapse Movie. Maybe you would like to shoot a series of images during an event or shoot star trails overnight with a sunrise at the end. There are many creative ways you can use Time Lapse.
The Time Lapse system has four internal settings:
• Frame: This setting allows you to choose from 1 to 999 still images during the automatic shooting interval. They can be used individually or combined into a Time Lapse Movie.
• Start Waiting Time: This setting allows you to choose a time delay before the first Time Lapse picture is taken, from 1 second to 99 hours, 99 minutes, and 99 seconds after you press the Shutter button.
• Interval Time: This setting configures how much delay occurs between pictures after the Start Waiting Time expires.
• Time Lapse Movie: If this setting is Off, the camera records each frame as an individual picture and does nothing else. If it is On, the camera will take each picture, and at the end of the Time Lapse series it will combine all the pictures into a 720p Motion JPEG HD Time Lapse Movie at 10 frames per second (fps) in AVI format. With either setting, you will have all the still pictures at the end. If Time Lapse Movie is On, you have the added benefit of a movie along with the still images. Note: Be sure to turn this On if you want a movie, otherwise you will have to combine the frames into a movie in post-processing software, such as Olympus Viewer 3. You can’t make a movie in-camera from existing images, except at the end of the Time Lapse series.
Now, let’s examine how to configure these settings so you can make some Time Lapse Movies!
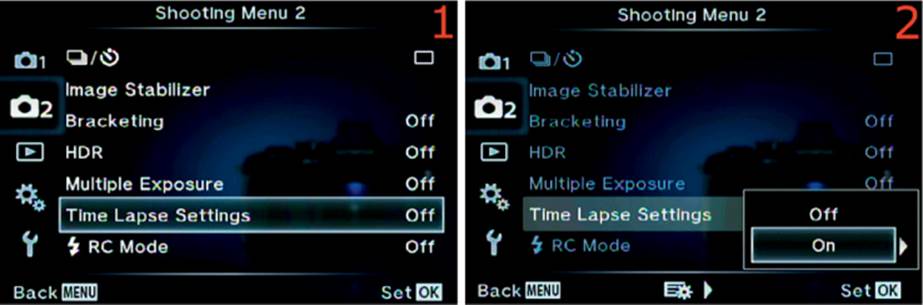
Figure 4.7A: Starting the Time Lapse sequence
1. Choose Time Lapse Settings from Shooting Menu 2 and scroll to the right (figure 4.7A, image 1).
2. A small window will open and allow you to choose Off or On (figure 4.7A, image 2). To configure the Time Lapse system, highlight On and scroll to the right.
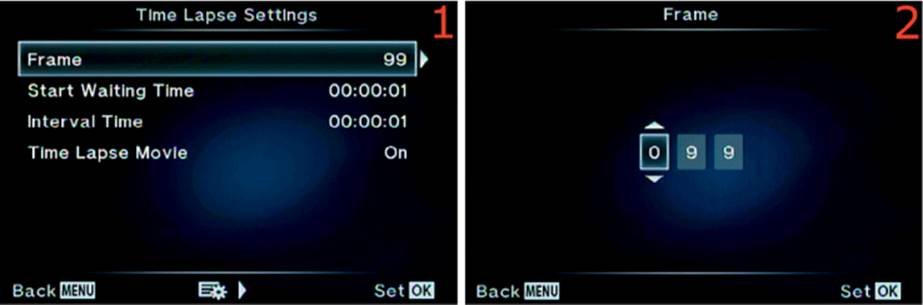
Figure 4.7B: Choosing the number of images in the Time Lapse series (1–999)
3. Choose Frame from the Time Lapse Settings menu and scroll to the right (figure 4.7B, image 1).
4. Use the three up/down menus to select the number of Frames (pictures) for the Time Lapse series, from 001 to 999 (figure 4.7B, image 2). The factory default is 099 images.

Figure 4.7C: Choosing when the Time Lapse series will start
5. Choose Start Waiting Time from the Time Lapse Settings menu and scroll to the right (figure 4.7C, image 1).
6. Use the three up/down menus to set an hour (hour), minute (min), and second (sec) delay, from 00:00:00 to 99:99:99, before the first Time Lapse frame is taken (figure 4.7C, image 2). The factory default is 00:00:01.
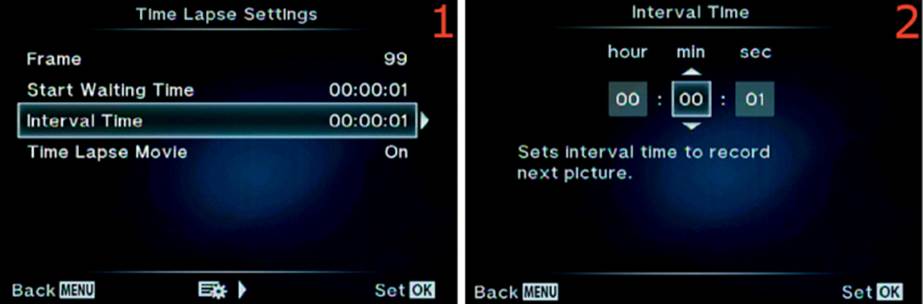
Figure 4.7D: Choosing the delay between frames of the Time Lapse series
7. Choose Interval Time from the Time Lapse Settings menu and scroll to the right (figure 4.7D, image 1).
8. Use the three up/down menus to set an hour (hour), minute (min), and second (sec) delay, from 00:00:00 to 99:99:99, between each frame of the Time Lapse sequence (figure 4.7D, image 2). The factory default is 00:00:01. Remember that you set the number of frames in the Time Lapsesequence in steps 3 and 4 (figure 4.7B). The Interval Time is the delay between each frame. It begins as soon as the first frame at the end of the Start Waiting Time has been taken.
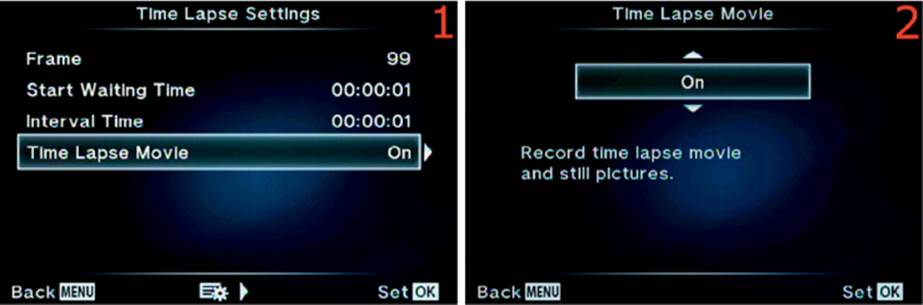
Figure 4.7E: Choosing whether to combine images into a Time Lapse Movie
9. Choose Time Lapse Movie from the Time Lapse Settings menu and scroll to the right (figure 4.7E, image 1).
10. Use the up/down menu to select On or Off (figure 4.7E, image 2). On means the camera will take still Time Lapse images plus make a Time Lapse Movie, and Off means it will take still images and not make a movie.
Power Sources for Long Time Lapse Sequences
Be sure you have a fully charged battery before you start a time lapse sequence. A single battery may not last through a longer series of images. Serious time lapse shooters have both a battery pack and an AC adapter for long-term time lapse sequences (figure 4.7F).
Many people use the Olympus HLD-7 battery pack so they can use two internal BLN-1 lithium ion (li-ion) batteries. They use an Olympus AC-3(U) AC adapter for an even longer time lapse series and more frames. The AC-3(U) adapter plugs in to the HLD-7 battery pack, not the camera itself. You therefore need to purchase both items shown in figure 4.7F, which costs around $300.
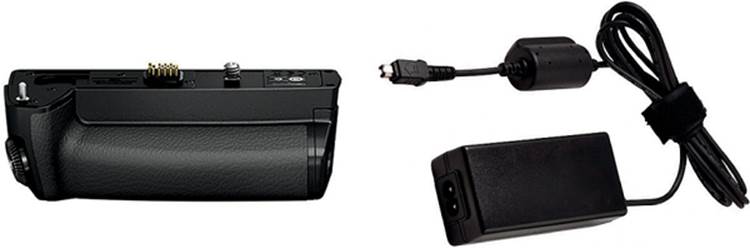
Figure 4.7F: Olympus HLD-7 battery pack (left) and Olympus AC-3(U) AC adapter (right)
Settings Recommendation: This camera makes it very easy to create short or long time lapse still-image sequences and movies. If you want to assemble your own time lapse movie outside the camera, you can use the provided Olympus Viewer 3 (or later) software. Or you can let the camera do it all for you. If you have always wanted to make some cool time lapse movies, you now have an easy way to do it. Why not try it tonight?
[Flash] RC Mode
[Flash] RC Mode allows you to use the separate FL-LM2 flash unit that is included in the box with the camera as a controller for an external, off-camera flash unit, such as the Olympus FL-600R or FL-300R. Those two Olympus flash units are recommended in the user’s manual, on page 131, as the best flash units for wireless remote control.
You can control up to three banks of multiple flash units, or just one or two external flashes, for much nicer flash light than direct on-camera flash.
We will examine how to make the E-M1 interface with an Olympus FL-600R flash unit and set it up to fire wirelessly as a slave, while using the small, hotshoe-mounted FL-LM2 flash unit as a master. First, let’s set up the camera, then we’ll configure the external flash unit(s).
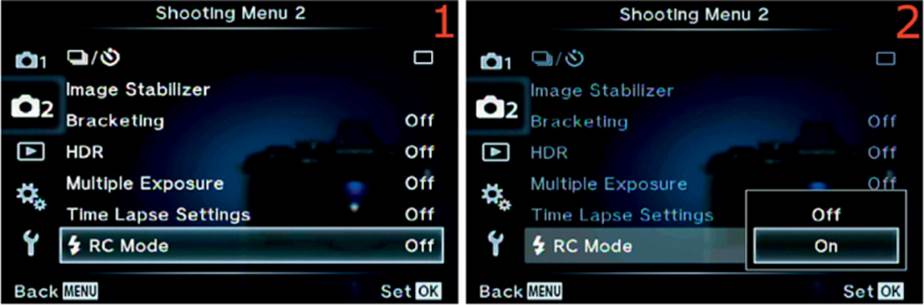
Figure 4.8A: Enabling RC Mode
1. Mount the FL-LM2 flash unit on the camera hot shoe and raise it up into firing position.
2. Press the Menu button, choose [Flash] RC Mode from Shooting Menu 2, and scroll to the right (figure 4.8A, image 1).
3. A small window will open and allow you to choose Off or On (figure 4.8A, image 2). To configure and use [Flash] RC Mode, select On and press the OK button. The live view screen will appear on the camera monitor, but we are not ready to shoot. We need to configure the Super Control Panel for remote-controlled flash.
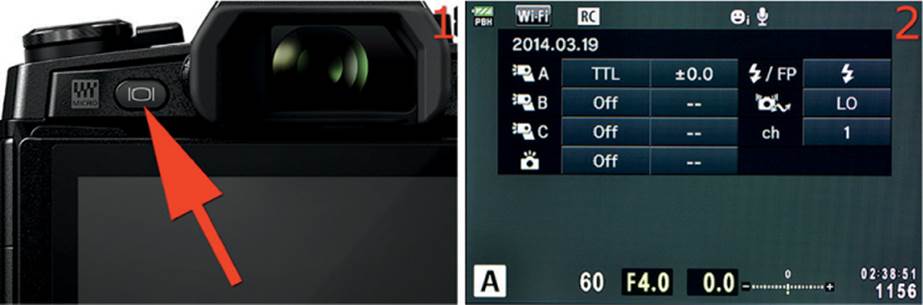
Figure 4.8B: Opening the Super Control Panel with the LV button
4. Press the LV button (figure 4.8B, image 1) to switch out of Live View and open the Super Control Panel (figure 4.8B, image 2). This version of the Super Control Panel is devoted to RC flash control and differs from the normal Super Control Panel. You will see this panel only when[Flash] RC Mode is On. We will use this panel to set up our camera to interface with and control an Olympus FL-600R flash unit. Note: If you do not see the Super Control Panel shown in figure 4.8B, image 2, after you press the LV button, you may need to press the Info buttonrepeatedly to bring it up.
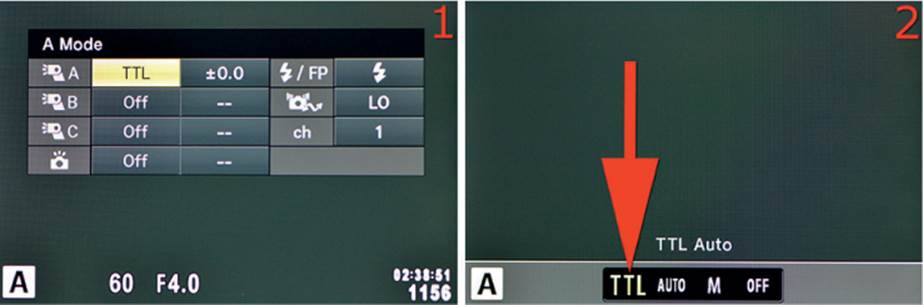
Figure 4.8C: Configuring flash bank A
5. Figure 4.8C, image 1, shows three flash control bank settings (A, B, and C) and a fourth setting (camera symbol) on the left. Each of the A, B, and C banks may control one or many flash units; you can set up complex lighting arrangements and control them wirelessly. Each bank can be configured separately for different lighting effects in various areas of your scene. We will configure only bank A in this example. Highlight TTL (figure 4.8C, image 1, yellow box) and press the OK button. This opens the TTL Auto window, which has four choices: TTL, Auto, M, and Off(figure 4.8C, image 2). You can change the flash mode for the remote slave flash by selecting a mode:
• TTL mode: The TTL mode, which is also known as TTL Auto, uses through-the-lens (TTL) technology to automatically create excellent exposures from any combination of flash units on that bank. The flash units send out a nearly imperceptible preflash immediately before the main flash fires. This lets the camera and flash combination balance the light so you don’t have to calculate lighting ratios; you just set it to TTL and take pictures.
• Auto mode: The Auto mode is an older non-TTL technology that is included for people who are accustomed to using an older type of flash unit. It works pretty much the same as TTL mode, without the preflash that helps the camera and flash unit more accurately balance the light. You can safely ignore Auto mode unless you want to experiment with it. The flash exposures may not be as accurate as those in TTL mode.
• M mode: M or manual mode is designed for photographers who are accustomed to using flash units in studios. You can control the power settings for each bank individually, from 1/1, or full power, to as low as 1/128 power. Many people are used to working with flash units this way, so this mode is familiar to them. It is often necessary to calculate flash ratios when you use this mode because there is no automation.
• Off: When you choose Off, a flash bank is disabled and does nothing. If you have a group of flash units set up to use this bank, you can temporarily disable the bank—for light testing purposes—by setting it to Off.
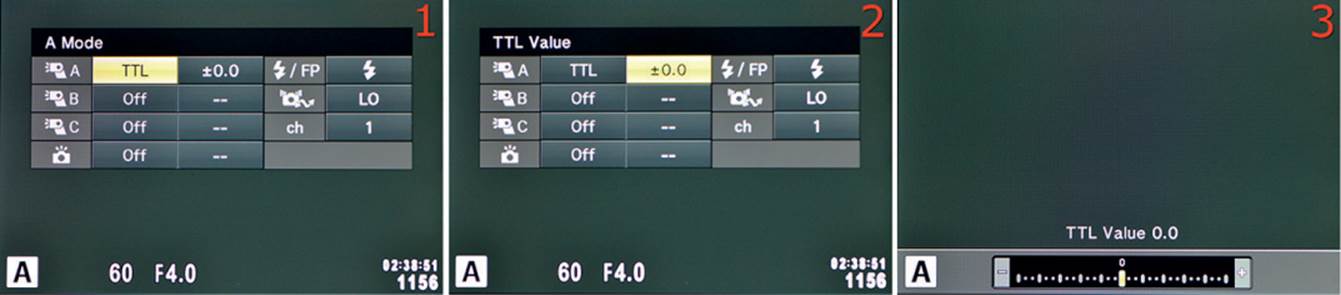
Figure 4.8D: Preparing bank A for using TTL mode
6. Now, let’s examine how to choose and prepare each of the three active settings in the previous list (TTL, Auto, and M). Remember, you set each flash bank (A, B, or C) individually so you can organize them separately. First we will look at TTL mode and make an exposure compensation for bank A. Choose TTL from the panel (figure 4.8D, image 1) and scroll to the right until ±0.0 is highlighted (figure 4.8D, image 2). Now press the OK button and the screen shown in figure 4.8D, image 3, will appear. You can enter a + or – exposure compensation value, and any flash unit on this bank will use that compensation. Scroll to the left or right to move the yellow-green indicator (in image 3 it is directly below the tiny 0 on the –/+ scale). Scroll left for underexposure (down to –5.0 EV TTL Value) and right for overexposure (up to +5.0 EV TTL Value). Press the OK button and that EV will be used by all flash units on that bank (in this case, bank A). If you want no exposure compensation, leave the TTL Value set to 0.0.
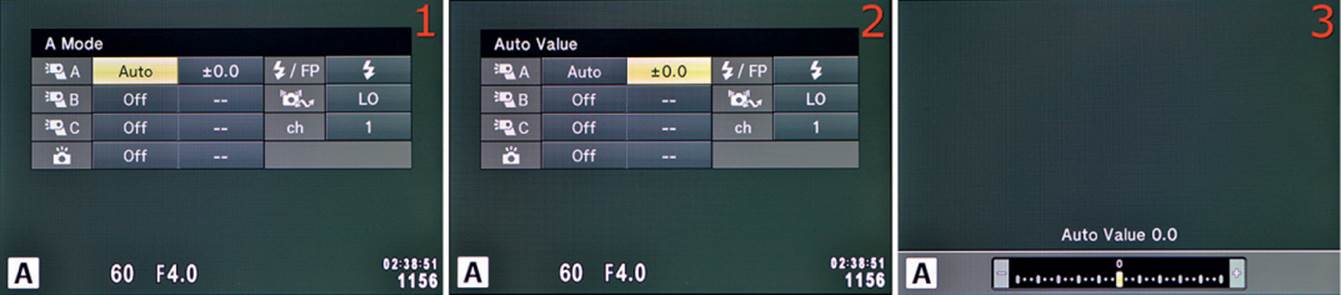
Figure 4.8E: Preparing bank A for AUTO mode
7. Choose Auto from the panel (figure 4.8E, image 1) and scroll to the right until ±0.0 is highlighted (figure 4.8E, image 2). Press the OK button and the screen shown in figure 4.8E, image 3, will appear. You can enter a + or – exposure compensation value, and any flash unit on this bank will use that compensation. Scroll to the left or right to move the yellow-green indicator (in image 3 it is directly below the tiny 0 on the –/+ scale). Scroll left for underexposure (down to –5.0 EV Auto Value) and right for overexposure (up to +5.0 EV Auto Value). Press the OK buttonand that EV will be used by all flash units on that bank (in this case, bank A). If you want no exposure compensation, leave the Auto Value set to 0.0.
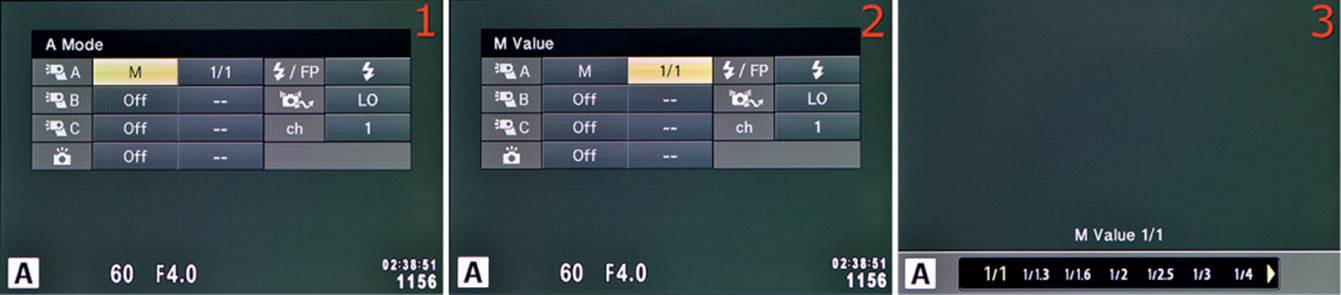
Figure 4.8F: Preparing bank A for M mode
8. Choose M from the panel (figure 4.8F, image 1) and scroll to the right until 1/1 is highlighted (figure 4.8F, image 2). Press the OK button and the screen shown in figure 4.8F, image 3, will appear. You can enter an M Value from 1/1 to 1/128, which corresponds to the power output of every flash unit on the bank (in this case, bank A). Scroll left for more flash power (up to 1/1, or full power) or right for less flash power (down to 1/128). Press the OK button and that power level will be used by all flash units on that bank.
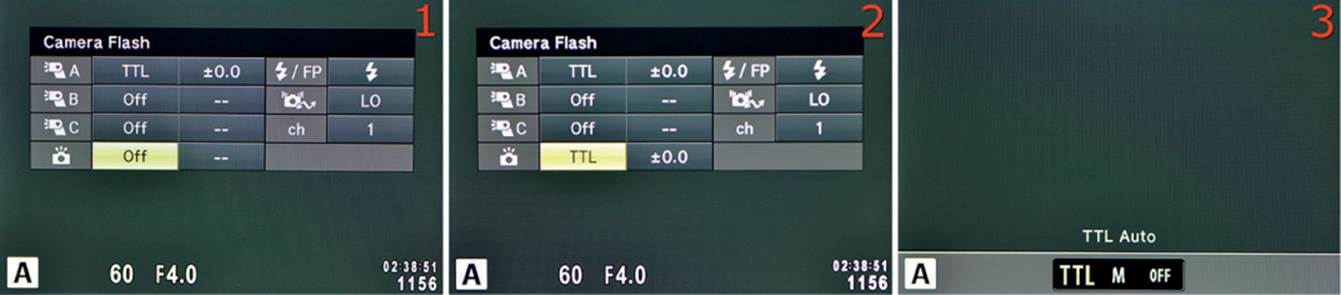
Figure 4.8G: Adding fill light with the FL-LM2 flash unit
9. Now you must decide if you want the FL-LM2 flash unit to add light to the image. The default is Off, as shown in figure 4.8G, image 1. That means the small FL-FM2 master flash will not provide a main flash burst like the slave units do. If it did, it would provide direct flash, which may not be what you want. Even with the FL-FM2 flash Off (figure 4.8G, image 1), you still must raise the flash unit to firing position and prepare it for use so it can fire a preflash to communicate with the slave units. Be careful that it does not add unwanted light to your image (e.g., eyeglass reflections). If it does, use a smaller aperture or move the camera farther away from your subject. If you do want the FL-FM2 flash to provide extra fill light, you can set it to TTL or M mode (figure 4.8G, images 2 and 3) and it will behave like the bigger slave units. When the FL-FM2 flash unit provides light to the scene, it has its own bank without an A, B, or C label.
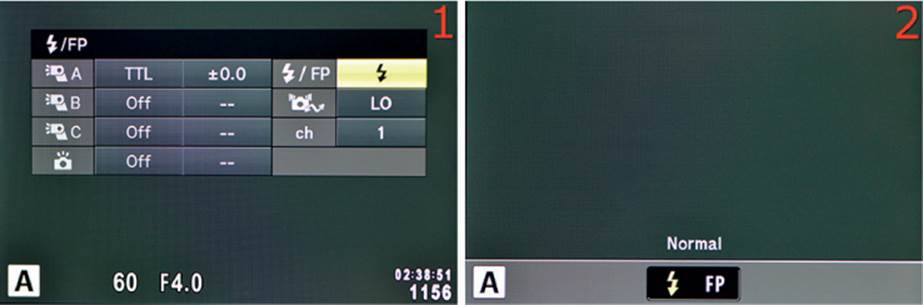
Figure 4.8H: Using normal x-sync or Super FP sync mode
10. Your camera will typically use a Normal maximum x-sync shutter speed of 1/250 second. However, that may not work if you are shooting outside and want to use a wider aperture and faster shutter speed. The camera can use a faster sync speed called Super FP (focal plane) high-speed sync mode (figure 4.8H, image 1) or FP mode. The upcoming sidebar titled Super FP Sync Mode describes how that mode works. You might want to shoot at f/2.8 in direct sunlight for a shallow depth of field, and use a shutter speed of up to 1/8000 second, while still using fill flash to reduce shadows. Most of the time this setting can stay at the Normal x-sync setting (maximum 1/250 second shutter speed), which is indicated by the lightning bolt symbol in figure 4.8H, image 2. You can select FP if you want to experiment with Super FP high-speed sync mode (up to 1/8000 second shutter speed).
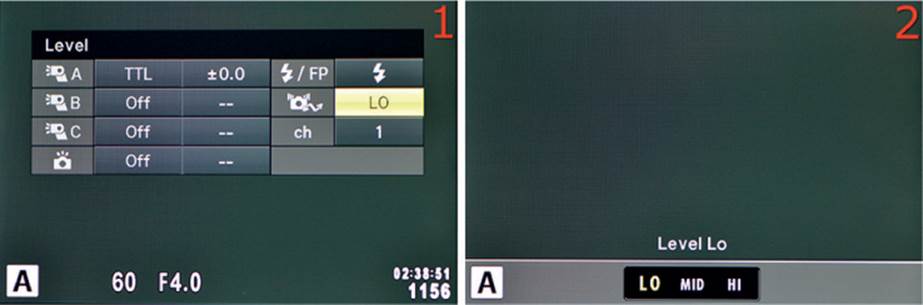
Figure 4.8I: Changing the power level of the master flash communication light output
11. When ambient light conditions are very bright or the slave flash units are farther away from the camera, you may need to increase the light output from the preflash of the master flash, which is how it communicates with the slave units (figure 4.8I). You can’t leave it set to Hi all the time because the Hi setting may cause the preflash to produce enough light to interfere with your lighting arrangement. You will need to experiment with this setting, especially if some or all of the slave flash units are not responding to the master flash. You many need to increase the power from Level Lo to Level Mid or even to Level Hi.

Figure 4.8J: Choosing a communication channel for the master and slaves
12. The master flash unit communicates with the slave units on a channel, so the master unit and each slave unit must be set to the same channel. You can choose from four channels (ch 1–4). The factory default is ch 1, so if you do not modify the channel setting, the flash system is ready to go (figure 4.8J, image 1). But if you buy a flash unit that has been changed, or if another photographer is working nearby, you may need to change the channel. You can choose from ch 1 to ch 4 and then press the OK button (figure 4.8J, image 2). I left the camera (master flash) set to ch 1and I’ll need to set the slave unit to the same channel for each bank, which we will do in the next few steps.
13. In this step we will prepare an Olympus FL-600R flash unit to use the correct bank and channel so it can receive communications from the preflash of the FL-LM2 flash unit. First we must set the flash unit to RC mode (figure 4.8K, top arrow). Turn the flash unit on and press the silver ring above MODE (figure 4.8K, bottom arrow) until you see A flashing under the MODE label on the flash unit’s LCD display. Turn the silver ring two clicks clockwise until RC appears under MODE (figure 4.8K, top arrow). Press the OK button on the flash unit to set RC mode. The accessory light on the front of the FL-600R unit will flash every few seconds to let you know it is in remote control (RC) mode and is ready to be used as a slave.
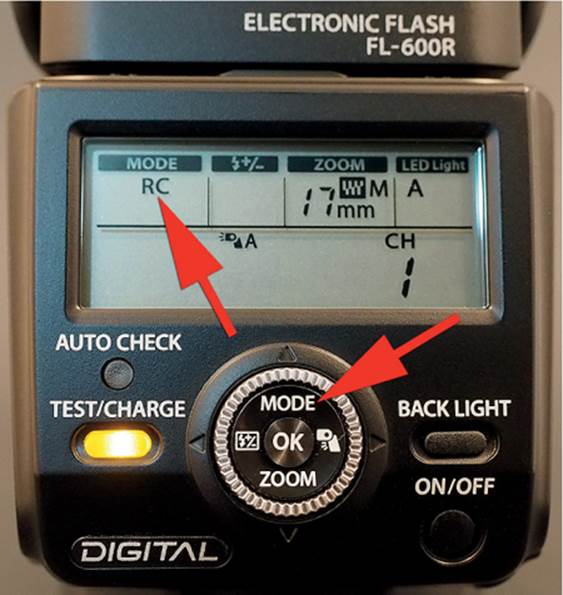
Figure 4.8K: Preparing an Olympus FL-600R flash unit for slave control
14. Now we must match the communication channel of the slave to the channel of the master. Press the OK button on the FL-600R flash (figure 4.8L, bottom arrow) and you will see RC start flashing under the MODE label of the flash unit’s LCD. Press the bottom of the silver ring below theOK button and the number under CH will start flashing on the LCD (figure 4.8L, top arrow). Turn the silver ring until the slave flash unit’s channel (CH) number matches the channel you chose for the master flash unit in step 12. I left the FL-600R flash set to CH 1, which matches the master flash unit’s ch 1. When you are done, press the OK button on the flash unit to set the channel.
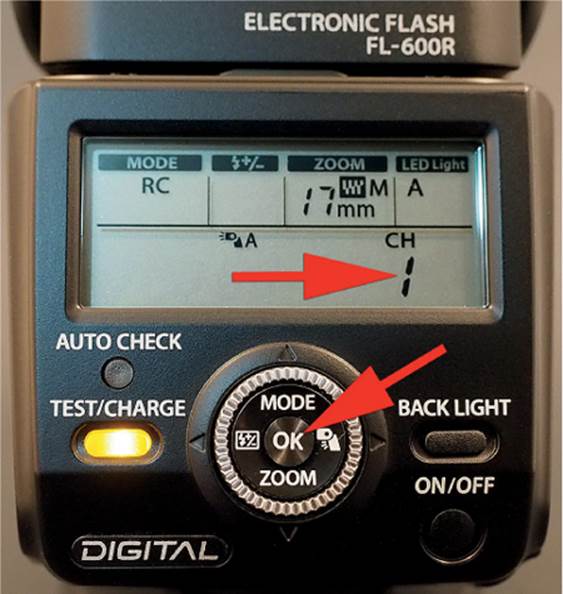
Figure 4.8L: Matching the slave unit channel to the master flash unit channel
15. The final step is to decide which bank (A, B, or C) to put the slave flash unit on. In our example, we prepared only bank A, and we left banks B and C set to Off. Therefore, we must set this FL-600R slave unit to bank A. It happens to be on bank A already (figure 4.8M, top arrow) because that is the factory default. However, let’s discuss how to change it. Press the OK button on the flash unit (figure 4.8M, bottom arrow) and RC will start flashing under the MODE label on the flash unit’s LCD. Press the bottom of the silver ring to move down, then press left on the silver ring to move to the bank label. (Note: If something else besides RC is flashing on the LCD, simply press down, up, left, or right on the silver ring to move to the bank location shown in figure 4.8M, top arrow). When the bank letter is flashing, rotate the silver ring to select a different bank (A, B, or C). When you are done, press the OK button on the flash unit. Raise the small master flash, position the slave flash, and start taking pictures.
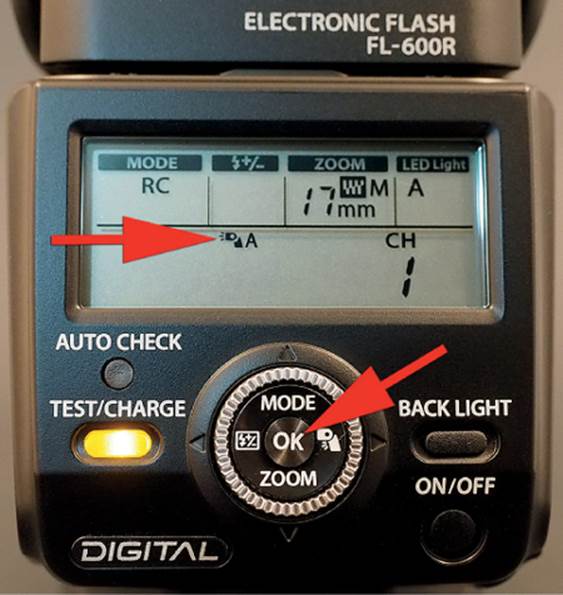
Figure 4.8M: Choosing a bank (A, B, or C) for your slave flash unit
Settings Recommendation: Keep in mind that we have configured only bank A, and the camera has three banks. You could have a large number of flash units configured in different lighting positions and with different power levels, all controlled by your FL-LM2 master flash unit. That tiny flash has a lot of power. It can control a virtually unlimited number of external flash units that are placed at a reasonable distance from the camera. It is quite a creative lighting system, isn’t it?
Super FP Sync Mode
The E-M1 has an additional mode that lets it exceed the normal flash sync speed of 1/250 second. It is called Super FP (focal plane) sync mode. Normally, both the front and rear shutter curtains must be out of the way before the flash fires. Super FP sync mode lets you use shutter speeds all the way up to 1/8000 second. At these speeds, the rear shutter curtain follows the front shutter curtain so closely that only a traveling narrow, horizontal slit exposes the sensor at any given time.
When you select a sync speed faster than 1/250 second, the camera fires the flash in a series of short pulses instead of one big flash. The pulses fire as the narrow shutter curtain slit moves across the face of the sensor. The faster the shutter speed, the less power the flash can manage. You must be able to depend on ambient light in addition to flash when you use Super FP sync mode, especially at higher shutter speeds. However, this lets you use faster lenses (e.g., f/1.4, f/2.8) wide open in bright light, due to the very fast shutter speed. You can expose properly with a very shallow depth of field, even though the light is very bright.
Author’s Conclusions
We’ve reached the end of another chapter full of configuration details. This camera is amazingly, if not overwhelmingly, configurable.
As we move into the next chapter, we will discuss the Playback Menu in detail. It lets you control things like displaying images on the monitor and in print (printing an image is a form of playback, when you think about it).
When we study the Playback menu, we will learn to display, edit, print, and protect our images. We will also learn how to use the camera’s built-in Wi-Fi to send pictures to a smartphone or tablet for immediate posting on social media and other websites.
Grab your phone, tablet, and camera, and have all of them available as we work through the next chapter.
All materials on the site are licensed Creative Commons Attribution-Sharealike 3.0 Unported CC BY-SA 3.0 & GNU Free Documentation License (GFDL)
If you are the copyright holder of any material contained on our site and intend to remove it, please contact our site administrator for approval.
© 2016-2026 All site design rights belong to S.Y.A.